

BAUKNECHT KR 1958 A+++ User Manual

Instructions for use
Consignes d’utilisation
Bedienungsanleitung

ENGLISH Instructions for use Page 3
FRANÇAIS Consignes d’utilisation Page 12
DEUTSCH Bedienungsanleitung Seite 21
2

INDEX
Chapter 1: INSTALLATION .......................................................................................................... 4
1.1. INSTALLING SINGLE APPLIANCE .............................................................................................................................4
1.2. INSTALLING TWO APPLIANCES ................................................................................................................................4
1.3. ADJUST DOORS IF AVAILABLE ...............................................................................................................................4
Chapter 2: FUNCTIONS ............................................................................................................... 5
2.1. ON/STAND BY ............................................................................................................................................................5
2.2. SMART DISPLAY* .......................................................................................................................................................5
2.3. 6TH SENSE FRESH CONTROL / PROFRESH
2.4. DOOR OPEN ALARM ..................................................................................................................................................5
2.5. VACATION ..................................................................................................................................................................5
2.6. FAST COOL ................................................................................................................................................................. 5
2.7. ZERO DEGREES DRAWER* ........................................................................................................................................6
2.8. FAN ..............................................................................................................................................................................6
2.9. TEMPERATURE SETTING ...........................................................................................................................................6
2.10. NOFROST REFRIGERATOR COMPARTMENT ........................................................................................................6
2.11. LED LIGHT SYSTEM* ................................................................................................................................................7
2.12. HUMIDITY CONTROLED CRISPER* .........................................................................................................................7
Chapter 3: USE ............................................................................................................................. 7
3.1. HOW TO INCREASE FRIDGE STORAGE CAPACITY ..................................................................................................7
3.2. NOTES ..........................................................................................................................................................................7
Chapter 4: FOODSTORAGE TIPS ............................................................................................... 7
4.1. AIR VENTILATION .......................................................................................................................................................7
4.2. HOW TO STORE FRESH FOOD AND BEVERAGE ......................................................................................................7
4.3. WERE TO STORE FRESH FOOD AND BEVERAGE......................................................................................................8
.......................................................................................................5
Chapter 5: FUNCTIONAL SOUNDS ............................................................................................. 8
Chapter 6: RECOMMENDATION IN CASE OF NO USE OF THEAPPLIANCE ............................ 9
6.1. ABSENCE / VACATION ................................................................................................................................................9
6.2. MOVING ......................................................................................................................................................................9
6.3. POWER FAILURE .........................................................................................................................................................9
Chapter 7: MAINTENANCE AND CLEANING.............................................................................. 9
Chapter 8: TROUBLESHOOTING GUIDE .................................................................................. 10
8.1. BEFORE CONTACTING AFTERSALES SERVICE… .................................................................................................10
8.2. FAILURES ...................................................................................................................................................................10
Chapter 9: AFTERSALES SERVICE ........................................................................................... 11
NOTE:
The instructions apply to several models, so there may be differences. Sections which only apply to certain
appliances are indicated with an asterisk (*).
Functions which are dedicated specially for your already bought model of product you will find in QUICK
START GUIDE.
3
1. INSTALLATION
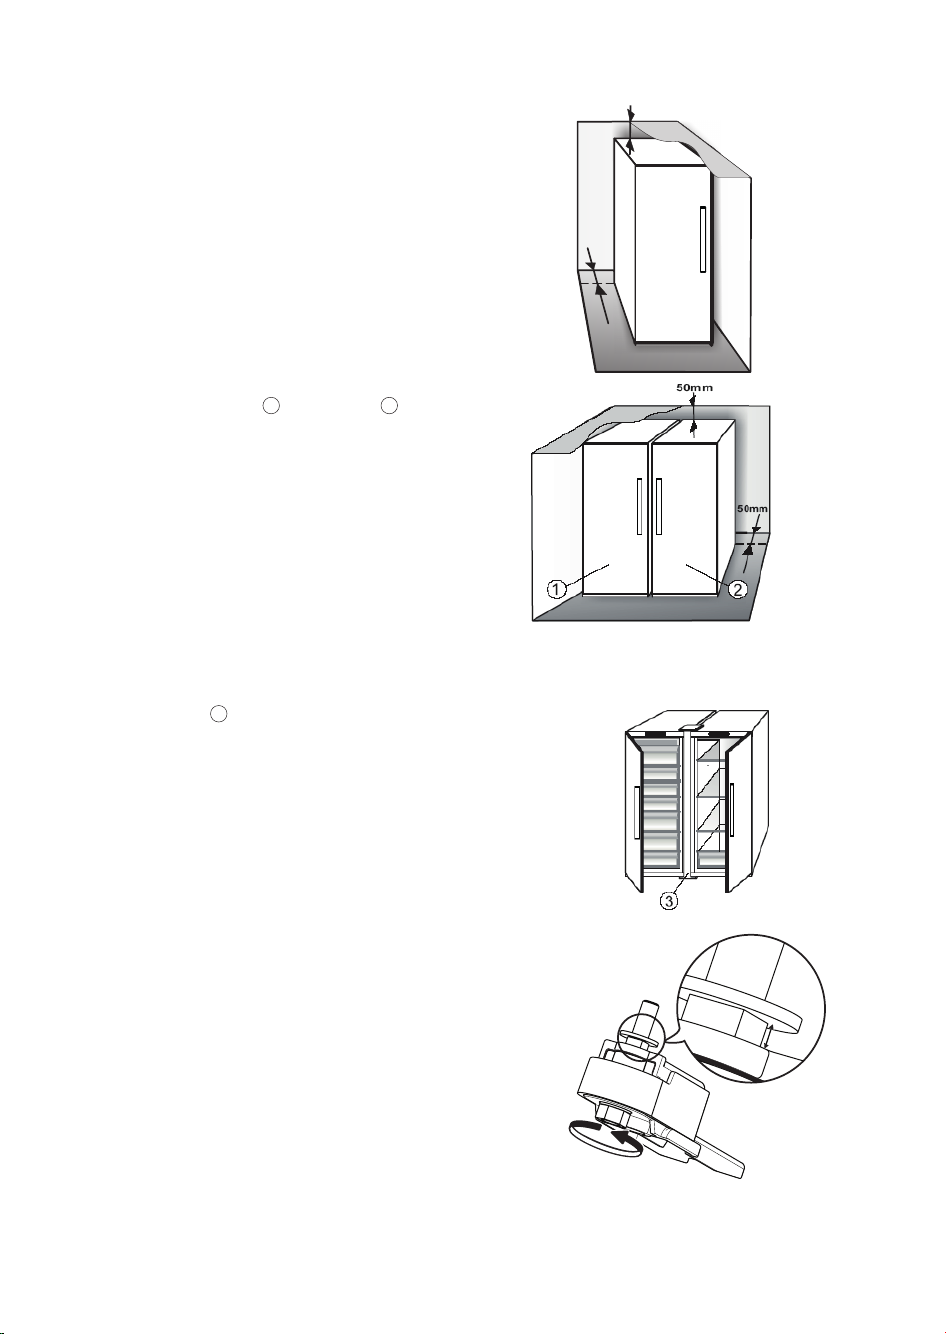
1.1. INSTALLING SINGLE APPLIANCE
To guarantee adequate ventilation, leave a space on both
sides and above the appliance.
The distance between the rear of the appliance and the
wall behind the appliance should be at least 50mm.
A reduction of this space will increase the Energy
consumption of product.
1.2. INSTALLING TWO APPLIANCES
50mm
50mm
During installing the freezer
1
and the fridge 2 together
ensure that the freezer is located on the left and the
fridge on the right (as shown on the drawing). Left side
of refrigerator is equipped with special device in order to
avoid condensation problems between appliances.
We recommended installing two appliances together
3
using the linking-kit
(as shown on the drawing).
You can buy it in Service.
1.3. ADJUST DOORS IF AVAILABLE
To level the doors using the adjustable lower hinge
(select models)
If the refrigerator door is lower than the freezer door, raise
the refrigerator door by turning the adjustment screw
counterclockwise using a M10 wrench.
If the freezer door is lower than the refrigerator door,
raise the freezer door by turning the adjustment screw
counterclockwise using a M10 wrench.
max
5 mm
4

2. FUNCTIONS
2.1. ON/STAND BY
This function turns On/Stand-by the refrigerator. To put
the product in Stand-by, press & hold the On/Stand-by
button
Stand-by, the light inside the refrigerator compartment
does not work. Remember that this operation does
not disconnect the appliance from the power supply.
To switch the appliance On again, simply press the On/
Stand-By button
2.2. SMART DISPLAY*
This optional function can be used to save energy. Please
follow the instructions contained in the Quick Start
Guide to activate/deactivate the function. Two seconds
after activation of the Smart Display, the display goes
off. To adjust the temperature or use other functions, it is
necessary to activate the display by pressing any button.
After activation of the Smart Display, the display goes
off, except the “
indicator. If Smart Display is active - to adjust the
temperature or use other functions, it is necessary to
activate the display by pressing any button.
After about 15 seconds without performing any action,
the display goes off again and only the “
Control” / “ProFresh” indicator remains visible. When
function is deactivated the normal display is restored.
The Smart Display is automatically disabled after a power
failure. Remember that this function does not disconnect
the appliance from the power supply, but only reduces
the power consumed by external display.
Note: The declared appliance energy consumption refers
to operation with the Smart Display function activated.
2.3. 6TH SENSE FRESH CONTROL
PROFRESH
This function allows optimum storage conditions
(regarding temperature and humidity) to be quickly
reached inside the appliance. The fan must also be
switched on for it to work properly. The “6th Sense Fresh
Control” / “ProFresh” is activated by default To activate or
deactivate this function – see enclosed Quick Start Guide.
After a power blackout or exit from Stand-by to normal
mode, the “6th Sense Fresh Control” / “ProFresh” status
resets to default i.e. active.
for 3 seconds. When the appliance is in
.
Sense Fresh Control” / “ProFresh”
Sense Fresh
/
2.4. DOOR OPEN ALARM
The Alarm icon
alarm sounds. The alarm is activated when the door is
left open for more than 2 minutes. To disengage the door
alarm close the door, or press once Stop Alarm button
to mute the acoustic alarm.
2.5. VACATION
This function can be activated to reduce the energy
consumption of the appliance during a period of absence.
Before activating the feature, all perishable food should
be removed from the refrigeration compartment and
make sure that the door is closed properly, since the
refrigerator will maintain a suitable temperature to
prevent the formation of unpleasant odors (+12°C).
To activate/ deactivate press the Vacation mode button
for 3 seconds. When the function is enabled, the
related symbol will light up and the temperature of the
refrigerator compartment will be set to a higher setpoint
(the temperature display will show the new temperature
setpoint of +12°C).
Changing the temperature setpoint will automatically
deactivate the function.
Attention:
• Incompatibility with the “Fast Cool” function
To guarantee optimal performance, the “Vacation” and
“Fast Cool” functions cannot be used at the same time.
Therefore, if the “Fast Cool” function has been already
engaged, it has to be disengaged first to activate the
“Vacation” function (and vice-versa).
2.6. FAST COOL
The use of this function is recommended when
placing a very high quantity of food in the refrigerator
compartment.
Using Fast Cool
cooling capacity in the refrigerator compartment. To
maximize the cooling capacity, please keep the fan switch
on.
Attention:
• Incompatibility with the “Vacation” function
To guarantee optimal performance, the “Vacation” and
“Fast Cool” functions cannot be used at the same time.
Therefore, if the “Vacation” function has been already
engaged, it has to be disengaged first to activate the “Fast
Cool” function (and vice-versa).
lights up blinking and the acoustic
function it is possible to increase the
*Available on selected models only. Please check on the QUICK START GUIDE if this function is actually available on your model.
5

2.7. ZERO DEGREES DRAWER*
The Zero Degrees Drawer is specifically designed to
maintain a low temperature and a suitable humidity level,
in order to keep foods fresher for longer (e.g. meat, fish,
fruit and winter vegetables).
Activating and deactivating the box
The temperature inside the box, when active, is
approximately 0°. The following factors are vital for the
“Zero Degrees” box to work properly:
- the refrigerator compartment must be switched on
- the temperature of the refrigerator compartment must
be between +2°C and +5°C
- the box must be inserted to enable activation
- no special functions must have been selected (Standby,
Vacation – where applicable).
If one of these special functions has been selected, the
“Zero Degrees” box must be deactivated manually, and
any fresh food inside it removed. If manual deactivation
does not take place, the box will be deactivated
automatically after 8 hours.
Note:
- if the symbol does not light up when the function is
activated, check that the drawer is properly inserted; if the
problem persists, contact your nearest authorized Aftersales Service
- if the function is active and the drawer open, the symbol
on the control panel may be deactivated automatically.
If the drawer is inserted, the symbol will become active
again
- irrespective of the state of the function, a slight noise
may be heard: this is normal and is not a cause for
concern.
- when the function is not active, the temperature in the
drawer depends on the general temperature inside the
refrigerator.
In this case, we recommend it is used to store fruit and
vegetables which are not sensitive to cold temperatures
(fruits of the forest, apples, apricots, carrots, spinach,
lettuce, etc.).
Important: when the function is activated and there
are foodstuffs with a high water content, condensation
may form on shelves. In this case, disable the function
temporarily.
2.8. FAN
The Fan improves temperature distribution inside the
product, allowing better preservation of stored food.
By default, the fan is switched on. It is advisable to
keep the fan switched on, so that the 6th Sense Fresh
Control / ProFresh function can work properly and also
when the ambient air temperature is above 27 ÷ 28°C
or if you notice drops of water on the glass shelves or in
sever humidity conditions. Please note that when the
fan is switched on it will not continuously work. The fan
will start/stop working depending on the temperature
and/or humidity level inside the product. It is therefore
absolutely normal if the fan does not move even if the fan
is switched on.
To activate or deactivate this function – see enclosed
Quick Start Guide.
Attention: Switching- off the Fan deactivate the 6th
Sense Fresh Control / ProFresh function.
Note:
Do not obstruct the air intake area with food items.
To guarantee the right performance at lower ambient
temperature (colder than 18°C) and to minimize Energy
Consumption, turn off the fan.
To turn off the fan please see above procedure.
If the appliance has the Fan it can be equipped with the
antibacterial filter.
Remove it from the box placed in the crisper drawer and
insert into the cover of fan.
The replacement procedure is included in the filter box.
2.9. TEMPERATURE SET TING
The appliance is normally factory-set for operation at
the recommended temperature of 5°C. The internal
temperature can be adjusted between 8°C and 2°C,
proceeding as follows:
• Press the temperature setting button (°C). The storage
temperature can be changed by -1°C with each
pressure of the button: the value changes cyclically
between 8°C and 2°C.
Note: Displayed set points correspond to the average
temperature throughout the whole refrigerator
2.10. NOFROST REFRIGERATOR COMPARTMENT
Refrigerator compartment defrosting is completely
automatic.
Droplets of water on the rear wall inside the refrigerator
compartment indicate that the automatic defrost phase
is in progress. The defrost water is automatically run
into a drain hole and collected in a container, where it
evaporates.
*Available on selected models only. Please check on the QUICK START GUIDE if this function is actually available on your model.
6
2.11. LED LIGHT SYSTEM*
The light system inside the fridge compartment uses
LEDs light, allowing a better lightning as well as very low
energy consumption. If the LED light system does not
work, please contact the Service to replace it.
Important:
The refrigerator compartment light switches on when
the refrigerator door is opened. If the door is kept open
for more than 10 minutes the light will be automatically
switched off.
3. USE
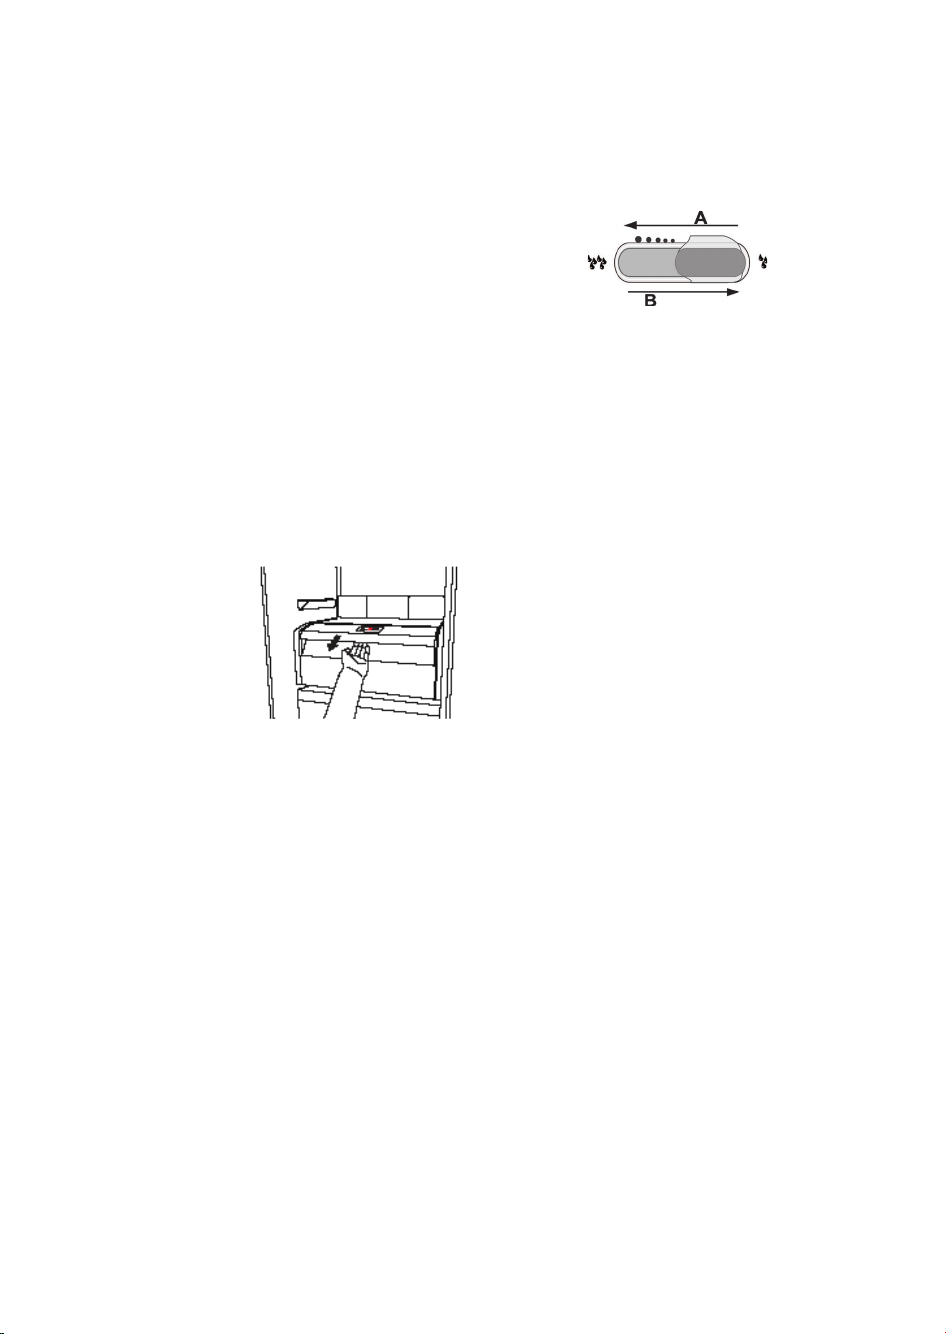
2.12.HUMIDITY CONTROLED CRISPER*
The salad crispers fitted inside the fridge have been
specially designed for the purpose of keeping fruit and
vegetables fresh and crisp. Open the humidity regulator
(position B) if you want to store food in a less humid
environment like fruit, or close it (position A) to store food
in a more humid environment like vegetable.
3.1. HOW TO INCREASE FRIDGE STORAGE CAPACITY
You can increase storage capacity by removing the “ZERO
DEGREES DRAWER”*
In this case proceed as follows:
• switch off the box
• pull out the drawer and the white plastic shelf
underneath the box.
Note: the upper shelf and the side support cannot be
removed. To restore “Zero Degrees Drawer” operation,
make sure you replace
the white plastic shelf
underneath the box
before inserting the
drawer and reactivating
the function. To optimise
energy consumption,
we recommend you
deactivate the “Zero
Degrees Drawer” and
remove it.
4. FOODSTORAGE TIPS
The refrigerator is the ideal storage location for ready
meals, fresh and preserved food, dairy products, fruit and
vegetables and beverage.
4.1. AIR VENTILATION
• The natural circulation of air in the refrigerator
compartment results in zones with different
temperatures. It is coldest directly above the fruits and
vegetables crisper and at the rear wall. It is warmest at
the top front of the compartment.
• Insufficient ventilation results in an increase in energy
consumption and reduction of the refrigerating
performance.
3.2. NOTES
• Do not block the air outlet area (on the back wall
inside the product) with food products.
• If the freezer is provided with a flap, it is possible to
maximize the storage volume by removing the flap.
• All shelves, flaps and pull-out baskets are removable.
• The internal temperatures of the appliance may be
affected by the ambient temperature, frequency of
door opening, as well as location of the appliance.
Temperature setting should take into consideration
these factors.
• Unless otherwise specified the appliance accessories
are not dishwasher safe.
• Use Smart Display function as frequently as possible.
4.2. HOW TO STORE FRESH FOOD AND BEVERAGE
• Use recyclable plastic, metal, aluminum and glass
containers and cling film to wrap foods.
• Always use closed containers for liquids and for food
that may give off or be tainted by odor or flavor
transfer or cover them.
• Foods which give off a large amount ethylene gas
and those that are sensitive to this gas, such as fruit,
vegetables and salad, should always be separated
or wrapped so as not to reduce the storage life; for
example do not store tomatoes together with kiwi
fruits or cabbage.
• Do not store food too close together to enable
sufficient air circulation.
• To avoid bottles falling over, you can use the bottle
holder (available on selected models).
• If you have a little quantity of food to store in the
refrigerator, we recommend to use the shelves above
the crisper for fruits and vegetables since this is the
coolest area of the compartment.
*Available on selected models only. Please check on the QUICK START GUIDE if this function is actually available on your model.
7
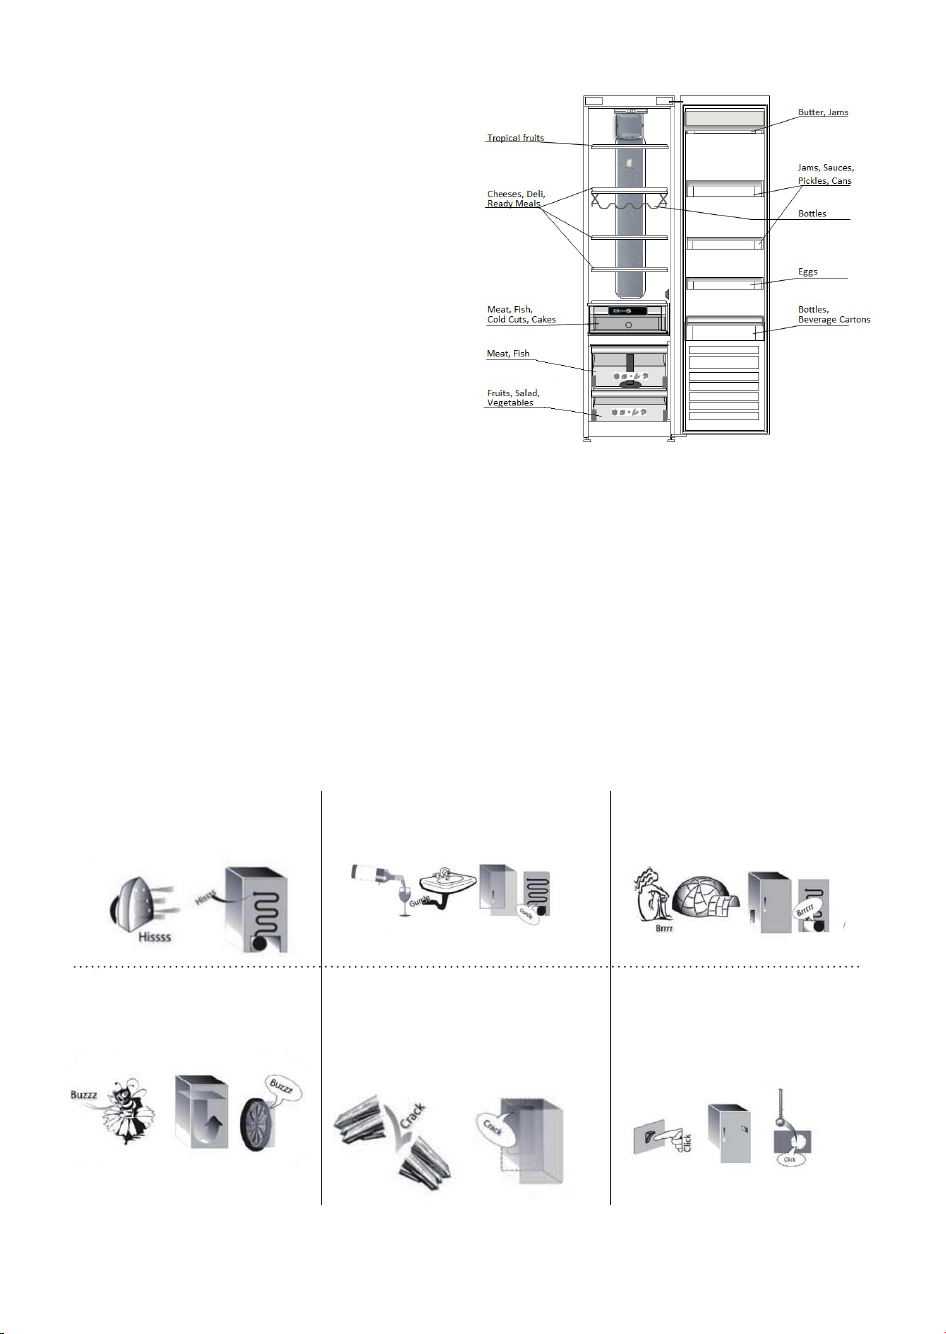
4.3. WERE TO STORE FRESH FOOD AND BEVERAGE
• On the fridge shelves: ready meals, tropical fruits,
cheeses, deli.
• In the coldest area – Zero Degrees drawer* (the one
above Cooler Compartment): meat, fish, cold cuts,
cakes
• In the fruits and vegetables crisper: fruits, salad,
vegetables.
• In the door: butter, jams, sauces, pickles, cans, bottles,
beverage cartons, eggs
5. FUNCTIONAL SOUNDS
EXAMPLE OF FOOD ARRANGEMENT
Sounds coming from your appliances are normal
since it has a number of fans and engines to regulate
performances that switch on and off automatically.
Some of the functional sounds can be reduced
through
• Leveling the appliance and installing it on an even
surface
• Separating and avoiding contact between the
appliance and furniture.
• Checking if the internal components are correctly
placed.
Some of the functional sounds you might hear:
A hissing sound when switching
on the appliance for the first time
or after a long pause.
Buzzing sound when water
valve or fan start working.
A gurgling sound when refrigerant
fluid enters into the pipes.
A cracking sound when compressor
starts or when ready ice drops
into ice box abrupt clicks when
compressor switches on and off.
• Checking if bottles and containers are not in contact
with each other.
BRRR sound is from the compressor
running.
The CLICK is from the thermostat
which adjusts how often the
compressor is running.
*Available on selected models only. Please check on the QUICK START GUIDE if this function is actually available on your model.
8
6. RECOMMENDATION IN CASE OF NO USE OF THEAPPLIANCE
6.1. ABSENCE / VACATION
In case of vacation its recommended to use up food and
to disconnect the appliance to save energy.
6.2. MOVING
1. Take out all internal parts.
2. Wrap them well, and fix them together with adhesive
tape so that they do not bang together or get lost.
3. Screw the adjustable feet so that they do not touch
the support surface.
4. Close and fix door with adhesive tape and, again using
adhesive tape, fix the power cable to the appliance.
6.3. POWER FAILURE
In the event of a power failure, call the local office of your
electricity supply company and ask how long it is going
to last.
Note: Bear in mind that a full appliance will stay cold
longer than a partially filled one.
If food is found to be in a poor condition, it is best to
throw it away.
For power failures lasting up to 24 hours.
1. Keep the door of the appliance closed. This will allow
For power failures lasting more than 24 hours.
1. Try to use up the food, which is more easily perishable.
7. MAINTENANCE AND CLEANING
Before any cleaning or maintenance operation, unplug the
appliance from the mains or disconnect the electrical power
supply.
Periodically clean the appliance with a cloth and a solution
of lukewarm water and neutral detergent specifically for
refrigerator interiors. Never use abrasives. Never clean
refrigerator parts with flammable fluids. The fumes can create a
fire hazard or explosion. Clean the outside of the appliance and
the door seal with a damp cloth and dry with a soft cloth.
Do not use steam cleaners.
Condenser placed in the rear of the appliance should be cleaned
regularly using a vacuum cleaner.
Condenser placed in the rear of the appliance should be cleaned
regularly using a vacuum cleaner.
Important:
• The buttons and control panel display must not be cleaned
with alcohol or alcohol-derived substances, but with a dry
cloth.
• The refrigeration system pipes are located near the defrost
pan and can become hot. Periodically clean them with a
vacuum cleaner.
the stored food to stay cold as long as possible.
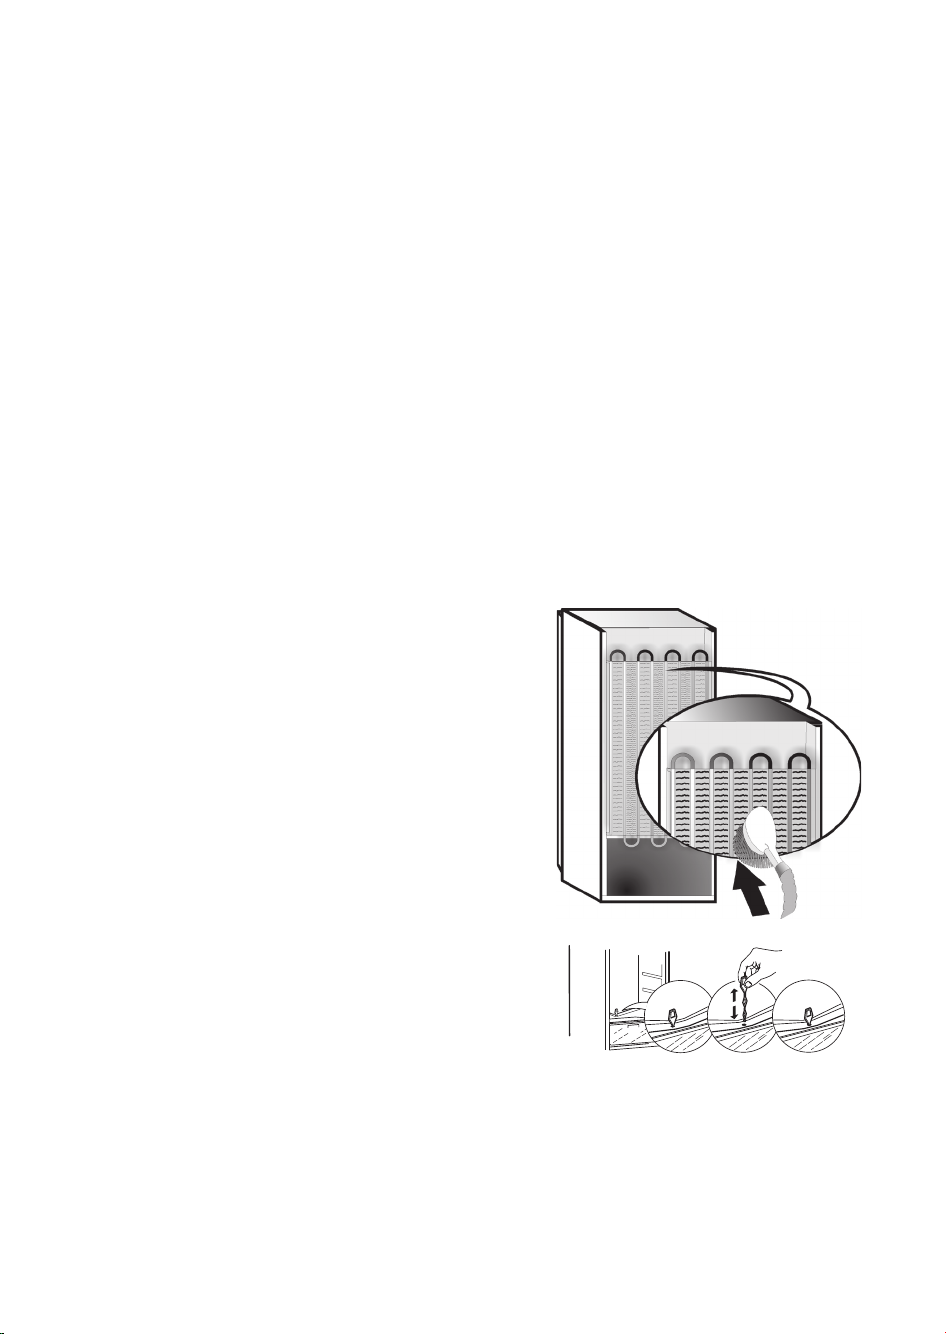
To ensure continuous and correct flow of defrost water,
regularly clean the inside of the draining hole on the back of the
refrigerator near the fruit and vegetable drawer, using the tool
provided .
Before cleaning the “Zero Degrees Drawer” (including the outside), remove the drawer so as to disconnect the
box from the electricity supply.
Clean the box and all its parts regularly, using a cloth and a solution of warm water and neutral detergent specifically
formulated for refrigerator interiors (take care not to immerse the white plastic shelf underneath thebox in water).
Never use abrasive detergents.
8. TROUBLESHOOTING GUIDE
8.1. BEFORE CONTACTING AFTERSALES SERVICE…
*Available on selected models only. Please check on the QUICK START GUIDE if this function is actually available on your model.
9
Performance problems often result from little things you can find and fix yourself without tools of any kind.
PROBLEM SOLUTION
The appliance is not working: • Is the power cable plugged into a live socket with the proper
voltage?
• Have you checked the protection devices and fuses of the electrical
system in your home?
If there is water in the defrost pan: • This is normal in hot, damp weather. The pan can even be half full.
Make sure the appliance is level so that the water does not overflow.
If the edges of the appliance cabinet,
• This is normal in hot weather and when the compressor is running.
which come in contact with the door
seal, are warm to the touch:
If the light does not work: • Have you checked the protection devices and fuses of the electrical
system in your home?
• Is the power cable plugged into a live socket with the proper
voltage?
• In case the LEDs are broken the user must call the Service for
exchange of the same type available only at our After-sales Service
Centers or authorized dealers.
If the motor seems to run too much: • Motor running time depends on different things: number of door
openings, amount of food stored, temperature of the room, setting
of the temperature controls.
• Is the condenser (back the appliance) free of dust and fluff?
• Are the door properly closed?
• Are the door seals properly fitted?
• On hot days or if the room is warm, the motor naturally runs longer.
• If the appliance door has been left open for a while or if large
amounts of food have been stored, the motor will run longer in order
to cool down the interior of the appliance.
If the appliance temperature is too
high:
• Are the appliance controls correctly set?
• Has a large amount of food been added to the appliance?
• Check that the door is not opened too often.
• Check that the door close properly.
If the doors do not open and close
properly:
• Check that food packages are not blocking the door.
• Check that the internal parts or automatic ice maker are not out of
position.
• Check that the door seals are not dirty or sticky.
• Ensure the appliance is level.
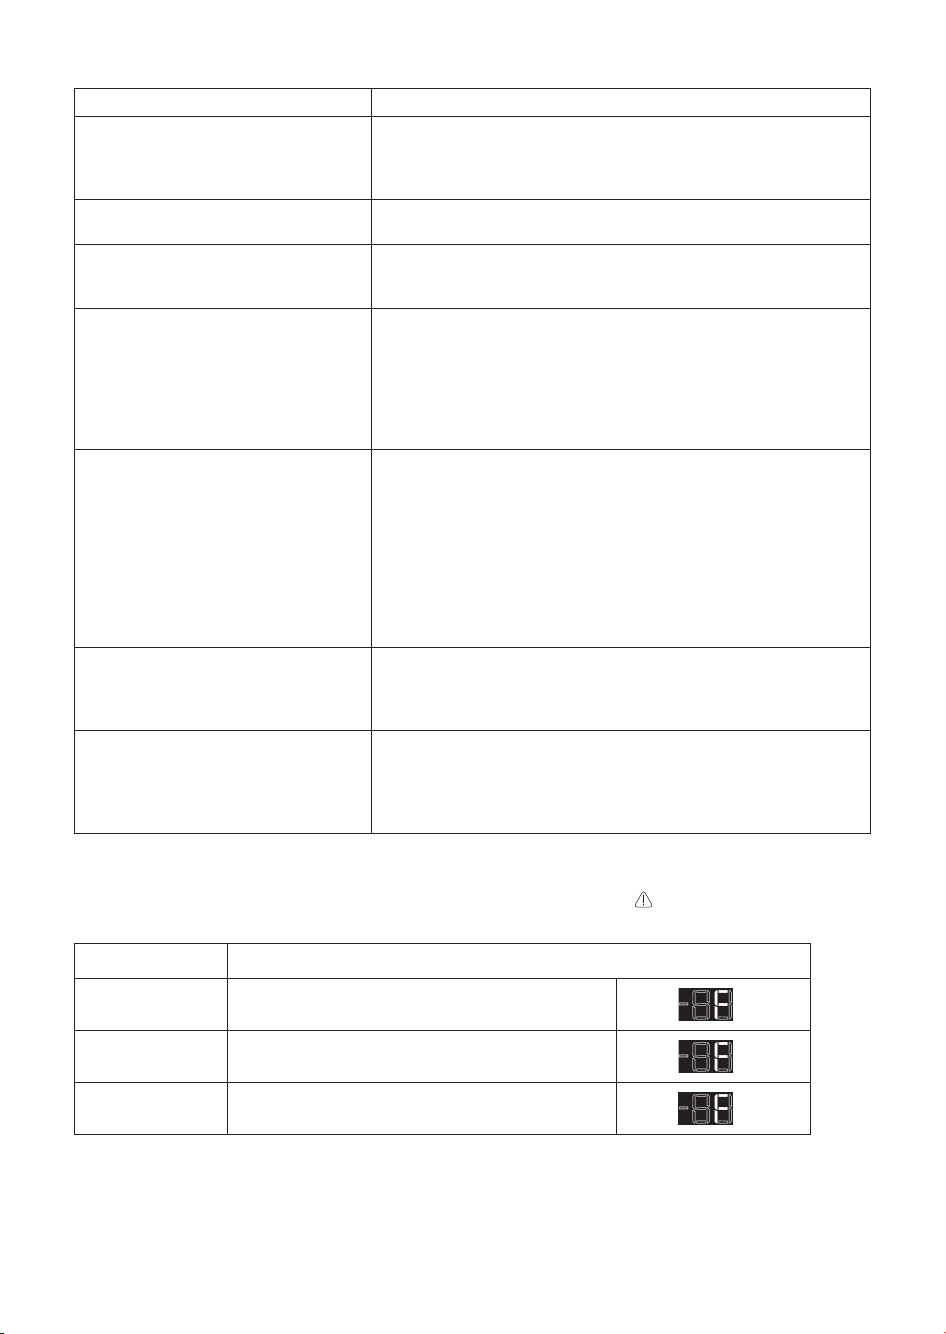
8.2. FAILURES
In the event of operation alarms, they will also be displayed in the digits LEDs, (e.g. Failure1, Failure 2, etc...) call Aftersales Service and specify the alarm code. The acoustic alarm sounds, the Alarm icon
lights up and the F letter on the
digit display blinks according to failure code described below:
Failure code Visualization
Error 2
Error 3
Error 6
*Available on selected models only. Please check on the QUICK START GUIDE if this function is actually available on your model.
F letter blink on/off at 0,5 sec. Blinks ON 2 times
then remain off for 5 seconds. Pattern repeats.
F letter blink on/off at 0,5 sec. Blinks ON 3 times
then remain off for 5 seconds. Pattern repeats.
F letter blink on/off at 0,5 sec. Blinks ON 6 times
then remain off for 5 seconds. Pattern repeats.
x2
x3
x6
10
 Loading...