

Page 1

Instructions for use
KGNA 335
Bauknecht AG, Industriestrasse 36, 5600 Lenzburg, www.bauknecht.ch
Verkauf Telefon 0848 801 002 Fax 0848 801 017 verkauf@bauknecht.ch
Kundendienst Telefon 0848 801 001 Fax 0848 801 003 service@bauknecht.ch
Ersatzteile Telefon 0848 801 005 Fax 0848 801 004 ersatzteilverkauf@bauknecht.ch
Page 2
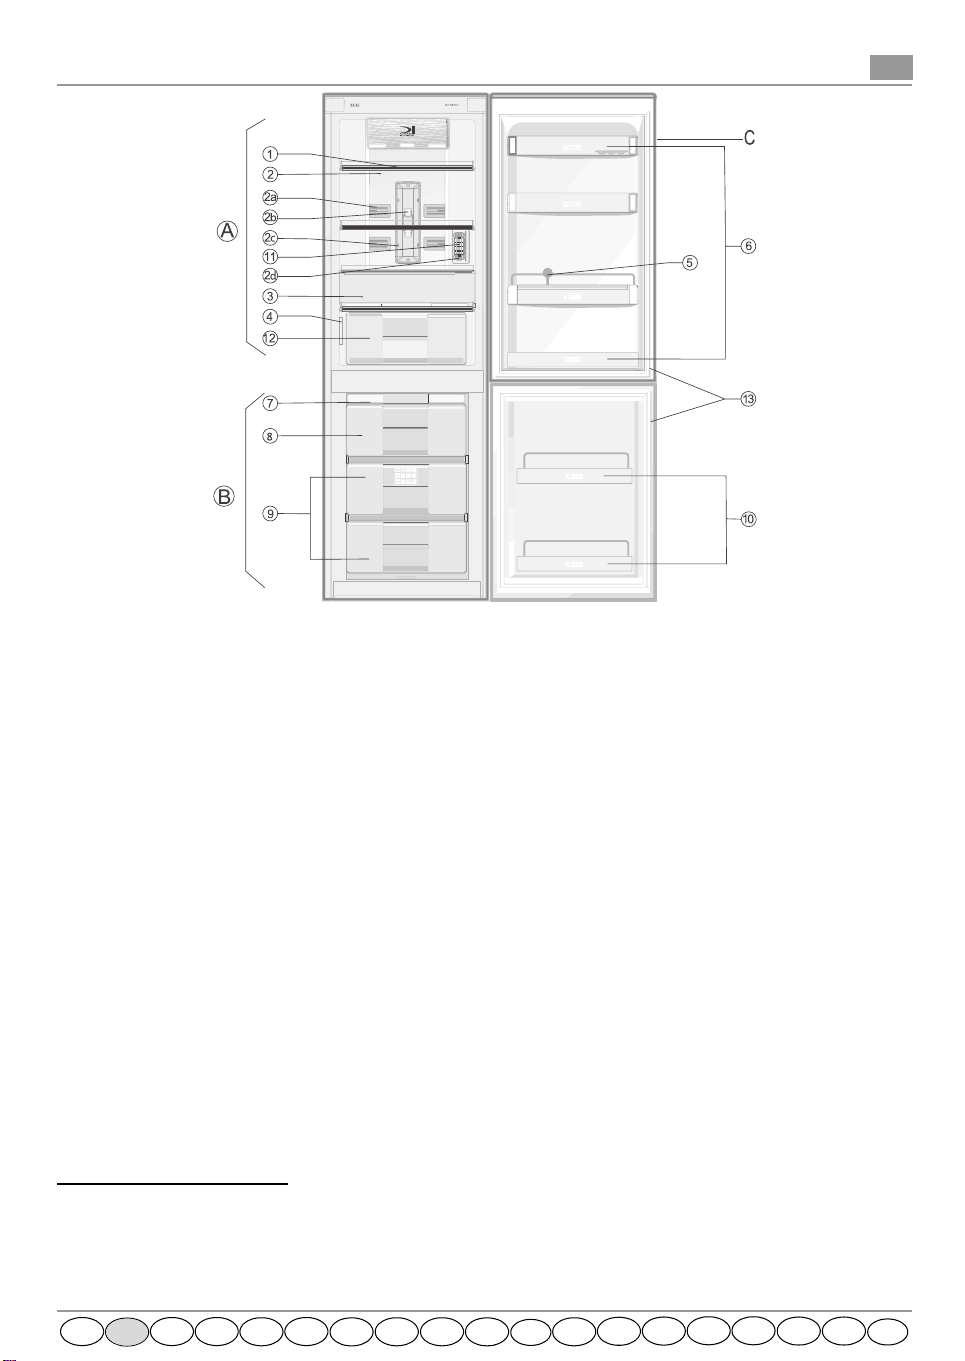
CB60 No-Frost PRODUCT SHEET
GB
A. Refrigerator Compartment
Shelves/Shelf area
1.
Cold air
2.
Multi-flow outlets
2a.
Light bulbs
2b.
Light cover
2c.
Area of air suction
2d.
Fresh control compartment (lower temperature than
3.
in other refrigerator chamber)
Rating plate
4.
Removable bottle holder
5.
Door trays
6.
Multi-flow
system
B. Freezer compartment
Rack for ice cube trays or ice packs
7.
(depending on model)
Upper basket (area for freezing)
8.
Baskets for storing frozen food
9.
Freezer compartment door trays (for pizza or other
10.
frozen food with a short term of storage)
C. Control panel with LCD
Anti-bacterial protection:
Hygiene + filter (depending on model)
11.
Crisper drawer
12.
Door seals
13.
The number of shelves and shape of accessories
Note:
may vary, depending on the model. All shelves, door trays
and racks are removable.
Do not obstruct the multi-flow intake area (2d)
with food and outlets (2a).
Important: Refrigerator/freezer accessories must
not be washed in a dishwasher.
Your new appliance is a combined ventilated,
fridge-freezer exclusively for domestic use.
Whirlpool Total-no-frost fridge freezers circulate chilled
air around the storage areas, reducing humidity to
prevent the formation of ice, thereby completely
eliminating the need for defrosting. Frozen items don't
stick together, labeling stays legible and storage space
remains clear. No-Frost's even temperature control also
helps keep food fresher for longer.
In combination with
it directs cooling power exactly where it is needed,
optimising energy efficiency.
The
Hygiene+ filter
the refrigerator through continuous purifying the air of
bacteria. Remove it from the box (found in the crisper
drawer item 12) and insert into the grille (item 11).
Replace the filter every 6 months.
Remove the filter together with the grille and dispose
1.
as a whole.
Replace the filter and the grille with the new ones.
2.
The replacement procedure is attached with the filter.
3.
This filter may be purchased from our After-sales Service
outlets.
The crisper and the door seals
materials that inhibit bacterial growth.
6th Sense
assures a higher level of hygiene in
intelligent sensor control,
are manufactured from
No-Frost
CZ
GB
F NL
D
P
E
I
GR N FIN
S
DK
PL
RUS
BG
RO
I
H
SK
Page 3
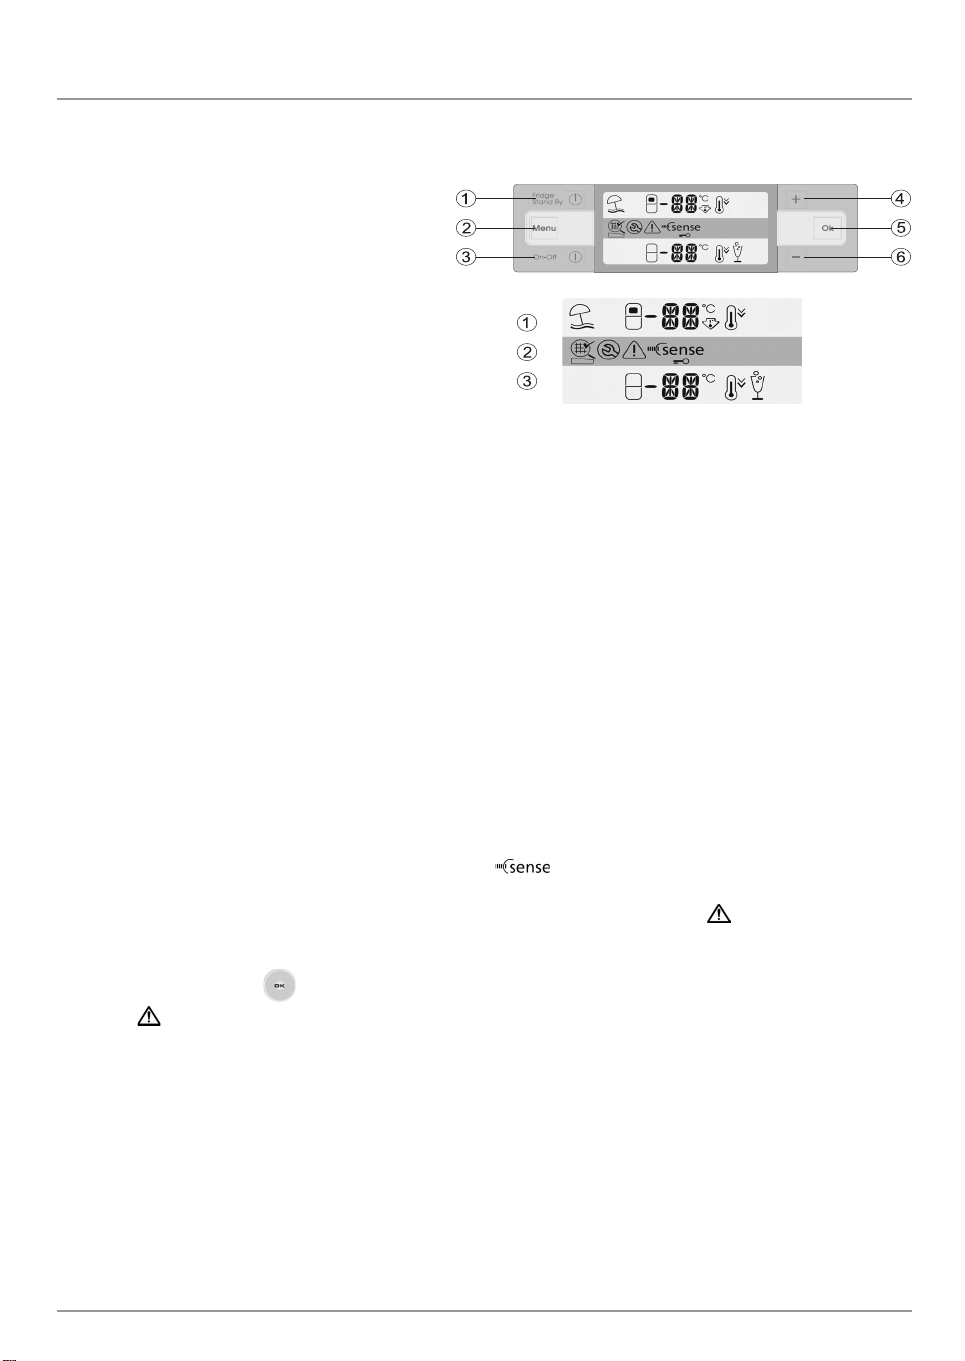
CONTROL PANEL DESCRIPTION
Compartments ON / OFF, menu, selection and
confirmation buttons
Refrigerator compartment Stand-by - ON/OFF
1.
button
Menu button
2.
Appliance ON/OFF button
3.
Selected compartment temperature increase
4.
button
Confirmation button
5.
Selected compartment temperature decrease
6.
button.
Functions and settings symbols
Functions and settings for the refrigerator
compartment
Appliance, alarm and malfunction symbols
!
Functions and settings for the freezer
compartment
Switching on the appliance:
Switching off the appliance:
Adjusting the temperature:
the Menu button until the refrigerator or freezer temperature symbol turns on (symbol flashes).
Then adjust the temperature by pressing the +/- buttons and confirm by pressing “OK”.
Displaying the refrigerator and freezer compartment temperatures.
The temperature inside the refrigerator compartment can be adjusted between +2°C and + 8°C. In the same way,
the freezer compartment temperature can be adjusted between -16°C and -24°C.
Press the On-Off button
Press the On-Off button again
To change the temperature inside the refrigerator or freezer compartment, press
ELECTRICAL CONNECTION
When the appliance is connected to the power supply, the display lights up and all the symbols appear on the display
for a few seconds.
The factory setting -18°C appears and flashes, the symbol lits, while the refrigerator display shows a
temperature of +5°C (factory-set).
While the appliance is working to reach the factory-set temperature, the alarm icon lits , an acoustic alarm
sounds and temperature symbol on the freezer display flashes (- -). This indicates that the appliance has not yet
reached the optimal temperature for storage of foodstuffs.
Press and hold the button until the acoustic alarm disables.
The icon disappears when the freezer compartment reaches a temperature below -12°C, the display will show
the temperature -18°C, at which point food can be loaded into the freezer compartment.
After being switched on, the refrigerator needs from 2 to 3 hours to reach the correct temperature to store a typical
volume of food in the refrigerator compartment.
IMPORTANT:
• If food is placed in the refrigerator before the appliance has cooled completely, it may deteriorate.
• Turning the refrigerator and freezer controls to a cooler than recommended setting will not cool the
compartments any faster.
• A built-in exterior moisture control continuously guards against moisture build-up on the front edges;
Do not be alarmed if these edges sometimes feel warm to the touch.
The inside light switches on when the refrigerator door is opened. After 10 minutes of door opening the light
switches off.
5019 637 01004
Page 4
GUIDE TO SELECTING FUNCTIONS
Functions are not available until freezer compartment reaches the temperature below -12°C.
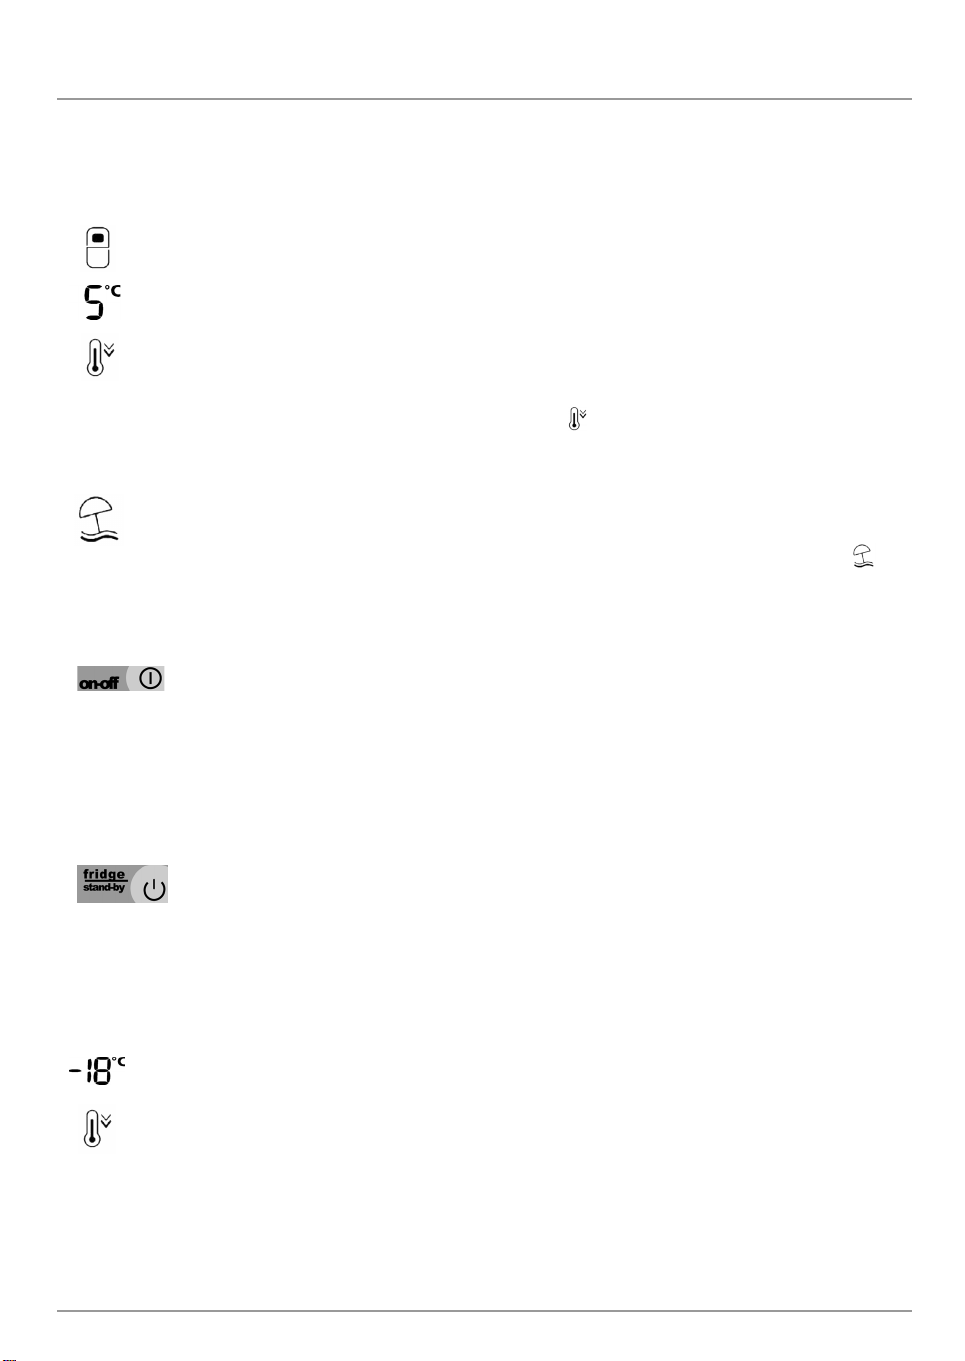
Functions and settings for the refrigerator compartment
Refrigerator compartment door open
Refrigerator compartment temperature setting
Fast cooling
This function should be selected before refrigerating fresh food. To select the function, keep pressing the
menu button until the display shows the fast cooling symbol . The symbol flashes, press OK to confirm.
The function is automatically disabled after 6 hours, or can be manually disabled by repeating the same
procedure.
Vacation
This function turns the refrigerator compartment to a warmer state if you are going away for some time.
To select the function, keep pressing the menu button until the display shows the vacation symbol .
Press OK to confirm. To turn the refrigerator back to setting point repeat this procedure.
Important
compartment and leave the door closed, since the refrigerator maintains a suitable temperature to prevent
the formation of unpleasant odours.
This function turns off both the refrigerator and freezer compartments.
To enable the stand-by function, press the “on-off” button for 3 seconds, two hyphens appear on both
display to indicate that the appliance is on stand-by.
To switch the appliance on again, follow the same procedure until the previously set temperature is shown
on the display.
When the appliance is on stand-by the light inside the refrigerator compartment does not work.
Remember that this operation does not disconnect the appliance from the power supply.
: after activating this function, remove all perishable foodstuffs from the refrigerator
ON/OFF
Fridge Stand-by
This function turn off the fridge compartment while the freezer compartment continue to run.
To enable the stand-by function, press the “Fridge stand-by” button for 3 seconds. To switch the fridge
compartment on again, follow the same procedure until the previously set temperature is shown on the
display. When the fridge compartment is on stand-by the light inside the refrigerator compartment does
not work.
Functions and settings for the freezer compartment
Freezer compartment temperature setting
Fast freezing
This function must be activated before freezing fresh food. To select the function, keep pressing the menu
button until the display shows the fast freeze symbol. Press OK to confirm. The function is automatically
disabled after 24 hours, or can be manually disabled by repeating the same procedure.
5019 637 01004
Page 5
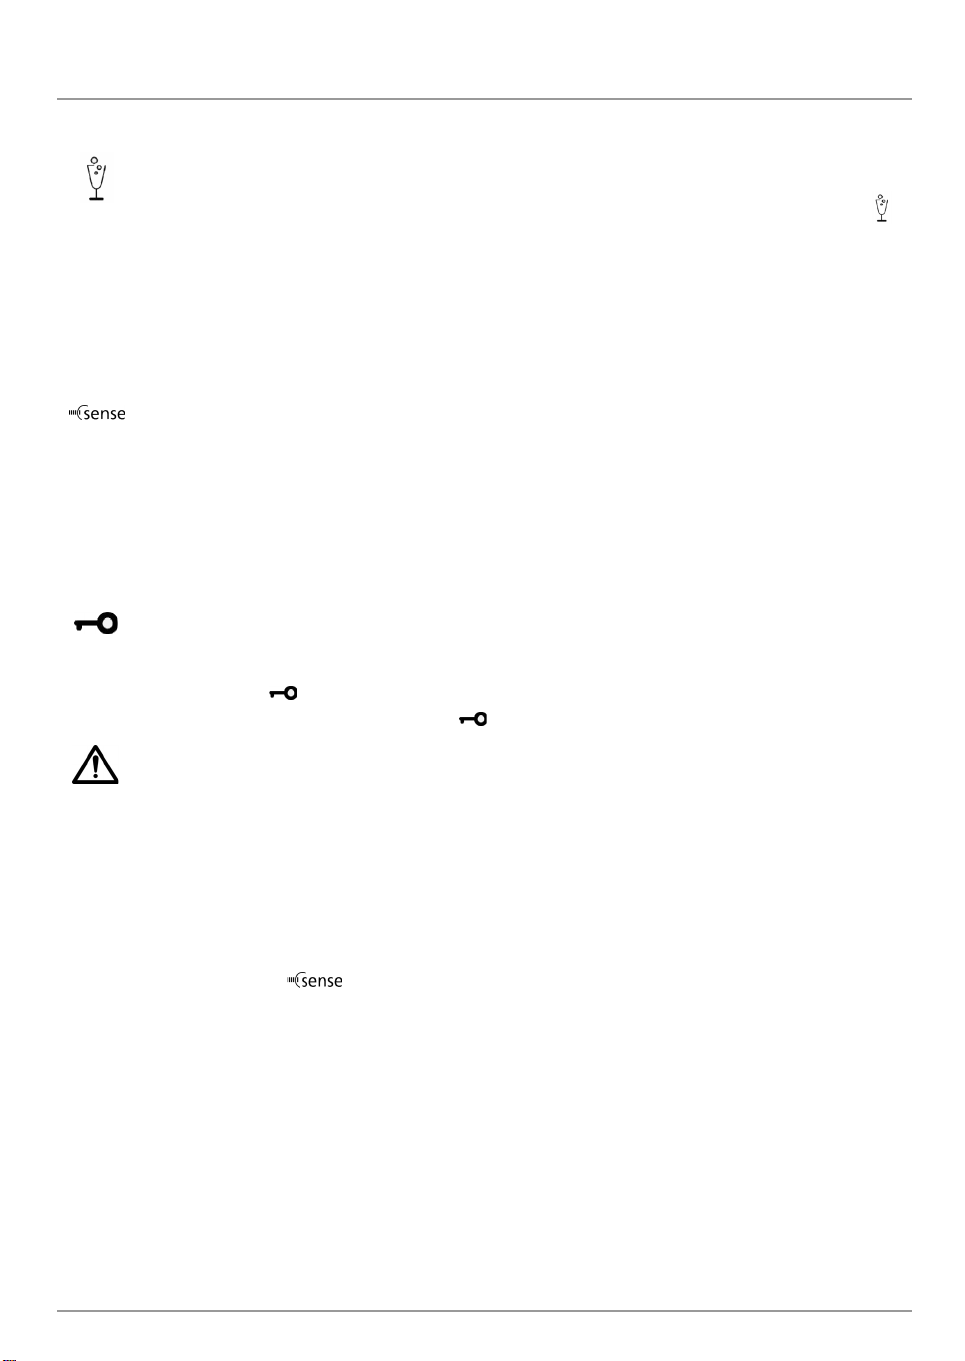
Party mode
To select the function, keep pressing the menu button until the display shows the party mode symbol .
The symbol flashes, press OK to confirm. Use this function to chill drinks inside the freezer compartment.
When the function is in operation, the symbol is animated. 30 minutes after selection (the time required to
chill a 0.75 l bottle without the glass breaking), the symbol flashes, an acoustic alarm sounds and the display
lights up: remove the bottle from the freezer compartment and press the OK button to disable the
function.
Important:
chilling.
Appliance, alarm and malfunction symbols
th
“6
Sense” function
The 6th Sense function is automatically activated when:
• a large amount of food is loaded into the refrigerator and/or freezer
• the refrigerator and/or freezer door is left open for a long time
• a prolonged power failure takes place, causing the internal temperature of the appliance to increase to
values that cannot guarantee safe storage of food.
The symbol flashes for approximately 3 seconds, after which it remains permanently lit until optimal storage
conditions have been automatically restored.
Control panel lock function
This function prevents anyone from inadvertently changing settings or switching off the appliance.
To lock the control panel, press buttons “+” - “OK” - “-” at the same time for 3 seconds until the display
shows the symbol : an acoustic signal confirms the function has been selected. To disable the function,
follow the same procedure until the symbol switches off.
do not leave the bottle inside the freezer compartment longer than the time necessary for
Alarms
In the event of an alarm, the acoustic alarm and indicator lights are activated.
Freezer temperature alarm
The acoustic alarm sounds: alarm symbol lights up and the temperature indicator flashes.
The alarm is activated when:
• The appliance is connected to the power supply for the first time or after prolonged disuse
• The freezer compartment temperature is too high
• The quantity of foods loaded into the freezer exceeds that indicated on the data plate
• The freezer door has been left open for a long time
in these cases automatically appears on the display
Note:
Power failure alarm
The maximum temperature reached during a power failure flashes on the freezer display. The alarm symbol
lights up and the acoustic alarm sounds at the same time.
This alarm may activate when:
• a prolonged power failure takes place, causing the internal temperature of the freezer to increase to
values that cannot guarantee safe storage of food.
To disable the alarm press OK, after which the pre-set temperature will appear on the display.
evaluate the state of the stored food.
Note:
5019 637 01004
Page 6
Operation alarms
In the event of operation alarms, other alarms will also be displayed in the refrigerator or freezer
compartment, depending on the malfunction site, (e.g. CF, AL01, AL02, AL03 or AL04 etc...) call Aftersales Service and specify the alarm code.
Refrigerator door open alarm
The refrigerator door symbol lights up and the acoustic alarm sounds.
The alarm is activated when:
• the refrigerator's door is left open for more than 2 minutes. Press OK to mute the acoustic alarm.
If the door is not closed, the acoustic alarm will sound again after two minutes.
Close the door/s and press the OK button.
in these cases 6th Sense automatically appears on the display
Note:
Malfunction and After-sales Service symbol (Call After-sales Service)
Listeria indicator - average temperature of the whole compartment (depending on model)
Right temperature inside the refrigerator
When the symbol indicates the proper temperature in the refrigerator compartment. For optimum
temperature adjustment, the refrigerator is provided with a temperature indicator to allow you control the
average temperature.
Checking the temperature
After the appliance has been switched on for at least 24 hours, can be checked if the temperature in the
refrigerator is correct and, if necessary, adjust the setting as indicated in the user instructions (see
“Adjusting the temperature”).
The internal temperature of the refrigerator depends on various factors such as the ambient temperature
of the room, the amount of food stored and how often the door is opened. These factors should be taken
into account when setting the appliance.
If the symbol is switched OFF, it means that the temp. inside the refrigerator is too warm; in this case
adjust the temp,. setting and wait for at least 12 hours before checking again if the temp, is correct.
IMPORTANT:
OFF for some time, especially if room temperature is very warm.
after opening the door or loading the refrigerator, it is normal if the symbol is switched
Function of replacing antibacterial filter necessity
After displaying icon, antibacterial filter should be replaced for new one. Description of replacing
(see IFU “Care and Maintenance”). Next press and hold the button “OK” for 5 seconds in order to switch
off the icon. After 6 months of product usage, the icon will display again, informing about replacing filter
necessity. It is possible to switch off icon for 6 hours by pressing the button “OK”.
Cleaning
Press the Stand-by button, which allows you to switch off the refrigerator compartment alone, keeping the
freezer on.
The refrigerator compartment can now be emptied and cleaned.
5019 637 01004
Page 7

REPLACING THE LIGHT BULB
Always disconnect the refrigerator from the power supply before replacing any light bulbs.
If the inside light is not working:
• Remove the light cover using a small screwdriver. Put the tip of screwdriver into upper rectangular hole, press
down the catch for unblock and pull cover towards outside.
• Check the bulb and if necessary replace it.
• Pull the bulb towards the outside of the lamp holder. Put the new one pushing connectors to the sockets of lamp
holder. It is used a special bulb, which does not unscrew.
This bulb is available only from our After-sales Service. Replace using maximum 15W bulb.
• Assembly again the light cover pushing in its place, hearing “click effect”. Do not leave not covered bulbs.
Warning:
After removing the light cover in order to cleaning, unplug the appliance at first. Use only slightly wet washcloth. Do
not touch the bulbs. Keep special precautions.
FRESH CONTROL COMPARTMENT
UNBLOCK
Press the both locks, pull the drawer out.
5019 637 01004
Page 8

INSTRUCTIONS FOR USE
BEFORE USING THE APPLIANCE
SAFEGUARDING THE ENVIRONMENT
PRECAUTIONS AND GENERAL
RECOMMENDATIONS
INSTALLATION
HOW TO STORE FOODS IN REFRIGERATOR
COMPARTMENT
HOW TO DEFROST THE FREEZER
COMPARTMENT (DEPENDING ON THE
MODEL)
HOW TO FREEZE FRESH FOOD
CARE AND MAINTENANCE
TROUBLESHOOTING GUIDE
AFTER-SALES SERVICE
ELECTRICAL CONNECTION
14
Page 9

BEFORE USING THE APPLIANCE
•
Your new appliance is designed exclusively for
domestic use
To get the most out of your new appliance,
read the user handbook thoroughly. The
handbook contains a description of the
appliance and useful tips for storing food.
Keep this handbook for future consultation.
1.
After unpacking, make sure that the appliance
is undamaged and that the door closes
properly. Any damage must be reported to
your dealer within 24 hours after delivery of
the appliance.
2.
Wait at least two hours before switching the
appliance on in order to ensure the refrigerant
circuit is fully efficient.
3.
Installation of the appliance and electrical
connections must be carried out by a qualified
electrician, in accordance with the
manufacturer's instructions and local safety
regulations
4.
Clean the inside of the appliance before using it.
SAFEGUARDING THE ENVIRONMENT
1.Packing
The packaging material is entirely recyclable,
and marked with the recycling symbol. Follow
local regulations for scrapping. Keep the
packaging materials (plastic bags, polystyrene
parts, etc.) out of reach of children, as they are
potentially dangerous.
2. Scrapping
The appliance is manufactured using recyclable
material.
This appliance is marked according to the
European directive 2002/96/EC on Waste
Electrical and Electronic Equipment (WEEE).
By ensuring this product is disposed of correctly,
you will help prevent potential negative
consequences for the environment and human
health, which could otherwise be caused by
inappropriate waste handling of this product.
The symbol on the product, or on the
documents accompanying the product, indicates
that this appliance may not be treated as
household waste. Instead it shall be handed over
to the applicable collection point for the
recycling of electrical and electronic equipment.
Before scrapping, make the appliance unusable
by cutting off the power cable and removing the
doors and shelves so that children cannot easily
climb inside the appliance.
Disposal must be carried out in accordance with
local environmental regulations for waste
disposal. Deliver the appliance immediately to
an authorized dump; do not leave it unattended
even for a few days, since it is potentially
dangerous for children. For more detailed
information about treatment, recovery and
recycling of this product, please contact your
local city office, your household waste disposal
service or the shop where you purchased the
product.
Information:
This appliance does not contain CFCs (replaced
with R134a) or HFCs (replaced with R600a).
Appliances with Isobutane (R600a):
isobutane is a naturally occurring, low
environmental impact gas. Caution is required,
however, because isobutane is flammable.
Therefore, it is essential to ensure that
refrigerant pipelines are not damaged.
Declaration of conformity
•
This appliance is designed to store food and is
manufactured in conformity with
EEC directives 90/128/CEE, 02/72/CEE and
No. 1935/2004.
•
This appliance is designed, manufactured, and
retailed in compliance with:
- the safety objectives of the Low Voltage
Directive 73/23/EEC;
- the protection requirements of the “EMC”
Directive 89/336/EEC, amended by Directive
93/68/EEC;
•
The electrical safety of the appliance can only
be guaranteed if the product is connected to
an approved earth connection.
15
Page 10

PRECAUTIONS AND GENERAL
RECOMMENDATIONS
•
Use the refrigerator compartment only for
storing fresh food and beverages and use the
freezer compartment only for storing frozen
food, freezing fresh food and making ice
cubes.
•
After installation, make sure that the
appliance is not standing on the power supply
cable.
•
Do not store glass containers with liquids in
the freezer since they may burst.
•
Do not eat ice cubes or ice lollies immediately
after taking them out of the freezer since they
may cause cold burns.
•
Before carrying out any maintenance or
cleaning, always unplug the appliance or
disconnect the power supply.
•
Make sure that your appliance is not near a
heat source.
•
Do not store or use gasoline or other
flammable vapours and liquids in the vicinity of
this or any other appliance. The fumes can
create a fire hazard or explosion.
•
To ensure proper ventilation leave a space on
both sides and above the appliance.
•
Ensure that the vent outlets on the appliance
casing or housing unit are unobstructed in
order to allow correct air circulation.
•
All appliances equipped with an ice maker or
water dispenser must be connected to a
mains water supply that delivers potable
water only (with water pressure between 1.7
and 8.1 bar (25 and 117 PSI)). Ice makers and/
or water dispensers not directly connected to
a mains water supply must be filled with
potable water only.
•
Install and level the appliance on a floor strong
enough to take its weight and in an area
suitable for its size and use.
•
Install the appliance in a dry and wellventilated place The appliance is set for
operation at specific ambient temperature
ranges, according to the climatic class
indicated on the data plate: The appliance may
not work properly if it is left for a long period
at a temperature above or below the
indicated range.
Climatic class Amb. T. (°C) Amb. T. (°F)
SN From 10 to 32 From 50 to 90
N From 16 to 32 From 61 to 90
ST From 18 to 38 From 64 to 100
T From 18 to 43 From 64 to 110
•
Be careful not to damage the floors when you
move the appliance (e.g. parquet flooring).
•
Do not use mechanical devices or any means
other than those recommended by the
manufacturer to speed up the defrosting
process.
•
Do not damage the refrigerant circuit.
•
Do not use electrical appliances inside the
freezer compartments, unless such appliances
are specifically recommended by the
manufacturer.
•
This appliance is not designed for use by
young children or the infirm.
•
To avoid the risk of children being trapped
and therefore suffocating, do not allow them
to play or hide inside the appliance.
•
The power cable may only be replaced by an
authorized person.
•
Do not use extension leads or adapters.
•
It must be possible to disconnect the
appliance from the mains by unplugging it or
by means of a two-pole switch fitted upline of
the socket.
•
Ensure that the voltage indicated on the
appliance data plate corresponds to the
domestic supply voltage
•
Do not ingest the contents (non-toxic) of the
ice packs (if provided).
16
Page 11

INSTALLATION
Location
•
Install the appliance in a dry, well-ventilated place. Ensure that
the appliance is level. Adjust the front feet if necessary.
•
Make sure that your appliance is not near a heat source.
•
Install and level the refrigerator on a floor strong enough to
take its weight and in an area suitable for its size and use.
•
After installation, make sure that the appliance is not standing
on the power supply cable.
•
Keep ventilation openings, in the appliance enclosure or in the
built-in structure, clear of obstruction. To ensure proper
ventilation, leave a 1 cm space on both sides and 5 cm above
the refrigerator.
•
The sides of some models are extended at the rear so the
appliance can be placed directly against the rear wall.
Otherwise, fit the spacers (if supplied and if not keep 4,5 cm
distance between the appliance and the wall) on the upper
part of the condenser at the rear of the appliance.
•
Clean the inside (see chapter “Care and Maintenance”).
•
Fit the accessories supplied.
•
Remove the compressor locking pin (on selected models
only).
Electrical Connection
•
Electrical connections must be made in accordance with local
regulations.
•
Ensure that the voltage indicated on the appliance data plate
corresponds to the domestic supply voltage.
•
If the plug and socket are not of the same type, have the
socket replaced by a qualified electrician
•
Appliance is safe in case it is connected to the right socket
with earth. Regulations require that the appliance is earthed.
•
The Manufacturer declines all liabilities for injury to persons or
animals or damage to proper resulting ty from failure to
observe these regulations.
HOW TO STORE FOODS IN REFRIGERATOR
COMPARTMENT
Position the food as shown in the figure.
A Cooked food
BFish, meat
C Fruit and vegetables
D Bottles
E Butter
F Dairy products, cheese
Notes:
•
The space between the shelves and the rear wall of the
refrigerator compartment must be unobstructed to allow
circulation of air.
•
Do not place food in direct contact with the rear wall of the
refrigerator compartment.
•
Do not place hot food in the refrigerator or freezer.
•
Store liquids in closed containers.
Storing vegetables with a high water content can result in
condensation in the crisper container: this will not affect the
correct operation of the appliance.
17
Page 12

EXTRA SHELF (depending on the model)
Your refrigerator is provided with extra wire shelf. It’s ideal to
store bottles.
•
To use it, pull it frontward to the position indicated in the
pictures.
•
When not in use, just pull it upward and then push it backward.
•
To remove the shelf, just slide the side locks (if available) as in
the picture, and pull it toward you.
•
After replacing the extra shelf, slide the side locks in its original
position.
1
2
SLIDING GLASS SHELVES (depending on the model)
Your refrigerator is provided with sliding glass shelves which
make it easier for you to access foods stored at the shelves or at
lower shelves.
•
The shelves are made of highly resistant hardened glass.
•
The edges of the shelves prevent split liquids from going to
other compartments.
•
In some models the maximum load of glass shelf is given ( )
Changing the position of shelves:
Your refrigerator allows you to change the position of shelves
according to your needs.
•
To remove the shelf, pull it forward to the stop.
•
Keep the lock pressed down ad shown in the picture detail,
and pull the shelf frontward until it is released. The locks can
be pressed separately.
•
Pull the pins outward to remove the rails.
•
Remove the rails as in the picture and place them where you wish.
•
To place the rails observe the inscrition “ ” written on the
rail.
•
After that, place the shelf on them.
V
3
1
2
3
18
4
5
Page 13

HOW TO DEFROST THE FREEZER
COMPARTMENT (DEPENDING ON THE
MODEL)
In “No-Frost” appliances, defrosting of freezer is
completely automatic.
In other appliances, defrost the freezer compartment once
or twice a year, or when the ice on the walls reaches a
thickness of about 3mm. If possible, defrost the freezer
when it is nearly empty.
•
Disconnect the appliance from the mains power supply
(refrigerator compartment switches off too).
•
Remove the food from the freezer, wrap in a paper and group
together in a cool place or in a portable cooler.
•
Remove the ice-cube tray.
•
Remove the baskets.
•
Pull out the defrost water drain from the base of the freezer
compartment.
•
Leave the freezer compartment door open. Place a shallow
container below the drain channel to collect the defrost water.
•
Clean the freezer compartment using a sponge dampened in a
solution of warm water and neutral detergent. Do not use
abrasive products.
•
Rinse the interior and dry thoroughly.
•
Reconnect the appliance to the power supply.
•
Refit the drain in place and reposition the baskets.
Note:
•
Do not use sharp or pointed metal instruments to scrape off ice;
do not heat the freezer compartment artificially. Any damage to
the appliance resulting from failure to observe these instructions
is not covered by the guarantee.
•
Any increase in temperature of frozen food during defrosting
can shorten its storage life.
19
Page 14

HOW TO FREEZE FRESH FOOD
You can use the freezer compartment to freeze food.
The amount of fresh food that can be frozen in 24 hours, at an
ambient temperature of +25°C, is indicated on the data plate.
How to proceed:
•
Wrap and seal the food in: aluminium foil, cling film, watertight
plastic bags, polythene containers with lids or special freezer
containers.
•
Place food in the top compartment, leaving enough space for air
to circulate around packs. To speed up the freezing process and
increase the compartment capacity, remove the top basket/s
and the ice pack storage drawer (if provided). Put the already
frozen food into the other drawers and the food still to be
frozen directly onto the refrigerator grid.
Note:
•
In case of power failure, the freezer compartment is able to
maintain the correct storage temperature for about 12 hours.
•
Do not open the freezer compartment door during a power
failure, it will allow to maintain a low temperature as long as
possible.
•
For models equipped with ice packs, this time can be elongated
to 18-24 hours.
The storage time for frozen fresh foods.
•
The table alongside shows the recommended maximum storage
time for frozen fresh foods.
When purchasing frozen food products:
•
Ensure that the packaging is not damaged (frozen food in
damaged packaging may have deteriorated). If the package is
swollen or has damp patches, it may not have been stored under
optimal conditions and defrosting may have already begun.
•
When shopping, leave frozen food purchases until last and
transport the products in a thermally insulated cool bag.
•
Place the items in the freezer compartment as soon as you get
home.
•
If food has defrosted even partially, do not re-freeze it.
Consume within 24 hours.
•
Avoid, or reduce temperature variations to the minimum.
•
Respect the best-before date on the package.
•
Always observe the storage information on the package.
Making ice cubes
•
Fill the ice cube tray 3/4 with water and fit it onto the runners
above the top basket (as shown in the figure).
•
If the tray sticks to the bottom of the compartment, do not use
pointed or sharp instruments to detach it.
20
Page 15

FOOD STORAGE CHART
Storage time will vary according to the quality of the food, the type of packaging or wrap used (moisture and
vapour proof), and the storage temperature (which should be -18°C).
FOODSTUFF AND STORAGE TIME DAIRY PRODUCTS
Fruit
Concentrated fruit juice 12 months
Fruit (in general) 8 to 12 months
Citrus fruit and fresh fruit
juice
Vegetables
Commercially frozen 8 months
Home frozen 8 to 12 months
Meat
Sausages 4 weeks or less
Hamburgers 1 month
Beef, veal, lamb 2 to 3 months
Roasts
Beef 6 to 12 months
Lamb and veal 6 to 12 months
Pork 4 to 8 months
Fresh sausages 1 to 2 months
Steaks and chops
Beef 8 to 12 months
Lamb, veal, pork 2 to 4 months
Fish
Cod, flounder, sole 6 months
Salmon 2 to 3 months
Mackerel, perch 2 to 3 months
Dressed fish (purchased) 3 months
Clams, oysters 3 to 4 months
Boiled fish, crabs 3 to 4 months
Raw prawns 12 months
Poultry
Chicken or turkey (whole or
parts)
Duck and goose 6 months
Offal 2 to 3 months
Poultry cooked in a sauce 6 months
Sliced meat (no sauce) 1 month
Stews
Meat, poultry, and fish 2 to 3 months
4 to 6 months
12 months
Butter 6 to 9 months
Margarine 12 months
Cheese
Camembert, mozzarella,
spreading cheese
Cream cheeses do not freeze
Brie, Emmenthal, Swiss
cheese, etc.
(freezing may affect cheese
texture)
Ice cream, fruit juices, milk 12 months
Eggs
(Add sugar or salt to yolks or
whole beaten eggs)
Whole (beaten), whites, yolks 12 months
3 months
6 to 8 months
PASTRY AND BREAD
Leavened bread and rolls 3 months
Unbaked bread 1 month
Croissants 3 months
Cakes (not iced) 2 to 4 months
Cakes (iced) and biscuits 6 to 12 months
Fruit pies 12 months
Biscuit pastry 3 months
Pie pastry 4 to 6 months
21
Page 16

CARE AND MAINTENANCE
Before carrying out any cleaning operations, unplug the
appliance.
•
Clean the inside of the freezer compartment when defrosting.
•
Periodically clean the inside of the refrigerator compartment
with a sponge dampened in warm water and/or neutral
detergent. Rinse and dry with a soft cloth. Do not use abrasive
products.
•
Clean the outside with a soft damp cloth. Do not use abrasive
products, scourers, stain-removers (e.g. acetone,
trichloroethylene) or vinegar.
•
Defrosting of the refrigerator compartment is completely
automatic. Some models are provided with a drain hole.
Clean the defrost water drain outlet regularly using the tool
supplied with the appliance. This precaution ensures that
defrost water is removed correctly.
• Periodically clean the conden ser (radiator) at the rear
of the appliance and the plinth with a vacuum cleaner
or brush.
Prolonged disuse
1.
Empty the refrigerator and freezer compartments.
2.
Disconnect the appliance from the power supply.
3.
Defrost the freezer compartment, and clean and dry both
compartments.
4.
Leave the doors open to prevent formation of unpleasant
odours.
Hygiene
refrigerator through continuous purifying of circulating air of
bacteria. After half a year of using of filter one should be change
it for a new one.
1.
2.
Note:
This type of filter is available from our After-sales Service.
+ filter assures the higher level of hygiene in your
Remove the filter together with the container.
Replace and fit the filter container with a new one.
Some noises are normal when the appliance is operating.
22
Page 17

TROUBLESHOOTING GUIDE
Defect Probably cause Solution
Check electric set.
Check properly inserted plug in the socket.
In case of lack of power supply. You need call
for electrician.
Set the temperature in chosen position
according to product sheet.
Check if it is possibility to closure doors.
Check if gasket is clear and undamage.
Set thermostat knob in chosen position
according to product sheet.
Check if the appliance is installed near heat
source.
Clear drain. (it is placed over the compressor
or in the middle of drip channel of
refrigerator).
Disconnect the appliance from mains power
supply. Remove the bulb cover. Check the bulb
and if necessary replace it. Replace using
maximum 15W bulb.
In some models a special bulb is used. Bulb
change instruction is put in the chart.
Check level of appliance
(adjustment front stems)
Check if the appliance isn’t in contact with
other furniture or objects.
Normal effect correctly.
Normal effect – prevent the formation of
condensation water.
1.The appliance is not working
2.Temperature inside the
compartments too high.
3.Water collects at the bottom of
the refrigerator or freezer
compartment (depends on model).
4.The inside light is not working
5.The appliance is excessively
noisy.
6. Noise from expanding
7. The front edge of the appliance
maybe hot.
Lack of power supply.
Burn fuse (safety device). Replace fuse (safety device).
Thermostat knob set to “Off” or
“0”.
Doors aren’t closed properly or
gasket uncorrecty adhered.
Improper set thermostat knob.
Improper appliance installed.
Drain of defrost water is blocked.
Improper setting food. Food shouldn’t touch back wall of cabinet.
Lack of power supply. See point 1.
Bulb burnt out.
The appliance is wrong set.
Noises due to expansion in the
refrigerant circuit.
AFTER-SALES SERVICE
Before contacting After-Sales Service:
1.
See if you can solve the problem yourself with
the help of the “Troubleshooting guide”).
2.
Switch the appliance on again to see if the
problem has been solved. If it has not,
disconnect the appliance from the power
supply and wait for about an hour before
switching on again.
3.
If the problem persists after this course of
action, contact After-sales Service.
Specify:
•
the nature of the problem,
•
the model,
•
the Service number (the number after the word
SERVICE on the data plate on the inside of the
appliance),
•
your full address,
•
your telephone number and area code.
Note:
The direction of door opening can be changed.
If this operation is performed by After-sales
Service it is not covered by the warranty.
23
Page 18

ELECTRICAL CONNECTION
1) For Great Britain only
Warning - this appliance must be earthed
Fuse replacement
If the mains lead of this appliance is fitted with a BS 1363A 13amp
fused plug, to change a fuse in this type of plug use an A.S.T.A.
approved fuse to BS 1362 type and proceed as follows:
1.
Remove the fuse cover (A) and fuse (B).
2.
Fit replacement 13A fuse into fuse cover.
3.
Refit both into plug.
Important:
The fuse cover must be refitted when changing a fuse and if the
fuse cover is lost the plug must not be used until a correct
replacement is fitted.
Correct replacement are identified by the colour insert or the
colour embossed in words on the base of the plug.
Replacement fuse covers are available from your local electrical
store.
2) For the Republic of Ireland only
The information given in respect of Great Britain will frequently
apply, but a third type of plug and socket is also used, the
2-pin, side earth type.
3) Socket outlet / plug (valid for both countries)
If the fitted plug is not suitable for your socket outlet, please
contact Whirlpool Service for further instruction. Please do not
attempt to change plug yourself. This procedure needs to be
carried out by a qualified Whirlpool technician in compliance with
the manufactures instructions and current standard safety
regulations.
24
 Loading...