

Page 1

ADSL USB Modem
User Manual
Page 2

Content
The Front Panel LEDs .........................................................................................3
Before You Start...................................................................................................4
Diagram……….…………………………………………………………………5
Install the USB ADSL Modem under Windows XP..........................................6
Install the USB ADSL Modem under Windows 2000………………..………14
Access Internet via “ AccessRunner DSL “ to Dial up…………………..…..19
Uninstall the USB ADSL Modem………………………….………….………20
Product Specification ......………………………………….………….………21
2
Page 3
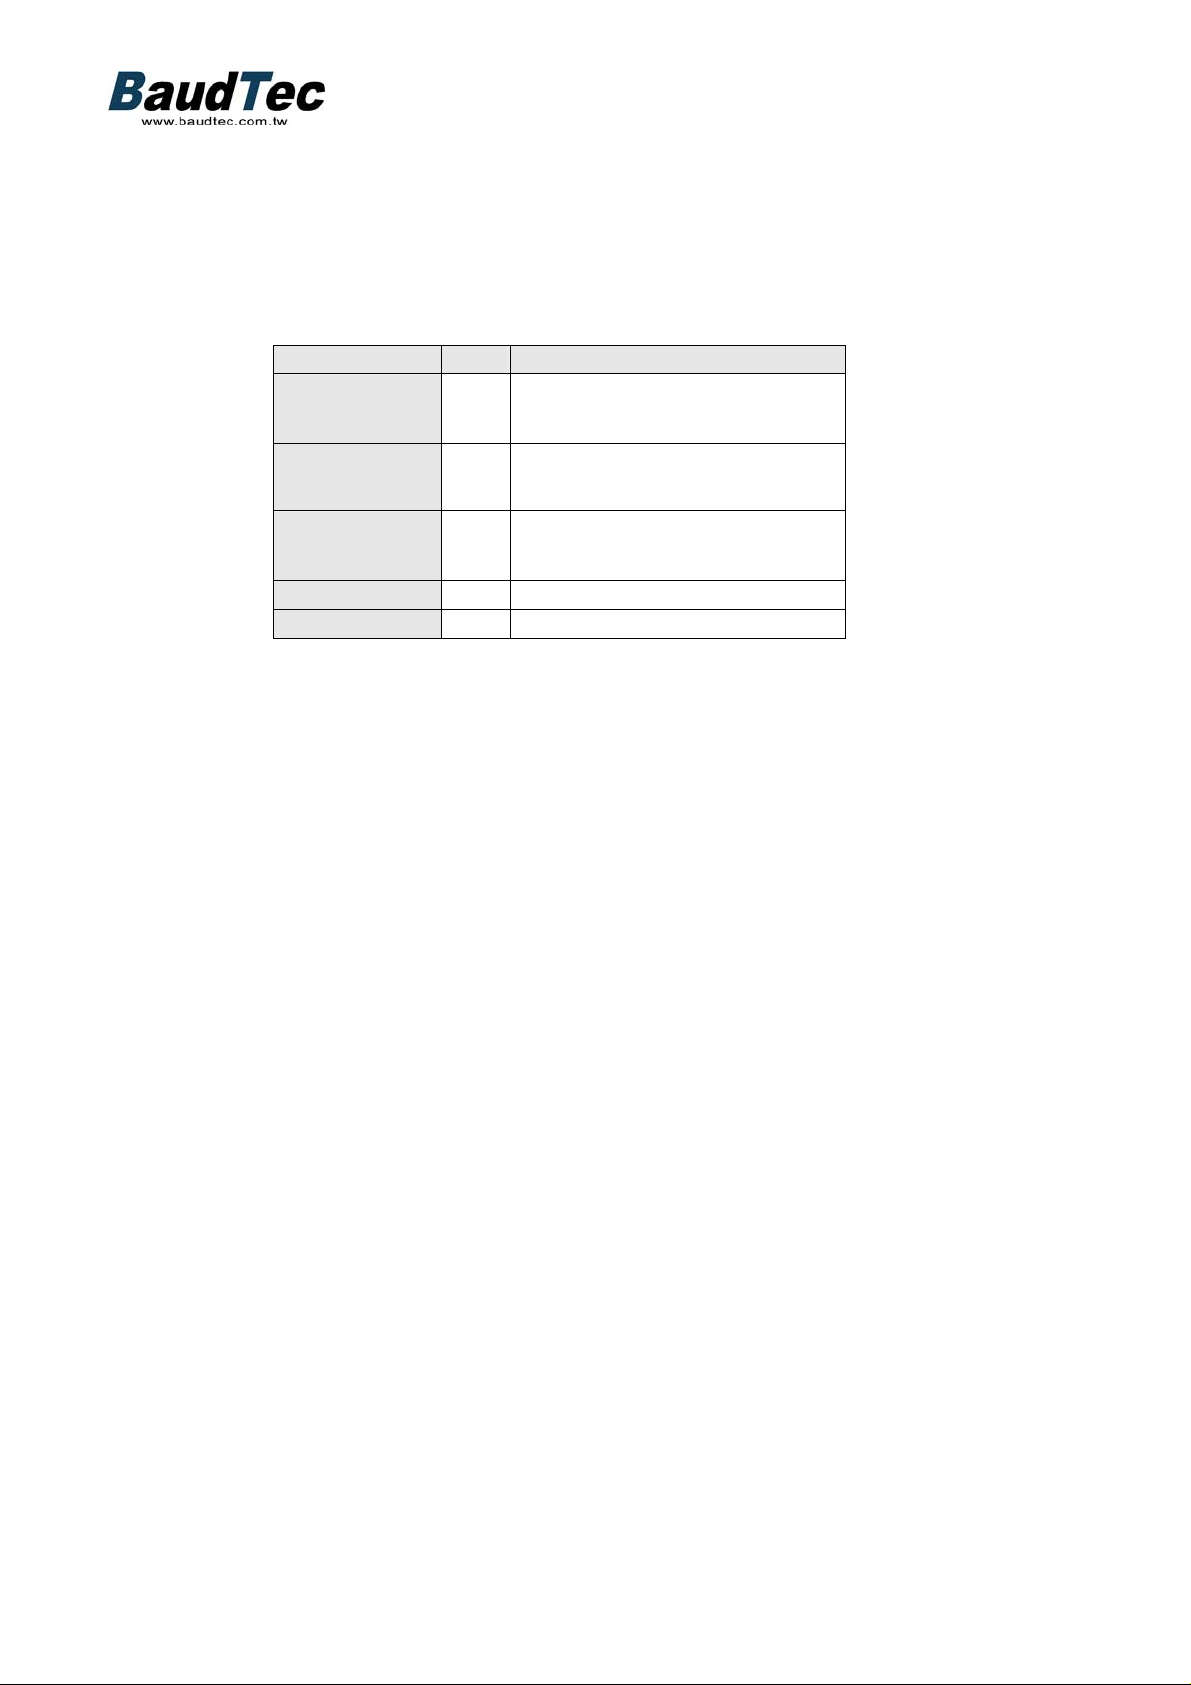
The Front Panel LEDs
LED Color Meaning
POWER
Green
When this LED is lit, it indicates that
the USB port is connected to the PC
and power on.
READY
SHOW TIME
TX
RX
Green
Yellow
Yellow Flashes when transferring data.
Yellow Flashes when receiving data.
When lit, it indicates that t he device is
working properly.
When lit, it indicates that the ADSL
(Line) port is connected to the
DSLAM and working properly.
3
Page 4

Before you Start…
Please make sure your PC meet the following requirements:
- Pentium 200 MHz processor or above
- Windows 98, Windows 98SE, Windows Me, Windows XP and Windows 2000.
- 64 MB of RAM or above
- 25 MB free diskspace
Verify that the following items are available before beginning the installation:
- ADSL USB Modem
- USB cable
- Annex A Splitter (ATF085A1R)
- Annex B Splitter (ATF057)
- CD-ROM (Software & Manual)
- 2 Telephone cables (RJ-11)
- Quick Installation Guide
4
Page 5
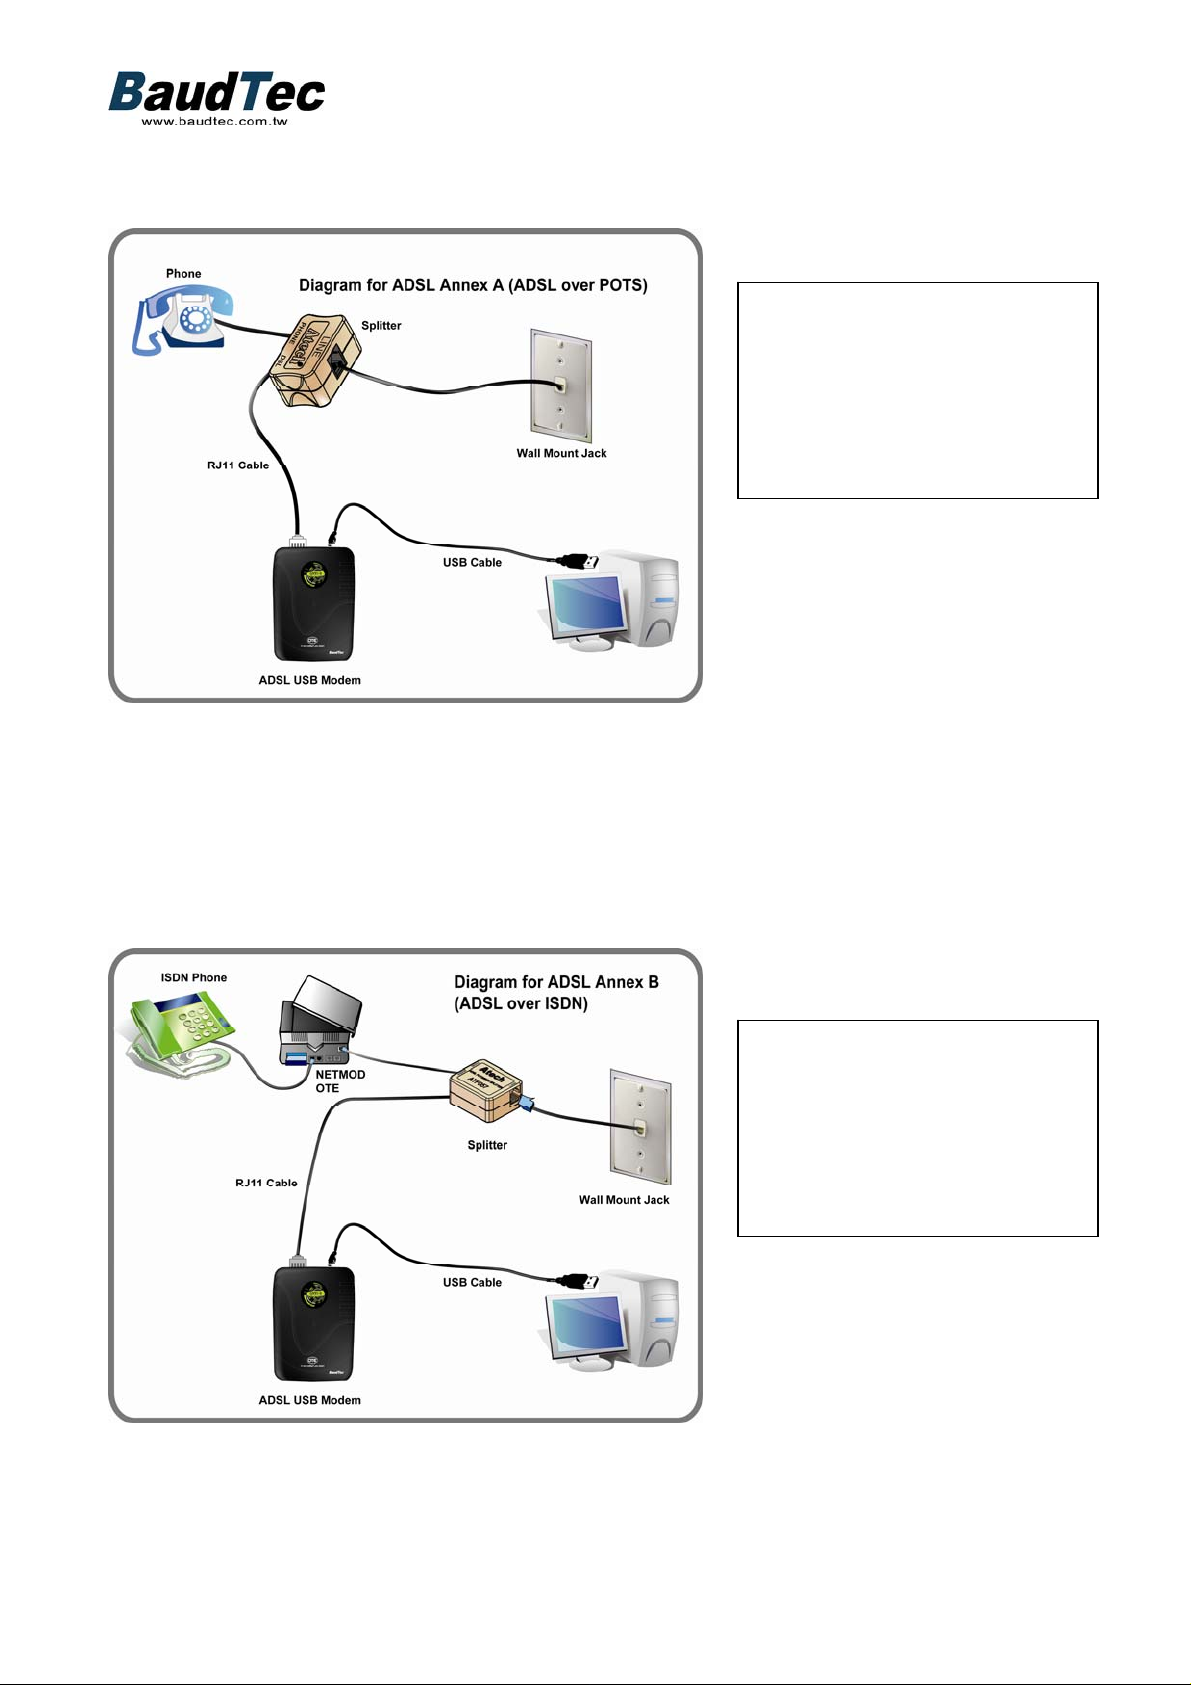
Diagram for ADSL Annex A (ADSL over POTS/ANALOG LINE)
IMPORTANT: USE THE SPLITTER “ATF085AIR”
IMPORTANT: DO NOT CONNECT THE USE MODEM TO THE COMPUTER
UNTIL PROMPTED TO DO SO DURING SOFTWARE INSTALLATION
IF YOU HAVE A PSTN
(NORMAL ANALOG)
TELEPHONE LINE
CONNECT THE MODEM AS
SHOWN IN THIS DIAGRAM
Diagram for ADSL Annex B (ADSL over ISDN LINE)
IF YOU HAVE AN ISDN
TELEPHONE LINE
CONNECT THE MODEM AS
SHOWN IN THIS DIAGRAM
IMPORTANT: USE THE SPLITTER “ATF057”
IMPORTANT: DO NOT CONNECT THE USE MODEM TO THE COMPUTER
UNTIL PROMPTED TO DO SO DURING SOFTWARE INSTALLATION
5
Page 6

Install the USB ADSL Modem under Windows XP
1. Please turn on your computer.
2. Do not connect your ADSL USB device to the PC prior to driver installation and follow
further instructions.
3. Please insert the ADSL USB Modem CD into your CD-ROM drive first.
4. The CD should auto-start, displaying the following window. If it does not start, click on
Start – Run and type in C:\autorun.exe (where C: is the drive letter of your CD-ROM drive.
5. Choose your country language
6
Page 7
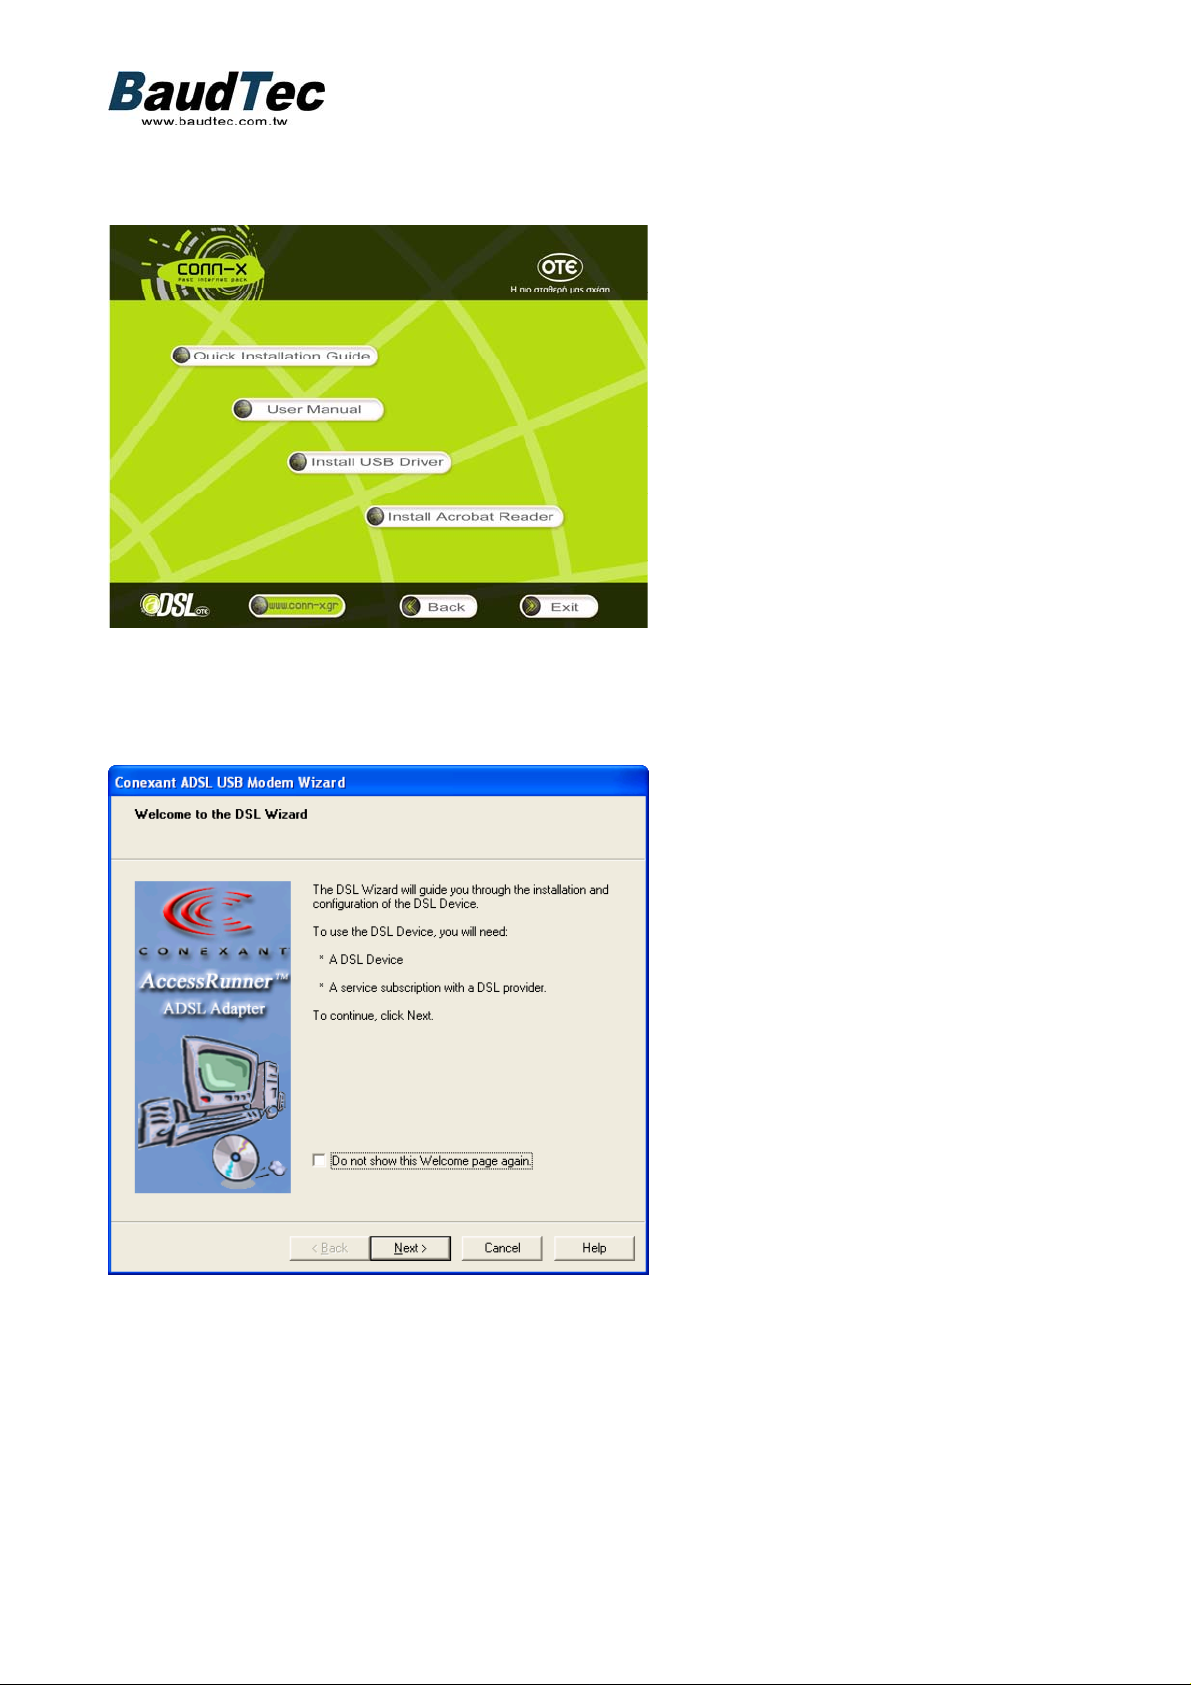
6. Pressing the” Install USB Driver “button will launch the installation of device
driver.
7. Click ” Next ” in the following window
7
Page 8

8. Please click “ Next ” button
9. Select your setting in this window and click “ Next ”. If you want to configure the
setting manually, please click “ Advanced ”.
IMPORTANT:
IF YOU HAVE A PSTN (NORMAL ANALOG TELEPHONE LINE) CHOOSE “OTE
Annex A, PPPoE”
IF YOU HAVE AN ISDN TELEPHONE LINE CHOOSE “OTE Annex B, PPPoE”
8
Page 9

10. You can see the parameters that you selected in this window, click “ Next “ to
continue.
IMPORTANT:
IF YOU HAVE A PSTN (NORMAL ANALOG TELEPHONE LINE) YOUR SETTINGS
DISPLAYED SHOULD BE “OTE Annex A, PPPoE”, VPI 8, VCI 35.
IF YOU HAVE AN ISDN TELEPHONE YOUR SETTINGS DISPLAYED SHOULD BE
“OTE Annex B, PPPoE”, VPI 8, VCI 35.
1 1. The warning will be displayed several times in Windows 2000 or Windows XP . Go
ahead and click “ Continue anyway ”.
9
Page 10

12. Please follow the instruction from pop-up window and plug in your ADSL USB
Device.
13. Choose “No, not this time” and click “Next”
10
Page 11

14. The computer will find new device, please click “Next “.
15. Please click “ Finish “ to continue.
11
Page 12

16. Choose “No, not this time” and click “Next”
17. Please click “ Next “ to continue.
12
Page 13

18. Please click “ Finish “ to continue.
19. Please click “ Finish “ to complete the installation.
13
Page 14

Install the USB ADSL Modem under Windows 2000
Note: Do not connect your ADSL USB device to the PC prior to driver installation and
follow further instructions.
1. Please insert the ADSL USB Modem CD into your CD-ROM drive first.
2. The CD should auto-start, displaying the following window. If it does not start, click
on Start – Run and type in C:\autorun.exe (where C: is the drive letter of your
CD-ROM drive.
3. Choose your language
14
Page 15

4. Start Installation as per step 5 below.
5. Pressing the ”Install USB driver“ button will launch the installation of device driver.
6. Click ” Next ” in the following window
15
Page 16

7. Please click “ Next ” button
8. Select your setting in this window and click “ Next ”. If you want to configure the
setting manually, please click “ Advanced ”.
IMPORTANT:
IF YOU HAVE A PSTN (NORMAL ANALOG TELEPHONE LINE) CHOOSE “OTE
Annex A, PPPoE”
IF YOU HAVE AN ISDN TELEPHONE LINE CHOOSE “OTE Annex B, PPPoE”
16
Page 17

9. You can see the parameters that you selected in this window, click “ Next “ to
continue.
IMPORTANT:
IF YOU HAVE A PSTN (NORMAL ANALOG TELEPHONE LINE) YOUR SETTINGS
DISPLAYED SHOULD BE “OTE Annex A, PPPoE”, VPI 8, VCI 35.
IF YOU HAVE AN ISDN TELEPHONE YOUR SETTINGS DISPLAYED SHOULD BE
“OTE Annex B, PPPoE”, VPI 8, VCI 35.
10. Please follow the instruction from pop-up window and plug in your ADSL USB
Device.
17
Page 18

11. Please click “ Finish “ to complete the installation.
18
Page 19

Access Internet via “AccessRunner DSL “ to Dial up
1. Double click the "AccessRunner DSL" icon on desktop
2. Please fill in the User name and Password that assigned by your Internet service
provider, check "Save password " and then click on " Dial " to connect to Internet.
(SEE BELOW *ATTENTION!! FOR DETAILS ON PASSWORD AND USERNAME!)
* ATTENTION!! FOR CUSTOMERS OF OTENET:
The first time that you will double click on the icon “AccessRunner DSL” and you have
NOT activated your account with OTEnet, then use the username otenet@otenet.gr
and password “otenet”. When the connection has been completed open the Internet
Explorer and in the address bar enter http://my.otenet.gr
When you are in the otenet site press “Activation” enter the Customer ID and the
password ID which was given to you and follow the procedure, choosing your desired
username and password. The Customer ID and Password ID must have been given
to you when you purchased your adsl product. When you have completed this
procedure the NEXT time that you will double click on the icon “AccessRunner DSL”
you will enter your personal username in the form of user@otenet.gr which you chose
as stated above and your password.
19
Page 20

Uninstall the USB ADSL Modem
1. Double click "ADSL Uninstall" icon on the desktop.
2. Please click on " Yes " to continue.
3. When the pop-up window is disappeared, the DSL Device and DSL Wizard have
been successfully uninstalled
20
Page 21

USB ADSL Modem C802USB
FULL RATE BROADBAND USB MODEM
Product Features
The model adopt with Conexant CX82320 solution
Plug-and-play installation provides seamless integration for Windows
98/2000/ME/XP,
WAN mode support
Æ PPP over ATM (RFC2364)
Æ PPP over Ethernet (RFC 2516)
LAN mode support
Æ Bridged/routed Ethernet over ATM (RFC 2684/1483)
Æ Classical IP over ATM (RFC2225/1577)
Discrete Multi-Tone ADSL ensures interoperability with service providers
Full rate ADSL allows speed up to 8Mbps downstream and 1Mbps
upstream
Simple and intuitive graphical user interface and Software upgrades
Support 12Mbps USB host V1.1 Interface
Benefits
Excellent solution for Desktop and notebook users
Ultra-quick plug and play installation
Worldwide ADSL access network and ISP interoperability
Rapid broad-scale deployment via configuration profiling
Easy field upgrade with feature enhancements
Connection picture
21
Page 22

Hardware Features:
Standard compliance
G.DMT
ANSI T1.413 issue 2 and ITU-T G.992.1
Downstream : Up to 8 Mbps in step of 32 Kbps
Upstream : Up to 1 Mbps in step of 32 Kbps
G.LITE
ITU-T G.992.2
Downstream : Up to 1.5 Mbps in step of 32 Kbps
Upstream : Up to 512 Kbps in step of 32 Kbps
ADSL DMT Engine
Echo cancellation
ADSL Framing
Forward Error Correction (FEC) encoding and decoding and interleaving
ATM mode
Constellation encoding/decoding
Device Specifications
Dimensions: approximately 98 x 66 x 27 (mm)
Bus Interface
Compliant with USB (Universal Serial Bus) Specification 1.1
Power Requirements
USB Bus Power
Physical Layer
Discrete Multi-Tone Asymmetric Digital Subscriber Line, compliant with ANSI
T1.413 Issue 2, ITU-T G.992.1 (G.DMT), ITU-T G.992.2 (G.LITE)
Loop Length
Reach to 18,000 feet
Protocol Support
RFC 1483 (Ethernet over ATM)
RFC 2364 (PPP over ATM)
RFC 2516 (PPP over Ethernet)
Cabling
ADSL interface: standard telephone wiring
USB interface: standard USB interface cable (included)
Environment
Operating temperature: 0ºC to 40ºC
Operating humidity: 10% to 90% non-condensing
Visual Indicators
LED indicators
.Power status
.Ready (Turns on when Driver has been installed properly)
.Link (Turns on, when physical layer being connected)
.TX (Flash during Data transmission)
.RX (Flash during date receiving)
22
 Loading...