

Page 1
EMPIREPAINTBALL.COM
3
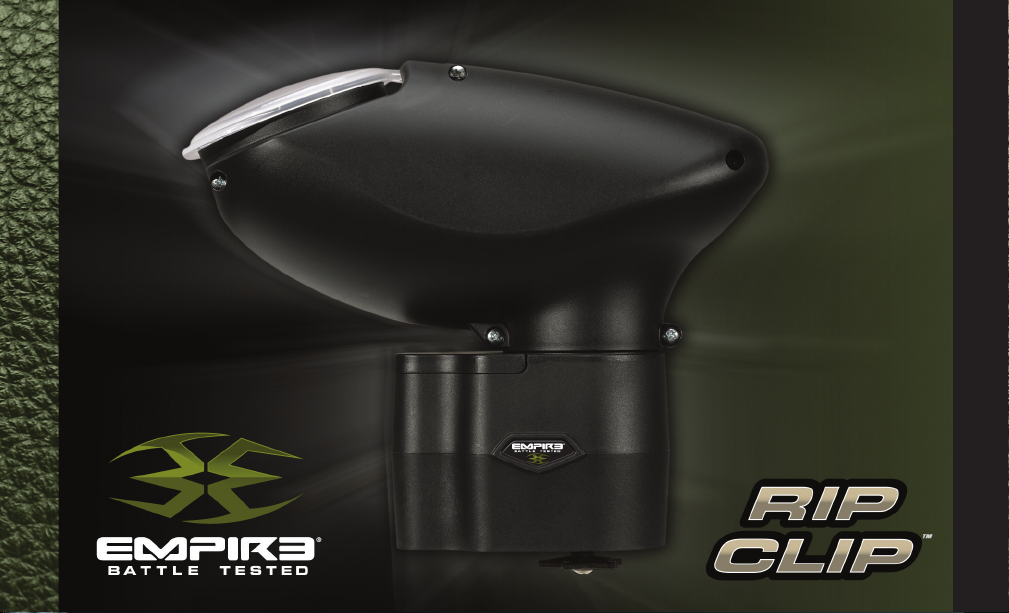
OWNER’S MANUAL
Page 2
EMPIREPAINTBALL.COM
Page 3
CONTENTS
1. Rules for Safe Marker Handling ................................................................ 2
2. Introduction and Specifications ................................................................ 2
3. Getting Started ........................................................................................... 3
• Rip-Clip Setup
• Battery Installation
• Rip-Clip Installation
• Hopper Installation
• Loader Installation
• Activating the Rip-Clip
• Rip Drive
4. General Maintenance ................................................................................ 5
• Emptying the Loader for Storage
• Cleaning the Loader
• Preloading the Drive Carrier Spring
5. Board Functions .......................................................................................... 6
• Programming
• Entering Programming Mode
• Current Settings
• Adjusting Settings
6. RF (Radio Frequency) .................................................................................. 7
• RF Installation
• Using the Rip-Clip in RF Mode
• Synchronizing Loader to Your Marker
7. Parts List and Diagram ............................................................................... 9
8. Warranty ................................................................................................... 10
For manuals, warranty details, or manuals in other languages,
(where applicable), go to: paintballsolutions.com
©2011 Empire Battle Tested Paintball. The Empire Battle
Tested Logo is a trademark of Empire Paintball. All rights
reserved. Empire is a brand of KEE Action Sports, LLC.
Covered by one or more of the following U.S. patent numbers:
5,954,042; 6,109,252; 6,701,907; 6,792,933; 7,343,909;
GB2322438.
EMPIREPAINTBALL.COM
1
Page 4
1. Rules for Safe Marker Handling
• Treat every marker as if it were loaded.
• Never look down the barrel of a paintball marker.
• Keep your finger off the trigger until ready to shoot.
• Never point the marker at anything you don’t wish to shoot.
• Keep the marker on “SAFE” until ready to shoot.
• Keep the barrel-blocking device in/on the marker’s muzzle when not shooting.
• Always remove paintballs and propellant source before disassembly.
• After removing propellant source, point marker in safe direction and discharge
until marker is degassed.
• Store the marker unloaded and degassed in a secure place.
• Follow warnings listed on propellant source for handling and storage.
• Do not shoot at fragile objects such as windows.
• Every person within range must wear eye, face, and ear protection designed
specifically to stop paintballs and meeting ASTM standard F1776.
• Always measure your marker’s velocity before playing paintball and never
shoot at velocities in excess of 91.44 meters (300 feet-per-second).
NOTE: Eye protective devices designed specifically for paintball use must
be worn by the operator and anyone within range.
©Empire Paintball, Inc. No part of this document may be copied or
reproduced without the prior written consent of Empire Paintball, Inc.
READ OWNER’S MANUAL BEFORE USING.
2. Introduction and Specifications
Empire Battle Tested Paintball would like to thank you for your purchase
of the Empire BT Rip-Clip™. At Empire Paintball, our mission is to build
products that exceed our customers’ highest demands. We aim to shake
the foundations of the status quo and set unprecedented standards in
value, design, service, and quality.
Specifications
• Power Requirements: 4AA batteries (not included)
• Capacity: 200+ paintballs
• Feed Rate: 15bps+
• Construction: Composite
Features
• Upgradable to RF (Radio Frequency)
• Adjustable Speed
• Automatic Ball Stack Monitoring
• Auto-Off 1 Hour
• Adjustable Sound Sensitivity
• Low Battery Indicator
• Ultra-Quiet Belt Drive
2
EMPIREPAINTBALL.COM
Page 5
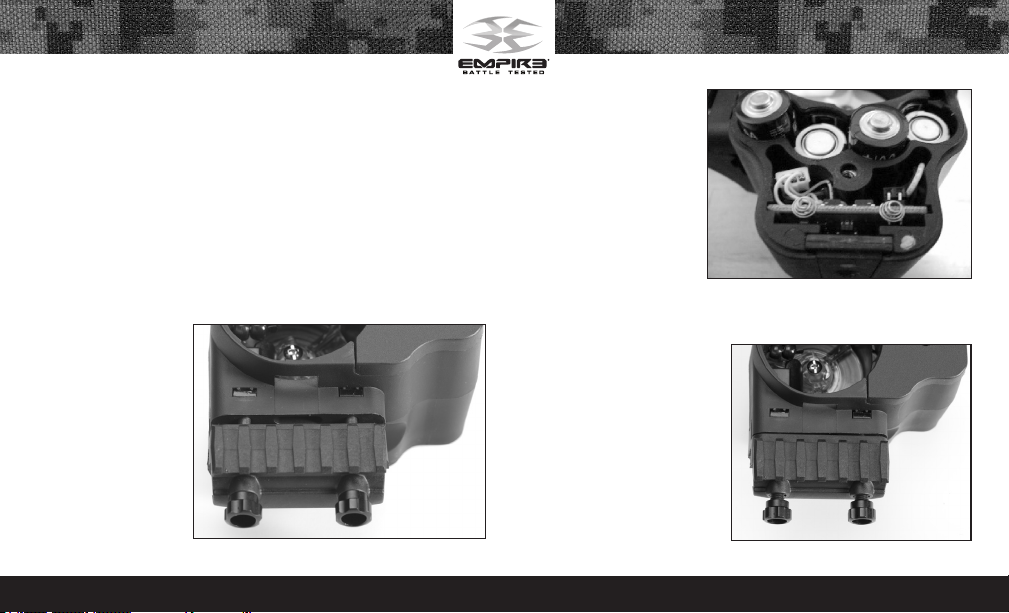
3. Getting Started
Rip-Clip Setup
The Rip-Clip™ comes with 2 different adapter plates and 2 different length
rail locking screw sets for use on all TM, BT-4, and Omega Series markers.
• For BT-4 and Omega Series markers, use the shorter screws to attach the RipClip™ to the paintball marker.
• For the TM-7 and TM-15 Series markers, use the longer screws to attach the
Rip-Clip to the paintball marker.
• Select the adapter plate for your marker, they are labeled either TM-15 or TM-7.
Do not use any of the adapter plates for the BT-4 or Omega Series markers.
• Put both screws
with thumb nuts
attached into the
Picatinny rail locking
arm.
• Place the correct
adapter onto the RipClip body if needed.
• Install the rail locking
arm with screws and
thumb nuts onto
the Rip-Clip body
using a flathead
Fig. 3.1
screwdriver (Fig.3.1).
• Make sure the screws
are fully seated into
the body.
Battery Installation
• Using a Phillipshead screwdriver,
remove the screw on
top of battery door
and lift off door.
• Install (4) AA alkaline
batteries following the polarity markings (Fig. 3.2).
• Reinstall the door and
battery door screw.
Note: For best results, only
use quality name-brand
alkaline batteries. When
replacing batteries, used
batteries should be recycled.
Rip-Clip Installation
• Loosen up the thumb nuts
(Fig. 3.3).
Fig. 3.2
Fig. 3.3
EMPIREPAINTBALL.COM
3
Page 6
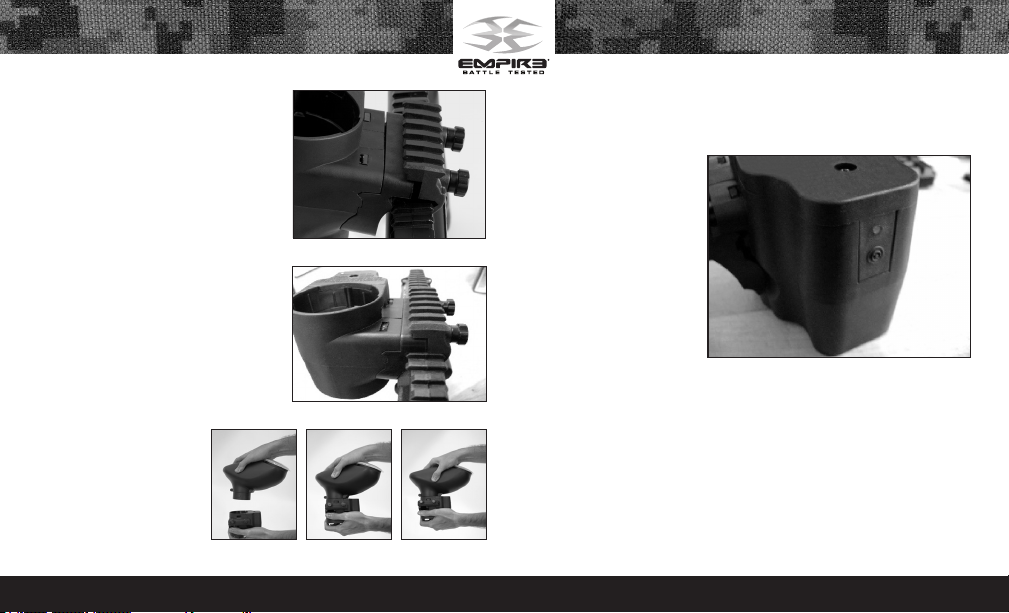
• Install the Rip-Clip onto the
marker’s Picatinny rail (Fig. 3.4).
• Check the position on the Picatinny
rail and make sure the Rip-Clip is
aligned with the feed hole on the
side of the marker (Fig. 3.5).
• Tighten up the thumb nuts and
you’re ready to go.
Hopper Installation
• You will notice that the loader has
an alignment tab on the left side.
• Locate the slot for the tab within
the Rip-Clip.
• Insert the loader into the slot and
turn the loader Counter-clockwise
until it is locked firmly
into the Rip-Clip. (Fig.
3.6)
Fig. 3.4
Fig. 3.5
Fig. 3.6
Activating the Rip-Clip
• Locate the power button on the rear of the Rip-Clip. Tap the power
button once to turn the
Rip-Clip on (Fig. 3.7).
The motor will spin for a
second and the loader
is now ready to use.
• The green LED will
flash repeatedly while
the unit is on to show
it is ready. If the LED
flashing changes to
red, then the batteries
are low and need to be
replaced.
Fig. 3.7
• To turn off the Rip-Clip,
press and hold the power button until the LED changes to Red. Release
the button and the loader will turn off. If the loader is left on, it will shut
off after 1 hour of inactivity.
Rip Drive
The Rip Drive is the thumbwheel located under the Rip-Clip and has
several uses.
4
EMPIREPAINTBALL.COM
Page 7
• Manually load up to 6 paintballs into your paintball gun for every
revolution of the thumbwheel. This can be done to chronograph your
marker without the need to turn on the hopper, or to feed paintballs if
your batteries should happen to die during a game.
• Clear a ball jam in your loader during a game by rotating the Rip Drive
backwards and clearing the jam, then forwards again to load the ball
stack.
• Use smaller thumb wheel to replace the factory installed Rip Drive
wheel if necessary.
4. General Maintenance
Emptying the Loader for Storage
With the Rip-Clip turned off, turn it upside down to dump the paintballs
out. While upside down, rotate the Rip Drive backwards from the feeding
direction to release paintballs. Do not store your Rip-Clip loader with any
paintballs left inside.
NOTE: When storing the Rip-Clip for an extended period of time,
remove the batteries and store it in a dry place.
Cleaning The Loader
To clean the loader, use only a clean, dry cloth, or apply a small amount
of goggle lens cleaner to a clean, dry cloth and wipe clean. Do not apply
goggle lens cleaner directly to loader surfaces, as too much contact will
deteriorate plastic and cause damage.
If any paintballs break inside the hopper; do not use any liquids or
chemicals to rinse out the hopper; doing so will cause severe damage to
the loader electronics.
Preloading the Drive Carrier Spring
If you remove the drive carrier for cleaning it will be necessary to preload
the drive carrier spring. Follow the instructions below.
• Install the spring cup, drive spring, and drive carrier onto the drive
shaft. Make sure the spring sits in the spring cup correctly.
• Rotate the drive carrier clockwise until its tab hits the spring housing
tab. You should now have both spring tabs pressed together.
• Lift the drive cone slightly and rotate it clockwise up and over the spring
cup’s tab, taking the upper spring tab with it.
• Snap the drive carrier down with the drive spring tab on the right side
of the drive cup’s tab.
• The drive cone spring is now pre-loaded and will snap back properly
when wound up.
EMPIREPAINTBALL.COM
5
Page 8
5. Board Functions
Programming
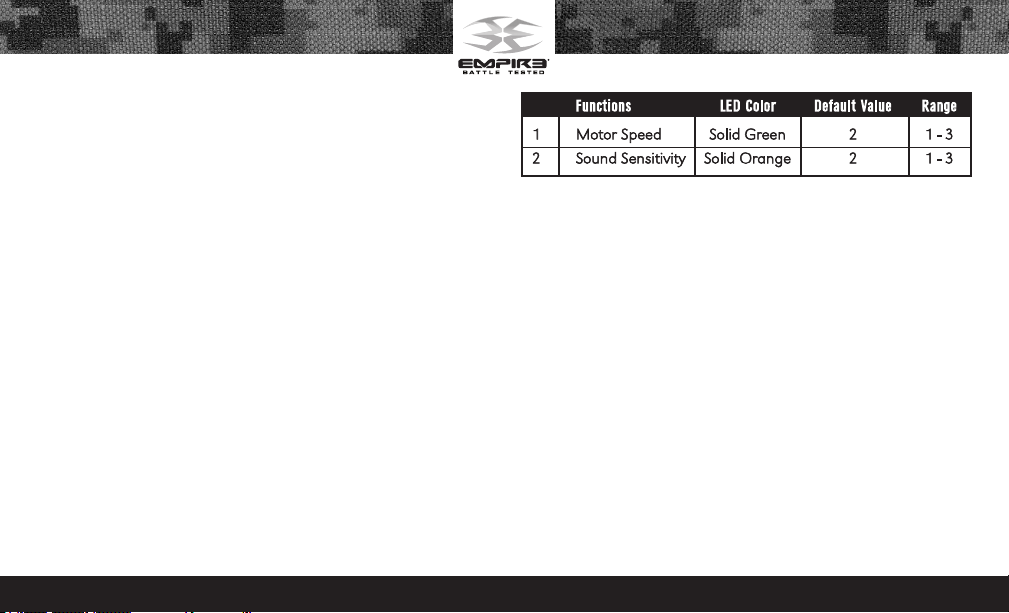
There are two functions which can be adjusted in programming mode.
The default settings should be good for your marker.
• Motor Speed– 3 levels of adjustment, level (1) being the slowest motor
speed and level (3) being the fastest.
Note: It is recommended that you do not set the speed higher than
needed. Using higher speeds than needed will only shorten the life of
your batteries.
Entering Programming Mode
• Make sure the loader is turned off.
• Press the power button, and then quickly release the power button.
• A solid green LED will appear, while the LED is a solid green, press the
power button one time.
• Sound Sensitivity– 3 levels of adjustment, level (1) being the least
sensitive and level (3) being the most sensitive. This setting is only used in
sound activation mode.
Note: It is better to have the microphone setting less sensitive and still
able to detect the marker firing. Do not set it to 3 if setting 1 detects
the marker firing. Only use a higher setting if the lower setting does not
detect the marker firing.
6
EMPIREPAINTBALL.COM
Current Settings
Once in programming mode the loader will display the current settings.
• The green LED will flash the motor’s current speed setting (1 slowest; 3
fastest).
• The orange LED will flash the current sensitivity setting (1 less sensitive;
3 most sensitive).
Adjusting Settings
After the Rip-Clip displays the current settings, you can enter the new
setting that you desire.
Page 9
• The green LED will come on for 1 second. If changing the speed setting,
press the power button while the LED is a solid green. When the LED
turns to red the new setting can be entered. Now press the power
button the number of times necessar y based on the new setting. Each
time the button is pushed an orange LED will appear. After the new
setting is entered the green LED will flash the new setting.
• The orange LED will come on for 1 second. If changing the sensitivity
level setting, press the power button while the LED is a solid orange.
When the LED turns to red the new setting can be entered. Now press
the power button the number of times necessary based on the new
setting. Each time the button is pushed an orange LED will appear.
After the new setting is entered the orange LED will flash the new
setting.
• The Rip-Clip will automatically exit programming mode.
6. RF (Radio Frequency)
RF Installation
The Rip-Clip comes ready to accept an Empire RF (Radio Frequency)
Transmitter (not included). Once a transmitter is installed the Rip-Clip will
be ready to receive an RF signal from your marker.
• Remove the battery
cover and set aside.
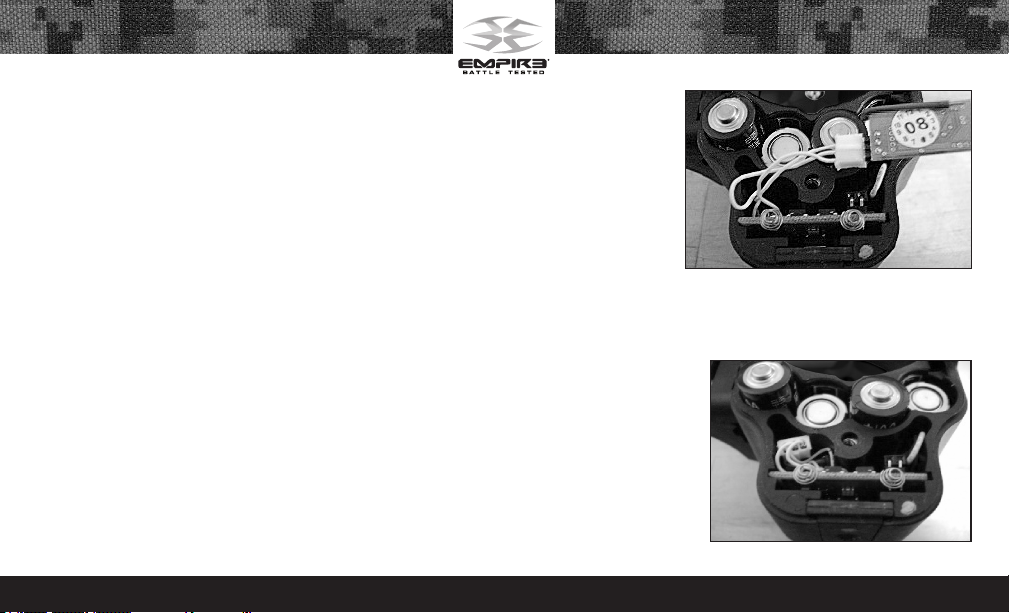
• Carefully plug the
RF transmitter
into the Rip-Clip’s
harness (Fig. 6.1 ).
• Install the RF
Transmitter into the
Rip-Clip’s body as
pictured (Fig. 6.2).
• Make sure the
harness wires are
not in the way of the battery door before re-installing it.
Using the Rip-Clip in RF
Mode
To use the Loader in
RF mode, an Empire RF
Transmitter or compatible
RF transmitter must be
installed in you marker.
Fig. 6.1
Fig. 6.2
EMPIREPAINTBALL.COM
7
Page 10
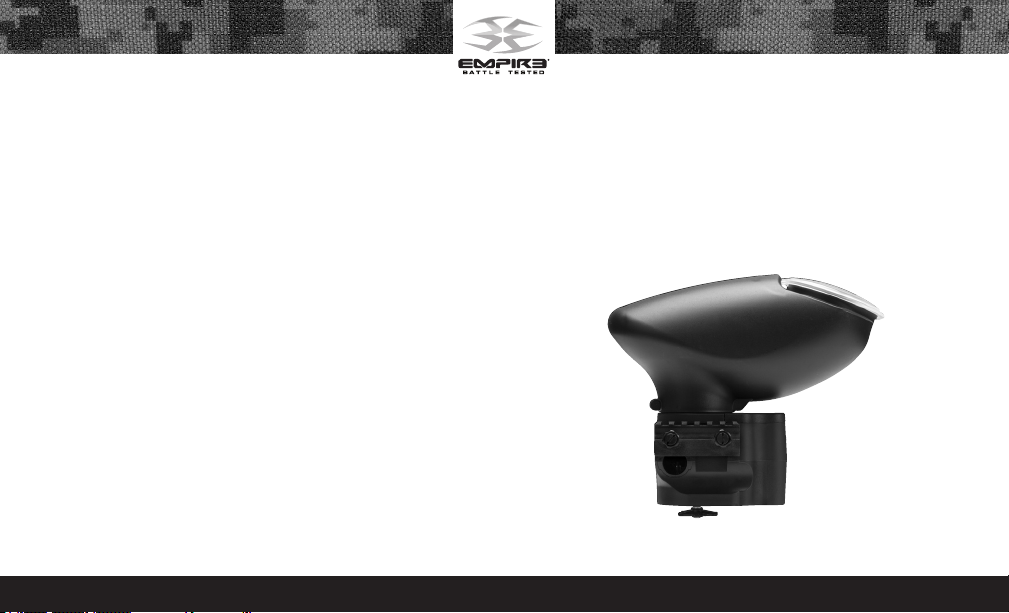
The Rip-Clip will automatically switch to RF Mode when a signal is
received from your marker. If no signal is received the loader will activate
with sound. It is recommended that you test that the Rip Clip is receiving
the RF signal, by turning the eyes of on a de-gassed marker and check
that the Rip-Clip spins for each marker solenoid activation.
In RF mode, you can switch back to Sound Mode by pushing the power
button one time and the LED will change from a double flashing green
LED to a single flashing green LED. If the power button is pushed 3 times
in a row within 10 seconds after the loader is turned on it will lock into
sound mode until the loader is turned off.
Synchronizing Loader to your Marker
It is recommended that you synchronize your loader to your marker for
optimal performance when using RF Mode. Also, synchronizing your
loader will prevent other RF signals from interfering with your signal. It
is possible to synchronize two markers with the Empire RF Transmitter to
your Empire BT Rip Clip Loader.
1) Make sure your marker is degassed and unloaded.
2) Turn your marker on with the eyes turned off. Read your markers
manual for eye operation if you are having problems turning them off.
3) Turn on the Empire BT Rip Clip Loader
4) Press power button and hold in until the solid red LED turns to orange.
5) Release power button and while the orange LED is lit, pull the trigger
on your marker. This must be done within 2 seconds of the LED
changing to orange.
6) If done correctly the LED will change from orange to green if a signal
is received from your marker. You are now ready to use your Empire BT
Rip Clip Loader in RF Mode.
8
EMPIREPAINTBALL.COM
Page 11
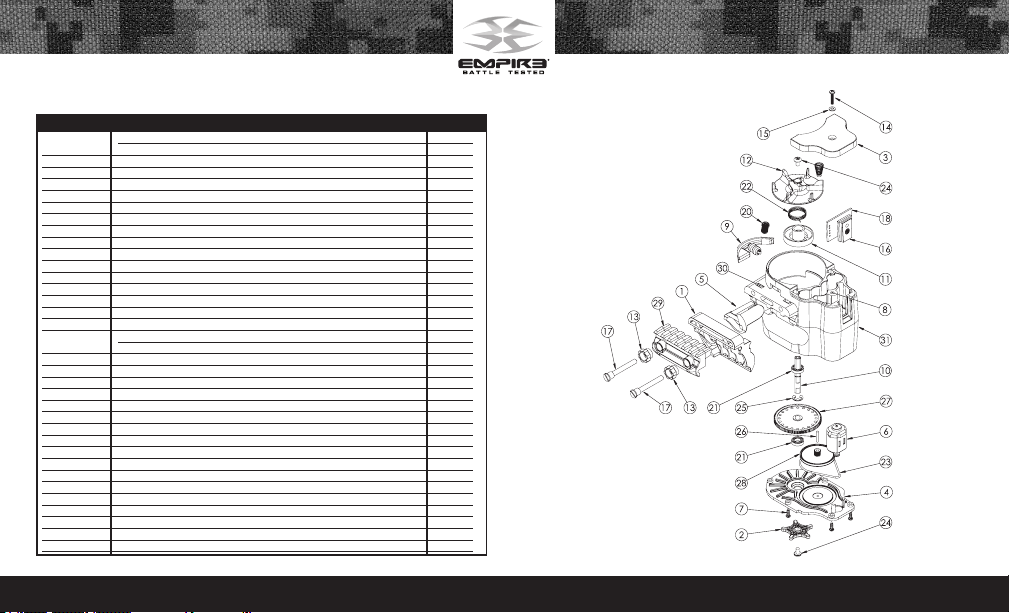
7. Parts List and Diagram
REF Nº DESCRIPTION PART #
1 TM-15 Adapter Plate 17852
TM-7 Adapter plate 38449
2 Rip Drive 2 Wheel 31023
3 Battery Cover Assembly 38413
4 Bottom Cover 38416
5 Ball Sleeve 38421
6 Motor w/ Harness 38423
7 Bottom Cover Screw 38425
8 Battery Cover Nut 38426
9 Anti Jam Assembly 38427
10 Drive Shaft 38428
11 Spring Housing 38429
12 Drive Carrier 38430
13 Rail Locking Thumb Nut 38433
14 Battery Cover Screw 38435
15 Battery Cover Washer 38436
16 On/Off Button Pad 38442
17 Rail Locking Screw Long TM Mar ker 38445
Rail Locking Screw Short BT-4 & Omega Markers 38432
18 TM Circuit Board 38448
20 Anti Jam Spring 38800
21 Bearing 38803
22 Drive Cone Spring 38814
23 Drive Belt 38820
24 Drive Shaft Screw 38822
25 E-Clip 38823
26 Pulley Gear Pin 38828
27 Sprocket Gear 38830
28 Pulley Gear 38837
29 Picitinny Locking Rail 38395
30 Locking Rail Nut 38396
31 Rip-Clip RF Body 38397
not shown Battery Polarity Sticker 38438
not shown Battery Spring Tab Screw 38440
not shown Battery Spring Tab 38441
optional Empire RF Transmitter Link Kit 38926
EMPIREPAINTBALL.COM
9
Page 12
8. Rip-Clip Limited Lifetime Warranty
LIMITED LIFETIME WARRANTY INFORMATION
(ORIGINAL PURCHASE RECEIPT REQUIRED)
Empire BT Paintball warrants that this product is free
from defects in materials and workmanship for as
long as it is owned by the original purchaser, subject to the terms and
conditions set forth below. Empire BT Paintball will repair or replace with
the same or equivalent model, without charge, any of its products that
have failed in normal use because of a defect in material or workmanship.
Empire BTPaintball is dedicated to providing you with products of the
highest quality and the industry’s best product support available for
satisfactory play.
Purchaser should register product to activate warranty. Register your
product by:
1. Online at www.paintballsolutions.com
2. Complete the product registration card (if applicable) and mail
along with a copy of your receipt to Paintball Solutions, 11723 Lime
Kiln Rd., Neosho, MO 64850.
WHAT THIS WARRANTY DOES NOT COVER
This warranty does not cover problems resulting from abuse, the
unauthorized modification or alteration of our product, problems
resulting from the addition of aftermarket products and scratches or
minor superficial imperfections. Due to the nature of paintball products
it is important that the product be maintained by the user as indicated
in the product manual to remain in good operating condition. Your
Limited Lifetime Warranty will be void if you fail to maintain the product
as recommended in the product instruction manual. In addition, certain
parts of a product may be subject to wear through regular usage.
Replacement and repair of such parts is the responsibility of the user
throughout the life of the product. These parts are not covered under
the Limited Warranty. Examples of this type of part include (but are
not limited to) goggle lens, straps, O-ring seals, cup seals, springs, ball
detents, batteries, hoses, drive belts, gears and any part of a product
subject to continuous impact from paintballs. Hydrotesting of air
cylinders is not covered under this warranty.
The Limited Lifetime Warranty also does not cover incidental or
consequential damages. This warranty is the sole written warranty on
Empire’s product and limits any implied warranty to the period that the
product is owned by the original purchaser.
Some states, provinces and nations do not allow the limitation of implied
warranties or of incidental or consequential damages, so the above
limitations or exclusions may not apply to you. This warranty gives you
specific legal rights and you may also have other rights which vary from
10
EMPIREPAINTBALL.COM
Page 13
state to state, province to province, nation to nation.
If you should encounter any problems with your product and you have
added aftermarket parts on your product, please test it with the original
stock par ts before sending it in. Always unload and remove air supply
before shipping markers. Do not ship your air supply tank if it is not
completely empty. Shipping a pressurized air supply tank is unsafe and
unlawful. Remove all batteries from products prior to shipping.
This Limited Warranty gives you specific legal rights, and you may also
have other rights which vary from state to state. Some states do not allow
the exclusion of incidental or consequential damages.
For warranty parts, service or information in the U.S., contact:
Paintball Solutions • www.paintballsolutions.com
E-mail: [email protected] • Phone: 1-800-220-3222
In Canada, contact:
Paintball Solutions
98 Bessemer Ct.
Unit 4
London, ON N6E 1K7
1-866-685-0030
Empire Battle Tested Rip-Clip Instruction Manual Version 1.6/2011
WARRANTY REGISTRATION
To assist us in providing the best customer service possible, complete
and mail this to:
11723 Lime Kiln Rd., Neosho, MO 64850
Name: ____________________________________________________
Address: __________________________________________________
City: ____________________________State: _______ Zip:__________
Country: __________________________________________________
E-mail Address: ______________________________________________
Serial Number (located on bottom of Rip-Clip):________________________
Date of Purchase: ____________________________________________
Place of Purchase: ____________________________________________
Or register online at www.PaintballSolutions.com
EMPIREPAINTBALL.COM
11
Page 14
EMPIREPAINTBALL.COM
Page 15

EMPIRE PAINTBALL
11723 Lime Kiln Rd., Neosho, MO 64850
www.empirepaintball.com
Empire is a brand of KEE Action Sports, LLC.
2
EMPIREPAINTBALL.COM
 Loading...