

Page 1
ENGLISH
Thank you for purchasing this product.
Please read these instructions carefully before installing this product.
Assembly Instructions, Mounting Instructions and User Instructions
Document Version HTR-VSA02-3.2
FOR USE WITH THE FOLLOWING PRODUCTS: (LOFT TWIN 6 Bar)
*Mounting parts supplied suitable for installation to masonry wall.
PRODUCT GUARANTEE
Please see separate product guarantee card supplied with your HTR for guarantee terms and conditions or visit www.bathroombutler.com.
WARNING
1. DO NOT install the heated towel rail (HTR) in the immediate vicinity of a water outlet, such as a tap or shower.
2. DO NOT attempt to disassemble the HTR, as the warranty will be void if disassembled.
3. DO NOT damage or tamper with the power cable. If the power cable is damaged please return to place of purchase.
4. DO NOT use the HTR as a ladder, hang or climb on it, to be used for intended purpose only.
5. The electrical connection must be connected by a registered electrician/wireman in accordance to the relevant wiring codes.
6. This is a heating device and should be treated as such, and thus precautions should always be followed to reduce the risk of fire, electrical
shock and injury to persons, including but not limited to the following:
6.1. Use the HTR as described in this manual only, any other use not recommended by the manufacturer may cause fire, electric shock or
personal injury.
6.2. Use the HTR for drying towels and adding some warmth to towels.
6.3. Due to high temperature and the risk of fire, keep electrical cords, drapery, furnishing and other combustibles at least 900mm / 3 ft /
36 inches clear from the front of the HTR.
7. The PTSelect Switch and TDC Timer are NOT electrical isolators.
8. To provide continued protection against risk of electric shock, this product must be EARTHED and connected to an EARTH LEAKAGE
protected circuit.
9. Before attempting any maintenance of the HTR ensure that the power is disconnected (switched off) at the point of isolation.
10. Check product rating label voltage and make sure correct voltage is supplied at electrical point.
(States a hazard which may pose serious injury or death if exact installation instructions are not followed)
CAUTION
1. HOT Surfaces, avoid contact with bare skin.
2. The heated towel rail (HTR) is intended for indoor use only.
3. The temperature of the individual rails of the HTR will increase when covered, AVOID touching the covered rails as the increase in rail
temperature may cause a minor contact burn.
4. Discoloration of certain bath towels may occur due to fabric make up, detergent residue or excessive amount of towels placed on HTR.
Reduce the temperature accordingly using the PTSelect Switch or TDC Timer (whichever is applicable).
5. Piling multiple towels on top of each other increases the risk of towel discoloration due to heat.
6. DO NOT place this appliance inside a shower, sauna, steam room or wherever the product would be exposed to direct constant water jets.
7. DO NOT clean while the HTR is hot.
8. DO NOT clean with an abrasive or acid based cleaning material (such as a tile grout remover/cleaner). Use only a soft, damp cloth.
9. The wall fasteners provided with the installation kit are for convenience purpose only, and are not suitable for all types of installations.
It is the ultimate responsibility of the installer to ensure that the appliance is mounted securely.
10. This HTR is not intended for use by children or other persons without assistance or supervision if their physical, sensory or mental
capabilities prevent them from using it safely. Children should be supervised to ensure that they do not play with the HTR and hurt
themselves in any way.
11. If the HTR is not in use for an extended period of time, it is recommended to disconnect (switch off) the power at the point of isolation.
12. When handling the HTR during installation be careful not to scratch, damage or dent any surfaces as this is not covered by the warranty.
NOTE
The products featured in the diagrams have been used for graphical representation only. Actual products may vary in relation to the diagrams.
Due to the fact that Bathroom Butler is always actively researching new methods and/or materials with a view to further improving its products,
you may notice some differences between the parts you received and the assembly method described herein. Please understand that this
instruction leaflet is intended as a guide only.
(States a hazard which may pose minor injury and/or product damage if installation instructions are not followed)
Page 2
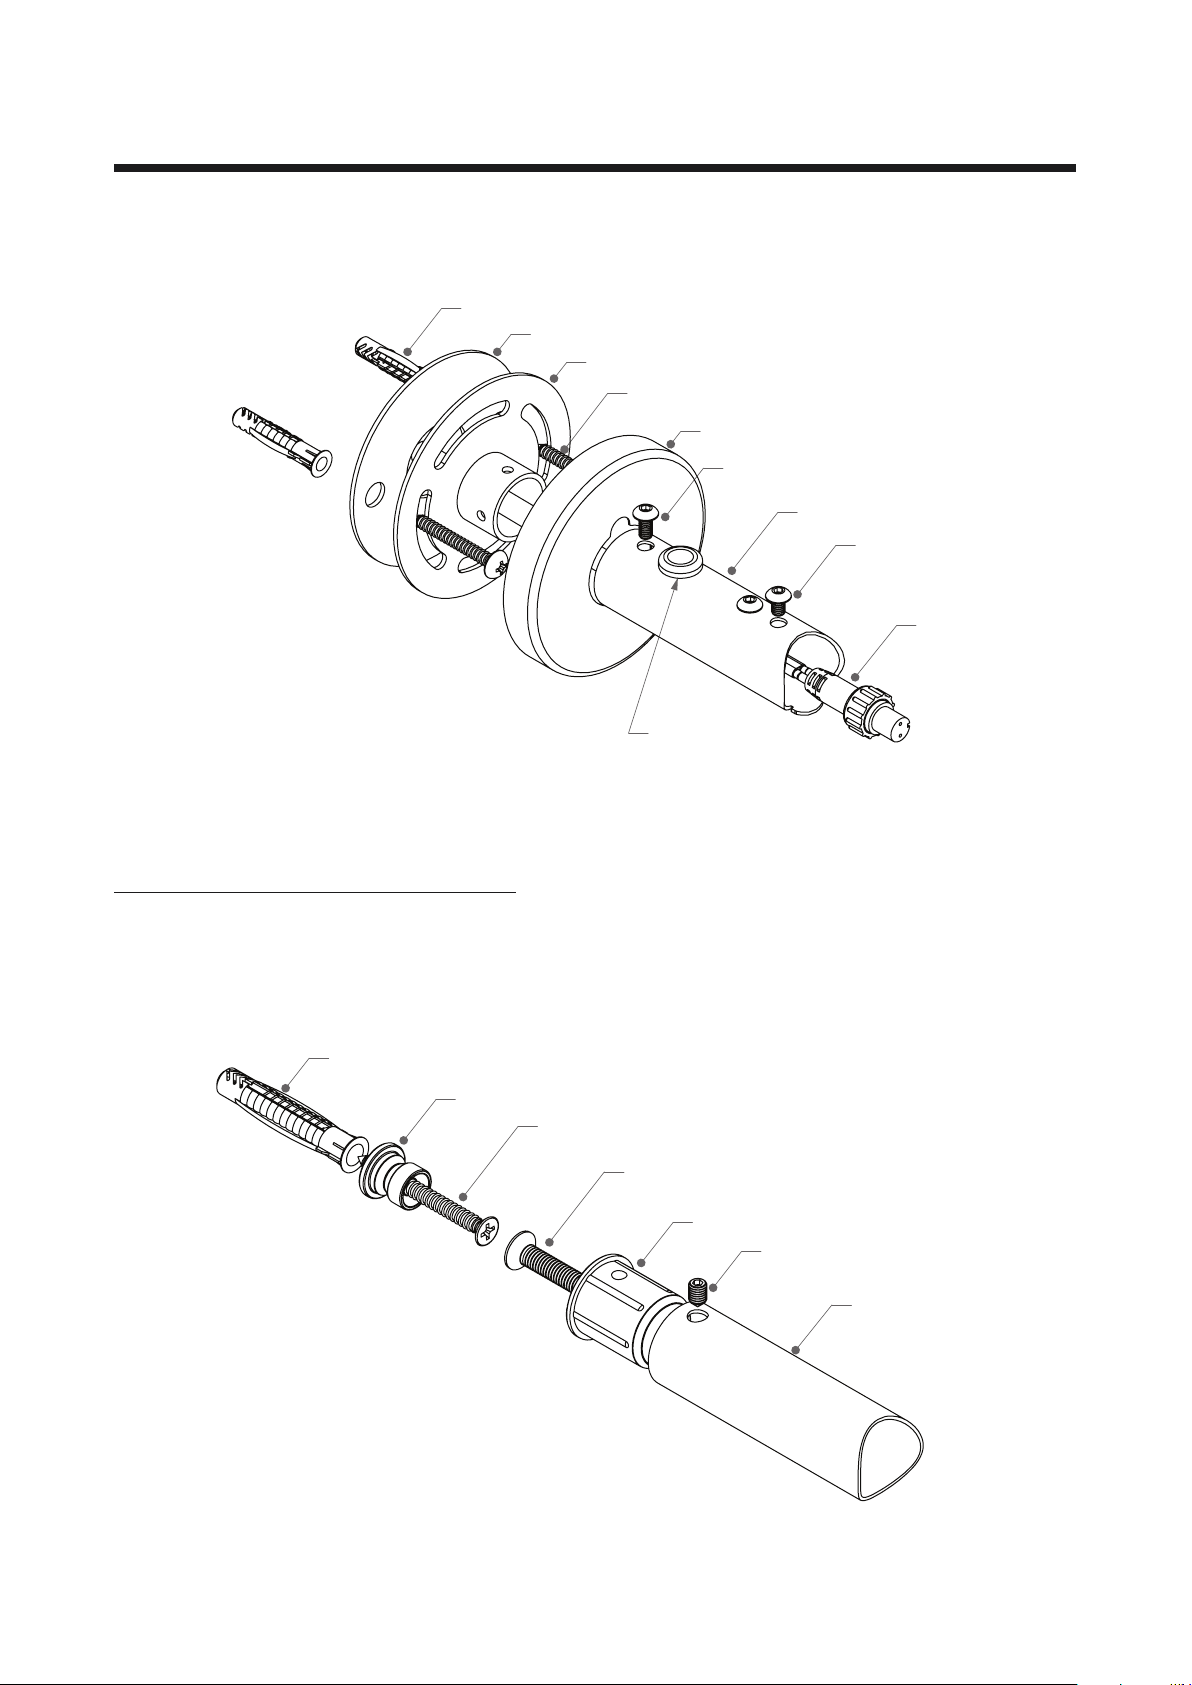
1. Mounting Parts Supplied
Mounting A = Qty 1
(Electrical Mount)
Wall fasteners suitable for installation to masonry wall
Plastic Wall Plug 6mm
Plastic Wall Plate
Wall Plate Bracket
Pozi Pan Head Screw
4.2x40mm
Cover Plate -SQ
Mounting C = Qty 3
(Standard Mount)
Wall fasteners suitable for installation to masonry wall
Button Head Screw
M4 x 8mm
To be used for
VISIBLE wiring
Mounting TUBE A
Button Head Screw
M4 x 6mm
Power Cable
Plastic Wall Plug 8mm
Male Mount II
PH2 Countersunk Head Screw
5.0x50mm
PH2 Countersunk Head Screw
M6 x 70mm
Female Mount
Grub Screw
M5 x 6mm
Mounting TUBE C
Page 3
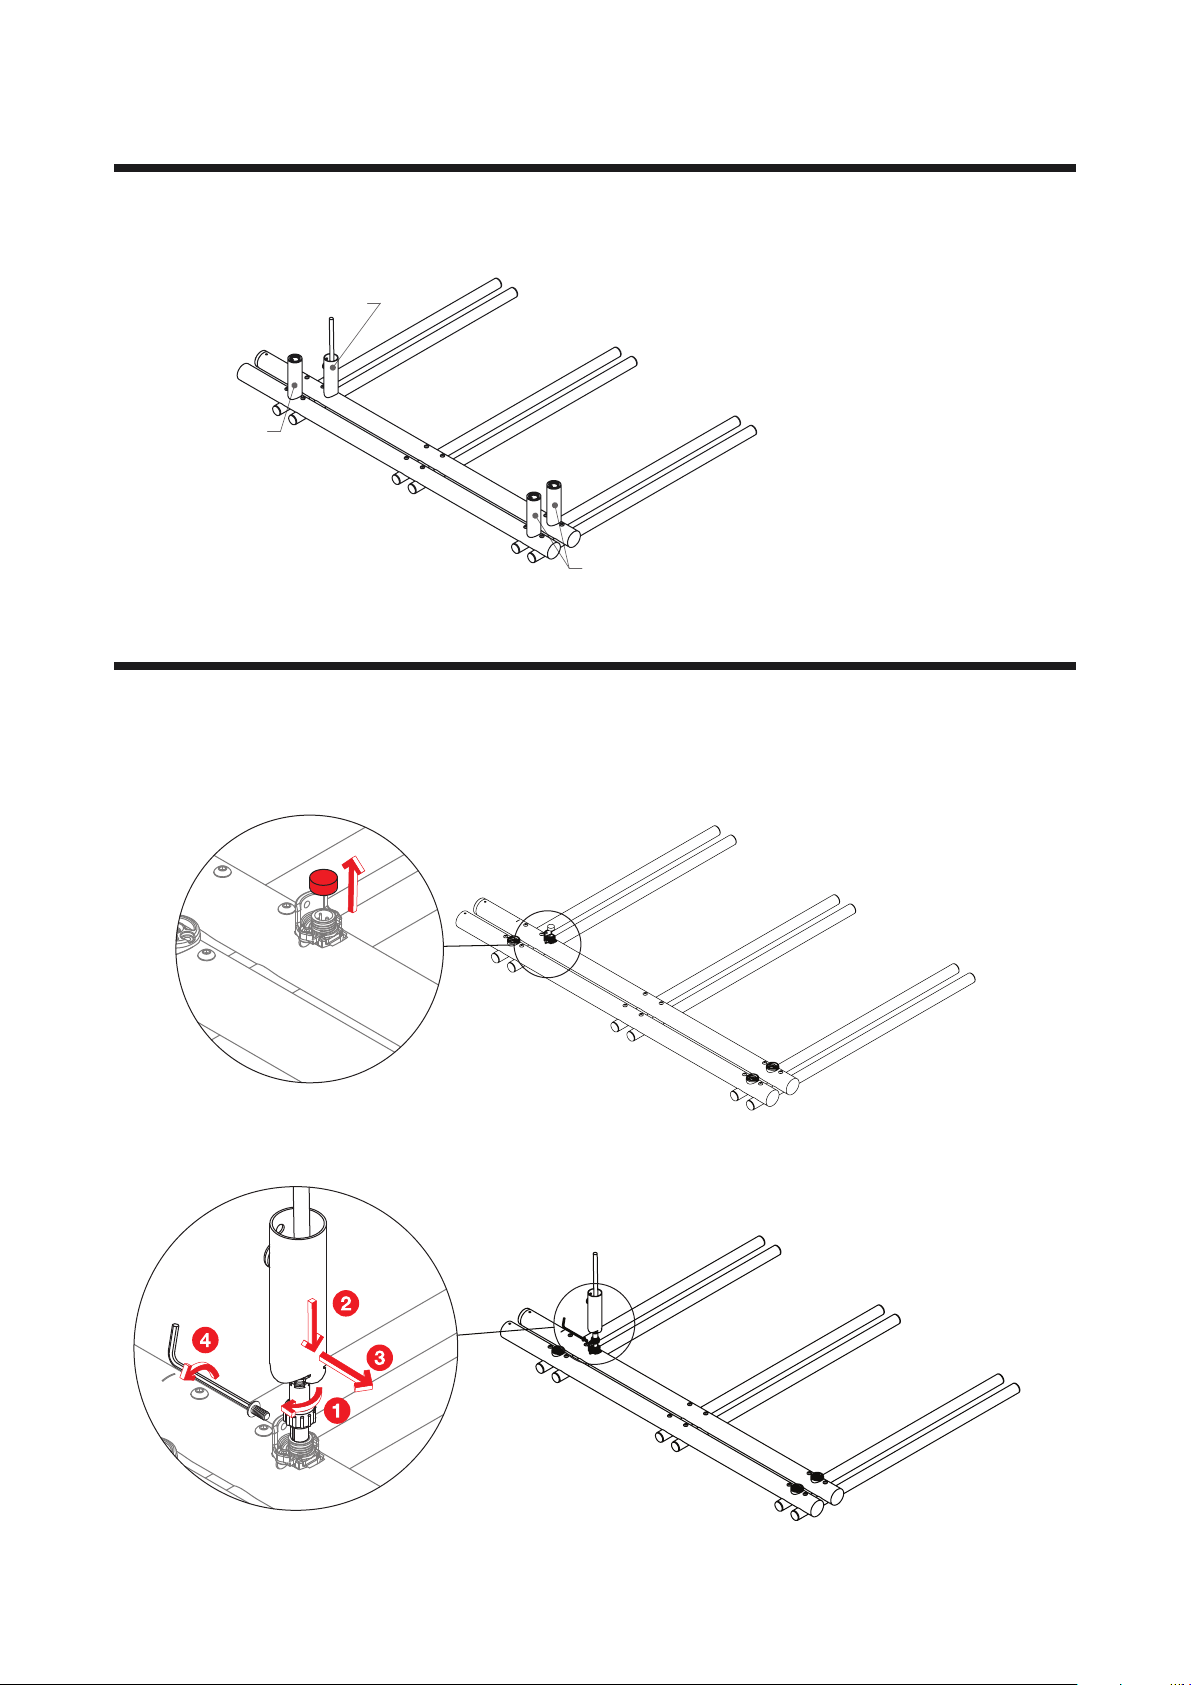
2. Assembly
Mounting C
Mounting A
Mounting C
2a. Assembly: Fit MOUNTING A
Page 4
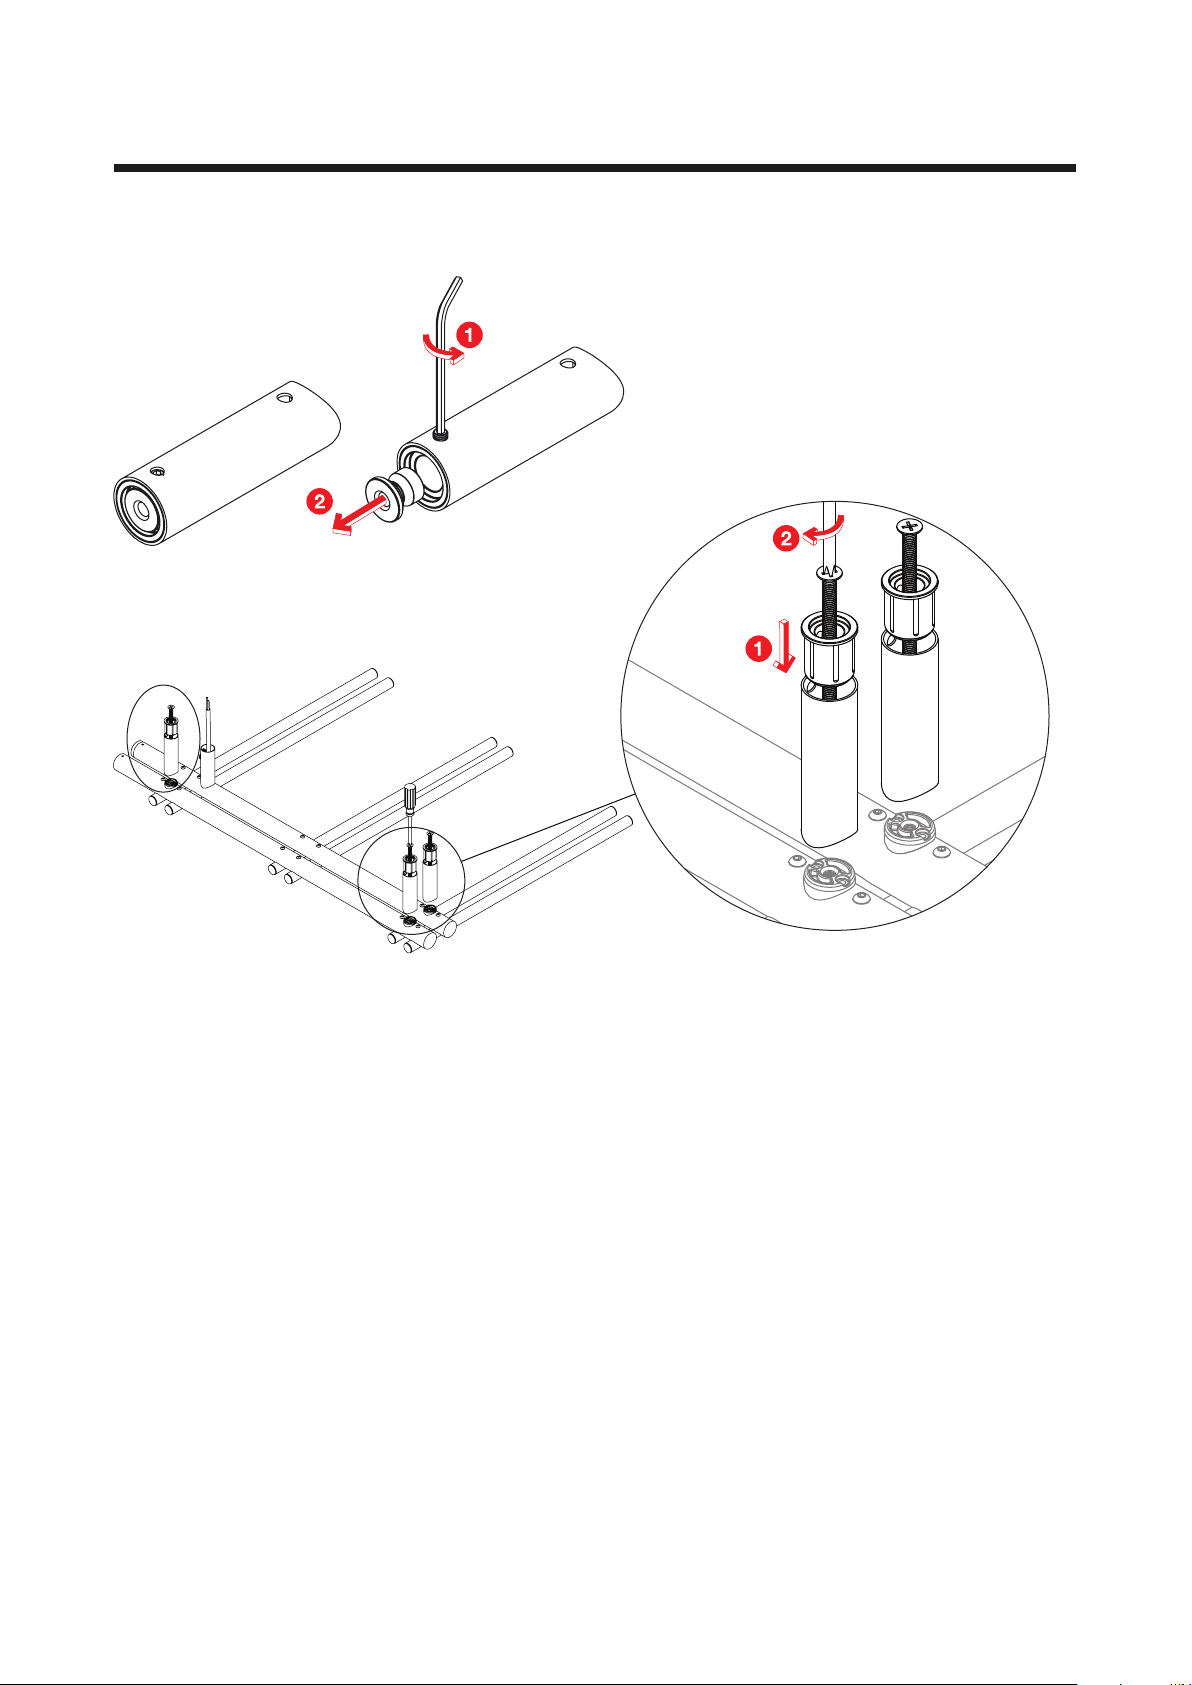
2b. Assembly: Fit MOUNTING C
*As supplied
X 3
X 3
Page 5
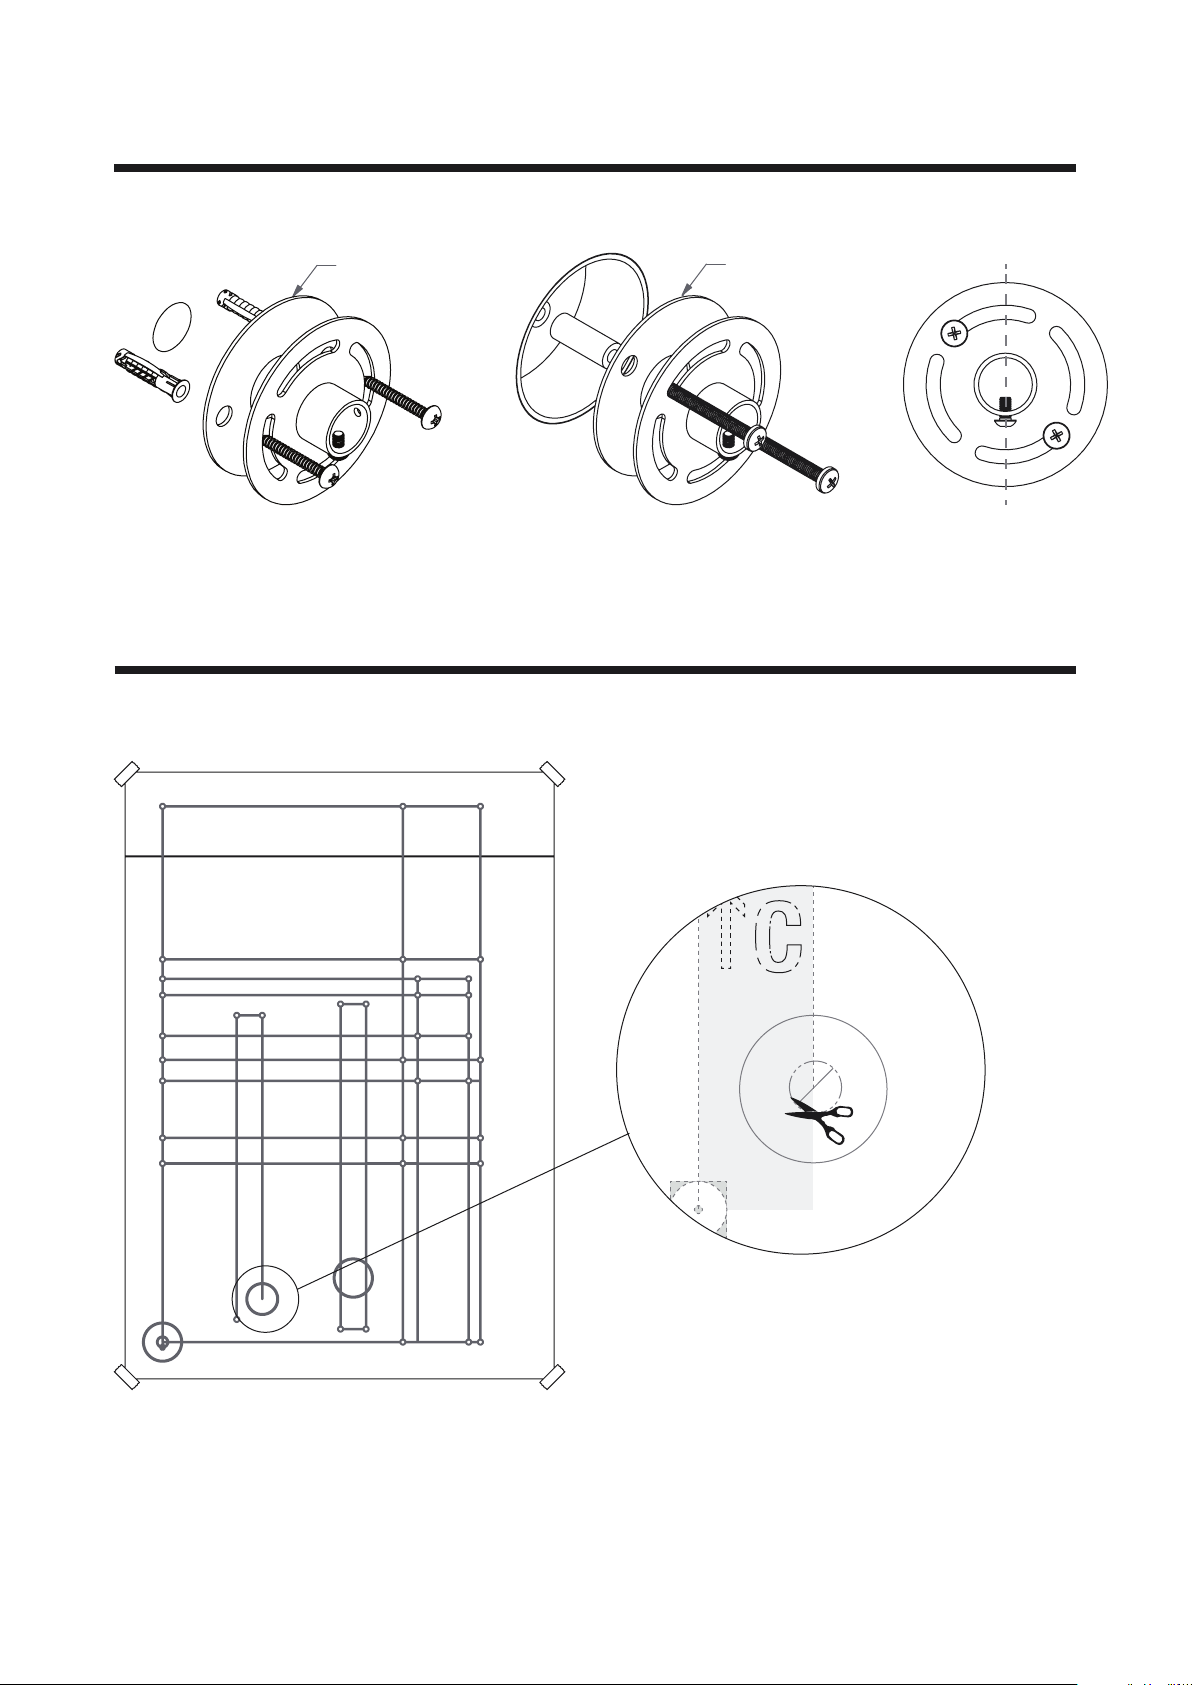
3a. Mounting: Wall Plate Bracket
E
O
–
E
l
e
c
t
r
i
c
a
l
O
u
t
l
e
t
S
t
a
r
t
h
e
r
e
C
u
t
o
u
t
Plastic Wall Plate Plastic Wall Plate
OR
i) Attach direct to wall
*For 6mm Wall Plug - drill 4mm Pilot hole,
then open hole with 6mm Drill
ii) Attach to junction box
*Screws not supplied
3b. Mounting: Use Mounting Template
Vertical
FOR RIGHT HAND Mounting: Not Possible
*Cut out Electrical Outlet hole and place template on wall
by positioning over the Wall Plate Bracket.
*Secure template in place with masking tape.
Page 6
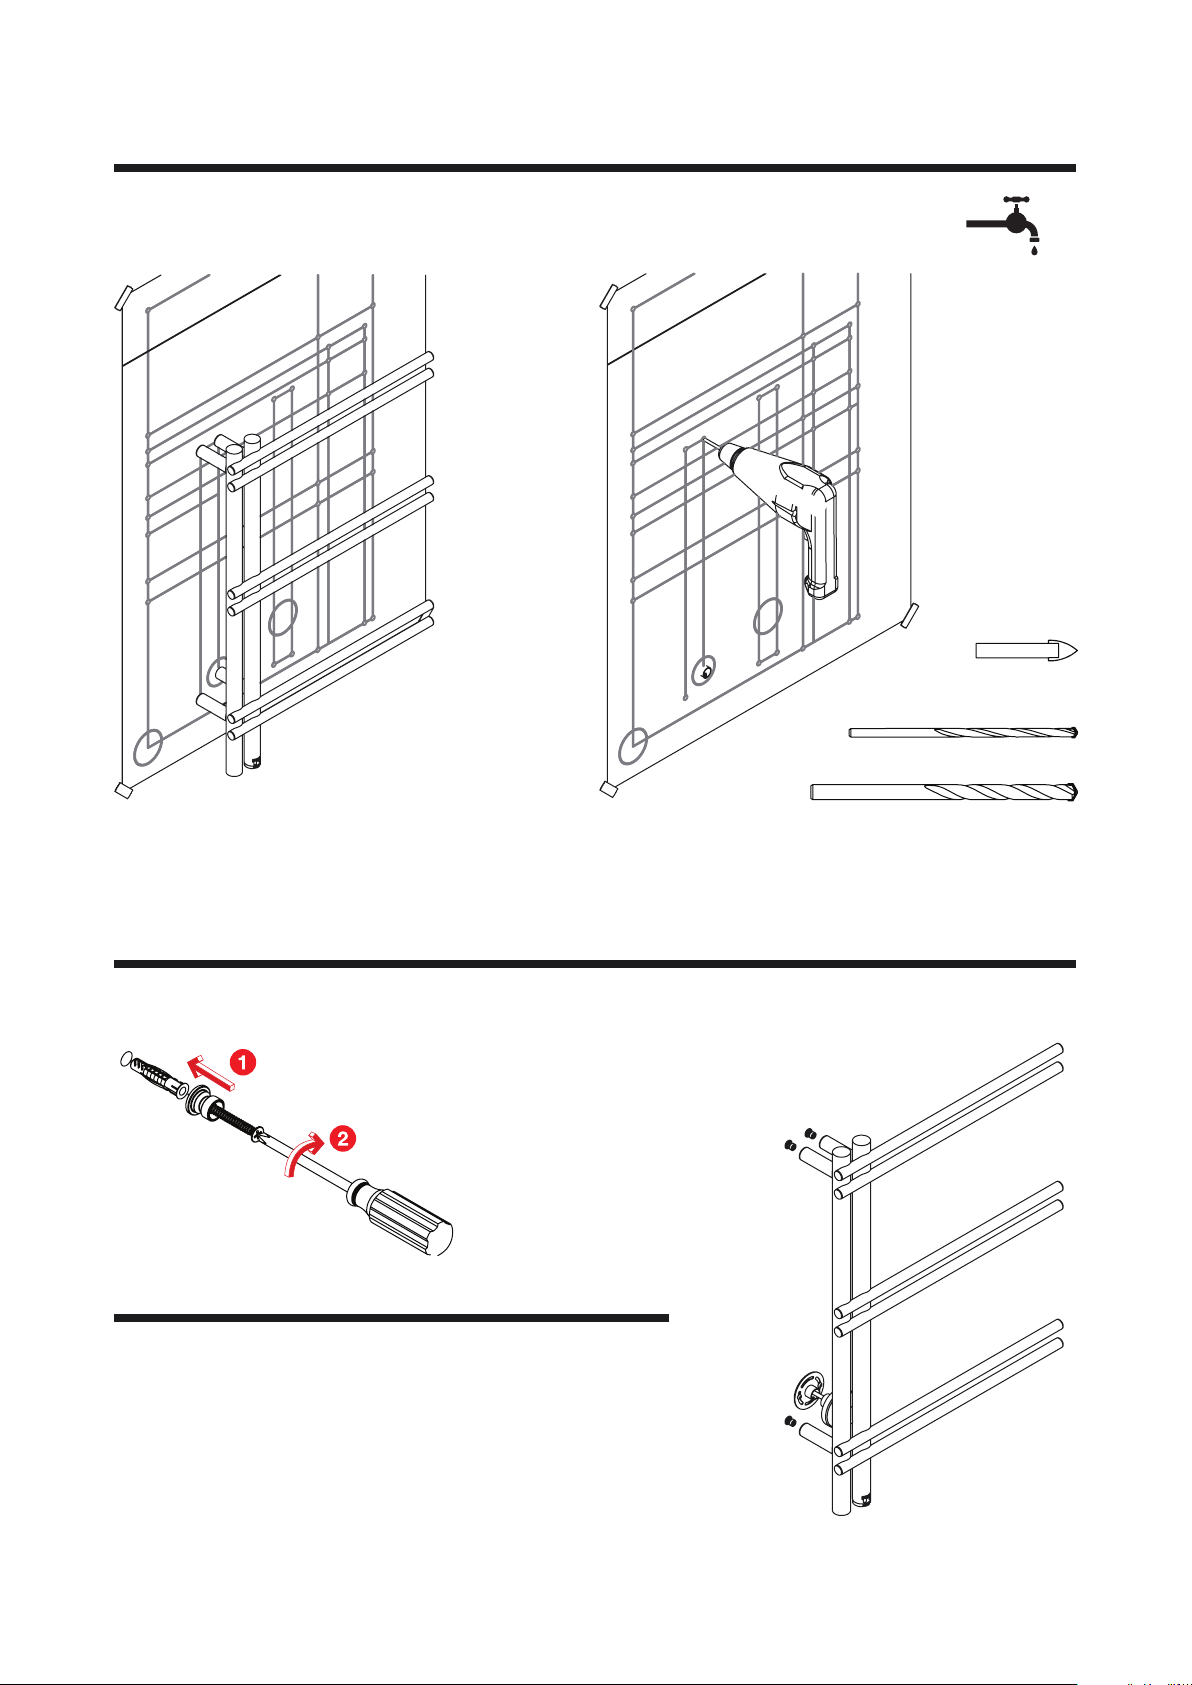
3c. Mounting: Drill Holes
(not supplied)
*CAUTION:
Before drilling check
for water pipes
X 3
Ceramic Tile
Ø8mm
(not supplied)
Masonry Wall
*Choose mounting points according to particular model
*CHECK that chosen points are correct using assembled HTR.
3d. Mounting: Secure Male Mounts
X 3
(not supplied)
*Drill holes at the 3 mounting points chosen.
*Drill 4mm pilot holes. Open up with 8mm drill.
Pilot hole - Ø4mm
(not supplied)
Sizing hole - Ø8mm
(not supplied)
3e. Mounting: Connect Electrical Wiring
1. DANGER- Electricity is dangerous.
2. Electrical connection must be done by a registered electrician/wireman in
accordance with the relevant Wiring Code.
3. HTRs are deemed to be fixed appliances and therefore are required to have either:
a. an Isolator Switch installed within arms distance of the heated towel rail.
b. be connected to a circuit breaker that can be locked in the open position.
4. The HTR must be connected to a circuit with Earth Leakage Protection.
5. Check product rating label voltage and make sure correct voltage is supplied at
electrical point.
REMEMBER to place Cover Plate over the
tube before making the electrical connection.
Page 7
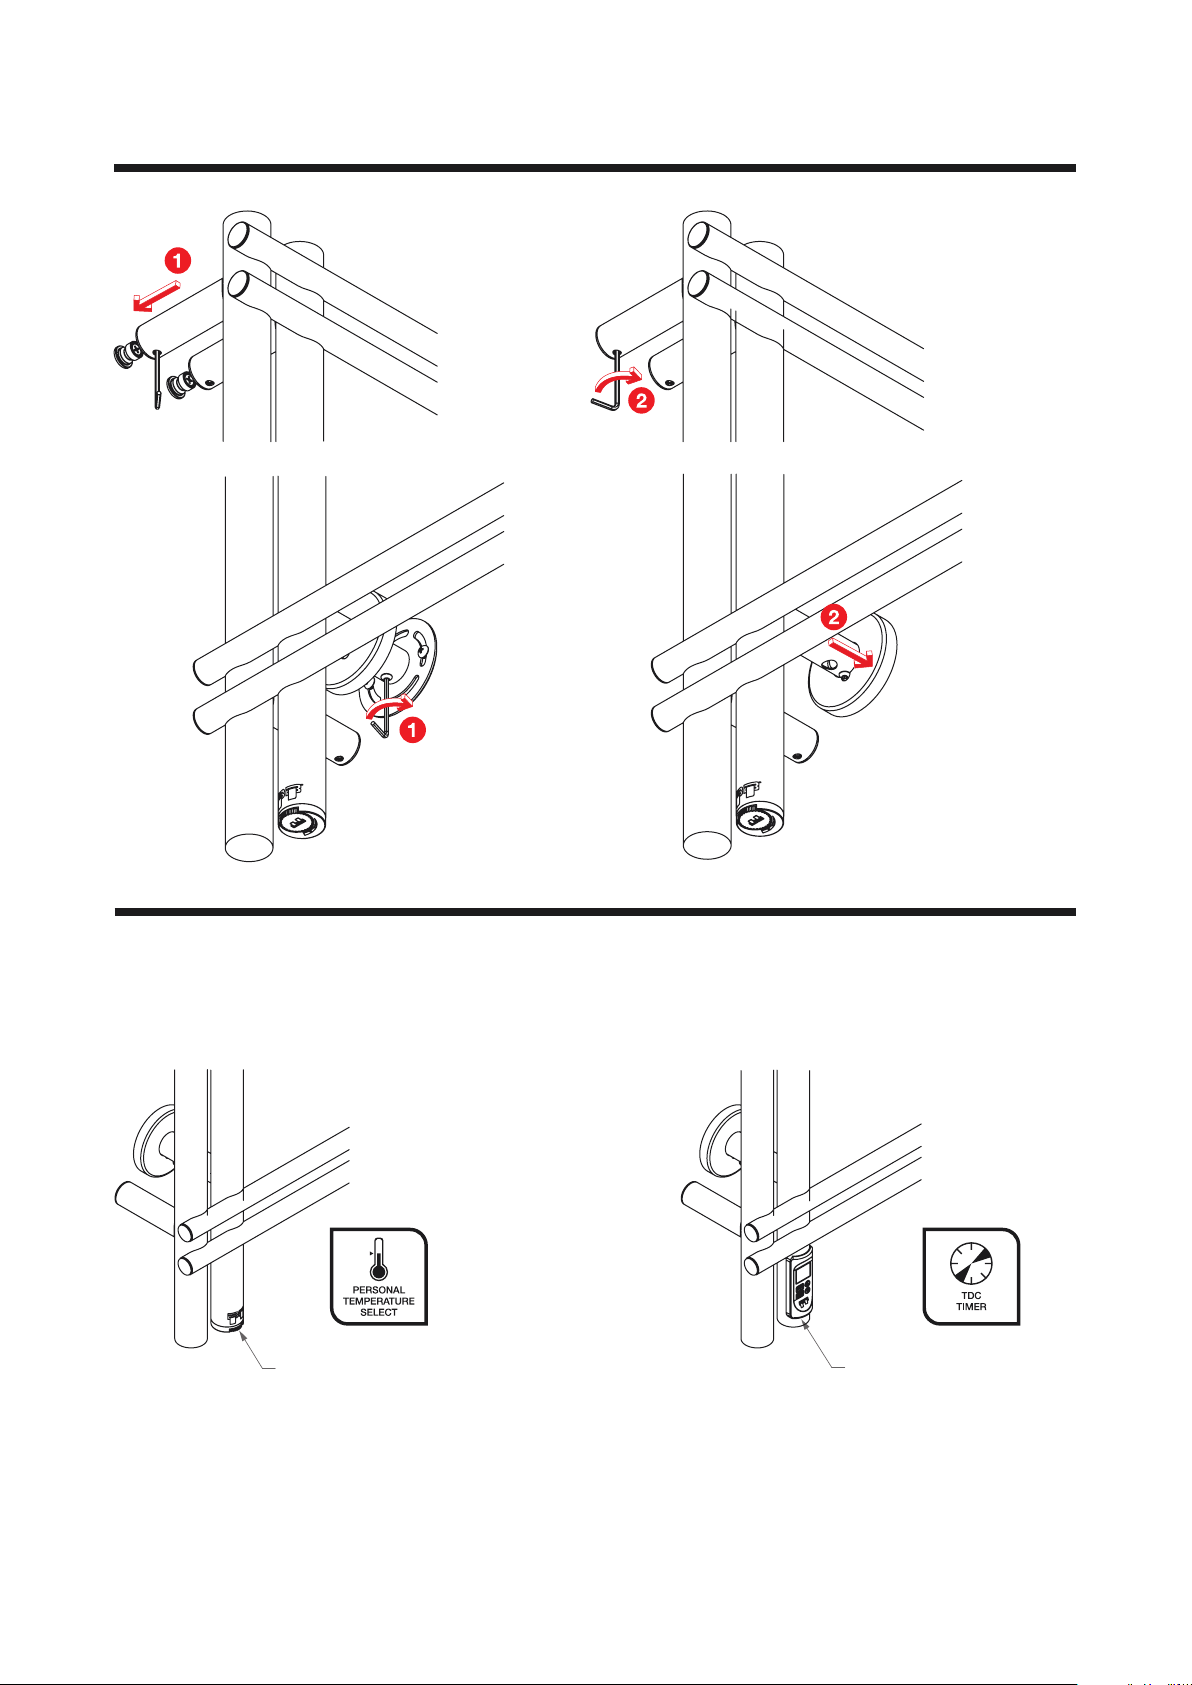
3f. Mounting: Secure Heated Towel Rail to the wall
X 3
4a. Using your Heated Towel Rail: Controllers
Bathroom Butler HTRs are offered with 2 different Controller options. Depending upon which specific model you
have purchased, either one of the controller information below will be applicable to your product.
PTSelect Switch TDC Timer
PTSelect Switch allows you to switch the HTR ON and OFF as
well as adjust the temperature.
To increase the temperature, turn the dial to the right. To
decrease the temperature, turn the dial to the left. To switch off,
keep turning the dial to the left until you hear an audible click.
When the HTR is on, the PTSelect Switch is illuminated by a red
light. This red light flashes, depending upon the heat level
chosen. The longer the red light glows, the warmer the heated
towel rail will be.
TDC Timer allows you to program the HTR to switch ON and
OFF automatically, therefore saving electricity. You can also
adjust the temperature of the HTR using the TDC Timer.
For further details of how to program the TDC Timer and
information of the other functions, please read the TDC Timer
manual supplied separately.
Page 8

4b. Using your Heated Towel Rail: Dry Element Technology
The main purpose of an HTR is to dry your towels, which will also add some warmth to your towels at the same time. Bathroom Butler HTRs
have the added benefit of user temperature adjustment, allowing the temperature to be increased or decreased to your individual preference.
This feature is especially useful in making Bathroom Butler HTRs effective in both summer and winter conditions.
The Bathroom Butler HTR has been designed to operate 24/7, which means you can leave your HTR on all day long. However, leaving the
HTR switched on permanently uses unnecessary electricity because, in most cases, your towels will be completely dry within 4 hours of being
hung, depending upon humidity levels and how wet your towel was originally.
Bathroom Butler uses Dry Element Technology (DET) and thanks to the benefit of Rapid Heating, which allows the unit to heat up to working
temperature within a mere 10 to 15minutes, its HTRs can be easily switched ON and OFF without further increasing the electricity consumption.
In order to save as much electricity as possible, the heating element is thread through the shortest path inside the bars of the HTR, which
means that the left-hand post will always be cool to the touch. Don’t be surprised when you find the temperature of the HTR under the towel
is higher than the exposed surfaces. This is called Direct Intelligent Heating, and it means that smaller wattage heating elements can be used,
thereby saving electricity, but still ensuring that your towels are dried effectively.
4b. Using your Heated Towel Rail: Folding your towels
To ensure that your towels are dried efficiently and effectively, it is important to fold your towels into 4 layers. Just draping your towel over the
HTR is ineffective and will prevent your towel from drying. It is also not advisable for there to be more than 4 layers of towelling on any one bar,
as it will be very difficult for the heat to penetrate beyond the 4 layers.
To fold your towel in to 4 layers is simple – just fold it in half and then in half again. Now hang the towel over the HTR. When the towel is
hung over the HTR, it is recommended that the bottom end of the towel should not extend more than 150mm below the bottom bar.
4b. Using your Heated Towel Rail: Cleaning and Maintenance
Bathroom Butler HTRs are made from GRADE 304 Stainless Steel and should be cleaned regularly with a warm damp cloth, and then buffed
dry with a clean dry cloth. Do not use the rough end of a kitchen sponge to clean your HTR. To remove any small blemishes or fine scratches,
use a metal polish. Remember to switch the HTR off and leave it to cool for 15 minutes before cleaning.
DO NOT clean your HTR with any kind of ACID BASED CHEMICAL, TILE CLEANER or detergents that contain chlorine, as this may
contaminate and damage the surface finish of the HTR.
There is no maintenance required on your Bathroom Butler HTR.
Every member of the Bathroom Butler team would like to sincerely thank you for purchasing this HTR, and would like to wish you
many days of dry, cosy towels ahead!
 Loading...