

Page 1
Revision 1
April 2012
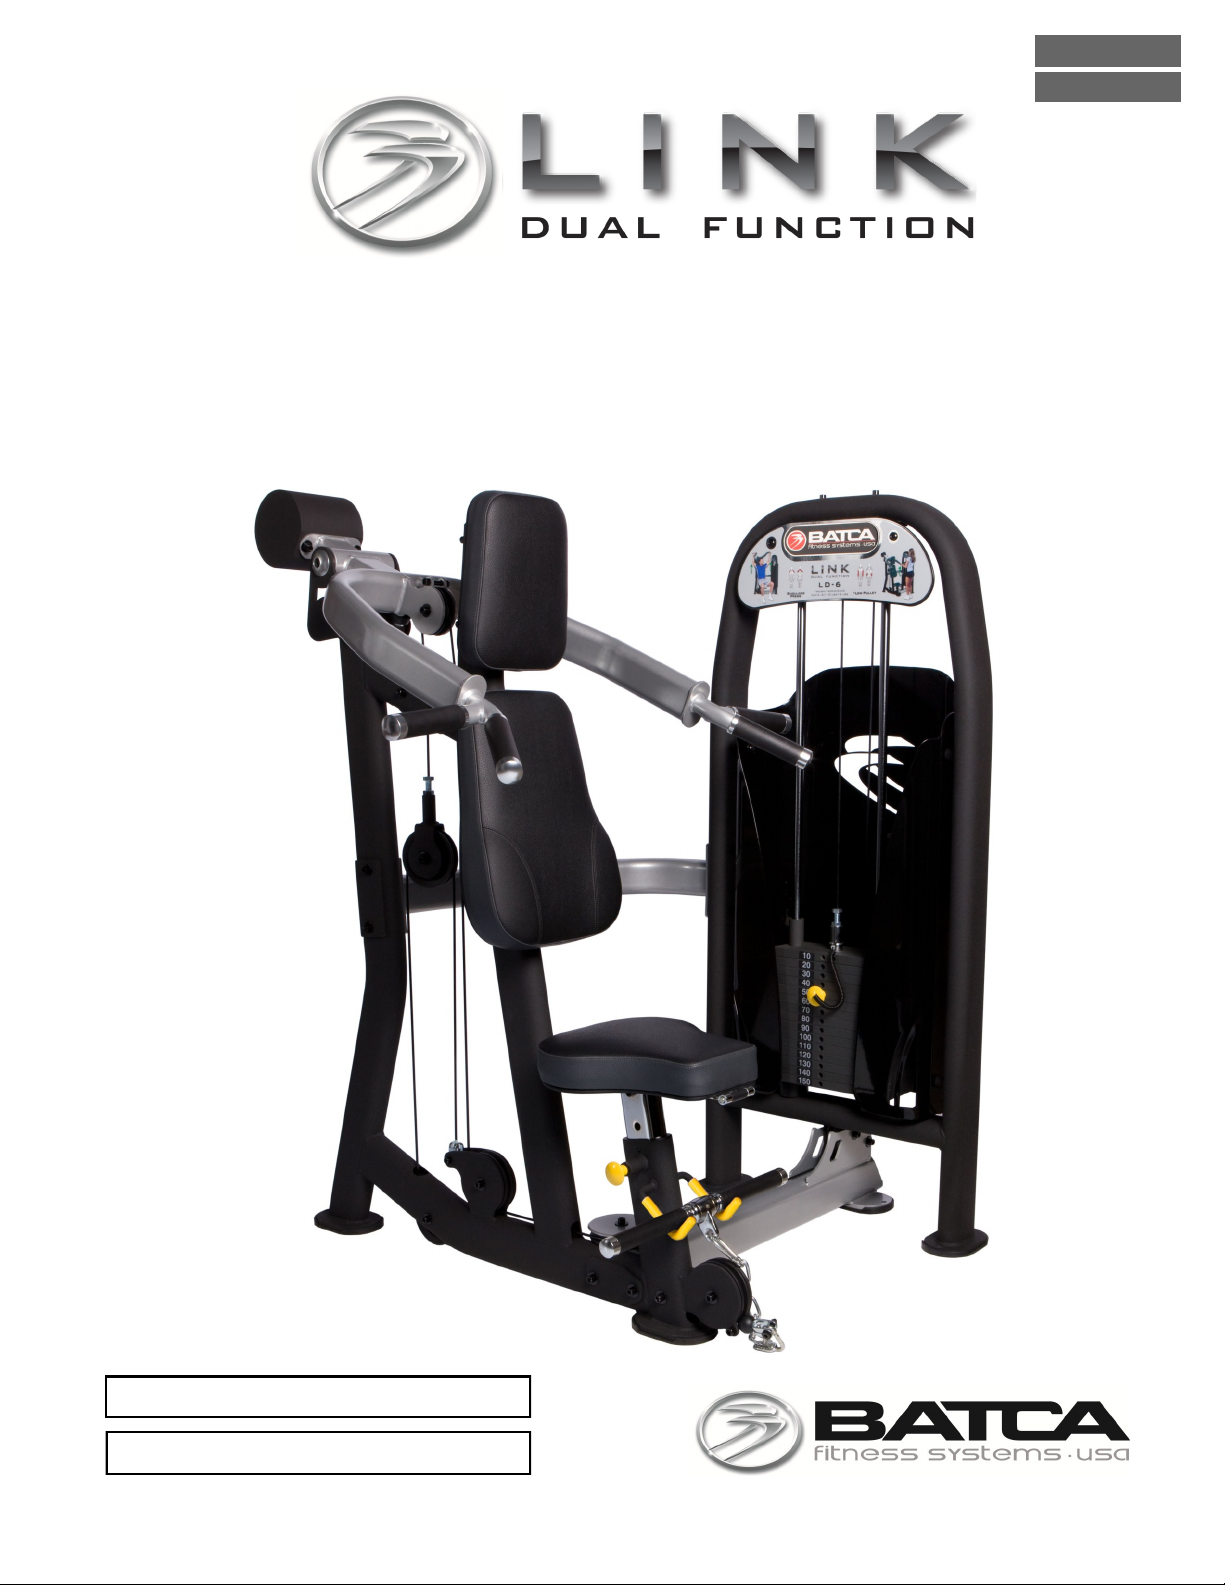
LD-6
Shoulder Press/Low Pulley
Owner’s Manual
Serial Number Here
Date of Purchase
www.batcafitness.com LD-6 O w n e r’ s Ma nu a l
1207 New Hope Road, Raleigh, NC - 919.255.1233 - www.batcafitness.com
Page 2
Instructions
Congratulations on the purchase of your new Batca LD-6. This gym will provide you with a lifetime of
enjoyment to meet your strength training needs. Batca Fitness Systems strives to build the best quality gyms
and to package these gyms in such a way to avoid any damage during shipping.
In order to get started with your assembly you should first familiarize yourself with this manual. It is
recommended that you read through each step thoroughly before you begin. Begin by opening your boxes and
separating all of your parts. Verify that all parts are accounted for and have no damage. When all parts are
accounted for, you may begin your assembly. Some items may have been pre-assembled for your convenience.
Please note that hardware quantities shown reflect total quantities for your gym and may not reflect actual
quantities in each bag. Assemble your gym on a solid level surface. This will ensure the best possible performance, function, and safety for the gym and your workout.
Assemble your gym according to the step by step instructions found in this manual. Failure to do so
will void your warranty and may result in personal injury. After assembly, you should check each station to
ensure correct operation. If a problem arises, recheck your assembly with these instructions to verify correct assembly. If you are unable to correct a problem or have questions with your assembly please contact
your authorized Batca dealer.
Warning
Batca Fitness Systems has built this gym to give you a safe, effective and enjoyable
workout. However, there is a risk assumed by individuals who use this type of equipment. It is
very important that all warnings and instructions are read and followed before beginning any
exercise program.
It is also very important to read and follow the preventative maintenance schedule
described in this manual. If any of the warning labels or stickers are worn, faded, torn,
scratched or missing they should be replaced immediately.
WARNING: There is a risk assumed by individuals who use this type of equipment. To minimize
risk always follow these rules.
1) It is essential that you consult with your physician before beginning any exercise program.
2) Inspect equipment before each use for loose, worn, or frayed parts (including cables, nuts
and bolts). Replace parts at first signs of wear (use only genuine BATCA replacement
parts). Use of equipment that is damaged, worn, frayed or not completely assembled on a
solid, level surface may result in injury.
3) Make sure all adjustment pins are fully engaged before using equipment.
4) Keep all parts of the body and clothing outside the path of any moving parts of the gym. Be
alert to the possibility of injury. Do not be careless.
5) Minors and children should not be allowed to play on or around this gym.
Table of Contents
__________ Page
Instructions 2
Parts Listing 3
Hardware Comparison 4-7
Main Assembly 8-17
Upholstery 15
Cable Routing 13-14
__________ Page
Final Assembly and Troubleshooting 18
Cable Tension and Adjustments 19
Maintenance 20
Warranty 21
Floor Plan Layout 22
Batca Fitness Systems 2 LD-6 Owner's Manual
Page 3
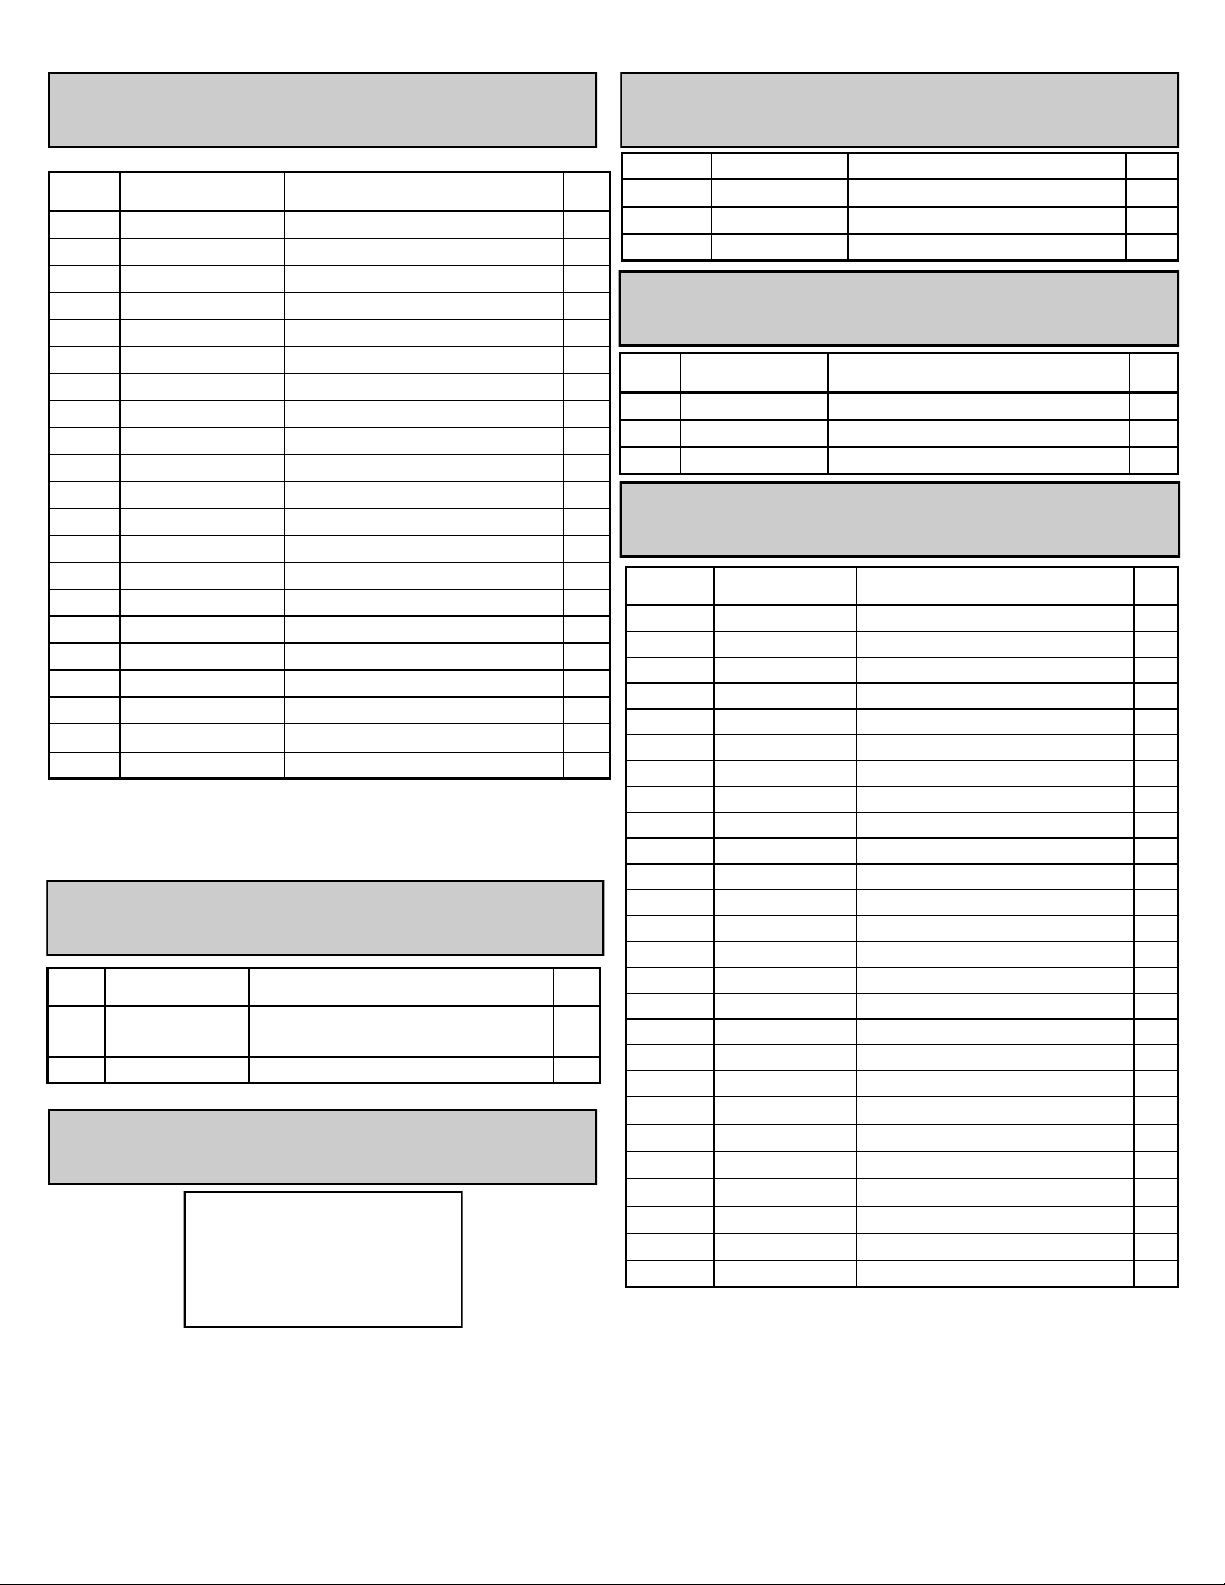
Frame Components
ITEM
NO.
1 BFP-10887 LD-6 Short Cage 1
2 BFP-10885 Base 1
3 BFP-10884 Shoulder Press Frame 1
4 BFP-51842 Anti-Deflection Plate 1
5 BFP-10886 Rear Support Brace 1
6 BFP-51945 Anti Deflection Plate 1
7 BFP-10888 Guide Rod Plate 1
8 BFP-51827 Guide Rod 2
9 BFP-10889 Top Weight Plate 1
10 BFM-50632 Weight Stack Plate 14
11 BFM-50529 Rubber Donut 2
12 BFP-10890 Shoulder Press Arm 1
13 BFP-51776 Axle 1
14 BFP-51944 6” Counter-Weight 1
15 BFP-10891 Chrome Seat Adjustment 1
16 BFP-10838 Free Floater 1
17 BFM-50345 Pulley Cover 1
18 BFP-51711
19 BFP-51740
20 BFP-51741
21 BFP-51742 Right Front Shroud 1
PART NUMBER DESCRIPTION QTY.
Placard Plate
Rear Weight Stack Shroud
Left Front Shroud
Cables
ITEM
PART NUMBER DESCRIPTION QTY.
NO.
22 CAB-15008 Weight Stack to Free
Floater
23 CAB-15009
Cable Lockout to Low Pulley
Tools Required
9/16” Wrench
9/16” Ratchet
Allen Wrench Set
Tape Measure
Accessories
ITEM NO. PART NUMBER DESCRIPTION QTY.
24
25
53
BFM-51173
BFC-50126 Short Bar 1
BFM-51464 Ankle Strap 1
Weight Stack Pull Pin 1
Upholstery
ITEM
PART NUMBER DESCRIPTION QTY.
NO.
26
BFP-52137
27
BFP-52136 Back Pad With Lumbar 1
28
BFP-52141 Bottom Pad 1
Head Pad
Hardware
ITEM NO. PART NUMBER DESCRIPTION
29 BFH-50173 3 1/2”Pulley 3
30 BFH-50174 4 1/2” Pulley 6
5” Pulley
1
1
1
1
1
31 BFH-50530
32 BFP-51696 Small Aluminum Cap 2
33 BFH-50210 Gas Spring 1
34 BFH-50188 Snap Hook 2
35
36 BFP-52430 BHSCS 3/8” x 3/4” 4
37 BFH-50254 HCS 3/8” x 3/4” 2
38 BFH-50620 BHSCS 3/8” x1” 2
39 BFP-52376 SHCS 3/8” x 1” 2
40 BFP-51653 SHCS 3/8” x 1 1/4” 2
41 BFP-51759 SHCS 3/8” x 2” 3
42 BFP-51752 SHCS 3/8” x 2 1/4” 7
43 BFP-51750 SHCS 3/8” x 2 3/4” 6
44 BFP-51747 SHCS 3/8” x 3” 2
45 BFP-51748 SHCS 3/8” x 3 1/4” 6
46 BFP-51799 SHCS 3/8” x 5” 4
47 BFP-51946 1/2” Pulley Spacer 6
48 BFH-50204 3/8” Curved Washer 4
49 BFH-50146 3/8” Flat Washer 44
50 BFH-50157 3/8” Nylock 24
51 BFH-50147 3/8” Lock Washer 6
52 BFH-50227 Cable Strap 2
54 BFH-50351 1 3/8” Shoulder Bolt 1
55 BFH-50267 5/16” Nylock 1
6xBFC-50128
6x 1” inch link Chain 1
1
QTY
.
1
www.batcafitness.com 3 LD-6 Owner’s Ma nu al
Page 4
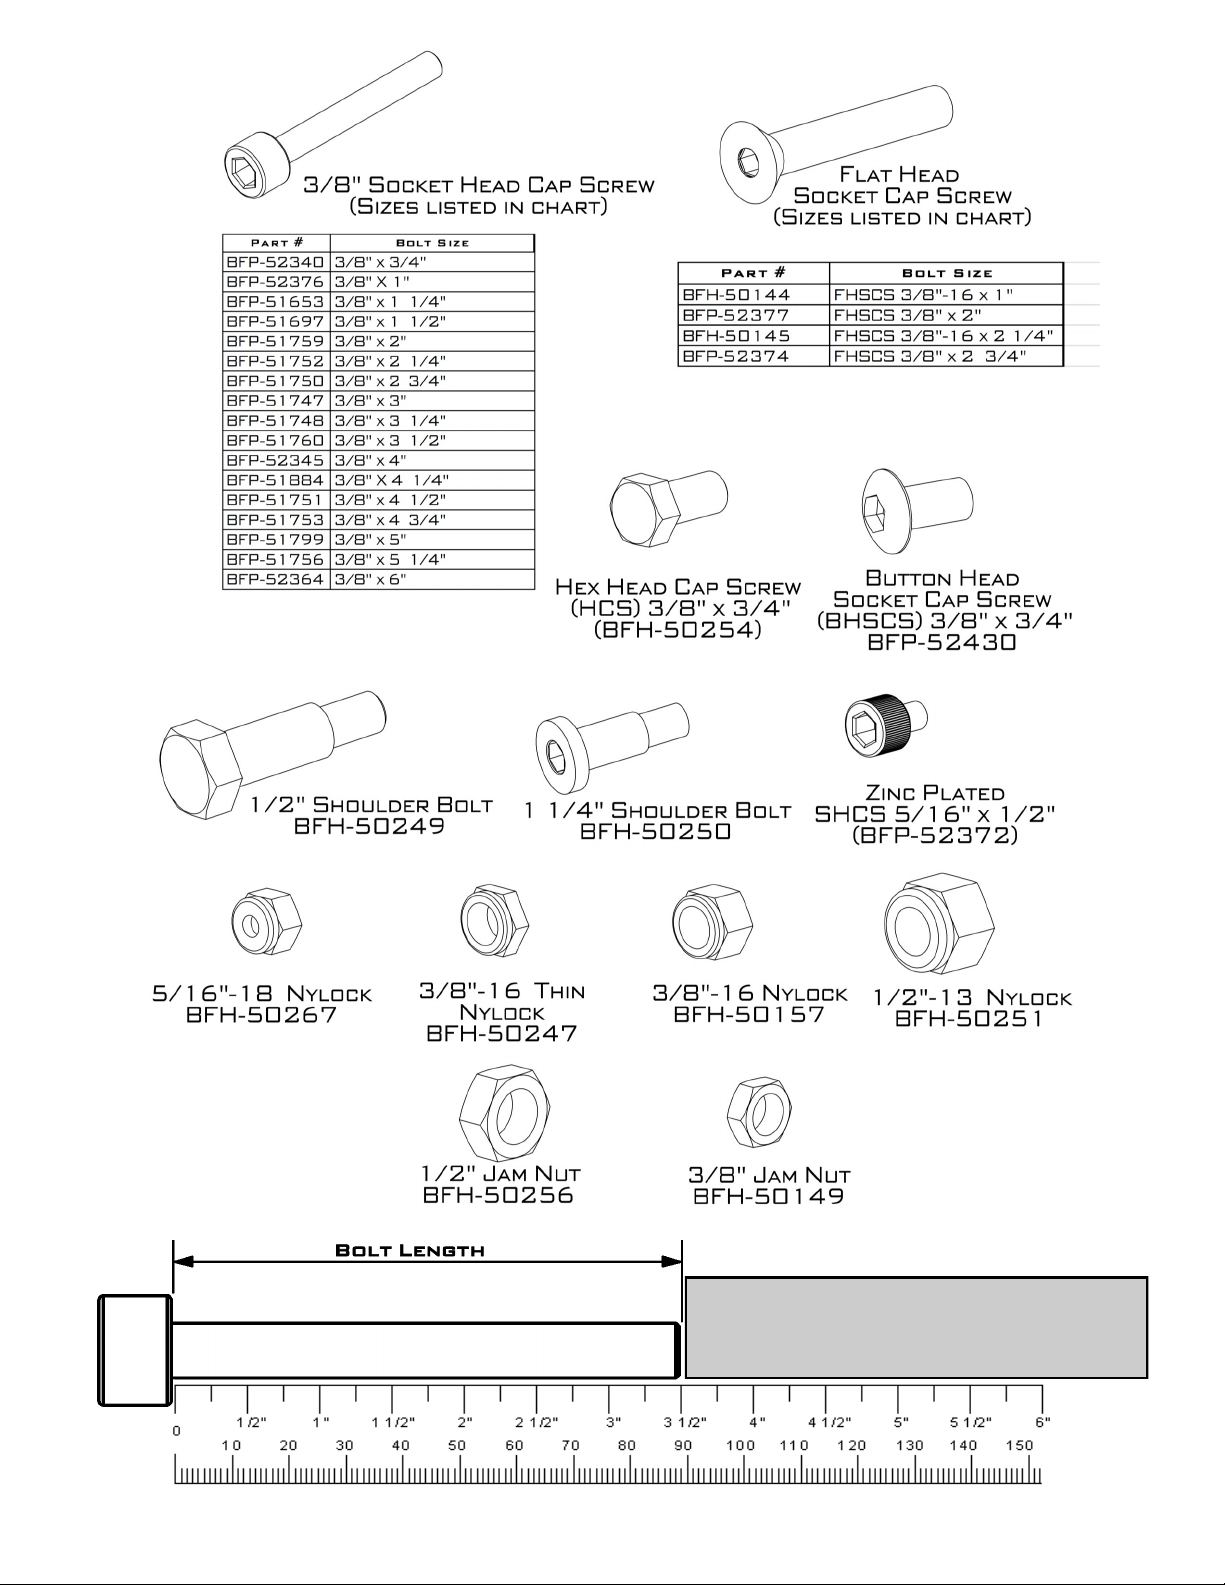
Bolt Length
Note: Bolt length is measured
from the underside of the head
of the bolt.
Batca Fitness Systems 4 LD-6 Owner's Manual
Page 5
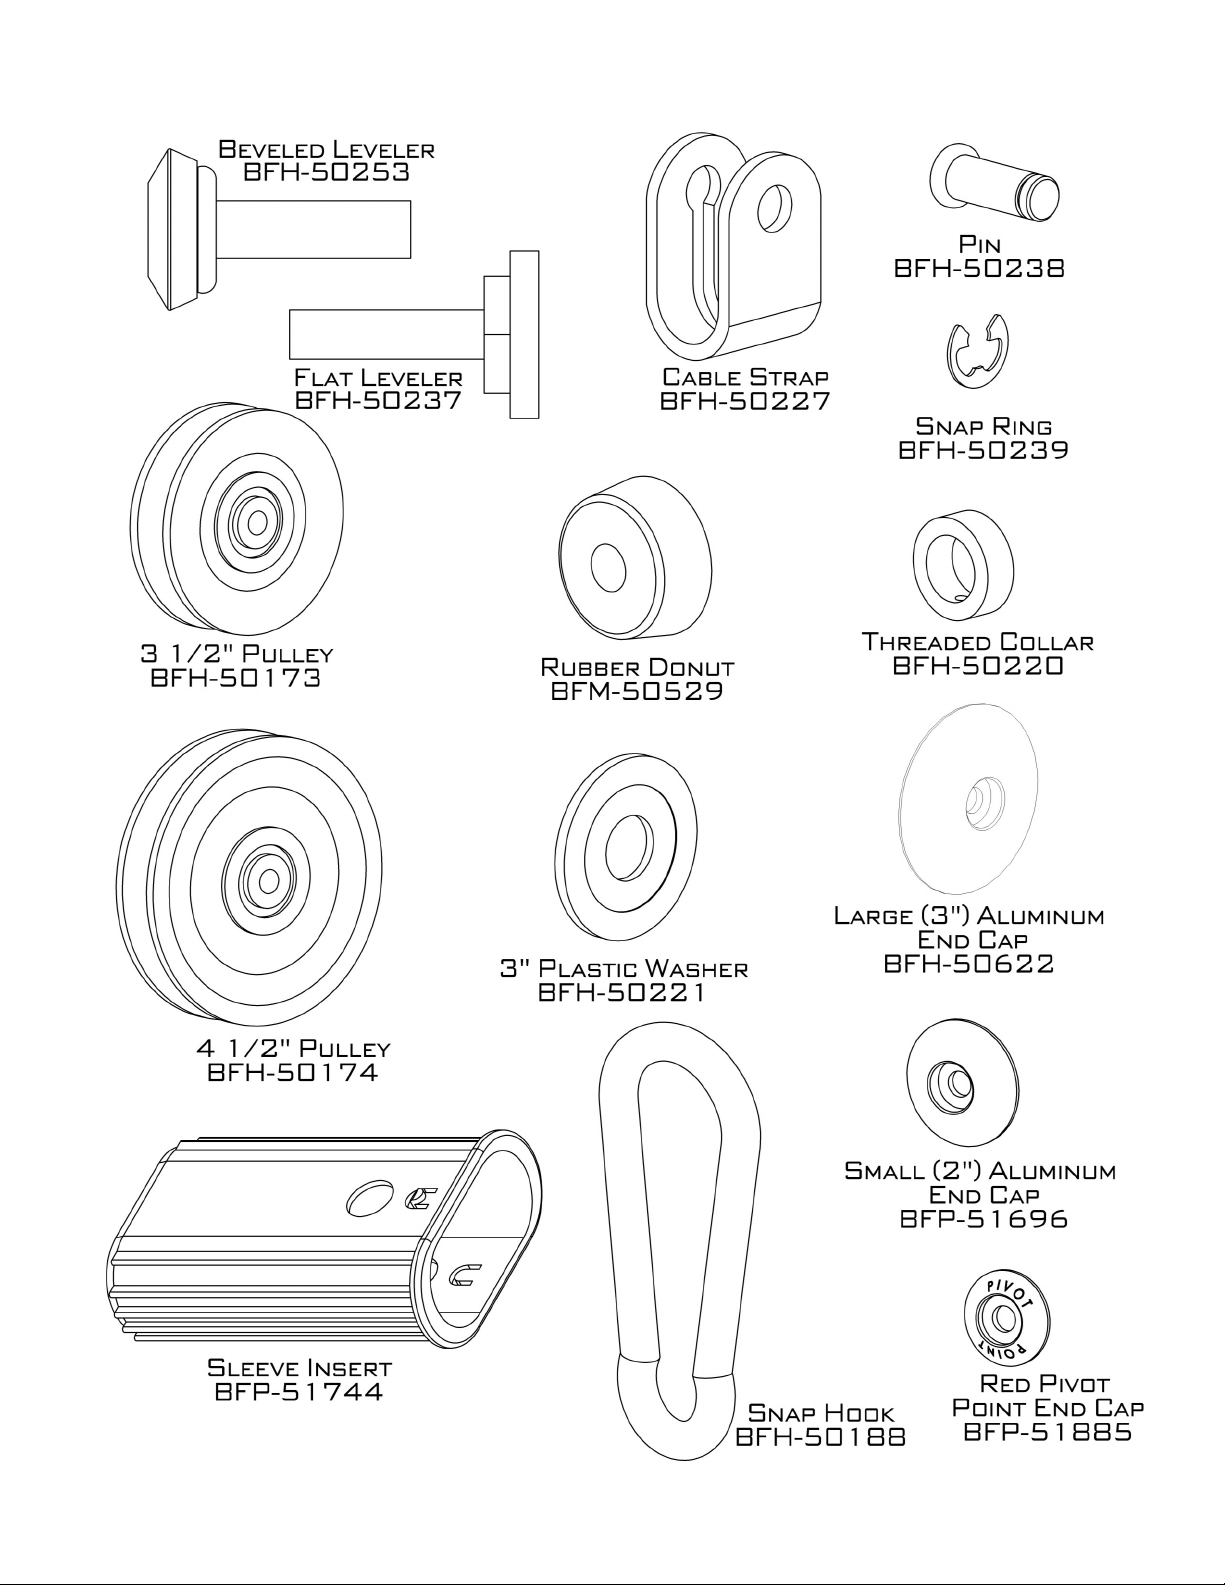
www.batcafitness.com 5 LD-6 Owner’s Ma nu al
Page 6
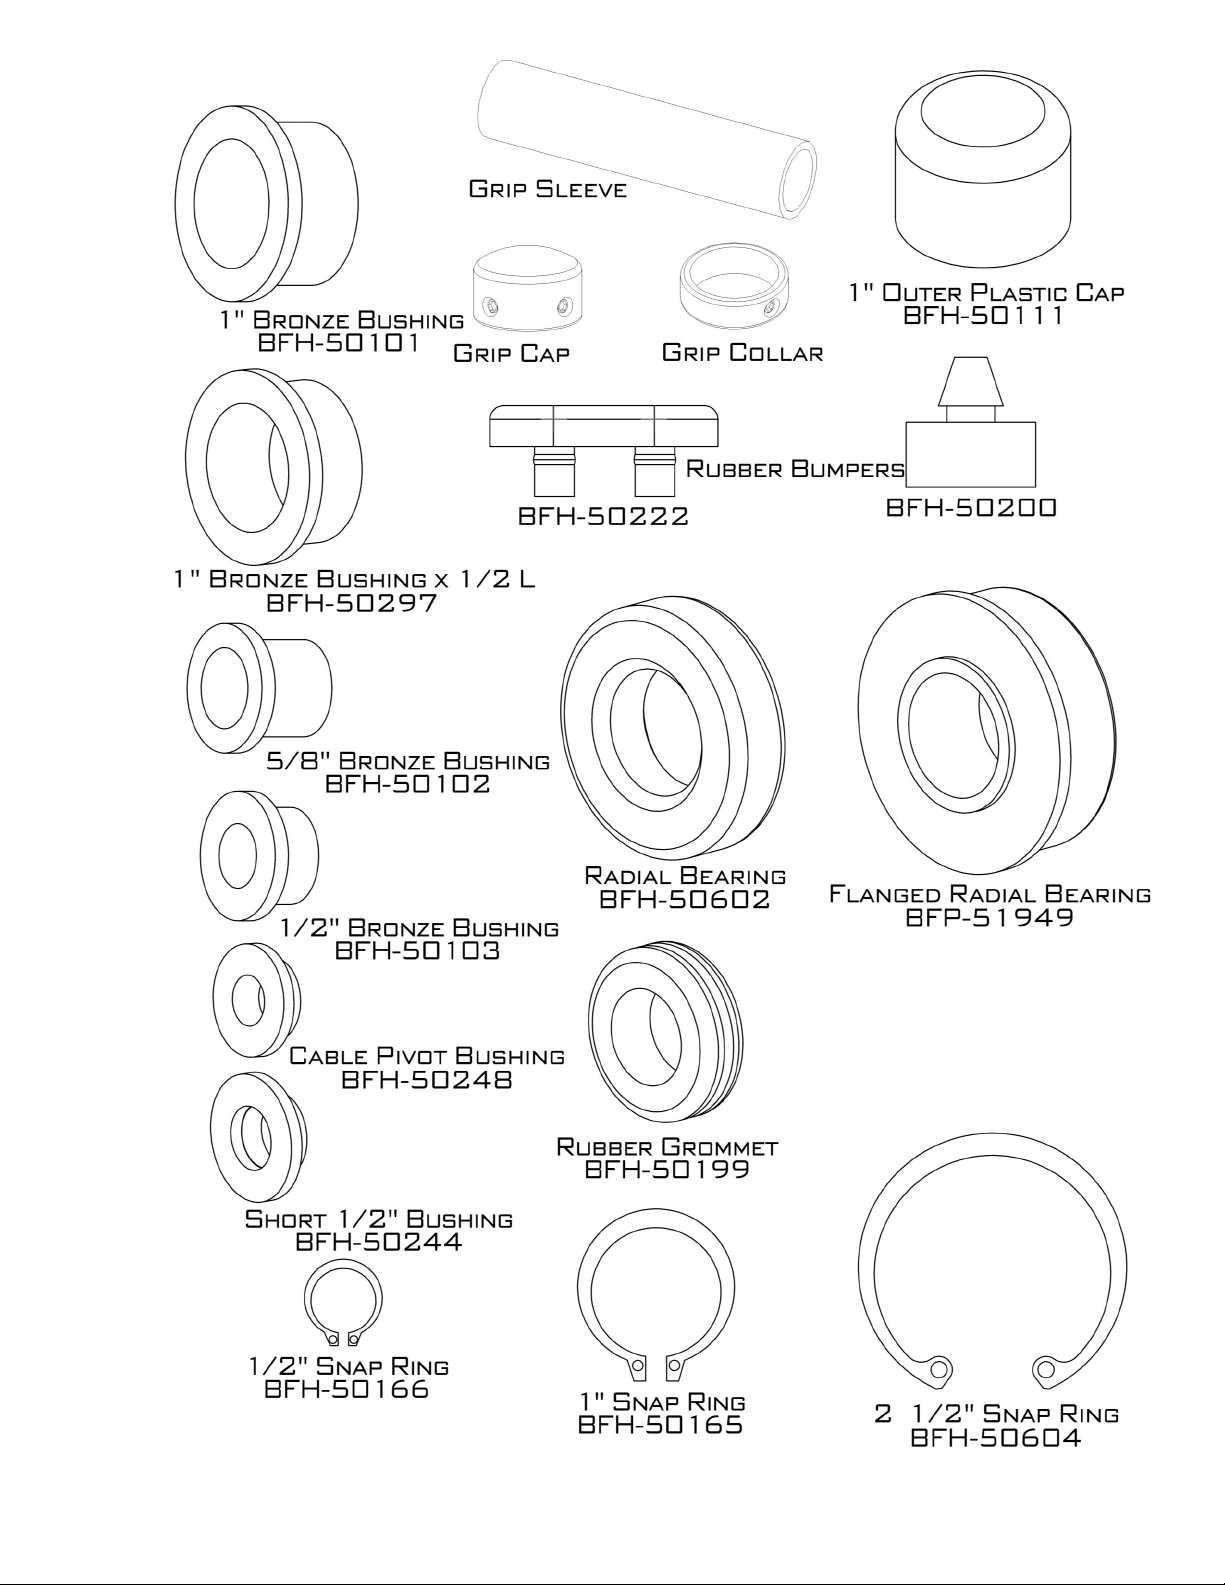
Batca Fitness Systems 6 LD-6 Owner's Manual
Page 7
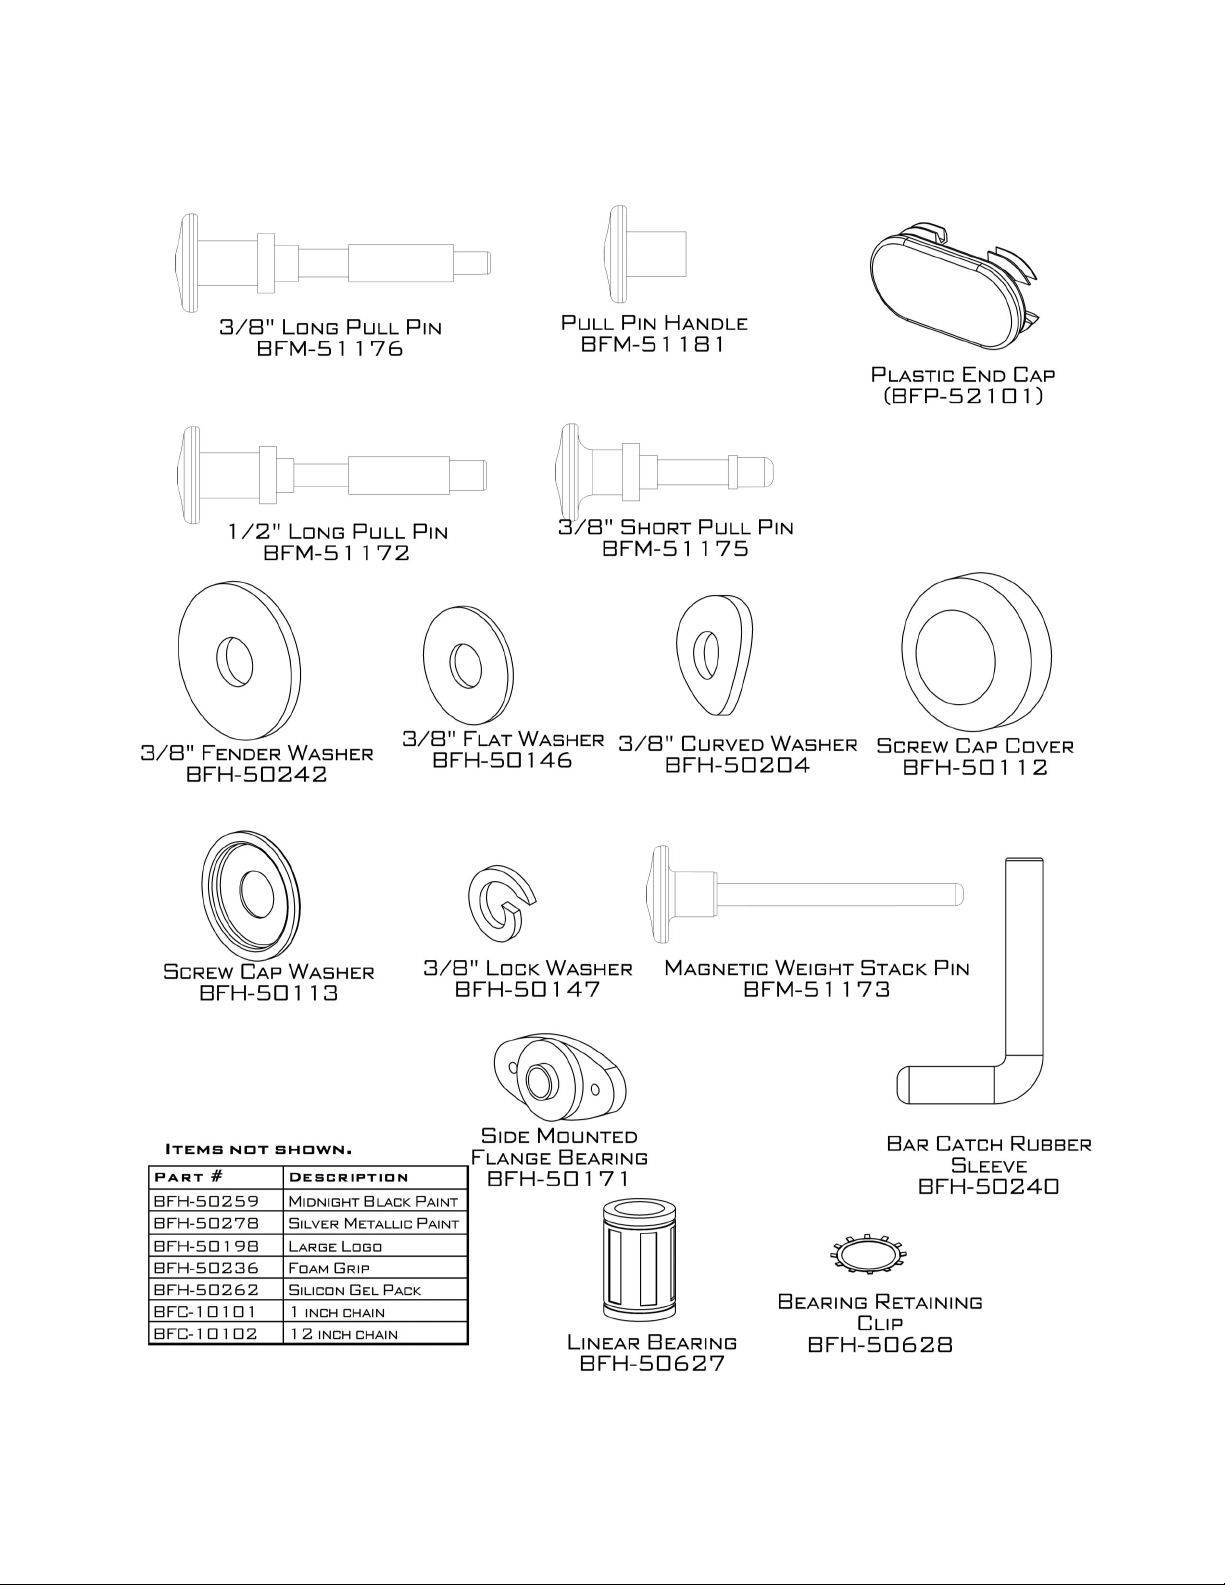
www.batcafitness.com 7 LD-6 Owner’s Ma nu al
Page 8
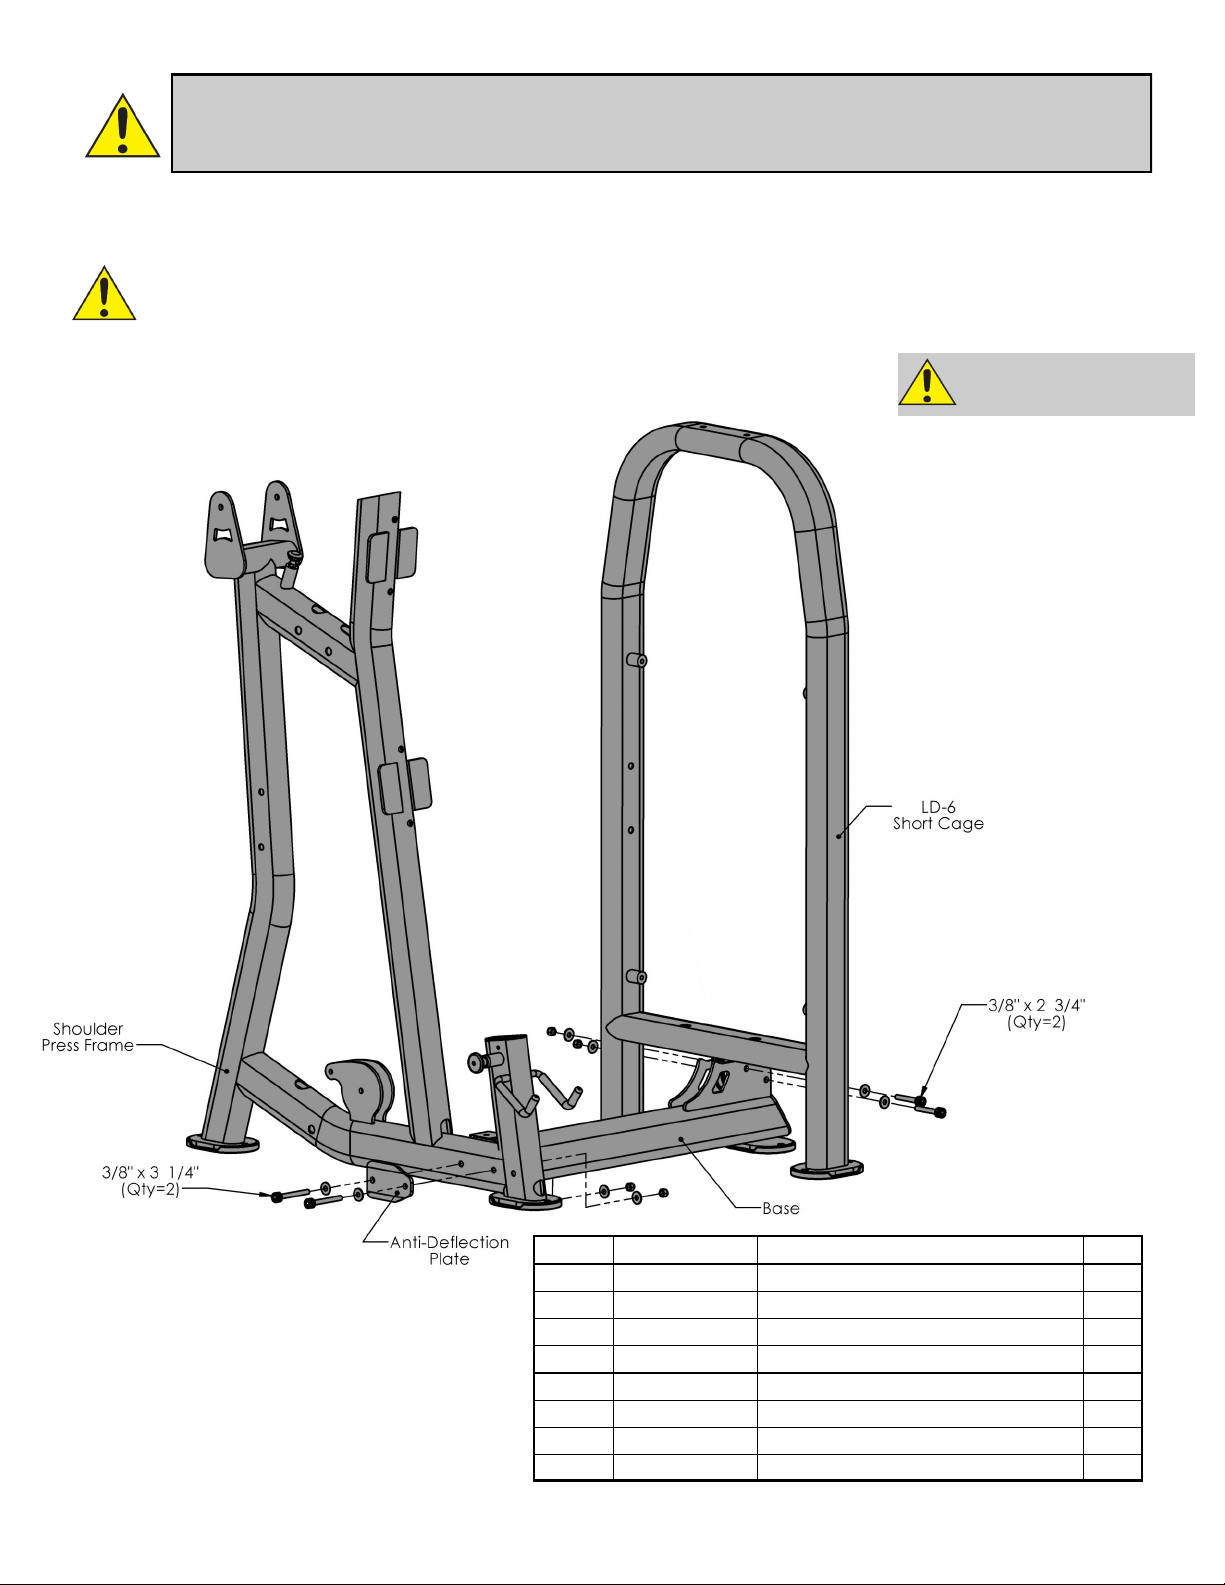
PLEASE FOLLOW ALL DIRECTIONS VERY
CAREFULLY FOR PROPER INSTALLATION.
Step 1:
Note: For a more consi stent appea ra nce, position all bolts in the dire cti on
shown in each figure
All Flat Washers and Nylocks are 3/8”
unless otherwise noted. Anywhere a washer is
against the round side of a tube there is to be a
3/8” CURVED WASHER
WASHER.
instead of a
.
3/8” FLAT
DO NOT TIGHTEN
BOLTS UNTIL STEP 3
Figure 1
Item # Part # Description Qty
1 BFP-10887 LD-6 Short Cage 1
2 BFP-10885 Base 1
3 BFP-10884 Shoulder Press Frame 1
4 BFP-51842 Anti-Deflection Plate 1
43 BFP-51750 SHCS 3/8” x 2 3/4” 2
45 BFP-51748 SHCS 3/8” x 3 1/4” 2
49 BFH-50146 3/8” Flat Washer 8
50 BFH-50157 3/8” Nylock 4
Batca Fitness Systems 8 LD-6 Owner's Manual
Page 9
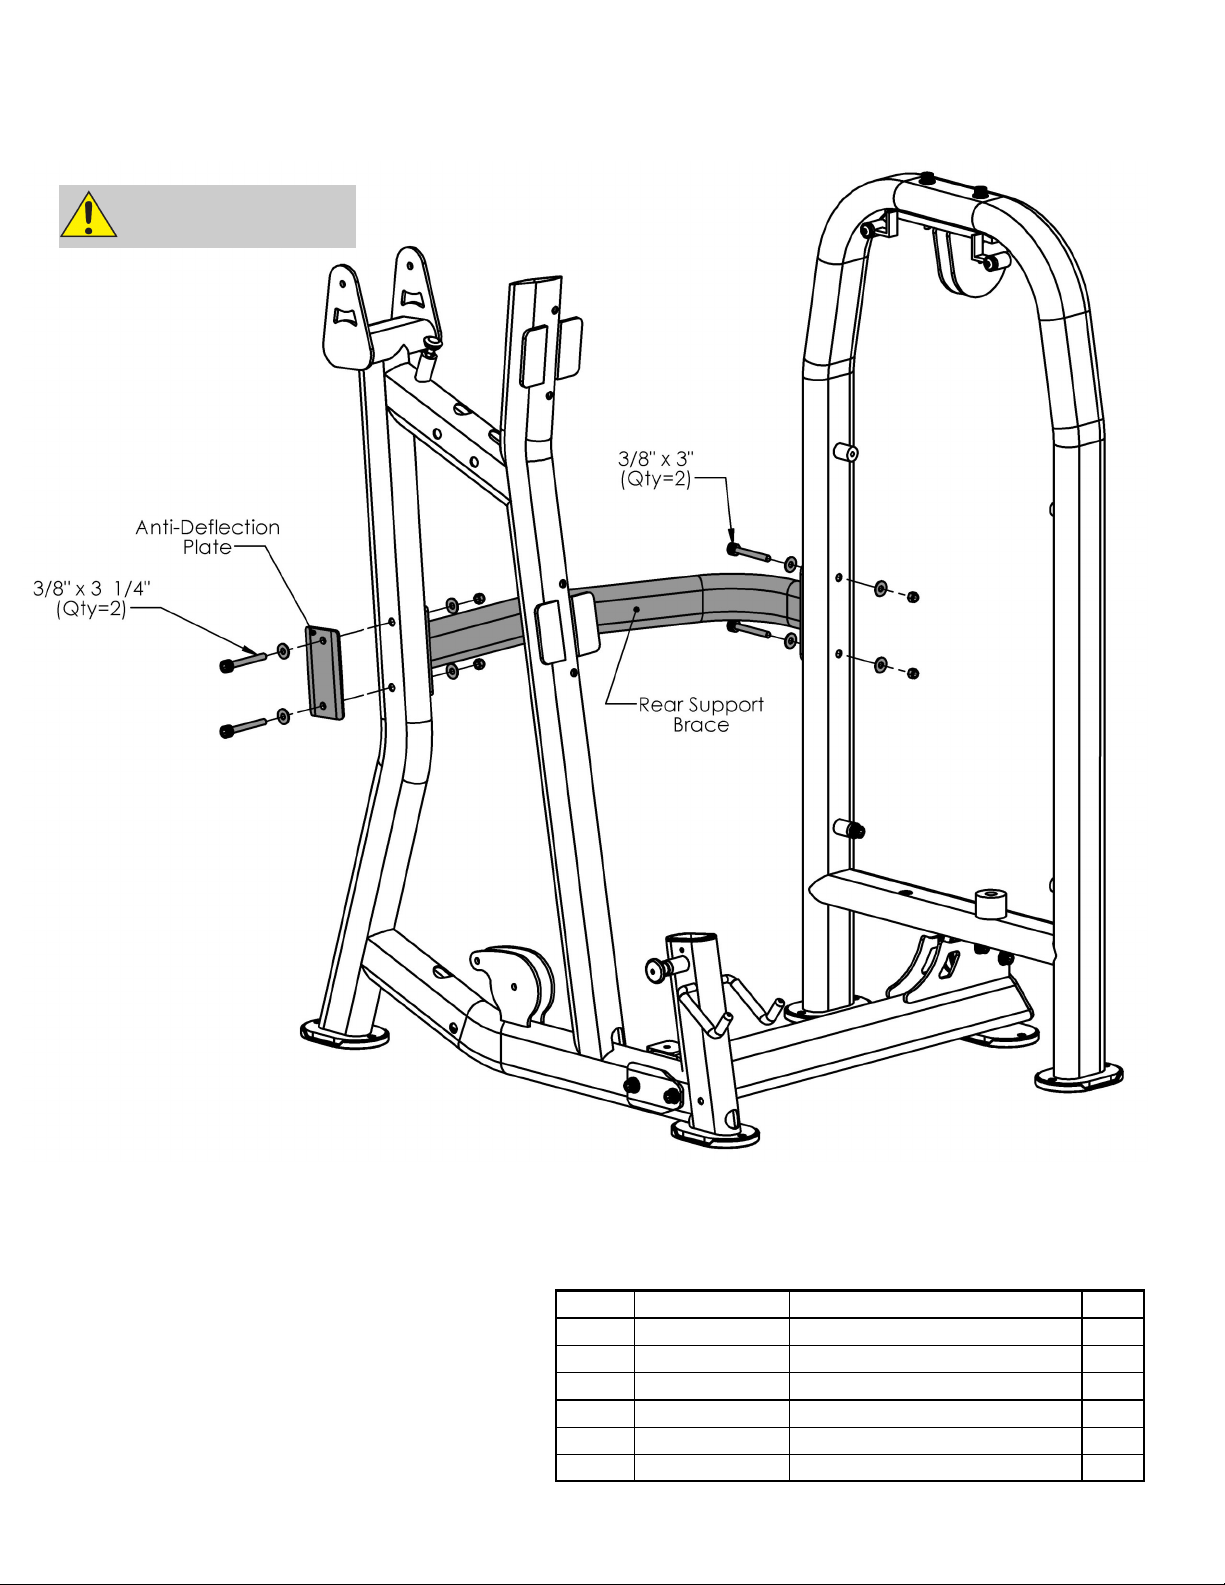
Step 2:
DO NOT TIGHTEN
BOLTS UNTIL STEP 3
Figure 2
All Flat Washers and Nylocks are 3/8” unless
otherwise noted.
Item # Part # Description Qty
5 BFP-10886 Rear Support Brace 1
6 BFP-51945 Anti Deflection Plate 1
44 BFP-51747 SHCS 3/8” x 3” 2
45 BFP-51748 SHCS 3/8” x 3 1/4” 2
49 BFH-50146 3/8” Flat Washer 8
50 BFH-50157 3/8” Nylock 4
www.batcafitness.com 9 LD-6 Owner’s Ma nu al
Page 10
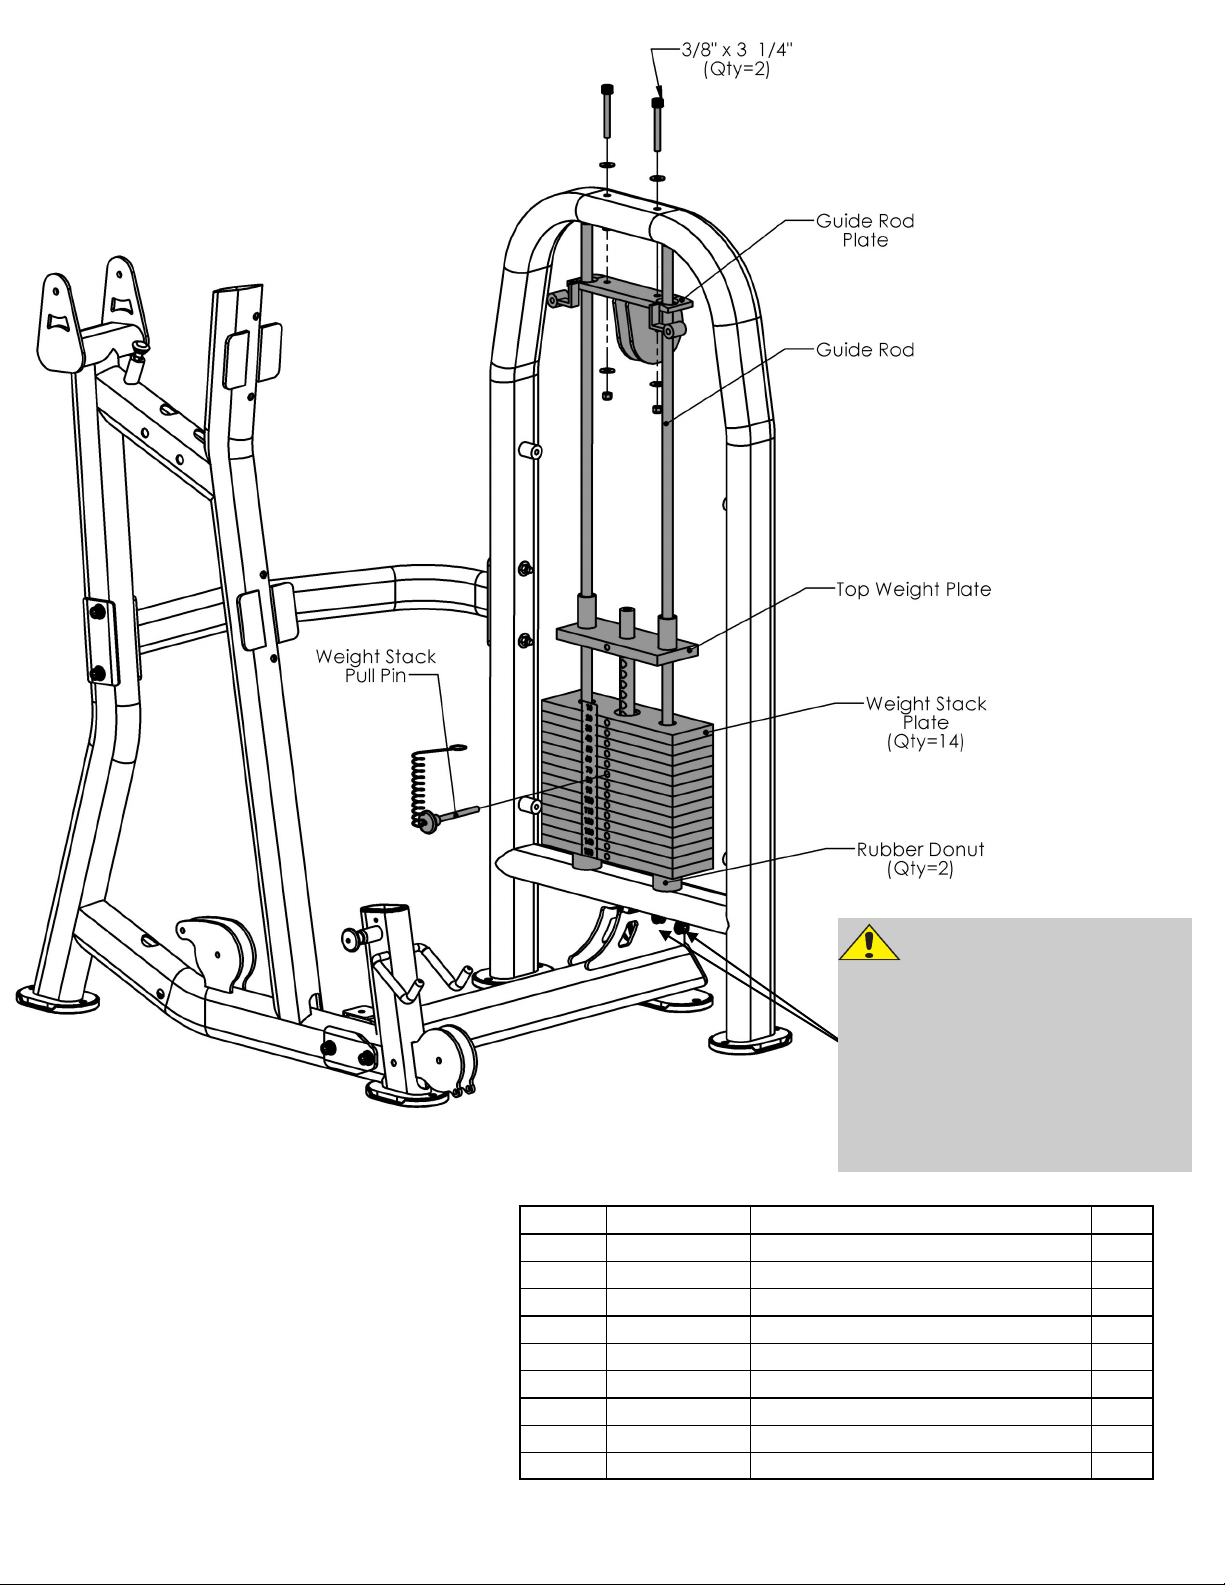
Step 3:
Make sure all bolts are
tightened before moving on
except for the SHCS 3/8” x 2
3/4” located under the cage. You
will need to remove these two
bolts in Step 6 when you are ready
Figure 3
to route the cable. Right now they
are being used to make sure the
assemblies are in the correct
location.
Item # Part # Description Qty
7 BFP-10888 Guide Rod Plate 1
8 BFP-51827 Guide Rod 2
9 BFP-10889 Top Weight Plate 1
10 BFM-50632 Weight Stack Plate 14
11 BFM-50529 Rubber Donut 2
24 BFM-51173 Weight Stack Pull Pin 1
All Flat Washers and Nylocks are 3/8” unless
otherwise noted.
45 BFP-51748 SHCS 3/8” x 3 1/4” 2
49 BFH-50146 3/8” Flat Washer 4
50 BFH-50157 3/8”Nylock 2
Batca Fitness Systems 10 LD-6 Owner's Manual
Page 11
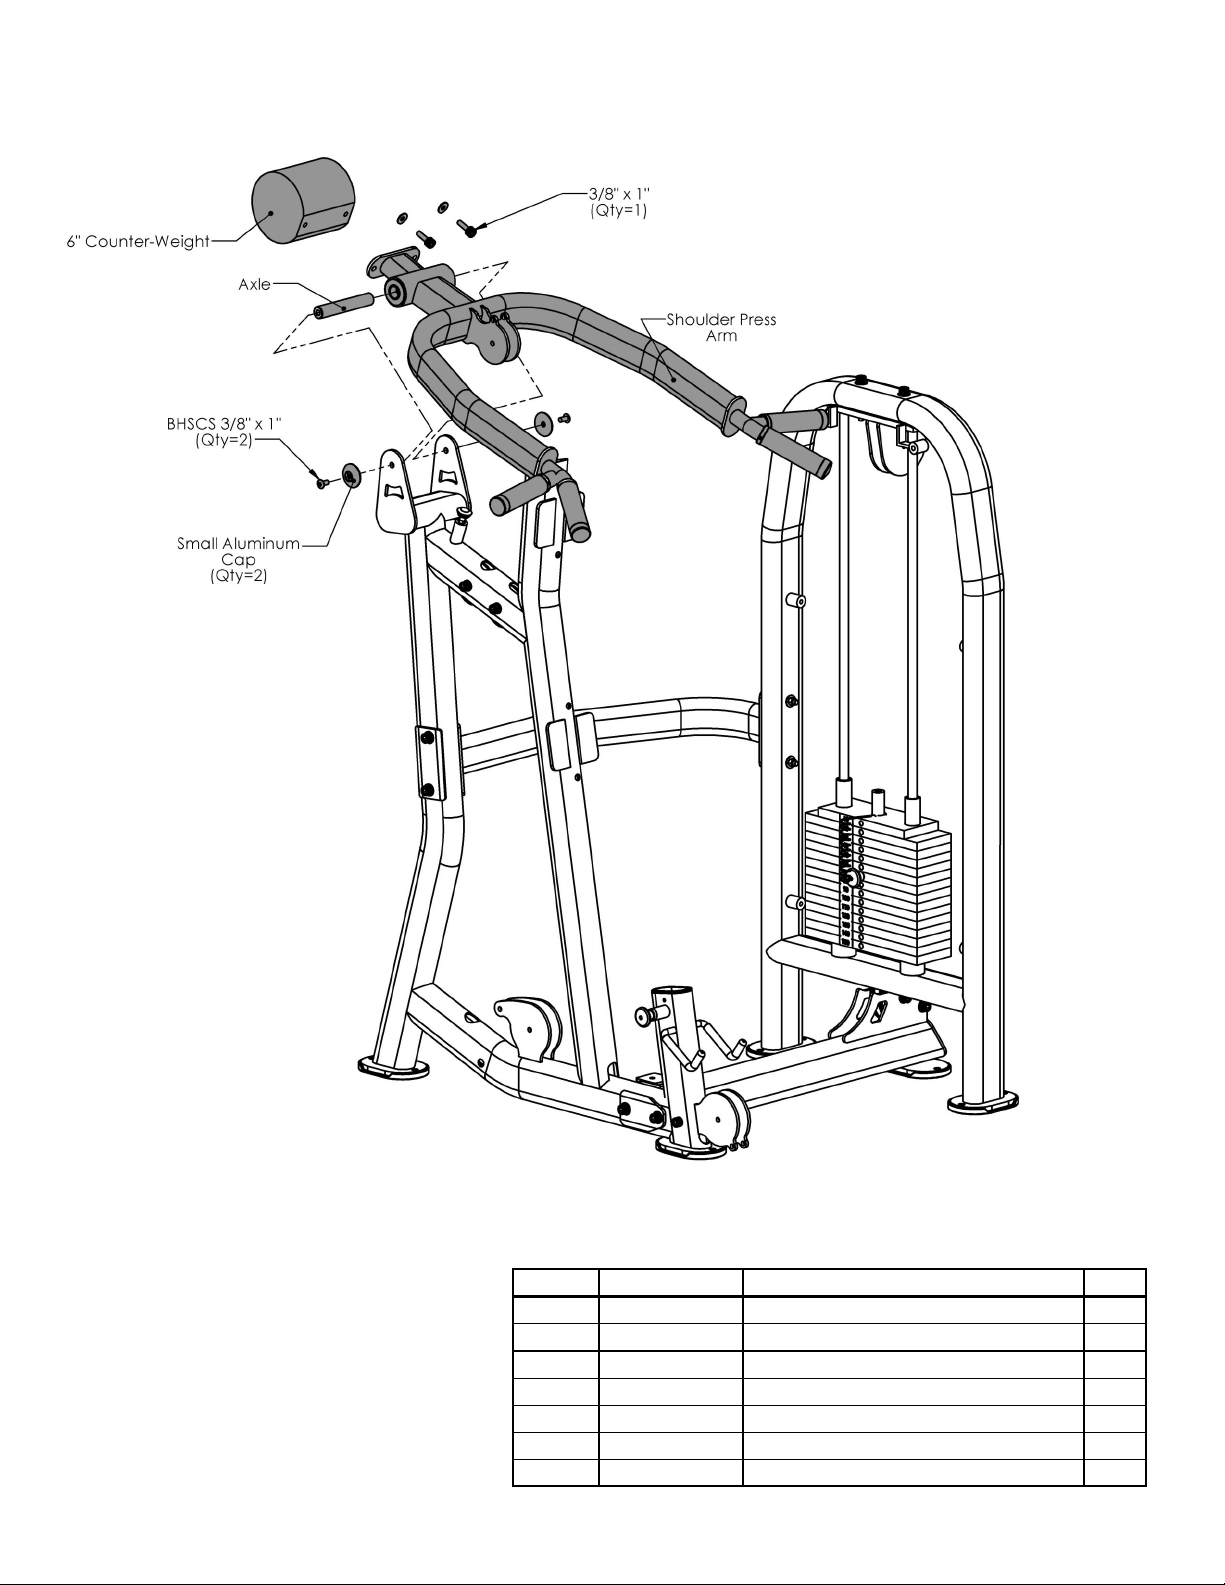
Step 4:
Figure 4
Item # Part # Description Qty
12 BFP-10890 Shoulder Press Arm 1
13 BFP-51776 Axle 1
14 BFP-51944 6” Counter-Weight 1
32 BFP-51696 Small Aluminum Cap 2
All Flat Washers and Nylocks are 3/8” unless
otherwise noted.
www.batcafitness.com 11 LD-6 Owne r ’ s Ma nu a l
38 BFH-50620 BHSCS 3/8” x1” 2
39 BFP-52376 SHCS 3/8” x 1” 2
49 BFH-50146 3/8” Flat Washer 2
Page 12
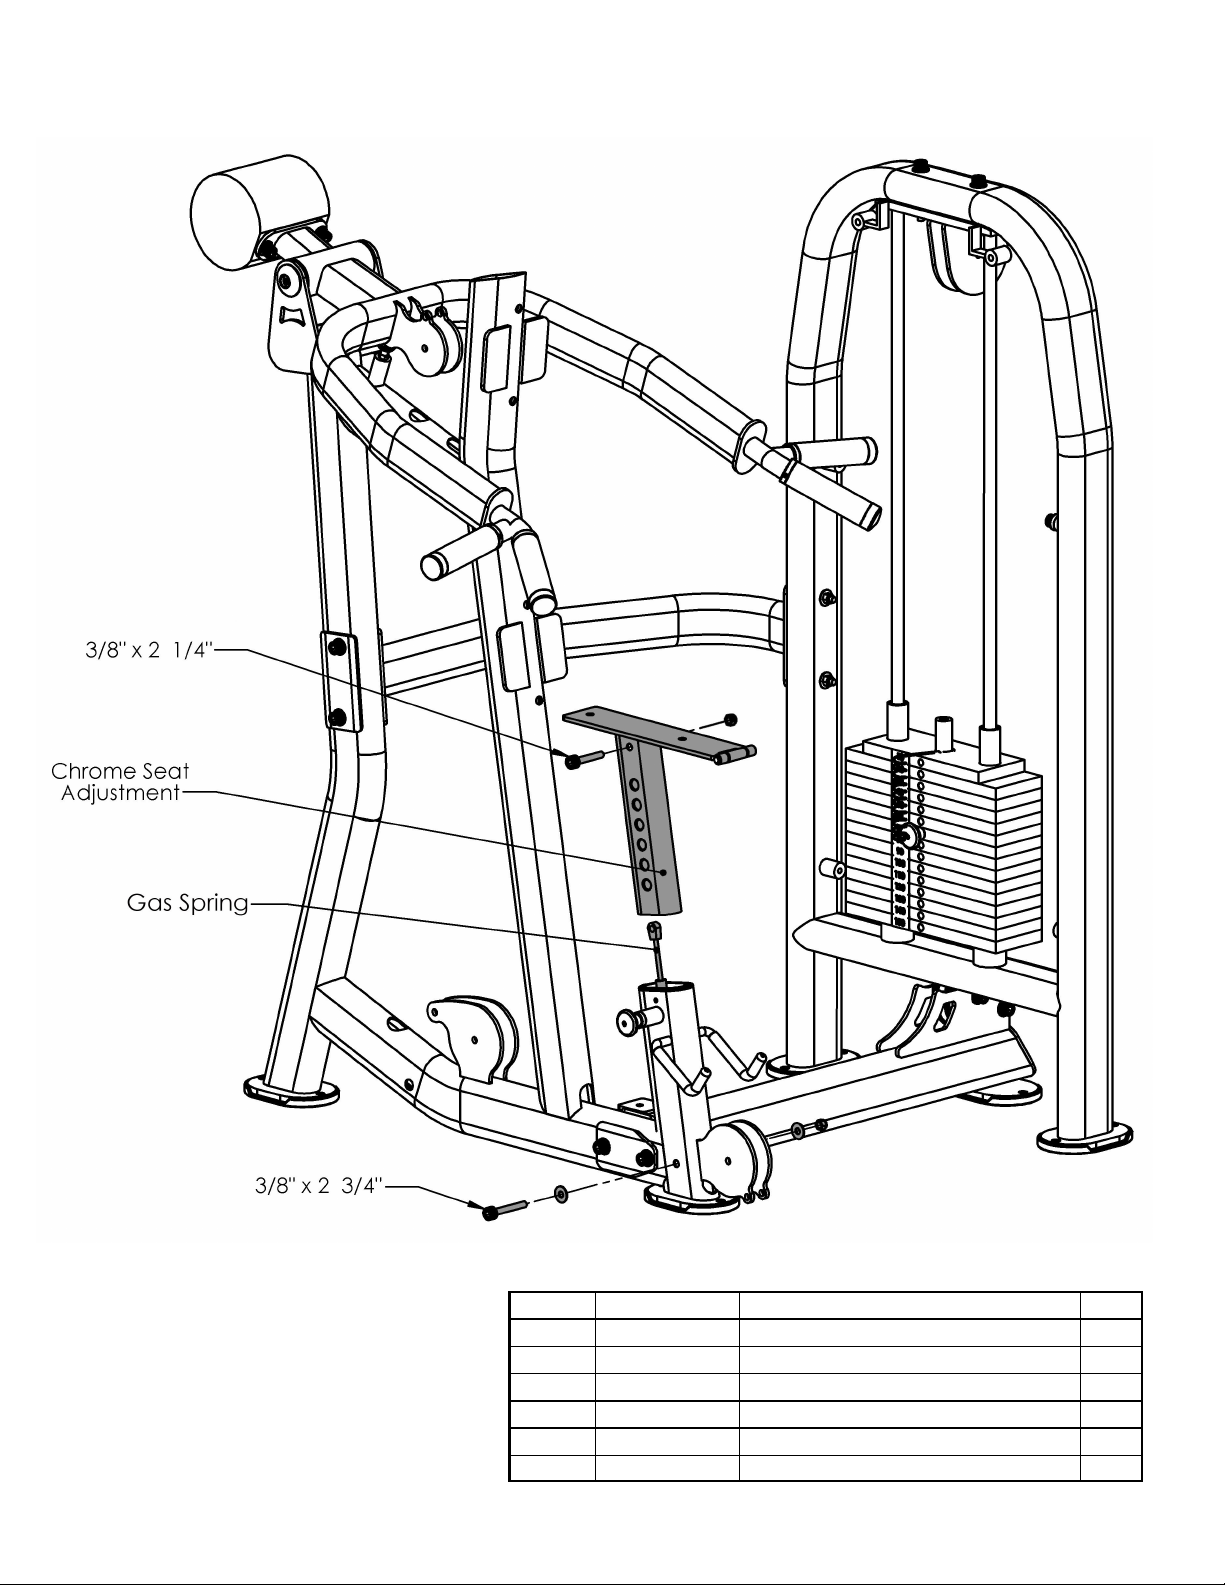
Step 5:
Figure 5
Item # Part # Description Qty
15 BFP-10891 Chrome Seat Adjustment 1
33 BFH-50210 Gas Spring 1
42 BFP-51752 SHCS 3/8” x 2 1/4” 1
All Flat Washers and Nylocks are 3/8” unless
otherwise noted.
43 BFP-51750 SHCS 3/8” x 2 3/4” 1
49 BFH-50146 3/8” Flat Washer 2
50 BFH-50157 3/8” Nylock 2
Batca Fitness Systems 12 LD-6 Owner's Manual
Page 13
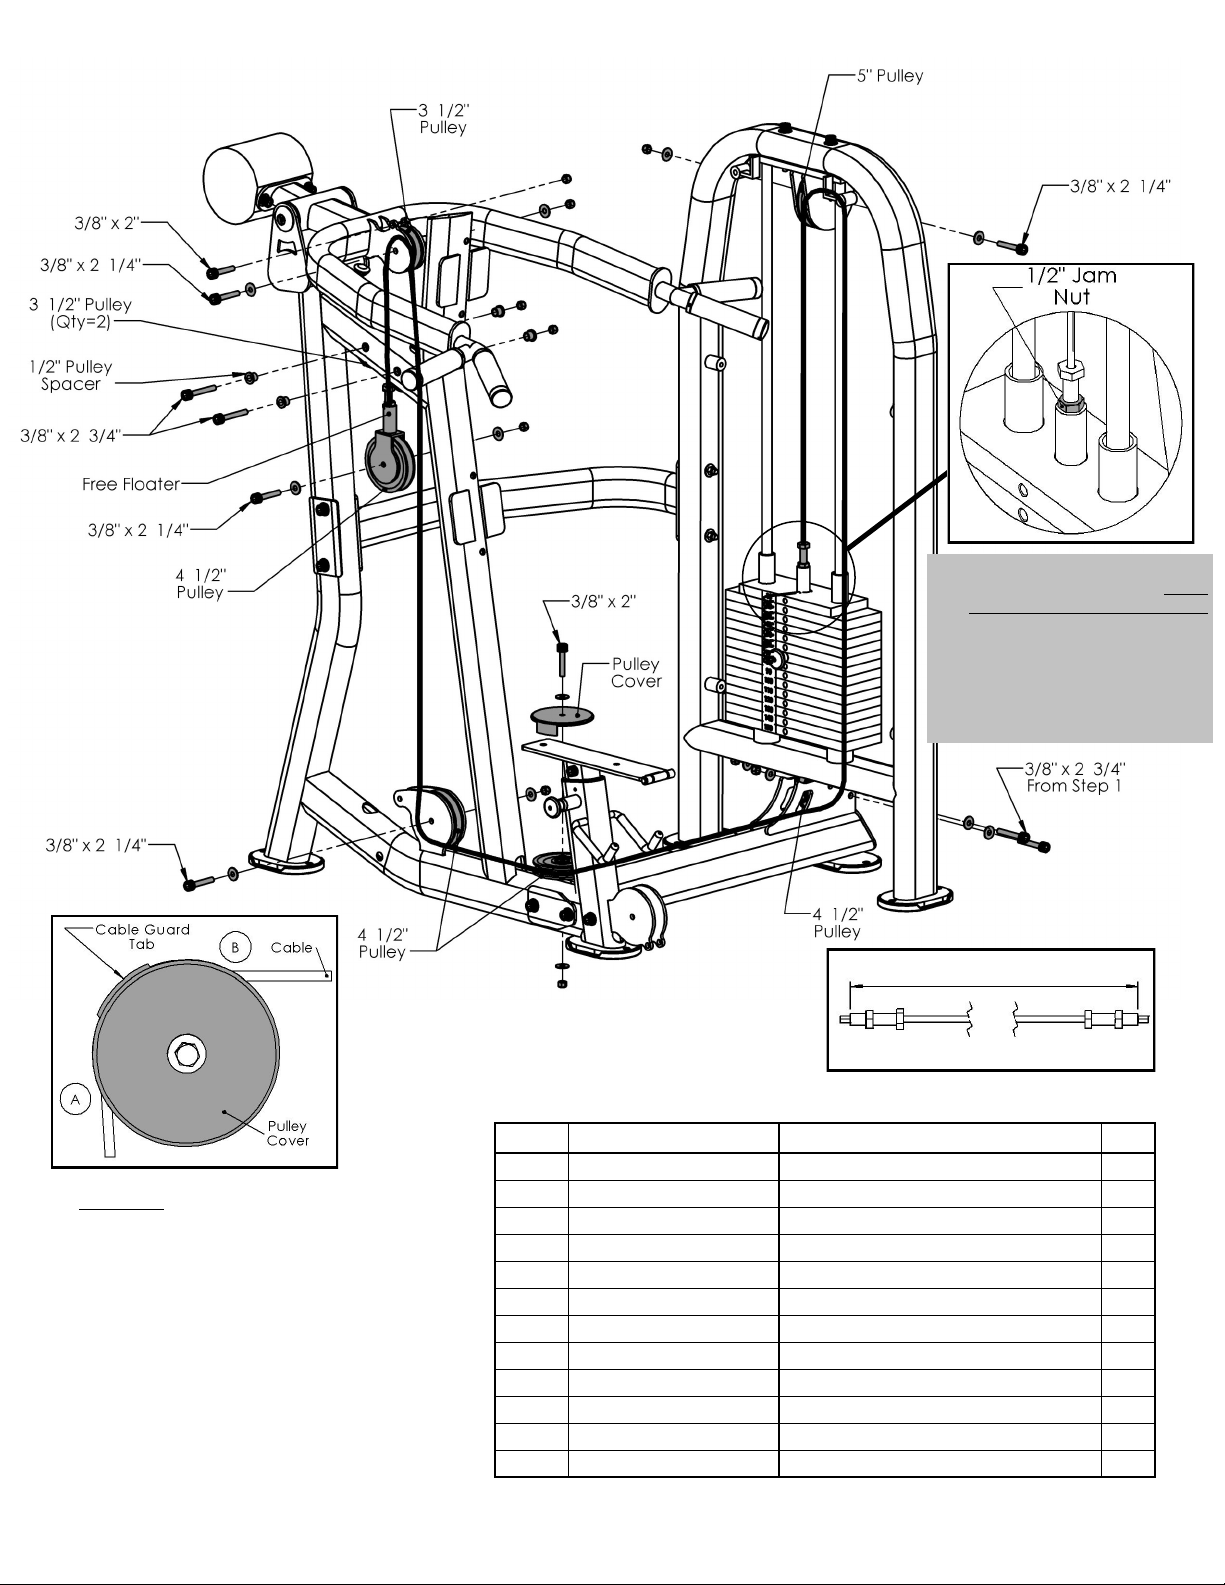
Step 6:
Figure 6
Note: The threaded bolt on
the end of the cable must
be threaded at least 1/2”
the Top Plate of the
weight stack. The bolt
must also be secured with
a 1/2” Jam Nut to ensure a
s a f e a n d p r o p e r
connection.
194 5/16”
CAB-15008
All Flat Washers and Nylocks are 3/8” unless otherwise noted.
Item # Part # Description Qty
22 CAB-15008 Weight Stack to Free Floater 1
Position the cable guard tab on the
Pulley Cover so that the tab prevents
the cable from coming out of it’s track
on the 4 1/2” Pulley. An example of this
positioning can be seen in the figure
above. The cable guard tab should be
positioned so that it is in the middle of
the cable wrap on the 4 1/2” Pulley,
between points “A” and “B”. This will
allow better protection and prevent
the cable from rubbing the cable guard
tab.
www.batcafitness.com 13 LD-6 Owne r ’ s Ma nu a l
16 BFP-10838 Free Floater 1
17 BFM-50345 Pulley Cover 1
29 BFH-50173 3 1/2”Pulley 3
30 BFH-50174 4 1/2” Pulley 3
31 BFH-50530
5” Pulley
41 BFP-51759 SHCS 3/8” x 2” 2
42 BFP-51752 SHCS 3/8” x 2 1/4” 4
43 BFP-51750 SHCS 3/8” x 2 3/4” 2
47 BFP-51946 1/2” Pulley Spacer 4
49 BFH-50146 3/8” Flat Washer 10
50 BFH-50157 3/8” Nylock 8
.
1
Page 14
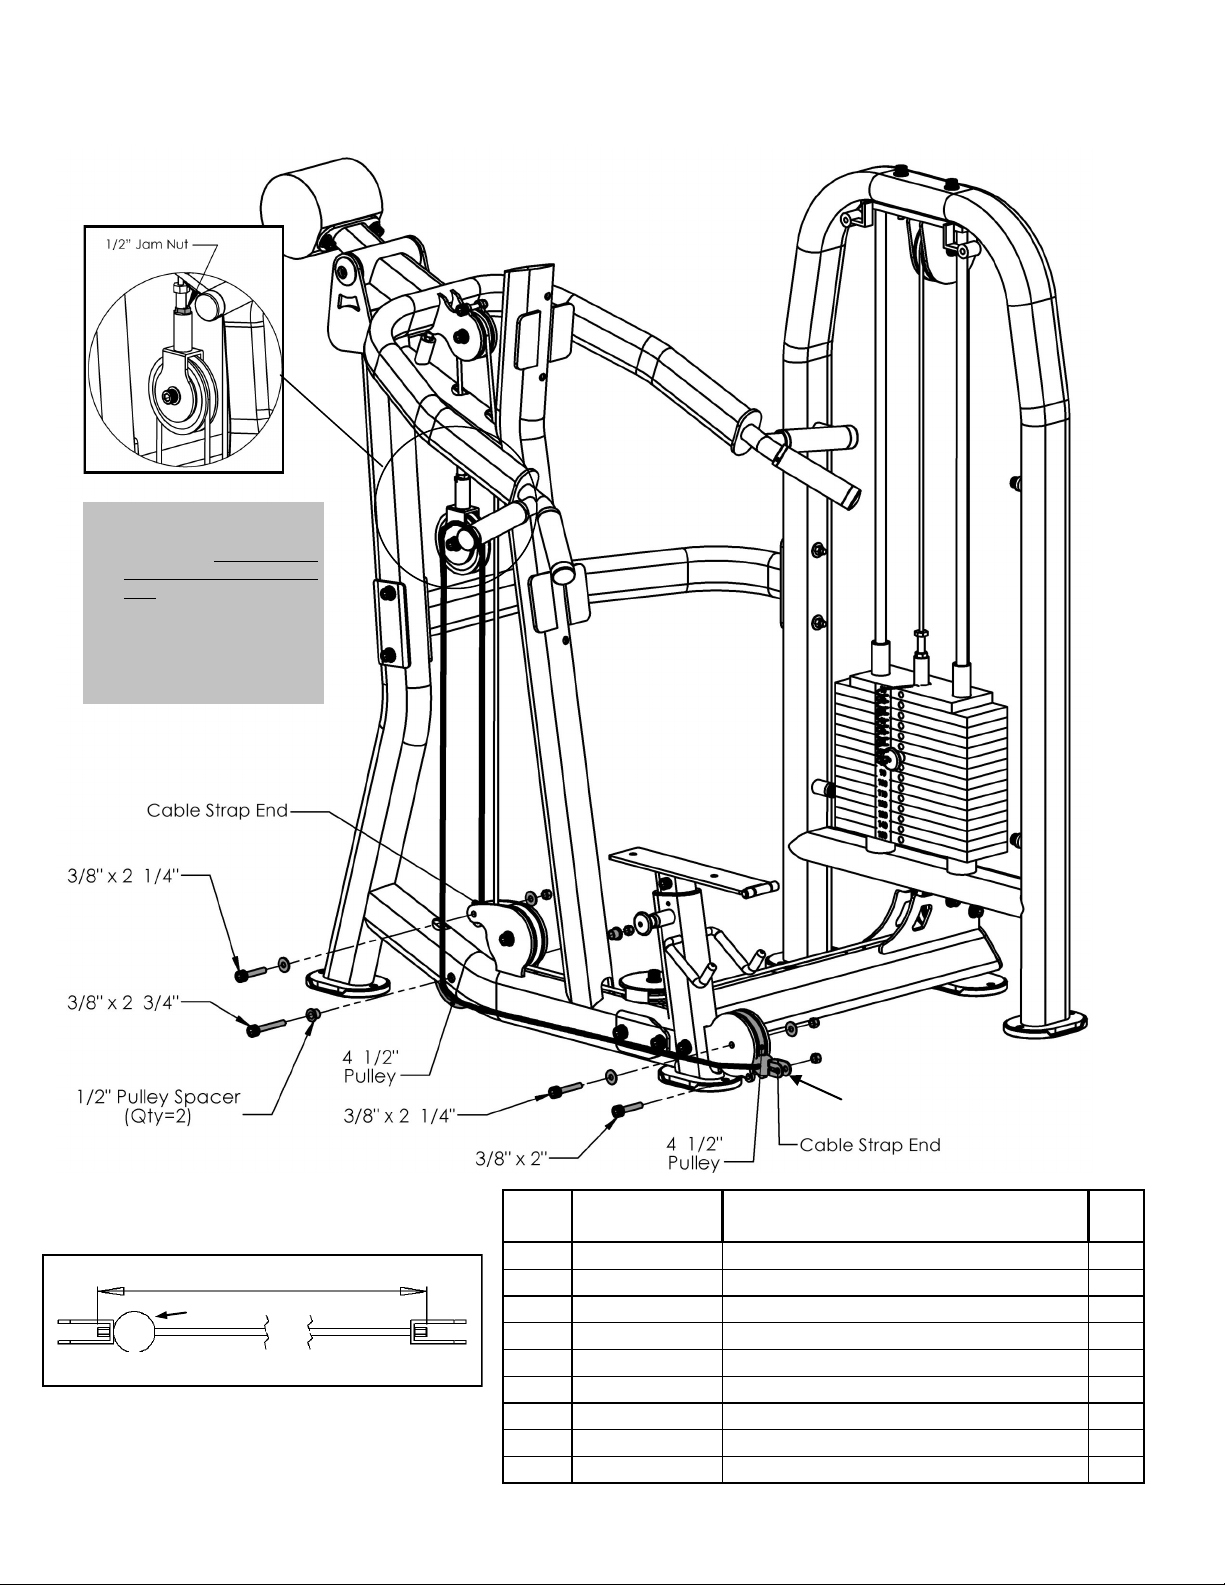
Step 7:
Note: The threaded bolt
on the end of the
c a bl e mu st b e
threaded at least
1/2” into the Free
Floater. The bolt
must also be secured
with a 1/2” Jam Nut to
ensure a safe and
proper connection.
Start Here
Figure 7
Item # Part # Description Qty
23 CAB-15009
90 9/16”
medium ball
30 BFH-50174 4 1/2” Pulley 2
41 BFP-51759 SHCS 3/8” x 2” 1
42 BFP-51752 SHCS 3/8” x 2 1/4” 2
CAB-15009
All Flat Washers and Nylocks are 3/8” unless
otherwise noted.
43 BFP-51750 SHCS 3/8” x 2 3/4” 1
47 BFP-51946 1/2” Pulley Spacer 2
49 BFH-50146 3/8” Flat Washer 4
50 BFH-50157 3/8” Nylock 4
52 BFH-50227 Cable Strap 2
Batca Fitness Systems 14 LD-6 Owner's Manual
Cable Lockout to Low Pulley
1
Page 15
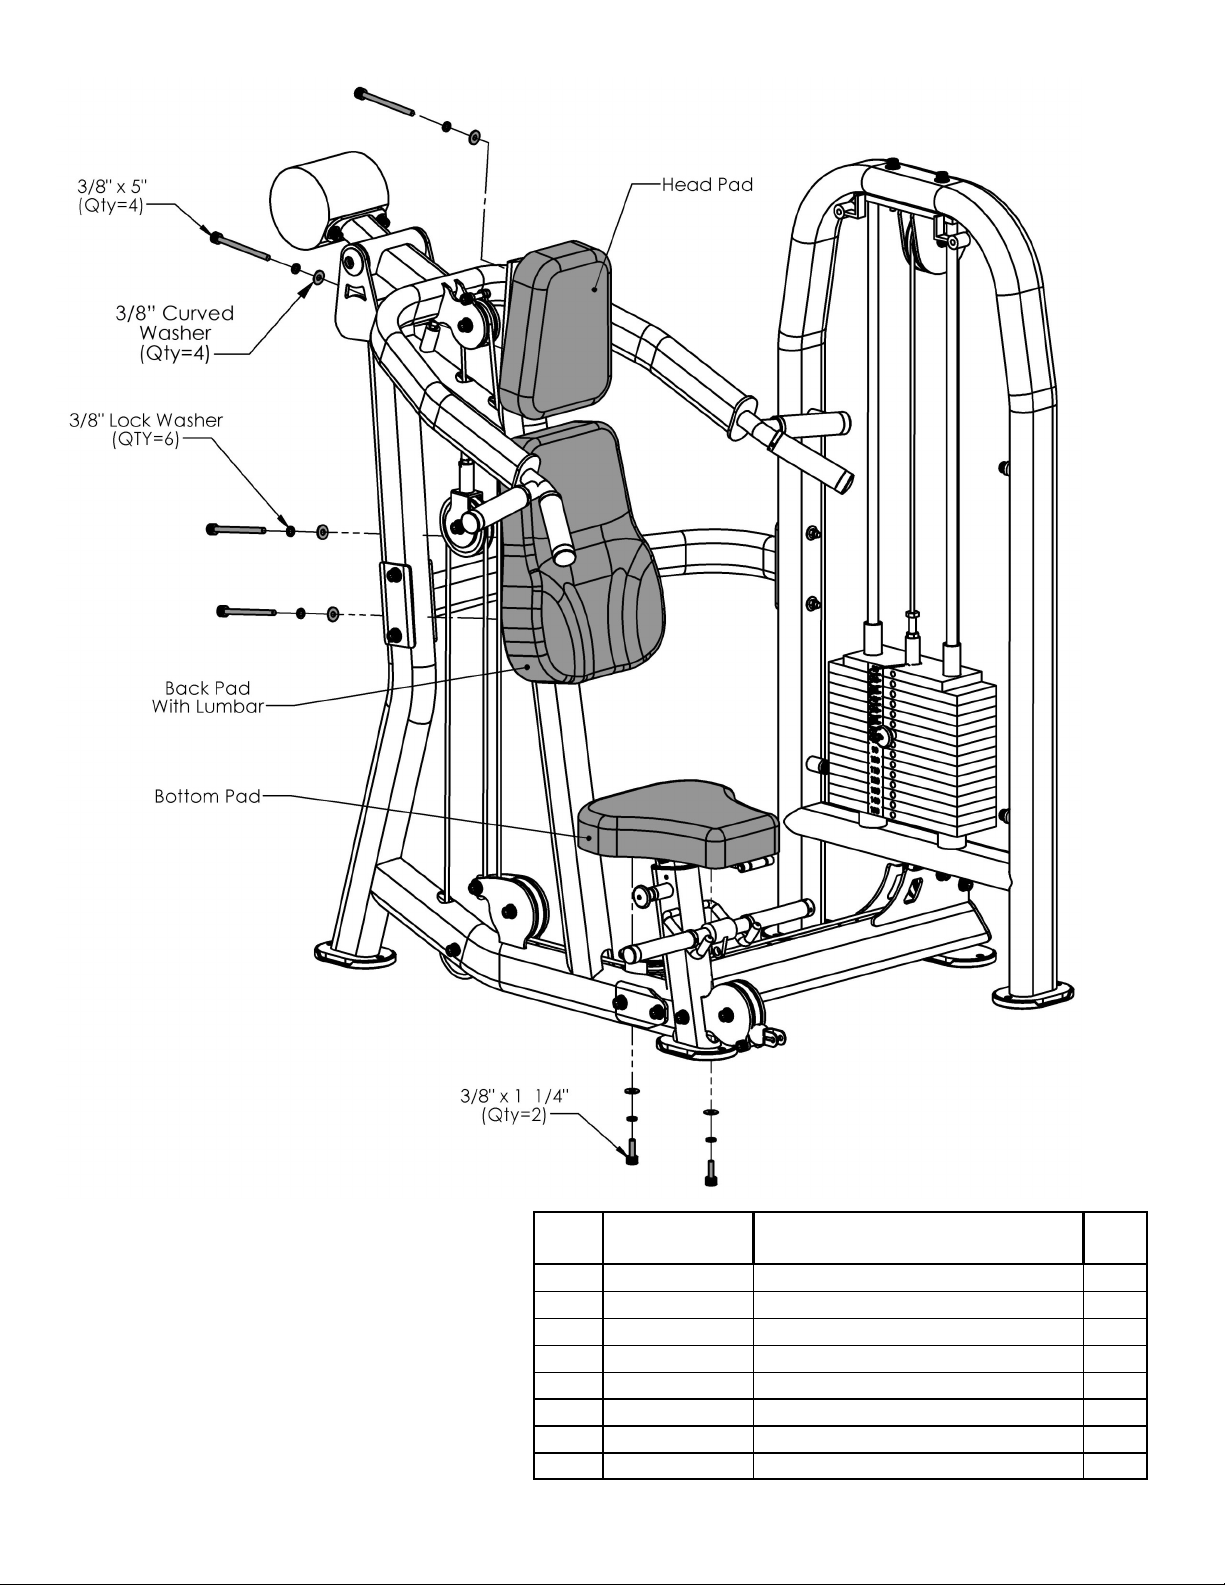
Step 8:
Figure 8
Item # Part # Description Qty
26 BFP-52137
Head Pad
27 BFP-52136 Back Pad With Lumbar 1
28 BFP-52141 Bottom Pad 1
40 BFP-51653 SHCS 3/8” x 1 1/4” 2
All Flat Washers and Nylocks are 3/8” unless
otherwise noted. Anywhere a washer is against the
round side of a tube there is to be a
WASHER
instead of a
3/8” FLAT WASHER.
3/8” CURVED
46 BFP-51799 SHCS 3/8” x 5” 4
48 BFH-50204 3/8” Curved Washer 4
51 BFH-50147 3/8” Lock Washer 6
49 BFH-50146 3/8” Flat Washer 6
www.batcafitness.com 15 LD-6 Owne r ’ s Ma nu a l
1
Page 16
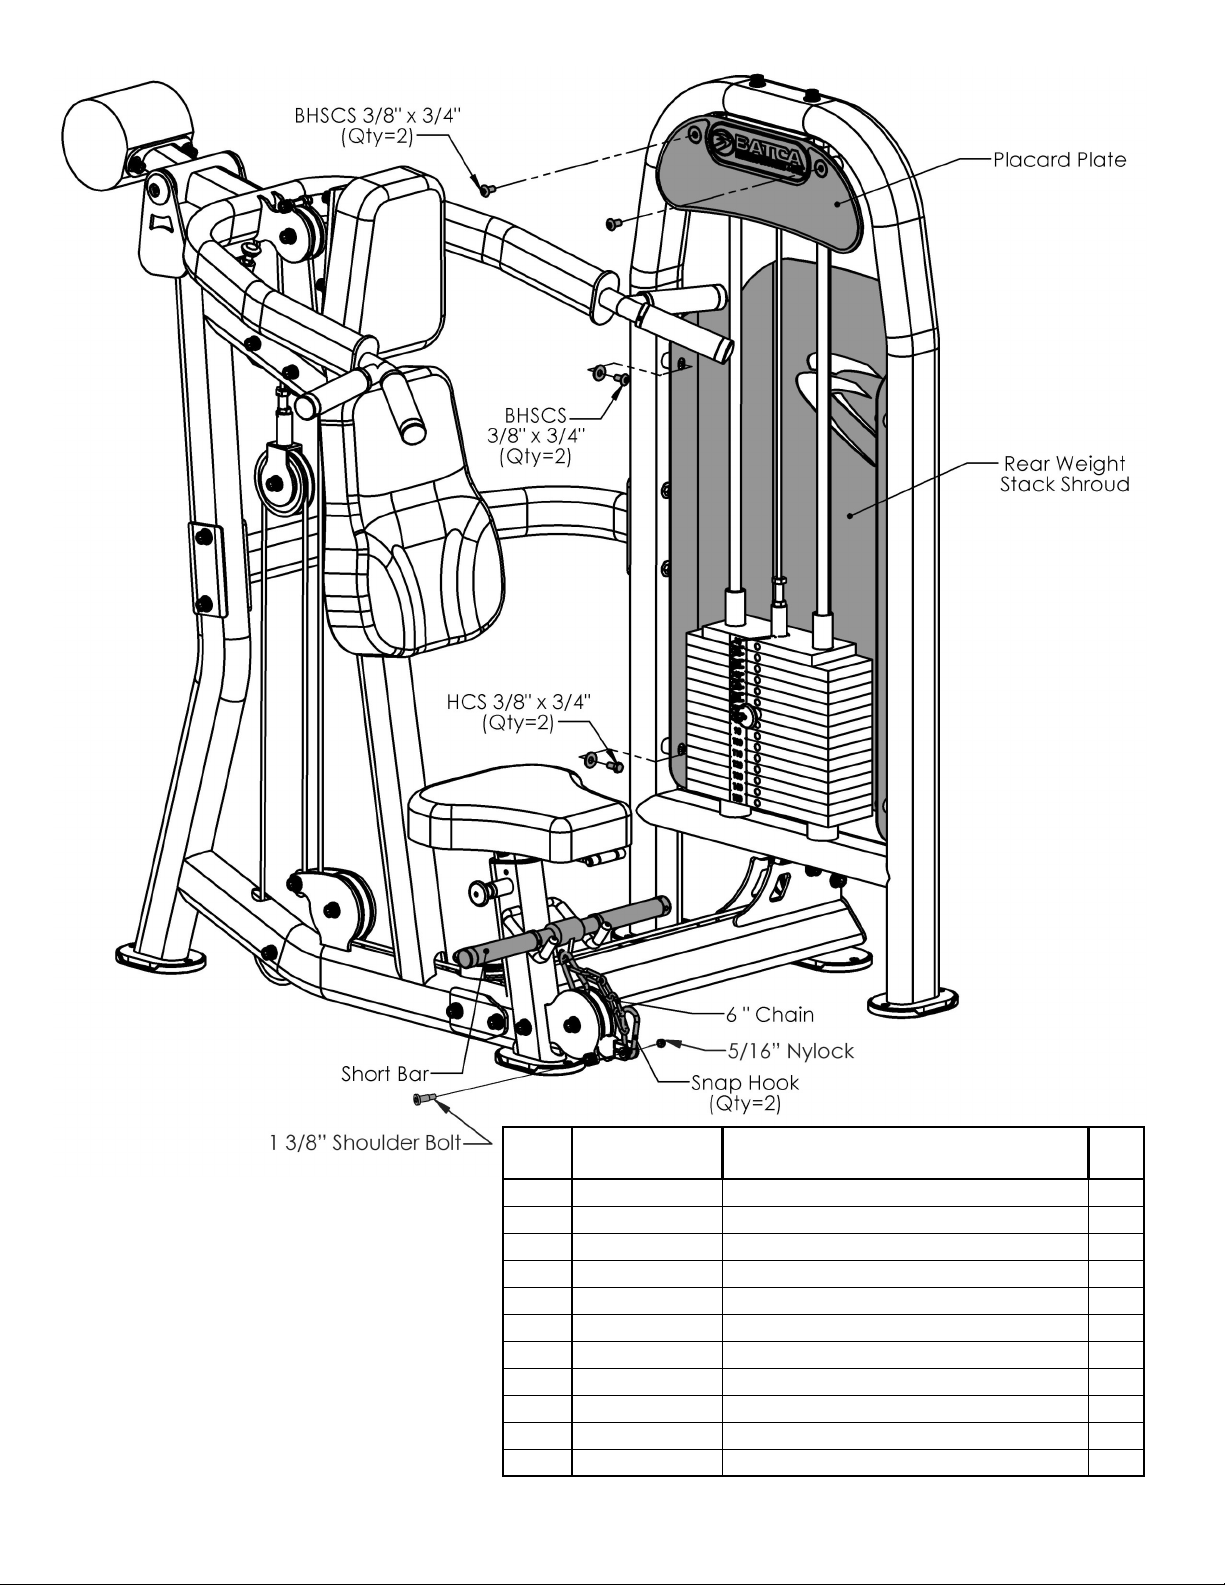
Step 9:
Item # Part # Description Qty
Figure 9
18 BFP-51711
19 BFP-51740 Rear Weight Stack Shroud 1
25 BFC-50126 Short Bar 1
35
6xBFC-50128
34 BFH-50188 Snap Hook 2
36 BFP-52430 BHSCS 3/8” x 3/4” 4
37 BFH-50254 HCS 3/8” x 3/4” 2
All Flat Washers and Nylocks are 3/8” unless
otherwise noted.
49 BFH-50146 3/8” Flat Washer 4
53 BFM-51464 Ankle Strap 1
54 BFH-50351 1 3/8” Shoulder Bolt 1
55 BFH-50267 5/16” Nylock 1
Batca Fitness Systems 16 LD-6 Owner's Manual
Placard Plate
6x 1” inch link Chain 1
1
Page 17
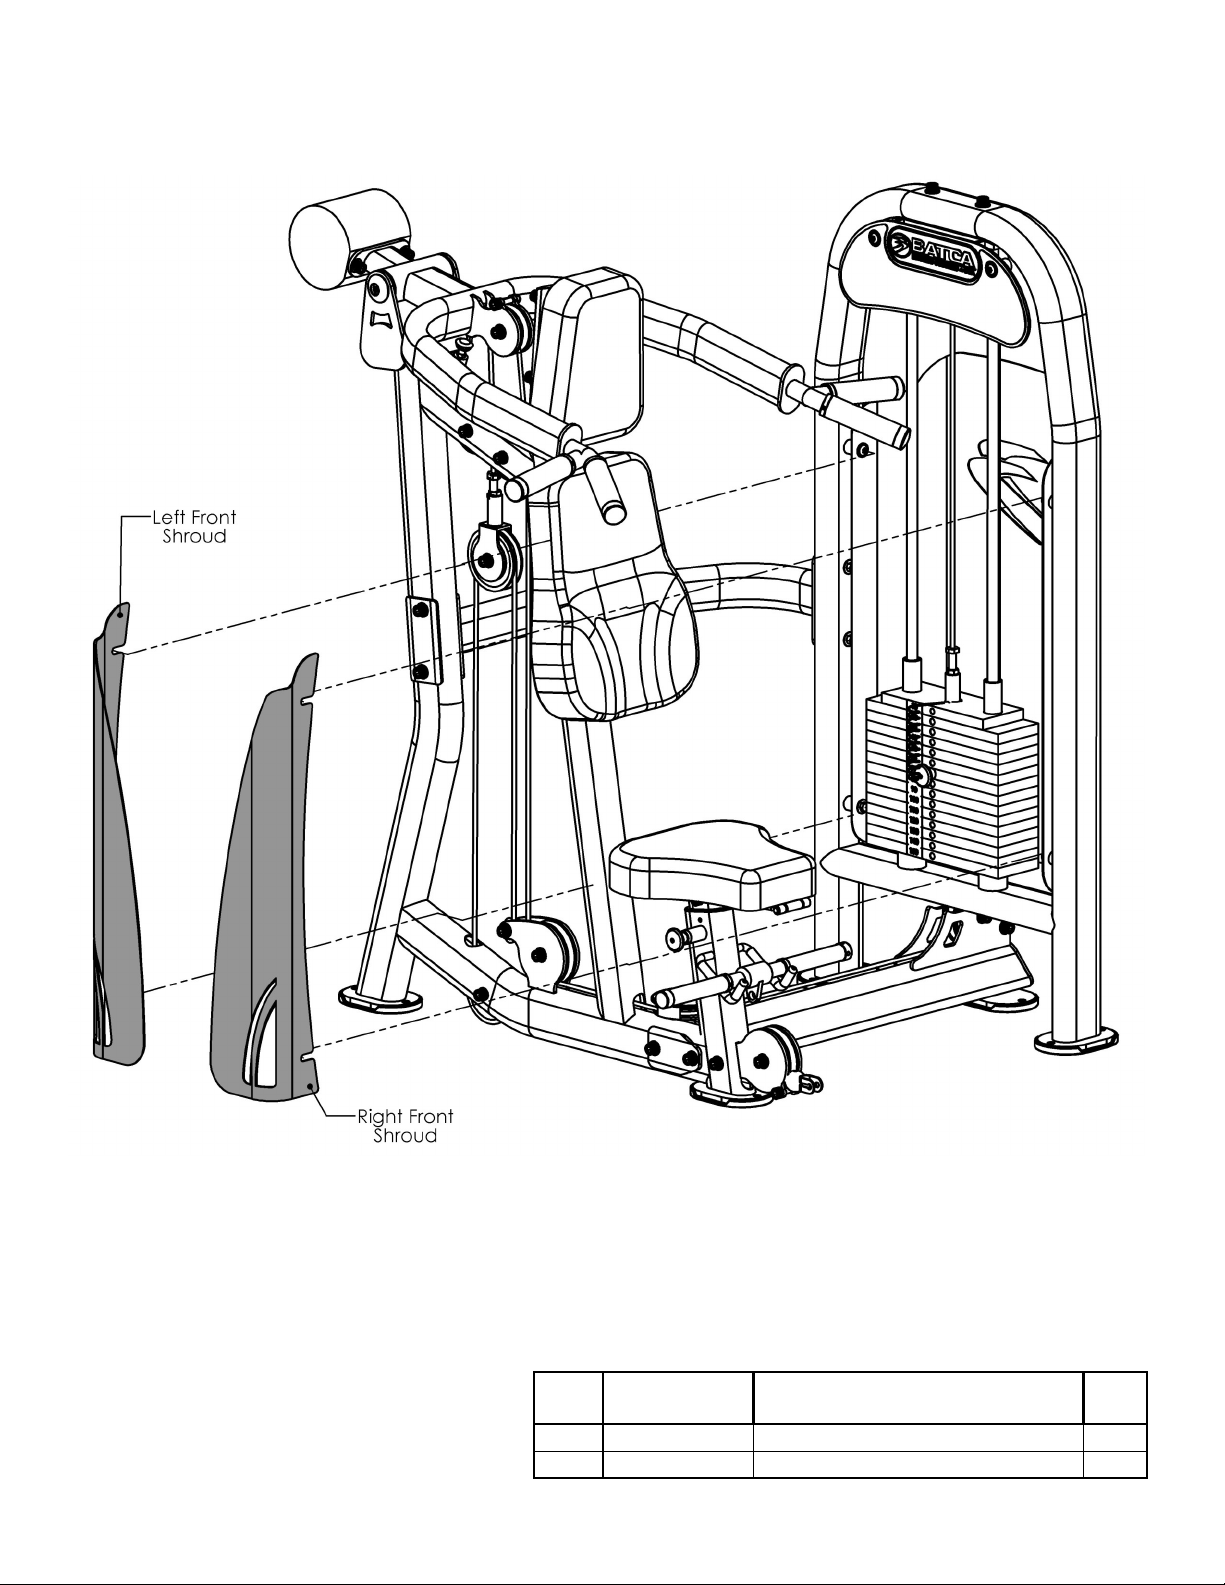
Step 10:
Figure 10
All Flat Washers and Nylocks are 3/8” unless
otherwise noted.
Batca Fitness Systems 17 LD-6 Owner's Manual
Item # Part # Description Qty
20 BFP-51741
21 BFP-51742 Right Front Shroud 1
Left Front Shroud
1
Page 18
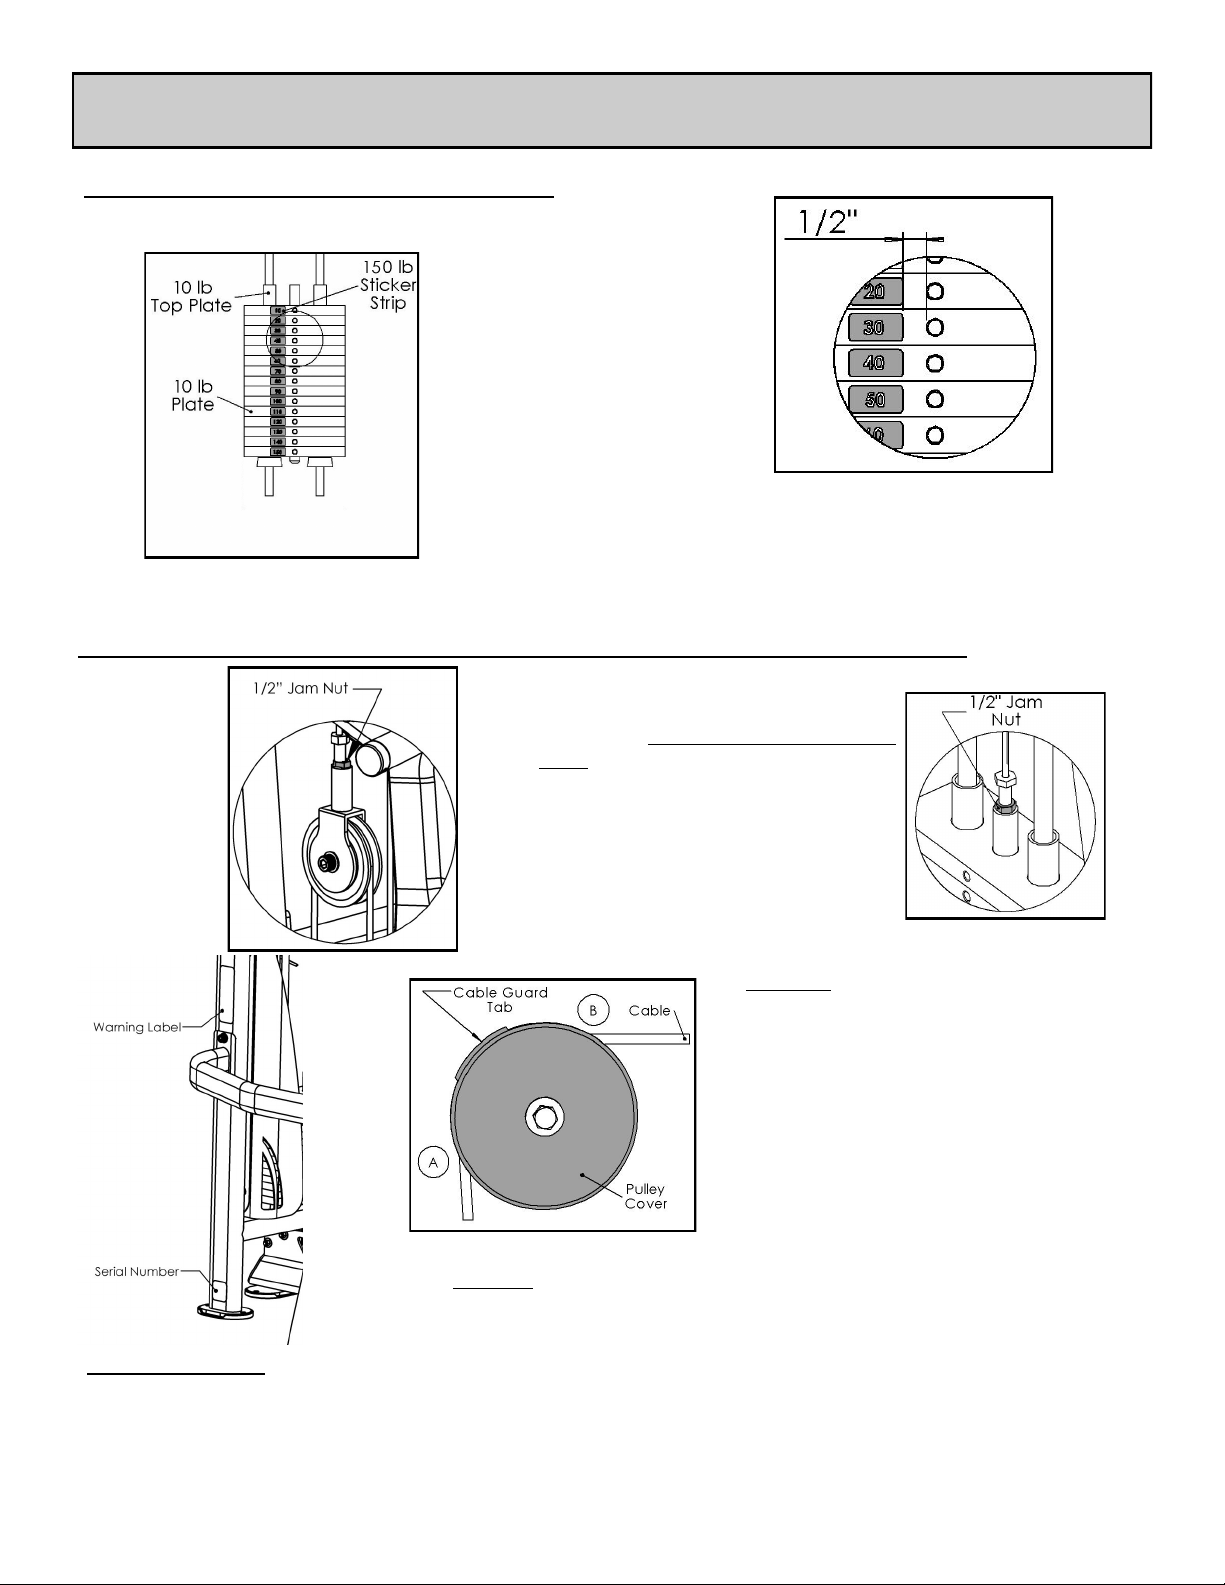
Final Assembly and Troubleshooting
Weight Stack Decals:
150lb Stack
IMPORTANT - Check These Components Before Using Gym:
Each Cable with a threaded bolt on
either end must be threaded at least
1/2” into its attachment, whether it
be a Free Floater, Lockout Free
Free Floater
Floater, or the Top Plate of the
weight stack. Each must also be
secured with a 1/2” Jam Nut to
ensure a safe and proper connection.
Top Plate
Position the cable guard tab on the
Pulley Cover so that the tab prevents
the cable from coming out of it’s track
on the 4 1/2” Pulley. An example of this
positioning can be seen in the figure to
the left. The cable guard tab should be
positioned so that it is in the middle of
the cable wrap on the 4 1/2” Pulley,
between points “A” and “B”. This will
allow better protection and prevent
the cable from rubbing the cable guard
tab.
Record your serial number on the front of this manual
and keep for your records. The serial number can be
found on the side of the cage as seen in the figure to the
Guide Rod
Clean guide rods with a lint-free cloth and apply a thin layer of silicone lubricant (Part # BFH-
50262) to each guide rod. This will ensure a glass smooth performance from your weight stack.
left.
Batca Fitness Systems 18 LD-6 Owner's Manual
Page 19
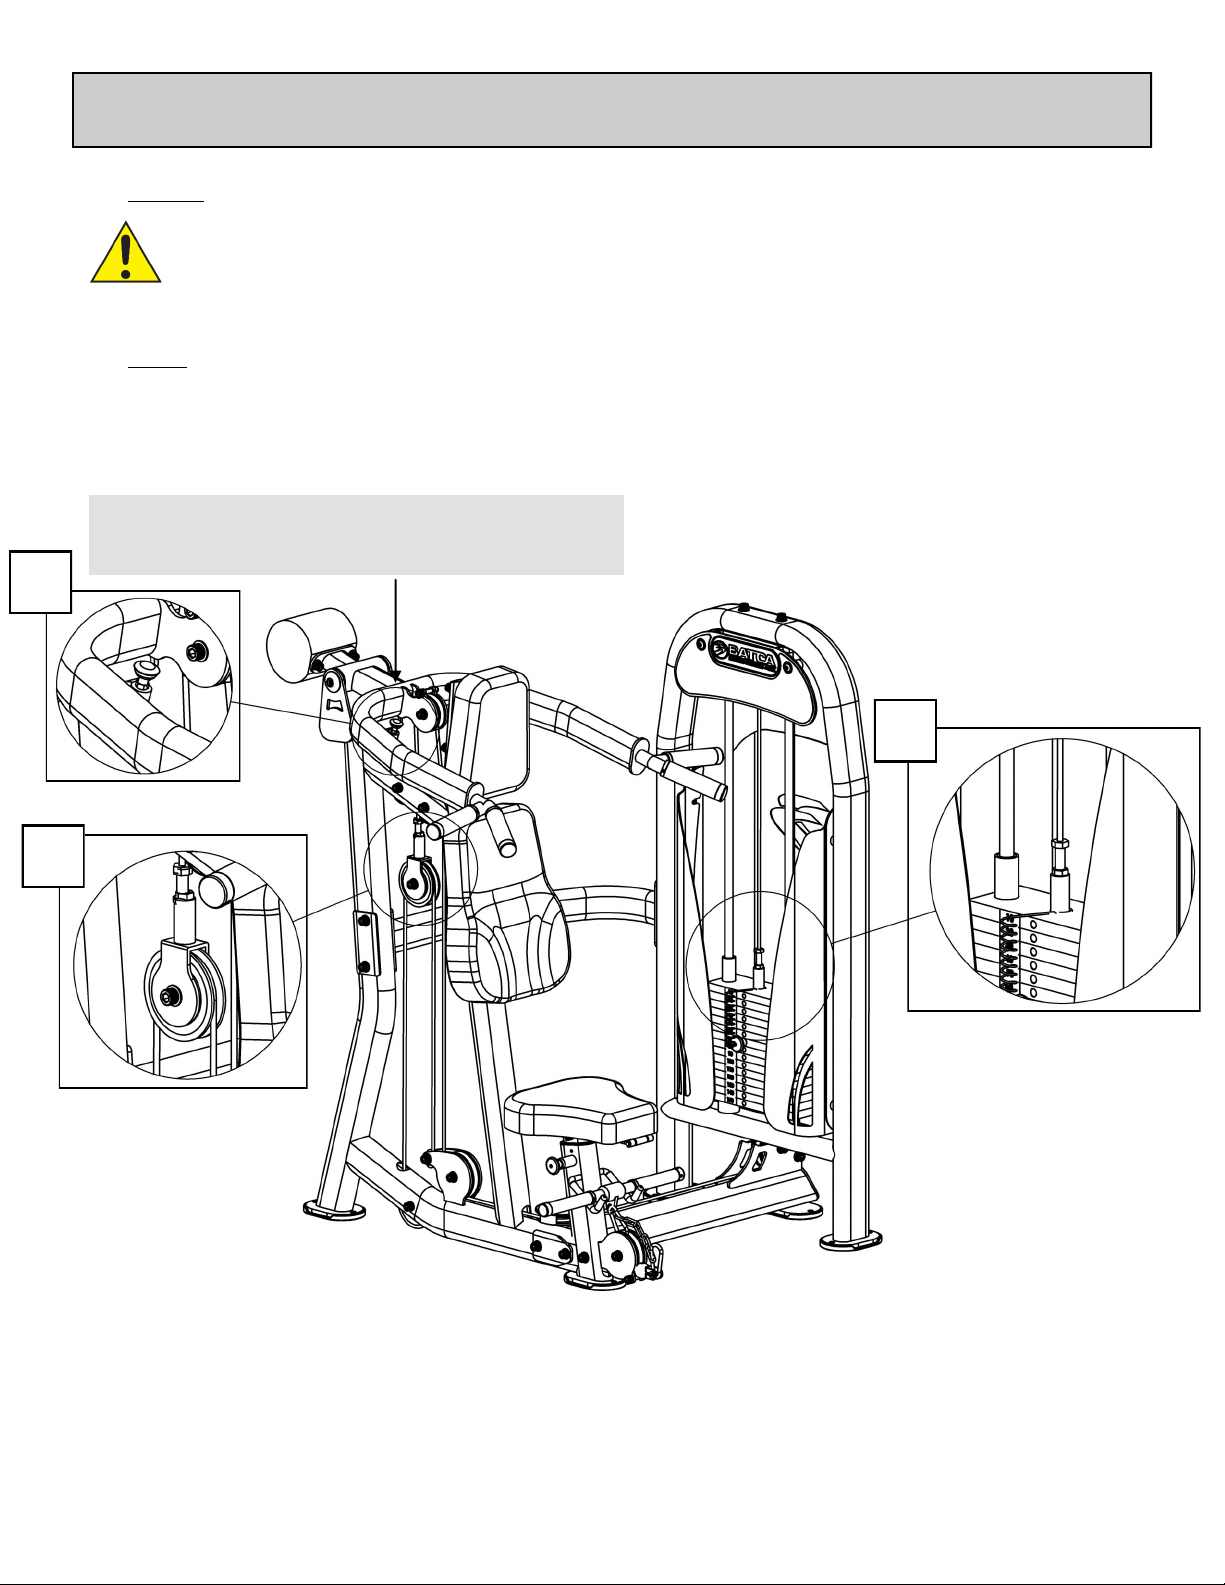
3
Cable Adjustments
Adjust cables to proper tension from any of the locations shown below.
Note: All cables with threaded adjustable ends must have at least 1/2” of the threads
threaded in to its counterpart. It is very important that the 1/2” Jam Nut be wrench tight-
ened to the counterpart to ensure that the threaded adjustable end of the cable does not
back out of its counterpart.
Note: If the top plate raises off of the second plate in the weight stack, then the cable ten-
sion is too tight. You will need to take some of the tension out to lower the Top plate flush
with the second plate.
Fine Adjustments to the cable can be made here. It
is very important to tighten the jam nut after
adjustments have been made
2
1
www.batcafitness.com 19 LD-6 Owne r ’ s Ma nu a l
Page 20
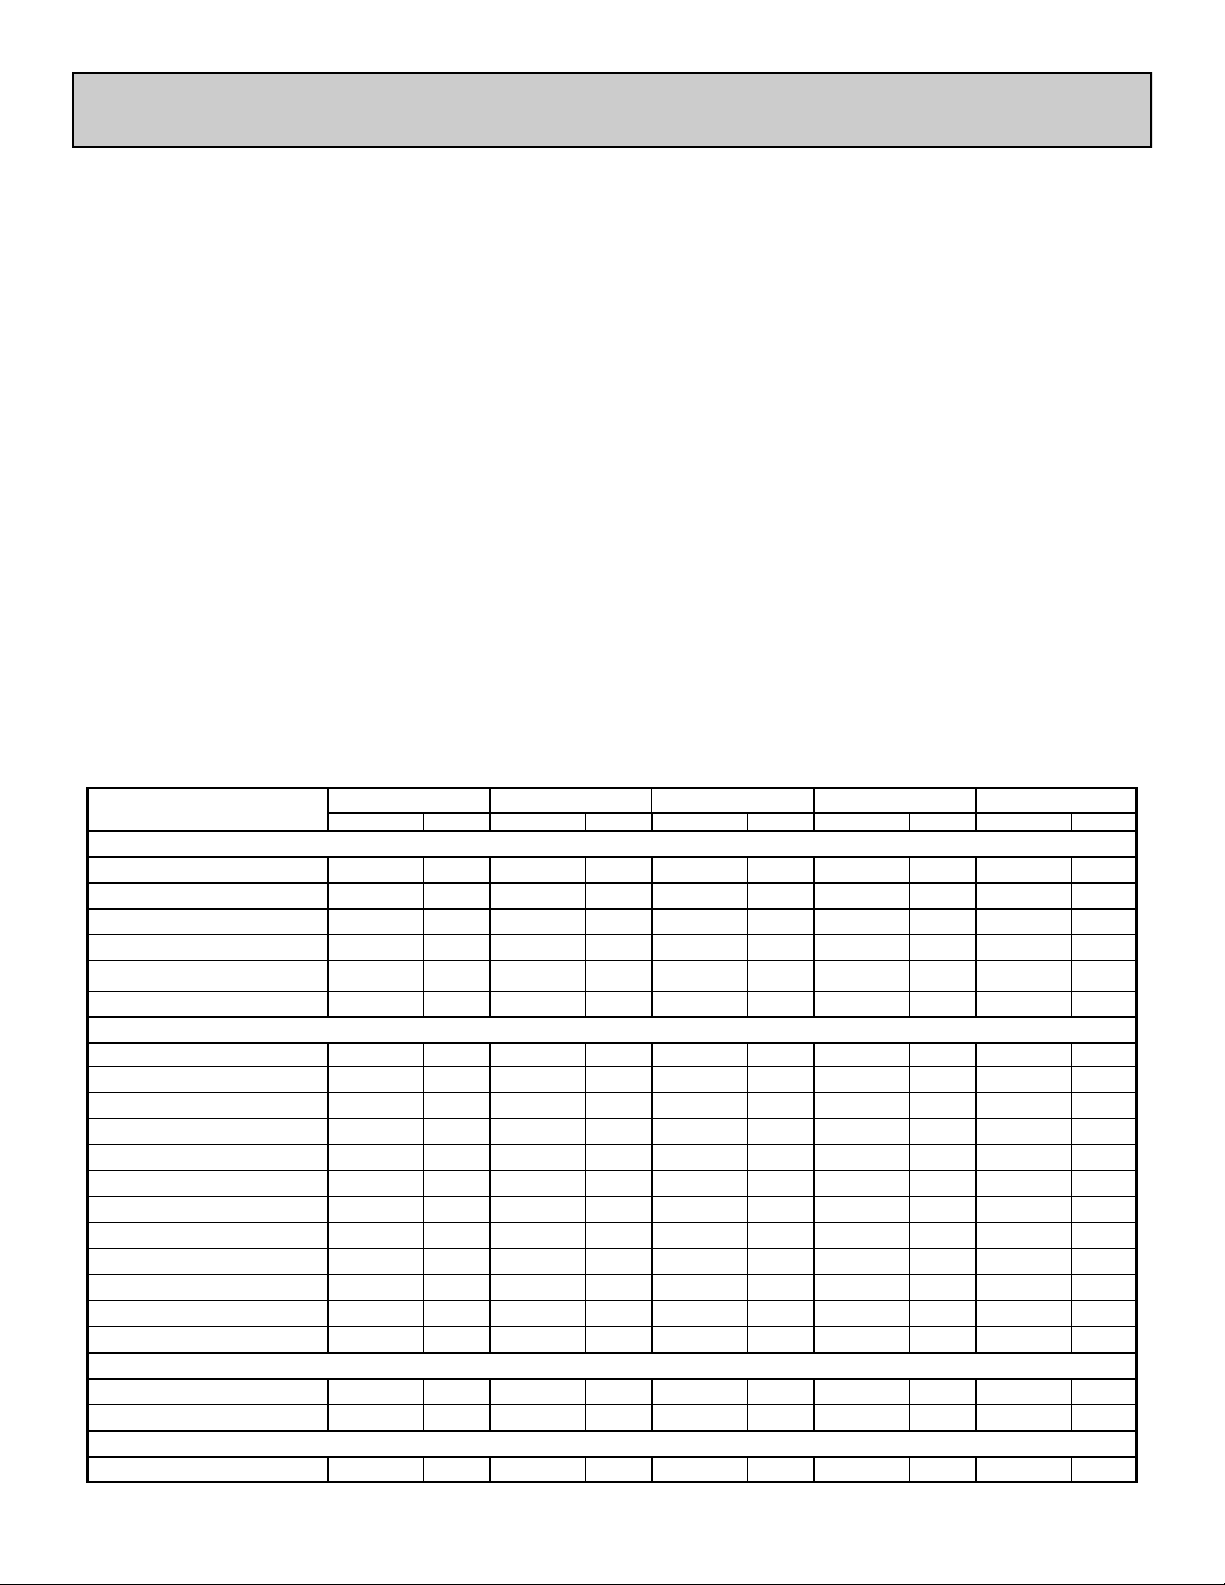
Preventive Maintenance
Batca Fitness Systems strives to give you the very best in quality, performance and safety through carefully
engineered designs and excellent workmanship. In order to maintain this high level of quality the preventative
maintenance schedule below should be followed.
Clean upholstery, grips, and roller pads with mild soap and water generally after every use. The guide rods,
chrome slides and frame should be cleaned with a cotton cloth. Upon cleaning the guide rods, a thin layer of
Silicone or Teflon gel should be applied to each rod to ensure a glass smooth performance.
An overall inspection should be done before each workout. If the warning and safety decals are worn or have
been removed they should be replaced immediately. The cables and cable systems should be inspected for
signs of wear and proper tension. In order to check cables properly you should carefully run the cable
through your fingertips, checking for signs of wear, cracks, burs and thinning spots. Replace any part at
first signs of wear. Cables should be adjusted for proper tension. See assembly instructions for this detail.
All hardware, stops, and adjustments should be checked and tightened as required.
The guide rods on your machine should be cleaned and lubricated regularly. This will ensure a glass smooth
performance from your weight stack. A thin layer of either Silicone or Teflon gel should applied to each rod.
Each pillow block bearing and flange bearing has a grease fittings that must be lubricated regularly. Use
general purpose bearing grease and follow the schedule below.
Although cables should be inspected daily, it is important that ALL cables be replaced as directed in the
schedule below. Please note that at any first sign of wear the cable should be replaced immediately.
If there are any questions concerning maintenance, please contact your local Batca dealer or contact Batca
Fitness Systems directly at:
Batca Fitness Systems
(919) 255-1233
www.batcafitness.com
Clean
Upholstery
Hand Grips
Roller Pads
Guide Rods
Chrome Slides
Frame
Inspect
Overall X X
Safety Decals
Cables
Cable Tension
Pulleys
Hardware
Stops
Upholstery
Hand Grips
Frame
Bushings
Bearings
Lubricate
Guide Rods
Bearings
Replace
Cables
Daily Weekly Monthly Quarterly Years
Commercial Home Commercial Home Commercial Home Commercial Home Commercial Home
X X
X X
X X
X X
X X
X X
X X
X X
X X
X X
X X
X X
X X
X X
X X
X X
X X
X X
1 3
As Needed
1
Batca Fitness Systems 20 LD-6 Owner's Manual
Page 21

Limited Lifetime Warranty
What is covered
For Residential Use:
Batca Fitness Systems warrants all of its products against defects in manufacturing, materials and
workmanship under normal use and service for one year from date of purchase including paint,
chrome, upholstery and grips. Batca Fitness Systems also warrants all cables, belts, bolts, nuts,
caps, plugs, bumpers, washers, levelers, decals, gas springs and other hardware for three years after date of purchase; all moving parts, including pulleys, bushings, bearings and pull pins for five
years after date of purchase and warrants the frame and all welded parts for the lifetime of the
original purchaser.
For Commercial Use:
Batca Fitness Systems warrants all of its products against defects in manufacturing, materials and
workmanship under normal use and service for six months from date of purchase including paint,
chrome, upholstery and grips. Batca Fitness Systems also warrants all cables, belts, bolts, nuts,
caps, plugs, bumpers, washers, levelers, decals, gas springs and other hardware for one year after
date of purchase; all moving parts, including pulleys, bushings, bearings and pull pins for three
years after date of purchase and warrants the frame and all welded parts for ten years after date of
purchase.
What is not covered
This warranty does not cover damage, which results from shipping, misuse, abuse, neglect, careless-
ness, modification or alteration, accident, fire, flood, “acts of God” or other contingencies beyond
the control of Batca Fitness Systems. This warranty also does not cover deterioration from wear
and tear or exposure or any defect, which would not have happened if instructions in the owner’s man-
ual had been followed. Improper installation, improper assembly or follow-up maintenance along with
installation of parts or accessories not originally intended for products of Batca Fitness Systems
are also not covered by this warranty. Only genuine Batca parts should be used for replacement,
repair, and maintenance for this warranty to apply.
Defective parts will be repaired or replaced at Batca Fitness Systems option, without parts charge to
the purchaser. All returns require a return authorization prior to acceptance of repair work. Batca
Fitness Systems reserves the right to make design changes without any prior notification and shall
not be responsible for incidental or consequential damages.
The purchaser is responsible for shipping the defective part back to the factory. Repair or replacement is the exclusive and sole remedy of the purchaser. Labor charges associated with parts changeovers are not covered by this warranty. Proof of purchase, serial number, model number and date of
purchase will be required along with all pertinent information of the alleged damage.
This warranty applies only to the original purchaser and is not transferable. Claims under this warranty must be made directly to Batca Fitness Systems.
Batca Fitness Systems
1207 N. New Hope Road
Raleigh, NC 27610
(919) 255-1233
www.batcafitness.com
www.batcafitness.com 21 LD-6 Owne r ’ s Ma nu a l
Page 22
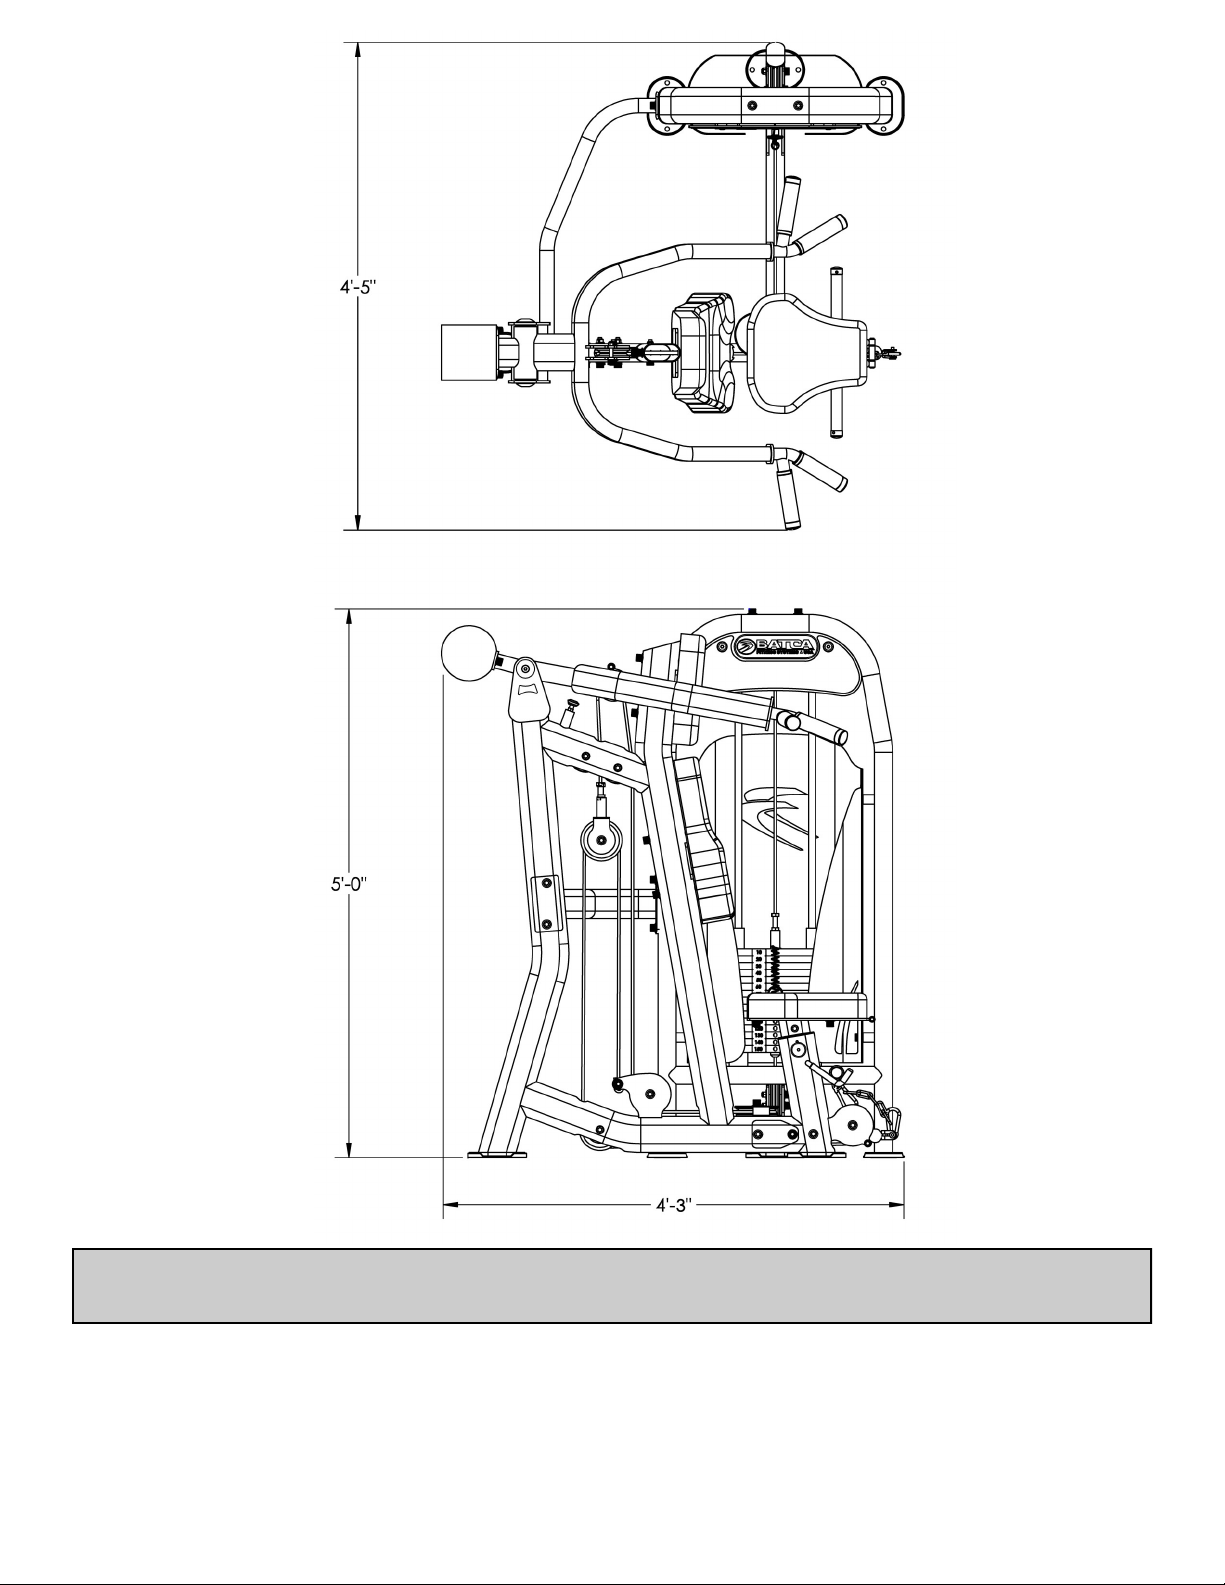
Layout Diagram
The LD-6 has a layout dimension of 4’-5” (width) x 4’-3” (length) x 5’-” (height). There
should be a minimum of 18”, preferably 24”, of working space around the entire unit.
Batca Fitness Systems 22 LD-6 Owner's Manual
 Loading...