

Page 1
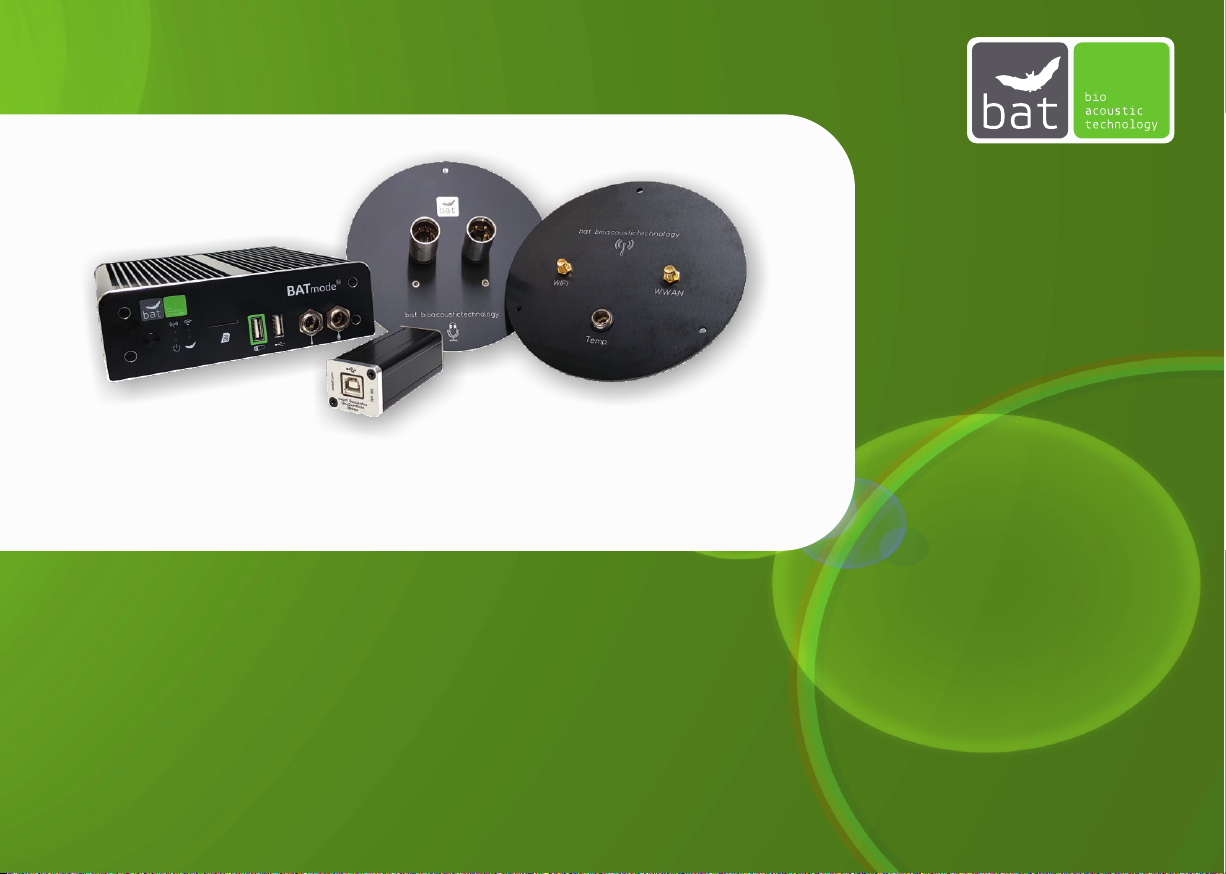
BATmode S / S+
QUICKSTART GUIDE
Set Up and First Start Up
1
Page 2

SAFETY INSTRUCTIONS
Please read these safety instrucons carefully before startup your
BATmode system!
Only use power supplies authorized by bat bioacousctechnology.
Avoid excessive mechanic strain on the BATmode-System, especially on
plugs and connectors if cables are connected to the BATmode or the antenna
and microphone disc. Strong vibraons, shaking or dropping may damage system parts.
Ensure a safe and stable mounng of the BATmode and the corresponding discs.
Dropping can harm persons, property or the BATmode-system.
Ensure that nobody can stumble on installed and connected wires.
Stumbling can harm persons and damage system parts.
Only use accessories supplied or authorized by bat bioacousctechnology.
The use of unauthorized accessories may damage the device.
Please contact our support if the BATmode-System shows any damage or does not work
properly. Do not open system parts and try to repair damage by yourself or through unauthorized
personnel. This will cause the loss of warranty.
2
!
Page 3

Table of Contents
SAFETY INSTRUCTIONS ................................................................
Learn about your device ...................................................................
LED Status Indicators .......................................................................
Antenna Disc and UltraSoundGate ...................................................
Microphones .....................................................................................
Connect ...........................................................................................
Remote Access via WIFI .................................................................
Remote Access via LAN ..................................................................
First Start Up ...................................................................................
Mobile Set Up ..................................................................................
Daily Status SMS..............................................................................
Remote SMS ...................................................................................
myBAT ............................................................................................
Set Up .............................................................................................
10
12
13
14
16
17
18
20
21
2
4
5
6
7
Installation .......................................................................................
22
3
Page 4
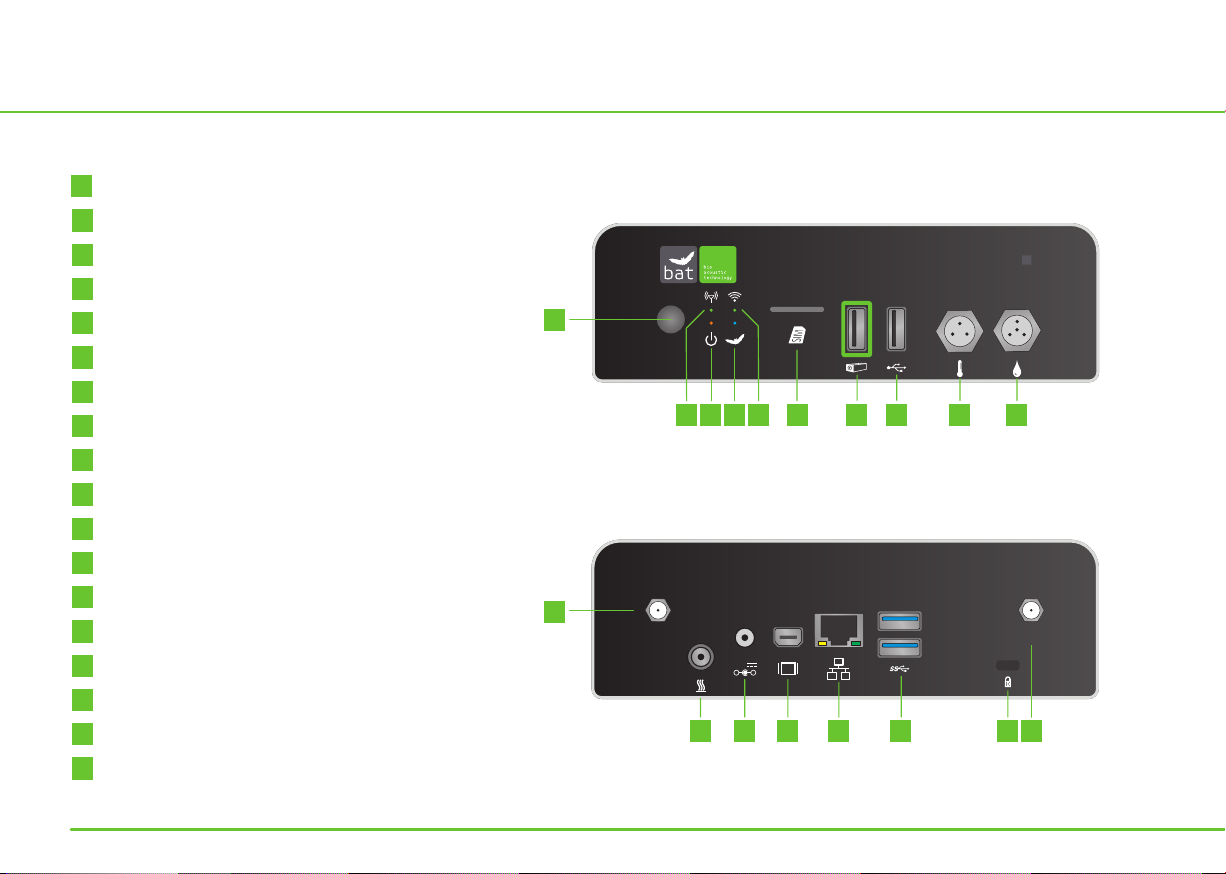
Learn about your device
1
On-/Off-Switch
2
Mobile Service LED
Power LED
3
Status LED
4
5
WIFI-Hotspot LED (only BATmode S+)
6
SIM-Card Slot (Mini-SIM)
7
USB-Port for UltraSoundGate (monitored)
8
USB 2.0-Port e.g. for keyboard and mouse
9
Temperature Sensor Input (only BATmode S+)
10
Precipitaon Sensor Input (only BATmode S+)
11
Cellular Antenna Connector
12
Heang Output
13
Power Supply
14
Minidisplay Port
15
LAN Connector
16
USB 3.0-Ports e.g. for Backup-Sck
17
Kensington-Lock
18
WIFI Antenna Connector (only BATmode S+)
11
- Front View BATmode S/S+ -
S+
mode
BAT
1
2 3 4 5 6 7 8 9
10
- Back View BATmode S/S+ -
WWAN
12
19V
-
13
+
15 16
14
17
WIFI
18
4
Page 5
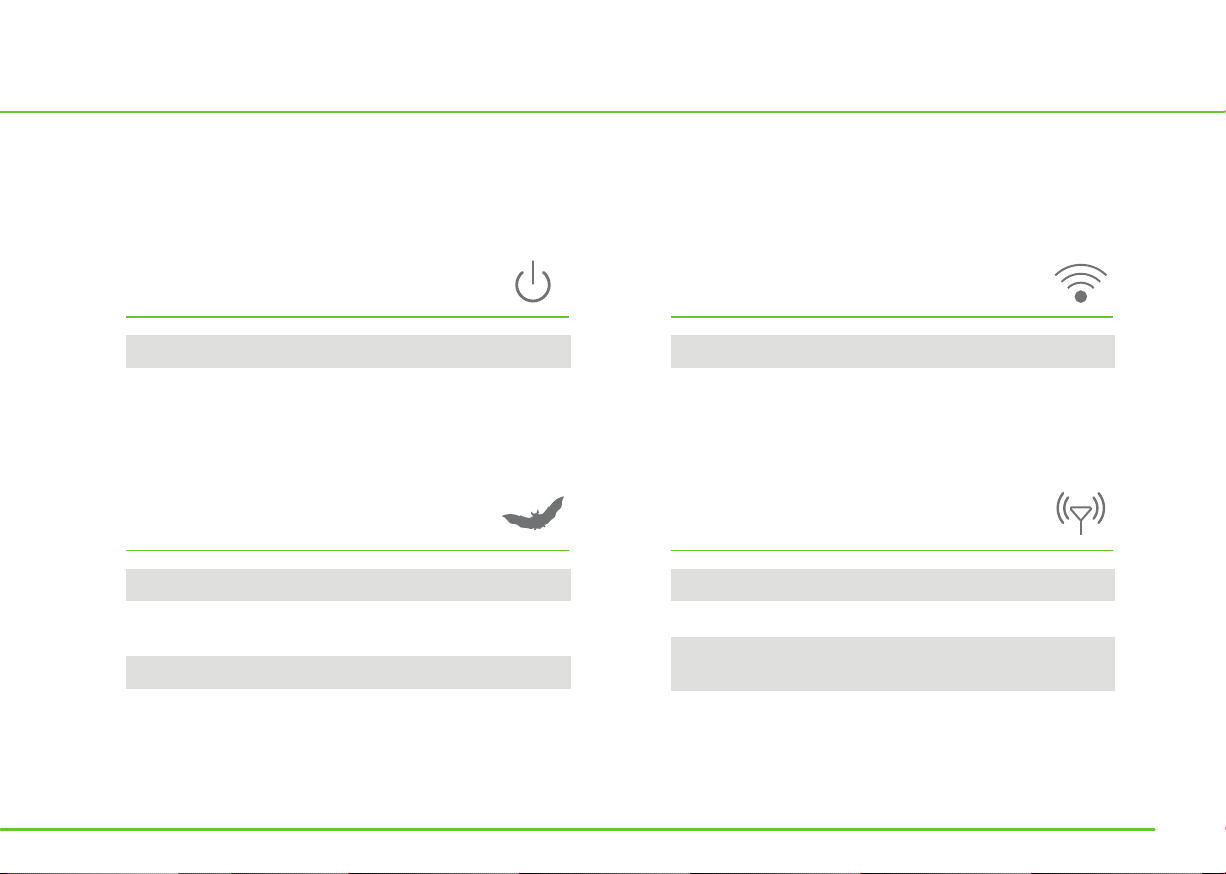
LED Status Indicators
How to interpret the LED status indicators of your BATmode correctly:
Power LED (orange)
On
Off
Device on
Device off
Status LED (blue)
Off
On
Blinking
BATcontrol not started
Monitoring stopped,
BATcontrol on
Monitoring started
WIFI Hotspot LED (green)
On
Off
WIFI-Hotspot on
WIFI-Hotspot off
Mobile Service LED (green)
On
Single blinking
Double blinking
Mobile connecon connected
Registered to mobile network
SIM locked, SIM not recognized,
no mobile service connecon
5
Page 6
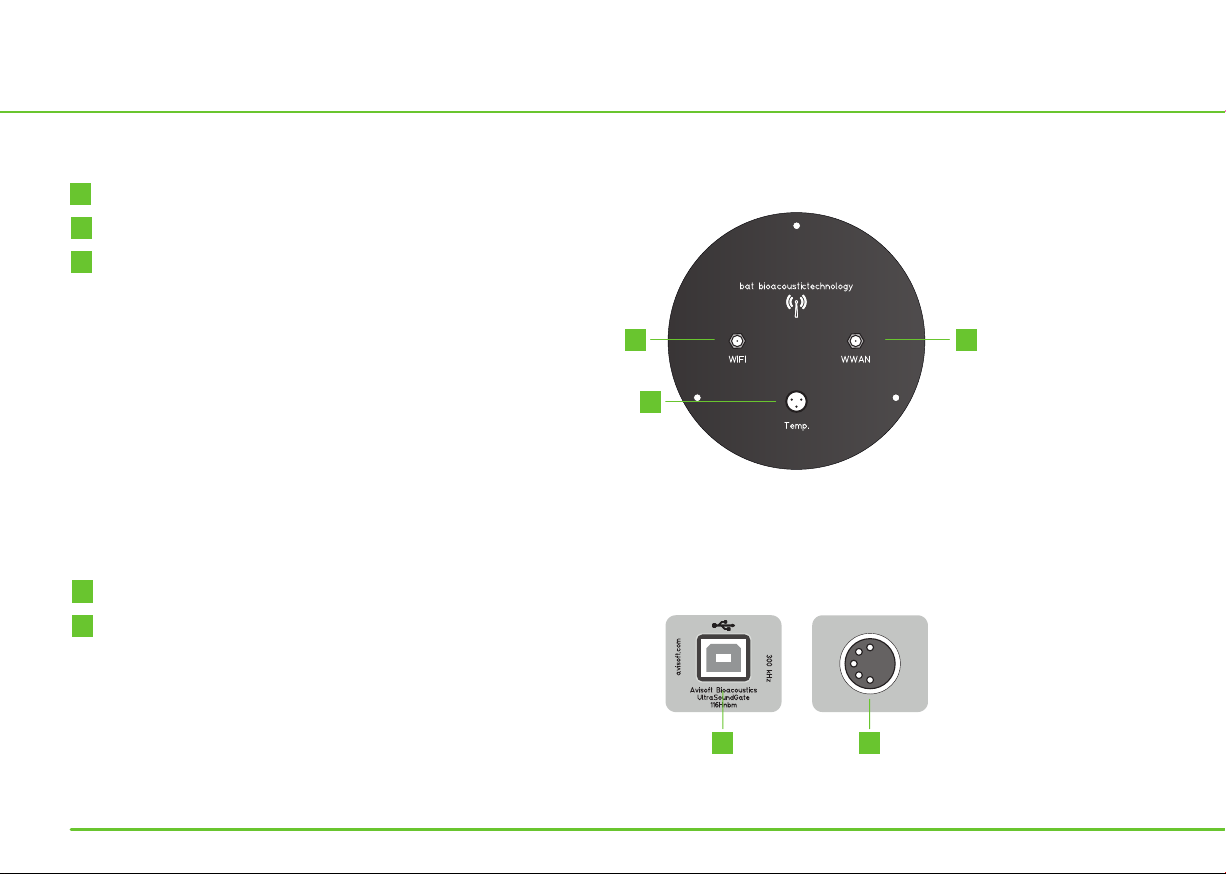
Antenna Disc and UltraSoundGate
- Antenna Disc (only BATmode S+) -
1
WIFI Antenna Connector
2
Temperature Sensor Connector
Cellular Antenna Connector
3
BATmode S Systems do not use an Antenna
Disc. Instead, please connect the enclosed magnec
base antenna for mobile connecon to the cellular
antenna connector of the BATmode S.
USB-2.0 Interface
4
5
Microphone XLR Connector
6
1
2
- UltraSoundGate 116Hnbm -
4
5
3
Page 7
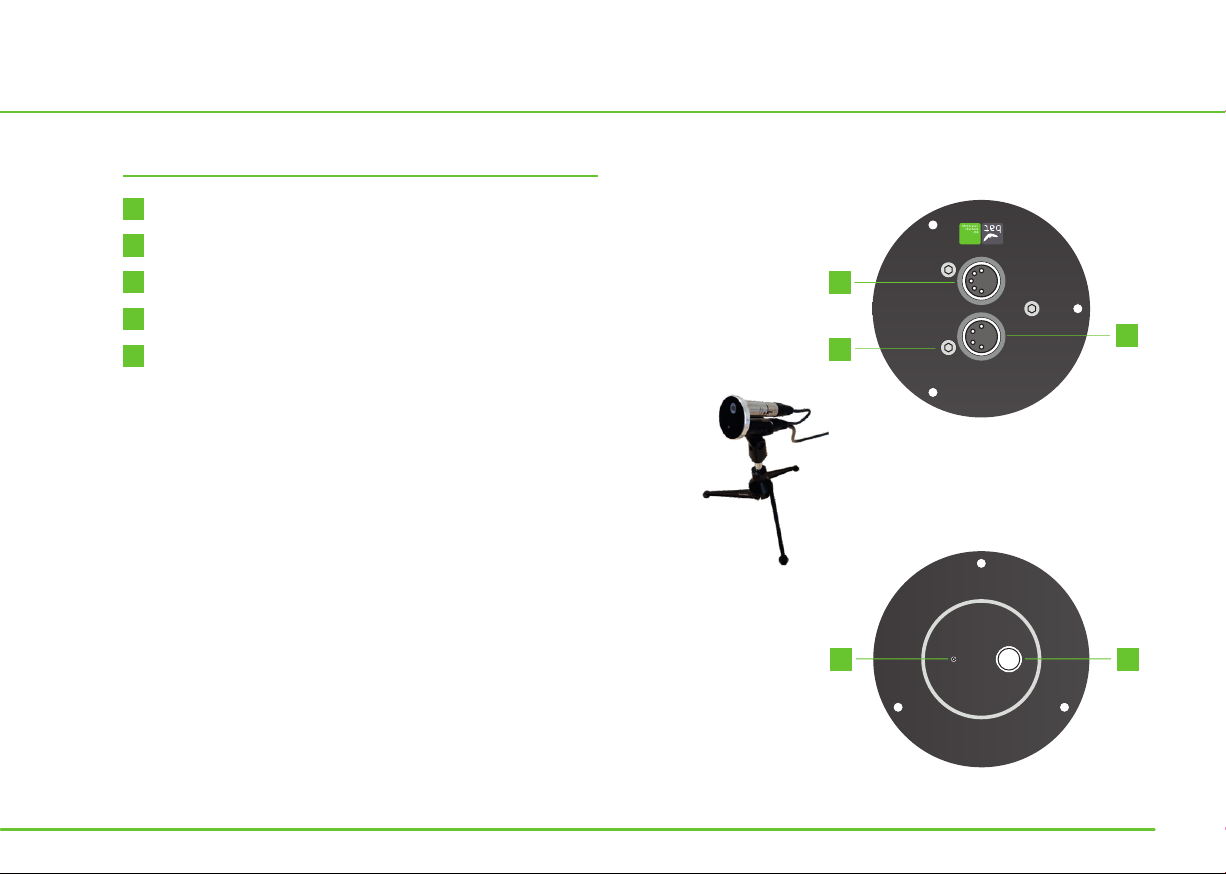
Microphones
Microphone Disc GM50
1
Microphone XLR Connector (UltraSoundGate)
2
Screws for removing the mounng plate
3
Reference Signal Speaker Connector (UltraSoundGate)
4
Microphone Capsule
5
Reference Signal Speaker
The Microphone Disc GM50 can either be used with
the enclosed mounng plate or with an oponal
tripod.
To connect the microphone and the reference signal
of the GM50 speaker please use the Y-XLR
microphone cable.
Be careful not to touch the microphone capsule and to
protect it from moisture!
- Front View -
1
2
GM50
3
- Back View -
4
5
7
Page 8
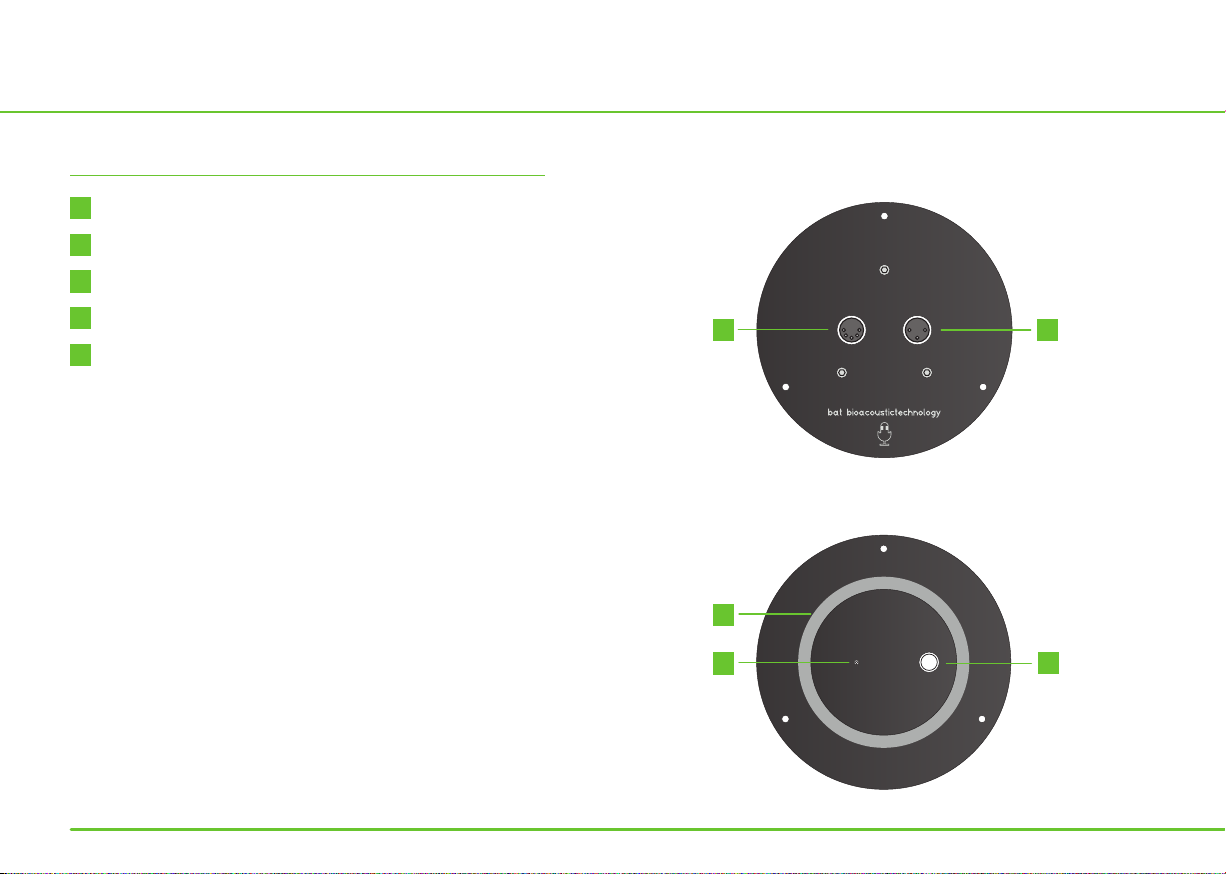
Microphones
Microphone Disc GM90
1
Microphone XLR Connector (UltraSoundGate)
2
Heang Connector
3
Windscreen made of foam
4
Microphone Capsule
5
Reference Signal Speaker
Do not remove the windscreen foam,
as this has an essenal influence on the
calibraon of your microphone disc!
Be careful not to touch the microphone capsule and to
protect it from moisture!
- Front View -
1
2
- Back View -
3
4
5
8
Page 9
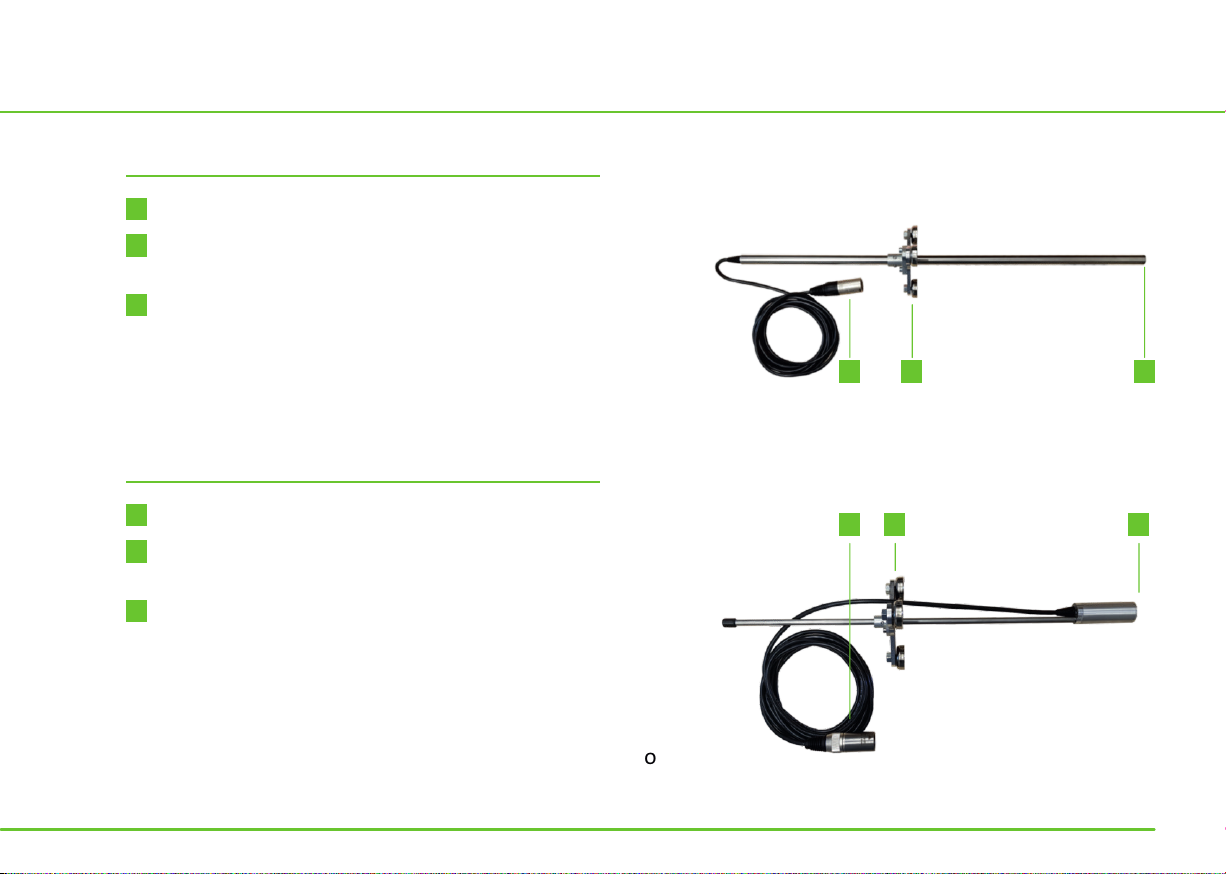
Tower Microphone TM10
1
Microphone XLR Connector (UltraSoundGate)
2
Oponally available movable tripod for
tower wall mounng
3
Microphone Capsule
Tower Microphone TM20
4
Microphone XLR Connector (UltraSoundGate)
5
Oponally available movable tripod for
tower wall mounng
6
Microphone Capsule and Reference Signal
Speaker
1 2 3
4 5 6
Be careful not to touch the microphone capsule and to
protect it from moisture!
9
Page 10
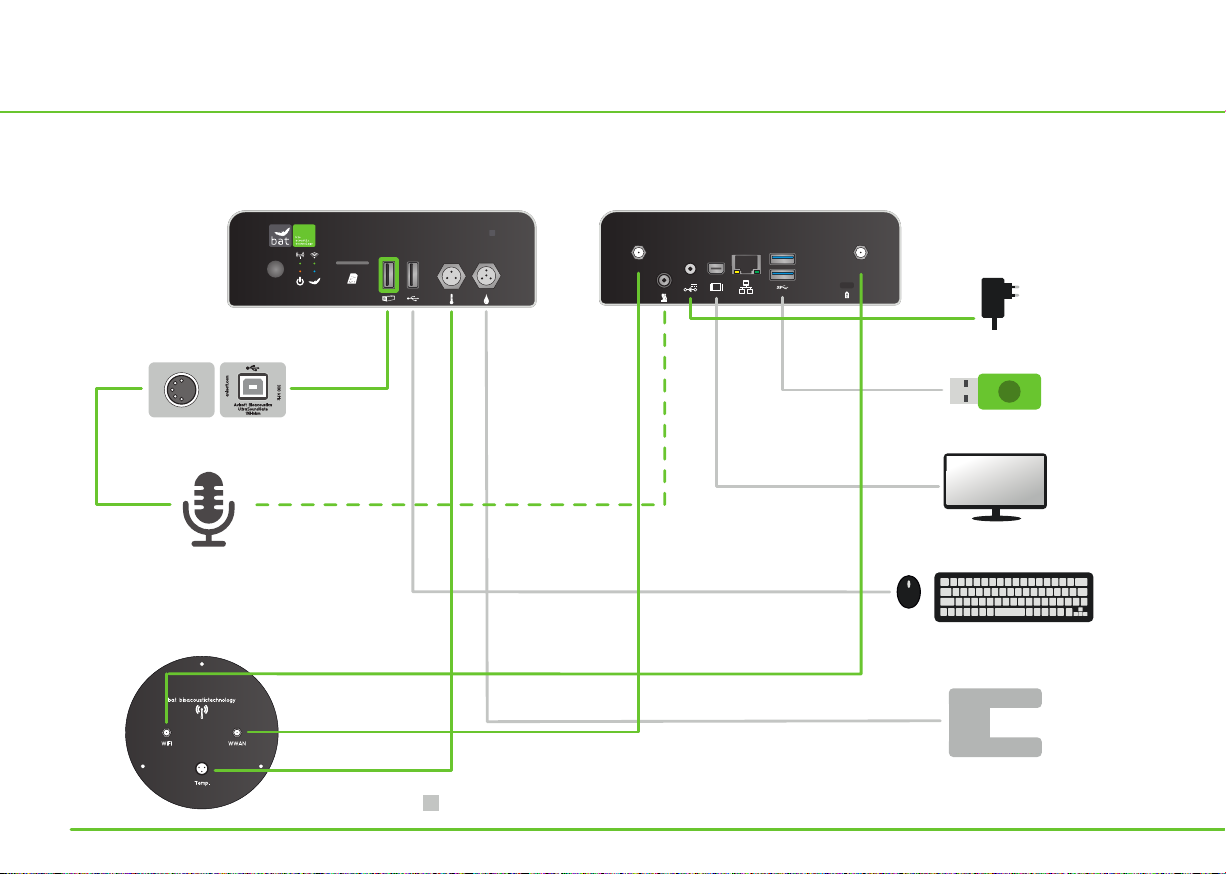
Connect
How to connect all components of your BATmode S+ System correctly:
- BATmode S+ -
S+
mode
BAT
WWAN
19V
+
- Power Adapter -
WIFI
- UltraSoundGate 116Hnbm -
- Microphone -
Depending on the selected microphone,
the heang can be omied
- Antenna Disc -
10
Oponal and not included in delivery scope
- Backup-Sck -
- Monitor -
- Keyboard / Mouse -
- Precipitaon Sensor -
Please follow the manual
of the precipitaon sensor
Page 11
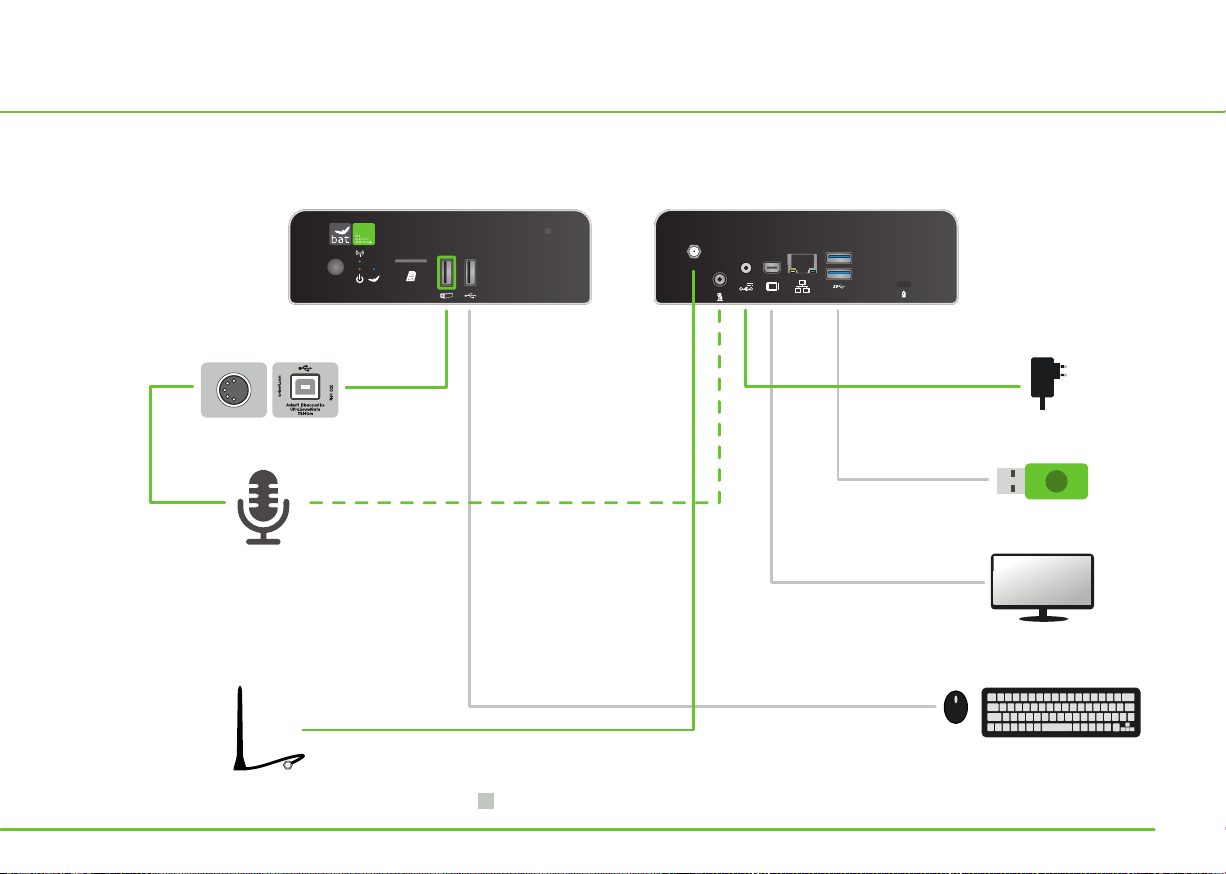
How to connect all components of your BATmode S System correctly:
- BATmode S -
S+
s
mode
BAT
WWAN
19V
+
- UltraSoundGate 116Hnbm -
- Microphone -
Depending on the selected microphone,
the heang can be omied
- Magnec Base Antenna -
- Power Adapter -
- Backup-Sck -
- Monitor -
- Keyboard / Mouse -
Oponal and not included in delivery scope
11
Page 12
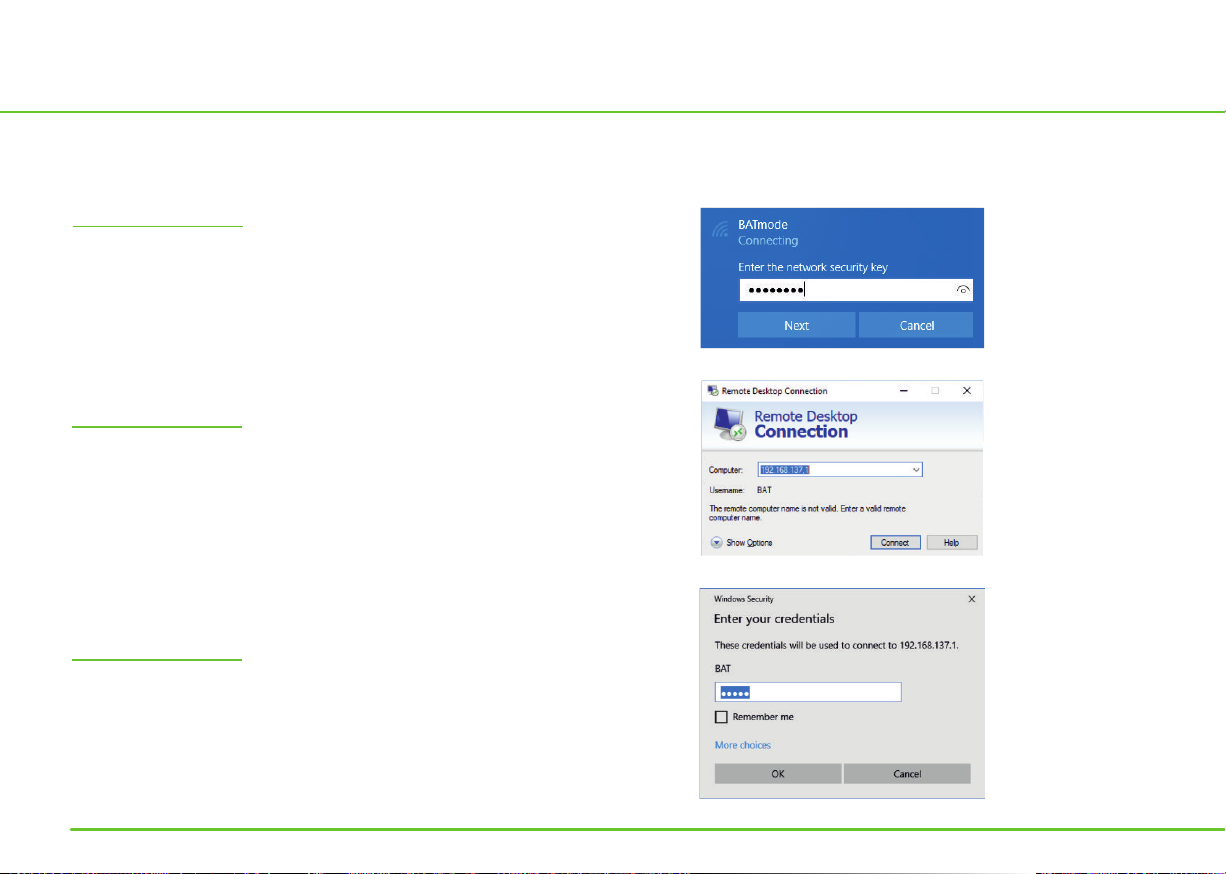
Remote Access via WIFI
How to access your BATmode with your Windows running laptop via WIFI:
Step 1
Connect the WIFI of your Windows running laptop
with the WIFI-Hotspot of the BATmode.
Default SSID: „BATmode“
Default Password: „12345678"
Step 2
Open the Windows program
,Remote Desktop Connecon
insert the WIFI IP of your BATmode
in Computer and press . Connect
Default WIFI IP: „192.168.137.1“
Step 3
Insert the Username „BAT“ and the
Windows Password and press . OK
Default Windows Password: „12345“
WIFI connecon is only available for BATmode S+.
12
Page 13
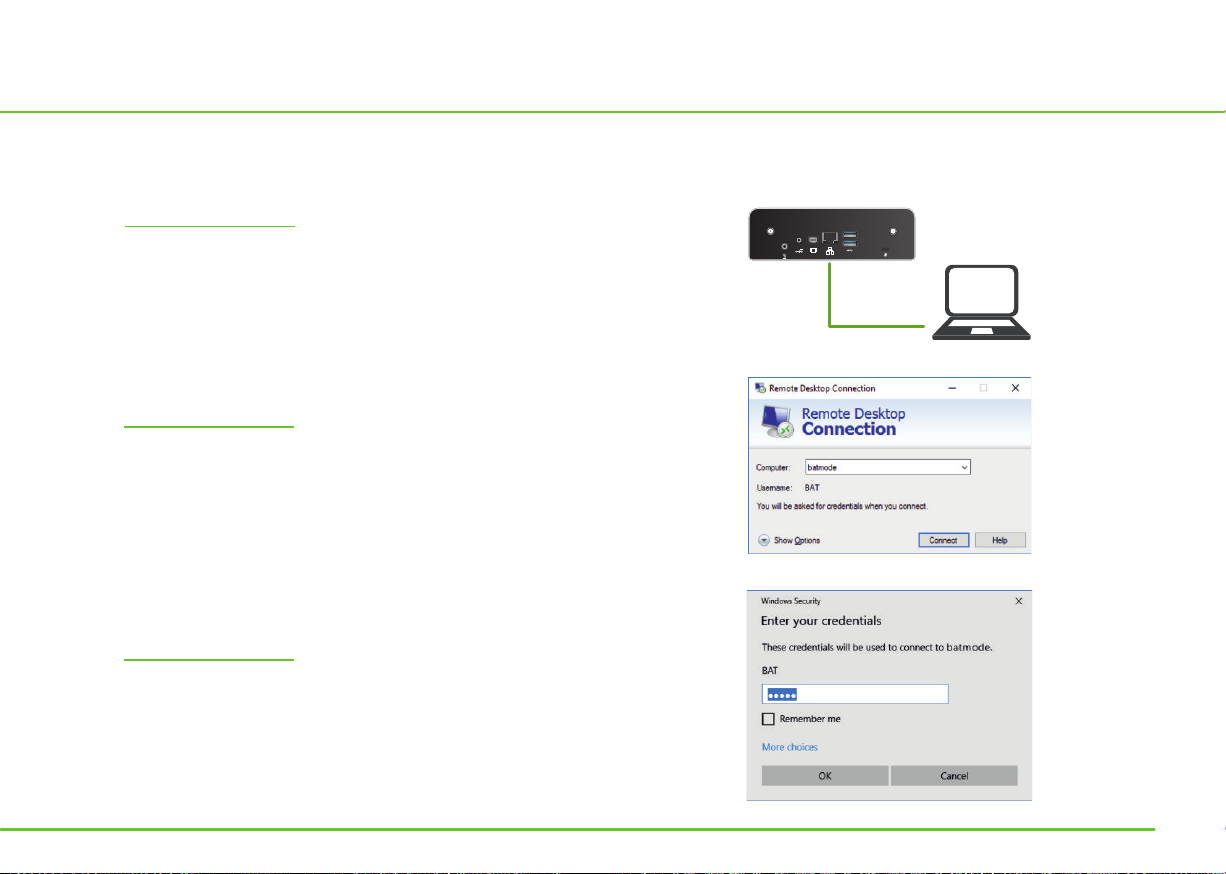
Remote Access via LAN
How to access your BATmode with your Windows running laptop via LAN:
Step 1
Use an Ethernet cable to connect the LAN port
of your Windows running laptop (RJ45)
with the one of the BATmode (RJ45).
Step 2
Open the Windows program
,Remote Desktop Connecon
insert „batmode“ in Computer
and press . Connect
Step 3
WWAN
19V
+
WIFI
Insert the Username „BAT“ and the
Windows Password and press . OK
Default Windows Password: „12345“
13
Page 14
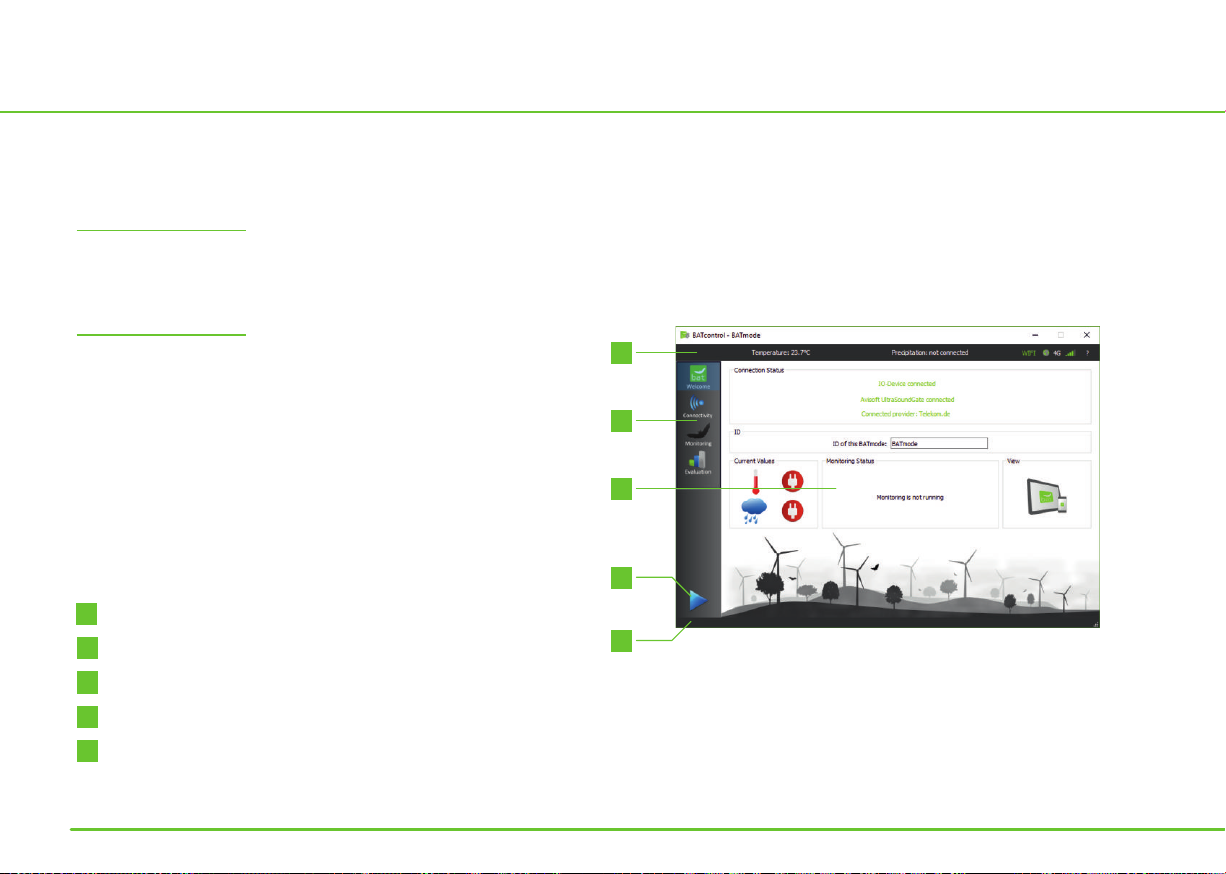
First Start Up
Starng of the BATmode System and the BATcontrol control soware:
Step 1
Start the BATmode System.
Step 2
Use mouse, keyboard and monitor or
connect your laptop via WIFI or LAN as
described on page 12 and 13.
The control soware BATcontrol starts
automacally.
1
Status Bar
2
Task Bar for page choosing
Selected Page
3
Monitoring Start-/Stop-Buon
4
5
Message Bar
14
1
2
3
4
5
1
Page 15
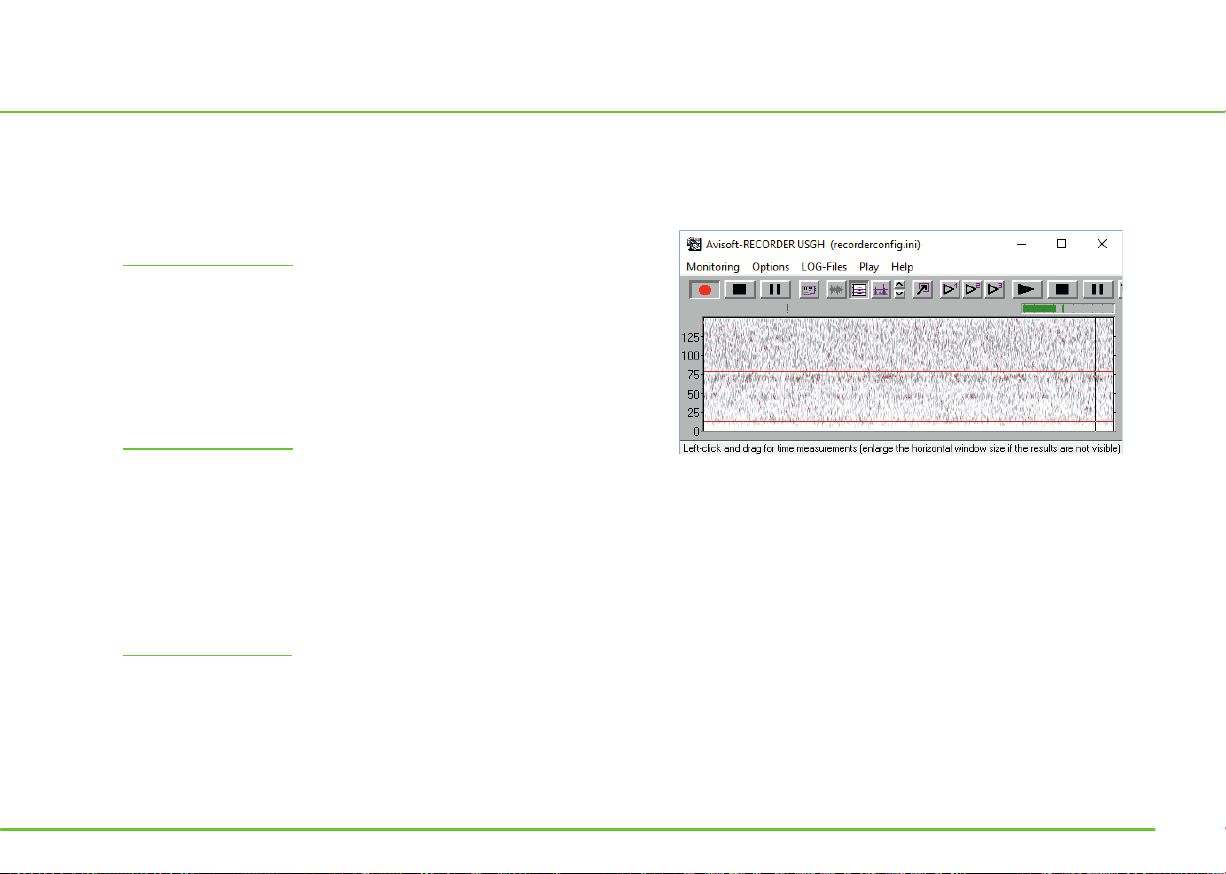
Starng of the Aviso-RECORDER USGH recording soware and the start of the acousc
monitoring and data acquision of the external sensors:
Step 1
Aer selecng your sengs on the different
pages of BATcontrol, start the monitoring
with a click on the Start-/Stop-Buon.
Step 2
The recording soware will open and the
acousc monitoring as well as the
simultaneous data acquison of
temperature and precipitaon begin.
Step 3
To stop data acquision click on the Start-/
Stop-Buon or close the recording soware.
The recording soware Aviso-RECORDER USGH offers
lots of sengs. However, the BATmode system is
configured especially for the bat detecon on wind
turbines according to the requirements specified in the
research project RENEBAT. Consequently, sengs in
the recording soware should only be changed by
experts following the instrucons in the detailed
manual. Otherwise validity of collected data may expire.
The external sensors for temperature and precipitaon acquision are only available for BATmode S+.
15
Page 16
Mobile Set Up
How to set up your BATmode for SMS and mobile Internet connecon:
Step 1
Insert the Mini-SIM card in the SIM card slot
(For this, the BATmode must be turned off).
Step 2
Use the Mobile sengs in Windows to remove
a possibly acvated PIN from your SIM card.
Step 3
Insert the APN of your provider in the mobile
sengs of Windows.
Step 4
Enter the number of the SMS center of your
provider in in BATcontrol. SMSC-Number
16
An acvated PIN will prevent the BATmode
system to restore a mobile connecon
aer a possible power failures, automacally.
Page 17
Daily Status SMS
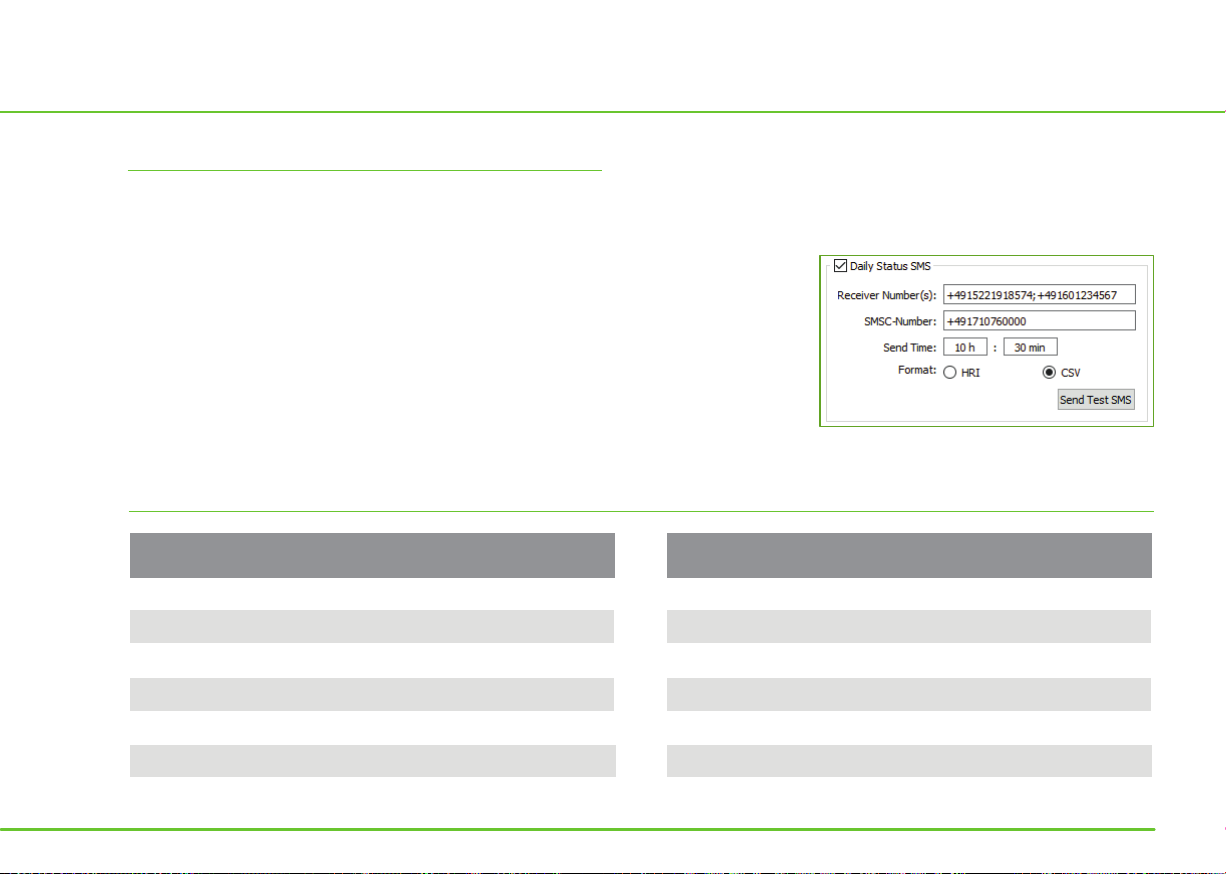
Sengs in BATcontrol
Enable and insert the phone numberDaily Status SMS
of the receiver of the Daily Status SMS in .Receiver Number(s)
Use the internaonal format: e.g. +4915221918574.
Use ; to separate mulple receiver numbers.
Select the daily transmission me and the desired
format.
HRI: Values preceded by acronym.
CSV: Values separated by commas.
Meaning of the sent values and acronyms
Acron.
ID
MON
LRL
LRD
LFD
FL24
Meaning
ID of the BATmode Systems
Current monitoring status
Last reference value
Time of the last reference value
Time of last recording
Recordings in the last 24 hours
Acron.
FT
FC
FD
SL
WWW
WIFI
Meaning
Total number of recordings
Free space on C: in GB
Free Space on D: in GB
Current mobile signal level in %
Status of the Internet connecon
Status of the WIFI-Hotspot
17
Page 18
Remote SMS
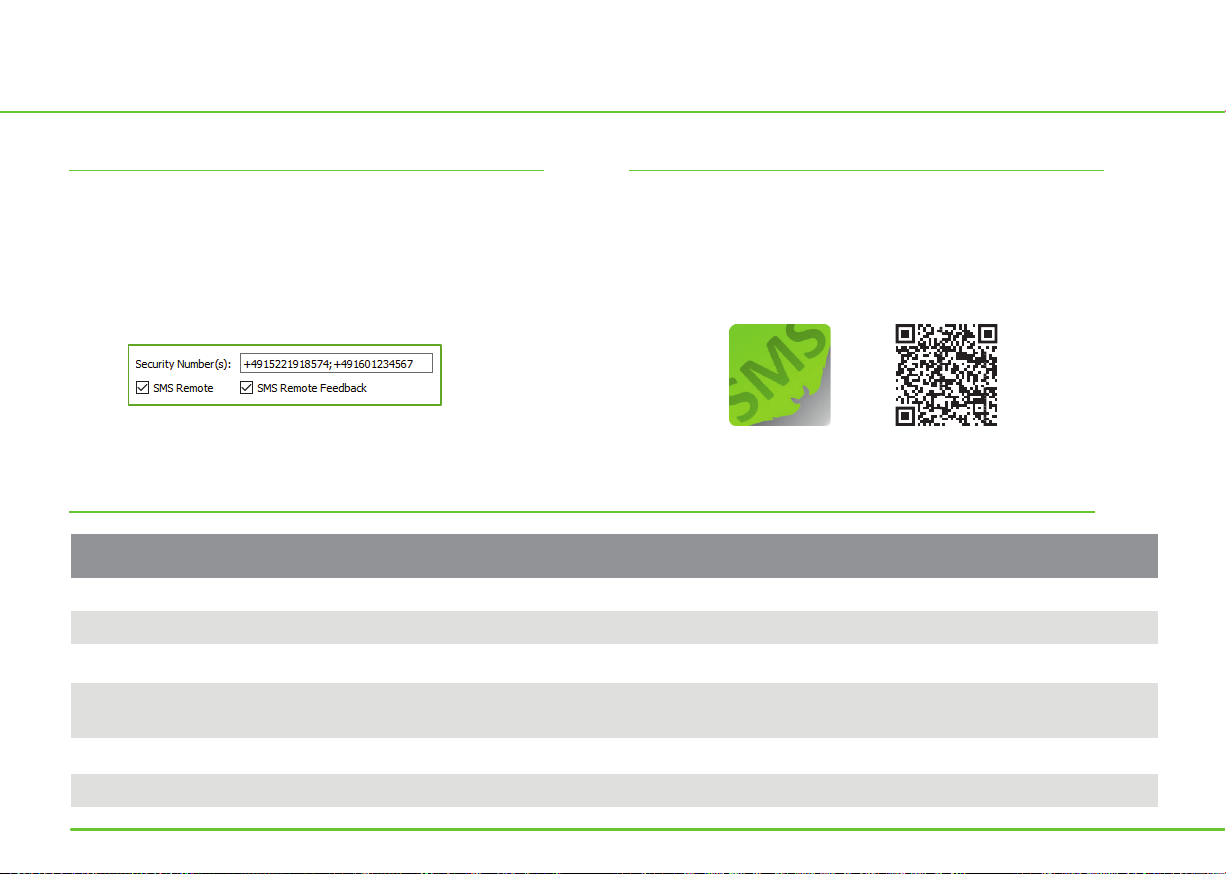
Sengs in BATcontrol
Enable the checkbox.SMS Remote
Add the mobile number of the command
sending device to the . Security Number(s)
Android-App
Download from the Google Play Store our free
Android App for SMS remoteBATconnect SMS
control of your BATmode systems.
Use these SMS commands to control your BATmode systems via text SMS
Command
Start monitoring!
Start monitoring: 11:00-14:00!
Start monitoring: 11:00-14:00 and 20:00-02:00!
Start monitoring: -20/10!
Stop monitoring!
Kill Recorder!
System response
Monitoring will start ungated
Monitoring will start from 11 am to 2 pm
Monitoring will start from 11 am to 2 pm and 8 pm to 2 am
Monitoring will start from 20min before sunset to 10min
aer sunrise
Monitoring will stop
Recording soware RECORDER will be killed
18
Page 19

Reboot!
Shutdown!
Send status!
Send Mail!
System will reboot
System will shut down
System will send Status SMS
System will send Status Mail
Send Mail to max(at)moritz.de
Start WIFI-Hotspot!
Stop WIFI-Hotspot!
Connect WWAN!
Disconnect WWAN!
Kill Recorder!
Reset USG!
Send MAC!
Send WIFI-IP!
Send LAN-IP!
Enable Status-Mail!
Disable Status-Mail!
Enable Status-SMS!
Disable Status-SMS!
Systen will send Status Mail to [email protected]
WIFI-Hotspot will start
WIFI-Hotspot will stop
Mobile Connecon will be connected
Mobile Connecon will be disconnected
Recording soware RECORDER will be killed
System will reset UltraSoundGate
System will send its MAC adress
System will send its WIFI IP
System will send its LAN IP
Daily Status Mail will be enabled
Daily Status Mail will be disabled
Daily Status SMS will be enabled
Daily Status SMS will be disabled
19
Page 20
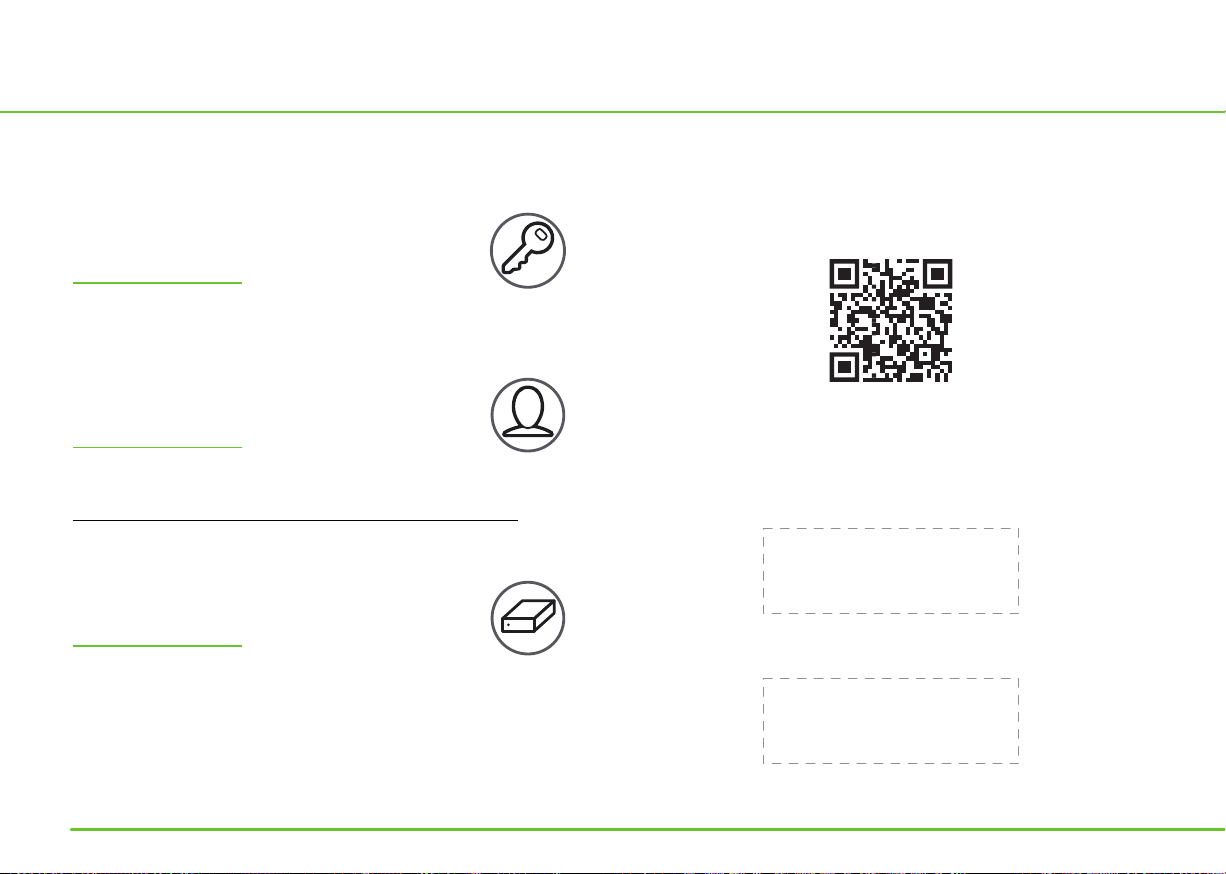
myBAT
Use the mybat cloud service to monitor your BATmode systems from anywhere in
the world.
Step 1
Acvate myBAT in BATcontrol on your BATmode.
Step 2
Sign Up by using your Purchase-Code on:
hps://www.mybat.bioacousctechnology.de
Step 3
Assign your BATmodes to your account by using
the MAC addresses of your BATmode systems.
myBAT requires an acve Internet connecon via LAN or mobile connecon.
20
Purchase-Code:
MAC adress of this BATmode:
Page 21
Set Up
This checklist will help you to forget nothing, when seng up your BATmode system:
Insert SIM Card
Change Windows password in Windows
Change Windows password in
ChangeAutoLogonPassword
Insert APN
Insert SMSC-Number
Change WIFI-Hotspot SSID and password
Change ID
Configure daily Status SMS
Configure daily Status Mail
This checklist refers to a standard configuraon of the BATmode system with GSM Switch Socket, which uses SMS,
mobile Internet and WIFI as remote access opons.
For more detailed explanaons of the individual sengs, please refere to the manual.
WIFI is only available for BATmode S+ systems.
Test all planned remote access paths before installaon in the wind turbine.
Configure SMS remote access
Configure myBAT
Enter Recording Periods
Configure daily reference signal
Set Monitoring sengs
Enter microphone calibraon values
Connect Backup-Sck and configure Backup
Install Teamviewer and set up a permanent
password
Configure GSM Switch Socket
21
Page 22
Installaon
The following points should be clarified in advance of the installaon:
Power supply
Mobile coverage at the installaon site
Internet via turbine network possible
Installaon locaon of the disc(s)
Installaon locaon of the BATmode/BATbox
Cabling/cable length
With this checkliste you only have to climb once in the nacelle of the turbine and have
everything necessary with you.
BATmode system (preferably in BATbox S)
Microphone disc
Antenna disc/magnec base antenna
All cables
Extension cable for power supply
Drill with a drill bit of 102 mm
2.2 mm metall drill bit for pre-drilling
the fastenings of the discs
at least six 3.5 mm SPAX screws with
screwdriver to fix the discs
Magnec feet or screws, pre-drill bit
and screwdriver to fix the BATmode or
BATbox
Cabinet key
Cable es
Laptop with Ethernet cable
Smartphone
GSM Switch Socket
Ethernet cable
This checklist refers to a standard configuraon of the BATmode system.
22
Page 23

Notes
23
Page 24
bat bioacoustictechnology GmbH
Hohe Straße 2
D-90610 Winkelhaid
www.bioacoustictechnology.de
+49 (0) 1522 / 1918574
The detailed manual is always available on
the Internet as up to date PDF download
www.bioacoustictechnology.de/downloads
Version: 11/18
24
Product illustrations similar. Misprints, errors, innovations
and changes reserved.
 Loading...