

Page 1

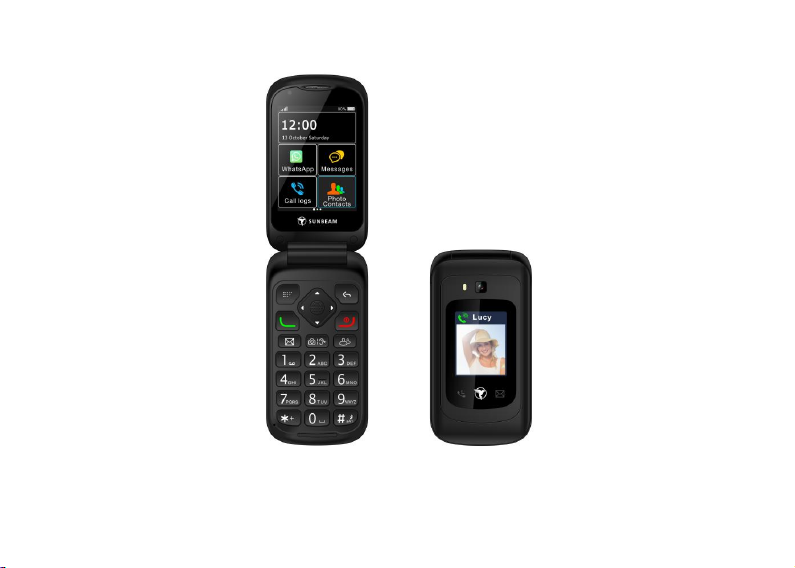
User Manual for F1
Page 2
1
Page 3
2
Page 4

3
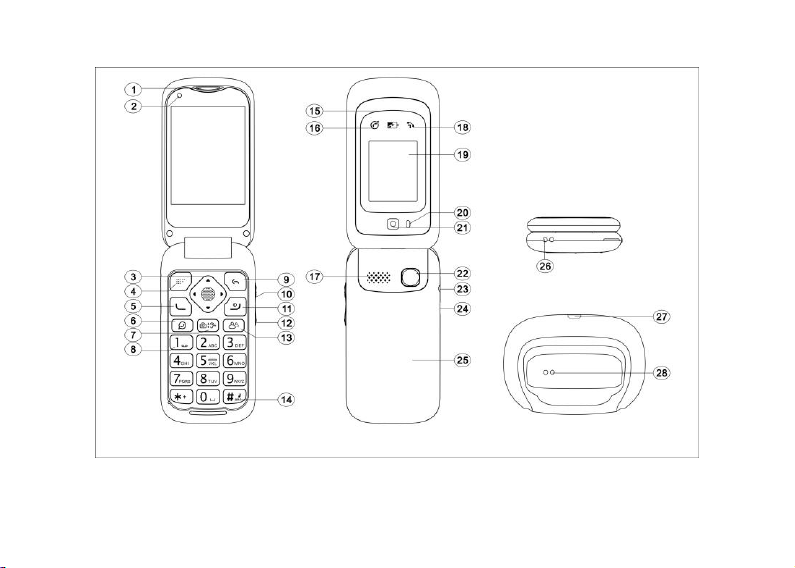
Instructions of button and telephone appearance
1. Earpiece
2. Front-facing camera
3. Up arrow key
4. Left-section key
5. Call key
6. WhatsApp
7. Camera/ Amplification key
8.Voice mail
9. Right-section key/Back key
10. + Volume key/Torch key
11. End call key/Power on/Power off
12. - Volume key
13. Photo contact
14. Silent/Input method
15. WhatApp messages/Missed messages
16. Red charging LED
17. Loudspeaker
18. Missed call LED
19. External display
20.Torch light
21.Rear-facing camera
22. SOS button
23. Battery cover
24. Microphone
25/27. Cradle socket
26. USB charging socket
Page 5
4
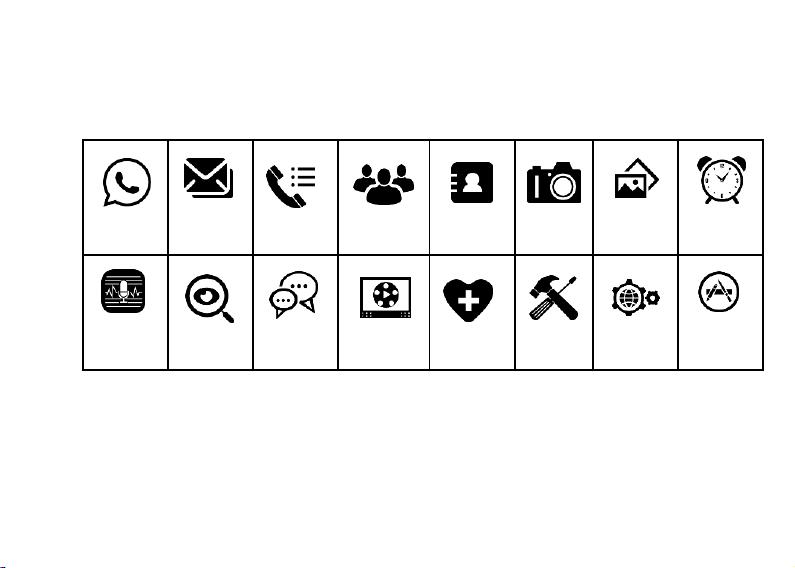
WhatsApp
Message
Call logs
Photo
contacts
Phonebook
Camera
Gallery
Alarm
Voice
memos
Magnifier
Social
media
Multimedia
SOS
Tools
Settings
APP
Instructions of main menu:
Contents
Page 6

5
Installation ..................................................................................................................... 7
Installing T-FLASH memory card ................................................................................... 7
Installing the SIM card .................................................................................................... 9
Installing the battery ....................................................................................................... 11
WhatsApp ..................................................................................................................... 12
Messages ........................................................................................................................ 13
Call logs ......................................................................................................................... 13
Photo contact ................................................................................................................ 14
Phonebook..................................................................................................................... 15
Camera ........................................................................................................................... 16
Gallery............................................................................................................................ 17
Alarm ............................................................................................................................. 17
Voice memos ................................................................................................................. 17
Magnifier ........................................................................................................................ 18
Social media .................................................................................................................. 19
YouTube ......................................................................................................................... 19
Browser .......................................................................................................................... 19
Lite ................................................................................................................................ . 19
Multimedia .................................................................................................................... 20
FM radio ......................................................................................................................... 20
Page 7

6
Recorder ......................................................................................................................... 20
Music ............................................................................................................................. 20
Video .............................................................................................................................. 21
SOS ................................................................................................................................ 21
Tools............................................................................................................................... 23
Calendar .................................................................................................................... 23
Caculator ................................................................................................................... 24
Note ........................................................................................................................... 24
File Manager ............................................................................................................. 24
SIM Toolkit ............................................................................................................... 25
Cell Broadcasts .............................................................................................................. 25
Settings ..................................................................................................................... 25
Airplane mode ........................................................................................................... 25
WLAN....................................................................................................................... 25
Mobile data ............................................................................................................... 26
Bluetooth ................................................................................................................... 26
Flip answers .............................................................................................................. 27
Page 8

7
Talking keys .............................................................................................................. 27
Tone and volume ....................................................................................................... 27
Common functions .................................................................................................. 28
Call settings ............................................................................................................... 28
Display ...................................................................................................................... 28
Language ................................................................................................................... 28
LED settings .............................................................................................................. 28
External clock style ................................................................................................ ........ 29
Special functions ...................................................................................................... 29
Low battery notifications .......................................................................................... 29
Amplify receiver volume .......................................................................................... 29
Android system ......................................................................................................... 30
Safety and Attentions ................................................................................................... 32
Page 9

8
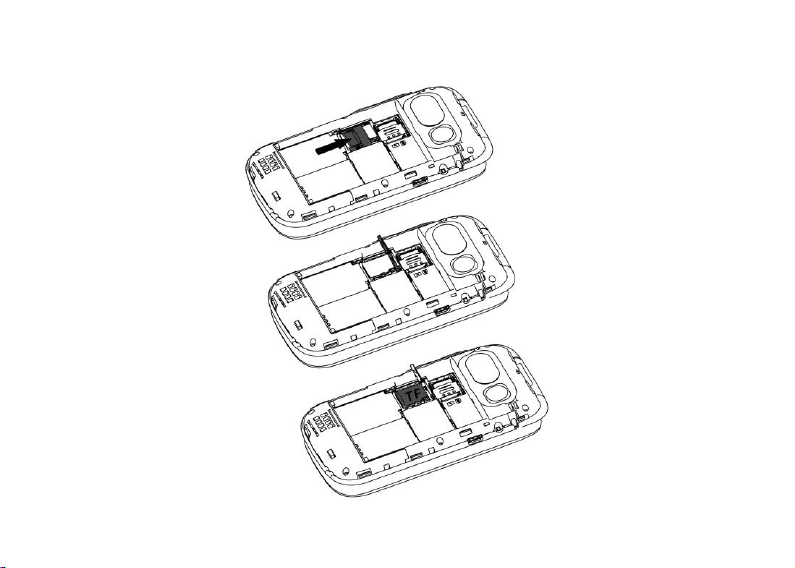
Installation
IMPORTANT
Turn off the phone and disconnect the charger before removing the battery cover.
Installing T-FLASH memory card
Insert the memory card into the slot under the SIM card holder, make sure card's contacts
face downwards, take care and please do not scratch or bend the contacts on the card.
You can check the pictures as below:
Page 10
9
Page 11

10
T-Flash card is used as phone storage, when connect to computer by USB cable, You can
copy Music, Picture or Photos inside.
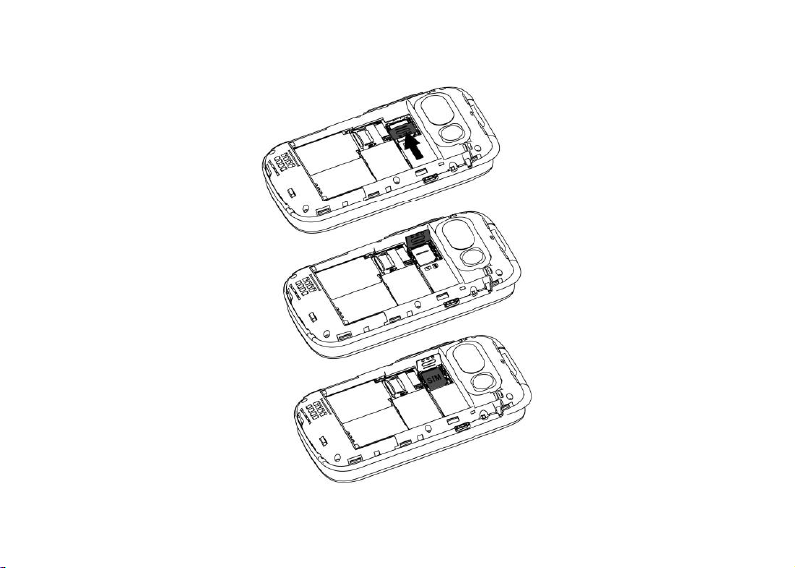
Installing the SIM card
1. Insert SIM Card into the SIM card slot upon the memory card holder.
(Make sure the SIM card’s contacts are facing inwards.)
2. Before taking out the SIM card, please turn off the phone firstly.
Page 12
11
Page 13
12
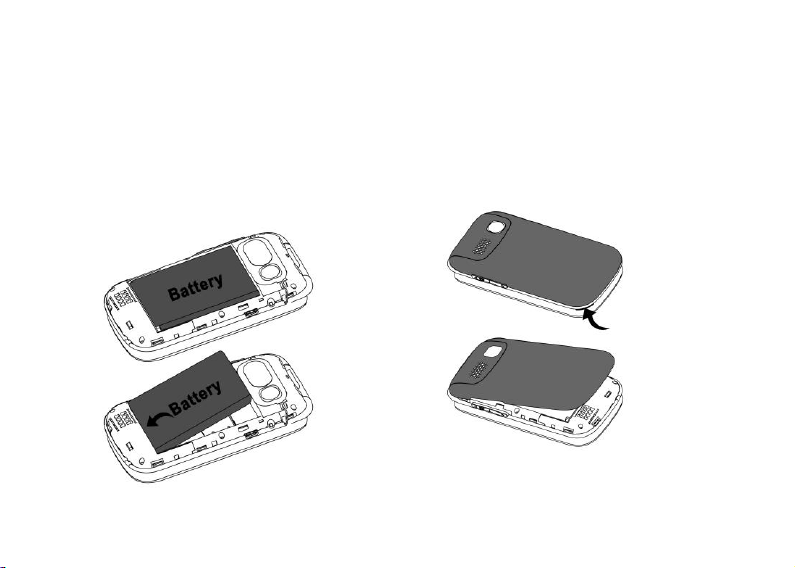
Installing the battery
For the first time use, please use up the battery and charge for 4 hours to achieve the best
state of battery.
Remove the battery cover,insert the battery into the battery compartment, replace the
battery cover.
Page 14

13
WhatsApp
AGREE AND CONTINUE to Verify your phone number first.
Select the contact you want to send a text to and start writing a message.
Tap the send icon when you’re done.
Remark:
Notification ticks
You will notice different coloured check marks next to each message.
One grey tick means that the message has been successfully sent from your phone.
Two grey ticks means that the message has been successfully delivered to your contact’s
phone.
Two blue ticks means that your contact has read your message.
Page 15

14
Messages
1. Press New to establish New message; Scroll or touch this icon to choose the
Recipient from the Phonebook or you can input the contact number directly.
2. Input your message then press Send to send out the message.
3. Press Back to cancel the previous steps.
4. Press the trash can icon to delete the received messages.
Call logs
1. All received, missed, dialed calls are saved in Call logs.
2. When there’s call history, press Options to view Send message, Add contact, Delete,
Add to the blacklist.
2.1 Send SMS: You can write new message to the contacts in Call logs.
2.2 Call: You can make a call in Call logs.
2.3 Add contact: You can save the contacts To Phone or To SIM.
2.4 Add to blacklist/Remove from blacklist: You can add or remove the contacts to the
Page 16

15
blacklist.
2.5 Delete: You can delete all received, missed, or dialed calls in Call logs.
Photo contacts
1. Press Edit, enter a name and number for new contact or press Import from
phonebook to enter a saved contact automatically.
2. Caller photo(OptionsTake photo from Camera or Choose photo from
Gallery).This picture will be displayed when you call the corresponding contact or
when they are calling you.
Select one of the following options:
1). Press Options to Take photo from camera.
Remark: Using Rear camera or Front camera to take picture(Picture size:5M pixels as
default, you can also choose 3M pixels, 2M pixels, 1.3M pixels, 1M pixels).
2). Press Options to Choose photo from an existing picture in Gallery.
Remark: You can manually use the edit box to adjust the image size.
3. Caller ringtone(OptionsRecord voice/ Select from files/ Select from ringtone/
Default) to select incoming call ringtone which you want. E.g.: you can select Record
Page 17

16
voice to record customized ringtone and press Save to finish it.
4. When there’s saved photo contact, you can press Options to choose Send SMS, Call,
Edit, Delete, and Import from phonebook.
Phonebook
Options
1. Add contact
You can add the new contact To Phone or To SIM, enter Name and Phone number, by
press Save to confirm.
2. Select to delete
When there’s saved contacts, you can select to delete the contacts you need.
3. Speed dial settings
You can set 2-9 number as the speed dial contacts.
4. Blacklist management
You can set the contacts to blacklist to filter out related calls and text messages.
Page 18

17
5. When there are saved contacts, you can View, Send SMS, Edit, Delete, Copy to SIM
card from Options.
Camera
1. Press Options to choose Rear camera or Front camera to take the photos.
2. Press Flash icon and choose On or Off to open or close the flash.
3. Press Self Timer icon to choose the countdown: Off, 3 seconds, 5 seconds, 10
seconds.
4. Press icon to view the videos library.
5. Press Settings icon to view more camera settings: Video quality, Storage path,
Restore defaults.
Remarks:
(1) Press * to check preview image;
(2) Press # to switch the Rear camera or Front camera;
Page 19

18
(3) Press left or right navigation key to switch take photo or take video;
(4) Press up or down navigation key to zoom in or zoom out the focus.
Gallery
All pictures, Vedio, Media, Podcasts, Photos, all received photos will be displayed here.
Alarm
Press New to edit an alarm: Alarm name, Time, Repeat, Sound, Vibrate(Off/On) and
press Save.
Voice memos
This menu option enables you to set up tasks about which the telephone can remind you
later. Accessing this menu option
shows a list of tasks configured.The options enable you to add new tasks and edit/delete
existing tasks.
If you add a new task or edit an existing task, enter Subject,Remind sound, Due date,
Page 20

19
Due time, Repeat, Sound loop (default:10 times) and Remind interval (default: 5
mins).
You can use Remind sound to record what you want to be reminded instead of
traditional input tasks.This will make elderly more easily to operate.
Remark:
1. When preset time is coming,the phone will play the recorded sound, and there is a
pop-up of task with options: Know and Repeat. By pressing Know or End call key to
exit the task.
2. Or in case the elderly people can’t listen to this remind task in timely,by pressing
Repeat,the phone will play the recorded sound again,and also several minutes later
repeat the sound again basic on the interval time of Remind interval.
Magnifier
With the camera’s magnifier, users can zoom in by adjusting the focus distance.
With this function, the elderly users can read the newspapers, magazines and other books
more easily.
Remark: Press * or # to zoom out or zoom in the focus.
Page 21

20
Social media
1. YouTube
1) Video sharing where you can watch, like, share, comment and upload your own
videos.
2) Search for or watch video you like.
2. Browser
1) Visit websites and do activities within them like login, view multimedia, link from one
site to another, visit one page from another.
2) Search things you like on Internet.
Remark: By using above social media base on the network connection like Mobile data,
Wi-Fi.
3. Lite
If you have the Facebook account, just enter the Phone number or Email and Password to
log in, so you can send the messages to your Facebook friend directly.
Page 22

21
Multimedia
1. FM radio
1) Press left arrow and right arrow to adjust the channel lists;
2) Press Options, you will view Auto search and save, Pause(default)/Play, choose the
action you need.
3) Press Back to Quit or background play.
2. Recorder
Press to record the voice, press to stop the recording, press to pause the
recording, press to play the recording, press to save the recording file, press
to cancel the recording, press to open the recording file list.
3. Music
(1) You can check and play audio files encoded in MP3 and other audio formats here;
(2) When there are existing audio files, you can view Play, Set as ringtone, Delete and
Page 23

22
choose the action you need.
4. Video
You can check all video you take by camera here.
SOS
1. Make sure SOS Enable to work.
2. Scroll to Emergency contacts to setup SOS number, here you can setup 5 numbers.
3. Scroll to Warning Tone to control warning tone status On or Off.
4. Scroll to Send message to choose whether to send SOS SMS or not.
5. Scroll to Emergency message to edit SOS emergency message.
Make a SOS call
Before making a SOS call, please ensure SOS status is Enable and you have already
finished SOS settings.
Click SOS button 4 times within 3 seconds, the phone will automatically send two
messages of one SOS emergency and another positioning of Google link to the saved
emergency contacts and then call the saved emergency contacts one by one, warning tone
is always on until someone manually abort the SOS function.
Page 24

23
Remarks:
1) There are 3 kinds of positioning: LBS(Location Base Station),Wi-Fi and GPS. LBS
and Wi-Fi positioning are using indoor. GPS positioning is using outdoor.
The positioning accuracy:LBS about 200m,Wi-Fi about 20m,GPS about10m.
2) When SOS function activated,the phone will automatically turn on GPRS mobile data
and connect to pre-stored Wi-Fi(if stored in phone in advance) for the purpose of more
precise positioning.If not pre-stored Wi-Fi,the phone only turn on GPRS mobile data.
While the SOS function is aborted,the phone will automatically turn off GPRS and/or
Wi-Fi.
3) SOS function always requests the network(GPRS and/or Wi-Fi) to have the
positioning, and sends out the message of Google link. If don’t have network(GPRS), it
will send the message”No network data,positioning failed” instead.
Warning!
The SOS function must be activated before use. For some interference factors (e.g.
Internet, environment and etc.), SOS function is not available.
Page 25

24
Tools
1. Calendar
1) Today's day and date is shown on the display.
2) Touch the date on the display to Add Event
A. Input Title for the event.
B. Enter a Start Date and End Date for the event.
C. Enter the Start Time and End time for the event.
D. Enter the Event Reminder for the event.
E. Enter Location for the event.
F. Write the Notes for the event.
G. Save the event.
3) Delete event
Delete the selected event.
4) Day view
Shown today’s date
5) Week view
Shown week date’s of this year.
Page 26

25
6) Month view
Shown the month date’s of this year.
Remark: If you choose All-day Event, you don’t need to enter Start Time and End
Time.
2. Calculator
1) Calculate the number according to following steps:
2) Input numbers.
3) Use arrow key to select +,-,=,×,÷.
4) Then press OK key. The calculation result is shown on the screen.
5) You can press * to choose decimal point.
6) You can press # to delete or clean the result.
3. Note
Here you can write anything you like.
4. File Manager
1) Use File manager to manage all files, you can rename, copy, delete, move the files.
Page 27

26
2) You can check all saved documents such as Audio, My music, Photos, Video etc. from
Internal shard storage or SD card.
5. SIM Toolkit
Enables the Subscriber Identity Module (SIM) to initiate actions which can be used for
various value-added services.
6. Cell Broadcasts
A mobile technology feature defined by the ETSI’s GSM committee and is part of the 2G,
3G, 4G LTE (telecommunication) and 5G standards.
Settings
1. Airplane mode
Power On /Off: Touch or select OK key On/Off to to enable or disable Airplane mode.
Remark: Airplane mode disconnects your device from all networks and turns off
connectivity features, such as phone calls and mobile data.
2. WLAN
Page 28

27
Power On/Off: Touch or select OK key On/Off to enable or disable WLAN.
Remarks:
1) When WLAN is turned on, your device will automatically scan for available networks
and display them.
2) Tap the network you want to connect to.When you select an open network, you are
automatically connected to the network. Otherwise, enter a password to connect.
3. Mobile data
Power On/Off: Touch or select OK key On/Off to enable or disable Mobile data.
Remark: Mobile data is one way that mobile device users can gain wireless access to the
internet.
4. Bluetooth
1) Power On /Off: Touch or select OK key On/Off to make the phone visible or
invisible to other devices.
2) Pair new device to search new available devices nearby, connect by share paring
code.
Page 29

28
3) You can transfer files, video, etc. between your devices and another Bluetooth device.
Remark: Pairing between two Bluetooth devices is a one-time process. Once a pairing is
created, the devices will continue to recognize their partnership and exchange
information without having to re-enter a pairing code.
5. Flip answer
Power On/Off: Touch or select OK key On/Off to to enable or disable Flip answer.
Remark: When Flip answer is turned on, you can automatically answer the call when
you open the phone cover.
6. Talking keys
Power On/Off: Touch or select OK key On/Off to to enable or disable Talking keys.
Remark: When Talking keys is turned on/off to open or close the sound of keypad.
7. Tones and volume
1) You can adjust the Media volume, Alarm volume, Ring volume here.
Page 30

29
2) Tab Also vibrate for calls to open or close the vibration.
3) Tab Phone ringtone to select ringtone type from the phone.
4) Tab Advanced for more steps, for example, open or close the Touch sounds.
8. Common functions
1) Call settings: You can set Calling accounts, Voicemail, Fixed Dialing Numbers,
Call forwarding, Call barring, Additional settings . And you can enter into Advanced
settings to set the Call waiting.
2) Display: You can set function of Brightness level, Sleep here.
3) Language: You can add or remove the language here.
4) LED Settings: Tab Status on, from Time Settings, you can set Start Time and End
time for LED flashing (Blue LED flashes for missed calls; Green LED flashes for missed
messages or whatsapp messages; Red LED flashes for low battery or charging ).
Remarks: Max. input number is 0-23.
Page 31

30
5) External clock style:
There are two clock style( Analog, Digital) here, you can choose one style you like to
show on front display.
9. Special functions
1) Low battery notifications
Status: On/Off
Notified contacts: 3 numbers
Notification SMS
When battery capacity is lower 10%,the phone will automatically send message to 3
preset Notified contacts to remind them to ask the user to charge the phone in timely.
Also the phone has 1st popup “Low battery,please put me on cradle!” to remind the
user of charging. Every 20 minutes,this popup come out to remind the user until the
phone is power off or charged higher 10% capacity.
2) Amplify receiver volume
Touch or select OK key On/Off to enable or disable Amplify receiver volume.
Page 32

31
This mobile telephone has a loud ringer. Moreover, there is a amplified function
to increase extra 25dB volume with amplified key. This useful feature make a
highly suitable telephone for the elderly with hard of hearing without using extra
hearing aid device or people in very noisy surrounding.
When select On,whenever you make or receive a call, the amplify feature can be set to
On or Off as a default to open or close the amplified function by pressing key
at 1 time.
10. Android system
1) Network & Internet
You will see and set the Wi-Fi(Page 23), mobile network(Page 24), Data usage, Hotspot
& tethering, VPN here.
Remark:Use Mobile Hotspot to share your device’s Internet connection with other
devices using your device as a portable Wi-Fi Hotspot.
2) Connected devices
You will see and set the Bluetooth(Page 24), Cast, Printing, USB here.
Page 33

32
3) Apps & notifications
Check all systems’ Apps, file manager and notifications here.
4) Battery
Check battery status here.
5) Display
Check Page 28.
6) Sound
Check Tones and volume(Page 27).
7) Storage
Check Device storage and SD card storage here.
8) Security & locations
Secure your device and protect your data with Lock Screen and Security settings
Set screen lock: Use Select a PIN to use for unlocking the screen. This option
Page 34

33
provides medium to high security.
None: Never use a Lock screen.
SIM card lock: Use a SIM PIN to lock SIM card.
9) Users & accounts
You can check add account, Emergency information, refresh Automatically sync data,
Add users from lock screen here.
10) System
You can set Languages & input, Date & time, Backup, Reset options, About phone here.
Backup: Enable backup of your information, account and data to Android system.
Reset options: You can check DRM reset, Reset Wi-Fi, mobile & Bluetooth, Reset
app preferences, Erase all data(factory reset) here.
Safety and Attentions
In order to use your mobile phone safely and efficiently, please read your messages
before using:
Page 35

34
Hearing Aid Compatible
This device can reach to highest HAC standard: M4/T4 rating of the ANSI C63.19
test method.Most hearing aids on the market should be compatible with this phone
but compatibility is not guaranteed. Please consult with your Doctor or hearing aid
manufacturer before using a hearing aid with this product. Also make sure you will
adjust the right position of phone nearby the hearing device when using the
phone,so it can achieve the best effect of hearing.
Please be careful when you are near chemical plant, gas station, tank farm and
other explorers. Even if your mobile phone is in standby, it will send out RF signal
as well. Therefore, please power off your mobile phone.
When you are driving, do not use your mobile phone. If you have to use it, please
park your car then have your calling.
Don’t use your mobile phone in the hospital so as not to disturb the operation of
medical equipment, such as heart pacemakers, hearing aids and etc. You should
Page 36

35
obey relevant rules before using.
Please power off your mobile phone before the plane taking off so as not to disturb
flying. It is dangerous and illegal to use mobile phone on board.
Please place your mobile phone and all accessories where is untouchable for kids.
Accessories and battery: please use the dedicated accessory and battery of our
company. If not, it will destroy the phone and lead to danger. Please do not shortcut,
tear down and adapt the battery. If the phone has excessive temperature, discolor,
variant, bulking, weeping and other unusual phenomenon, please stop using and
change the battery immediately so as not to affect the safety. Please place the old
batteries in specific recycle spots.
No charging without the battery. When you take off the battery, please power off
the mobile phone so as not destroy the property of the phone.
The phone is not waterproof. Please keep it dry.
Avoid using the phone in an excessive and too low temperature.
Page 37

36
Not throw, fall and beat the phone so as not to destroy the internal and external
phone.
Authorized Service: install and maintain the phone by professional people. Please
not tear off the phone on your own.
Page 38

37
FCC Statement
15.19 Labeling requirements.
This device complies with part 15 of the FCC Rules. Operation is subject to the
following two conditions: (1) This device may not cause harmful interference, and
(2) this device must accept any interference received, including interference that
may cause undesired operation.
15.21 Information to user.
Any Changes or modifications not expressly approved by the party responsible
for compliance could void the user's authority to operate the equipment.
15.105 Information to user.
This equipment has been tested and found to comply with the limits for a Class B
digital device, pursuant to Part 15 of the FCC Rules. These limits are designed to
provide reasonable protection against harmful interference in a residential
installation. This equipment generates uses and can radiate radio frequency
energy and, if not installed and used in accordance with the instructions, may
cause harmful interference to radio communications. However, there is no
Page 39

38
guarantee that interference will not occur in a particular installation. If this
equipment does cause harmful interference to radio or television reception, which
can be determined by turning the equipment off and on, the user is encouraged to
try to correct the interference by one or more of the following measures:
-- Reorient or relocate the receiving antenna.
-- Increase the separation between the equipment and receiver.
-- Connect the equipment into an outlet on a circuit different from that to which the
receiver is connected.
-- Consult the dealer or an experienced radio/TV technician for help.
Specific Absorption Rate (SAR) information:
This product meets the government's requirements for exposure to radio waves.
The guidelines are based on standards that were developed by independent
scientific organizations through periodic and thorough evaluation of scientific
studies. The standards include a substantial safety margin designed to assure the
safety of all persons regardless of age or health.
FCC RF Exposure Information and Statement The SAR limit of USA (FCC) is 1.6
Page 40

39
W/kg averaged over one gram of tissue. This device was tested for typical
body-worn operations with the back of the handset kept 10mm from the body. To
maintain compliance with FCC RF exposure requirements, use accessories that
maintain a 10mm separation distance between the user's body and the back of
the handset. The use of belt clips, holsters and similar accessories should not
contain metallic components in its assembly. The use of accessories that do not
satisfy these requirements may not comply with FCC RF exposure requirements,
and should be avoided.
Body-worn Operation
This device was tested for typical body-worn operations. To comply with RF
exposure requirements, a minimum separation distance of 10mm for body worn
must be maintained between the user’s body, including the antenna. Third-party
belt-clips, holsters, and similar accessories used by this device should not contain
any metallic components. Body-worn accessories that do not meet these
requirements may not comply with RF exposure requirements and should be
avoided. Use only the supplied or an approved antenna.
Page 41

40
IC STATEMENT
This device complies with Industry Canada’s licence-exempt RSSs. Operation is
subject to the following two conditions:
(1) This device may not cause interference; and
(2) This device must accept any interference, including interference that may
cause undesired operation of the device.
Le présent appareil est conforme aux CNR d'Industrie Canada applicables aux
appareils radio exempts de licence. L'exploitation est autorisée aux deux
conditions suivantes: (1) l'appareil ne doit pas produire de brouillage, et (2)
l'utilisateur de l'appareil doit accepter tout brouillage radioélectrique subi, même si
le brouillage est susceptible d'en compromettre le fonctionnement.
Specific Absorption Rate (SAR) information:
This product meets the government's requirements for exposure to radio waves.
The guidelines are based on standards that were developed by independent
scientific organizations through periodic and thorough evaluation of scientific
studies. The standards include a substantial safety margin designed to assure the
Page 42

41
safety of all persons regardless of age or health.
IC RF Exposure Information and Statement The SAR limit of USA (IC) is 1.6 W/kg
averaged over one gram of tissue. This device was tested for typical body-worn
operations with the back of the handset kept 10mm for body worn. To maintain
compliance with IC RF exposure requirements, use accessories that maintain a
10mm for body worn. The use of belt clips, holsters and similar accessories
should not contain metallic components in its assembly. The use of accessories
that do not satisfy these requirements may not comply with IC RF exposure
requirements, and should be avoided.
Body-worn Operation
This device was tested for typical body-worn operations. To comply with RF
exposure requirements, a minimum separation distance of 10mm for body worn
must be maintained between the user’s body and the handset, including the
antenna. Third-party belt-clips, holsters, and similar accessories used by this
device should not contain any metallic components. Body-worn accessories that
do not meet these requirements may not comply with RF exposure requirements
and should be avoided. Use only the supplied or an approved antenna.
 Loading...