

Page 1

Operating instructions
Handheld vacuum sealer
Item no. 1434331
Intended use
The product serves for sealing or welding and cutting plastic bags or sacks. Bags and sacks
can be sealed up to a thickness of 0.3 mm. To nd out which materials are supported, please
see the technical data of these instructions.
The power is supplied by a permanently integrated Li-ion rechargeable battery (non-replacea-
ble), which can be recharged through the supplied micro-USB cable from USB port or the USB
power adapter.
For safety and approval reasons (CE), you may not convert and/or alter the product. If you
use the product for purposes other than those described above, the product may be damaged.
Furthermore, improper use may cause risks such as short-circuits, re, etc. Please read the
operating instructions carefully and do not discard them. If you pass the product on to a third
party, please hand over these operating instructions as well.
This product complies with the applicable national and European regulations. All names of
companies and products are the trademarks of the respective owners. All rights reserved.
Package Contents
• Handheld vacuum sealer
• USB cable
• Operating instructions
Getting started and operation
Never touch the heating element!
Risk of burns!
a) Charging the product
Before you start using the product, the built-in rechargeable battery should be fully charged.
This takes about 20 to 45 minutes.
To charge the product, proceed as follows.
• Connect the provided micro SB cable to the micro USB port on the rear panel of the device.
Pay attention to the correct orientation when inserting the plug.
• Connect the normal USB plug type A to a USB port, e.g., of a USB power adapter.
• The charging process starts immediately. Meanwhile, the built-in LED lights blue.
• The LED lights up red out once the charging process is over.
b) Preparation of the product for operation
• In any case, remove the micro USB cable before you start using the product.
• Then close the upper cover.
If you are not using the product, the mechanical slide
switch should be always in the “Lock” position. Besides, the cover should be closed.
• To start using the product, slide the switch from the “Lock” to
“Seal” position.
• Thus the product is ready for use.
Up-to-date operating instructions
Download the latest operating instructions via the link www.conrad.com/downloads or scan the
QR code. Follow the instructions on the website.
Safety Instructions
Please read the operating instructions carefully and pay particular attention to
the safety instructions. We do not assume liability for injuries/material damages resulting from failure to observe the safety instructions and the information
in these operating instructions regarding the proper handling of the product.
Furthermore, in such cases, the warranty/guarantee will be null and void.
• The product is not a toy. Keep out of the reach of children and pets.
• Do not carelessly leave the packaging material lying around, since it could become a dangerous plaything for children.
• Never touch the heating element! Risk of burns!
• If you will not be using the product, please make sure that the slide switch is
always in the “Lock” position and the cover closed.
• If you are not going to use the product for a long time (e.g., putting it into storage),
recharge the battery every 3 months at the latest to prevent deep discharge. In
the event of a deep discharge, the built-in Li-ion rechargeable battery will be permanently damaged!
• Protect the product from extreme temperatures, direct sunlight, strong vibrations
and combustible gases, vapours and solvents.
• Never expose the product to mechanical stress.
• The product must not get damp or wet, as this will destroy it. There is also risk of
re and explosion from the integrated rechargeable battery.
• If safe operation is no longer possible, take the device out of service and secure
it against unintended use. Safe operation is no longer possible, if the product:
- has visible damage,
- no longer functions properly,
- has been stored under adverse ambient conditions for an extended period of
time or
- has been exposed to considerable strain during transport.
• Please handle the product carefully. The product can be damaged if crushed,
struck or dropped, even from a low height.
• If you have doubts about how the equipment should be operated or how to safely
connect it, consult a trained technician.
• Maintenance, adjustment and repair work may be carried out only by an expert or
a specialist workshop.
• If you have any questions that are not answered in these operating instructions,
please contact our technical customer service or another specialist.
c) Sealing a sack
• Hold rmly one end of the sack and set the handheld vacuum sealer in position (gure 1, ar-
row 1). At that, keep some distance to the device. Press on the cover and wait for 3 seconds
until the product preheats.
• Slide the handheld vacuum sealer along the sack to seal it (gure 2); always keep the cover
closed.
The speed of movement depends on the thickness of the bag. Sealing process for 20 cm
section should last about 5 to 7 seconds.
• As soon as you have nished on the right-hand side (gure 2), turn the sack around and place
the sealer onto the part that has not been sealed yet (gure 3, arrow 2).
• Preheat it again for 3 seconds and seal the remaining part of the sack.
Before you seal the sack completely, it is advisable to remove the air out of it.
• Now the sack is water and airtight sealed.
Whenever you stop operation, please remember to preheat the device for 3 seconds
thereafter.
The bag is either just sealed or cut and sealed depending on the thickness of the
bag and sealing speed. Thus, you can decide by yourself whether your bag should
or should not be cut.
If you are a left-hander, just seal the bag in a reverse direction. See gure above,
3 small gures shown bottom left.
• After you have nished using the product, slide the switch from the “Seal” to “Lock” position.
Page 2
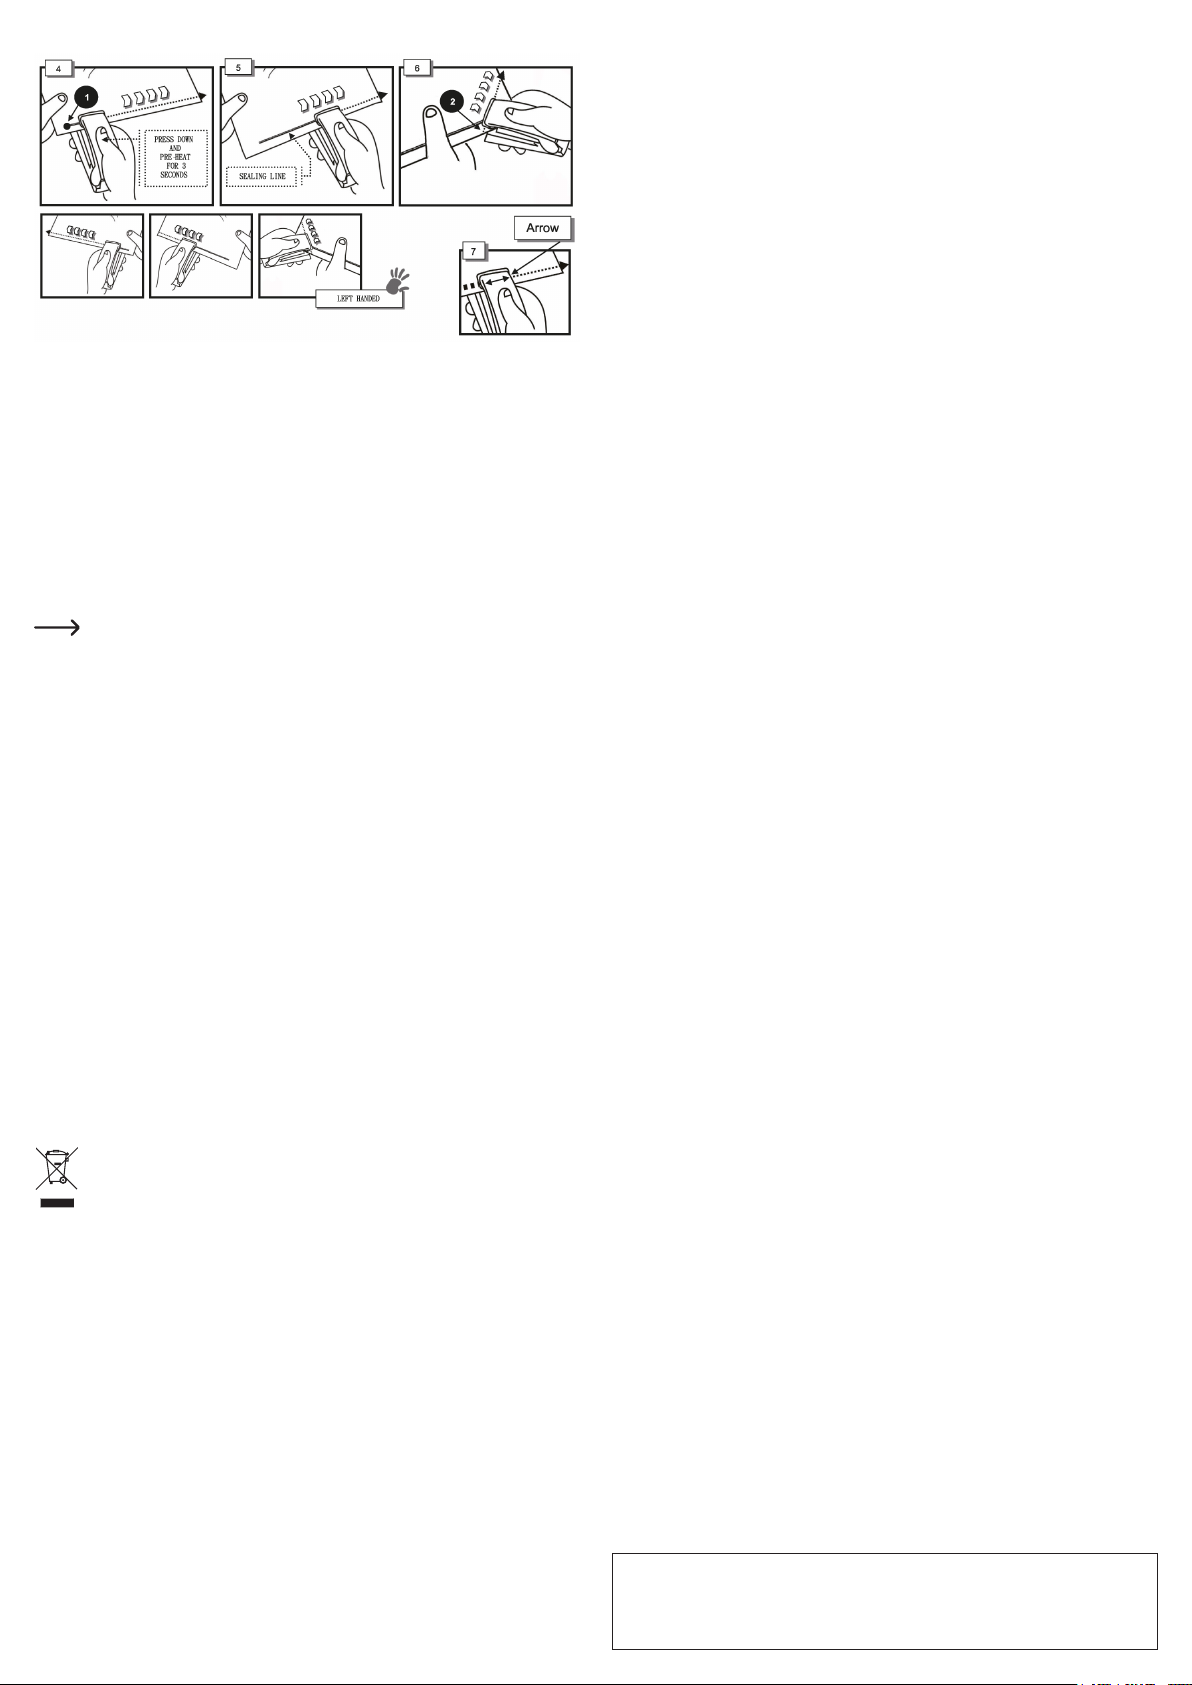
d) Sealing a bag from thicker lm or aluminium foil
• Hold again rmly one end of the sack and set the handheld lm sealing unit in position (-
gure 4, arrow 1). At that, keep some distance to the device. Press on the cover and wait for
3 seconds until the product preheats.
• Slide the handheld vacuum sealer along the sack to seal it (gure 5); always keep the cover
closed.
The speed of movement depends on the thickness of the sack.
• As soon as you have nished on the right-hand side (gure 5), turn the sack around and place
the sealer onto the part that has not been sealed yet (gure 3, arrow 2).
• Preheat it again for 3 seconds and seal the remaining part of the sack. At that, tack the rst
weld seam.
Before you seal the sack completely, it is advisable to remove the air out of it.
• Now the sack is water- and airtight sealed.
Whenever you stop operation, please remember to preheat the device for 3 seconds
thereafter.
Thicker sacks or bags from aluminium foil are just sealed, but not cut. However, it
depends on the thickness of the bag and sealing speed again.
If you are left-handed, just seal the bag in a reverse direction. See again the 3 small
gures shown bottom left.
• After you have nished using the product, slide the switch from the “Seal” to “Lock” position.
e) Tips and Notes
• If you want to weld bags or sacks consisting of different materials or feature different
thickness‘s, just change the preheat time. Besides, you can repeat preheating in the course
of the sealing operation.
• When preheated for 3 seconds, the heating element reaches the temperature of approx.
160 °C. You can increase the preheat time for max. 30 seconds.
• Due to built-in magnets on the underside of the product, you can attach it to any magnetic
metal surface.
Technical Data
Power supply (operation) ..................... by the permanently installed Li-Ion rechargeable
battery
Battery ................................................. rechargeable Li-Ion battery, 3.7 V/DC, 300 mAh
Power supply (recharging) ................... via the micro USB cable; 5 V/DC
Current consumption (charging) .......... max. 1 A
Charging .............................................. via the enclosed micro USB cable; duration approx. 20
to 45 minutes; 300 to 500 charge cycles
Heating time ........................................ to 160 °C in 3 seconds; maximum heating time 30 se-
conds
Sealing ................................................. max. 10000 seals; max. 100 seals per full charge
Supported materials ............................ PP, PVC, PE, OPP & PET bags; non-woven bags,
bags from shrink-wrapped foil (PVC, POF)
Dimensions (L x W x H) ....................... approx. 97 x 30 x 28 mm
Weight ................................................. approx. 73 g
Operating and storage conditions ........ -10 °C to +60 °C; 0% to 90% relative humidity
Care and Cleaning
• Disconnect the product from the mains supply before each cleaning procedure (pull out the
micro USB cable).
• Do not use abrasive cleaning agents, cleaning alcohol or other chemical solutions, since
these could damage the housing or even impair operation.
• Use a dry, lint-free cloth to clean the product.
Disposal
Electronic devices are recyclable material and do not belong in the household waste.
Once the product becomes unusable, dispose of it in accordance with the relevant
statutory regulations.
This is a publication by Conrad Electronic SE, Klaus-Conrad-Str. 1, D-92240 Hirschau (www.conrad.com).
All rights including translation reserved. Reproduction by any method, e.g. photocopy, microlming, or the capture in
electronic data processing systems require the prior written approval by the editor. Reprinting, also in part, is prohibited.
This publication represent the technical status at the time of printing.
Copyright 2016 by Conrad Electronic SE. 1434331_V1_0616_02_VTP_m_en
Page 3

Mode d‘emploi
Mise en service et utilisation
Ne touchez jamais l’élément
chauffant !
Risque de brûlures !
Thermosoudeuse manuelle
N° de commande 1434331
Utilisation conforme
Le produit sert à souder ou souder et couper des sachets et des pochettes en plastique. Le
produit permet de souder des sachets et des pochettes jusqu‘à une résistance de 0,3 mm.
Pour connaître les matériaux supportés, veuillez consulter les caractéristiques techniques de
ce mode d‘emploi.
L‘alimentation en tension a lieu via grâce à la batterie Li-Ion intégrée et xe (non remplaçable),
qui peut être rechargée via le câble micro-USB fourni, ou bien via un bloc d‘alimentation USB.
Pour des raisons de sécurité et d‘homologation (CE), vous ne devez pas modier et/ou transformer le produit. Si le produit est utilisé à d‘autres ns que celles décrites ci-dessus, il peut être
endommagé. En outre, une utilisation incorrecte peut générer des risques, comme par exemple un court-circuit, un incendie, une électrocution, etc. Lisez attentivement le mode d‘emploi et
conservez-le. Transmettez toujours le mode d‘emploi du produit si vous le donnez à des tiers.
Le produit est conforme aux prescriptions des directives européennes et nationales en vigueur.
Tous les noms d‘entreprise et les appellations d‘appareil gurant dans ce manuel d‘utilisation
sont des marques déposées de leurs propriétaires respectifs. Tous droits réservés.
Étendue de la livraison
• Thermosoudeuse manuelle
• Câble USB
• Mode d‘emploi
Modes d‘emploi actuels
Téléchargez les modes d‘emplois actuels sur le lien www.conrad.com/downloads ou bien
scannez le code QR représenté. Suivez les indications du site internet.
a) Chargement du produit
Avant de mettre le produit en service, la batterie rechargeable intégrée et xe doit d‘abord être
rechargée complètement. Cela peut prendre de 20 à 45 minutes environ.
Pour recharger le produit, procédez de la manière suivante.
• Raccordez le câble micro-USB au port USB du micro, à l‘arrière de l‘appareil. Lors de
l‘insertion, assurez-vous de la bonne orientation de la connexion.
• Branchez la che USB normale de type A sur un port USB, p. ex. d‘un bloc d‘alimentation
USB.
• Le processus de charge commence immédiatement. Le voyant LED intégré s‘allume en bleu
pendant ce processus.
• Si le voyant LED s‘allume en rouge, le processus de charge est terminé.
b) Préparation du produit pour le fonctionnement
• Avant de pouvoir utiliser le produit, enlevez en tous les cas d‘abord le câble micro-USB.
• Fermez tout simplement le couvercle.
Quand vous n‘utilisez pas le produit, ‚interrupteur
coulissant mécanique doit toujours se trouver en
position « Lock » . En outre, le couvercle doit être
fermé.
• Pour utiliser l‘appareil, faites coulisser l‘interrupteur de la position « Lock » à la position « Seal ».
• L‘appareil est à présent prêt à être utilisé.
c) Soudage d‘un sachet
Consignes de sécurité
Lisez attentivement le mode d’emploi et respectez particulièrement les
consignes de sécurité. Si vous ne respectez pas les consignes de sécurité
et les instructions contenues dans ce mode d’emploi pour une manipulation
appropriée, nous déclinons toute responsabilité pour les dommages corpo-
rels et matériels en résultant. En outre, la garantie prend n dans de tels cas.
• Cet appareil n‘est pas un jouet. Gardez-le hors de portée des enfants et des animaux domestiques.
• Ne laissez pas traîner le matériel d‘emballage. Il pourrait devenir un jouet dangereux pour les enfants.
• Ne touchez jamais le capteur ! Risque de brûlures !
• Quand vous n‘utilisez pas le produit, veillez à ce que l‘interrupteur coulissant soit
toujours sur la position « Lock » et que le couvercle soit fermé.
• Si le produit n‘est pas utilisé pendant une longue période (p. ex. en cas de stockage), vous devez recharger la batterie rechargeable au plus tard tous les 3 mois
pour éviter sa décharge complète. En cas de décharge complète, la batterie Li-Ion
intégrée sera irréversiblement endommagée !
• Protégez le produit contre les températures extrêmes, les rayons directs du soleil,
des chocs intenses, des gaz, vapeurs et solvants inammables.
• Évitez d‘exposer le produit à des sollicitations mécaniques.
• Le produit ne doit pas être humide ou mouillé, car ceci l‘endommagerait. La batte-
rie intégrée pourrait en outre provoquer un incendie ou une explosion.
• S‘il n‘est plus possible d‘utiliser le produit sans danger, débranchez/éteignez le
produit et protégez-le contre toute utilisation non autorisée. L‘utilisation en toute
sécurité n‘est plus possible quand le produit :
- est visiblement endommagé,
- ne fonctionne plus correctement,
- a été conservé pendant une longue période de temps dans des conditions ambiantes défavorables ou
- a été exposé à de fortes contraintes pendant son transport.
• Manipulez le produit avec précaution. Les chocs, les coups ou les chutes, même
d‘une faible hauteur endommageront l‘appareil.
• Adressez-vous à un technicien, si vous avez des doutes concernant le mode de
fonctionnement, la sécurité ou le branchement de l‘appareil.
• Faites appel exclusivement à un professionnel ou à un atelier spécialisé pour
effectuer des travaux de maintenance, de réglage ou de réparation.
• Si vous avez encore des questions après la lecture de ce mode d‘emploi, ad-
ressez-vous alors à notre service technique ou à d‘autres personnes qualiées.
• Tenez un côté du sachet et positionnez la thermosoudeuse manuelle (image 1, èche 1).
Maintenez un peu de distance de l‘appareil. Appuyez sur le couvercle et attendez 3 secondes
pour préchauffer le produit.
• Faites glisser la thermosoudeuse manuelle le long du sachet pour le souder (image 2) tout
en maintenant le couvercle toujours fermé.
La vitesse dépend de la résistance du sachet. Pour une longueur de 20 cm, le processus de
soudage dure de 5 à 7 secondes.
• Quand vous êtes arrivé au côté droit (image 2), tournez le sachet et placez la thermosoude-
use face au côté non soudé (image 3, èche 2).
• Faites chauffer à nouveau 3 secondes et soudez le reste du sachet.
Avant de souder le sachet complet, il est conseillé d‘en faire d‘abord sortir l‘air.
• Le sachet est maintenant soudé et étanche à l‘air et à l‘eau.
Lorsque vous interrompez le processus, veillez toujours à faire pré-chauffer
l‘appareil 3 secondes.
Selon la résistance du sachet et la vitesse de soudage, le sachet sera soudé ou sou-
dé et coupé. Vous pouvez ainsi déterminer vous-même, en changeant la vitesse, si
le sachet doit être coupé ou non.
Si vous êtes gaucher, soudez le sachet tout simplement dans l‘autre direction. Voir
l‘image plus haut et les 3 petites images plus bas.
• Après l‘utilisation, faite coulisser l‘interrupteur de la position « Seal » à la position « Lock ».
Page 4

d) Soudage d‘un sachet fait en matériau plus épais ou en feuille d‘aluminium
• Tenez un côté du sachet et positionnez la thermosoudeuse manuelle (image 4, èche 1).
Maintenez un peu de distance de l‘appareil. Appuyez sur le couvercle et attendez 3 secondes
pour préchauffer le produit.
• Faites glisser la thermosoudeuse manuelle le long du sachet pour le souder (image 5) tout
en maintenant le couvercle toujours fermé.
La vitesse dépend de la résistance du sachet.
• Quand vous êtes arrivé au côté droit (image 5), tournez le sachet et placez la thermosoude-
use face au côté non soudé (image 3, èche 2).
• Faites chauffer à nouveau 3 secondes et soudez le reste du sachet. Croiser le premier cordon de soudure.
Avant de souder le sachet complet, il est à nouveau conseillé d‘en faire d‘abord sortir l‘air.
• Le sachet est maintenant soudé et étanche à l‘air et à l‘eau.
Lorsque vous interrompez le processus, veillez toujours à faire pré-chauffer
l‘appareil 3 secondes.
Les sachets en matériau plus épais ou en feuille d‘aluminium seront seulement
soudés et non pas coupés. Toutefois cela dépend à nouveau de la résistance du
sachet et de la vitesse de soudage.
Si vous êtes gaucher, soudez le sachet tout simplement dans l‘autre direction. Voir
à nouveau les 3 petites images plus bas.
• Après l‘utilisation, faite coulisser l‘interrupteur de la position « Seal » à la position « Lock ».
e) Trucs et astuces
• Si vous voulez soudez des sachets ou des pochettes qui sont faits en matériaux différents ou
qui ont des résistances différentes, modiez tout simplement le temps de préchauffage. En
outre, vous pouvez à nouveau préchauffer pendant le processus de soudage.
• Avec un préchauffage de 3 secondes, l‘élément de chauffage atteint une température d‘env.
160°C, vous pouvez régler un temps de préchauffage de maximum 30 secondes.
• Les aimants intégrés sur la face inférieure du produit permettent de maintenir l‘appareil sur
des surfaces métalliques.
Caractéristiques techniques
Alimentation en tension (fonctionnement) ........... via la batterie Li-Ion intégrée
Batterie ................................................................ Batterie rechargeable Li-Ion, 3,7 V/CC,
300 mAh
Alimentation en tension (chargement) ................. via le câble micro-USB ; 5 V/CC
Puissance absorbée (chargement) ..................... max. 1 A
Chargement ......................................................... via le câble micro-USB fourni ; durée env.
de 20 à 45 minutes ; de 300 à 500 cycles de
chargement
Temps de préchauffage ....................................... jusqu‘à 3 secondes à 160 °C ; temps de
préchauffage maximum 30 secondes
Soudures ............................................................. max. 10000 soudures ; max. 100 soudures
par chargement
Matériaux supportés ............................................ sachets en PP, PVC, PE, OPP & PET ; sacs
non tissés, sachets en lm rétractable (PVC,
POF)
Dimensions (L x P x H) ........................................ env. 97 x 30 x 28 mm
Poids .................................................................... env. 73 g
Conditions de fonctionnement et de stockage ..... de -10 °C à +60 °C ; de 0% à 90%
d’humidité relative de l’air
Nettoyage et entretien
• Débranchez le produit de la prise de courant avant tout nettoyage.
• N‘utilisez en aucun cas de produits de nettoyage agressifs, d‘alcool de nettoyage ou d‘autres
solutions chimiques, car ces produits risquent d‘attaquer le boîtier ou même de nuire au
fonctionnement.
• Utilisez un chiffon sec et non-pelucheux pour le nettoyage du produit.
Élimination
Les appareils électroniques sont des objets recyclables et ils ne doivent pas être
éliminés avec les ordures ménagères.
Éliminer le produit inutilisable selon les dispositions de différentes lois applicables.
Ceci est une publication de Conrad Electronic SE, Klaus-Conrad-Str. 1, D-92240 Hirschau (www.conrad.com).
Tous droits réservés, y compris de traduction. Toute reproduction, quelle qu‘elle soit (p. ex. photocopie, microlm,
saisie dans des installations de traitement de données) nécessite une autorisation écrite de l‘éditeur. Il est interdit de
le réimprimer, même par extraits. Cette publication correspond au niveau technique du moment de la mise sous presse.
Copyright 2016 by Conrad Electronic SE. 1434331_V1_0616_02_VTP_m_fr
Page 5

Gebruiksaanwijzing
Handlasapparaat voor Folie
Bestelnr. 1434331
Beoogd gebruik
Het product is bedoeld voor het sealen of het sealen en snijden van zakjes of zakken uit
kunststof. Daarbij kunnen zakjes en zakken tot een dikte van 0,3 mm worden geseald. Welke
materialen precies ondersteund worden, leest u in de technische gegevens van deze gebruiksaanwijzing.
De voeding geschiedt via de vast ingebouwde Li-Ion-accu (niet vervangbaar), die via de meegeleverde micro-USB-kabel aan een USB-poort of met een USB-netvoedingadapter kan worden opgeladen.
Om veiligheids- en keuringsredenen (CE) is het ombouwen en/of veranderen van het product
niet toegestaan. Als u het product voor andere doeleinden gebruikt dan hiervoor beschreven,
kan het beschadigd raken. Bovendien kan onjuist gebruik gevaren zoals kortsluiting, brand,
etc. veroorzaken. Lees de gebruiksaanwijzing nauwkeurig en bewaar ze goed. Geef het product uitsluitend samen met de gebruiksaanwijzing aan derden.
Het product voldoet aan de wettelijke, nationale en Europese regels. Alle voorkomende rma- en productnamen zijn handelsmerken van de betreffende eigenaren. Alle rechten voorbehouden.
Omvang van de levering
• Handlasapparaat voor Folie
• USB-kabel
• Gebruiksaanwijzing
Ingebruikname en bediening
Raak nooit het verwarmings-
element aan!
Verbrandingsgevaar!
a) Product opladen
Laad eerst de ingebouwde accu volledig op, voordat u het product in gebruik neemt. Dit duurt
ongeveer 20 tot 45 minuten.
Om het product op te laden, gaat u als volgt te werk.
• Sluit de meegeleverde micro-USB-kabel aan op de micro-USB-poort aan de achterzijde van
het apparaat. Let bij het insteken op de juiste oriëntatie.
• De normale USB-stekker, type A, sluit u aan op een USB-poort, bijv. van een USB-netvoe-
dingadapter.
• Het laden begint onmiddellijk. De geïntegreerde led brandt ondertussen blauw.
• Zodra de led rood brandt, is het laden beëindigd.
b) Product voorbereiden voor de werking
• Voordat u het product kunt gebruiken dient u in ieder geval eerst de micro-USB-kabel te
verwijderen.
• Klap vervolgens het bovenste deksel open.
De mechanische schuifschakelaar dient zich, wan-
neer u het apparaat niet gebruikt, altijd in de stand
„Lock“ te bevinden. Bovendien moet het deksel gesloten zijn.
• Om het apparaat te gebruiken schuift u de schakelaar van de
stand „Lock“ in de stand „Seal“.
• Daarmee is het product klaar voor gebruik.
Actuele gebruiksaanwijzingen
Download de actuele gebruiksaanwijzingen via de link www.conrad.com/downloads of scan ze
met behulp van de afgebeelde QR-code. Volg de aanwijzingen op de website.
Veiligheidsvoorschriften
Lees de gebruiksaanwijzing zorgvuldig door en let vooral op de veiligheidsvoorschriften. Indien u de veiligheidsaanwijzingen en de informatie over het
juiste gebruik in deze gebruiksaanwijzing niet opvolgt, zijn wij niet aansprakelijk voor de daaruit voortkomende verwondingen/materiële schade. Bovendien vervalt in dergelijke gevallen de waarborg/garantie.
• Dit product is geen speelgoed. Houd het uit de buurt van kinderen en huisdieren.
• Het verpakkingsmateriaal niet laten rondslingeren. Dit kan voor kinderen gevaarlijk speelgoed zijn.
• Raak nooit het verwarmingselement aan! Verbrandingsgevaar!
• Let er als u het product niet gebruikt op, dat de schuifschakelaar te allen tijde in de
stand „Lock“ staat en het deksel gesloten is.
• Wanneer u het product langere tijd niet gebruikt (bijv. tijdens opslag), de accu minimaal elke 3 maanden opladen om volledige ontlading te voorkomen. Bij volledige
ontlading wordt de ingebouwde Li-ion-accu blijvend beschadigd!
• Het product beschermen tegen extreme temperaturen, direct zonlicht, heftige trillingen, brandbare gassen, dampen en oplosmiddelen.
• Stel het product niet bloot aan mechanische belastingen.
• Het product mag niet vochtig of nat worden, daardoor wordt het onherstelbaar
beschadigd. Bovendien bestaat er vanwege de geïntegreerde accu brand- en
explosiegevaar.
• Als een veilige werking niet meer mogelijk is, het instrument niet langer gebruiken
en beschermen tegen onbedoeld gebruik. De veilige werking is niet meer gegarandeerd indien het product:
- zichtbare schade vertoont,
- niet meer naar behoren functioneert,
- gedurende langere tijd onder ongunstige omstandigheden werd opgeslagen of
- aan zware transportbelastingen werd blootgesteld.
• Ga voorzichtig met het product om. Door schokken, slagen of een val, ook van
geringe hoogte, wordt het beschadigd.
• Raadpleeg a.u.b. een vakman wanneer u vragen heeft over de werkwijze, veiligheid of aansluiting van het product.
• Laat onderhouds-, aanpassings- en reparatiewerkzaamheden uitsluitend door
een vakman of een gespecialiseerde werkplaats uitvoeren.
• Mocht u nog vragen hebben die niet in deze gebruiksaanwijzing worden beantwoord, neem dan contact op met onze technische klantenservice of andere specialisten.
c) Sealen van een zak
• Houd één kant van de zak vast en breng de hand-foliesealer in positie (afb. 1, pijl 1). Houd
daarbij wat afstand tot het apparaat. Druk op het deksel en wacht ca. 3 seconden om het
product voor te verwarmen.
• Schuif het handlasapparaat voor Folie om te sealen langs de zak (afb. 2) en houd het deksel
daarbij de hele tijd ingedrukt.
De snelheid hangt af van de dikte van de zak. Voor breedte van 20 cm dient het sealen
ongeveer 5 tot 7 seconden te duren.
• Wanneer u aan de rechterkant bent aangekomen (afb. 2) draait u de zak om en plaatst u de
sealer voor het niet gesealde deel (afb. 3, pijl 2).
• Verwarm weer 3 seconden voor en seal de rest van de zak.
Voordat u de zak volledig sealt raden wij u aan eerst de lucht eruit te drukken.
• De zak is nu water- en luchtdicht geseald.
Houd er rekening mee dat u altijd eerst weer 3 seconden voor moet verwarmen als
u het proces heeft onderbroken.
Afhankelijk van de dikte van het zakje en de snelheid van het sealen wordt het zakje
alleen geseald of geseald en gesneden. U kunt zelf bepalen of het zakje gesneden
dient te worden of niet door het aanpassen van de snelheid.
Wanneer u linkshandig bent sealt u het zakje gewoon in de andere richting. Zie
afbeelding boven, de 3 kleine foto‘s linksonder.
• Na het gebruik schuift u de schakelaar van de stand „Seal“ in de stand „Lock“.
Page 6

d) Sealen van een zak die uit dikkere folie of aluminiumfolie bestaat
• Houd weer één kant van de zak vast en breng de hand-foliesealer in positie (afb. 4, pijl 1).
Houd daarbij wat afstand tot het apparaat. Druk op het deksel en wacht ca. 3 seconden om
het product voor te verwarmen.
• Schuif het andlasapparaat voor Folie om te sealen langs de zak (afb. 5) en houd het deksel
daarbij de hele tijd ingedrukt.
De snelheid hangt af van de dikte van de zak.
• Wanneer u aan de rechterkant bent aangekomen (afb. 5) draait u de zak om en plaatst u de
sealer voor het niet gesealde deel (afb. 3, pijl 2).
• Verwarm weer 3 seconden voor en seal de rest van de zak. Kruis daarbij de eerste sealnaad.
Voordat u de zakken volledig sealt raden wij u weer aan eerst de lucht eruit te drukken.
• De zak is nu water- en luchtdicht geseald.
Houd er rekening mee dat u altijd eerst weer 3 seconden voor moet verwarmen als
u het proces heeft onderbroken.
Bij dikkere zakken of zakjes uit aluminiumfolie worden deze alleen geseald en niet
gesneden. Dit hangt ook weer af van de dikte van het zakje en de snelheid van het
sealen.
Wanneer u linkshandig bent sealt u het zakje gewoon in de andere richting. Zie weer
de 3 kleine foto‘s linksonder.
• Na het gebruik schuift u de schakelaar van de stand „Seal“ in de stand „Lock“.
e) Tips en aanwijzingen
• Wanneer u zakjes of zakken wilt sealen die uit verschillende materialen bestaan of verschillende diktes hebben, past u gewoon de voorverwarmingstijd aan. Bovendien kunt u gewoon
tijdens het sealen opnieuw voorverwarmen.
• Bij 3 seconden voorverwarmen bereikt het verwarmingselement een temperatuur van ca.
160 °C. U kunt de voorverwarmingstijd tot max. 30 seconden verhogen.
• Door de geïntegreerde magneten aan de onderkant van het product kunt u het op elk metalen vlak bevestigen.
Technische gegevens
Voeding (gebruik) ............................via de vast ingebouwde Li-Ion accu
Accu .................................................oplaadbare Li-Ion Accu, 3,7 V/DC, 300 mAh
Voeding (opladen) ...........................via micro-USB-kabel; 5 V/DC
Stroomverbruik (opladen) ................ max. 1 A
Opladen ........................................... via de meegeleverde micro-USB-kabel; duur ca. 20 tot
45 minuten; 300 tot 500 laadcycli
Opwarmtijd ...................................... binnen 3 seconden op 160 °C; maximale opwarmtijd
30 seconden
Seals ................................................ max. 10000 seals; max. 100 seals per oplading
Ondersteunde materialen ................ PP, PVC, PE, OPP & PET zakken; niet-geweven zakken,
zakken uit krimpfolie (PVC, POF)
Afmetingen (l x b x h) .......................ca. 97 x 30 x 28 mm
Gewicht ............................................ca. 73 g
Bedrijfs- en opslagvoorwaarden ...... -10 °C tot +60 °C; 0% tot 90% relatieve luchtvochtigheid
Onderhoud en reiniging
• Koppel het product los van de voeding voordat u het schoonmaakt (haal de micro-USB-kabel
eruit).
• Gebruik in geen geval agressieve schoonmaakmiddelen, reinigingsalcohol of andere chemische oplosmiddelen, omdat hierdoor de behuizing aangetast of de algehele werking negatief
beïnvloed kan worden.
• Gebruik een droge, pluisvrije doek om het product te reinigen.
Verwijdering
Elektronische apparaten bevatten waardevolle materialen en horen niet bij het huis-
houdelijk afval.
Voer het onbruikbaar geworden product af volgens de geldende wettelijke bepalin-
gen voor afvalverwerking.
Dit is een publicatie van Conrad Electronic SE, Klaus-Conrad-Str. 1, D-92240 Hirschau (www.conrad.com).
Alle rechten, vertaling inbegrepen, voorbehouden. Reproducties van welke aard dan ook, bijvoorbeeld fotokopie,
microverlming of de registratie in elektronische gegevensverwerkingsapparatuur, vereisen de schriftelijke toestemming
van de uitgever. Nadruk, ook van uittreksels, verboden. De publicatie voldoet aan de technische stand bij het in druk
bezorgen.
Copyright 2016 by Conrad Electronic SE. 1434331_V1_0616_02_VTP_m_nl
 Loading...