

Page 1

BaseStation
1000
Irrigation
Controller
Quick Start Guide
Firmware Version 1.0
June 26, 2012
Customer Service 1-866-294-5847
Page 2

Baseline Inc.
www.baselinesystems.com
Phone 208-323-1634
FAX 208-323-1834
Toll Free 866-294-5847
©2012 Baseline Inc. All Rights Reserved.
Revision 1
Page 3

BaseStation 1000 Quick Start Guide
Table of Contents
INTRODUCTION ....................................................................................................................................... 1
CONTROLLER FRONT PANEL LAYOUT ............................................................................................... 1
ON-SCREEN HELP..................................................................................................................................... 2
ZONE STATUS REPORT .......................................................................................................................... 2
Understanding Zone Statuses ............................................................................................. 3
QUICK START YOUR CONTROLLER..................................................................................................... 3
STEP 1 – Install and Connect Devices ................................................................................... 3
STEP 2 – Search For and Assign Devices ............................................................................... 3
STEP 3 – Set the Date and Time on the Controller ................................................................ 4
STEP 4 – Set Zone Runtimes ................................................................................................ 4
STEP 5 – Set Watering Start Conditions ............................................................................... 4
STEP 6 – Set the Water Windows ........................................................................................ 5
STEP 7 – Set Soak Cycles ..................................................................................................... 5
STEP 8 – Set the Controller to RUN ...................................................................................... 6
BASESTATION 1000 MENUS AND OPTIONS ..................................................................................... 6
Run Menu........................................................................................................................... 6
Zone Status ........................................................................................................................ 6
Zone Status ......................................................................................................................... 7
Program Status.................................................................................................................... 7
Flow & MV/Pump Status ..................................................................................................... 7
Running Zones..................................................................................................................... 7
View Messages .................................................................................................................... 7
Rain Delay ........................................................................................................................... 7
Event Days........................................................................................................................... 7
System Status ...................................................................................................................... 7
Program Setup Menu .......................................................................................................... 7
Zone Runtimes ................................................................................................................... 7
Setup Prg. Start Menu ......................................................................................................... 7
Day & Time Start Menu ....................................................................................................... 7
Moisture Start ..................................................................................................................... 8
E. Switch Start ..................................................................................................................... 8
Temperature Start .............................................................................................................. 8
Seasonal Adjust .................................................................................................................. 8
Soak Cycles ......................................................................................................................... 8
Water Windows .................................................................................................................. 8
Zones at One Time .............................................................................................................. 8
Enabled/Disabled ............................................................................................................... 8
Setup Prg. Pause ................................................................................................................. 8
Moisture Pause ................................................................................................................... 9
E. Switch Pause ................................................................................................................... 9
Temperature Pause ............................................................................................................. 9
Setup Prg. Stop ................................................................................................................... 9
Moisture Stop ..................................................................................................................... 9
Page i
Page 4

BaseStation 1000 Quick Start Guide
Switch Stop ......................................................................................................................... 9
Temperature Stop ............................................................................................................... 9
MV/Pump........................................................................................................................... 9
Water Source ...................................................................................................................... 9
Flow Setup Menu................................................................................................................ 9
Water Source Setup Menu .................................................................................................. 9
Water Source # Setup Menu ............................................................................................... 9
Learn Flow Menu .............................................................................................................. 10
Learn All Zones Screen ...................................................................................................... 10
Learn One Zone Screen ..................................................................................................... 10
Search & Assign Menu ...................................................................................................... 10
Zone Menu ....................................................................................................................... 10
Device Assignment ............................................................................................................ 10
Device Setup ..................................................................................................................... 10
MV/Pump Menu ............................................................................................................... 10
Device Assignment ............................................................................................................ 10
Device Setup ..................................................................................................................... 11
Moisture Sensor Menu ..................................................................................................... 11
Device Assignment ............................................................................................................ 11
Device Setup ..................................................................................................................... 11
Flow Sensor Menu ............................................................................................................ 11
Device Assignment ............................................................................................................ 11
Device Setup ..................................................................................................................... 11
Event Switch Menu ........................................................................................................... 11
Device Assignment ............................................................................................................ 11
Device Setup ..................................................................................................................... 11
Temperature Sensor Menu ............................................................................................... 11
Device Assignment ............................................................................................................ 11
Device Setup ..................................................................................................................... 11
Manual Run Menu ............................................................................................................ 11
Run Zone .......................................................................................................................... 11
Set Manual Runtimes ........................................................................................................ 11
Run All Zones .................................................................................................................... 11
Run Program Zones........................................................................................................... 11
Run Master Valves ............................................................................................................ 11
Start/Stop Program .......................................................................................................... 11
Test Menu ........................................................................................................................ 12
Test Zone .......................................................................................................................... 12
Test MV/Pump ................................................................................................................. 12
Test Moisture Sensor ........................................................................................................ 12
Test Flow Sensor ............................................................................................................... 12
Test Event Switch ............................................................................................................. 12
Test Temp. Sensor ............................................................................................................ 12
Test Two-Wire .................................................................................................................. 12
Test All Devices ................................................................................................................. 12
System Setup Menu .......................................................................................................... 12
Time & Date Setup ............................................................................................................ 12
Network Setup Menu ....................................................................................................... 12
Ethernet Setup .................................................................................................................. 12
Ethernet Info ..................................................................................................................... 12
BaseManager Setup .......................................................................................................... 12
Page ii
Page 5

BaseStation 1000 Quick Start Guide
BaseManager Info ............................................................................................................. 12
Display Setup .................................................................................................................... 13
Security Setup .................................................................................................................. 13
Clear Programming ........................................................................................................... 13
Backup & Restore ............................................................................................................. 13
Firmware Update Menu .................................................................................................... 13
USB Update ....................................................................................................................... 13
BaseManager Update ....................................................................................................... 13
Export Data ...................................................................................................................... 13
Controller Off ................................................................................................................... 13
Page iii
Page 6

BaseStation 1000 Quick Start Guide
Page iv
Page 7

BaseStation 1000 Quick Start Guide
ENG/ESP
Switch between the English and the Spanish interface on the controller
Introduction
Congratulations on purchasing the BaseStation 1000 – a smart irrigation controller designed to
provide the features that are essential for intelligent watering.
This quick start guide helps you get familiar with the BaseStation 1000 interface and the buttons on
the front panel. It walks you through the basic steps for getting your controller configured for
watering. Keep in mind that this guide is intended as a basic overview of the setup – you will find
complete instructions for all of the controller’s features in the User Manual.
This quick start also includes a structured list of all menus and options in the controller along with a
brief description of those options.
Controller Front Panel Layout
Display – The display indicates the current state of the controller and is used to program the
controller. Refer to Setting Up the Screen Display in the User Manual for information about
improving image quality in outdoor conditions including direct sunlight and low light.
Main Menu Buttons – The buttons are used to select the various operating or programming menus
of the controller. An indicator light glows on the button for the menu that is active.
Buttons – The buttons are used to select programming elements, change their values, and initiate
operations like testing a zone.
Page 1
Page 8

BaseStation 1000 Quick Start Guide
?
Display help for any screen
+
Increase the value of the highlighted field, or sequences through the available
options in the selected field
-
Decrease the value of the selected field, or sequences through the available
options in the selected field
PRG
Select the program that you want to modify
Arrow
Buttons
Move within a screen
OK
Select an option or perform an action
BACK
Return to a previous screen or cancel an action
On-Screen Help
Press the ? button at any time to display the On-Screen Help. When the help displays, press the
button to scroll through the text. When you have finished using the help, press the ? button or the
BACK button to return to the previous screen.
Zone Status Report
When the controller is in the Run menu, the Zone Status report typically displays on the screen.
If you do not see “ZONE STATUS” and the list of
zones, press the RUN button to make sure that the
controller is in the Run menu, and then press the
BACK button to display the Status Report menu.
Select the Zone Status option from the menu.
Page 2
Page 9

BaseStation 1000 Quick Start Guide
Icon
Status
Description
Unassigned
The zone does not have a biCoder assigned to it
Done
The complete cycle has finished for this zone – including watering
and soaking
Waiting
The zone is scheduled to run, but currently it is not watering or
soaking
Watering
Watering is in progress
Soaking
The zone has watered and is now soaking
Paused
A pause condition is in effect for this zone
Disabled
The zone is marked as being disabled
Message
There is a message associated with this zone
Understanding Zone Statuses
The following icons identify the status of the zones:
Quick Start Your Controller
These instructions walk you through the basic steps for getting your controller configured for
watering. Refer to the User Manual for complete instructions for all of the controller’s features.
STEP 1 – Install and Connect Devices
Install all of your irrigation devices and connect them to the controller according to the instructions
that came with the devices.
STEP 2 – Search For and Assign Devices
Press the Search & Assign button on the controller
and go through each option to find the devices that
you connected to the controller. Assign biCoders to
zone numbers and other devices to their ID
numbers.
Page 3
Page 10

BaseStation 1000 Quick Start Guide
STEP 3 – Set the Date and Time on the Controller
Press the System Setup button. Highlight the Time
& Date Setup option, and then press OK.
Change all the fields to reflect the current time and
date.
Note: If the controller is connected to BaseManager
2.0, the time will be automatically set by the server.
STEP 4 – Set Zone Runtimes
Press the Program Setup button. Highlight the Zone Runtimes option, and then press OK.
Verify that the correct program number displays in
the upper-left corner. Press PRG to change if
necessary.
Press the or button to move to the zone that
you want to set the runtime for. Press the or
button to move to the digits that you want to
change. Press the + or – button to change the time.
STEP 5 – Set Watering Start Conditions
A program is not active until you select a start condition for it.
Press the Program Setup button. Highlight the Setup Prg. Start option, and then press OK. For the
initial system configuration, we recommend that you set up a Day & Time Start. After you verify
that your system is watering as expected, you can add other start conditions or switch to a
different start condition.
Verify that the correct program number displays in the upper-left corner. Press PRG to change if
necessary.
Press the button to highlight the Day & Time Start option, and then press the + button to select
the option. Press the OK button to go to the next menu level.
Press the button to highlight the Set Start Days option, and then press the OK button to go to
the Set Start Days screen.
Again, for the initial system configuration, we
recommend that you set up the Weekday option.
After you verify your system is watering as
expected, you can change to another start day
option.
Page 4
Page 11
BaseStation 1000 Quick Start Guide
In the Set Weekdays screen, press the button to set up the weekdays when you want the
program to start. By default, the boxes for the days of the week are marked with a checkmark,
which indicates that the program will start every day. If you want to change a start day setting,
press the button to select the day, and then press the OK button to change the setting.
Press the BACK button to return to the Day & Time Start menu.
Press the button to highlight the Set Start Times option, and then press the OK button. The Set
Start Times screen displays.
Note: Each active program must have at least one start time. Programs that have no start times will
not run.
Press the button to highlight the box for the start time that you want to change.
Press the + or – button to change the number in the box.
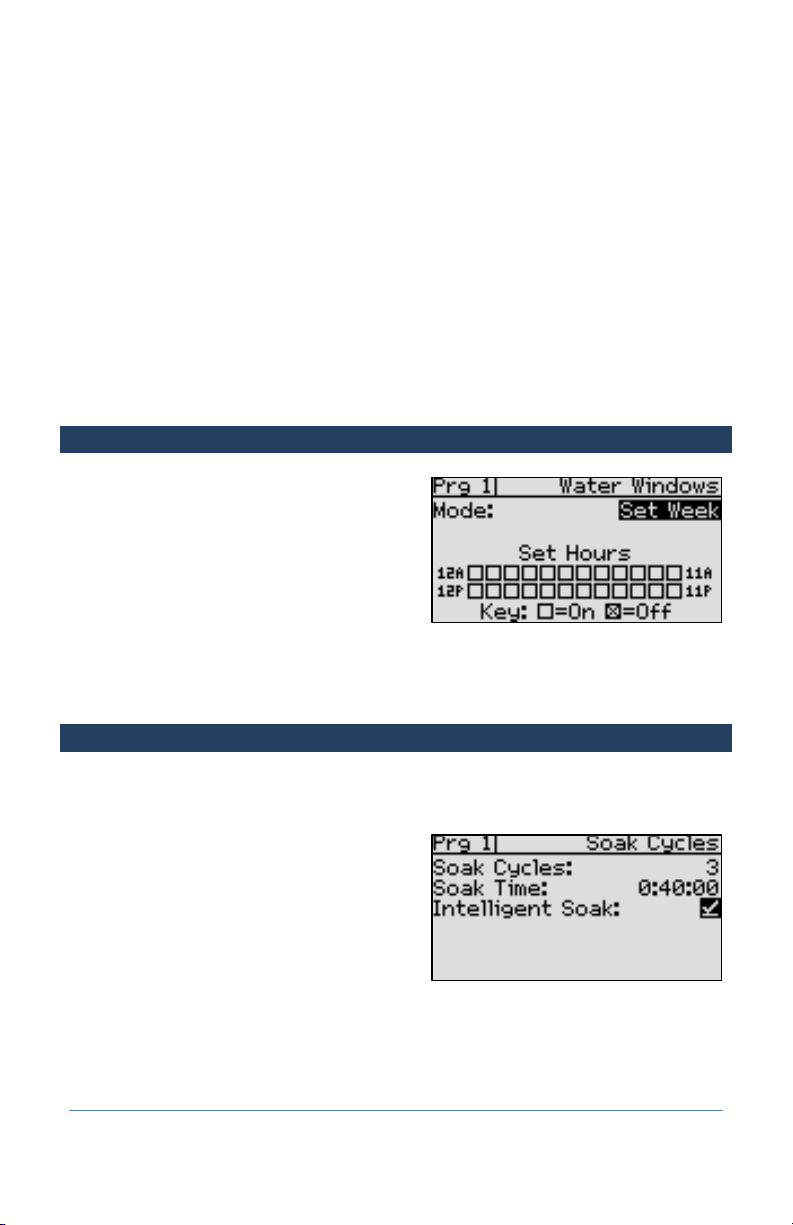
STEP 6 – Set the Water Windows
Water windows are used to indicate when watering
will or will not be allowed.
Press the Program Setup button. Highlight the
Water Windows option, and then press OK.
Verify that the correct program number displays in
the upper-left corner. Press PRG to change if
necessary.
By default, watering is allowed during all hours of the week. Unless you need to comply with water
restrictions or set aside a time for mowing, we recommend that you leave the default settings for
the water windows.
STEP 7 – Set Soak Cycles
Because each type of soil has a different rate at which it can absorb water, you should set up the
cycle time and soak time (“soak cycles”) for your zones to ensure that water soaks into the soil
instead of being wasted.
Soak Cycle Example: If your zone runtime is 60
minutes and you set up 3 soak cycles with a 40
minute soak time, the zone waters for 20 minutes,
and then allows that water to soak in for 40
minutes. While this zone is soaking, other zones can
run. After the 40 minute soak time, the zone will be
allowed to run another 20 minutes after any zone
that is currently running finishes.
Press the Program Setup button. Highlight the Soak Cycles option, and then press OK.
Verify that the correct program number displays in the upper-left corner. Press PRG to change if
necessary.
Page 5
Page 12

BaseStation 1000 Quick Start Guide
If Soak Cycles are set to Off, press the + button to replace that setting with a number. Press the + or
– button to set the appropriate number of soak cycles.
Press the button to move to the Soak Time field and then press the button to move to the
digits that you want to change. Press the + or – button to set the time.
Press the button to highlight the Intelligent Soak field. If you want to enable Intelligent Soak for
this program, press the OK button to display a checkmark in the field.
When you enable the Intelligent Soak™ feature, the BaseStation 1000 uses intelligent watering
algorithms that apply cycles in the optimal order to maximize water penetration and minimize
evaporation loss. If there are many zones in a program, zones will be cycled and soaked until all
have been completed. Zones that have completed their soak cycles are prioritized higher that
zones that are still waiting to water so the first zones to start watering will be the first to complete.
STEP 8 – Set the Controller to RUN
Press the RUN button to put the controller in the Run menu. Watering will start when the next start
day and time is reached.
If you want to manually start a program, press the MANUAL RUN button. Press the button to
highlight the Start/Stop Program option.
If the program is idle, the Start? option displays on
the right side of the screen. To start the program,
highlight the Start? option, and then press the OK
button. The label to the right of the program
number changes to “Running.”
If the program is running, the Stop? option displays
on the right side of the screen. To stop the
program, highlight the Stop? option, and then
press the OK button. The label to the right of the program number changes to “Done.”
BaseStation 1000 Menus and Options
This section is a structured list of all menus and options in the controller along with a brief
description of those options. Refer to this list when you want to know where an option is located or
when you find an option and want to know what it does.
Run Menu
Zone Status
The Zone Status report displays when the Run menu is active. Refer to the User Manual or the OnScreen Help for a description of the zone statuses.
When the Zone Status report is displayed, you can press the BACK button to display the Status
Report menu. The following options are available:
Page 6
Page 13

BaseStation 1000 Quick Start Guide
Zone Status
Displays the Zone Status report
Program Status
Displays the Program Status report
Flow & MV/Pump Status
Displays the Flow and MV/Pump Status report
Running Zones
Displays the zones that are currently running
View Messages
Displays any messages generated by the controller
Rain Delay
Enables you to set up a rain delay that stops all watering for a specified number of days
Event Days
Enables you to set up event days and times that will pause all watering
System Status
Displays the System Status screen
Program Setup Menu
Zone Runtimes
Use this option to configure the total amount of time that each zone can run.
Setup Prg. Start Menu
A program is not active until you select a start condition for it. Use the options under this menu to
set up the start conditions for your program.
Day & Time Start Menu
If there is no start time, then the program is considered to be OFF or disabled and no
watering will be allowed on the zones of that program.
Set Start Days
A variety of start day options are available. Of those options, the following have a
specialized configuration screen:
Set Weekdays
Choose the weekdays when watering is allowed.
Page 7
Page 14

BaseStation 1000 Quick Start Guide
Interval
Set up a custom day interval.
Smart Interval
Set up the intervals for each half month.
Set Start Times
Each active program must have at least one start time. Programs that have no start
times will not run.
Moisture Start
Set up a moisture start condition for a program that will cause the program to start based on
a specified soil moisture reading.
E. Switch Start
Set up a start condition for a program based on the state of an event switch.
Temperature Start
Set up a start condition for a program that will cause the program to start based on a
specified temperature sensor reading.
Seasonal Adjust
Adjust your entire system either up or down if your area is experiencing unusually wet or dry
weather.
Soak Cycles
Set up the cycle time and soak time (“soak cycles”) for your zones to ensure that water soaks into
the soil instead of being wasted.
Water Windows
Set up when watering will or will not be allowed.
Zones at One Time
Depending on the amount of water available from your water source and the electrical limits, your
system might be able to operate more than one zone at a time.
Enabled/Disabled
By default, all BaseStation 1000 programs are enabled, which means that those programs will run
when devices are connected and configured for the programs. If you do not want certain programs
to run, you can disable them. You can re-enable a disabled program as needed.
Setup Prg. Pause
Set up a condition that will cause a running program to pause when that condition occurs. The
following pause conditions are available:
Page 8
Page 15

BaseStation 1000 Quick Start Guide
Moisture Pause
If you have a soil moisture sensor installed, you can use this option to have a program pause
when a specified soil moisture sensor limit is reached.
E. Switch Pause
If you have an event switch device installed, you can use this option to have a program pause
when a specified switch condition occurs.
Temperature Pause
If you have an air temperature sensor installed, you can use this option to have a program
pause when a specified temperature is reached.
Setup Prg. Stop
Set up a condition that will cause a running program to stop when that condition occurs.
Moisture Stop
Switch Stop
Temperature Stop
MV/Pump
Use this option to associate a master valve or pump start biCoder with a program. Before you
perform this procedure, you must assign a biCoder as a master valve or pump biCoder.
Water Source
Use this option to associate a water source with a program.
Flow Setup Menu
Water Source Setup Menu
Water Source # Setup Menu
Flow Sensors
If you have a flow sensor connected to your system, you can assign it to a water source.
MV/Pumps
If you have a master valve/pump start biCoder connected to your system, you can assign
it to a water source.
Flow Management Menu
Limit Zones by Flow
Enter a target flow in gallons per minute (GPM) for the water source that supplies
water through the flow device to the rest of the irrigation system. The BaseStation
Page 9
Page 16

BaseStation 1000 Quick Start Guide
1000 uses this value to manage the number of zones that can run at one time so
that the water source is used as efficiently as possible. If you set this value to zero,
you cannot use this GPM amount to control concurrent zones.
High Flow Limit
Enter a flow limit for a running water source and then set up the system to shut
down the water source if that limit is exceeded.
Unexpected Flow Limit
Enter a flow limit for a water source that is turned off and then set up the system
to shut down the water source if that limit is exceeded.
Pipe Fill Time
To calibrate the Learn Flow process on the BaseStation 1000, you should enter the
pipe fill time before you initiate the Learn Flow. The pipe fill time is the number of
minutes that it takes to fill the empty line, activate the valve, and reach a steady
state operating pressure.
Enable/Disable
By default, the BaseStation 1000 enables all connected water sources. You can disable a
water source as needed and then re-enable it at another time.
Learn Flow Menu
Learn All Zones Screen
The controller runs one zone at a time to learn its flow. The learn flow cycle starts as soon as
you select the Learn All Zones option. Depending on how many zones are enabled on your
system, the learn flow cycle could take more than an hour to complete.
Learn One Zone Screen
Run a learn flow cycle for a specific zone.
Search & Assign Menu
After you have finished connecting all your devices, you need to have the controller find those
devices so you can assign them. Use the options under each of the following menus to assign and
set up the devices that you have connected to your controller.
Zone Menu
Device Assignment
Device Setup
MV/Pump Menu
Device Assignment
Page 10
Page 17

BaseStation 1000 Quick Start Guide
Device Setup
Moisture Sensor Menu
Device Assignment
Device Setup
Flow Sensor Menu
Device Assignment
Device Setup
Event Switch Menu
Device Assignment
Device Setup
Temperature Sensor Menu
Device Assignment
Device Setup
Manual Run Menu
The BaseStation 1000 has the following options that enable you to manually control your irrigation
system.
Run Zone
Set Manual Runtimes
Run All Zones
Run Program Zones
Run Master Valves
Start/Stop Program
Page 11
Page 18

BaseStation 1000 Quick Start Guide
Test Menu
The BaseStation 1000 has the following features for testing zones, valves, biCoders and biSensors.
These tests help you isolate and identify components and devices that are not working properly so
you know what needs to be repaired.
Test Zone
Test MV/Pump
Test Moisture Sensor
Test Flow Sensor
Test Event Switch
Test Temp. Sensor
Test Two-Wire
Test All Devices
System Setup Menu
Time & Date Setup
Set or change the controller date and time to match the current date and time.
Network Setup Menu
Ethernet Setup
Enable the Dynamic Host Configuration Protocol (DHCP) or a static IP address to establish the
Internet connection from your controller.
Ethernet Info
Displays the status of your Ethernet connection and the network IDs that were automatically
assigned to your controller.
BaseManager Setup
Enable the BaseManager connection so you can use LiveView to remotely operate your
controller.
BaseManager Info
Displays the status of your BaseManager connection and allows you to connect.
Page 12
Page 19

BaseStation 1000 Quick Start Guide
Display Setup
Adjust the brightness and contrast on the BaseStation 1000 display screen to provide better
visibility in a variety of lighting conditions and to accommodate a variety of viewing angles.
Security Setup
Enable security on the controller and set up PINs for 3 levels of access.
Clear Programming
Clear or erase all programming information from the controller. We recommend that you use this
function only as directed by Baseline Support.
Backup & Restore
Enables you to back up the controller programming to a USB drive or to the controller’s onboard
memory. This function also restores all programming information in the controller from a backup
that you made. We recommend that you use this function only as directed by Baseline Support.
Firmware Update Menu
Firmware updates are free for the life of any Baseline controller as long as the hardware is
compatible. Baseline will periodically release firmware upgrades that enhance the usefulness of our
products or fix the occasional bug.
USB Update
Use this method when your controller is not connected to the Internet. You will need a
computer with a USB port. This computer must have access to the Internet. You also need a
USB drive. You download the firmware from the Baseline web site, “unzip” the compressed
file, and copy the folder that contains the files to the USB drive. Finally, you take the USB
drive to the controller and install the update.
BaseManager Update
Use this method when your controller is connected to the Internet. You can install the
firmware update directly from BaseManager to your controller.
Export Data
Copies the log files from the controller to a USB drive.
Controller Off
Press the OFF button when you want to halt all watering for an indefinite period of time. All current
watering cycles will be stopped. No watering cycles will be started. Use this button for seasonal
shutdown. DO NOT power down the BaseStation.
When the controller is off, the status “SYSTEM OFF” displays in the upper-left corner of the screen,
and the screen displays the Zone Status report.
Page 13
 Loading...