

Page 1
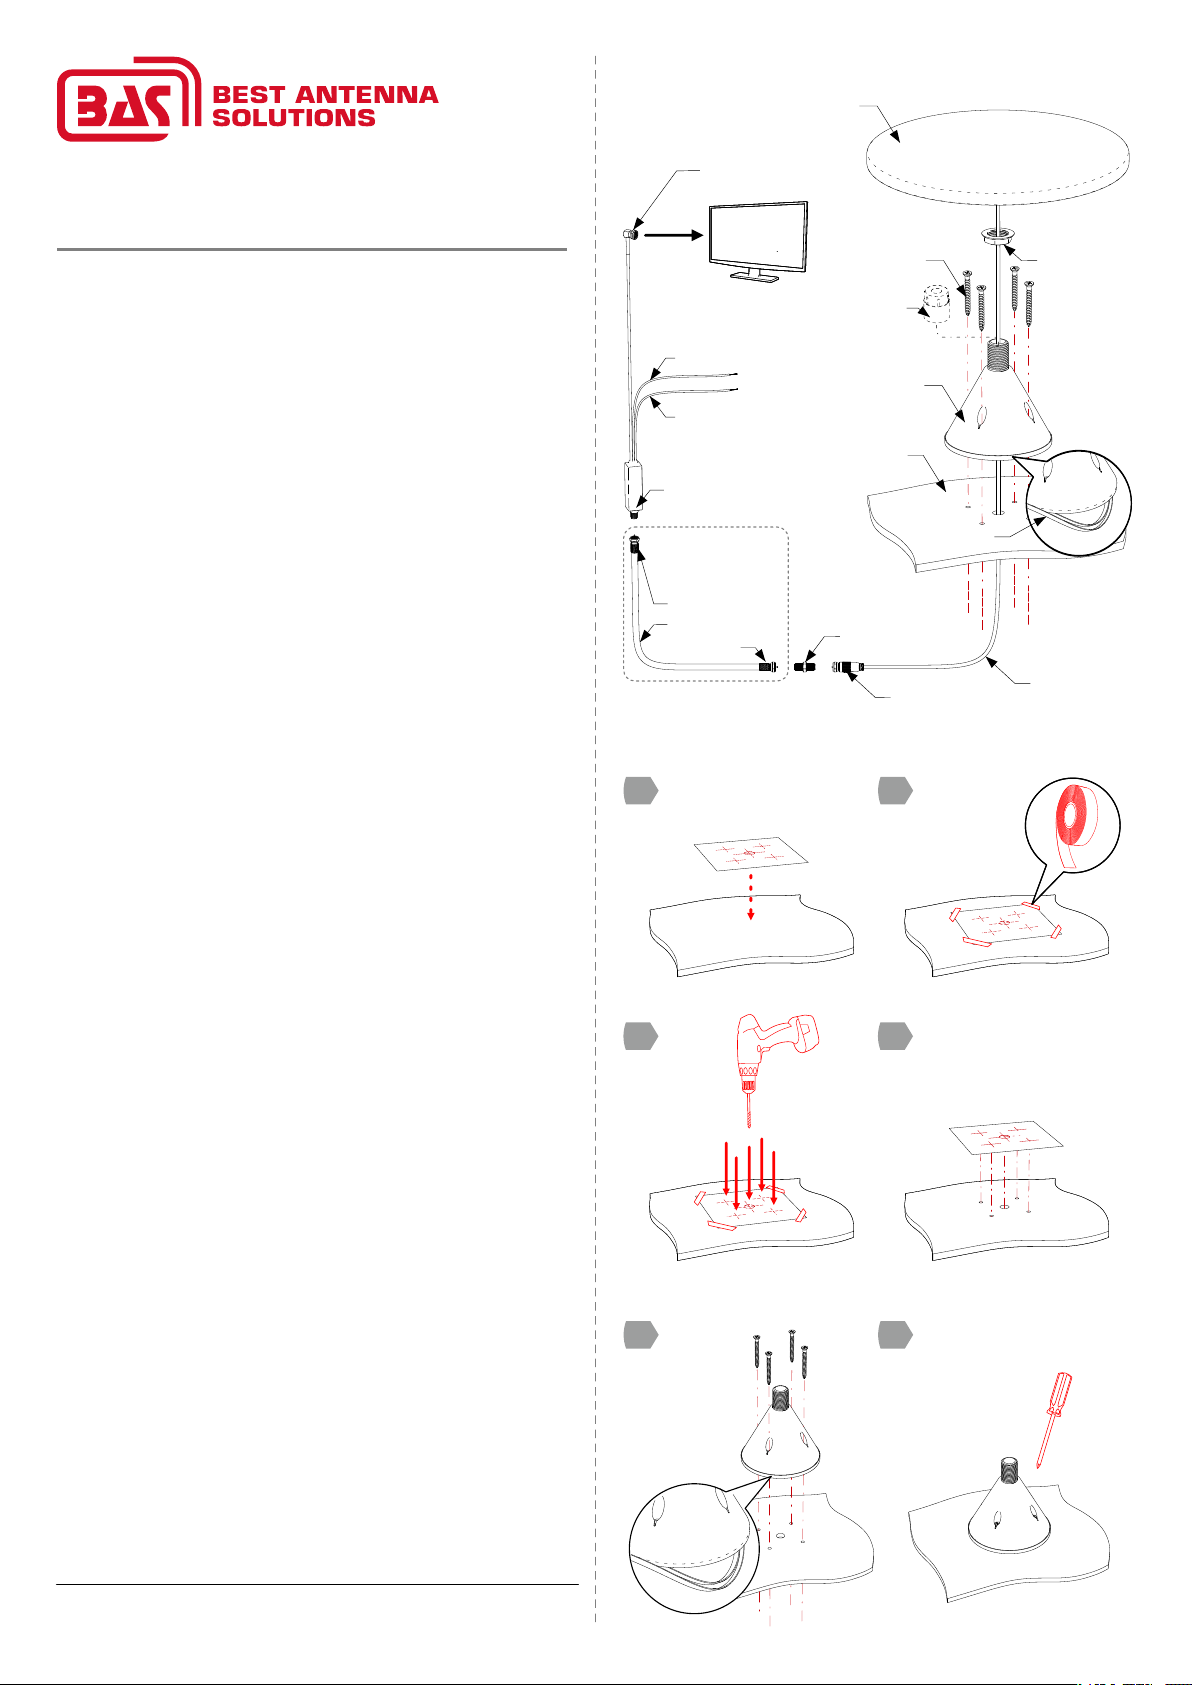
Antenna Installation & Connections Diagram
Antenna
TV Antenna Outdoor
Omnidirectional for Vehicles
BAS-6103 Venus UHF
QUICK USER GUIDE | ПАСПОРТ
Thank you for choosing the antenna outdoor BAS-6103 Venus UHF!
It has been developed by a team of engineers determined to continue the tradition
of excellence and innovation of REMO-Technologii products. The antenna BAS-6103 Venus
UHF is made of high-quality materials in accordance with thoroughly detailed design.
Features:
- Compatible with HDTV (DVB-T, DVB-T2, ATSC, ISDB-T, FreeTV, etc.).
- Built-in high-gain low-noise amplier, shielded to eliminate interference.
- Omnidirectional antenna receives UHF TV-signal from every direction regardless on where
you are traveling.
- Amplier with SMD technology and micro-electronics ensure excellent antenna performance.
- Built-in ltering of signals 2G, 3G, LTE, WiFi and other radio-frequency interference.
- Waterproof antenna made of UV resistant ABS material
- Receiving range of TV signal up to 80 miles
Technical Specications:
UHF — 470..790MHz
Gain — 30dB
Direction — omnidirectional
Power Supply — DC 11..28V 100mA
Size — 320x320x165mm
Weight — 0.850kg
F-connector (for USA)
TV-plug (for EU and
other countries)
to TV-set
Red Wire - 12..24V DC
Black Wire - Ground
Injector
Purchased
Separately
F-connector
Coaxial Cable
F-connector
Mounting Screw
Sealing Cup
Mounting Stand
Vehicle Roof
Sealing Ring
F-F connector
F-connector
Installation Antenna Mount Diagram
Locking Nut
Coaxial Cable
In Box:
Antenna (with cable) — 1pcs
Mount Stand — 1pcs
Locking Nut — 1pcs
Sealing Cup — 1 pcs
Sealing Ring — 1pcs
Mounting Screw — 4pcs
F-F connector — 1pcs
Injector — 1pcs
User Guide — 1pcs
Installation:
Step 1: Decide location of power supply before mounting your antenna. Antenna and power
supply location will determine where and how you run the cables.
DO NOT install the antenna before you read this instruction.
Step 2: Drill a hole thru the roof to run cable from the antenna into your vehicle. Or if your
vehicle have a cable hole already, run the cable thru hole to the antenna.
Step 3: Using 4 screw to securely fasten antenna mount to the roof. Do not over tighten
the mounting bolts, damage to the mounting stand or roof may occur.
Step 4: Use cable tool to drive the cable into the mounting bracket on the underside of the
antenna, aligning the end of the connector with the F connector on the antenna.
Step 5: Slide antenna onto the mount. Gently pull back any extra cable inside vehicle.
Step 6: Fasten antenna to mount and tighten hex nut. Tighten rmly to prevent antenna
from turning on mount.
Step 7: Route the coaxial cable (Type RG-6/U, SAT-50, SAT-703 etc.) inside the vehicle.
Step 8: Connect the coaxial cable to the antenna and to the power injector.
Step 9: Connect power injector to supply – red wire to positive power supply 11-28 Volts DC,
black wire to ground or negative power supply.
Step 10: Connect coaxial cable from the power injector to TV set.
Uninstalling the antenna and retaining the antenna mount:
Step 1: Disconnect the coaxial cable from the injector.
Step 2: Loosen hex nut and remove the antenna from the mount.
Step 3: Gently pull an extra cable out of the vehicle.
Step 4: Fasten the cup to mount and tighten hex nut.
1
Set the template
3
5
Check the presence
of the sealing ring!
2
4
Remove the template
6
Fasten antenna mount
to the roof
REMO-Technologii, LLC., P.O.Box 500, Saratov, 410052, Russia
www.remo-electronics.com, [email protected], +7 (8452) 495-232, 495-242
Page 2
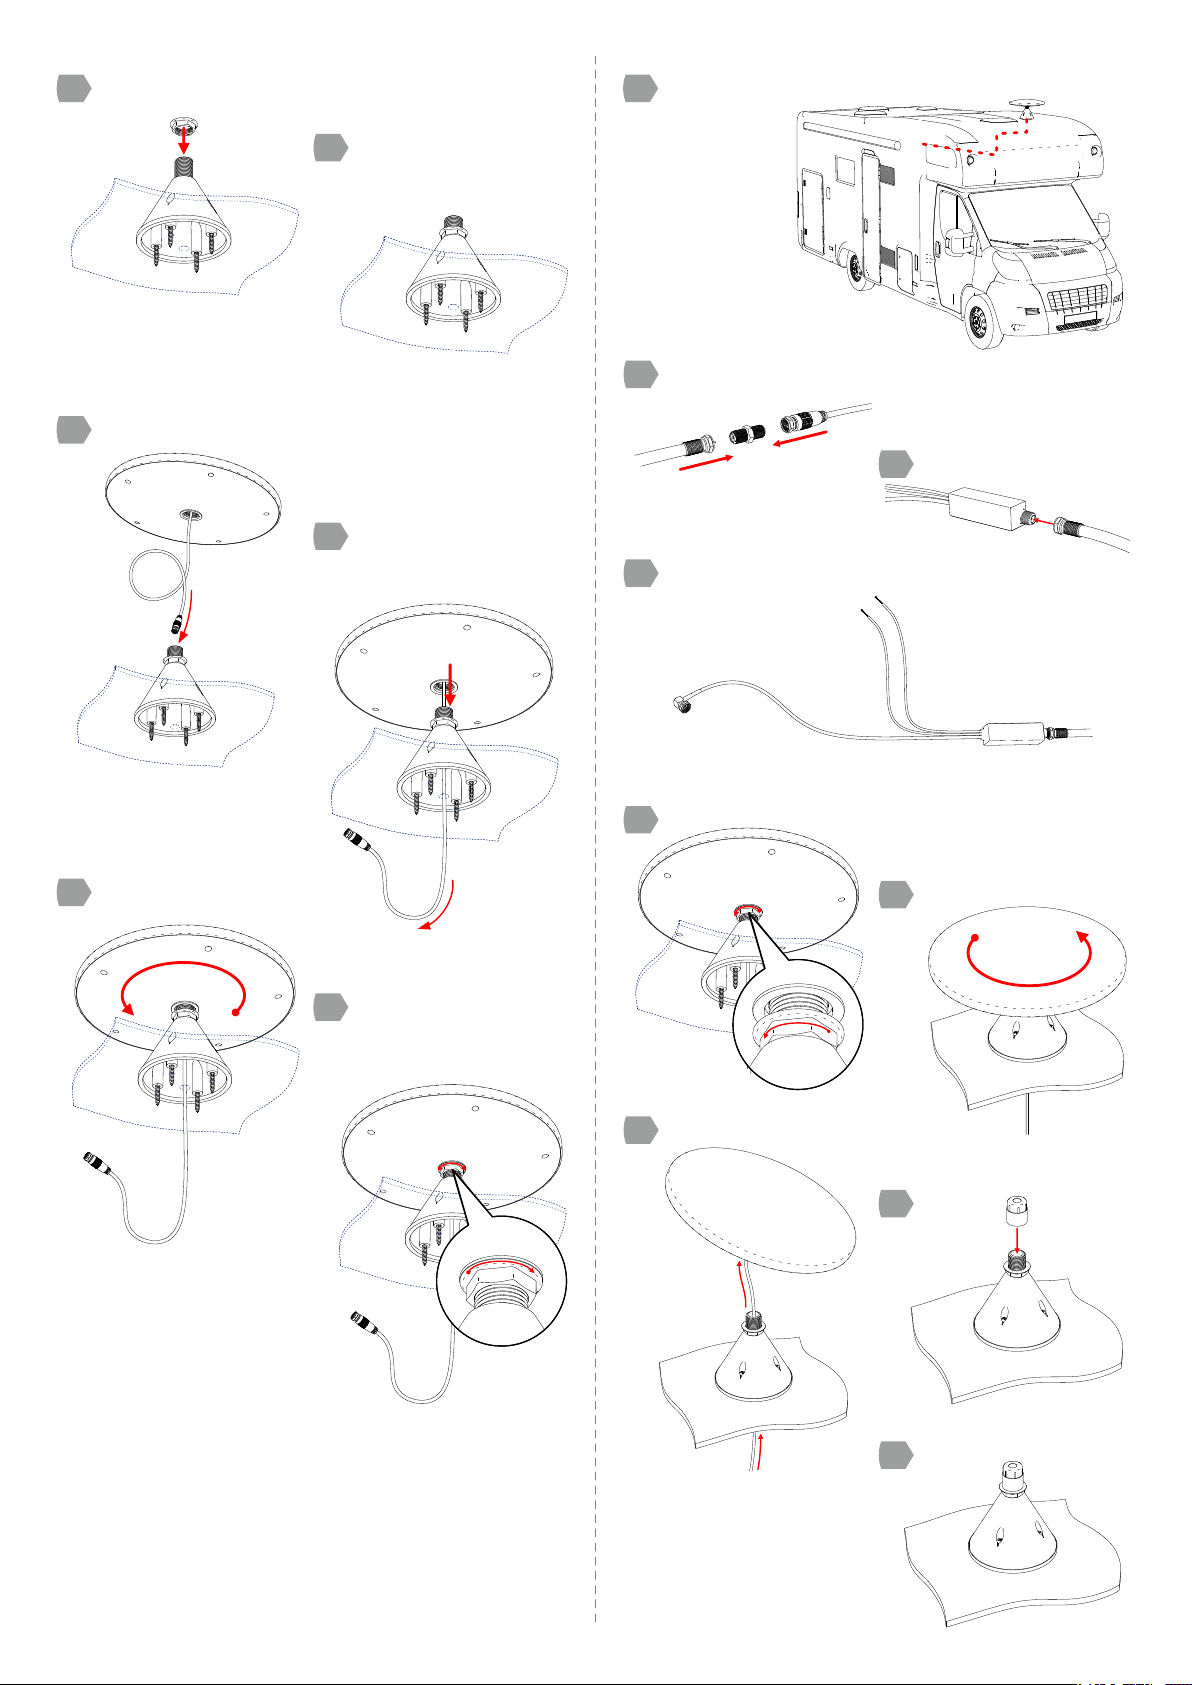
Antenna Assembly Diagram
1
1
Connections Diagram
2
Route the coaxial cable inside the vehicle
2
3
Coaxial Cable
From the antenna
3
Power Injector
4
4
Coaxial Cable
Black Wire – Ground Red Wire – DC 11..28V
To the TV set
Antenna Disassembly Diagram
1
5
2
6
Loosen the nut
3
4
Tighten the nut
5
Tighten the nut
Page 3
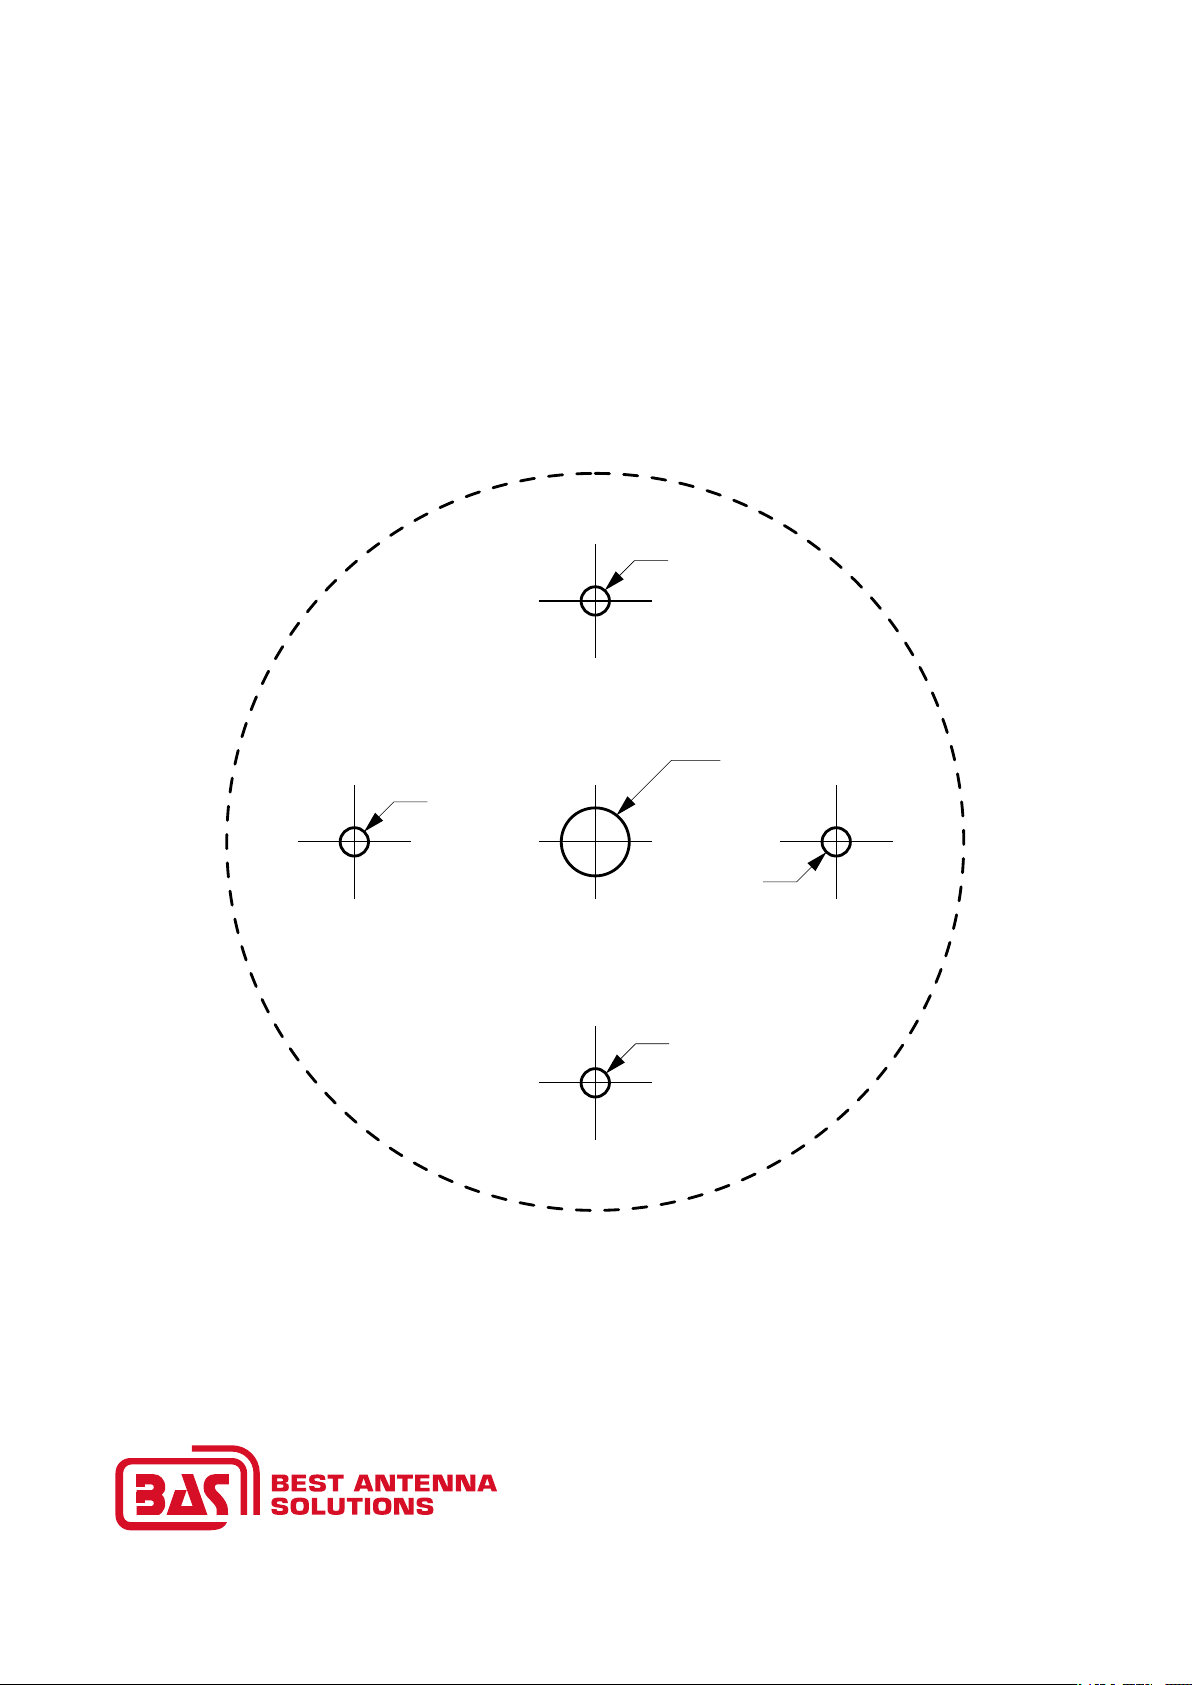
TEMPLATE FOR MARKING AND DRILLING HOLES
D 4.5mm
D 4.5mm
D 12mm
D 4.5mm
D 4.5mm
BAS-6103 Venus UHF
TV Antenna Outdoor
Omnidirectional for Vehicles
 Loading...