


WEH1500
109901

Bartscher GmbH
Franz-Kleine-Str. 28
D-33154 Salzkotten
Germany
Phone: +49 5258 971-0
Fax: +49 5258 971-120
Service hotline: +49 5258 971-197
www.bartscher.com
Version: 1.0
Date of preparation: 2023-12-01
EN
2

Original instruction manual
1 Safety ............................................................................................................ 2
1.1 Explanation of Signal Words .................................................................... 2
1.2 Safety instructions.................................................................................... 3
1.3 Intended Use ........................................................................................... 5
1.4 Unintended Use ....................................................................................... 5
2 General information ....................................................................................... 6
2.1 Liability and Warranty .............................................................................. 6
2.2 Copyright Protection ................................................................................ 6
2.3 Declaration of Conformity ........................................................................ 6
3 Transport, Packaging and Storage ................................................................ 7
3.1 Delivery Check ......................................................................................... 7
3.2 Packaging ................................................................................................ 7
3.3 Storage .................................................................................................... 7
4 Technical Data ............................................................................................... 8
4.1 Technical Specifications .......................................................................... 8
4.2 List of Components of the Appliance ....................................................... 9
4.3 Functions of the Appliance ..................................................................... 10
5 Installation and operation ............................................................................ 15
5.1 Installation .............................................................................................. 15
5.2 Electrical Connection ................................ ............................................. 20
5.3 Operation ............................................................................................... 20
5.4 Settings ................................................................ ................................ .. 23
6 Cleaning and Maintenance .......................................................................... 28
7 Possible Malfunctions .................................................................................. 28
8 Disposal ....................................................................................................... 30
109901 1 / 30

Safety
EN
Read this instruction manual before using and keep it available
at all times!
DANGER!
The signal word DANGER warns against hazards that lead to severe
injuries or death if the hazards are not avoided.
WARNING!
The signal word WARNING warns against hazards that may lead to
moderate or severe injuries or death if the hazards are not avoided.
Diese Bedienungsanleitung beschreibt di e Installation, Bedienung und Wartung d es Geräts und gilt als wichtige Infor mationsquelle und Nachschlagewer k. Die Kenntnis aller enthaltenen Sicherh eitshinweise und Handlungsanweisunge n schafft die Voraussetzung f ür das sichere und sachgerechte Ar beiten mit dem Gerät. Darüber hinaus müssen die für den Einsatzbereich d es Geräts geltenden örtlichen Unfall verhütungsvorschriften und allgemeine n Sicherheitsbestimmungen eingehalten werden. Diese Bedienungsanleitung is t Bestandteil des Produkts und muss in unmittelbarer Nähe des Ger äts für das In¬stallations-, Bedienu ngs-, Wartungs- und Reinigungspers onal jederzeit zugänglich auf¬bewahrt werd en. Wenn das Gerät an eine dritt e Person
weitergegeben wird, muss die Bedienung sanleitung mit ausgehändigt werden.
This instruction manual contains information about installation, operation and
maintenance of the appliance and constitutes an important source of information
and reference guide. The knowledge of all operational and safety instructions
included in this manual is a prerequisite for safe and proper handling of the
appliance. Additionally, accident prevention, occupational health and safety, and
legal regulations in force in the area the appliance is used apply.
Before you start using the appliance, especially before turning it on, read this
instruction manual in order to avoid personal injuries and property damages.
Improper use may cause damage.
This instruction manual forms and integral part of the product and must be stored in
an immediate vicinity of the appliance and be available at all times. The instruction
manual should be transferred together with the appliance.
1 Safety
This appliance has been manufactured in accordance with technical standards
currently in force. However, the appliance may be a source of hazards if used
improperly or contrary to its intended purpose. All persons using the appliance must
consider information included in this instruction manual and observe safety
instructions.
1.1 Explanation of Signal Words
Important safety instructions and warning information are indicated in this
instruction manual with appropriate signal words. You must strictly follow the
instructions, to prevent accidents, personal injuries and property damages.
2 / 30 109901

Safety
EN
CAUTION!
The signal word CAUTION warns against hazards that may lead to
light or moderate injuries if the hazards are not avoided.
IMPORTANT!
The signal word IMPORTANT indicates possible property damages,
which may occur if safety instructions are not observed.
NOTE!
The symbol NOTE indicates subsequent information and guidelines
for the user on usage of the appliance.
, die
1.2 Safety instructions
Electrical Current
• Too high a mains voltage or incorrect installation may cause electric shock.
• The appliance may be connected only if data on the rating plate correspond with
the mains voltage.
• To avoid short-circuit, the appliance should be kept dry.
• If there are malfunctions during operation, disconnect the appliance from the
power supply.
• Do not touch the appliance’s plug with wet hands.
• Never take hold of the appliance if it has fallen into water. Immediately
disconnect the appliance from the power supply.
• Any repairs or housing opening may be carried out by professionals and
relevant workshops only.
• Do not transport the appliance, holding it by the power cord.
• Do not allow the power cord to come into contact with heat sources or sharp
edges.
• Do not bend, pinch nor knot the power cord.
• Always completely unwind the power cord.
• Never place the appliance or other objects on the power cord.
• Always take hold of the plug to disconnect the appliance from the power supply.
109901 3 / 30

Safety
EN
• Check the power cord regularly for damage. Do not use the appliance if the
power cord is damaged. If this cable is damaged, it must be replaced by
customer service or a qualified electrician in order to avoid dangers.
Operating Personnel
• The appliance may only be operated by qualified personnel and trained
specialist personnel.
• This appliance may not be operated by persons (including children) with limited
physical, sensory or mental capabilities, nor by persons with limited experience
and/or limited knowledge.
• Children should be supervised to ensure that they are not playing with or
switching on the appliance.
Improper Use
• Unintended or prohibited use may cause damage to the appliance.
• The appliance may only be used when its technical condition is flawless and
allows for safe operation.
• The appliance may only be used when all connections are executed according
to rules of law in force.
• The appliance may only be used when it is clean.
• Use only original spare parts. Never attempt to repair the appliance on your own.
• Do not introduce any changes in the appliance nor modify it.
4 / 30 109901

Safety
EN
1.3 Intended Use
As described below, every use of the appliance for a purpose differing and/or
diverging from its intended standard use, is prohibited and considered to be an
unintended use.
The following is an intended use:
– Reduces limescale build-up in an appliance and on washed items by
reducing water hardness.
1.4 Unintended Use
An unintended use may lead to personal injuries or property damages caused by
hazardous voltage, fire or high temperature. The appliance may only be used to
perform tasks described in this instruction manual.
109901 5 / 30

General information
EN
2 General information
2.1 Liability and Warranty
All information and instructions in this instruction manual account for legal
regulations in force, current level of technical engineering knowledge as well as our
expertise and experience, developed over the years. If special models or additional
options are ordered, or state-of-the-art technical solutions were implemented, the
actual scope of delivery of the appliance may, in some circumstances, differ from
descriptions and numerous drawings in this instruction manual.
The manufacturer is not liable for any damages nor faults stemming from:
– failure to observe instructions,
– unintended use,
– technical alterations introduced by the user,
– usage of unapproved spare parts.
We reserve the right to introduce technical modifications to the product, intended for
improvement of the appliance and its performance.
2.2 Copyright Protection
This instruction manual, and texts, drawings and images included in it, as well as its
other components are copyright protected. It is prohibited to reproduce this
instruction manual (including its excerpts), in any form and by any means, and to
use and/or transfer its content to third parties without manufacturer’s written
permission. Violation of the above results in obligation to pay compensation. We
reserve the right to claim further damages.
2.3 Declaration of Conformity
The appliance meets the currently applicable standards and guidelines of the
European Union. We confirm the above in the EC Declaration of Conformity. We
may provide relevant Declaration of Conformity upon request.
6 / 30 109901

Transport, Packaging and Storage
EN
3 Transport, Packaging and Storage
3.1 Delivery Check
Immediately upon reception, check the delivery for completeness and possible
shipping damage. In the case of visible transport damage refuse to accept the
appliance or accept it conditionally. Mark and note the scope of damage in shipping
documents/consignment list of the shipping company and lodge a complaint.
Concealed damage must be reported immediately upon its discovery, as
compensation claims may only be filed within applicable time limits.
If you find that parts or accessories missing, please contact our Customer Service
Department.
3.2 Packaging
Do not dispose of the appliance cardboard box. It may be used to store the
appliance when relocating or when shipping the appliance to our service point in the
case of any damages.
The packaging and its elements are made of recyclable materials. Particularly,
these are: plastic films and bags, cardboard box.
When disposing of the packaging, observe applicable domestic regulations.
Recyclable packaging materials should be recycled.
3.3 Storage
Leave the packaging closed until installation of the appliance; observe external
indications concerning method of placing and storage. Store the packaging in the
following conditions only:
– in closed rooms;
– in dry and dust-free surrounding;
– away from aggressive agents;
– in a location protected against sunlight;
– in a location protected against mechanical shocks.
In the case of extended storage (over three months), make sure you check the
condition of the packaging and the parts regularly. If needed, replace the packaging
with a new one.
109901 7 / 30

Technical Data
EN
Name:
Water softening system
WEH1500
Art. No.:
109901
Material:
plastic
Output capacity:
1.500 litres/day at 10° dH (total
hardness)
Water connection:
3/4“
Water temperature at inlet, in °C:
1 - 30
Connection capacity, appliances:
1
Return value per cartridge:
0
Operating pressure:
2 - 6
Salt stock in brine tank, in kg:
20
Salt consumption, in kg / regeneration:
0,7
Regeneration duration, in min:
45
Dimensions (W x D x H), in mm:
238 x 465 x 478
Weight, in kg:
9,2
4 Technical Data
4.1 Technical Specifications
We reserve the right to implement technical modifications.
Version / Characteristics
• Designed for: industrial dishwashers
• Digital display
• Setting options:
– interval
– hour
– day of the week
– water hardness
– regeneration
• Regeneration: flow rate or period
8 / 30 109901

Technical Data
EN
Fig. 1
1. Control valve with digital display
2. Filter cartridge
3. Brine tank cover
4. Brine tank
5. Housing
6. Connections
4.2 List of Components of the Appliance
109901 9 / 30

Technical Data
EN
4.3 Functions of the Appliance
How the Appliance Works
Hard water contains a combination of calcium (Ca), magnesium (Mg) and iron (Fe).
Softening is used to remove positively charged ions using an ion exchange resin.
When the ion exchange resin loses its effectiveness, it is activated through a
regeneration process.
Regeneration
Regeneration is carried out by rinsing the sludge with a salt solution and flushing
the absorbed calcium and magnesium ions into the wastewater.
Regeneration is carried out automatically in an intelligent, logical way: based on the
water consumption of the previous 7 days, the system itself selects the day of
regeneration at the set time. During regeneration (60 min), unsoftened water is
available.
The regeneration process consists of 4 cycles:
1. Regenerating agent replenishment
2. Rinsing with the regenerating agent solution
3. Backwashing
4. Quick rinsing
Water Softening System Structure
The system is configured for 0.7 kg of regenerating agent per regeneration. The
amount of water softened between regenerations is calculated with the formula:
Z = 1350x10 / Y
Z — means the amount of softened water between regenerations,
Y — means the hardness of the tested water based on dH (German degrees of
hardness).
Example of calculation of the amount of softened water between regeneration
processes:
The tested water hardness is 15°dH.
The amount of water Z between regeneration processes is calculated as follows:
Z = 1350 x 10/15 = 900 litres.
With a water hardness of 15°dH, 900 litres of softened water will be obtained.
10 / 30 109901

Technical Data
EN
Degree of hardness
Softened
water (L)
English
hardness
French
hardness
PPM
German
hardness
12,5
18,0
178,6
10
1500
13,8
19,8
196,5
11
1364
15,0
21,6
214,3
12
1250
16,3
23,4
232,2
13
1154
17,5
25,2
250,0
14
1071
18,8
27,0
267,9
15
1000
20,0
28,8
285,8
16
938
21,3
30,6
303,6
17
882
22,5
32,4
321,5
18
833
23,8
34,2
339,3
19
789
25,0
36,0
357,2
20
750
26,3
37,8
375,1
21
714
27,5
39,6
392,9
22
682
28,8
41,4
410,8
23
652
30,0
43,2
428,6
24
625
31,3
45,0
446,5
25
600
32,5
46,8
464,4
26
577
33,8
48,6
482,2
27
556
35,0
50,4
5001
28
536
36,3
52,2
517,9
29
517
37,5
54,0
535,8
30
500
38,8
55,8
553,7
31
484
40,0
57,6
571,5
32
469
41,3
59,4
589,4
33
455
42,5
61,2
607,2
34
441
43,8
63,0
625,1
35
429
45,0
64,8
643,0
36
417
46,3
66,6
660,8
37
405
Water Hardness Performance Table (°)
109901 11 / 30

Technical Data
EN
47,5
68,4
678,7
38
395
48,8
70,2
696,5
39
385
50,0
72,0
714,4
40
375
Tab. 1
Standards, Rules and Regulations
• The water used to supply the appliance must be of drinking water quality and
conform to the requirements of the regulations for the use of water of the public
utility at a site.
• All parts in contact with the treated water must be made of waterproof material.
• Ensure that a soil drainage is installed at the water treatment site. The
purchaser is responsible for the drainage.
• The maximum temperature of the supplied water should not exceed 30°C.
• Do not remove the water softening system during use.
• Do not open the water softening system, otherwise the warranty will be voided.
12 / 30 109901
Technical Data
EN
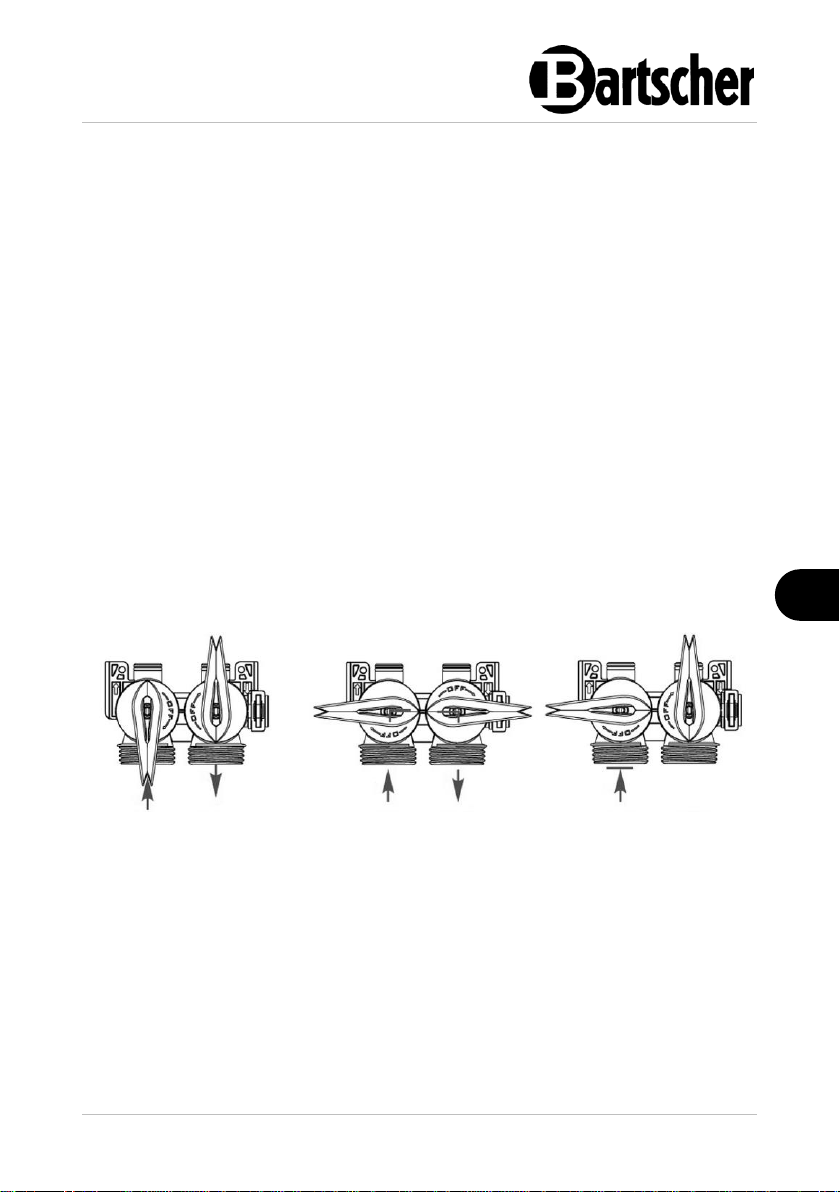
Service position
Bypass position
Shut-off position
Inlet
Discharge
Inlet
Discharge
Inlet
Discharge
Fig. 2
Control Function
Control Valve
Before starting, set the current time and water hardness in degrees.
The valve is set by default to regenerate at 2:00 AM at 20 German degrees.
Salt Replenishment Reminder
The system automatically detects the salt level in the brine tank each time after
regeneration. If the salt level is below normal, the low salt sensor will relay this to
the intelligent control system, and a "SALT" alarm will be displayed in the screen.
The buzzer will sound daily from 7:30 PM to 10:30 PM to remind the user to
replenish the salt.
Salt should be replenished on time to avoid using unsoftened water. When the
display shows the "SALT" alarm, the salt in the brine tank can be used for 2 or 3
more regenerations.
Bypass
The bypass connection allows for convenient installation and maintenance. There
are three different types of states when the bypass handle is rotated.
DRY Brine Tank
The system fills the brine tank each time just a few hours before regeneration to
keep the brine tank largely dry, preventing salt from accumulating above the tank or
leaking out.
INTELLIGENT Control
• The water softening system is equipped with the latest intelligent control valve,
described below.
109901 13 / 30

Technical Data
EN
Upflow regeneration system. Unlike downflow systems, a water softening
system with the upflow system directs the water flow upward. Water flows from
the bottom of the brine tank in an upward swirling motion through the resin. The
upflow system is a high-efficiency system. Thanks to regeneration with the water
stream directed upward, the system can use 30% less salt.
Proportional regeneration. The system regenerates the used resin only
according to the water consumption condition. This saves salt and keeps the
resin fresh.
Holiday mode When the system is not going to be used for a long time, the
holiday mode can keep the resin fresh. Holiday mode can be activated by
pressing and holding the button in softening mode until HOLIDAY appears
in the display. To switch the holiday mode off, press the button until the
HOLIDAY message is no longer displayed.
• If the control valve does not detect water consumption greater than 6 LPM (litres
per minute) or 85 LPD (litres per day) in the next 4 days, the control valve will
initiate 100% regeneration at the set time of the 4th day, and then remain in
standby mode in the operating position.
• If the control valve does not detect water consumption greater than 6 LPM (litres
per minute) or 85 LPD (litres per day) in the next 4 days, the controller will only
perform a 5-minute backwash and quick rinse at the programmed time on the
2nd and 4th day, respectively.
• If the control valve detects water consumption greater than 6 LPM (litres per
minute) or 85 LPD (litres per day), the holiday mode is discontinued and the
control valve switches to normal mode based on previous conditions. The
amount of water consumed is added via the control valve to the records.
14 / 30 109901

Installation and operation
EN
CAUTION!
Incorrect installation, positioning, operation, maintenance or misuse of
the appliance may lead to personal injury or property damage.
Positioning and installation, as well as repairs may be performed by
authorised technical service only and in compliance with the applicable
national law.
NOTE!
The manufacturer disclaims all liability and provides no warranty for
damages, which may be attributed to non-observance of regulations or
incorrect installation.
5 Installation and operation
5.1 Installation
Information for Installer
• All installation and maintenance work on the water softening system must be
performed only by trained and authorized specialized personnel.
• Unpack the appliance and discard the entire packing material. Never remove the
rating plate or any warning signs from the appliance.
• Before installing the water softening system, the appliance working with it
(dishwasher) must be free of lime and gypsum deposits.
• Do not install the appliance in the vicinity of heat sources and open flames.
Protect the appliance from sunlight.
• Protect the appliance from mechanical damage.
• If the water pressure in the water supply line exceeds 6 bar, it is necessary to
install a pressure reducer to the appliance.
• Accessories for the water softening system in contact with water must be made
of material suitable for this purpose.
• All parts must be installed in accordance with the country's guidelines for the
installation of drinking water systems.
• The ambient temperature at the installation site must be at least 10°C.
• Protect the appliance from frost.
109901 15 / 30

Installation and operation
EN
• The installation site of the appliance must be protected from damage caused by
water (e.g., by an existing floor drain). The manufacturer is not responsible for
damage caused by water.
ATTENTION!
After storage and transportation at temperatures below 0°C, the appliance
must be kept in its open original packaging for at least 24 hours before it is
put into operation at the specified ambient temperature.
Preparation for Installation
The user must make the following preparations at the installation site
1. Water supply line with 3/4" connection and shut-off valve.
2. Water discharge line (sewer) with a maximum height of 100 mm,
DN50 connection.
3. Socket 230 V / 50 Hz, 16 A.
4. Floor drain in the installation room.
5. Mechanical fine filter must be installed upstream of the system.
16 / 30 109901

Installation and operation
EN
Fig. 3
1. Water supply line with 3/4"
connection and shut-off valve
2. Cold water supply
3. Mechanical cleaning filter
4. Electrical socket
5. Control valve
6. Brine tank
7. Overflow drain elbow
8. Flexible regeneration hose
9. Air gap
10. Sewage network
11. Floor drain
12. Softened water
Installation Diagram
109901 17 / 30

Installation and operation
EN
Fig. 4
Water Softening System Installation
1. After preparation for installation, place the appliance in the designated room
according to the installation plan.
2. Connect all supply and drain lines. The appliance's connections are shown in
the following figure:
– Connect the water supply line (2) and drain pipe (1) to the appliance.
– Connect the flexible sewage pipe (1/2") to the connection pipe (5) and to
the drain or sewage system.
ATTENTION!
The sewage pipe must be large enough to allow 5 l/m of rinse water to
drain. The drain pipe must be rigid enough not to break and lead to
blockages and overflowing of the brine tank, as well as to the malfunction
of the regeneration process.
– A mechanical fine filter should be installed in front of the water softening
system to protect the appliance from mechanical damage caused by
sediment from water pipes.
– Fill the brine tank of the water softening system with salt tablets.
– Then add 3 litres of water.
– Check all connections to the appliance and tighten them if necessary.
– Connect the water softening system to a single grounded outlet.
18 / 30 109901

Installation and operation
EN
Disassembly and Disposal
At the end of its life, the appliance will be disassembled (for final destruction or
scrapping).
Disassembly should be done in reverse order.
ATTENTION!
First, thoroughly clean the system with clean drinking water and
completely empty the tanks and hoses!
Observe health and safety regulations when doing so!
Preferred Settings
The appliance is pre-set at the factory. Precise adjustment is done by user on site.
1. Program the control valve (section 5.4).
2. Before commissioning, set the current time and water hardness in German
degrees of hardness.
3. Check the water hardness and enter the correct value.
Based on this, the system will calculate the capacity after which regeneration
should begin. The control valve is set by default so that regeneration takes place at
2:00 AM at 20 degrees of water hardness according to the German scale.
4. Open the water supply to the water softening system.
The water pressure must be at least 2.0 bar and a maximum of 6.0 bar.
5. Vent the system, starting the regeneration process. Start the regeneration by
pressing the (EXIT) button for 5 seconds.
There will be an audible buzzing of the electric motor, indicating that regeneration is
in progress. During the regeneration process, the system is ventilated and the brine
tank is filled with water. Immediately after regeneration is complete, the appliance is
ready for operation again. Hard water is available during regeneration.
109901 19 / 30

Installation and operation
EN
Fig. 5
5.2 Electrical Connection
• Verify if the technical specification of the appliance (see the rating plate)
corresponds to the characteristics of the local electric mains grid.
• Connect the appliance to a single, properly grounded mains socket with a
protective contact. Do not connect the appliance to a multi-socket.
• The power cord should be laid in a way preventing anyone from threading on it
or tripping against it.
5.3 Operation
Display Messages
a – current time
b – information about the day of the week
c – appliance: M3 – flow rate; PPM, dH, FH – water hardness unit, dH – German
hardness, FH – French hardness, Kg – total resin replacement capacity.
d – cycle stage: When this message flashes, it means that the control is moving to
the current cycle stage.
e – wireless control: When this message appears, it means that the wireless unit
can control the valve.
f – backup battery: The battery is installed. When this message flashes, it means
that the battery level is low.
20 / 30 109901
Installation and operation
EN
Fig. 6
Time programming menu
Short press – enter user
settings
Entering
Approval and saving of
current settings
Increase button
Increase setting value
Decrease button
Decrease the value of the
settings
Exit
1. Short press in programming mode – return to previous setting step
2. Long press (5 sec) – regeneration starts immediately
3. Short press in softening mode – forces regeneration to start at the
programmed time.
g – queue regeneration: The initiation of queue regeneration means that the
controller is currently in the process of regeneration.
h – flow meter: When the flow meter is installed and flashing, it means that the flow
is going through the meter.
i – appliance is running: If flashing, it means that the controller is moving to the
operating position.
j – setting mode: At the controls in the data settings.
k – valve type: SOFT – softening valve, FILTE – filter valve.
Control Keys
109901 21 / 30

Installation and operation
EN
Fig. 7
Backup battery – connection and functions
NOTE!
The backup battery is not included in the scope of supply.
A 9 V 6LR61 block battery is required for the appliance.
To extend the life of the battery, connect the battery only when the control
valve is properly set.
1. Remove the cover from the battery socket.
2. Slide the battery terminal onto the battery.
3. Then place the battery in the battery socket.
Functions:
• When the power is switched off in the operating position, the control valve
remains in the same position, even after reaching regeneration. The battery,
processor and flow meter operate normally. The skipped regeneration will be
made up as soon as the power supply is restored.
• When there is a power failure during the regeneration stage, the control valve
battery remains on, and the control valve completes the current stage and
moves it back to the operating position, where it waits for electrical power to be
restored. It then returns to the operating position to continue and complete the
remaining regeneration stages to be executed.
22 / 30 109901

Installation and operation
EN
1. To enter the setting mode, press the
button.
2. In the home screen, press the
button to set the time.
Fig. 8
The hours indicator starts flashing.
3. Press the or button to set the
hours.
4. Press the button to save the
setting.
Fig. 9
The minutes indicator starts flashing.
5. Press the or button to set the
minutes.
6. Press the button to save the
setting.
Fig. 10
5.4 Settings
Settings
The appliance is pre-set at the factory. The default language is German.
To set other options, follow the setting steps in the table below or contact the
service department.
109901 23 / 30

Installation and operation
EN
The day of the week indicator starts
flashing.
7. Press the or button to set the
day of the week.
8. Press the button to save the
setting.
Fig. 11
The overrun day indicator starts flashing.
9. Press the or button to set the
overrun day.
10. Press the button to save the
setting.
Fig. 12
The regeneration time indicator starts
flashing.
11. Press the or button to set the
regeneration time.
12. Press the button to save the
setting.
Fig. 13
When the maintenance time arrives, the
informal indicator and alarm will alternate
in the screen.
Fig. 14
24 / 30 109901

Installation and operation
EN
13. Press the button to abort the
alarm and return to the home screen.
Fig. 15
The water hardness indicator starts
flashing.
14. Set the degree of water hardness (dH)
on the inlet by pressing the or
button.
15. Press the button to save the
setting.
Fig. 16
The electric power indicator flashes.
16. Press the button to switch the
acoustic signal off when connected to
the electric power supply.
Fig. 17
109901 25 / 30

Installation and operation
EN
17. In the home screen, press the
button for 3 seconds to activate the
holiday mode.
A message appears in the display as
shown on the left.
18. Press the button again to switch
the message off.
Fig. 18
Manual regeneration initiation
19. Press the button in the home
screen for 5 seconds.
The control valve initiates regeneration
immediately.
Press the button again to proceed to
the next stage of the cycle.
Fig. 19
Output position cannot be located
Fig. 20
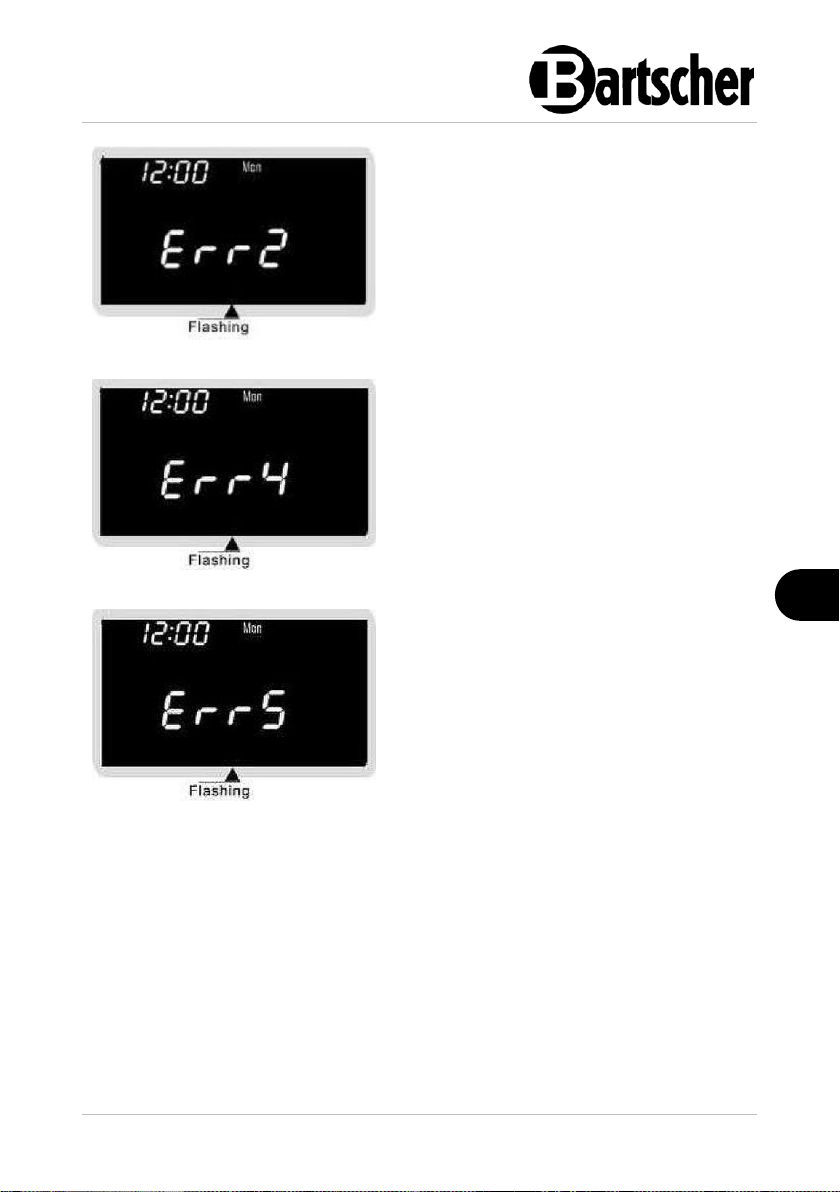
Automatically Detect and Store System Errors
The control valve automatically displays all detected system errors and warns the
user via the display. The details are as follows:
26 / 30 109901
Installation and operation
EN
The optical sensor does not receive a
signal
Fig. 21
The electric motor is blocked or locking
the wrong starting position
Fig. 22
Digital display is not well connected to the
control valve (cable and radio)
Fig. 23
109901 27 / 30

Cleaning and Maintenance
EN
Malfunction
Possible Cause
Solution
The controller does
not automatically
perform regeneration
Disconnect the meter
cable
Reattach the meter cable
Damaged transformer
Replace the transformer
Damaged controller or
sensor
Contact the service company
Replace or repair the parts
Hardness of treated
water is higher than
the setting
Bypass valve is not in
operating position
Move the bypass valve to the
operating position
Incorrectly installed water
supply line and/or drain
line
Correctly install water supply
line and/or drain line
6 Cleaning and Maintenance
1. Check the water treatment device regularly.
2. Check the tightness of the connections. If the connections or seals are leaking,
remove them, and if necessary, replace them.
3. Check hoses for kinks; kinked hoses should be replaced.
4. Hoses should be replaced regularly after a maximum of 5 years, or sooner if
leaking.
5. Do not use caustic chemicals, cleaning solutions or detergents for cleaning.
6. Have the controls maintained and the entire appliance serviced by a qualified
specialist every 3 years.
7 Possible Malfunctions
Mögliche
The table below contains descriptions of possible causes and solutions to
malfunctions or errors during operation of the appliance. When malfunction cannot
be removed, contact the technical service.
In such a case, provide article number, model name and serial number. These data
may be found in the rating plate.
28 / 30 109901
Possible Malfunctions
EN
Malfunction
Possible Cause
Solution
Hardness of treated
water is higher than
the setting
The hardness of the inlet
water is higher than the
setting
Reset the water hardness at
the water inlet
Resin is contaminated
and unsuitable
Contact service and have the
resin replaced
Insufficient salt
concentration or amount
Keep the brine tank filled with
salt at all times. Clean
annually.
The appliance does
not take salt solution
Clogged drain line or flow
regulator
Clean the drain line and flow
regulator
Clogged injector
Clean injector, replace injector
housing
No water in the brine tank
Check that the flow regulator
is not clogged. Make sure the
safety float is not blocked
Salty taste of treated
water
Low pressure in the water
supply line
Install a pressure booster
pump to increase the pressure
in the water supply line
The drain line is blocked
Remove the blockage
Constant flow into
the drain
Internal control leak
Clean valve, reinstall
Contact the service company
Pin stuck in brine
109901 29 / 30

Disposal
EN
Electric appliances are marked with this symbol. Electrical
appliances must be disposed of and recycled in a correct
and environmentally friendly manner. You must not dispose
of electric appliances with household waste. Disconnect the
appliance from the power supply and remove power cord
from the appliance.
8 Disposal
Electrical Appliance
Electrical appliances should be returned to designated collection points.
30 / 30 109901
 Loading...