


EN
Instructions for Installation, Use and
Maintenance
110530
110531
110532
COD.: 3000E
Ed. 08 - 02/2018
APPLICARE ETICHETTA
MATRICOLA
Thank you for choosing our appliance.
The installation, use and maintenance instructions given in this manual have been
prepared to ensure the long life and correct operation of your appliance.
Follow these instructions carefully.
We have designed and manufactured this appliance according to the latest technological
developments. Now, it is in your care.
Your satisfaction is our greatest reward.
READ THE INSTRUCTIONS CAREFULLY BEFORE INSTALLING THE MACHINE.
WARNING: FAILURE TO COMPLY (EVEN PARTIALLY) WITH THE RULES GIVEN IN THIS MANUAL
WILL INVALIDATE THE PRODUCT WARRANTY AND RELIEVES THE MANUFACTURER OF ANY
RESPONSIBILITY.

TRANSLATION OF THE ORIGINAL INSTRUCTIONS
SUMMARY Page
WARNINGS 22
INSTALLER SECTION
1. MACHINE INSTALLATION 24
1.1 Dataplate 24
1.2 Reception of the appliance 25
1.3 Water connection 25
1.3.1 Water supply characteristics 25
1.4 Electrical connection 26
1.5 Temperature adjustment 26
1.6 Rinse aid dispenser operation (pict. 1 - 2) 26
1.7 Peristaltic rinse aid dispenser operation (optional - pict. 3) 27
2. DETERGENT DISPENSER RETROFIT 27
2.1 Electrical connection 27
2.2 Water connection 27
2.3 Dispensing the detergent 27
3. TECHNICAL DATA AND USEFUL INFORMATION ON PUMPS 28
3.1 Washing pump 28
3.2 Emptying pump (optional) 28
3.3 Pressure increasing pump (optional) 28
EN
USER SECTION
4. CONTROL PANEL AND RELATIVE SYMBOLS 29
5. OPERATION 29
5.1 Cutlery and crockery loading 30
5.2 Use of detergent 30
5.3 Use of rinse aid 30
5.4 Discharge pump system (optional) 31
5.5 Regeneration device (optional) 31
5.6 Compliance with hygiene regulations and H.A.C.C.P. 32
5.7 Machine features 32
6. MAINTENANCE 32
6.1 Regular Maintenance 32
6.2 Special Maintenance 32
7. ALARMS 33
8. ENVIRONMENTAL FEATURES 33
8.1 Packing 33
8.2 Disposal 33
9. ECOLOGICAL FEATURES 33
9.1 Recommendations for optimum energy, water, and additive consumption 33
10. TROUBLESHOOTING 34
11. EU DECLARATION 36
page 21

EN
WARNINGS
This instruction booklet must be kept with the dishwasher for future
consultation. If the dishwasher is sold or transferred to another user,
make sure the booklet always goes with the appliance so that the new
owner can have the necessary information on operation and the relative
instructions.
The instruction booklet must be carefully read before installation and fi rst use of
the dishwasher.
• Adaptation of the electrical and water systems for dishwasher installation must
only be carried out by qualifi ed operarators.
• This dishwasher must only be used by adults. This is a professional
by qualifi ed personnel, and installed and repaired exclusively by a qualifi ed technical
assistance service. The Manufacturer declines any responsibility for improper use,
maintenance or repair.
• This appliance can be used by trained youth aged from 15 years and above. It cannot
be used by persons with reduced physical, sensory or mental capabilities or lack of
experience and knowledge.
• Children shall not play with the appliance.
• Cleaning and user maintenance shall not be made by children without supervision.
• Accompany the door in opening and closing.
• Make sure the dishwasher is not resting on the power cord or the fi lling and drain hoses.
Level the machine by adjusting the support feet.
• Do not use the appliance or any part of it as a stepladder or means of support as it has
been designed exclusively to bear the weight of the dishrack containing dishes to be
washed.
• The dishwasher is designed only and solely for washing plates, glasses and various
pots and pans with human food type of residue. DO NOT wash articles polluted
with petrol, paint, bits of steel or iron, fragile objects or material not resistant to
the washing process. Do not use acidic corrosive chemical products or alkaline
and solvents or chlorine based detergents.
• Do not open the machine door when operating. In any case, the machine has a special
safety device which immediately stops the unit if the door is open, thus preventing water
spillage. Always switch the machine completely off and drain the water tank, before
accessing inside.
• This machine must be disconnected from the main electrical supply after use at the
end of the day and for any service/maintenance operation following this procedure:
Switch the machine off from the control panel.
Drain the tank by removing the overfl ow pipe.
Disconnect the electrical supply by the omni-polar switch (main switch located on
the wall).
machine to be used
page 22

EN
Shut the water supply valve(s).
Disregarding the aforesaid prescriptions is a serious misuse and can cause
damages and injures to property and people, and will relieve the manufacturer
from whatever liability.
• The user must not carry out any repair and/or maintenance operations.
contact qualifi ed personnel.
• Servicing of this dishwasher must be performed by authorized personnel.
N.B.: Only use original replacement parts. Otherwise the product warranty is
invalidated and the manufacturer is no longer responsible.
• Do not use old load pipe, but only new ones.
• Some important rules must be followed for using this appliance:
1) never touch the appliance with wet hands or feet
2) never use the appliance when barefoot
3) do not install the appliance in places exposed to water sprays.
• Do not dip bare hands into water containing detergent. If this should occur, wash them
immediately with plenty of water.
• Only follow the instructions given in the manufacturer’s booklet for cleaning operations
(chap. 6).
• This appliance is designed to work at room temperatures from 5°C up to a max. 35°C,
in a suitable room.
• Do not use water to extinguish fi res on electrical parts.
• Do not cover the intake or dissipation grids.
• Only qualifi ed personnel can access the control panel, when the main power switch is
OFF.
• The machine has an IPX3, protection rating against accidental water splashes and is not
protected against pressurized water jets. Pressure-cleaning systems shall, therefore, not
be used on this machine.
In any case
ATTENTION: INTERNAL CLEANING OF THE MACHINE SHALL BE
CARRIED OUT AT LEAST 10 MINUTES AFTER THE POWER SWITCH
HAS BEEN TURNED OFF.
ATTENTION: DO NOT INSERT HANDS AND/OR TOUCH THE PARTS
LOCATED AT THE BOTTOM OF THE WASH TANK AND/OR AT THE END
OF THE WASH CYCLE.
NOTE: The manufacturer declines any responsibility for accidents
damage deriving from failure to observe the above listed instructions.
to people or any
page 23

EN
ATTENTION:
At the end of installation make sure to remove the parts of this booklet relevant to the installer, for future
consultation.
1. MACHINE INSTALLATION
1.1 Dataplate
/QFGN &9::::;;;;
&'5%4+26+10
%QFG
50 6[RG&9.:::::
A
B
C
80*< ZZ#
ZZZZ9
ÄM2C
/#:
RoHS
IPXX
D
E
*1
/#:
Model S/N
Model DW XXXX
Model DW XXXX.YYYY
A Power source
B Total power installed
C Dynamic pressure
D Envelope protection degree
E Total electricity absorption
ZZ°%
ZZZkcal
FAMIGLIA PRODOTTO
FAMILY PRODUCT
FAMILLE DU PRODUIT
FAMILIA PRODUCTO
FAMILIE DES PRODUKTES
FAMIGLIA PRODOTTO
FAMILY PRODUCT
FAMILLE DU PRODUIT
FAMILIA PRODUCTO
FAMILIE DES PRODUKTES
CODICE MODELLO
CODE MODEL
CODE ARTICLE
CODIGO MODELO
KODE VON MODELL
/#&'+0+6#.; ;;;;
S/N DW X xxxxxxx
/QFGN &9::::;;;;
&'5%4+26+10
%QFG
50 6[RG&9.:::::
80*< ZZ#
ZZZZ9
ÄM2C
/#:
*1
ZZ°%
/#:
ZZZkcal
Model S/N
ANNO
YEAR
ANNÉE
AÑO
JAHR
E=2010 - 2011
F=2011 - 2012
G=2013 - 2014
H=xxxx - xxxx
NUMERO DI SERIE
SERIAL NUMBER
NUMÉRO DI SÉRIE
NUMERO DI SERIE
SERIENNUMMER
RoHS
IPXX
/#&'+0+6#.; ;;;;
page 24

table 1
INSTALLER SECTION
EN
1.2 Reception of the appliance
After removing the packing, ensure that the appliance has not been damaged in transport. If it has, inform
the retailer. If safety has been compromised, do not install the machine.
Double check the fi
rm tightness of all hose-clamps on piping, nuts and bolts, and fasteners, that
might come loose with the transport, to prevent water dripping or leakages, or other damages,
during the machine's operation.
For disposal of the packing, see chap. 8.
1.3 Water connection
Connect the machine's water supply with an interrupt valve capable of quickly and completely shutting off water
intake.
Make sure that the water supply pressure comes within the values given in the Table 1.
Water characteristics table Min Max
Static Pressure 200Kpa 400Kpa
Dynamic Pressure 150Kpa 350Kpa
Water hardness 2°f 8°f
Cold water-supply temperature 5°C 50°C
Hot water-supply temperature 50°C 60°C
Capacity 10lt/min
If it is less than 2 bar dynamic pressure (200 kPa) a pressure pump must be installed to guarantee optimal machine operation
(by request, the dishwasher can be supplied with a pump).
If, however, the water supply pressure is greater than 400 kPa, a pressure reducing device must be installed.
For water with average hardness greater than 8°f, a water softener must be used.
This will result in cleaner dishes and longer life of the appliance.
By request, the machine can be equipped with a water softener (see par. 5.5).
All damages caused by the hydraulic limestone (calcareous water higher-up than 8°f and without watersoftner) are not are
not covered by warranty.
In order to ensure the optimum performance, the water supply temperature must come within the range given in table 1.
Machines shall be made with extra power in case of cold water infeed.
Each machine is provided with a rubber tube with a ¾" threaded attachment for water fi lling.
Connect the emptying tube, supplied with the appliance, to the union elbow located under the tub so that water fl ows freely.
If it is not possible to empty the water at a level lower than the drain of the appliance, it is advisable to install an emptying
pump, which can be provided by request.
The emptying tube should always be connected to a siphon to prevent odor back-up from the screen.
1.3.1 Water supply characteristics
The machine water supply must be potable, in compliance with Directive 98/83/EC.
The inlet water must also meet the parameters given in the table 2.
table 2
Water parameters table Min Max
Chlorine
pH 6,5
Water hardness 8°f
Iron
Manganese
1
1
3
4
2mg/l
3
8,5
2-3
0,2 mg/l
0,05 mg/l
1
Out of range values might lead to corrosion and jeopardize the life of the machine.
2
Should the water hardness is higher it is compulsory to install a water softner and check periodically its operation.
3
Out of range values might lead scaling and sediments with a consequent lower performance, functionality, and expected
life of the machine.
4
Desired value: Out of range values might lead stainless steel blackening/tarnishing.
It is recommended a water test once a year.
page 25
EN
INSTALLER SECTION
1.4 Electrical connection
The electrical connection must be made according to current technical standards.
Ensure that the mains voltage corresponds to the value given on the machine dataplate.
It is necessary to install a suitable omni-polar automatic fuse
that assures the complete disconnection from the network in an overvoltage category III condition.
This switch must be incorporated in the supply network, dedicated only and exclusively to this circuit and installed
in the immediate vicinity.
The machine has to be absolutely turned off by this switch: only this switch gives the full warranty of complete
detachment from the electric network.
Make sure the appliance is linked to an effi cient ground connection.
switch sized according to the absorption
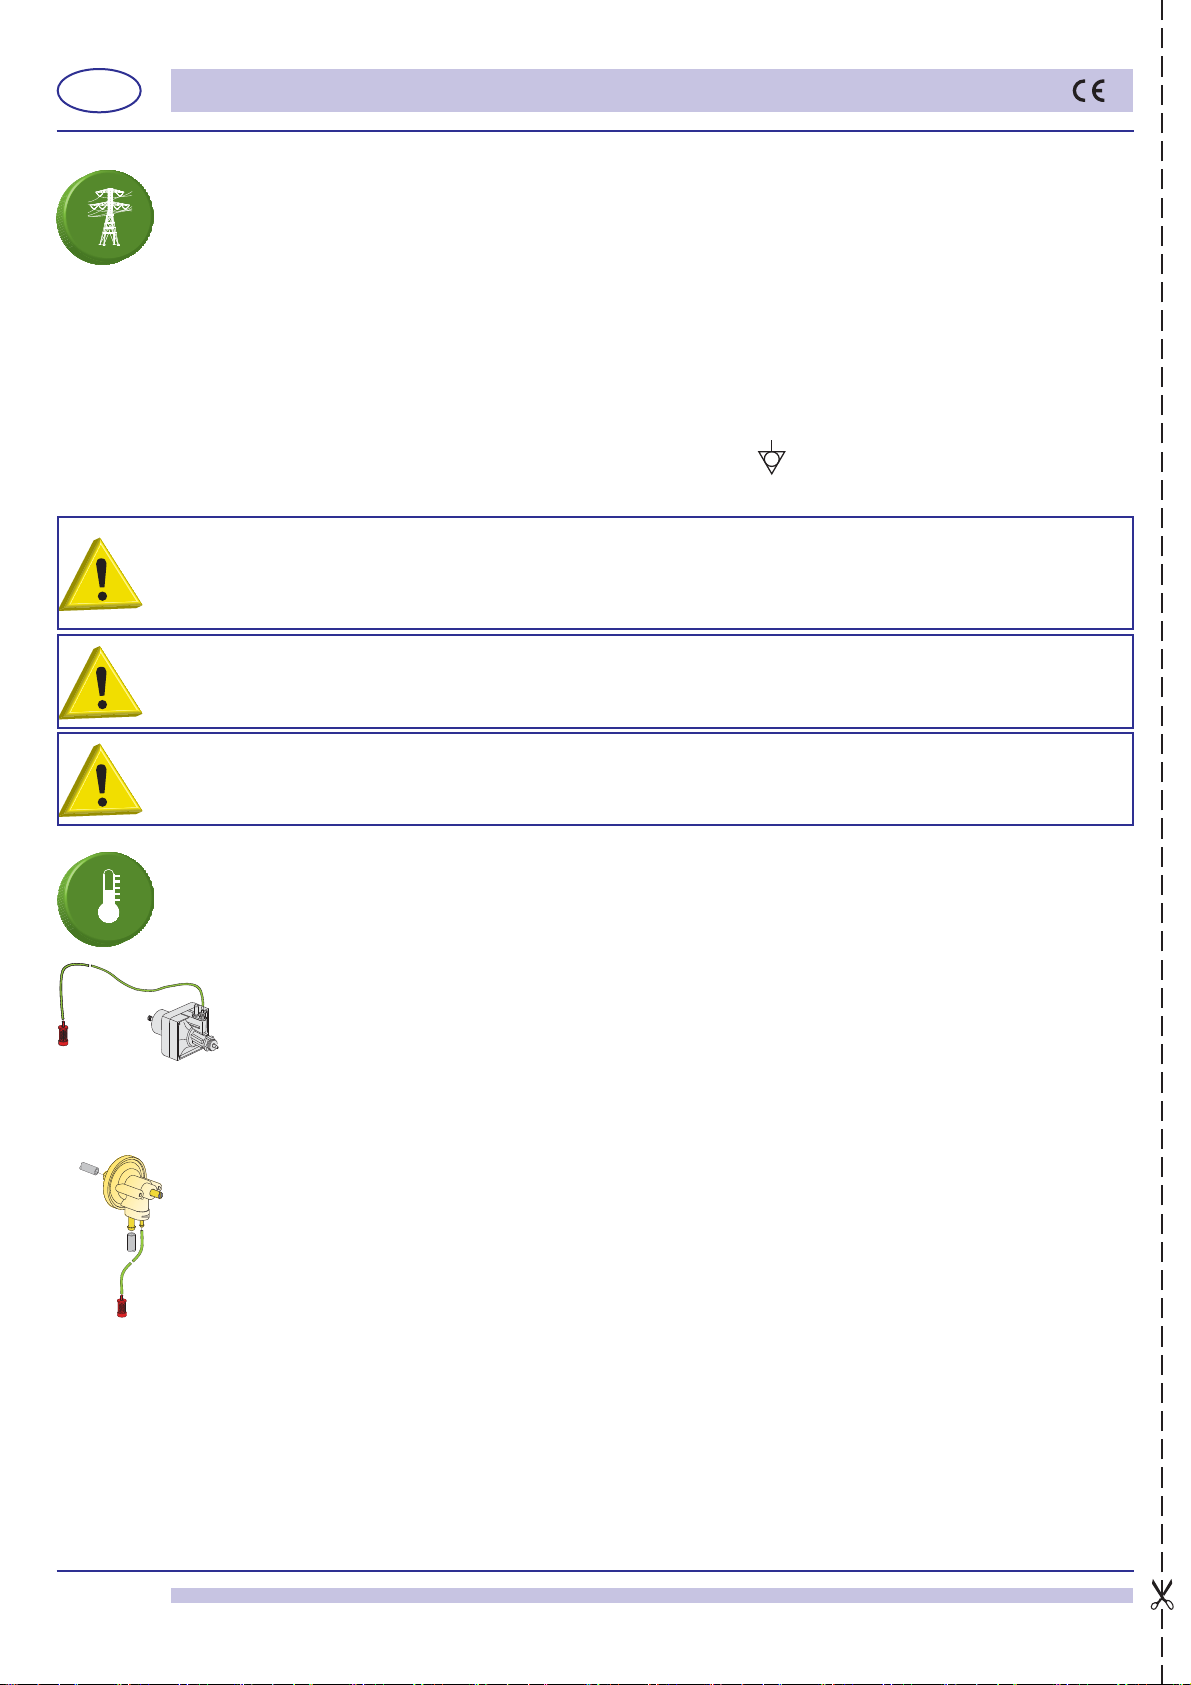
On the back of the appliance there is a terminal marked with the symbol
, which is provided for equipotential
connection between diff erent appliances (see electrical safety standards).
WARNING: check very carefully if the “ground connection” of the machine is properly sized and fully effi cient, and
that not too many units are connected to it. An undersized or poor “ground connection” might lead to corrosion
and/or pitting eff ect on the stainless steel plates, even to perforation.
FOR APPLIANCES USING A THREE-PHASE POWER SUPPLY, FOLLOW THE INSTRUCTIONS AND WIRING
DIAGRAM ATTACHED TO THE APPLIANCE.
ATTENTION TO CORRECT SENSE OF TRI-PHASES PUMPS ROTATION (if present).
Feed cable: the retailer - importer - installer must ensure that the feed cable complies with the cable insulation
category of the workplace, in conformity with current Technical Standards.
1.5 Temperature adjustment
If necessary, the water temperature of the wash and rinse cycles can be adjusted by means of the fi ne-adjustment
screws on the respective thermostats.
The recommended temperatures are 55°C for the wash cycle (tub) and 85 - 90°C for the rinse cycle (boiler).
1.6 Rinse aid dispenser operation (pict. 1 - 2)
B
C
A
code 10799
pict. 1
A
D
C
B
code 10799/G
pict. 2
to 0.2 cm³/turn (about 0.21g/turn with a concentration of 1.05 g/cm³ of rinse aid). The rinse aid cannot function properly if
the diff erence in level between the bottom of the machine and the container exceeds 80 cm.
THE DISPENSERS ARE PRE-SET TO A 5 CM OF TUBE (0,65 gr.) INTAKE OF PRODUCT FOLLOWING A TEST PHASE
SYSTEM CHECK. THIS MEASUREMENT SHOULD BE ADJUSTED ACCORDING TO THE TYPE OF RINSE AID USED
AND WATER HARDNESS.
Operation: It utilizes the diff erence in combined pressure caused by turning the washing pump on and
off , and the rinse pressure.
D
Water connection:
1) Connect the dispenser tube fi tting A to the pump, by means of the rubber tube installed in the
appliance (pump pressure).
2)
Connect the small black rubber tube by the brass delivery fi tting B to the connection in the boiler
(injector).
3) Make sure that the green product suction tube is inserted on the special fi tting C and that the small fi lter
and the ballast are inserted in the rinse aid tank.
Priming: To prime the dispenser, turn on the appliance and carry out several complete wash cycles.
Adjustment: With each rinse cycle, the dispenser draws an amount of rinse aid,
adjustable from 0 to 4
cc, equivalent to a length of 0 to 30 cm drawn into the suction tube.
In order to regulate the dispenser to the minimum amount, turn the adjustment screw D completely clockwise.
For the maximum amount, turn the screw anticlockwise about 20 complete turns.
For the correct amount of rinse aid, see the paragraph 5.3 Use of rinse aid.
Note: for each turn of the screw the amount of the product drawn into the tube varies by 1.6 cm, equivalent
page 26

INSTALLER SECTION
1.7 Peristaltic rinse aid dispenser operation (optional - pict. 3)
Operation: The rinse aid dispenser is a peristaltic pump.
The rinse aid dispenser is also activated when the tank is loaded.
15186/T
Water connection: Make sure that the green product suction tube is inserted on the
C and that the small fi lter and the ballast are inserted in the rinse aid tank.
special fi tting
Adjustment: With each rinse cycle, the dispenser draws an amount of rinse aid, adjustable from 0
to 4 gr
.
To adjust the capacity of the pump, use a screwdriver (see pict. 3).
THE DISPENSERS ARE PRE-SET TO A 1,65 gr INTAKE OF PRODUCT FOLLOWING A TEST
PHASE SYSTEM CHECK. THIS MEASUREMENT SHOULD BE ADJUSTED ACCORDING TO THE
code 15985/G
TYPE OF RINSE AID USED AND WATER HARDNESS.
pict. 3
2. DETERGENT DISPENSER RETROFIT
2.1 Electrical connection
Follow the wiring diagram attached to the machine.
2.2 Water connection
a) A Ø 12 hole must be made on the back of the appliance.
In some appliances the hole has already been made and is closed
with a plastic cap.
Remove the cap from the hole and fi t the delivery connection.
b) Otherwise, drill one of the same diameter as the injector on the back
part of the tub (see pict. 5. This operation must be carried out by the
Technical Service.
The hole must be made above the water level.
Important: make the hole in a position distant from the overfl ow tube,
so that detergent does not fl ow out immediately. Fix the dispenser in
A
a vertical position with tube connectors turned downwards, making
sure not to place it on energized components.
Clean the inside of the machine from any drilling residual.
c) Correctly mount the injector C using the appropriate fi xtures.
d) Connect the suction tube to the suction attachment of the dispenser
(see pict. 5 point A).
e) Connect the delivery tube to the other attachment of the dispenser, and the delivery fi tting (see pict. 5 point B).
f) Insert the suction tube with fi lter in the detergent tank.
g) Prime the detergent and proceed to dispense.
2.3 Dispensing the detergent
The detergent dispenser capacity can be adjusted using a screwdriver as shown in pict. 4.
Every 2 cm of product drawn into the tube corresponds to 0.25 cm³ equivalent to 0.3 gr (with a
concentration of 1.2g/cm³). For proper dispensing see paragraph 5.2.
Ø 10
Punto B
min 3
cm
C
B
CONNECTION DIAGRAM
pict. 5
EN
15185
code 15985
pict. 4
page 27
EN
INSTALLER SECTION
3. TECHNICAL DATA AND USEFUL INFORMATION ON PUMPS
3.1 Washing pump
When the dishwasher has not been used for some time, check that the washing pump turns freely.
To do this, operate using a screwdriver in the special slot on the ventilating side of the motor shaft.
In case of blocking, turn the main switch off and move the motor shaft, inserting the screwdriver in the notch, turning it
clockwise and anticlockwise.
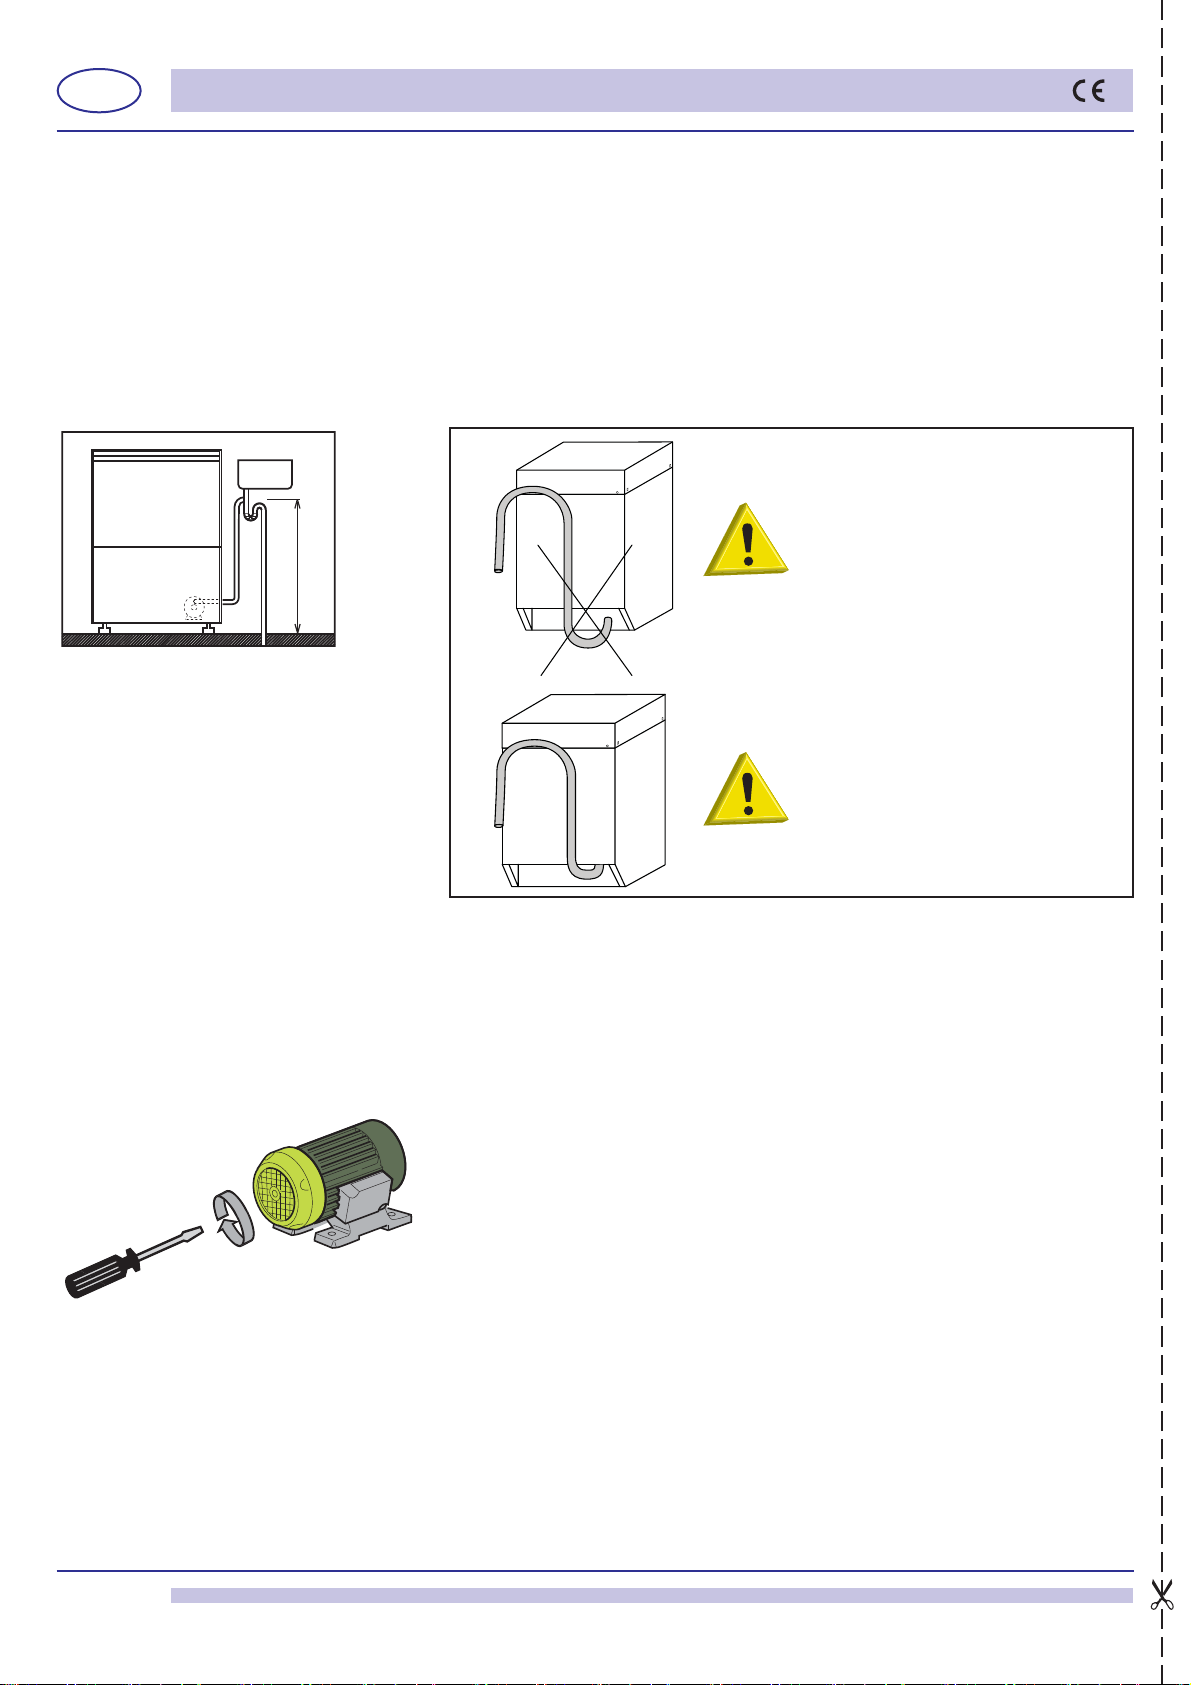
3.2 Emptying pump (optional)
How installing, pay particular attention to the position of the emptying tube (see pict. 6).
See paragraph 5.4 for operations description.
CAUTION: INCORRECT
POSITIONING OF THE TUBE.
MAX 0,8m
pict. 6
CAUTION: CORRECT
POSITIONING OF THE TUBE
3.3 Pressure increasing pump (optional)
When the dishwasher has not been used for some time, check that the supplementary pressure increasing pump turns freely.
To do this, operate using a screwdriver in the special slot on the ventilating side of the motor shaft (see pict. 7).
In case of blocking, turn the main switch off and move the motor shaft, inserting the screwdriver in the notch, turning it
clockwise and anticlockwise.
pict. 7
page 28

USER SECTION
4. CONTROL PANEL AND RELATIVE SYMBOLS
EN
CONTROLS
1) Main switch 0-1
2) Cycle ST
3) Cooling glasses button (optional)
4) Regeneration START button (optional)
5) Manual empty button (optional)
6) Wash type selector (if provided)
ART button
a
b
c
d
e
INDICATORS
a) Power on indicator
b) Tub full indicator
c) Washing cycle indicator
d) Regeneration cycle indicator
e) Temperature indicator
5. OPERATION
• Check that the fi lter is correctly fi tted in its seat (pict. 8-9-10).
The fi lter must be cleaned after every 20 wash cycles and whenever necessary.
DO NOT use the appliance without the fi lter.
• Insert the overfl ow tube in the special seat inside the tub (pict. 8-9-10).
• Close the dishwasher door.
• Insert the special rinse aid dispenser tube in the liquid container and check that the quantity of additive is suffi cient for
daily use (see paragraph 5.3 Use of rinse aid).
• Open the water tap and plug in the main switch.
• Turn switch 0-1 (1 - see chap. 4) to position 1 (pressed).
pict. 8
pict. 9
pict. 10
chap. 4) and hold it down for the desired length of time after the indicator
remain wet.
• The appliance is now ready for a new wash.
• At the end of the day, clean the machine (see chap. 6 Maintenance).
• Turn off the machine and the water tap.
• Turn off the main wall switch.
The operation is signalled by the switch indicator lighting up or by the indicator with the symbol
(a) (see chap. 4).
The machine will automatically fi ll the tub with water (indicator (b) - see chap. 4 - when present
will turn on, indicating the tub is full). Should the machines be equipped with the WRAS certifi ed
Break Tank, the tank fi lling phase is extended. Then the heating phase begins.
Indicator (e) (see chap. 4) comes on when the water temperature is reached.
• Insert the rack fi lled with dishes to wash.
The plates must be correctly placed in the rack (see par. 5.1).
• On machines with selector 6 (see chap. 4), select the wash cycle required.
• Before starting the wash-cycle, in absence of an automatic dosing system, pour the detergent in
the wash-tank. When the temperature indicator (e) will turn on, press the START 2 button (see
chapter 4) for at least a second. The beginning of the cycle is indicated either by the light on the
button itself or on the (c) lamp.
At the end of the washing cycle, a hot rinse cycle will take place.
The indicator light of the START button 2 or the (c) lamp (see chap. 4) will turn off when the cycle
has fi nished.
Note: At cycle end with the door closed, dishes do not get dried. Take out the baset or keep the
door open to allow the evaporation and the drying of the dishes.
To carry out a cooling glasses cycle, on appliances equipped with this option, press button 3 (see
light C goes off . After this cycle, the glasses
page 29

EN
USER SECTION
5.1 Cutlery and crockery loading
Before cutlery and crockery loading in the machine, coarsely clean them from the leftover food.
It isn't necessary to rinse the cutlery an crockery under water.
ATTENTION: Do not wash articles polluted with petrol, paint, chips of steel or
iron, ash, sand, wax, lubricant grease. These substances damage the machine.
Do not wash fragile objects or material not resistant to the washing process.
pict. 11
pict. 12
that in large amounts, can alter the crockery and plastic parts colors.
Any discoloration does not mean that the plastic is not heat resistant.
Crockery and cutlery not suitable for dishwasher
Not suitable for dishwasher:
•
Wooden crockery and cutlery or with wooden parts; water at high temperature causes deformation to wood. Also the
adhesives used are not suitable for treatment in the dishwasher; a consequence could be the handles detachment.
• Crafts, precious vases or decorated glasses.
• Not heat-resistant plastic crockery.
• Copper, brass, pewter or aluminum objects: they may become discolored or opaque.
• The decorations on glass, after a certain number of washes, can lose gloss.
• Fragile glasses or crystal items, if often washed, can become opaque.
We recommend to buy exclusively crockery and cutlery suitable for dishwashing.
After several washes, the glass can become opaque.
It is mandatory to repeat the washing cycle if at the end of the cycle the crockery are not well clean or if there are
washing residues (glasses, cups, bowls, etc. with liquid inside).
Note the following recommendations :
• Crockery and cutlery should not be inserted inside one another, covering each other.
• Place the crockery in order to all surfaces can be reached by water; otherwise the dishes
are not washed.
• Make sure all the crockery are in a stable position and that the hollow containers don't
overturn (cups, glasses, bowls, etc.) .
• Place in the rack all the hollow containers such as cups, glass, etc. upside-down.
•
Place the crockery with deep hollow with upper face downwards, so that water can fl ow
out.
• Make sure the smaller crockery do not fall from the rack.
• Check all the wash arms runs freely and they are not blocked by too tall or too prominent
crockery. Eventually, run a manual rotation of the arms to check it.
Some foods, such as carrots, tomatoes, and others, may contain some natural dyes substances,
5.2 Use of detergent
The detergent shall be the NO FOAM type, suitable for industrial dishwashers.
It is advisable to use liquid detergents.
Put the detergent directly in the tub.
DETERGENT
The correct amount will be suggested by the product manufacturer according to the water hardness. By request,
the dishwasher can be equipped with an electric detergent dispenser (always recommended).
1cm. of the product drawn into the tube is equal to about 0.15 g. A correct amount of detergent is very important
for a successful wash.
5.3 Use of rinse aid
The machine is equipped with a rinse aid dispenser.
The machine automatically draws the rinse aid chemical.
The rinse-aid chemical, shall be suitable for professional glass and dishwashers. It is advisable to rely on
RINSE-AID
CHEMICAL
specialized retailers in the sector.
page 30

USER SECTION
EN
5.4 Discharge pump system (optional)
To drain completely the wash-tank keep the machine ON, extract the overfl ow pipe and shut the door. Press
the button (5 - see chap. 4) for at least a second: the discharge pump will automatically drain the wash-tank.
When the drain is completed, turn the machine OFF.
Turn the machine OFF and, after 5 seconds, ON (button 1 - see chap. 4) to fi ll the wash-tank and run a new cycle.
Opening the door will stop the machine that will re-start when the door is shut.
During the wash-rinse cycle the water in excess is automatically drained.
5.5 Regeneration device (optional)
SALE
pict. 13
in the water softener will be automatically regenerated in about 20 minutes. The cycle is completed when the indicator
light (d) goes off . Wait 20 seconds before opening the door.
After the softening cycle, switch the machine off with button (1 - see chap. 4).
Turn off the main wall switch.
Note: once the cycle has begun it cannot be stopped.
If a water conditioner is installed externally, follow the instructions given in the relative manual to regenerate the resins.
• The fl ashing of the cycle lamp during the softening cycle, indicates a malfunction or a missed draining of the wash-tank
(see chapter 7).
Resin regeneration by the water softener is very important.
Resin regeneration: resin regeneration should be carried out according to the number of cycles as indicated
in the picture below. Ex. 27°f (or 15°D) = 39 cycles.
To carry out the purifying cycle, follow these instructions:
• Open the the water tap and plug in the main switch.
• Turn the main switch 1 (see chap. 4) to 1 (ON).
• Open the door.
• Remove the overfl ow tube and empty all the water in the tub.
• Once the tank is empty check and fully replenish the salt, being careful not to spill it on the tank itself.
A strong concentration of salt can negatively aff ect the correct functioning and service life of the machine.
Fill the special container, placed on the inside of the tub, (see pict. 13) with coarse salt (1-2 mm. grains - the
maximum capacity of the bowl is 500 gr.).
• Close the door, press button (4 - see chap. 4) for 5 seconds and wait for the turn on of the indicator
light (d) - see chap. 4. The indicator light (d) will come on when the cycle is activated. The resins contained
In the case of water hardness above 35°f it is advisable to install an external water softener
page 31

EN
USER SECTION
5.6 Compliance with hygiene regulations and H.A.C.C.P.
• The machines are equipped with a temperature indicator (e - chap. 4) which lights up when the boiler and the tub have reached the
preset temperature (values set by the manufacturer). It is recommended to wait for this light to go on before starting the next cycle.
• Scrape food from the dishes carefully in order not to clog the fi lters, nozzles and pipes.
• Unload the wash tub and clean the fi lters at least twice a day.
• Check that the amount of detergent and rinse aid dispensed is correct (as suggested by the supplier of the product). In
the morning before starting up the machine, check that there is enough product in the containers for daily use.
• Always clean the support fl oor of the dishes.
• Remove the rack from the dishwasher with clean hands or gloves so as not to dirty the cutlery.
• Do not dry or polish the dishes with non-sterilized cloths, brushes, or dusters.
5.7 Machine features
The machine’s sound level is Lpa = 70dBA ± 2.5dB(A)**
**test made according to EN 60335-2-58/A11
6. MAINTENANCE
6.1 Regular Maintenance
WARNING: The machine is not protected against water jets, therefore do not use pressure cleaning
systems.
Contact your cleaning products retailer for detailed instructions on the methods and products to
use for periodic sanitizing of your appliance.
DO NOT use bleach or chlorine-based detergents for cleaning the appliance.
In order to ensure perfect performance, the appliance must be completely
• Turn the switch to 0 (1 - see chap. 4).
• Switch off the main switch.
• Turn off the water tap.
• Remove the overfl ow tube to empty the water.
For appliances provided with emptying pump follow the indications as described on paragraph 5.4.
• Remove the fi lter and clean it with a brush under running water.
• Remove the rotors by loosening the fi xing screws, and thoroughly clean the nozzles and
cleaning and rinsing arms under running water.
If presents, remove the surface fi lters and clean it with a brush under running water (see
pict. 14).
• Reassemble all parts and refi t the rotors in their seats, fi xing them with the relative screws.
Take extreme care to re-assemble the nozzles in the right position (open and / or closed
nozzles) and that the arms are installed with the right axial angle.
pict. 14
• Clean the tub thoroughly using specifi c products.
• At the end of the day, it is advisable to leave the dishwasher door open.
cleaned at least once a day in the following way:
Note.: It is advisable to replace the tub water by refi lling the tub at least every 20 wash cycles, or twice
a day. Do not use metal brushes or corrosive products which can damage the machine.
6.2 Special Maintenance
Once or twice a year have a qualifi ed technician inspect the machine:
1 To clean the electrovalve fi lter.
2 To remove residual deposits.
3 To check the watertight of the seals for water loading and unloading connections.
4 The condition and/or wear of the components.
5 The operation of the dispensers.
page 32

USER SECTION
EN
7. ALARMS
TYPE OF ALARM CAUSE REMEDIES
Flashing of the cycle lamp Missed refi
Missed heating of the water boiler (in
machines equipped with Thermostop)
Flashing of the softening
lamp
Missed tank emptying remove the overfl ow pipe and drain the tank. Switch the
ll of water in the wash-tank Verify the full opening of the water inlet valve or the right
positioning of the overfl ow pipe. Switch the machine OFF
and ON to reset the alarm
Boiler thermostat or boiler heating element out of order.
Check them or call for Service
machine OFF and ON to reset the alarm
8. ENVIRONMENTAL FEATURES
8.1 Packing
The packing consists of the following:
• a wood pallet;
• a nylon bag (LDPE);
• multi-layered cardboard;
• polyurethane foam (PS);
• polypropylene support (PP).
We kindly advise you to dispose of the above-mentioned material
regulations.
8.2 Disposal
The use of the WEEE Symbol indicates that this product may not be treated as householdwaste.
By ensuring this product is disposed of correctly, you will help protect the environment. For
more detailed information about the recycling of this product, please contact your local authority,
your household waste disposal service provider or the shop where you purchased the product.
For the disposal of the machine or one part of its, please follow the directives 2011/65/UE, 2012/19/UE and
following changes and/or the legislative decrees of application.
This product or parts of it cannot be disposed of as domestic waste but must be treated by means of separate collection
(see barred waste container symbol on product).
At the time of product disposal, the user must refer to the specifi c waste collection systems for electric and electronic
appliances (WEEE).
The manufacturer guarantees the absence of dangerous substances in the EEE’s used in compliance with the 2011/65/UE
Directive.
In the case of failure to comply with that prescribed, the user will be subject to the sanctions envisioned by the individual
European Community member.
Disconnect the machine from the electrical and water supply before disposal.
Cut off the electrical cable in order to make any other use impossible.
All the metal parts are recyclable as they are in stainless steel.
Recyclable plastic parts are marked with the symbol of the plastic material.
in accordance with current environmental
9. ECOLOGICAL FEATURES
9.1 Recommendations for optimum energy, water, and additive consumption
Dispensing of salt: A pre-set quantity (by the manufacturer) of salt is injected in the resins every regeneration
cycle. It is important to observe the number of regeneration cycles recommended in paragraph 5.5 in order to
avoid salt spills or lime deposits.
If
possible operate the machine at full capacity: Thus avoiding a waste in detergent, rinse aid, and electrical and
water consumption.
Detergents and rinse aids: Out of respect for the environment, use detergents and rinse aids with the highest biodegradability.
Check the correct amount according to the water hardness at least once a year. An excessive amount of the product will
pollute rivers and seas, an inadequate quantity will preclude proper washing and/or cleanliness of the dishes.
Temperature of the tub and boiler: The temperature of the tub and boiler are set by the manufacturer in such a way as to
ensure the best washing results from the majority of detergents on the market. These may be re-set by the installer according
to your detergent (see par. 1.5).
page 33

EN
Removal of food: Carefully scrape food from the dishes using lukewarm water in moderation to help in the removal of animal
fat. To successfully remove caked on material, soaking in hot water is recommended.
Note: Wash dishes as soon as possible to prevent hardening of the deposits and compromising the eff ectiveness of the
washing.
For an eff ective washing process, regular cleaning and maintenance of the dishwasher is recommended (see chap. 6).
Non-compliance with the above recommendations or with any and all
waste of energy, water, and detergent, further causing an increase in user costs and/or a reduction in performance.
USER SECTION
information within the manual could result in a
10. TROUBLESHOOTING
Type of Problem Possible Causes Cure
The appliance does not
start
The appliance does not
draw water
Flashing of the cycle lamp See chapter 7 Alarms
Unsatisfactory washing
results
Presence of foam Use of unsuitable products Use non-foaming detergent or use less of same detergent
Glasses or dishes are not
completely dry
The main switch is turned off
The water tap is closed Open the water tap
The rinsing arm nozzles or the
electrovalve fi lter are clogged and/
or caked with lime deposits
Faulty pressure switch Replace the pressure switch (call the Technical Assistance
The washing nozzles are clogged
or the washing arms do not rotate
Unremoved grease or starch Detergent concentration too low
The fi lter is too dirty Remove the fi lter, clean it with a brush under running water
Check the tub temperature (it must
be between 50°C and 60°C)
Length of washing cycle inadequate
for type of grime build-up
Wash water too dirty Empty water from the tub, clean fi lters; refi ll the tub and
Tub temperature too low Adjust the thermostat or check correct heating element
Insuffi cient rinse aid Increase the amount of rinse aid by turning the screw on the
The rack is unsuitable for the
glasses and dishes
The dishes have been too long in
the tub
Rinse water temperature is less
than 75°C - 80°C
Surface of dishes and glasses too
rough or porous for material wear
Turn on the switch
Clean the rinsing arm nozzles, the pipes and the electrovalve
fi lter. If the machine has a water softener check the salt
content or regenerate the resins more often
service)
Unscrew and clean the nozzles and the rotating column,
refi t them correctly in their seats
and refi t in its seat
Adjust the thermostat or check correct heating element
operation
Choose a longer cycle if possible, otherwise repeat wash
cycle
correctly reposition the fi lters
operation
dispenser (see paragraph Rinse aid dispenser)
Use a suitable rack enabling the dishes to be tilted so water
can run off
As soon as the wash cycle is fi nished, pull the rack out
immediately, allowing the air to dry the glasses and dishes
more quickly
Check the temperature of the boiler thermostat
Replace type of dishes and glasses used
page 34

USER SECTION
Type of Problem Possible Causes Cure
Streaks and spots on
glasses and dishes
The appliance suddenly
stops during the cycle
During wash cycle the
machine stops and draws
water
The booster pump can't
prime
The washing pump doesn't
work
oo much rinse aid Decrease the amount of rinse aid by turning the fi ne-
T
adjustment screw on the dispenser (see paragraphRinse
aid dispenser)
The water is too hard Check the water hardness. Water should not be harder
than 2-8 °f
For appliances with conditioners:
too little salt in the salt container or
the resins have not been properly
regenerated
Salt present in dishwasher tub Thoroughly clean and rinse the appliance, and avoid spilling
The appliance is connected to an
overloaded circuit
A safety device has been activated Check safety devices (call the Technical Assistance service)
Water from the previous day has
not been replaced
The tub water temperature is too
high
Faulty pressure switch
The overflow tube is incorrectly
positioned
Little pressure on feeding Take out the boiler pipe and drain the pump
The pump is blocked Call the Technical Assistance service
Fill the salt container (coarse salt: 1-2 mm grains) and
regenerate the resins more often. If lime deposits are also
observed on the body of the machine, have a qualifi ed
technician check the operation of the water softener
salt when fi lling the container
Connect the appliance separately (call the Technical
Assistance service)
Empty the tub and refi ll it
Have the Technical Assistance service check the thermostat
and the pressure switch
Remove the overfl ow tube and correctly reposition it
EN
N.B. For any other problems, contact the Technical Assistance service.
The manufacturer reserves the right to alter the technical characteristics without prior notice.
page 35

EN
USER SECTION
11. EU DECLARATION
The machine purchased is in compliance with the norms stated in the EU declaration attached to the machine in original.
Please fi nd attached below the facsimile of this declaration, with the general data of the machine purchased. For the absorption
data refer to the data-plate on the machine.
DICHIARAZIONE DI CONFORMITA' UE
EU DECLARATION OF CONFORMITY
DÉCLARATION EU DE CONFORMITÉ
EU-KONFORMITÄTSERKLÄRUNG
DECLARACIÓN EU DE CONFORMIDAD
DECLARAÇÃO EU DE CONFORMIDADE
Il sottoscritto (1), autorizzato dall’azienda (2), dichiara che la lavastoviglie elettrica per uso collettivo (3) è stata progettata e costruita in conformità alle
norme armonizzate (4) secondo quanto prescritto dalle seguenti direttive e successivi emendamenti (5) e in applicazione a quanto previsto dalle direttive
citate, è stata dotata di Marcatura CE e sono stati predisposti i fascicoli tecnici presso la nostra sede (2). Tale dichiarazione riguarda esclusivamente la
macchina nello stato in cui è stata immessa sul mercato, escludendo i componenti aggiunti e/o le operazioni eff ettuate successivamente dall’utente fi nale.
Declina ogni responsabilità per sinistri a persone, a cose o ad animali derivanti da manomissione della macchina da parte di terzi, ovvero da carenze di
manutenzione, di riparazione o di installazione della stessa da parte di personale non qualifi cato.(*)
The undersigned (1), autorized by the company(2), hereby declares that the commercial electric dishwashing machine (3) is in compliance with the
harmonised standards (4) according to the following directives and further amendments (5) and pursuant of the above mentioned directives, the CE Marking
have been applied. Furthermore, adeguate technical fi les have been prepared and are available at our offi ces (2). This declaration relates exclusively to
the machinery in the state in which it was placed on the market, and excludes components which are added and/or operations carried out subsequently
by the fi nal user. Declines all responsibility for damages to people, properties and animals resulting from bad servicing of the machine by third parties as
from inadequate maintenance or repairs or installation by unskilled technicians.
Le soussigné (1), désigné par la societé (2), déclare que le lave-vaisselle électrique à usage collectif (3) est conforme aux normes harmonisées (4) selon
les prescriptions et directives suivantes et les amendements successifs (5) et en application des directives citées, il porte le Marquage CE. Les dossiers
techniques sont déposés dans notre siège (2). Cette déclaration concerne exclusivement la machine dans l’état dans lequel elle a été mise sur le marché
et exclut les composants ajoutés et/ou les opérations eff ectuées par la suite par l’utilisateur fi nal. Décline toute responsabilité pour tout sinistre à personnes,
choses ou animaux résultant de l'endommagement de la machine par un tiers, c'est-à-dire dû à une maintenance, des réparations ou une installation
inadéquates eff ectuées par du personnel non-qualifi é.
Der Unterzeichenete (1) berechtigt von der Firma (2), erklärt, daß die elektrischen Spülmaschinen für den gewerblichen Gebrauch (3). In Übereinstimmung
mit den harmonisierten Normen ist (4) gemäß folgender Richtlinien und deren nachfolgenden Änderungen (5) und daß in Übereinstimmung mit den
erwähnten Richtlinien die CE-Kennzeichnung angebracht wurde und daß die relevanten technischen Unterlagen zusammengestellt wurden (2). Diese
Erklärung bezieht sich nur auf die Maschine in dem Zustand, in dem sie in Verkehr gebracht wurde; vom Endnutzer nachträglich angebrachte Teile und/
oder nachträglich vorgenommene Eingriff e bleiben unberücksichtigt. Jede Verantwortung für an Personen, Sachen und Tieren verursachten Schäden, die
durch die Manipulation seitens Dritten, beziehungsweise auf mangelhafte Wartung und Reparaturarbeiten oder Installation von unqualifi ziertem Personal
zurückzuführen sind, werden abgelehnt.
Quien subscribe (1), elegido de la empresa (2), declara que el lavavajilla eléctrico de uso colectivo (3) es conforme a las normas armonizadas (4) como
la prescripción de la siguientes directivas y sucesivas enmiendas (5) y, conforme con lo previsto en las citadas directivas, han recibido el Marcado CE.
Existe asimismo los especifi co expediente técnico relativo disponible en nuestro domicilio (2). Esta declaración se refi ere únicamente a las máquinas en
el estado en que se comercialicen, con exclusión de los elementos añadidos y/o de las operaciones que realice posteriormente el usuario fi nal. Declina
toda responsabilidad por daños a personas, cosas o animales producidos del mal servicio de la máquina por terceras partes asi como por reparaciones
o mantenimiento indadecuados o de instalaciones por parte del personal no cualifi cado.
O abaixo-assinado (1), autorizado pela empresa (2), vem por este meio declarar que a máquina de lavar louça para uso comercial (3) esta de acordo com
as normasharmonizadas (4) de acordo com o previsto pelas seguintes diretivas e posteriores alterações (5) a Marcação CE foi aplicada no seguimento
das diretivas mencionadas. Os processos técnicos estão preparados e adequados e encontram-se disponíveis na nossa sede (2). Esta declaração diz
respeito apenas à máquina tal como se encontra no momento da colocação no mercado, excluindo-se os componentes adicionados e/ou as operações
efectuadas
mau manuseamento da máquina por parte de terceiros assim como manutenção incorrecta ou reparações inadequadas ou instalação por pessoal não
qualifi cado.
(*) Lingua originale / Original language / Originalsprache / Langue originale / Idioma original / Idioma original
2) 3)
posteriormente pelo utilizador fi nal. Declina toda e qualquer responsabilidade por danos causados a pessoas, bens e animais, resultantes do
4) EN 60335-1:2012; EN 60335-2-58:2005; EN 55011:2009;
EN55014:2006; EN 61000 3-2:2006; EN 61000 3-3:2008;
EN61000 3-11:2000; EN 61000 3-12:2005; EN 61000 4-2:2009;
EN61000 4-4:2010; EN 61000 4-5:2006; EN 61000 4-6:2009;
EN61000 4-11:2004
1) Preposto/Person in Charge
page 36
5) 2014/30/EU; 2006/42/EC; 2011/65/EU; 2012/19/EU
Firmato in originale e conservato presso la nostra sede (2).
Original document signed and available at our offi ce (2).
Dieses Dokument ist im Original unterzeichnet und bei uns aufbewahrt (2).
Signé en original et gardé à notre siège (2).
Firmado en original y conservado en nuestro domicilio (2).
Original assinado e armazenado na nossa sede (2).
 Loading...