


PS 1L-W
850049

Bartscher GmbH
Franz-Kleine-Str. 28
D-33154 Salzkotten
Germany
Phone: +49 5258 971-0
Fax: +49 5258 971-120
Service hotline: +49 5258 971-197
www.bartscher.com
Version: 1.0
Date of preparation: 2020-11-02
Original instruction manual
EN

EN
Name:
Soap dispenser PS 1L-W
Article number
850049
Material:
aluminium, polypropylene
Volume, in l:
1
Dosing per one pump stroke, in ml:
4
Dimensions (W x D x H), in mm:
93 x 200 x 325
Weight, in kg:
0,82
Technical data
We reserve the right to implement technical modifications.
Version / Characteristics
• Version: wall-mounting
• Refillable
• Filling level control: transparent plastic container
• Operation:
– one-hand operation
– elbow operation
– manual
• Dosing: pump system
• Lockable
• Features:
– cartridge-free
– user-friendly
– hygienic
– requires little maintenance
• The set includes:
– 1 key
– 1 wall holder
– attachment material
• The set does not include: filling
850049 3 / 8

EN
Fig. 1
1. Operating lever
2. Housing
3. Front guard
4. Soap container
5. Lock
6. Dosing pump
7. Dosing head
8. Dosing head cover
B
List of Components of the Appliance
The soap dispenser was designed to keep optimal hygienic standards in public
utility buildings, restaurants, kitchens, laboratories, schools, etc. Touchless, elbowoperated soap dispenser is highly hygienic and user-friendly. The cartridge-free
pumping system may be easily re-filled and it requires almost no maintenance.
4 / 8 850049
EN
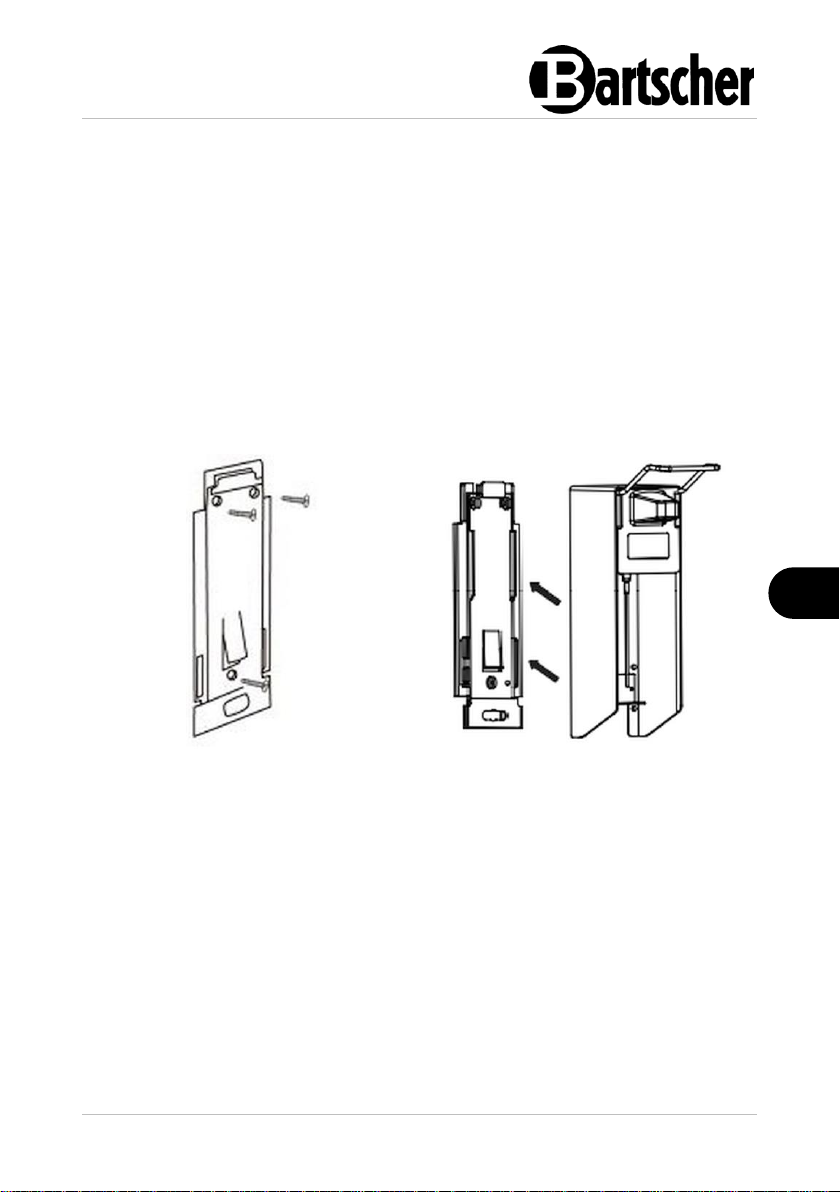
Fig. 2
Fig. 3
7. Using the openings in the wall
holder mark 3 spots to make holes
and bore them in the wall.
8. Insert studs into the bored holes.
Mount the wall holder with bolts.
9. Finally, slide the soap dispenser
housing onto the wall holder until
the locking button clicks.
Wall Mounting
1. Fix the soap dispenser in a required location.
2. Observe the following information during installation:
– space required above the disinfectant dispenser: 40 mm
– recommended installation height: 130–135 cm, measured from the floor
to the upper edge of the liquid dispenser.
3. Unlock the lock with the enclosed key.
4. Pull the front liquid dispenser cover down.
5. Slightly lift the soap container and remove it from the soap dispenser.
6. Press the locking button from the inside and pull the wall holder down from the
housing.
850049 5 / 8

EN
Fig. 4
Fig. 5
10. Insert the tube into the filled-up soap
container and move it upwards until
it stands steadily on the shelf of the
housing.
11. Fix the front cover on the soap
dispenser.
12. Close the soap dispenser with a
key.
Filling with Liquid Soap
1. The front cover sight glass makes it possible to verify the filling level of the soap
container.
2. To fill the soap container, remove it from the dispenser's housing.
3. Fill the soap container with a suitable liquid soap.
4. Introduce the tube into the soap container.
5. Move the soap container up, until it stands on the bottom shelf of the housing.
6. Fix the front cover on the housing.
7. Close the soap dispenser with a key.
6 / 8 850049

EN
1. Dispense the liquid soap from the soap container
as needed by pressing your elbow against the
operating lever and hold the other hand under the
dispensing head.
Information:
With the first time operation, press the operating
lever several times to the stop until the soap
dispenser starts dispensing. Hold your hand under
the dispensing head.
ATTENTION!
For cleaning, never use any scrubbing not acute cleaning agents,
neither cleaning agents that contain chlorine, as they may damage the
surface.
Liquid Soap Dispensing
Cleaning and Disinfecting of Housing and Dosing Pump
1. Regularly perform disinfecting cleaning by wiping external surfaces of the soap
dispenser.
2. Before each refilling of the soap dispenser thoroughly clean it manually.
3. Remove the soap container from the housing.
4. Wash the housing, dispensing head, dispensing pump with tube thoroughly
under hot running water.
5. Dry all cleaned surfaces thoroughly.
6. Finally, place the housing with the dosing pump onto the wall holder.
850049 7 / 8

EN
7. Fill the soap container with a liquid soap.
8. Introduce the soap container into the housing.
9. Fix the front cover on the housing.
10. Close the soap dispenser with a key.
11. Pump the liquid soap a few times.
8 / 8 850049
 Loading...