


PF15E - PF25E - PF40E
PF15E PF25E PF40E
101902
ISTRUZIONI PER L'USO E LA MANUTENZIONE
Istruzioni originali
OPERATION AND MAINTENANCE MANUAL
Translation of the original instructions
IT
EN
MANUEL D’UTILISATION ET D’ENTRETIEN
Traduction des instructions originales
FR
BEDIENUNGS-UND WARTUNGSANLEITUNG
Übersetzung der Original-Bedienungsanleitung
DE
MANUAL DE OPERACIÓN Y MANTENIMIENTO
Traducción de las instrucciones originales
ES
MANUAL DE OPERAÇÃO E MANUTENÇÃO
Tradução das instruções originais
РУКОВОДСТВО ПО ЭКСПЛУАТАЦИИ И ТЕХНИЧЕСКОМУ ОБСЛУЖИВАНИЮ
Перевод оригинальных инструкций
Cod. EM1081BCV0 - 01/2023
PT
RU
AR

MEANING OF SYMBOLS
Meaning of the danger and hazard symbols used in this
manual
Each of the symbols used in this manual correspond to a specic given meaning.
IT
EN
FR
l
a
f
d
WARNING
To indicate particularly important and sensitive operations
which, if not correctly performed, could damage the equipment and/or materials used by it.
CAUTION! HAZARD
To indicate operations which may cause injury of a generic nature, or which may cause malfunctions or damage to the equip-
ment and/or materials used by it, if not carried out correctly;
they therefore require due attention and adequate preparation.
CAUTION! ELECTRICAL HAZARD
To indicate operations which may cause injury from electri-
cal accidents, or which may cause malfunctions or damage to
the equipment and/or materials used by it, if not carried out
correctly; they therefore require due attention and adequate
preparation.
IT IS PROHIBITED TO
To indicate operations which MUST NOT be performed.
DE
Compliance
The equipment complies with the necessary directives for proper placing on the market. The full text of the declarations of conformity is provided with the documentation
ES
supplied with the equipment.
PT
RU
AR
28

INDEX
Table of contents
1 SAFETY . . . . . . . . . . . . . . . . . . . . . . . . . . . . . . . . . . . . . . . . . . . . . . . . . . . . . . . . . . . . . . .30
1.1 Important safety information . . . . . . . . . . . . . . . . . . . . . . . . . . . . . . . . . . . . . . 30
1.1.1 General warnings . . . . . . . . . . . . . . . . . . . . . . . . . . . . . . . . . . . . . . . . . . . . . . . . . . . . . . 30
1.1.2 Prohibitions . . . . . . . . . . . . . . . . . . . . . . . . . . . . . . . . . . . . . . . . . . . . . . . . . . . . . . . . . . . 32
1.2 Symbols on the equipment . . . . . . . . . . . . . . . . . . . . . . . . . . . . . . . . . . . . . . . . 33
2 Equipment presentation . . . . . . . . . . . . . . . . . . . . . . . . . . . . . . . . . . . . . . . . . . . . . . . .34
2.1 Identification . . . . . . . . . . . . . . . . . . . . . . . . . . . . . . . . . . . . . . . . . . . . . . . . . . . . 34
2.2 Working environment . . . . . . . . . . . . . . . . . . . . . . . . . . . . . . . . . . . . . . . . . . . . 34
2.3 Technical data and dimensions . . . . . . . . . . . . . . . . . . . . . . . . . . . . . . . . . . . . 35
2.4 Description . . . . . . . . . . . . . . . . . . . . . . . . . . . . . . . . . . . . . . . . . . . . . . . . . . . . . 35
2.4.1 Main components . . . . . . . . . . . . . . . . . . . . . . . . . . . . . . . . . . . . . . . . . . . . . . . . . . . . . 36
3 Using the equipment . . . . . . . . . . . . . . . . . . . . . . . . . . . . . . . . . . . . . . . . . . . . . . . . . . . 39
3.1 Product receiving . . . . . . . . . . . . . . . . . . . . . . . . . . . . . . . . . . . . . . . . . . . . . . . . 39
3.2 Transport and handling . . . . . . . . . . . . . . . . . . . . . . . . . . . . . . . . . . . . . . . . . . . 39
3.3 Initial start-up . . . . . . . . . . . . . . . . . . . . . . . . . . . . . . . . . . . . . . . . . . . . . . . . . . . 40
3.3.1 Preliminary cleaning . . . . . . . . . . . . . . . . . . . . . . . . . . . . . . . . . . . . . . . . . . . . . . . . . . . 41
3.3.2 Electrical connection . . . . . . . . . . . . . . . . . . . . . . . . . . . . . . . . . . . . . . . . . . . . . . . . . . . 41
3.3.3 Water connection (PF40E models only) . . . . . . . . . . . . . . . . . . . . . . . . . . . . . . . . . . . . 42
3.4 Use . . . . . . . . . . . . . . . . . . . . . . . . . . . . . . . . . . . . . . . . . . . . . . . . . . . . . . . . . . . . 43
3.4.1 Description of controls . . . . . . . . . . . . . . . . . . . . . . . . . . . . . . . . . . . . . . . . . . . . . . . . . 43
3.4.2 Extruder die . . . . . . . . . . . . . . . . . . . . . . . . . . . . . . . . . . . . . . . . . . . . . . . . . . . . . . . . . . . 44
3.4.3 Electric knife (optional for PF25E - standard for PF40E) . . . . . . . . . . . . . . . . . . . . . . 45
3.4.4 Use . . . . . . . . . . . . . . . . . . . . . . . . . . . . . . . . . . . . . . . . . . . . . . . . . . . . . . . . . . . . . . . . . . 45
4 Cleaning the equipment . . . . . . . . . . . . . . . . . . . . . . . . . . . . . . . . . . . . . . . . . . . . . . . . 47
4.1 Cleaning at the end of the process . . . . . . . . . . . . . . . . . . . . . . . . . . . . . . . . . 47
4.1.1 Removing components for easier cleaning . . . . . . . . . . . . . . . . . . . . . . . . . . . . . . . . 48
4.1.2 Cleaning the electric knife . . . . . . . . . . . . . . . . . . . . . . . . . . . . . . . . . . . . . . . . . . . . . . . 49
4.2 Long periods of inactivity . . . . . . . . . . . . . . . . . . . . . . . . . . . . . . . . . . . . . . . . . 49
5 Equipment maintenance. . . . . . . . . . . . . . . . . . . . . . . . . . . . . . . . . . . . . . . . . . . . . . . . 50
5.1 Scheduled maintenance . . . . . . . . . . . . . . . . . . . . . . . . . . . . . . . . . . . . . . . . . . 50
5.1.1 Scheduled maintenance table . . . . . . . . . . . . . . . . . . . . . . . . . . . . . . . . . . . . . . . . . . . 50
5.2 Extraordinary maintenance . . . . . . . . . . . . . . . . . . . . . . . . . . . . . . . . . . . . . . . 51
5.3 Possible operating faults . . . . . . . . . . . . . . . . . . . . . . . . . . . . . . . . . . . . . . . . . . 51
5.4 Disposal . . . . . . . . . . . . . . . . . . . . . . . . . . . . . . . . . . . . . . . . . . . . . . . . . . . . . . . . 52
6 Attachments . . . . . . . . . . . . . . . . . . . . . . . . . . . . . . . . . . . . . . . . . . . . . . . . . . . . . . . . . . 53
IT
EN
FR
DE
ES
PT
29
RU
AR

SAFETY
1 SAFETY
1.1 Important safety information
1.1.1 General warnings
IT
EN
FR
DE
ES
PT
RU
l
WARNING
– This manual is the property of the equipment manufacturer;
the reproduction or transmission of its contents to third par-
ties is prohibited. All rights reserved. It is an integral part of
the product; make sure it is always supplied with the equipment, even if sold/transferred to another owner, so that it
can be consulted by the user or by authorised personnel for
maintenance and repairs. Photographs and drawings are
provided as examples. The manufacturer may make changes
without prior notice as part of its policy of ongoing product
development and updating.
– Read this manual carefully before using the equipment
to ensure safe operation.
– The product is delivered in a single package. Ensure the sup-
ply is intact and contact the local distributor that sold you the
equipment if anything is damaged or missing.
– If the packaging is damaged, inform the carrier and the sup-
plier promptly of the issue.
– The equipment is designed to knead and extrude dough in
dierent formats. Any contractual and extra-contractual liability of the manufacturer for damage caused to people, an-
imals or property by adjustment or maintenance errors or
improper use is excluded.
– This equipment is not designed for mass or industrial-scale
food production.
– The equipment is not designed to be used in locations ex-
posed to atmospheric agents.
– For proper equipment use, place it in a stable position on a
strong, stable, level surface that can be cleaned and sanitised
to avoid the risk of dirt build-up and contamination from
foodstus.
AR
30

SAFETY
– In case of doubt as to the conditions and/or functionalities of
the equipment and its parts, please contact the local distributor for further information.
– The conditions required for proper equipment operation are:
– Ambient temperature no lower than 5°C.
– Relative humidity between 50% (detected at 40°C) and 90% (de-
tected at 20°C).
– Remove any utensils from the equipment before the initial
start-up.
– Place unused utensils on the shelf out of reach of children
and unauthorised people.
– Always stay at a safe distance from the moving parts.
– Following the initial start-up, notify the product supplier of
any faults or malfunctions encountered.
– Provide adequate workplace lighting. Proper lighting is im-
portant to ensure suitably safe working conditions.
– Check the power cable, plug and socket at regular intervals. If
the power cable is damaged, it must only be replaced by the
manufacturer or the local distributor who sold you the equip-
ment, or by personnel authorised to carry out maintenance
and repairs.
– Carry out the following as a minimum if the equipment is un-
used for a long period:
– set the main equipment switch to “OFF”
– remove the power plug from the socket. If the plug is not eas-
ily accessible, disconnect the omnipolar switch relating to the
socket to which the equipment is connected
– empty it completely and clean it.
– Only use original spare parts or those approved by the man-
ufacturer to prevent causing any damage to the product.
– If a qualied person detects or suspects a fault that could
compromise safe use, the equipment must be stopped immediately and may only be used again after repairs are car-
ried out.
IT
EN
FR
DE
ES
PT
RU
31
AR

1.1.2 Prohibitions
SAFETY
IT
EN
FR
DE
ES
PT
RU
AR
d
IT IS PROHIBITED TO
– DO NOT make changes to and/or attempt to repair the prod-
uct. Making changes will void the equipment Declaration of
Conformity. The user alone is liable for any damage arising
from improper use. Any repairs must be carried out by a
qualied technician.
– DO NOT leave the equipment exposed to atmospheric agents.
– DO NOT obstruct the equipment vents.
– DO NOT touch the equipment with bare feet or parts of the
body which are wet/damp. If current dispersion is detected
on contact with metal parts of the equipment, turn o the
switch, unplug the equipment and contact an authorised
dealer.
– DO NOT allow children or persons with reduced abilities or
who do not have the required experience or knowledge to
use the equipment, unless they are supervised by a qualied
person responsible for their safety.
– DO NOT allow children to play with the equipment.
– DO NOT leave the packaging material in the environment or
within reach of children as it may be a potential source of
hazard. Dispose of it as required by current legislation.
– DO NOT remove any entangled material from the equipment
when it is running, or introduce foreign material during the
work cycle.
– DO NOT use the equipment if its electrical connections are
damaged. This may cause a dangerous short-circuit.
– DO NOT use the equipment if its safety guards are not cor-
rectly positioned or in perfect condition.
– DO NOT place anything on the equipment when it is in oper-
ation or in standby.
– DO NOT use the equipment in an improper way.
– NEVER consume alcoholic beverages or medication which
could cause tiredness and/or drowsiness before and during
work.
– DO NOT force the equipment while it is running. Always use
it under suitable operating conditions.
32

SAFETY
– DO NOT remove or damage any nameplate or safety sign on
the equipment.
– NEVER pull, disconnect or twist electrical wiring which pro-
trudes from the appliance, even if the latter is isolated from
the electrical power supply.
1.2 Symbols on the equipment
Safety pictograms are applied to the equipment at points where RESIDUAL RISKS exist.
The pictograms and their meanings are listed below.
Electrical hazard: indicates that the mains power supply must be cut (or
the plug removed) before carrying out any cleaning or maintenance.
IT
33
EN
FR
DE
ES
PT
RU
AR

EQUIPMENT PRESENTATION
2 Equipment presentation
2.1 Identication
The equipment is tted with a nameplate stating the product data. Ensure the nameplate is tted. If not, inform the manufacturer and/or dealer immediately. Equipment
without a nameplate must not be used, or the manufacturer will forfeit all liability.
1
6
2
3
5
4
1 Manufacturer identication
2 CE marking of conformity
IT
3 Year of manufacture
4 Technical data
5 Serial number
EN
6 Equipment model
FR
l
WARNING
Products without a nameplate are to be considered anonymous and potentially hazardous.
DE
2.2 Working environment
The equipment can operate in locations with the following environmental conditions:
ES
– ambient temperature: from +4°C to +40°C
– humidity: max 90%
– lighting: the location must be suciently lit (see the applicable technical standards
PT
RU
in the country of use)
– altitude: max 2000 m above sea level (contact the manufacturer for use above this
altitude).
AR
34

EQUIPMENT PRESENTATION
2.3 Technical data and dimensions
Description PF15E PF25E P40E U/M
Power 0,25 (0,33) 0,37 (0,5) 0,75 (1) kW (Hp)
Electrical power supply 230/1/50Hz 230-400V/3/50Hz V/Ph/Hz
Tank capacity 1,5 2,5 4 kg
Maximum hourly output (*) 5 8 13 kg/h
Extruder die diameter Ø 50 Ø 57 mm
Equipment dimensions (LxDxH)
Net weight 16 35 48 kg
Type of installation Worktop installation
Noise level < 70 dB (A)
(*) Rough estimate, output depends on type of extrusion and our used.
253 x 472.5 x
316-450
2.4 Description
“Fresh pasta machines” are designed and manufactured to knead and extrude dough
in dierent formats for human consumption.
The equipment is for professional use and is to be installed in commercial settings
(bars, pizzerias, restaurants, etc.). No special training is required, but knowledge and
skills specic to the hospitality sector are necessary.
285 x 540 x
420-540
305 x 600 x
525-625
mm
l
WARNING
Any use other than that indicated by the manufacturer is to be
considered IMPROPER USE.
The equipment is made from selected construction materials suitable for guaranteeing maximum hygiene, oxidation resistance, considerable energy saving and safe operation.
All food contact parts are made from suitable materials.
35
IT
EN
FR
DE
ES
PT
RU
AR

EQUIPMENT PRESENTATION
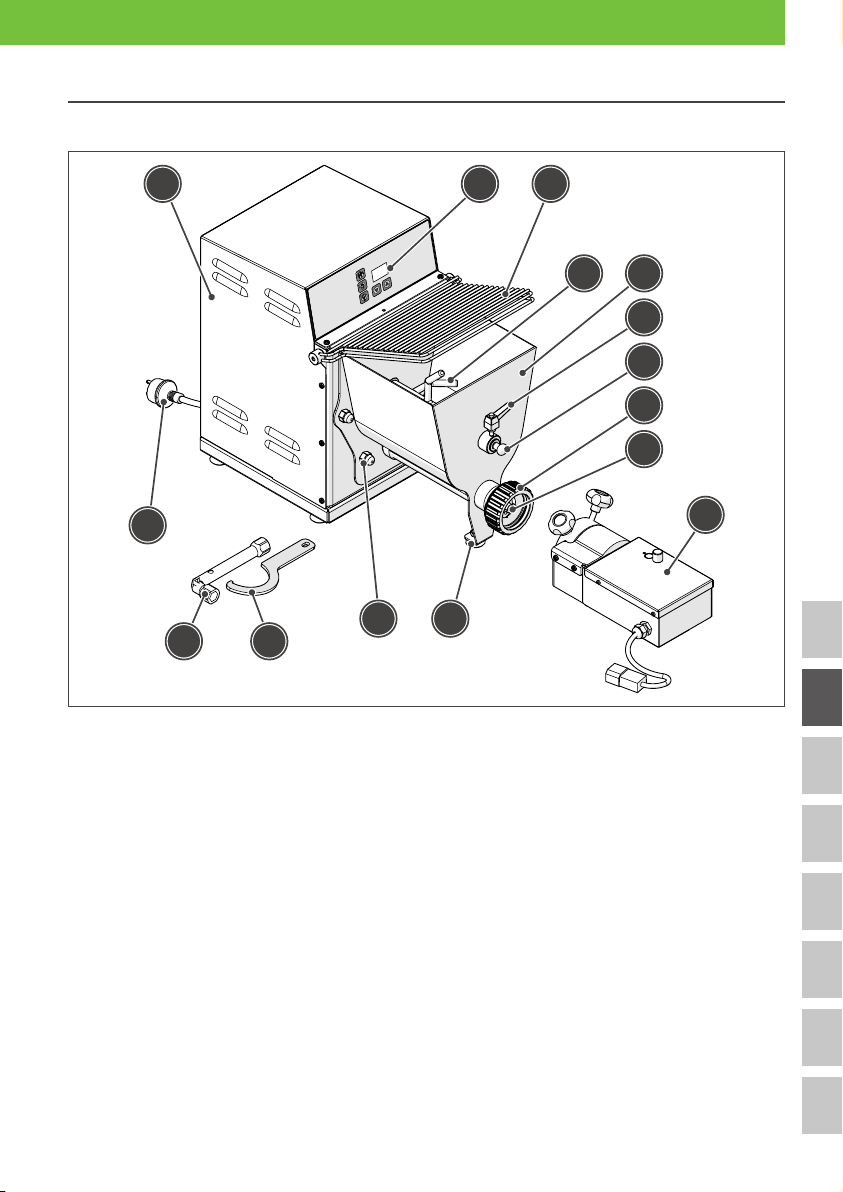
2.4.1 Main components
PF15E
1 2
3 4
5
14
IT
1213
1011
EN
1 Guard covering electrical parts
2 Tank cover tted with safety device that stops the equipment when opened
FR
3 Dough kneader
4 Tank for containing the food to be kneaded
5 Kneader locking pin
DE
6 Kneader alignment shaft
7 Ring nut for locking die
8 Food propeller
ES
9 Adjustable feet for levelling the equipment on the worktop
10 Release nuts for removing the tank
11 Function selector (knead - STOP/START cycle - extrude)
PT
12 Spanner for loosening the ring nut
13 Socket wrench for loosening the tank nuts
14 Power plug
RU
6
7
8
9
AR
36
PF25E
EQUIPMENT PRESENTATION
1 3
2
4 5
6
7
8
9
15
10
1112
1314
1 Guard covering electrical parts
2 Function selector (knead - STOP/START cycle - extrude)
3 Tank cover tted with safety device that stops the equipment when opened
4 Dough kneader
5 Tank for containing the food to be kneaded
6 Kneader locking pin
7 Kneader alignment shaft
8 Ring nut for locking die
9 Food propeller
10 Electric knife for cutting the pasta (optional)
11 Adjustable feet for levelling the equipment on the worktop
12 Release nuts for removing the tank
13 Spanner for loosening the ring nut
14 Socket wrench for loosening the tank nuts
15 Power plug
IT
EN
FR
DE
ES
PT
RU
37
AR

PF40E
EQUIPMENT PRESENTATION
1 3
2
17
IT
12141516
13
EN
1 Guard covering electrical parts
2 Function selector (knead - STOP/START cycle - extrude)
3 Tank cover tted with safety device that stops the equipment when opened
FR
4 Dough kneader
5 Tank for containing the food to be kneaded
6 Kneader locking pin
DE
7 Kneader alignment shaft
8 Ring nut for locking die
9 Food propeller
ES
10 Electric knife for cutting the pasta (optional)
11 Water circuit for cooling the extruder
12 Adjustable feet for levelling the equipment on the worktop
13 Release nuts for removing the tank
PT
14 Spanner for loosening the ring nut
15 Socket wrench for loosening the tank nuts
16 Pipes for water circuit connection
RU
17 Power plug
11
4 5
6
7
8
9
10
AR
38

USING THE EQUIPMENT
3 Using the equipment
3.1 Product receiving
The equipment is delivered in a single package, protected by a cardboard box and
stabilised with impact-resistant material to ensure it stays intact.
The package may be fastened to a pallet depending on the equipment characteristics
and to make it easier to handle.
The following material is contained in a plastic bag inside the package:
– Spanner for loosening the ring nut
– Socket wrench for loosening the tank nuts
– Pipes for water circuit connection (PF40E models only)
– Electric knife for cutting the pasta (standard for PF40E models, optional for PF25E
models).
l
The equipment is provided with the instructions and documentation summarised in
chapter “6 Attachments” on page 53.
l
WARNING
On receiving the equipment, check all components are intact.
If any parts are damaged or missing, contact your local dealer
to agree on how to proceed.
WARNING
All documentation provided with the equipment must be carefully read and stored.
3.2 Transport and handling
a
CAUTION! HAZARD
– The equipment must be transported by professionally quali-
ed personnel, taking care to avoid causing any damage to its
parts by impact or stresses caused by incorrect lifting.
– The warranty does not cover damage to the equipment
caused during transport and handling.
– Repairs or replacements of damaged parts are to be paid
for by the customer and must be carried out by personnel
authorised by the manufacturer using solely original spare
parts.
IT
EN
FR
DE
ES
PT
RU
39
AR

USING THE EQUIPMENT
– The packed product must be handled according to its charac-
teristics (weight, dimensions, etc.). If the weight and dimensions are small, the product can be handled manually. Otherwise, suitable lifting gear must be used.
– Manual lifting must be carried out by at least two people.
Once the packing is removed, the equipment must be handled following the loading
and unloading instructions stated on the packing.
d
IT IS PROHIBITED TO
leave the packaging material in the environment or within
reach of children as it may be a potential source of hazard.
Dispose of it as required by current legislation.
3.3 Initial start-up
l
IT
EN
FR
DE
ES
PT
WARNING
– The initial start-up must be carried out by authorised, ex-
pert personnel who must ensure in advance that the power
supply line complies with current laws, standards and spec-
ications in force in the country of use. Checks must be run
to ensure the electrical installation is properly earthed and
the line voltage and frequency match the data stated on the
nameplate.
– Before starting the equipment, check that the chosen loca-
tion meets the requirements stated in section “2.2 Working
environment” on page 34.
– Check that the work surface is able to withstand the
weight and characteristics of the equipment, that it is
stable, level, and can be easily cleaned to avoid the risk
of dirt build-up and contamination from foodstus. Use
the adjustable feet to level the equipment.
– Failure to follow these instructions exposes the user to the
risk of equipment failure and accidents arising from direct or
indirect contact.
RU
AR
40

USING THE EQUIPMENT
f
3.3.1 Preliminary cleaning
Clean and sanitise the equipment before use.
f
l
CAUTION! ELECTRICAL HAZARD
– Harm to property, animals and people caused by the ab-
sence of an earth plate is not covered by the warranty and all
liability will fall entirely on the operator who failed to check
the presence of the earth plate and a correctly installed and
calibrated dierential safety switch.
– If an adapter is used for the electric socket, its characteristics
must be checked to ensure they are not below those of the
equipment.
– Never use multiple sockets.
CAUTION! ELECTRICAL HAZARD
Before carrying out any cleaning, always make sure the equipment is disconnected from the power supply.
WARNING
Only use suitable cleaning products. Never use corrosive or
ammable cleaning products or products containing substances harmful to human health. Do not use substances designed
for cleaning and polishing silver, brass or other unapproved
products.
IT
EN
3.3.2 Electrical connection
f
CAUTION! ELECTRICAL HAZARD
The machine’s mains electrical connection and related preliminary test must be carried out solely by a specialised installer
with proper training and tools.
FR
DE
ES
PT
RU
AR
41

USING THE EQUIPMENT
21
To connect the equipment to the mains, simply insert the plug (1) into the prepared
socket (2).
3.3.3 Water connection (PF40E models only)
PF40E models are equipped with a liquid cooling system that prevents the union and
ring nut from overheating while extruding the pasta. This cooling system prevents the
dough inside the union from overheating and losing the right consistency.
IT
EN
OUT
IN
1
2
FR
To connect to the water supply:
– connect the water inlet pipe (1) provided to the water supply at one end and to the
DE
ES
PT
“IN” quick-t coupling on the back of the equipment
– connect the water outlet pipe (2) provided to a drain at one end and to the “OUT”
quick-t coupling on the back of the equipment
– open the tap slowly to check there are no leaks.
To connect the pipes to the quick ts, simply push the pipe all the way into the hole and
then pull it towards you to check it is secure.
To remove the pipes, simply push the movable part around the quick t all the way in
and then pull the pipe out towards you.
RU
AR
42

USING THE EQUIPMENT
l
WARNING
Install a stopcock upstream of the water inlet.
3.4 Use
a
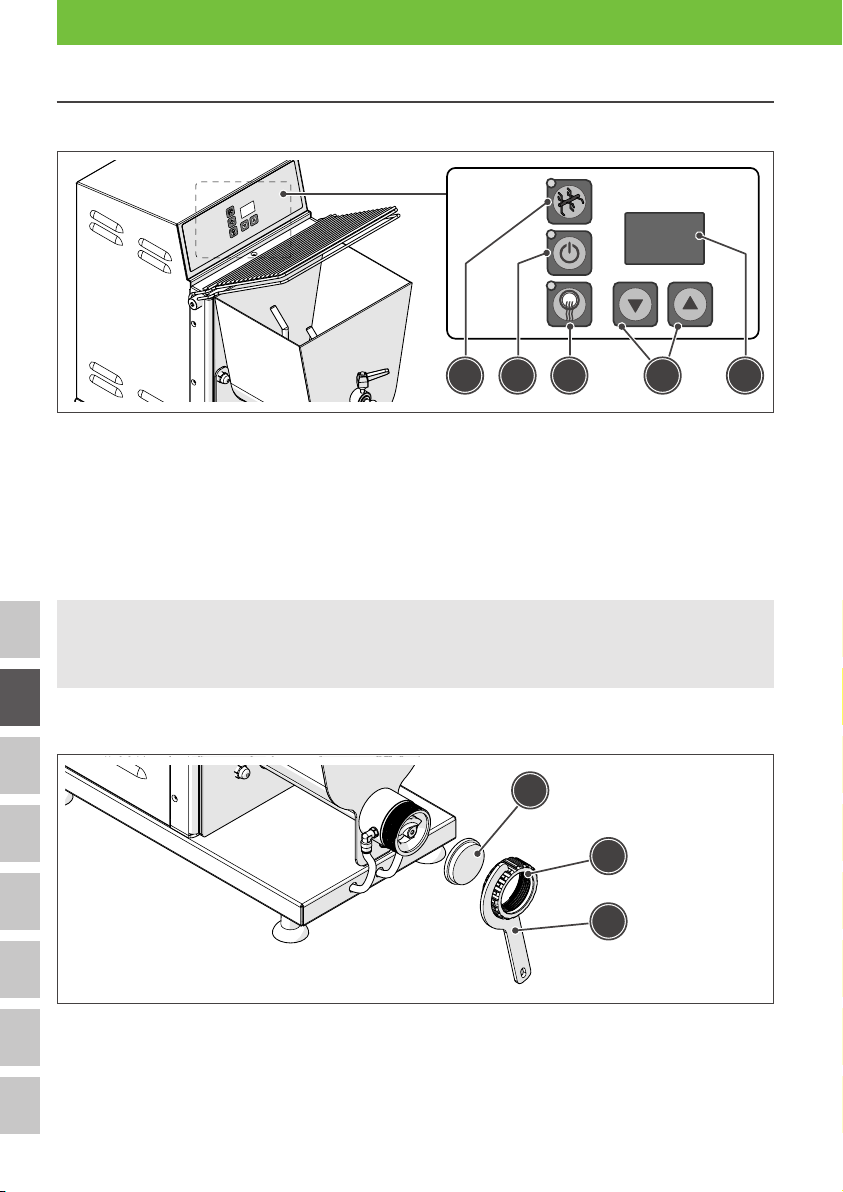
3.4.1 Description of controls
PF15E
CAUTION! HAZARD
– Before using the equipment, ensure that the top guards are
intact and the interlock is ecient. Do not attempt to remove
the interlock or tamper with it.
– Never run the equipment when it is empty.
– Do not smoke or use open ame appliances in the proximity
of the equipment.
1
2
IT
EN
3
1 Kneading cycle selector (press repeatedly to set the kneading cycle timer)
2 Start/stop cycle selector: starts or stops the kneading cycle
3 Extrusion cycle selector.
The LED at the side of selectors (1) and (3) indicates the function currently active. The
LED at the side of selector (2) indicates the power supply is on.
43
FR
DE
ES
PT
RU
AR
USING THE EQUIPMENT
PF25E - PF40E
1 524 3
1 Extrusion cycle selector
2 Start/stop cycle selector: starts or stops the kneading cycle
3 Display: displays the time during the kneading cycle
4 Kneading cycle selector
5 Set timer duration buttons.
The LED at the side of selectors (1) and (4) indicates the function currently active. The
LED at the side of selector (2) indicates the power supply is on.
IT
l
WARNING
The EXTRUSION cycle only activates after at least one minute
of kneading.
EN
3.4.2 Extruder die
FR
3
DE
ES
PT
To install or replace the extruder die:
RU
– unscrew ring nut (1) using the spanner (2) provided
– replace the extruder die (3) with the one suitable for the selected process
– reposition and tighten ring nut (1).
AR
44
1
2

USING THE EQUIPMENT
3.4.3 Electric knife (optional for PF25E - standard for PF40E)
1
3
2
67
To install the electric knife:
– check that the ring nut (2) is properly tightened
– position the knife group (1) on the ring nut (2) and secure it by tightening the two
knobs (3)
– plug the knife’s power connector (4) into the socket (5).
To activate the knife:
– check that the equipment is on and the tank cover is closed
– press the button (6)
– turn the regulator (7) to change the cutting speed (depending on the selected pro-
cess)
– press the button (6) again to stop the knife.
l
WARNING
5 4
– The knife stops whenever the equipment stops.
– If the knife is to be used for the rst time, before installing it
remove the protective lm and clean it thoroughly using suitable cleaning products. Never use corrosive or ammable
cleaning products or products containing substances harmful to human health.
IT
EN
FR
DE
ES
3.4.4 Use
The main phases for normal equipment use are listed below.
– Fit the utensils for the chosen process (for extruding see section “3.4.2 Extruder die”
on page 44, to use the knife see section “3.4.3 Electric knife (optional for PF25E - standard for PF40E)” on page 45).
– Lift the tank cover
– Add the our and then the liquid (do not add the liquid rst as it may leak out of the
extrusion holes)
– Close the tank cover
45
PT
RU
AR

USING THE EQUIPMENT
KNEADING CYCLE
– Select the kneading cycle using the selector
– For models with a DISPLAY: a ashing number shows on the display indicating the
duration of the kneading cycle in minutes. The time can be set using the designated
buttons
– Start the kneading cycle using the START CYCLE selector
– For models with a DISPLAY: the minutes remaining until the end of the cycle are
shown
– During the kneading cycle, the equipment can be stopped by using the STOP CYCLE
selector or lifting the tank cover. This can be done to correct the dough consistency
(if necessary) by adding our or liquid to obtain the granular dough needed for ex-
trusion. The kneading cycle lasts roughly 8-10 minutes. The equipment only resumes
the work cycle if the cover is lowered and the START CYCLE selector is used. Continue
until the dough reaches the right consistency
– Stop the kneading cycle using the STOP CYCLE selector
EXTRUSION CYCLE
– Select the extrusion cycle by pressing and holding the designated selector for 3 sec-
onds
– For models with a DISPLAY: two dashes (- -) appear on the display as this is a man-
ual function
– Start the extrusion cycle using the START CYCLE selector and check the desired type
of pasta exits the extrusion holes
– For models with a DISPLAY: the number of minutes since the motor started are
IT
shown on the display
– At the end of the process, stop the extrusion cycle using the STOP CYCLE selector.
EN
l
FR
WARNING
The EXTRUSION cycle only activates after at least one minute
of kneading.
DE
ES
PT
RU
AR
46

CLEANING THE EQUIPMENT
4 Cleaning the equipment
f
l
CAUTION! ELECTRICAL HAZARD
Before carrying out any cleaning, always make sure the equipment is disconnected from the power supply.
WARNING
– All cleaning operations must be carried out by qualied per-
sonnel who have read this manual and been trained in the
equipment’s operation.
– Only use suitable cleaning products. Never use corrosive or
ammable cleaning products or products containing substances harmful to human health. Do not use substances
designed for cleaning and polishing silver, brass or other unapproved products.
– Do not wash the equipment using a pressurised, spray or im-
mersion device.
– Do not use steam utensils to clean the equipment.
– Do not use sponges, abrasive pads or utensils previously
used to clean metals or metal alloys.
– Ensure the equipment is completely empty before cleaning.
– How often the equipment is cleaned depends on the use en-
vironment and the type of foodstu processed.
– Never leave the equipment dirty between processes.
IT
EN
FR
4.1 Cleaning at the end of the process
At the end of each process the equipment must be properly cleaned to remove any
food residue from its surfaces.
Cleaning can be carried out by hand or using a dishwasher.
The outer surfaces can be wiped with a soft damp cloth or sponge.
Clean the work surface and all surrounding areas thoroughly.
47
DE
ES
PT
RU
AR

CLEANING THE EQUIPMENT
4.1.1 Removing components for easier cleaning
Some components can be removed for easier cleaning.
1
4
2
3
7 6 5
IT
8 9
EN
To do this:
– lift the tank protection (1)
– loosen clamp (2) and remove shaft (3)
FR
– take out kneader (4)
– loosen and remove ring nut (5)
– remove die (6) and take out propeller (7)
– remove nuts (8) and remove tank (9).
DE
WARNING
The dies are not dishwasher safe and must be washed by hand.
ES
l
After being used, they must be soaked in hot water to prevent
the formation of dried dough.
PT
After washing the removed components by hand, they can be placed in a dishwasher
(with the exception of the dies which must only be washed by hand). If cleaning by
hand, the components can be soaked in hot water to make it easier to remove dough
RU
residue.
After cleaning, check that all components are perfectly clean and dry, then ret them
in the reverse order in which they were removed.
AR
48

CLEANING THE EQUIPMENT
l
4.1.2 Cleaning the electric knife
The electric knife can be wiped with a soft damp cloth or sponge.
f
d
WARNING
Pay attention to the top cover after removing the tank. After
removing the tank, the lid must be in the fully open and NOT
closed position.
Comply with the following warnings:
– DO NOT close the lid without the tank;
– DO NOT force or lean on the lid when closing in the absence
of the tank;
– DO NOT place anything on the lid without the tank to prevent
damage to the safety micro-switch.
– After removing the tank, check that the lid is properly opened
until the end of the stroke.
CAUTION! ELECTRICAL HAZARD
Do not put the electric knife under a direct ow of water as its
electrical parts could be damaged.
IT IS PROHIBITED TO
wash the electric knife in the dishwasher.
IT
EN
4.2 Long periods of inactivity
If the equipment is unused for a long period:
– disconnect it from the power supply
– carry out a general cleaning of the equipment
– cover the equipment with a sheet to protect it from dust and dirt.
FR
DE
ES
PT
RU
AR
49

EQUIPMENT MAINTENANCE
5 Equipment maintenance
f
CAUTION! ELECTRICAL HAZARD
Before carrying out any maintenance, always make sure the
equipment is disconnected from the power supply.
5.1 Scheduled maintenance
Regular maintenance is essential for maintaining equipment performance and guaranteeing its safe operation over time.
5.1.1 Scheduled maintenance table
Description Inspection Frequency Action
Check the working area Visual check Daily - Follow the instructions
Clean the machine Visual check Daily
Visual check
Check the safety devices
Daily, before
operation
IT
Functional
check
Daily, before
operation
EN
FR
Check the nameplates and
safety pictograms are intact
Visual check Weekly
DE
on cleaning the equipment and working area
- Carry out a visual
inspection to check the
safety and protective
devices are intact
- Run a functional check
of the safety devices,
interlock and start and
stop elements
- Carry out a visual
inspection to check the
nameplates and safety
pictograms are intact.
If they are illegible or
have come o, request
copies from the manufacturer
ES
PT
RU
AR
a
50
CAUTION! HAZARD
If the safety devices malfunction, are damaged or fail to trip,
disconnect the equipment from the power supply immediately, do not use it and contact the manufacturer.

EQUIPMENT MAINTENANCE
5.2 Extraordinary maintenance
a
CAUTION! HAZARD
– Extraordinary maintenance operations require specic skills
and must be carried out by the manufacturer, who declines
all liability in the event of failure to comply with this instruction.
– Any operations requiring the removal of mechanical parts,
protective devices, safety devices, or access to the electrical
installation or electronic boards must be carried out solely by
the manufacturer.
5.3 Possible operating faults
This section contains solutions to problems that may arise during equipment use.
a
CAUTION! HAZARD
It is important to intervene solely after having read this manual
in detail.
Fault Cause Possible solution
- Check that line voltage reaches the
workplace and that the socket works
- Check that the equipment is correctly
connected to the power supply
- Check that the power supply to the sock-
et is correct and its specications match
those stated on the product nameplate
- Check that the interlock system is closed
and operational
- Check the cover is closed correctly
- Contact the manufacturer
- Switch o and unplug the equipment
immediately. Contact the manufacturer
- If liquid accidentally spills on the electrical parts, DISCONNECT THE EQUIPMENT
FROM THE SOCKET IMMEDIATELY and
contact the manufacturer
The equipment does not start
Unusual noise during operation
Accidental spillage of water or
other liquids on electrical parts
No electrical
power supply
The tank cover
is not closed
correctly
The electric
motor or electronic board is
faulty
Malfunctioning
belt or mechanical parts
Exposure to or
contact with
liquids
IT
EN
FR
DE
ES
PT
RU
AR
51

EQUIPMENT MAINTENANCE
Fault Cause Possible solution
- Check the status of the protective devices (no cracks or deformation caused
by the fall). If the protective devices are
damaged, DO NOT USE THE EQUIPMENT
and contact the manufacturer
Violent impact Accidental fall
- Check the operation of the safety devic-
es. If the safety devices are damaged or
do not work, DO NOT USE THE EQUIP-
MENT and contact the manufacturer
- Check there are no unusual noises or
faults. In the event of unusual noise, DO
NOT USE THE EQUIPMENT and contact
the manufacturer
l
WARNING
If the equipment still does not start after implementing the
suggested solutions, contact the manufacturer.
5.4 Disposal
As with the initial start-up and maintenance operations, equipment disposal at the end
of its lifespan must also be carried out by qualied personnel.
This product is made up of various types of material: some can be recycled; others
IT
must be disposed of. Find out about the recycling or disposal systems provided by the
regulations in your area for this category of product.
EN
a
CAUTION! HAZARD
– Some product parts may contain polluting or hazardous sub-
FR
stances that, if released into the environment, could harm
the environment and human health.
DE
ES
l
– Current local regulations may impose heavy penalties in the
event of improper disposal of this product.
WARNING
As indicated by the adjacent symbol, this product
must not be disposed of with domestic waste. It
PT
must be recycled in accordance with local regulations or returned to the vendor when purchasing a
new equivalent product.
RU
AR
52

ATTACHMENTS
6 Attachments
The following attached documentation is provided with the equipment:
– Usage and maintenance instructions
– Declarations of conformity
– Any other documents for safe equipment use.
l
WARNING
All documentation provided with the equipment must be carefully read and stored.
IT
EN
FR
DE
53
ES
PT
RU
AR
 Loading...