

Page 1
E500D LPR
110512
Page 2

Bartscher GmbH
Franz-Kleine-Str. 28
D-33154 Salzkotten
Germany
Phone: +49 5258 971-0
Fax: +49 5258 971-120
Technical Support Hotline: +49 5258 971-197
www.bartscher.com
Version: 1.0
Date of preparation: 2019-08-15
Original operation manual
Page 3
Beschreibung
Fig. 1
A B C D E F R
Current
Water
Rinsing
agent
Cleaning
agent
Drain
Potential
equalization
Connection
strip
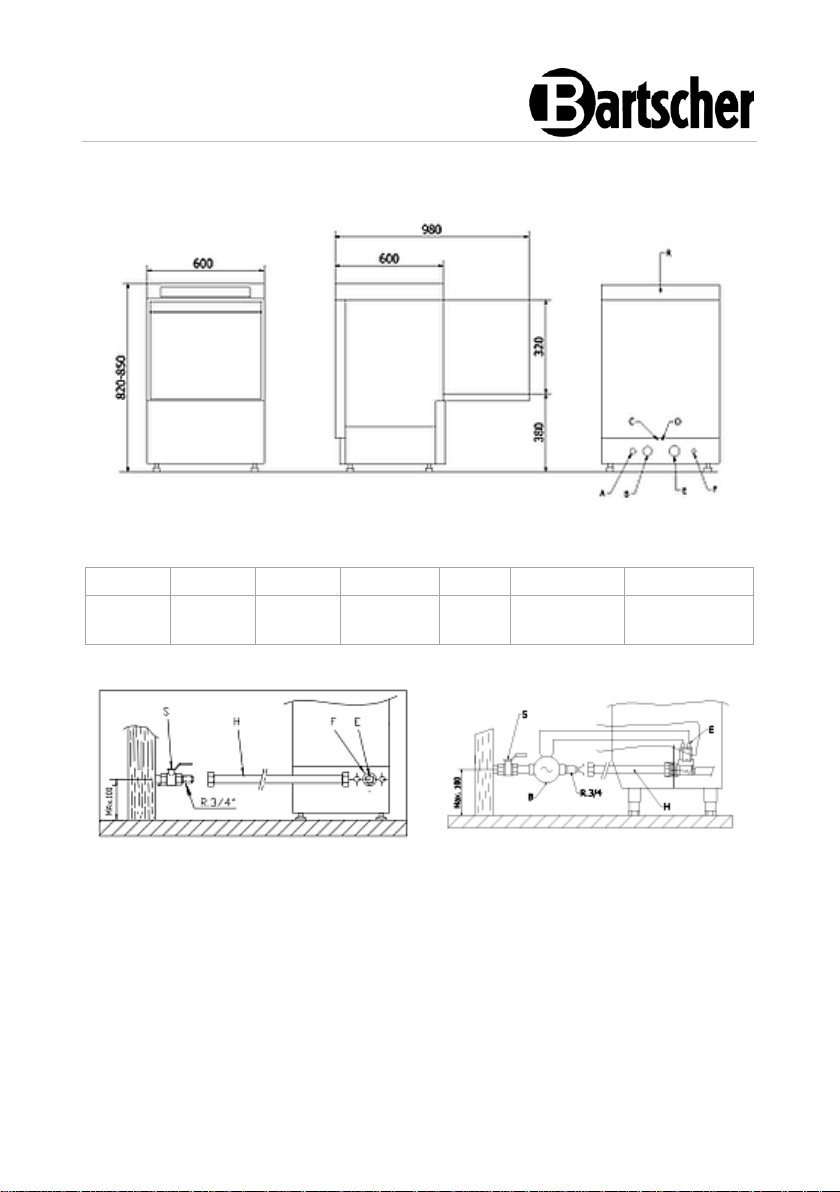
Fig. 2
Fig. 3
Dimensions / supply lines (mm)
Page 4
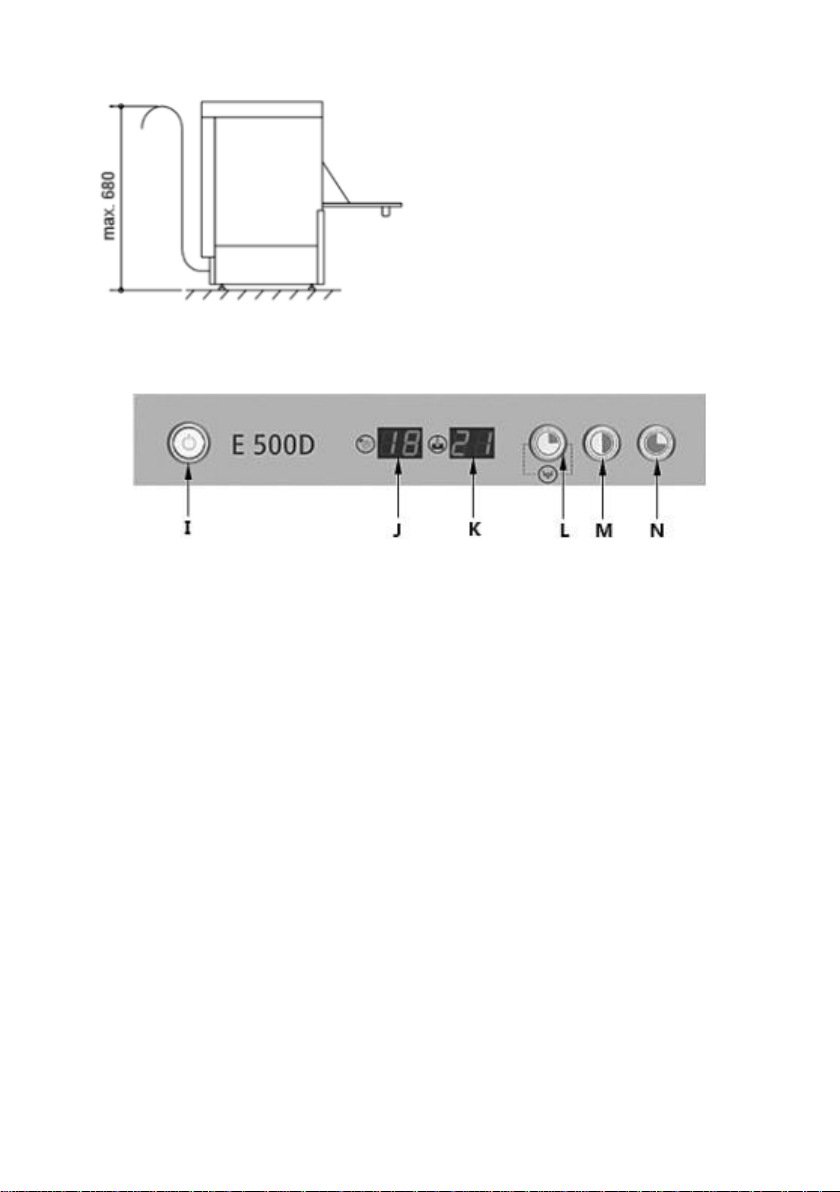
Fig. 4
Fig. 5
EN
Page 5

1 Safety ............................................................................................................ 2
1.1 Explanation of signal words ..................................................................... 2
1.2 Safety instructions.................................................................................... 3
1.3 Intended use ............................................................................................ 5
1.4 Unintended Use ....................................................................................... 5
2 General information ....................................................................................... 6
2.1 Liability and warranty ................................ ............................................... 6
2.2 Copyright protection ................................................................................. 6
2.3 Declaration of conformity ......................................................................... 6
3 Transport, packaging and storage ................................................................. 7
3.1 Delivery Check ......................................................................................... 7
3.2 Packaging ................................................................................................ 7
3.3 Storage .................................................................................................... 7
4 Technical data ................................................................ ............................... 8
4.1 List of components of the appliance......................................................... 8
4.2 Technical specifications ........................................................................... 9
4.3 Functions of the appliance ..................................................................... 10
5 Installation Instructions ................................................................................ 11
5.1 Unpacking .............................................................................................. 11
5.2 Positioning ............................................................................................. 12
5.3 Electrical Connection ................................ ............................................. 12
5.4 Water Connection .................................................................................. 13
5.5 Discharge Pump .................................................................................... 15
5.6 Cleaning Agent Dosing Pump ................................................................ 15
5.7 Rinsing Agent Dosing Pump .................................................................. 15
6 Operation and Maintenance Instructions ..................................................... 16
6.1 Operation ............................................................................................... 16
6.2 Cleaning and Maintenance .................................................................... 20
6.3 Indications and Tips ............................................................................... 22
7 Possible Malfunctions .................................................................................. 23
8 Disposal ....................................................................................................... 28
110512 1 / 32
Page 6

Safety
EN
Read this instruction manual before using and keep it available
at all times!
DANGER!
The signal word DANGER warns against hazards that lead to severe
injuries or death if the hazards are not avoided.
Diese Bedienungsanleitung beschreibt di e Installation, Bedienung und Wartung d es Geräts und gilt als wichtige Inform ationsquelle und Nachschlagewer k. Die Kenntnis aller enthaltenen Sicherheits hinweise und Handlungsanweisungen schafft die Voraussetzung für das sich ere und sachgerechte Arbeiten mit d em Gerät. Darüber hinaus müssen die für den Einsatzbereich des Geräts gelt enden örtlichen Unfallverhütungsvorsc hriften und allgemeinen Sicherheitsb estimmungen eingehalten werden. Dies e Bedienungsanleitung ist Bestandteil d es Produkts und muss in unmittelbarer N ähe des Geräts für das In¬stall ations-, Bedienungs-, Wartungs- und R einigungspersonal jederzeit zugängli ch auf¬bewahrt werden. Wenn das Gerät an eine dritte Person
weitergegeben wird, muss die Bedienungsa nleitung mit ausgehändigt werden.
This instruction manual contains information about installation, operation and
maintenance of the appliance and constitutes an important source of information
and reference guide. The knowledge of all operational and safety instructions
included in this manual is a prerequisite for safe and proper handling of the
appliance. Additionally, accident prevention, occupational health and safety, and
legal regulations in force in the area the appliance is used apply.
Before you start using the appliance, especially before turning it on, read this
instruction manual in order to avoid personal injuries and property damages.
Improper use may cause damage.
This instruction manual forms and integral part of the product and must be stored in
an immediate vicinity of the appliance and be available at all times. The instruction
manual should be transferred together with the appliance.
1 Safety
This appliance has been manufactured in accordance with technical standards
currently in force. However, the appliance may be a source of hazards if used
improperly or contrary to its intended purpose. All persons using the appliance must
consider information included in this instruction manual and observe safety
instructions.
1.1 Explanation of signal words
Important safety instructions and warning information are indicated in this
instruction manual with appropriate signal words. You must strictly follow the
instructions, to prevent accidents, personal injuries and property damages.
2 / 32 110512
Page 7
Safety
EN
WARNING!
The signal word WARNING warns against hazards that may lead to
moderate or severe injuries or death if the hazards are not avoided.
CAUTION!
The signal word CAUTION warns against hazards that may lead to
light or moderate injuries if the hazards are not avoided.
IMPORTANT!
The signal word IMPORTANT indicates possible property damages,
which may occur if safety instructions are not observed.
NOTE!
The symbol NOTE indicates subsequent information and guidelines
for the user on usage of the appliance.
, die
1.2 Safety instructions
Electrical current
• Too high a mains voltage or incorrect installation may cause electric shock.
• The appliance may be connected only if data on the rating plate correspond with
the mains voltage.
• To avoid short-circuit, the appliance should be kept dry.
• If there are malfunctions during operation, disconnect the appliance from the
power supply.
• Do not touch the appliance’s plug with wet hands.
• Never take hold of the appliance if it has fallen into water. Immediately
disconnect the appliance from the power supply.
• Any repairs or housing opening may be carried out by professionals and
relevant workshops only.
• Do not transport the appliance, holding it by the power cord.
• Do not allow the power cord to come into contact with heat sources or sharp
edges.
• Do not bend, pinch nor knot the power cord.
110512 3 / 32
Page 8

Safety
EN
• Always completely unwind the power cord.
• Never place the appliance or other objects on the power cord.
• Always take hold of the plug to disconnect the appliance from the power supply.
Operating Personnel
• The appliance may only be operated by a qualified personnel and trained
specialist personnel.
Improper Use
• Unintended or prohibited use may cause damage to the appliance.
• The appliance may only be used when its technical condition is flawless and
allows for safe operation.
• The appliance may only be used when all connections are executed according
to rules of law in force.
• The appliance may only be used when it is clean.
• Use only original spare parts. Never attempt to repair the appliance on your
own.
• Do not introduce any changes in the appliance nor modify it.
4 / 32 110512
Page 9

Safety
EN
1.3 Intended use
As described below, every use of the appliance for a purpose differing and/or
diverging from its intended standard use, is prohibited and considered to be an
unintended use.
The following is an intended use:
– Washing dishes, glasses, pots, pans, etc.
The appliance is intended for professional use only.
1.4 Unintended Use
An unintended use may lead to personal injuries or property damages caused by
hazardous voltage, fire or high temperature. The appliance may only be used to
perform tasks described in this instruction manual.
The following is an unintended use:
– Washing other unsuitable objects.
110512 5 / 32
Page 10

General information
EN
2 General information
2.1 Liability and warranty
All information and instructions in this instruction manual account for legal
regulations in force, current level of technical engineering knowledge as well as our
expertise and experience, developed over the years. If special models or additional
options are ordered, or state-of-the-art technical solutions were implemented, the
actual scope of delivery of the appliance may, in some circumstances, differ from
descriptions and numerous drawings in this instruction manual.
The manufacturer is not liable for any damages nor faults stemming from:
– failure to observe instructions,
– unintended use,
– technical alterations introduced by the user,
– usage of unapproved spare parts.
We reserve the right to introduce technical modifications to the product, intended for
improvement of the appliance and its performance.
2.2 Copyright protection
This instruction manual, and texts, drawings and images included in it, as well as its
other components are copyright protected. It is prohibited to reproduce this
instruction manual (including its excerpts), in any form and by any means, and to
use and/or transfer its content to third parties without manufacturer’s written
permission. Violation of the above results in obligation to pay compensation. We
reserve the right to claim further damages.
2.3 Declaration of conformity
The appliance meets the currently applicable standards and guidelines of the
European Union. We confirm the above in the EC Declaration of Conformity. We
may provide relevant Declaration of Conformity upon request.
6 / 32 110512
Page 11

Transport, packaging and storage
EN
3 Transport, packaging and storage
3.1 Delivery Check
Immediately upon reception, check the delivery for completeness and possible
shipping damage. In the case of visible transport damage refuse to accept the
appliance or accept it conditionally. Mark and note the scope of damage in shipping
documents/consignment list of the shipping company and lodge a complaint.
Concealed damage must be reported immediately upon its discovery, as
compensation claims may only be filed within applicable time limits.
If you find that parts or accessories missing, please contact our Customer Service
Department.
3.2 Packaging
Do not dispose of the appliance cardboard box. It may be used to store the
appliance when relocating or when shipping the appliance to our service point in the
case of any damages.
The packaging and its elements are made of recyclable materials. Particularly,
these are: plastic films and bags, cardboard box.
When disposing of the packaging, observe applicable domestic regulations.
Recyclable packaging materials should be recycled.
3.3 Storage
Leave the packaging closed until installation of the appliance; observe external
indications concerning method of placing and storage. Store the packaging in the
following conditions only:
– in closed rooms;
– in dry and dust-free surrounding;
– away from aggressive agents;
– in a location protected against sunlight;
– in a location protected against mechanical shocks.
In the case of extended storage (over three months), make sure you check the
condition of the packaging and the parts regularly. If needed, replace the packaging
with a new one.
110512 7 / 32
Page 12

Technical data
EN
Fig. 6
4 Technical data
4.1 List of components of the appliance
8 / 32 110512
Page 13

Technical data
EN
Description for Fig. 6
1. Control panel
2. Wash-tank
3. Dishwasher basket
4. Housing
5. Height-adjustable feet (4 pcs.)
6. Handle
7. Appliance door
8. Appliance door lock
9. Upper rinse arm
10. Upper wash arm
11. Lower rinse arm
12. Lower wash arm
13. Valve
14. Wash baskets guide rail
Name:
Dishwasher E500D LPR
Art. No.:
110512
Material:
Stainless steel
Basket dimensions (W x D x H), in mm:
500 x 500
Max. glass height, in mm:
280
Run time, in seconds:
60 / 90 / 180
Max. output / hour, baskets:
60
Number of wash programs:
3
Tank volume, in litres:
25
Water consumption at 2 bars, in litres:
2,7
Water pressure, in bar:
2 - 4
Water supply:
G 3/4
Water outlet, ø in mm:
20
Tank heating, in kW:
2,8
Boiler heating, in kW:
2,8
Power supply:
3.4 kW / 230 V / 250 Hz
Dimensions (W x D x H) in mm:
735 x 655 x 1000
Weight in kg:
71
4.2 Technical specifications
E500D LPR
We reserve the right to implement technical modifications!
110512 9 / 32
Page 14

Technical data
EN
Version / Characteristics
• Discharge pump
• Cleaning agent dosing pump
• Rinsing agent dosing pump
• Booster pump
• Double-walled door
• Safety thermostat
• Door contact switch
• Appliance connection: ready to plug in
• ON/OFF switch
• Indicator light: ON/OFF, heating
• TERMOSTOP electronic system
• Boiler and tank temperature indicator
• Max. water intake temperature: 60°C
• Check valve
• The set includes: 1 glasses basket, 1 cutlery basket, 1 water supply hose
4.3 Functions of the appliance
The dishwasher is intended for washing suitable dishes, kitchen pots, pans, cutlery,
etc.
The TERMOSTOP electronic system provides for perfect temperature of additional
rinsing.
10 / 32 110512
Page 15

Installation Instructions
EN
CAUTION!
Incorrect installation, positioning, operation, maintenance or misuse of
the appliance may lead to personal injury or property damage.
Positioning and installation, as well as repairs or fitting may be performed
by authorised technical service only and in compliance with the applicable
national law.
CAUTION!
Choking hazard!
Prevent children from accessing packaging materials, for instance: plastic
bags and EPS.
5 Installation Instructions
5.1 Unpacking
• The appliance may be moved with the use of a fork lift or similar equipment only
to avoid damaging the appliance's structure. First, deliver the appliance to the
final installation location and unpack it there.
• Unpack the appliance, remove all external and internal packaging elements and
shipment safeguards.
• If the appliance is covered with a protective film, remove it. Remove the film
slowly, so no glue residues are left. Remove any glue residues with the use of a
suitable solvent.
• Be careful not to damage the rating plate and warning labels affixed to the
appliance.
110512 11 / 32
Page 16

Installation Instructions
EN
ATTENTION!
Before the appliance’s installation, carefully check the conditions of
the location in which the appliance is to be set to exclude any
subsequent damages which may appear during operation.
• The appliance is equipped with heightadjustable feet.
• To level the appliance, screw the feet out to
the required height.
• Correct levelling is necessary to ensure
optimum performance of the appliance.
Fig. 7
5.2 Positioning
• Never place the appliance in humid or wet environment.
• Place the appliance in a way making the connections easily accessible, so that
they may be quickly disconnected if such a need arises.
• The appliance should be placed on surfaces that are:
– even, with sufficient bearing capacity, resistant to water, dry and resistant
to high temperatures;
– sufficiently large, and thus enabling usage of the appliance with no
problems;
– easily accessible;
– well ventilated.
• The appliance should be installed only in a room, in which ambient temperature
falls in the range of 5°C – 40°C.
5.3 Electrical Connection
• Verify if the technical specification of the appliance (see the rating plate)
correspond to the local electricity grid.
• Connect the appliance to a single, properly grounded mains socket with
protective contact. Do not connect the appliance to a multi-socket.
• The power cord should be laid in a way preventing anyone from threading on it
or tripping against it.
• The appliance is ready for installation and equipped with a power cord of 1.3 m
in length with a plug.
12 / 32 110512
Page 17

Installation Instructions
EN
Water
temperature (T):
max. 60 °C
Total water
hardness
5 °fH (French hardness
degree scale)
pH value:
6.5–7.5
7 °eH (English hardness
degree scale)
Physical
contamination:
Ø < 0.08 mm
9 °dH (German hardness
degree scale)
Chlorides:
max. 150 mg/l
Conductivity:
400 μS/cm
CI:
0.2–0.5 mg/l
• A multipolar switch with at least 3 mm opening should be connected near the
device, and should be easily accessible. This device is designed for switching
the appliance off in the case of installation, repair, cleaning or maintenance work
conducted on the appliance. This switch must be equipped with fuses adjusted
for the rated voltage of the appliance. A properly selected magnetic thermal
switch may be an alternative to the above mentioned switch.
• The appliance must be properly connected to the equipotent bonding circuit; see
F, Fig. 1.
The manufacturer accepts no liability for any possible bodily injuries nor
property damages relating to the appliance that stem from non-compliance
with instructions and incorrect installation.
5.4 Water Connection
Use only hoses supplied with the appliance (never use second-hand hoses).
Before connecting the appliance to the water supply system, the analysis of water
quality should be performed. Manufacturer recommends the following parameters of
water quality:
If the water hardness exceeds 9 °dH (German hardness degree scale), the use of
water softener is required.
Furthermore, when checking the water quality, the pressure of water supply system
must be taken into account. This parameter determines the correct operation of the
appliance.
110512 13 / 32
Page 18

Installation Instructions
EN
Water
pressure
MIN.
MAX.
bar
kPa
kg/cm2
psi
bar
kPa
kg/cm2
psi 2 200
2.03
29 4 400
4.07
58.01
S
Shut-off valve
H
Water hose
E
Solenoid valve
B
Booster pump
F
Filter
Cold water
Hot water
5°C – 25°C / 41°F – 95°F
40°C – 60°C / 122°F – 140°F
Water pressure should correspond to the following values:
If the water pressure is above the recommended value, it is required to install the
reducing valve between the water supply system and the water connection of the
appliance (Fig. 2 at the beginning of the operation manual).
Fig. 2. Direct connection of the hose to the water supply installation.
If the water pressure is below the recommended value, it is required to install a
booster pump between the water supply system and the water connection of the
appliance (Fig. 3).
Fig. 3 Connection of the booster pump
The appliance is equipped with the booster pump.
To properly install the appliance, please follow the instructions below:
– water connection must be equipped with a shut-off valve to block the
water supply;
– pressure in the water supply system must be within the range of
recommended values;
– to optimise operation, the recommended water intake temperature
should fall within the range of values given in table below:
– when using warm water, the water temperature may not exceed the
values of 60°C / 140°F;
– the appliance must be equipped with a threaded connection (¾").
14 / 32 110512
Page 19

Installation Instructions
EN
5.5 Discharge Pump
The appliance is equipped with the discharge pump that, when properly set,
provides for discharging water after washing.
In such a case, the height of 680 mm cannot be exceeded (Fig. 1, Fig. 4).
Fig. 4 Setting of the drain height through the drain pump.
5.6 Cleaning Agent Dosing Pump
The appliance is equipped with the cleaning agent dosing pump. Thanks to this
dosing device the appropriate quantity of cleaning agent is added to the wash-tank
each time.
Located at the rear of the appliance, the hose with marking for cleaning agent (D,
Fig. 1) should be introduced to the tank with cleaning agent.
Operation: the cleaning agent dosing pump is activated when the appliance
collects water during washing or filling process.
Setting: the quantity of cleaning agent should be set during the installation at the
cleaning agent dosing pump, so that the user may use all washing features in an
optimum way from the very beginning.
The hose in the cleaning agent dosing pump must be replaced annually.
ATTENTION!
Use ONLY liquid leaning agent, designed for professional use, which is
suitable for using in high temperatures and shows little foaming
properties.
KlarsKl
5.7 Rinsing Agent Dosing Pump
The appliance is equipped with the rinsing agent dosing pump. Thanks to this
dosing device, the appropriate quantity of rinsing agent is added to the wash-tank
each time.
Located at the rear of the appliance, the hose with marking for rinsing agent (C, Fig.
1) should be introduced to the tank with rinsing agent.
The hoses are transparent, thus the introduced chemical compounds are always
visible.
Operation: Thanks to this dosing device, the liquid rinsing agent is supplied
whenever a drop in pressure is detected during rinsing. This happens when the
filling valve is closed. As an outcome, underpressure is generated, which causes
the liquid to be sucked by the rinsing agent dosing device.
Setting: this dosing device should be set up during the installation, because only
this way the user may use all washing features in an optimum way from the very
110512 15 / 32
Page 20

Operation and Maintenance Instructions
EN
CAUTION!
Incorrect installation, positioning, operation, maintenance or misuse of
the appliance may lead to personal injury or property damage.
Positioning and installation, as well as repairs or fitting may be performed
by authorised technical service only and in compliance with the applicable
national law.
beginning. The setting must be properly adjusted depending on the selected rinsing
agent and hardness of the available water.
NOTE:
A selection of the rinsing agent and setting of the rinsing agent dosing
pump should be ordered with a qualified technician who has experience
with chemical products, to achieve the most efficient washing effects.
6 Operation and Maintenance Instructions
6.1 Operation
• Przed pierwszym użyciem wyczyścić urzą dzenie i wypos ażenie zgodnie z e wskazówka mi zawartymi w punkcie 6 „Czyszczenie” . Make sure n o water enters electric installati on and connectio n box. Nastę pnie dokładnie os uszyć urządze nie i element y wyposażenia .
• Setzen Sie die Boden-Abdeckung in das Becken ein. The cover acts as a spac er between the heating element and left- over food tray.
• Carefully insert the connection box with th e heating element at the back edge of th e appliance. A pin in bottom part of th e connection box must enter a hole i n the main appliance. This way the con nection box is properly mounted.
Preparing the Appliance
1. Before use, clean the appliance, observing instructions in section 6 “Cleaning”.
2. Dry the appliance thoroughly.
16 / 32 110512
Page 21

Operation and Maintenance Instructions
EN
I
ON/OFF button
L
Washing cycle 1 (60 s) / draining
button
J
Boiler temperature indicator
M
Washing cycle 2 (90 s) button
K
Tank temperature indicator
N
Washing cycle 3 (180 s) button
Functions of Operating Elements / Indicators (Fig. 5)
Starting the Appliance
Before switching the appliance on make sure that the following conditions are met:
– the main switch is off;
– water shut-off valve is open;
– water supply is ensured;
– all filters are installed in their respective locations;
– overflow is in the right location;
– device door is closed;
– ON/OFF button must be pressed for 1.5 sec.
Filling and Heating Process
Filling process begins after starting the appliance. First the rinsing boiler is filled in,
and then the wash-tank. Filling process may take up to a few minutes. As soon as
the wash-tank is filled in, the heating process of boiler starts. When the boiler is
heated up, the heating process of wash-tank starts.
Although it would be now possible to start the washing process, the manufacturer
does not recommend this, because the water inside the appliance has not reached
the optimum temperature yet. When the appliance reaches temperature ideal for
proper washing of dishes, it will be displayed in respective digital displays (J + K).
The appliance must reach proper temperatures: 82°C – 90°C in boiler, and 57°C –
62°C in tank, respectively.
110512 17 / 32
Page 22

Operation and Maintenance Instructions
EN
It is recommended that the water in the appliance should be changed every 40/50
washing cycles or twice a day.
NOTE: To start the filling process, the appliance door must be fully closed.
Due to safety reasons, the appliance cannot be filled in with door is open.
The device is equipped with a safety thermostat inside the boiler and another
safety thermostat inside the wash-tank. In the case of failure of any of the main
thermostats, the heating process is stopped.
Preparation of Dishes
1. Dishes to be washed must be prepared in the following way:
– Before placing the dishes in the basket, remove larger food left-overs
from the dishes.
– Wash glasses first.
– Always place glasses face down.
– Put the plates in plate holders in the dishwasher basket.
– Put the cutlery in the cutlery basket with handles facing down. Cutlery of
various sized should be mixed.
– Insert the cutlery baskets to basic dishwasher baskets.
2. When filling the dishwasher baskets pay attention to the following:
Max. glass height: 280 mm, max. plate height: 320 mm
Washing Process Selection
1. Before starting the washing process, slide the appropriate basket with dishes
into the appliance.
2. Close the appliance door.
3. Select the required washing program, pressing the right button (J, K or L).
Washing cycle will start automatically.
TERMOSTOP Function
The appliance is equipped with TERMOSTOP electronic system. This function
provides for constant rinsing at 85°C. This means that the dishwasher rinses until
the boiler reaches ideal temperature. Only then does the washing cycle start.
NOTE: If the water temperature in water supply system is below 50°C,
there may be a drop in rated values, provided the appliance is equipped
with this device.
18 / 32 110512
Page 23

Operation and Maintenance Instructions
EN
Interrupting and Finishing the Washing Process
The washing process may be interrupted in one of the following two ways:
– the appliance is switched off → The washing process is completely
interrupted.
– the appliance door is opened → Then the door is closed again during the
cycle.
After finishing the washing process, the basket with dishes may be removed.
Dishes are dried by evaporation. Remove dishes from the basket only with clean
hands. Makes sure not to scald your hands, because the dishes are still hot.
Draining the Appliance with the Discharge Pump
With this method, the discharge hose must always be connected to a drain trap to
prevent foul scents.
Proceed in the following way:
– Remove the overflow valve.
– Open the appliance door.
– Press the J button for 3 seconds.
Draining cycle will start automatically.
– When the draining cycle is finished, switch the appliance off with the
ON/OFF button.
Switching the Appliance Off
To switch the dishwasher off, press the ON/OFF button and hold it for 1.5 sec.
The manufacturer does not recommend to switch the appliance off during the
washing process, because the dishes inside the dishwasher will not be washed
properly.
110512 19 / 32
Page 24

Operation and Maintenance Instructions
EN
6.2 Cleaning and Maintenance
• Before cleaning, disconnect the appliance from the power supply.
• Do not use any sharp or pointed, nor metal implements (knife, fork, etc.). Sharp
or pointed implements may damage the appliance, and when in contact with live
parts, they may cause electric shock.
• For cleaning, do not use any scouring agents that contain solvents nor corrosive
cleaning agents. They may damage the surface.
Daily Cleaning and Maintenance
At the end of the working day, thoroughly clean filters, wash arms, rinse arms, as
well as other accessories. Thorough cleaning is the most important condition for
maintaining long service life of the appliance. Proper cleaning and disinfection of
the appliance is the prerequisite for effective washing of dishes.
NOTE: To ensure that the draining process proceeds correctly with the
use of a discharge pump, the drain hose must be located at the
appropriate height (not higher than 680 mm).
The following should be performed regularly:
– At the end of the working day, remove all food left-overs from the
appliance.
– Never use abrasive, corrosive or caustic cleaning agents, or solvents and
cleaning agents based on chlorine or petrol derivatives.
– Do not use pressurized water for washing the appliance.
– Check the wash/rinse arms to make sure they rotate correctly.
– Before starting the washing process, always check the salt, rinsing agent
and cleaning agent levels.
20 / 32 110512
Page 25

Operation and Maintenance Instructions
EN
Technical Service Maintenance
Twice a year, a technical service should carry out the following inspections:
– water filters cleaning;
– descaling of heating resistors;
– checking the condition of gaskets;
– checking the condition of all other components;
– setting of dosing devices;
– checking of electrical connectors;
– checking of power cord.
ATTENTION!
To prevent hazards, a defective power cord may be replaced only by the
qualified electrician while observing all safety measures.
Descaling
To take advantage of all the features offered by the dishwasher, carefully read the
following indications and tips on descaling and follow them.
– add appropriate quantity of the descaling agent to the wash-tank (per 25
litres of water) and run 1–2 washing cycles;
– drain the device (section 6.1);
– refill the wash-tank with water, and then run 2–3 washing cycles without
any dishes;
– finally, pump out all the water to remove all residues of the descaling
agent.
110512 21 / 32
Page 26

Operation and Maintenance Instructions
EN
6.3 Indications and Tips
Dishwasher Cleaning Agent and Rinsing Agent
ATTENTION!
Usage of incorrect dishwasher cleaning agent and rinsing agent may
damage the appliance.
Use only special cleaning agents designed for dishwashers intended for
professional use.
Do not use any foaming dishwasher cleaning agents.
Do not use any dishwasher washing agents, which are indented for household
use only.
We recommend Bartscher F12kg dishwasher washing agent (art. No. 173070) or
F12kgXTRA dishwasher washing agent (art. No. 173071) and Bartscher F10kg
rinsing agent (art. No. 173072).
When the type of rinsing or washing agent it is necessary to introduce new settings.
The settings may only be introduced by qualified technical personnel.
CAUTION!
When in contact with chemical substances, follow suitable safety
instructions.
When in contact with chemical substances always wear safety clothing,
safety gloves and safety glasses.
Do not mix cleaning agents with one another.
Hygiene Regulations
• Do not touch clean dishes with dirty or greasy hands to avoid soiling dishes.
• For final drying of dishes use clean, sterile towels.
• We recommend using the appliance always after reaching the optimum
temperature to ensure that washing also produces optimum results.
• Drain the wash-tank at least twice a day or every 40/50 washing cycles.
22 / 32 110512
Page 27

Possible Malfunctions
EN
Malfunction
Possible Cause
Solution
The appliance
cannot be switched
on.
No voltage in the mains.
Check the thermal
magnetic switch for
disconnection.
Melted fuses.
Contact technical service
to determine the cause.
The appliance is not
switched on through the
main switch.
Close the main switch.
Optimum Results
To obtain optimum results during washing dishes, we recommend to proceed the
following way:
– Wash dishes only when the appliance is ready for work.
– Dosing devices must always be properly set.
– Always keep the dishwasher properly clean.
Periods of Non-Operation
If the appliance is not used for a longer period (holidays, interruptions at work etc.),
follow the instructions below:
– Fully drain the appliance, including the boiler.
– Thoroughly clean the appliance.
– Leave the dishwasher door open.
– Close the water supply valve.
– Switch the main power switch off.
– If there is a risk of frost, order the protection of the appliance against frost
to proper technical service.
7 Possible Malfunctions
Mögliche
The table below contains descriptions of possible causes and solutions to
malfunctions or errors during operation of the appliance. When malfunction cannot
be removed, contact the technical service.
110512 23 / 32
Page 28

Possible Malfunctions
EN
Malfunction
Possible Cause
Solution
The appliance does
not collect water.
Water supply valve closed.
Open the water supply
valve.
Rinse arm nozzles clogged.
Clean the nozzles and
check the rinse arms for
limestone.
Solenoid valve filter clogged.
Contact technical service
to order cleaning.
Rinse pump failure.
Contact technical service
to order replacement.
Pressure switch error.
Contact technical service
to order replacement.
Incorrectly closed appliance
door.
Close the appliance door
correctly.
Washing results are
not satisfactory.
Wash arms are clogged.
Thoroughly clean the wash
arms.
Not enough washing agent
added.
Contact technical service
to request setting of the
rinsing agent dosing pump.
Filters are dirty.
Thoroughly clean the
filters.
Foaming.
Inappropriate cleaning
agent. Contact technical
service to select correct
cleaning agent.
Too much rinsing agent.
Contact technical service
to request change of
setting of the rinsing agent
dosing pump.
24 / 32 110512
Page 29

Possible Malfunctions
EN
Malfunction
Possible Cause
Solution
Washing results are
not satisfactory.
Temperature in the washtank is below 50°C/122°F.
Thermostat failure or
thermostat is not set
correctly. Contact technical
service to order repair.
Washing cycle is too short for
the heavily soiled dishes.
Select a longer washing
cycle.
Washing water is very dirty.
Drain the wash-tank and fill
in with clean water.
Dishes, pots, pans,
etc. are not properly
dried.
No rinsing agent.
Add the liquid rinsing agent
to the tank.
Not enough liquid rinsing
agent.
Contact technical service
to order new setting of
dosing devices.
Dishes, pots, pans,
etc. are not properly
dried.
Dishes remained too long in
the dishwasher.
Remove the dishes right
after the cleaning cycle and
remain to dry in open air.
Temperature of the rinsing
agent is below 80°C/176°F.
Contact technical service
to fix the problem.
Streaks and spots on
dishes.
Too much rinsing agent.
Contact technical service
to repair the rinsing agent
dosing pump.
Water too hard.
Check water hardness
degree.
110512 25 / 32
Page 30

Possible Malfunctions
EN
Malfunction
Possible Cause
Solution
Streaks and spots on
dishes.
Salt container is almost
empty.
Fill up the salt container (if
it is installed).
Salt left-overs remain in the
wash-tank.
Be carful when filling the
salt container, not to spill
salt in the wash-tank.
The appliance stops
during the washing
and starts refilling
water.
Clogged pressure switch.
Drain and thoroughly clean
the wash-tank.
Pressure switch malfunction.
Drain and thoroughly clean
the wash-tank.
Overflow incorrectly installed.
Install the overflow
correctly.
The washing cycle
does not start.
Incorrectly closed appliance
door.
Close the appliance door
correctly. If the appliance
door cannot be closed,
contact technical service to
order setting of tensioning
devices.
Door micro switch
malfunction.
Contact technical service
to order replacement.
Draining process is
not successfully
completed.
The appliance is not set
correctly.
Set the appliance correctly.
Pressure switch malfunction.
Contact technical service
to order replacement.
26 / 32 110512
Page 31

Possible Malfunctions
EN
Error
Message
Description
E1
The LED indicator light of the
ON/OFF button lights up for 0.5 sec.,
and then goes off for 2 seconds. The
entire process is repeated numerous
times.
Device door is open.
E2
The LED indicator light of the
ON/OFF button lights up twice for 0.5
sec., and then goes off for 2 seconds.
The entire process is repeated
numerous times.
The water level is wrong.
Time-out of the estimated
filling time.
E3
The LED indicator light of the
ON/OFF button lights up thrice for 0.5
sec., and then goes off for 2 seconds.
The entire process is repeated
numerous times.
The appliance was drained
incorrectly. Time-out of the
estimated draining time.
E4
The LED indicator light of the
ON/OFF button lights up four times
for 0.5 sec., and then goes off for 2
seconds. The entire process is
repeated numerous times.
The temperature in the
boiler is not OK. Time-out of
the estimated boiler heating
time.
E5
The LED indicator light of the
ON/OFF button lights up five times for
0.5 sec., and then goes off for 2
seconds. The entire process is
repeated numerous times.
The temperature in the tank
is not OK. Time-out of the
estimated tank heating time.
Error Codes
110512 27 / 32
Page 32

Disposal
EN
Electric appliances are marked with this symbol. Electrical
appliances must be disposed of and recycled in a correct
and environmentally friendly manner. You must not dispose
of electric appliances with household waste. Disconnect the
appliance from the power supply and remove power cord
from the appliance.
8 Disposal
Electrical appliance
Electrical appliances should be returned to designated collection points.
28 / 32 110512
 Loading...