


Original-Gebrauchsanleitung
V1/0917
7GN111
300098
Name
Clearing trolley 7GN111
Code-No.:
300098
Material:
Stainless steel
Realization:
Capacity: GN 1/1, GN 1/2, GN 1/3, GN 2/3***
Depth GN container, max.: 65 mm
Trays can be inserted from both sides
One container latch each on the front and rear
Frame made of square tubes 25 x 25 mm
Swivel castors, Ø 100 mm 4 swivel castors,
2 with breaks
Wheel buffers: 4, plastic
Easy assembly kit
Slots:
7
Distance between slots:
80 mm
Carrying capacity:
total: max.: 60 kg
per slot, max.: 8 kg
Storage space: 5 kg
Dimensions:
W 450 x D 620 x H 1010 mm
Size of storage space
W 390 x D 555 mm
Weight:
13 kg
GB/UK
Technical data
We reserve the right to implement the technical modifications!
*** Not included in delivery:
GN containers, trays, grids
- 5 -

1
2 x side elements with
preassembled slots and
1 container latch each
5
2 swivel castors without brakes
6
2 x swivel castors with brakes
2
1 x storage space
7
4 x buffers for swivel castors
3
2 x cross member
Allen key (no fig.)
4
8 x bolt
8 x bolt washer
Fig. 1
2. First, attach both cross members (3)
to one of the pre-assembled side
elements (1) of the clearing trolley.
Place a square washer between the
cross member and side element and
between the side element and bolt,
and tighten those elements with the
use of the Allen key.
3. Fasten the cross members (3) to
the other side element (1), as
described above.
Delivery status (figs. 1 and 2)
Assembly
1. Unpack all elements and verify for delivery completeness (table above). Remove
all the packaging material.
- 6 -
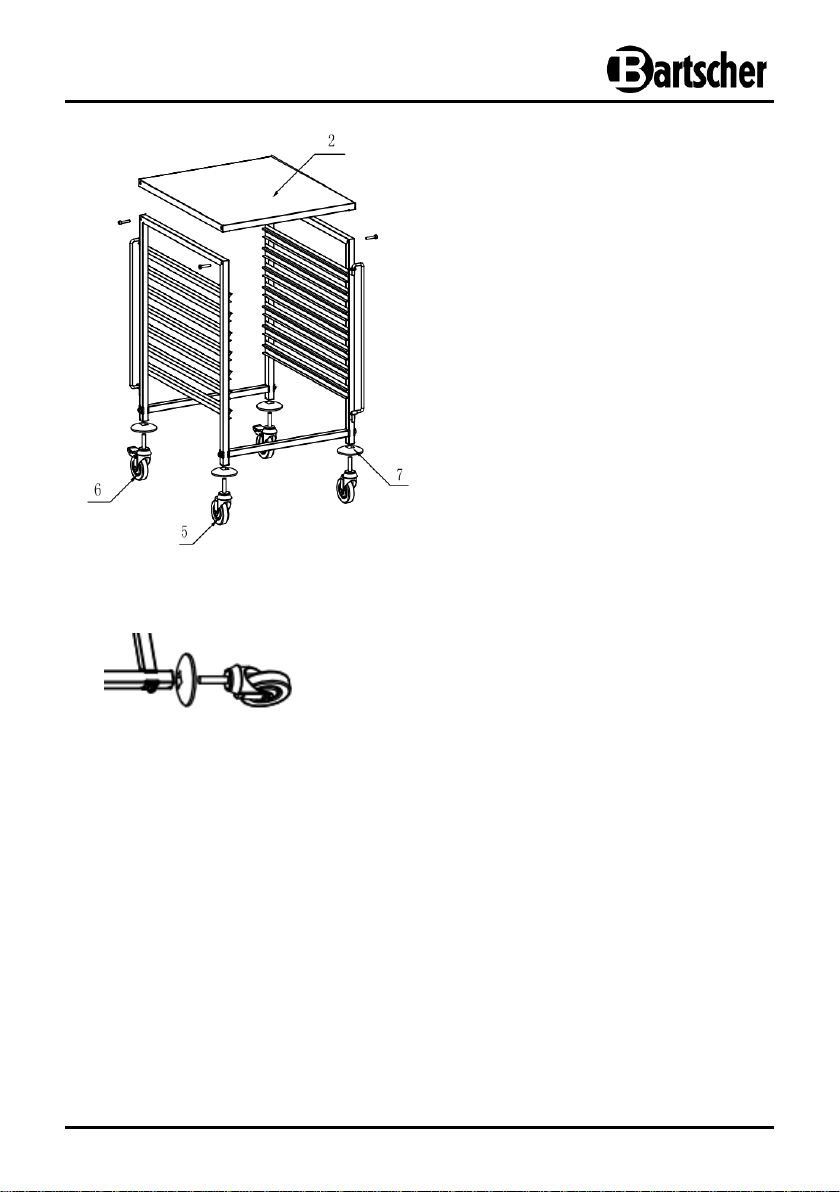
Fig. 2
4. Fix the upper storage shelf (2) to the
side elements with the use of the
supplied bolts.
5. Lay the clearing trolley on its side or place it on
the storage shelf (2).
Attach the buffers (7) to the side elements (1)
and screw 4 swivel castors (5 + 6) to the side
elements (1).
We recommend to assemble the swivel castors
and breaks cornerwise.
6. Place the clearing trolley on the swivel castors and check its stability.
7. The clearing trolley may be aligned by adjusting the swivel castors.
8. After placing the clearing trolley in a required place lock 2 castors with breaks to
prevent the accidental relocation or falling down.
- 7 -

Place the appropriate GN containers
in the clearing trolley slots.
Secure the containers at the front and rear
with the container latches by lifting them
up and bolting in front of the containers.
User instructions
Cleaning
Clean the clearing trolley periodically with a damp, soft cloth.
Never use cleaning agents that may damage the surface of the trolley.
Dry the clearing trolley with a soft cloth.
Bartscher GmbH
Franz-Kleine-Str. 28
33154 Salzkotten phone: +49 (0) 5258 971-0
Germany fax: +49 (0) 5258 971-120
- 8 -
 Loading...