


AGN1800-2/1
300185

Bartscher GmbH
Franz-Kleine-Str. 28
D-33154 Salzkotten
Germany
Phone: +49 5258 971-0
Fax: +49 5258 971-120
Service hotline: +49 5258 971-197
www.bartscher.com
Version: 1.0
Date of preparation: 2022-06-23
Original instruction manual
EN

EN
Name:
Gastronorm trolley AGN1800-2/1
Art. No.:
300185
Material:
stainless steel
Designed for:
2/1GN, 1/1GN
Number of guide rail pairs:
18
Distance between guide rail pairs, in
mm:
80
Max. GN container depth, in mm:
65
Load-bearing capacity per guide pair,
max. in kg.:
10
Dimensions of utility surface (W x D), in
mm:
765 x 785
Load-bearing capacity of utility surface,
max. in kg:
10
Total load-bearing capacity, max. in kg:
80
Number of swivel casters:
4
Locking swivel casters:
2
Diameter of casters in mm:
100
Number of caster dampers:
4
Material of caster dampers:
plastic
Dimensions (W x D x H), in mm:
765 x 785 x 1.750
Weight, in kg:
30,2
Technical Data
We reserve the right to implement technical modifications.
300185 3 / 8

EN
Version / Characteristics
• Delivery form: self-assembly set, simple assembly
• Area of application: clearing
• Version: GN guides
• May be loaded from both sides
• Utility surface
• The set does not include:
– GN containers
– sheets
– grates
• Features:
– one container lock per front and rear of the trolley
– square tubing frame, 25.4 x 25.4 mm section
<Endergebnis>
Intended Use
As described below, every use of the appliance for a purpose differing and/or
diverging from its intended standard use, is prohibited and considered to be an
unintended use.
The following is an intended use:
– cleaning and transportation of dishes in GN containers,
– storage of dishes in GN containers.
4 / 8 300185

EN
Component
Number
Name
2
Lateral section with 18 preinstalled
guides and 1 container lock per each
1
Display area
6
Crossbar
2
Locking swivel caster
2
Non-locking swivel caster
4
Damper for swivel caster
1
Allen wrench
16
Square washers
12
Screw
Scope of Delivery / Part Name
• Unpack the Gastronorm trolley and remove the packing material pursuant to
environmental regulations.
• Check completeness of delivery according to the list below:
300185 5 / 8
EN
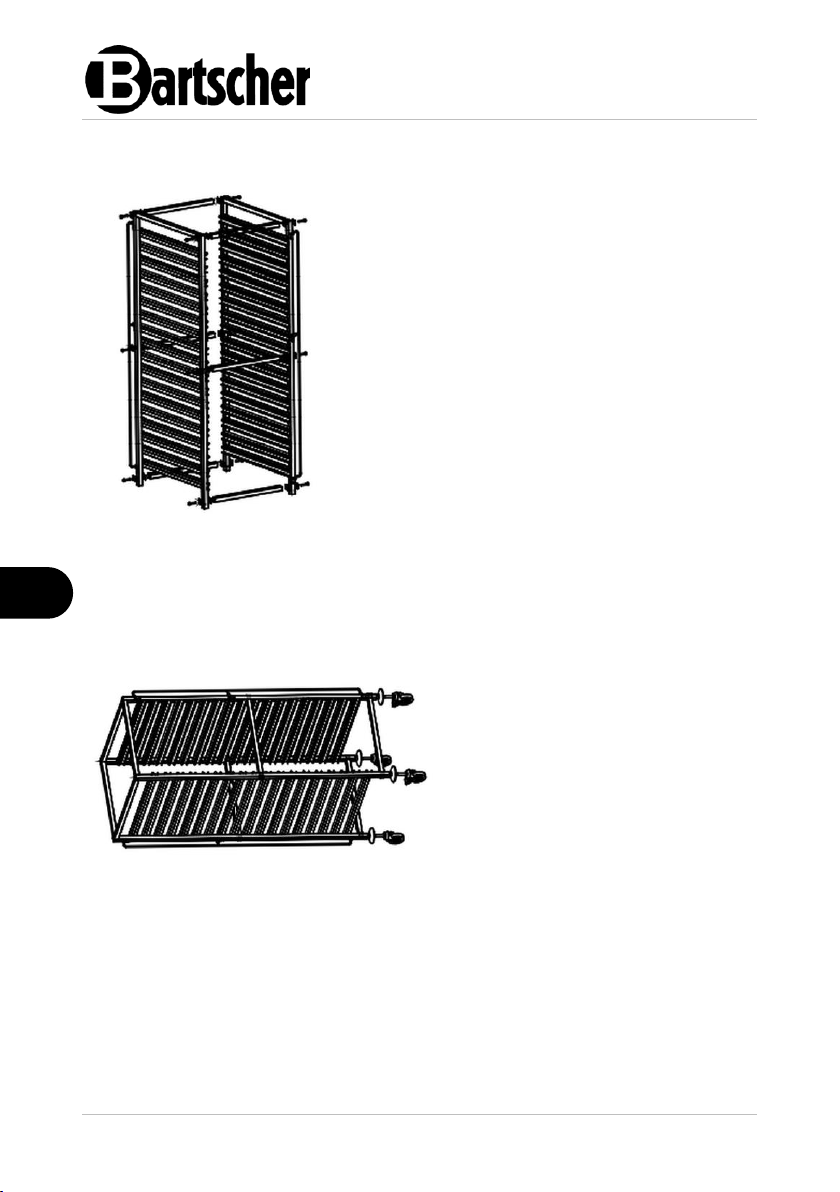
1. Place one lateral section on the ground.
2. To one of the lateral sections of the
Gastronorm trolley assemble 6 crossbars (at
the top, in the middle and at the bottom).
3. Each time, with bottom crossbar, use square
washer between a crossbar and the lateral
section and between lateral section and a bolt.
4. Then, use Allen wrench and tighten bolts.
5. Each time, with middle crossbars, use only
one square washer between the lateral
section and a bolt.
Fig. 1
8. Place the Gastronorm trolley on its
side.
9. Mount 4 swivel caster dampers
onto square tubing of lateral
sections.
10. Finally, screw swivel casters into
square tubing of lateral sections.
(Fig. 2)
Fig. 2
Assembly
6. Use Allen wrench and tighten bolts.
7. Mount 6 crossbars on the second lateral section, using washers and blots, as
described above. (Fig. 1)
6 / 8 300185

EN
1. Set the Gastronorm trolley on swivel casters.
2. Place the utility shelf at the top, on the
Gastronorm trolley.
Fig. 3
Setting
1. Check the stability of the Gastronorm trolley.
2. Level the Gastronorm trolley through screwing in and out swivel casters.
3. After setting the Gastronorm trolley in a designated place, lock 2 swivel casters
with lockings to prevent accidental relocation or overturn of the Gastronorm
trolley.
300185 7 / 8

EN
1. Place required number of suitable
GN containers in guides.
2. Secure GN containers at front and
rear with container lockings, lifting
them slightly up and closing before
GN containers (see Fig. to the left).
Fig. 4
ATTENTION!
Scrubbing agents, washing agents with solvents or caustic substances
may damage the surface.
For cleaning, use only agents suitable for stainless steel.
Container Safeguard
Cleaning
1. Clean the Gastronorm trolley regularly with warm water and a soft, damp cloth.
Use a mild cleaning agent if required.
2. Dry the Gastronorm trolley with a soft cloth.
8 / 8 300185
 Loading...