

Page 1
Montageanleitung
Assembly
instruction
Notice de montage
Montagehandleiding
Instrukcja monta
żu
V2/0610
601.710 / 601.712
Arbeitstisch mit Bodenbord
Seite 3 bis 5
D/A/CH
Work table with bottom shelf
from page 7 to 9
Plan de travail avec tablette
de page 11 à page 13
Werktafel met onderschap
blz. 15 t/m 17
Stół roboczy z półką
strony od 19 do 21
GB/UK
F/B/CH
NL/B
PL
- 1 -
Page 2

- 2 -
Page 3
D/A/CH
Technische Daten
Bezeichnung Arbeitstische
Artikel-Nr.:
Ausführung:
601.710 601.712
Chromnickelstahl 18/10
Abmessungen (mm): B 1000 x T 700 x H 860-900 B 1200 x T 700 x H 860-900
Gewicht: 22 kg 25 kg
Gewichtsbelastung: Arbeitsplatte: 160 kg ; Bodenbord: 120 kg
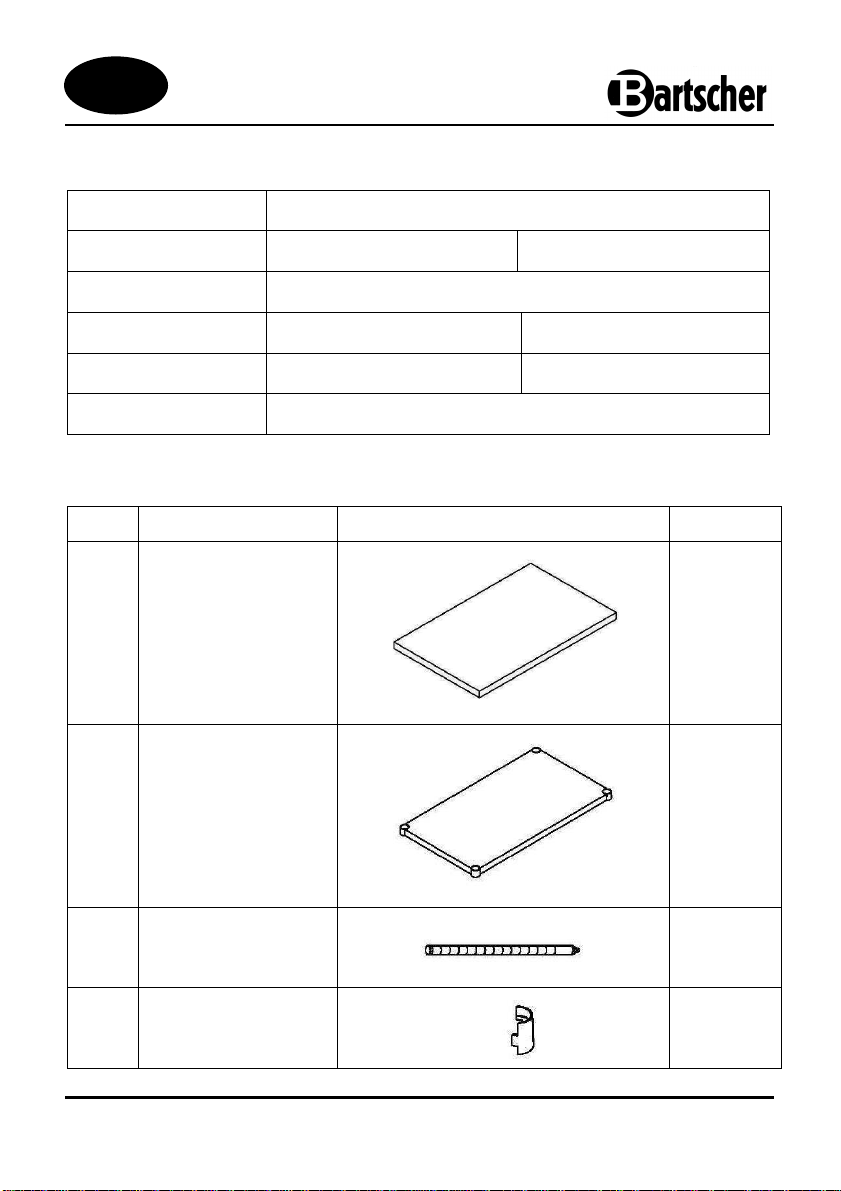
Lieferumfang
Nr. Bezeichnung Abbildung Anzahl
A Arbeitsplatte
B Bodenbord
1
1
C
D Kunststoffriegel
Pfosten
4
16
- 3 -
Page 4
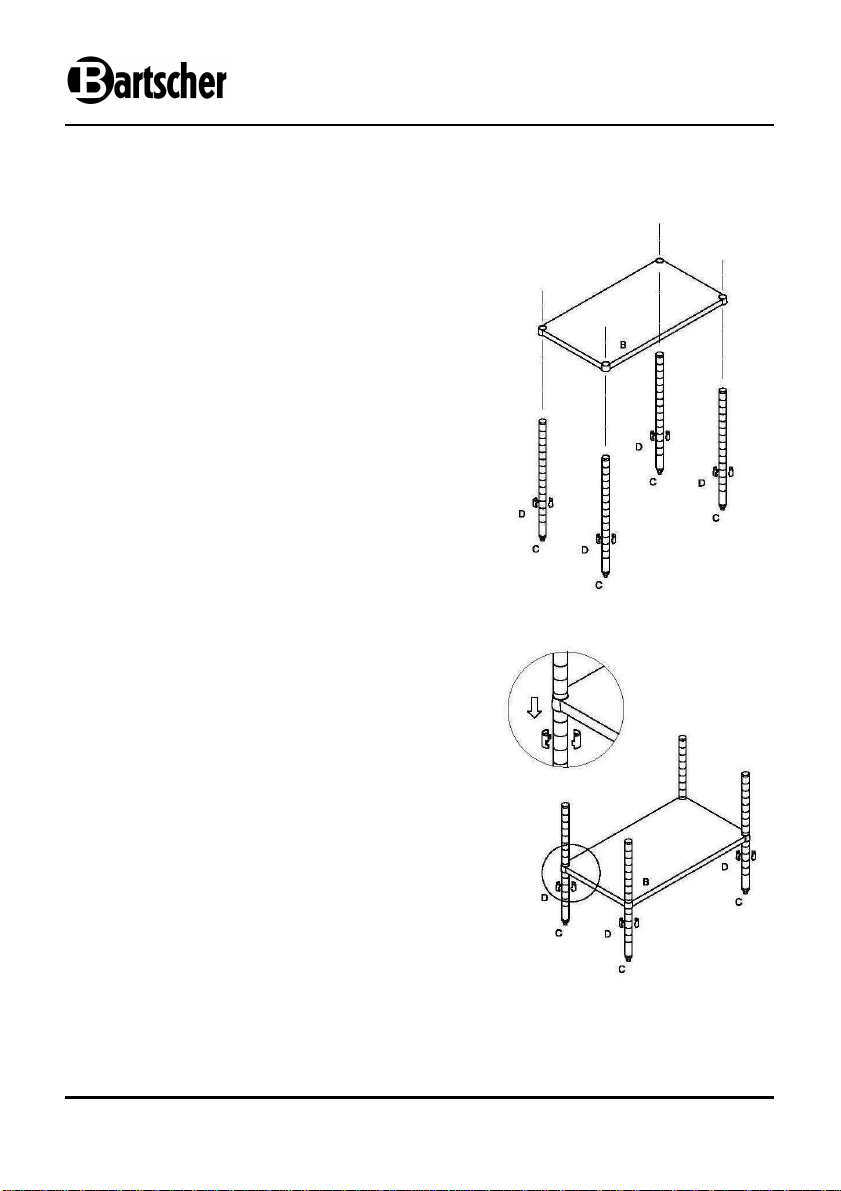
Schritt 1
Montage
In der gewünschten Bodenhöhe die konischen
Kunststoffriegel (D)in die Rillen der Pfosten (C)
einschnappen lassen, wobei das kleine, verjüngte
Ende der Kunststoffriegel (D) nach oben zeigen
muss.
Die Kunststoffriegel (D) sind höhenverstellbar um
jeweils ca. 2,5 cm, wobei das dickere Ende der
konischen Kunststoffriegel (D) nach unten zeigen
sollte. Wir empfehlen das Bodenbord (B) nicht
höher als 15 cm über dem Fußboden
anzubringen.
Schritt 2
Schieben Sie die vier Pfosten (C) an den Ecken
durch das Bodenbord (B) und lassen Sie diesen
dann bis auf die Kunststoffriegel (D) herunter
gleiten.
Richten Sie den Tisch auf und drücken Sie das
Bodenbord (B) fest herunter, um sicher-zustellen,
dass dieses fest auf den Kunststoffriegeln (D)
aufliegt.
- 4 -
Page 5
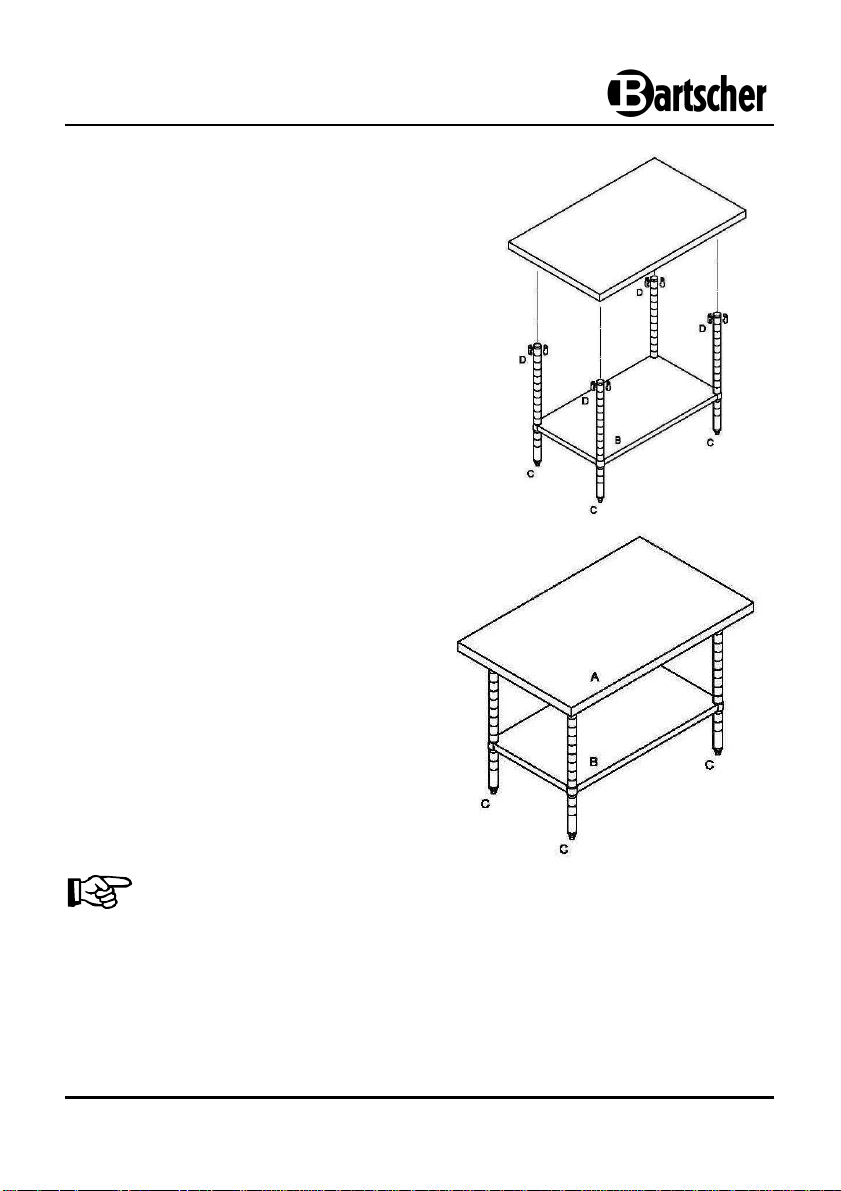
Schritt 3
Kunststoffriegel (D) jeweils an den vier
Pfosten (C) oben anbringen. Die Arbeitsplatte
(A) auf den Pfosten (C) anbringen.
Schritt 4
Nun ist der Tisch komplett
zusammengebaut.
Zum Höhenausgleich (zur Nivellierung) die
Füße an den Unterteilen der Pfosten (C)
hinein- oder herausdrehen.
HINWEIS!
Entfernen Sie die Schutzfolie nach der Montage!
Bartscher GmbH
Franz-Kleine-Str. 28
D-33154 Salzkotten Tel.: +49 (0) 5258 971-0 Service-Hotline: 0180 5 971 197
Germany Fax: +49 (0) 5258 971-120
(14ct/Min. aus dem deutschen Festnetz)
- 5 -
Page 6

- 6 -
Page 7

GB/UK
Technical data
Description Work table with bottom shelf
Article no.:
Construction: Stainless steel 18/10
Dimensions (mm):
Weight: 22 kg 25 kg
Carrying capacity:
Contents
Ref.
A Tabletop
B Bottom shelf
W 1000 x D 700 x H 860-900 W 1200 x D 700 x H 860-900
Name
601.710 601.712
Tabletop: 160 kg; bottom shelf: 120 kg
Illustration
Quantity
1
1
C Post
D Plastic blockade
4
16
- 7 -
Page 8

Step 1
Assembly Procedure:
Place the round plastic blockades (D) inside the
slots in the posts (C) at the desired height, with the
small, narrow end of the plastic blockades (D) at
the top.
The plastic blockades (D) allow for changes of
height at intervals of 2.5 cm, and the thicker end
of a blockade (D) should be located at the
bottom. We recommend placing the bottom shelf
(B) not higher than 15 cm above the floor.
Step 2
Insert the four posts (C) into the corners of the
bottom shelf (B) and slide along until reaching the
plastic blockades (D).
Adjust and level out the table, then press on the
bottom shelf (B) to ensure it is securely fixed in
the plastic blockades (D).
- 8 -
Page 9

Step 3
Fix the plastic blockades (D) at the upper end
of the four posts (C). Place the tabletop (A) on
the posts (C).
Step 4
The table is fully assembled.
To adjust the height, screw in or screw out the
threaded feet at the bottom of the posts (C).
NOTE!
After assembly remove the plastic
wrapping film.
Bartscher GmbH
Franz-Kleine-Str. 28
D-33154 Salzkotten phone: +49 (0) 5258 971-0
Germany fax: +49 (0) 5258 971-120
- 9 -
Page 10

- 10 -
Page 11

F/B/CH
Caractéristiques techniques
Désignation Table de travail avec étagère inférieure
N° de l'article:
601.710 601.712
Finition: Acier inoxydable 18/10
Dimensions (mm): L 1000 x P 700 x H 860-900 L 1200 x P 700 x H 860-900
Poids: 22 kg 25 kg
Capacité de charge:
Plan de travail : 160 kg ; étagère inférieure : 120 kg
Contenu de l'emballage
No
A Plan de travail
B Ètagère inférieure
Descriptif
Illustration
Nombre
1
1
C Pieds
D Cale en plastique
4
16
- 11 -
Page 12

Etapes du montage:
Etape 1
Insérer les cales coniques en plastique (D) dans
les fentes des pieds (C) à la hauteur désirée. Les
petites terminaisons étroites des cales (D) doivent
se trouver en haut.
Les cales en plastique (D) permettent de régler
par niveaux de 2,5 cm de hauteur. Les grosses
terminaisons des cales en plastique (D) doivent
se trouver en bas. Nous vous conseillons de ne
pas placer l'étagère inférieure (B) à plus de
15 cm du sol.
Etape 2
Insérer les quatre pieds (C) dans les coins de
l'étagère inférieure (B) et les faire glisser jusqu'à
atteindre les cales en plastique (D).
Régler et mettre la table de niveau et ensuite
appuyer sur l'étagère inférieure (B) afin de
s'assurer de sa stabilité et qu'elle a bien atteint
les cales en plastique (D).
- 12 -
Page 13

Etape 3
Fixer les cales en plastique (D) aux
terminaisons supérieures des quatre pieds (C).
Placer le plan de travail (A) sur les pieds (C).
Etape 4
La table est entièrement montée.
Afin de régler le niveau, visser ou dévisser
les terminaisons filetées des pieds (C).
REMARQUE !
Après le montage, retirer le film de protection.
Bartscher GmbH
Franz-Kleine-Str. 28
D-33154 Salzkotten Tél.: +49 (0) 5258 971-0
Germany Fax: +49 (0) 5258 971-120
- 13 -
Page 14

- 14 -
Page 15

NL/B
Technische gegevens
Beschrijving Werktafel met onderschap
Artikelnr.:
601.710 601.712
Uitvoering: chroomnikkelstaal 18/10
Afmetingen (mm):
B 1000 x T 700 x H 860-900 B 1200 x T 700 x H 860-900
Gewicht: 22,0 kg 25,0 kg
Draagvermogen:
Inhoud levering
Nr.
Omschrijving
Werkblad: 160 kg; bodemplank: 120 kg
Afbeelding
A Werkblad
B Bodemplank
Aantal
1
1
C
Staander
D Kunststof steuntje
4
16
- 15 -
Page 16

Stap 1
Montagevolgorde:
Klik de kegelvormige kunststof steuntjes (D) op de
gewenste hoogte in de spleten van de staanders
(C), waarbij de kleine, versmalde uiteinden van de
kunststof steuntjes (D) zich aan de bovenkant
moeten bevinden.
De kunststof steuntjes (D) maken het mogelijk om
de plank in hoogte te verstellen in stappen van ca.
2,5 cm, waarbij het dikste uiteinde van het
kunststof steuntje (D) zich aan de onderkant moet
bevinden. Wij bevelen aan om de bodemplank (B)
niet hoger dan 15 cm boven de grond aan te
brengen.
Stap 2
Schuif de vier staanders (C) in de hoeken door de
bodemplank (B) en laat deze op de kunststof
steuntjes zakken.
Zet de tafel overeind en druk de bodemplank (B)
stevig naar onder, om ervoor te zorgen dat hij
goed op de kunststof steuntjes rust.
- 16 -
Page 17

Stap 3
Breng kunststof steuntjes (D) aan op het
bovenste uiteinde van de vier staanders (C).
Plaats het werkblad (A) op de staanders (C).
Stap 4
De tafel is nu compleet gemonteerd.
Om de tafel waterpas te zetten, draait u aan
de voetjes die aan de onderkant van de
staanders (C) zitten.
AANWIJZING!
Verwijder het beschermfolie na de montage!
Bartscher GmbH
Franz-Kleine-Str. 28
D-33154 Salzkotten Tel.: +49 (0) 5258 971-0
Germany Fax: +49 (0) 5258 971-120
- 17 -
Page 18

- 18 -
Page 19

PL
Dane techniczne
Opis Stół roboczy z półką
Nr artykułu:
601.710 601.712
Wykonanie: stal chromowo-niklowa 18/10
Szerokość 1000
Wymiary (mm):
Głębokość 700
Wysokość 860-900
Wysokość 860-900
Waga: 22 kg 25 kg
Nośność:
Zakres dostawy
Nr
Określenie
Blat roboczy: 160 kg; dolna półka: 120 kg
Ilustracja
A Blat roboczy
B Dolna półka
Szerokość 1200
Głębokość 700
Liczba
1
1
C
D Plastikowa blokada
Słupek
4
16
- 19 -
Page 20

Krok 1
Kolejność czynności przy składaniu:
Stożkowe blokady z plastiku (D) należy zazębić ze
szczelinami w słupkach (C) na żądanej wysokości,
przy czym małe, zwężone końce plastikowych
blokad (D) powinny znaleźć się u góry.
Plastikowe blokady (D) pozwalają na skokową
zmianę wysokości po 2,5 cm, przy czym grubszy
koniec plastikowej blokady (D) powinien
znajdować się na dole. Zalecamy umieszczenie
dolnej półki (B) nie wyżej niż 15 cm nad podłogą.
Krok 2
Cztery słupki (C) wsunąć w narożnikach w dolną
półkę (B) i przesunąć aż do osiągnięcia
plastikowych blokad (D).
Ustawić i wyrównać stół, a następnie nacisnąć na
dolną półkę (B), aby upewnić się, że stabilnie
dochodzi ona do plastikowych blokad (D).
- 20 -
Page 21

Krok 3
Plastikowe blokady (D) zamocować przy
górnych końcach czterech słupków (C). Blat
roboczy (A) ułożyć na słupkach (C).
Krok 4
Stół jest kompletnie zmontowany.
W celu wyregulowania poziomu należy
odpowiednio wkręcać lub wykręcać kołki
gwintowane stanowiące stopy słupków (C).
WSKAZÓWKA!
Po zakończeniu montażu należy usunąć
folię zabezpieczającą.
Bartscher GmbH
Franz-Kleine-Straße 28
D-33154 Salzkotten Tel.: +49 (0) 5258 971-0
Niemcy Faks: +49 (0) 5258 971-120
- 21 -
 Loading...