

Page 1
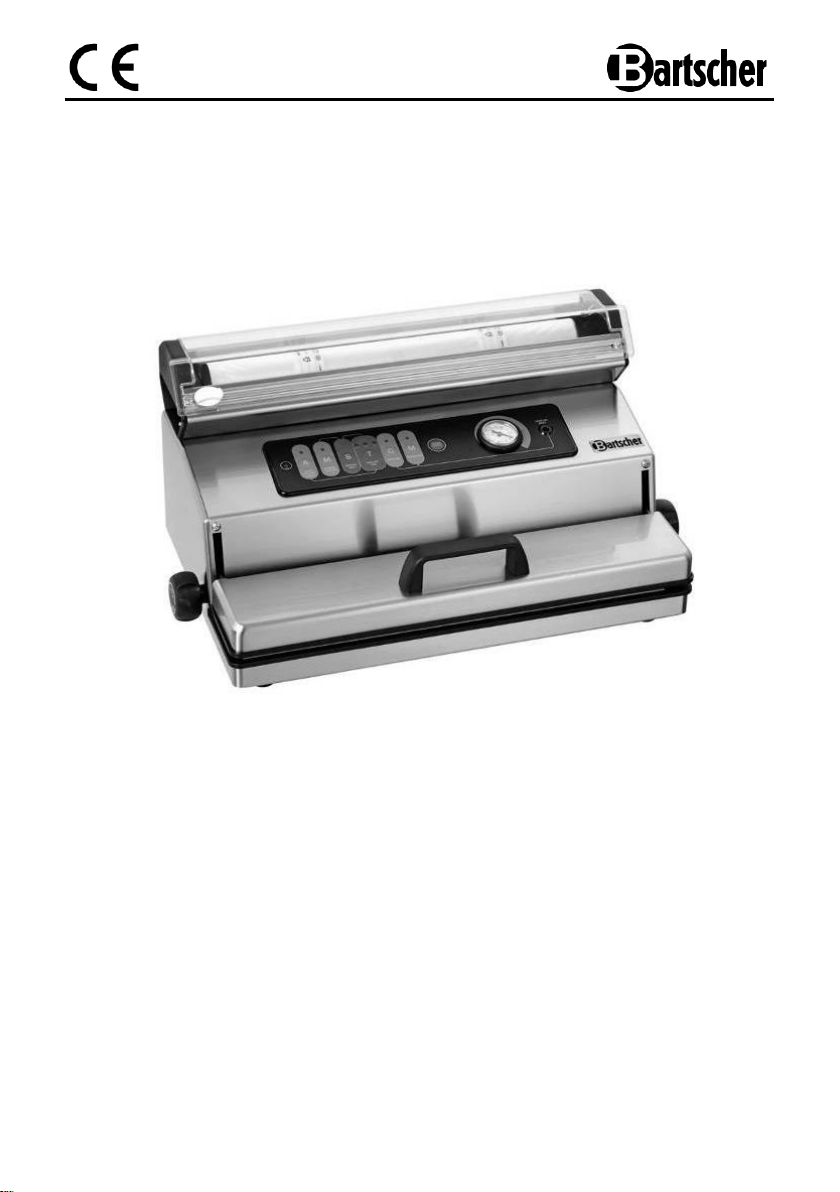
Original-Gebrauchsanleitung
V2/0118
400M
300435
Page 2

GB/UK
ENGLISH
Table of contents
1. Safety ...................................................................................................................... 34
1.1 Key to symbols ................................................................................................... 34
1.2 Safety instructions .............................................................................................. 35
1.3 Proper use ......................................................................................................... 39
2. General information .............................................................................................. 40
2.1 Liability and Warrantees .................................................................................... 40
2.2 Copyright protection ........................................................................................... 40
2.3 Declaration of conformity ................................................................................... 40
3. Transport, packaging and storage ....................................................................... 41
3.1 Delivery check .................................................................................................... 41
3.2 Packaging .......................................................................................................... 41
3.3 Storage .............................................................................................................. 41
4. Technical data ........................................................................................................ 42
4.1 Overview of parts ............................................................................................... 42
4.2 Technical specification ....................................................................................... 44
5. Installation and operation ..................................................................................... 45
5.1 Installation .......................................................................................................... 45
5.2 Advantages of vacuum packaging ..................................................................... 46
5.3 Guidelines for vacuum packaging ...................................................................... 48
5.4 Operation ........................................................................................................... 53
5.4.1 Control panel/Functions of keys and display .......................................... 53
5.4.2 Operations before use ............................................................................ 53
5.4.3 Switching the device on .......................................................................... 54
5.4.4 Settings ................................................................................................... 54
5.4.5 Making bags from rolls ............................................................................ 55
5.4.6 Automatic vacuum packing cycle with bags ............................................ 57
5.4.7 Manual vacuum packing cycle with bags ................................................ 59
5.4.8 Automatic vacuum packing cycle with containers ................................... 59
6. Cleaning ................................................................................................................. 61
7. Troubleshooting .................................................................................................... 62
8. Waste disposal ...................................................................................................... 64
Bartscher GmbH phone: +49 5258 971-0
Franz-Kleine-Str. 28 fax: +49 5258 971-120
33154 Salzkotten Service-Hotline: +49 5258 971-197
Germany www.bartscher.com
- 33 -
Page 3
Read this instruction manual before using and
keep them available at all times!
This instruction manual contains information about the installation, operation and
maintenance of the device and should be consulted as an important source of
information and reference guide.
Awareness of the safety instructions and instructions for use in this manual will ensure
the safe and correct use of the device.
In addition to the information given here, you should comply with any local Health and
safety Controls and generally applicable safety regulations.
The instruction manual forms part of the product and should be kept near the device
and easily accessible for anyone carrying out the installation, servicing, maintenance or
cleaning.
Please keep these instructions and give them to future owners of the device.
1. Safety
This device is designed in accordance with the presently applicable technological
standards. However, the device can pose a danger if handled improperly and
inappropriately.
All persons using the device must follow the recommendations and instructions
in this instruction manual.
1.1 Key to symbols
In this manual, symbols are used to highlight important safety instructions and any
advice relating to the device. The instructions should be followed very carefully to avoid
any risk of accident, personal injury or material damage.
DANGER!
This symbol highlights hazards which could lead to injury.
WARNING!
This symbol highlights dangerous situations which could lead to injury or death.
- 34 -
Page 4
CAUTION!
This symbol highlights dangerous situations which could lead to light
injuries, or damage, malfunction, and/or destruction of the device.
NOTE!
This symbol highlights recommendations and information aimed for effective
and trouble-free device operation.
1.2 Safety instructions
The device can be used by children 8 years and up, as well as
by people with disabilities and those with limited experience/
knowledge as long as they are under supervision or have been
instructed on proper use of the device and its possible dangers.
Children should not play with the device. Cleaning and
maintenance cannot be performed by children and must be
done under supervision. Children under the age of 8 years old
must be kept away from the device and its power cord.
Prevent access of children to the package materials like plastic
bags and foamed polystyrene elements. Suffocation hazard!
Never leave the device unattended when in use.
Only use the device indoors.
The device must be operated in correct and safe technical
condition only. In case of operational problems disconnect the
device from the power supply (pull the plug from the socket) and
contact the service company.
- 35 -
Page 5
Only a qualified technician and using original spare parts and
accessories should carry out repairs and maintenance of the
device. Do not attempt to repair the device yourself.
Do not use any accessory or spare parts that have not been
recommended by the manufacturer. These can be dangerous
for the user or lead to damages of the device or personal injury,
and further, the warranty expires.
To prevent hazards and to ensure optimum efficiency, no
modifications or alterations to the device that are not explicitly
approved by the manufacturer may be undertaken.
DANGER! Electric shock hazard!
To avoid the hazard results please follow the safety instructions
below.
Never allow the power cable to come into contact with heat
sources or sharp edges. The power cable should not hang over
the side of the working surface. Ensure that no one can step on
or trip over the cable.
The power cable must not be folded, bent or tangled, and must
always remain fully unrolled. Never place the device or other
objects on the power cable.
Do not cover the cable. Keep away the cable from operating
range and do not immerse it into water.
- 36 -
Page 6

Do not immerse the device in water or use it when the plug or
power cable is wet. If such a case occures while operating, put
on the rubber gloves and pull out the plug immediately. Do not
touch or remove the device when immersed in water until
the plug is pulled out from the power supply socket. Do not
use the device when removed from water (dispatch it immediately to the authorised service point or your vendor).
Check the power cord regularly for damage. Do not use the
device if the power cord is damaged. If this cable is damaged, it
must be replaced by customer service or a qualified electrician in
order to avoid dangers.
The supply cable must be disconnected from the socket
only by pulling the plug.
Never carry or lift the device by the supply cable.
In any case do not open the device housing. In case of
electrical or mechanical modifications the electric shock
hazard will occur.
Do not use any acid agents and make sure no water ingresses
the device.
Never operate the device with moist hands or standing on wet
floor.
Remove the plug from its socket:
- when the device is not used,
- in case of anomalies during operation,
- before cleaning.
- 37 -
Page 7

CAUTION!
The device is not suitable for continuous operation. Do not
perform more than one full cycle of vaccum packing every
2 minutes. The operating cycle takes approx. 50 seconds, then
there is a break of approx. 2 minutes. In extreme ambient
conditions intense exploitation of the device may trigger
automatic overheating protection system. In such a case, leave
the device to cool down until ready to use again, or until the
overheating protection system has switched off again.
Do not use the device on hot surfaces or in their vicinity.
The casing of the device does not protect against liquid
penetration of the interior.
Avoid sucking in liquids in the vacuum packing chamber. In case
it has happened anyway, dry the vacuum packing chamber
immediately.
When operating the device do not touch the sealing bar to
avoid injury or burns.
Never use the adapter suitable for use with the power supply
voltage other than the voltage indicated on the identification
plate on the underside of the device.
Do not use lids or containers with cracks or other damages.
We recommend using Bartscher bags for vacuum packing. If
you do not use the above-mentioned bags, the smooth side of
a bag for vaccum packing should be in contact with the sealing
rail to perform multiple vacuum packing.
- 38 -
Page 8
1.3 Proper use
The operational safety of the device is assured only in case of proper use, according
to the operation manual.
All technical activities like installation and maintenance must be performed by the
qualified service personnel only.
The vacuum packing machine is only intended for packing food products or other
vacuum packed objects.
CAUTION!
Any use going beyond the intended purpose and/or any different use of the
device is forbidden and is not considered as conventional.
Any claims against the manufacturer or his authorized representative as a
consequence of experiencing damages resulting from unconventional use
are impossible.
The operator is liable for all damages resulting from inappropriate use.
- 39 -
Page 9
The device complies with the current standards and directives of the EU.
We certify this in the EC declaration of conformity. If required we will be
glad to send you the according declaration of conformity.
2. General information
2.1 Liability and Warrantees
All the information and instructions in this manual take into account standard safety
regulations, current levels of technical engineering as well as the expertise and
experience we have developed over the years.
The instruction manual was translated with all due care and attention. However, we do
not accept liability for any translation errors. The German version of this instruction
manual is definitive.
If the delivery consists of a special model, the actual scope of delivery may differ from
the descriptions and illustrations in this manual. This is also the case for special orders
or when the device has been modified in line with new technology.
CAUTION!
Read this manual carefully and thoroughly before any operation
of the device, and especially before turning it on!
Manufacturer is not liable for any damages or faults caused by:
- violation of advice concerning operation and cleaning;
- use other than designed;
- alterations made by user;
- use of inadequate spare parts.
We reserve the right to make technical changes for purposes of developing and improving
the useful properties.
2.2 Copyright protection
The instruction manual including any texts, drawings, images or other illustrations is
copyright. No part of this publication may be reproduced, transmitted or used in any
form or by any means without permission in writing from the manufacturer. Any person
who commits any unauthorized act in relation to this publication shall be liable to claims
for damages. All rights reserved.
NOTE!
The contents, texts, drawings, pictures and any other illustrations are
copyright and subject to other protection rights. Any person unlawfully
using this publication is liable to criminal prosecution.
2.3 Declaration of conformity
- 40 -
Page 10

If you liked to dispose the packing, consider the regulations applicable
in your country. Supply re-usable packing materials to the recycling.
3. Transport, packaging and storage
3.1 Delivery check
Please check the delivery upon completeness and transport damage immediately
after receipt. In case of visible damage do not accept or accept the delivery with
reservation only.
Note the extent of damage on the carrier’s bill of delivery. Trigger off the complaint.
Hidden damages should be reclaimed immediately after notice, as claims for damages
can only be asserted within the effective period for complaints.
3.2 Packaging
Please do not throw away the covering carton of your device as it might be useful for
storage purposes, when moving or, in case of damages, when the device must be sent
back to a repair center. The outer and inner packing material should be removed
completely from the device before installation.
Please inspect the device upon completeness. In case any part is missing please
contact our customer service center immediately.
3.3 Storage
Keep the package closed until installation and under consideration of the outside
indicated positioning- and storage markings.
Packages should be stored under consideration of the following:
- do not store outdoors,
- keep it dry and dust-free,
- do not expose it to aggressive media,
- do not expose it to direct sunlight,
- avoid mechanical shocks and vibration,
- in case of longer storage (> 3 months) make sure you check the state
of the packaging and the parts regularly, if required refresh or renew.
- 41 -
Page 11
4. Technical data
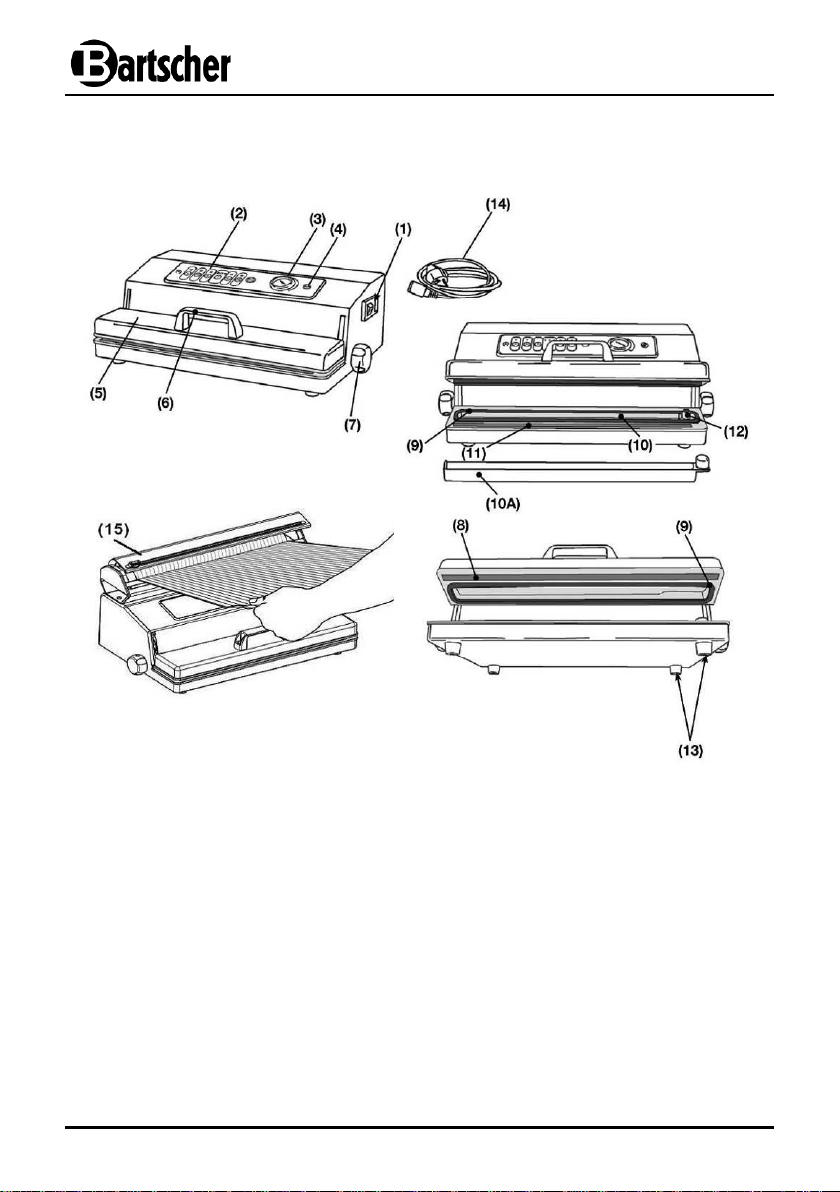
4.1 Overview of parts
(1) ON/OFF (I/O) switch - Press the switch to (I) to turn the device on. Turn the
device off by pressing (O) when not in use.
(2) Control panel - the various functions of the device can be adjusted by selecting
the corresponding button.
(3) Vacuum gauge - indicates the vacuum level reached.
(4) Hose air inlet - Insertion of hose to generate vacuum in containers or bottles.
(5) Lid - it is not possible to open and lock the lifted door. This way, the bag can be
positioned for vacuum packing.
(6) Lid handle - facilitates closure of the lid for the vacuum packing cycle.
- 42 -
Page 12

(7) “Lock & Unlock System” device - used to hold the bag for automatic execution
of the packaging cycle. Lock & Unlock System - equipped with a gas spring to
adjust opening of the lid.
(8) Sealing gasket - Presses the bag on the sealing bar.
(9) Airtight gaskets - Guarantee vacuum tightness in the chamber when air is
removed from the bags.
(10) Vacuum chamber with removable tray - this is the seat for positioning of the bag
and evacuation of air; the liquid collection tray is inserted inside the chamber (10A),
which can be removed and washed even in dishwashers with a high degree of
hygiene.
(11) Sealing bar with cooling system for intensive use - Heating element which
seals the bag and prevents it from sticking to the sealing bar.
(12) Protective filter for powdered foods - protects the pump from the entrance of
powdered foods (sugar, flour, coffee, etc.) which could damage it. It can easily
be removed and cleaned. The liquid-collecting tray (10A) should be pulled out
before removing the filter.
(13) NON-slip feet - to keep the device from moving during the vacuum packing cycle.
(14) Power cable- to connect the device to the electric mains.
(15) Roll holder - to insert the vacuum film roll.
- 43 -
Page 13
Name
Vacuum packaging machine 400M
including roll holder
Code-No.:
300435
Material:
Chrome nickel steel 18/10
Realization:
Vacuum pump: 1,9 m3/h (approx. 31,5 l/min.)
Seal bar: 1 seal seam, 400 mm long
Maximum vacuum: -850 mbar
Pressure display with manometer
Roll holder with integrated knife
Removable drip tray insert for liquids
Power supply:
0,38 kW / 230 V 50 Hz
Dimensions:
L 550 x P 325 x H 270 mm
Accessories:
1 vacuum foil roll (40 cm x 3 m)
5 vacuum bags (40 x 50 cm)
1 connecting hose for vacuum sealing containers
Weight:
12,45 kg
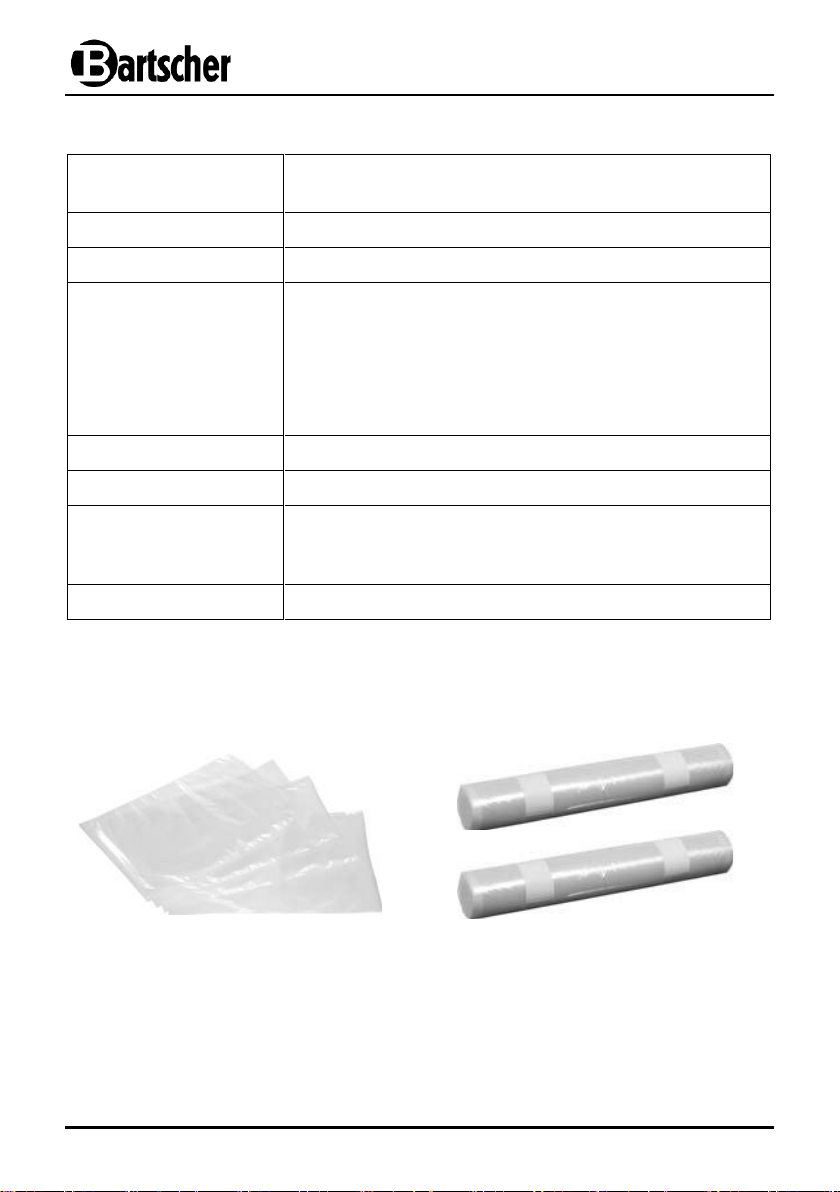
Vacuum bags
one-side corrugated, embossed
each with 50 bags in one package
Size: 400 x 600 mm
Capacity: 20 litres
Code-No. 300414
Vacuum sealer roll set 400
Set consists of 2 foil rolls,
each 40 cm wide, 6 m long
Code-No. 300421
4.2 Technical specification
We reserve the right to make technical changes!
Additional equipment (not included in the delivery!)
- 44 -
Page 14
5. Installation and operation
5.1 Installation
Positioning
Unpack the device and remove all package materials according to the valid
environment protection regulations.
CAUTION!
Never remove the nameplate and warning signs from the device.
Put the device on an even, stable, dry and waterproof surface which is resistant to
high temperature.
Never place the device on an inflammable surface.
Do not place the device near open flame, electric heaters or other heat source.
Never put the device in a moist or wet area.
Keep the device out of the reach of children. Make sure that small children cannot
pull the device by its cable.
Place the device away from the edges of the work surface. Leave sufficient space
in front of the device so that the bag can be filled with food while vacuum packed.
Make sure there is sufficient air circulation, provide at least 20 cm of free space
on all sides and 1 m above the device.
Place the device so that the plug is easily accessible so as to quickly disconneet
the device if the need arises.
Connection
DANGER! Electric shock hazard!
The device can cause injuries due to improper installation!
Before installation and connecting the local power grid
specification should be compared with that of the device
(see rating plate). Connect the device only in case of
compliance!
The power supply circuit with the socket must be protected by the fuse of at least 16A.
Connect the device directly to a single grounded socket. Do not use any power bar or
multiple socket.
- 45 -
Page 15
5.2 Advantages of vacuum packaging
With vacuum packaging, air is removed from the film bags or from containers and sealed
hermetically in order to stop or slow down food spoiling. Vacuum packaging prolongs
preservation of food which lasts 3 to 5 times longer. The taste and vitamin supply remain
intact.
Food is protected from burns caused by freezing, bacteria and mould.
Vacuum packaging is a particularly suitable preservation method for fresh foods and
must be combined with low temperatures, namely the vacuum packaged product must
be kept in the refrigerator or freezer for best results. Food preserved this way lasts
longer than other products which are not vacuum packed, which last a few hours or a
few days.
Vacuum packaging is the right choice to keep food in a healthy manner and to save
money:
It is therefore possible to take advantage of special offers
by vacuum packing food to preserve them for longer time;
for pre-cooking during the week,
to make salads, vegetables and herbs last longer (they remain crisp and fresh);
To preserve high-quality oils and similar products in a bottle is no problem;
There is more space in the freezer;
Food is protected from freezer burns;
It is marinated in a quicker and more sustainable way (20 minutes vacuum packed
are enough);
Allows to vacuum pack meat, cold cuts and cheese (preserving their taste);
It saves money, since all leftovers can be easily packed and used later on;
All types of fruit and vegetables can be purchased fresh and kept vacuum packed
longer.
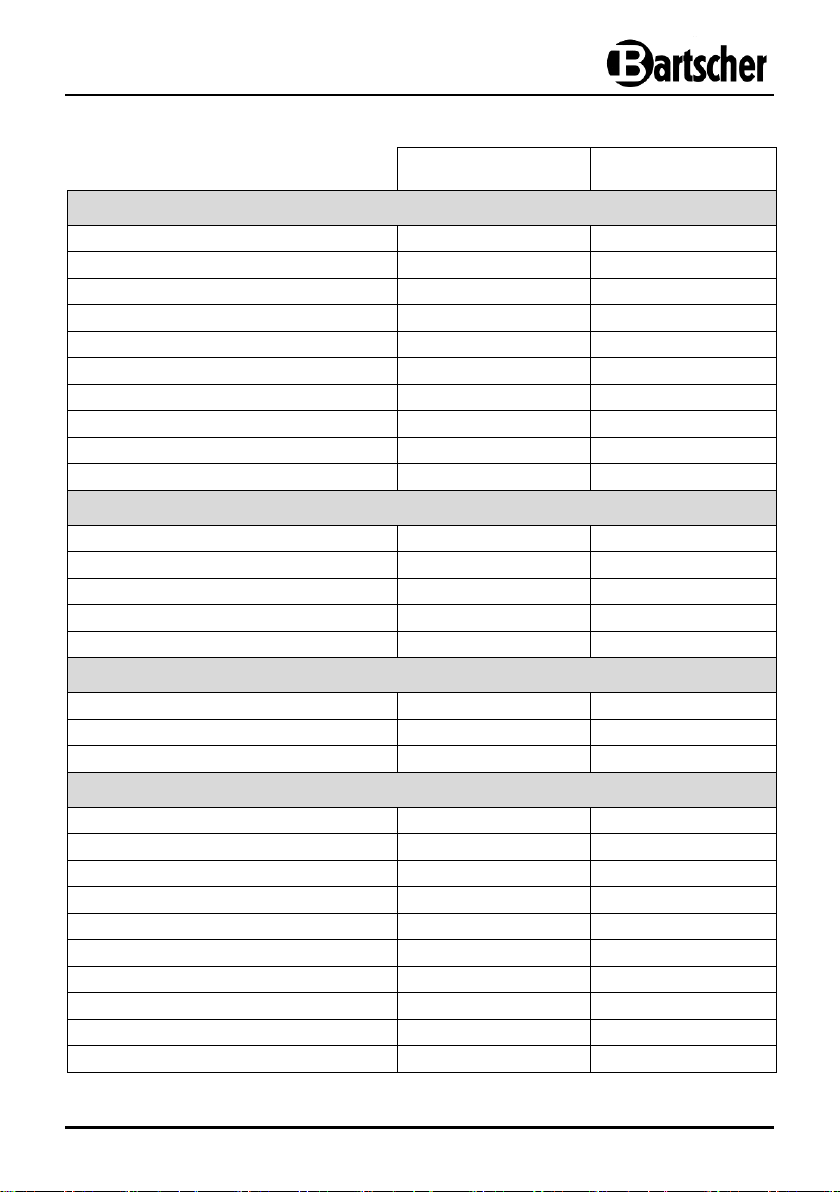
All of the data in the following table are reference values which depend on the
solidity of the packaging and quality of the organoleptic characteristics of the
food.
CAUTION!
Keep perishable foods in the freezer or refrigerator. Vacuum packing lengthens
the duration of food but that does not transform them into “preserves”, namely
a product which can be preserved at room temperature.
- 46 -
Page 16
Preservation time
not vacuum packed
Preservation time
vacuum packed
Refrigerated food (5+/-2°C)
Red meat
3 - 4 days
8 - 9 days
White meat
2 - 3 days
6 - 9 days
Whole fish
1 - 3 days
4 - 5 days
Game
2 - 3 days
5 - 7 days
Sausages
7 - 15 days
25 - 40 days
Cold cuts
4 - 6 days
20 - 25 days
Soft cheese
5 - 7 days
14 - 20 days
Hard/semi hard cheese
15 - 20 days
25 - 60 days
Vegetables
1 - 3 days
7 - 10 days
Fruit
5 - 7 days
14 - 20 days
Cooked and refrigerated food (5+/-2°C)
Vegetable puree and soups
2 - 3 days
8 - 10 days
Pasta and risotto
2 - 3 days
6 - 8 days
Boiled and roast beef
3 - 5 days
10 - 15 days
Filled cakes (with cream or fruit)
2 - 3 days
6 - 8 days
Frying oil
10 - 15 days
25 - 40 days
Frozen food (-18+/-2°C)
Meat
4 - 6 months
15 - 20 months
Fish
3 - 4 months
10 - 12 months
Vegetables
8 - 10 months
18 - 24 months
Food at room temperature (25+/-2°C)
Bread
1 - 2 days
6 - 8 days
Packs of biscuits
4 - 6 months
12 months
Pasta
5 - 6 months
12 months
Rice
5 - 6 months
12 months
Flour
4 - 5 months
12 months
Dried fruit
3 - 4 months
12 months
Ground coffee
2 - 3 months
12 months
Powdered tea
5 - 6 months
12 months
Freeze-dried products
1 - 2 months
12 months
Powdered milk
1 - 2 months
12 months
Preservation times for food “with and without” vacuum packaging:
- 47 -
Page 17

5.3 Guidelines for vacuum packaging
Vacuum packaging for freezer
A correct preservation will help the device to keep food fresh. Pack the food as fresh
as possible.
Delicate foods or those which you desire to keep their shape and appearance could
be damaged if packed as fresh products. We recommend pre-freezing delicate
products such as meat, fish, berries, bread, etc.. They can be frozen for a maximum
of 24 hours without suffering freezer burns. Once they have been pre-frozen, air can
be suctioned from the bag and they can remain a long time in the freezer while
maintaining their taste and nutritional value.
To preserve liquids such as soups, flans and stews vacuum packed, first freeze
them in a tray or bowl, and then pack them hermetically and preserve them frozen
in the freezer.
To preserve fresh vegetables, clean them or peel them and have them parboiled for a
short time in boiling water (or, if necessary, heat them in a microwave oven), to obtain
fresh and cooked vegetables. When they have cooled off, seal the desired portions
vacuum packed.
To pack products which are not deep-freezed, allow approximately 5 cm more per bag
to guarantee space for expansion of the food to the frozen state. Put meat or fish on a
paper towel, and then seal them hermetically with the paper napkin in a plastic bag.
This will absorb the liquid in the food.
Before vacuum packaging foods such as tortillas, crepes or hamburgers, place wax
paper between the various pieces. This makes it easier to remove the single pieces
and to reclose the bag kept in the freezer.
Vacuum packaging for the refrigerator
The food can be cooked in advance, kept in the refrigerator vacuum packed and
heated when necessary.
Vacuum packaging for the pantry
Some foods can also be preserved at room temperature (coffee, flour, pasta, sugar,
etc.) and this can be facilitated by vacuum packaging. If they are not used for several
days, for example when you are on holiday, they must be protected with vacuum
packaging. This way they will remain fresh at room temperature and will not be
attacked by mould or insects.
- 48 -
Page 18
Defrosting vacuum packed food
Food preserved vacuum packed such as meat, fish, fruit, vegetables and other foods
can be defrosted on the bottom shelf of the refrigerator.
Let the bread and cakes defrost at room temperature.
For soups or other liquids, defrost the bag directly in warm water until the content is
completely warm. To defrost at room temperature or in a double saucepan, cut a
corner of the bag to release vacuum and to free the vapour.
Consume food as soon as it is defrosted. Do not freeze leftovers once again.
Vacuum packing of packed foods
Many foods, such as cheese or meat, are sold vacuum packed. After these packs
have been opened, they can be vacuum packed once again to maintain their taste
and freshness.
CAUTION!
Packed foods must always be consumed within the expiration date specified
on the original package. When vacuum packed the second time, they must be
treated with the utmost care and hygiene.
Suggestions for vacuum packaging
When vacuum packaging foods with sharp edges, such as bones or spaghetti,
strengthen the corners with paper napkins to avoid damaging the bag.
Use storage containers to keep fragile foods such as berries, rusks or biscuits from
crumbling or breaking in the vacuum package.
A great variety of objects can be vacuum packed. For example, camping supplies,
such as clean matches, first aid boxes and clothing can be kept dry and clean.
Emergency triangles are always ready for use. Pipe tobacco can be preserved.
Oxidation of silver and jewellery is prevented by vacuum packing.
- 49 -
Page 19
General safety instructions
1. Clean your hands, utensils and work surfaces used to cut and vacuum pack foods.
2. If possible, wear gloves to handle the food.
3. Use only fresh food for vacuum packaging.
4. Immediately preserve perishable foods vacuum packed in the refrigerator or freezer
and do not leave them too long at room temperature.
5. Distribute vacuum packed packages uniformly in the refrigerator or freezer to allow
them to freeze quickly.
6. Packed foods must in any case be consumed within the date of expiration carried on
the original packaging of the product.
7. Vacuum packaging prolongs preservation of dried fruits. Foods with a high fat
content can go rancid quickly if exposed to oxygen and heat. Vacuum packaging
also increases the preservation time of nuts, coconut flakes and cereals. Keep them
in a cool place away from sources of light.
8. Vacuum packaging will not lengthen the time of preservation of fruit and vegetables,
such as bananas, apples, potatoes or other vegetables unless they are peeled
before being vacuum sealed.
9. Some vegetables, such as broccoli, cauliflower and cabbage, emit gas when
vacuum packaged fresh. This is why these foods must be parboiled before being
packed and frozen.
10. To repack vacuum packed food after it has been removed from vacuum packaging,
follow the instructions for preservation in the refrigerator after opening and for
keeping vacuum packed food safely.
11. Consume perishable foods immediately after they have been heated, defrosted or
removed from the refrigerator. Do not consume foods that were left for several
hours in the open air, especially if they were cooked in a thick sauce and kept in a
vacuum bag or another air-free environment.
12. Pre-freeze soft and delicate products the night before (fish, berries, etc.). Once they
have been pre-frozen, they can be vacuum packed and placed in the freezer.
CAUTION!
Vacuum packaging does not substitute deep-freezing or freezing.
Perishable foods must be frozen before being vacuumed packed,
they must be cold after vacuum packaging and frozen.
- 50 -
Page 20

Advice for preserving vacuum packed foods
The vacuum packed preservation system is the way to preserve purchased and cooked
food. Once you have used vacuum packing preservation, it will soon become essential
in preparing food. Follow the instructions below concerning vacuum packaging and
preservation to guarantee food quality:
1. Chemical reactions of food in contact with room temperature, air, humidity and the
formation of enzymes, microorganisms or contamination from insects ruin food.
2. Oxygen in the air is the main reason for loss of nutritional substances, texture, taste
and quality. The growth of microorganisms is largely due to air, as it removes
humidity, unless food is wrapped in moisture resistant material. Frozen foods,
exposed to freezing, suffer freezer burns.
3. Vacuum packaging suctions approximately 90% of the air from the bag.
With approximately 21% oxygen in the air, removing 90% means about 2%-3% of
air is left in the vacuum packed bag. If the oxygen content is less than 5%, most
microorganisms do not multiply.
4. In general there are three types of microorganisms: moulds, yeasts and bacteria.
They are everywhere, but are dangerous only in certain circumstances.
5. In an environment with little oxygen or without humidity, moulds cannot grow.
In a moist, sugary environment and at mild temperatures, yeasts grow with or without
air. Refrigeration capability slows down the growth of yeast, while deep-frozen
preservation completely impairs growth of bacteria with or without air.
6. One of the most dangerous types of bacteria, Clostridium botulinum, in certain
conditions grows without air: at a temperature between 4 °C and 46 °C. Clostridium
botulinum is a very dangerous type of bacteria which can develop in environments
which do not contain acids, are oxygen-free and exposed to temperatures higher
than 4 °C for long periods.
7. Foodstuffs frozen, dried, very acids, salted or sweeten are botulinum resistant.
Other foodstuffs with low acidity such as meat, seafood, olives, poultry, fish, eggs
and mushrooms as well as medium acidity foodstuffs like ripe tomatoes, onions,
red peppers, figs and cucumbers are all vulnerable to be attacked by Clostridium
Botulinum.
8. These foods must be preserved for a short amount of time in a cool place, whereas
for a long time if frozen, and consumed immediately after being cooked.
- 51 -
Page 21

9. Some dry foods such as flour and cereals can contain insect larvae. If they are not
preserved vacuum packed, the larvae could contaminate food during preservation.
To prevent insects from hatching, vacuum package foods.
10. Food can be preserved at low temperatures since only a few microorganisms
thrive without air.
11. If the refrigerator temperature is higher than 4 °C (especially for a long time), this
favours the growth of harmful microorganisms. Therefore it is recommended to
keep the temperature below 4 °C.
12. A freezer temperature of -17 °C or lower is suitable for food preservation. Even
though freezing does not kill microorganisms, it inhibits their growth.
13. Vacuum packing preservation temperature also has an effect on dried fruits: the
duration of preservation increases 3 - 4 times at every 10 °C temperature reduction.
- 52 -
Page 22
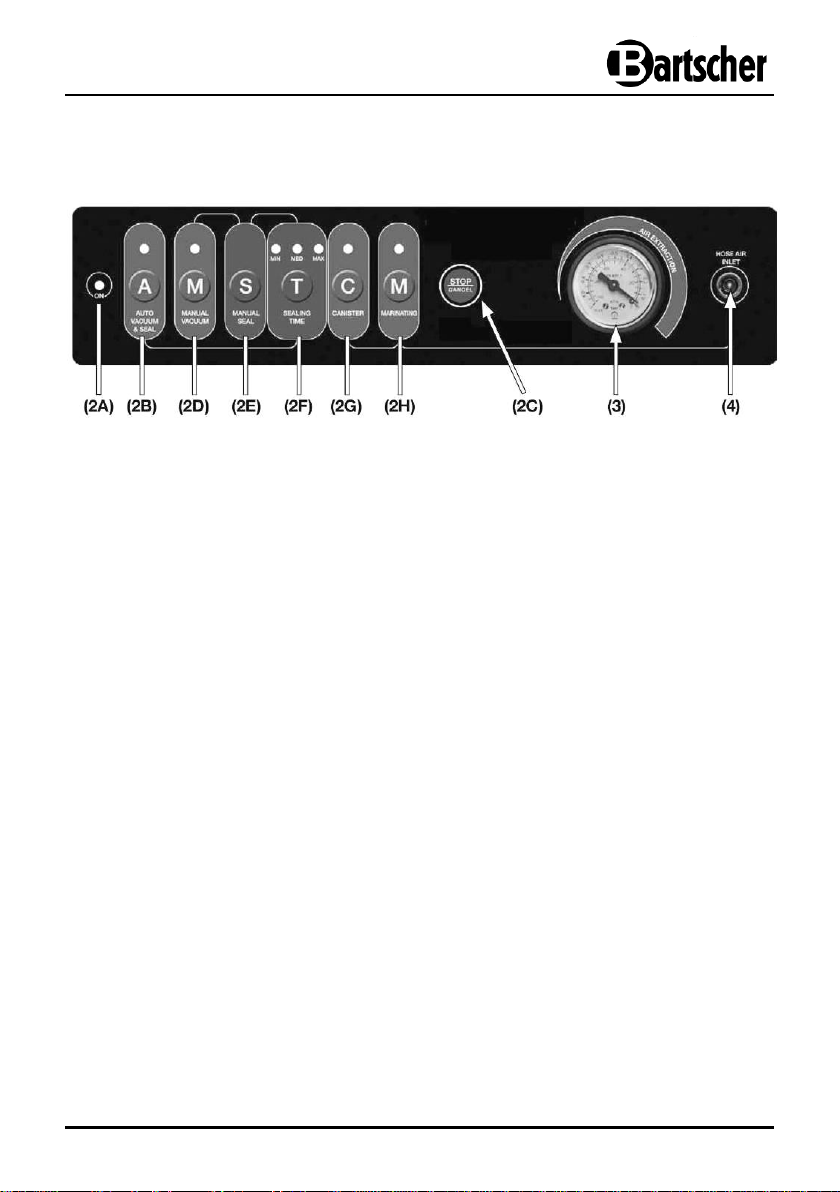
5.4 Operation
5.4.1 Control panel/Functions of keys and display
(2A) “ON” indicator light - when the switch (1) is at (I), the indicator light is green.
(2B) “A” key (Auto Vacuum & Seal) - The start key for the automatic vacuum
packing cycle for bags including sealing.
(2C) “STOP/CANCEL” key - stops the device at any time.
(2D) “M” key (Manual Vacuum) - Start key for manual cycle; the device suctions the
air and performs the manual sealing cycle by pressing the “S” key.
(2E) “S” key (Manual Seal) - Start key of manual Sealing.
(2F) “T” key (Sealing Time) - Key for setting the sealing time.
(2G) “C” key (Canister) - Start key for automatic vacuum packaging cycle in containers.
(2H) “M” key (Marinating) - Start key for “Fast marinating” function
(3) Vacuum gauge – indicates the vacuum level reached.
(4) HOSE AIR INLET – To connect the hose to create vacuum in containers sealed
with lids, in bottles sealed with caps and glass jars provided with lid and ring.
5.4.2 Operations before use
Before using the device, thoroughly clean its surfaces and the work surface which
will come into contact with foods and accessories (containers, leads, etc.). Proceed
as explained in the instructions provided in the Section 6 “Cleaning”.
Insert the plug of the power cable into the socket on the side of the machine and
then connect the plug to a wall socket depending on the voltage of the machine
(data found on the identification plate).
- 53 -
Page 23

5.4.3 Switching the device on
Press the (1) button on the right side; on the front panel, the green “ON” (2A)
indicator light and red (2F) closure time (MED) indicator switch on.
5.4.4 Settings
Setting sealing time
To set the sealing time, press the “T” key (2F) before the vacuum packing cycle.
The set sealing time is saved until:
- the sealing time is set once again;
- the STOP key is pressed;
To deactivate the device, move the switch to “O” or unplug it.
The position of the red switch on the button shows the set closure time:
- MIN (red control indicator light switches on) corresponds to a minimum closure
time recommended when performing several closures;
- MED (middle red indicator light flashes) corresponds to medium closure time,
suitable for most applications; the device is set at automatic closure time
according to default settings.
- MAX (right red indicator light switches on) max. closure time recommended
when preserving moist food.
STOP/CANCEL key – 2C
To stop the machine at any moment, press the “STOP/CANCEL” button (2C), Fig. A.
Unlock the lid by turning one of the two knobs (7) of the “Lock & Unlock System”
device.
- 54 -
Page 24
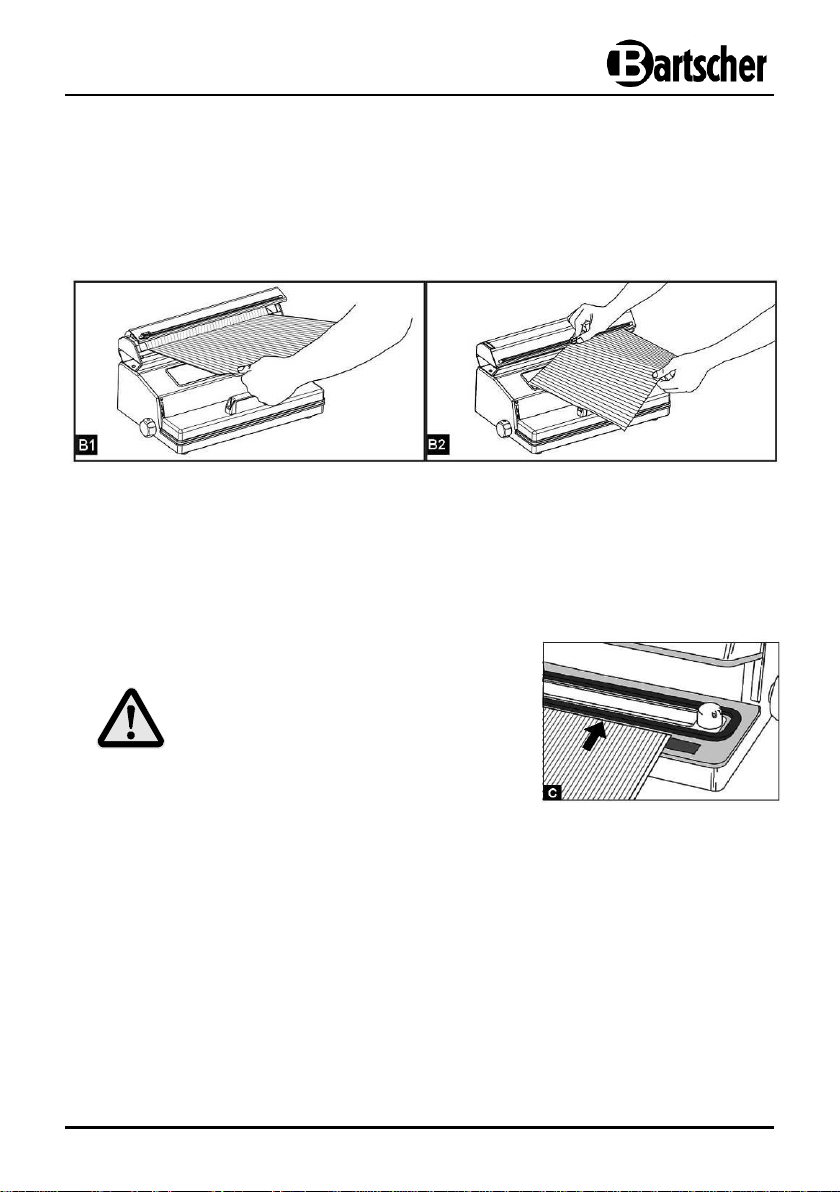
a) Lift the lid and pull the two corners of the roll to the right length, (Fig. B1) and then
close the lid. Press the cutting blade and pull the bag from the left or from the right
(Fig. B2). A straight cut can be obtained. Furthermore, an open side of the bag can be
sealed as follows:
b) Bring one of the open ends of the bag with the
smooth side on the sealing bar (11) (Fig. C).
CAUTION!
The bag must not protrude into the vacuum
chamber (10) or on the gasket (9), but must
reach the end of the external part of the gasket,
as shown in the figure.
5.4.5 Making bags from rolls
Insert a roll of suitable film in the roll holder (15) of the device.
Use only rolls for vacuum packing (with ribbed or embossed side).
Select the appropriate size for the bag in which the food will be preserved.
Make sure that the bag is at least 8 cm longer than the food being preserved. Every
new vacuum packaging reduces the bag by 2 cm.
- 55 -
Page 25
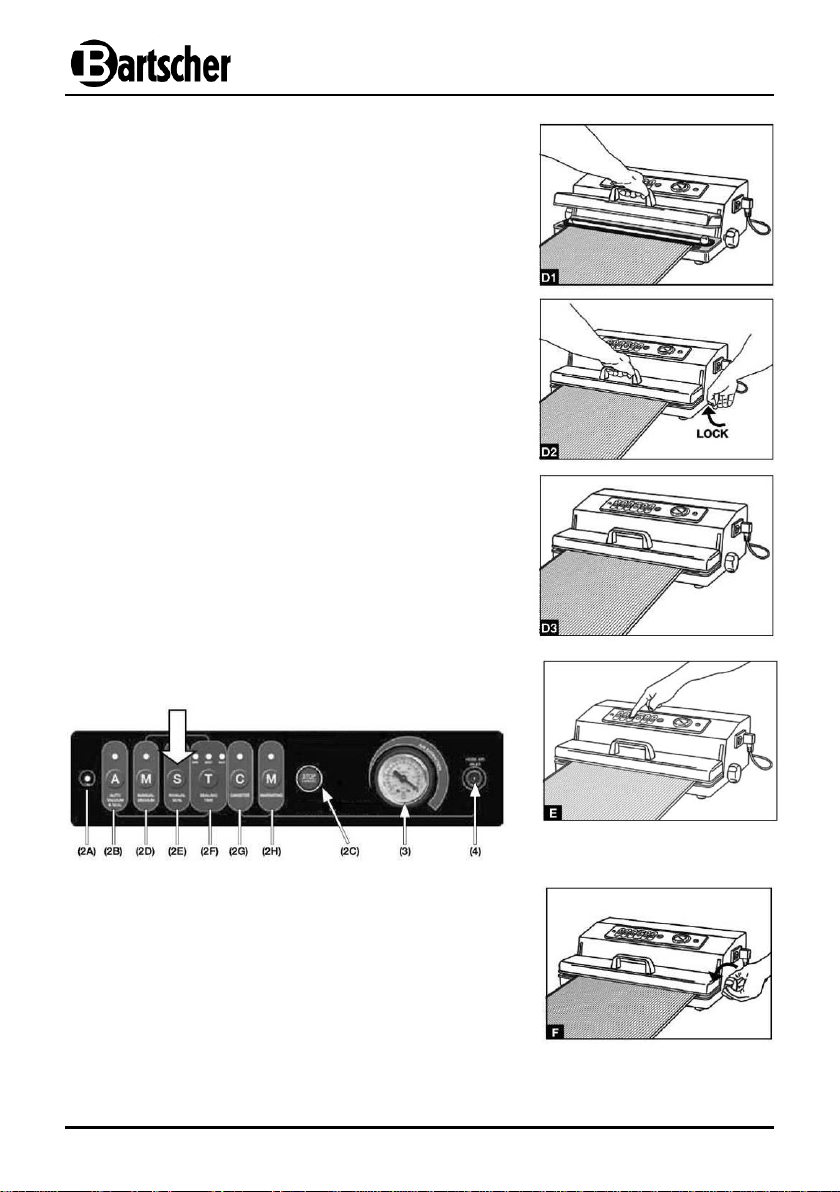
c) Lower the lid (5) by pressing the handle
downwards (6) (Fig. D1), then take it with the
other hand and turn one of the two knobs (7) in
the direction of the LOCK arrow (Fig. D2).
The lid (5) must remain all the way down
(Fig. D3).
d) Press the “S” button (2E): the device closes the
bag automatically and switches off at the end of
the process (Fig. E).
e) Unlock the lid by turning one of the two knobs (7)
of the “Lock & Unlock System” device (Fig. F)
and remove the bag.
- 56 -
Page 26
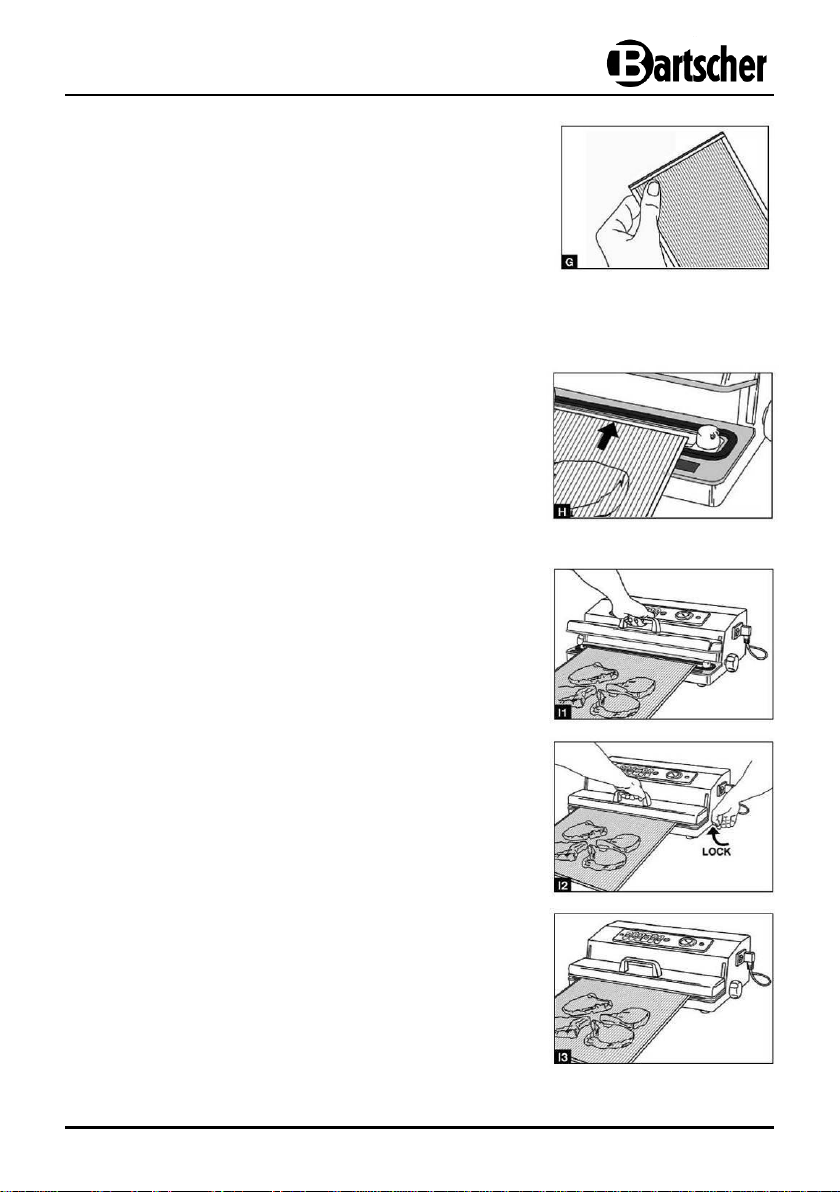
f) Make sure it is sealed properly. A correct sealing
must be smooth, straight and without any creases,
the seam must not show the pattern on the bottom
layer (Fig. G).
5.4.6 Automatic vacuum packing cycle with bags
(precut or see P. 5.4.4)
To perform the automatic packaging cycle in bags
including final sealing.
a) Insert the food in the bag without creating
particular creases or tension on the surface.
Eliminate liquids or food residues from the inner
zone of the bag which must be sealed.
b) Place the bag with its contents in front of the
machine, positioning it at the open end inside
the vacuum chamber (10) with the smooth part
facing upwards (fig. H).
c) Lower the lid (5) all the way (6) (Fig. I1) then take
it with the other hand and turn one of the two
knobs (7) in the direction of the LOCK arrow
(Fig. I2).
The lid (5) must remain closed (Fig. I3).
- 57 -
Page 27
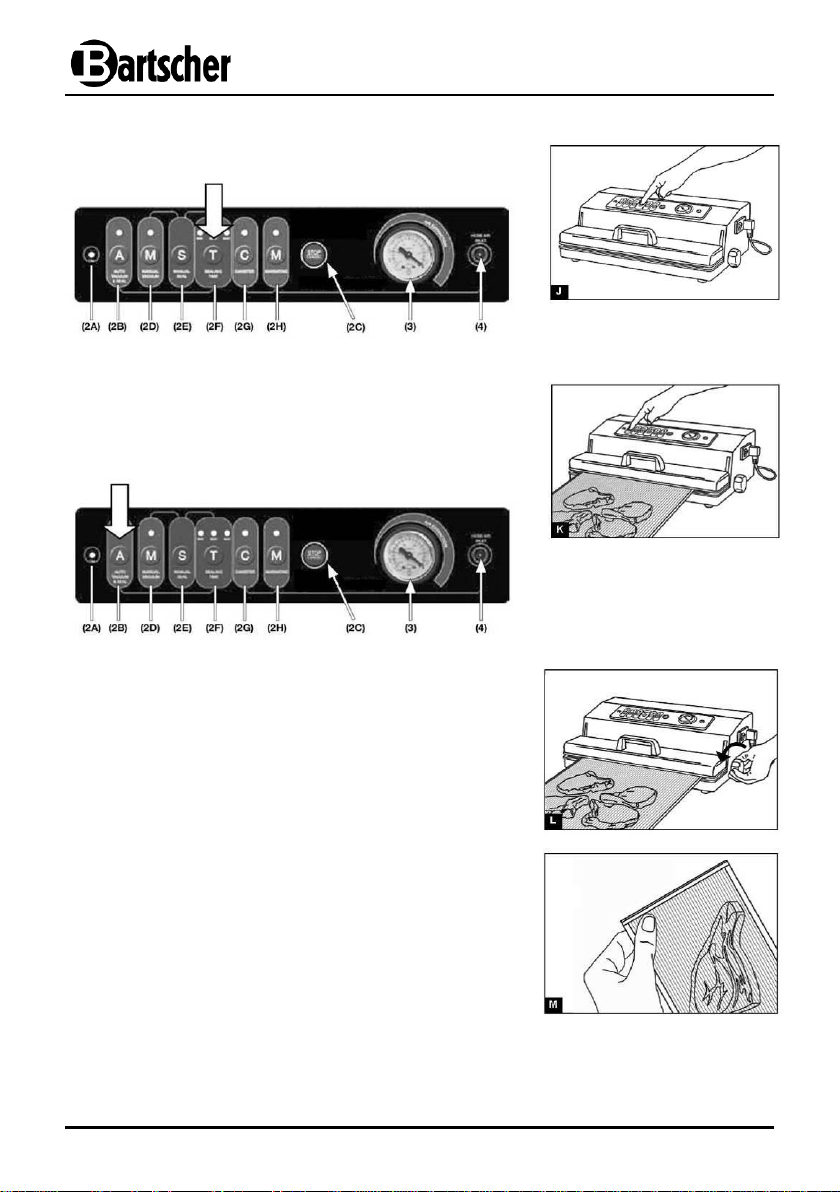
d) If necessary, adjust the sealing time (see point
5.4.3 “Settings/Sealing time settings”) (Fig. J).
e) Press the “A” button (2B) for the automatic cycle.
The device performs a vacuum packing cycle in
automatic mode. Wait for the red indicator light of
the “T” key to quit flashing (Fig. K).
f) Unlock the lid by turning one of the two knobs (7)
of the “Lock & Unlock System” device (Fig. L)
and remove the bag.
g) Make sure sealing is uniform. A correct sealing
must be smooth, straight and without any creases,
the seam must not show the pattern on the bottom
layer (Fig. M).
- 58 -
Page 28
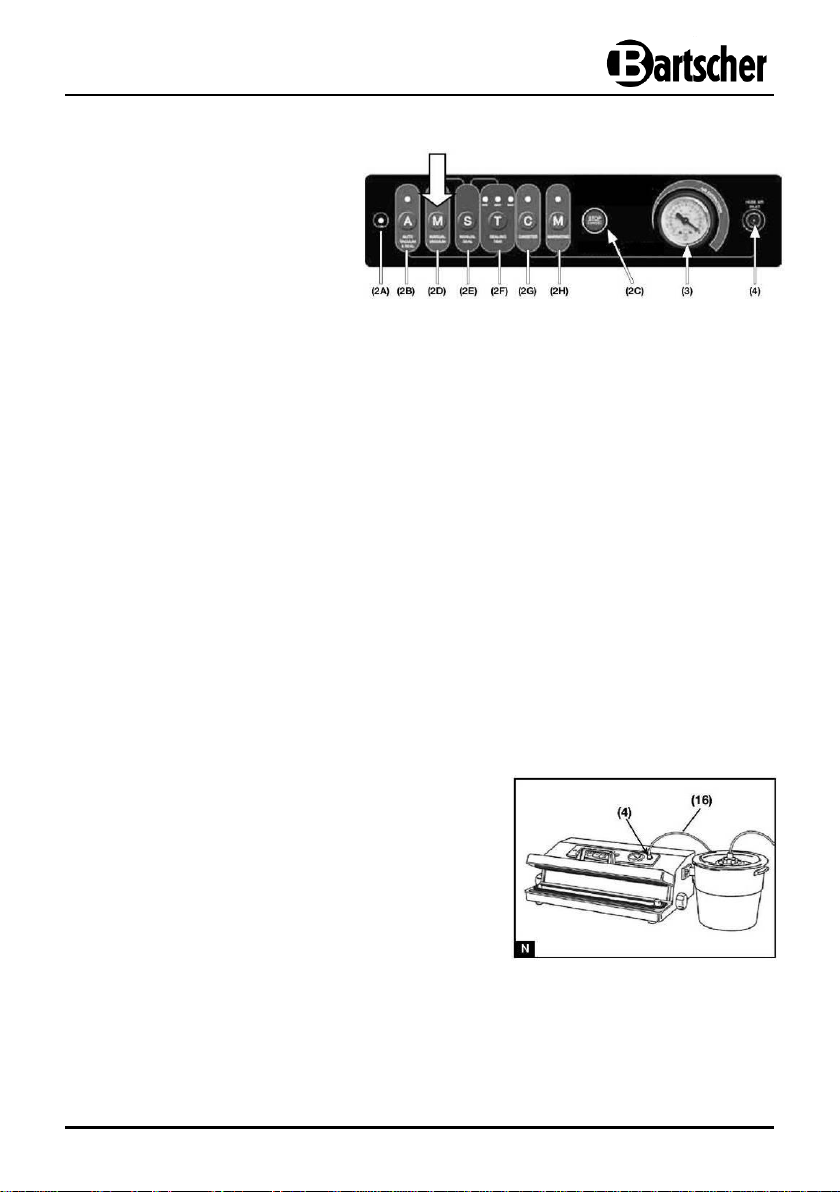
- Repeat the operations from
point a) to d) of section 5.4.5.
- Start the manual vacuum
packing cycle by pressing the
“M” key (2D).
a) Fill the appropriate container and leave at
least 3 cm free from the top edge.
b) Place the lid on the container
c) Connect the supplied hose (16) to the lid of
the container and to the hose air inlet (4) of
the device (Fig. N).
5.4.7 Manual vacuum packing cycle with bags
Then press the “S” key (2E) to seal the bag manually before crushing its fragile or
sensitive contents.
Wait for one of the three red indicator lights MIN / MED / MAX on the “T” key to start
flashing and unlock the lid with one of the two knobs (7) to remove the bag; in this
phase, the device can perform a second safety closure when the pump has not reached
a certain vacuum level (the pump switches back on for a short amount of time).
Maximum air suction even with food having a complex shape
- Repeat the operations from point a) to d) of section 5.4.5.
- Start a manual vacuum packing cycle by pressing the “M” button (2D), wait for the
vacuum gauge (3) to indicate the maximum value (approximately - 0.85 bar) and leave
the pump running for about another minute.
Perform manual closure by pressing the “S” button (2E).
This method is recommended for vacuum packaging foods such as cheese,
Emmenthal, an entire chicken, fish, etc.
5.4.8 Automatic vacuum packing cycle with containers
The devices has also been designed to vacuum with specific containers.
- 59 -
Page 29
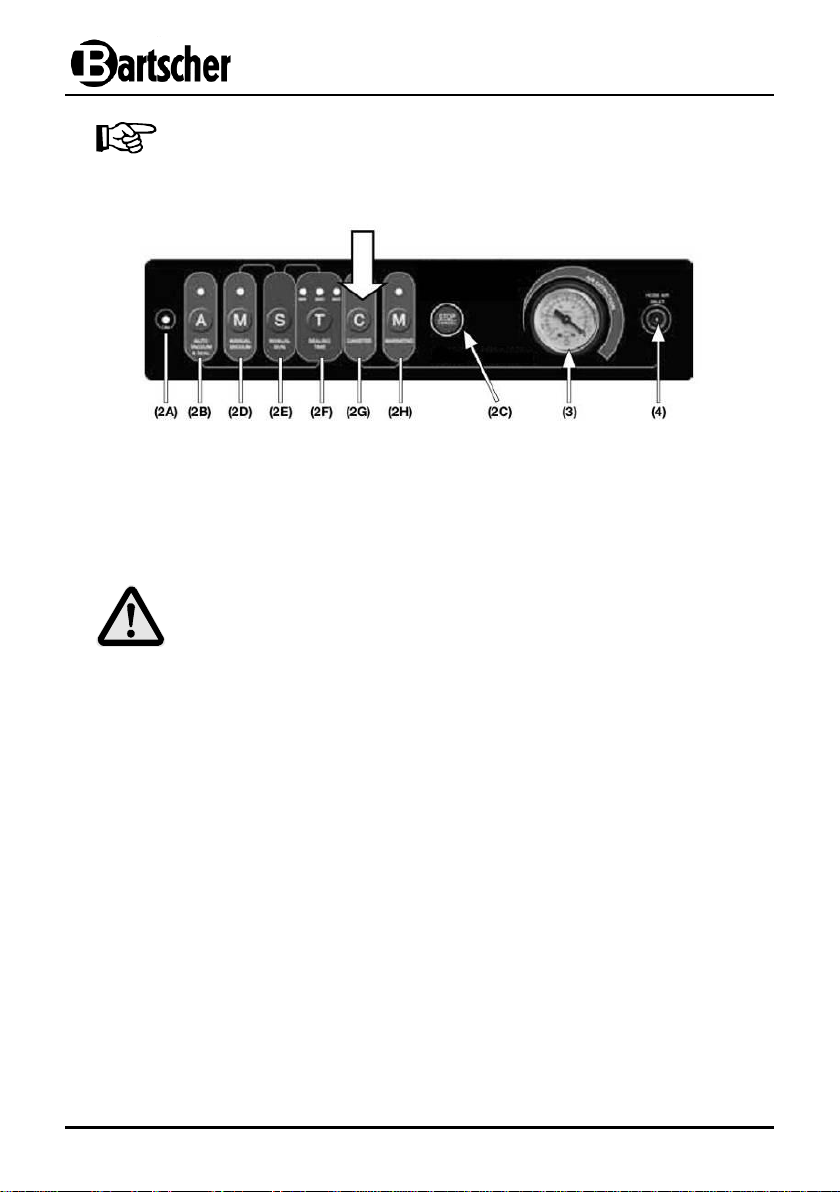
NOTE!
At the start of the vacuum phase, it could be necessary to press
the lid of the container by hand in order to close it hermetically.
d) Press the “C” button (2G). The device performs the vacuum packing cycle and
switches off automatically when it is over. The pump switches off automatically
after approximately 5 minutes.
e) Disconnect the hose from the lid of the container and from the hose air inlet of the
device.
CAUTION!
To guarantee safe and ideal vacuum packaging, only use suitable
accessories and respect the manufacturer's instructions.
- 60 -
Page 30
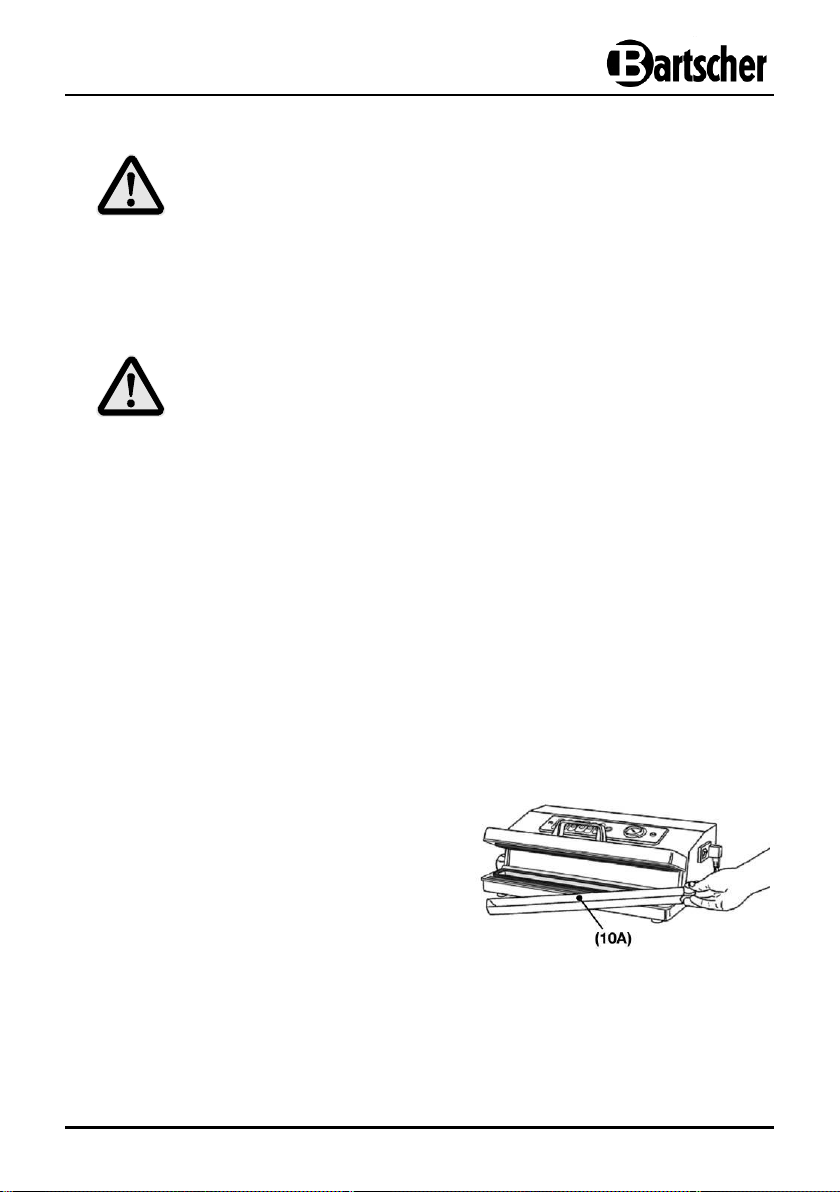
o The liquid protection tank of the device (10A)
can be completely removed and washed in
the upper rack of the dishwasher. Rinse it
like normal kitchen utensils and leave it to
dry completely. Then put it back in the
vacuum chamber.
6. Cleaning
WARNING!
Before cleaning, disconnect the device from the power
supply (unplug!).
The device is not suited for direct washing via water jets.
Protect the device from the water penetration.
CAUTION!
Do not use aggressive detergents, solvents or aromatic essence-based
products!
o Clean the device regularly.
o Unplug the device before cleaning it.
o Clean the surfaces of the equipment before and after use with a moist sponge and
neutral soap, or denatured alcohol, or a water and white vinegar solution.
o If any liquid falls accidentally into the device, unplug it and do not use it. Contact a
service centre or your dealer.
o Important: Do not use metal tools (such as scissors, knife, punch or scraper) to
eliminate impurities as they could damage the steel surface, causing it to corrode.
o Furthermore, improper use of chlorine-based detergents or hydrochloric acid,
hydrofluoric acid or sulphuric acid (as are some decalcifying agents) can reduce
the typical brightness of the stainless steel and affect its resistance.
o To clean the accessories (containers, lids, etc.) see the instructions of the individual
accessory.
- 61 -
Page 31
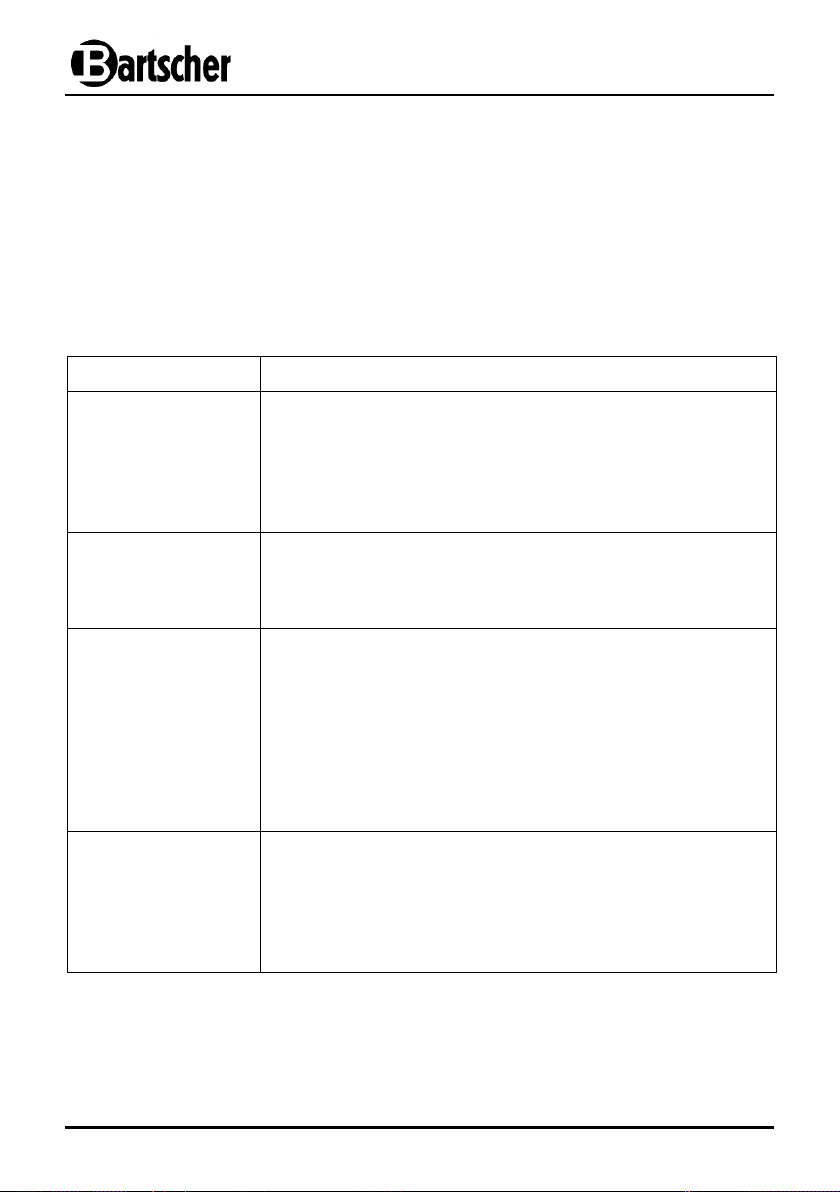
Problem
Possible cause and solution
The device does
not work
Check the switches (1).
Make sure the power cable is plugged into the device and
into the wall. Check the socket by plugging in another
device.
Make sure that the power cable or plug is not damaged.
In that case, do not use the device.
Device does not
perform the first
sealing on the
piece of roll cut
Make sure the roll is positioned properly as described in
paragraph: 5.4.4 “Making bags from a roll”.
Make sure that the closure gasket is positioned properly
and is not damaged.
The device does
not supply
complete vacuum
in the bags
To seal correctly, the open end of the bag should be fully
inside the vacuum chamber compartment.
Check that the sealing bar and both the sealing and airtight
gaskets are not dirty. After having cleaned them, if
necessary, put them back in place properly.
The bag could be perforated. To check whether it leaks,
fill the bag with air, put it in water and make pressure.
If there are bubbles it means that there is a leak. Reseal
the bag or use another one.
The device does
not seal the bag
properly
If the bag does not close correctly, increase the sealing
time by pressing the “T” key (2F).
If the sealing bar heats up and melts the bag, raise the lid
and let the sealing bar cool off for a few minutes.
Make sure that the closure gasket is positioned properly
and is not damaged.
o Use only a soft cloth and never use abrasive detergents which could scratch the
surface.
o After cleaning, use a soft and dry cloth to dry and polish the surface.
7. Troubleshooting
In case of malfunction, disconnect the device from its power source. Before contacting
the service or sales agent, verify - based on the table below - whether it is possible to
eliminate disruption in operation.
- 62 -
Page 32
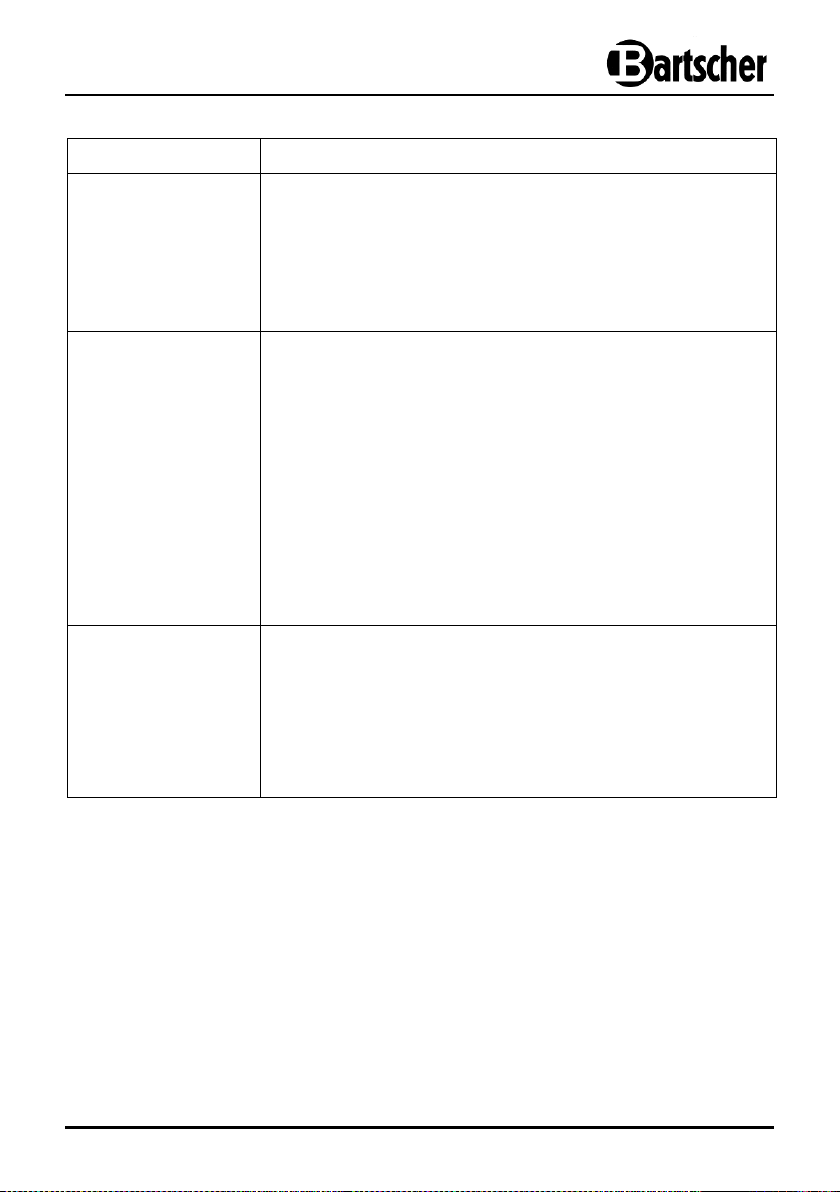
Problem
Possible cause and solution
The bag does not
hold the vacuum
after closure
Closure leakages could be caused by creases, crumbs,
grease and humidity. Open the bag, clean the top part on
the inside, remove debris from the sealings bar and perform
a second closure.
Make sure the bag has no damage or holes which could
reduce vacuum. Protect sharp edges of the contents with a
paper napkin.
The device does not
create vacuum
in the container
Reconnect the suction hose to the container lid (or to the
suction cap, if necessary) and the hose air inlet to the
device
Leave at least 3 cm between the contents and the top of
the container.
Liquid could leak because it did not cool off sufficiently
before being vacuum sealed. Cool the liquid in the
refrigerator and not at room temperature.
Make sure that the top edge of the container and the gasket
of the lid are intact and clean. Clean both with a moist cloth
and perform vacuum packaging.
Make sure that the gaskets of the container lid are
positioned properly and are not damaged.
The container or
the lid lose their
vacuum
Make sure that the top edge of the container and the gasket
of the lid are intact and clean. Clean both with a moist cloth
and perform vacuum packaging.
Make sure that the gaskets of the container lid or the
universal lid are positioned properly and are not damaged.
Make sure that the hose is connected properly to the
container lid and to the hose air inlet (4) of the device.
If you cannot remove the malfunctions:
- do not open the body,
- notify the customer service point or contact the sales
agent, while providing the following information:
type of malfunction;
code number and serial number (see identification plate
on device underside);
date of purchase.
- 63 -
Page 33
For the disposal of the device please consider and
act according to the national and local rules and
regulations.
8. Waste disposal
Discarding old devices
At the end of its service life the discarded device has to be disposed in accordance with
the national regulations. It is advisable to contact a company which is specialized in
waste disposal, or just contact the local disposal service in your community.
WARNING!
To exclude any abuse and the dangers involved make
the waste device unfit for use before disposal.
For that purpose disconnect device from mains supply
and remove mains connection cable from the device.
Bartscher GmbH phone: +49 5258 971-0
Franz-Kleine-Str. 28 fax: +49 5258 971-120
33154 Salzkotten Service-Hotline: +49 5258 971-197
Germany www.bartscher.com
- 64 -
 Loading...