

Bartscher 296411, IR092M01, IRE92M01, IR091M01, 296421 Installation, Operating And Maintenance Instructions
...
CERA N H E R D E
CERAMIC GLASS STOVE
FOURNEAU VITROCERAMIQUE
CUCINA VETROCERAMICA
COCINA DE VITROCERAMICA
296411 / IR091M01
296421 / IR092M01
296321 / IRE92M01
FOGÕES DE CERÂMICA
KERAMISCH FORNUIS
KUCHNIA CERAMICZNA
DE
GB
FR
IT
ES
PT
NL
Rev.-Nr.: 01-2017
INS T A LLA T I O N S-, B E DIE N U N GSUN D W AR T UNGS A NW E ISU N GEN
INS T A LLA T I O N , O P E R ATI N G
AND M AINT E N ANC E N STRU C T IONS
MA N U E L D' I N STAL L ATION ,
D' U T I LISA T I O N E T D 'E N T R E TIE N
MA N U A LE D I I NST A L L AZI O N E ,
US O E MA N U T E NZ I O N E
MA N U A L DE I N STA L A C IÓN,
US O Y MA N T E N IMI E N T O
MA N U A L DE I N STA L A ÇÃO,
UT I L I ZAÇÃ O E MA N U T ENÇÃ O
HA N D L EIDI N G VOOR I NST A L L ATIE ,
GE B R U IK E N O ND E R H O UD
W SK A Z ÓW KI DO T Y C ZĄ C E I NST A L A CJI,
UŻ Y T K OW AN IA I KONS E RW AC J I
PL

DE
TECHNISCHE ÄNDERUNGEN VORBEHALTEN!
GB
FR
IT
ES
PT
NL
TECHNICAL CHANGES RESERVED!
SOUS RÉSERVE DE MODIFICATIONS TECHNIQUES !
CI RISERVIAMO LA POSSIBILITÀ DI INTRODURRE MODIFICHE TECNICHE!
¡SE RESERVA EL DERECHO A INTRODUCIR MODIFICACIONES TÉCNICAS!
SUJEITO A ALTERAÇÕES TÉCNICAS!
TECHNISCHE WIJZIGINGEN VOORBEHOUDEN!
PL
WPROWADZANIE ZMIAN TECHNICZNYCH ZASTRZEŻONE!

ENGLISH
1. TABLE OF CONTENTS
1. TABLE OF CONTENTS ..................................................................................................................... 1
2. INDEX ................................................................................................................................................. 2
3. SAFETY .............................................................................................................................................. 3
4. GENERAL INFORMATION AND WARNINGS ................................................................................... 4
4.1. General guidelines ................................................................................................................... 4
4.2. Description of the appliance ..................................................................................................... 4
4.3. Index plate ................................................................................................................................ 5
4.4. Exchange of components (service technician) ........................................................................ 5
4.5. Protection devices .................................................................................................................... 5
5. USE AND OPERATION ..................................................................................................................... 6
5.1. Description of the use the device. ............................................................................................ 6
5.2. Heating plate switching on and off ........................................................................................... 7
5.3. Oven switching on and off ........................................................................................................ 8
5.4. Guidelines on how to use the appliance .................................................................................. 8
6. CLEANING AND MAINTENANCE ..................................................................................................... 9
6.1. Guidelines on cleaning and maintenance ................................................................................ 9
6.2. Correct maintenance ................................................................................................................ 9
6.3. Cleaning of ceramic plate ....................................................................................................... 10
6.4. Cleaning of the oven .............................................................................................................. 10
7. PROBLEMS DURING OPERATION ................................................................................................ 11
8. INSTALLATION ................................................................................................................................ 11
8.1. Packaging and unpacking ...................................................................................................... 11
8.2. Installation (service technician) .............................................................................................. 12
8.3. Installation of the appliance in a line ...................................................................................... 13
8.4. Connection to the mains (service technician) ........................................................................ 13
8.5. Check-up (service technician) ................................................................................................ 15
9. APPLIANCE DISPOSAL .................................................................................................................. 16
ATTACHMENTS ....................................................................................................................................... I
Bartscher GmbH
Franz-Kleine-Str. 28
33154 Salzkotten phone: +49 (0) 5258 971-0
Germany fax: +49 (0) 5258 971-120
GB
1
ENGLISH
2. INDEX
GB
A
APPLIANCE DISPOSAL 16
C
Check-up 15
Cleaning of ceramic plate 10
Cleaning of the oven 10
Connection to the mains 13
Correct maintenance 9
D
Description of the appliance 4
Description of the of the use the device 6
E
Exchange of components 5
G
General guidelines 4
Guidelines on cleaning 9
Guidelines on how to use the appliance 8
Guidelines on regular use of the appliance 8
H
Heating plate switching on and off 7
Heating plates - safety thermostat 5
I
Index plate 5
Installation 12
Installation of the appliance in a line 13
L
Longer interval in the use of the appliance 8
M
Maintenance 9
O
Oven - safety thermostat 5
Oven switching on and off 8
P
Packaging 11
PROBLEMS DURING OPERATION 11
Protection devices 5
R
Residual heat indicator light. 6
S
SAFETY 3
U
Unpacking 11
2
3. SAFETY
Read carefully the guidelines and
instructions in the instruction manual
before you use the appliance.
The instruction manual contains general
information on how to safely use and maintain the
appliance. Retain the manual for future reference.
Electric installation conforms to CEI EN
60335-1 and 60335-2-36 regulation.
To prevent any hazard, the damaged
mains power cable may be replaced by the
manufacturer or service personnel only.
The manufacturer took extra care when designing
and manufacturing to prevent any safety or health
hazard to the personnel operating the appliance.
Please read carefully the guidelines in the
instruction manual and instructions placed directly
onto the appliance. Above all, observe all the
safety instructions.
Do not intervene in or remove the protective
devices installed in the appliance. Noncompliance may lead to severe safety and health
hazard against people. We recommend to perform
a few tests to know the layout and main functions
of the control panel, particularly those to switch
the appliance on and off.
The appliance is intended only for the use it has
been designed for and any other use is
considered as the use not in compliance with the
intended use.
The manufacturer is not liable for material
damage or damage to person caused by
misapplication or incorrect application of the
appliance.
Any maintenance work that requires special
technical license or special skills may be
performed by qualified personnel only.
ENGLISH
To provide hygiene and protect foods from dirt, all
the elements that have direct or indirect contact
with the foods and all border areas must be
thoroughly cleaned. Use only the cleaning agents
intended for use in contact with food and avoid
using flammable agents or harmful to health.
After each use of the appliance make sure that all
the heating elements and control elements have
been switched off and the cable unplugged.
In case of prolonged interval in using the
appliance disconnect all power supply cables and
thoroughly clean the inside and outside elements
of the appliance.
In direct connection to the mains
the safety switch should be supplied
where wire joints dilation is large enough
to secure disconnection in category III
overvoltage, which is in accordance with
the installation rules.
The device requires some safety
measures during installation, positioning,
fixing, and connecting to the power supply
(section 8 “INSTALLATION”).
Do not clean the device with direct
stream of water.
When the cooker surface is cracked
immediately disconnect it from the power
supply.
Do not place any plastic containers on
hot surface of the cooker.
Avoid using the aluminium foil for
protecting the surfaces during the device
operation.
GB
3
GB
ENGLISH
4. GENERAL INFORMATION AND WARNINGS
4.1. General guidelines
The manual has been edited by the manufacturer
to provide the authorized personnel with the
information necessary to work with the appliance.
We recommend the intended readers to read the
manual carefully and comply with the information.
By reading the information contained in the
manual, hazards against people health and safety
may be prevented.
Retain the manual in an easily available place
throughout the time of use of the appliance to
have access and refer to the required information
at any time.
4.2. Description of the appliance
Special symbols, described below, have been
used to stress important information or draw
attention to essential data:
Warning
Indicate important safety
instructions. You should acquire the
proper conduct to prevent hazard against
people health and safety or not to cause
any damage.
Caution
Indicate essentials technical data that
you cannot ignore.
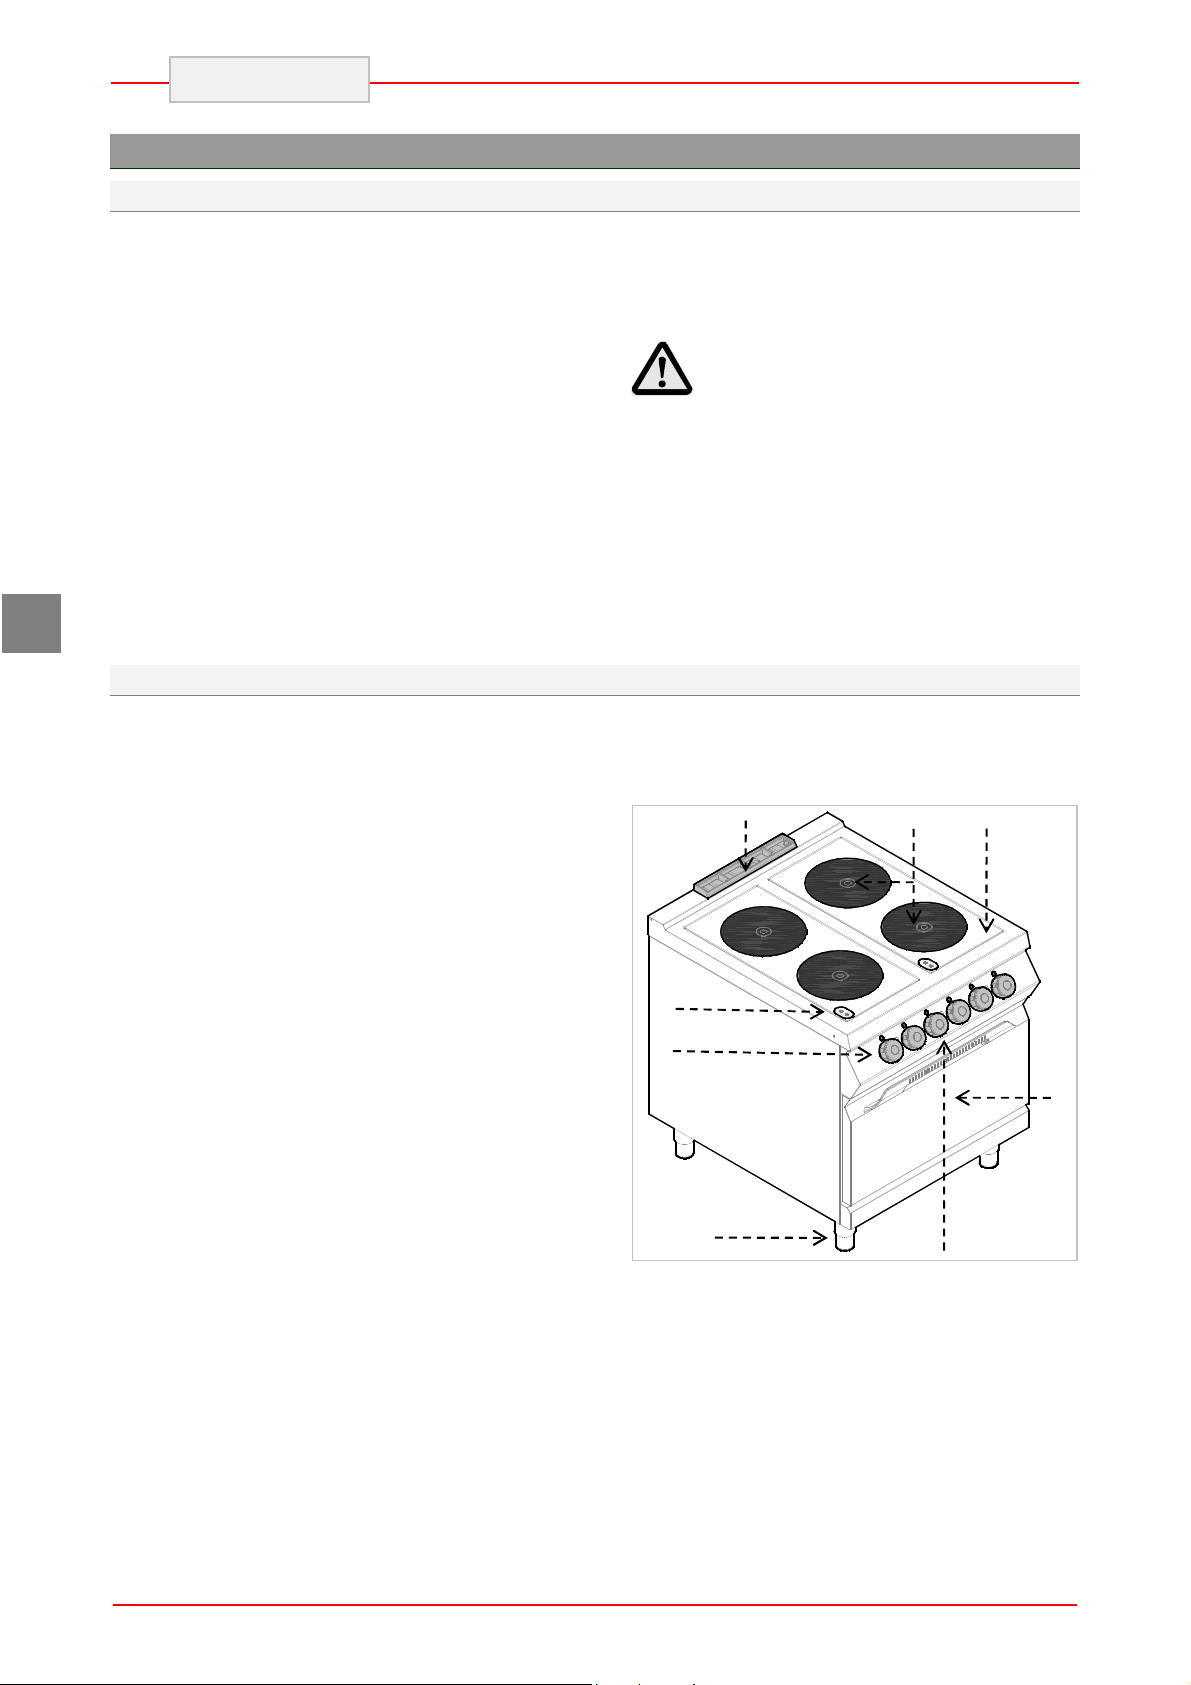
The electric cooker with infrared ceramic heating
plate has been designed and manufactured for
preparing and cooking of food products in the
professional gastronomy sector.
1) Cooker: with ceramic heating plate and
infrared heating coil;
2) Hob;
3) Temperature controller: adjusts power
of electric heating plate;
4) Feet of adjustable height;
5) Power supply indicator light: indicates
activation of supply voltage.
6) Heating plates indicator light: Indicates
activation of the heating plates and is on
when their temperature exceeds 50°C
7) Electric oven (static);
8) Oven smoke extraction;
9) Oven thermostat controller: adjusts
temperature of the electric oven
10) Oven switch: turns on or off the oven
heating coils.
11) Thermostat indicator light: indicates
activation of the safety thermostats.
12) Power supply indicator light: indicates
activation of supply voltage.
13) Temperature indicator light: indicates
oven heating.
8
6
3 5
4
2
9 10 11 12 13
1
7
4

2
5
4.3. Index plate
The index plate indicated in the drawing is
mounted directly onto the appliance. There are all
guidelines and information on the plate required
for safe use.
1) EAN-No.
2) Code-No. / Model-No.
3) Connection: power / supply frequence /
supply voltage
4) Date of production
5) Serial-No.
6) WEEE symbol
7) CE-marking
2
3
4
4.4. Exchange of components (service technician)
ENGLISH
1
6
7
GB
Before exchange of the component
switch on all the existing protection
devices.
In particular, switch off the electric
supply with the electrical potential switch.
If necessary, exchange the used components
to the original spare parts.
4.5. Protection devices
The device is equipped with the following
protection systems:
1. Heating plates - safety thermostat: It is the
device inside each heating plate which
reduces power in case of overheating. When
the reason is removed and temperature
drops, the operation is automatically restored.
2. Oven - safety thermostat: Cuts off the oven
power supply in case of overheating.
Safety thermostat activation is indicated by
appropriate indicator light. Figure shows position (2)
of oven safety thermostats.
We are not liable for personal injury or
damage to the components that arise due to
application of other spare parts than original
or intervention into the appliance without the
manufacturer’s consent that may have altered
the safety requirements.
5
Front heating
Back heating
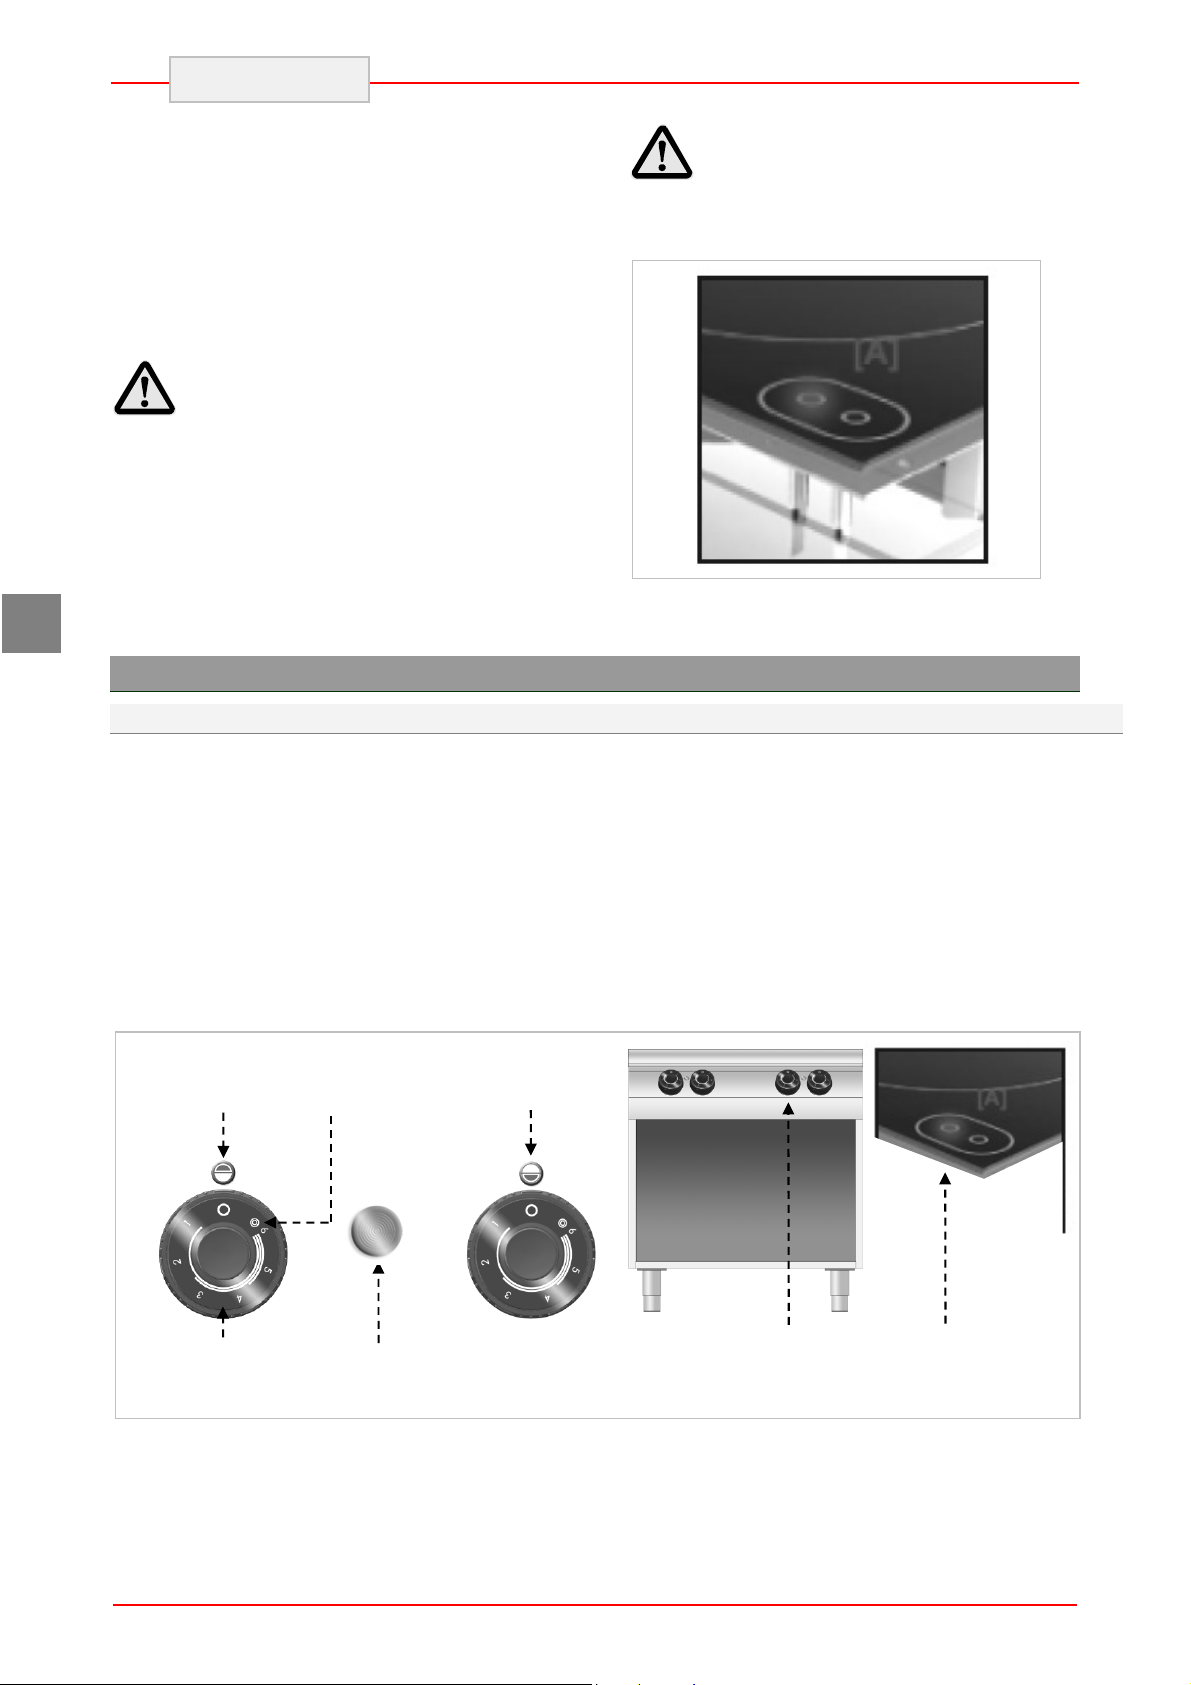
The ceramic cooker is equipped IN STANDARD
with RESIDUAL HEAT INDICATOR LIGHT on
the cooker, which indicates that temperature of
the cooking surfaces exceeds 70°C and warns the
user to NOT TO TOUCH the cooking surfaces to
avoid burns. The indicator light becomes on after
few minutes from the activation of cooker heating
coils and remains on during the normal operation.
After deactivation of the heating plates it remains
on until the temperature drops below 50°C.
ENGLISH
Keep in mind that in case of sudden
power supply failure there is the risk of
burns as the cooking surfaces may be still
hot.
Check every day that the protection
devices are mounted correctly and
operational.
GB
5. USE AND OPERATION
5.1. Description of the use the device.
The elements controlling the essential functions
are located on the control panel of the device.
A) Temperature controller: adjusts power
of electric heating plates
B) Oven thermostat controller: adjusts
temperature of the electric oven
C) Oven switch: activates upper, lower, or
both heating coils.
D) Green indicator light: indicates activated
power supply
Maximum
plate position
power
position
plate position
E) White indicator light: indicates oven
heating
F) Red indicator light: indicates activation of
safety thermostats.
G) Indicator light of heating plates:
indicates activation of electric heating
plates.
A
Plate power
D
Supply voltage
indicator light
6
A
G
Oven indicator
Oven heating coils
position
position
ENGLISH
Oven
lights
Oven
D
E
B
F
Oven
temperature
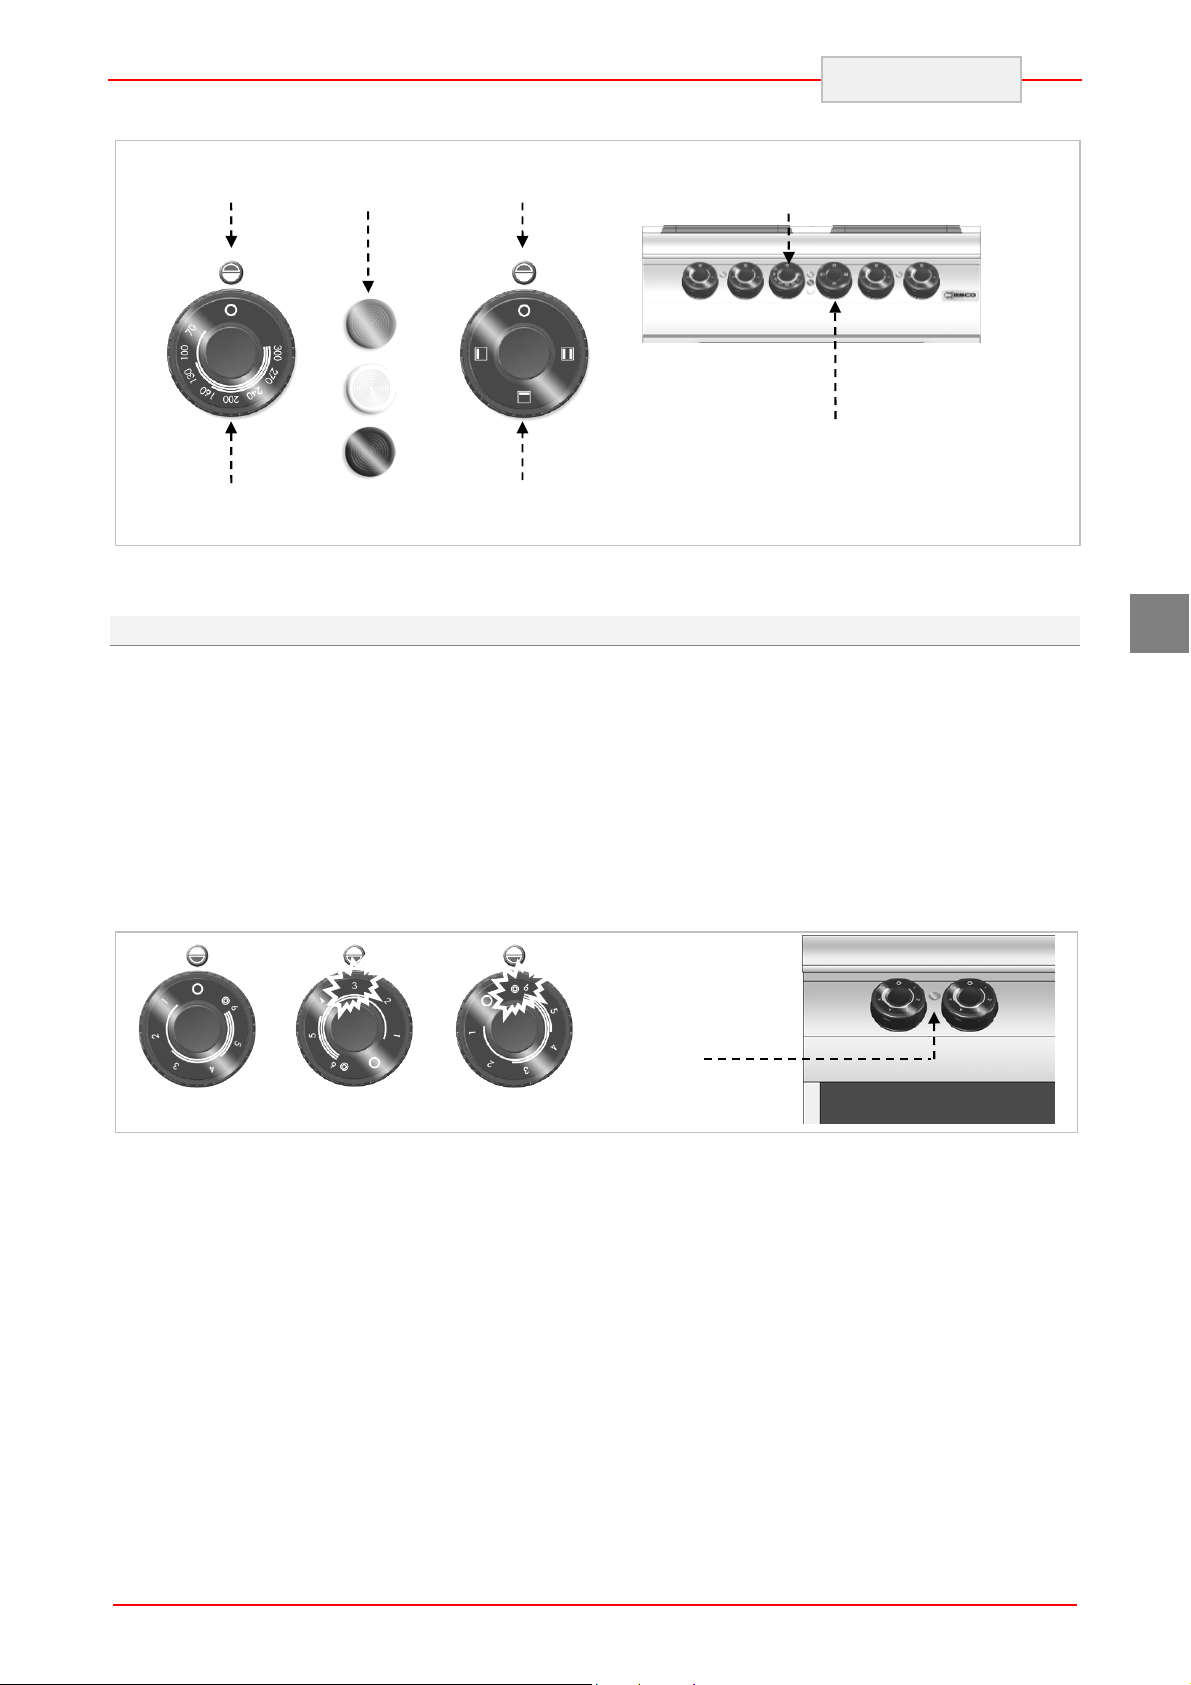
5.2. Heating plate switching on and off
During the first activation leave the heating plates
for heating without pots.
A) Start the automatic switch-off to turn on
the electrical connection.
B) Turn the temperature controller to position 1
to set the heating plate to minimum power.
The green control light (V) will come on.
C) Then turn the temperature controller to
desired position.
position
C
Oven – thermostat
controller
Oven switch
GB
D) Turn the temperature controller to position
A to set the heating plate to maximum
power.
E) Turn the temperature controller to position 0
to switch off the heating plate. The green
control light (V) will go off.
F) Start the automatic switch-off to turn off
the electrical connection, when needed.
V
Pos 0
Pos A
7
 Loading...