

Page 1

Original-Gebrauchsanleitung
V1/1018
„Aurora 22“
190157
Page 2
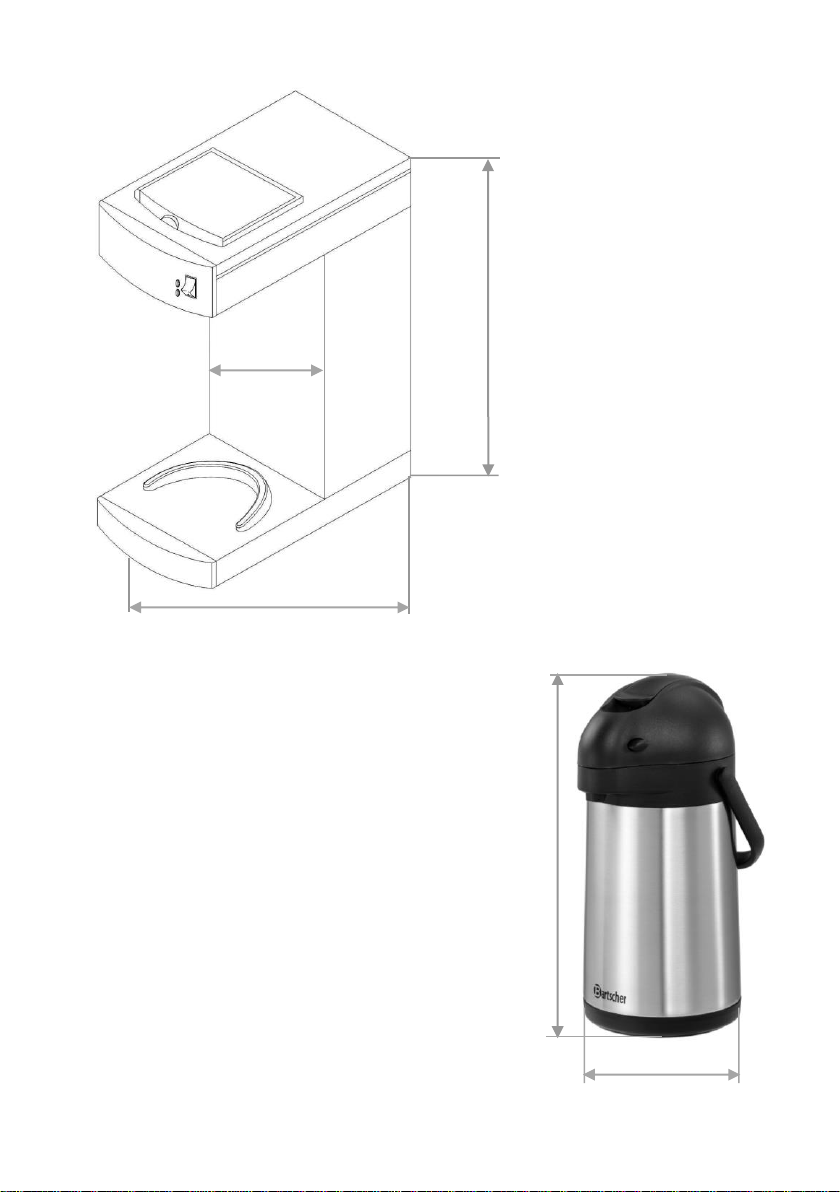
520
405
390
150
215
Page 3
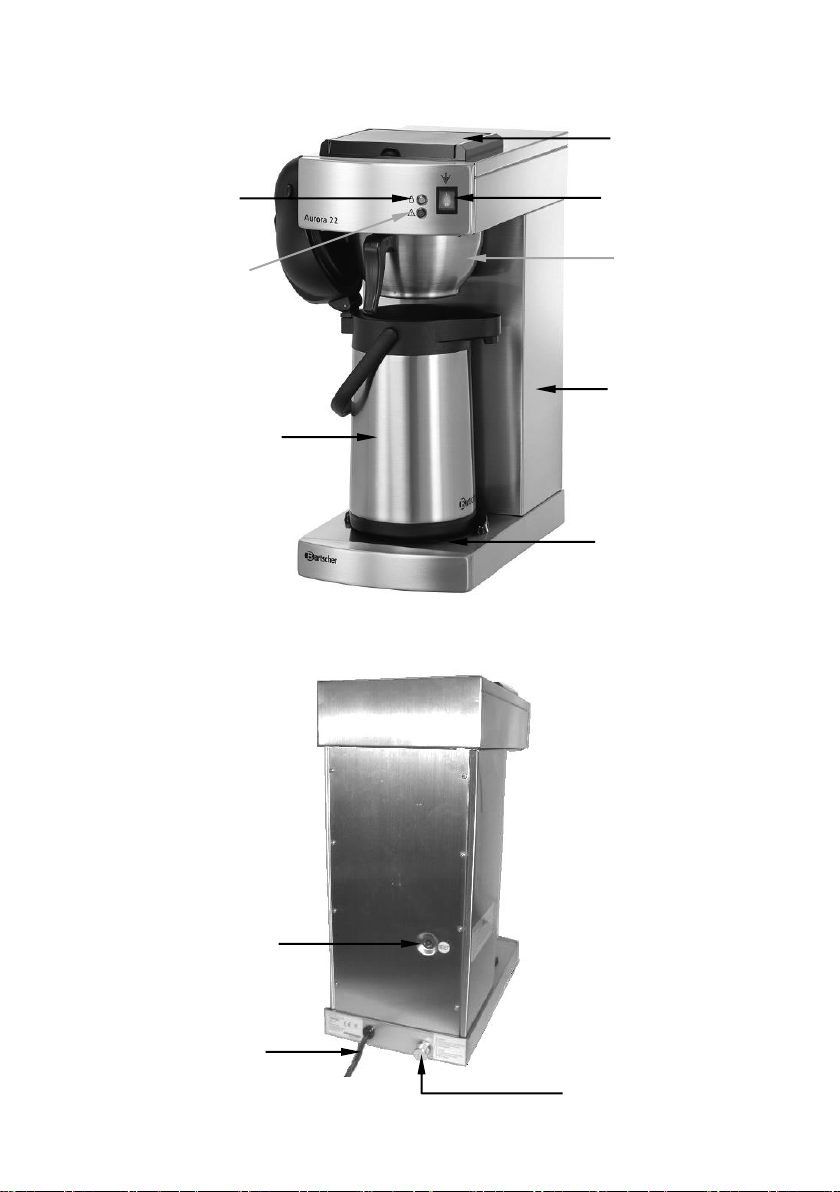
8
6
11
9
5 1 7
2
3
4
10
Page 4

GB/UK
ENGLISH
Table of contents
1.Safety ........................................................................................................................ 24
1.1 Key to symbols ..................................................................................................... 24
1.2 Safety instructions ................................................................................................ 25
1.3 Proper use ............................................................................................................ 29
1.4 Use against the intended purpose ........................................................................ 29
2. General information ................................................................................................ 30
2.1 Liability and Warrantees ....................................................................................... 30
2.2 Copyright protection ............................................................................................. 30
2.3 Declaration of conformity ...................................................................................... 30
3. Transport, packaging and storage......................................................................... 31
3.1 Delivery check ................................................................ ...................................... 31
3.2 Packaging ............................................................................................................. 31
3.3 Storage ................................................................................................................. 31
4. Technical data ......................................................................................................... 32
4.1 Technical specification ......................................................................................... 32
4.2 Overview of parts ................................................................................................. 34
5. Installation and operation ....................................................................................... 35
5.1 Installation ............................................................................................................ 35
5.2 Operation .............................................................................................................. 36
6. Cleaning and descaling .......................................................................................... 39
7. Possible Malfunctions ............................................................................................ 42
8. Waste disposal ........................................................................................................ 44
Bartscher GmbH phone: +49 5258 971-0
Franz-Kleine-Str. 28 fax: +49 5258 971-120
33154 Salzkotten Service-Hotline: +49 5258 971-197
Germany www.bartscher.com
- 23 -
Page 5
Read this instruction manual before using and
keep them available at all times!
This instruction manual contains information about the installation, operation and
maintenance of the device and should be consulted as an important source of
information and reference guide.
Awareness of the safety instructions and instructions for use in this manual will ensure
the safe and correct use of the device.
In addition to the information given here, you should comply with any local Health and
safety Controls and generally applicable safety regulations.
The instruction manual forms part of the product and should be kept near the device
and easily accessible for anyone carrying out the installation, servicing, maintenance or
cleaning.
Please keep these instructions and give them to future owners of the device.
1.Safety
This device is designed in accordance with the presently applicable technological
standards. However, the device can pose a danger if handled improperly and
inappropriately.
All persons using the device must follow the recommendations and instructions
in this instruction manual.
1.1 Key to symbols
In this manual, symbols are used to highlight important safety instructions and any
advice relating to the device. The instructions should be followed very carefully to avoid
any risk of accident, personal injury or material damage.
WARNING!
This symbol highlights hazards which could lead to injury.
WARNING!
This symbol highlights dangerous situations which could lead to injury or death.
- 24 -
Page 6

HOT SURFACE!
This symbol is a warning that the device surface is hot when in use.
Ignoring this warning may result in burns!
HOT STEAM!
This symbol indicates that during the operation the hot steam escapes from the
device. Risk of scalding if safety instructions are not observed!
CAUTION!
This symbol highlights dangerous situations which could lead to light
injuries, or damage, malfunction, and/or destruction of the device.
NOTE!
This symbol highlights recommendations and information aimed for effective
and trouble-free device operation.
1.2 Safety instructions
The device can be used by children 8 years and up, as well as
by people with disabilities and those with limited experience/
knowledge as long as they are under supervision or have been
instructed on proper use of the device and its possible dangers.
Children should not play with the device. Cleaning and
maintenance cannot be performed by children younger than 8
years old and must be done under supervision. Children under
the age of 8 years old must be kept away from the device and
its power cord.
Never leave the device unattended when in use.
Only use the device indoors.
- 25 -
Page 7
The device is not adapted for use with an external timer or
remote control.
The device must be operated in correct and safe technical
condition only. In case of operational problems disconnect the
device from the power supply (pull the plug from the socket)
and contact the service company.
Prevent access of children to the package materials like plastic
bags and foamed polystyrene elements. Suffocation hazard!
Only a qualified technician and using original spare parts and
accessories should carry out repairs and maintenance of the
device. Do not attempt to repair the device yourself.
Do not use any accessory or spare parts that have not been
recommended by the manufacturer. These can be dangerous
for the user or lead to damages of the device or personal injury,
and further, the warranty expires.
To prevent hazards and to ensure optimum efficiency, no
modifications or alterations to the device that are not explicitly
approved by the manufacturer may be undertaken.
DANGER! Electric shock hazard!
Follow the safety instructions below to avoid the hazard.
Never allow the power cable to come into contact with heat
sources or sharp edges. The power cable should not hang over
the side of the working surface. Ensure that no one can step on
or trip over the cable.
- 26 -
Page 8

The power cable must not be folded, bent or tangled, and must
always remain fully unrolled. Never place the device or other
objects on the power cable.
Do not cover the cable. Keep away the cable from operating
range and do not immerse it into water.
Check the power cord regularly for damage. Do not use the
appliance if the power cord is damaged. If this cable is damaged,
it must be replaced by customer service or a qualified electrician
in order to avoid dangers.
The supply cable must be disconnected from the socket
only by pulling the plug.
Never carry or lift the device by the supply cable.
In any case do not open the device housing. In case of
electrical or mechanical modifications the electric shock
hazard will occur.
Do not use any acid agents and make sure no water ingresses
the device.
Never operate the device with moist hands or standing on wet
floor.
Remove the plug from its socket:
- when the device is not used,
- in case of anomalies during operation,
- before cleaning.
- 27 -
Page 9
HOT SURFACE! Burn hazard!
Follow the safety instructions below to avoid the hazard.
During the operation, the surface of the device is very hot! To
prevent burns to fingers and hands do not touch hot surfaces
of the device! During operation only touch the designated
handles and switches.
WARNING! Risk of scalding with hot steam and water!
Follow the safety instructions below to avoid the hazard.
During the brewing a small amount of hot steam is produced.
To avoid burns, be careful when removing the thermos pump
jug from the lower plate.
Drain the water from the water tank only when the device and
the water cooled down sufficiently. Finally, retighten the drain
screw.
CAUTION!
In order to avoid any damages of the device follow the
instructions below:
Never wash the device in the dishwasher.
Do not use any sharp objects or abrasive cleaning agents for
surface cleaning.
Do not turn the device on if there is no water in the tank.
- 28 -
Page 10

1.3 Proper use
Every use of the device for a different purpose and/or in a way that diverges from the
intended use is not allowed and is assumed as the use against the intended purpose.
Any claims against the manufacturer or their authorized representatives as a consequence
of experiencing damage resulting from the use against the intended purpose are
inadmissible.
The liability for damage occurred during the use of the device against its intended
purpose is borne solely and exclusively by the user.
Safety operation of the device is guaranted only when it is used for its intended purpose
and according to the instructions included in this manual.
The coffee machine is intended only for preparing brewed filter coffee beverages
using ground coffee, filter and cold water.
1.4 Use against the intended purpose
Any use other than those mentioned in point 1.3 “Proper use“ is assumed as the use
against the intended purpose and is not allowed.
The use against the intended purpose may lead to severe injury or damage caused by
hazardous voltage, fire or high temperature. It is allowed to use the device to perform
only the work described in the instruction manual. Improper use may cause the device
damage.
Any manipulation with the device, assembly or maintenance work may be performed
exclusively by the authorized service staff.
- 29 -
Page 11
The device complies with the current standards and directives of the EU.
We certify this in the EC declaration of conformity. If required we will be
glad to send you the according declaration of conformity.
2. General information
2.1 Liability and Warrantees
All the information and instructions in this manual take into account standard safety
regulations, current levels of technical engineering as well as the expertise and
experience we have developed over the years.
The instruction manual was translated with all due care and attention. However, we do
not accept liability for any translation errors. The German version of this instruction
manual is definitive.
If the delivery consists of a special model, the actual scope of delivery may differ from
the descriptions and illustrations in this manual. This is also the case for special orders
or when the device has been modified in line with new technology.
CAUTION!
Read this manual carefully and thoroughly before any operation
of the device, and especially before turning it on!
Manufacturer is not liable for any damages or faults caused by:
- violation of advice concerning operation and cleaning;
- use other than designed;
- alterations made by user;
- use of inadequate spare parts.
We reserve the right to make technical changes for purposes of developing and improving
the useful properties.
2.2 Copyright protection
The instruction manual including any texts, drawings, images or other illustrations is
copyright. No part of this publication may be reproduced, transmitted or used in any
form or by any means without permission in writing from the manufacturer. Any person
who commits any unauthorized act in relation to this publication shall be liable to claims
for damages. All rights reserved.
NOTE!
The contents, texts, drawings, pictures and any other illustrations are
copyright and subject to other protection rights. Any person unlawfully
using this publication is liable to criminal prosecution.
2.3 Declaration of conformity
- 30 -
Page 12
If you liked to dispose the packing, consider the regulations applicable
in your country. Supply re-usable packing materials to the recycling.
3. Transport, packaging and storage
3.1 Delivery check
Please check the delivery upon completeness and transport damage immediately
after receipt. In case of visible damage do not accept or accept the delivery with
reservation only.
Note the extent of damage on the carrier’s bill of delivery. Trigger off the complaint.
Hidden damages should be reclaimed immediately after notice, as claims for damages
can only be asserted within the effective period for complaints.
3.2 Packaging
Please do not throw away the covering carton of your device as it might be useful for
storage purposes, when moving or, in case of damages, when the device must be sent
back to a repair center. The outer and inner packing material should be removed
completely from the device before installation.
Please inspect the device upon completeness. In case any part is missing please
contact our customer service center immediately.
3.3 Storage
Keep the package closed until installation and under consideration of the outside
indicated positioning- and storage markings.
Packages should be stored under consideration of the following:
- do not store outdoors,
- keep it dry and dust-free,
- do not expose it to aggressive media,
- do not expose it to direct sunlight,
- avoid mechanical shocks and vibration,
- in case of longer storage (> 3 months) make sure you check the state
of the packaging and the parts regularly, if required refresh or renew.
- 31 -
Page 13
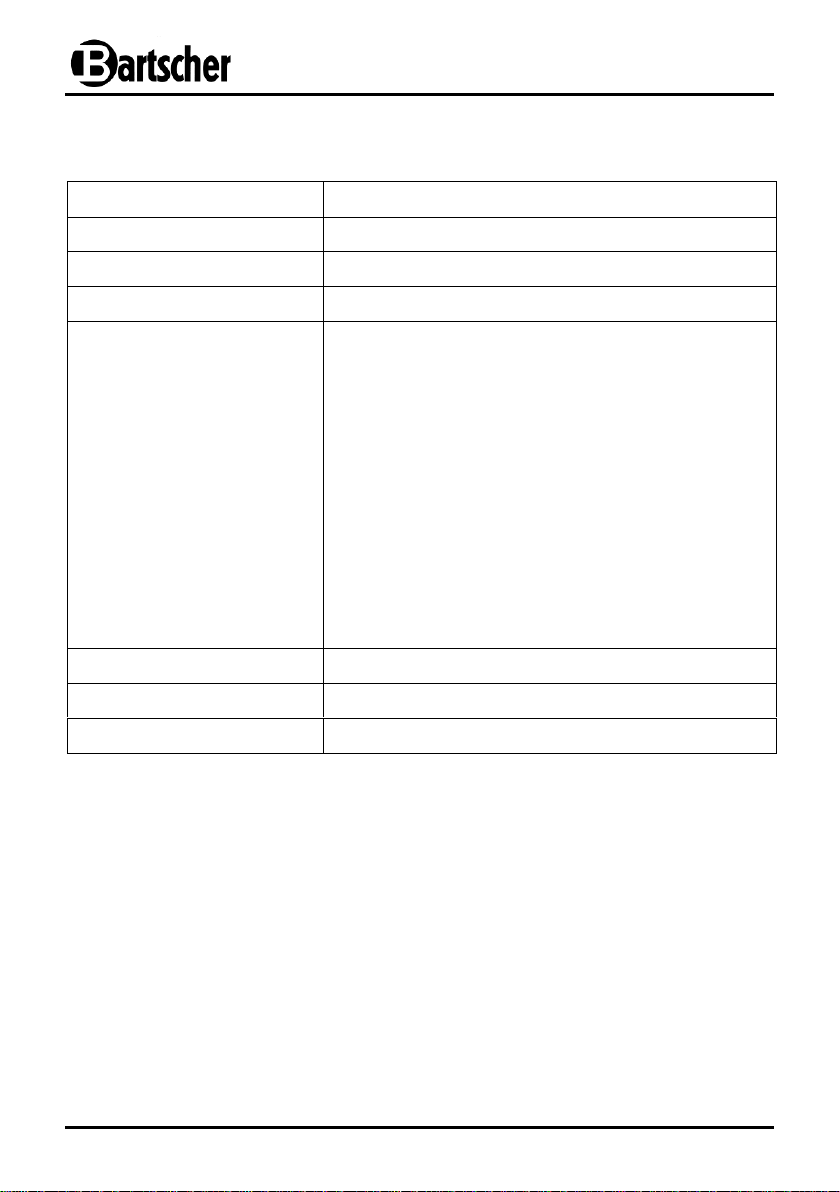
Description
Coffee machine “Aurora 22“
Code-No.:
190157
Material:
Stainless steel
Colour:
Silver
Model:
Basket filter
Number of hobs: 1
Thermo pump jug:
- Number: 1
- Material: stainless steel
- Capacity: 1.9 litres
Brewing time: 8 minutes for 1.9 litres
Maximum brewed amount: 0.5 litres
Max. output: 12 cups
ON/OFF switch
Control: rocker switch
Indicator light: On/Off
Descale indicator light
Power supply:
1.9 kW / 230 V 50/60 Hz
Dimensions:
W 215 x D 405 x H 520 mm
Weight:
8.0 kg
4. Technical data
4.1 Technical specification
We reserve the right to make technical changes!
- 32 -
Page 14
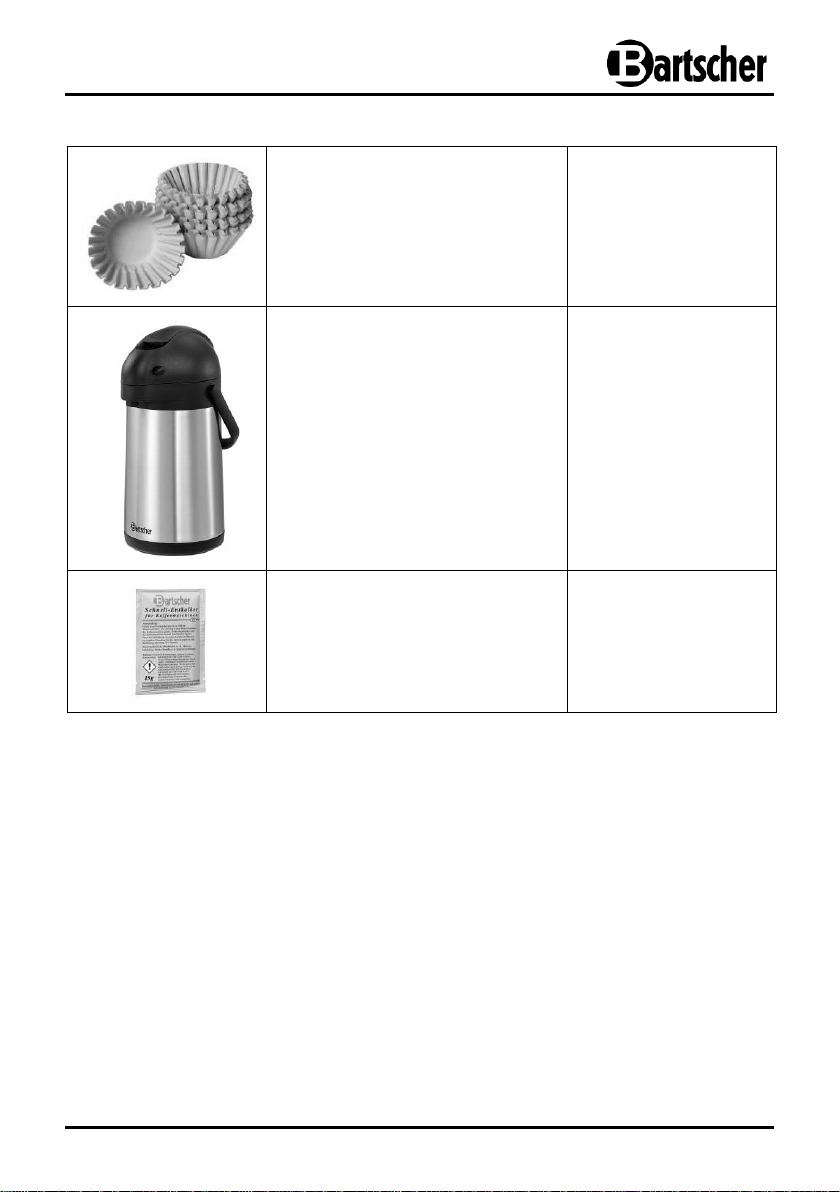
Basket filter paper 250/90-L
(1000 Filter papers per box)
Basket filter paper 250/90-S
(250 Filter papers per box)
Code-No.: 190014
Code-No.: 190015250
Thermo pump jug 1,9L-ST
Capacity: 1.9 liters
Code-No.: 190117
Fast descaler
for coffee machines
(30 portions of 15 g/each)
Code-No.: 190065
Additional accessories (not included in the packaging)
- 33 -
Page 15
NOTE!
The cover flap contains the coffee machine most
important parts. While reading the instructions this
page should always be open and visible.
1
Cover flap for filling in cold water
2
ON/OFF switch with integrated
power control light (red)
3
Heating indicator light (green)
4
Descale indicator light (orange)
5
Filter basket with insert
6
Water tank
7
Bottom plate
8
Thermo pump jug
9
RESET button
10
Power cable
11
Water drain screw
Green heating indicator light indicates that the coffee machine is
brewing coffee. As long as the light is on, the coffee is flowing through
the machine. When the brewing process is finished, a series of three
beeps is heard and the green indicator light goes off.
Orange descale indicator light flashes only when it is necessary to
descale the device. It is still possible to make several pots of coffee
before descaling the coffee machine.
4.2 Overview of parts
Indicator lights
- 34 -
Page 16
5. Installation and operation
5.1 Installation
Positioning
Unpack the device and remove all packing material.
CAUTION!
Never remove the rating plate and any warning signs from the device.
Place the device on top of an even, stable, dry, and water-resistant surface which
supports the weight of the device and is not heat sensitive.
Never place the device at the edge of a table to avoid accidents.
Never place the device in humid or wet environment.
Never place the device on the flammable surfaces.
Place the device so that the plug is easily accessible and can be quickly removed
from its socket in case of necessity.
Connection
DANGER! Electric shock hazard!
The device can cause injuries due to improper installation!
Before installation and connecting the local power grid
specification should be compared with that of the device
(see rating plate). Connect the device only in case of
compliance!
The power supply circuit with the socket must be protected by the fuse of at least 16A.
Connect the device directly to a single grounded socket. Do not use any power bar or
multiple socket.
- 35 -
Page 17
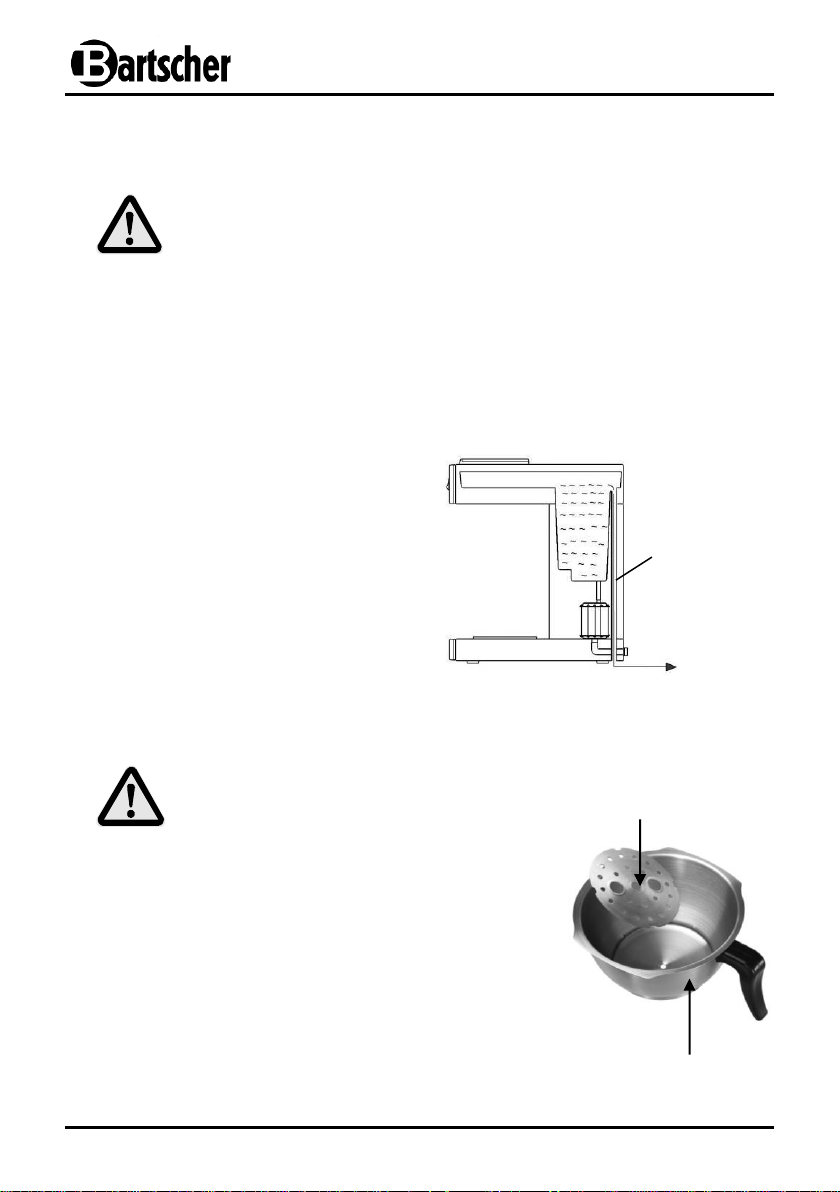
Always fill the water tank with an
amount of water that fits into the
supplied thermo pump jug.
The amount of coffee brewed will
be the same as the amount of
water poured.
If too much water is accidentally
poured into the water tank, the
excess water will drain out through
the overflow hose.
CAUTION!
When cleaning, be aware of the removable
insert at the bottom of the filter basket. After
cleaning, replace the insert in the filter basket
so that it is secured to the bottom of the filter
and will not be accidentally thrown out while
disposing of coffee grounds.
When brewing coffee without the insert, the
paper filter can block the filter basket’s drip
flow opening and hinder the flow of coffee to
the thermo pump jug.
Overflow hose
Filter basket
Insert
5.2 Operation
Before the first use
CAUTION!
Never fill hot water into the water tank.
Do not fill water into the hot device. Wait until it has cooled down.
Before the first use of the coffee maker, run 2 or 3 cycles of water through the coffee
machine without coffee, in order to properly rinse the device (“Preparation of
coffee“ steps 1 - 8).
Due to the design of the device, after the first use, a small amount of water remains in
the water container. Take this into consideration when refilling the tank with water.
Before the use, the thermo pump jug and filter basket with insert should be
thoroughly washed in warm water and a mild cleaning agent, then rinsed with
clear water. Dry thoroughly after washing.
- 36 -
Page 18
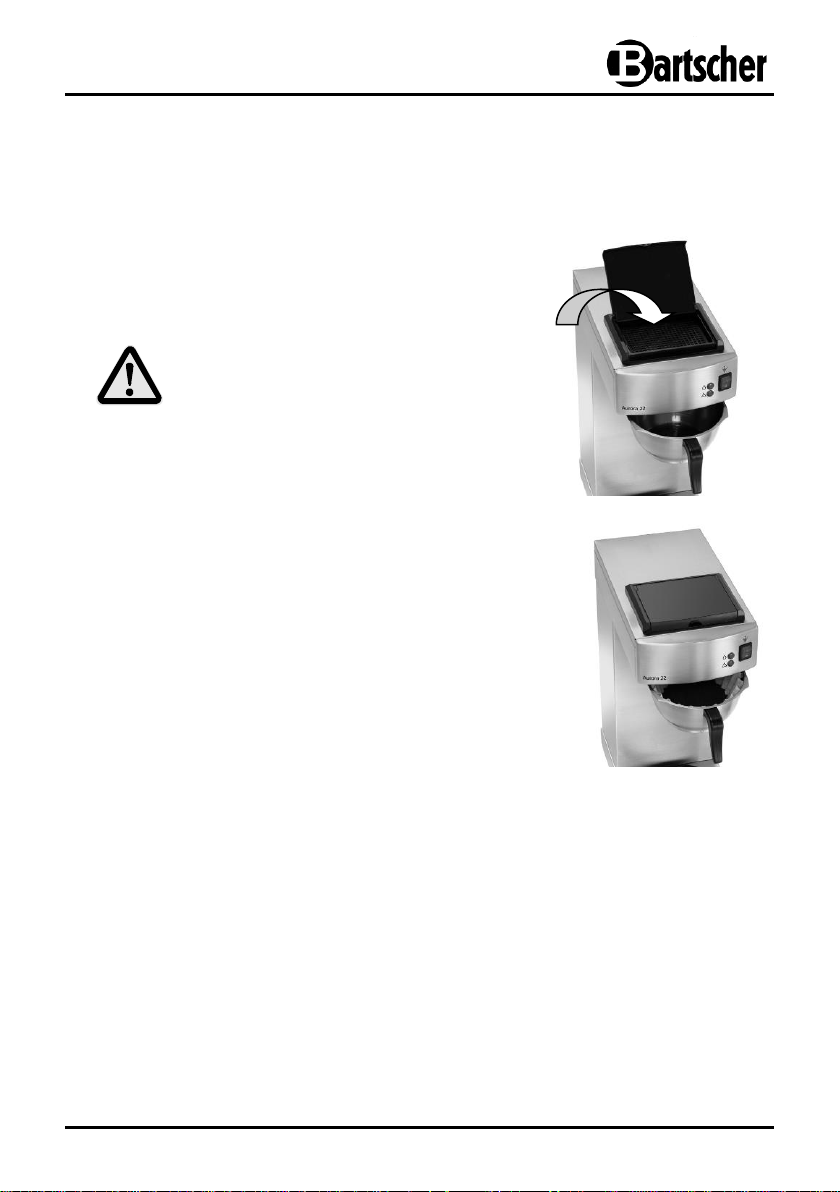
1. Fill the water tank with cold fresh drinking water
in appropriate amount, max. 2 litres. The minimum
amount necessary for brewing coffee is 0.5 litre.
CAUTION
Fill the water tank only with fresh drinking
water. Never pour sugar, coffee, tea or milk
into the opening for filling the coffee machine.
2. Remove the filter basket with insert and place
the proper paper basket filter from Bartscher
(Code-No.: 190014 or 190015250).
3. Add a proper amount of ground coffee into paper
basket filter. Use 35 to 50 g of coffee per one litre
of water, in accordance with your preferences.
4. Place the filter basket with insert in the guides and
slide it all the way to the rear until it “clicks” into place.
Wipe the device’s casing with a moist cloth and wipe dry with a soft cloth.
Plug the device into a single grounded socket.
The coffee machine is ready for use.
Preparation of coffee
5. Open the cover of the thermo pump jug and remove the pump’s tube. Open the
thermo pump jug’s cover to the side and place the open thermo jug on the bottom
plate, in such a manner that the thermo pump jug opening is located below the drip
opening of the filter basket.
6. Turn the device using ON/OFF rocker switch. The red power indicator light in the
ON/OFF rocker switch light comes on.
7. Green heating indicator light comes on and the brewing process starts. After a short
time, the hot coffee will start flowing into the thermo jug.
8. When the brewing process is finished, the coffee machine automatically turns itself
off and the orange heating indicator light goes off. The coffee is ready to be served.
- 37 -
Page 19
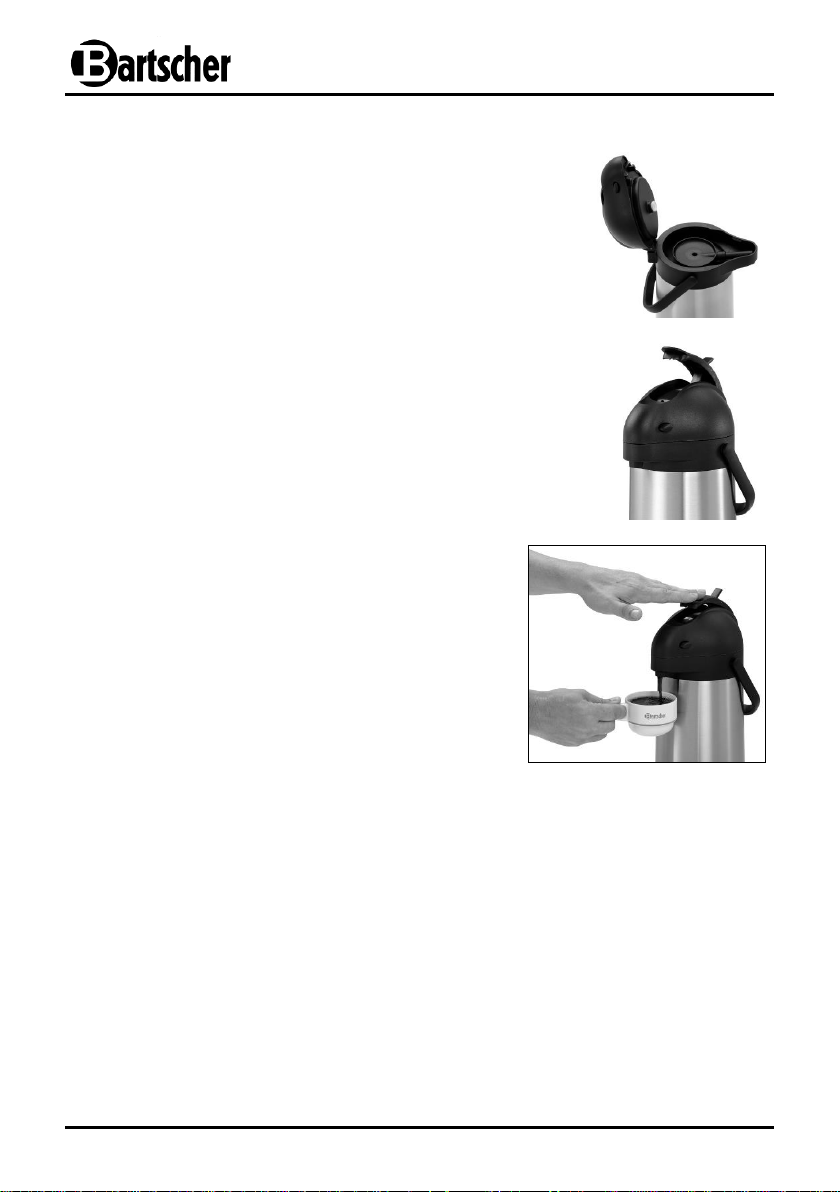
9. Remove the thermo pump jug from the bottom
plate. Replace the pump tube and close the
pump lid until the buttons click into place.
10. To pour drinks from the thermo pump jug,
pull the pump lid up until it clicks.
11. Next, press the pump lever to start the
pump mechanism.
Press the lever as many times as required
to fill in the container (cup, glass) with the
desired amount of beverage.
- 38 -
Page 20
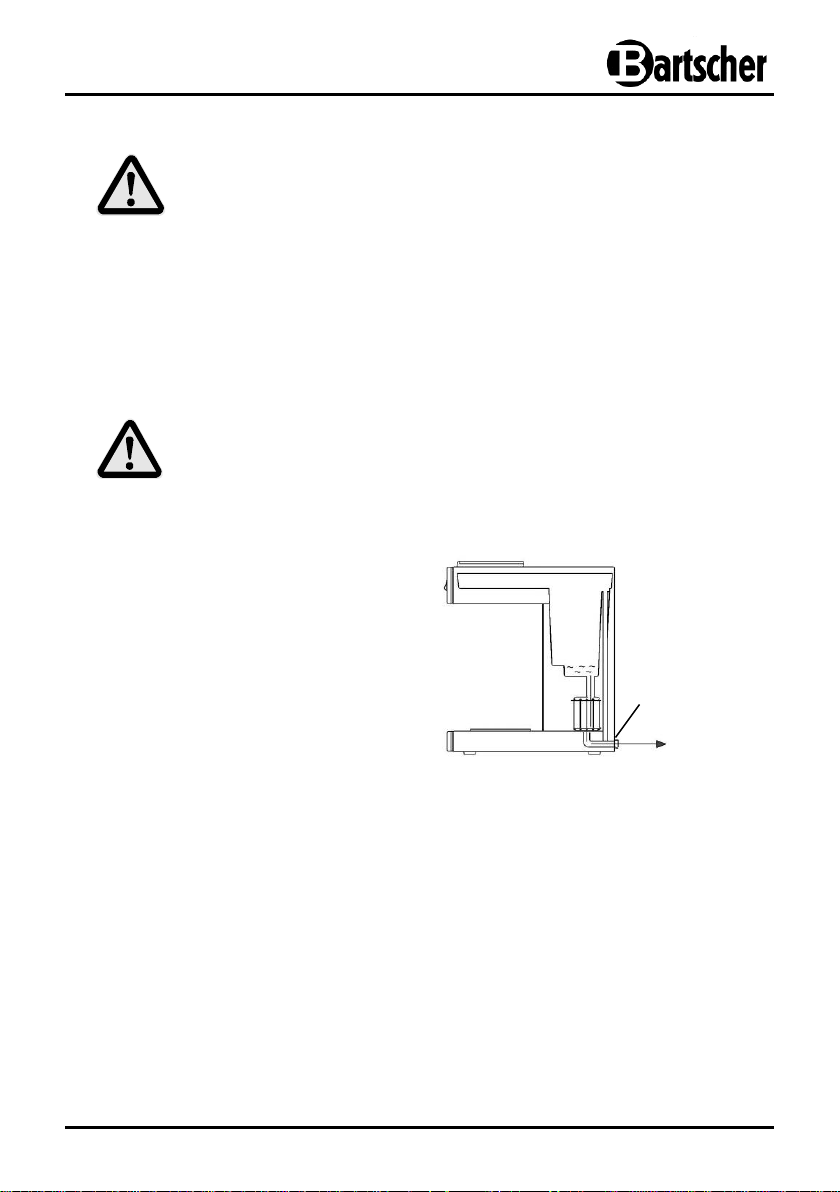
o Due to the fact that trace amounts of
water remain in the device's water
tank, if the device is to be unused for a
longer period of time it is necessary to
shake out any remaining water with the
help of the water drain screw located
at the rear of the device (at the
bottom), and clean the device.
Drain screw
6. Cleaning and descaling
WARNING!
Before cleaning, switch the device off using the ON/OFF
rocker switch and disconnect it from the power supply
(pull the plug!).
The device is not suited for direct washing via water jets!
Protect the device from water penetration.
Regular cleaning
CAUTION!
Always, prior to cleaning, moving or transport of the coffee machine, empty
the water tank.
o During shorter interruptions in the coffee machine operation, it is sufficient to run the
clean water through the machine without adding any coffee.
o If the device has not been used for a longer period of time, it is necessary to repeat
steps 1 - 8 (“Preparation of coffee“) without adding coffee.
o The thermo pump jug, pump’s tube and filter basket with insert should be rinsed
after every use.
o Use only soft cloth, never use abrasive cleaning agents which could scratch the
surface of the device.
o After cleaning, use a soft, dry cloth to wipe down and dry the surface of the device.
- 39 -
Page 21
Regular descaling
CAUTION!
In order to prolong the life of the unit and maintain a high level of coffee
quality, the coffee machine should regularly be cleaned of deposits!
Returns will not be accepted if the coffee machine has not been cleaned of
deposits regularly - as written in the instructions for use.
Such complaints are not subject to repair under warranty!
o During use of the coffee machine, depending on the hardness of the local water supply
internal parts of the unit can become covered in calcium deposits. In order to maintain
the unit in the best possible condition and ensure the best possible results from each
brewing cycle it is necessary to clean the unit of deposits from time to time.
o The coffee machine is equipped with the descale indicator light (orange) which
activates after exceeding a certain level of limescale. When the descale indicator
light comes on, the device needs to be descaled, otherwise the proper operation and
quality of brewed coffee cannot be ensured.
o If it is not possible to clean the coffee machine immediately, it is still possible to brew
several pots of coffee before descaling.
o For removal of calcium deposits we recommend „Fast descaler for coffee
machines“ a formula tried and tested by us:
(Code-No.: 190065; packaged in 30 portions of 15 g/each).
o Dissolve the contents of 2 bags in 1 - 2 litres of water.
o Pour the solution containing the calcium deposit removal formula to the water tank of
the coffee machine.
o Insert the filter basket by sliding it along the appropriate guides (without ground
coffee).
o Place the empty thermo pump jug on the lower plate under the filter basket.
o Turn the device on using the ON/OFF rocker switch as for normal use.
o After several drops of the solution have poured into the thermo pump jug, turn the
coffee machine off.
o Wait 5-6 minutes, for the remainder of the solution to dissolve the deposits, then turn
the device on again.
o After the entire solution has flowed through the machine, turn the coffee machine
off using the ON/OFF rocker switch and dispose of the solution.
- 40 -
Page 22
o After removing deposits, repeat the brewing process 2 - 3 times using only water.
Leave the device to cool down.
o In the end, drain the water remaining in the coffee machine with the use of the water
drain screw located at the rear of the device (at the bottom).
o Rinse the thermo pump jug several times with warm water.
o The device is now ready to resume brewing coffee.
o Sash your hands thoroughly after descaling.
CAUTION!
During the calcium deposit removal process, you must not leave the coffee
machine unattended. During the process, you should wear protective gloves
and goggles!
Cleaning the thermo jug
Clean the thermo pump jug after each use.
Never use aggressive cleaning agents.
Never use cleaning agents that may scratch the surface of the thermo pump jug.
Use only a soft cloth for cleaning.
Never place the thermo pump jug in a dishwasher.
Never place the thermo pump jug in water.
Open the pump lid of the thermo pump jug and remove the pump tube. Pour out
the contents of the thermo pump jug.
Clean the thermo pump jug, pump tube and pump lid with warm water and mild
cleaning agent. Thoroughly rinse the cleaned parts with clean water.
Wipe the outside of the thermo pump jug with a soft, moist cloth.
Hard water may leave calcium deposits inside the thermo pump jug. Coffee
usually colour the deposits and leave the brownish deposit. In order to remove
the deposits use a cleaning agent available on the market. Observe the
instructions of the manufacturer of such a cleaning agent. Finally, rinse the
thermo pump jug several time with clean water.
After cleaning, leave the thermo pump jug open to dry and store until further use.
- 41 -
Page 23
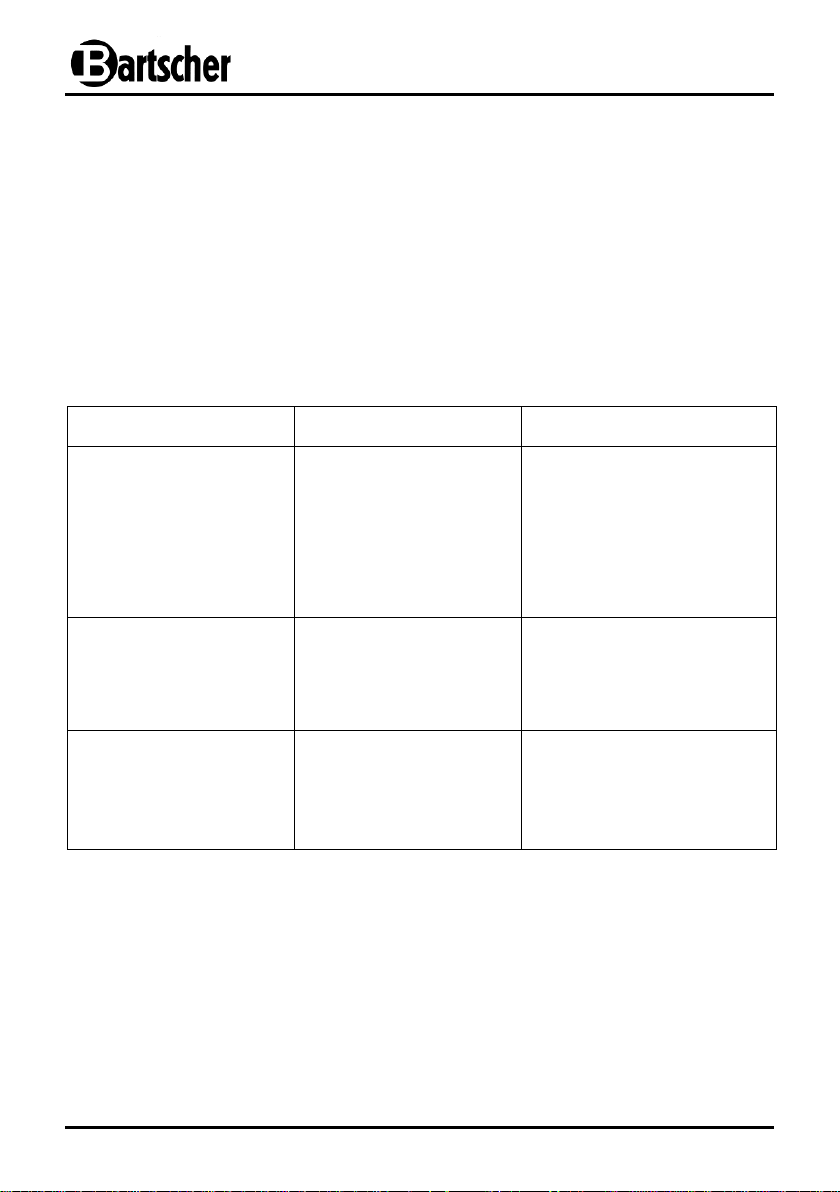
PROBLEM
CAUSE
SOLUTION
The device is switched
on, but the red power
indicator light in the
ON/OFF rocker switch
has not come on.
Incorrectly connected
plug.
The power supply fuse
is blown.
Defective indicator light
Defective switch.
Connect plug correctly.
Check a fuse, connect
device to another socket
and check the device.
Contact the vendor.
Contact the vendor.
The device is switched
on, the green heating
indicator light does not
come on and hot water
is not flowing.
Insufficient amount of
brewed liquid.
Defective filling switch
Increase the amount of
brewed liquid.
Contact the vendor.
The device turns off.
Overheating protection
was triggered.
Defective thermostat.
Pull the plug and left the
coffee machine to cool off,
press the Reset button on
the back of the machine.
Contact the vendor.
Storing the device
o If the device is not used for a longer time, clean the device according to the above
mentioned instructions and store it in a dry, clean place protected against frost, sun
and children. Do not place any heavy objects on the device.
7. Possible Malfunctions
In case of malfunction, disconnect the device from its power source. Before contacting
the service or sales agent, verify - based on the table below - whether it is possible to
eliminate disruption in operation.
- 42 -
Page 24
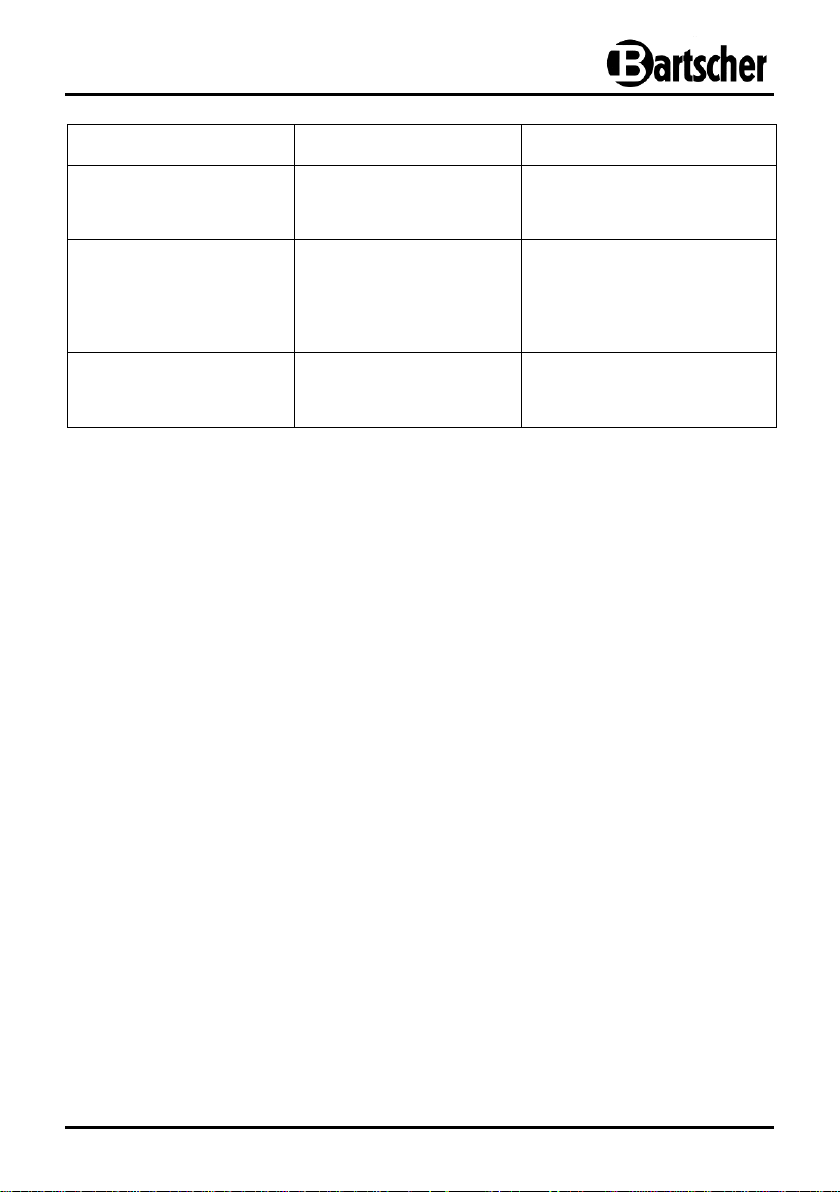
PROBLEM
CAUSE
SOLUTION
Orange descale indicator
light flashes.
Limescale in the coffee
machine exceeds the
critical level.
Descale the coffee
machine (Section:
“Regular descaling“)
The device is switched
on, the green heating
indicator light comes on
but the hot water is not
flowing.
Defective heating
element
Defective thermostat.
Contact the vendor.
Contact the vendor.
When switched on, a
fuse is blown
immediately.
Short-circuit
Contact the vendor.
If you cannot remove the malfunctions:
- do not open the body,
- notify the customer service point or contact the sales
agent, while providing the following information:
type of malfunction;
article number and serial number (rating plate at the
rear of the device);
date of purchase.
- 43 -
Page 25
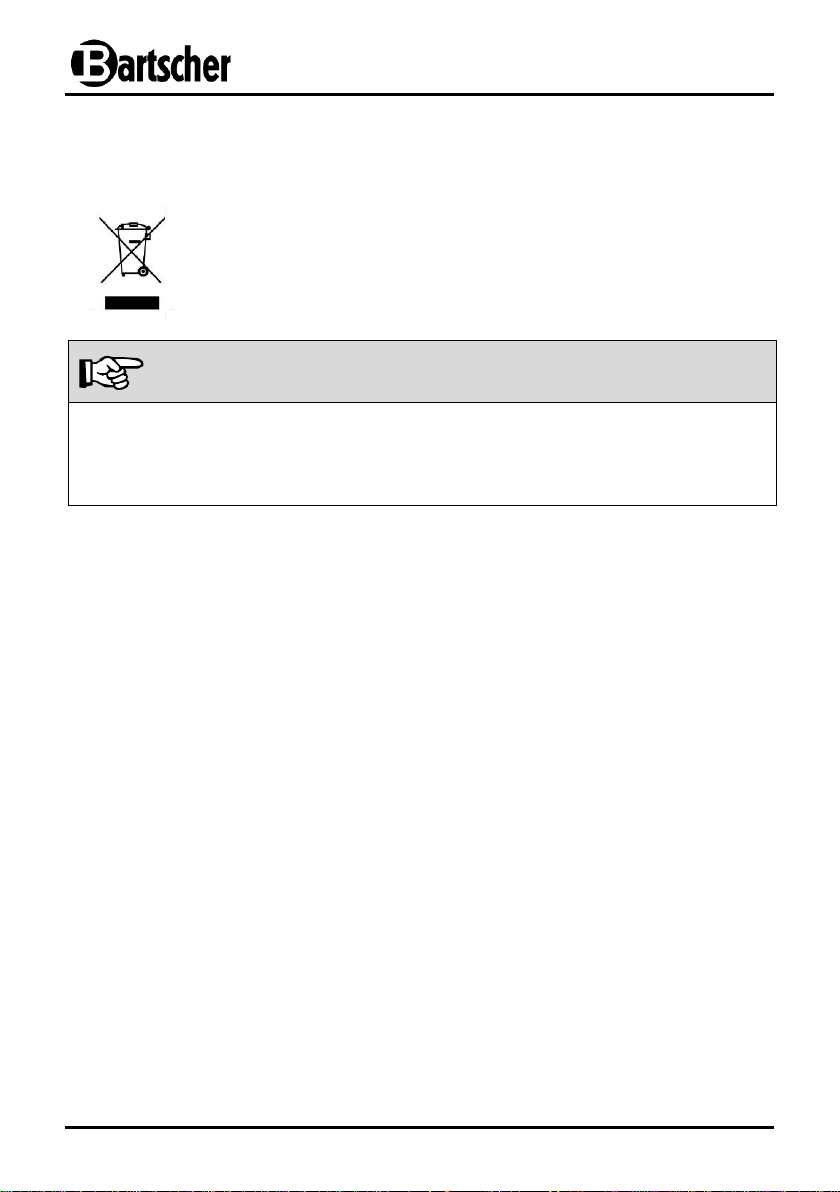
The electric devices are marked with this symbol. You must not
dispose of electric devices with household waste. When the
device may not be longer used each consumer is obliged to
dispose of the device at the dedicated local collection point,
separately from household waste.
NOTE!
Electric devices should be used and disposed of properly to prevent the impact on
the environment.
Disconnect the device from the power supply and remove the power cord from
the device.
8. Waste disposal
Old devices
Bartscher GmbH phone: +49 5258 971-0
Franz-Kleine-Str. 28 fax: +49 5258 971-120
33154 Salzkotten Service-Hotline: +49 5258 971-197
Germany www.bartscher.com
- 44 -
 Loading...