

Bartscher W3110-200U, W3110-200W, W3110-200A, W4110-200U, W4110-200W Operating instructions
...
W3110-200U / 200W / 200A - W4110-
200U / 200W / 200A
125633-125633V1-125633V2 - 125634-
125634V1-125634V2

Bartscher GmbH
Franz-Kleine-Str. 28
D-33154 Salzkotten
Germany
Phone: +49 5258 971-0
Fax: +49 5258 971-120
Technical Support Hotline: +49 5258 971-197
www.bartscher.com
Version: 1.0
Date of preparation: 2021-11-19
EN

Original instruction manual
1 Safety ............................................................................................................ 2
1.1 Explanation of Signal Words .................................................................... 2
1.2 Safety instructions.................................................................................... 3
1.3 Intended Use ........................................................................................... 6
1.4 Unintended Use ....................................................................................... 6
2 General information ....................................................................................... 7
2.1 Liability and Warranty .............................................................................. 7
2.2 Copyright Protection ................................................................................ 7
2.3 Declaration of Conformity ........................................................................ 7
3 Transport, Packaging and Storage ................................................................ 8
3.1 Delivery Check ......................................................................................... 8
3.2 Packaging ................................................................................................ 8
3.3 Storage .................................................................................................... 8
4 Technical Data ............................................................................................... 9
4.1 Technical Specifications .......................................................................... 9
4.2 Functions of the Appliance ..................................................................... 11
4.3 List of Components of the Appliance ..................................................... 12
5 Installation and operation ............................................................................ 13
5.1 Installation ................................ .............................................................. 13
5.2 Operation ............................................................................................... 14
6 Cleaning ...................................................................................................... 20
6.1 Safety Instructions for Cleaning ............................................................. 20
6.2 Cleaning ................................................................................................ . 21
7 Disposal ....................................................................................................... 22
125633-125633V1-125633V2 1 / 24

Safety
EN
Read this instruction manual before using and keep it available
at all times!
DANGER!
The signal word DANGER warns against hazards that lead to severe
injuries or death if the hazards are not avoided.
Diese Bedienungsanleitung beschreibt di e Installation, Bedienung und Wartung d es Geräts und gilt als wichtige Informationsq uelle und Nachschlagewerk. Die Ken ntnis aller enthaltenen Sicherheitshinweis e und Handlungsanweisungen schafft die Voraussetzung für das sichere und sachgerechte Arbeiten mit de m Gerät. Darüber hinaus müssen die für de n Einsatzbereich des Geräts geltende n örtlichen Unfallverhütungsvorschrift en und allgemeinen Sicherheitsbestim mungen eingehalten werden. Diese Bedien ungsanleitung ist Bestandteil des Pro dukts und muss in unmittelbarer Näh e des Geräts für das In¬stallations-, B edienungs-, Wartungs- und Reinigungsp ersonal jederzeit zugänglich auf¬be wahrt werden. Wenn das Gerät an eine dri tte Person
weitergegeben wird, muss die Bedienungsa nleitung mit ausgehändigt werden.
This instruction manual contains information about installation, operation and
maintenance of the appliance and constitutes an important source of information
and reference guide. The knowledge of all operational and safety instructions
included in this manual is a prerequisite for safe and proper handling of the
appliance. Additionally, accident prevention, occupational health and safety, and
legal regulations in force in the area the appliance is used apply.
Before you start using the appliance, especially before turning it on, read this
instruction manual in order to avoid personal injuries and property damages.
Improper use may cause damage.
This instruction manual forms and integral part of the product and must be stored in
an immediate vicinity of the appliance and be available at all times. The instruction
manual should be transferred together with the appliance.
1 Safety
This appliance has been manufactured in accordance with technical standards
currently in force. However, the appliance may be a source of hazards if used
improperly or contrary to its intended purpose. All persons using the appliance must
consider information included in this instruction manual and observe safety
instructions.
1.1 Explanation of Signal Words
Important safety instructions and warning information are indicated in this
instruction manual with appropriate signal words. You must strictly follow the
instructions, to prevent accidents, personal injuries and property damages.
2 / 24 125633-125633V1-125633V2

Safety
EN
WARNING!
The signal word WARNING warns against hazards that may lead to
moderate or severe injuries or death if the hazards are not avoided.
CAUTION!
The signal word CAUTION warns against hazards that may lead to
light or moderate injuries if the hazards are not avoided.
IMPORTANT!
The signal word IMPORTANT indicates possible property damages,
which may occur if safety instructions are not observed.
NOTE!
The symbol NOTE indicates subsequent information and guidelines
for the user on usage of the appliance.
, die
1.2 Safety instructions
Electrical Current
• Too high a mains voltage or incorrect installation may cause electric shock.
• The appliance may be connected only if data on the rating plate correspond with
the mains voltage.
• To avoid short-circuit, the appliance should be kept dry.
• If there are malfunctions during operation, disconnect the appliance from the
power supply.
• Do not touch the appliance’s plug with wet hands.
• Never take hold of the appliance if it has fallen into water. Immediately
disconnect the appliance from the power supply.
• Any repairs or housing opening may be carried out by professionals and
relevant workshops only.
• Do not transport the appliance, holding it by the power cord.
• Do not allow the power cord to come into contact with heat sources or sharp
edges.
• Do not bend, pinch nor knot the power cord.
125633-125633V1-125633V2 3 / 24

Safety
EN
• Always completely unwind the power cord.
• Never place the appliance or other objects on the power cord.
• Always take hold of the plug to disconnect the appliance from the power supply.
• Check the power cord regularly for damage. Do not use the appliance if the
power cord is damaged. If this cable is damaged, it must be replaced by
customer service or a qualified electrician in order to avoid dangers.
Flammable Materials
• Never subject the appliance to contact with high temperature sources, e.g.:
oven, furnace, open flame, heat generating devices, etc.
• To avoid fire hazard, clean the appliance regularly.
• Do not cover the appliance with, e.g., aluminium foil or cloths.
• Use the appliance only with materials designated to this end and with correct
temperature settings. Materials, groceries and left-overs remaining in the
appliance may catch fire.
• Never use the appliance near flammable or inflammable materials, e.g.: petrol,
spirit, alcohol, etc. High temperature triggers evaporation of these materials,
and, as a result of contact with sources of ignition, an explosion may occur.
• In case of fire, disconnect the appliance from the power supply before
attempting suitable fire-extinguishing actions.
• Never attempt to extinguish fire with water if the appliance is connected to the
power supply. Following extinction of fire, ensure sufficient fresh air inflow.
Hot Surfaces
• Surfaces of the appliance become hot during operation. Burning hazard! High
temperature remains for some time after switching the appliance off.
• Do not touch any hot surfaces of the appliance. Use the provided handling
elements and holders.
• You may transport and clean the appliance after it cools down entirely.
• It is prohibited to sprinkle hot surfaces with cold water or flammable liquids.
Operating personnel
• This appliance is not intended to be used by persons (including children) with
limited physical, sensory or mental capabilities, nor by persons with limited
experience and/or limited knowledge.
• Children should be supervised to ensure that they are not playing with or
switching the appliance on.
4 / 24 125633-125633V1-125633V2

Safety
EN
Children may only take dishes or food products from the device!
Supervised Usage only
• Only supervised appliance may be used.
• Always remain in an immediate vicinity of the appliance.
Improper Use
• Unintended or prohibited use may cause damage to the appliance.
• The appliance may only be used when its technical condition is flawless and
allows for safe operation.
• The appliance may only be used when all connections are executed according
to rules of law in force.
• The appliance may only be used when it is clean.
• Use only original spare parts. Never attempt to repair the appliance on your own.
• Do not introduce any changes in the appliance nor modify it.
125633-125633V1-125633V2 5 / 24

Safety
EN
1.3 Intended Use
As described below, every use of the appliance for a purpose differing and/or
diverging from its intended standard use, is prohibited and considered to be an
unintended use.
The following is an intended use:
– Keeping the prepared food warm in suitable GN containers.
1.4 Unintended Use
An unintended use may lead to personal injuries or property damages caused by
hazardous voltage, fire or high temperature. The appliance may only be used to
perform tasks described in this instruction manual.
The following is an unintended use:
– Heating-up flammable, hazardous to health and volatile, etc. liquids and
materials.
6 / 24 125633-125633V1-125633V2

General information
EN
2 General information
2.1 Liability and Warranty
All information and instructions in this instruction manual account for legal
regulations in force, current level of technical engineering knowledge as well as our
expertise and experience, developed over the years. If special models or additional
options are ordered, or state-of-the-art technical solutions were implemented, the
actual scope of delivery of the appliance may, in some circumstances, differ from
descriptions and numerous drawings in this instruction manual.
The manufacturer is not liable for any damages nor faults stemming from:
– failure to observe instructions,
– unintended use,
– technical alterations introduced by the user,
– usage of unapproved spare parts.
We reserve the right to introduce technical modifications to the product, intended for
improvement of the appliance and its performance.
2.2 Copyright Protection
This instruction manual, and texts, drawings and images included in it, as well as its
other components are copyright protected. It is prohibited to reproduce this
instruction manual (including its excerpts), in any form and by any means, and to
use and/or transfer its content to third parties without manufacturer’s written
permission. Violation of the above results in obligation to pay compensation. We
reserve the right to claim further damages.
2.3 Declaration of Conformity
The appliance meets the currently applicable standards and guidelines of the
European Union. We confirm the above in the EC Declaration of Conformity. We
may provide relevant Declaration of Conformity upon request.
125633-125633V1-125633V2 7 / 24

Transport, Packaging and Storage
EN
3 Transport, Packaging and Storage
3.1 Delivery Check
Immediately upon reception, check the delivery for completeness and possible
shipping damage. In the case of visible transport damage refuse to accept the
appliance or accept it conditionally. Mark and note the scope of damage in shipping
documents/consignment list of the shipping company and lodge a complaint.
Concealed damage must be reported immediately upon its discovery, as
compensation claims may only be filed within applicable time limits.
If you find that parts or accessories missing, please contact our Customer Service
Department.
3.2 Packaging
Do not dispose of the appliance cardboard box. It may be used to store the
appliance when relocating or when shipping the appliance to our service point in the
case of any damages.
The packaging and its elements are made of recyclable materials. Particularly,
these are: plastic films and bags, cardboard box.
When disposing of the packaging, observe applicable domestic regulations.
Recyclable packaging materials should be recycled.
3.3 Storage
Leave the packaging closed until installation of the appliance; observe external
indications concerning method of placing and storage. Store the packaging in the
following conditions only:
– in closed rooms;
– in dry and dust-free surrounding;
– away from aggressive agents;
– in a location protected against sunlight;
– in a location protected against mechanical shocks.
In the case of extended storage (over three months), make sure you check the
condition of the packaging and the parts regularly. If needed, replace the packaging
with a new one.
8 / 24 125633-125633V1-125633V2

Technical Data
EN
Name:
Buffet trolley W3110-200U / 200W /
200A
Art. No.:
125633-125633V1-125633V2
Material:
laminated wood; stainless steel, plastic
Colour:
elm / wenge / anthracite
Number of basins:
1
Basin size, GN format:
3 x 1/1 GN
Max. GN container depth, in mm:
200
Serving height, in mm:
900
Temperature range, min.–max., in °C:
30 - 90
Dimensions of tray slide shelf (W x D), in
mm:
1.170 x 250
Number of bars:
4
Bar dimensions (W x D), in mm:
528 x 30
Connected load:
2,262 kW | 230 V | 50 Hz
Dimensions (W x D x H), in mm:
1.170 x 1.245 x 1.520
Weight, in kg:
112,0
4 Technical Data
4.1 Technical Specifications
125633-125633V1-125633V2 9 / 24

Technical Data
EN
Name:
Buffet trolley W4110-200U / 200W /
200A
Art. No.:
125634-125634V1-125634V2
Material:
laminated wood; stainless steel, plastic
Colour:
elm / wenge / anthracite
Number of basins:
1
Basin size, GN format:
4 x 1/1 GN
Max. GN container depth, in mm:
200
Serving height, in mm:
900
Temperature range, min.–max., in °C:
30 - 90
Dimensions of tray slide shelf (W x D), in
mm:
1.495 x 250
Number of bars:
4
Bar dimensions (W x D), in mm:
528 x 30
Connected load:
3,016 kW | 230 V | 50 Hz
Dimensions (W x D x H), in mm:
1.495 x 1.245 x 1.520
Weight, in kg:
134,6
10 / 24 125633-125633V1-125633V2

Technical Data
EN
Version / Characteristics
• Folding tray slide shelf
• Sneeze guard
• Lighting:
– LED
– switched on separately
• Drain tap
• Type of power cord:
– spiral cord
– cord length: 1.6 m
• Swivel castors: 5 swivel castors, 2 with brakes
• Indicator lights: ON/OFF
• State at delivery: assembled for ready to use
• Features:
– stainless steel basins
– rounded edges
• The set includes: 4 bars, length 528 mm, width 30 mm
• The set does not include: GN container
We reserve the right to implement technical modifications.
4.2 Functions of the Appliance
The buffet trolley with sneeze guard and LED lighting is capable of housing 3 or 4
1/1 GN containers, and owing to the employment of bain-marie, the food in the
buffet remain warm and eye-catching.
125633-125633V1-125633V2 11 / 24
Technical Data
EN
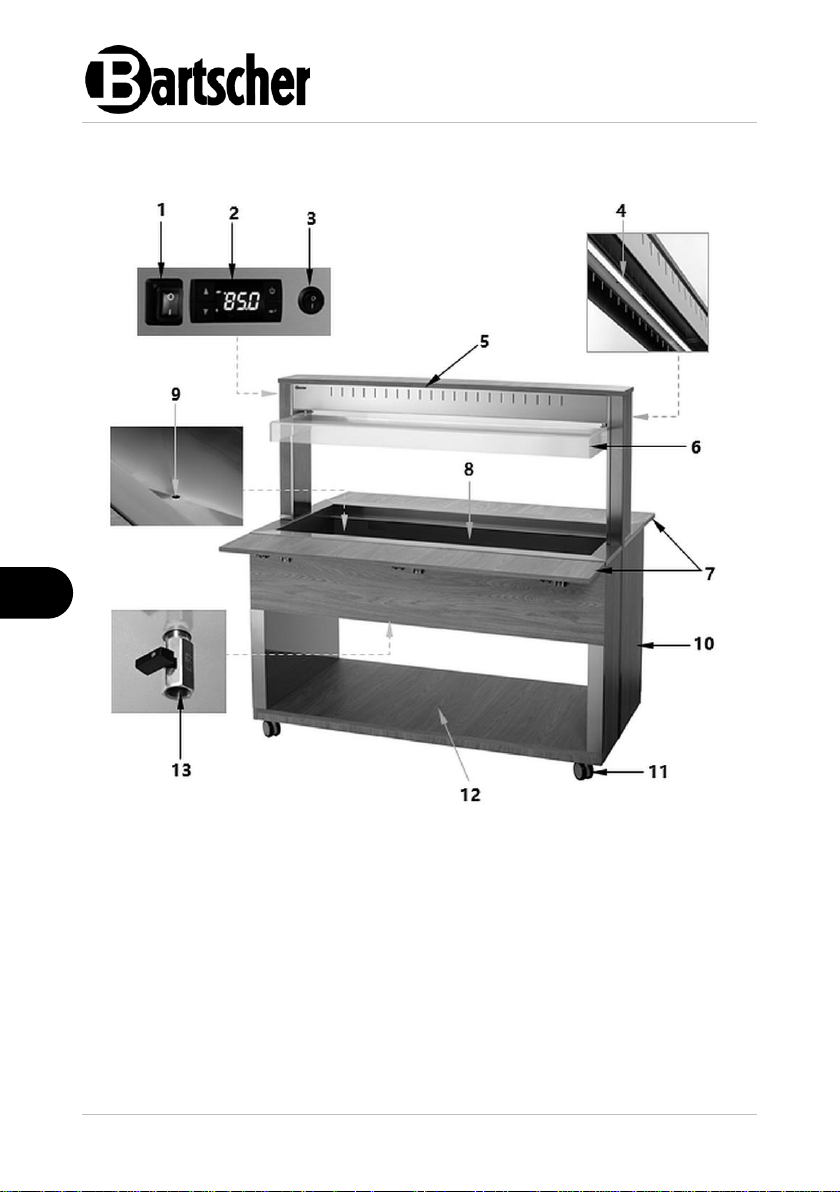
Fig. 1
1. ON/OFF switch with integrated power
indicator light (green)
2. Digital temperature controller
3. LED lighting ON/OFF switch
4. LED lighting
5. Sneeze guard bracket
6. Sneeze guard
7. Tray slide shelf (2 pcs)
8. GN container basin
9. GN container basin drain opening
10. Body
11. Swivel castors (5 pcs), 2 with brakes
12. Bottom working surface
13. Water drain tap
4.3 List of Components of the Appliance
12 / 24 125633-125633V1-125633V2

Installation and operation
EN
CAUTION!
Incorrect installation, positioning, operation, maintenance or misuse of
the appliance may lead to personal injury or property damage.
Positioning and installation, as well as repairs may be performed by
authorised technical service only and in compliance with the applicable
national law.
CAUTION!
Choking hazard!
Prevent children from accessing package materials, for instance: plastic
bags and EPS.
5 Installation and operation
5.1 Installation
Unpacking / Positioning
• Unpack the appliance, remove all external and internal packaging elements and
shipment safeguards.
• If the appliance is covered with a protective film, remove it. Remove the film
slowly, so no glue residues are left. Remove any glue residues with the use of a
suitable solvent.
• Be careful not to damage the rating plate and warning labels fixed on the
appliance.
• Never place the appliance in humid or wet environment.
• Place the appliance in a way making the connections easily accessible, so that
they may be quickly disconnected if such a need arises.
• The appliance should be placed on surfaces that are:
– even, with sufficient bearing capacity, resistant to water, dry and resistant
to high temperatures;
– sufficiently large, and thus enabling usage of the appliance with no
problems;
– easily accessible;
– well ventilated.
• Leave at least 20 cm clearance from flammable walls and items.
125633-125633V1-125633V2 13 / 24

Installation and operation
EN
• When the appliance is move to the selected location, block the swivel castors
with parking brakes.
Power supply connection
• Verify if technical data of the appliance (see rating plate) correspond with the
local electric power grid specification.
• Connect the appliance to a single, properly grounded mains socket with
protective contact. Do not connect the appliance to a multi-socket.
• The power cord should be laid in a way preventing anyone from threading on it
or tripping against it.
5.2 Operation
• Reinigen Sie das Gerät und Zubehörteile vor dem Ge brauch gründlic h nach den An weisungen im Absch nitt 6 „Reinigung“ . Achten Si e darauf, dass keine Feuchtigkeit in die elektrisch e Anlage bzw. den Schaltkasten eindringt. Tr ocknen Sie das Gerät und Zubehörteile gründlich ab!
• Setzen Sie die Boden-Abdeckung in das Becken ein. Diese dient als Abstandhalt er für das Heizelement und Auffangschal e für Speisereste, etc..
• Setzen Sie den Schaltkasten mit Heizele ment vorsichtig auf den hinteren Rand d es Gerätes. Der Bolzen must sit in the o pening in the basic appliance, at t he bottom side of the switch box. This way the connection box is properly mounted .
Tips for the User
• Do not place any objects on the sneeze guard (for example, do not place a
stack of plates).
• To place utensils, etc., use bottom working surfaces.
• Avoid large amounts of water coming into contact with the wooden parts to
prevent blistering and scratching.
• If possible, put warm food in appropriate GN containers into the GN container
basin, so that they are ready for serving faster.
• Prior to first operation, clean the appliance and its equipment, observing instructi ons in section 6 'Cleaning'. Make sur e no water enters electric installation an d connection box. Then thoroughly dr y the appliance and the entire equipment.
• Insert the bottom cover into the appliance. The cover acts as a spacer between t he heating element and left-over food tray.
• Carefully insert the connection box with th e heating element at the back edge of th e appliance. A pin in bottom part of th e connection box must enter a hole i n the main appliance. This way the con nection box is properly mounted.
Preparation of the Appliance
1. Before use, clean the appliance, observing instructions in section 6 'Cleaning'.
2. Dry the appliance thoroughly.
3. Make sure the drain tap is closed.
4. Make sure that the appliance is switched off.
5. Pour water into the GN container basin, up to MAX marking.
ATTENTION!
Never use the appliance without water.
Check the water level in the GN container basin regularly. If needed, top up
with water.
14 / 24 125633-125633V1-125633V2

Installation and operation
EN
Fig. 1
Key
Name
Functions
Function key
1. HACCP data display
2. To turn on/off the controller (if LFC = 1)
3. In the programming mode: to exit the
parameter menu without saving the new
setting values (Esc command)
4. During an alarm event: to disable the optional
internal buzzer and relay
Enter key
1. Programming Mode Activation
2. View and confirm new setting values
Setting value
decrease button
1. Keep pressed together with the Enter button
for 5 seconds to lock or unlock the buttons
2. In the programming mode: to scroll through
the parameter menus and decrease the
setting values
Setting value
increase button
1. To display the temperature of the current
probe 1 for a few seconds
2. In the programming mode: to scroll the
parameter menus and increase setting
values
Digital Temperature Controller
125633-125633V1-125633V2 15 / 24

Installation and operation
EN
LED
Status of the
active function
Meaning
illuminates
the heater is working (the K1 output relay is on,
Act = 1)
flashes
during the heater delay time
LED Indicators
The LED indicators in the digital display show the status of the active function:
The upper left point flashes in programming mode and lights when the external
contact (digital input) is active or in Standby mode.
The number "1" that appears on the digital display shows the current temperature of
the sensor.
Setting the temperature (required value)
1. Press the button once for a moment.
The digital display shows “SET”. The upper point to the left of the temperature
gauge is flashing to indicate entering programming mode.
2. To display the set value, press the button again.
3. To set the required set value, press the or button within 15 seconds.
4. Press the button to confirm the set data.
NOTE!
If this button is not operated for more than 15 seconds (Timeout) or when
the button is pressed once, the last value shown on the display will be
adopted and the previous message will be displayed again.
NOTE!
If additional parameter settings are necessary, contact technical service.
16 / 24 125633-125633V1-125633V2

Installation and operation
EN
Button lock
1. Press and hold the buttons and simultaneously for 6 seconds to lock
and unlock the keypad (the top point to the left of the temperature gauge is
blinking).
When "Pof" appears on the digital display, the keypad is locked. When “Pon” is
displayed, the keypad is unlocked.
When the keypad is locked, all parameters can be displayed but not changed.
Display of stored alarm temperatures (HACCP function)
The digital temperature controller saves the last 3 temperature alarm events:
The sensor temperature was lower than ALo or higher than AHi.
– if the temperature controller shows temperature (i.e. not in programming
mode), press and release the button ;
– the message "HcP" (HACCP) and (if alarm data are stored) the message
"AL1", min./max reached temperature and its duration in minutes
appears, when temperature 1 was above ALo or AHi, next “AL2” min-/
max alarm appears. ... . AL1 refers to the most recent event. AL3 is the
oldest.
When HACCP data is displayed on the digital display by pressing the button
for more than 5 seconds ("----" is displayed), the stored alarm data can be erased.
The digital temperature controller only displays alarm data for events that have
returned to normal state. If the alarm continues, it can be terminated by ending ALo
or increasing the AHi value. At the end of the alarm, the HACCP data is saved.
There is no alarm recording during the defrost process.
The temperature controller is not equipped with a battery, if a power failure occurs,
no data is monitored/saved.
If the recorded temperature unit is changed (parameter “unt”), the recorded
temperatures/parameter values reflect the unit set in the past (they are not
converted).
125633-125633V1-125633V2 17 / 24

EN
Parameter alarms
Country
Description
Value
Initial
settings
Atp
Alarm type values
0: ALo, AHi are absolute temperatures;
1: ALo, AHi are the temperature values
related to the SEt value.
0..1
0
ALo
Low temperature alarm (ex LoA). If the
temperature drops below this value (ALo-0,4),
the controller transmits an alarm signal on the
display and starts recording the minimum
temperature and the alarm duration (HACCP
function). In addition, it activates an internal
buzzer and an alarm relay if available
(optional)
AtP=0,
-50.. (AHi-1)
AtP=1,
-50 .. -0.5°C
-40 °C
AHi
Alarm when the temperature is exceeded (ex
HiA). If the temperature raises above this
value (ALo+0,4), the controller transmits an
alarm signal on the display and starts
recording the highest temperature and the
alarm duration (HACCP function). In addition,
it activates an internal buzzer and an alarm
relay if available (optional).
AtP=0
(ALo+1)..150
AtP=1
0,5 ..285 °C
110 °C
Installation and operation
18 / 24 125633-125633V1-125633V2

Installation and operation
EN
• Prior to first operation, clean the appliance and its equipment, observing instructi ons in section 6 'Cleaning'. Make sur e no water enters electric installation and connection box. Then thoroughly dry th e appliance and the entire equipmen t.
• Insert the bottom cover into the appliance. The cover acts as a spacer between t he heating element and left-over food tray.
• Carefully insert the connection box with th e heating element at the back edge of th e appliance. A pin in bottom part of the c onnection box must enter a hole i n the main appliance. This way the connec tion box is properly mounted.
Appliance Start-up
1. Plug the appliance into a suitable single socket.
2. Switch the appliance on with the ON/OFF switch.
The green power indicator light in the ON/OFF switch lights up.
The temperature controller digital display shows 'OFF'.
3. Press the temperature controller function button and hold it for 2 seconds to
start the appliance.
The initial temperature will be shown in the digital display. The indicator
light lights up and signals the heating-up phase in progress.
The factory default set temperature is 90ºC.
4. Wait for the appliance to reach the set temperature before you put warm food in
suitable GN containers into the GN container basin.
NOTE!
Information about subsequent temperature settings may be found in
section 'Digital Temperature Controller'.
Switching the LED Lighting ON/OFF
1. If needed, switch the sneeze guard LED lighting on or off with the lighting
ON/OFF switch.
Switching the Appliance OFF
1. Switch the sneeze guard LED lighting off with the lighting ON/OFF switch.
2. Switch the appliance off with the ON/OFF switch.
3. Disconnect the appliance from the socket (pull the plug out).
125633-125633V1-125633V2 19 / 24

Cleaning
EN
1. To drain water from the GN containers
basin, perform the following:
– place a suitable container under
the spout pipe (A);
– open the drain valve (A);
– drain water.
2. Close the drain tap.
Fig. 2
Drain water
WARNING! Risk of scalding!
The water in the GN containers basin may heat up considerably.
Wait for the water to cool down before draining.
6 Cleaning
6.1 Safety Instructions for Cleaning
• Before cleaning, disconnect the appliance from the power supply.
• Leave the appliance to cool down completely.
• Make sure water does not enter the appliance. Do not immerse the appliance in
water or other liquids during cleaning. Do not clean the appliance with a
pressurized water jet.
• Do not use any sharp or pointed, nor metal implements (knife, fork, etc.). Sharp
or pointed implements may damage the appliance, and when in contact with live
parts, they may cause electric shock.
• For cleaning, do not use any scouring agents that contain solvents nor corrosive
cleaning agents. They may damage the surface.
20 / 24 125633-125633V1-125633V2

Cleaning
EN
6.2 Cleaning
1. Clean the appliance regularly at the end of each working day, and, if necessary,
also in the meantime or when the appliance is not to be used for a longer time.
2. Remove GN containers from the basin only when the appliance cools down
completely.
3. Drain water from the GN containers basin (section 'Draining Water').
4. Clean the GN containers basin thoroughly with a soft cloth and a mild cleaning
agent.
5. Wipe with a clean cloth.
6. Dry the GN containers basin thoroughly afterwards.
7. Clean the hygienic cover with a soft, damp cloth and dry it thoroughly.
8. Clean laminated wooden surfaces only with a slightly damp cloth. For stubborn
stains, use a little alcohol.
9. Wash GN containers regularly and thoroughly in warm water with a soft cloth
and a mild cleaning agent.
10. Rinse in fresh water.
11. Dry GN containers or leave them in the open air to dry.
125633-125633V1-125633V2 21 / 24

Disposal
EN
Electric appliances are marked with this symbol. Electrical
appliances must be disposed of and recycled in a correct
and environmentally friendly manner. You must not dispose
of electric appliances with household waste. Disconnect the
appliance from the power supply and remove power cord
from the appliance.
7 Disposal
Electrical Appliance
Electrical appliances should be returned to designated collection points.
22 / 24 125633-125633V1-125633V2
 Loading...