

Page 1

BRASIERA, MULTIPLA
re subito le informazioni rali!
IT – CH
KIPPBRATPFANNE, ELEKTRO MULTI-BRATER
Die Hinweise sollen sofo
DE – AT – IT – BE – LU –CH
TILTING BRATT PAN,
GB – IE – MT
SAUTEUSE BASCULANTE,
Lire tout de suite averissements!
FR – BE – LU – CH
SARTEN VOLCABLE,
¡En primer l r leer las advertencias!
ES
KANTELBARE BRAADPAN,
NL – BE
SNACK 115155 / 115157
ISTRUZIONI PER L’INSTALLAZIONE, USO E MANUTENZIONE
geneLegge
ANWEISUNGEN FÜR INSTALLATION, GEBRAUCH UND WARTUNG
rt gelesen werden!
MULTI-PERFORMANCES COOKING APPLIANCE
INSTRUCTIONS FOR INSTALLATION, OPERATION AND MAINTENANCE
Read the general informations immediately!
APPAREIL DE CUISSON MULTIFUNCION
INSTRUCIONS POUR INSTALLATION, EMPLOI ET ENTRETIEN
APPARADOS DE COCCION MULTIFUNCION
INSTRUCCIONE S PARA INSTAKKACIO N , USO Y M ANTENINIENTO
uga
MULTI-BRAADPANNEN
ISTRUCTIES VOOR INSTALLATIE, GEBRUIK EN ONDERHOUD
Lees de waarschuwingen onmiddellijk!
DOC.NO CR0930070
EDITION 001
Page 2
SCHEMA DI INSTALLAZIONE - INSTALLATION DIAGRAM - INSTALLATIONSPLAN - SCHÉMA D’INSTALLATION -
ESQUEMA DE INSTALACION -INSTALLATIESCHEMA - IINSTALLATIONSRITNINGAR
11
Page 3
SCHEMA DI INSTALLAZIONE - INSTALLATION DIAGRAM - INSTALLATIONSPLAN - SCHÉMA D’INSTALLATION -
ESQUEMA DE INSTALACION -INSTALLATIESCHEMA - IINSTALLATIONSRITNINGAR
2
Page 4
DATI TECNICI - TECHNICAL DATA - TECHNISCHE DATEN - CARACTERISTIQUES TECHNIQUES - DATOS TECNI-
COS - TECHNISCHE GEGEVENS
VB64E ECM62T OVB64E 6NBF/E400
VB66E ECM63T OVB66E 6NBF/E600
3
Page 5

INFORMAZIONI GENERALI .................................................................................................................................................... 5
1 DATI DELLA APPARECCHIATURA ........................................................................................................................... 5
2 AVVERTENZE GENERALI ........................................................................................................................................ 5
AVVERTENZE PER L' INSTALLATORE .................................................................................................................................. 5
AVVERTENZE PER L' UTILIZZATORE.................................................................................................................................... 5
AVVERTENZE PER IL MANUTENTORE ................................................................................................................................. 5
AVVERTENZE PER LA PULIZIA .............................................................................................................................................. 5
3 DISPOSITIVI DI SICUREZZA E CONTROLLO ......................................................................................................... 5
3.1 MULTIPLA .................................................................................................................................................................. 5
4 SMALTIMENTO IMBALLO E APPARECCHIATURA .................................................................................................. 5
ISTRUZIONI PER L' INSTALLAZIONE .................................................................................................................................... 6
AVVERTENZE PER L' INSTALLATORE .................................................................................................................................. 6
5 NORME E LEGGI DI RIFERIMENTO ........................................................................................................................ 6
6 DISIMBALLO.............................................................................................................................................................. 6
7 POSIZIONAMENTO ................................................................................................................................................... 6
8 COLLEGAMENTI ....................................................................................................................................................... 6
9 MESSA IN SERVIZIO ................................................................................................................................................ 7
ISTRUZIONI PER L' USO ........................................................................................................................................................ 7
AVVERTENZE PER L' UTILIZZATORE.................................................................................................................................... 7
10 USO DELLA BRASIERA ELETTRICA........................................................................................................................ 7
11 USO DELLA MULTIPLA ............................................................................................................................................. 7
12 PERIODI DI INUTILIZZO ........................................................................................................................................... 8
ISTRUZIONI PER LA PULIZIA ................................................................................................................................................. 8
AVVERTENZE PER LA PULIZIA .............................................................................................................................................. 8
ISTRUZIONI PER LA MANUTENZIONE .................................................................................................................................. 8
AVVERTENZE PER IL MANUTENTORE ................................................................................................................................. 8
13 MESSA IN SERVIZIO ................................................................................................................................................ 8
14 RISOLUZIONE MALFUNZIONAMENTI ..................................................................................................................... 8
AVVERTENZE PER LA SOSTITUZIONE DEI COMPONENTI. ............................................................................................... 8
14.1 BRASIERA ELETTRICA............................................................................................................................................. 8
14.2 MULTIPLA .................................................................................................................................................................. 9
15 SOSTITUZIONE DEI COMPONENTI ........................................................................................................................ 9
AVVERTENZE PER LA SOSTITUZIONE DEI COMPONENTI. ............................................................................................... 9
15.1 BRASIERA ELETTRICA............................................................................................................................................. 9
15.2 MULTIPLA .................................................................................................................................................................. 9
16 PULIZIA DELLE PARTI INTERNE ............................................................................................................................. 9
17 COMPONENTI PRINCIPALI ...................................................................................................................................... 9
17.1 BRASIERA ELETTRICA............................................................................................................................................. 9
17.2 MULTIPLA .................................................................................................................................................................. 9
4
Page 6

INFORMAZIONI GENERALI
In questo Capitolo sono riportate le informazioni generali che
devono essere a conoscenza di tutti gli utilizzatori di questo
manuale. Le informazioni speciche per ciascuno degli utilizzatori di questo manuale sono riportate nei Capitoli successivi
( " ISTRUZIONI PER .... " ).
1 DATI DELLA APPARECCHIATURA
• La targa dati della apparecchiatura si trova sulla superce
interna del pannello comandi.
• Il modello e il numero di matricola della apparecchiatura si
trovano anche su talloncini posti sotto il marchio e sull' imballo.
2 AVVERTENZE GENERALI
Il costruttore dell’apparecchiatura non puo’ essere considerato responsabile per eventuali danni causati dalla
inosservanza degli obblighi sotto riportati.
AVVERTENZE PER L' INSTALLATORE
• Leggere attentamente questo manuale. Fornisce importanti
informazioni sulla sicurezza di installazione , d’uso e manutenzione della apparecchiatura.
• La installazione, la conversione ad altro tipo di gas e la manutenzione dell’apparecchiatura devono essere effettuati da
personale qualicato e autorizzato dal costruttore , in conformità alle normative di sicurezza in vigore e alle istruzioni di
questo manuale.
• Individuare il modello della apparecchiatura. Il modello e' riportato sull' imballo e sulla targa dati dell'apparecchiatura.
• Installare l'apparecchiatura solo in locali sufcientemente aerati.
• Non ostruire i fori di aerazione e di scarico presenti sulla apparecchiatura.
• Non manomettere i componenti dell'apparecchiatura.
AVVERTENZE PER L' UTILIZZATORE
• Leggere attentamente questo manuale. Fornisce importanti
informazioni sulla sicurezza di installazione , d’uso e manutenzione della apparecchiatura.
• Conservare questo manuale in un luogo sicuro e noto , per
essere consultabile per la durata di utilizzo della apparecchiatura.
• La installazione, la conversione ad altro tipo di gas e la manutenzione dell’apparecchiatura devono essere effettuati da
personale qualicato e autorizzato dal costruttore , in conformità alle normative di sicurezza in vigore e alle istruzioni di
questo manuale.
• Per la assistenza rivolgersi solo a centri tecnici autorizzati dal
costruttore ed esigere l’ impiego di ricambi originali.
• Sottoporre la apparecchiatura , almeno due volte l’anno, a
manutenzione. E' consigliato di stipulare un contratto di manutenzione.
• L’apparecchiatura è destinata ad un uso professionale e
deve essere utilizzata da personale addestrato.
• L’apparecchiatura va adibita alla cottura di cibi come indicato
nelle avvertenze d'uso.Ogni altro uso è considerato improprio.
• Evitare di far funzionare a vuoto , per lunghi periodi , la apparecchiatura. Effettuare il preriscaldamento immediatamente
prima dell' uso.
• Sorvegliare l'apparecchiatura durante il suo funzionamento.
• In caso di guasto o malfunzionamento della apparecchiatura
, chiudere il rubinetto d’intercettazione gas e/o disinserire
l’interruttore generale di alimentazione elettrica , installati a
monte della stessa.
• Eseguire la pulizia secondo le istruzioni del Capitolo " ISTRUZIONI PER LA PULIZIA ".
• Non tenere materiali inammabili in prossimità dell’apparecchiatura. PERICOLO DI INCENDIO.
• I bambini devono essere sorvegliati per sincerarsi che non
giochino con l’apparecchio.
• L’apparecchio non è destinato a essere usato da persone
(bambini compresi) le cui capacità siche, sensoriali o men-
tali siano ridotte, oppure con mancanza di esperienza o di conoscenza, a meno che esse abbiano potuto beneciare, attraverso l’intermediazione di una persona responsabile della
loro sicurezza, di una sorveglianza o di istruzioni riguardanti
l’uso dell’apparecchio.
• Non ostruire i fori di aerazione e di scarico presenti sulla apparecchiatura.
• Non manomettere i componenti dell'apparecchiatura.
AVVERTENZE PER IL MANUTENTORE
• Leggere attentamente questo manuale. Fornisce importanti
informazioni sulla sicurezza di installazione , d’uso e manutenzione della apparecchiatura.
• La installazione, la conversione ad altro tipo di gas e la manutenzione dell’apparecchiatura devono essere effettuati da
personale qualicato e autorizzato dal costruttore , in conformità alle normative di sicurezza in vigore e alle istruzioni di
questo manuale.
• Individuare il modello della apparecchiatura. Il modello e' riportato sull' imballo e sulla targa dati dell'apparecchiatura.
• Installare l'apparecchiatura solo in locali sufcientemente aerati.
• Non ostruire i fori di aerazione e di scarico presenti sulla apparecchiatura.
• Non manomettere i componenti dell'apparecchiatura.
AVVERTENZE PER LA PULIZIA
• Pulire quotidianamente le superci esterne satinate in acciaio
inossidabile, la superce delle vasche di cottura, la superce
delle piastre di cottura.
• Far eseguire ad un tecnico autorizzato , almeno due volte
l’anno, la pulizia delle parti interne dell'apparecchiatura.
• Non lavare l’apparecchiatura con getti d’acqua diretti o ad
alta pressione.
• Non usare prodotti corrosivi per pulire il pavimento sotto l’apparecchiatura.
3 DISPOSITIVI DI SICUREZZA E CONTROLLO
3.1 MULTIPLA
TERMOSTATO DI SICUREZZA
Il costruttore dell’apparecchiatura non puo’ essere con-
siderato responsabile per eventuali danni causati dalla
inosservanza degli obblighi sotto riportati.
• L' apparecchiatura è dotata di un termostato di sicurezza a
ripristino manuale che interrompe il riscaldamento quando la
temperatura di funzionamento supera la temperatura massima ammessa.
• Per ripristinare il funzionamento dell' apparecchiatura e'
necessario premere il pulsante di ripristino del termostato.
Questa operazione puo’ essere effettuata solo da un tecnico
qualicato e autorizzato.
4 SMALTIMENTO IMBALLO E APPARECCHIATURA
4.1 IMBALLO
L’imballo è realizzato con materiali compatibili con l'ambiente.I
componenti in materiale plastico soggetti a riciclaggio sono :
5
Page 7

• la copertina trasparente , i sacchetti del manuale istruzioni e
degli ugelli ( in Polietilene - PE ).
• le reggette ( in Polipropilene - PP ).
4.2 APPARECCHIATURA
L' apparecchiatura e' costituita per oltre il 90% del peso da
materiali metallici riciclabili ( acciao inox , lamiera alluminata
, rame.... ).
L’apparecchiatura deve essere smaltita nel rispetto delle normative vigenti.
• Non disperderla nell'ambiente.
• Renderla inutilizzabile prima dello smaltimento.
ISTRUZIONI PER L' INSTALLAZIONE
AVVERTENZE PER L' INSTALLATORE
Il costruttore dell’apparecchiatura non puo’ essere considerato responsabile per eventuali danni causati dalla
inosservanza degli obblighi sotto riportati.
• Leggere attentamente questo manuale. Fornisce importanti
informazioni sulla sicurezza di installazione , d’uso e manutenzione della apparecchiatura.
• La installazione, la conversione ad altro tipo di gas e la manutenzione dell’apparecchiatura devono essere effettuati da
personale qualicato e autorizzato dal costruttore , in conformità alle normative di sicurezza in vigore e alle istruzioni di
questo manuale.
• Individuare il modello della apparecchiatura. Il modello e' riportato sull' imballo e sulla targa dati dell'apparecchiatura.
• Installare l'apparecchiatura solo in locali sufcientemente aerati.
• Non ostruire i fori di aerazione e di scarico presenti sulla apparecchiatura.
• Non manomettere i componenti dell'apparecchiatura.
Apparecchi della serie DROP-IN (da incasso)
• Eseguire l’installazione rigorosamente secondo quanto prescritto negli schemi allegati in appendice.
• Effettuare l’installazione solamente su mobili metallici (no legno e/o altri materiali combustibili).
• Fare attenzione al percorso del cavo di alimentazione: i passaggi devono essere privi di spigoli e/o bave taglienti. Inoltre,
il cavo, in ogni suo punto, non deve superare di oltre 50°C la
temperatura ambiente.
5 NORME E LEGGI DI RIFERIMENTO
Installare l'apparecchiatura in conformità alle norme di sicurezza UNI 8723 e al D.M. n°74 del 12.04.1996.
Installare l'apparecchiatura in conformita' con la EN1717 ed i
regolamenti nazionali dell'acqua in vigore.
6 DISIMBALLO
Controllare le condizioni dell' imballo e in caso di danni evidenti
richiedere allo spedizioniere l' ispezione della merce.
• Rimuovere l' imballo
• Rimuovere la pellicola che protegge i pannelli esterni.Rimuo-
vere con idoneo solvente il collante eventualmente rimasto
su questi.
7 POSIZIONAMENTO
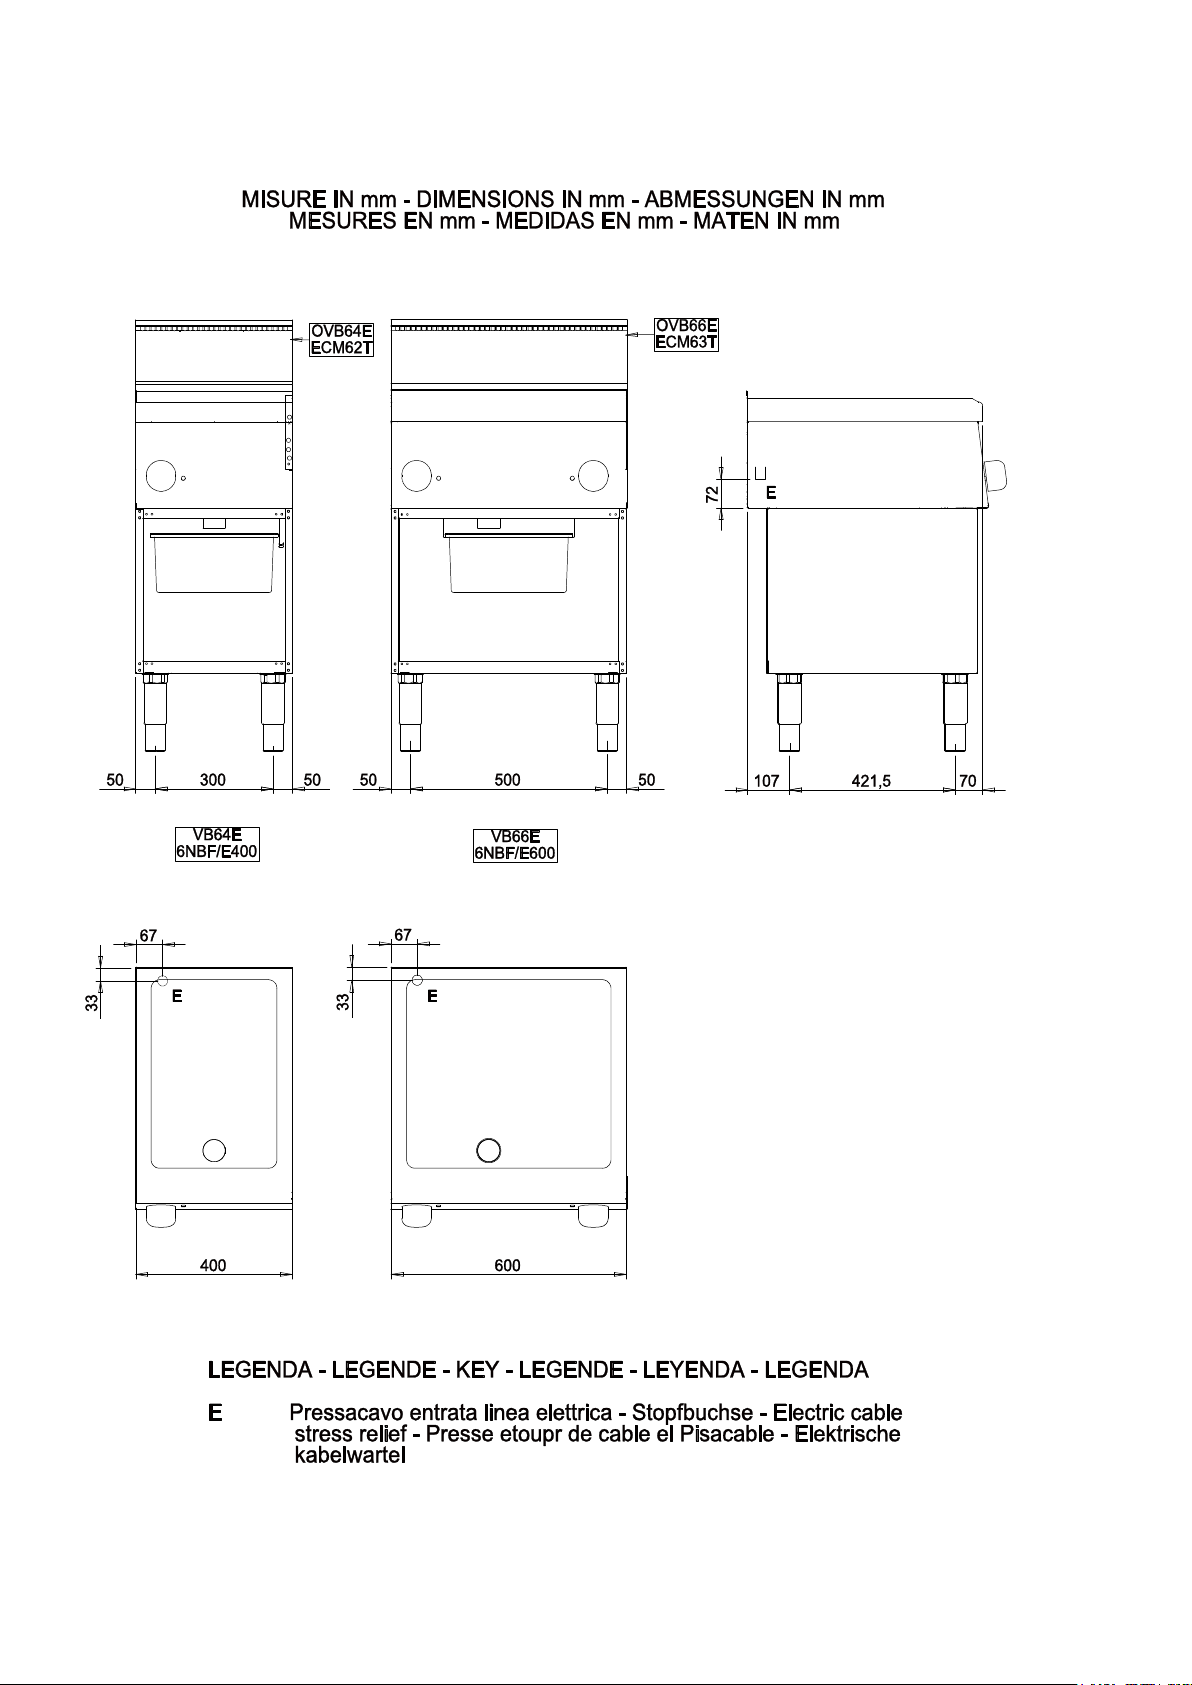
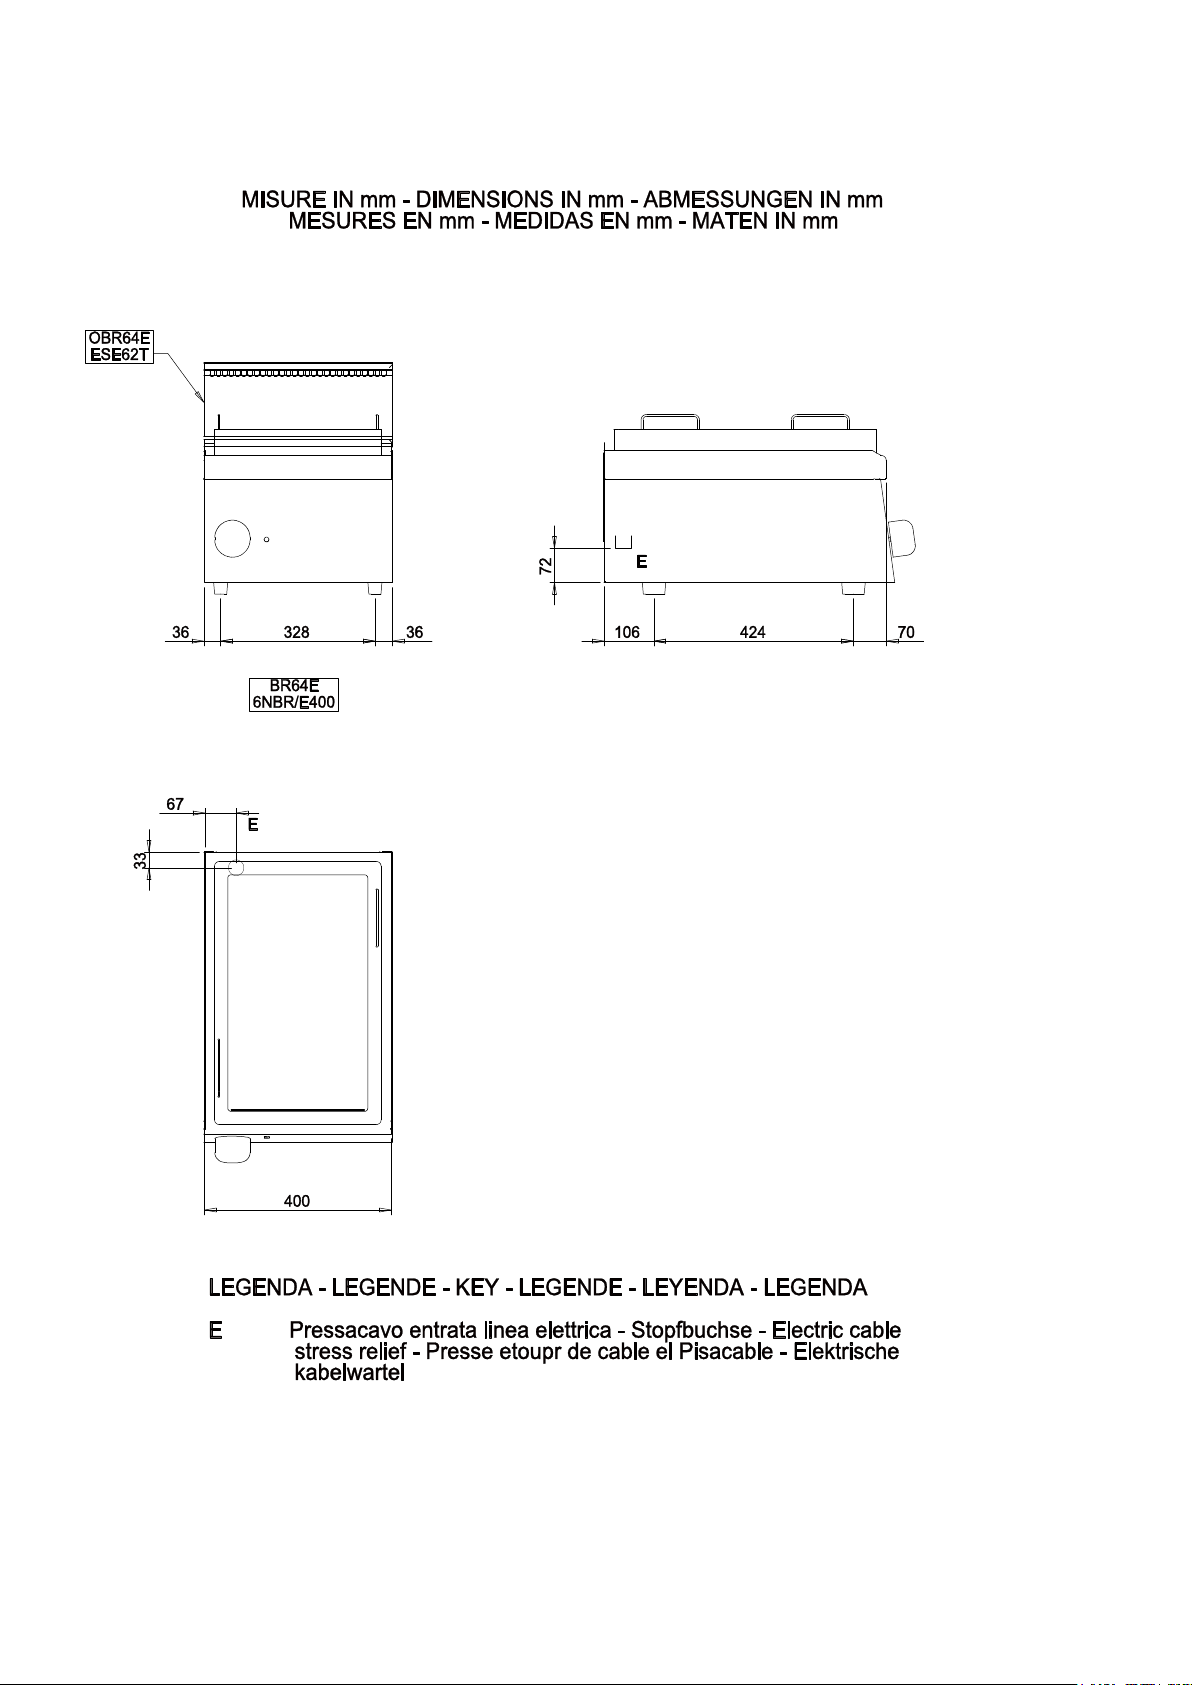
• Le dimensioni di ingombro della apparecchiatura e la posizione degli allacciamenti sono riportate nello schema di installazione che si trova all' inizio di questo manuale.
• La apparecchiatura puo' essere installata singolarmente o
unita ad altre apparecchiature della stessa gamma.
• L' apparecchiatura non è adatta per l'incasso.
• Posizionare l' apparecchiatura ad almeno 10 cm dalle pareti
circostanti.Tale distanza può essere inferiore quando le pareti sono incombustibili o protette da isolante termico.
7.1 MONTAGGIO DELL' APPARECCHIATURA SU BASE
Seguire le istruzioni fornite con il tipo di supporto utilizzato.
7.2 UNIONE TRA APPARECCHIATURE
• Accostare le apparecchiature e livellarle no a far combaciare i piani di lavoro.
• Unirle utilizzando gli appositi coprigiunti di unione ( forniti a
richiesta).
8 COLLEGAMENTI
La posizione e la dimensione degli allacciamenti sono riportate
nello schema di installazione che si trova all' inizio di questo
manuale.
8.1 COLLEGAMENTO ALLA RETE ELETTRICA
Vericare se l' apparecchiatura è predisposta per funzionare
alla tensione e frequenza con cui sara' alimentata. Controllare
quanto riportato nella targa dati dell' apparecchiatura.
• Installare a monte dell'apparecchiatura , in un luogo facilmente accessibile , un interruttore onnipolare di portata adeguata
, con un’apertura dei contatti di almeno 3 mm e un dispositivo
di protezione ad alta sensibilità. La massima corrente di dispersione dell'apparecchiatura è di 1 mA/kW.
• Utilizzare un cavo di alimentazione essibile con isolamento
in gomma con caratteristiche non inferiori al tipo H05 RN-F.
• Allacciare il cavo di alimentazione alla morsettiera come indicato nello schema elettrico fornito con la apparecchiatura.
• Bloccare il cavo di alimentazione con il pressacavo.
• Proteggere il cavo di alimentazione esterno alla apparecchia-
tura con tubo metallico o in plastica rigida.
8.2 COLLEGAMENTO A TERRA E A NODO EQUIPOTEN-
ZIALE
Collegare l’apparecchiatura alimentata elettricamente ad una
efcace presa di terra. Allacciare il conduttore di terra al mor-
setto con il simbolo posto accanto alla morsettiera di arrivo
linea.
Collegare la struttura metallica dell' apparecchiatura alimentata
elettricamente ad un nodo equipotenziale. Allacciare il condut-
tore al morsetto con il simbolo posto sulla parte esterna
del fondo.
8.3 COLLEGAMENTO ALLA RETE IDRICA
Alimentare l'apparecchiatura con acqua potabile.La pressione
di alimentazione dell'acqua deve essere compresa tra 150 kPa
e 300 kPa. Utilizzare un riduttore di pressione se la pressione
di alimentazione e' superiore a quella massima indicata.
• Installare a monte dell’apparecchiatura, in un luogo facilmen-
te accessibile, un ltro meccanico e un rubinetto di intercet-
tazione.
• Spurgare le tubazioni di allacciamento da eventuali scorie
ferrose prima di collegare il ltro e l'apparecchiatura.
• Chiudere con un tappo a tenuta gli allacciamenti non colle-
gati.
• Vericare , dopo l'allacciamento , la assenza di perdite nei
punti di collegamento.
6
Page 8

8.4 COLLEGAMENTO AGLI SCARICHI DELL' ACQUA
I condotti di scarico devono essere realizzati con materiali resistenti alla temperatura di 100 °C. Il fondo della apparecchiatura
non deve essere investito dal vapore prodotto dallo scarico di
acqua calda.
9 MESSA IN SERVIZIO
Vedere il Capitolo " ISTRUZIONI PER LA MANUTENZIONE ".
10 USO DELLA BRASIERA ELETTRICA
AVVERTENZE D' USO
• Importante! Questa apparecchiatura non deve essere usata
come friggitrice.
• Importante! Non inserire il riscaldamento con la bacinella
vuota.
RIEMPIMENTO E SVUOTAMENTO DELLA BACINELLA
ISTRUZIONI PER L' USO
AVVERTENZE PER L' UTILIZZATORE
Il costruttore dell’apparecchiatura non puo’ essere considerato responsabile per eventuali danni causati dalla
inosservanza degli obblighi sotto riportati.
• Leggere attentamente questo manuale. Fornisce importanti
informazioni sulla sicurezza di installazione , d’uso e manutenzione della apparecchiatura.
• Conservare questo manuale in un luogo sicuro e noto , per
essere consultabile per la durata di utilizzo della apparecchiatura.
• La installazione, la conversione ad altro tipo di gas e la manutenzione dell’apparecchiatura devono essere effettuati da
personale qualicato e autorizzato dal costruttore , in conformità alle normative di sicurezza in vigore e alle istruzioni di
questo manuale.
• Per la assistenza rivolgersi solo a centri tecnici autorizzati dal
costruttore ed esigere l’ impiego di ricambi originali.
• Sottoporre la apparecchiatura , almeno due volte l’anno, a
manutenzione. E' consigliato di stipulare un contratto di manutenzione.
• L’apparecchiatura è destinata ad un uso professionale e
deve essere utilizzata da personale addestrato.
• L’apparecchiatura va adibita alla cottura di cibi come indicato
nelle avvertenze d'uso.Ogni altro uso è considerato improprio.
• Evitare di far funzionare a vuoto , per lunghi periodi , la apparecchiatura. Effettuare il preriscaldamento immediatamente
prima dell' uso.
• Sorvegliare l'apparecchiatura durante il suo funzionamento.
• In caso di guasto o malfunzionamento della apparecchiatura
, chiudere il rubinetto d’intercettazione gas e/o disinserire
l’interruttore generale di alimentazione elettrica , installati a
monte della stessa.
• Eseguire la pulizia secondo le istruzioni del Capitolo " ISTRUZIONI PER LA PULIZIA ".
• Non tenere materiali inammabili in prossimità dell’apparecchiatura. PERICOLO DI INCENDIO.
• I bambini devono essere sorvegliati per sincerarsi che non
giochino con l’apparecchio.
• L’apparecchio non è destinato a essere usato da persone
(bambini compresi) le cui capacità siche, sensoriali o men-
tali siano ridotte, oppure con mancanza di esperienza o di conoscenza, a meno che esse abbiano potuto beneciare, attraverso l’intermediazione di una persona responsabile della
loro sicurezza, di una sorveglianza o di istruzioni riguardanti
l’uso dell’apparecchio.
• Non ostruire i fori di aerazione e di scarico presenti sulla apparecchiatura.
• Non manomettere i componenti dell'apparecchiatura.
Riempimento
• Riempire la vasca no a raggiungere la tacca di livello massimo presente sulla parete della bacinella. Non utilizzare l'apparecchiatura con un livello d'acqua superiore alla tacca di
livello massimo.
Svuotamento
• Disinserire il riscaldamento.
• Per svuotare la bacinella toglierla dall’apparecchiatura,come
se si dovesse togliere una pentolada un piano di cottura.
• Per effettuare questa manovra è necessarioadottare gli opportuni accorgimenti per:proteggere le mani dal calore quando siimpugnano le apposite maniglie poste nellaparte superiore (es. guanti adatti); proteggere il corpo da eventuali schizzi
dicibo caldo durante le manovre di sollevamento,trasporto e
svuotamento della bacinella.
• Il recipiente nel quale scaricare il contenutodella bacinella
deve essere adatto a contenerecibi a temperatura elevata.
ACCENSIONE E SPEGNIMENTO RISCALDAMENTO
La manopola di comando del termostato ha le seguenti posizioni di utilizzo :
0 Spento
50 Temperatura minima
100-250 Temperature intermedie
300 Temperatura massima
Accensione
• Ruotare la manopola del termostato nella posizione corrispondente alla temperatura di cottura prescelta.
• La lampada spia gialla si accende.
• Lo spegnimento della lampada spia gialla indica il raggiungi-
mento delle temperatura prescelta.
Spegnimento
• Ruotare la manopola del termostato in posizione “ 0 ”.
11 USO DELLA MULTIPLA
AVVERTENZE D' USO
• L’apparecchiatura è destinata alla cottura diretta dei cibi ( cottura in umido, zuppe,bistecche, hamburger, pesci, verdure,
ecc.).
• La piastra di cottura non deve essere utilizzata per il riscaldamento e la cottura indiretta di cibi appogiandovi
pentole,tegami,padelle ecc..
• Non utilizzare l'apparecchiatura come friggitrice, la temperatura del fondo vasca supera i 230°C con pericolo di incendio
dell'olio.
• A ne giornata pulire accuratamente la vasca per evitare la
formazione di depositi corrosivi all’ interno della stessa.
• Il modello M40 ha un'unica zona di cottura con vasca di capacità massima 13 Lt. Il modello M60 ha due zone di cottura
con vasca di capacità massima 22 L.
7
Page 9

ACCENSIONE E SPEGNIMENTO RISCALDAMENTO
La manopola di comando del termostato ha le seguenti posizioni di utilizzo :
0 Spento
50 Temperatura minima
100-200 Temperature intermedie
300 Temperatura massima
Accensione
• Ruotare la manopola del termostato nella posizione corrispondente alla temperatura di cottura prescelta.
• La lampada spia gialla si accende.
• Lo spegnimento della lampada spia gialla indica il raggiungi-
mento delle temperatura prescelta.
Spegnimento
• Ruotare la manopola del termostato in posizione “ 0 ”.
12 PERIODI DI INUTILIZZO
Prima di un previsto periodo di inutilizzo della apparecchiatura
procedere come segue :
• Eseguire una accurata pulizia della apparecchiatura.
• Passare su tutte le superci in acciaio inox un panno appe-
na imbevuto di olio di vaselina in modo da stendere un velo
protettivo.
• Lasciare aperti i coperchi.
• Chiudere rubinetti o interruttori generali a monte delle appa-
recchiature.
Dopo un prolungato periodo di inutilizzo dell'apparecchiatura
procedere come segue:
VASCHE DI COTTURA
• Pulire le vasche portando l' acqua in ebollizione , con la eventuale aggiunta di prodotti sgrassanti.
• Rimuovere eventuali depositi di calcare utilizzando prodotti
appropriati.
ISTRUZIONI PER LA MANUTENZIONE
AVVERTENZE PER IL MANUTENTORE
Il costruttore dell’apparecchiatura non puo’ essere considerato responsabile per eventuali danni causati dalla
inosservanza degli obblighi sotto riportati.
• Leggere attentamente questo manuale. Fornisce importanti
informazioni sulla sicurezza di installazione , d’uso e manutenzione della apparecchiatura.
• La installazione, la conversione ad altro tipo di gas e la manutenzione dell’apparecchiatura devono essere effettuati da
personale qualicato e autorizzato dal costruttore , in conformità alle normative di sicurezza in vigore e alle istruzioni di
questo manuale.
• Individuare il modello della apparecchiatura. Il modello e' riportato sull' imballo e sulla targa dati dell'apparecchiatura.
• Installare l'apparecchiatura solo in locali sufcientemente aerati.
• Non ostruire i fori di aerazione e di scarico presenti sulla apparecchiatura.
• Non manomettere i componenti dell'apparecchiatura.
13 MESSA IN SERVIZIO
Dopo la installazione , l' adattamento ad altro tipo di gas o
interventi di manutenzione vericare il funzionamento della
apparecchiatura.In presenza di malfunzionamenti consultare il
successivo Paragrafo "Risoluzione malfunzionamenti".
• Sottoporre l'apparecchiatura a controllo prima di riutilizzarla.
• Far funzionare le apparecchiature elettriche alla minima tem-
peratura per almeno 60 minuti.
ISTRUZIONI PER LA PULIZIA
AVVERTENZE PER LA PULIZIA
Il costruttore dell’apparecchiatura non puo’ essere considerato responsabile per eventuali danni causati dalla
inosservanza degli obblighi sotto riportati.
• Pulire quotidianamente le superci esterne satinate in acciaio
inossidabile, la superce delle vasche di cottura, la superce
delle piastre di cottura.
• Far eseguire ad un tecnico autorizzato , almeno due volte
l’anno, la pulizia delle parti interne dell'apparecchiatura.
• Non lavare l’apparecchiatura con getti d’acqua diretti o ad
alta pressione.
• Non usare prodotti corrosivi per pulire il pavimento sotto l’apparecchiatura.
SUPERFICI SATINATE IN ACCIAIO INOSSIDABILE
• Pulire le superci con un panno o spugna utilizzando acqua
e comuni detersivi non abrasivi. Passare il panno nel verso
della satinatura. Risciacquare spesso e asciugare poi accuratamente.
• Non usare pagliette o altri oggetti in ferro.
• Non usare prodotti chimici contenenti cloro.
• Non usare oggetti appuntiti che possono incidere e rovinare
le superci.
13.1 APPARECCHIATURA ELETTRICA
Mettere in funzione l'apparecchiatura secondo le istruzioni e
avvertenze per l' uso riportate nel Capitolo " ISTRUZIONI PER
L'USO " e vericare :
• i valori della corrente di ciascuna fase.
• la regolarita' di accensione delle resistenze di riscaldamento.
14 RISOLUZIONE MALFUNZIONAMENTI
AVVERTENZE PER LA SOSTITUZIONE DEI COMPO-
NENTI.
• Staccare l' alimentazione elettrica dell'apparecchiatura , se
presente , prima di eseguire qualunque operazione.
• Vericare, dopo la sostituzione di un componente del circuito
gas, la assenza di perdite nei suoi punti di collegamento al
circuito stesso.
• Vericare , dopo la sostituzione di un componente del circuito
elettrico , il suo corretto collegamento al cablaggio.
14.1 BRASIERA ELETTRICA
L' apparecchiatura non riscalda.
Possibili cause:
• Il termostato di regolazione della temperatura e' guasto.
• Le resistenze sono guaste.
Non si regola il riscaldamento
Possibili cause:
• Il termostato di regolazione della temperatura e' guasto.
8
Page 10

14.2 MULTIPLA
17 COMPONENTI PRINCIPALI
L' apparecchiatura non riscalda.
Possibili cause:
• Il termostato di regolazione della temperatura e' guasto.
• Le resistenze sono guaste.
• Il termostato di sicurezza e' intervenuto.
Non si regola il riscaldamento
Possibili cause:
• Il termostato di regolazione della temperatura e' guasto.
15 SOSTITUZIONE DEI COMPONENTI
AVVERTENZE PER LA SOSTITUZIONE DEI COMPO-
NENTI.
• Staccare l' alimentazione elettrica dell'apparecchiatura , se
presente , prima di eseguire qualunque operazione.
• Vericare, dopo la sostituzione di un componente del circuito
gas, la assenza di perdite nei suoi punti di collegamento al
circuito stesso.
• Vericare , dopo la sostituzione di un componente del circuito
elettrico , il suo corretto collegamento al cablaggio.
15.1 BRASIERA ELETTRICA
Sostituzione della resistenza
• Slare le manopole presenti sul fronte dell’apparecchiatura,
rimuovere il cruscotto e la bacinella.
• Smontare e sostituire il componente.
• Rimontare tutte le parti. Seguire, in ordine inverso, la sequen-
za utilizzata per il loro smontaggio.
17.1 BRASIERA ELETTRICA
• Resistenza
• Lampada spia
• Regolatore di temperatura
17.2 MULTIPLA
• Termostato di lavoro
• Termostato di sicurezza
• Resistenza
• Lampada spia
Sostituzione regolatore di temperatura
• Slare le manopole presenti sul fronte dell’apparecchiatura,
rimuovere il cruscotto.
• Smontare e sostituire il componente.
• Rimontare tutte le parti. Seguire, in ordine inverso, la sequen-
za utilizzata per il loro smontaggio.
15.2 MULTIPLA
Sostituzione della resistenza e della lampada spia.
• Smontare il pannello comandi.
• Smontare e sostituire il componente.
• Rimontare tutte le parti. Seguire, in ordine inverso, la sequen-
za utilizzata per il loro smontaggio.
Sostituzione del termostato di lavoro e del termostato di
sicurezza.
• Smontare il pannello comandi.
• Estrarre il bulbo dalla sede ssata alla vasca.
• Smontare e sostituire il componente.
• Rimontare tutte le parti. Seguire, in ordine inverso, la sequen-
za utilizzata per il loro smontaggio.
16 PULIZIA DELLE PARTI INTERNE
• Controllare le condizioni delle parti interne all' apparecchiatura.
• Rimuovere eventuali depositi di sporcizia.
• Controllare e pulire il sistema di scarico dei fumi.
9
Page 11

BRASIERA, MULTIPLA
Leggere subito le informazioni genera li!
IT – CH
KIPPBRATPFANNE, ELEKTRO MULTI-BRATER
Die Hinweise sollen sofortge lesen werden!
DE – AT – IT – BE – LU –CH
TILTING BRATT PAN,
GB – IE – MT
SAUTEUSE BASCULANTE,
Lire tout de suite averissements!
FR – BE – LU – CH
SARTEN VOLCABLE,
¡En primer lugar leer las advertencias!
ES
KANTELBARE BRAADPAN,
NL – BE
SNACK
ISTRUZIONI PER L’INSTALLAZIONE, USO E MANUTENZIONE
ANWEISUNGEN FÜR INSTALLATION, GEBRAUCH UND WARTUNG
MULTI-PERFORMANCES COOKING APPLIANCE
INSTRUCTIONS FOR INSTALLATION, OPERATION AND MAINTENANCE
Read the general informations immediately!
APPAREIL DE CUISSON MULTIFUNCION
INSTRUCIONS POUR INSTALLATION, EMPLOI ET ENTRETIEN
APPARADOS DE COCCION MULTIFUNCION
INSTRUCCIONE S PARA INSTAKKACIO N , USO Y M ANTENINIENTO
MULTI-BRAADPANNEN
ISTRUCTIES VOOR INSTALLATIE, GEBRUIK EN ONDERHOUD
Lees de waarschuwingen onmiddellijk!
DOC.NO CR0930070
EDITION 001
Page 12

ALLGEMEINE INFORMATIONEN ............................................................................................................................................11
1 GERÄTEDATEN ........................................................................................................................................................11
2 ALLGEMEINE HINWEISE .........................................................................................................................................11
HINWEISE FÜR DEN INSTALLATIONSTECHNIKER .............................................................................................................11
HINWEISE FÜR DEN BENUTZER ..........................................................................................................................................11
HINWEISE FÜR DEN WARTUNGSTECHNIKER ....................................................................................................................11
REINIGUNGSHINWEISE .........................................................................................................................................................11
3 SICHERHEITS- UND REGELVORRICHTUNGEN ....................................................................................................11
3.1 MULTI-KIPPBRATPFANNE ...................................................................................................................................... 11
4 ENTSORGUNG DER VERPACKUNG UND DES GERÄTS ......................................................................................11
INST ALLATIONSANLEITUNGEN ............................................................................................................................................ 12
HINWEISE FÜR DEN INSTALLATIONSTECHNIKER .............................................................................................................12
5 BEZUGSNORMEN UND -GESETZE .........................................................................................................................12
6 AUSPACKEN ............................................................................................................................................................. 12
7 GERÄTEAUFSTELLUNG ..........................................................................................................................................12
8 ANSCHLÜSSE ...........................................................................................................................................................12
9 INBETRIEBNAHME ...................................................................................................................................................13
GEBRAUCHSANLEITUNGEN .................................................................................................................................................13
HINWEISE FÜR DEN BENUTZER ..........................................................................................................................................13
10 GEBRAUCH DER ELEKTRO-KIPPBRATPFANNE .................................................................................................. 13
11 GEBRAUCH DER MULTI-KIPPBRATPFANNE ........................................................................................................13
12 STILLSTANDZEITEN .................................................................................................................................................14
REINIGUNGSANLEITUNGEN .................................................................................................................................................14
REINIGUNGSHINWEISE .........................................................................................................................................................14
WARTUNGSANLEITUNGEN ...................................................................................................................................................14
HINWEISE FÜR DEN WARTUNGSTECHNIKER ....................................................................................................................14
13 INBETRIEBNAHME ...................................................................................................................................................14
14 ABHILFE BEI BETRIEBSSTÖRUNGEN .................................................................................................................... 14
HINWEISE FÜR DEN ERSATZ VON BAUTEILEN. ................................................................................................................. 14
14.1 ELEKTRO-KIPPBRATPFANNE .................................................................................................................................15
14.2 MULTI-KIPPBRATPFANNE ...................................................................................................................................... 15
15 ERSATZ VON BAUTEILEN .......................................................................................................................................15
HINWEISE FÜR DEN ERSATZ VON BAUTEILEN. ................................................................................................................. 15
15.1 ELEKTRO-KIPPBRATPFANNE .................................................................................................................................15
15.2 MULTI-KIPPBRATPFANNE ...................................................................................................................................... 15
16 REINIGUNG DER INNEREN GERÄTETEILE ........................................................................................................... 15
17 HAUPTKOMPONENTEN ...........................................................................................................................................15
17.1 ELEKTRO-KIPPBRATPFANNE .................................................................................................................................15
17.2 MULTI-KIPPBRATPFANNE ...................................................................................................................................... 15
10
Page 13

ALLGEMEINE INFORMATIONEN
Dieses Kapitel enthält die allgemeinen Informationen, die sämtlichen Benutzern dieser Anleitungen bekannt sein müssen. Die
spezifi schen Informationen für die einzelnen Benutzer dieser
Anleitungen sind in den folgenden Kapiteln enthalten ("ANLEITUNGEN FÜR ... ").
1 GERÄTEDATEN
• Das Schild mit den Gerätedaten befi ndet sich an der Innen-
seite des Bedienfeldes.
• Das Modell und die Seriennummer des Geräts sind darüber
hinaus auf den Etiketten unter dem Markenzeichen und an
der Verpackung vermerkt.
2 ALLGEMEINE HINWEISE
Der Gerätehersteller ist nicht haftbar für eventuelle
Schäden, die durch Missachtung der nachstehenden
Pfl ichten verursacht werden.
HINWEISE FÜR DEN INSTALLATIONSTECHNIKER
• Lesen Sie diese Anleitungen aufmerksam durch. Sie enthalten wichtige Hinweise zur Installations-, Gebrauchs- und
Wartungssicherheit des Geräts.
• Installation, Umstellung auf einen anderen Gasbetrieb und
Wartung des Geräts sind durch qualifi ziertes und vom Her-
steller autorisiertes Personal entsprechend den einschlägigen Sicherheitsbestimmungen und diesen Anleitungen vorzunehmen.
• Gerätemodell feststellen. Das Modell ist an der Verpackung
und auf dem Schild der Gerätedaten vermerkt.
• Installieren Sie das Gerät nur in gut belüfteten Räumen.
• Verdecken Sie die am Gerät vorhandenen Belüftungsschlitze
und Abfl ussöffnungen nicht.
• Nehmen Sie keine unerlaubten Änderungen an den
Gerätekomponenten vor.
HINWEISE FÜR DEN BENUTZER
• Lesen Sie diese Anleitungen aufmerksam durch. Sie enthalten wichtige Hinweise zur Installations-, Gebrauchs- und
Wartungssicherheit des Geräts.
• Bewahren Sie diese Anleitungen an einem sicheren und
bekannten Ort auf, damit sie während der Nutzungsdauer
des Geräts eingesehen werden können.
• Installation, Umstellung auf einen anderen Gasbetrieb und
Wartung des Geräts sind durch qualifi ziertes und vom Her-
steller autorisiertes Personal entsprechend den einschlägigen Sicherheitsbestimmungen und diesen Anleitungen vorzunehmen.
• Fordern Sie Kundendienstleistungen nur bei den vom Hersteller autorisierten Servicecentern an und verlangen Sie Originalersatzteile.
• Das Gerät sollte zumindest zwei Mal jährlich gewartet werden. Wir raten zum Abschluss eines Wartungsvertrags.
• Das Gerät ist für den gewerblichen Gebrauch durch geschultes Personal bestimmt.
• Das Gerät ist zum Garen von Lebensmitteln entsprechend
den Gebrauchshinweisen zu verwenden. Jeder davon abweichende Gebrauch gilt als unsachgemäß.
• Vermeiden Sie es, das Gerät über längere Zeit hin leer zu
betreiben. Heizen Sie das Gerät erst unmittelbar vor dem
Gebrauch vor.
• Überwachen Sie das Gerät während des Betriebs.
• Schließen Sie bei Defekten oder Betriebsstörungen den Gasabsperrhahn und/oder unterbrechen Sie die Stromversorgung am Hauptschalter, die beide dem Gerät vorgeschaltet
sind.
• Beachten Sie bei der Reinigung die Anweisungen im Kapitel
"REINIGUNGSANWEISUNGEN".
• Bewahren Sie keine entfl ammbaren Stoffe in Nähe des
Geräts auf. BRANDGEFAHR
• Achtung: Kinder müssen beaufsichtigt werden, um sicherzustellen, dass sie nicht mitdem Gerät spielen.
• Dieses Gerät ist nicht für die Benutzung durch Personen (einschließlich Kinder) mit stark reduzierten physischen, sensorischen oder geistigen Fähigkeiten oder dem Fehlen vonErfahrung und Wissen geeignet - es sei denn, sie werden durch
eine für ihre Sicherheit verantwortliche Person überwacht
oder im Gebrauch des Gerätes unterwiesen.
• Verdecken Sie die am Gerät vorhandenen Belüftungsschlitze
und Abfl ussöffnungen nicht.
• Nehmen Sie keine unerlaubten Änderungen an den
Gerätekomponenten vor.
HINWEISE FÜR DEN WARTUNGSTECHNIKER
• Lesen Sie diese Anleitungen aufmerksam durch. Sie enthalten wichtige Hinweise zur Installations-, Gebrauchs- und
Wartungssicherheit des Geräts.
• Installation, Umstellung auf einen anderen Gasbetrieb und
Wartung des Geräts sind durch qualifi ziertes und vom Her-
steller autorisiertes Personal entsprechend den einschlägigen Sicherheitsbestimmungen und diesen Anleitungen vorzunehmen.
• Gerätemodell feststellen. Das Modell ist an der Verpackung
und auf dem Schild der Gerätedaten vermerkt.
• Installieren Sie das Gerät nur in gut belüfteten Räumen.
• Verdecken Sie die am Gerät vorhandenen Belüftungsschlitze
und Abfl ussöffnungen nicht.
• Nehmen Sie keine unerlaubten Änderungen an den
Gerätekomponenten vor.
REINIGUNGSHINWEISE
• Reinigen Sie täglich die Außenfl ächen aus mattiertem Edel-
stahl, die Flächen der Garbecken und der Kochplatten.
• Beauftragen Sie einen autorisierten Techniker mindestens
zwei Mal im Jahr mit der Reinigung des Geräteinneren.
• Waschen Sie das Gerät nicht mit Spritzwasser oder Hochdruckwasserstrahlen.
• Verwenden Sie keine korrosiven Produkte, um den Boden
unter dem Gerät zu reinigen.
3 SICHERHEITS- UND REGELVORRICHTUNGEN
3.1 MULTI-KIPPBRATPFANNE
SICHERHEITSTHERMOSTAT
Der Gerätehersteller ist nicht haftbar für eventuelle
Schäden, die durch Missachtung der nachstehenden
Pfl ichten verursacht werden.
• Das Gerät verfügt über einen von Hand rückstellbaren Sicherheitsthermostat, der die Beheizung unterbricht, wenn die
Betriebstemperatur die zulässige Höchsttemperatur überschreitet.
• Zur Wiederherstellung des Gerätebetriebs die Rückstelltaste
des Thermostats drücken. Dieser Eingriff ist ausschließlich
einem qualifi zierten und autorisierten Techniker vorbehalten.
4 ENTSORGUNG DER VERPACKUNG UND DES
GERÄTS
4.1 VERPACKUNG
Die Verpackung ist aus umweltverträglichen Materialien gefertigt. Die recyclebaren Kunststoffkomponenten sind:
1111
Page 14

• die transparente Hülle, die Beutel mit den Gebrauchsanleitungen und den Düsen (aus Polyethylen - PE)
• die Umreifungsbänder (aus Polypropylen - PP).
4.2 GERÄT
Zu mehr als 90% seines Gewichtes besteht das Gerät aus
recyclebaren Metallwerkstoffen (Edelstahl, aluminiertes Blech,
Kupfer ).
Das Gerät ist entsprechend den einschlägigen Vorschriften zu
entsorgen.
• Es darf nicht in die Umwelt gelangen.
• Vor der Entsorgung unbrauchbar machen.
INSTALLATIONSANLEITUNGEN
HINWEISE FÜR DEN INSTALLATIONSTECHNIKER
Der Gerätehersteller ist nicht haftbar für eventuelle
Schäden, die durch Missachtung der nachstehenden
Pfl ichten verursacht werden.
• Lesen Sie diese Anleitungen aufmerksam durch. Sie enthalten wichtige Hinweise zur Installations-, Gebrauchs- und
Wartungssicherheit des Geräts.
• Installation, Umstellung auf einen anderen Gasbetrieb und
Wartung des Geräts sind durch qualifi ziertes und vom Her-
steller autorisiertes Personal entsprechend den einschlägigen Sicherheitsbestimmungen und diesen Anleitungen vorzunehmen.
• Gerätemodell feststellen. Das Modell ist an der Verpackung
und auf dem Schild der Gerätedaten vermerkt.
• Installieren Sie das Gerät nur in gut belüfteten Räumen.
• Verdecken Sie die am Gerät vorhandenen Belüftungsschlitze
und Abfl ussöffnungen nicht.
• Nehmen Sie keine unerlaubten Änderungen an den
Gerätekomponenten vor.
Geräteder Serie DROP-IN (Einbaugeräte)
• Die Installation muß rigoros gemäß der in derAnlage beigelegten
• Schaltpläne erfolgen.Ausschließlich an Metallmöbeln
installieren(nicht aus Holz und/oder anderen brennbarenMaterialien).
• Sorgfältig auf den Verlauf des Kabels achten:die Durchgänge müssen frei von Ecken und/oder scharfen Kanten sein.
Außerdem darf dasKabel auf seiner gesamten Länge dieRaumtemperatur nicht um mehr als 50° C überschreiten.
5 BEZUGSNORMEN UND -GESETZE
Installieren Sie das Gerät gemäß den einschlägigen Bestimmungen.
Das Gerät muss in Konformität mit EN 1717 und den geltenden
nationalen Regelwerken über Wasserinstallationen installiert
werden.
Für die Installation müssen folgende Vorschriften befolgt werden
• Entsprechende Rechtsverordungen wie Bauordnungen
undFeuerungsverordnungen der Länder.
• Verordnungen über Arbeitsstätten.Bauaufsichtliche Richtlinien über die brandschutztechnischenAnforderungen an
Lüftungsanlagen.
• DVGW -Arbeitsblatt G634 “Installation von Großküchen-Gasverbrauchseinrichtungen”.
• DVGW -Arbeitsblatt G600 (TRGI) “T echnische Regeln fürGasinstallationen”.
• TRF “T echnische Regeln für Flüssiggas”.Einschlägige Unfallverhütungsvorschriften und Richtlinien fürKüchen und Flüssiggas.
• Einschlägige Richtlinien und Bestimmungen desGasversorgungsunternehmen (GVU).
6 AUSPACKEN
Überprüfen Sie die Verpackung auf Schäden und fordern Sie
ggf. den Spediteur zu einer Kontrolle der Ware auf.
• Entfernen Sie die Verpackung.
• Entfernen Sie die Schutzfolie von den Außenpaneelen und
verwenden Sie ein passendes Lösungsmittel zur Entfernung
möglicher Kleberrückstände.
7 GERÄTEAUFSTELLUNG
• Die Außenmaße des Geräts und die Position der Anschlüsse
sind dem Installationsschema am Anfang dieser Anleitungen
zu entnehmen.
• Das Gerät kann einzeln oder zusammen mit anderen Geräten
derselben Baureihe installiert werden.
• Das Gerät eignet sich nicht für den Einbau.
• Halten Sie einen Mindestabstand von 10 cm von den angrenzenden Wänden, der im Fall feuerbeständiger oder durch
Wärmeisolierstoff geschützter Wände auch geringer sein
darf.
7.1 GERÄTEMONTAGE AUF SOCKEL
Befolgen Sie die zusammen mit dem jeweiligen Halterungselement gelieferten Anleitungen.
7.2 GERÄTEZEILE
• Rücken Sie die Geräte nebeneinander und richten Sie sie auf
die Höhe der Arbeitsplatten aus.
• Die Geräte unter Verwendung der auf Anfragemitgelieferten
Fugenabdeckungen untereinan-der verbinden
8 ANSCHLÜSSE
Position und Abmessungen der Anschlüsse sind dem Installationsschema am Anfang dieser Anleitungen zu entnehmen.
8.1 ANSCHLUSS AN DAS STROMNETZ
Prüfen Sie, ob das Gerät auf die Spannung und die Frequenz
eingestellt ist, mit der es effektiv betrieben wird. Kontrollieren
Sie dazu das Schild der Gerätedaten.
• Installieren Sie vor dem Gerät einen allpoligen Schutzschalter mit entsprechender Leistung und mindestens 3 mm Kontaktöffnungsweite sowie einen hochsensiblen Differentialschutzschalter. Höchstzulässiger Fehlstrom 1 mA/kW.
• Verwenden Sie ein fl exibles Versorgungskabel mit einem
Schutzmantel aus Gummi, das mindestens dem Typ H05
RN-F entsprechen muss.
• Schließen Sie das Versorgungskabel an die Klemmenleiste
entsprechend dem mit dem Gerät gelieferten Schaltplan an.
• Klemmen Sie das Versorgungskabel mit der Kabelschelle
fest.
• Schützen Sie den geräteexternen Abschnitt des Versorgungskabels mit einem Metallrohr oder einem steifen Kunststoffschlauch.
8.2 ERDUNGS- UND POTENTIALAUSGLEICHSAN-
SCHLUSS
Schließen Sie das Elektrogerät an eine funktionstüchtige Erdung an. Verbinden Sie den Erdleiter mit der durch das Symbol
markierten Klemme neben der Eingangsklemmenleiste.
12
Page 15

Verbinden Sie die Metallkonstruktion des Elektrogeräts mit einem Potentialausgleich. Verbinden Sie den Leiter mit der durch
das Symbol
Gerätebo- dens.
8.3 ANSCHLUSS AN DIE WASSERLEITUNG
Das Gerät ist mit Trinkwasser zu versorgen. Der Wasserdruck
muss zwischen 150 kPa und 300 kPa betragen. Verwenden
Sie einen Druckminderer, falls der Versorgungsdruck höher als
der angegebene Höchstdruck sein sollte.
• Schalten Sie dem Gerät einen mechanischen Filter und einen Absperrhahn an einer leicht zugänglichen Stelle vor.
• Reinigen Sie die Anschlussrohre vor dem Anschluss des Filters und des Geräts, um etwaige Eisenschlacken zu entfernen.
• Verschließen Sie die unbenutzten Anschlüsse mit einem hermetischen Verschluss.
• Stellen Sie nach dem Anschluss sicher, dass keine Undichtigkeiten an den Verbindungsstellen vorliegen.
8.4 ANSCHLUSS AN DIE WASSERABFLÜSSE
Die Abfl ussleitungen müssen aus bis zu 100 °C hitzebeständi-
gen Materialien gefertigt sein. Der Geräteboden darf nicht dem
beim Warmwasserablauf erzeugten Schwaden ausgesetzt
werden.
markierten Klemme an der Außenseite des
9 INBETRIEBNAHME
Siehe Kapitel "WARTUNGSANLEITUNGEN".
GEBRAUCHSANLEITUNGEN
HINWEISE FÜR DEN BENUTZER
Der Gerätehersteller ist nicht haftbar für eventuelle
Schäden, die durch Missachtung der nachstehenden
Pfl ichten verursacht werden.
• Lesen Sie diese Anleitungen aufmerksam durch. Sie enthalten wichtige Hinweise zur Installations-, Gebrauchs- und
Wartungssicherheit des Geräts.
• Bewahren Sie diese Anleitungen an einem sicheren und
bekannten Ort auf, damit sie während der Nutzungsdauer
des Geräts eingesehen werden können.
• Installation, Umstellung auf einen anderen Gasbetrieb und
Wartung des Geräts sind durch qualifi ziertes und vom Her-
steller autorisiertes Personal entsprechend den einschlägigen Sicherheitsbestimmungen und diesen Anleitungen vorzunehmen.
• Fordern Sie Kundendienstleistungen nur bei den vom Hersteller autorisierten Servicecentern an und verlangen Sie Originalersatzteile.
• Das Gerät sollte zumindest zwei Mal jährlich gewartet werden. Wir raten zum Abschluss eines Wartungsvertrags.
• Das Gerät ist für den gewerblichen Gebrauch durch geschultes Personal bestimmt.
• Das Gerät ist zum Garen von Lebensmitteln entsprechend
den Gebrauchshinweisen zu verwenden. Jeder davon abweichende Gebrauch gilt als unsachgemäß.
• Vermeiden Sie es, das Gerät über längere Zeit hin leer zu
betreiben. Heizen Sie das Gerät erst unmittelbar vor dem
Gebrauch vor.
• Überwachen Sie das Gerät während des Betriebs.
• Schließen Sie bei Defekten oder Betriebsstörungen den Gasabsperrhahn und/oder unterbrechen Sie die Stromversorgung am Hauptschalter, die beide dem Gerät vorgeschaltet
sind.
• Beachten Sie bei der Reinigung die Anweisungen im Kapitel
"REINIGUNGSANWEISUNGEN".
• Bewahren Sie keine entfl ammbaren Stoffe in Nähe des
Geräts auf. BRANDGEFAHR
• Achtung: Kinder müssen beaufsichtigt werden, um sicherzustellen, dass sie nicht mitdem Gerät spielen.
• Dieses Gerät ist nicht für die Benutzung durch Personen (einschließlich Kinder) mit stark reduzierten physischen, sensorischen oder geistigen Fähigkeiten oder dem Fehlen vonErfahrung und Wissen geeignet - es sei denn, sie werden durch
eine für ihre Sicherheit verantwortliche Person überwacht
oder im Gebrauch des Gerätes unterwiesen.
• Verdecken Sie die am Gerät vorhandenen Belüftungsschlitze
und Abfl ussöffnungen nicht.
• Nehmen Sie keine unerlaubten Änderungen an den
Gerätekomponenten vor.
10 GEBRAUCH DER ELEKTRO-KIPPBRATPFANNE
GEBRAUCHSHINWEISE
• WICHTIG! Dieses Gerät darf nicht als Friteuse benutzt werden!
• WICHTIG: Die Heizung bei leerem Einsatz nicht anschalten!
TIEGEL FÜLLEN UND DER EINSATZ
Füllen
• Füllen Sie das Becken bis zur Markierung des Höchstfüllstands an der Einsatz. Benutzen Sie das Gerät nicht wenn
der Höchstfüllstand überschritten wird.
Entleeren
• Das Gerät ausschalten.
• Den Einsatz vom Gerät abnehmen (als wäre esein normaler
Kochtopf).Dabei muß folgendes beachtet werden:Hände vor
Hitze schützen (z.B. mitHandschuhe)den Köper vor eventuellen heißen Speisespritzernschützen (während den Abnehm,Transport und Entleerungsvorgängen).
• Einen ausreichend bemessenen und austemperaturbeständigem Material bestehendenAuffangbehälter verwenden.
EIN- UND AUSSCHALTEN DER BEHEIZUNG
Der Bedienknebel des Thermostats hat folgende Betriebsstellungen:
0 Aus
50 Mindesttemperatur
100-250 Mittlere Temperaturen
300 Höchsttemperatur
Einschalten
• Drehen Sie den Knebel des Thermostats auf die gewählte
Gartemperatur.
• Die gelbe Kontrolllampe leuchtet auf.
• Die gelbe Kontrolllampe erlischt, wenn die gewählte Temperaturstufe erreicht ist.
Ausschalten
• Drehen Sie den Thermostatknebel auf “0”.
11 GEBRAUCH DER MULTI-KIPPBRATPFANNE
GEBRAUCHSHINWEISE
• Das Gerät dient zum direkten Garen von Speisen (Saucengerichte, Suppen, Steaks, Hamburger, Fisch, Gemüse, usw .).
13
Page 16

• Die Kochplatte darf nicht zum Aufwärmen und indirekten
Garen von Speisen in Töpfen, Kasserollen, Pfannen usw.
verwendet werden.
• Das Gerät darf nicht als Fritteuse benutzt werden; die Temperatur des Tiegelbodens übersteigt 230°C und es besteht
die Gefahr, dass das Öl Feuer fängt.
• Nehmen Sie am Ende des Arbeitstags eine gründliche Reinigung des Beckens vor, damit sich keine korrosiven Ablagerungen darin bilden können.
• Das Model M40 verfügt über einer Heizzone für einerVerfassungcapazität von 13 lieter.Das Model M60 verfügt über einer Heizzone füreiner Verfassungcapazität von 22 lieter.
EIN- UND AUSSCHALTEN DER BEHEIZUNG
Der Bedienknebel des Thermostats hat folgende Betriebsstellungen:
0 Aus
50 Mindesttemperatur
100-200 Mittlere Temperaturen
300 Höchsttemperatur
Einschalten
• Drehen Sie den Knebel des Thermostats auf die gewählte
Gartemperatur.
• Die gelbe Kontrolllampe leuchtet auf.
• Die gelbe Kontrolllampe erlischt, wenn die gewählte Temperaturstufe erreicht ist.
Ausschalten
• Drehen Sie den Thermostatknebel auf “0”.
12 STILLSTANDZEITEN
Gehen Sie vor einer geplanten Stillstandzeit des Geräts wie
folgt vor:
• Reinigen Sie das Gerät gründlich.
• Wischen Sie sämtliche Edelstahlfl ächen mit einem kurz zu-
vor in Vaselineöl getränkten Tuch ab, um einen Schutzfi lm
aufzubringen.
• Legen Sie die Deckel nicht.
• Schließen Sie die dem Gerät vorgeschalteten Absperrhähne
und Hauptschalter.
Gehen Sie nach einer längeren Stillstandzeit des Geräts wie
folgt vor:
• Kontrollieren Sie das Gerät, bevor Sie es wieder in Betrieb
nehmen:
• Setzen Sie die Elektrogeräte für wenigstens 60 Minuten bei
Mindesttemperatur in Betrieb.
REINIGUNGSANLEITUNGEN
MATTIERTE EDELSTAHLFLÄCHEN
• Reinigen Sie die Flächen mit einem Tuch oder Schwamm
und verwenden Sie dazu Wasser und handelsübliche Reiniger ohne Scheuermittel. Wischen Sie mit dem Tuch im Verlauf der Mattierung. Mehrmals nachspülen und anschließend
sorgfältig abtrocknen.
• Keine Kratzschwämme oder andere Metallgegenstände
verwenden.
• Verwenden Sie keine chemischen Produkte, die Chlor enthalten.
• Verwenden Sie keine spitzen Gegenstände, die die Flächen
einritzen und beschädigen können.
GARBECKEN
• Bringen Sie zur Reinigung der Becken das Wasser zum Kochen und fügen Sie nach Bedarf entfettende Produkte zu.
• Entfernen Sie mögliche Kalksteinablagerungen mit den
entsprechenden Produkten.
WARTUNGSANLEITUNGEN
HINWEISE FÜR DEN WARTUNGSTECHNIKER
Der Gerätehersteller ist nicht haftbar für eventuelle
Schäden, die durch Missachtung der nachstehenden
Pfl ichten verursacht werden.
• Lesen Sie diese Anleitungen aufmerksam durch. Sie enthalten wichtige Hinweise zur Installations-, Gebrauchs- und
Wartungssicherheit des Geräts.
• Installation, Umstellung auf einen anderen Gasbetrieb und
Wartung des Geräts sind durch qualifi ziertes und vom Her-
steller autorisiertes Personal entsprechend den einschlägigen Sicherheitsbestimmungen und diesen Anleitungen vorzunehmen.
• Gerätemodell feststellen. Das Modell ist an der Verpackung
und auf dem Schild der Gerätedaten vermerkt.
• Installieren Sie das Gerät nur in gut belüfteten Räumen.
• Verdecken Sie die am Gerät vorhandenen Belüftungsschlitze
und Abfl ussöffnungen nicht.
• Nehmen Sie keine unerlaubten Änderungen an den
Gerätekomponenten vor.
13 INBETRIEBNAHME
Überprüfen Sie nach der Installation, der Anpassung an
eine andere Gasart oder nach Wartungseingriffen den
Gerätebetrieb. Liegen Betriebsstörungen an, können Sie im
nachfolgenden Abschnitt "Abhilfe bei Betriebsstörungen" nachschlagen.
13.1 ELEKTROGERÄTE
Setzen Sie das Gerät entsprechend den Gebrauchsanleitungen und -hinweisen im Kapitel "GEBRAUCHSANLEITUNGEN"
in Betrieb und kontrollieren Sie:
REINIGUNGSHINWEISE
Der Gerätehersteller ist nicht haftbar für eventuelle
Schäden, die durch Missachtung der nachstehenden
Pfl ichten verursacht werden.
• Reinigen Sie täglich die Außenfl ächen aus mattiertem Edel-
stahl, die Flächen der Garbecken und der Kochplatten.
• Beauftragen Sie einen autorisierten Techniker mindestens
zwei Mal im Jahr mit der Reinigung des Geräteinneren.
• Waschen Sie das Gerät nicht mit Spritzwasser oder Hochdruckwasserstrahlen.
• Verwenden Sie keine korrosiven Produkte, um den Boden
unter dem Gerät zu reinigen.
14
• die Stromwerte jeder Phase
• das vorschriftsmäßige Einschalten der Heizelemente.
14 ABHILFE BEI BETRIEBSSTÖRUNGEN
HINWEISE FÜR DEN ERSATZ VON BAUTEILEN.
• Vor Durchführung jedes Eingriffs muss die eventuell vorhandene Stromzufuhr zum Gerät getrennt werden.
• Stellen Sie nach dem Ersatz einer Komponente des Gaskreises sicher, dass an ihren Anschlussstellen an den Kreis keine
Undichtigkeiten vorliegen.
Page 17

• Stellen Sie nach dem Ersatz einer Komponente des
Stromkreises ihren korrekten Anschluss an die Verkabelung
sicher.
14.1 ELEKTRO-KIPPBRATPFANNE
Das Gerät heizt nicht.
Mögliche Ursachen:
• Der Thermostat des Temperaturreglers ist defekt.
• Die Heizelemente sind defekt.
• Nehmen Sie die Kugel aus ihrem Sitz am Becken.
• Das Teil ausbauen und ersetzen.
• Sämtliche Teile wieder einbauen. In umgekehrter Reihenfolge im Vergleich zum Ausbau vorgehen.
16 REINIGUNG DER INNEREN GERÄTETEILE
• Kontrollieren Sie den Zustand der inneren Geräteteile.
• Entfernen Sie die Rückstände etwaiger Unreinheiten.
• Prüfen und reinigen Sie das Wrasenabzugssystem.
17 HAUPTKOMPONENTEN
Die Heizleistung lässt sich nicht regulieren.
Mögliche Ursachen:
• Der Thermostat des Temperaturreglers ist defekt.
14.2 MULTI-KIPPBRATPFANNE
Das Gerät heizt nicht.
Mögliche Ursachen:
• Der Thermostat des Temperaturreglers ist defekt.
• Die Heizelemente sind defekt.
• Der Sicherheitsthermostat wurde ausgelöst.
Die Heizleistung lässt sich nicht regulieren.
Mögliche Ursachen:
• Der Thermostat des Temperaturreglers ist defekt.
15 ERSATZ VON BAUTEILEN
HINWEISE FÜR DEN ERSATZ VON BAUTEILEN.
• Vor Durchführung jedes Eingriffs muss die eventuell vorhandene Stromzufuhr zum Gerät getrennt werden.
• Stellen Sie nach dem Ersatz einer Komponente des Gaskreises sicher, dass an ihren Anschlussstellen an den Kreis keine
Undichtigkeiten vorliegen.
• Stellen Sie nach dem Ersatz einer Komponente des
Stromkreises ihren korrekten Anschluss an die Verkabelung
sicher.
17.1 ELEKTRO-KIPPBRATPFANNE
• Heizelement
• Kontrolllampe
• Temperaturregler
17.2 MULTI-KIPPBRATPFANNE
• Betriebsthermostat
• Sicherheitsthermostat
• Heizelement
• Kontrolllampe
15.1 ELEKTRO-KIPPBRATPFANNE
Ersatz des Heizelements
• Die Knebel abziehen und Bedienblende entfernen muß auch
der Einsatz abgenommen werden.
• Das Teil ausbauen und ersetzen.
• Sämtliche Teile wieder einbauen. In umgekehrter Reihenfolge im Vergleich zum Ausbau vorgehen.
Ersatz des Temperaturreglers
• Die Knebel abziehen und Bedienblende entfernen.
• Das Teil ausbauen und ersetzen.
• Sämtliche Teile wieder einbauen. In umgekehrter Reihenfolge im Vergleich zum Ausbau vorgehen.
15.2 MULTI-KIPPBRATPFANNE
Ersatz des Heizelements und der Kontrolllampe
• Bedienfeld entfernen.
• Das Teil ausbauen und ersetzen.
• Sämtliche Teile wieder einbauen. In umgekehrter Reihenfolge im Vergleich zum Ausbau vorgehen.
Ersatz des Betriebs- und des Sicherheitsthermostats
• Bedienfeld entfernen.
15
Page 18

GENERAL INFORMATION ....................................................................................................................................................... 17
1 APPLIANCE SPECIFICATIONS ................................................................................................................................17
2 GENERAL PRESCRIPTIONS .................................................................................................................................... 17
REMINDERS FOR THE INSTALLER ....................................................................................................................................... 17
REMINDERS FOR THE USER ................................................................................................................................................ 17
REMINDERS FOR THE MAINTENANCE TECHNICIAN .........................................................................................................17
REMINDERS FOR CLEANING ................................................................................................................................................17
3 SAFETY AND CONTROL DEVICES .......................................................................................................................... 17
3.1 MULTI-PURPOSE APPLIANCE ................................................................................................................................17
4 DISPOSAL OF PACKING AND THE APPLIANCE .....................................................................................................17
INSTRUCTIONS FOR INSTALLATION ....................................................................................................................................17
REMINDERS FOR THE INSTALLER ....................................................................................................................................... 17
5 REFERENCE STANDARDS AND LAWS ...................................................................................................................18
6 UNPACKING ..............................................................................................................................................................18
7 POSITIONING ............................................................................................................................................................ 18
8 CONNECTIONS ......................................................................................................................................................... 18
9 COMMISSIONING .....................................................................................................................................................18
INSTRUCTIONS FOR USE ...................................................................................................................................................... 18
REMINDERS FOR THE USER ................................................................................................................................................ 18
10 USING THE ELECTRIC BRATT PAN ....................................................................................................................... 19
11 USING THE MULTI-PURPOSE APPLIANCE ........................................................................................................... 19
12 PROLONGED DISUSE ..............................................................................................................................................19
INSTRUCTIONS FOR CLEANING ........................................................................................................................................... 19
REMINDERS FOR CLEANING ................................................................................................................................................19
INSTRUCTIONS FOR MAINTENANCE ................................................................................................................................... 20
REMINDERS FOR THE MAINTENANCE TECHNICIAN .........................................................................................................20
13 COMMISSIONING .....................................................................................................................................................20
14 TROUBLESHOOTING ............................................................................................................................................... 20
REMINDERS FOR REPLACING COMPONENTS. .................................................................................................................. 20
14.1 ELECTRIC BRATT PAN .............................................................................................................................................20
14.2 MULTI-PURPOSE APPLIANCE ................................................................................................................................20
15 REPLACING COMPONENTS ....................................................................................................................................20
REMINDERS FOR REPLACING COMPONENTS. .................................................................................................................. 20
15.1 ELECTRIC BRATT PAN .............................................................................................................................................20
15.2 MULTI-PURPOSE APPLIANCE ................................................................................................................................20
16 CLEANING THE INTERIOR ...................................................................................................................................... 21
17 MAIN COMPONENTS ............................................................................................................................................... 21
17.1 ELECTRIC BRATT PAN .............................................................................................................................................21
17.2 MULTI-PURPOSE APPLIANCE ................................................................................................................................21
16
Page 19

GENERAL INFORMATION
This chapter contains general information which all users of the
manual must be familiar with. Specifi c information for individual
users of the manual is provided in subsequent chapters (" IN-
STRUCTIONS FOR .... " ).
1 APPLIANCE SPECIFICATIONS
• The appliance data plate is located inside the control panel.
• The appliance model and serial number are also detailed on
decals under the brand logo and on the packing.
2 GENERAL PRESCRIPTIONS
The manufacturer will not be liable for any damage or injury resulting from failure to observe the following rules
REMINDERS FOR THE INSTALLER
• Read this manual carefully. It provides important information
for safe installation, use and maintenance of the appliance.
• Installation, conversion to a different type of gas and appliance maintenance must be carried out by qualifi ed technicians
authorized by the manufacturer, in compliance with current
safety standards and the instructions in this manual.
• Identify the specifi c appliance model. The model number is
detailed on the packing and on the appliance data plate.
• The appliance must be installed in a well-ventilated room.
• Do not obstruct any air vents or drains present on the appliance.
• Do not tamper with appliance components.
REMINDERS FOR THE USER
• Read this manual carefully. It provides important information
for safe installation, use and maintenance of the appliance.
• Keep this manual in a safe place known to all users so that it
can be consulted throughout the working life of the appliance.
• Installation, conversion to a different type of gas and appliance maintenance must be carried out by qualifi ed technicians
authorized by the manufacturer, in compliance with current
safety standards and the instructions in this manual.
• For after-sales service, contact technical assistance centers
authorized by the manufacturer and demand the use of original spare parts.
• Have the appliance serviced at least twice a year. The manufacturer recommends taking out a service contract.
• The appliance is designed for professional use and must be
operated by trained personnel.
• The appliance is to be used for cooking food as specifi ed
in the reminders for use. Any other use must be considered
improper
• Do not allow the appliance to operate empty for prolonged
periods. Only pre-heat the oven just before use.
• Do not leave the appliance unattended while in operation.
• In the event of an appliance fault or malfunction, shut the
gas shut-off valve and/or switch the appliance off at the main
switch installed upline.
• Clean the appliance following the instructions given in Chapter " INSTRUCTIONS FOR CLEANING".
• Do not store fl ammable materials in close proximity to the
appliance. FIRE HAZARD.
• Children should be supervised to ensure that they do not play
with the appliance.
• This appliance is not intended for use by persons (including
children) with reduced physical, sensory or mental capabilities, or lack of experience and knowledge, unless they have
been given supervision or instruction concerning use of the
appliance by a person responsible for their safety.
• Do not obstruct any air vents or drains present on the appliance.
• Do not tamper with appliance components.
REMINDERS FOR THE MAINTENANCE TECHNICIAN
• Read this manual carefully. It provides important information
for safe installation, use and maintenance of the appliance.
• Installation, conversion to a different type of gas and appliance maintenance must be carried out by qualifi ed technicians
authorized by the manufacturer, in compliance with current
safety standards and the instructions in this manual.
• Identify the specifi c appliance model. The model number is
detailed on the packing and on the appliance data plate.
• The appliance must be installed in a well-ventilated room.
• Do not obstruct any air vents or drains present on the appliance.
• Do not tamper with appliance components.
REMINDERS FOR CLEANING
• Clean the satin fi nish stainless steel exterior surfaces, the
cooking wells and the surface of the hotplates every day.
• At least twice a year, have an authorized technician clean the
internal parts of the appliance.
• Do not use direct or high pressure water jets to clean the
appliance.
• Do not use corrosive products to clean the fl oor beneath the
appliance.
3 SAFETY AND CONTROL DEVICES
3.1 MULTI-PURPOSE APPLIANCE
SAFETY THERMOSTAT
The manufacturer will not be liable for any damage or in-
jury resulting from failure to observe the following rules
• The appliance is equipped with a manual reset safety thermostat that interrupts heating when the operating temperature exceeds the maximum permitted value.
• To restore appliance operation press the thermostat reset
button. This procedure must only be carried out by a qualifi ed, authorized technician.
4 DISPOSAL OF PACKING AND THE APPLIANCE
4.1 PACKING
The packing is made using environmentally friendly materials.
The plastic recyclable components are:
• the transparent cover, the bags containing the instructions
manual and nozzles ( made of Polyethylene - PE ).
• the straps (in Polypropylene - PP).
4.2 APPLIANCE
The appliance is manufactured 90% from recyclable metals
(stainless steel, aluminium sheet, copper.... ).
The appliance must be scrapped in compliance with current
regulations governing such disposal.
• It must be disposed of properly.
• Make the appliance unusable before scrapping.
INSTRUCTIONS FOR INSTALLATION
REMINDERS FOR THE INSTALLER
The manufacturer will not be liable for any damage or injury resulting from failure to observe the following rules
1717
Page 20

• Read this manual carefully. It provides important information
for safe installation, use and maintenance of the appliance.
• Installation, conversion to a different type of gas and appliance maintenance must be carried out by qualifi ed technicians
authorized by the manufacturer, in compliance with current
safety standards and the instructions in this manual.
• Identify the specifi c appliance model. The model number is
detailed on the packing and on the appliance data plate.
• The appliance must be installed in a well-ventilated room.
• Do not obstruct any air vents or drains present on the appliance.
• Do not tamper with appliance components.
Appliances in the DROP-IN series
• The appliance must be installed in strictc ompliance with the
directions given in the attached drawings.
• Appliances should only be installed on units made of metal
(and not wood and/or other fl ammable materials).
• Take particular care with the power lead: the channelways
must be perfectly smooth with no sharp corners and/or edges. The lead must not, at any point, be subjected to temperatures of more than 50°C above normal room temperature.
5 REFERENCE STANDARDS AND LAWS
Install the appliance in compliance with current safety standards.
Install the appliance in compliance with the prescriptions of
EN1717 and the water pollution regulations in force in your
country.
6 UNPACKING
Check the state of the packing and in the event of damage, ask
the delivery person to inspect the goods.
• Remove the packing
• Remove the protective fi lm from the external panels. Use a
suitable solvent to remove any residual adhesive from the
panels
7 POSITIONING
• The overall dimensions of the appliance and the position of
connections are given on the installation diagram at the start
of this manual.
• The appliance can be installed singly or in combination with
other appliances in the same product range.
• The appliance is not suitable for integrated installation.
• Position the appliance at least 10 cm from adjacent walls.
This distance can be reduced in the presence of non-combustible walls or heat-insulated walls.
7.1 APPLIANCE ASSEMBLY WITH BASE
Follow the instructions provided with the type of support utilized.
8.1 ELECTRICAL CONNECTIONS
Check that the appliance is designed to operate at the voltage
and frequency of the power supply present on site. Check the
details given on the appliance data plate.
• At an easily accessible point upline of the appliance, fi t an
all-pole disconnect switch of suitable capacity with a contact
breaking distance of at least 3 mm, and a highly sensitive differential protection device. The maximum permitted leakage
current is 1 mA/kW.
• A fl exible rubber cable with insulation specifi cations not lower
than type H05 RN-F must be used for connection.
• Connect the power supply cable to the terminal board as
shown in the wiring diagram supplied with the appliance.
• Secure the power supply cable with the cable clamp.
• Protect the power supply cable on the outside of the appliance with a rigid plastic or metal pipe.
8.2 PROTECTIVE EARTH AND EARTH BONDING CON-
NECTIONS
Connect the appliance to an effi cient ground circuit. Connect
the earth conductor to the terminal with the symbol located
next to the main terminal board.
Connect the metal structure of the appliance to the equipoten-
tial node. Connect the conductor to the terminal with the
symbol
8.3 CONNECTION TO THE WATER SUPPLY
The appliance must be connected to a potable water supply.
The water inlet pressure must be between 150 kPa and 300
kPa. Use a pressure reducer if the inlet pressure is above the
maximum permitted level.
• Install a mechanical fi lter and a shut-off valve upstream of the
appliance in an easily accessible point.
• Make sure the water circuit is free from ferrous particles before connecting the fi lter and the appliance.
• Seal any unused connectors with a plug.
• Once the appliance has been installed, check for gas leaks at
the connection points.
8.4 CONNECTION TO THE WATER DRAIN
The water drainage system must be provided using materials
resistant to temperatures of 100 °C. The bottom of the appliance must not be subjected to steam produced by drainage of
hot water.
on the outside part of the bottom.
9 COMMISSIONING
See Chapter " INSTRUCTIONS FOR MAINTENANCE "
INSTRUCTIONS FOR USE
7.2 JOINING APPLIANCES TOGETHER IN LINE
• Place the appliances side by side and adjust the tops to the
same height.
• Unite the appliances using the special unionjoint-coverings
supplied upon request
8 CONNECTIONS
The position and dimensions of connections are given in the
installation diagram at the start of this manual.
18
REMINDERS FOR THE USER
The manufacturer will not be liable for any damage or injury resulting from failure to observe the following rules
• Read this manual carefully. It provides important information
for safe installation, use and maintenance of the appliance.
• Keep this manual in a safe place known to all users so that it
can be consulted throughout the working life of the appliance.
• Installation, conversion to a different type of gas and appliance maintenance must be carried out by qualifi ed technicians
authorized by the manufacturer, in compliance with current
safety standards and the instructions in this manual.
Page 21

• For after-sales service, contact technical assistance centers
authorized by the manufacturer and demand the use of original spare parts.
• Have the appliance serviced at least twice a year. The manufacturer recommends taking out a service contract.
• The appliance is designed for professional use and must be
operated by trained personnel.
• The appliance is to be used for cooking food as specifi ed
in the reminders for use. Any other use must be considered
improper
• Do not allow the appliance to operate empty for prolonged
periods. Only pre-heat the oven just before use.
• Do not leave the appliance unattended while in operation.
• In the event of an appliance fault or malfunction, shut the
gas shut-off valve and/or switch the appliance off at the main
switch installed upline.
• Clean the appliance following the instructions given in Chapter " INSTRUCTIONS FOR CLEANING".
• Do not store fl ammable materials in close proximity to the
appliance. FIRE HAZARD.
• Children should be supervised to ensure that they do not play
with the appliance.
• This appliance is not intended for use by persons (including
children) with reduced physical, sensory or mental capabilities, or lack of experience and knowledge, unless they have
been given supervision or instruction concerning use of the
appliance by a person responsible for their safety.
• Do not obstruct any air vents or drains present on the appliance.
• Do not tamper with appliance components.
Switching on
• Turn the thermostat knob to the chosen temperature setting
for cooking.
• The yellow indicator light switches on.
• The yellow indicator light switches off when the oven reaches
the set temperature.
Switching off
• Turn the thermostat knob to position "0".
11 USING THE MULTI-PURPOSE APPLIANCE
REMINDERS FOR USE
• The appliance is designed for direct cooking of foods ( stewed
dishes, soups, steaks, hamburgers, fi sh, vegetables, etc.).
• The hotplate must not be used for indirect heating or cooking
of foods in pots, pans, etc..
• Do not use the appliance as a fryer, the temperature on the
bottom of the pan exceeds 230°C, meaning oil could catch
fi re.
• At the end of each day, clean the well thoroughly in order to
prevent the formation of corrosive deposits.
• The model M40 has one zone of cooking with amax capacity well of 13lt.The model M60 has two zone of cooking with
amax capacity well of 22lt.
SWITCHING ON AND OFF
The thermostat control knob has the following positions:
0 Off
10 USING THE ELECTRIC BRATT PAN
REMINDERS FOR USE
• CAUTION! Don’t use this unit as a fryer!
• IMPORTANT Don’t start heating with an empty cooking container!
FILLING AND EMPTYING THE COOKING CONTAINER
Filling
• Fill the well until the water is level with the maximum level
indicated on the wall of the cooking container. Do not use the
appliance with the water level above the maximum indicated
level.
Emptying
• Switch-off heating.
• Take off container from appliance.
• To do this follow this indications:protect hands from heat (for
example usingsuitable gloves);protect body from accidental
hot sprinklesduring lifting, transport and emptying ofcontainer.
• The container where hot foods are emptied mustbe large
enough and of heat resistant material.
SWITCHING ON AND OFF
The thermostat control knob has the following positions:
0 Off
50 Minimum temperature
100-250 Intermediate temperatures
300 Maximum temperature
50 Minimum temperature
100-200 Intermediate temperatures
300 Maximum temperature
Switching on
• Turn the thermostat knob to the chosen temperature setting
for cooking.
• The yellow indicator light switches on.
• The yellow indicator light switches off when the oven reaches
the set temperature.
Switching off
• Turn the thermostat knob to position "0".
12 PROLONGED DISUSE
Before any prolonged disuse of the appliance, proceed as follows:
• Clean the appliance thoroughly.
• Rub stainless steel surfaces with a cloth soaked in Vaseline
oil to create a protective fi lm.
• Leave pot open.
• Shut off taps and main switches upline of appliances.
Following prolonged disuse, proceed as follows:
• Inspect the appliance thoroughly before using it again.
• Allow electric appliances to operate at the lowest temperature for at least 60 minutes.
INSTRUCTIONS FOR CLEANING
REMINDERS FOR CLEANING
The manufacturer will not be liable for any damage or injury resulting from failure to observe the following rules
19
Page 22

• Clean the satin fi nish stainless steel exterior surfaces, the
cooking wells and the surface of the hotplates every day.
• At least twice a year, have an authorized technician clean the
internal parts of the appliance.
• Do not use direct or high pressure water jets to clean the
appliance.
• Do not use corrosive products to clean the fl oor beneath the
appliance.
SATIN FINISH STAINLESS STEEL SURFACES
• Clean the surfaces with a cloth or sponge using water and
proprietary non-abrasive detergents. Follow the direction of
the satin fi nish lines. Rinse repeatedly and dry thoroughly.
• Do not use pan scourers or other iron items.
• Do not use chemical products containing chlorine.
• Do not use sharp objects which might scratch and damage
the surfaces.
COOKING WELLS
• Clean the wells by bringing the water to the boil, with the addition of grease remover detergent if necessary
• Remove any limescale deposits with a proprietary limescale
remover
INSTRUCTIONS FOR MAINTENANCE
14.1 ELECTRIC BRATT PAN
The appliance does not heat.
Possible causes:
• Temperature thermostat defective.
• Heating elements defective.
Heating cannot be adjusted
Possible causes:
• Temperature thermostat defective.
14.2 MULTI-PURPOSE APPLIANCE
The appliance does not heat.
Possible causes:
• Temperature thermostat defective.
• Heating elements defective.
• Safety thermostat tripped.
Heating cannot be adjusted
Possible causes:
• Temperature thermostat defective.
REMINDERS FOR THE MAINTENANCE TECHNICIAN
The manufacturer will not be liable for any damage or injury resulting from failure to observe the following rules
• Read this manual carefully. It provides important information
for safe installation, use and maintenance of the appliance.
• Installation, conversion to a different type of gas and appliance maintenance must be carried out by qualifi ed technicians
authorized by the manufacturer, in compliance with current
safety standards and the instructions in this manual.
• Identify the specifi c appliance model. The model number is
detailed on the packing and on the appliance data plate.
• The appliance must be installed in a well-ventilated room.
• Do not obstruct any air vents or drains present on the appliance.
• Do not tamper with appliance components.
13 COMMISSIONING
Following installation, conversion to a different type of gas or
any maintenance operations, check appliance operation. In the
event of any malfunction, consult the next Paragraph "Troubleshooting".
13.1 ELECTRICAL APPLIANCES
Switch on the appliance as directed in the instructions and reminders for use given in Chapter " INSTRUCTIONS FOR USE
" and check:
• the current values of each phase.
• the correct operation of the heating elements.
14 TROUBLESHOOTING
15 REPLACING COMPONENTS
REMINDERS FOR REPLACING COMPONENTS.
• Disconnect the appliance electric supply, if present, before
carrying out any operation.
• After replacing a gas system component, check for gas leaks
at connection points.
• After replacing an electrical system component, check it is
correctly wired.
15.1 ELECTRIC BRATT PAN
Replacing the heating element
• Pull out the control knobs , remove control panel and the container.
• Remove and replace the component.
• Re-assemble all parts. For assembly, proceed in reverse order.
Replacing the temperature regulator
• Pull out the control knobs , remove control panel.
• Remove and replace the component.
• Re-assemble all parts. For assembly, proceed in reverse order.
15.2 MULTI-PURPOSE APPLIANCE
Replacing the heating element and the indicator light
• Remove the control panel.
• Remove and replace the component.
• Re-assemble all parts. For assembly, proceed in reverse order.
REMINDERS FOR REPLACING COMPONENTS.
• Disconnect the appliance electric supply, if present, before
carrying out any operation.
• After replacing a gas system component, check for gas leaks
at connection points.
• After replacing an electrical system component, check it is
correctly wired.
20
Replacing the working thermostat and safety thermostat
• Remove the control panel.
• Remove the bulb from its seat on the well.
• Remove and replace the component.
• Re-assemble all parts. For assembly, proceed in reverse order.
Page 23

16 CLEANING THE INTERIOR
• Check the condition of the inside of the appliance.
• Remove any built-up dirt.
• Check and clean the fumes exhaust system.
17 MAIN COMPONENTS
17.1 ELECTRIC BRATT PAN
• Heating element
• Indicator light
• Temperature regulator
17.2 MULTI-PURPOSE APPLIANCE
• Working thermostat
• Safety thermostat
• Heating element
• Indicator light
21
Page 24

INFORMATIONS GÉNÉRALES ...............................................................................................................................................23
1 DONNÉES DE L'APPAREIL ......................................................................................................................................23
2 AVERTISSEMENTS GÉNÉRAUX ............................................................................................................................. 23
AVERTISSEMENTS POUR L'INSTALLATEUR ........................................................................................................................ 23
AVERTISSEMENTS POUR L'UTILISATEUR ........................................................................................................................... 23
AVERTISSEMENTS POUR LE TECHNICIEN PRÉPOSÉ À L'ENTRETIEN ...........................................................................23
AVERTISSEMENTS POUR LE NETTOYAGE ......................................................................................................................... 23
3 DISPOSITIFS DE SÉCURITÉ ET DE CONTRÔLE ................................................................................................... 23
3.1 MULTIPLE .................................................................................................................................................................23
4 ÉLIMINATION DE L'EMBALLAGE ET DE L'APPAREIL ............................................................................................ 23
INSTRUCTIONS POUR L'INSTALLATION .............................................................................................................................. 24
AVERTISSEMENTS POUR L'INSTALLATEUR ........................................................................................................................ 24
5 NORMES ET TEXTES DE LOI DE RÉFÉRENCE ..................................................................................................... 24
6 DÉBALLAGE ..............................................................................................................................................................24
7 MISE EN PLACE........................................................................................................................................................24
8 RACCORDEMENTS .................................................................................................................................................. 24
9 MISE EN SERVICE ....................................................................................................................................................25
INSTRUCTIONS POUR L'UTILISATION..................................................................................................................................25
AVERTISSEMENTS POUR L'UTILISATEUR ........................................................................................................................... 25
10 UTILISATION DE LA BRAISIÈRE ÉLECTRIQUE .....................................................................................................25
11 UTILISATION DE LA MULTIPLE ...............................................................................................................................25
12 PÉRIODES D'INACTIVITÉ ........................................................................................................................................26
INSTRUCTIONS POUR LE NETTOYAGE ............................................................................................................................... 26
AVERTISSEMENTS POUR LE NETTOYAGE ......................................................................................................................... 26
INSTRUCTIONS POUR L'ENTRETIEN ................................................................................................................................... 26
AVERTISSEMENTS POUR LE TECHNICIEN PRÉPOSÉ À L'ENTRETIEN ...........................................................................26
13 MISE EN SERVICE .................................................................................................................................................... 26
14 RÉSOLUTION DES DYSFONCTIONNEMENTS ....................................................................................................... 26
AVERTISSEMENTS POUR LE REMPLACEMENT DE PIÈCES. ............................................................................................ 26
14.1 BRAISIÈRE ÉLECTRIQUE ........................................................................................................................................ 26
14.2 MULTIPLE .................................................................................................................................................................26
15 REMPLACEMENT DE PIÈCES .................................................................................................................................26
AVERTISSEMENTS POUR LE REMPLACEMENT DE PIÈCES. ............................................................................................ 26
15.1 BRAISIÈRE ÉLECTRIQUE ........................................................................................................................................ 27
15.2 MULTIPLE .................................................................................................................................................................27
16 NETTOYAGE DES PIÈCES INTERNES ................................................................................................................... 27
17 PIÈCES PRINCIPALES .............................................................................................................................................27
17.1 BRAISIÈRE ÉLECTRIQUE ........................................................................................................................................ 27
17.2 MULTIPLE .................................................................................................................................................................27
22
Page 25

INFORMATIONS GÉNÉRALES
Ce chapitre fournit des informations générales dont tous les
utilisateurs de ce manuel doivent prendre connaissance. Les
informations spécifi ques destinées à chaque utilisateur de ce
manuel fi gurent dans les chapitres suivants ( « INSTRUC-
TIONS POUR .... » ).
1 DONNÉES DE L'APPAREIL
• La plaque signalétique de l'appareil se trouve à l'intérieur du
panneau de commandes.
• Le modèle et le numéro de série de l'appareil se trouvent
également sur les talons sous la marque et sur l'emballage.
2 AVERTISSEMENTS GÉNÉRAUX
Le fabricant de l'appareil décline toute responsabilité en
cas de dommages dus à la non-observation des impératifs
qui suivent.
AVERTISSEMENTS POUR L'INSTALLATEUR
• Lire ce manuel attentivement. Il fournit des informations importantes pour l'installation, l'utilisation et l'entretien de l'appareil en toute sécurité.
• L'installation, la conversion à un autre type de gaz et l'entretien de l'appareil doivent être effectués par des installateurs
qualifi és et agréés par le fabricant, conformément aux nor-
mes de sécurité en vigueur et aux consignes données dans
ce manuel.
• Repérer le modèle d'appareil. Le modèle est indiqué sur l'emballage et sur la plaque signalétique de l'appareil.
• Installer l'appareil seulement dans des locaux suffi samment
aérés.
• Ne pas obstruer les orifi ces d'aération et d'évacuation de l'ap-
pareil.
• Ne pas manipuler les pièces de l'appareil.
AVERTISSEMENTS POUR L'UTILISATEUR
• Lire ce manuel attentivement. Il fournit des informations importantes pour l'installation, l'utilisation et l'entretien de l'appareil en toute sécurité.
• Conserver ce manuel dans un endroit sûr et connu afi n de
pouvoir le consulter pendant toute la durée de vie utile de
l'appareil.
• L'installation, la conversion à un autre type de gaz et l'entretien de l'appareil doivent être effectués par des installateurs
qualifi és et agréés par le fabricant, conformément aux nor-
mes de sécurité en vigueur et aux consignes données dans
ce manuel.
• Pour l'assistance, s'adresser uniquement aux centres techniques agréés par le fabricant et exiger des pièces détachées
originales.
• Faire contrôler et entretenir l'appareil au moins deux fois par
an. Il convient de stipuler un contrat d'entretien.
• Cet appareil est destiné à un usage professionnel et doit
donc être utilisé par du personnel formé à cet effet.
• L’appareil est destiné à la cuisson d'aliments comme indiqué
dans les avertissements. Toute autre utilisation est impropre.
• Éviter de faire marcher l'appareil à vide pendant de longues
périodes. Préchauffer l'appareil juste avant de l'utiliser.
• Surveiller l'appareil pendant son fonctionnement.
• En cas de panne ou de dysfonctionnement de l'appareil, fermer le robinet d'arrêt du gaz et/ou désactiver l'interrupteur
général d'alimentation électrique installés en amont de l'appareil.
• Effectuer le nettoyage conformément aux instructions
données dans le Chapitre « INSTRUCTIONS POUR LE
NETTOYAGE ».
• Ne pas stocker de substances infl ammables à proximité de
l'appareil. RISQUE D'INCENDIE
• Attention: Les enfants doivent être surveillés afi n qu’ils ne
jouent pas avec l’appareil.
• Cet appareil n’est pas destiné à être utilisé par des personnes (y compris les enfants) avec incapacité sychique et de
motion, ou le manque d’expérience et de connaissances,
sauf s'il y a contrôle ou instruction sur l’utilisation de l’appareil
par une personne responsable de leur sécurité.
• Ne pas obstruer les orifi ces d'aération et d'évacuation de l'ap-
pareil.
• Ne pas manipuler les pièces de l'appareil.
AVERTISSEMENTS POUR LE TECHNICIEN PRÉPOSÉ À
L'ENTRETIEN
• Lire ce manuel attentivement. Il fournit des informations importantes pour l'installation, l'utilisation et l'entretien de l'appareil en toute sécurité.
• L'installation, la conversion à un autre type de gaz et l'entretien de l'appareil doivent être effectués par des installateurs
qualifi és et agréés par le fabricant, conformément aux nor-
mes de sécurité en vigueur et aux consignes données dans
ce manuel.
• Repérer le modèle d'appareil. Le modèle est indiqué sur l'emballage et sur la plaque signalétique de l'appareil.
• Installer l'appareil seulement dans des locaux suffi samment
aérés.
• Ne pas obstruer les orifi ces d'aération et d'évacuation de l'ap-
pareil.
• Ne pas manipuler les pièces de l'appareil.
AVERTISSEMENTS POUR LE NETTOYAGE
• Nettoyer tous les jours les surfaces extérieures en acier inox
poli, la surface des cuves de cuisson, la surface des plaques
de cuisson.
• Faire nettoyer les pièces internes de l'appareil au moins deux
fois par an par un technicien agréé.
• Ne pas laver l’appareil avec des jets d'eau directs ou à haute
pression.
• Ne pas utiliser de produits corrosifs pour nettoyer le sol sous
l'appareil.
3 DISPOSITIFS DE SÉCURITÉ ET DE CONTRÔLE
3.1 MULTIPLE
THERMOSTAT DE SÉCURITÉ
Le fabricant de l'appareil décline toute responsabilité en
cas de dommages dus à la non-observation des impératifs
qui suivent.
• Un thermostat de sécurité à rétablissement manuel qui coupe
le chauffage lorsque la température de service dépasse celle
maximum admise est monté dans l'appareil.
• Pour rétablir le fonctionnement de l'appareil appuyer sur
le bouton de rétablissement du thermostat. Cette opération
peut être effectuée uniquement par un technicien qualifi é et
agréé
4 ÉLIMINATION DE L'EMBALLAGE ET DE L'APP AREIL
4.1 EMBALLAGE
L’emballage est réalisé dans des matériaux compatibles avec
l'environnement. Les éléments en matière plastique recyclables sont :
• la couverture transparente, les sachets du manuel d'instructions et des injecteurs (en polyéthylène - PE).
2323
Page 26

• les feuillards (en polypropylène - PP)
4.2 APPAREIL
L'appareil est réalisé à plus de 90 % dans des matériaux métalliques recyclables (acier inox, tôle aluminée, cuivre, etc. ).
L’appareil doit être mis au rebut conformément à la réglementation en vigueur.
• Ne pas l'abandonner dans la nature.
• Le rendre inutilisable avant son élimination
INSTRUCTIONS POUR L'INSTALLATION
AVERTISSEMENTS POUR L'INSTALLATEUR
Le fabricant de l'appareil décline toute responsabilité en
cas de dommages dus à la non-observation des impératifs
qui suivent.
• Installer l'appareil à une distance de 10 cm minimum des
murs. Cette distance peut être inférieure si les murs sont incombustibles ou protégés par un isolant thermique.
7.1 MONTAGE DE L' APPAREIL SUR UN SOCLE
Suivre les instructions fournies avec le type de support utilisé.
7.2 UNION DE PLUSIEURS APPAREILS
• Mettre les appareils les uns à côté des autres et d'aplomb de
façon à ce que les plans de travail soient alignés.
• Unissez les appareils en utilisant les couvre-joints d’union
spéciaux fournis sur demande
8 RACCORDEMENTS
La position et la dimension des raccordements sont précisées
sur le schéma d'installation fi gurant au début de ce manuel.
• Lire ce manuel attentivement. Il fournit des informations importantes pour l'installation, l'utilisation et l'entretien de l'appareil en toute sécurité.
• L'installation, la conversion à un autre type de gaz et l'entretien de l'appareil doivent être effectués par des installateurs
qualifi és et agréés par le fabricant, conformément aux nor-
mes de sécurité en vigueur et aux consignes données dans
ce manuel.
• Repérer le modèle d'appareil. Le modèle est indiqué sur l'emballage et sur la plaque signalétique de l'appareil.
• Installer l'appareil seulement dans des locaux suffi samment
aérés.
• Ne pas obstruer les orifi ces d'aération et d'évacuation de l'ap-
pareil.
• Ne pas manipuler les pièces de l'appareil.
Appareils de la série DROP-IN (à encastrer)
• Effectuer l’installation en respectant rigoureusement les indications des schémas en annexe.
• N’installer ces appareils que sur des meubles métalliques
(bois et/ou autres matériaux combustibles à éviter).
• Faire attention au cordon d’alimentation: les passage ne doivent présenter ni angle ni bavure susceptible de couper le
cordon. De plus, la différence entre la température ambiante
et celle du cordon ne doit pas être supérieure à 50°C.
5 NORMES ET TEXTES DE LOI DE RÉFÉRENCE
Installer l'appareil conformément aux normes de sécurité en
vigueur.
Installer l'appareil conformément à la norme EN1717 et à la
réglementation de l'eau en vigueur.
6 DÉBALLAGE
Contrôler l'état de l'emballage et demander au transporteur
d'inspecter la marchandise en cas de dommages évidents.
• Enlever l'emballage
• Enlever la pellicule de protection des panneaux extérieurs.
Enlever les éventuels résidus de colle avec un solvant adapté.
7 MISE EN PLACE
• Les dimensions de l'appareil et la position des raccordements sont indiquées dans le schéma d'installation fi gurant
au début de ce manuel.
• L'appareil peut être installé seul ou avec d'autres appareils
de la même gamme.
• Cet appareil ne peut pas être encastré.
8.1 BRANCHEMENT ÉLECTRIQUE
Vérifi er si l'appareil est conçu pour fonctionner à la tension et
à la fréquence auxquelles il sera alimenté. Contrôler la plaque
signalétique de l'appareil.
• Installer en amont de l'appareil, dans un endroit facilement accessible, un disjoncteur omnipolaire d'une capacité adaptée,
avec une distance d'ouverture des contacts d'au moins 3 mm
et un dispositif de protection à haute sensibilité. Le courant
de fuite maximum de l'appareil est de 1 mA/kW.
• Utiliser un cordon d'alimentation fl exible avec gaine isolante
en caoutchouc ayant des caractéristiques au moins égales
au type H05 RN-F.
• Relier le cordon d'alimentation à la plaque à bornes selon les
indications du schéma électrique remis avec l'appareil.
• Bloquer le cordon d'alimentation avec le serre-câble.
• Protéger le cordon d'alimentation à l'extérieur de l'appareil
avec un conduit en métal ou en plastique rigide.
8.2 MISE À LA TERRE ET NOEUD ÉQUIPOTENTIEL
Brancher l'appareil à une prise de terre effi cace. Relier le con-
ducteur de terre à la borne portant le symbole
de la plaque à bornes d'arrivée de la ligne.
Relier la structure métallique de l'appareil sous tension à un
nœud équipotentiel. Relier le conducteur à la borne avec le
symbole
8.3 RACCORDEMENT AU RÉSEAU HYDRIQUE
Alimenter l'appareil avec de l'eau potable. La pression d'alimentation de l'eau doit être de 150 kPa à 300 kPa. Utiliser un
réducteur si la pression d'alimentation est supérieure à celle
maximale indiquée.
• Installer un fi ltre mécanique et un robinet d'arrêt en amont de
l’appareil, dans un endroit facilement accessible.
• Éliminer les éventuels dépôts ferreux des tuyaux de raccordement avant de raccorder le fi ltre et l'appareil.
• Fermer les raccords n'étant pas reliés avec un bouchon étanche.
• Après le raccordement, vérifi er qu'il n'y ait pas de fuites au
niveau du raccordement.
8.4 RACCORDEMENT À L'ÉVACUATION DES EAUX
USÉES
Les conduits d'évacuation doivent être réalisés dans des
matériaux résistant à 100 °C. La vapeur produite par l'évacuation de l'eau chaude ne doit pas atteindre le fond de l'appareil.
situé sur la partie extérieure du fond.
situé à côté
24
Page 27

9 MISE EN SERVICE
Voir le chapitre « INSTRUCTIONS POUR L'ENTRETIEN ».
INSTRUCTIONS POUR L'UTILISATION
AVERTISSEMENTS POUR L'UTILISATEUR
Le fabricant de l'appareil décline toute responsabilité en
cas de dommages dus à la non-observation des impératifs
qui suivent.
• Lire ce manuel attentivement. Il fournit des informations importantes pour l'installation, l'utilisation et l'entretien de l'appareil en toute sécurité.
• Conserver ce manuel dans un endroit sûr et connu afi n de
pouvoir le consulter pendant toute la durée de vie utile de
l'appareil.
• L'installation, la conversion à un autre type de gaz et l'entretien de l'appareil doivent être effectués par des installateurs
qualifi és et agréés par le fabricant, conformément aux nor-
mes de sécurité en vigueur et aux consignes données dans
ce manuel.
• Pour l'assistance, s'adresser uniquement aux centres techniques agréés par le fabricant et exiger des pièces détachées
originales.
• Faire contrôler et entretenir l'appareil au moins deux fois par
an. Il convient de stipuler un contrat d'entretien.
• Cet appareil est destiné à un usage professionnel et doit
donc être utilisé par du personnel formé à cet effet.
• L’appareil est destiné à la cuisson d'aliments comme indiqué
dans les avertissements. Toute autre utilisation est impropre.
• Éviter de faire marcher l'appareil à vide pendant de longues
périodes. Préchauffer l'appareil juste avant de l'utiliser.
• Surveiller l'appareil pendant son fonctionnement.
• En cas de panne ou de dysfonctionnement de l'appareil, fermer le robinet d'arrêt du gaz et/ou désactiver l'interrupteur
général d'alimentation électrique installés en amont de l'appareil.
• Effectuer le nettoyage conformément aux instructions
données dans le Chapitre « INSTRUCTIONS POUR LE
NETTOYAGE ».
• Ne pas stocker de substances infl ammables à proximité de
l'appareil. RISQUE D'INCENDIE
• Attention: Les enfants doivent être surveillés afi n qu’ils ne
jouent pas avec l’appareil.
• Cet appareil n’est pas destiné à être utilisé par des personnes (y compris les enfants) avec incapacité sychique et de
motion, ou le manque d’expérience et de connaissances,
sauf s'il y a contrôle ou instruction sur l’utilisation de l’appareil
par une personne responsable de leur sécurité.
• Ne pas obstruer les orifi ces d'aération et d'évacuation de l'ap-
pareil.
• Ne pas manipuler les pièces de l'appareil.
10 UTILISATION DE LA BRAISIÈRE ÉLECTRIQUE
AVERTISSEMENTS
• ATTENTION: cet appareil ne doit pas être utilisé comme friteuse!
• IMPORTANT! Ne pas brancher l’appareil sans avoir remplissé le bassin de cuisson.
REMPLISSAGE ET VIDANGE DE LA BASSIN
Remplissage
• Remplir la cuve jusqu'au repère maximum se trouvant sur la
paroi de la bassin. Ne pas utiliser l'appareil avec un niveau
d'eau supérieur au repère maximum.
Vidange
• Débranchez le chauffage.
• Enlevez le bassin de l’appareil.
• Pour ce faire suivez les indications suivantes:protégez
vos main de la chaleur en utilisantpar ex. des gants
appropiés;protégez le corps des eventuelles gicléeschauds
pendant le transport et le vigade dubassin.
• Prévoir un récipient apte à contenir les alimentschauds.
ALLUMAGE ET EXTINCTION DU CHAUFFAGE
La manette de commande du thermostat offre les positions d'utilisation suivantes :
0 Éteint
50 Température de cuisson minimum
100-250 Températures intermédiaires
300 Température maximum
Allumage
• Tourner la manette du thermostat sur la position correspondant à la température de cuisson choisie.
• Le voyant jaune s'allume.
• Le voyant jaune s'éteint pour indiquer que la température
choisie est atteinte.
Extinction
• Tourner la manette du thermostat sur la position « 0 ».
11 UTILISATION DE LA MULTIPLE
AVERTISSEMENTS
• L’appareil est destiné à la cuisson directe d'aliments (cuisson au court-bouillon, potages, biftecks, steaks hachés, poissons, légumes, etc.).
• La plaque de cuisson ne doit pas être utilisée pour chauffer
ou cuire directement des aliments en posant dessus des casseroles, des poêles, des récipients, etc.
• Ne pas utiliser l'appareil comme friteuse, car la température
du fond de la cuve peut dépasser 230°C et l'huile peut prendre feu.
• En fi n de journée, nettoyer soigneusement la cuve pour éviter
la formation de dépôts corrosifs à l'intérieur.
• L’appareil mod. M40 a une zone de cuisson unecuvette avec
capacité maximale de 13lt.L’appareil mod. M60 a 2 zones de
cuissons unecuvette avec capacité maximale de 22lt
ALLUMAGE ET EXTINCTION DU CHAUFFAGE
La manette de commande du thermostat offre les positions d'utilisation suivantes :
0 Éteint
50 Température de cuisson minimum
100-200 Températures intermédiaires
300 Température maximum
Allumage
• Tourner la manette du thermostat sur la position correspondant à la température de cuisson choisie.
• Le voyant jaune s'allume.
• Le voyant jaune s'éteint pour indiquer que la température
choisie est atteinte.
25
Page 28

Extinction
• Tourner la manette du thermostat sur la position « 0 ».
12 PÉRIODES D'INACTIVITÉ
Avant une période d'inactivité prévue, procéder comme suit :
• Nettoyer l'appareil à fond.
• Passer un chiffon imbibé d'un peu d'huile de vaseline sur toutes les surfaces de façon à étaler un fi lm de protection.
• Laisser les couvercles ouverts.
• Fermer les robinets ou interrupteurs généraux en amont des
appareils.
Après une période d'inactivité prolongée de l'appareil, procéder
comme suit :
• Contrôler l'appareil avant de le réutiliser.
• Faire fonctionner les appareils électriques à la température
minimum pendant au moins 60 minutes
INSTRUCTIONS POUR LE NETTOYAGE
• Installer l'appareil seulement dans des locaux suffi samment
aérés.
• Ne pas obstruer les orifi ces d'aération et d'évacuation de l'ap-
pareil.
• Ne pas manipuler les pièces de l'appareil.
13 MISE EN SERVICE
Après l'installation, l'adaptation à un autre type de gaz ou des
interventions d'entretien, vérifi er le fonctionnement de l'appa-
reil En cas de dysfonctionnements, consulter le paragraphe "
Résolution des dysfonctionnements "
13.1 APPAREIL ÉLECTRIQUE
Mettre l'appareil en marche conformément aux instructions d'utilisation fi gurant au chapitre " INSTRUCTIONS POUR L'UTILI-
SATION " et vérifi er :
• les valeurs du courant de chaque phase
• la régularité d'allumage des résistances de chauffage
AVERTISSEMENTS POUR LE NETTOYAGE
Le fabricant de l'appareil décline toute responsabilité en
cas de dommages dus à la non-observation des impératifs
qui suivent.
• Nettoyer tous les jours les surfaces extérieures en acier inox
poli, la surface des cuves de cuisson, la surface des plaques
de cuisson.
• Faire nettoyer les pièces internes de l'appareil au moins deux
fois par an par un technicien agréé.
• Ne pas laver l’appareil avec des jets d'eau directs ou à haute
pression.
• Ne pas utiliser de produits corrosifs pour nettoyer le sol sous
l'appareil.
SURFACES POLIES EN ACIER INOXYDABLE
• Nettoyer les surfaces avec un chiffon ou une éponge en utilisant de l'eau et des produits nettoyants non abrasifs Passer
le chiffon dans le sens du polissage Rincer souvent et sécher
ensuite soigneusement
• Ne pas utiliser de tampons à récurer ni d'autres objets en fer
• Ne pas utiliser de produits chimiques contenant du chlore
• Ne pas utiliser d'objets pointus pouvant rayer la surface
CUVES DE CUISSON
• Nettoyer les cuves en portant l'eau à ébullition et en ajoutant
éventuellement des produits dégraissants.
• Enlever les éventuels dépôts de calcaire avec des produits
adaptés
INSTRUCTIONS POUR L'ENTRETIEN
AVERTISSEMENTS POUR LE TECHNICIEN PRÉPOSÉ À
L'ENTRETIEN
Le fabricant de l'appareil décline toute responsabilité en
cas de dommages dus à la non-observation des impératifs
qui suivent.
• Lire ce manuel attentivement. Il fournit des informations importantes pour l'installation, l'utilisation et l'entretien de l'appareil en toute sécurité.
• L'installation, la conversion à un autre type de gaz et l'entretien de l'appareil doivent être effectués par des installateurs
qualifi és et agréés par le fabricant, conformément aux nor-
mes de sécurité en vigueur et aux consignes données dans
ce manuel.
• Repérer le modèle d'appareil. Le modèle est indiqué sur l'emballage et sur la plaque signalétique de l'appareil.
14 RÉSOLUTION DES DYSFONCTIONNEMENTS
AVERTISSEMENTS POUR LE REMPLACEMENT DE
PIÈCES.
• Couper l'alimentation électrique de l'appareil, si sous tension,
avant toute opération
• Après avoir remplacé une pièce du circuit de gaz, vérifi er qu'il
n'y a aucune fuite sur les points de raccordement au circuit.
• Après le remplacement d'un composant du circuit électrique,
vérifi er qu'il est correctement relié au câblage
14.1 BRAISIÈRE ÉLECTRIQUE
L'appareil ne chauffe pas.
Causes possibles
• Le thermostat de réglage de la température est défectueux.
• Les résistances sont défectueuses.
Le chauffage ne se règle pas
Causes possibles
• Le thermostat de réglage de la température est défectueux
14.2 MULTIPLE
L'appareil ne chauffe pas.
Causes possibles
• Le thermostat de réglage de la température est défectueux
• Les résistances sont défectueuses
• Le thermostat de sécurité s'est déclenché
Le chauffage ne se règle pas
Causes possibles
• Le thermostat de réglage de la température est défectueux
15 REMPLACEMENT DE PIÈCES
AVERTISSEMENTS POUR LE REMPLACEMENT DE
PIÈCES.
• Couper l'alimentation électrique de l'appareil, si sous tension,
avant toute opération
• Après avoir remplacé une pièce du circuit de gaz, vérifi er qu'il
n'y a aucune fuite sur les points de raccordement au circuit.
• Après le remplacement d'un composant du circuit électrique,
vérifi er qu'il est correctement relié au câblage
26
Page 29

15.1 BRAISIÈRE ÉLECTRIQUE
Remplacement de la résistance
• Retirez les boutons de commande. Retirez le panneau de
commande et le bassin.
• Déposer et remplacer le composant.
• Remonter toutes les pièces. Effectuer les opérations de
démontage dans l'ordre inverse.
Remplacement du régulateur de température
• Retirez les boutons de commande. Retirez le panneau de
commande.
• Déposer et remplacer le composant.
• Remonter toutes les pièces. Effectuer les opérations de
démontage dans l'ordre inverse.
15.2 MULTIPLE
Remplacement de la résistance et du voyant
• Démonter le panneau de commandes
• Déposer et remplacer le composant.
• Remonter toutes les pièces. Effectuer les opérations de
démontage dans l'ordre inverse.
Remplacement du thermostat de travail et du thermostat
de sécurité
• Démonter le panneau de commandes
• Sortir la boule de son logement fi xé à la cuve.
• Déposer et remplacer le composant.
• Remonter toutes les pièces. Effectuer les opérations de
démontage dans l'ordre inverse.
16 NETTOYAGE DES PIÈCES INTERNES
• Contrôler l'état des pièces se trouvant à l'intérieur de l'appareil
• Enlever la saleté s'étant éventuellement déposée
• Contrôler et nettoyer le système d'évacuation des fumées
17 PIÈCES PRINCIPALES
17.1 BRAISIÈRE ÉLECTRIQUE
• Résistance
• Voyant
• Régulateur de température
17.2 MULTIPLE
• Thermostat de travail
• Thermostat de sécurité
• Résistance
• Voyant
27
Page 30

INFORMACIÓN GENERAL ...................................................................................................................................................... 29
1 DATOS DEL EQUIPO ................................................................................................................................................ 29
2 ADVERTENCIAS GENERALES ................................................................................................................................ 29
ADVERTENCIAS PARA EL INSTALADOR ..............................................................................................................................29
ADVERTENCIAS PARA EL USUARIO ..................................................................................................................................... 29
ADVERTENCIAS PARA EL MANTENEDOR ........................................................................................................................... 29
ADVERTENCIAS PARA LA LIMPIEZA ..................................................................................................................................... 29
3 DISPOSITIVOS DE SEGURIDAD Y CONTROL ........................................................................................................ 29
3.1 SARTÉN BASCULANTE MÚLTIPLE ........................................................................................................................ 29
4 ELIMINACIÓN DEL EMBALAJE Y DEL EQUIPO ......................................................................................................29
INSTRUCCIONES DE INSTALACIÓN ..................................................................................................................................... 30
ADVERTENCIAS PARA EL INSTALADOR ..............................................................................................................................30
5 NORMAS Y LEYES DE REFERENCIA .....................................................................................................................30
6 DESEMBALAJE ......................................................................................................................................................... 30
7 EMPLAZAMIENTO .................................................................................................................................................... 30
8 CONEXIONES ...........................................................................................................................................................30
9 PUESTA EN SERVICIO .............................................................................................................................................31
INSTRUCCIONES DE USO .....................................................................................................................................................31
ADVERTENCIAS PARA EL USUARIO ..................................................................................................................................... 31
10 USO DE LA SARTÉN BASCULANTE ELÉCTRICA .................................................................................................. 31
11 USO DE LA SARTÉN BASCULANTE MÚLTIPLE .................................................................................................... 31
12 INACTIVIDAD DEL EQUIPO .....................................................................................................................................32
INSTRUCCIONES DE LIMPIEZA .............................................................................................................................................32
ADVERTENCIAS PARA LA LIMPIEZA ..................................................................................................................................... 32
INSTRUCCIONES DE MANTENIMIENTO ............................................................................................................................... 32
ADVERTENCIAS PARA EL MANTENEDOR ........................................................................................................................... 32
13 PUESTA EN SERVICIO ............................................................................................................................................. 32
14 SOLUCIÓN DE PROBLEMAS ...................................................................................................................................32
ADVERTENCIAS PARA LA SUSTITUCIÓN DE COMPONENTES. ........................................................................................32
14.1 SARTÉN BASCULANTE ELÉCTRICA ....................................................................................................................... 32
14.2 SARTÉN BASCULANTE MÚLTIPLE ........................................................................................................................ 32
15 SUSTITUCIÓN DE COMPONENTES ........................................................................................................................ 32
ADVERTENCIAS PARA LA SUSTITUCIÓN DE COMPONENTES. ........................................................................................32
15.1 SARTÉN BASCULANTE ELÉCTRICA ....................................................................................................................... 33
15.2 SARTÉN BASCULANTE MÚLTIPLE ........................................................................................................................ 33
16 LIMPIEZA DE LAS PARTES INTERNAS ...................................................................................................................33
17 COMPONENTES PRINCIPALES ..............................................................................................................................33
17.1 SARTÉN BASCULANTE ELÉCTRICA ....................................................................................................................... 33
17.2 SARTÉN BASCULANTE MÚLTIPLE ........................................................................................................................ 33
28
Page 31

INFORMACIÓN GENERAL
En este capítulo se suministran informaciones generales que
deben conocer todos los usuarios de este manual. Las informaciones específi cas para cada usuario del manual fi guran en
los capítulos siguientes ("INSTRUCCIONES PARA ... ").
1 DATOS DEL EQUIPO
• La placa de datos del equipo está aplicada a la superfi cie
interior del panel de mandos.
• El modelo y el número de serie del equipo también fi guran en
las etiquetas aplicadas bajo la marca y en el embalaje.
2 ADVERTENCIAS GENERALES
El fabricante del equipo no asume ninguna responsabilidad por daños debidos a la inobservancia de las indicaciones siguientes.
ADVERTENCIAS PARA EL INSTALADOR
• Leer atentamente este manual. Suministra información importante sobre la seguridad de instalación, uso y mantenimiento del equipo.
• La instalación, la conversión para otro tipo de gas y el mantenimiento del equipo deben ser efectuados por personal cualifi cado y autorizado por el fabricante, de conformidad con las
normas de seguridad vigentes y con las instrucciones dadas
en este manual.
• Observar de qué modelo es el equipo. El modelo está indicado en el embalaje y en la placa de datos del equipo.
• Instalar el equipo solamente en un local sufi cientemente ai-
reado.
• No obstruir los orifi cios de entrada de aire y salida de humos
del equipo.
• No alterar de ningún modo los componentes del equipo.
ADVERTENCIAS PARA EL USUARIO
• Leer atentamente este manual. Suministra información importante sobre la seguridad de instalación, uso y mantenimiento del equipo.
• Guardar este manual en un lugar seguro y conocido para que
pueda consultarse durante toda la vida útil del equipo.
• La instalación, la conversión para otro tipo de gas y el mantenimiento del equipo deben ser efectuados por personal cualifi cado y autorizado por el fabricante, de conformidad con las
normas de seguridad vigentes y con las instrucciones dadas
en este manual.
• Para la asistencia, acudir sólo a centros técnicos autorizados
por el fabricante y exigir el empleo de recambios originales.
• Hacer realizar el mantenimiento del equipo como mínimo dos
veces al año. Se aconseja suscribir un contrato de mantenimiento.
• El equipo está destinado al uso profesional y debe ser utilizado por personal capacitado.
• El equipo debe utilizarse para cocinar alimentos tal como se
indica en las instrucciones de uso. Todo otro uso se considera inadecuado.
• No hacer funcionar el equipo de vacío durante mucho tiempo. Efectuar el precalentamiento inmediatamente antes del
uso.
• Vigilar el equipo durante el funcionamiento.
• En caso de avería o fallo del equipo, cerrar la llave de paso
del gas y/o desconectar el interruptor general de alimentación eléctrica, instalados antes del equipo.
• Efectuar la limpieza de acuerdo con lo indicado en el capítulo
"INSTRUCCIONES PARA LA LIMPIEZA".
• No dejar material infl amable cerca del equipo. PELIGRO DE
INCENDIO.
• Los niños deben ser supervisados para asegurarse de que
no juegan con la aplicación.
• Esta aplicación no se piensa para uso de personas (niños
incluyendo) con capacidades físicas, sensoriales o mentales
reducidas, o la carencia de la experiencia y del conocimiento,
a menos que hayan sido dados la supervisión o la instrucción
referente al uso de la aplicación por una persona responsable de su seguridad.
• No obstruir los orifi cios de entrada de aire y salida de humos
del equipo.
• No alterar de ningún modo los componentes del equipo.
ADVERTENCIAS PARA EL MANTENEDOR
• Leer atentamente este manual. Suministra información importante sobre la seguridad de instalación, uso y mantenimiento del equipo.
• La instalación, la conversión para otro tipo de gas y el mantenimiento del equipo deben ser efectuados por personal cualifi cado y autorizado por el fabricante, de conformidad con las
normas de seguridad vigentes y con las instrucciones dadas
en este manual.
• Observar de qué modelo es el equipo. El modelo está indicado en el embalaje y en la placa de datos del equipo.
• Instalar el equipo solamente en un local sufi cientemente ai-
reado.
• No obstruir los orifi cios de entrada de aire y salida de humos
del equipo.
• No alterar de ningún modo los componentes del equipo.
ADVERTENCIAS PARA LA LIMPIEZA
• Limpiar todos los días las superfi cies exteriores de acero ino-
xidable satinado, las cubas y las placas de cocción.
• Hacer limpiar el interior del equipo por un técnico autorizado,
al menos dos veces al año.
• No lavar el equipo con chorros de agua directos o de alta
presión.
• No utilizar productos corrosivos para limpiar el suelo debajo
del equipo.
3 DISPOSITIVOS DE SEGURIDAD Y CONTROL
3.1 SARTÉN BASCULANTE MÚLTIPLE
TERMOSTATO DE SEGURIDAD
El fabricante del equipo no asume ninguna responsabili-
dad por daños debidos a la inobservancia de las indicaciones siguientes.
• El equipo está dotado de un termostato de seguridad con
rearme manual que interrumpe el calentamiento cuando la
temperatura de funcionamiento supera el valor máximo permitido.
• Para restablecer el funcionamiento del equipo presionar el
pulsador de rearme del termostato. Esta operación debe ser
realizada exclusivamente por un técnico cualifi cado y auto-
rizado
4 ELIMINACIÓN DEL EMBALAJE Y DEL EQUIPO
4.1 EMBALAJE
El embalaje está realizado con materiales compatibles con el
medio ambiente. Los componentes de material plástico que
deben reciclarse son:
• sobrecubierta transparente, bolsas del manual de instrucciones y de los inyectores (polietileno - PE).
• fl ejes (polipropileno - PP)
2929
Page 32

4.2 EQUIPO
El equipo está realizado en más del 90% de su peso con materiales metálicos reciclables (acero inoxidable, chapa aluminizada, cobre, etc. ).
Desechar el equipo conforme a las normas vigentes.
• No dejarlo en ningún sitio que no sea específi co para tal fi n.
• Inutilizarlo antes de desecharlo.
INSTRUCCIONES DE INSTALACIÓN
ADVERTENCIAS PARA EL INSTALADOR
El fabricante del equipo no asume ninguna responsabilidad por daños debidos a la inobservancia de las indicaciones siguientes.
• Leer atentamente este manual. Suministra información importante sobre la seguridad de instalación, uso y mantenimiento del equipo.
• La instalación, la conversión para otro tipo de gas y el mantenimiento del equipo deben ser efectuados por personal cualifi cado y autorizado por el fabricante, de conformidad con las
normas de seguridad vigentes y con las instrucciones dadas
en este manual.
• Observar de qué modelo es el equipo. El modelo está indicado en el embalaje y en la placa de datos del equipo.
• Instalar el equipo solamente en un local sufi cientemente ai-
reado.
• No obstruir los orifi cios de entrada de aire y salida de humos
del equipo.
• No alterar de ningún modo los componentes del equipo.
Aparatos de la serie DROP-IN (de empotrar)
• Al efectuar la instalación, respetar escrupulosamente los
esquemas que se anexanen el apéndice.
• Instalar los aparatos exclusivamente en muebles metálicos
(no de madera ni de ningún otro material combustible).
• Controlar atentamente el recorrido del cable de alimentación.
No pasarlo sobre aristas ni rebabas cortantes. Ningún punto
del cable debe superar en más de 50°C la temperatura ambiente.
• Ubicar el equipo a 10 cm como mínimo de las paredes circundantes. Esta distancia puede ser menor si las paredes son
incombustibles o están protegidas con un aislante térmico.
7.1 MONTAJE DEL EQUIPO SOBRE BASE
Seguir las instrucciones incluidas con el tipo de soporte escogido.
7.2 UNIÓN DE VARIOS EQUIPOS
• Juntar los equipos y nivelarlos hasta que las encimeras coincidan.
• Unir los equipos utilizando los cubrejuntas deunión realizados a tal proposito suministradospor encargo.
8 CONEXIONES
La posición y el tamaño de las conexiones se indican en el
esquema de instalación incluido al principio de este manual.
8.1 CONEXIÓN A LA RED ELÉCTRICA
Controlar si el equipo está preparado para funcionar con la
tensión y frecuencia de la red local. Leer estos valores en la
placa de datos del equipo.
• Instalar en un punto anterior al equipo, que sea fácilmente
accesible, un interruptor omnipolar de capacidad adecuada
con apertura de los contactos no inferior a 3 mm, y un dispositivo de protección de alta sensibilidad. La corriente máxima
de dispersión del equipo es de 1 mA/kW.
• Utilizar un cable de alimentación fl exible con aislamiento de
goma y características no inferiores a las del H05 RN-F.
• Conectar el cable de alimentación a la regleta como se indica
en el esquema eléctrico suministrado con el equipo.
• Bloquear el cable de alimentación con el prensacable.
• Proteger el cable de alimentación que queda fuera del equipo con un tubo metálico o de plástico rígido.
8.2 CONEXIÓN A TIERRA Y AL PUNTO EQUIPOTENCIAL
Conectar los equipos eléctricos a una puesta a tierra efi caz.
Conectar el conductor de tierra al borne que lleva el símbo-
, situado junto a la regleta de entrada de la línea.
lo
5 NORMAS Y LEYES DE REFERENCIA
Instalar el equipo con arreglo a las normas de seguridad vigentes.
Instalar el equipo con arreglo a EN 1717 y a las disposiciones
nacionales sobre la utilización del agua.
6 DESEMBALAJE
Controlar el estado en que se encuentra el embalaje y, en caso
de daño evidente, solicitar al transportista la inspección de la
mercancía.
• Retirar el embalaje.
• Quitar la película que protege los paneles externos. Si quedan restos de adhesivo en los paneles, eliminarlos con un
disolvente.
7 EMPLAZAMIENTO
• Las dimensiones exteriores del equipo y la posición de las
conexiones se indican en el esquema de instalación incluido
al principio de este manual.
• El equipo se puede instalar solo o unido a otros aparatos de
la misma gama.
• Este equipo no se puede empotrar.
Conectar la estructura metálica de los equipos eléctricos a un
punto equipotencial. Conectar el conductor al borne que tiene
el símbolo
8.3 CONEXIÓN A LA RED DE AGUA
Alimentar el equipo con agua potable. La presión de alimentación del agua debe estar comprendida entre 150 kPa y 300
kPa. Si la presión es superior a la máxima indicada, utilizar un
reductor de presión.
• Instalar en un punto anterior al equipo, que sea fácilmente
accesible, un fi ltro mecánico y una llave de corte.
• Antes de conectar el fi ltro y el equipo, controlar que en el
interior de los tubos no haya escorias ferrosas y limpiar si
las hubiere.
• Cerrar con un tapón hermético las conexiones que no se utilicen.
• Una vez efectuada la conexión, verifi car que no haya pérdi-
das en los puntos de unión.
8.4 CONEXIÓN AL DESAGÜE
Los conductos de desagüe se han de realizar con materiales
resistentes a una temperatura de 100 °C. El fondo del equipo
no ha de quedar expuesto al vapor producido por el vaciado
del agua caliente.
, situado en la parte exterior del fondo.
30
Page 33

9 PUESTA EN SERVICIO
Ver el capítulo "INSTRUCCIONES DE MANTENIMIENTO"
INSTRUCCIONES DE USO
ADVERTENCIAS PARA EL USUARIO
El fabricante del equipo no asume ninguna responsabilidad por daños debidos a la inobservancia de las indicaciones siguientes.
• Leer atentamente este manual. Suministra información importante sobre la seguridad de instalación, uso y mantenimiento del equipo.
• Guardar este manual en un lugar seguro y conocido para que
pueda consultarse durante toda la vida útil del equipo.
• La instalación, la conversión para otro tipo de gas y el mantenimiento del equipo deben ser efectuados por personal cualifi cado y autorizado por el fabricante, de conformidad con las
normas de seguridad vigentes y con las instrucciones dadas
en este manual.
• Para la asistencia, acudir sólo a centros técnicos autorizados
por el fabricante y exigir el empleo de recambios originales.
• Hacer realizar el mantenimiento del equipo como mínimo dos
veces al año. Se aconseja suscribir un contrato de mantenimiento.
• El equipo está destinado al uso profesional y debe ser utilizado por personal capacitado.
• El equipo debe utilizarse para cocinar alimentos tal como se
indica en las instrucciones de uso. Todo otro uso se considera inadecuado.
• No hacer funcionar el equipo de vacío durante mucho tiempo. Efectuar el precalentamiento inmediatamente antes del
uso.
• Vigilar el equipo durante el funcionamiento.
• En caso de avería o fallo del equipo, cerrar la llave de paso
del gas y/o desconectar el interruptor general de alimentación eléctrica, instalados antes del equipo.
• Efectuar la limpieza de acuerdo con lo indicado en el capítulo
"INSTRUCCIONES PARA LA LIMPIEZA".
• No dejar material infl amable cerca del equipo. PELIGRO DE
INCENDIO.
• Los niños deben ser supervisados para asegurarse de que
no juegan con la aplicación.
• Esta aplicación no se piensa para uso de personas (niños
incluyendo) con capacidades físicas, sensoriales o mentales
reducidas, o la carencia de la experiencia y del conocimiento,
a menos que hayan sido dados la supervisión o la instrucción
referente al uso de la aplicación por una persona responsable de su seguridad.
• No obstruir los orifi cios de entrada de aire y salida de humos
del equipo.
• No alterar de ningún modo los componentes del equipo.
10 USO DE LA SARTÉN BASCULANTE ELÉCTRICA
ADVERTENCIAS DE USO
• IMPORTANTE! No utilizar este aparato como freidora!
• IIMPORTANTE. No poner en funcionamiento el aparato con
la bandeja vacía!
LLENADO Y VACIADO DE LA BANDEJA
Llenado
• Verter agua hasta la marca de nivel máximo practicada en la
pared de la bandeja. No utilizar el equipo si el agua supera la
marca de nivel máximo.
Vaciado
• Desactivar el calentamiento.
• Remover la bandeja.
• Para efectuar esta maniobra es necesario adoptarlas oportunas sagacidades paraprotegir las manos del calor cuando seimpugnan las manijas situadas en la partesuperior (ex
guantes adaptos)protegir el cuerpo de eventuales chorrosde
comida caliente durante las mainobras delevantamiento,
transporte y vaciamiento delrecipiente.
• Utilizar un recipiente adecuado para poneralimentos con
temperatura elevada.
ENCENDIDO Y APAGADO DEL CALENTAMIENTO
El mando del termostato tiene las siguientes posiciones:
0 Apagado
50 Temperatura mínima
100-250 Temperaturas intermedias
300 Temperatura máxima
Encendido
• Girar el mando del termostato a la posición correspondiente
a la temperatura de cocción elegida.
• Se enciende el testigo amarillo.
• El apagado del testigo amarillo indica que se ha alcanzado la
temperatura elegida.
Apagado
• Girar el mando del termostato a la posición “0”.
11 USO DE LA SARTÉN BASCULANTE MÚLTIPLE
ADVERTENCIAS DE USO
• El equipo está destinado a la cocción directa de alimentos
(preparaciones con líquidos, chuletas, hamburguesas, pescado, verduras, etc.).
• No apoyar ollas ni sartenes en la placa de cocción para calentar o cocinar alimentos.
• No utilizar el equipo como freidora, puesto que la temperatura en el fondo de la cuba supera los 230 °C y el aceite puede
prender fuego.
• Al fi nal de la jornada, limpiar cuidadosamente la cuba para
evitar que se formen depósitos corrosivos en su interior.
• El modelo M40 tiene una zona de cocción concuba de capacidad maxima 13 litros.El modelo M60 tienes dos zonas de
cocción concuba de capacidad maxima 22 litros.
ENCENDIDO Y APAGADO DEL CALENTAMIENTO
El mando del termostato tiene las siguientes posiciones:
0 Apagado
50 Temperatura mínima
100-200 Temperaturas intermedias
300 Temperatura máxima
Encendido
• Girar el mando del termostato a la posición correspondiente
a la temperatura de cocción elegida.
• Se enciende el testigo amarillo.
• El apagado del testigo amarillo indica que se ha alcanzado la
temperatura elegida.
31
Page 34

Apagado
• Girar el mando del termostato a la posición “0”.
12 INACTIVIDAD DEL EQUIPO
Antes de un periodo de inactividad del equipo, efectuar las
operaciones que se describen a continuación:
• Limpiar el equipo esmeradamente.
• Pasar por todas las superfi cies de acero inoxidable un paño
humedecido en aceite de vaselina para formar una capa protectora.
• Dejar las tapas abiertas.
• Cerrar las llaves de corte o los interruptores generales instalados en puntos previos a los equipos.
Después de un tiempo prolongado sin utilizar el equipo, proceder del siguiente modo:
• Controlar atentamente el equipo antes de volver a utilizarlo.
• Hacer funcionar los equipos eléctricos a la temperatura mínima durante una hora como mínimo.
INSTRUCCIONES DE LIMPIEZA
ADVERTENCIAS PARA LA LIMPIEZA
El fabricante del equipo no asume ninguna responsabilidad por daños debidos a la inobservancia de las indicaciones siguientes.
• Limpiar todos los días las superfi cies exteriores de acero ino-
xidable satinado, las cubas y las placas de cocción.
• Hacer limpiar el interior del equipo por un técnico autorizado,
al menos dos veces al año.
• No lavar el equipo con chorros de agua directos o de alta
presión.
• No utilizar productos corrosivos para limpiar el suelo debajo
del equipo.
SUPERFICIES DE ACERO INOXIDABLE SATINADO
• Limpiar las superfi cies mediante un paño o una esponja con
agua y un detergente común no abrasivo. Pasar el paño en
el sentido del satinado. Aclarar varias veces y secar por completo.
• No emplear estropajos ni otros objetos de hierro.
• No emplear productos químicos que contengan cloro.
• No utilizar objetos puntiagudos que puedan rayar y arruinar
las superfi cies.
CUBAS DE COCCIÓN
• Para limpiar las cubas, hacer hervir agua en ellas, si es necesario con un producto desengrasante.
• Quitar los depósitos de cal con un producto apropiado.
INSTRUCCIONES DE MANTENIMIENTO
ADVERTENCIAS PARA EL MANTENEDOR
El fabricante del equipo no asume ninguna responsabilidad por daños debidos a la inobservancia de las indicaciones siguientes.
• Instalar el equipo solamente en un local sufi cientemente ai-
reado.
• No obstruir los orifi cios de entrada de aire y salida de humos
del equipo.
• No alterar de ningún modo los componentes del equipo.
13 PUESTA EN SERVICIO
Después de la instalación, de la adaptación a otro tipo de
gas o del mantenimiento, comprobar que el equipo funcione
correctamente. Si se nota algún fallo, consultar el apartado siguiente "Solución de problemas".
13.1 EQUIPO ELÉCTRICO
Encender el equipo como se indica en el capítulo "INSTRUCCIONES DE USO" y verifi car:
• la intensidad de corriente de cada fase;
• el encendido correcto de las resistencias de calentamiento.
14 SOLUCIÓN DE PROBLEMAS
ADVERTENCIAS PARA LA SUSTITUCIÓN DE COMPO-
NENTES.
• Antes de efectuar cualquier operación en un aparato eléctrico, desconectarlo de la red de alimentación.
• Después de sustituir un componente del circuito del gas, verifi car que no haya pérdidas en los puntos de conexión.
• Después de sustituir un componente del circuito eléctrico,
verifi car que esté bien conectado al cableado.
14.1 SARTÉN BASCULANTE ELÉCTRICA
El equipo no se calienta.
Causas posibles:
• El termostato de regulación de la temperatura está averiado.
• Las resistencias están averiadas.
No se puede regular el calentamiento
Causas posibles:
• El termostato de regulación de la temperatura está averiado.
14.2 SARTÉN BASCULANTE MÚLTIPLE
El equipo no se calienta.
Causas posibles:
• El termostato de regulación de la temperatura está averiado.
• Las resistencias están averiadas.
• Ha actuado el termostato de seguridad.
No se puede regular el calentamiento
Causas posibles:
• El termostato de regulación de la temperatura está averiado.
15 SUSTITUCIÓN DE COMPONENTES
• Leer atentamente este manual. Suministra información importante sobre la seguridad de instalación, uso y mantenimiento del equipo.
• La instalación, la conversión para otro tipo de gas y el mantenimiento del equipo deben ser efectuados por personal cualifi cado y autorizado por el fabricante, de conformidad con las
normas de seguridad vigentes y con las instrucciones dadas
en este manual.
• Observar de qué modelo es el equipo. El modelo está indicado en el embalaje y en la placa de datos del equipo.
32
ADVERTENCIAS PARA LA SUSTITUCIÓN DE COMPO-
NENTES.
• Antes de efectuar cualquier operación en un aparato eléctrico, desconectarlo de la red de alimentación.
• Después de sustituir un componente del circuito del gas, verifi car que no haya pérdidas en los puntos de conexión.
• Después de sustituir un componente del circuito eléctrico,
verifi car que esté bien conectado al cableado.
Page 35

15.1 SARTÉN BASCULANTE ELÉCTRICA
Sustitución de la resistencia
• Extraer los mandos, quitar el panel de mandos y la bandeja .
• Desmontar y sustituir el componente.
• Volver a montar todas las partes. Efectuar las operaciones
de desmontaje en orden contrario.
Sustitución del regulador de temperatura
• Extraer los mandos, quitar el panel de mandos.
• Desmontar y sustituir el componente.
• Volver a montar todas las partes. Efectuar las operaciones
de desmontaje en orden contrario.
15.2 SARTÉN BASCULANTE MÚLTIPLE
Sustitución de la resistencia y del testigo
• Desmontar el panel de mandos.
• Desmontar y sustituir el componente.
• Volver a montar todas las partes. Efectuar las operaciones
de desmontaje en orden contrario.
Sustitución del termostato de trabajo y del termostato de
seguridad.
• Desmontar el panel de mandos.
• Extraer el bulbo del alojamiento fi jado a la cuba.
• Desmontar y sustituir el componente.
• Volver a montar todas las partes. Efectuar las operaciones
de desmontaje en orden contrario.
16 LIMPIEZA DE LAS PARTES INTERNAS
• Controlar las condiciones de las partes internas del equipo.
• Quitar toda la suciedad.
• Controlar y limpiar el sistema de salida de humos.
17 COMPONENTES PRINCIPALES
17.1 SARTÉN BASCULANTE ELÉCTRICA
• Resistencia
• Testigo
• Regulador de temperatura
17.2 SARTÉN BASCULANTE MÚLTIPLE
• Termostato de trabajo
• Termostato de seguridad
• Resistencia
• Testigo
33
Page 36

ALGEMENE INFORMATIE .......................................................................................................................................................35
1 GEGEVENS VAN HET APPARAAT ........................................................................................................................... 35
2 ALGEMENE AANWIJZINGEN ................................................................................................................................... 35
AANWIJZINGEN VOOR DE INSTALLATEUR .........................................................................................................................35
AANWIJZINGEN VOOR DE GEBRUIKER ............................................................................................................................... 35
AANWIJZINGEN VOOR DE ONDERHOUDSMONTEUR ........................................................................................................ 35
AANWIJZINGEN VOOR DE REINIGING .................................................................................................................................35
3 VEILIGHEIDS- EN CONTROLEVOORZIENINGEN ..................................................................................................35
3.1 MULTI-BRAADPAN ...................................................................................................................................................35
4 AFVOER VAN DE VERPAKKING EN HET APPARAAT ALS AFVAL ......................................................................... 36
INSTRUCTIES VOOR DE INSTALLATIE .................................................................................................................................36
AANWIJZINGEN VOOR DE INSTALLATEUR .........................................................................................................................36
5 TOEPASSELIJKE NORMEN EN WETTEN ...............................................................................................................36
6 UITPAKKEN ...............................................................................................................................................................36
7 PLAATSING ............................................................................................................................................................... 36
8 VERBINDINGEN ........................................................................................................................................................36
9 INBEDRIJFSTELLING ...............................................................................................................................................37
INSTRUCTIES VOOR HET GEBRUIK ..................................................................................................................................... 37
AANWIJZINGEN VOOR DE GEBRUIKER ............................................................................................................................... 37
10 GEBRUIK VAN DE ELEKTRISCHE BRAADPAN ..................................................................................................... 37
11 GEBRUIK VAN DE MULTI-BRAADPAN .................................................................................................................... 37
12 PERIODES WAARIN HET APPARAAT NIET WORDT GEBRUIKT ........................................................................... 38
INSTRUCTIES VOOR DE REINIGING .................................................................................................................................... 38
AANWIJZINGEN VOOR DE REINIGING .................................................................................................................................38
INSTRUCTIES VOOR HET ONDERHOUD ............................................................................................................................. 38
AANWIJZINGEN VOOR DE ONDERHOUDSMONTEUR ........................................................................................................ 38
13 INBEDRIJFSTELLING ...............................................................................................................................................38
14 OPLOSSEN VAN STORINGEN ................................................................................................................................. 39
AANWIJZINGEN VOOR DE VERVANGING VAN ONDERDELEN. .........................................................................................39
14.1 ELEKTRISCHE BRAADPAN ......................................................................................................................................39
14.2 MULTI-BRAADPAN ................................................................................................................................................... 39
15 VERVANGING VAN ONDERDELEN ......................................................................................................................... 39
AANWIJZINGEN VOOR DE VERVANGING VAN ONDERDELEN. .........................................................................................39
15.1 ELEKTRISCHE BRAADPAN ......................................................................................................................................39
15.2 MULTI-BRAADPAN ................................................................................................................................................... 39
16 REINIGING VAN DE INWENDIGE DELEN ...............................................................................................................39
17 BELANGRIJKSTE ONDERDELEN ............................................................................................................................ 39
17.1 ELEKTRISCHE BRAADPAN ......................................................................................................................................39
17.2 MULTI-BRAADPAN ................................................................................................................................................... 39
34
Page 37

ALGEMENE INFORMATIE
In dit hoofdstuk wordt de algemene informatie gegeven waarvan alle gebruikers van deze handleiding kennis moeten nemen. De specifi eke informatie voor elke gebruiker van deze
handleiding wordt vermeld in de hoofdstukken erna (“INSTRUCTIES VOOR ... " ).
1 GEGEVENS VAN HET APPARAAT
• Het plaatje met de gegevens van het apparaat zit aan de
binnenkant van het bedieningspaneel.
• Het model en het serienummer van het apparaat staan ook
vermeld op de labels onder het merk en op de verpakking.
2 ALGEMENE AANWIJZINGEN
De fabrikant van het apparaat kan niet verantwoordelijk
worden geacht voor eventuele schade die veroorzaakt
wordt door het niet naleven van de hieronder vermelde
verplichtingen.
AANWIJZINGEN VOOR DE INSTALLATEUR
• Lees deze handleiding aandachtig, want zij levert belangrijke
informatie over de veiligheid bij de installatie, het gebruik en
het onderhoud van het apparaat.
• De installatie, aanpassing aan een ander gastype en het onderhoud van het apparaat moeten worden uitgevoerd door
gekwalifi ceerd personeel dat hiertoe geautoriseerd is door
de fabrikant, in overeenstemming met de geldende veiligheidsvoorschriften en de instructies in deze handleiding.
• Stel het model van het apparaat vast. Het model wordt aangegeven op de verpakking en op het gegevensplaatje van
het apparaat.
• Installeer het apparaat alleen in vertrekken met voldoende
ventilatie.
• Dek de luchtinlaat- en uitlaatopeningen van het apparaat niet
af.
• Maak de onderdelen van het apparaat niet onklaar.
AANWIJZINGEN VOOR DE GEBRUIKER
• Lees deze handleiding aandachtig, want zij levert belangrijke
informatie over de veiligheid bij de installatie, het gebruik en
het onderhoud van het apparaat.
• Bewaar deze handleiding op een veilige, bekende plaats, om
haar altijd te kunnen raadplegen zolang het apparaat meegaat.
• De installatie, aanpassing aan een ander gastype en het onderhoud van het apparaat moeten worden uitgevoerd door
gekwalifi ceerd personeel dat hiertoe geautoriseerd is door
de fabrikant, in overeenstemming met de geldende veiligheidsvoorschriften en de instructies in deze handleiding.
• Maak voor assistentie uitsluitend gebruik van door de fabrikant erkende technische centra, en sta op het gebruik van
originele vervangingsonderdelen.
• Laat minstens tweemaal per jaar onderhoud plegen op het
apparaat. Geadviseerd wordt om een onderhoudscontract af
te sluiten.
• Het apparaat is bestemd voor professioneel gebruik en moet
worden bediend door opgeleide personen.
• Het apparaat is bestemd voor het bereiden van voedsel in
overeenstemming met de gebruiksaanwijzingen. Ieder ander
gebruik is oneigenlijk.
• Laat het apparaat niet gedurende lange periodes leeg
werken. Voor het gebruik moet het apparaat worden voorverwarmd.
• Houd het apparaat tijdens de werking in het oog.
• In het geval van een storing of een defect in het apparaat
moet de gaskraan worden dichtgedraaid en/of moet de ho-
ofdschakelaar van de elektrische voeding, die bovenstrooms
van het apparaat geplaatst is, worden uitgeschakeld.
• Voer de reiniging uit volgens de instructies in het hoofdstuk
“INSTRUCTIES VOOR DE REINIGING".
• Houd geen ontvlambare materialen in de buurt van het apparaat. BRANDGEVAAR.
• De kinderen zouden moeten worden gecontroleerd om ervoor te zorgen dat zij niet met het toestel spelen.
• Dit toestel is niet voorgenomen voor gebruik door personen
(met inbegrip van kinderen) met verminderde fysieke, sensorische of geestelijke mogelijkheden, of onervarenheid en
kennis, tenzij zij supervisie of instructie betreffende gebruik
van het toestel door een persoon verantwoordelijk voor hun
veiligheid zijn gegeven.
• Dek de luchtinlaat- en uitlaatopeningen van het apparaat niet
af.
• Maak de onderdelen van het apparaat niet onklaar.
AANWIJZINGEN VOOR DE ONDERHOUDSMONTEUR
• Lees deze handleiding aandachtig, want zij levert belangrijke
informatie over de veiligheid bij de installatie, het gebruik en
het onderhoud van het apparaat.
• De installatie, aanpassing aan een ander gastype en het onderhoud van het apparaat moeten worden uitgevoerd door
gekwalifi ceerd personeel dat hiertoe geautoriseerd is door
de fabrikant, in overeenstemming met de geldende veiligheidsvoorschriften en de instructies in deze handleiding.
• Stel het model van het apparaat vast. Het model wordt aangegeven op de verpakking en op het gegevensplaatje van
het apparaat.
• Installeer het apparaat alleen in vertrekken met voldoende
ventilatie.
• Dek de luchtinlaat- en uitlaatopeningen van het apparaat niet
af.
• Maak de onderdelen van het apparaat niet onklaar.
AANWIJZINGEN VOOR DE REINIGING
• Maak de gesatineerde buitenkant van roestvrij staal, het oppervlak van de bereidingsbakken en het oppervlak van de
kookplaten iedere dag schoon.
• Laat de inwendige delen van het apparaat minstens tweemaal per jaar schoonmaken door een geautoriseerd technicus.
• Reinig het apparaat niet met directe waterstralen of stralen
met hoge druk.
• Gebruik geen bijtende producten om de vloer onder het apparaat schoon te maken.
3 VEILIGHEIDS- EN CONTROLEVOORZIENINGEN
3.1 MULTI-BRAADPAN
VEILIGHEIDSTHERMOSTAAT
De fabrikant van het apparaat kan niet verantwoordelijk
worden geacht voor eventuele schade die veroorzaakt
wordt door het niet naleven van de hieronder vermelde
verplichtingen.
• Het apparaat is voorzien van een handmatig terug te stellen
veiligheidsthermostaat die de verwarming uitschakelt wanneer de bedrijfstemperatuur boven de maximaal toegestane
temperatuur stijgt.
• Om de werking van het apparaat te hervatten moet de resetknop van de thermostaat worden ingedrukt. Dit mag alleen worden gedaan door een gekwalifi ceerd, geautoriseerd
technicus.
3535
Page 38

4 AFVOER VAN DE VERPAKKING EN HET APPARAAT
ALS AFV AL
4.1 VERPAKKING
De verpakking is gemaakt van milieuvriendelijke materialen.
De onderdelen van recyclebaar kunststof zijn:
• de transparante afdekking, de zakjes van de instructiehandleiding en van de inspuiters (van polyethyleen - PE).
• de spansluitstrips (van polypropyleen – PP).
4.2 APPARAAT
Het apparaat bestaat voor meer dan 90% van zijn gewicht uit
recyclebare metalen materialen (roestvrij staal, gealumineerd
staal, koper... ).
Het apparaat moet worden afgevoerd in overeenstemming met
de geldende voorschriften.
• Niet achterlaten in het milieu.
• Maak het apparaat onbruikbaar voordat het wordt afgevoerd.
INSTRUCTIES VOOR DE INSTALLATIE
AANWIJZINGEN VOOR DE INSTALLATEUR
De fabrikant van het apparaat kan niet verantwoordelijk
worden geacht voor eventuele schade die veroorzaakt
wordt door het niet naleven van de hieronder vermelde
verplichtingen.
• Lees deze handleiding aandachtig, want zij levert belangrijke
informatie over de veiligheid bij de installatie, het gebruik en
het onderhoud van het apparaat.
• De installatie, aanpassing aan een ander gastype en het onderhoud van het apparaat moeten worden uitgevoerd door
gekwalifi ceerd personeel dat hiertoe geautoriseerd is door
de fabrikant, in overeenstemming met de geldende veiligheidsvoorschriften en de instructies in deze handleiding.
• Stel het model van het apparaat vast. Het model wordt aangegeven op de verpakking en op het gegevensplaatje van
het apparaat.
• Installeer het apparaat alleen in vertrekken met voldoende
ventilatie.
• Dek de luchtinlaat- en uitlaatopeningen van het apparaat niet
af.
• Maak de onderdelen van het apparaat niet onklaar.
Apparatuuruit de serie DROP-IN (inbouw)
• Voer de installatie strikt volgens devoorschriften van de in de
appendix bijgevoegde schema’s uit.
• Verricht de installatie uitsluitend op metalen meubels (geen
hout en/of andere brandbarematerialen).
• Let op de route van de voedingskabel: de doorgangen mogen geen scherpe randen en/of snijdende bramen vertonen.
Bovendien mag de kabel op geen enkel punt warmer worden
dan 50°C boven de omgevingstemperatuur.
5 TOEPASSELIJKE NORMEN EN WETTEN
Installeer het apparaat overeenkomstig de geldende veiligheidsnormen.
Installeer het apparaat overeenkomstig de norm EN1717 en de
nationale geldende reglementen inzake water.
De installatie en de aansluiting van de apparatuur moet wordenuitgevoerd overeenkomstig de geldende normen.
6 UITPAKKEN
Controleer de conditie van de verpakking. Als deze zichtbaar
beschadigd is, moet de expediteur worden gevraagd om een
inspectie van de goederen.
• Verwijder de verpakking
• Verwijder de folie die de buitenpanelen beschermt. Verwijder
de eventueel achtergebleven lijm met een geschikt oplosmiddel.
7 PLAATSING
• De afmetingen van het ruimtebeslag van het apparaat en de
positie van de aansluitingen worden aangegeven in het installatieschema aan het begin van deze handleiding.
• Het apparaat kan afzonderlijk of in combinatie met andere
apparaten van dezelfde serie worden geïnstalleerd.
• Het apparaat is niet geschikt voor inbouw.
• Plaats het apparaat op minstens 10 cm van de wanden
eromheen. Deze afstand mag kleiner zijn als de wanden
onbrandbaar of thermisch geïsoleerd zijn.
7.1 MONTAGE VAN HET APPARAAT OP EEN BASIS
Volg de instructies die worden gegeven bij het gebruikte type
ondersteuning.
7.2 VERBINDING VAN APPARATEN
• Zet de apparaten tegen elkaar en zet hen waterpas zodat de
werkbladen op elkaar aansluiten.
• Verbind de apparaten met elkaar met behulpvan speciale
verbindingsprofi elen enafdeklijsten (die op aanvraag lever-
baar zijn)
8 VERBINDINGEN
De positie en de afmeting van de aansluitingen worden vermeld
in het installatieschema aan het begin van deze handleiding.
8.1 VERBINDING MET HET ELEKTRICITEITSNET
Controleer of het apparaat geschikt is om te werken met de
spanning en de frequentie waarmee het zal worden gevoed.
Controleer dit aan de hand van de gegevens van het typeplaatje van het apparaat.
• Installeer vóór het apparaat, op een gemakkelijk toegankelijke plaats, een meerpolige schakelaar met een geschikt vermogen, met een opening tussen de contacten van minstens
3 mm en een uiterst gevoelige beveiliging. De maximale
lekstroom van het apparaat bedraagt 1 mA/kW.
• Gebruik een buigzame voedingskabel met rubberen isolatie,
met eigenschappen van minstens het type H05 RN-F.
• Sluit de voedingskabel aan op het klemmenbord, zoals aangegeven in het schakelschema dat bij het apparaat geleverd
is.
• Zet de voedingskabel vast met de kabelklem.
• Bescherm de voedingskabel buiten het apparaat met een
buis van metaal of hard plastic.
8.2 AARDING EN EQUIPOTENTIAALVERBINDING
Verbind elektrische apparaten met een deugdelijke aardingsleiding. Sluit de aardgeleider aan op de klem met het symbo-
ol
dat naast het ingangsklemmenbord van de lijn zit.
Verbind de metalen structuur van het elektrische apparaat met
een equipotentiaal knooppunt. Sluit de geleider aan op de klem
met het symbool
die op de buitenkant van de bodem zit.
36
Page 39

8.3 VERBINDING MET DE WATERLEIDING
Voed het apparaat met drinkwater. De voedingsdruk van het
water moet tussen 150 kPa en 300 kPa liggen. Gebruik een
drukverlager als de voedingsdruk hoger is dan de aangegeven
maximumdruk.
• Installeer bovenstrooms van het apparaat, op een gemakkelijk te bereiken plaats, een mechanisch fi lter en een afslu-
itkraan.
• Tap eventuele ijzerdeeltjes af uit de aansluitleidingen alvorens het fi lter en het apparaat te verbinden.
• Maak de niet verbonden aansluitpunten dicht met een goed
sluitende dop.
• Controleer na de aansluiting of er geen lekken zijn op de verbindingspunten.
8.4 VERBINDING MET DE WATERAFVOERPUNTEN
De afvoerleidingen moeten worden gerealiseerd met materialen die bestand zijn tegen een temperatuur van 100 °C. De
onderkant van het apparaat mag niet worden geraakt door de
damp die veroorzaakt wordt door de afvoer van heet water.
9 INBEDRIJFSTELLING
Zie het hoofdstuk “INSTRUCTIES VOOR HET ONDERHOUD".
• De kinderen zouden moeten worden gecontroleerd om ervoor te zorgen dat zij niet met het toestel spelen.
• Dit toestel is niet voorgenomen voor gebruik door personen
(met inbegrip van kinderen) met verminderde fysieke, sensorische of geestelijke mogelijkheden, of onervarenheid en
kennis, tenzij zij supervisie of instructie betreffende gebruik
van het toestel door een persoon verantwoordelijk voor hun
veiligheid zijn gegeven.
• Dek de luchtinlaat- en uitlaatopeningen van het apparaat niet
af.
• Maak de onderdelen van het apparaat niet onklaar.
10 GEBRUIK VAN DE ELEKTRISCHE BRAADPAN
AANWIJZINGEN VOOR HET GEBRUIK
• LET OP! Dit apparaat mag niet als frituurbak gebruikt worden!
• LET OP! Schakel de verwarming niet in wanneer de bakje
leeg is.
VULLEN EN LEGEN VAN DE BAKJE LEEG
Vullen
• Vul de bak tot aan het teken van het maximumniveau op de
wand van de bakje leeg. Gebruik het apparaat niet als het
water boven het teken van het maximumniveau staat.
INSTRUCTIES VOOR HET GEBRUIK
AANWIJZINGEN VOOR DE GEBRUIKER
De fabrikant van het apparaat kan niet verantwoordelijk
worden geacht voor eventuele schade die veroorzaakt
wordt door het niet naleven van de hieronder vermelde
verplichtingen.
• Lees deze handleiding aandachtig, want zij levert belangrijke
informatie over de veiligheid bij de installatie, het gebruik en
het onderhoud van het apparaat.
• Bewaar deze handleiding op een veilige, bekende plaats, om
haar altijd te kunnen raadplegen zolang het apparaat meegaat.
• De installatie, aanpassing aan een ander gastype en het onderhoud van het apparaat moeten worden uitgevoerd door
gekwalifi ceerd personeel dat hiertoe geautoriseerd is door
de fabrikant, in overeenstemming met de geldende veiligheidsvoorschriften en de instructies in deze handleiding.
• Maak voor assistentie uitsluitend gebruik van door de fabrikant erkende technische centra, en sta op het gebruik van
originele vervangingsonderdelen.
• Laat minstens tweemaal per jaar onderhoud plegen op het
apparaat. Geadviseerd wordt om een onderhoudscontract af
te sluiten.
• Het apparaat is bestemd voor professioneel gebruik en moet
worden bediend door opgeleide personen.
• Het apparaat is bestemd voor het bereiden van voedsel in
overeenstemming met de gebruiksaanwijzingen. Ieder ander
gebruik is oneigenlijk.
• Laat het apparaat niet gedurende lange periodes leeg
werken. Voor het gebruik moet het apparaat worden voorverwarmd.
• Houd het apparaat tijdens de werking in het oog.
• In het geval van een storing of een defect in het apparaat
moet de gaskraan worden dichtgedraaid en/of moet de hoofdschakelaar van de elektrische voeding, die bovenstrooms
van het apparaat geplaatst is, worden uitgeschakeld.
• Voer de reiniging uit volgens de instructies in het hoofdstuk
“INSTRUCTIES VOOR DE REINIGING".
• Houd geen ontvlambare materialen in de buurt van het apparaat. BRANDGEVAAR.
Legen
• Schakel de verwarming uit.
• Verwijder het bakje uit het apparaat om het afte kunnen tappen.
• Voor deze manoeuvre moeten de nodigemaatregelen genomen worden om:uw handen tegen de hitte te beschermenwanneer u de handgrepen aan de bovenkantvastpakt
(b.v. geschikte handschoenen);uw lichaam te beschermen
tegen warmvoedsel dat eventueel zou kunnen opspattenbij
het optillen, vervoeren en leggen van hetbakje.
• De container waarin de inhoud van de bakwordt afgetapt
moet geschikt zijn om voedselmet hoge temperaturen te bevatten.
AAN- EN UITZETTEN VAN DE VERHITTING
De bedieningsknop van de thermostaat kan in de volgende
standen worden gebruikt:
0 Uit
50 Laagste temperatuur
100-250 Tussenliggende temperaturen
300 Hoogste temperatuur
Aanzetten
• Draai de thermostaatknop op de stand van de gewenste bereidingstemperatuur.
• Het gele controlelampje gaat branden.
• Als het gele controlelampje uitgaat, is de ingestelde temperatuur bereikt.
Uitzetten
• Draai de thermostaatknop in de stand “ 0 ”.
11 GEBRUIK VAN DE MULTI-BRAADPAN
AANWIJZINGEN VOOR HET GEBRUIK
• Het apparaat is bestemd voor het direct bereiden van voedsel (stoven, bereiden van soepen, bakken van biefstukken,
hamburgers, vis, groenten, enz.).
37
Page 40

• De bereidingsplaat mag niet worden gebruikt voor het indirect bereiden van voedsel; er mogen dus geen pannen of
koekenpannen enz. op worden gezet.
• Gebruik het apparaat niet als friteuse, de temperatuur van de
bodem van de bak stijgt namelijk tot boven 230°C, waardoor
het gevaar bestaat dat de olie in brand vliegt.
• Maak de bak aan het einde van de dag grondig schoon, om
te voorkomen dat er corroderende afzettingen in ontstaan.
• Het model M40 heeft een enkele kookzone in een pan met
een maximale capaciteit van 13liter.Het model M60 heeft
twee kookzone's in eenpan met een maximale capaciteit van
22 liter.
AAN- EN UITZETTEN VAN DE VERHITTING
De bedieningsknop van de thermostaat kan in de volgende
standen worden gebruikt:
0 Uit
50 Laagste temperatuur
• Gebruik geen bijtende producten om de vloer onder het apparaat schoon te maken.
GESATINEERDE OPPERVLAKKEN VAN ROESTVRIJ STAAL
• Maak de oppervlakken schoon met een doek of spons en
water en gewone, niet-schurende reinigingsmiddelen. Wrijf
de doek in de richting van de satinering. Spoel de doek vaak
uit, en maak het apparaat vervolgens goed droog.
• Gebruik geen schuursponzen of andere voorwerpen van
ijzer.
• Gebruik geen chemische producten die chloor bevatten.
• Gebruik geen scherpe voorwerpen, die de oppervlakken kunnen krassen of beschadigen.
BEREIDINGSBAKKEN
• Maak de bakken schoon door het water aan de kook te brengen, en voeg hieraan eventueel ontvettende producten toe.
• Verwijder eventuele kalkafzettingen met geschikte producten.
100-200 Tussenliggende temperaturen
300 Hoogste temperatuur
Aanzetten
• Draai de thermostaatknop op de stand van de gewenste bereidingstemperatuur.
• Het gele controlelampje gaat branden.
• Als het gele controlelampje uitgaat, is de ingestelde temperatuur bereikt.
Uitzetten
• Draai de thermostaatknop in de stand “ 0 ”.
12 PERIODES WAARIN HET APPARAAT NIET WORDT
GEBRUIKT
Doe het volgende als het apparaat een tijd niet zal worden gebruikt:
• Maak het apparaat grondig schoon.
• Wrijf alle roestvrij stalen oppervlakken in met een doek met
vaselineolie, zodat er een beschermend laagje wordt aangebracht.
• Laat de deksels open staan.
• Draai kranen dicht en zet hoofdschakelaars uit die vóór het
apparaat zijn geplaatst.
Doe het volgende als het apparaat lange tijd niet is gebruikt:
• Controleer het apparaat, alvorens het weer te gebruiken.
• Laat elektrische apparaten gedurende minstens 60 minuten
functioneren op de laagste temperatuur.
INSTRUCTIES VOOR HET ONDERHOUD
AANWIJZINGEN VOOR DE ONDERHOUDSMONTEUR
De fabrikant van het apparaat kan niet verantwoordelijk
worden geacht voor eventuele schade die veroorzaakt
wordt door het niet naleven van de hieronder vermelde
verplichtingen.
• Lees deze handleiding aandachtig, want zij levert belangrijke
informatie over de veiligheid bij de installatie, het gebruik en
het onderhoud van het apparaat.
• De installatie, aanpassing aan een ander gastype en het onderhoud van het apparaat moeten worden uitgevoerd door
gekwalifi ceerd personeel dat hiertoe geautoriseerd is door
de fabrikant, in overeenstemming met de geldende veiligheidsvoorschriften en de instructies in deze handleiding.
• Stel het model van het apparaat vast. Het model wordt aangegeven op de verpakking en op het gegevensplaatje van
het apparaat.
• Installeer het apparaat alleen in vertrekken met voldoende
ventilatie.
• Dek de luchtinlaat- en uitlaatopeningen van het apparaat niet
af.
• Maak de onderdelen van het apparaat niet onklaar.
13 INBEDRIJFSTELLING
Na de installatie, aanpassing aan een ander gastype of onderhoudswerkzaamheden moet de werking van het apparaat
worden gecontroleerd. In het geval van storingen moet de paragraaf “Oplossen van storingen”, verderop in deze handleiding,
worden geraadpleegd.
INSTRUCTIES VOOR DE REINIGING
AANWIJZINGEN VOOR DE REINIGING
De fabrikant van het apparaat kan niet verantwoordelijk
worden geacht voor eventuele schade die veroorzaakt
wordt door het niet naleven van de hieronder vermelde
verplichtingen.
• Maak de gesatineerde buitenkant van roestvrij staal, het oppervlak van de bereidingsbakken en het oppervlak van de
kookplaten iedere dag schoon.
• Laat de inwendige delen van het apparaat minstens tweemaal per jaar schoonmaken door een geautoriseerd technicus.
• Reinig het apparaat niet met directe waterstralen of stralen
met hoge druk.
38
13.1 ELEKTRISCHE APP ARATEN
Stel het apparaat in werking volgens de instructies en de
aanwijzingen voor het gebruik die te vinden zijn in het hoofdstuk “INSTRUCTIES VOOR HET GEBRUIK”, en controleer
het volgende:
• de stroomwaarden van elke fase.
• de inschakeling van de verwarmingselementen.
Page 41

14 OPLOSSEN VAN STORINGEN
AANWIJZINGEN VOOR DE VERVANGING VAN ONDER-
DELEN.
• Schakel de elektrische voeding van het apparaat uit, indien
aanwezig, alvorens welke handeling dan ook te gaan verrichten.
• Controleer telkens wanneer er een onderdeel van het gascircuit vervangen is of er geen lekken zijn op de verbindingspunten met het circuit zelf.
• Controleer na de vervanging van een onderdeel van het
elektrische circuit of de verbinding met de bedrading in orde
is.
14.1 ELEKTRISCHE BRAADPAN
Het apparaat wordt niet warm.
Mogelijke oorzaken:
• De regelthermostaat van de temperatuur is defect.
• De verwarmingselementen zijn defect.
De verwarming kan niet worden geregeld
Mogelijke oorzaken:
• De regelthermostaat van de temperatuur is defect.
14.2 MULTI-BRAADPAN
Het apparaat wordt niet warm.
Mogelijke oorzaken:
• De regelthermostaat van de temperatuur is defect.
• De verwarmingselementen zijn defect.
• De veiligheidsthermostaat is geactiveerd.
De verwarming kan niet worden geregeld
Mogelijke oorzaken:
• De regelthermostaat van de temperatuur is defect.
15 VERVANGING VAN ONDERDELEN
• Monteer alle onderdelen weer. Doe dit door de werkzaamheden voor de demontage omgekeerd uit te voeren.
15.2 MULTI-BRAADPAN
Vervanging van het verwarmingselement en het controlelampje.
• Demonteer het bedieningspaneel.
• Demonteer en vervang het onderdeel.
• Monteer alle onderdelen weer. Doe dit door de werkzaamheden voor de demontage omgekeerd uit te voeren.
Vervanging van de regelthermostaat en de veiligheidsthermostaat.
• Demonteer het bedieningspaneel.
• Haal de bol uit de zitting die aan de bak bevestigd is.
• Demonteer en vervang het onderdeel.
• Monteer alle onderdelen weer. Doe dit door de werkzaamheden voor de demontage omgekeerd uit te voeren.
16 REINIGING VAN DE INWENDIGE DELEN
• Controleer de conditie van de inwendige delen van het apparaat.
• Verwijder eventuele vuilafzettingen.
• Controleer het dampafvoersysteem en maak het schoon.
17 BELANGRIJKSTE ONDERDELEN
17.1 ELEKTRISCHE BRAADPAN
• Verwarmingselement
• Controlelampje
• Temperatuurregelaar
17.2 MULTI-BRAADPAN
• Regelthermostaat
• Veiligheidsthermostaat
• Verwarmingselement
• Controlelampje
AANWIJZINGEN VOOR DE VERVANGING VAN ONDER-
DELEN.
• Schakel de elektrische voeding van het apparaat uit, indien
aanwezig, alvorens welke handeling dan ook te gaan verrichten.
• Controleer telkens wanneer er een onderdeel van het gascircuit vervangen is of er geen lekken zijn op de verbindingspunten met het circuit zelf.
• Controleer na de vervanging van een onderdeel van het
elektrische circuit of de verbinding met de bedrading in orde
is.
15.1 ELEKTRISCHE BRAADPAN
Vervanging van het verwarmingselement
• Haal de knoppen op de voorkant van hetapparaat weg en
verwijder het bedieningspaneel neem ook het bakje .
• Demonteer en vervang het onderdeel.
• Monteer alle onderdelen weer. Doe dit door de werkzaamheden voor de demontage omgekeerd uit te voeren.
Vervanging temperatuurregelaar
• Haal de knoppen op de voorkant van hetapparaat weg en
verwijder het bedieningspaneel.
• Demonteer en vervang het onderdeel.
39
 Loading...