

Original-Gebrauchsanleitung
V1/1118
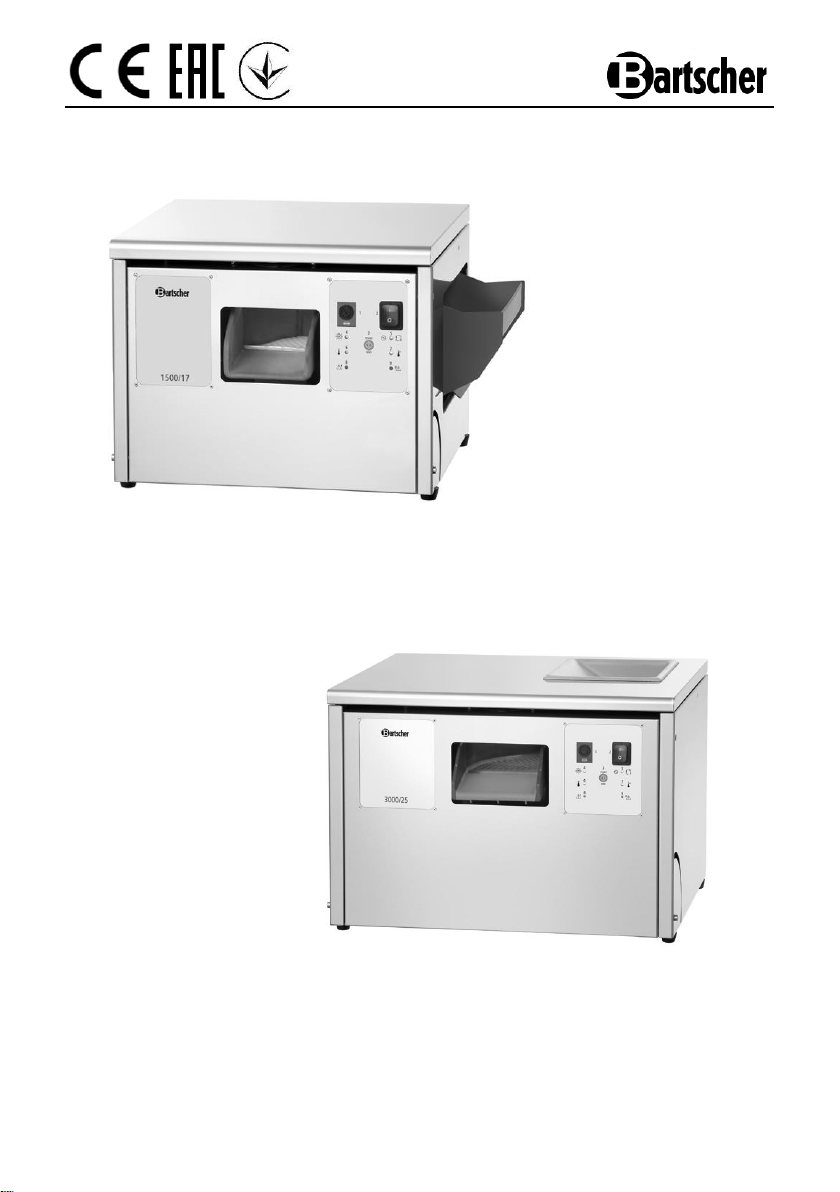
1500/17
110431
3000/25
110432

GB/UK
ENGLISH
Table of contents
1. Safety ...................................................................................................................... 28
1.1 Key to symbols ..................................................................................................... 28
1.2 Safety instructions ................................................................................................ 29
1.3 Use as intended ................................................................................................... 33
1.4 Use against the intended purpose ........................................................................ 33
2. General information .............................................................................................. 34
2.1 Liability and Warrantees ....................................................................................... 34
2.2 Copyright protection ............................................................................................. 34
2.3 Declaration of conformity ...................................................................................... 34
3. Transport, packaging and storage ....................................................................... 35
3.1 Delivery check ...................................................................................................... 35
3.2 Packaging ............................................................................................................. 35
3.3 Storage ................................................................................................................. 35
4. Technical data ........................................................................................................ 36
5. Installation and operation ..................................................................................... 40
5.1 Installation ............................................................................................................ 40
5.2 Operation .............................................................................................................. 42
6. Cleaning and maintenance ................................................................................... 47
7. Possible Malfunctions ........................................................................................... 50
8. Waste disposal ...................................................................................................... 52
Bartscher GmbH phone: +49 5258 971-0
Franz-Kleine-Str. 28 fax: +49 5258 971-120
33154 Salzkotten Service-Hotline: +49 5258 971-197
Germany www.bartscher.com
- 27 -
Read this instruction manual before using and
keep them available at all times!
This instruction manual contains information about the installation, operation
and maintenance of the device and should be consulted as an important source
of information and reference guide.
Awareness of the safety instructions and instructions for use in this manual will ensure
the safe and correct use of the device.
In addition to the information given here, you should comply with any local Health and
safety Controls and generally applicable safety regulations.
The instruction manual forms part of the product and should be kept near the device
and easily accessible for anyone carrying out the installation, servicing, maintenance
or cleaning.
Please keep these instructions and give them to future owners of the device.
1. Safety
This device is designed in accordance with the presently applicable technological
standards. However, the device can pose a danger if handled improperly and
inappropriately.
All persons using the device must follow the recommendations and instructions
in this instruction manual.
1.1 Key to symbols
In this manual, symbols are used to highlight important safety instructions and any
advice relating to the device. The instructions should be followed very carefully to avoid
any risk of accident, personal injury or material damage.
DANGER!
This symbol highlights hazards which could lead to injury.
WARNING!
This symbol highlights dangerous situations which could lead to injury or death.
- 28 -
HOT SURFACE!
This symbol is a warning that the device surface is hot when in use.
Ignoring this warning may result in burns!
CAUTION!
This symbol highlights dangerous situations which could lead to light
injuries, or damage, malfunction, and/or destruction of the device.
NOTE!
This symbol highlights recommendations and information aimed for effective
and trouble-free device operation.
1.2 Safety instructions
The device is not intended for use by individuals (including
children) with physical or mental disabilities, insufficient
experience, and/or insufficient knowledge unless such persons
are under the care of a person responsible for their safety or
have received instructions regarding appropriate use of the
device.
Children should be observed to ensure that they are not playing
with or starting the device.
Prevent access of children to the package materials like plastic
bags and foamed polystyrene elements. Suffocation hazard!
Never leave the device unattended when in use.
Only use the device indoors.
- 29 -
The device must be operated in correct and safe technical
condition only. In case of operational problems disconnect the
device from the power supply (pull the plug from the socket) and
contact the service company.
Only a qualified technician and using original spare parts and
accessories should carry out repairs and maintenance of the
device. Do not attempt to repair the device yourself.
Do not use any accessory or spare parts that have not been
recommended by the manufacturer. These can be dangerous
for the user or lead to damages of the device or personal injury,
and further, the warranty expires.
To prevent hazards and to ensure optimum efficiency, no
modifications or alterations to the device that are not explicitly
approved by the manufacturer may be undertaken.
DANGER! Electric shock hazard!
To avoid the hazard results please follow the safety instructions
below:
Never allow the power cable to come into contact with heat
sources or sharp edges. The power cable should not hang over
the side of the working surface. Ensure that no one can step
on or trip over the cable.
The power cable must not be folded, bent or tangled, and must
always remain fully unrolled. Never place the device or other
objects on the power cable.
Do not cover the cable. Keep away the cable from operating
range and do not immerse it into water or other liquids.
- 30 -

Check the power cord regularly for damage. Do not use the
appliance if the power cord is damaged. If this cable is damaged,
it must be replaced by customer service or a qualified electrician
in order to avoid dangers.
The supply cable must be disconnected from the socket
only by pulling the plug.
Never carry or lift the device by the supply cable.
In any case do not open the device housing. In case of
electrical or mechanical modifications the electric shock
hazard will occur.
Do not use any acid agents and make sure no water ingresses
the device.
Never operate the device with moist hands or standing on wet
floor.
Remove the plug from its socket:
- when the device is not used,
- in case of anomalies during operation,
- before cleaning.
- 31 -
HOT SURFACE! Burn hazard!
To avoid the hazard results please follow the safety instructions
below:
During the operation of the device, the dryer’s drum becomes
very hot (ca. 150 °C). Never attempt to reach inside the dryer’s
drum.
Before you start cleaning or moving the device elsewhere, let it
cool down completely.
Direct exposure to UV lamp may burn your eyes and skin.
- 32 -

1.3 Use as intended
Every use of the device for a different purpose and/or in a way that diverges from the
intended use is not allowed and is assumed as the use against the intended purpose.
Any claims against the manufacturer or their authorized representatives as a consequence
of experiencing damage resulting from the use against the intended purpose are
inadmissible.
The liability for damage occurred during the use of the device against its intended
purpose is borne solely and exclusively by the user.
Safety operation of the device is guaranted only when it is used for its intended purpose
and according to the instructions included in this manual.
The cutlery polishing machine is intended only for drying and polishing of
washed cutlery made of stainless steel and silver.
1.4 Use against the intended purpose
Any use other than those mentioned in point “1.3 Use as intended“ is assumed as the
use against the intended purpose and is not allowed.
The use against the intended purpose may lead to severe injury or damage caused by
hazardous voltage, fire or high temperature. It is allowed to use the device to perform
only the work described in the instruction manual. Improper use may cause the device
damage.
Any manipulation with the device, assembly or maintenance work may be performed
exclusively by the authorized service staff.
- 33 -
The device complies with the current standards and directives of the EU.
We certify this in the EC declaration of conformity. If required we will be
glad to send you the according declaration of conformity.
2. General information
2.1 Liability and Warrantees
All the information and instructions in this manual take into account standard safety
regulations, current levels of technical engineering as well as the expertise and
experience we have developed over the years.
The instruction manual was translated with all due care and attention. However, we do
not accept liability for any translation errors. The German version of this instruction
manual is definitive.
If the delivery consists of a special model, the actual scope of delivery may differ from
the descriptions and illustrations in this manual. This is also the case for special orders
or when the device has been modified in line with new technology.
CAUTION!
Read this manual carefully and thoroughly before any operation of the device,
and especially before turning it on!
Manufacturer is not liable for any damages or faults caused by:
- violation of advice concerning operation and cleaning;
- use other than designed;
- alterations made by user;
- use of inadequate spare parts.
We reserve the right to make technical changes for purposes of developing and improving
the useful properties.
2.2 Copyright protection
The instruction manual including any texts, drawings, images or other illustrations
is copyright. No part of this publication may be reproduced, transmitted or used in any
form or by any means without permission in writing from the manufacturer. Any person
who commits any unauthorized act in relation to this publication shall be liable to claims
for damages. All rights reserved.
NOTE!
The contents, texts, drawings, pictures and any other illustrations are
copyright and subject to other protection rights. Any person unlawfully
using this publication is liable to criminal prosecution.
2.3 Declaration of conformity
- 34 -

If you liked to dispose the packing, consider the regulations applicable
in your country. Supply re-usable packing materials to the recycling.
3. Transport, packaging and storage
3.1 Delivery check
Please check the delivery upon completeness and transport damage immediately
after receipt. In case of visible damage do not accept or accept the delivery with
reservation only.
Note the extent of damage on the carrier’s bill of delivery. Trigger off the complaint.
Hidden damages should be reclaimed immediately after notice, as claims for damages
can only be asserted within the effective period for complaints.
3.2 Packaging
Please do not throw away the covering carton of your device as it might be useful for
storage purposes, when moving or, in case of damages, when the device must be sent
back to a repair center. The outer and inner packing material should be removed
completely from the device before installation.
Please inspect the device upon completeness. In case any part is missing please
contact our customer service center immediately.
3.3 Storage
Keep the package closed until installation and under consideration of the outside
indicated positioning- and storage markings.
Packages should be stored under consideration of the following:
- do not store outdoors,
- keep it dry and dust-free,
- do not expose it to aggressive media,
- do not expose it to direct sunlight,
- avoid mechanical shocks and vibration,
- in case of longer storage (> 3 months) make sure you check the state
of the packaging and the parts regularly, if required refresh or renew.
- 35 -

1
Housing
2
Cutlery input
3
Feet
4
Control panel
5
Cutlery output
6
Cutlery collection basket
7
Maize granulate
3
2
6
5
4 7 1
4. Technical data
List of components 110431
Fig. 1
- 36 -

Name
Cutlery polishing machine 1500/17
Code-no.:
110431
Material:
Stainless steel
Model:
Polishing/drying method: heated maize granulate
Maximum output: 1 500 pieces of cutlery per hour
Filing volume of maize granulate: 1.7 kg
Fan for granulate removal
UV lamp for cutlery disinfection
Cutlery input:
- right side of the device
- width of the opening: 215 mm
Cutlery output:
- front of the device
- width of the opening: 100 mm
ON/OFF switch
Indicator light:
- Temperature
- Heating
- Standby
- Warning light
Features:
- Start/Stop key
- HACCP compliant due to 80 °C operating
temperature
- 10 minutes after-run for granulate drying after
switch-off
- Automatic switch-off when the cover is opened
- Easy access to the cutlery channel
Power:
0.4 kW / 230 V 50 Hz
Dimensions:
W 510 x D 440 x H 345 mm
Weight:
27.0 kg
Included:
1 cutlery collection basket, 2 kg of maize granulate
Technical specification
We reserve the right to make technical changes!
- 37 -

1
Housing
2
Cutlery input
3
Feet
4
Control panel
5
Cutlery output
6
Cutlery collection sieve
7
Cutlery collection basket
8
Maize granulate
3
2
5 4 1
6 7 8
List of components 110432
Fig. 2
- 38 -

Name
Cutlery polishing machine 3000/25
Code-no.:
110432
Material:
Stainless steel
Model:
Polishing/drying method: heated maize granulate
Maximum output: 3 000 pieces of cutlery per hour
Filing volume of maize granulate: 2.5 kg
Fan for granulate removal
UV lamp for cutlery disinfection
Cutlery input:
- top of the device
- width of the opening: 230 mm
Cutlery output:
- front of the device
- width of the opening: 130 mm
ON/OFF switch
Indicator light:
- Temperature
- Heating
- Standby
- Warning light
Features:
- Start/Stop key
- HACCP compliant due to 80 °C operating
temperature
- 10 minutes after-run for granulate drying after
switch-off
- Automatic switch-off when the cover is opened
- Easy access to the cutlery channel
Power:
0.56 kW / 230 V 50 Hz
Dimensions:
W 580 x D 560 x H 410 mm
Weight:
40.0 kg
Included:
1 cutlery collection sieve, 1 cutlery collection basket,
3 kg of maize granulate
Technical specification
We reserve the right to make technical changes!
- 39 -

Lift the device’s cover.
Unscrew the fastening knob (A) and remove
the cover (B) (Fig. 3).
Remove the fastening bars (C).
Reattach the cover (B) and screw it in using
the fastening knob (A).
Fig. 3
B
A
D
5. Installation and operation
5.1 Installation
CAUTION!
Any installation, connection and maintenance work related to the device must
be performed by the qualified and certified technician in accordance with the
applicable international, national and local regulations.
Unpacking
Unpack the device, remove and dispose of all package material according to
the environment protection regulations.
CAUTION!
Never remove the nameplate and warning signs from the device.
Remove transport fastenings
CAUTION!
Before starting the device remove all transport fastenings!
Keep all parts for re-use, if the device is to be transported again or moved to a
different place.
If the transport fastenings are not removed or if they are not fully removed,
this may lead to damaging the device.
In order to remove the transport fastenings, follow this instruction:
- 40 -

CAUTION
The cover (B) for closing the drying basin before the use of the device
must be reinstalled.
Reinstall the cover before switching the device on.
Positioning
Put the device on an even, stable, dry and waterproof surface which is resistant to
high temperature.
Never place the device on an inflammable surface.
Do not place the device near open flame, electric heaters or other heat source.
Never place the device at the edge of a table to avoid tilting or falling.
Never put the device in a moist or wet area.
Never locate the device in the direct vicinity of walls, low wall, kitchen furniture, or
other objects. Make sure there is enough distance (at least 30 cm) from walls and
other flammable or prone to discolouration objects. Follow the valid fire protection
regulations.
Always keep the working area around the device clean and dry.
When locating the device, make sure the power plug is easily accessible to
immediately unplug the device, if necessary.
Connection
DANGER! Electric shock hazard!
The device can cause injuries due to improper installation!
Before installation and connecting the local power grid specification should
be compared with that of the device (see rating plate). Connect the device only
in case of compliance!
The power supply circuit with the socket must be protected by the fuse of at least 16A.
Connect the device directly to a single grounded socket. Do not use any power bar or
multiple socket.
- 41 -

No.
Symbol
Description of symbols
1
Fuse
Overvoltage protection.
2
ON/OFF switch
To switch the device on and off.
This switch should be always on during the operation of
the device, and in order to switch the device on and off,
use START / END button (3).
3
START / END button
The device is switched on by pressing this button.
By pressing this button during the operation, the device is
being switched off, the maize granulate is dried for ca. 10
minutes before the device’s switch-off.
5.2 Operation
Before use, clean the device according to the instructions set out in point 6
“Cleaning and maintenance”.
Control panel
- 42 -
Fig. 4

No.
Symbol
Description of symbols
4
UV lamp indicator light
When the device is switched on, it indicates that the UV lamp is
working.
Flashing light indicates lamp malfunction.
5
“Power” / “Cycle switch-off” indicator light
When the device is switched on, it indicates that the power
is supplied to the device.
Flashing light indicates that the maize granulate drying cycle is
in progress, and then it goes off (ca. 10 minutes).
6
“Operating temperature reached” indicator light
When the device is switched on, it indicates that the maize
granulate has an optimum operating temperature.
Flashing light indicates that the maize granulate is being
heat up.
7
“Heating” indicator light
When the device is switched on, it indicates that maize
granulate is being heat up.
When the device is switched off, it indicates that the maize
granulate has an optimum operating temperature.
8
„ALARM 1“ indicator light
See. Table in section 7. “Possible malfunction”
9
„ALARM 2“ indicator light
See. Table in section 7. “Possible malfunction”
- 43 -

Description of operation
Switch-on phase
Switch the device on by pressing the ON/OFF button (2): the cutlery polishing
machine is ready to work.
Press the “START“ button (3) to start the device.
Drying cycle
Wait until the device has reached the operating temperature: “Operating
temperature reached“ indicator light (6) comes on and at the same time the
“Heating” indicator light (7) comes on.
The device should be used according to the description presented in the section
“Loading of the cutlery polishing machine”.
Switch-off phase
After the use of the device, press the END button (3), to start the device’s switch-
off phase. The device is switched off after ca. 10 minutes, whereas “Power” /
“Cycle switch-off” indicator light (5) is flashing. After this time the device stops
and “Power” / “Cycle switch-off” indicator light (5) remains on in continuous
mode for the remaining duration of the drying cycle.
The switch-off phase is necessary to allow for full drying of the maize granulate.
Loading the device with maize granulate
Switch the device on by pressing the ON/OFF button and press START button (3).
Slowly fill in the cutlery input on the right side or at the top with appropriate maize
granulate.
NOTE!
Always add the exact quantity of the maize granulate, as presented in the
table “Technical data” for a given device.
CAUTION!
Never leave the cutlery polishing machine switched on, if the maize granulate
has not been added to the dryer’s drum to avoid overheating and damaging the
housing of the dryer’s drum.
- 44 Fig. 5 Fig. 6

Loading of the cutlery polishing machine
Switch the device on by pressing the ON/OFF button (2).
Press the “START“ button (3) to start the device.
Before placing the cleaned cutlery in the cutlery input opening, wait until “Heating“
indicator light goes off.
CAUTION!
Load the device only with properly cleaned cutlery (no fat or oil residues),
to avoid damaging the surface of the dryer’s drum.
Place the supplied cutlery collection basket (Code-no.110431, fig. 7), or cutlery
collection sieve (Code-no. 10432, fig. 8) under the cutlery output.
Place the cutlery for drying into the cutlery input at the side (Code-no. 110431, fig. 5)
or on the (Code-no. 110432, fig. 6)
NOTE!
Load the cutlery to the cutlery input opening adding them gradually to
avoid mixing them up.
Cutlery goes to the dryer’s drum with the maize granulate and is dried there (fig. 10).
- 45 -

Fig. 7
Fig. 8
After the drying phase, cutlery leaves the cutlery polishing machine through the
cutlery output and fall the cutlery collection basket (fig. 7) or the cutlery collection
sieve with cutlery collection basket (fig. 8).
In the upper area of the cutlery output
there is a blower which prevents the
granulate from leaving the device with
cutlery.
Furthermore, there is an UV lamp in
this area which disinfects the cutlery.
Fig. 9
If a piece of cutlery gets stuck and
blocks the transport channel, you can
easily open the device cover.
As soon as the cover is opened, a
micro-switch embedded in the cover
disconnects the motor and heater.
Remove the cover of the transport
channel to diagnose the malfunction
and fix it (fig. 10).
Reinstall removed elements, close the
cover and continue the drying process.
Fig. 10
If the device is no longer used, switch it off using the START/END button. The device
continues to work for ca. 10 min. drying the granulate. After expiry of this time, the
device is switched off. Unplug the device.
- 46 -

6. Cleaning and maintenance
WARNING!
Before beginning cleaning, switch off the unit using the on/ off switch (set it
to „O”) and disconnect it from the power supply (pull the plug!).
Leave the device to cool down completely.
The device is not suited for direct washing via water jets!
Protect the device from water penetration.
CAUTION
Do not use any cleaning agents including alcohol, solvents and similar
components.
Do not use any abrasive or scouring cleaning agents, such as steel wool,
steel wool containing soap, metal / plastic sponges or similar agents with
abrasive surface.
Cleaning the inside and outside of the machine
o Clean the external surface of the device daily using warm water and a sponge or
soft, moist cloth. Then, wipe dry the surface using a soft cloth.
o Clean the inside of the device (dryer’s drum) each time when the maize granulate is
replaced. Use only warm water and sponge. Thoroughly wipe dry the dryer’s drum
with a soft cloth.
Replacement of the maize granulate
CAUTION!
Electronic counter counts the hours of work of the machine. After reaching the
number of hours of work set by the manufacturer, alarm indicator lights start flashing
(see. Section 7. “Possible Malfunction”), which signal a need to replace the maize
granulate.
A warning light remains active in Stand-by mode of the device, until zeroing of the
hour counter. Reaching of the set number of working hours does not block further
operation of the device.
- 47 -

1. Pull the power plug from the socket.
2. Open the cover of the device (fig. 11).
3. Unscrew the fastening knob (A) of the cover
of the dryer’s drum. Remove the cover of
the dryer’s drum (B).
4. Remove the maize granulate from the dryer’s
drum by hand or using small dustpan. The rest
may be removed with a vacuum cleaner.
5. Clean the inside of the dryer’s drum and
wipe it dry thoroughly.
6. Always add precisely measured quantity of
the maize granulate (see. “Technical Data”
table) directly to the dryer’s drum of the
device (fig. 12).
7. Finally, fasten the cover of the dryer’s
drum with the fastening knob.
8. Close the cover of the cutlery polishing
machine.
Fig. 11
Fig. 12
A
B
Replacement of the maize granulate
Resetting the hour counter.
1. With device switched off, press and hold the START/END button and activate the
power supply by pressing the ON/OFF button (set it to “I“ position).
2. Release the START/END button: Red indicator lights (ALARM 1 and ALARM
2) are flashing for 5 seconds. Then the hour counter is set to zero and the
device is ready to work.
- 48 -

1. Pull the power plug from the socket.
2. Open the device’s cover (fig. 11).
3. Unscrew the upper side fastening bolts
of the front plate of the device using the
supplied wrench and remove them;
loosen lower side bolts (fig. 13).
4. Using a soft cloth carefully wipe the
dust from the lamp’s fluorescent tube
which might have gathered during the
use of the device.
Fig. 12
Cleaning of the UV lamp
5. If possible do not touch the fluorescent tube with bare hands.
6. After cleaning of the UV lamp, retighten the front plate with screws.
Replacement of the UV lamp
1. Pull the power plug from the socket.
2. Open the device’s cover (fig. 11).
3. Unscrew the upper side fastening bolts of the front plate of the device using the
supplied wrench and remove them; loosen lower side bolts (fig. 13).
4. Dismantle the fluorescent tube by turning it 90° and carefully removing it. Handle
the fluorescent tube with care and if possible do not touch it with bare hands not to
soil the surface during the installation.
5. Finally, retighten the front plate of the device with screws.
6. Close the lid of the device.
NOTE!
In order to ensure the proper operation, the UV lamp (fluorescent tube) should
be always replaced after 8000 hours of work.
Storing of the device
o If the device is not used for a longer time, clean it thoroughly according to the
instructions above and store it in a dry, clean place, protected from cold, sunlight,
and children. Do not place any heavy objects on the device.
- 49 -

No.
Symbol
Malfunction
Possible reasons
Solution
1+2
The machine
does not
work
No power supply
ON/OFF switch in
“O“ position
The lid is not closed
properly
Fuse damaged
Check the power cable
and make sure that the
plug is correctly inserted
to the socket.
Check if the ON/OFF
switch is pressed into
“I“ position
Check if the lid is closed
properly
Replace the fuse
4
LED 4
indicator
light is
flashing
Damaged UV lamp
Damaged lamp
socket
Replace the UV lamp
Replace the lamp
socket
8
LED 8
indicator
light is
flashing
Flashing indicates
that no power
supply reaches the
motor
Check the motor’s
power supply, possibly
contact the service in
order to replace the
motor
9
LED 9
indicator
light is
flashing
Flashing indicates
that the motor is
blocked
Disconnect the device
from the power supply.
Make sure that no cutlery
blocks motor rotation,
possibly contact the
service in order to
replace the motor
7. Possible Malfunctions
In case of malfunction, disconnect the device from its power source. Before contacting
the service or sales agent, verify - based on the table below - whether it is possible to
eliminate disruption in operation.
- 50 -

No.
Symbol
Malfunction
Possible reasons
Solution
6+8
LED 6 and
LED 8
indicator
lights are
flashing
If both LED
indicator lights
(6/8) or (6/9) are
flashing, the
malfunction is
related to the
temperature sensor
(sensor shortcircuit or sensor
not connected)
In this status, the
cycle of 8 minutes
of OFF and 8
minutes of ON,
during which the
resistor is
controlled directly
by the printed
circuit board.
Replace the sensor
6+9
LED 6 and
LED 9
indicator
lights are
flashing
4+5
+6+
7+8
+9
LED 4, 5, 6,
7, 8, 9
indicator
lights are
flashing
If all the indicated
LED indicator lights
are flashing (4, 5,
6, 7, 8, 9), you
need to replace the
maize granulate
and reset the hour
counter.
Replace the maize
granulate and reset the
hour counter (observe
instructions in section 6
“Cleaning and
maintenance”)
The device
is not
heating up
Damaged heating
element.
Order the replacement
of the heating element
from the technical
service
If you cannot remove the malfunctions:
- do not open the body,
- notify the customer service point or contact the sales
agent, while providing the following information:
type of malfunction;
article and serial number (rating plate at the
rear of the device).
- 51 -

The electric devices are marked with this symbol. You must not
dispose of electric devices with household waste. When the
device may not be longer used each consumer is obliged to
dispose of the device at the dedicated local collection point,
separately from household waste.
NOTE!
Electric devices should be used and disposed of properly to prevent the impact on
the environment.
Disconnect the device from the power supply and remove the power cord from
the device.
8. Waste disposal
Old devices
Bartscher GmbH phone: +49 5258 971-0
Franz-Kleine-Str. 28 fax: +49 5258 971-120
33154 Salzkotten Service-Hotline: +49 5258 971-197
Germany www.bartscher.com
- 52 -
 Loading...