

Page 1
Bartec Auto ID Ltd. SW Version: R.55.2 (English) 2017
TECH300
Tyre Pressure Monitoring System Tool
User Guide
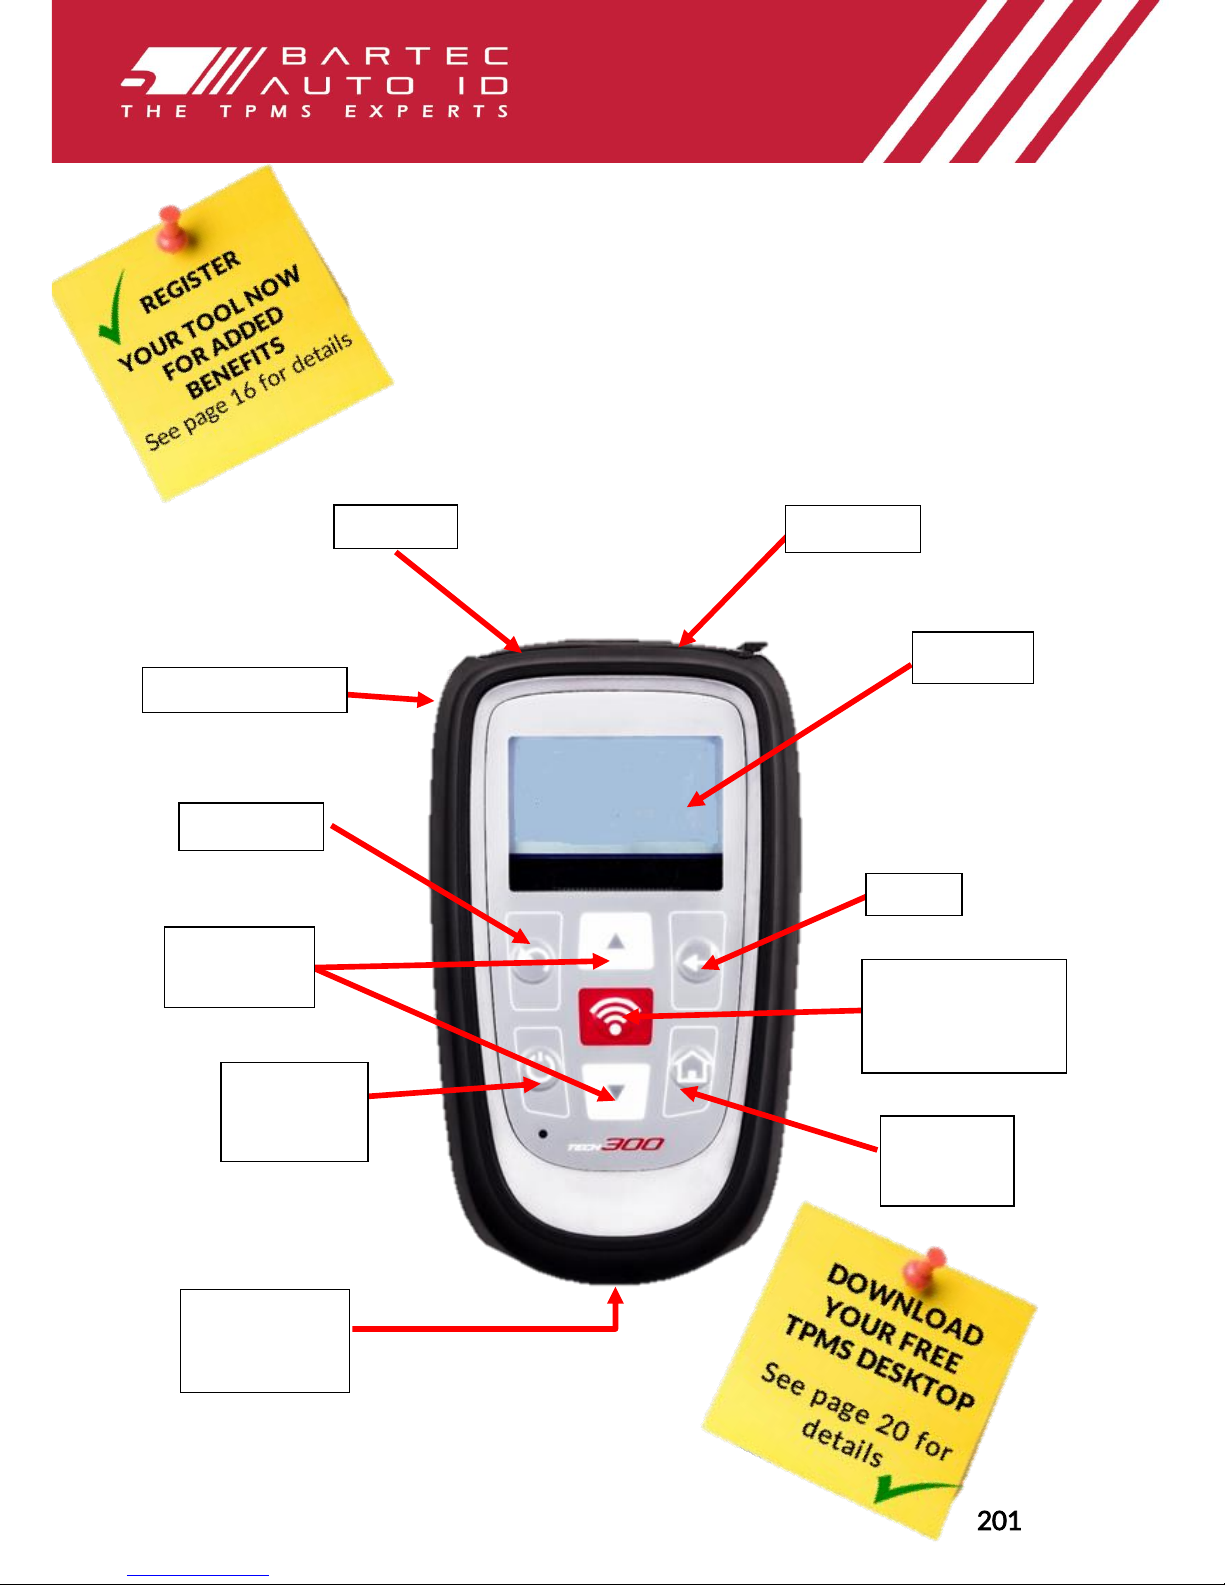
Mini USB
SD Card
Display
Rubber housing
Enter
Test:
commence a TPM
test, only works on
Vehicle Audit Screen
Home:
returns to
Home menu
On/Off:
hold down for
a few seconds
Up/Down
navigation
Back/Esc
OBD cable
connector
(optional)
Page 2
T e c h 3 0 0 User Guide R.55.2 2017
2 | P a g e
FOREWORD
Dear customer,
Thank you for having chosen one of our tools. We are certain that it will give the utmost
satisfaction and be a great help on the job.
Please become fully familiar with the instructions in this user’s manual. It should be
kept ready to hand for consultation whenever required.
CE COMPLIANCE
Type Designation: Tech300SDE
Description/Intended Use: Hand Held Tyre Pressure Measurement Tool/used to activate, decode data
from, and display information about tyre pressure monitoring devices. Also used to communicate with
some vehicles OBD2 ports (optional).
Hereby, Bartec declares that the product referenced above is in compliance with the essential
requirements of Directive 1999/5/EC, on the approximation of the laws of the member states
relating to Directive 1999/5/EC.
Page 3

T e c h 3 0 0 User Guide R.55.2 2017
3 | P a g e
LIST OF CONTENTS
FOREWORD ........................................................................................ 2
LIST OF CONTENTS ............................................................................ 3
IMPORTANT NOTICES ........................................................................ 4
SAFETY PRECAUTIONS ....................................................................... 4
BEFORE GETTING STARTED ............................................................... 6
VEHICLE CHECK ................................................................................. 7
VEHICLE AUDIT SCREEN .................................................................... 8
POSSIBLE READING SCENARIOS ......................................................... 9
SUCCESSFUL SENSOR READ ............................................................. 10
VEHICLE CHECK TOOLKIT ................................................................ 10
VIEW VEHICLE INFORMATION ......................................................... 10
REVIEW VEHICLE DATA ................................................................... 10
PROGRAM SENSOR .......................................................................... 11
RELEARN .......................................................................................... 12
HISTORIC DATA ............................................................................... 14
TOOLKIT ........................................................................................... 14
MY TOOL ......................................................................................... 15
REGISTRATION ................................................................................. 16
UPDATING YOUR TOOL VIA USB CABLE ......................................... 18
CHANGING FROM EU TO US VEHICLE COVERAGE ....................... 19
TPMS DESKTOP .............................................................................. 20
APPENDIX ......................................................................................... 22
TECHNICAL SPECIFICATION ............................................................. 23
BARTEC PRODUCT RANGE & ACCESSORIES .................................... 24
Page 4

T e c h 3 0 0 User Guide R.55.2 2017
4 | P a g e
IMPORTANT NOTICES
SAFETY DEFINITIONS
All Danger, Warning, Important, and Note messages must be followed for your safety. These
safety messages are in the following form
DANGER: Means you may risk possible loss of life.
WARNING: Means you may risk possible bodily harm.
CAUTION: Means you risk damage to the vehicle or the tool.
These safety messages cover situations Bartec is aware of. Bartec cannot know, evaluate and
advise you as to all the possible hazards. You must be certain that any conditions or service
procedures encountered do not jeopardise your personal safety.
COPYRIGHT
No part of this manual may be reproduced, stored in a retrieval system or transmitted, in any
form or by any means, electronic, mechanical, photocopying, recording, or otherwise, without
the prior written permission of Bartec.
DISCLAIMER
All information, illustrations, and specifications contained in this technical instruction manual
are based on the latest information available at the time of publication. The right is reserved to
make changes at any time without obligation to notify any person or organization of such
revisions or changes. Further, Bartec shall not be liable for errors contained with the furnishing,
performance or use of this material.
SAFETY PRECAUTIONS
Read carefully the installation, operating and maintenance instructions in the Operator’s
manual.
Do not allow unqualified persons to use this equipment. This will prevent injury to persons and
damage to the equipment.
The work place must be dry, sufficiently lit and well ventilated.
Do not forget that breathing carbon monoxide (odourless) can be very dangerous and even
fatal.
When working on the vehicle:
Wear suitable clothing and act in such a way as to prevent industrial accidents.
Before starting, check to be certain the gear shift is in neutral (or in PARK (P) if the
transmission is automatic) and put the handbrake on and check to be sure the wheels
are completely locked.
Do not smoke or use naked flames when working on a vehicle.
Wear safety glasses to protect your eyes from dirt, dust or metal chips.
Page 5

T e c h 3 0 0 User Guide R.55.2 2017
5 | P a g e
Disposing of equipment
Do not dispose of this equipment as miscellaneous solid waste but arrange to have
collected separately.
The re-use or correct recycling of electronic equipment (EEE) is important in order to
protect the environment and human health.
In accordance with European Directive WEEE 2002/96/EC, special disposal points are
available for waste electrical and electronic equipment.
Public administrators and producers of electrical and electronic equipment are involved
in facilitating the re-use and recovery of waste electrical and electronic equipment
through these collection activities and use of appropriate planning arrangements.
Unauthorised disposal of waste electrical and electronic equipment is punishable by
law with appropriate penalties.
Disposing of batteries
The Tech300 contains a Lithium Polymer rechargeable battery which is not accessible
to the user.
Batteries must be recycled or disposed of properly. Do not throw batteries away as part
of normal refuse disposal.
Do no throw batteries on to an open fire
Correct use of the tool
Do not expose the tool to excessive moisture.
Do not use the tool near sources of heat or polluting emissions (stoves, ovens, etc.).
Do not drop the tool.
Do not allow the tool to come into contact with water or other liquids.
Do not open the tool or attempt to perform maintenance or repair operations on any
internal parts.
You are advised to keep the packaging and to re-use it if the tool is moved to another
site.
When using the tool remember:
Do not subject the tool to magnetic or electric interference.
Reception, maintenance and guarantee:
Inspect the tool when delivered. Damage sustained during shipment is not covered by the
guarantee. Bartec will accept no responsibility for material or bodily harm resulting from
inappropriate use of the product, failure to maintain it, or incorrect storage conditions.
Bartec provides training for clients desirous of acquiring the knowledge required for the correct
use of its products.
Only personnel authorized by Bartec are permitted to make any repairs that may be necessary.
This tool is guaranteed against any manufacturing fault for 12 months as of date of invoice
(parts and labour) only if product has been correctly used. Serial number must stay readable
and proof of purchase must be retained for presentation upon request.
Bartec Auto ID Ltd
Unit 9
Redbrook Business Park
Wilthorpe Road
Barnsley
S75 1JN
+44 (0) 1226 770581
Page 6
T e c h 3 0 0 User Guide R.55.2 2017
6 | P a g e
BEFORE GETTING STARTED
1. Charging
NOTICE: Only use the power supply or USB cable that is included in the TECH300 tool kit to
charge this tool. The use of un-approved power supplies may damage it and will void the tool
warranty.
2. Registration
The Bartec TECH300 can be registered at https://tools.bartecautoid.com/ . Follow the on-
screen prompts filling in the information and tool serial number. A valid serial number and
supplier is required to process the registration, which can take up to 24hrs once submitted.
3. Update
Once the tool is registered, verify the software level loaded to the level available online and
update the tool if necessary.
KIT COMPONENTS
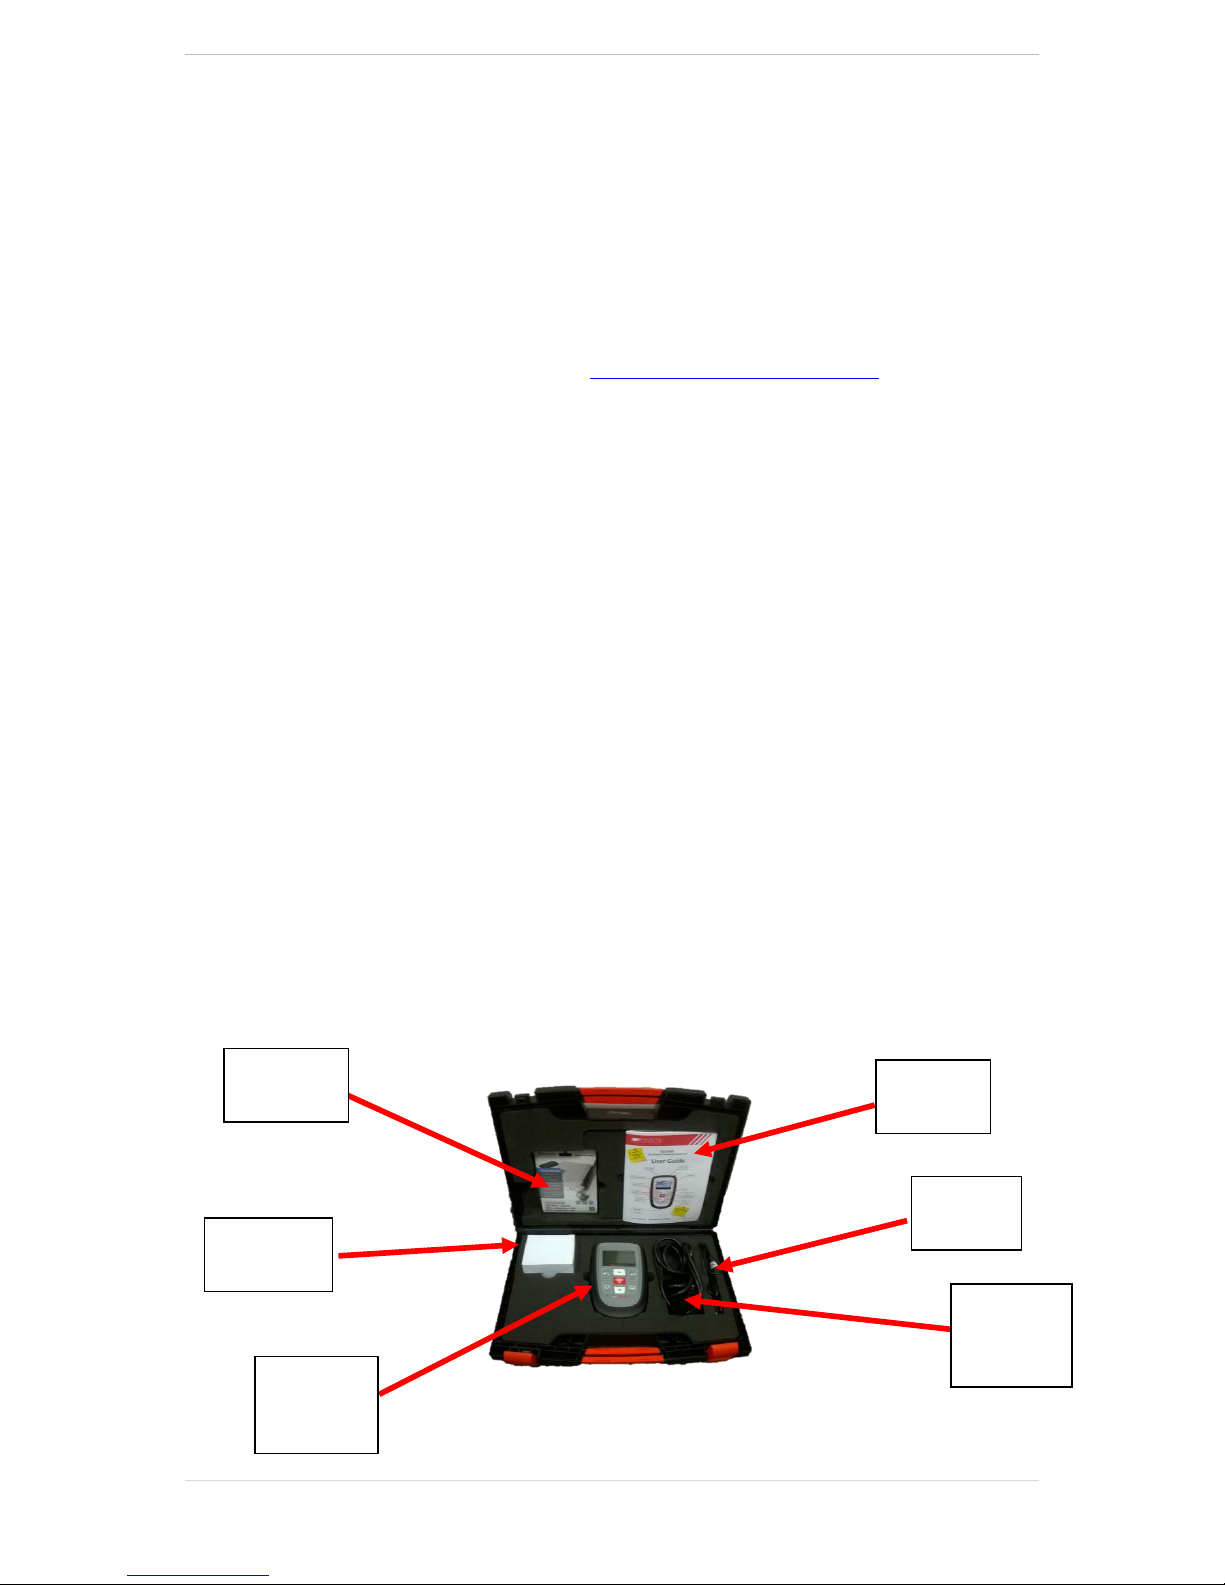
The TECH300SDE kit inside the tool box includes:
TPMS activation tool
OBD II cable (optional)
USB cable
Battery charger
Bluetooth Stick
User Manual
Identifying Kit Components and Features
The TECH300SDE tool is battery operated and generates a low-frequency magnetic field to
activate tyre sensors. It receives UHF radio signals from the tyre sensors typically at 434MHz.
User
manual
USB
Cable
OBD II
cable
(optional)
TPMS
activation
tool
Bluetooth
Stick
Battery
charger
Page 7
T e c h 3 0 0 User Guide R.55.2 2017
7 | P a g e
CHARGING TOOL
The TECH300 is shipped with a charged battery. It is recommended that the tool is charged 2+
hours before first use. For optimum performance, always keep it sufficiently charged.
When there is an insufficient amount of power remaining in the battery, the TECH300 will
flash its battery icon for two seconds, save all of the TPM Data and then power itself off.
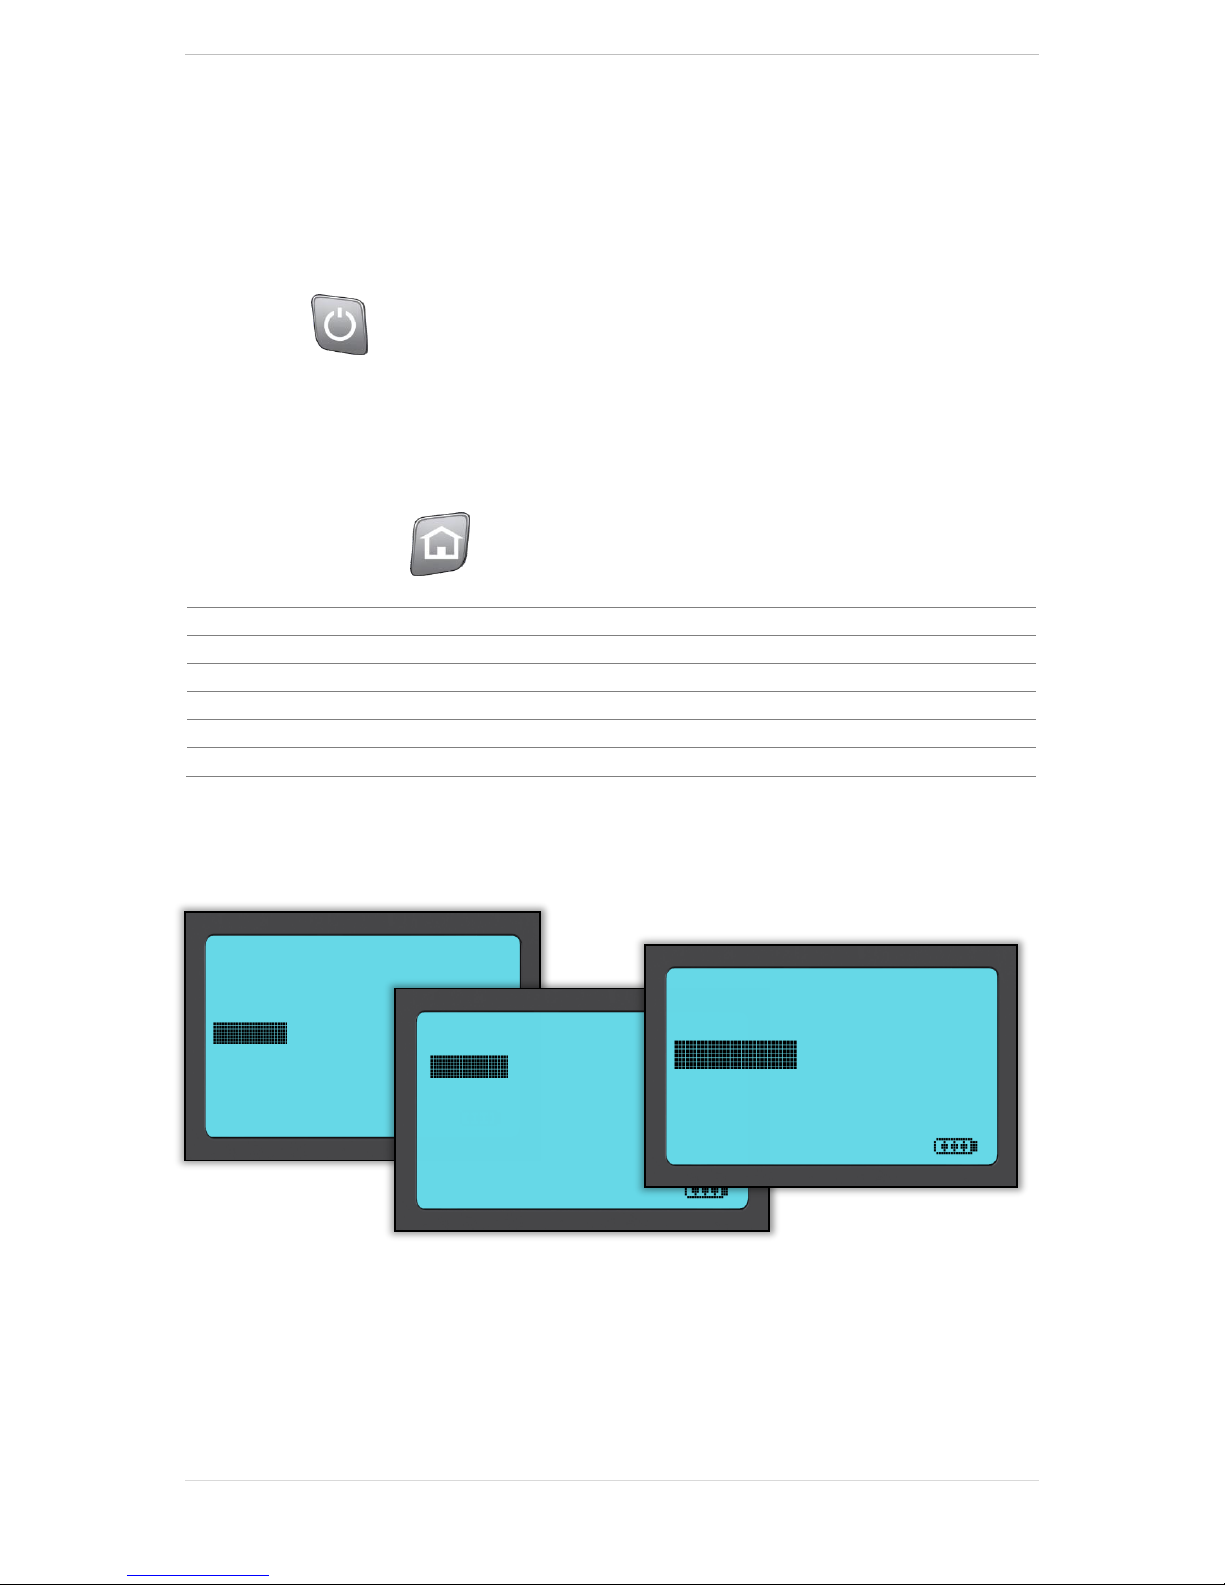
POWER ON/OFF SEQUENCE
Auto power off is after 5 minutes of inactivity.
The unit automatically powers up when the charger or USB port is in use – auto power off is
not operational. The tool cannot be operated when plugged in.
HOME MENU
Vehicle Check
Used when doing a service check.
Program Sensor
Used for just programming universal sensors.
Relearn
Used when relearning the sensor ID’s to the vehicle.
Historic Data
Used when reviewing read data.
Toolkit
Used to test the remote car key or to use the UHF Monitor.
My Tool
Used for settings and tool info.
VEHICLE CHECK
To verify the year of manufacture, it is possible to use the VIN.
Enter Vehicle Registration
This can be enabled or disabled in My Tool > Workflow.
Select by Make
Lexus
Lincoln
Lotus
Maserati
Maybach
Mazda
25/41
Lotus
Elise
Evora
Exige
1/3
Lotus Elise
01/2008>
1/1
Page 8
T e c h 3 0 0 User Guide R.55.2 2017
8 | P a g e
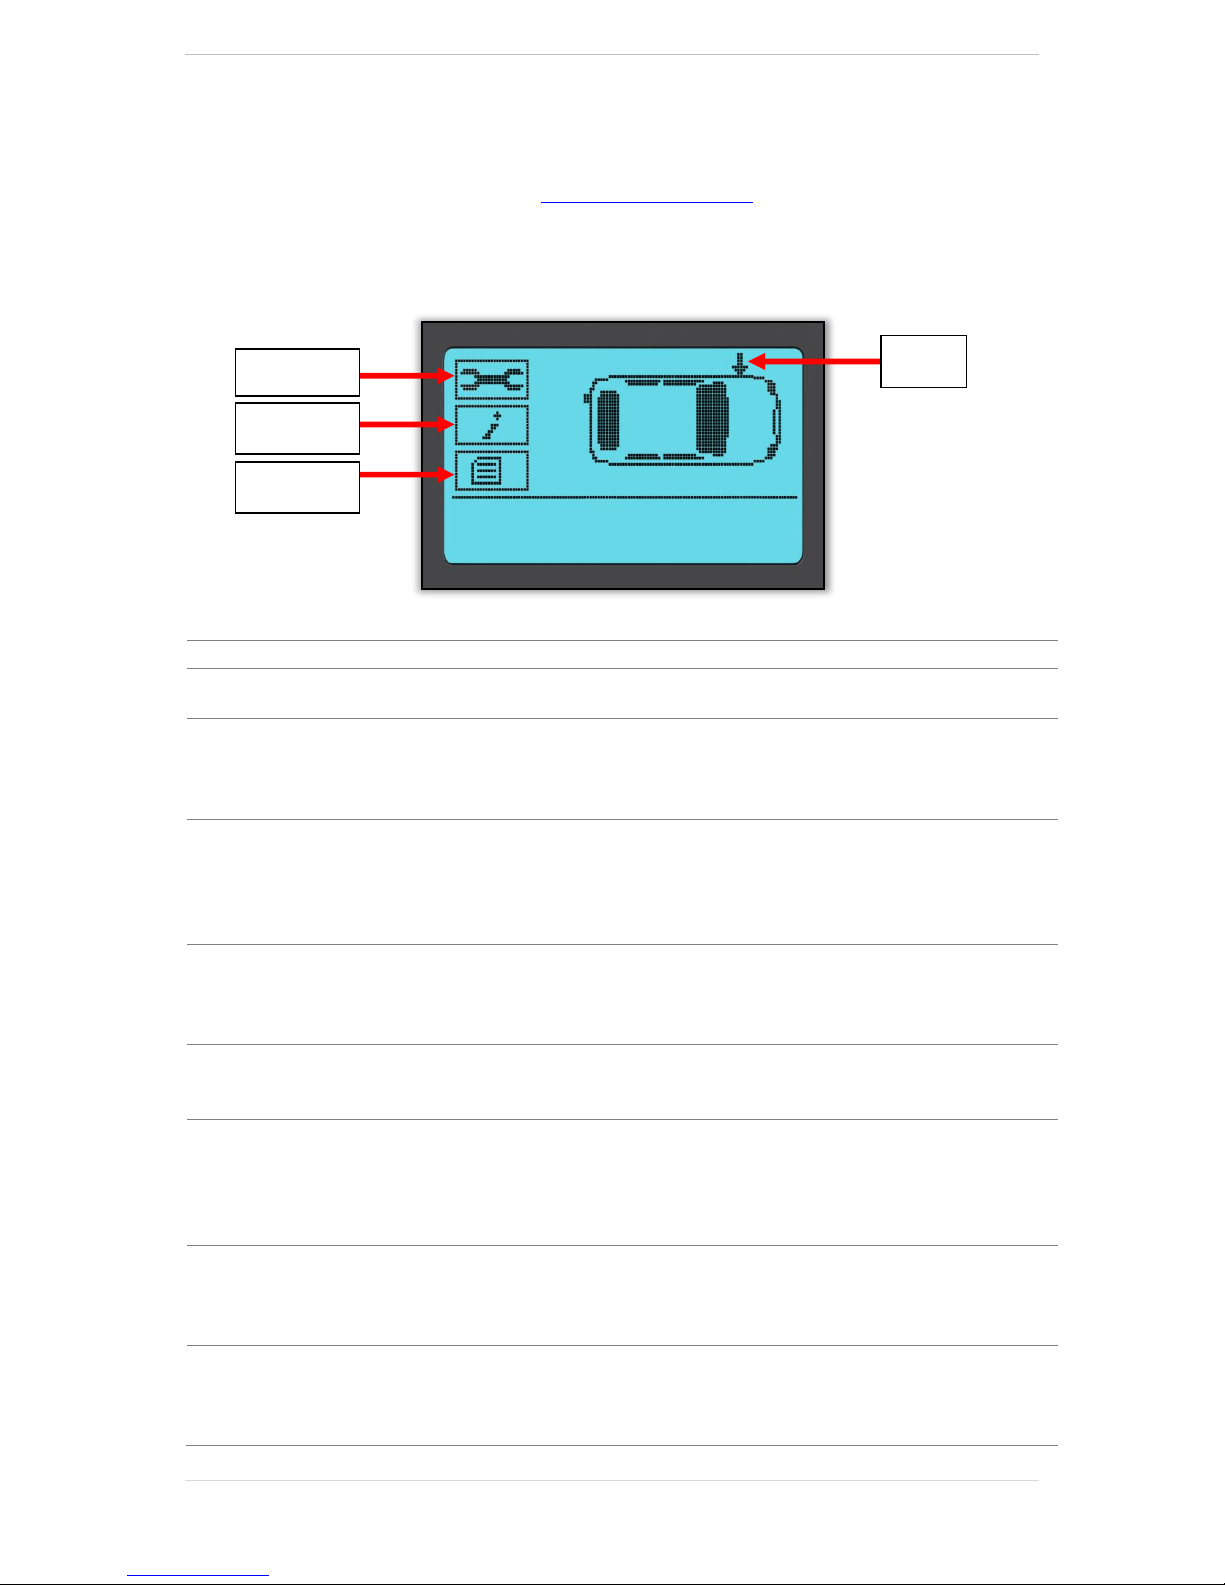
VEHICLE AUDIT SCREEN
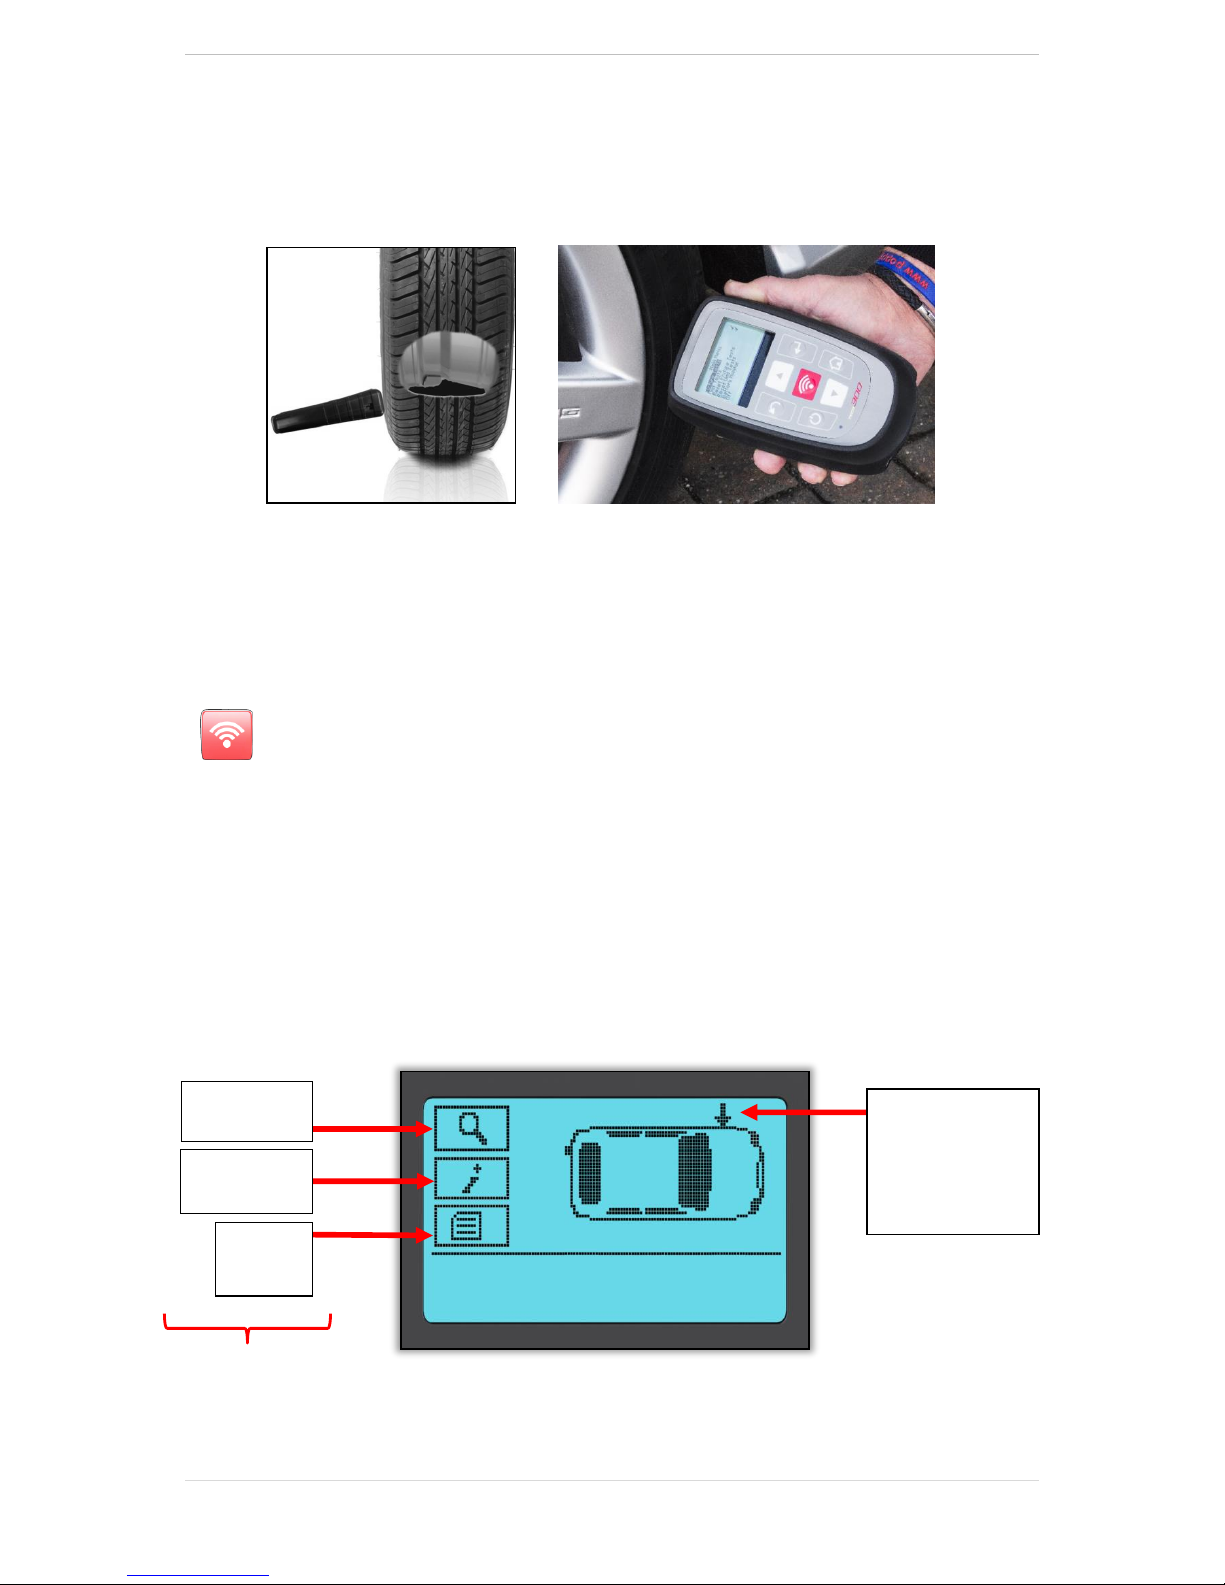
Tool Positioning
Do NOT touch the metal rim. The tool needs to point through the rubber at the sensor.
Sensor Activation/ Test
1. LF activated sensors
To test a sensor the tool should be placed alongside the valve stem and the ‘Test’ key
pressed.
(Note with Ford Banded sensor’s, the tool should be held 180°away from the stem.)
2. Non-LF activated sensors (some Beru sensors up to 2009)
If the tool requires rapid tyre deflation (of the order of 10psi or 0.5bar), then deflate the tyre
and place the tool alongside the stem while pressing the test key.
During testing, the screen confirms the sensor type being tested and displays a progress bar.
Different makes of TPM respond at different speeds/ time intervals.
Details on page 10
Use the Up and Down arrows to navigate.
Press Test To Activate
Left Front
Selected tyre,
processing order:
Left Front,
Right Front,
Right Rear,
Left Rear
Review
Vehicle
Data
View Vehicle
Information
Vehicle Check
Toolkit
Page 9
T e c h 3 0 0 User Guide R.55.2 2017
9 | P a g e
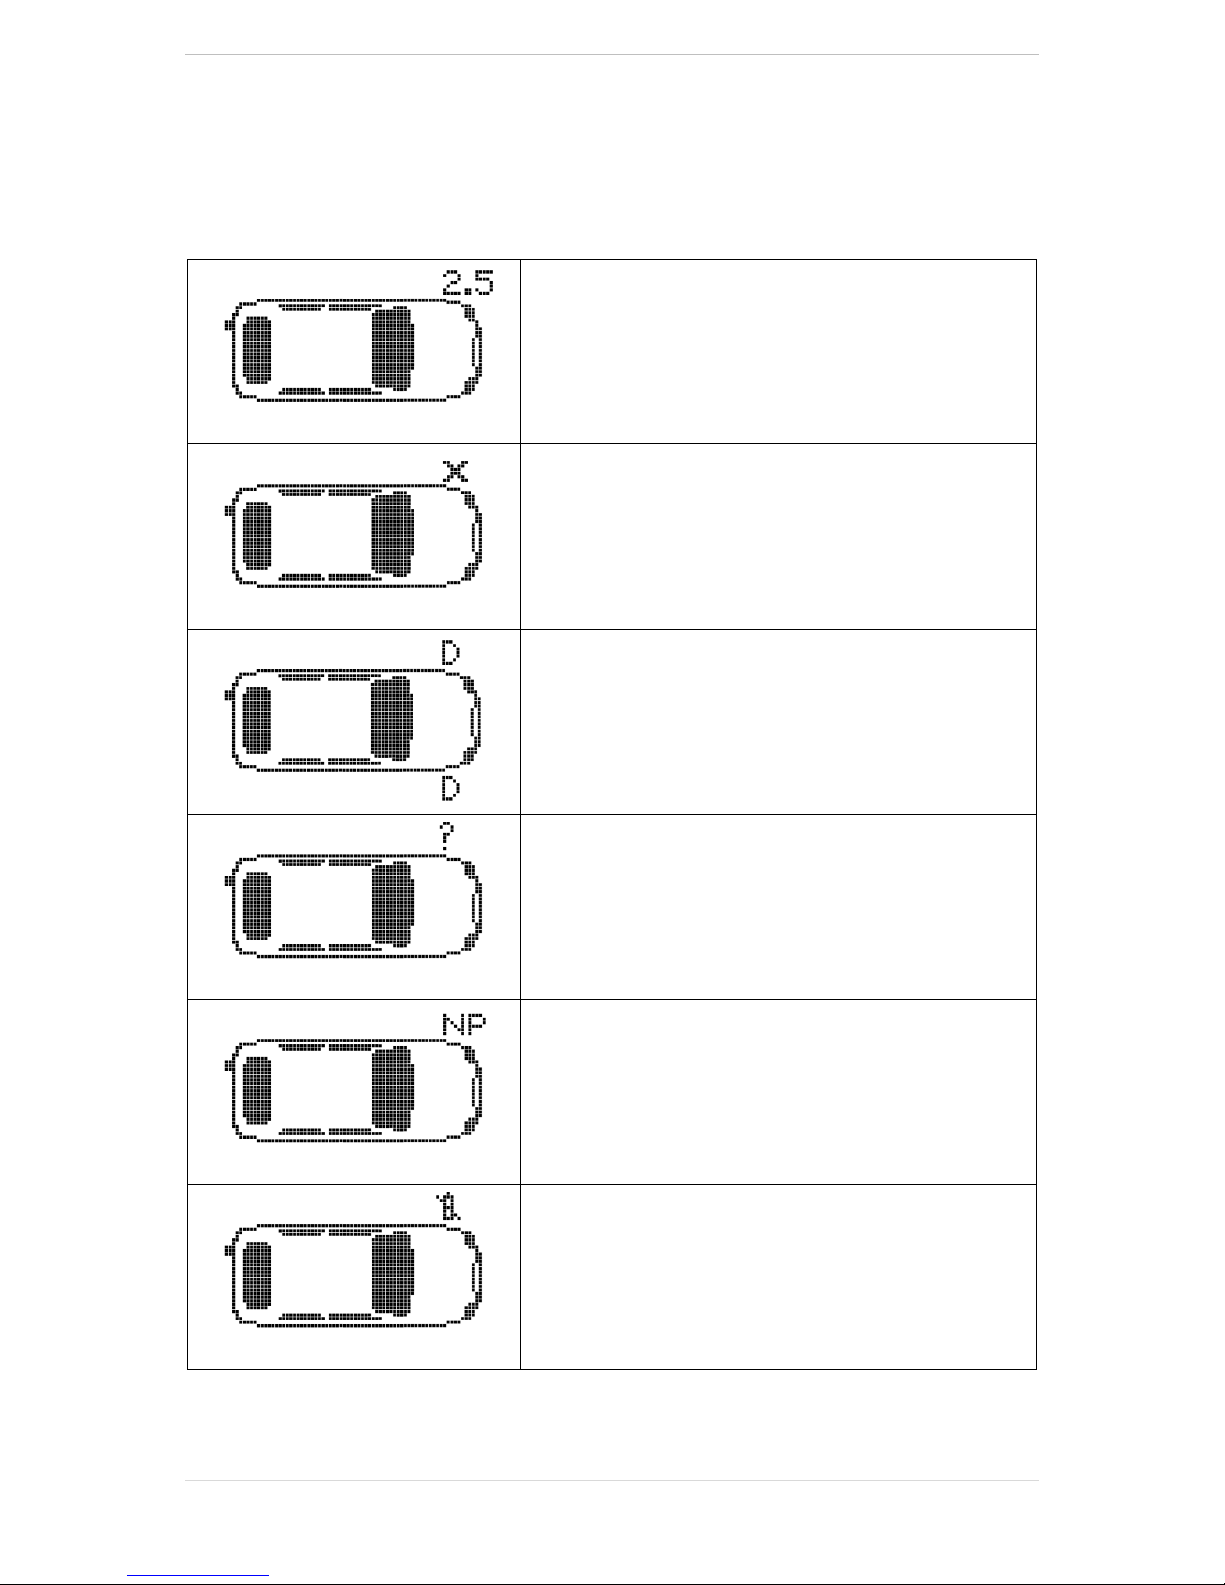
POSSIBLE READING SCENARIOS
Note that if a faulty TPM sensor has been replaced, some method of relearn procedure will
need to be followed, as explained later in this manual.
Successful Sensor Read
TPMS sensor was successfully activated and
decoded. Displays pressure (in Bar or PSI) at
wheel location.
Failed Sensor Read
No Sensor Activation or Decode. May be wrong
sensor fitment or non-functioning sensor. Tool will
prompt to attempt reading the sensor 3 times.
Duplicate ID
A sensor with a duplicate ID has been read. Tool will
direct to re-read those sensors.
Wrong Sensor Type
A TPMS sensor was activated and decoded, but
does not match the protocol for the Make Model
Year that the tool was set-up for.
No Pressure
Sensor IDs read from ECU.
Low Sensor Battery
Sensor’s internal battery has dropped below a
certain voltage threshold.
Page 10

T e c h 3 0 0 User Guide R.55.2 2017
10 | P a g e
SUCCESSFUL SENSOR READ
When all four wheels have been read, there are several different things which could happen.
If “OBD Required” is enabled in My Tool > Workflow and OBD is available for this vehicle, the
OBD prompt message will be displayed.
Save
Allows storage of the data in the tool that can later be transferred to a computer.
Print
Sends the data immediately to the Bluetooth printer that will print out the report.
Send
Sends the data to the TPMS Desktop via Bluetooth.
Edit
Allows the user to mark a wheel which has a mechanical problem such as a
corroded valve stem.
VEHICLE CHECK TOOLKIT
OBD
This option only appears for some vehicles. It allows to read information
from the vehicle such as the VIN, DTCs (Diagnostic Trouble Codes) and
the IDs of the sensors.
Sensor Search
The tool tries to read all possible sensor types that could be fitted to
the selected Make. The search will identify that the sensor is working,
although it may not be the correct sensor for a particular Make, Mode
and Year.
RKE Test
Allows to test the signal strength emitted by a remote keyless entry.
Select RKE Test, hold the Key Fob and press the function buttons on
the Fob. The TECH300 will indicate the strength of the signal. When
performing relearn processes that use the Key Fob it is important to
verify that the Key Fob is transmitting.
VIEW VEHICLE INFORMATION
Sensors do not have to have been read to access the information.
This selection gives access to detailed information about replacement parts, service kits,
sensors, vehicles and service tips.
REVIEW VEHICLE DATA
Sensors and OBD need to have been read for data to be shown.
The menu gives direct access to specific screens that display the TPM data. This option is
helpful if the user wants to have a second look at the Sensor Data, OBD Data or wants to print
the data from the last processed vehicle via the Bluetooth printer.
Page 11

T e c h 3 0 0 User Guide R.55.2 2017
11 | P a g e
PROGRAM SENSOR
The “Program Sensor” menu on the home screen enables the function of programming
aftermarket replacement sensors like the Alligator sens.it or the Schrader EZ-sensor. Even
when they are already mounted in a wheel or programmed to another vehicle.
The user has two options to choose from:
New Vehicle
When selecting this option, the used vehicle must be selected using MakeModel-Year. The procedure for selecting Make-Model-Year and inputting
the vehicle registration (if required), is the same as in the Vehicle Check.
Stored Data
This option is used for a known vehicle for which the sensor data were
already saved and the user wants to copy the ID’s. There are three options
to find the specific vehicle:
- Browse a list of saved vehicle registrations
- Search for (parts of) a specific vehicle registration
- Browse a list of models
After selecting the vehicle please chose the replacement sensor.
At the moment the programmable sensors don’t cover 100% of the OE sensors. This is why
the displayed replacement sensors may vary. The coverage increases with every software
update.
The current coverage list is available at www.bartecautoid.com > Downloads.
The user has the option to either create or copy the ID.
Notice: sensors need to be read before copying.
Create ID
Indicates that a new ID is generated. The ID needs to be relearned to the
vehicle’s ECU. The following pages will describe the procedure.
Copy ID
Requires the read of the old sensor to program the same ID on the
replacement sensor to avoid the relearning process.
Enter ID
This option only appears for some sensors, when creating an ID can cause a
problem on the vehicle. If it is not possible to copy the ID, enter the same
ID manually, which is written on the sensor body.
The screen displays the different Wheel Positions and the user can program them.
Sensors that can be programmed by the tool may have slightly different procedures and times.
Recommended sensor position for programming:
Page 12
T e c h 3 0 0 User Guide R.55.2 2017
12 | P a g e
RELEARN
To find out which relearn type is available for a vehicle, just turn on the tool and select Relearn.
Or refer to the current coverage list at www.bartecautoid.com > Downloads.
Select Make-Model-Year in the same way as it was done in Vehicle Check. Follow the
instructions on the screen afterwards.
Relearn Toolkit:
Program Sensors
Gives direct access to the “Program Sensor” section. The instructions
can be found above in the corresponding paragraph.
Sensor Search
The tool tries to read all possible sensor types that could be fitted to
the selected Make. This will identify that the sensor is working,
although it may not be the correct sensor for a particular Make, Mode
and Year.
RKE Test
Allows to test the signal strength emitted by a remote keyless entry.
Select RKE Test, hold the Key Fob and press the function buttons on
the Fob. The TECH300 will indicate the strength of the signal. When
performing relearn processes that use the Key Fob it is important to
verify that the Key Fob is transmitting.
Toyota ECU
Reset
If at any time the vehicle TPMS Reset button is pressed with the new
sensor IDs fitted, the ECU OBD relearn will not work until the Toyota
ECU Reset is selected (with the tool connected to OBD). The TPMS
Reset button should only be used to set new tyre pressures.
Set to Park
For vehicles with Continental sensors this option shows. If the sensors
are supplied in Off or Test mode, put them in Park mode, which is
necessary for the sensors to work with the vehicle.
Reset YD Sensor
Shows for some Kia and Hyundai vehicles with the newer low line TRW
YD sensors. It allows to put the sensors back into the correct mode
(Sleep or Rest) to work with the vehicle.
View Vehicle
Information
Gives detailed information about relearn procedures, replacement
parts, service kits, sensors, vehicles and service tips.
Review Vehicle
Data
Displays Sensor Data and OBD Data such as Print via the Bluetooth
Printer.
Press Test To Activate
Left Front
Relearn
Toolkit
View Vehicle
Information
Selected
tyre
Review
Vehicle Data
Page 13
T e c h 3 0 0 User Guide R.55.2 2017
13 | P a g e
Stationary Relearns:
Stationary Relearns use the vehicle on-board TPMS system to listen for transmissions from
TPM sensors while the vehicle is in a “Learn Mode”.
Once the vehicle is in Learn Mode, use the TPMS tool to activate the sensors. The vehicle will
listen for the sensor IDs and learn them to the vehicle.
Active (Drive) Relearns:
Some vehicles can be reset by driving. Refer to the on-screen relearn procedures for details on
how far/long to drive. It can take up to 20 minutes to relearn the TPM IDs.
OBD Relearns:
OBD connection allows the TECH300 to directly program the vehicle electronics module with
TPM IDs.
Note that not all vehicles support vehicle communications modes.
OBD can be connected when all sensors are successfully read and the message “All Sensors
OK” is displayed.
Please use the “View Vehicle Information” menu and select “View Vehicle Info” to find the OBD
location.
To perform a relearn read all 4 wheels. If one or more sensors are faulty, please use the ‘Relearn
Toolkit’.
Navigate with the Down Arrow to the ‘Relearn Toolkit’ then ‘Program Sensor’ and select the
programmable sensor. The instructions can be found above in the corresponding paragraph
(‘Program Sensor’).
Universal Sensors
EZ-Sensor
IntelliSens
Sensit.it
1/3
Relearn Toolkit
Program Sensor
OBD
Sensor Search
UHF Monitor
1/4
Relearn Toolkit
Page 14

T e c h 3 0 0 User Guide R.55.2 2017
14 | P a g e
HISTORIC DATA
This menu gives access to specific screens that display the previous read TPM data sorted by
registration or model.
The following screen provides all of the TPM Data available from the TPM Type read; this may
include: TPM ID (Hexadecimal & Decimal), Battery State, Temperature and Pressure. Not all
TPM’s provide the same data.
List by Registration
This option is only useful if a registration is entered with each
tested vehicle. It will sort the saved data by registration.
Search by Registration
Allows to search a vehicle with a specific registration. Use the
Up Arrow to start with upper case, the Down Arrow for
numbers and lower case, Test to enter the next character, and
Enter to start searching.
List by Model
Stored data will be sorted by model.
Upload Stored Data
To enable Bluetooth, select “My Tool” > “Networks” >
“Bluetooth” and connect to TPMS Desktop to upload all stored
data.
Delete Uploaded Data
Deletes all stored data on the tool that have already been sent
to the TPMS Desktop.
Delete All Data
Deletes all stored data.
If one data set is selected, it is possible to get further information about the sensor and the
OBD, to directly access the Program Sensor section and to print the data via the Bluetooth
printer.
TOOLKIT
RKE Test
Select RKE Test, hold the Key Fob and press the function buttons on
the Fob. The TECH300 will check only for a signal present. When
performing relearn processes that use the Key Fob it is important to
verify that the Key Fob is transmitting.
UHF Monitor
Allows operator to search for sensor signals. This feature is used for
advanced diagnostics to determine if signals may be causing issues
during sensor activation and vehicle relearns.
Page 15

T e c h 3 0 0 User Guide R.55.2 2017
15 | P a g e
MY TOOL
Sub-menu containing important information and settings about the tool itself.
Settings
TPM ID
Select whether the tool displays the TPM ID in DECIMAL or
HEXIDECIMAL
Pressure
Change how pressure is displayed, choose between PSI or Bar.
Temperature
Select Celsius or Fahrenheit.
Display Contrast
Adjust tool display contrast.
Lang.
Select Language for tool.
Date/Time
Allows to set the date and time.
Restore Defaults
Reset all settings back to the factory default values.
Networks
To enable Bluetooth change the settings from Disabled to Enabled.
For Bluetooth, please see section ‘TPMS Desktop’ (page 20).
Tool Info
Gives the operator the ability to view:
Software Version currently installed.
Build Date of that Software.
Serial Number of the tool.
Enter Update Mode
Used to install an update on the tool. See page 18 onwards for update instructions.
Switch to US coverage
Note: can only be used if US coverage is downloaded on the tool.
Usage
View the number of Power Cycles, Sensor Activations and OBD Relearns.
Support
On screen reference for Bartec Auto ID Ltd support.
Workflow
Vehicle No.
Allows the user to select different formats of licence plates.
OBD required
Enables or disables the Mandatory OBD for the Vehicle Check.
Page 16
T e c h 3 0 0 User Guide R.55.2 2017
16 | P a g e
REGISTRATION
It is essential to register the tool as it enables the notification
of software updates and the ability to download update files to the
tool.
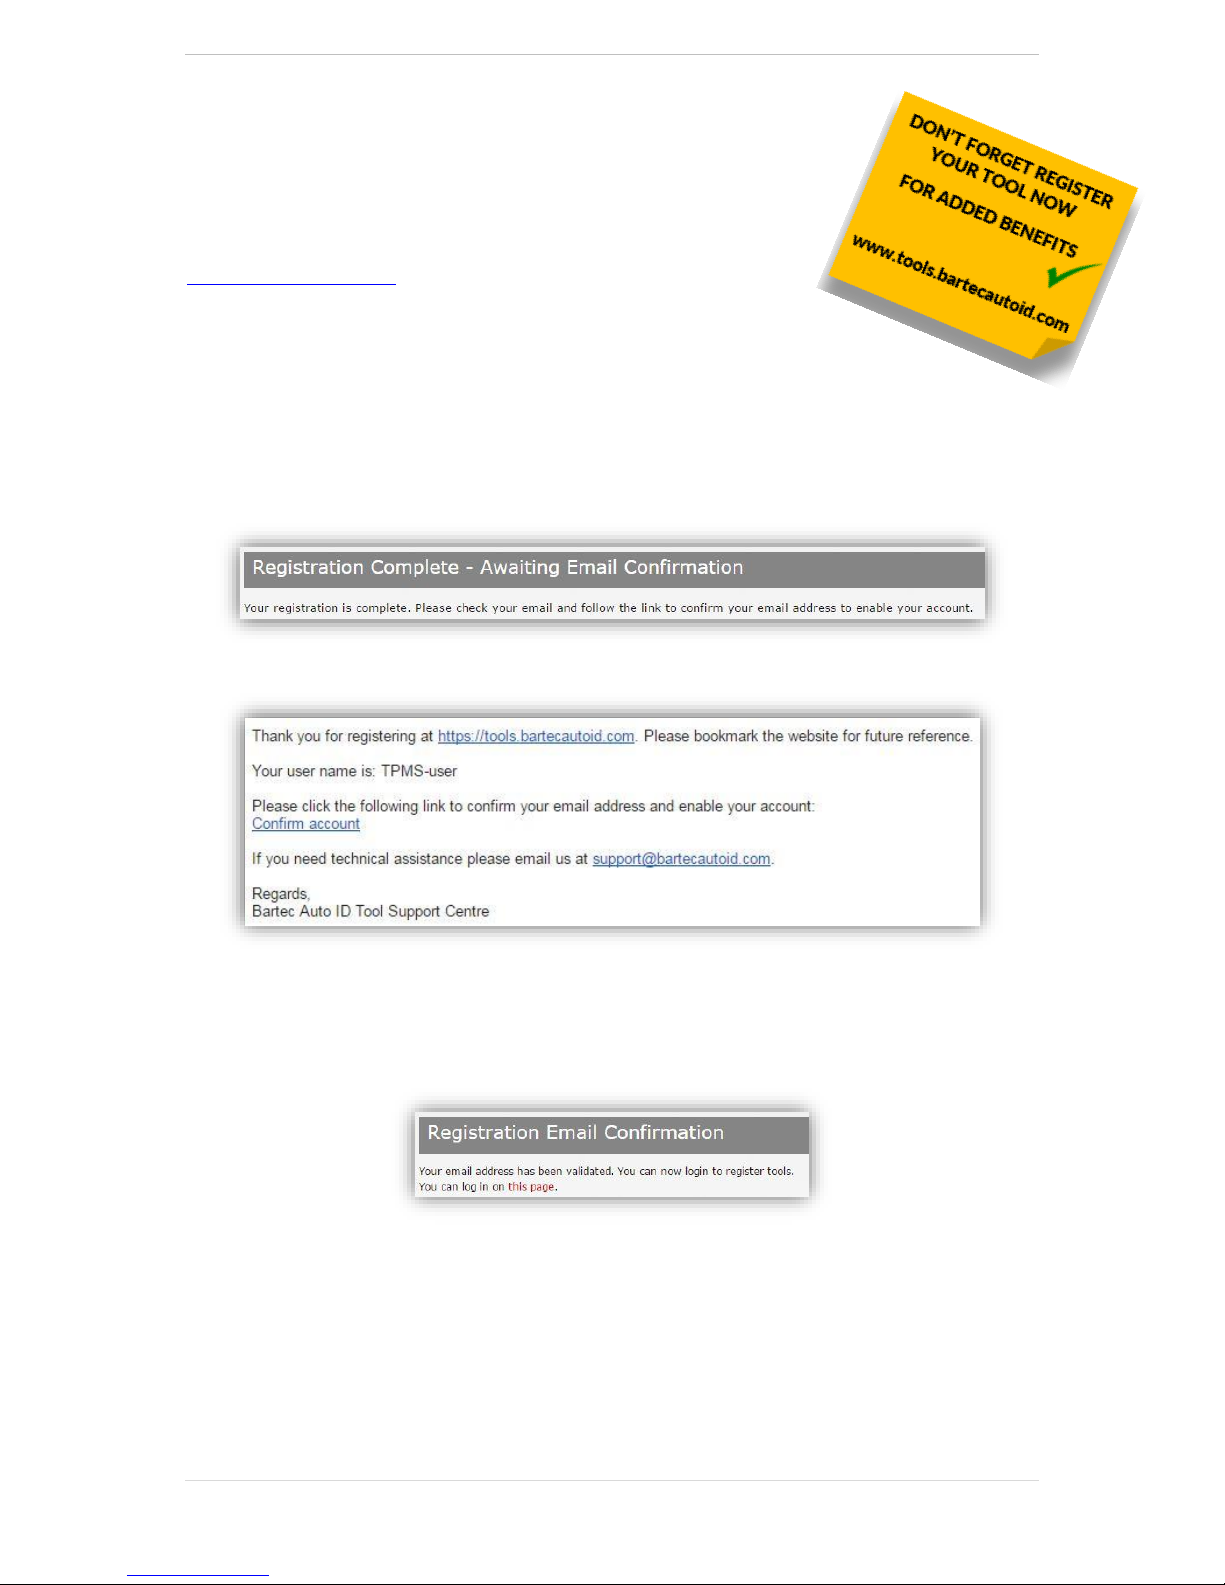
To register a tool, navigate to the Bartec TPMS website at
tools.bartecautoid.com .
The first page is the TPMS Tool Support Center page, showing the TECH300
and the TPMS PAD latest software release versions.
Select ‘Register’ to create a new account. It is important to fill in all fields completely and
accurately. This information will help Bartec remain in contact regarding updates and other
important TPMS information. Choose a username (without a space) and password.
If the details are accepted, this message will show:
The following email should arrive within a few minutes:
When clicking ‘Confirm account’ it will bring the user back to the website and the following
page will show that the registration was successful. Click on ‘this page’ to log in.
Page 17
T e c h 3 0 0 User Guide R.55.2 2017
17 | P a g e
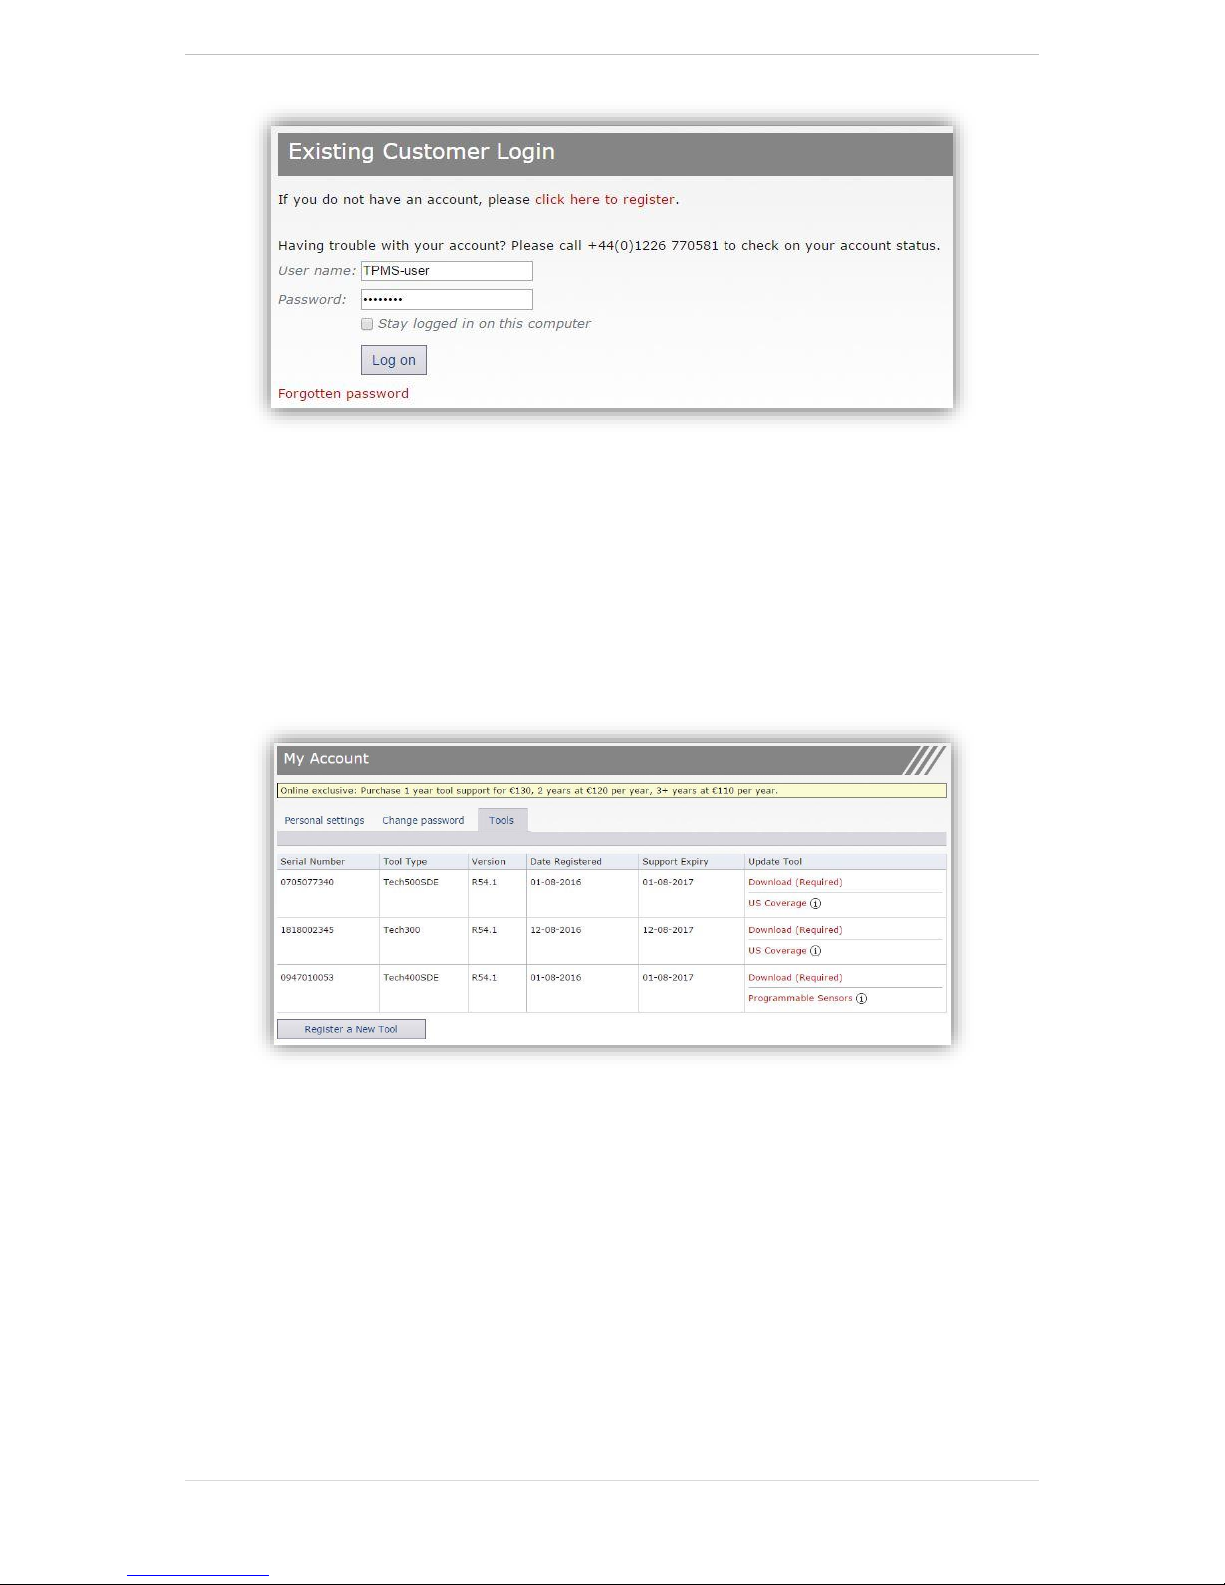
After Login, the personal settings will show, which can be changed as required.
Selecting Tools gives the user the option to register a new tool. The serial number is printed
on the back of the tool or in ‘My Tool’ menu ‘Tool Info’.
Note that this Serial Number is validated by the website and it must be entered correct.
If the number is accepted the user will see the tool listed, along with a Download button which
will allow to get the latest software version:
Selecting ‘Download’ generates a version of the software locked to the serial number only and
gives a standard download message (dependent on the browser) to save the software file. After
saving the file, continue with the update process as described in the following.
Page 18
T e c h 3 0 0 User Guide R.55.2 2017
18 | P a g e
UPDATING THE TOOL VIA USB CABLE
The tool is compatible with PCs running Windows operating systems.
Find a detailed written and video guide at www.bartecautoid.com > TPMS Dropdown menu >
TPMS Support > SW Update Guide.
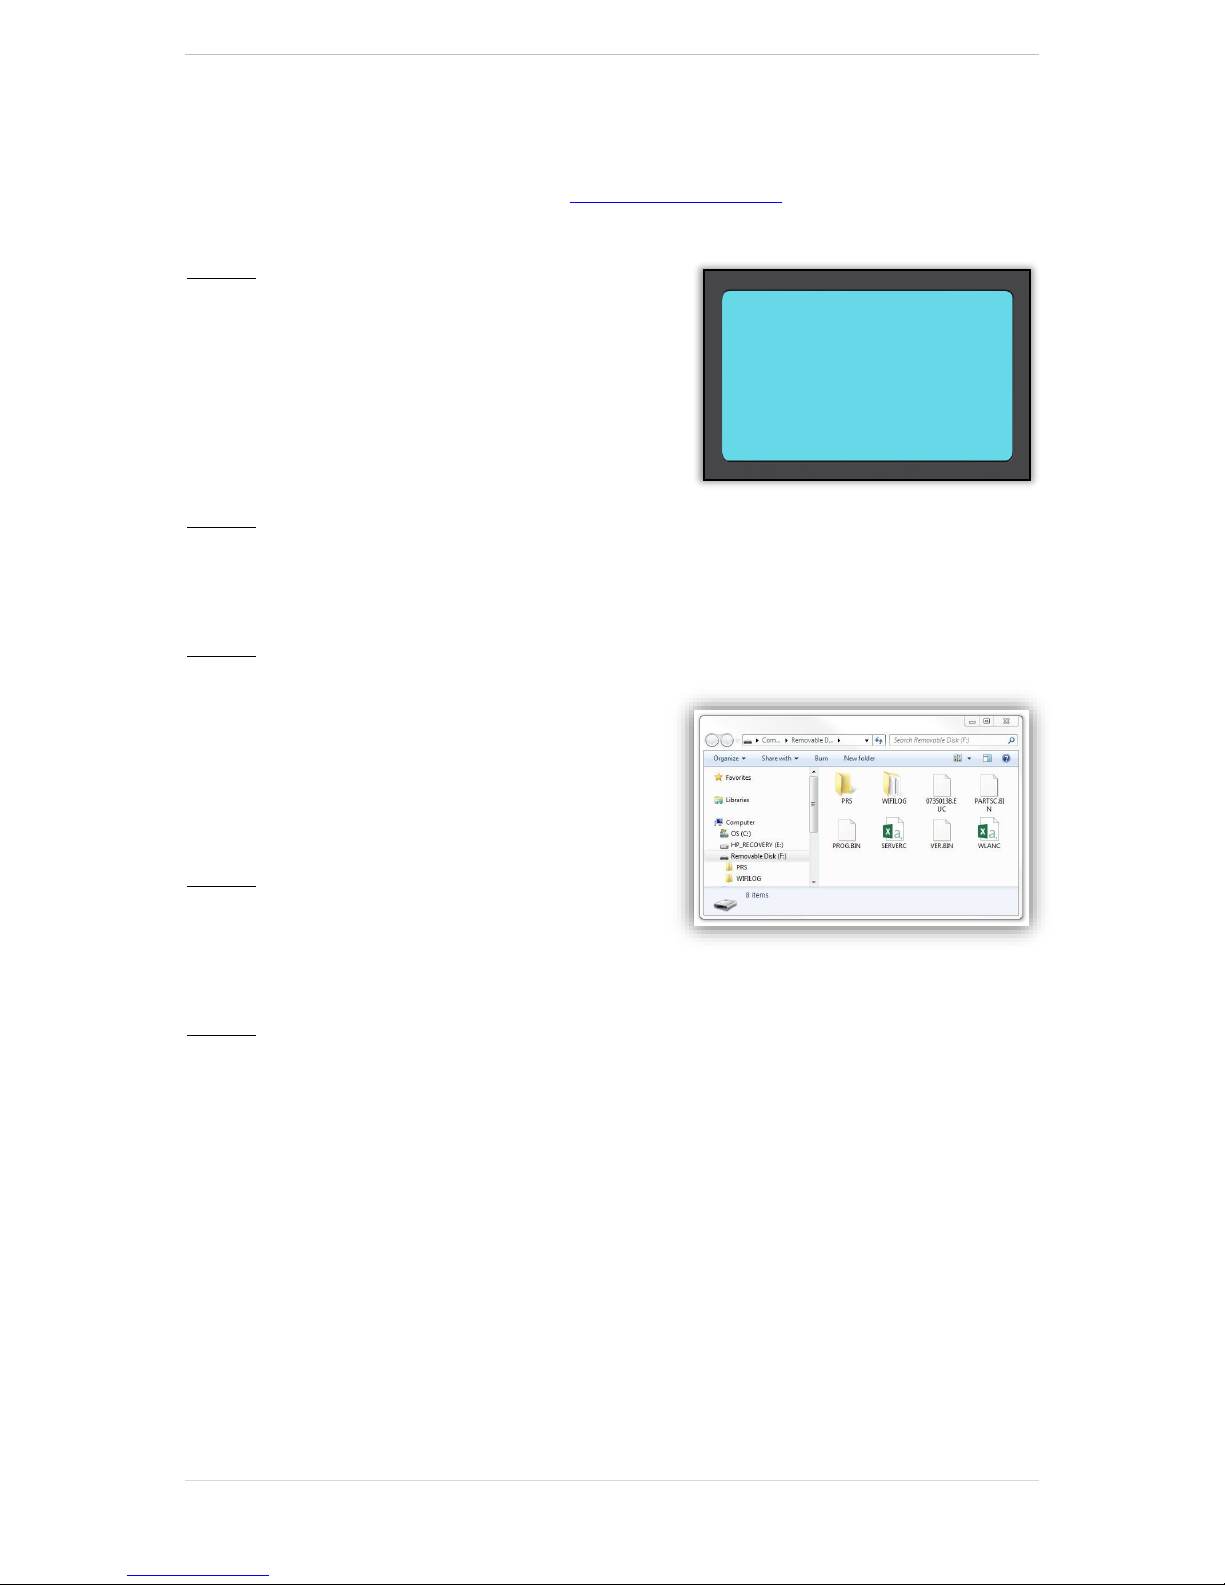
Step 1:
Power on the TECH300, select My Tool from the
Main Menu, select Software Updates and select Enter
Update Mode.
Tool will prompt user to “Insert USB Lead to Transfer
Update Files” and connect to the PC.
Step 2:
The tool should open a window on the computer screen which is seen as a Removable Disk.
OR: To open window, navigate to My Computer and open the removable disk.
Step 3:
Copy and Paste or Drag and Drop the saved Update
file (*.mfu) into the Removable Disk Window.
Note: Every tool needs its own unique update file.
The file can only be used for the specific tool
identified by the serial number.
Step 4:
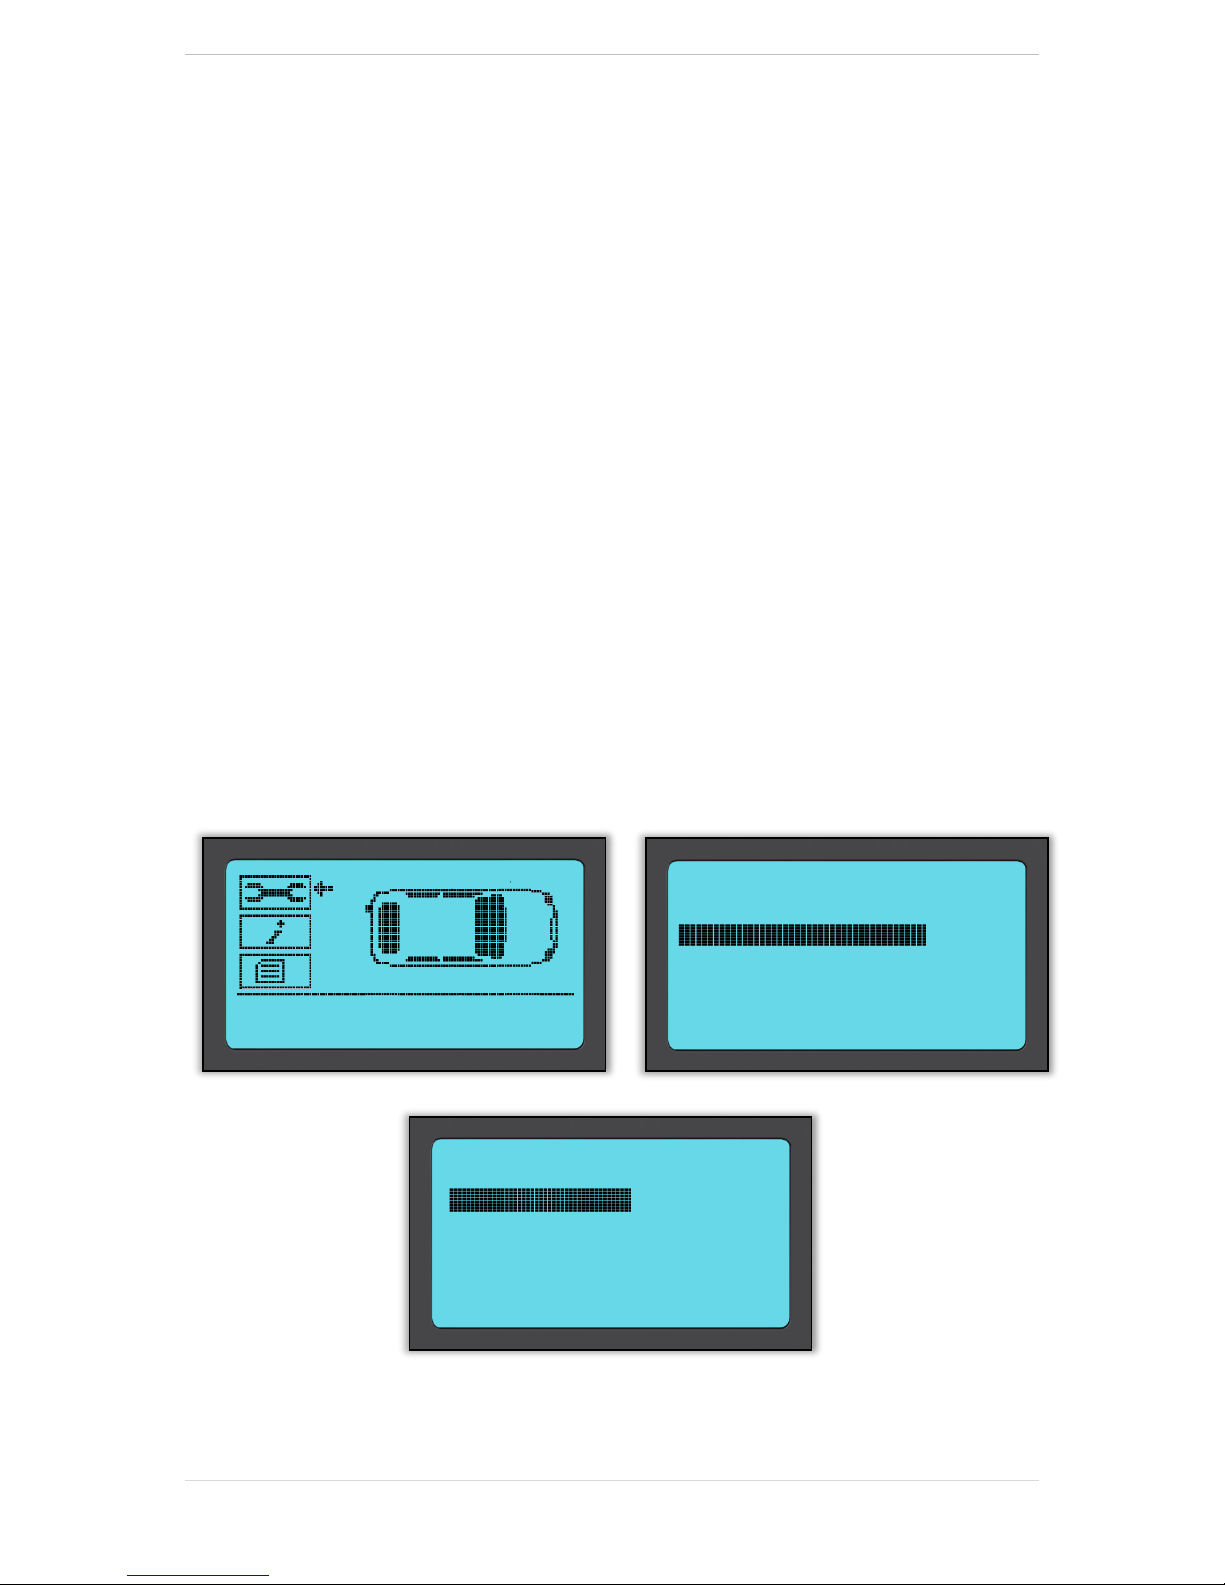
The tool will load the update file to the operating
system.
Once the verification is complete the update finishes and the tool can be unplugged.
Step 5:
The tool is now updated and ready to go. The software version can also be checked in the Tool
Info screen.
Trouble Shooting Tips:
If Windows does not recognize the tool, please check that the USB cable is connected,
that the tool is in update mode, and that there are no unnecessary update files on your PC
available.
Make sure the right update file is used.
Do not delete any files that may already be in the removable disk window.
UPDATE MODE V5
INSERT USB LEAD
TO TRANSFER
UPDATE FILES
Page 19

T e c h 3 0 0 User Guide R.55.2 2017
19 | P a g e
CHANGING FROM EU TO US VEHICLE COVERAGE
To work with USA coverage the user needs to download and install the US coverage software
update. Log on to ‘My Account’ at tools.bartecautoid.com , go to ‘Tools’ and click on the link
for US Coverage .
The file will be downloaded onto your computer.
Connect the TECH300 to the computer via USB cable, click and drag the file from the
computer’s download section onto the removable disk of the TECH300.
Once the update is completed the tool is ready to switch from EU coverage to USA coverage.
Go to My Tool > Switch To USA Coverage and press Enter. A message will be displayed that
the tool is “Preparing update…” and will go into Update mode to install the USA coverage. The
process can take a few minutes.
To switch back to the EU coverage: go to My Tool > Switch to EURO Coverage.
Page 20
T e c h 3 0 0 User Guide R.55.2 2017
20 | P a g e
TPMS DESKTOP
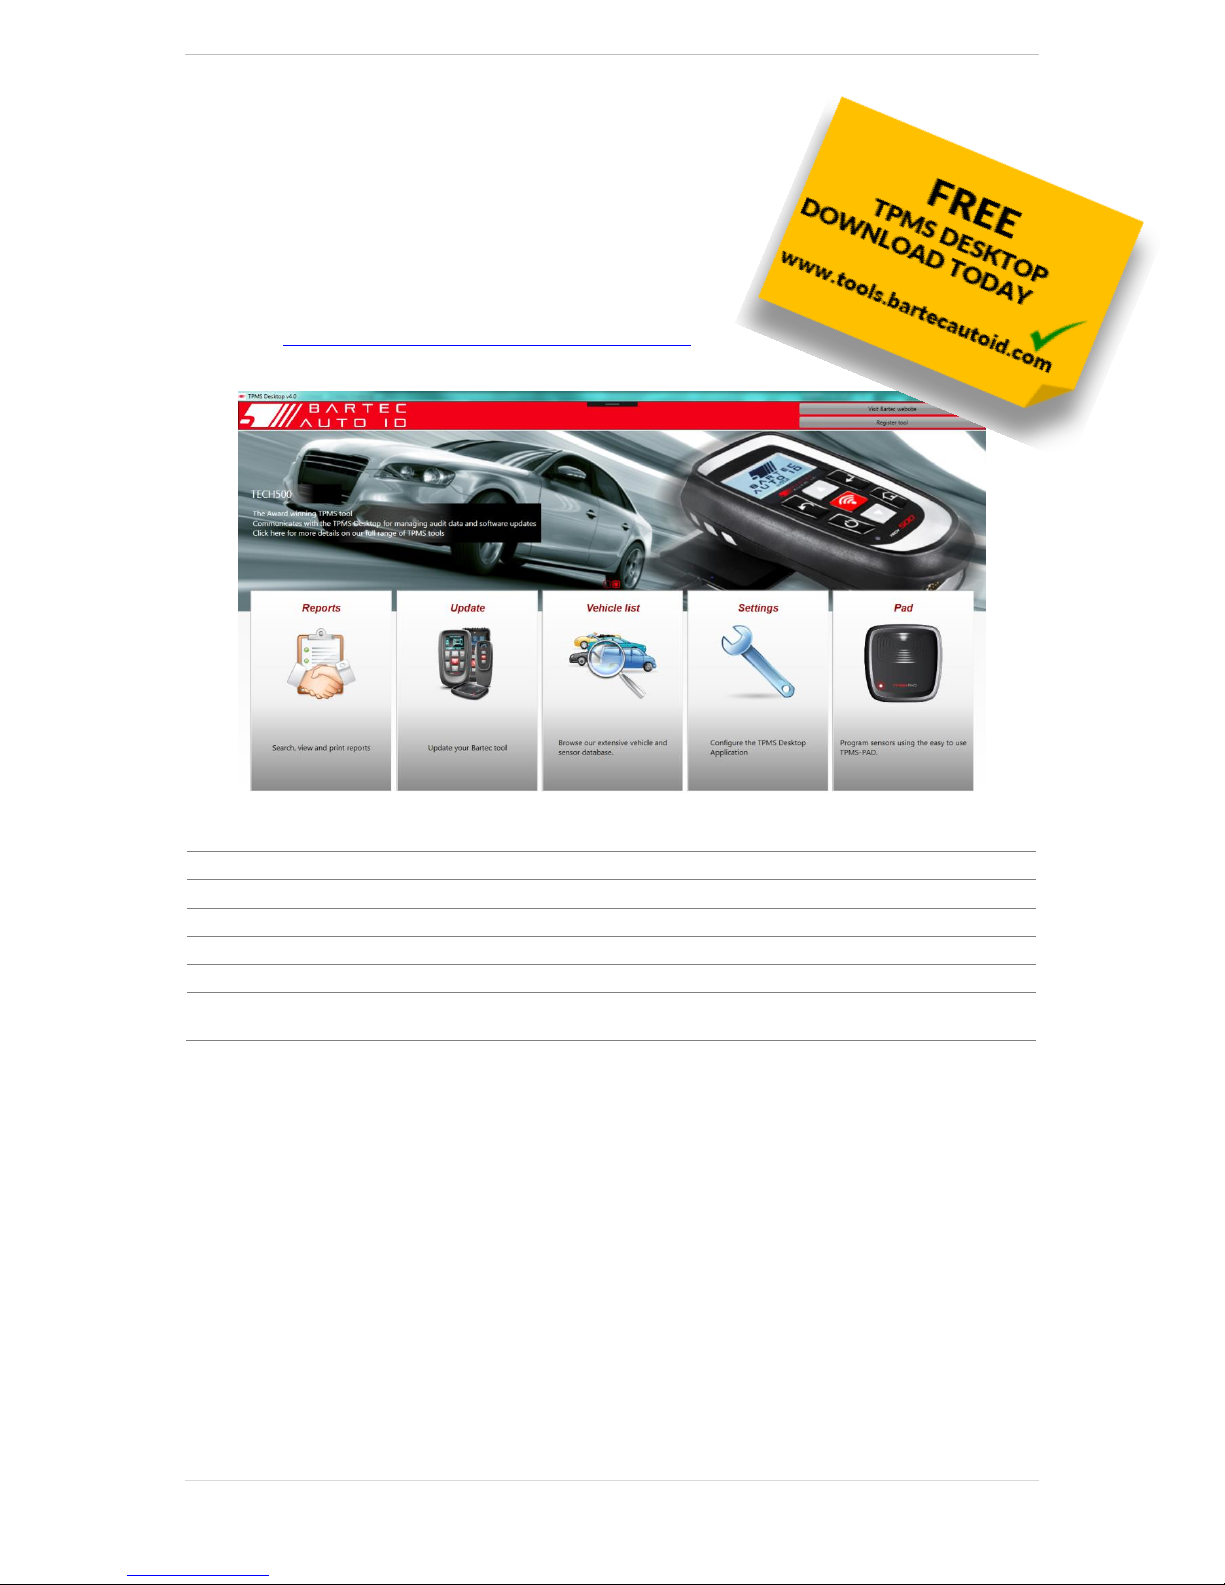
The TPMS Desktop provides revolutionary technology to help
manage Bartec TPMS tools on the computer. The TPMS
Desktop is designed to work with the following Bartec tools;
TECH400, TECH500, TECH300, TAP100/200 and the TPMS
PAD.
Go to https://tools.bartecautoid.com/tpmsdesktop/ to
download your FREE copy now!
Reports
Complete job reports recorded and stored when needed
Update
Automatically retrieve update files from the current registered account
Vehicle List
Lookup TPMS information for a vehicle quickly and easily
Settings
Configure settings for Bluetooth
PAD
Launches the software to run the TPMS PAD
Display
Software available to display vehicle details, tyre pressure and tread depth
readings on a TV or Monitor for Tyre shop garages or waiting rooms
Reports
Search, view and print job reports. This preformatted and detailed record contains the
necessary job information needed for users and customers! To sort or filter reports by date,
make, model and year. Or to print a report and attach it to the invoice as proof of work
completed. Reports can be used to create customer receipts and limit liability.
Update
Register and update the Bartec Tool with the latest software. This feature helps to keep control
of all tools in use and updates them with the most current software available. Simply connect
the tool to a PC with TPMS Desktop installed and click
Update
.
Vehicle List
Browse the extensive vehicle and sensor database. Search by make, model and year to quickly
find the data needed: OBD location, TPMS relearn, sensor information – it’s all there with
TPMS Desktop. Plus, the database is regularly updated.
Page 21
T e c h 3 0 0 User Guide R.55.2 2017
21 | P a g e
System Settings
Configure the TPMS Desktop Application to meet the tyre shop’s needs. Want to connect with
Bluetooth. Connectivity is just a few clicks away with TPMS Desktop.
PAD
Program sensors using the dedicated, easy to use TPMS PAD. Simply connect the TPMS PAD
to the PC using a USB cable to program and test sensors with ease! Copy and create a universal
sensor with
Copy Sensor
and
Create Sensor
– features only available with TPMS Desktop.
Display
Garage/Tyre shop display screen functionality enables the technician to show the customer
their vehicle readings on a TV or monitor in the garage or waiting room. Gives the customer
more confidence and sells more tyres.
The TECH300 will connect wirelessly to the TPMS Desktop using
Bluetooth technology. While this will work easily with most
computers, some have software which can be difficult to setup. In
these rare circumstances, or if the computer does not support Bluetooth, a Bluetooth adaptor
be used. Additional information on how to install an adaptor can be found on the Bartec
support website: tools.bartecautoid.com
SETTINGS
To be able to use the TECH300 with Bluetooth, the tool first needs to be configured. Go to
My Tool > Networks > Bluetooth and choose ‘Enabled’.
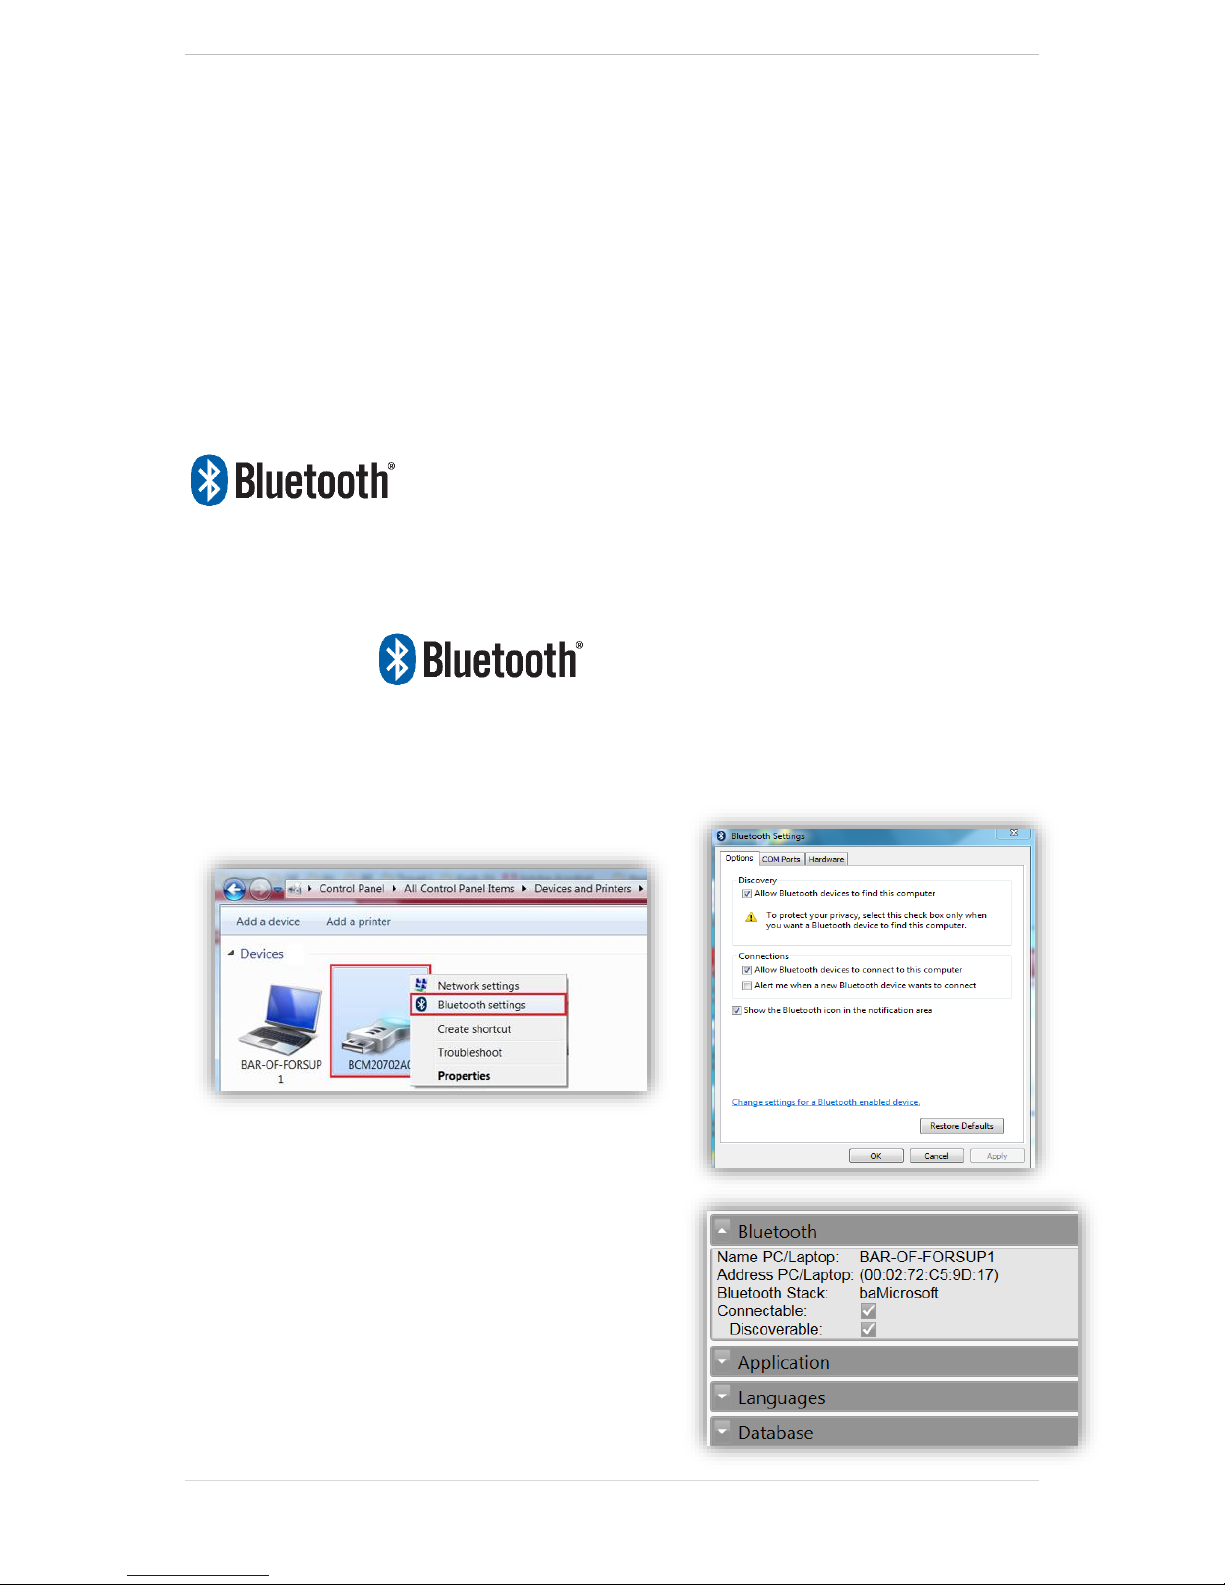
If there are problems using the built-in Bluetooth, the user can use a USB dongle. Select
Devices and Printers in Control Panel.
Right click on the Bluetooth dongle icon and click on
Bluetooth settings. Tick the boxes as seen on the
Options tab above. Press OK when finished.
Start the TPMS Desktop application and go to
Settings. Open the Bluetooth section: the PC/Laptop
should be connectable and discoverable for the
TECH300.
Page 22
T e c h 3 0 0 User Guide R.55.2 2017
22 | P a g e
APPENDIX
APPENDIX A: Vehicle Identification Number (VIN)
When using the TECH300 tool, it is important for the user to verify the Model Year to help
insure looking for that proper sensor and using the proper vehicle
COMs when necessary.
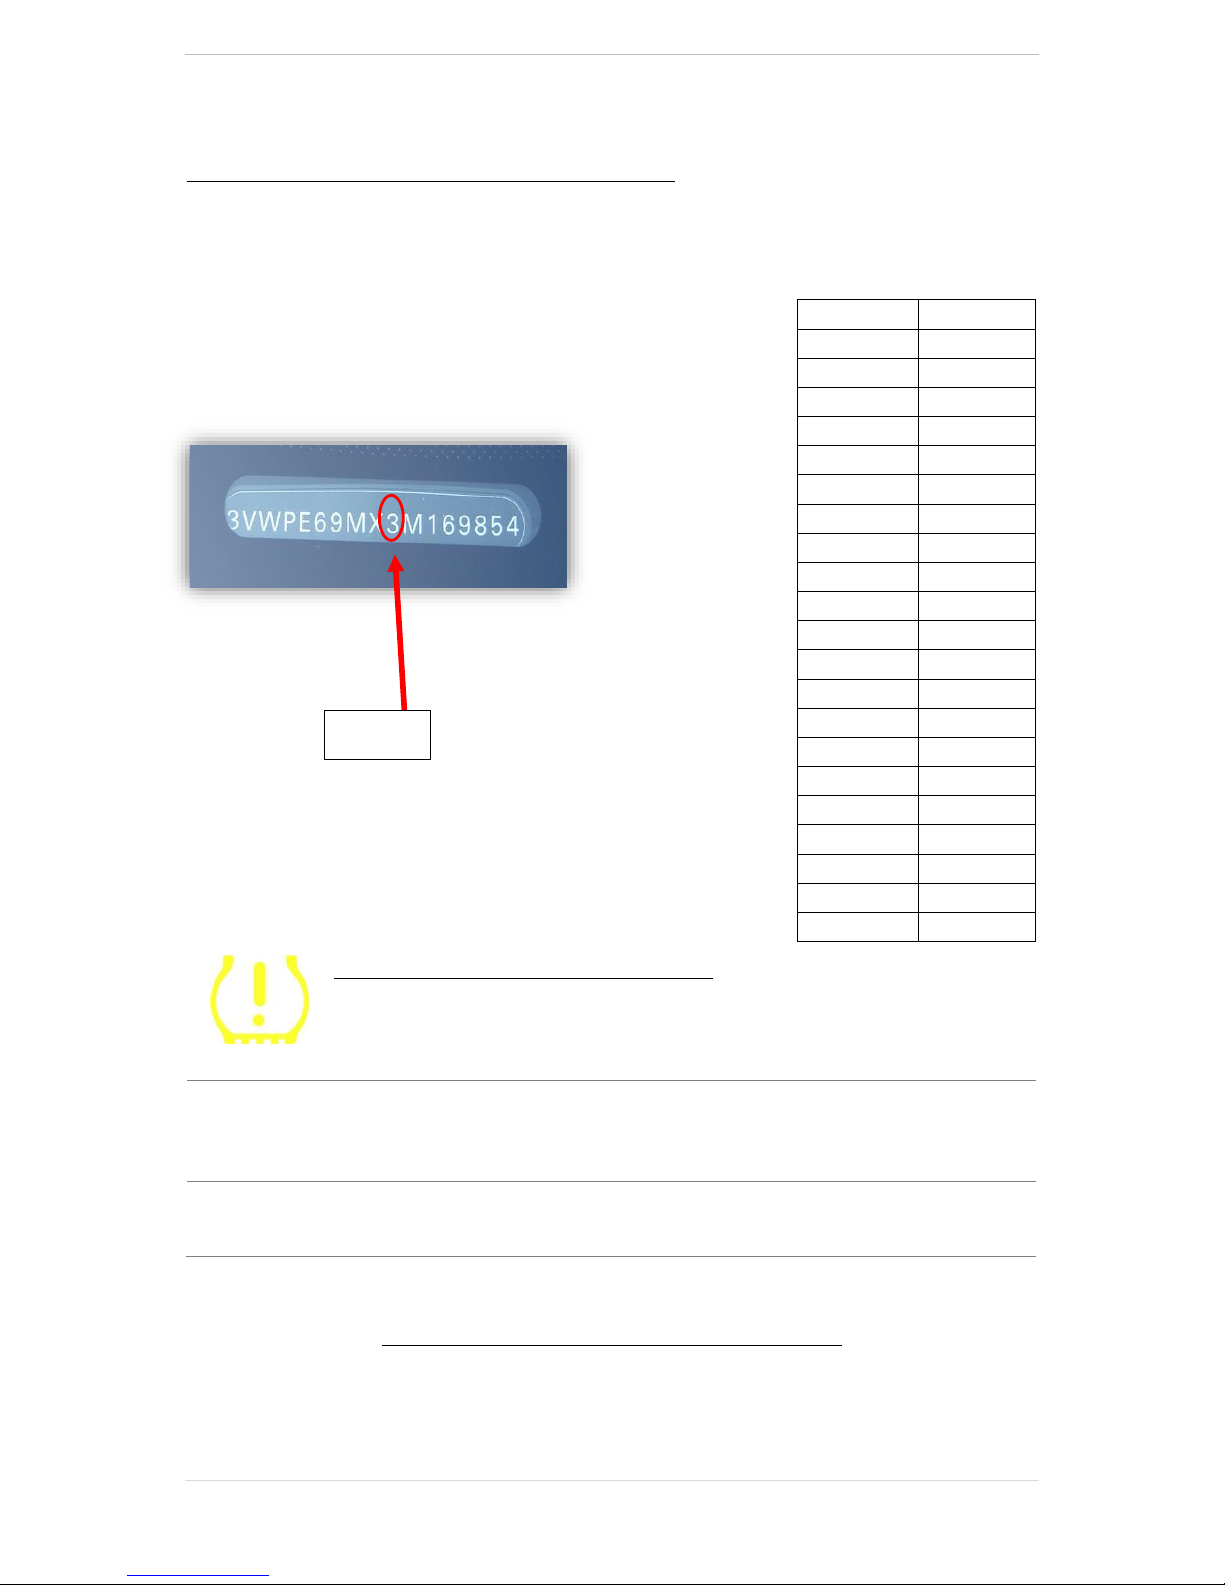
By using the vehicles VIN and locate the 10th digit from the left
the user can in most cases accurately determine that vehicle’s
Model Year. Take that digit and reference the chart on this sheet.
This will be the Model Year which needs to be selected on the tool.
APPENDIX B: TPMS SYSTEM REVIEW
When cycling the ignition for off to run, the TPMS tell-tale should come on,
and go off. This would indicate a system with no fault present.
Solid Light: Pressure Problem
Check the tyre pressures, and adjust to placard.
NOTE: Some vehicles are equipped with sensors in
the spare. Also, with some vehicles, over pressure
may turn on the light.
Flashing Light: System Problem
System problems can range from faulty sensor(s) to
sensors on the vehicle that haven’t been learned to
that vehicle.
APPENDIX C: MODES and MODE CHANGING
Sensors can have many different “modes” when they have been read, such as Learn, Tool LF,
YD Sleep, YD Rest, Hi Norm Dly. Some of those are called sleep mode to preserve battery life.
10th Digit in
VIN
Year
W
1998
X
1999
Y
2000
1
2001
2
2002
3
2003
4
2004
5
2005
6
2006
7
2007
8
2008
9
2009
A
2010
B
2011
C
2012
D
2013
E
2014
F
2015
G
2016
H
2017
J
2018
K
2019
3 = 2003
Page 23

T e c h 3 0 0 User Guide R.55.2 2017
23 | P a g e
Mostly, these modes are not important because the sensor will be supplied already in the
correct mode to use. But for some sensors made by Continental it is important that the mode
is displayed as “Park”, as otherwise it will not work on the vehicle.
The TECH300 tool has the ability to perform the necessary mode change. If a sensor is shown
as “Ship”, “Test” or “Off” and the relearn toolkit provides the option “Set Sensor to Park Mode”,
please use this option to change the sensor mode into the correct one:
Go to “Relearn” and select vehicle (MMY).
Press enter when relearn procedure shows.
Select the spanner in the upper left corner with the Up/Down buttons. Press Enter.
Select “Set Sensor to Park Mode”, press Enter.
Go to the wheel, hold the tool near the sensor and press “Test”.
Repeat for each wheel.
Start the Relearn procedure.
Also, some sensors are supplied in a mode where they cannot be read by the tool unless they
are pressurized in a wheel. Some examples would be replacement sensors bought from a Ford
dealership, and some Mitsubishi Continental sensors.
APPENDIX D: COMMS ERROR TROUBLESHOOTING
If a problem or error occurs during the COMMS process, follow the steps below before calling
customer support.
Check vehicle ignition
Vehicle ignition must be in the RUN position in order for vehicle COMMS process to complete.
Check cable to tool connection
Insure the cable is connected at the DB15 and thumb screws are finger tight.
Check cable connection at vehicle
Make sure OBDII connection is good.
Verify Make, Model, and Year
COMMS can change from Model to Model, and Year to Year. Verify the tool is set-up to the
proper MMY.
Verify tool power level
If the tool has a low battery charge, this may affect the COMMS process. Charge tool and try
again.
TECHNICAL SPECIFICATION
Power Supply
Lithium Polymer rechargeable battery, not user serviceable
Max power consumption
1.5W Schrader TPM, 0.5W all others
Display
LCD single colour, graphic, resolution 128x64
Keyboard
7 keys, dust, water and grease-resistant
Input/output
Mini-B style USB used to Connect to PC for firmware
update and audit file download.
Vehicle connection
15 way D connector on tool connects cable with OBDII
connector (optional) on the other end
Working environment
Temperature 0°C - 45°C, Humidity: 20-55%
Storage environment
Temperature 10°C - 50°C, Humidity: 20-60%
Dimensions
187mm x 107mm x 47mm
Weight(including batteries)
410g
Page 24
T e c h 3 0 0 User Guide R.55.2 2017
24 | P a g e
BARTEC PRODUCT RANGE & ACCESSORIES
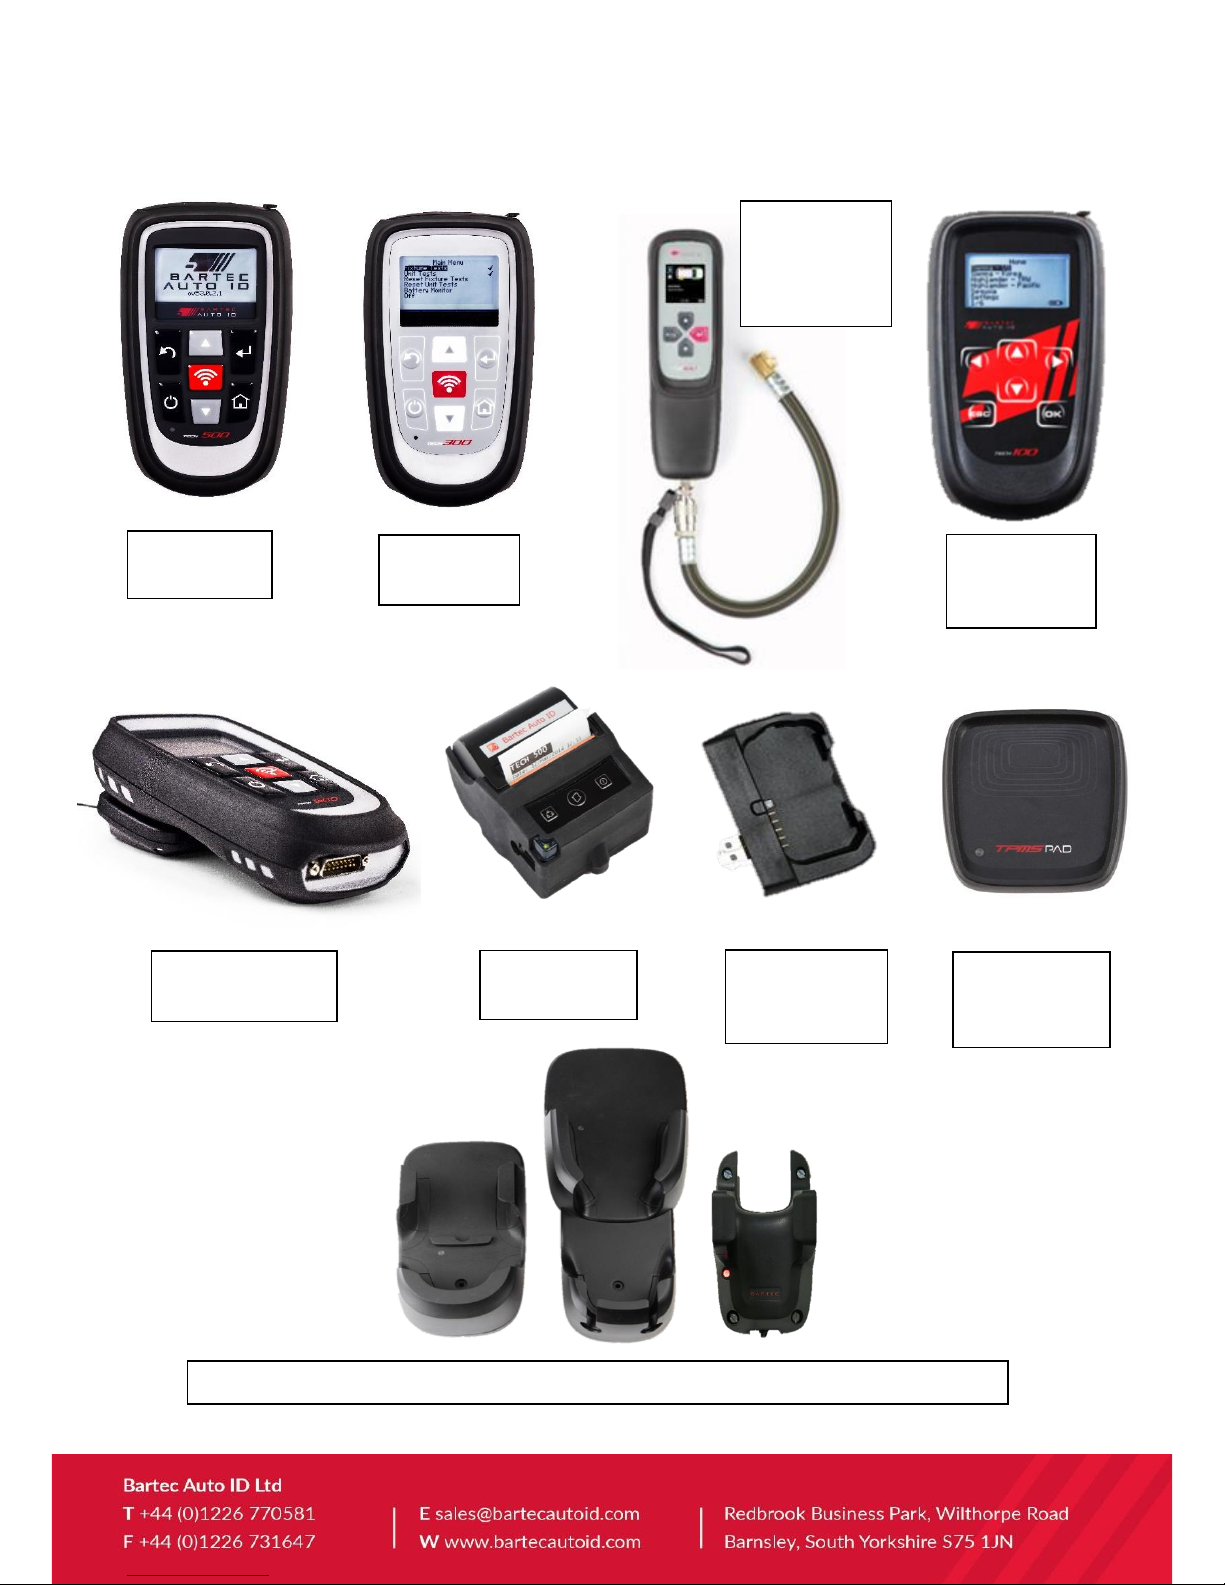
TPMS Tool
TECH500
TPMS Tool
TECH300
Tread Depth
and Pressure
Tool TAP100
& TAP200
ACCESSORIES
TPMS sensor
programming
PAD
Audit Report
Mini Printer
CUB Adapter
programming
Fixture
Wall mountable wireless charging stations for the workshop or mobile working
Diagnostics
Tool
TECH100
TPMS wireless
charging PAD
 Loading...