

Page 1
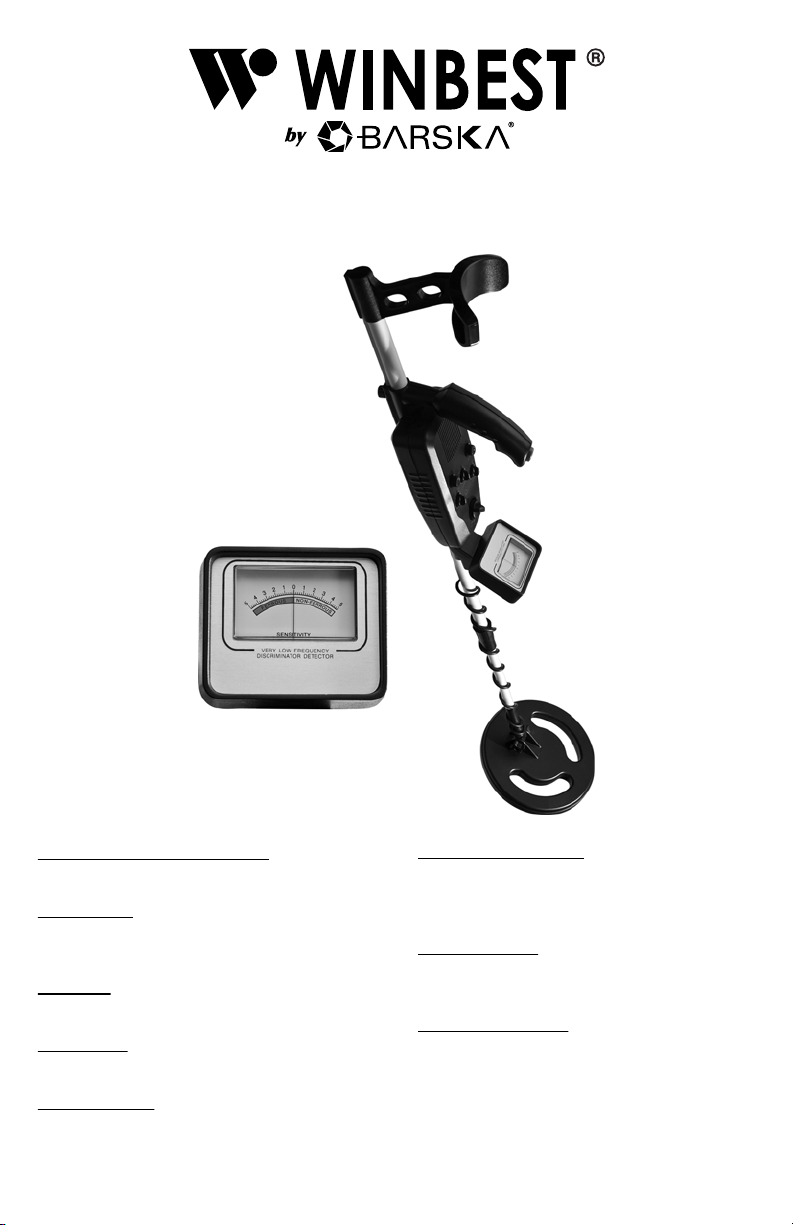
Master Edition Metal Detector
Three-Tone Audio Discrimination
Distinctive tones for different types of metals
Analog Meter
Shows the probable type of metal being
detected
Auto Tune
Tune your detector quickly for accuracy
Arm Support
Operate your detector comfortably
Adjustable Stem
Adjust the detector’s length for comfortable use
BC194 6/11
Waterproof Search Coil
Lets you use the detector to search under
water. Note: The search coil is waterproof, but
the detector’s control housing is not waterproof
Headphone Jack
Lets you connect headphones (not supplied) to
the detector
Low Battery Indicator
Lets you know when it is time to replace the
batteries
Operates on two 9V alkaline batteries (not
supplied)
Page 2

ˆ
Contents
Features .................................................................................................................................. 3
Treasure Hunter’s Code of Ethics ..................................................................................... 3
Preparation ............................................................................................................................. 4
Assembling the Detector ................................................................................................... 4
Installing Batteries ............................................................................................................. 4
Using Headphones ............................................................................................................ 5
Listening Safely ......................................................................................................... 5
Traffic Safety .............................................................................................................. 6
A Quick Look at Your Metal Detector ................................................................................... 6
Operation ................................................................................................................................ 7
Preparing the Detector ...................................................................................................... 7
Turning On the Detector ............................................................................................ 7
Tuning the Detector ................................................................................................... 7
Testing and Using the Detector ......................................................................................... 7
Indoor Testing ............................................................................................................ 7
Outdoor Testing and Use ........................................................................................... 8
Fine-Tuning the Detector .................................................................................................. 9
Adjusting Sensitivity ................................................................................................... 9
Adjusting Ground ....................................................................................................... 9
Adjusting Discrimination ............................................................................................. 9
False Signals ..................................................................................................................... 9
Detection Hints ................................................................. ... ............................................ 10
Pinpointing a Target ............................................................ ... ......................................... 10
Troubleshooting ................................................................................................................... 11
Care ....................................................................................................................................... 11
Warranty................................................................................................................................. 12
2
Page 3

ˆ
Features
With your metal detctor, you can hunt for
coins, relics, jewelry, gold, and silver just
about anywhere. The Metal Detector is
versatile and easy to use. Its features
include:
Three-Tone Audio Discrimination
sounds distinctive tones for different types of
metals, to make target identification easier.
Analog Meter
metal being detected.
Auto Tune
quickly for accuracy.
Arm Support —
your detector comfortably.
Waterproof Search Coil
detector to search under water. (The search
coil is waterproof, but the detector’s control
housing is not waterproof.)
Adjustable Stem
detector’s length for comfortable use.
Headphone Jack
headphones (not supplied) to the detector.
Low Battery Indicator
when it is time to replace the batteries.
— shows the probable type of
— lets you tune your detector
lets you carry and operate
— lets you use the
— lets you adjust the
— lets you connect
— lets you know
—
TREASURE HUNTER’S
CODE OF ETHICS
All treasure hunters might be judged by the
example you set. Here are a few basic rules
you should follow while using your detector.
• Always get permission before searching
any site.
• Respect the rights and property of
others.
• Observe all national, state, and local
laws while treasure hunting.
• Never destroy historical or
archaeological treasures. If you are not
sure about an object you have found,
contact a museum or historical society
in your area.
• Leave the land and vegetation as it was.
Fill in any holes you may dig.
• Use your detector only in safe areas.
• Dispose of any junk you find, only in
approved areas. Do not leave it for the
next treasure hunter to find.
Features
3
Page 4
Preparation
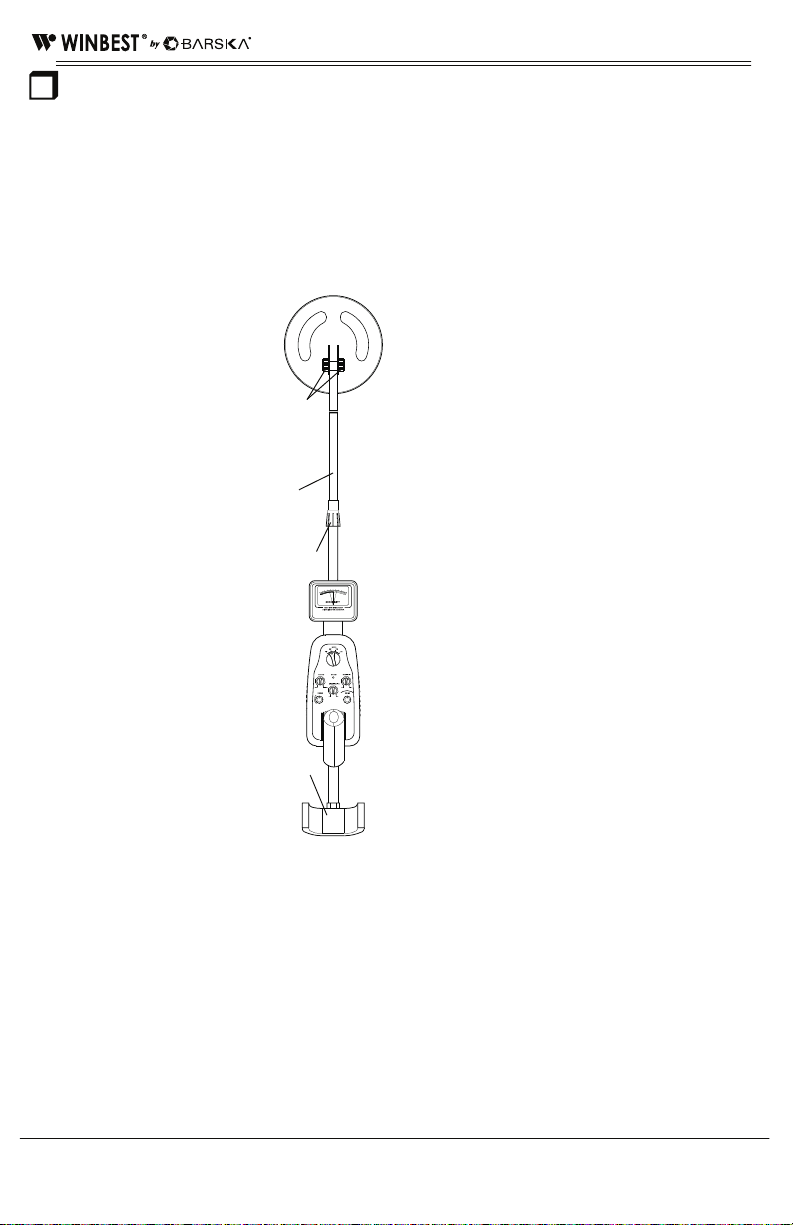
ASSEMBLING THE
DETECTOR
Assembling your detector is easy and
requires no special tools. Just follow these
steps.
1. Turn the stem’s lock
nut clockwise until it
loosens.
2. Lengthen or shorten
the stem so when
you stand upright
with the detector in
your hand, the search
coil is level with and
1
/2 to 2 inches
about
above the ground
with your arm relaxed
at your side.
3. Turn the stem’s lock
nut counter-clockwise
to lock it in place.
4. Unscrew the knobs
on the search coil
and remove the
knobs and
connector. Insert the
stem and align the
holes on the search
coil bracket and the stem.
Push the connector through the holes,
then replace and tighten the knobs.
5. Wind the search coil cable around the
stem. Leave enough slack in the cable
to let you adjust the search coil when
you are hunting on uneven ground.
6. Insert the search coil’s plug into the
search coil jack on the detector’s control
Search
Coil
Knobs
Stem
Lock Nut
Arm
Support
housing so the pins on the plug are
aligned with the holes in the jack.
Cautions:
• The search coil’s plug fits into the
connector only one way. Do not force
the plug or you could damage it.
• To disconnect the search coil’s cable
from the detector, grasp the plug and
pull it out of the connector. Never pull
on the cable.
7. Loosen the knob at the search coil’s
end, then adjust the search coil to the
desired angle. (The search coil should
be parallel with the ground.) Tighten the
knob just enough to keep the search coil
from rotating or wobbling.
Caution:
coil or use tools such as pliers to tighten
it.
8. Loosen the knob at the base of the
handle, insert the arm support, and
tightenthe knob.
Do not overtighten the search
INSTALLING BATTERIES
Your detector requires two 9V alkaline
batteries (not supplied) for power.
Cautions:
• Use only new batteries of the required
size and recommended type.
• Do not mix old and new batteries,
different types of batteries (standard,
alkaline, or rechargeable), or
rechargeable batteries of different
capacities.
4
Preparation
Page 5
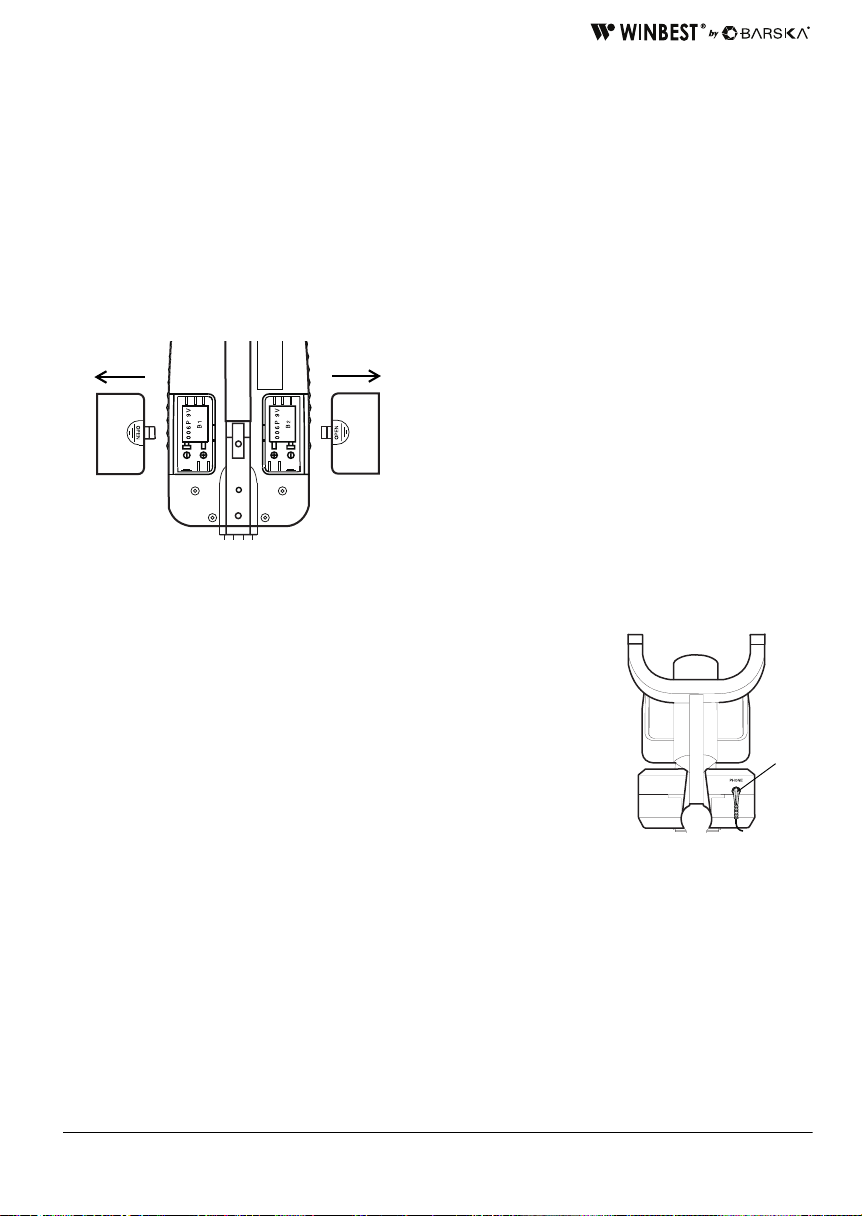
1. If the detector is on, turn
PHONE
Jack
Note:
When you turn the mode switch to
OFF
, the LOW BATT indicator flashes
MODE
to
OFF
.
once.
2. Press the right battery compartment
cover’s tab and slide the cover off in the
direction of the arrow.
Notes:
• For better life, exchange the two batteries periodically.
• You can extend battery life by using
headphones, which require less power
than the built-in speaker. See “Using
Headphones.”
3. Place a 9-volt battery into the battery
compartment on top of the ribbon,
matching the polarity symbols (+ and –)
marked inside.
4. Replace the right battery compartment
cover.
5. Press the left battery compartment
cover’s tab and slide the cover off in the
direction of the arrow.
6. Place a 9-volt battery into the battery
compartment on top of the ribbon,
matching the polarity symbols (+ and –)
marked inside.
7. Replace the left battery compartment
cover.
Warning:
Dispose of old batteries promptly
and properly. Do not burn or bury them.
Caution:
If you do not plan to use the detector for a week or more, remove the batteries.
Batteries can leak chemicals that can destroy electronic parts.
Preparation
If the LOW BATT indicator lights during normal use or the detector does not function
properly, replace the batteries. If it still does
not function properly, you might need to reset the detector.
USING HEADPHONES
You can connect a pair of stereo headphones (not supplied) to the detector so you
can listen to it privately. Using headphones
also saves battery power and makes it easier
to identify subtle changes in the sounds you
hear, for better detection results. Your local
RadioShack store has a wide selection of
headphones.
To connect headphones to the detector, insert the
headphones’
inch plug into the
PHONE
jack on the
side of the control
housing.
The detector’s internal speaker disconnects when you connect headphones.
Listening Safely
To protect your hearing, follow these guidelines when you use headphones.
• Set the volume to the lowest setting
before you begin listening. After you
begin listening, adjust the volume to a
comfortable level.
1
/8-
5
Page 6
• Do not listen at extremely high volume
Traffic Safety
levels. Extended high-volume listening
can lead to permanent hearing loss.
Do not wear headphones while operating a
motor vehicle or riding a bicycle. This can
• Once you set the volume, do not
increase it. Over time, your ears adapt
create a traffic hazard and could be illegal in
some areas.
to the volume level, so a volume level
that does not cause discomfort might
still damage your hearing.
Even though some headphones let you hear
some outside sounds when listening at
normal volume levels, they still can present
a traffic hazard.
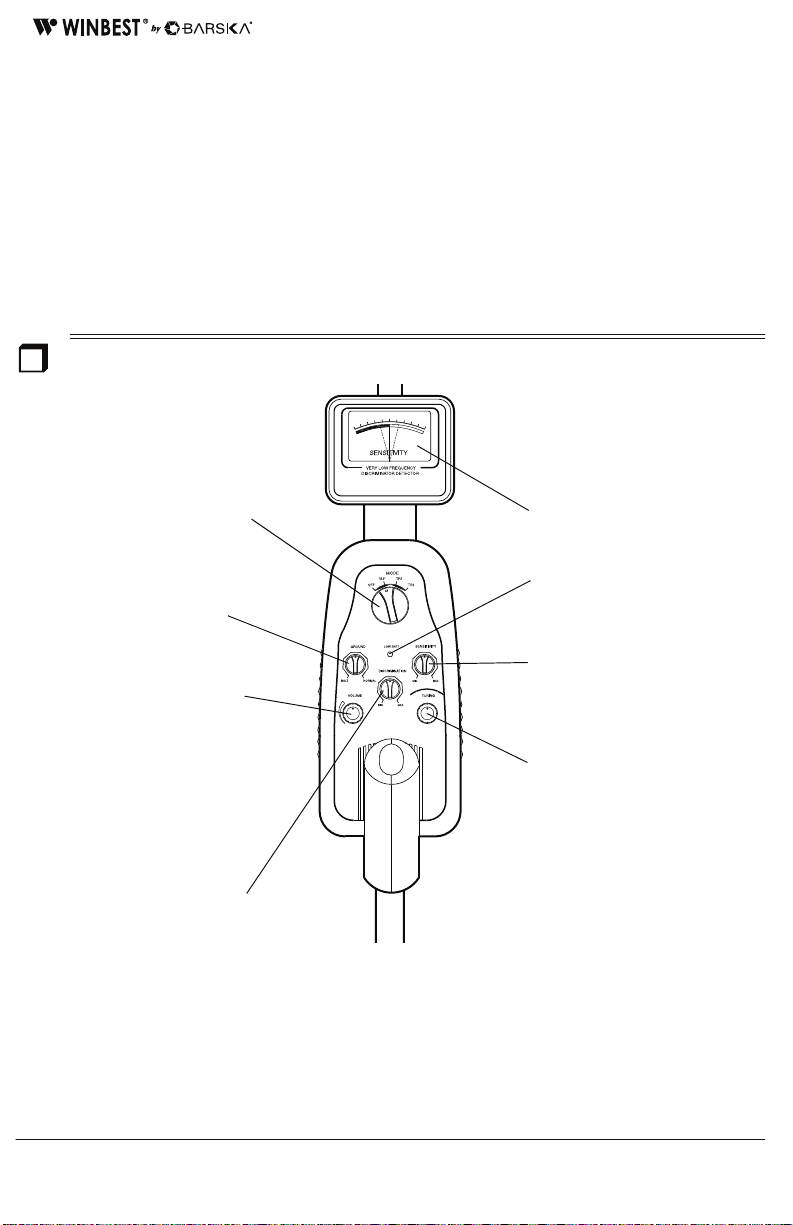
A Quick Look at Your Metal Detector
MODE — lets you select from
OFF, VLF, TR1, TR2. (See “Turning On the Detector” on Page 7.)
GROUND — compensates for
false signals from mineralized
soil. (See “Adjusting Ground”
on Page 9.)
VOLUME — lets you adjust the
volume of alert tones.
DISCRIMINATION — lets you adjust the metal detector’s ability
to distinguish between different
types of metal. (See “Adjusting
Discrimination” on Page 9.)
Analog Meter
LOW BATT Indicator
SENSITIVITY — lets you adjust
the detection depth. (See “Adjusting Sensitivity” on Page 9.)
TUNING — adjusts the balance
between the receiver and transmitter. (See “Tuning the Detector” on Page 7.)
6
A Quick Look at Your Metal Detector
Page 7

ˆ
Operation
Your metal detector distinguishes between
ferrous and non-ferrous metals. Ferrous
metals contain iron, while non-ferrous
metals such as gold, silver, copper,
platinum, aluminum, lead, and zinc do not.
When the detector senses a metallic object,
the meter reading changes and the detector
sounds one of three tones. The tone depends on what metal is detected. The higher
the tone’s pitch, the stronger the detection.
PREPARING THE
DETECTOR
Turning On the Detector
Hold the detector in a comfortable position,
MODE
then rotate
VLF (Very Low Frequency)
GROUND
and
Page 9 and “Tuning the Detector” below.)
TR1 (Transmit 1)
ences in metals, such as iron and gold. The
difference between iron and gold shows on
the meter (iron in the ferrous section, gold in
the non-ferrous section).
TR2 (Transmit 2)
between metals, such as aluminum and gold
(see “Adjusting Discrimination” on Page 9).
Tuning the Detector
TUNE
fine-tunes the balance between the detector’s receiver and transmitter circuitry to
provide consistent pointer and tone indications. Follow these steps to set
1. Rotate
tion.
MODE
2. Set
to the desired position.
— to adjust
. (See “Adjusting Ground” on
— to detect extreme differ-
— to detect finer distinctions
TUNE
.
VOLUME
to the 10 o’clock posi-
VLF
to
.
TUNE
3. Set
4. Hold the search coil at least 1 foot away
As you search, you can fine-tune the detector using the other controls (see “Fine-Tuning
the Detector” on Page 9).
Note:
any time during operation to automatically return the pointer to the center of the analog
meter.
GROUND, DISCRIMINATION
SENSITIVITY
from the ground and any metal object,
hold down the red button on the handl e
and slowly rotate
meter pointer resets at or near 0.
Press the red button on the handle at
to mid-range.
TUNE
until the analog
, and
TESTING AND USING THE
DETECTOR
To learn how the detector reacts to different
metals, you should test it before you use it
the first time. You can test the detector indoors or outdoors.
Indoor Testing
1. Remove any watches, rings, or other
metal jewelry you are wearing, then
place the detector on a wooden or plastic table.
2. Adjust the search coil’s angle so the flat
part faces the ceiling.
Note:
Never test the detector on a floor
inside a building. Most buildings have
metal of some kind in the floor, which
might interfere with the objects you are
testing or mask the signal completely.
MODE
3. Set
4. Move a sample of the material you want
the detector to find (such as a gold ring
to
TR1
.
Operation
7
Page 8

or a coin) about 2 inches above the
search coil.
Notes:
• The search coil will not detect without
motion. You must move the object since
you are not sweeping with the detector
at this time.
Search Coil Sweeping Hints:
• Never sweep the search coil as if it
were a pendulum. Raising the search
coil while sweeping or at the end of a
sweep causes false readings.
• Sweep slowly; hurrying makes you
miss targets.
• If you are using a coin, the detector
detects it more easily if you hold it so a
flat side (not the edge) is parallel with
the flat side of the search coil.
If the detector detects the material, the pointer moves to
FERROUS
NON-FERROUS
or
while the detector determines the type of
metal it is detecting. If it detects non-ferrous
metal, it also sounds a tone.
If the detector does not detect the material,
check the LOW BATT indicator and verify
that the search coil is properly connected. Also, you might need to fine-tune the detector
See “Fine-Tuning the Detector” on Page 9
Outdoor Testing and Use
1. Find an area on the ground outside
where there is no metal.
2. Place a sample of material you want the
detector to find (such as a gold ring or a
coin) on the ground. (If you are using
valuable metal such as gold to test the
detector, mark the area where you place
the item, to help you find it later. Do not
place it in tall grass or weeds.)
MODE
3. Set
4. While holding the search coil level about
1–2 inches above the ground, slowly
move the search coil over the area
where you placed the sample, sweeping
the search coil in a side-to-side motion.
to
TR1
.
If the detector detects the item, it sounds
a tone and the pointer moves to the type
of metal it found. When you detect
metal, switch
MODE TR1
to
TR2
to deter-
mine the quality of the metal.
If the detector does not detect the mate-
rial, make sure you are moving the
search coil correctly.
Notes:
• The detector responds with a strong
signal when it detects most valuable
metal objects. If a signal does not
repeat after you sweep the search
coil over the target a few times, the
target is probably junk metal.
• False signals can be caused by areas
containing large amounts of trash,
electrical interference, or large irregular pieces of junk metal. False signals
are usually broken or non-repeatable.
5. Try finding other metal in the area.
When you find a metal item, wait a few
seconds after the tone stops before continuing to allow the detector time to reset
(or, press the red button on the handle to
return the pointer to the center of the
analog meter).
8
Operation
Page 9

FINE-TUNING THE
DETECTOR
After you become familiar with how your detector works, you can fine-tune it to make it
less sensitive to interference and more selective in what it finds.
Adjusting Sensitivity
To adjust the search coil’s ability to detect
objects at different depths in the soil, rotate
SENSITIVITY
between
maximum detection depth, leave
TY
set as high as possible. If the detector
makes a “chattering” noise, decrease
TIVITY
until the chatter stops.
MIN
and
MAX
. For
SENSITIVI-
SENSI-
Adjusting Discrimination
Discrimination is the detector’s ability to differentiate between types of metal. The detector’s
DISCRIMINATION
whether the detector will distinguish between
different types of ferrous and non-ferrous
metals.
MODE
If
TION
is set to
set to mid-range. While you use the de-
tector, adjust
TR2
DISCRIMINATION
position. As you set
the detector becomes more sensitive to the
differences between large aluminum and
gold pieces, for example, but some small
valuable pieces, such as coins and small
rings, might be overlooked.
setting determines
, start with
DISCRIMINA-
to the best
DISCRIMINATION
higher,
Adjusting Ground
1. Set
GROUND
MODE
takes a little time, but is crit-
GROUND
VLF
to
and lower the search
GROUND
tunes
.
coil to 1/2 to 2 inches above the ground.
2. If the pointer swings to the right (Nonferrous), turn
GROUND
to
NORMAL
. If
the pointer swings to left (Ferrous), turn
GROUND
to
BASALT
.
3. Raise the search coil about 1 foot from
the ground and press the red button on
the handle. The pointer returns to the
center.
4. Repeat Steps 1–3 until the pointer stays
close to the center each time you lower
the search coil to the ground.
GROUND
, the detector is set for
Setting
ical for accurate operation.
out false signals from mineralized soil. Follow these steps to set
After you set
the soil type at that particular site. Do not reset it until you use the detector at a different
site.
As you set
DISCRIMINATION
to higher levels,
the detector first does not detect small pieces of silver paper, then thick foil, and finally
metal objects like pull tabs from aluminum
cans.
Note:
Each time you use the detector in a
different area, you must readjust
NATION
. Each search location presents new
DISCRIMI-
challenges.
FALSE SIGNALS
Because your detector is extremely sensitive, trash-induced signals and other sources
of interference might cause signals that
seem confusing. The key to handling these
types of signals is to dig for only those targets that emit a strong, repeatable signal. As
you sweep the search coil back and forth
over the ground, learn to recognize the difference between signals that occur at random
and signals are stable and repeatable.
To reduce false signals when searching areas containing large amounts of trash, scan
only a small area at a time using slow, short
overlapping sweeps.
Operation
9
Page 10

DETECTION HINTS
Notes:
No detector is 100 percent accurate. Various
conditions influence metal detection. The detector’s reaction depends on a number of
factors:
• the angle at which the object rests in the
ground
• the depth of the object
• the amount of iron in the object
• the size of the object
PINPOINTING A TARGET
Accurately pinpointing a target makes digging it up easier. This takes practice, and we
suggest you practice finding and digging up
small metal objects on your own property before you search other locations.
Sometimes, targets are difficult to accurately
locate due to the sweep direction. Try changing your sweep direction to pinpoint a target.
1. When the detector locates a buried target, continue sweeping the search coil
over the target, in a narrowing side-toside motion.
• If trash in an area is so heavy that you
get false signals, slow your sweep
speed and use shorter sweeps.
• Recently buried coins might not respond
the same as coins buried for a long
period of time because of oxidation.
• Some nails, nuts, bolts, and other iron
objects (such as old bottle caps) oxidize
and create a “halo” effect. A halo effect
is caused by a mixture of natural elements in the ground and the oxidation
created by different metals. Because of
the metal mixtures, target signals might
not be in a “fixed” position. This effect
makes these objects very hard to detect
accurately. (See “Fine-Tuning the Detector” on Page 9.)
2. Make a visual note of the exact spot on
the ground where the detector beeps.
3. Stop the search coil directly over this
spot on the ground. Then move the
search coil straight away from you and
straight back toward you a couple of
times.
4. Make a visual note of the exact spot on
the ground where the detector beeps.
5. Repeat Steps 1–3 at a right angle to the
original searchline, making an “X” pattern. The target will be directly below the
“X” at the point of the loudest response.
10
Operation
Page 11
Troubleshooting
If your detector is not working as it should, follow these suggestions to see if you can eliminate
the problem.
Problem Suggestion
The detector displays or
sounds false signals.
The display does not show
the correct metal type when
the detector finds a target. Or,
the detector sounds more
than one type of tone when it
finds a target.
Care
The sensitivity might be set too high. Adjust
You might be sweeping the detector’s search coil too fast
or at the wrong angle. Sweep the search coil more slowly
and hold the detector correctly. See “Testing and Using the
Detector” on Page 7 and “Pinpointing a Target” on
Page 10.
The detector might sound a false signal if it detects heavily
oxidized metals. Try pinpointing the target from several different angles (see “Pinpointing a Target” on Page 10). If
the detector does not display and sound the same signal
each time, the target is probably heavily oxidized metal.
There might be more than one target in the area you are
searching.
The target might be a type of metal that the detector does
not recognize.
If the target is heavily oxidized, the detector might not display the correct metal type. This is not a malfunction.
The sensitivity might be set too high. Adjust
SENSITIVITY
SENSITIVITY
.
.
Keep the metal detector dry; if it gets wet,
wipe it dry immediately. Use and store the
metal detector only in normal temperature
environments. Handle the metal detector
carefully; do not drop it. Keep the metal detector away from dust and dirt, and wipe it
with a damp cloth occasionally to keep it
looking new.
Modifying or tampering with the metal detector’s internal components can cause a malfunction and might invalidate its warranty.
Troubleshooting
The search coil supplied with the detector is
waterproof and can be submerged in either
fresh or salt water. However, do not let water
enter the detector’s control housing. After using the search coil in salt water, rinse it with
fresh water to prevent corrosion of the metal
parts.
11
Page 12

by
1 YEAR LIMITED WARRANTY
Metal Detector
WINBEST® by BARSKA®, as manufacturer, warrants this new product to be free of original defects in
materials and/or workmanship for the length of time specified by this warranty. This warranty does not
include damage caused by abuse, improper handling, installation, maintenance, normal wear-and-tear,
unauthorized repairs or modifications and tampering in anyway.
This warranty is limited to the original purchaser and is not transferable. This warranty applies only to
products purchased in the United States of America and Canada.
In the event of a defect within 30 days, the consumer must return the defective unit to the WINBEST®
by BARSKA® dealer (the place of purchase) at his/her own expense.
Beyond 30 days, WINBEST® by BARSKA® products should be sent to the following address for warranty
repairs. Products must be packed carefully and sturdily to prevent damage in transit, and returned
freight prepaid to:
1721 WRIGHT AVE.
LA VERNE, CA 91750
For additional and updated information
please visit www.barska.com
Please email [email protected] or call 1.888.666.6769 for Return Merchandise Number (RMA#) before
any returns.
NOTE: All merchandise received without a valid RMA# will be returned to shipper at his/her own
expense.
Please include all of the following when returning WINBEST® by BARSKA® products for service and/or
replacement:
1. Please write your complete details (Name, Address, Telephone #, E-mail address, RMA#, etc.)
2. Purchase receipt or Proof of Purchase. (Original/Copy)
3. A brief explanation of the defect
4. A Check/Money Order of $25.00 to cover inspection, shipping and handling
*Please allow 6-8 weeks for delivery
This product will either be replaced or repaired at the discretion of the warrantor. If it's a discontinued
item, we will replace the product with an equivalent product. Should the repair not be covered by this
warranty, an estimate will be sent for your approval. Non-warranty repairs or refurbishing are always
provided at a reasonable cost.
WINBEST® by BARSKA® shall not be liable for any consequential, incidental and/or contingent damages
whatsoever. We will not pay shipping, insurance or transportation charges from you to us, or any
import fees, duties and or taxes.This warranty supersedes all previous Winbest® by BARSKA warranties.
© 2011 BARSKA
BARSKA
®
®
06/11BC-190
 Loading...