

Page 1
Tools:
Tools:
Faux Panels
Tools:
Exterior Installation Instructions
For Structural Walls Constructed Using Hardboard, Particleboard,
Plywood, Rigid Foam Insulated Board & OSB
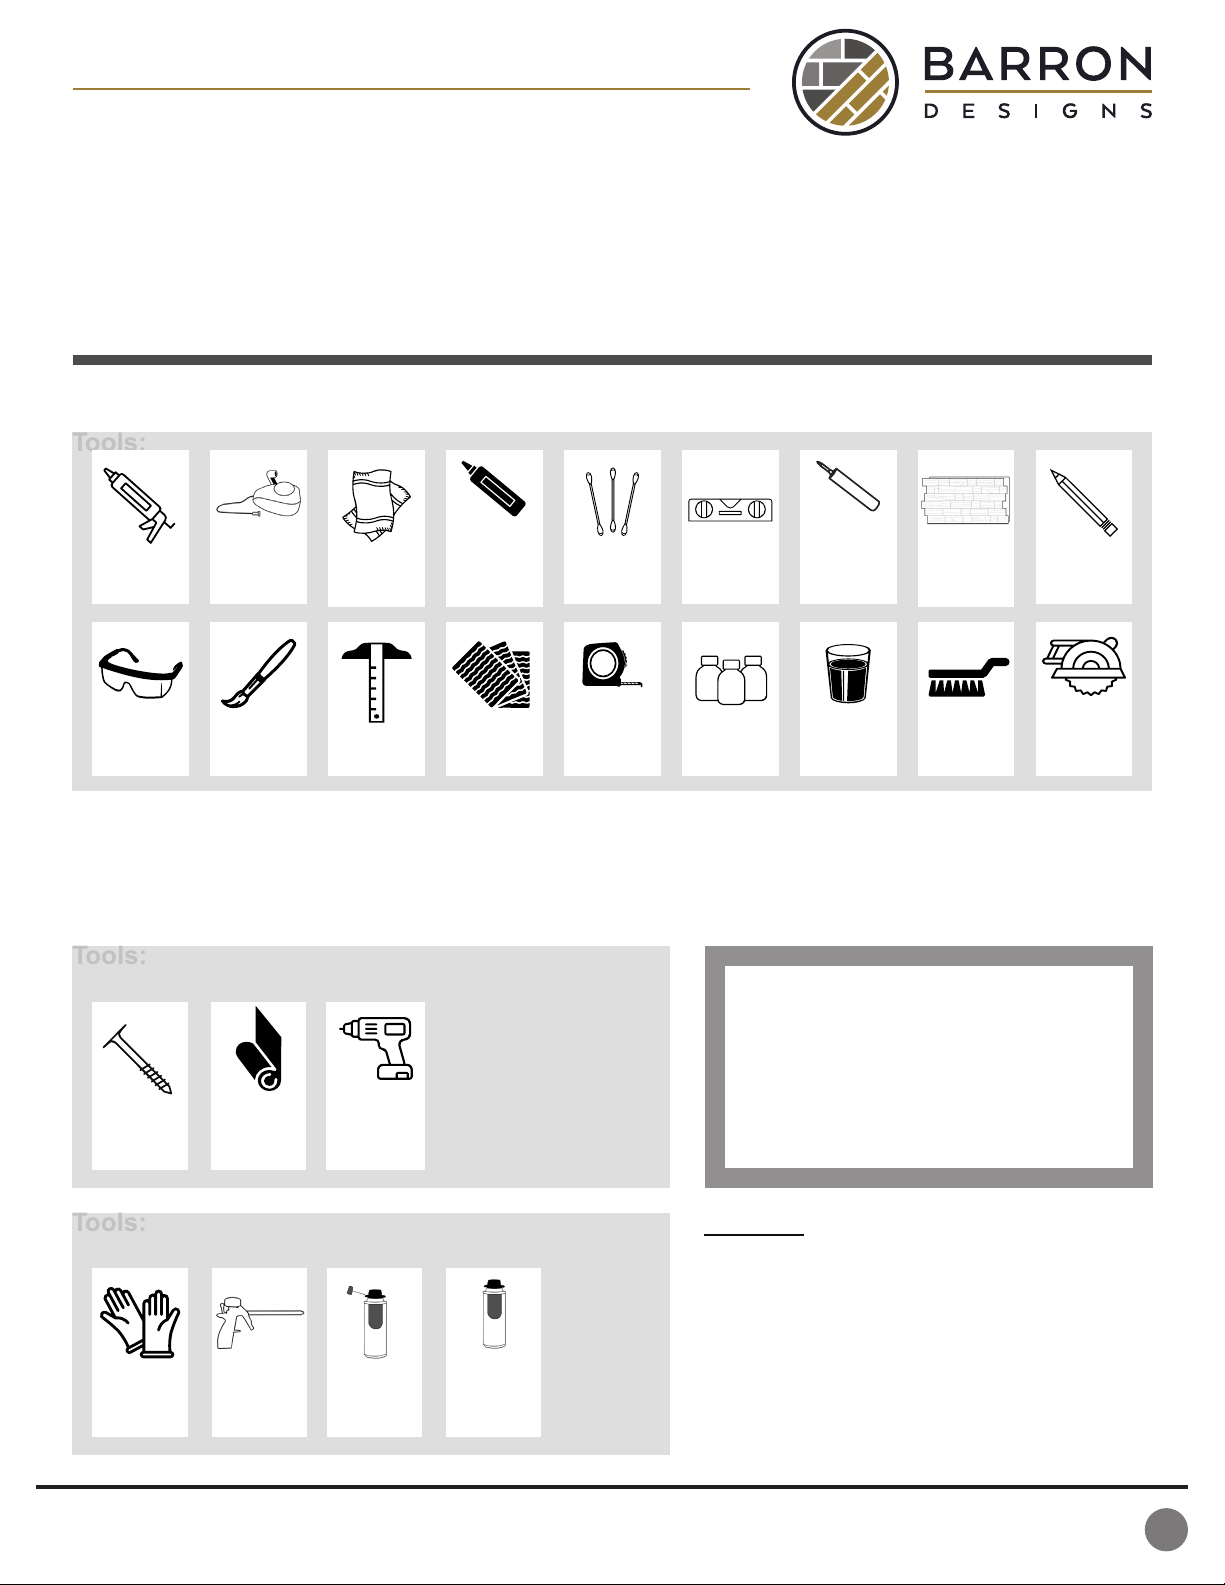
General Tools and Materials:
Caulk Gun
Safety
Glasses
Chalk Line /
Laser
Small Paint
Brush
Clean Cloth
T-square
Color
Coordinating
Textured
Caulk
Tack Cloth
Cotton
Swabs
Tape
Measure
Level
Touchup Kit
Loctite® PL®
Premium® 3X
Construction
Adhesive
Water
NOTE: (1) tube of Loctite PL Premium 3X adhesive is typically needed for every (3) panels.
(1) tube of textured caulk is typically needed for every (4) panels.
Installation-Specic Tools and Materials:
Adhesive and Fastener Installation (Recommended)
24 Hours Before Starting
Acclimate all panels by storing them at
in the installation location (but away from
moisture and direct sunlight or other heat
sources) for at least 24 hours.
Deck
Screws
Drainage
Mat
Screw Gun /
Drill Driver
& Driver Bits
Panels
Wire Brush
Pencil
Wood Cutting
Saw with
Finish Blade
Adhesive-Only Installation Over Concrete/Masonry/Metal
Disposable
Gloves
Great Stuff
Applicator
Gun
Great Stuff
Pro Gun
Cleaner
Great Stuff
Pro™
Construction
Adhesive
Questions? Our Customer Experience & Design Support Team is here
to assist you Monday-Friday from 9AM to 5PM EST at (800) 651-4223.
WARNING:
• Be sure to obey all safety rules and
recommendations set forth by tool manufacturers.
• Wear safety glasses during the entire installation
process.
• Be sure to follow all applicable building codes.
• Always comply with clearances set forth by the
manufacturer of stoves, replaces, furnaces, and
any other heat source.
1
Page 2
Exterior Installation
Before You Start
• Ensure wall is structurally sound and in good condition. Clear away brush and debris.
• Install exterior sheathing and house wrap.
• Gather all tools and materials.
How to Determine Installation Workow
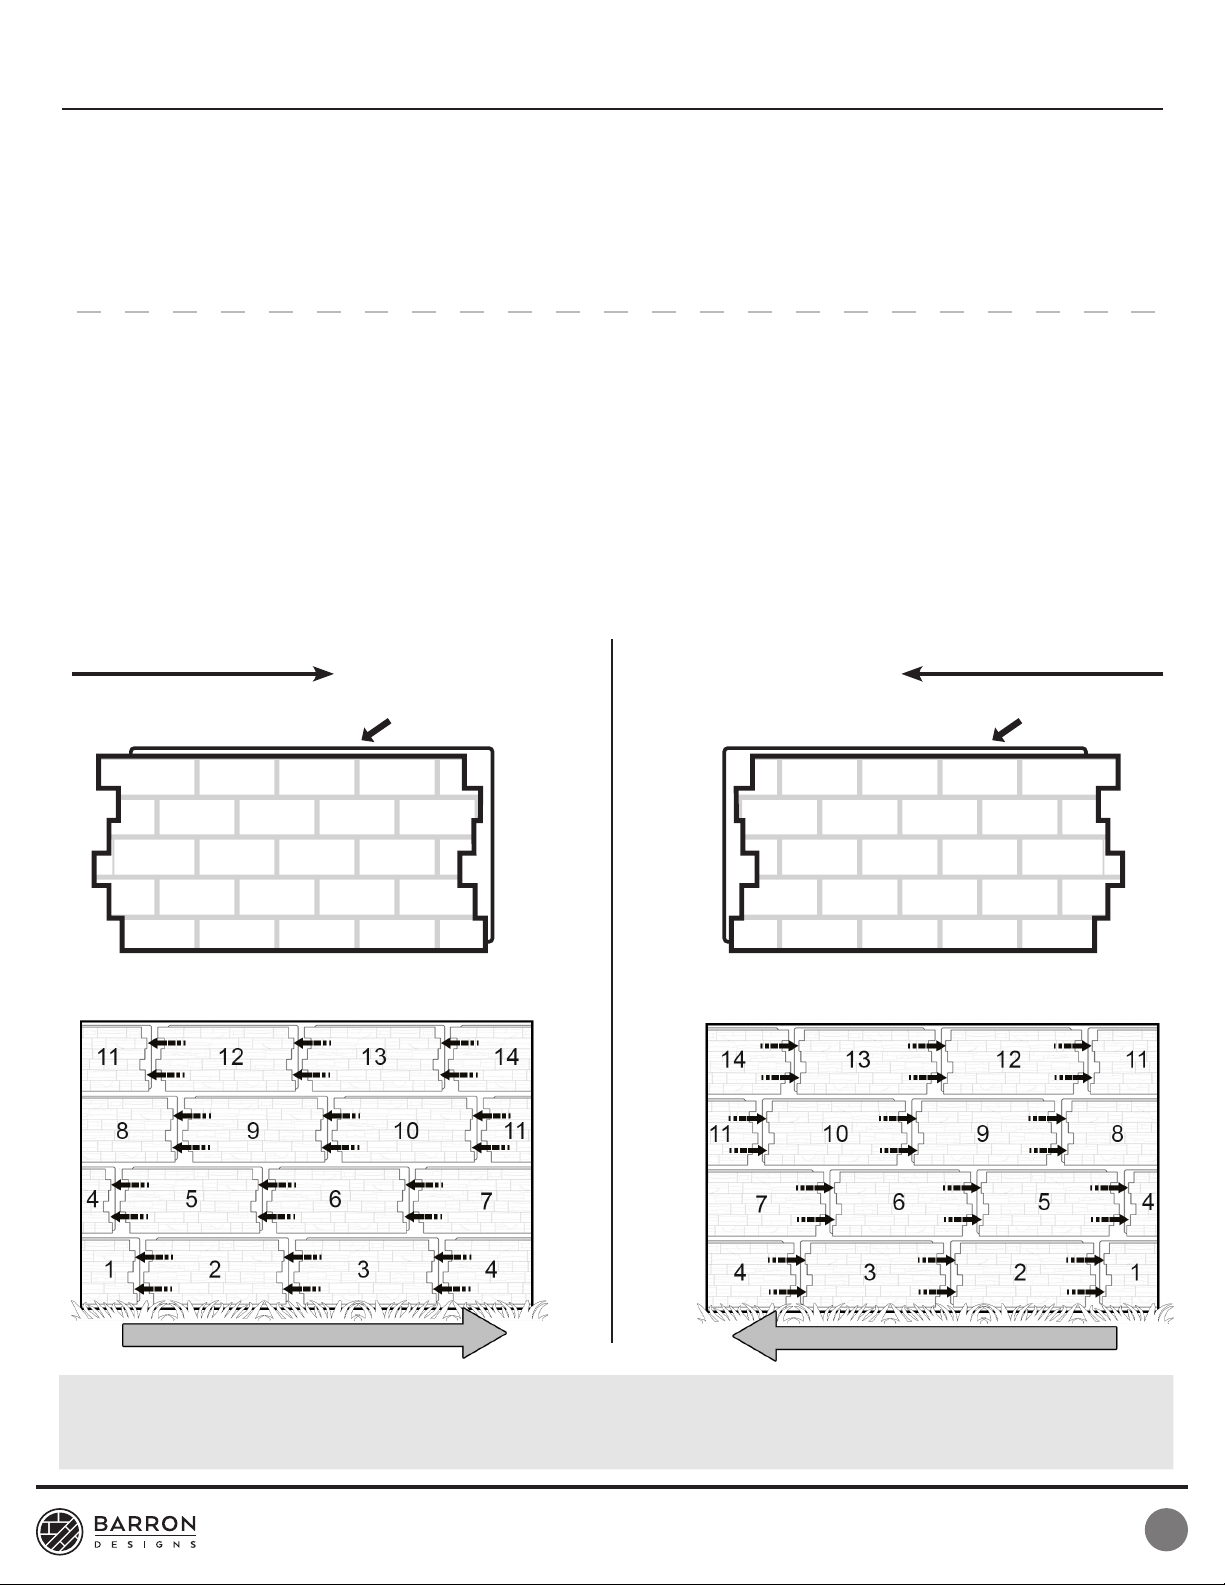
WARNING: Your panels can only be installed one way. Before starting, look at your panels to
determine which way they must be installed.
• Installation will run left to right or right to left depending on the panel style. Orient one of your panels so that the at lip
on the long side (A) is up. If the ngers project to the left, the installation will run left to right. If the ngers are on the
right side of the panel, the installation will go right to left.
• Chevron panels can be installed horizontally or vertically. For vertical installation of a Chevron focal wall, if you want the
center of a panel to align with the middle of the wall, plan for that alignment when trimming the rst panel.
Left to Right Installation Right to Left Installation
Finger Side
A
Slot Side Finger SideSlot Side
A
Work Flow
HINT: For styles other than Chevron, River Rock and Fieldstone, seams should be offset for a more realistic look.
To reduce waste, try to use reserved portions from previously cut panels to start and nish each row.
Panels may require shimming and trimming for proper alignment.
Questions? Our Customer Experience & Design Support Team is here
to assist you Monday-Friday from 9AM to 5PM EST at (800) 651-4223.
Work Flow
2
Page 3
Exterior Installation
Orient Panels &
1
Determine Installation Order
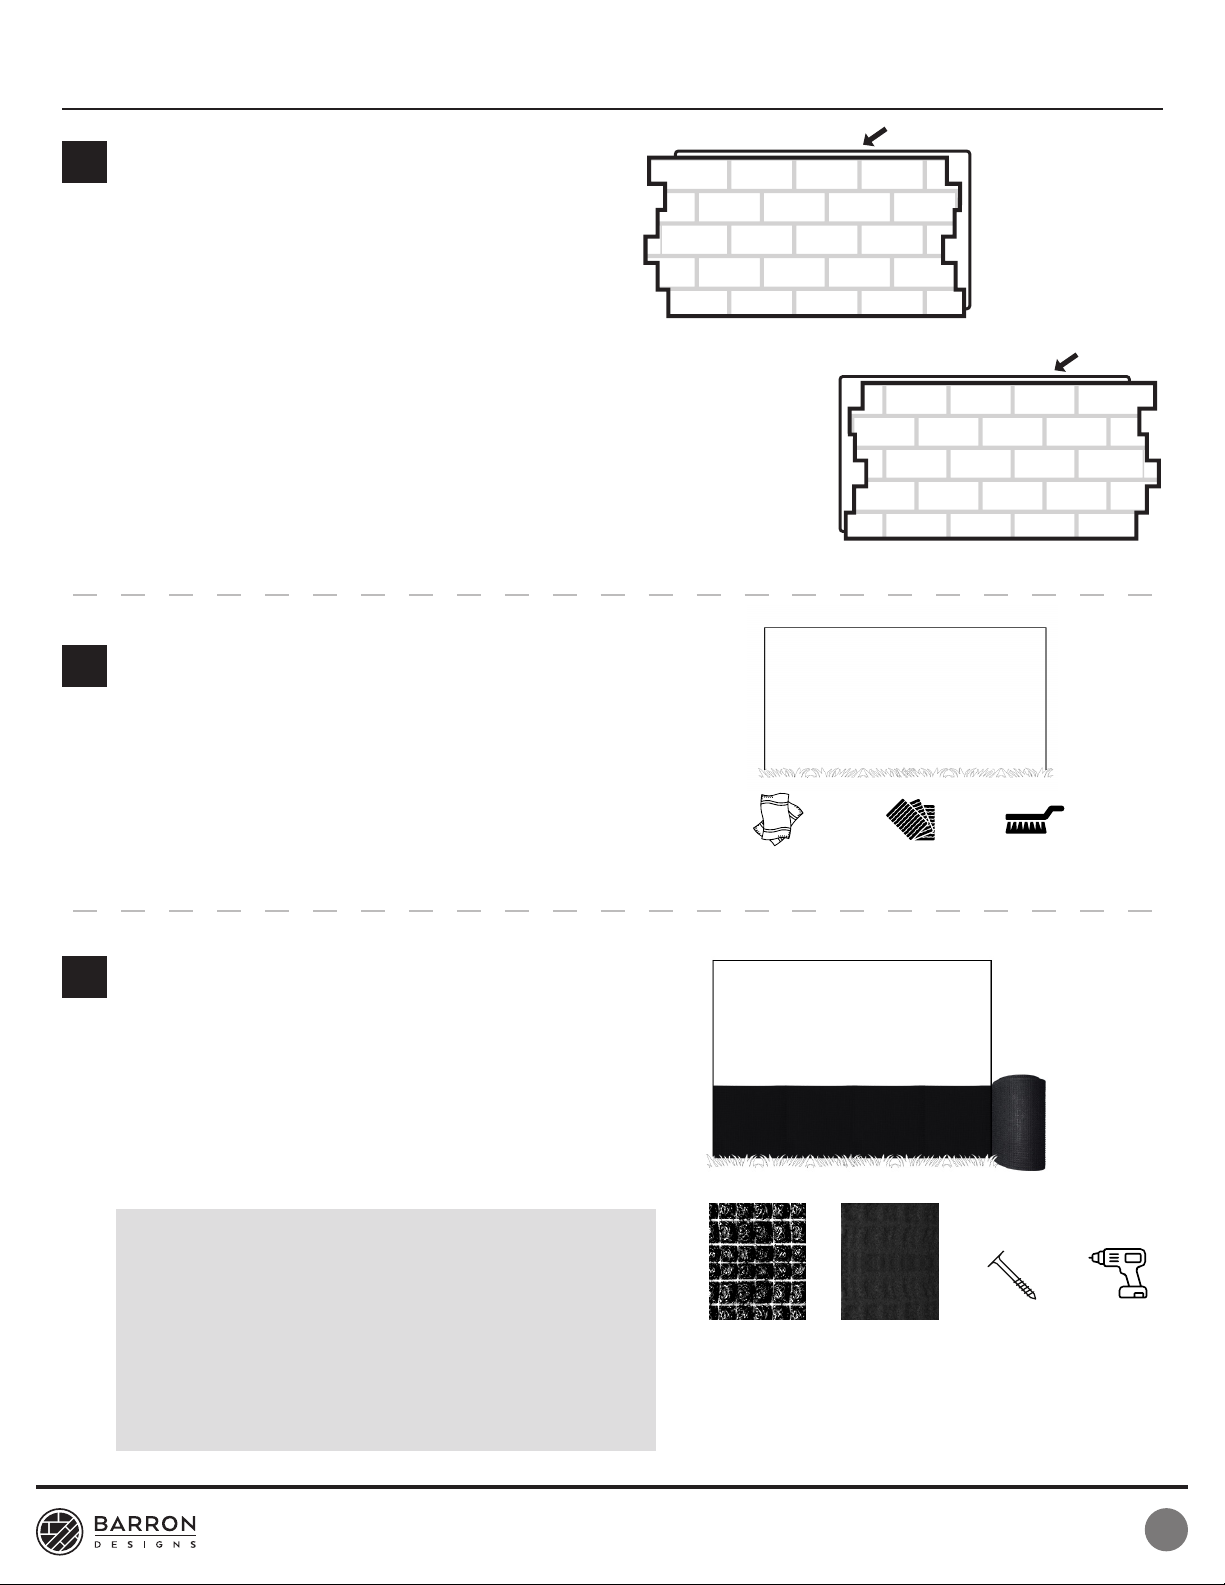
1. Orient each of the panels so that the at lip on the
long side (A) is up.
2. Each panel is hand painted and unique. In some
cases, a style includes multiple molds to create
an even more realistic look. Frequently the
panels will have “A” and “B” stamped on the at
lip (A) to indicate the different molds. When both
are available, it is a good idea to try to alternate
between A and B panels when installing.
3. It is helpful to establish an order for the panels
by laying them out prior to starting the installation
process. Look at the variation in color and texture to
ensure no one section draws the eye.
Prepare Surfaces
2
1. Ensure wall is stable and in good condition.
2. Wipe hard surfaces with a wire brush to remove
loose debris.
3. Wipe walls with a tack cloth to remove any dirt or
sawdust. Clean surfaces are required to ensure
the panels adhere properly.
Finger Side
Clean Cloth
A
Slot Side
A
Finger SideSlot Side
Wire BrushTack Cloth
Install Drainage Mat
3
NOTE: Skip this step if installing with adhesive only method
over concrete, masonry or metal.
1. Orient the roll so that the grid side faces the wall and
the smoother side faces out.
2. Fasten the drainage mat to the wall using deck screws
long enough to pass through the mat, house wrap and
into the structural material.
• Please comply with all regional building codes.
Drainage mats are required for all exterior installations
except those over concrete/masonry/metal.
• The DM-3611R Drainage Mat meets Canadian
Building Codes and is required for most exterior
installations in Canada.
• Exterior sheathing and house wrap must be installed
before the drainage mat.
Questions? Our Customer Experience & Design Support Team is here
to assist you Monday-Friday from 9AM to 5PM EST at (800) 651-4223.
Side that
faces wall
Side that faces
away from wall
Deck Screws
Screw Gun/
Drill Driver with
Driver Bits
3
Page 4
Exterior Installation
Draw Level Line
4
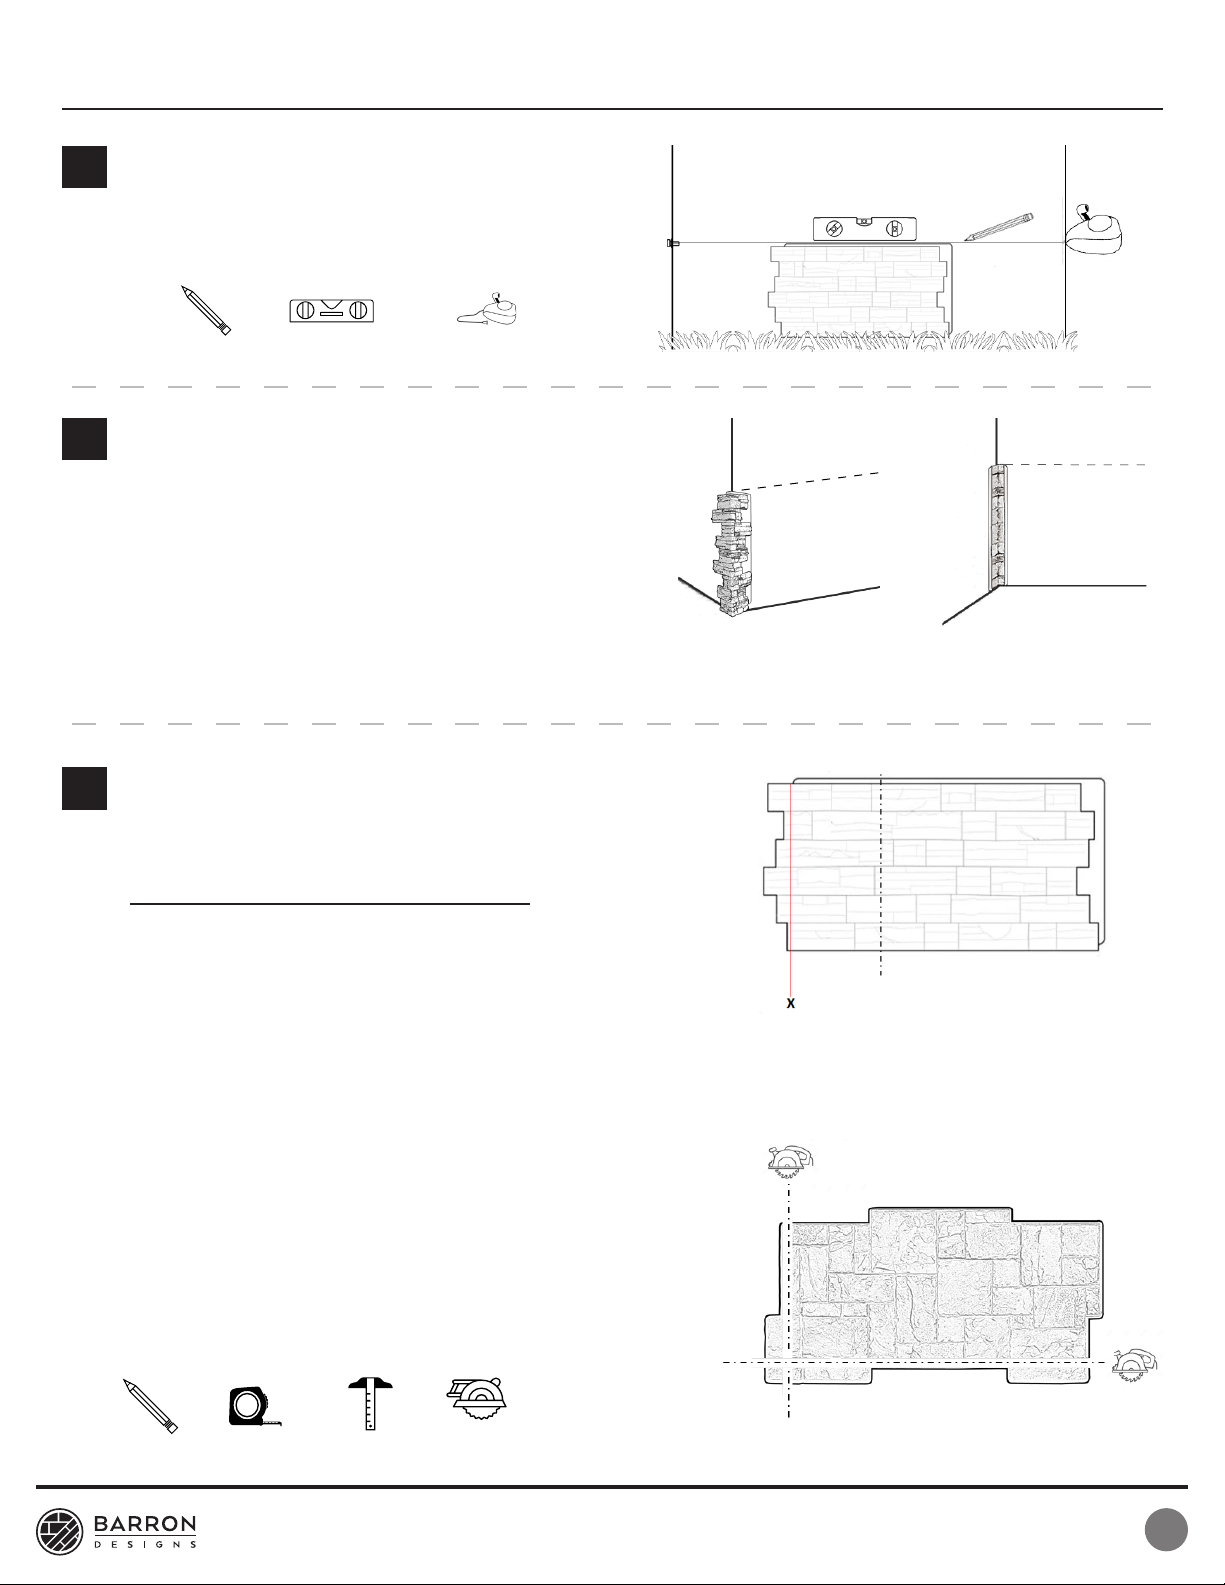
Find the high point on the oor/ground using a level.
Place a full size panel against the wall and mark the
height. Draw a level line the length of the wall.
Pencil
Level / Laser Level
Chalk Line / Laser
Install Corner Piece (optional)
5
If you are using corner pieces as part of your project,
the rst corner should be installed prior to starting the
rst row of the panel installation.
Interlocking corners: Install it and the panels by
following Step 7 through Step 9, skipping Step 6 for the
panels. Figure A
Flush corners: Install the corner by following Step 7
through Step 9. The panels will then need to be trimmed
as shown in Step 6. Figure B
Trim First Panel
6
NOTE: Skip if installing interlocking corners.
For all panels
except Chevron, River Rock & Fieldstone:
Figure A Figure B
Use rst
1. Turn the panel over on a soft surface and mark where
you intend to cut the panel. Trim the panel, using a
wood cutting saw with a nish blade.
2. We recommend cutting off at least ¼ of the panel to
minimize waste.
3. The slot side will be used rst. Reserve the nger side
for use later in the project.
For River Rock and Fieldstone panels:
NOTE: These styles will not have staggered seams.
1. Determine the number of panels needed to run the
length of the rst row.
2. Trim the bottom off each panel so that they will sit
ush with the oor/ground.
3. Trim the ngers off the rst panel.
Tape Measure Wood Cutting Saw
T-squarePencil
with Finish Blade
Not recommended to
trim only the ngers
This cut is for the
rst panel only.
Questions? Our Customer Experience & Design Support Team is here
to assist you Monday-Friday from 9AM to 5PM EST at (800) 651-4223.
4
Page 5
Exterior Installation
Trim First Panel (continued)
6
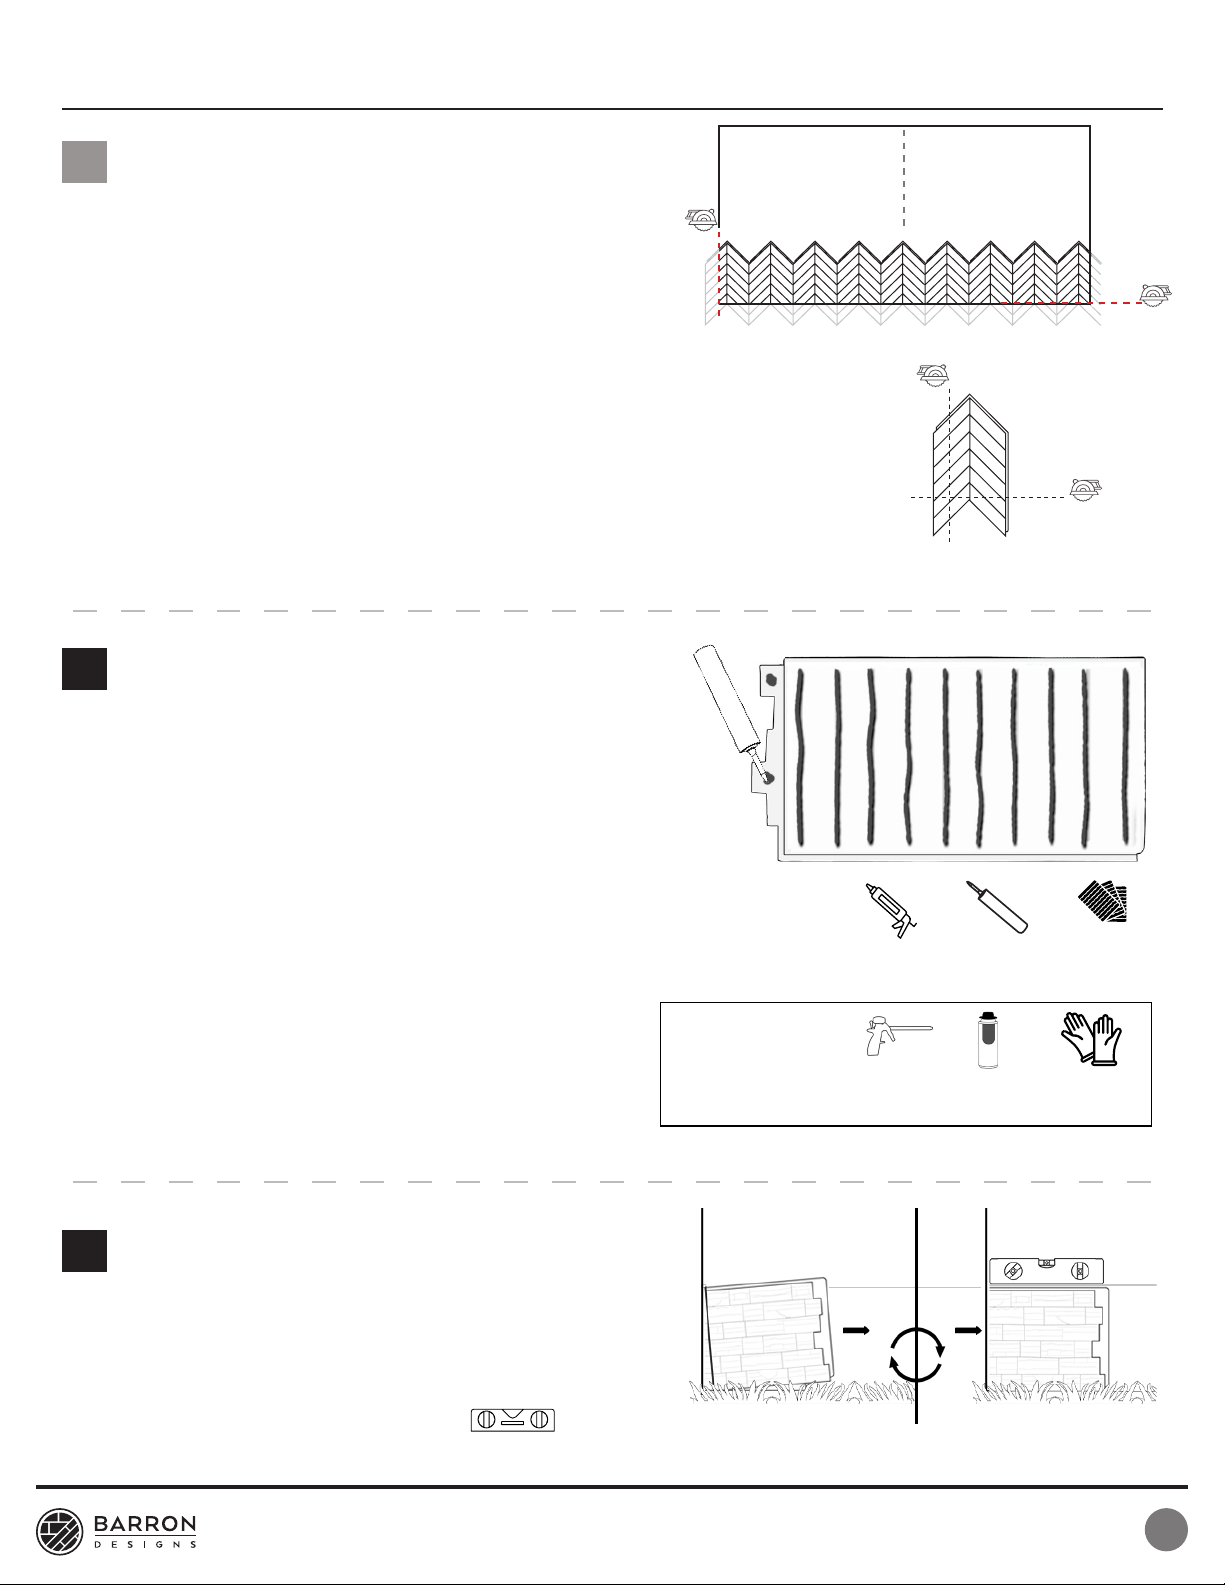
For Chevron (vertical installation):
NOTE: This style will not have staggered seams.
1. We recommend aligning the installation so that the
peak of a panel is centered on the wall.
2. Find and mark the center of the wall.
3. Determine the number of panels needed to run the
length of the wall
4. Trim the bottom off of each panel so that they will
sit ush with the oor/ground.
5. Trim the leftmost panel such that when the panels
are installed the center of a panel aligns with the
center of the wall.
6. Install the rest of the panels before trimming the
last panel in the run.
Apply Adhesive
7
Wipe the back of the panel with a tack cloth to remove debris.
This cut is for the
rst panel only.
Adhesive and Fastener Installation:
Turn the panel over on a soft surface and apply beads of
Loctite PL 3X adhesive to the back of the panel in vertical
lines spaced no more than 3” apart. Also add a dab of
adhesive to the back of each nger.
Adhesive-Only Installation:
Wearing gloves and following the instructions on the Great
Stuff Pro™ Construction Adhesive canister, turn the panel
over and apply beads of Great Stuff Pro™ Construction
Adhesive to the panel in vertical lines starting 2” from the
edge and in 6” increments along the interior of the panel,
and a dab on the back of each panel nger. When applying
to metal buildings ensure that the adhesive beads align
with any embossed patterns in the cladding.
Adhere Panel to Wall
8
1. Use a slight twisting motion to ensure good
contact.
2. Ensure panel is level, lines up with the level
line drawn in Step 3 and plumb with the edge
of the wall.
ADHESIVE-ONLY
INSTALLATION
OVER CONCRETE,
MASONRY OR
METAL
Caulk Gun Tack ClothLoctite PL 3x
Great Stuff
Applicator
Gun
Great Stuff Pro™
Construction
Adhesive
Disposable
Gloves
Level
Questions? Our Customer Experience & Design Support Team is here
to assist you Monday-Friday from 9AM to 5PM EST at (800) 651-4223.
5
Page 6
Exterior Installation
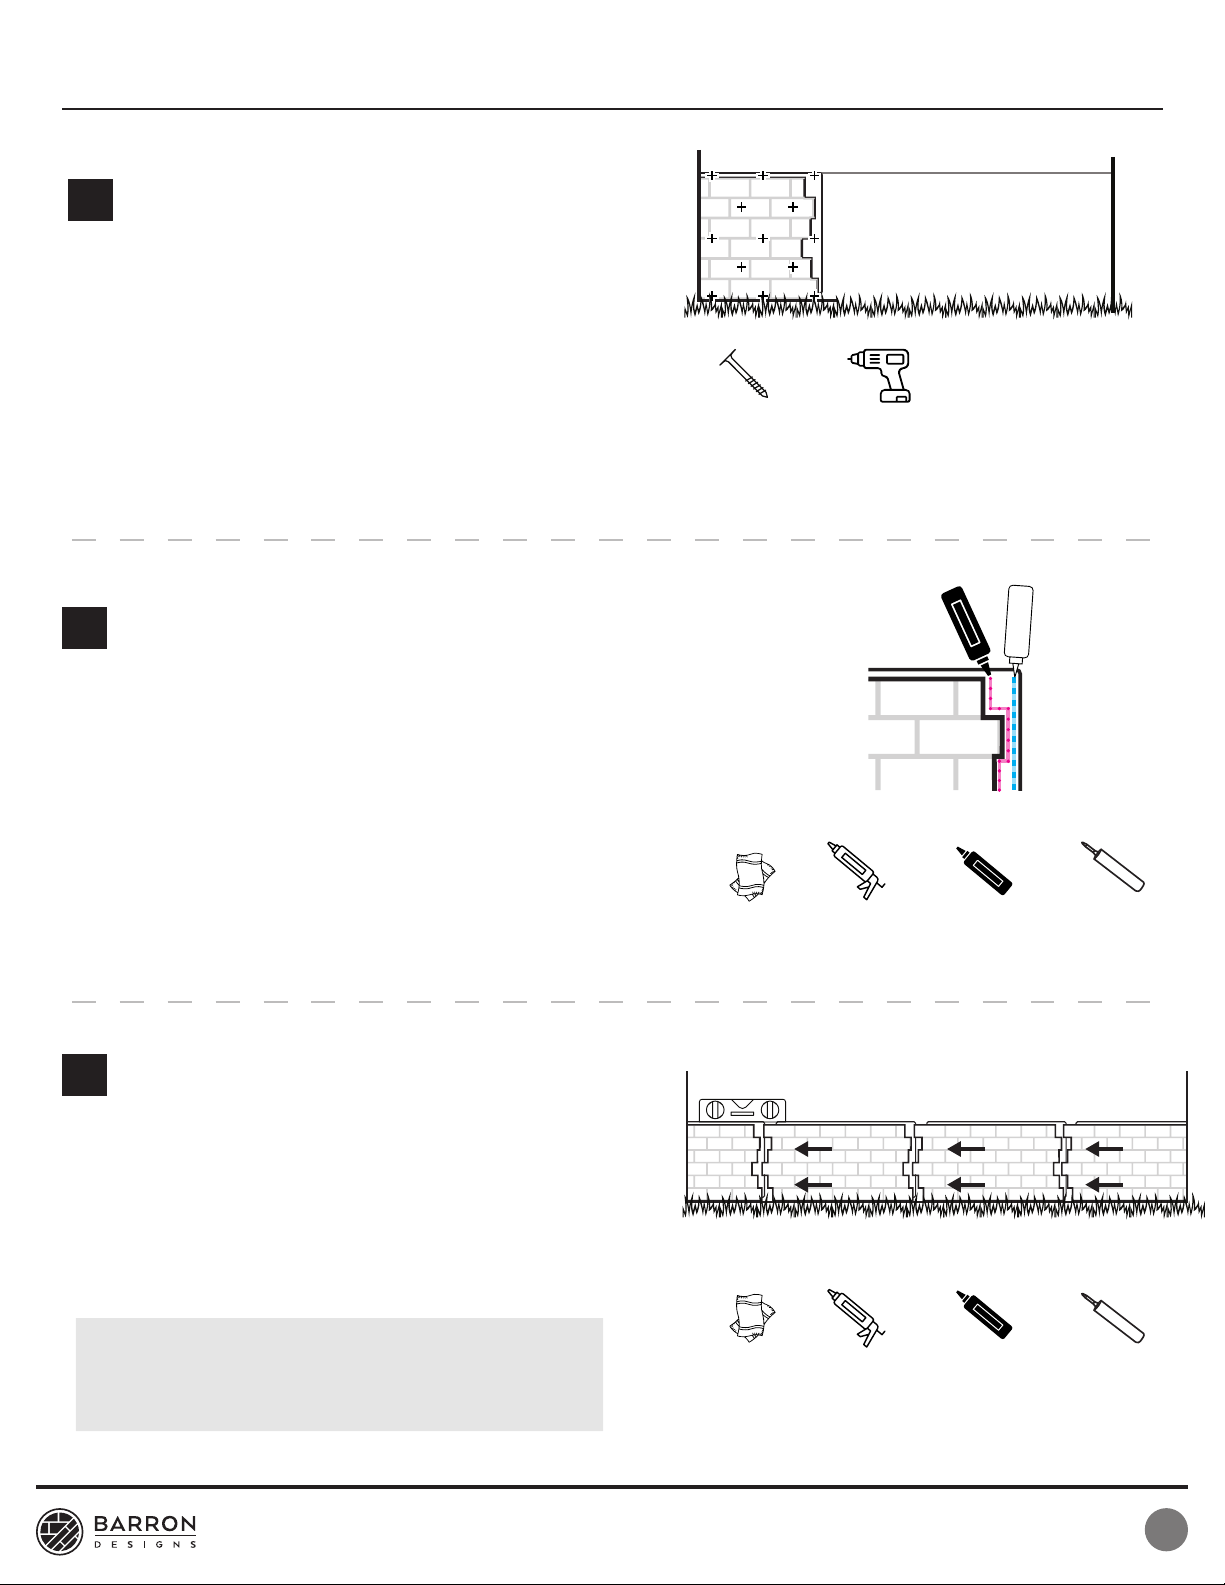
Screw Panel to Wall
9
NOTE: Skip this step if installing with adhesive only
method.
Place (1) screw per foot along the perimeter and
(1) screw per square foot in the middle of the panel.
Screws should be slightly recessed. Place screws
under protruding rocks or in grout lines to make them
less noticeable.
DO NOT OVER TIGHTEN SCREWS.
Add Adhesive and Caulk
10
1. Add adhesive to the lip of the panel about 1” from the
face.
2. Also apply a bead of textured caulk where the face
meets the panel. Caulk must be added during this
step. Adding caulk later will not protect against
water and result in a less realistic appearance.
3. Use a damp cloth to remove any excess adhesive
or caulk.
Deck Screws
Screw Gun / Drill Driver
& Driver Bits
Repeat Steps 7–10
11
1. Butt the panels tightly together while following
the level line. Dry t each panel before applying
adhesive to ensure it ts ush.Trim if necessary.
The last panel on the row will have to be trimmed
from the nger side of a panel.
2. Wipe off any excess caulk or adhesive with a damp
cloth before it dries.
HINT: Before cutting a full size panel, check to see
if a previously cut panel can be used to nish
the row.
Clean Cloth
Clean Cloth
Caulk Gun
Caulk Gun
Color Coordinating
Textured Caulk
Color Coordinating
Textured Caulk
Loctite PL 3x
Loctite PL 3x
Questions? Our Customer Experience & Design Support Team is here
to assist you Monday-Friday from 9AM to 5PM EST at (800) 651-4223.
6
Page 7
Exterior Installation
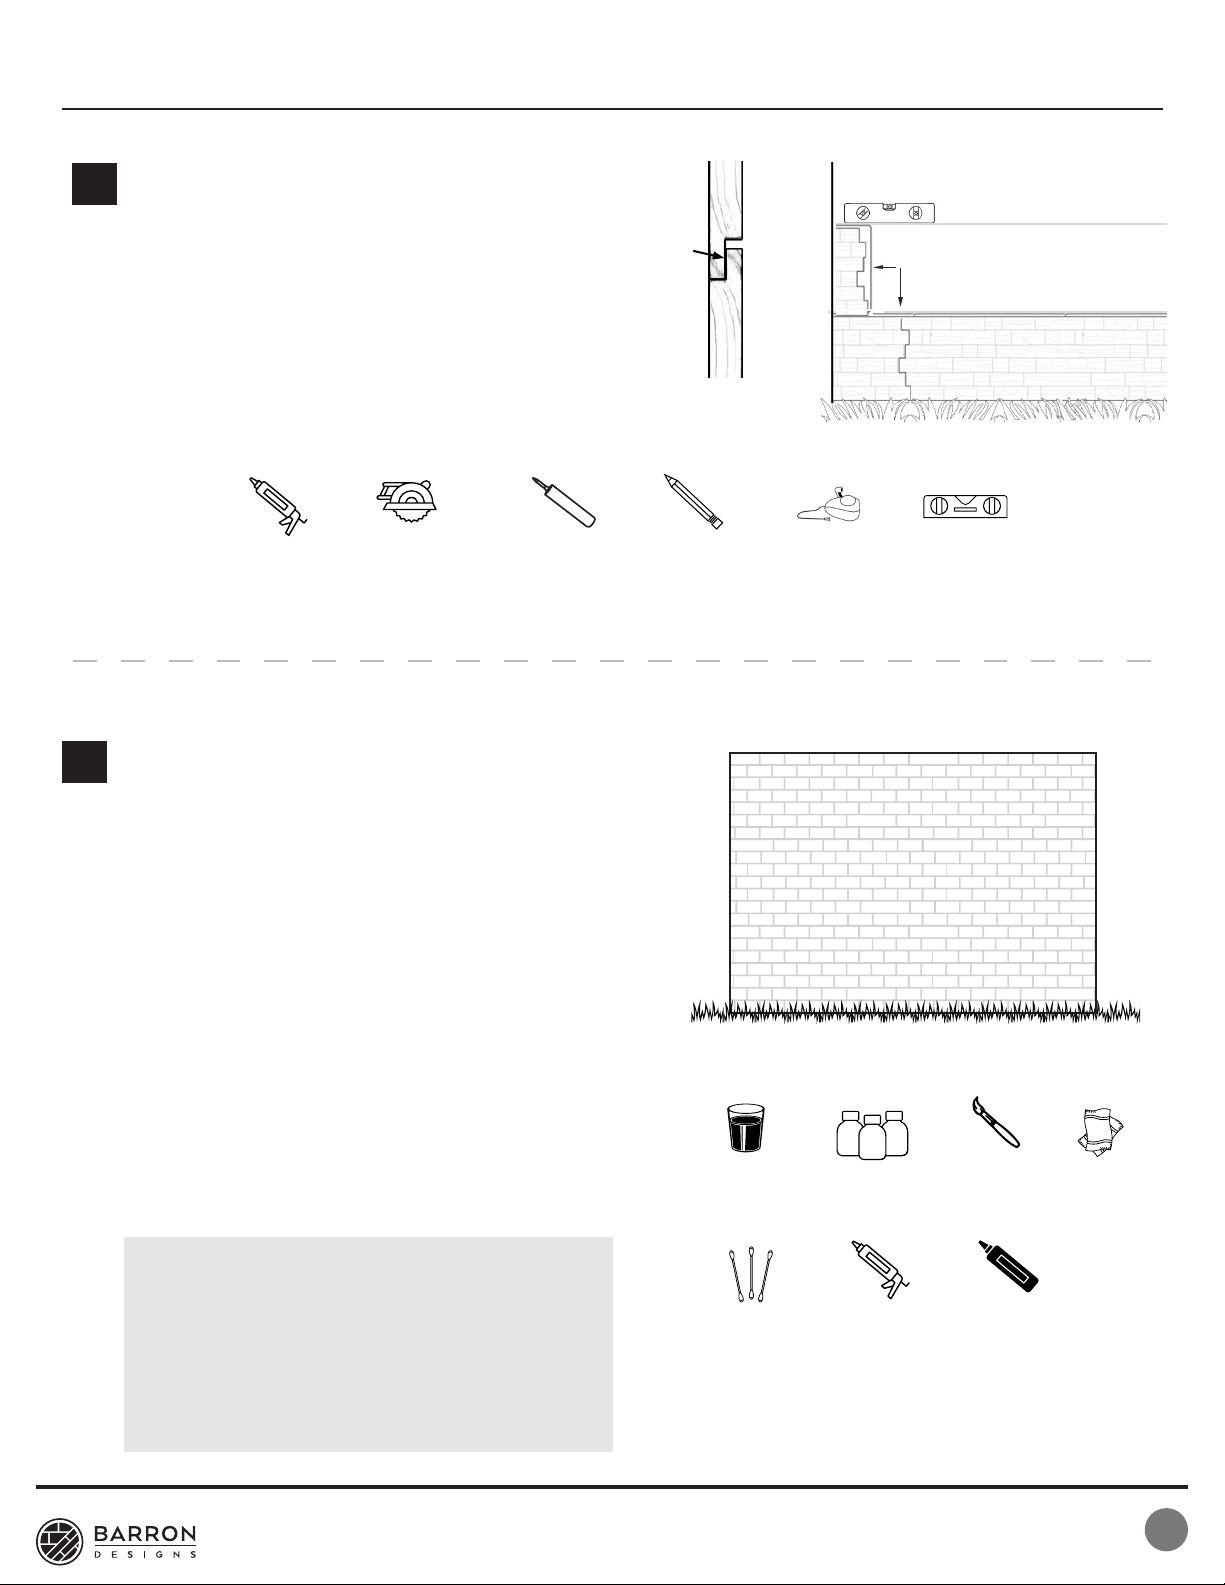
Start Next Row
12
1. For multiple rows, start the next row directly above
the rst panel, taking care to offset the seams
(does not apply to River Rock, Fieldstone or
Chevron panels). Panels are designed to create a
shiplap joint.
2. Before installing each panel on the next row apply
adhesive to the top lip of the panel below. Take
care when placing the panel to ensure a tight t
with the panel below.
adhesive
prole of
shiplap joint
wall
offset
Wood Cutting Saw
with Finish Blade
Touch-Up As Needed
13
1. Add a bead of caulk to seal any mitered joints and
where a panel butts against another surface (like
an adjoining wall).
2. Add caulk to ll in voids, gaps and holes from
screw heads. Carefully blend before it dries.
3. If your touch-up kit contains a base coat, use a
cotton swab to apply a light layer of the base coat
and allow it to dry completely (about 30 minutes).
4. Using a paint brush, apply the appropriate paint
then dab with a soft cloth to blend and allow to dry
completely (about 30 minutes).
5. If your touch-up kit contains a wash, apply the
wash using a paint brush and dab with a soft cloth
to blend. If the bottle is labeled “wash concentrate”
add tap water to the neck of the bottle, screw the
lid back on and shake to mix before using.
Pencil LevelChalk Line/ LaserCaulk Gun Loctite PL 3x
Clean ClothTouch-up Kit Paint BrushWater
PN01FGB 08/21
HINTS
• If you need to mix colors to achieve the desired
shade, we recommend doing so on a piece of
scrap material.
• Paint can be thinned by adding water.
• Start with lighter colors.
Questions? Our Customer Experience & Design Support Team is here
to assist you Monday-Friday from 9AM to 5PM EST at (800) 651-4223.
Cotton Swabs
Caulk Gun
Color Coordinating
Textured Caulk
7
 Loading...