

Page 1
BR-6
Rotary Rock Tumbler
Owner’s Manual
03.2014Revision 103
Manual Part# 168148
Caution: Read all safety and operating instructions
before using this equipment. This manual MUST
accompany the equipment at all times.
Barranca Diamond Products, Inc.
1315 Storm Parkway
Torrance, CA 90501
Toll-Free: (800) 630-7682
Phone: (310) 523-5867
Fax: (310) 257-3063
www.barrancadiamond.com
Page 2

INTRODUCTION
Congratulations on your purchase of a Barranca Diamond BR-6 Rotary Rock Tumbler. We are certain that you will be pleased with your purchase.
The following are safety and general guidelines for polishing rocks. Rock tumbling is not an exact
science. After a few batches you will discover your own techniques and make modification to suit
your specific needs. When selecting rocks to tumble, remember the finished product is determined
by the quality of rocks with which you start.
Read and follow all safety and operating instructions. If you have any questions concerning your
Barranca Diamond BR-6 Rotary Rock Tumbler, please feel free to call customer service at
(800) 630-7682.
Regards,
Barranca Diamond
NOTE: For your (1) one year warranty to be effective, complete the warranty card and mail it in as
soon as possible.
2
Page 3

TABLE OF CONTENTS
SAFETY
General Safety 4-5
Electrical Requirements and Grounding Requirements 6
INFORMATION, ASSEMBLY, SET-UP & INSTRUCTION
Information 7
Assembly 7
Set-Up 7
Instruction 8
EXPLODED VIEW and PART LISTS
Exploded View 10
Parts List 10
WARRANTY
Warranty 11-13
3
Page 4
BR-6 SAFETY
GENERAL SAFETY
• DO NOT operate or service this equipment before reading this entire manual.
• This equipment should not be operated by persons under 18 years of age.
• NEVER operate this equipment when not feeling well due to fatigue, illness or taking
medicine.
• NEVER operate this equipment under the inuence of drugs or alcohol.
• Whenever necessary, replace nameplate, operation and safety decals when they become
difcult to read.
• ALWAYS store equipment properly when it is not being used. Equipment should be
stored in a clean, dry location out of the reach of children.
ON / OFF
• NEVER leave the machine unattended. Turn off electric motor when unattended.
CAUTION
Caution must be observed while servicing the machine. Rotating parts can
cause injury if contacted.
• NEVER operate the machine in an explosive atmosphere.
ELECTRICAL REQUIREMENTS AND GROUNDING INSTRUCTIONS
In case of a malfunction or breakdown, grounding provides a path of least resistance for electric current to reduce the risk of electric shock. This tool is equipped with an electric cord having an equipment-grounding conductor and a grounding plug. The plug must be plugged into a matching outlet
that is properly installed and grounded in accordance with all local codes and ordinances.
WARNING
In order to prevent potential electrical shock and injury, the following electrical
safety precautions and symbols should be followed at all times!
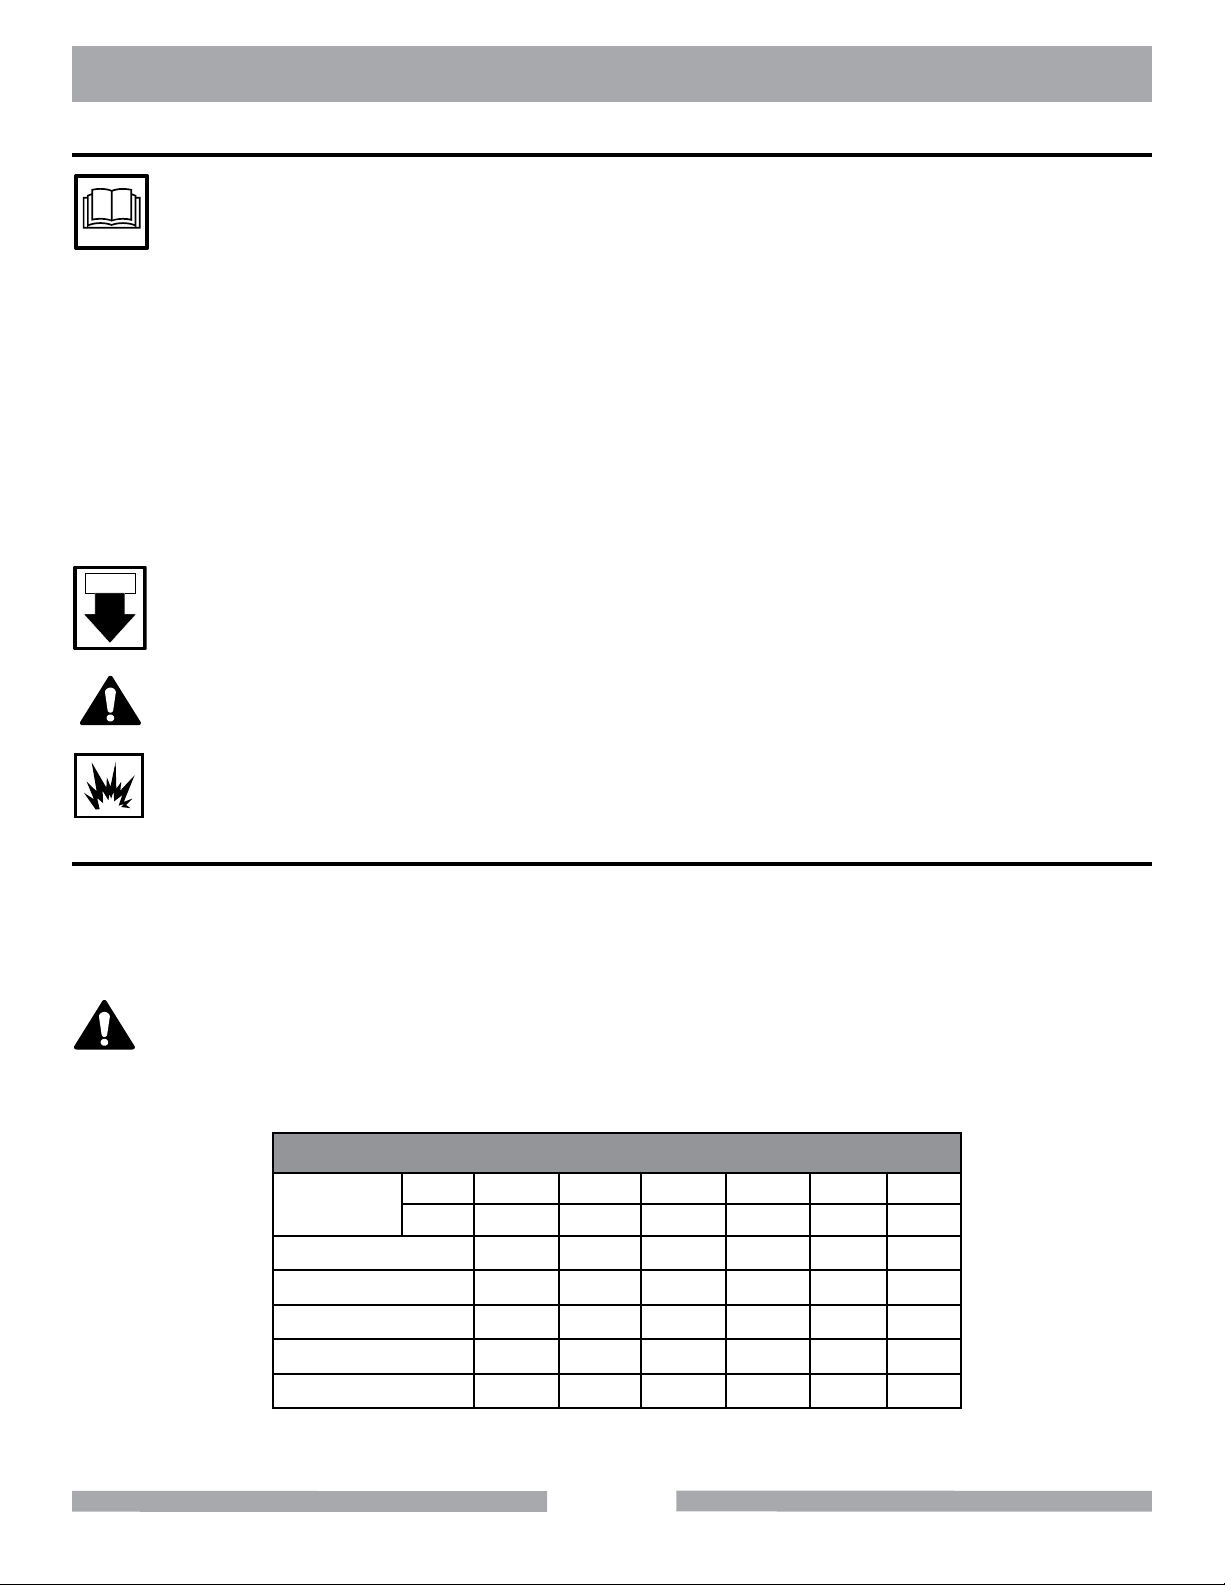
EXTENSION CORD LENGTH
Nameplate
Amperes
0 - 5 16 16 16 14 12 12
115V 25' 50' 75' 100' 150' 200'
250V 50' 100' 150' 200' 300' 400'
5.1 - 8 16 16 14 12 10 •
8.1 - 12 14 14 12 10 • •
12.1 - 15 12 12 10 10 • •
15.1 - 20 10 10 10 • • •
4
Page 5
BR-6 SAFETY
• Do not modify the plug provided – if it will not t the outlet; have the proper outlet installed by a
qualied electrician.
• Improper connections of the equipment-grounding conductor can result in a risk of electric shock.
The equipment grounding conductor is the insulated conductor that has an outer surface that is
green, with or without yellow stripes. If repair or replacement of the electric cord or plug is
necessary, do not connect the equipment-grounding conductor to a live terminal.
• Check with a qualied electrician or service personnel if the grounding instructions are not
completely understood, or if in doubt as to whether the tool is properly grounded.
• Use only 3-wire extension cords that have 3-prong grounding plugs and 3-pole receptacles that
accept the tool’s plug.
• Repair or replace a damaged or worn cord immediately.
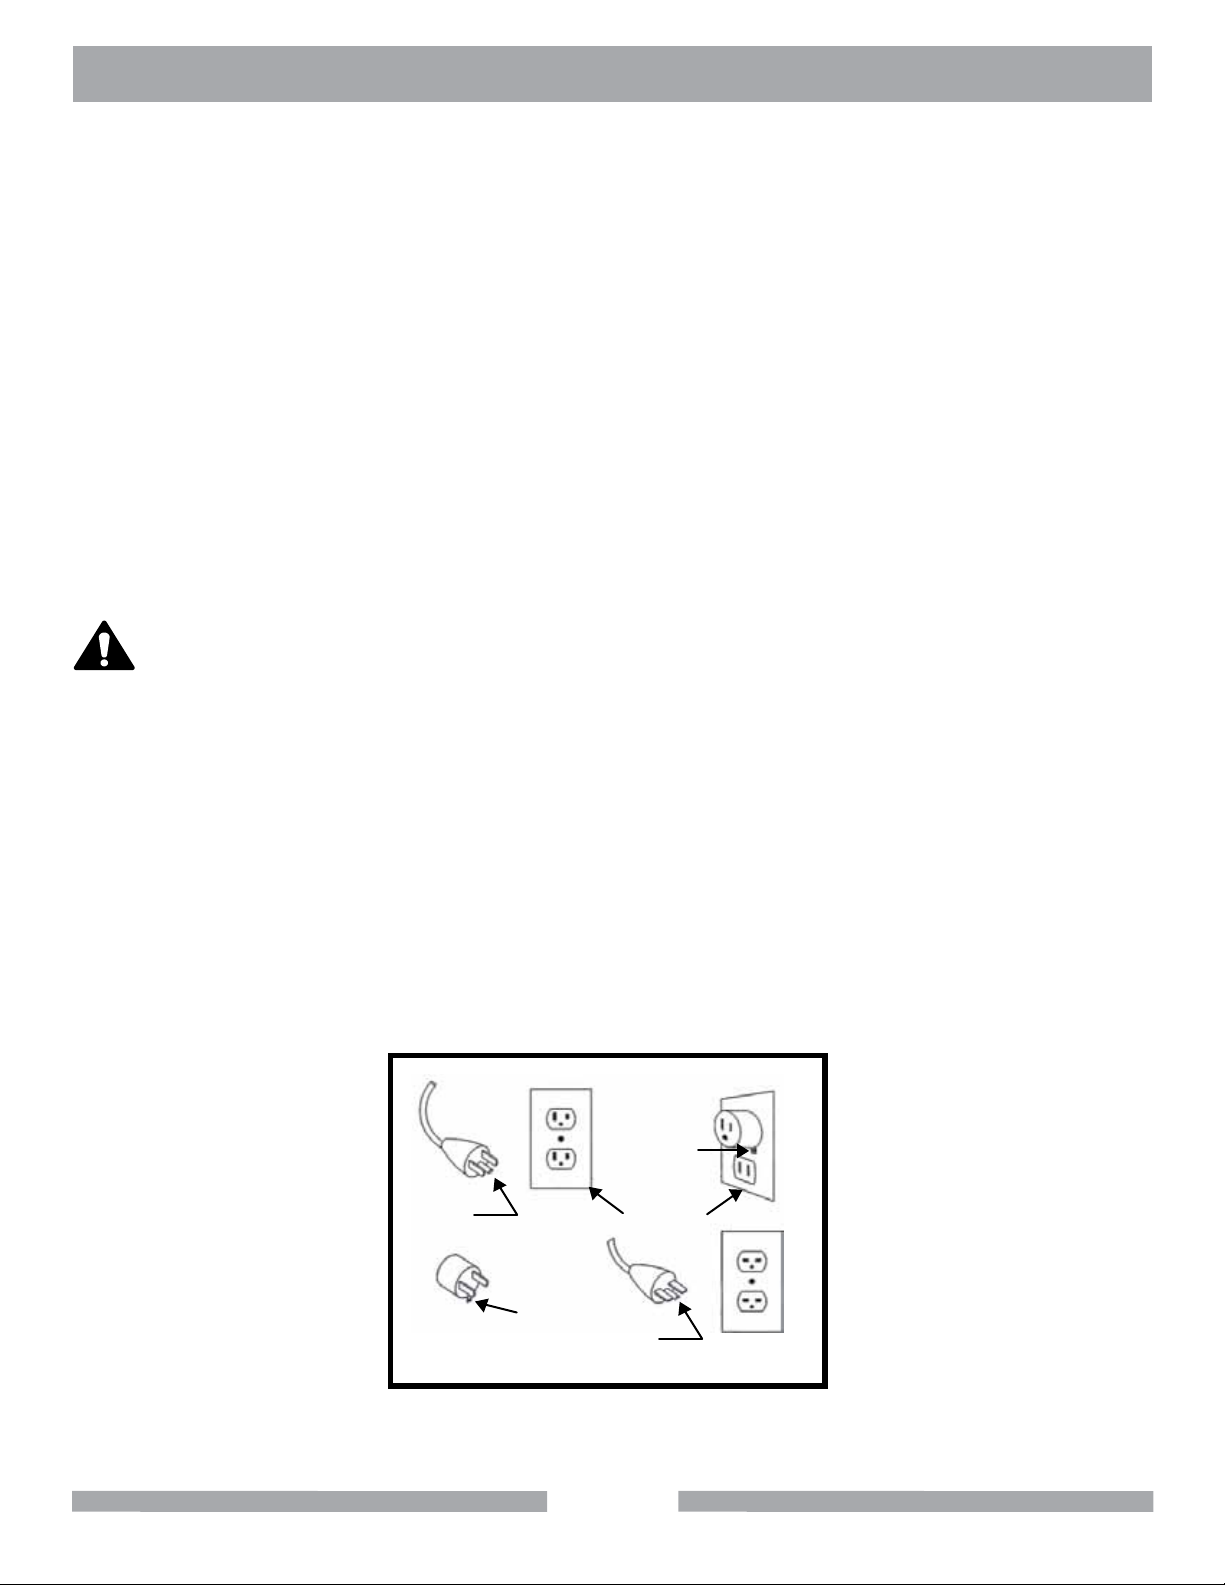
WARNING
This tool is intended for use on a circuit that has an outlet that looks like the one shown in Sketch A.
The tool has a grounding plug that looks like the plug illustrated in Sketch A. A temporary adapter,
which looks like the adapter illustrated in Sketches B and C, may be used to connect this plug to a
2-pole receptacle as shown in Sketch B, if a properly grounded outlet is not available. The temporary
adapter should be used only until a properly grounded outlet can be installed by a qualied electrician. The green-colored rigid ear, plug, and the like, extending from the adapter, must be connected
to a permanent ground such as a properly grounded outlet box.
NOTE: Use of a temporary adapter is not permitted in Canada.
Metal Screw
Grounding
Pin
(A)
Cover of
Grounded
Outlet Box
(B)
ADAPTER
Grounding
Means
(C)
Grounding
Pin
(D)
Circuit and Adapter Information
5
Page 6

BR-6 SAFETY
WARNING
To reduce the risk of electrocution, keep all connections dry and off the ground. A Ground Fault
Circuit Interrupter (GFCI) should be provided on the circuit(s) or outlet(s) to be used for this machine.
Receptacles are available having built-in GFCI protections and may be used for this measure of
safety. When using an extension cord, the GFCI should be installed closest to the power source,
followed by the extension cord and lastly, the machine.
DANGER
WARNING
Use only extensions cords that are intended for outdoor use. These extension cords are identied
by a marking “Acceptable for use with outdoor appliances; store indoors while not in use.” Use only
extension cords having an electrical rating not less than the rating of the product. Do not use damaged extension cords. Examine extension cords before using and replace if damaged. Do not abuse
extension cords and do not yank on any cord to disconnect. Keep cords away from heat and sharp
edges. Always disconnect the extension cord from the receptacle before disconnecting the product
from the extension cord.
WARNING
To reduce the risk of electrocution, keep all connections dry and off the ground. Do not touch the
plug with wet hands.
WARNING
Use of undersized extension cords result in low voltage to the motor that can result in motor burnout
and premature failure. Barranca Diamond warns that equipment returned to us showing signs of being
run in a low voltage condition, through the use of undersized extension cords, will be repaired or replaced totally at the customer's expense. There will be no warranty claim.
DO NOT use in wet conditions.
To choose the proper extension cord,
• Locate the length of extension cord needed in table provided.
• Once the proper length is found, move down the column to obtain the correct AWG size required
for that length of extension cord. For example, a fty foot extension cord would require an AWG
size of 14 for a 120V volt circuit.
6
Page 7

BR-6 INFORMATION
INFORMATION
For best results, select gemstones of similar hardness and roughness to tumble together. Ideally,
your drum should use about 6 lbs. of gem stones. Rocks may vary in size.
There are 4 steps in the rock tumbling process:
1. 60-90 grit silicon carbide
2. 220 grit silicon carbide
3. Pre-polish (400 or 600 grit silicon carbide)
4. Cerium oxide or aluminum oxide final polish
Seven days (162 hours) are needed to complete each of the 4 steps. More time may be needed
depending on the hardness of the rock. The optimum objective for rock tumbling is to obtain a slurry
that coats the stones during the tumbling process. Learn to tell by the feel of the slurry when the grit
is worn out and you need to rinse the rock and drum, then add fresh grit. At the end of the 28 days,
you will see your batch of beautiful, shiny, tumbled stones.
Rock Tumbling Formula:
1. 1/2 cup 60-90 grit (silicon carbide) & 6 oz. water
2. 1/2 cup 220 grit (silicon carbide) & 6 oz. water
3. 1/2 cup pre-polish (400 or 600 grit silicon carbide) and 4 oz. water
4. 1/2 cup cerium oxide or aluminum oxide & 4 oz. water
ASSEMBLY AND SETUP
1. Place the BR-6 Rock
Tumbler on a firm, smooth,
level surface
2. Slide the barrel onto
the shaft and tighten the
thumbscrew onto the flat of the
shaft. Plug in Rock Tumbler
3. Remove cap from barrel
7
Page 8

BR-6 INSTRUCTIONS
INSTRUCTIONS
5. Add 1/2 cup 60-90 grit (silicon carbide).
6. Add 6 oz. of water, a little at a time until the grit starts to cling to the rocks. Too much water will
tend to rinse the grit back off the rocks.
7. Check the stones every couple days and add small amounts of water if the slurry seems too
thick.
8. Before proceeding to each next step, you need to open the barrel, add 3 tablespoons of
dishwashing soap and 1 additional cup of water to the barrel and run the tumbler for 5 – 10
minutes. This short pre-cleaning process de-slurries your stones before you empty the barrel and
cleans your stones and barrel to prepare for the next grit.
9. Rinse the rock carefully, it should be removed from the barrel and both the rock and the barrel
cleaned thoroughly.
10. Add 1/2 cup 220 grit (silicon carbide) and 6 oz. of water.
11. Repeat steps 7 through 9. Plastic pellets may be used during this step if your barrel is less than
3/4 capacity.
12. Add 1/2 cup pre-polish (400 or 600 grit silicon carbide) and 4 oz. of water.
13. Repeat steps 7 through 9. Plastic pellets may be used during this step if your barrel is less than
3/4 capacity.
14. Add 1/2 cup cerium oxide or aluminum oxide and 4 oz. of water.
NOTE: Be sure to rinse the rock carefully, it should be removed from the barrel and both the rock
and the barrel cleaned before proceeding to the next grit.
NOTE: Never dispose of the sludge from the tumbler down a drain as the grinding compound is very
hard and will settle out and plug your drain.
NOTE: Do not cover unit with anything as this may block air flow and cause the motor to overheat,
or possible fire hazard.
NOTE: Export version of the BR-6 Rotary Rock Tumble with a 220 volt, 50 Hz gear motor available
(Part # 170046)
8
Page 9

NOTES
9
Page 10

BR-6 EXPLODED VIEW & PARTS LIST
19
3
13
23
15
21
1
11
2
12
24
20
17
5
16
10
7
6
4
8
18
14
3
ITEM DESCRIPTION PART # QTY
1 SCREW, THUMB 1/4-20 X 3/4 150991 1
2 BUSHING, FLANGE, 1/2X5/8X1 156441 2
3 SCREW, PAN HD SELF TAP 8-32 X 1/2 156632 10
4 SWITCH, TOGGLE 15A/120V 1 PST 156649 1
5 TAG, SERIAL NUMBER, BLANK 157500-RW 1
6 SCREW, DRIVE, RND HD, #7X5/16 157849 4
7 PLATE, TOGGLE SWITCH LOCKOUT 158211 1
8 SCREW HEX HD FL 10-24X 5/16 159597 1
9 CARTON, 21X15X15 159822 1
10 STOP, RUBBER BUMPER 159855 4
11 SCREW, RD HEAD 10-32 X 1" 161042 4
12 COLLAR, SHAFT, 1/2 162633 1
13 COVER, TUMBLER 167931 1
14 GEARMOTOR, 20RPM 168068 1
15 HUB, 3/8" BORE 168070 1
16 HUB, 5/16" BORE 168071 1
17 COUPLING, SPIDER 168072 1
18 WASHER, #10, NYLON 168095 8
19 CORD, 14/3 SJTW X 5-15P POWER 168122 1
20 CASTING, BASE, TUMBLER-COMP 168142 1
21 CASTING, PANEL, SIDE, TUMBLER-COM 168144 2
22 OWNER'S MANUAL, BR-6 TUMBLER 168148 1
23 O-RING, CAP GASKET, #341 168197 1
24 SHAFT, DRIVE, 1/2" 170845 1
25 BARREL, TUMBLER, SLIP-ON 170846 1
10
Page 11

BR-6 LIMITED WARRANTY
Barranca DiamonD LimiteD Warranty
Please complete the warranty registration card and return. Any problems encountered should be directed to
Barranca Diamond Customer Service department at (800) 630-7682 M-F 8am - 5pm PST.
NOTE THIS INFORMATION FOR FUTURE USE:
MODEL NUMBER:
SERIAL NUMBER:
PURCHASE PLACE:
PURCHASE DATE:
Barranca Diamond warrants to the original retail purchaser for a period of 1 year except as noted, from the
date of purchase all products covered by this Warranty to be free of defects in materials and workmanship.
This Warranty shall not apply to any parts that have been subjected to misuse or improper service, that had
been damaged in transit or handling, or that have been altered or repaired by unauthorized representatives.
This Warranty does not cover defects caused by or resulting from misuse, abuse, neglect or damage caused
by accident or the failure to provide reasonable maintenance. This Warranty is void if the product or any of its
individual components is altered or modied by the purchaser or if the product is used in a manner or with a
blade not recommended by the manufacturer.
Any claim arising under this Warranty must be submitted by the original purchaser within the warranty period
specied above, and shall include proof of purchase. During said warranty period Barranca Diamond shall,
at its option, either replace or repair, at no charge to the original purchaser, any parts or components that are
found to be defective by Barranca Diamond. Barranca Diamond shall not be responsible for or obligated to
pay for freight or other transportation related costs or expenses in connection with any defective products or
components that are either returned to Barranca Diamond’s facility or any authorized repair station and/or any
replacement products or components that are shipped from Barranca Diamond pursuant to this Warranty.
Parts and labor needed to maintain products and the replacement of components due to normal wear and tear
are the purchaser’s responsibility and are not covered by this Warranty. All products or components replaced
under warranty become the property of the manufacturer. All replacement parts will be considered to be part of
the original product and any warranty on such parts will expire coincidentally with the original Warranty. Barranca Diamond will pay for parts and labor in connection with warranty repairs conducted by Barranca Diamond
or its authorized repair centers. Replacement part(s) installed by anyone else will be provided without a charge
for such replacement part(s), but this Warranty will not apply to labor charges in connection therewith.
IN NO EVENT SHALL ANY LIABILITY UNDER THIS WARRANTY EXCEED THE REPLACEMENT COST OF
ANY DEFECTIVE PRODUCT OR COMPONENT THEREOF, AND BARRANCA DIAMOND SHALL NOT BE LIABLE FOR ANY INCIDENTAL OR CONSEQUENTIAL DAMAGES OR FOR ANY OTHER DAMAGE OR LOSS
NOT EXPRESSLY ASSUMED AS SET FORTH HEREIN.
The foregoing constitutes an expressed warranty on the terms set forth above and is the only warranty or
warranties applicable to the products it covers. All other warranties, including, without limitation, the implied
warranty of merchantability and/or tness for a particular purpose or use being denied. This limited warranty is
expressly in lieu of all other warranties, whether expressed or implied.
11
Page 12

BR-6 LIMITED WARRANTY
Specics Applicable to Limited Warranty of Diamond Blades and Core Bits:
Laser Welded Blade and Bit Warranty:
If the laser weld between the segment and the steel core or barrel fails during normal use, the blade
or bit will be replaced free of charge. Blades and bits damaged due to careless or improper use are
not covered under this warranty.
Brazed Blade, Bit, and Cup Wheel Warranty:
If the brazed bond between the segment and the core, barrel, or cup fails within the rst .050 of segment wear, the blade, bit, or cup will be replaced free of charge. Blades, bits, and cup wheels damaged due to careless or improper use are not covered under this warranty.
Continuous Rim Blade Warranty:
If the bond between the rim and the core fails during normal use, the blade will be replaced free of
charge. Blades and bits damaged due to careless or improper use are not covered under this warranty.
Exclusions:
Barranca Diamond does not warrant the following components, which carry their own manufacturer’s
warranty for the indicated periods:
Electric Motors Manufacturer’s Warranty
Baldor: 1 year
Ryobi: 1 Year
Soga: 1 Year
Gas Engines Manufacturer’s Warranty
Honda: 2 years
Engine Power Information
Engine power ratings are calculated by the individual engine manufacturer and the rating method
may vary among engine manufacturers. Barranca Diamond Products makes no claim, representation
or Warranty as to the power rating of the engine on this equipment and disclaims any responsibility
or liability of any kind whatsoever with respect to the accuracy or the engine power rating. Users are
advised to consult the engine manufacturer’s owners manual and website for specic information
regarding the engine power rating.
12
Page 13

BR-6 LIMITED WARRANTY
rePLacement PartS
Replacement parts for this tool may be ordered from your Barranca Diamond distributor or directly from Barranca Diamond. Please have the following information ready before calling:
• Model and serial number of the machine
• Date of purchase
• Description of parts being ordered (see parts list)
retUrn materiaLS ProceDUre
To expedite the service relative to the return of a product purchased through Barranca Diamond, please have
the following information available:
• Model and serial number of the machine
• Date of purchase
• Distributor’s name
Then please call Barranca Diamond at (310) 523-5867 or toll free at 800-630-7682 to obtain a Return Goods
Authorization number (RGA) authorizing the return.
Please Note:
• Ensure your item(s) are prepaid to the destination
• Return items must have been purchased within the previous twelve (12) months
• Follow the packaging instructions in the following section
• Be sure to include the RGA number, return address and your phone number on or within the
return shipping box.
PacKaGinG inStrUctionS
Ship the equipment using its original shipping crate if possible. Secure inside the shipping crate. Ensure all
parts are secured in the packaging to prevent movement. Do not ship the equipment partially exposed.
13
Page 14

NOTES
14
Page 15

NOTES
15
Page 16

Barranca Diamond Products, Inc.
1315 Storm Parkway
Torrance, CA 90501
Toll-Free: (800) 421-5830
Phone: (310) 539-5221
Fax: (310) 539-5158
www.barrancadiamond.com
 Loading...