

Page 1

Barracuda Web Site Firewall Administrator’s Guide
Version 7.0
Barracuda Networks Inc.
3175 S. Winchester Blvd.
Campbell, CA 95008
http://www.barracuda.com
Page 2

Copyright Notice
Copyright 2008, Barracuda Networks
www.barracuda.com
080702-70v4132-01-0516
All rights reserved. Use of this product and this manual is subject to license. Information in this document is subject to change without notice.
Trademarks
Barracuda Web Site Firewall is a trademark of Barracuda Networks. All other brand and product names mentioned in this document are
registered trademarks or trademarks of their respective holders.
ii Barracuda Web Site Firewall Administrator’s Guide
Page 3

Contents
Chapter 1 – Introduction . . . . . . . . . . . . . . . . . . . . . . . . . .7
Overview . . . . . . . . . . . . . . . . . . . . . . . . . . . . . . . . . . . . . . . 8
Methods of attack . . . . . . . . . . . . . . . . . . . . . . . . . . . . . . . . . 8
Other Considerations . . . . . . . . . . . . . . . . . . . . . . . . . . . . . . 10
Current Prevention Techniques . . . . . . . . . . . . . . . . . . . . . . . . . . 11
Network Firewalls . . . . . . . . . . . . . . . . . . . . . . . . . . . . . . . . 11
Intrusion Detection Systems . . . . . . . . . . . . . . . . . . . . . . . . . . 11
Building Security into the Application . . . . . . . . . . . . . . . . . . . . . . 11
Patch Management . . . . . . . . . . . . . . . . . . . . . . . . . . . . . . . 12
Web Security Requirements . . . . . . . . . . . . . . . . . . . . . . . . . . . . 13
Deep Inspection . . . . . . . . . . . . . . . . . . . . . . . . . . . . . . . . . 13
Web Application Firewalls . . . . . . . . . . . . . . . . . . . . . . . . . . . . 13
Barracuda Web Site Firewall Purpose . . . . . . . . . . . . . . . . . . . . . . . 15
Features of Barracuda Web Site Firewall. . . . . . . . . . . . . . . . . . . . . . 17
Web Firewall . . . . . . . . . . . . . . . . . . . . . . . . . . . . . . . . . . 17
Load Balancing . . . . . . . . . . . . . . . . . . . . . . . . . . . . . . . . . 17
Website Cloaking . . . . . . . . . . . . . . . . . . . . . . . . . . . . . . . . 18
Policy Recommendation Wizard . . . . . . . . . . . . . . . . . . . . . . . . 18
Security Policies. . . . . . . . . . . . . . . . . . . . . . . . . . . . . . . . . 18
Request Limits . . . . . . . . . . . . . . . . . . . . . . . . . . . . . . . 19
Cookie Security . . . . . . . . . . . . . . . . . . . . . . . . . . . . . . . 19
URL/ Parameter Protection . . . . . . . . . . . . . . . . . . . . . . . . . 19
Data Theft Protection . . . . . . . . . . . . . . . . . . . . . . . . . . . . 19
URL Normalization . . . . . . . . . . . . . . . . . . . . . . . . . . . . . 19
Global ACLs . . . . . . . . . . . . . . . . . . . . . . . . . . . . . . . . 19
Action Policy . . . . . . . . . . . . . . . . . . . . . . . . . . . . . . . . 19
Passive Monitoring . . . . . . . . . . . . . . . . . . . . . . . . . . . . . . . 19
Custom Security per Application . . . . . . . . . . . . . . . . . . . . . . . . 20
SSL Encryption . . . . . . . . . . . . . . . . . . . . . . . . . . . . . . . . . 20
Certificate Management . . . . . . . . . . . . . . . . . . . . . . . . . . . . . 20
Performance. . . . . . . . . . . . . . . . . . . . . . . . . . . . . . . . . . . 20
High Availability . . . . . . . . . . . . . . . . . . . . . . . . . . . . . . . . . 21
Energize Updates . . . . . . . . . . . . . . . . . . . . . . . . . . . . . . . . 21
Logging and Reporting . . . . . . . . . . . . . . . . . . . . . . . . . . . . . 21
Usability . . . . . . . . . . . . . . . . . . . . . . . . . . . . . . . . . . . . . 21
Chapter 2 – Web Site Firewall Concepts . . . . . . . . . . . . . . 23
Basic Terminology . . . . . . . . . . . . . . . . . . . . . . . . . . . . . . . . . 24
Service . . . . . . . . . . . . . . . . . . . . . . . . . . . . . . . . . . . . . . . 26
Web Site Profiles . . . . . . . . . . . . . . . . . . . . . . . . . . . . . . . . 26
Server Monitors . . . . . . . . . . . . . . . . . . . . . . . . . . . . . . . . . 26
Trusted Host . . . . . . . . . . . . . . . . . . . . . . . . . . . . . . . . . . . . 27
Web Site Security. . . . . . . . . . . . . . . . . . . . . . . . . . . . . . . . . . 28
Protocol Checks . . . . . . . . . . . . . . . . . . . . . . . . . . . . . . . . . 28
Request Limits . . . . . . . . . . . . . . . . . . . . . . . . . . . . . . . . . 28
iii
Page 4

Cloaking . . . . . . . . . . . . . . . . . . . . . . . . . . . . . . . . . . . . . 28
Cookie Security . . . . . . . . . . . . . . . . . . . . . . . . . . . . . . . . . 28
Allow/Deny Rules . . . . . . . . . . . . . . . . . . . . . . . . . . . . . . . . 29
Load balancing . . . . . . . . . . . . . . . . . . . . . . . . . . . . . . . . . . . 30
High Availability . . . . . . . . . . . . . . . . . . . . . . . . . . . . . . . . . . . 31
Chapter 3 – Getting Started . . . . . . . . . . . . . . . . . . . . . . . . 33
Deployment Modes for the Barracuda Web Site Firewall. . . . . . . . . . . . . . 34
Reverse Proxy (Recommended) . . . . . . . . . . . . . . . . . . . . . . . . 36
Bridge-Path . . . . . . . . . . . . . . . . . . . . . . . . . . . . . . . . . . . 37
One-armed . . . . . . . . . . . . . . . . . . . . . . . . . . . . . . . . . . . 37
Best Practise . . . . . . . . . . . . . . . . . . . . . . . . . . . . . . . . . . 38
Initial Setup . . . . . . . . . . . . . . . . . . . . . . . . . . . . . . . . . . . . . 40
Prepare for the Installation . . . . . . . . . . . . . . . . . . . . . . . . . . . 40
Connect Barracuda Web Site Firewall to Network . . . . . . . . . . . . . . . 41
Configure IP Address and Network Settings . . . . . . . . . . . . . . . . . . 41
Configure the Barracuda Web Site Firewall . . . . . . . . . . . . . . . . . . . 42
Update the Barracuda Web Site Firewall Firmware . . . . . . . . . . . . . . . 43
Verify Your Subscription Status . . . . . . . . . . . . . . . . . . . . . . . . . 43
Update Attack and Security Definitions . . . . . . . . . . . . . . . . . . . . . 44
Chapter 4 – Securing a Web Site . . . . . . . . . . . . . . . . . . . . 45
Creating Services . . . . . . . . . . . . . . . . . . . . . . . . . . . . . . . . . . 46
Deploying HTTP service . . . . . . . . . . . . . . . . . . . . . . . . . . . . 46
Deploying HTTPS service . . . . . . . . . . . . . . . . . . . . . . . . . . . . 46
Securing an HTTP Web Site with HTTPS. . . . . . . . . . . . . . . . . . . . 47
Creating a redirect service . . . . . . . . . . . . . . . . . . . . . . . . . . . 48
Passive versus Active Mode . . . . . . . . . . . . . . . . . . . . . . . . . . 48
Security Policy. . . . . . . . . . . . . . . . . . . . . . . . . . . . . . . . . . 48
Allowing/Denying Specific URLs . . . . . . . . . . . . . . . . . . . . . . . . 49
Chapter 5 – Customized Security for Websites. . . . . . . . . . 51
Security Policies . . . . . . . . . . . . . . . . . . . . . . . . . . . . . . . . . . 52
Request Limits . . . . . . . . . . . . . . . . . . . . . . . . . . . . . . . . . 52
Cookie Security . . . . . . . . . . . . . . . . . . . . . . . . . . . . . . . . . 53
URL Protection . . . . . . . . . . . . . . . . . . . . . . . . . . . . . . . . . 54
Parameter Protection . . . . . . . . . . . . . . . . . . . . . . . . . . . . . . 54
Cloaking . . . . . . . . . . . . . . . . . . . . . . . . . . . . . . . . . . . . . 55
Data Theft Protection . . . . . . . . . . . . . . . . . . . . . . . . . . . . . . 55
Protected Data Types . . . . . . . . . . . . . . . . . . . . . . . . . . . 56
URL Normalization . . . . . . . . . . . . . . . . . . . . . . . . . . . . . . . 56
Global ACLs . . . . . . . . . . . . . . . . . . . . . . . . . . . . . . . . . . . 57
Existing Global ACLs . . . . . . . . . . . . . . . . . . . . . . . . . . . . 58
Action Policy. . . . . . . . . . . . . . . . . . . . . . . . . . . . . . . . . . . 58
Creating a New Security Policy . . . . . . . . . . . . . . . . . . . . . . . . . . . 59
Web Site Profiles . . . . . . . . . . . . . . . . . . . . . . . . . . . . . . . . . . 60
URL profile . . . . . . . . . . . . . . . . . . . . . . . . . . . . . . . . . 60
Parameter profile . . . . . . . . . . . . . . . . . . . . . . . . . . . . . . 61
iv Barracuda Web Site Firewall Administrator’s Guide
Page 5

Web Site Translations . . . . . . . . . . . . . . . . . . . . . . . . . . . . . . . 62
Configuring Request Rewrite . . . . . . . . . . . . . . . . . . . . . . . . 62
Request Rewrite Condition . . . . . . . . . . . . . . . . . . . . . . . . . 62
Configuring Response Rewrite . . . . . . . . . . . . . . . . . . . . . . . 64
Response Rewrite Condition . . . . . . . . . . . . . . . . . . . . . . . . 64
Trusted Hosts . . . . . . . . . . . . . . . . . . . . . . . . . . . . . . . . . . . . 66
Chapter 6 – Keys and Certificates . . . . . . . . . . . . . . . . . . . 67
Overview . . . . . . . . . . . . . . . . . . . . . . . . . . . . . . . . . . . . . . 68
Types of Certificates. . . . . . . . . . . . . . . . . . . . . . . . . . . . . . . 68
X.509 Certificate . . . . . . . . . . . . . . . . . . . . . . . . . . . . . . 69
Certificate Usage . . . . . . . . . . . . . . . . . . . . . . . . . . . . . . . . 69
Certificate Components . . . . . . . . . . . . . . . . . . . . . . . . . . . . . 69
Key Pair . . . . . . . . . . . . . . . . . . . . . . . . . . . . . . . . . . 69
Distinguished Name (DN) . . . . . . . . . . . . . . . . . . . . . . . . . 69
Token . . . . . . . . . . . . . . . . . . . . . . . . . . . . . . . . . . . . 70
CA Certificate . . . . . . . . . . . . . . . . . . . . . . . . . . . . . . . . 70
Creating a Test Certificate . . . . . . . . . . . . . . . . . . . . . . . . . . . . . 71
Loading a Certificate . . . . . . . . . . . . . . . . . . . . . . . . . . . . . . . . 72
Signed Certificate . . . . . . . . . . . . . . . . . . . . . . . . . . . . . . . . 72
Certificate Key. . . . . . . . . . . . . . . . . . . . . . . . . . . . . . . . . . 72
Intermediary Certificates . . . . . . . . . . . . . . . . . . . . . . . . . . . . 72
Chapter 7 – Monitoring, Reporting and Logging . . . . . . . . . 73
Monitoring Barracuda Web Site Firewall . . . . . . . . . . . . . . . . . . . . . . 74
Viewing Performance Statistics . . . . . . . . . . . . . . . . . . . . . . . . . 74
Monitoring the Health of Services . . . . . . . . . . . . . . . . . . . . . . . . 74
Automating the Delivery of System Alerts. . . . . . . . . . . . . . . . . . . . 75
Viewing System Tasks . . . . . . . . . . . . . . . . . . . . . . . . . . . . . 75
Understanding the Indicator Lights . . . . . . . . . . . . . . . . . . . . . . . 75
Logs. . . . . . . . . . . . . . . . . . . . . . . . . . . . . . . . . . . . . . . . . 77
Web Firewall Logs. . . . . . . . . . . . . . . . . . . . . . . . . . . . . . . . 77
Access Logs. . . . . . . . . . . . . . . . . . . . . . . . . . . . . . . . . . . 77
Audit Logs . . . . . . . . . . . . . . . . . . . . . . . . . . . . . . . . . . . . 78
Syslog . . . . . . . . . . . . . . . . . . . . . . . . . . . . . . . . . . . . . . 78
Search Logs . . . . . . . . . . . . . . . . . . . . . . . . . . . . . . . . . . . 79
Reports . . . . . . . . . . . . . . . . . . . . . . . . . . . . . . . . . . . . . . . 80
Available Reports . . . . . . . . . . . . . . . . . . . . . . . . . . . . . . . . 80
Generate Report . . . . . . . . . . . . . . . . . . . . . . . . . . . . . . . . 80
Report Properties . . . . . . . . . . . . . . . . . . . . . . . . . . . . . . . . 80
Chapter 8 – High Availability . . . . . . . . . . . . . . . . . . . . . . . 81
Creating a High Availability (HA) Environment . . . . . . . . . . . . . . . . . . . 82
Evaluating System Status . . . . . . . . . . . . . . . . . . . . . . . . . 83
Failover . . . . . . . . . . . . . . . . . . . . . . . . . . . . . . . . . . . 84
Failback . . . . . . . . . . . . . . . . . . . . . . . . . . . . . . . . . . 84
Data Propagated to Linked Systems . . . . . . . . . . . . . . . . . . . . 84
Updating Redundant Barracuda Web Site Firewalls . . . . . . . . . . . . 84
v
Page 6

Removing units from a cluster . . . . . . . . . . . . . . . . . . . . . . . 85
Removing the units for RMA . . . . . . . . . . . . . . . . . . . . . . . . 85
Chapter 9 – Advanced Concepts . . . . . . . . . . . . . . . . . . . . 87
Deployment . . . . . . . . . . . . . . . . . . . . . . . . . . . . . . . . . . . . . 88
Multiple IP Address Configuration. . . . . . . . . . . . . . . . . . . . . . . . 88
Static Routes . . . . . . . . . . . . . . . . . . . . . . . . . . . . . . . . . . 88
Interface Routes. . . . . . . . . . . . . . . . . . . . . . . . . . . . . . . . . 88
Security . . . . . . . . . . . . . . . . . . . . . . . . . . . . . . . . . . . . . . . 90
Creating Identity Theft Patterns . . . . . . . . . . . . . . . . . . . . . . . . . 90
Using Custom Patterns . . . . . . . . . . . . . . . . . . . . . . . . . . . . . 90
Creating Attack Types. . . . . . . . . . . . . . . . . . . . . . . . . . . . . . 91
Creating Input Types . . . . . . . . . . . . . . . . . . . . . . . . . . . . . . 91
Creating Custom Parameter Class . . . . . . . . . . . . . . . . . . . . . . . 92
Creating a Customized Response Page for Errors . . . . . . . . . . . . . . . 93
View Internal Patterns . . . . . . . . . . . . . . . . . . . . . . . . . . . . . . 93
Chapter 10 – Administrating the Barracuda Web Site
Firewall . . . . . . . . . . . . . . . . . . . . . . . . . . . 95
Administrative Settings . . . . . . . . . . . . . . . . . . . . . . . . . . . . . . . 96
Controlling Access to the Administration Interface . . . . . . . . . . . . . . . 96
Customizing the Appearance of the Web Interface . . . . . . . . . . . . . . . 96
Setting the Time Zone of the System . . . . . . . . . . . . . . . . . . . . . . 96
Enabling SSL for Administration . . . . . . . . . . . . . . . . . . . . . . . . 96
Maintaining the Barracuda Web Site Firewall. . . . . . . . . . . . . . . . . . . . 99
Backing up and Restoring Your System Configuration . . . . . . . . . . . . . 99
Updating the Firmware of Your Barracuda Web Site Firewall . . . . . . . . . . 99
Updating Attack and Security Definitions Using Energize Updates . . . . . . 100
Replacing a Failed System . . . . . . . . . . . . . . . . . . . . . . . . . . 100
Reloading, Restarting, and Shutting Down the System . . . . . . . . . . . . 100
Using the Built-in Troubleshooting Tools . . . . . . . . . . . . . . . . . . . 101
Using the Task Manager . . . . . . . . . . . . . . . . . . . . . . . . . . . 101
Setting the System Configuration . . . . . . . . . . . . . . . . . . . . . . . 101
Rebooting the System in Recovery Mode. . . . . . . . . . . . . . . . . . . 101
Reboot Options . . . . . . . . . . . . . . . . . . . . . . . . . . . . . . 102
Appendix A – Barracuda Web Site Firewall Hardware . . . . . 103
Barracuda Web Site Firewall Front Panel . . . . . . . . . . . . . . . . . . . . 104
Barracuda Web Site Firewall Back Panel. . . . . . . . . . . . . . . . . . . . . 105
Hardware Compliance . . . . . . . . . . . . . . . . . . . . . . . . . . . . . . 106
Notice for the USA . . . . . . . . . . . . . . . . . . . . . . . . . . . . . . 106
Notice for Canada . . . . . . . . . . . . . . . . . . . . . . . . . . . . . . . 106
Notice for Europe (CE Mark) . . . . . . . . . . . . . . . . . . . . . . . . . 106
Appendix B – Extended Match and Condition Expressions . 107
Quick reference . . . . . . . . . . . . . . . . . . . . . . . . . . . . . . . . 107
Structure of an Extended Match Expression . . . . . . . . . . . . . . . . . 107
vi Barracuda Web Site Firewall Administrator’s Guide
Page 7

Operators . . . . . . . . . . . . . . . . . . . . . . . . . . . . . . . . . . . 108
Elements . . . . . . . . . . . . . . . . . . . . . . . . . . . . . . . . . . . 108
Joins. . . . . . . . . . . . . . . . . . . . . . . . . . . . . . . . . . . . . . 109
Combining . . . . . . . . . . . . . . . . . . . . . . . . . . . . . . . . . . . 109
Escaping . . . . . . . . . . . . . . . . . . . . . . . . . . . . . . . . . . . .110
Appendix C – Limited Warranty and License . . . . . . . . . . . 111
Limited Warranty . . . . . . . . . . . . . . . . . . . . . . . . . . . . . . . .111
Exclusive Remedy. . . . . . . . . . . . . . . . . . . . . . . . . . . . . . . .111
Exclusions and Restrictions . . . . . . . . . . . . . . . . . . . . . . . . . . .112
Software License . . . . . . . . . . . . . . . . . . . . . . . . . . . . . . . .112
Energize Update Software License . . . . . . . . . . . . . . . . . . . . . . .113
Open Source Licensing . . . . . . . . . . . . . . . . . . . . . . . . . . . . .117
vii
Page 8

viii Barracuda Web Site Firewall Administrator’s Guide
Page 9

Chapter 1
Introduction
This chapter provides an overview of the Barracuda Web Site Firewall and includes the following
topics:
• Overview on page 8
• Current Prevention Techniques on page 11
• Web Security Requirements on page 13
• Barracuda Web Site Firewall Purpose on page 15
• Features of Barracuda Web Site Firewall on page 17
Introduction 7
Page 10

Overview
Methods of attack
Web-based applications offer organizations a rapid, cost-effective vehicle for deploying applications
to customers, partners, and employees. They also present an easy target for malicious hackers, putting
critical data and processes at significant risk from external attack. Current security methods were not
designed to address Web-based attacks. Every organization relying on Web applications must
consider how to protect themselves against the constantly changing array of potential applicationlayer attacks.
There are wide variety of known application and network layer attack methods. These methods fall
into a number of categories. The following table describes some of the common attack techniques.
The Protection column summarizes how a Barracuda Web Site Firewall can address these attack
methods.
Table 1.1: Protection against different methods of attack
Technique Description
Application Layer Attack Techniques
Cross-Site
Scripting
SQL Injection SQL injection allows commands to
Command
Injection
Cookie/Session
Poisoning
Cross-site scripting takes
advantage of a vulnerable Web
site to attack clients who visit that
Web site. The most frequent goal
is to steal the credentials of users
who visit the site.
be executed directly against the
database, allowing disclosure and
modification of data in the
database.
Operating system and platform
commands can often be used to
give attackers access to data and
escalate privileges on back-end
servers.
Cookies are often used to transmit
sensitive credentials, and they can
be modified to escalate access or
assume another user's identity.
Protection provided by Barracuda
Web Site Firewall
Protects against cross-site scripting
vulnerabilities by inspecting application traffic
and blocking all methods of inserting malicious
scripts into URLs, headers, and forms.
Protects against all SQL injection vulnerabilities
by inspecting application traffic and blocking all
methods of inserting dangerous database
commands into URLs, headers, and forms.
Protects against all command injection
vulnerabilities by inspecting application traffic
and blocking all methods of inserting dangerous
operating system and platform commands into
URLs, headers, and forms.
Digitally encrypts, signs, and time-stamps
cookies, protecting their content from tampering.
Parameter/Form
Tampering
8 Barracuda Web Site Firewall Administrator’s Guide
Parameters used in URLs, HTTP
headers, and forms are often used
to control and validate access to
sensitive information.
Protects against parameter tampering by using
parameter profiles for all application parameters
and allowing only user requests that match the
legitimate profile.
Page 11

Table 1.1: Protection against different methods of attack
Technique Description
Buffer Overflow Attackers attempt to flood
vulnerable back-end servers with
excess requests. If successful,
attackers can often execute
commands directly on the
compromised server.
Directory
Traversal/
Forceful
Browsing
Cryptographic
Interception
Cookie
Snooping
Allowing access outside of the
defined application provides
unintended information disclosure
and/or modification.
Hackers seldom attempt to break
strong encryption like SSL.
Instead, they attack sensitive
hand-off points where data is
temporarily unprotected. The use
of multiple devices for managing
cryptography and encryption
makes cryptographic interception
far more likely.
Cookies are commonly used to
transmit user credentials and are
often encoded only with simple
encoding methods like Base64.
This can lead to disclosure of login
credentials.
Protection provided by Barracuda
Web Site Firewall
Automatically enforces legitimate buffer limits at
the perimeter, ensuring that even vulnerable
servers cannot be compromised.
Prevents the access of unpublished Web pages
by using application profiles and blocking
requests with path traversal metacharacters and
enforcing access to only those pages that the
application was designed to expose.
Has extensive SSL security capabilities and can
ensure that no unencrypted traffic traverses the
network in any circumstance. Combining all
critical DMZ functionality into a single device
also reduces the risk of exposure.
Digitally encrypts, signs, and time-stamps
cookies, protecting their content from tampering.
Log Tampering Erasing and tampering with
transaction logs allows an attacker
to cover their tracks or alter Web
transaction records.
Error Message
Interception
Attack
Obfuscation
Application
Platform Exploits
Security
Management
Exploits
Information in error messages are
often rich with site-specific
information, allowing an attacker
to learn private application
architectures.
Hackers frequently disguise
attacks by encoding their requests
with methods like URL encoding or
Unicode.
Well-known exploits can often be
addressed through a patch, but
patching is not always timely.
Sophisticated attackers may target
security management systems in
an attempt to modify or turn off
security enforcement. (These
could be either network or
application layer.)
Centralizes the collection of all back-end server
logs, then digitally signs and encrypts them to
prevent tampering. As with all its features,
secure logs can be generated on a perapplication basis.
The Website cloaking feature prevents
unintended information disclosure from error
messages.
Fully decodes URL, Unicode, and polymorphic
encoding before inspection.
Allows for blocking of well-known attacks,
effectively buying time for proper patch
management.
Has all management functions securely
firewalled from production traffic and is operated
through dedicated, secure management
channels.
Introduction 9
Page 12

Table 1.1: Protection against different methods of attack
Technique Description
TCP
Fragmentation
Denial of Service There are a wide variety of
Fragmenting an attack into
multiple TCP packets allows
attacks to slip by devices that are
inspecting only packets, and not
inspecting the entire session.
methods used to flood critical
applications and servers in an
attempt to take them out of
production.
Other Considerations
Many techniques to manage Web application security can have an adverse impact on performance and
availability. Adverse consequences can include the following:
• Significant performance degradation from intensive data analysis and processing
• Web site inaccessibility for legitimate users from misapplied rules
• Long and complex configuration procedures subject to a variety of observable and transparent
errors
• Processing bottlenecks from inefficient load balancing
• Availability risks from complex or unreliable failover (redundancy) procedures
Protection provided by Barracuda
Web Site Firewall
Network Layer Attack Techniques
Performs both stateful and deep inspection
throughout the entire session, incorporating
packet and stream reassembly to search out
attacks.
Includes full network-layer DoS protection
through integrated techniques like SYN cookies
and client-rate limiting.
10 Barracuda Web Site Firewall Administrator’s Guide
Page 13

Current Prevention Techniques
Companies try to protect their Web applications with solutions designed to protect networks that were
optimized for client-server application delivery. Network firewalls, intrusion detection systems,
software development methodology, and patch management are woven together to create a complex
security system that is ineffective in stopping Web attacks.
Network Firewalls
The first generation network firewalls were designed to control access to network resources.
Administrators could create network Access Control Lists (ACLs) to allow or deny traffic based on
source and destination IP addresses and ports. Traditional network firewalls do not prevent Web
attacks, whether inside or outside the corporate firewall. They are incapable of inspecting, blocking,
modifying, deleting, or rewriting application HTTP content of requests and responses. To provide
access to mission-critical Web applications, port 80 is typically configured as either open or closed,
meaning anyone trying to access Web applications from the Internet may connect directly to Web and
application servers with virtually no security inspection and enforcement.
Stateful inspection firewalls represented a significant improvement in firewall technology. Today
they are widely deployed. These firewalls add stateful inspection to network layer ACLs. They track
the session state and verify that inbound packets match a previously allowed session. Stateful
inspection firewalls added the capability to prevent network-layer attacks with TCP anomaly and
attack signature methodologies. Many also perform IP defragmentation/assembly, detecting
problems and attacks distributed among multiple packets. However, stateful inspection firewalls
cannot detect many application-layer attacks. An attack hidden in a valid packet is still passed on to
the target application. Likewise, an attack encrypted or payload encoded in the data cannot be
detected at the firewall.
Intrusion Detection Systems
Network Intrusion Detection Systems (IDS) use signature-recognition to log and alert administrators
of potential threats. They are passive and do not block attacks or alert you of unknown attacks. The
bulk of the attack database is comprised of network layer attacks. Inherently, the pure signature
detection methods create a "false positive" problem that drains resources. In addition, they can be
bypassed with encryption, TCP fragmentation, and other evasion techniques.
Building Security into the Application
Security features can be written directly into an application, and many companies have used this
approach. However, securing applications directly is difficult and time consuming. According to a
U.S. Department of Defense study, on average there are up to 15 security defects in every 1000 lines
of code. Shortcuts, debug features, poor code, and insufficient documentation all increase security
risk. Developers are hard pressed to deliver feature functionality on time and in budget. Security can
become a second-level priority, which substantially increases security risk.
Introduction 11
Page 14

Patch Management
Security patch management is about applying software patches for known application vulnerabilities.
However, keeping up with the deluge of patches has become close to impossible. IT organizations
face two major choices; try to find and patch all known problems to close application security holes,
or patch only the most pressing ones and live with the risk of potential attack. In addition, security
patches cannot be deployed to prevent unknown vulnerabilities or threats. Patches also do not
eliminate vulnerabilities caused by administration or configuration errors.
Patching is problematic at best. For custom applications, the software developers must keep current
on advisories affecting libraries and code as well as best practices for application security, such as
validating input in forms and cookies. Couple this with the challenge of integrating multiple
platforms, Web servers, application servers, databases and legacy systems, and the scope of the
security problem becomes evident.
For commercial application software, IT organizations must rely on vendors to supply fixes, typically
as interim patches for known security problems. But aggressive patching as a strategy is costly, risky,
and sometimes ineffective. Companies can take up to six months to release a patch for a known
security problem. Patches that make it through the pipeline faster may not experience the thorough
testing that customers expect. Managing software patches alone is a huge task for complex data
centers, which must track and maintain critical patches from multiple vendors.
12 Barracuda Web Site Firewall Administrator’s Guide
Page 15

Web Security Requirements
Securing Web applications at the perimeter simplifies and centralizes security management,
significantly reducing the cost and effort. Perimeter security provides the following benefits:
• Limits changes to back-end servers and applications
• Reduces the need for continuous patch management
• Supports rapid, secure deployment of new applications
Establishing perimeter Web security requires that data packets be deeply inspected and that Web (as
well as network) firewalls be implemented.
Deep Inspection
A firewall capable of deep inspection is one that can look far enough into the packet to block attacks
at Layers 4-7 (as well as lower levels) of the OSI network model. A deep packet inspection firewall
performs all the tasks of a stateful inspection firewall (such as enforcing network-layer ACLs,
maintaining TCP session state, applying TCP attack prevention, and defragmenting and reassembling
packets) and the following four essential tasks:
• Decryption of application-layer information. Attacks can be disguised in URL-encoding,
Unicode, or SSL-encrypted data. Deep inspection firewalls can decrypt application-specific
protocols. SSL-encrypted data is the most notable. If the firewall cannot decrypt SSL on the fly,
then it leaves a wide opening to applications that are probably the most sensitive.
• Traffic normalization to a consistent, canonical format. A deep inspection firewall must be able
to normalize all traffic to a common, canonical encoding before performing a security string
match. In the HTTP world, this means decoding Unicode, UTF, or Hex to base text. Otherwise,
the firewall compares policies in different formats, and the security strings will not match.
Hackers can take advantage of firewalls that do not normalize traffic by disguising attacks with
different encoding formats.
• Application protocol conformance. Deep inspection firewalls have protocol conformance
detectors built on the TCP/IP protocol for specifications such as HTTP, SMTP, POP3, DNS,
IMAP, and FTP. Only RFC-compliant traffic should be allowed; at the minimum traffic is
manipulated to conform to a protocol.
• Bi-directional payload inspection. The firewall must be able to inspect, manipulate, and apply
policy on the payload of traffic flow to and from the Web servers, in both directions and
simultaneously on all portions of the packet, including HTTP headers, URLs, forms, and
message body.
Web Application Firewalls
Web application firewalls have both similar and unique components relative to traditional network
firewalls.
The major features of traditional firewalls (network ACLs and NAT) have corollaries in the Web
application security field, Web Address Translation (WAT). In many ways you can think of the URL
as the IP address of the Web universe. You apply Web ACLs (WACLs) and WAT to URLs much as
you apply ACLs and NAT to an IP address. Just as a traditional firewall denies or allows traffic based
on connection tables or network ACLs, the Web application firewall denies or allows traffic by
comparing the results of its deep inspection with Web application ACLs.
Introduction 13
Page 16

The other two critical components of a Web application firewall are unique to the demands of Web
application security, that is, profiling application traffic for expected behavior and passive
monitoring. A Web data center is highly dynamic, with new applications, recoded software modules,
and patches constantly changing the landscape. Security professionals need tools and methods for
applying effective policies in such a dynamic environment. Dynamic application profiling and
passive monitoring extend an application firewall to assist in effective policy analysis and
implementation.
14 Barracuda Web Site Firewall Administrator’s Guide
Page 17
Barracuda Web Site Firewall Purpose
The Barracuda Web Site Firewall is designed to provide all the features necessary to implement a
high-speed Web application security perimeter. Figure 1.2 explains the detailed architecture of
Barracuda Web Site Firewall. The Barracuda Web Site Firewall combines all critical Web security
functionality into a single, high performance gateway, including a full-featured Web application
firewall specifically designed to protect the Web data center. The Barracuda Web Site Firewall
performs deep inspection of all Web traffic, enabling it to provide a wide range of intrusion
prevention capabilities at both the network and application layers.
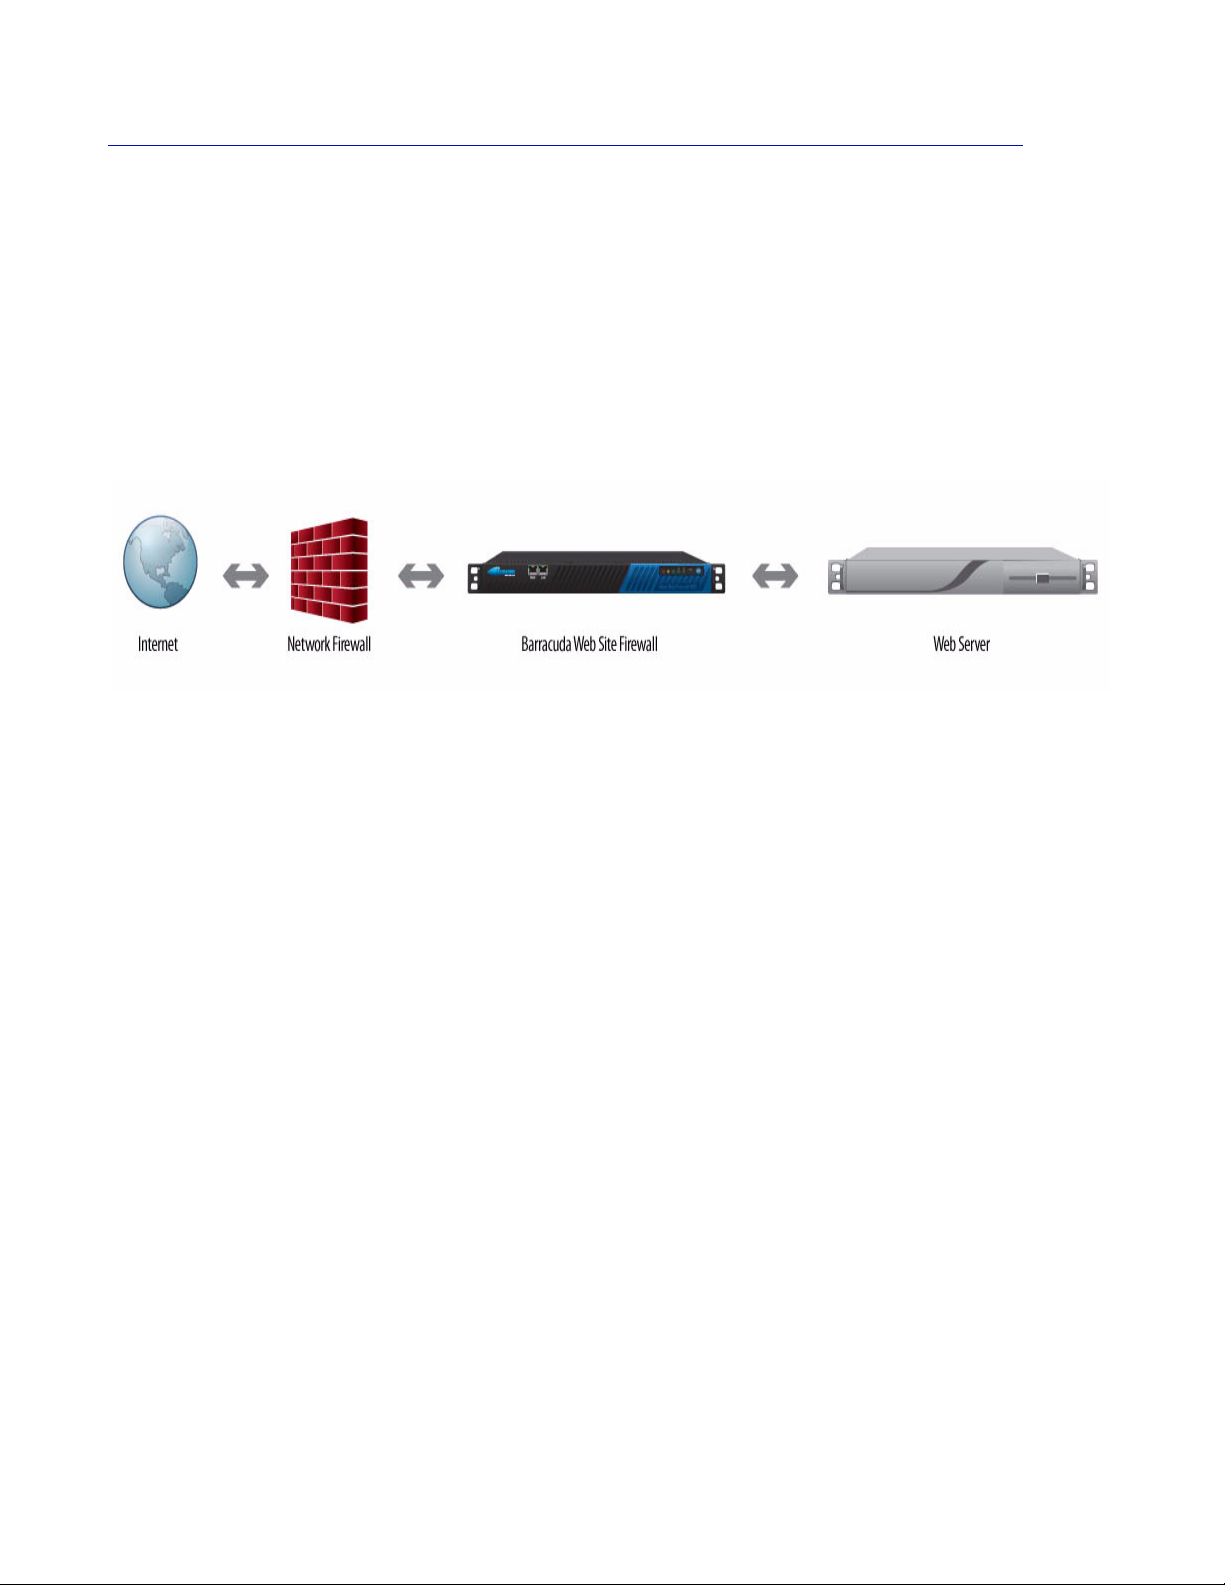
The Barracuda Web Site Firewall can reside in-line behind an existing network firewall as shown in
Figure 1.1 or in other locations to protect the Web data center.
Figure 1.1: Standard Barracuda Web Site Firewall Deployment
The Barracuda Web Site Firewall's deep inspection capabilities enable it to examine application-layer
traffic and apply policies defined in ACLs to individual applications or entire groups of applications.
In addition, the Barracuda Web Site Firewall can analyze data in both directions, profile application
behavior to define an allowed normal behavior set, and passively monitor policies before putting them
into action. The Barracuda Web Site Firewall provides an extensive range of application security and
optimization features.
The Barracuda Web Site Firewall physically separates Web traffic from management operations by
providing separate ports for data (two on the front) and management (one on the back), ensuring that
administrators never have access to the Web traffic itself. When the Barracuda Web Site Firewall is
in operation, data traffic is never passed to the management system. An attacker cannot access the
management system, because it is effectively blocked from the data control and forwarding ports.
The Barracuda Web Site Firewall stores highly confidential information, such as keys and certificates,
on an internal disk drive that is fully encrypted.
Introduction 15
Page 18
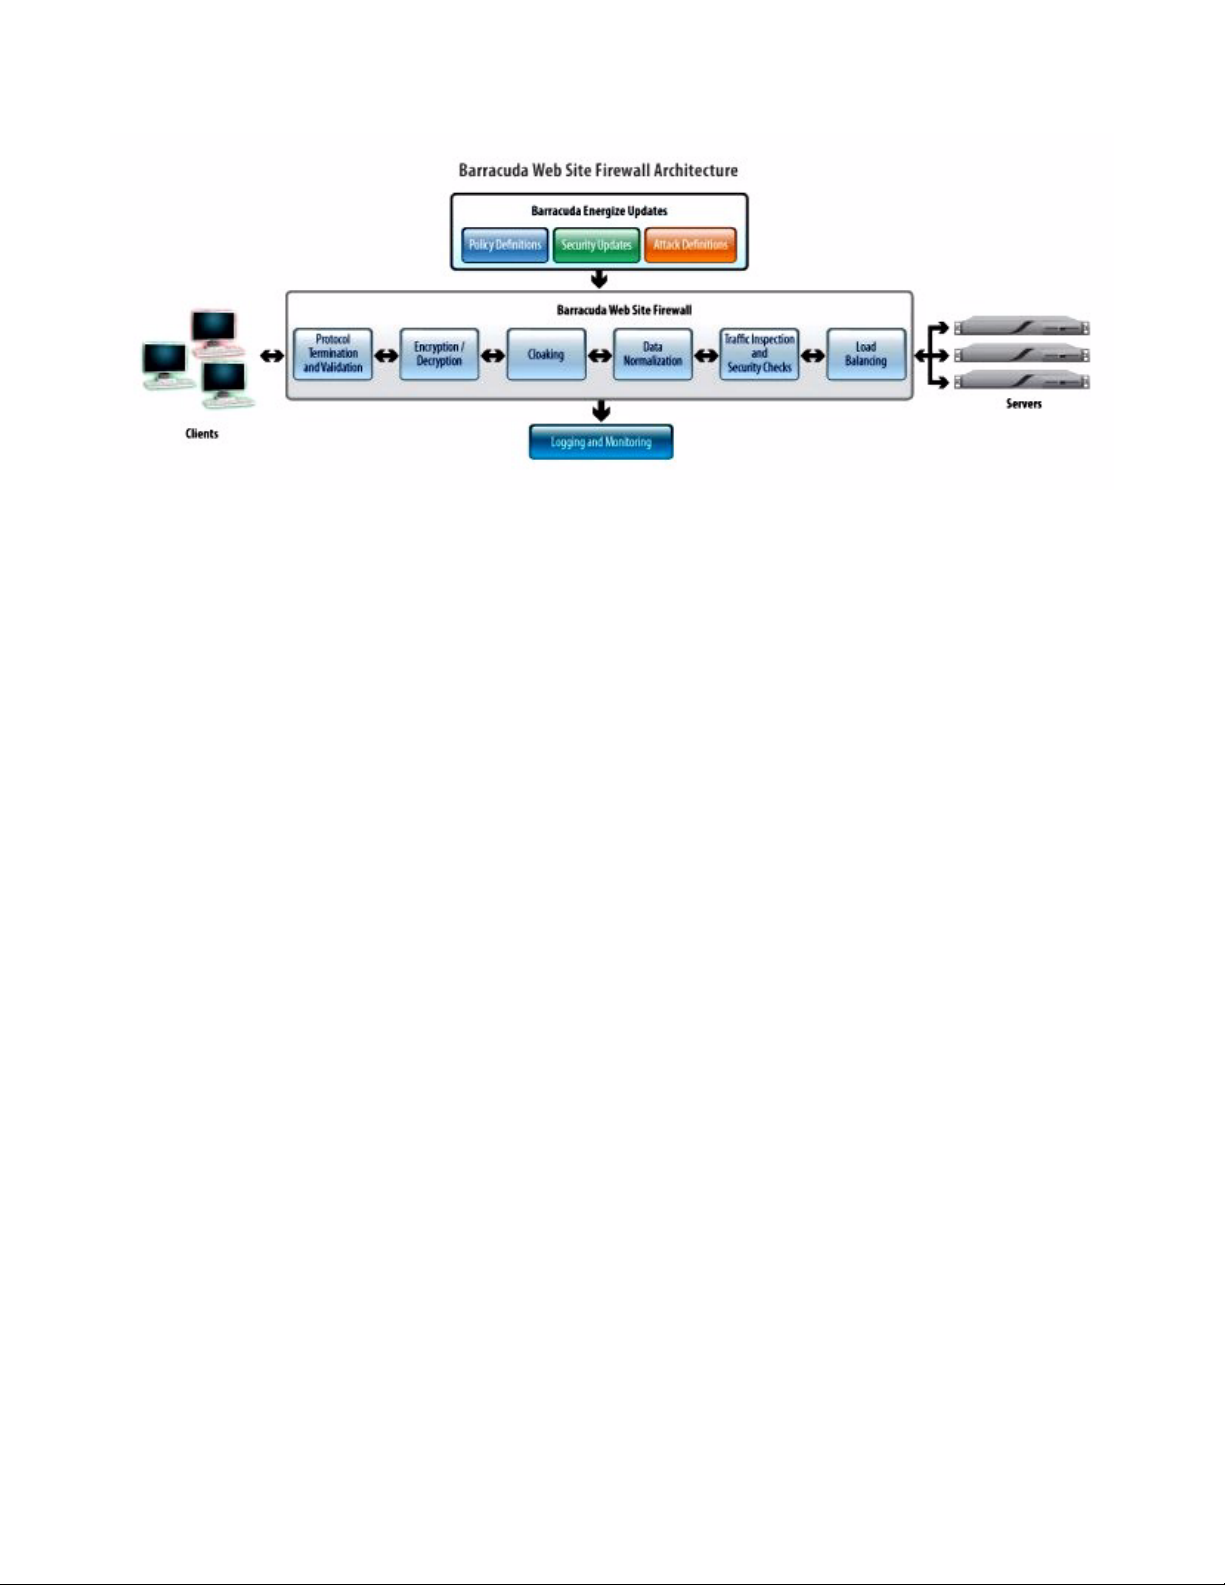
Figure 1.2: Barracuda Web Site Firewall Architecture
16 Barracuda Web Site Firewall Administrator’s Guide
Page 19

Features of Barracuda Web Site Firewall
Barracuda Web Site Firewall supports features designed specifically to address the problems
discussed above. These features include the following:
Web Firewall ...................................................................................... 17
Load Balancing..................................................................................17
Website Cloaking ............................................................................... 18
Policy Recommendation Wizard ........................................................18
Security Policies ................................................................................ 18
Passive Monitoring ............................................................................ 19
Custom Security per Application....................................................... 20
SSL Encryption .................................................................................. 20
Certificate Management..................................................................... 20
Performance....................................................................................... 20
High Availability................................................................................21
Energize Updates ............................................................................... 21
Logging and Reporting ...................................................................... 21
Usability.............................................................................................21
Web Firewall
The Barracuda Web Site Firewall proactively protects Web applications by performing deep
inspection of all Web traffic, enabling it to provide a wide range of intrusion prevention capabilities.
The Barracuda Web Site Firewall supports application firewalls that can inspect and enforce security
policy at all layers.
At the application layer, the Barracuda Web Site Firewall proactively blocks attacks before they reach
the Web server, preventing malicious requests and embedded software code from ever reaching the
target application. The Barracuda Web Site Firewall defragments, normalizes, and decodes all
incoming requests; examines them for validity and correct formation; and only allows properly
formatted and RFC-compliant requests to pass through. Known patterns of malicious activity are
blocked and invalid input embedded in headers, forms, and URLs is stopped. The Barracuda Web Site
Firewall enforces Web address translation, request limits, URL normalization, and cookie security.
The Barracuda Web Site Firewall stops entire classes of attacks, both known and unknown, including
Day Zero attacks. It thwarts common Web hacking techniques such as cross site scripting, buffer
overflows, forceful browsing, and SQL injection.
Each Web firewall can be defined at a granular level. For example, consider a typical CGI script that
accepts a wide range of parameters in form fields such as transaction ID, account number, date, and
password. The password parameter might legitimately include special characters like an exclamation
mark (!) that in other situations could signal a metacharacter used to launch a malicious script. While
general ACLs could deny these metacharacters, a specific ACL for just the password parameter would
allow necessary special characters.
Load Balancing
The Barracuda Web Site Firewall has the capability to act as a stand-alone load balancer or in
conjunction with other load balancers. It can be situated in front of a set of servers and distribute
incoming traffic across the servers based on an algorithm.
Introduction 17
Page 20

The Barracuda Web Site Firewall includes the following load-balancing features:
• Sends traffic requests to a collection of servers according to a user-configured algorithm.
• Automatically identifies the status of a server for appropriate routing of traffic.
• Add and removes servers without interrupting network traffic.
• Provides persistence support that allows a user to maintain connection integrity between a client
and a Web application.
• Provides redirect support that defines the HTTP redirect response when all servers in a server
group are deemed to be out of service.
Website Cloaking
Most successful Web attacks begin by probing a network for weaknesses. Readily available tools on
the Internet make it easy for potential intruders to scan a Web site for information about applications,
servers, and URLs. The Barracuda Web Site Firewall provides Website cloaking capabilities that
make enterprise Web resources invisible to hackers and worms scanning for vulnerabilities. The
Barracuda Web Site Firewall hides URL return codes, HTTP headers, and back-end IP addresses.
Because the Barracuda Web Site Firewall fully terminates all inbound and outbound TCP/IP sessions,
there is no direct access to Web servers, application servers, operating systems, or patches running on
the protected Web sites. With an Barracuda Web Site Firewall deployed in front of Web applications,
critical information that could be used to exploit vulnerabilities is completely inaccessible, making it
less likely that hackers or worms will be able to launch a successful attack.
Policy Recommendation Wizard
Policy Wizard simplifies the human intervention to allow the false- positives (URLs and parameters
that should be allowed but are not allowed). For all the blocked requests or responses in the firewall
logs, the policy wizard recommends an action(s) which will remove it from being generated in the
future. If, for a log entry which is identified as a false positive, the recommended action is accepted,
the policy wizard automatically applies the fix without the user having to manually locate and change
the configuration. This greatly simplifies the administration and monitoring of the Barracuda Web
Site Firewall.
Security Policies
The Barracuda Web Site Firewall provides default security policies to define strict checks to a
Website and Web applications. Apart from these default policies, you can create customized policies.
Each policy is a collection of nine sub-policies which protects against:
• HTTP protocol compliance
• SQL injection blocking
• OS command injection protection
• XSS protection
• Form/cookie tampering defense
• Denial of Service Protection
• Web site cloaking
18 Barracuda Web Site Firewall Administrator’s Guide
Page 21

Request Limits
Enforcing size limits on the HTTP request header fields prevents the request with malicious code to
pass. Requests that have fields larger than the defined lengths are dropped. Proper configuration of
limits helps mitigate buffer overflow exploits that lead to Denial of Service (DoS) attacks.
Cookie Security
Cookie Security reduces the Cross Site Scripting Attacks using HttpOnly cookies. It guarantees
confidentiality of the cookie and avoids tampering of the cookie value. A shorter timeout interval can
be configured for cookies to help minimize the chances of cookie stealing.
URL/ Parameter Protection
URL Protection s
ettings protects the service against web attacks in the absence of a URL profile.
Parameter Protection protects the service against attacks based on parameter values in the absence
of a parameter profile.
Data Theft Protection
Data Theft Protection identifies confidential personal or business information such as social security
numbers, credit card information, and other privileged personal or corporate information such data in
responses sent by the server and protect it against exposure.
URL Normalization
Barracuda Web Site Firewall normalizes all traffic into a standard or "canonical" form before
applying any security policy string matches. In the HTTP world, this means decoding Unicode, UTF,
or Hex to base text. Otherwise, hackers can disguise attacks within different encoding formats that the
firewall might not detect using a string match.
Global ACLs
Global ACLs defines strict Access Controls (ACLs) to a Website and services.
Action Policy
Action Policy specifies the action to be taken for a particular type of Web attack.
Passive Monitoring
Configuring a Web firewall can have unintended consequences. Applying inappropriate rules can
adversely impact current application behavior. Because of this, many administrators are hesitant to
enforce the highest levels of security. Passive monitoring is an essential feature for application
security, as it lets administrators test policies non-intrusively before putting them into action.
The Barracuda Web Site Firewall provides a passive mode where a rule’s effects can be observed
before the rule is actively applied. The administrator can then analyze the behavior to determine if the
policy is appropriate or has unintended consequences.
For example, for a new Barracuda Web Site Firewall implementation, an administrator can configure
ACLs with passive monitoring and then deploy the device in line. The Barracuda Web Site Firewall
then generates log events for traffic that would have been blocked. The device also supports passive
Introduction 19
Page 22

monitoring for specific ACLs, so administrators can test the effects of security policy changes without
affecting production traffic.
Custom Security per Application
The Barracuda Web Site Firewall allows administrators to manage multiple security zones from a
single gateway. Different applications can require varying sets of security policies. For example, a
business-to-business extranet application might require a Web firewall, encryption, authentication,
and detailed transaction logging, while an HR portal might only require encryption and moderate
logging. The Barracuda Web Site Firewall provides a single, consolidated way to manage security
customized to each application.
SSL Encryption
The Secure Sockets Layer (SSL) protocol provides an authenticated (public and private key pair),
secure (encrypted), and reliable (integrity check) connection. Many businesses rely on SSL
encryption to protect transactions from being compromised. Supporting SSL encryption can,
however, be an expensive and time consuming process.
The Barracuda Web Site Firewall lets enterprises easily encrypt entire Web sites using SSL. No
changes to back-end applications or servers are required. The Barracuda Web Site Firewall fully
terminates incoming HTTPS sessions and automatically transforms unencrypted URLs (HTTP) into
encrypted ones (HTTPS).
The Barracuda Web Site Firewall supports both SSL strengths: 40-bit and 128-bit encryption.
(Strength refers to the length of the session key that each encrypted transaction generates; longer keys
are considered more difficult to break.) The Barracuda Web Site Firewall also supports both the SSL
and the Transport Layer Security (TLS) protocols.
The Barracuda Web Site Firewall off-loads all SSL processing from the servers, freeing processing
resources and providing an instant performance boost for servers. Without SSL processing creating a
bottleneck, existing servers can better handle growing Web traffic. Customers experience faster
response times and the security of knowing that their transactions are safe from online eavesdropping.
Certificate Management
Barracuda Web Site Firewall allows users to upload PKI Objects to manage the encryption and
decryption process. This includes signed and intermediary certificates purchased from Certificate
Authorities.
Users can also generate and use self-signed certificates using Barracuda Web Site Firewall.
Performance
The top of the line Barracuda Web Site Firewall can handle up to 1 million simultaneous TCP sessions
and 4,000 full SSL sessions per second. None of this processor-intensive work is off-loaded to other
system servers, thus significantly reducing the performance cost of enhanced Web security.
The data ports come in either 10/100-Mb or 1-Gb speeds. You can deploy the Barracuda Web Site
Firewall in-line, in which one data port is for external (front-end) traffic with the Web while the other
20 Barracuda Web Site Firewall Administrator’s Guide
Page 23

is for internal (back-end) traffic with the Web servers, or one-armed, in which a single data port is
used for both internal and external traffic.
The Barracuda Web Site Firewall contains load balancing features and is designed to complement
existing traffic management devices. The Barracuda Web Site Firewall integrates critical reliability
services for security enforcement by clustering or load balancing multiple Web servers into a single
redundant system. It identifies failed applications and transparently places those servers in or out of
service.
High Availability
Two Barracuda Web Site Firewalls can be configured as a fault-tolerant cluster pair. In this
configuration each Barracuda Web Site Firewall manages its set of active services, but each also
functions as a redundant standby gateway for the services running on its partner. Should one of the
Barracuda Web Site Firewalls have a problem or go into single-user mode, the active services on that
gateway automatically move to the partner gateway. The active Barracuda Web Site Firewall
maintains the state information during a failover, so the sessions can continue even when a failover
occurs.
In most areas of the Barracuda Web Site Firewall, administrators can make dynamic configuration
changes without taking the system off-line. This allows you to add, modify, or delete services without
adversely affecting existing services.
Energize Updates
Once you install the Barracuda Web Site Firewall, your Energize Update and Instant Replacement
subscriptions are most likely active. However, it is important for you to verify the subscription status
so that your Barracuda Web Site Firewall can continue to receive the latest attack and security
definition files released by Barracuda Central. The Energize Update service is responsible for
downloading these updates to your Barracuda Web Site Firewall.
Logging and Reporting
The Barracuda Web Site Firewall uses the logging feature to record occurrence of significant
events.These log messages of the Barracuda Web Site Firewall are extensive and have filtering
capabilities for easing the search. These log messages can be used to analyze the traffic for suspicious
activity and also fine tune the web firewall policies
The Barracuda Web Site Firewall reporting feature help the system administrators in their day-to-day
security management and statistical analysis of the log messages.The reporting feature augments the
management capabilities available with the Barracuda Web Site Firewall. Using this module, reports
can be generated based on all the logged information.
Usability
The Barracuda Web Site Firewall includes a graphical user interface (GUI) for administering and
configuring the Barracuda Web Site Firewall. The GUI interface is designed to provide a consistent
look and feel across multiple tasks and to leverage standard interfaces that many users already know.
Introduction 21
Page 24

Ease of use is a very important feature in Web Site Firewalls, since the underlying technology and
related configuration can be complex. Barracuda Web Site Firewall GUI has been specifically
designed to facilitate easy deployment and administration of the product for intermediate as well as
advanced users. For new users, the default security policies will provide adequate protection out of
the box. Advanced users can use the advanced GUI screens to customize their security policies.
22 Barracuda Web Site Firewall Administrator’s Guide
Page 25

Chapter 2
Web Site Firewall Concepts
This chapter provides an overview of the Barracuda Web Site Firewall and includes the following
topics:
• Basic Terminology on page 24
• Service on page 26
• Trusted Host on page 27
• Web Site Security on page 28
• Load balancing on page 30
• High Availability on page 31
Web Site Firewall Concepts 23
Page 26

Basic Terminology
The following is a list of some of the terms used by the Barracuda Web Site Firewall. Understanding
these particular terms will aid administering your Barracuda Web Site Firewall.
Table 2.1: Basic terminology
Term Description
ACL A network Access Control List (ACL) defines an IP firewall rule. The rules
Certificate An encrypted digital statement that establishes credentials of a user. It
Cookie Poisoning HTTP is a stateless protocol, which means that it does not remember the
specify matching criteria for a packet and a corresponding action. If the
packet matches the criteria, the configured actions are allowed.
contains a public key and a variety of other identification information. A
certificate is a secure object that was created based on a distinguished name
(DN) and the key. A certificate can be created and stored locally in Barracuda
Web Site Firewall. It can also be installed and loaded from a third-party
company and then stored locally.
connection status and contents of a session. Cookies are small files on the
hard drive or in memory that maintain the state of a Web application. Cookies
usually contain a session identifier (session ID), and they can contain user
credentials such as the user ID and password. Cookie poisoning is an attempt
to modify the data in the cookie, usually to assume another user's online
identity.
Cross-site Scripting Cross-site scripting (XSS) is a type of vulnerability typically found in web
applications which allow code injection by malicious web users into the web
pages viewed by other users. An exploited cross-site scripting vulnerability
can be used by attackers to bypass access controls such as the same origin
policy. Vulnerabilities of this kind have been exploited to craft powerful
phishing attacks and browser exploits.
Forceful Browsing Forceful browsing is an attempt to access files and directories in a Web
application without using the Web application to provide the links to the files
and directories. An attacker who attempts to execute a forceful browsing
attack would see a directory such as
http://someapp.com/guests/welcome.html and attempt to go to
http://someapp.com/members/welcome.html. In this way, the attacker gains
access to the members area of the Web site without supplying proper
credentials.
Load Balancing Load balancing distributes traffic to servers according to a specific algorithm.
Load balancing is managed by the Barracuda Web Site Firewall on a per
application basis.
Private Key A secret key in the asymmetric key pair and in the sole possession of a single
owner. A private key is the secret portion of an encryption/decryption key pair.
It should be known only to the person exchanging a secure transaction. A
private key can be created and stored locally in an Barracuda Web Site
Firewall.
SQL Injection SQL injection is a technique that exploits a security vulnerability occurring in
the database layer of an application. The vulnerability is present when user
input is either incorrectly filtered for string literal escape characters embedded
in SQL statements or user input is not strongly typed and thereby
unexpectedly executed.
24 Barracuda Web Site Firewall Administrator’s Guide
Page 27

Term Description
Server This container represents the server properties. It contains all the parameters
that are configurable for the server. This resource is created under a server
group.
Service A user-designed entry point for controlled access to the Web site. A service
sets the front-end interface (VIP) and a variety of possible controls (such as
SSL encryption, authentication, load balancing, and caching policies) for the
Web site.
Signed Certificate A signed certificate is a certificate obtained from a third party CA organization.
SSL Secure Socket Layer. This is an encryption technology to provide secure Web
traffic.
Syslog This specifies the mechanism for storing log messages or events from various
network elements.
TCP Session Hijacking To hijack a TCP session, the attacker must be able to assume the identity of
one end of the TCP session. (The Web [HTTP] uses TCP as its transport
mechanism.) Usually the attacker spoofs the IP address of one end of the
session, and it can then send and receive as this new party in the
conversation.
Trusted Certificate A trusted certificate is a certificate sent from a CA. Including the CA's
certificate as a trusted certificate implies that any entity that has a certificate
signed by the CA will be authenticated for the SSL services that a Barracuda
Web Site Firewall provides.
Virtual IP (VIP) The user-defined IP address (registered if it is used for Internet access) on
which the Barracuda Web Site Firewall accepts traffic for a configured
application. In a redundant configuration it is a virtual address that applies
regardless of which Barracuda Web Site Firewall is managing the application
at any given time.
Web Logs These logs contain messages about actions that occurred on a customer's
Web site protected by an Barracuda Web Site Firewall. While Web logs is a
common industry term, in this context the term Web application logs is used
to distinguish these logs from Web firewall logs.
Web Worms Web worms are a special type of malicious code ("malware") that target Web
applications. A worm is an automated form of a virus that requires no user
interaction to propagate. A Web worm uses port 80 (HTTP) or 443 (HTTPS)
to target Web applications.
Web Site Firewall Concepts 25
Page 28

Service
Web Site Profiles
A Service processes Web (HTTP and HTTPS) traffic between front-end clients and back-end Web
servers. The service defines a transport layer access point. A front-end virtual IP (VIP) and port
number identifies the service. (The back-end interface is specified under
Config
page; see Advanced IP Config help for more information.) The front-end and back-end
parameters identify the external and internal interfaces for the service.
By default all services use 'default' as the Web Firewall Policy. Depending on your need you can use
the available Web Firewall polices or create a new policy specific to that service under
POLICIES > Policy Manager
the IP address and port configured on the service.
The structure of the Web Site is called the profile of the Web Site.Web Site Profiles are used to
describe a Web Site. Profiles can be used to specify fine grained security settings for individual URLs
or form parameters.
URL Profiles are defined for each Web Site and provide security settings applicable at the defined
URL. Form parameters can be secured by creating parameter profiles under the corresponding URL
Profile.
page. These policies define the processing of HTTP requests destined to
ADVANCED > Advanced IP
SECURITY
The profile is distinct from the action that is what happens when a request is not conforming to the
profile received. The combination of a profile and a set of action preferences determine how a nonconforming request is disposed off.
For example, a profile contains information about a particular form URL with five parameters and
specifies each parameter's name. This means that a request with four or six parameters is treated as
violation of the profile. But, the action to be taken on different types of violations is not part of the
profile. The action can be deny the request, only log it or just ignore it.
A Web Site profile is auto generated when a new service is added to the Barracuda Web Site Firewall.
If the parameter “Use Profile” is set to “Yes”, then URL profiles and parameter profiles must be
created for validating the requests coming for that service.
Server Monitors
The Server Monitor is the mechanism used by the Barracuda Web Site Firewall to detect the
availability of a downstream real server. It can be configured on a per server basis to use one of several
different methods to establish the availability of a real server.
26 Barracuda Web Site Firewall Administrator’s Guide
Page 29

Trusted Host
The Barracuda Web Site Firewall allows you to designate a Trusted Host, that is, to specify an IP
address for which authentication is not necessary. In this case, it is assumed that any request from that
address is from an allowed user, and all user requests from that IP address are exempted from
authentication.
Web Site Firewall Concepts 27
Page 30

Web Site Security
Protocol Checks
At a basic level, the Barracuda Web Site Firewall verifies that all inbound requests comply with the
HTTP specification. For example, only the request with version HTTP/1.0 and HTTP/1.1 are allowed
and the request with version HTTP/0.9 and below is blocked automatically.
Request Limits
Message headers included in an HTTP request describe the contents of each message. However, the
request could include malicious code that a hacker added (injected) into the message header.
Enforcing size limits on the HTTP request header fields prevents the request with malicious code to
pass. (Requests that have fields larger than the defined lengths are dropped.) Proper configuration of
limits helps mitigate buffer overflow exploits that lead to Denial of Service (DoS) attacks.
Cloaking
Most successful Web attacks begin by probing a network for weaknesses. Readily available tools on
the Internet make it easy for potential intruders to scan a Web site for information about applications,
servers, and URLs. The Barracuda Web Site Firewall provides Web Site cloaking capabilities that
make enterprise Web resources invisible to hackers and worms scanning for vulnerabilities. The
Barracuda Web Site Firewall hides URL return codes, HTTP headers, and back-end IP addresses.
Because the Barracuda Web Site Firewall fully terminates all inbound and outbound TCP/IP sessions,
there is no direct access to Web servers, application servers, operating systems, or patches running on
the protected Web sites. With an the Barracuda Web Site Firewall deployed in front of Web
applications, critical information that could be used to exploit vulnerabilities is completely
inaccessible, making it less likely that hackers or worms will be able to launch a successful attack.
Cookie Security
A cookie is a simple text file provided by a Web server. Cookies provide a mechanism to store Web
application state information on a client's navigation platforms, such as browsers and other user
agents. Cookies are used to store user preferences, shopping cart items, and sometimes very sensitive
information such as registration and login information. If the structure of the cookie can be revealed,
the user's information is vulnerable to attack.
A server can send a cookie, which is a packet of whatever information the server chooses to send (such
as information to authenticate or identify a user), to maintain state between otherwise stateless HTTP
transactions. Because cookies are simple text files, they can easily be altered and then used to launch
a Web attack. Cookies can also be stolen and sensitive information, such as client information, can be
obtained from the message.
28 Barracuda Web Site Firewall Administrator’s Guide
Page 31

Allow/Deny Rules
The Barracuda Web Site Firewall allows you to configure fine grained policy per URL. These policies
control which URLs are allowed or explicitly denied. The rules can be configured per Web Site under
WEBSITES > Allow/Deny > URL ACLs or globally under SECURITY POLICIES > GLobal ACLs.
Web Site Firewall Concepts 29
Page 32

Load balancing
A load balancer is a networking device that distributes traffic to servers, so that the demand for the
servers is evenly distributed. This ensures that one server is not over-burdened and the Web traffic is
sent faster to its intended destination.
The Barracuda Web Site Firewall has the capability to act as a load balancer. It can check incoming
traffic intended for the servers, and then send the traffic to an appropriate server based on the
algorithm used. When requests are given to a service, they are load balanced to the servers, according
to the specified algorithm. This feature is available only with the purchase of Barracuda Web Site
Firewall model 460 and higher.
Load Balancing Features of the Barracuda Web Site Firewall:
• sends the traffic requests to a collection of servers according to a user-configurable algorithm.
• automatically identifies the status of a server to appropriate routing of traffic.
• adds and removes servers without interrupting network traffic.
• provides Persistence support within load balancing that allows a user to maintain connection
integrity between a client and a Web server application. This policy sends traffic back and forth
to a specific client and its receiving server until the session ends or the cookie expires. This is an
essential feature for applications that require a conversation to complete a multi-phased
transaction. For example, in an E-commerce application this policy maintains the connection
from the time an online customer begins filling a shopping cart until that customer purchases the
cart contents and completes the transaction.
• provides Redirect support within load balancing that defines the HTTP redirect response when
all servers in a server group are deemed to be out-of-service.
30 Barracuda Web Site Firewall Administrator’s Guide
Page 33

High Availability
Enabling High Availability (HA) on your Barracuda Web Site Firewall allows you to connect it to a
backup Barracuda Web Site Firewall to act as a fail-over server in case your primary system fails for
any reason. This feature is available only with the purchase of two (2) Barracuda Web Site Firewalls,
model 360 or higher.
For High Availability to be active, both systems must be located on the same network since the
secondary unit will take over the services of the primary Barracuda Web Site Firewall whenever it
does not detect a heartbeat from the primary system.
Note
To enable High Availability, the Software versions must be same on both units in a cluster.
Web Site Firewall Concepts 31
Page 34

32 Barracuda Web Site Firewall Administrator’s Guide
Page 35

Chapter 3
Getting Started
This chapter provides general instructions for deploying and installing the Barracuda Web Site
Firewall. This chapter covers the following topics:
• Deployment Modes for the Barracuda Web Site Firewall on page 34
• Initial Setup on page 40
Getting Started 33
Page 36

Deployment Modes for the Barracuda Web Site Firewall
Before deploying the Barracuda Web Site Firewall, user must get acquainted with the interfaces
present on the Barracuda Web Site Firewall. They are:
• WA N : The WAN interface is connected to the client side or Internet facing network.
• LAN: The LAN interface is connected to the server side or Application facing network.
• MGMT (Management): The MGMT interface is connected to a separate out-of-band network
for securely managing the Barracuda Web Application Controller. The MGMT port on the
Barracuda Web Application Controller is secure and denies ICMP Pings by default.
• By default the configuration happens through the WAN port
• But it is highly recommended that the configuration happen through the MGMT port
• Virtual IP (VIP): This is a per service IP address configured for each service on the Barracuda
Web Site Firewall. Depending on the mode of deployment, these can be same as or different
from the Real Server IP addresses. In Bridge-path mode, they are the same while in Reverse
Proxy and One Arm mode they are different.
Services on the Barracuda Web Site Firewall can be deployed in the following three modes:
Reverse Proxy (Recommended).......................................................... 36
Bridge-Path........................................................................................37
One-armed ......................................................................................... 37
The deployment mode chosen is usually dependent on the type of network configuration that currently
exists at your site as well as on the types of services that you want from the Barracuda Web Site
Firewall. The Bridge-path is recommended for initial deployment, as it requires the least amount of
invasive changes to your existing network configuration. For this reason the Barracuda Web Site
Firewall is shipped with the bridge mode setting. Depending on your need, you can choose the mode
of operation. To change the mode of operation, go to
appropriate radio button under Operation Mode and click
BASIC > IP Configuration page, select the
Save Changes.
Note
When deploying in either One-armed or Reverse Proxy mode, the Operation Mode should be set
Proxy.
to
Table 3.1 The following table lists the criteria to consider when deciding which deployment strategy
is optimal for your environment.
Table 3.1: Deployment Options
Criteria Reverse Proxy Bridge-Path One-Armed
Maximize network bandwidth (use
both ports)
Create secure path to Web
servers
Minimize change to existing
network infrastructure
Integrate with existing enterprise
load balancers
XX
X
X
X
34 Barracuda Web Site Firewall Administrator’s Guide
Page 37

Table 3.1: Deployment Options
Criteria Reverse Proxy Bridge-Path One-Armed
Establish multiple paths to servers
for testing
Cannot change existing IP
addresses.
XX**
X*
Note:
* - Clients can reach the website either (i) via the Barracuda Web Site Firewall VIP (secure) or (ii)
directly through the server host IP (insecure).
** - Server host can retain IP address, but DNS will have to be changed to point to the VIP for the
website on the Barracuda Web Site Firewall. Also accessing directly via server IP will be insecure
since it bypasses the Barracuda Web Site Firewall.
Getting Started 35
Page 38

Reverse Proxy (Recommended)
In Reverse Proxy, the Barracuda Web Site Firewall is deployed in-line, using both the physical ports
(WAN and LAN) of the device. This is the recommended configuration and/as it provides the best
security, but it requires changes to the existing network infrastructure.
With reverse proxy, the WAN and LAN interface of the Barracuda Web Site Firewall must be on
separate logical networks.
• The servers are moved to a private network connected through a switch on the LAN port.
• The WAN port connects to a switch to which the publicly accessible IP addresses will be routed
from the internet.
Each server in the private network gets a virtual IP on the Barracuda Web Site Firewall. The virtual
IP addresses should be accessible from the internet and should be routed to the WAN port via the
switch connected to it. When a request is received by the Barracuda Web Site Firewall on a VIP
advertised through the WAN port, it inspects it and redirects it to the real server on the private network
via the LAN port.
The following table describes the advantages and disadvantages of deploying your Barracuda Web
Site Firewall in Reverse proxy mode.
Advantages Disadvantages
Full feature availability including Load
Balancing and Instant SSL
Most Secure Deployment Scheme since
backend servers are completely isolated
Fast High Availability failover Deployment requires cutover of live services
Network changes such as Server IP addresses and DNS
mappings are required
Backing out requires undo of all the changes
Figure 3.1: Sample Reverse proxy network layout
36 Barracuda Web Site Firewall Administrator’s Guide
Page 39
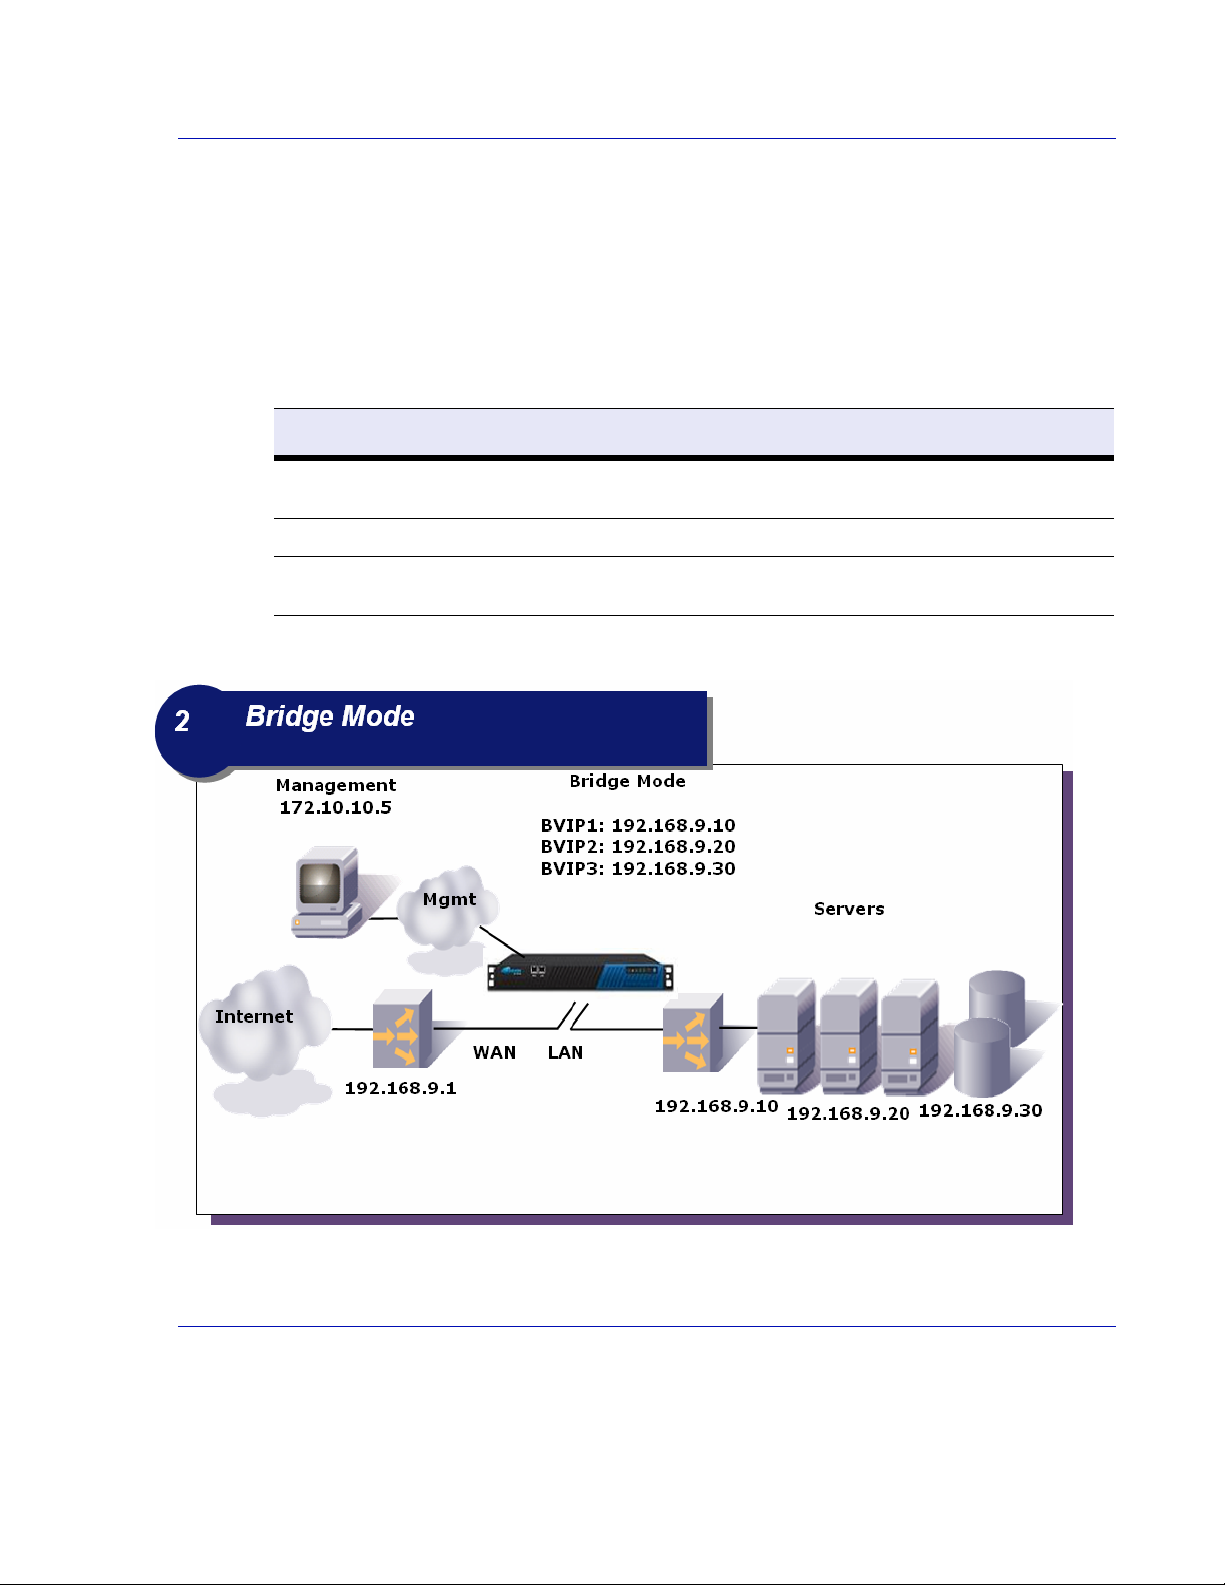
Bridge-Path
Bridge-Path provides an easy configuration scenario by using the same IP address for the VIP and
back-end server. It does not use any extra IP address. Also changes to the server IP addresses or DNS
mappings are not required. Users may place the Barracuda Web Site Firewall inline with their existing
IP infrastructure, and add servers as required without changing IP addresses. With Bridge-Path
deployment, the WAN and LAN interfaces must be on physically separate networks and the LAN
interface must be on the same logical switch as the servers.
The following table describes the advantages and disadvantages of deploying your Barracuda Web
Site Firewall in Bridge-Path mode.
Advantages Disadvantages
Minimal network changes since the existing IP
infrastructure is reused
Real Servers keep their existing IP addresses Less resilient to network misconfigurations
Sensitive to broadcast storms and other errors related to
loops in a Spanning Tree protocol.
Features like Load balancing, Instant SSL and TCP
pooling are not available
Figure 3.2: Sample Bridge-Path network layout
One-armed
One-armed deployment minimizes changes to the existing infrastructure. This option uses WAN port
for both external and internal traffic passing through the Barracuda Web Site Firewall. The network
throughput is less as only one port (WAN) is used.
Getting Started 37
Page 40

The following table describes the advantages and disadvantages of deploying your Barracuda Web
Site Firewall in One-Armed mode.
Advantages Disadvantages
Easier Deployment compared to Reverse
Proxy. Network infrastructure and partitioning
does not need to be changed.
Helps establish multiple path to servers for
testing.
Easier integration with existing enterprise load
balancers.
Requires DNS, IP changes as in Reverse Proxy.
Lower throughput since only one port (WAN) is used.
Not as secure as Reverse Proxy since server can be
accessed directly.
Figure 3.3: Sample One-armed network layout
Best Practise
Barracuda realizes that some customers don’t want to change their IP addressing schemes and that
certain implementation modes might be easier on the migration path to Reverse-Proxy mode. The
following conclusion can be drawn from the above three modes of deployment:
• Using one interface, the One-Armed mode is by far the most transparent and easiest way to plug
into a network, without affecting any existing traffic in the network.
• Using Bridge Mode, no renumbering of IP addresses on either for the Real Servers or for the
client facing IP address for the Service is required. The bridge is transparent, so no existing
services are disrupted, disconnecting it from the network is easy, and all proxy-based security
features at the application layer are supported.
• Reverse-Proxy is the most secure of all topologies and results in a complete security barrier
between the internet and the Web Applications.
38 Barracuda Web Site Firewall Administrator’s Guide
Page 41

In addition, services in each of the modes can be run in Passive or Active mode.
• Passive mode simply logs offending traffic and doesn’t block
• Active mode performs full blocking of threats
So the general practise would be to intially run the service in Passive mode as the application is new,
there is not much traffic on it and then gradually change it to Active mode when the traffic starts
coming in.
Getting Started 39
Page 42

Initial Setup
These are the general steps to set up your Barracuda Web Site Firewall. For more detailed instructions
for each step, see the following reference pages.
Prepare for the Installation
Before installing your Barracuda Web Site Firewall, complete the following tasks:
• Decide which type of deployment is most suitable to your network. For more information on the
• To install the Barracuda Web Site Firewall certain changes might be required to your existing
•(Reverse proxy deployment only) Re-configure the Real Servers with a new private network and
• Identify the TCP port numbers used by the services/applications running on the real servers that
• Verify you have the necessary equipment:
Prepare for the Installation ............................................................... 40
Connect Barracuda Web Site Firewall to Network............................ 41
Configure IP Address and Network Settings ..................................... 41
Configure the Barracuda Web Site Firewall......................................42
Update the Barracuda Web Site Firewall Firmware ......................... 43
Verify Your Subscription Status.......................................................... 43
Update Attack and Security Definitions ............................................ 44
deployment options, see Deployment Modes for the Barracuda Web Site Firewall on page 34.
network. The exact nature of the changes depends upon your existing network configuration and
the mode in which you deploy the Barracuda Web Site Firewall. Network Changes can be
classified as:
• Hardware changes - Changes related to cabling, switches, routers, network interfaces,
etc.
• Configuration changes - Changes related to DNS databases, IP addresses of hosts and
services, router configuration etc.
set the Real Servers’ default gateway to an unused IP address in this subnet. This IP addres will
be assigned to the LAN IP address of the Barracuda Web Site Firewall in step 3a of Configure
the Barracuda Web Site Firewall.
you want to protect.
• Barracuda Web Site Firewall (check that you have received the correct model)
• AC power cord
• Ethernet cables
• Mounting rails (model 660 and higher) and screws
• VGA monitor (recommended)
• PS2 keyboard (recommended)
40 Barracuda Web Site Firewall Administrator’s Guide
Page 43

Connect Barracuda Web Site Firewall to Network
1. Fasten the Barracuda Web Site Firewall to a standard 19-inch rack or other stable location.
Caution
Do not block the cooling vents located on the front and rear of the unit.
2. If using Reverse proxy, then the network switch referenced in the steps below may be the same
physical switch. If using Bridge-Path, however, then separate switches on different Layer 2
networks must be used.
2a. Connect a CAT5 Ethernet cable from the WA N interface on the Barracuda Web Site
Firewall to the network switch where the VIPs reside.
2b. Connect a CAT5 Ethernet cable from the LAN interface on the Barracuda Web Site
Firewall to the network switch where the Real Servers reside.
Note
It is recommended to connect MGMT port located on the back panel of the unit to the network
switch where the VIPs reside.
3. Connect the following to your Barracuda Web Site Firewall:
•Power cord
•VGA monitor
• PS2 keyboard
After you connect the AC power cord, the Barracuda Web Site Firewall may power on for a few
seconds and then power off. This behavior is normal.
4. Press the Power button located on the front of the unit.
The login prompt for the administrative console displays on the monitor, and the power light on
the front of the Barracuda Web Site Firewall turns on. For a description of each indicator light,
refer to Understanding the Indicator Lights on page 75.
Configure IP Address and Network Settings
The Barracuda Web Site Firewall is assigned a default IP address of 192.168.200.200. You can
change the address using the administrative console or by pressing and holding the RESET button on
the front panel.
Holding RESET for eight seconds changes the default IP address to 192.168.1.200. Holding the
button for 12 seconds changes the IP address to 10.1.1.200.
To set a new IP address from the administrative console:
1. Connect your keyboard and monitor directly to the Barracuda Web Site Firewall.
2. At the barracuda login prompt, enter admin for the login and admin for the password.
The User Confirmation Requested window displays the current IP configuration of the
Barracuda Web Site Firewall.
Getting Started 41
Page 44

Using your Tab key, select Change and press Enter to change the IP configuration.
3.
4. Enter the new IP address, netmask, and default gateway for your Barracuda Web Site Firewall.
Save to enter your changes. (The Primary and Secondary DNS fields are optional at this
Select
time, but if not entered at this step then they must be entered in step 3c. of To configure the
Barracuda Web Site Firewall on page 42). Select
Exit.
The new IP address and network settings are applied to your Barracuda Web Site Firewall.
Configure the Barracuda Web Site Firewall
After specifying the IP address of the Barracuda Web Site Firewall and opening the necessary ports
on your corporate firewall, configure the Barracuda Web Site Firewall from the Web administration
interface. Make sure the system being used to access the Web interface is connected to the same
network as the Barracuda Web Site Firewall, and that the appropriate routing is in place to allow
connection to the Barracuda Web Site Firewall’s IP address via a Web browser.
To configure the Barracuda Web Site Firewall
1. From a Web browser, enter the IP address of the Barracuda Web Site Firewall followed by port
8000.
For example: http://192.168.200.200:8000.
2. To log into the administration interface, enter admin for the username and admin for the
password.
3. Select BASIC > IP Configuration, and perform the following steps:
3a. Enter the following information in the LAN IP Configuration section:
• LAN IP Address. The address that connects the Barracuda Web Site Firewall to the
Real Server network.
When in Reverse proxy mode, the LAN interface provides the default gateway for the
Real Servers. All Real Server IP addresses need to be in the same subnet as the LAN
IP address because they will need to use this IP as their default gateway.
• LAN Netmask.The subnet mask tied to the LAN.
3b. Enter the IP address of your primary and secondary DNS servers (if these have not yet
been set up).
3c. Enter the default hostname and default domain name of the Barracuda Web Site
Firewall.
3d. Click Save Changes.
Note
When you reconfigure the WAN IP address of the Barracuda Web Site Firewall on the IP
Configuration page, you will be disconnected from the administration interface. Please log in again
using the new IP address.
4. Select BASIC > Administration, and perform the following steps:
4a. Assign a new administration password to the Barracuda Web Site Firewall (optional).
This step is highly recommended.
4b. Make sure the local time zone is set correctly.
Time on the Barracuda Web Site Firewall is automatically updated via NTP (Network
Time Protocol). It requires that port 123 is opened for outbound UDP (User Datagram
Protocol) traffic on your firewall (if the Barracuda Web Site Firewall is located behind
one).
42 Barracuda Web Site Firewall Administrator’s Guide
Page 45

It is important that the time zone is set correctly because this information is used to
coordinate traffic distribution and in all logs and reports.
4c. If desired, change the port number used to access the Barracuda Web Site Firewall
administration interface. The default port is 8000.
4d. Enter the amount of time for the session expiration length (in minutes) of your Web
administration interface session.
At expiration, you are required to log back into the administration interface.
4e. (Optional) Specify your local SMTP server. Enter the email address for your
Administrator to receive system and threat email alerts and notifications.
4f. Click Save Changes.
Update the Barracuda Web Site Firewall Firmware
To update the firmware on the Barracuda Web Site F irewa ll:
1. Select Advanced > Firmware Update.
2. Read the release notes to learn about the latest features and fixes provided in the new firmware
version.
3. Click Download Now next to Latest Version. Click OK on the download duration window.
Updating the firmware may take several minutes. Do not turn off the unit during this process.
Download Now is disabled if the Barracuda Web Site Firewall is already up-to-date with the
latest firmware version.
The Barracuda Web Site Firewall begins downloading the latest firmware version. You can
view the download status by clicking
once the download is complete.
4. Click Apply Now when the download completes.
5. Click OK when prompted to reboot the Barracuda Web Site Firewall.
A Status page displays the progress of the reboot. Once the reboot is complete, the login page
appears.
Refresh. A “Firmware downloaded” message displays
Verify Your Subscription Status
Once you purchased the Barracuda Web Site Firewall, your Energize Update and Instant Replacement
subscriptions are most likely active. However, it is important for you to verify the subscription status
so that your Barracuda Web Site Firewall can continue to receive the latest updates to the Intrusion
Prevention System from Barracuda Central. The Energize Update service is responsible for
downloading these updates to your Barracuda Web Site Firewall.
To check your subscription status:
1. Select BASIC > Status.
2. From the Subscription Status section, verify that the word Current appears next to Energize
Updates
3. The Barracuda Web Site Firewall should arrive with the Energize Updates (and Instant
Replacement where applicable) subscription already enabled. If it is, then this step can be
skipped. Otherwise, to enable your subscription:
and Instant Replacement Service (if purchased).
3a. Click the Activate link as shown in Figure 3.4. The product activation displays in a
new browser window.
Getting Started 43
Page 46
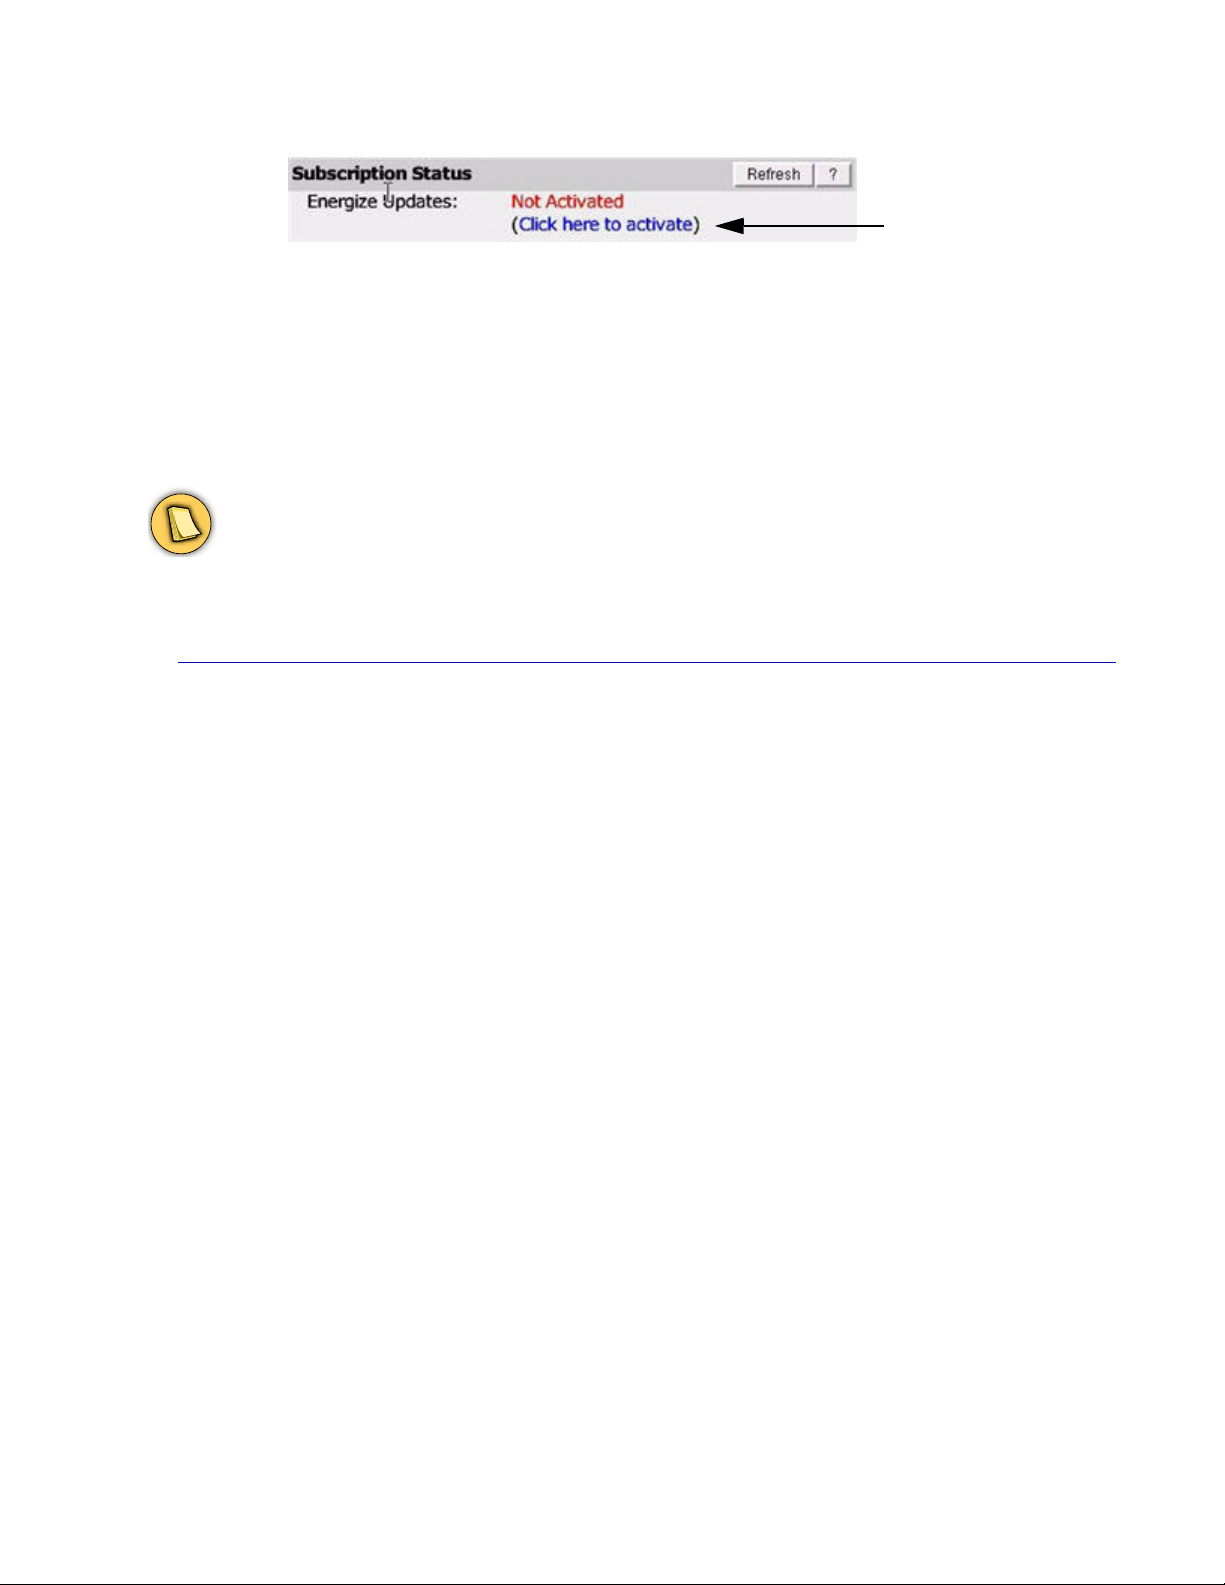
Figure 3.4: Location of the Activate Link
3b. On the Product Activation page, fill in the required fields and click Activate. A
confirmation page opens to display the terms of your subscription.
3c. After a few minutes, from the Barracuda Web Site Firewall administration interface,
Refresh in the Subscription Status section of the BASIC > Status page. The status
click
of your subscriptions displays as Current.
Note
If your subscription status does not change to Current, or if you have trouble filling out the Product
Activation
page, call your Barracuda Networks sales representative.
Update Attack and Security Definitions
Click to activate your
subscription
To apply latest attack and security definitions.
1. Select Advanced > Energize Updates.
2. Select Hourly or Daily for Automatically Update. The recommended setting is Hourly for Attack
Definition Updates and Security Definition Updates.
3. Check to see if the current version is the same as the latest general release. If the rules are up-to-
date, proceed to the next section. If the rules are not up-to-date, continue to the next step.
4. Click Update to download and install the latest available attack or security definitions onto the
Barracuda Web Site Firewall.
5. Click Save Changes.
44 Barracuda Web Site Firewall Administrator’s Guide
Page 47

Note
Chapter 4
Securing a Web Site
This chapter describes the configuration and monitoring tasks you can perform from the Web
interface. The following topic is covered:
• Creating Services on page 46
For more detailed information about a specific page in the Web interface, view the online help by
clicking the question mark icon on the right side of the interface.
Securing a Web Site 45
Page 48

Creating Services
The BASIC > Services page allows you to add a new service that specifies the parameters for
configuring a service and server(s) to be protected by the Barracuda Web Site Firewall. Four types of
services can be created. They are:
• HTTP service
• HTTPS service
• Redirect service
• Instant SSL service
By default, passive mode is enabled for a service. For more information refer Passive versus Active
Mode on page 48. To change it to active mode, click
Passive Mode under Basic Security section. Click Save Changes.
Edit next to the service and select “No” for
Note
In bridge mode, the same IP address is used for both the VIP (service) and the server. Therefore
Real Server field is not available. To change the operation mode, go to the BASIC > IP
Configuration page, set the Mode of Operation to Proxy under Operation Mode section.
Deploying HTTP service
An HTTP service acts as a front-end for a non-encrypted HTTP application on the server.
To create an HTTP service:
1. Specify values for the following fields:
• Service Name. Name used to identify this specific service.
• IP Address. The IP address used to reach this service.
• Port. Specify the specific TCP port for the service to listens on.
• Type. Select HTTP from the drop down list.
• Real Server. Specify the IP Address of the server that hosts the service that will be
protected by the Barracuda Web Site Firewall.
2. Click Add. The service appears on the BASIC > Health page with a green, orange, or red health
indicator next to it. For more information, refer to the next section.
3. To configure advanced settings for a service, click Edit next to the service.
Deploying HTTPS service
An HTTPs service acts as a front-end for an encrypted HTTPs application on the server. This allows
all transactions to the clients to be authenticated via SSL.
To manually create an HTTPS service:
1. Specify values for the following fields:
• Service Name. Name used to identify this specific service.
• IP Address. The IP address used to reach this service.
• Port. Specify the specific TCP port for the service to listens on.
46 Barracuda Web Site Firewall Administrator’s Guide
Page 49

• Type. Select HTTPS from the drop down list.
• Real Server. Specify the IP Address of the server that hosts the service that will be
protected by the Barracuda Web Site Firewall.
• Certificate. Select a certificate from the drop-down list. This is the certificate presented
by the service when authenticating itself to a browser or some other client. The list of
certificates available is based on the certificates that are created or imported in the
> Server Certificates
2. Click Add. The service appears on the BASIC > Health page with a green, orange, or red health
page.
indicator next to it.
3. This creates an HTTPS service that encrypts only the contents between the Barracuda Web Site
Firewall and the client browser. To use SSL encryption between the Barracuda Web Site
Firewall and the server, click
Edit next to the server and select “Yes” for Server uses SSL
under SSL(Server) section.
4. To configure advanced settings for a service, click Edit next to the service.
Securing an HTTP Web Site with HTTPS
An Instant SSL service redirects an HTTP connection to an HTTPS service. This creates two
services with the same IP address. An HTTPS service with port 443 and a redirect service with port
80. The redirect service is a non-SSL service that redirects all the requests to the HTTPS service. At
least one secured site domain should be specified to determine which links in the response will be
converted from 'http' to 'https'. For example; if http://www.barracuda.com is specified, all such links
found in the outgoing response will be rewritten to https://www.barracuda.com. After adding, you can
edit the HTTPS service to add more domains which must be rewritten in the response. On receiving
the request, the redirect service does the redirection to the service on port 443/HTTPS which in turn
sends it to the servers. The HTTPS service rewrites an “http:...” request into an “https:...” in the
response content.
BASIC
Note
Instant SSL works only in Proxy mode.
To manually create an instant SSL service:
1. Specify values for the following fields:
• Service Name. Name used to identify this specific service.
• IP Address. The IP address used to reach this service.
• Port. Specify the specific TCP/UDP port for the service to listens on.
• Type. Select Instant SSL from the drop down list.
• Real Server. Specify the IP Address of the server that hosts the service that will be
protected by the Barracuda Web Site Firewall.
• Domain. Specify the main domain which identifies links to be rewritten from 'http' to
'https'.
• Certificate. Select a certificate from the drop-down list. This is the certificate presented
by the service when authenticating itself to a browser or some other client. The list of
certificates available is based on the certificates that are created or imported in the
> Server Certificates
page.
BASIC
Securing a Web Site 47
Page 50

Click Add. The service appears on the BASIC > Health page with a green, orange, or red health
2.
indicator next to it.
3. To configure advanced settings for a service, click Edit next to the service.
Creating a redirect service
The redirect service is a non-SSL service that redirects all the HTTP requests to an HTTPS service.
To manually create a redirect service:
1. Specify values for the following fields:
• Service Name. Name used to identify this redirect service.
• IP Address. The IP address used to reach this service.
• Port. Specify the specific TCP/UDP port for the service to listens on.
• Type. Select Redirect Service from the drop down list.
• Real Server. Specify the IP Address of the server that hosts the service that will be
protected by the Barracuda Web Site Firewall.
2. Click Add. The service appears on the BASIC > Health page with a green, orange, or red health
indicator next to it.
3. To configure advanced settings for a service, click Edit next to the service.
Passive versus Active Mode
Active mode blocks any request when an anomaly or intrusion is observed. Passive mode observes
the traffic, logs all observed anomalies and intrusions, and allows the traffic to pass through the
Barracuda Web Site Firewall. Active mode might block some legal traffic resulting in false positives
if the policy is not configured properly. Consider enabling a
passive mode initially. Observe the Web firewall logs for potential intrusions, and make appropriate
adjustments to security policies before enabling active mode.
Passive Mode is set to “Yes” for a service, all request with attacks on that service would be
If the
logged but allowed to pass the Barracuda Web Site Firewall. This setting overrides the passive mode
setting in the
When the
URL Policy and URL Profile.
in
URL Policies and URL Profiles for that service.
Passive Mode is set to “No”, an attack is allowed or denied based on the URL Match settings
Also, if the service is in passive mode, the deny/process ACLs under
for that service will be logged but not enforced.
ACLs
Security Policy
The Barracuda Web Site Firewall provides a range of security policies for your Web Sites and Web
applications. These policies determine what actions to take when one or more of the rules match the
request. All policies are global and they can be shared among multiple services configured on the
Barracuda Web Site Firewall. Some commonly used policies are defined by default. They are:
Service and or individual URL Policy in
WEBSITES > Allow/Deny > URL
• Default
• Sharepoint
48 Barracuda Web Site Firewall Administrator’s Guide
Page 51

•OWA
• Oracle
Apart from these default policies, you can create customized policies. Each policy is a collection of 9
sub-policies. They are; Request Limits, Cookie Security, URL Protection, Action Policy, Global
ACLs, URL Normalization, Cloaking, Parameter Protection and Data Theft Protection.
To create a new policy, go to
Policy Name field and click the Add button. This creates a new policy with default values. To
in
SECURITY POLICIES > Policy Manager enter a name for the new policy
modify a particular policy, go to the desired sub-policy page and select the policy from the
Name
drop-down list and change the value of the parameter(s) and click the Save Changes button.
When a service is created, a basic set of Web Firewall features are activated automatically. By default
all services use “default” as the policy. Based on your requirement you can change the policy for a
service. To change the policy for a service, go to the
The service page opens, select the desired policy from the
Basic Security. Click the Save Changes button to save and activate the new setting.
Allowing/Denying Specific URLs
The WEBSITES > Allow/Deny allows you to define strict allow/deny rules for a Web Site. URL
ACLs allow you to customize access to your site for a variety of specific conditions such as the
following:
• Partition a Web site into security zones and configure different security policies on each zone.
• Configure explicit deny ACLs for known or observed attacks.
A security zone is a partition of a site that can be specified using a URL ACL key. The key is
comprised of the URL, host and an optional extended match rule (that is, a value or expression for the
header parameter). The matching URL ACL is determined by a best match algorithm using the host,
URL and extended match fields in specified sequential order. In most cases, host and URL may only
be used to specify an ACL. The Barracuda Web Site Firewall optimizes the search for the most
common case by implementing a parallel search algorithm on all ACLs. The best matching ACL is
the ACL with longest matching host and URL keys. To configure a more complex ACL based on
certain fields in the request such as a client IP or an HTTP header, use extended match rules. Not all
extended match rules are considered for evaluation. Only the ones specified for the matching host and
URL are used for evaluation. If more than one such rule is specified, they are evaluated based on the
specified extended match sequence.
Policy
Basic > Services page, click Edit under Actions.
Web Firewall Policy drop-down list under
There are two ways of redirecting a request using the URL ACL:
1. Set the Action parameter to Redirect, and specify the Redirect URL.
2. Set the Action parameter to Deny, set the Deny Response to Redirect and specify the Redirect
URL.
The first case is not considered as an attack, therefore:
• It is logged at a lesser severity.
• Passive mode has no effect on it.
Whereas the second case is a suspected attack, therefore:
• It is logged at a higher severity.
• Passive mode is applied on it so that the request is not denied.
Securing a Web Site 49
Page 52

To manually create an URL ACL:
1. From WEBSITES > Allow/Deny page, click Add under Actions. The Create ACL page opens.
2. Specify values for the following fields:
• URL ACL Name. Enter the name for the URL ACL.
• Enable URL ACL. Enables access controls policy for all services.
• Host Match. Enter the matching criterion for host field in the Request Header. This is
either a specific host match or a wildcard host match with a single “*” anywhere in the
URL. You can enter a partial domain with wildcard (for example: *.abc.com) but you can
not use multiple asterisks. (Examples: *, *.abc.com, www.abc.com)
• URL Match. Enter the matching criterion for URL field in the Request Header. The URL
should start with a “/”and can have only one “*” anywhere in the URL. A value of /*
means that the ACL applies for all URLs in that domain. (Examples: /, /index.html,
/public/index.html)
• Extended Match. Enter an expression that consists of a combination of HTTP headers
and/or query string parameters. Use “*” to denote “any request”, that is, do not apply the
Extended Match condition.
• Extended Match Sequence. Enter an order for matching the extended match rule when a
request matches multiple rules with the same URL Match.
• Action. Select the action to be taken on the request matching this URL from the dropdown list.
• Deny Response. Select the response to be sent to the client if the request is denied. A
deny response is used when the “Action” is set to “Deny”.
• Response Page. Select the response page to be sent to the client, if the deny response
parameter is set to “Custom Response”.
• Redirect URL. Enter the URL to be used to redirect the client if the “Deny Response” is
set to “Redirect”.
3. Click Add to add the above configurations.
50 Barracuda Web Site Firewall Administrator’s Guide
Page 53

Note
Chapter 5
Customized Security for Websites
This chapter describes the configuration and monitoring tasks you can perform from the Web
interface. The following topics are covered:
• Security Policies on page 52
• Creating a New Security Policy on page 59
• Web Site Profiles on page 60
• Web Site Profiles on page 60
• Web Site Translations on page 62
• Trusted Hosts on page 66
For more detailed information about a specific page in the Web interface, view the online help by
clicking the question mark icon on the right side of the interface.
Customized Security for Websites 51
Page 54

Security Policies
A Web application is configured with several security policies. These policies define the processing
of HTTP requests destined to the IP address and port configured on the Web application. Barracuda
Web Site Firewall allows you to define strict checks to a Web Site and Web applications. It is a
shareable policy that can be used among multiple Web applications configured on a Barracuda Web
Site Firewall. Some commonly used policies, defined by default are:
• default
•sharepoint
•owa
•oracle
Apart from these default policies, you can create customized policies. Each policy is a collection of
nine sub-policies. You can modify a policy, by visiting the desired sub-policy page and changing the
value of the parameter(s). The following topics discuss these nine sub-policies in detail:
Request Limits.................................................................................... 52
Cookie Security .................................................................................. 53
URL Protection .................................................................................. 54
Parameter Protection......................................................................... 54
Cloaking............................................................................................. 55
Data Theft Protection ........................................................................ 55
URL Normalization ............................................................................56
Global ACLs ...................................................................................... 57
Action Policy...................................................................................... 58
Request Limits
The SECURITY POLICIES > Request Limit page displays the parameters to configure Request Limits.
Request Limits define the validation criterion for incoming requests by enforcing size limits on HTTP
request header fields. The request that have fields larger than the defined lengths are dropped. Proper
configuration of limits helps mitigate buffer overflow exploits that lead to Denial of Service (DoS)
attacks.
Request limits are enabled by default, and the default limit values are chosen with the assumption that
any requests with lengths greater than the defaults are potential buffer overflow attacks. The defaults
are normally appropriate, but you might choose to change one or more of the default values under
certain conditions.
To configure Request Limits
1. Select the policy from the Policy Name drop-down list.
2. Specify values for the following fields:
• Enable Request Limits. Select whether to enable size limit checks on requests.
• Max Request Length. Enter the maximum allowable request length. This includes the
• Max Request Line Length. Enter the maximum allowable length for the request line.
• Max URL Length. Enter the maximum allowable URL length including the query string
Request Line and all HTTP request headers.
The request line consists of the method, the URL (including any query strings) and the
HTTP version.
portion of the URL.
52 Barracuda Web Site Firewall Administrator’s Guide
Page 55

• Max Query Length. Enter the maximum allowable length for the query string portion of
the URL.
• Max Number of Cookies. Enter the maximum number of cookies to be allowed.
• Max Cookie Name Length. Enter the maximum allowable length for cookie name.
• Max Cookie Value Length. Enter the maximum allowable length for a cookie value.
Requests with Cookie values that are larger than the defined setting are denied.
• Max Number of Headers. Enter the maximum number of headers in a request. If there
are more headers than this limit in the request, the request is denied.
• Max Header Name Length. Specifies the maximum allowable length for header name.
• Max Header Value Length. Enter the maximum allowable length for any request
header. A request header could either be a HTTP protocol header such as "Host," "UserAgent" and so on, or a custom header such as "IIS Translate" header. A request may
contain any number of these headers.
3. Click Save Changes to save the above settings.
Cookie Security
The SECURITY POLICIES > Cookie Security page displays the parameters to configure Cookie
Security.
Cookies provide a mechanism to store service state information on a client's navigation platforms,
such as browsers and other user agents. Cookies are used to store user preferences, shopping cart
items, and sometimes very sensitive information such as registration and login information. If the
structure of the cookie can be revealed, the user's information is vulnerable to attack.
A server can send a cookie, which is a packet of whatever information the server chooses to send (such
as information to authenticate or identify a user), to maintain state between otherwise stateless HTTP
transactions. Because cookies are simple ASCII name value pairs, they can easily be altered and then
used to launch a Web attack. Cookies can also be stolen and sensitive information, such as client
information, can be obtained from the message.
You have the option to apply security features to the cookies sent from the servers to the Web users.
Cookie security is disabled by default.
To configure Cookie Security
1. Select the policy from the Policy Name drop-down list.
2. Specify values for the following fields:
• Tampe r Pro o f Mod e . Select whether the cookies should be encrypted or signed.
• Cookie Max Age. Enter the maximum age for session cookies.
• Cookie Replay Protection Type. Select the type of protection to be used to prevent the
cookie replay attacks from the drop-down list.
• Custom Headers. Enter the custom headers to be used in the cookie if the parameter
"Cookie Replay Protection Type" is set to "Custom Headers" or "IP and Custom
Headers" and click
Add.
• Secure Cookie. Select whether the cookies need to be returned for HTTPS requests only.
This parameter directs the user agents to send this cookie back only when they make
secure HTTPS connection to the origin server.
• HTTP Only. Select whether the cookie security feature should be enabled for HTTP
cookies.
• Cookies Exempted. Enter the cookies to be exempted from the policy and click
Add.
Customized Security for Websites 53
Page 56

Click Save Changes to save the above settings.
3.
URL Protection
The SECURITY POLICIES > URL Protection page displays the parameters to configure URL
Protection. The settings in this container protects the service against Web attacks in the absence of a
URL Profile.
To configure URL Protection
1. Select the policy from the Policy Name drop-down list.
2. Specify values for the following fields:
• Enable URL Protection. Select whether to enable or disable URL protection
• Allowed Methods. Enter the list of allowable methods in the request and click
• Allowed Content Types. Enter the list of allowable content types in the POST body for a
URL and click
• Max Content Length. Enter the maximum allowable length of the content, that is, the
request body.
• Max Parameters. Enter the maximum number of parameters allowed in a request.
• Max Upload Files. Enter the maximum number of files that can be of file-upload type in
one request.
• Max Parameter Name Length. Enter the maximum length of any parameter name in the
request.
3. Click Save Changes to save the above settings.
Add.
Add.
Parameter Protection
The SECURITY POLICIES > Parameter Protection page setting protects the service against attacks
based on parameter values in the absence of a parameter profile. It defines strict limitations in form
fields and other parameters. It deep inspects the user input when a FORM is submitted. This allows
users to set up validation rules for FORM parameters.
To configure Parameter Protection
1. Select the policy from the Policy Name drop-down list.
2. Specify values for the following fields:
• Enable Parameter Protection. Select whether to enable or disable parameter protection.
• Denied Metacharacters. Enter the meta-characters to be denied in this parameter value.
• Max Param Value Length. Enter the maximum allowable length of the value of a
parameter.
• File Upload Extensions. Enter the extensions that are allowed while uploading the files.
'.' is a special extension which indicates no extension, and * indicates any extension and
Add.
click
• Max Upload File Size. Enter the maximum size for individual files that can be of fileupload type in one request.
• Blocked Attack Types. Select the check box(es) for malicious patterns in the parameter
value. An intrusion is detected when the value of a parameter matches one of the selected
Attack Types.
54 Barracuda Web Site Firewall Administrator’s Guide
Page 57

3. Click Save Changes to save the above settings.
Cloaking
The SECURITY POLICIES > Cloaking page is used to enable security policies to cloak a Web site or
service.
It does this by removing HTTP headers and return codes before sending a response to a client. This
prevents hackers from gleaning information about services that could be used to launch attacks. (In
the industry, the term Website cloaking is sometimes used to refer to the technique of delivering one
version of a Web page to a user while delivering a different version of the same page to a search
engine, but that is not the meaning in this case.)
This policy offers the following cloaking features:
• Remove specified headers such as Server from responses.
• Suppress client error (status code 4xx) and server error (status code 5xx) messages from
• Custom Blocked Attack Types. Select the check box(es) to define your own attack
patterns to extend the parameter protection. These custom attack types can be defined in
Advanced > Libraries page as a set of regular expression patterns.
the
• Ignore Parameters. Enter the list of parameters to exempt from all validations and click
Add.
responses.
All Website Cloaking parameters are enabled by default. There is rarely a reason to change any of the
default values, except to add headers to be filtered.
To configure Cloaking
1. Select the policy from the Policy Name drop-down list.
2. Specify values for the following fields:
• Suppress Return Code. Select whether to enable or disable the blocking of the return of
an HTTP status code in a response header.
• Filter Response Header. Select whether to enable or disable removing the HTTP
headers in responses. Configure the list of HTTP headers to remove using the "Headers to
Filter" parameter.
• Headers to Filter. Enter a list of headers that are removed from a response before
serving it to a client and click
3. Click Save Changes to save the above settings.
Data Theft Protection
Data theft refers to the unauthorized copying of confidential personal or business information such as
social security numbers, credit card information, and other privileged personal or corporate
information. Unintended exposure of such data can lead to identity theft.
Add.
The SECURITY POLICIES > Data Theft Protection page is used to identify such data in responses sent
by the server and protect it against exposure. Enabling data theft protection on an ACL increases the
processing overhead per page. To optimize performance, enable it only for parts of the site that are
known to carry such sensitive information.
Customized Security for Websites 55
Page 58

To configure Data Theft Protection
1. Select the policy from the Policy Name drop-down list.
2. Specify values for the following fields:
• Data Theft Element Name. Enter the name for this data theft element.
• Enabled. Select whether the data theft element is used. When this set to "Yes," all URL
policies which have Data Theft Protection > Status = On will look for this data type in
server response pages.
• Identity Theft Type. Select the data type that the element refers to from the drop-down
list. It is a binding to data type defined under
Identity Theft Patterns
.
ADVANCED > View Internal Patterns >
• Custom Identity Theft Type. Select the customized identity theft type to be used, if the
parameter "Identity Theft Type" is set to "<CUSTOM>" from the drop-down list. Refer
Creating Identity Theft Patterns on page 90 for more information.
• Action. Select whether to block any page sent by server containing this data type or to
cloak (part of the data overwritten with "X"s) from the drop-down list.
• Initial Characters to keep. Enter the number of initial characters are to be displayed to
the user when the data of this data type is identified in a server page.
• Trailing Characters to keep. Enter the number of trailing characters are to be displayed
to the user when the data of this data type is identified in a server page.
3. Click Save Changes to save the above settings.
Protected Data Types
This table lists all the default and created data theft elements. You can edit these data theft elements.
URL Normalization
The SECURITY POLICIES > URL Normalization page displays the parameters to configure URL
Normalization.
The Barracuda Web Site Firewall normalizes all traffic into a standard or "canonical" form before
applying any security policy string matches. In the HTTP world, this means decoding Unicode, UTF,
or Hex to base text. Otherwise, hackers can disguise attacks within different encoding formats that the
firewall might not detect using a string match.
Normalization (converting a URL into a canonical form) is always enabled if the Web firewall is
active. The Default Character set parameter specifies the character set encoding type for incoming
requests. It is set to ASCII by default; to specify an alternate type, simply select a different type such
as Shift-JIS for Japanese characters.
Additional checks to prevent path traversal and path disclosure attacks are set in URL Normalization.
There are situations where multiple character set encoding is needed. For example, a Japanese
language site might need both Shift-JIS and EUC-JP encoding. You have the option of setting the
Barracuda Web Site Firewall to automatically add character set encodings as needed. To configure
this, set the Detect Response Charset parameter to Yes. (It does this by searching all response
headers for a META tag that specifies the character set encoding type and dynamically adding any
supported types listed in the META tags.)
Double encoding is the re-encoding of the encoded data. For example: The UTF-8 escape for the
backslash character is %5C, which is a combination of three characters i.e. %, 5, and C. So the Double
56 Barracuda Web Site Firewall Administrator’s Guide
Page 59

encoding is the re-encoding either one or all the 3 characters by using their corresponding UTF-8
escapes as %25, %35, and %63.
The following table describes double-encoding variations of the \ character.
Table 5.1: Double encoding variations of the \ character.
Escape Description
%5C %5C Normal UTF-8 escape of the backslash character.
%255C %25, the escape for % followed by 5C.
%%35%63 The % character followed by %35, the escape for 5, and %63, the
escape for C.
%25%35%63 The individual escapes for %, 5, and C.
To configure URL Normalization
1. Select the policy from the Policy Name drop-down list.
2. Specify values for the following fields:
• Default Character Set. Select the character set encoding type to be used for incoming
requests from the drop-down list.
• Detect Response Charset. Defines whether or not the Barracuda Web Site Firewall will
detect the character set encoding from the response. When it cannot determine the
character set encoding, it will default to one specified for the 'charset' parameter.
• Parameter Separators. Select the URL-encoded parameter separator to be used from the
drop-down list.
• Double Encoding. Select whether to re-encode the encoded data.
3. Click Save Changes to save the above settings.
Global ACLs
The SECURITY POLICIES > Global ACLs page allows you to define strict allow/deny rules for all the
services configured on the Barracuda Web Site Firewall. It is a shareable policy that can be used
among multiple services. You can add a new URL ACL or modify the existing URL ACL.
To configure Global ACLs
1. Select the policy from the Policy Name drop-down list.
2. Specify values for the following fields:
• URL ACL Name. Enter the name for the URL ACL.
• Enable URL ACL. Enables access controls policy for all services.
• URL Match. Enter the matching criterion for URL field in the Request Header. The
URL should start with a "/" and can have only one " * " anywhere in the URL. A value of
/* means that the ACL applies for all URLs in that domain.
• Extended Match. Enter an expression that consists of a combination of HTTP headers
and/or query string parameters. Use '*' to denote "any request", that is, do not apply the
Extended Match condition.
• Extended Match Sequence. Enter an order for matching the extended match rule when a
request matches multiple rules with the same URL Match.
Customized Security for Websites 57
Page 60

3. Click Add to add the above configurations.
Existing Global ACLs
This table lists all the default and created global URL ACLs. You can edit these URL ACLs.
Action Policy
The SECURITY POLICIES > Action Policy page specifies the action to be taken for a particular type
of Web attack. Action policy is a collection of settings that decide what action to be taken when a
violation occurs. It consists of a set of attack groups, which in turn contains a set of attack actions.
The following attack groups are available:
The following attack groups are available:
• advanced-policy-violations
• application-profile-violations
• param-profile-violations
• protocol-violations
• request-policy-violations
• response-violations
• url-profile-violations
• Action. Select the action to be taken on the request matching this URL from the dropdown list.
• Redirect URL. Enter the URL to be used to redirect the client if the parameter "Deny
Response" is set to "Redirect".
To edit an Action Policy
1. Select the policy from the Policy Name drop-down list.
2. Click Edit against the default attack action.
3. Specify values for the following fields:
• Action. Select the action to be taken for an invalid request from the drop-down list.
• Deny Response. Select the response from the drop-down list to be sent to the client if the
request is denied. A deny response is used when the parameter "Action" is set to
"Protect".
• Redirect URL. Enter the URL to be used to redirect the request if the deny response is
set to "Redirect".
• Response Page. Select the response page to be sent to the client, if the parameter "Deny
Response" is set to "Send Response" from the drop-down list.
• Follow Up Action. Select the follow up action to be taken from the drop-down list if the
request is denied.
• Follow Up Action Time. Enter the time in seconds to block the client IP, if the parameter
"Follow Up Action" is set to "Block Client IP".
4. Click Save Changes to save the above settings.
58 Barracuda Web Site Firewall Administrator’s Guide
Page 61

Creating a New Security Policy
Apart from the default policies, you can create customized policies. The new policy is created with
default values. You can change the default values by visiting the individual sub-policy pages and
changing the values.
To create a customized Security Policy:
1. From the SECURITY POLICIES > Policy Manager page, enter a name of the new policy under
Create New Policy and click Add.
2. The new policy with the default values is created and added to the list of policies under Policy
Overview
3. To modify a policy, go to the desired sub-policy page and select the policy from the Policy
Name
4. Change the value of the parameter(s) and click Save Changes to save and activate the new
settings.
5. Click Delete to remove a policy. All the policies can be removed except the default policy.
By default all services use the default policy. Based on your requirement you can change the policy
for a service.
To change the policy for a service
1. From the Basic > Services page, click Edit under Actions. The service page opens.
2. Select the desired policy from the Web Firewall Policy drop-down list under Basic Security.
3. Change the value of the parameter(s) and click the Save Changes button to save and activate the
new setting.
.
drop-down list.
Customized Security for Websites 59
Page 62

Web Site Profiles
The WEBSITES > Web Site Profiles page uses the URL profiles and Parameter profiles created for a
service to validate the requests coming for that service. When a new service is added, a Web Site
profile is created by default and is “Off” for that service. You can modify the default settings, which
overrides the default policies. If the parameter "Use Profile" is set to "Yes", then URL Profiles and
Parameter Profiles must be created for validating the requests coming for that service. This falls in
accordance with the positive security nodes, which denies any request for which there is no URL or
Param Profile.
To edit a Web Site Profile
1. Click Edit against the created Web Site Profile. The Edit Web Site Profile dialog box opens.
2. Specify values for the following fields:
• Use Profile. Select whether to use URL profiles and parameter profiles for validating the
requests coming for this service.
• Domain. Enter the domain attribute of the session cookie and click
• Exclude URL Patterns. Enter the list of URL patterns to exclude the URL profile
validations and click
• Include URL Patterns. Enter the list of URL patterns to be included in the URL profile
validations in spite of being listed in "Exclude URL Patterns" parameter and click
• State. Select the state of the Web Site profile for this service from the drop-down list.
• Session Cookie Domain. Enter the cookie domain to be used to allow the browser to
send the cookie back to the Barracuda Web Site Firewall.
• Session Cookie Timeout. Enter the time-out for session cookie after the successful login.
0 indicates no time-out, the session lives forever.
3. Click Save Changes to save the above settings.
Add.
Add. (Examples: *.html,*.htm,*.jpg, *.gif,*.css,*.js).
Add.
URL profile
URL Profiles are used to validate the requests coming to the service as per the settings in parameter
"State" in the Web Site Profile. You can create many URL profiles for a service.
To add a URL Profile
1. Click Add URL Profile against the created Web Site Profile. The Create URL Profile dialog box
opens.
2. Specify values for the following fields:
• URL Profile Name. Enter the name for this URL profile.
• Status. Select whether to enable this URL profile.
• URL Match. Enter the matching criterion for URL field in the Request Header. The
URL should start with a "/" and can have only one " * " anywhere in the URL. A value of
/* means that the ACL applies for all URLs in that domain.
• Extended Match. Enter an expression that consists of a combination of HTTP headers
and/or query string parameters. Use '*' to denote "any request", that is, do not apply the
Extended Match condition. For more on how to write extended match expressions, refer
Extended Match and Condition Expressions on page 107.
• Extended Match Sequence. Enter an order for matching the extended match rule when a
request matches multiple rules with the same Host Match and URL Match.
• State. Select the state for this URL profile from the drop-down list. It can be either be
“Active” or “Passive”.
60 Barracuda Web Site Firewall Administrator’s Guide
Page 63

• Allow Content Types. Enter the list of allowable content-types in the POST body for a
URL.
• Hidden Parameter Protection. Select the protection for hidden parameters in the forms
and URLs from the drop-down list.
• CSRF Prevention. Select the cross-site request forging prevention for the forms and
URLs from the drop-down list. This CSRF protection is not applicable when there is no
parameter profile.
• Max Parameter Name Length. Enter the maximum length of the parameter name.
• Max Upload Files. Enter the maximum number of files that can be of file-upload type in
one request.
3. Click Add to add the above configurations.
4. Click Edit against the created URL Profile to modify the settings.
5. Click Delete against the created URL Profile to delete it.
Parameter profile
Parameter Profiles is used to validate the requests coming for this service as per the settings for the
parameter "State" under URL profile. You can create many parameter profiles for a service.
To add a Parameter Profile
1. Click Add Param Profile against the created Web Site Profile. The Create Parameter Profile
dialog box opens.
2. Specify values for the following fields:
• Parameter Profile Name. Enter the name for this parameter profile.
• Status. Select whether to enable or disable this parameter profile.
• Parameter. Enter the name of the parameter expected in the requests. No name
parameter (&noname-param) is also supported. The parameter name with the special
characters like &pathinfo and &sessionid and wildcard (*) should be manually specified.
• Type. Select the type of parameter to be validated in the requests from the drop-down
list.
• Va lu es . Enter a fixed set of strings to match against the parameter's value, if the
parameter "Type" is set to "Global Choice".
• Parameter Class. Select the parameter class to be used from the drop-down list.
• Custom Parameter Class. Select the customized parameter class to be used, if the
parameter "Parameter Class" is set to "<Custom>" from the drop-down list. Refer
Creating Custom Parameter Class on page 92 for more information.
• Max Value Length. Enter the maximum allowable length for the value of the parameter.
• Required. Select whether this parameter is required to be present always in the request,
or can it be skipped.
• Ignore. Select whether to ignore this parameter completely, that is, not to validate the
value of this parameter at all.
• Max Instances. Enter the maximum number of times this parameter is allowed.
• File Upload Extensions. Enter the list of extensions that are allowed in file uploads. '.' is
a special extension which indicates no extension, and * indicates any extension is
allowed.
3. Click Add to add the above configurations.
4. Click Edit against the created Parameter Profile to modify the settings.
5. Click Delete against the created Parameter Profile to delete it.
Customized Security for Websites 61
Page 64

Web Site Translations
The WEBSITE > Website Translations page is used to set a variety of address translation rules for
application-specific packets sent through the Barracuda Web Site Firewall. It translates the internal
codes, headers, and cookies so that the actual message is concealed to the external users. It has
features for Web site cloaking and translation of URLs and headers in the requests and responses.
Configuring Request Rewrite
This policy sets rewrite rules for inbound requests. It specifies the parameters to modify incoming
request headers. It allows you to add, delete, or rewrite headers and rewrite or redirect the URL.
Request Rewrites are used for specific purposes. For example, the Barracuda Web Site Firewall fully
terminates the TCP/IP session for the original request and creates a new request using the private
interface (PIF) as the new source IP address. If you have a need for the original source IP address, you
could add a header that stores that address.
It is used to relay the actual client information back to the back-end resource. Enabling this parameter
allows a back-end resource to know exactly who is the client and from where the client is requesting
the information.
This feature is available only with the purchase of Barracuda Web Site Firewall model 460 and
higher.
To configure Request Rewrite
1. Specify values for the following fields:
• Rule Name. Enter the name for the request rewrite rule.
• Sequence Number. Enter the sequence number of this request rewrite policy. The
sequence number sets the order of execution for multiple configured policies from
highest (1) to lowest (64).
• Action. Select the request rewrite action for this policy from the drop-down list.
• Header Name. Enter the header name to match for this policy. This is required if the
action is to a header (rather than an URL).
• Old value. Enter the old value of a header or URL path to be rewritten.
• Rewrite Value. Enter the new value of a header or URL path to rewrite. This is required
if the action is to rewrite (or redirect) a header or URL.
• Rewrite Condition. Enter the condition under which the rewrite should occur. An
asterisk (*) indicates there are no conditions (applies to all). Refer Request Rewrite
Condition on page 62 for more information.
• Continue Processing. Select whether to check against other (higher sequence number)
policies or stop here. This is relevant only when additional policies have been configured.
2. Click Add to add the above configurations.
Request Rewrite Condition
Request rewrite condition is an expression that consists of a combination of HTTP headers and/or
query string parameters. For HTTP headers, word "Header" should be prefixed before the header
expression and for Non-HTTP headers "Header" should not be prefixed. Define the header type (for
example, user agent or accept) for which you want an action to occur or add a wildcard to accept any
type of header.
The following are the possible operations that can be given in the expression:
62 Barracuda Web Site Firewall Administrator’s Guide
Page 65

• contains, CONTAINS, co, CO - checks if the operand contains the given value.
• ncontains, nCONTAINS, nco, nCO - checks if the operand does not contain the given value.
• rcontains, rCONTAINS, rco, rCO - checks if the operand contain the given value. The given
value is interpreted as a regular expression.
• equals, EQUALS, eq, EQ - checks if the operand is equal to the given value.
• nequals, nEQUALS, neq, nEQ - checks if the operand is not equal to the given value.
• requals, rEQUALS, req, rEQ - checks if the operand is equal to the given value. The given value
is interpreted as a regular expression.
• exists, EXISTS, ex, EX - checks if the operand exists. It does not require any given value.
• nexists, nEXISTS, nex, nEX - checks if the operand does not exist. It does not require any given
value.
Each expression can be joined with another expression by using either of the following tokens:
• or, OR, || - This checks for either of the expressions are true.
• and, AND, && - This checks if both the expressions are true.
More than one expressions can be grouped together by using parenthesis '(' and ')'.
The expression consists of an operation being carried out on one of the following tokens. Each of the
following tokens are case insensitive.
Header
This refers to an HTTP header on the request path. The term "Header" should be followed by the name
of the header on which the action is to be applied.
Example: Header Accept co soap or Header Soap-Action ex
Client IP
This refers to the IP address of the client sending the request. The IP address can be either host IP
address or subnet IP address specified by a mask. Only the following operations are possible for this
token:
"EQUAL" and "NOT EQUAL"
Using any other operations are not permitted.
Example: Client-IP eq 192.168.1.0/24 (subnet IP address containing the mask)
Client-IP eq 192.168.1.10 (host IP address)
Uri
The URI is a Uniform Resource Identifier and identifies the resource upon which to apply the request.
Example: URI rco /abc*html
Method
This refers to HTTP method in the request.
Example: Method eq GET
Http Version
This refers to the version of the HTTP protocol of the request.
Example: HTTP-Version eq HTTP/1.1
Parameter
Customized Security for Websites 63
Page 66

This refers to query part of the URL which is passed to the servers as a name-value pair. In addition,
the word "$NONAME_PARAM" is used to refer to the case where the parameter name is absent.
Example: Parameter sid eq 1234, Parameter $NONAME_PARAM co abcd
Pathinfo
This refers to the portion of URL which contains extra information about the path of the resource on
the server.
Example: pathinfo rco abc*
Configuring Response Rewrite
This policy sets rewrite rules for outbound responses. It allows you to add, delete, or rewrite headers.
Response Rewrites are used for specific purposes. For example, if responses include a header that lists
the source IP address you could delete that header. This would prevent users from seeing the actual
IP address of a server.
To configure Response Rewrite
1. Specify values for the following fields:
• Rule Name. Enter the name for the response rewrite rule.
• Sequence Number. Enter the sequence number of this request rewrite policy. The
sequence number sets the order of execution for multiple configured policies from
highest (1) to lowest (64).
• Action. Select the request rewrite action for this policy from the drop-down list.
• Header Name. Enter the header name to match for this policy. This is required if the
action is to a header (rather than an URL).
• Old value. Enter the old value of a header or URL path to be rewritten. This is required if
the action is to rewrite (or redirect) a header or URL.
• Rewrite Value. Enter the new value of a header or URL path to rewrite. This is required
if the action is to rewrite (or redirect) a header or URL.
• Rewrite Condition. Enter the condition under which the rewrite should occur. An
asterisk (*) indicates there are no conditions (applies to all). Refer Response Rewrite
Condition on page 64 for more information.
• Continue Processing. Select whether to check against other (higher sequence number)
policies or stop here. This is relevant only when additional policies have been configured.
2. Click Add to add the above configurations.
Response Rewrite Condition
Response rewrite condition is an expression that consists of a combination of HTTP headers and/or
query string parameters. For HTTP headers, word "Header" should be prefixed before the header
expression and for Non-HTTP headers "Header" should not be prefixed. Define the header type (for
example, user agent or accept) for which you want an action to occur or add a wildcard to accept any
type of header.
The following are the possible operations that can be given in the expression.
• contains, CONTAINS, co, CO - checks if the operand contains the given value.
• ncontains, nCONTAINS, nco, nCO - checks if the operand does not contain the given value.
• rcontains, rCONTAINS, rco, rCO - checks if the operand contain the given value. The given
value is interpreted as a regular expression.
64 Barracuda Web Site Firewall Administrator’s Guide
Page 67

• equals, EQUALS, eq, EQ - checks if the operand is equal to the given value.
• nequals, nEQUALS, neq, nEQ - checks if the operand is not equal to the given value.
• requals, rEQUALS, req, rEQ - checks if the operand is equal to the given value. The given value
is interpreted as a regular expression.
• exists, EXISTS, ex, EX - checks if the operand exists. It does not require any given value.
• nexists, nEXISTS, nex, nEX - checks if the operand does not exist. It does not require any given
value.
Each expression can be joined with another expression by using either of the following tokens:
• or, OR, || - This checks for either of the expressions are true.
• and, AND, && - This checks if both the expressions are true.
More than one expressions can be grouped together by using parenthesis '(' and ')'.
The expression consists of an operation being carried out on one of the following tokens. Each of the
following tokens are case insensitive.
Header
This refers to an HTTP header on the request path. The term "Header" should be followed by the name
of the header on which the action is to be applied.
Example: Header Accept co soap or Header Soap-Action ex
Response Header
This refers to an HTTP header on the response path. The term "Response-Header" should be followed
by the name of the header on which the action is to be applied.
Example: Response-Header Set-Cookie co sessionid
Status Code
This refers to the status code of the response returned by the servers.
Example: Status-Code eq 200
Customized Security for Websites 65
Page 68

Trusted Hosts
The WEBSITES > Trusted Hosts page allows you to designate a trusted host, that is, to specify an IP
address for which authentication is not necessary. In this case, it is assumed that any request from that
address is from an allowed user, and all user requests from that address are exempted from
authentication.
To configure a Trusted Host
1. Enter a name in Trusted Host Group Name field and click Add.
2. Click Add Host under Actions to add a trusted host under the created Trusted Host Group. The
Create Trusted Host dialog box opens.
3. Specify values for the following fields:
4. Click Add to add the above configurations.
• Truste d Host . Enter the trusted host name for which you want to exempt the security
checks.
• IP Address. Enter the IP address for the trusted host.
• Mask. Enter the associated netmask for the trusted host.
66 Barracuda Web Site Firewall Administrator’s Guide
Page 69

Note
Chapter 6
Keys and Certificates
This chapter provides an introduction to the Public Key Infrastructure (PKI) technology. It also
includes a system overview of how the Barracuda Web Site Firewall uses PKI encryption to protect
traffic:
• Overview on page 68
• Creating a Test Certificate on page 71
• Loading a Certificate on page 72
For more detailed information about a specific page in the Web interface, view the online help by
clicking the question mark icon on the right side of the interface.
Keys and Certificates 67
Page 70

Overview
The Barracuda Web Site Firewall uses PKI objects for Secure Socket Layer (SSL) encryption. This
technology encrypts data that is to be transmitted between a client and the Barracuda Web Site
Firewall, or between the Barracuda Web Site Firewall and Web servers. SSL encryption is the most
effective way to securely send confidential user information over the Internet. The Barracuda Web
Site Firewall includes Public Key Infrastructure (PKI) objects like keys and certificates that can be
used for SSL encryption.
The PKI technology allows secure exchange of data over the Internet. It allows successful and safe
accomplishment of the transactions such as using a credit card to purchase items online or allowing
employees’ access company’s Intranet. Unlike earlier forms of cryptography the public key
technology works with a pair of keys for authentication and encryption. This type of cryptography
starts with the creation of the two keys: a public key and a private key. The contents of a public key
is to be known by everyone, whereas the contents of a private key is secret and is known only by its
owner. This key pair is then used to encrypt and then decrypt messages sent by this owner. As the
private key remains secret and the public key is known you are able to initiate a secure communication
without having to previously share a secret through some other type of medium. Private portion of the
key pair confirms the owner’s identity.
Caution
A compromised private key is a security threat! If a private key is exposed, then the public key can
be easily derived. However, a private key cannot be derived from an exposed public key. A digital
certificate is derived from a key pair. It is an attachment to a sent message and used for security
purpose. The certificate helps verify the identity of a user that sends the message. A certificate also
provides the receiver the means to encode a reply. The most widely used standard for digital
certificates is X.509.
Most browsers require a digital certificate from a trusted third-party certificate authority (CA). In
most cases, if a browser does not recognize a certificate, it may deny a transaction or refuse access to
a secret portion of their Web site. In this case, an individual wants to send an encrypted message will
apply for a digital certificate from a trusted CA, such as VeriSign or Thawte. A CA issues a certificate
containing the applicant’s public key and other identification information. This digital certificate is
installed locally as root certificate. This enables confidential and authenticated communication with
other browsers that already have a certificate installed from the same CA.
PKI protects data sent over the Internet in the following ways:
• Authentication. an issued digital certificate that is given to a user, organization, or Web site
validates the identity of a person and then allows them to access the Web site.
• Privacy. a certificate also protects data from being intercepted during transmission.
• Integrity. a “signed” digital certificate ensures that the message or document has not been
manipulated or corrupted during transmission.
• Authorization. before certificates, users were required to give an ID and password for
authorization. This information was sometimes lost or forgotten. Certificates guarantee the
authenticity of each user.
Digital certificates that is created within the Barracuda Web Site Firewall are of the standard X.509
format. A test (user) certificate that is created is considered as self-signed.
Types of Certificates
Currently the Barracuda Web Site Firewall only supports X.509 certificate.
68 Barracuda Web Site Firewall Administrator’s Guide
Page 71

X.509 Certificate
This certificate is used to encrypt a client’s session. This is an industry standard digital certificate,
which the Barracuda Web Site Firewall uses to negotiate an SSL session to a service
digital certificate can be created from scratch within the Barracuda Web Site Firewall. This certificate
is one of the most commonly used types of certificate and the International Telecommunication Union
(ITU) recommends it. This certificate is a self-signed certificate.
Certificate Usage
The Barracuda Web Site Firewall encrypts the traffic coming from a client to a back-end Web server,
and also makes server-side encryption. Standard X.509 certificates are used for the server-side
encryption. This type of certificates can either be created on the Barracuda Web Site Firewall or they
can be imported from a trusted third-party CA such as VeriSign or Thawte for the SSL encryption.
Besides server-side encryption, the Barracuda Web Site Firewall can also be used for clientauthentication. This type of encryption is used to protect services configured on the Barracuda Web
Site Firewall. The certificate received from a client’s browser acts as trusted certificate and
authenticates the client to the Barracuda Web Site Firewall.
The client-server negotiations includes the following:
• The Barracuda Web Site Firewall sends the server’s certificate to the client.
• Then the Barracuda Web Site Firewall requests the certificate in return.
.The X.509
The server is verified in the SSL handshake that allows the server and the client to authenticate each
other. This allows the alliance of the client and the server in creating symmetric keys that are used for
encryption, decryption, and tamper detection during the SSL sessions.
The Barracuda Web Site Firewall sends the server’s certificate to the client and requests the
certificate. In return, the client sends the user certificate, which is authenticated by Barracuda Web
Site Firewall using the trusted certificate.
The traffic between the Barracuda Web Site Firewall and the back-end server can either be encrypted
or unencrypted. The actual configuration of the server does not impact the SSL negotiation between
the Barracuda Web Site Firewall and the client in any way.
Certificate Components
Key Pair
The Barracuda Web Site Firewall implements an asymmetric methodology for encryption, where two
related keys are used in combination as opposed to symmetric encryption where just one key is used.
A key pair consists of a public key and a private key. They work together in such a way that one of
the key pair encrypts a message, and the other decrypts the encrypted message.
Even though the public key is known, it is still practically and mathematically impossible to deduce
the private key from the public key.
Distinguished Name (DN)
The Distinguished Name (DN) in the certificate uniquely identifies the public key owner who issues
the certificate.
Keys and Certificates 69
Page 72

Token
A token is a cryptographic item used for secure storage and transfer of private interface and
certificate. Currently, the Barracuda Web Site Firewall supports only the PKCS12-type token. The
PKCS12 token can be loaded onto the Barracuda Web Site Firewall from a remote system or saved
from the Barracuda Web Site Firewall onto a remote system.
CA Certificate
A CA certificate is a third-party certificate that a CA issues and is part of trust between a root CA and
a certificate installed in the Barracuda Web Site Firewall. This certificate can be added to a certificate
chain, where it is used for encryption and authentication. Some browsers require that a certificate
should be from a known source (such as VeriSign), before communication between a client and a
server occurs.
70 Barracuda Web Site Firewall Administrator’s Guide
Page 73

Creating a Test Certificate
Another PKI object that can be created from scratch within the Barracuda Web Site Firewall is an
X.509 digital certificate. This certificate is one of the most commonly used types of certificate and
the International Telecommunication Union (ITU) recommends it. However, it is not defined as the
industry standard for certificates. This means that an X.509 certificate generated by the Barracuda
Web Site Firewall may or may not be readable by a Web server or a Web browser.
This certificate is a self-signed certificate and is also called as a user certificate.
To create a test certificate do the following:
1. Select BASIC > Server Certificates > Certificate Generation.
2. Click the Create Certificate button. Certificate Generation dialog box opens. Enter the following
information:
2a. Certificate Name - Enter a name to identify this certificate.
2b. Common Name (CN) - Enter the domain name (DN) that is used to access the
Barracuda Web Site Firewall's Web interface. For example: "barracuda.domain.com".
2c. Country - Enter the two-letter country code for this new DN.
2d. State or Province Name - Enter the state's complete name for this DN.
2e. Locality Name - Enter a location's complete name for this DN.
2f. Organization Name - Enter the organization's complete name for this DN.
2g. Organization Unit Name - Enter the organization's division or unit for this DN.
3. Click the Generate Certificate button.
Keys and Certificates 71
Page 74

Loading a Certificate
The BASIC > Server Certificates > Upload Certificate section allows CA certificates to be uploaded
on Barracuda Web Site Firewall.
Signed Certificate
A signed-certificate is a certificate obtained from the third party CA organization (such as VeriSign
or Thawte) to be used for SSL encryption. When uploading a signed certificate as a PKCS #12 token,
it is mandatory that the file should be with .pfx extension, otherwise it is treated as *.pem file.
To upload a Signed Certificate
1. Specify values for the following fields:
• Certificate Name. Enter the name of the certificate.
• Upload Signed Certificate. Click
• Certificate Password. Enter the password for the certificate only if its in PKCS12 token.
2. Click Upload Now to upload the signed certificate.
Certificate Key
Browse to upload a signed certificate.
A private-key is the secret portion of an encryption/decryption key pair. Only the person exchanging
a secure transaction should know it. Click
a X.509 certificate. This key must be unencrypted and it should be in PEM format.
Intermediary Certificates
Intermediary certificates are the are the CA certificates in PEM format. Click Browse to upload an
intermediary certificate. You can add a single or a set of intermediary CA certificates by clicking the
‘+’ button.
Browse to upload an unencrypted private key to accompany
72 Barracuda Web Site Firewall Administrator’s Guide
Page 75

Note
Chapter 7
Monitoring, Reporting and Logging
This chapter provides information about the various types of logs and reports available for the
Barracuda Web Site Firewall. The following topics are covered:
• Monitoring Barracuda Web Site Firewall on page 74
• Logs on page 77
• Reports on page 80
For more detailed information about a specific page in the Web interface, view the online help by
clicking the question mark icon on the right side of the interface.
Monitoring, Reporting and Logging 73
Page 76

Monitoring Barracuda Web Site Firewall
This section describes the monitoring tasks you can perform from the Web administration interface
and from the front panel of the Barracuda Web Site Firewall. This section covers the following topics:
Viewing Performance Statistics ......................................................... 74
Monitoring the Health of Services..................................................... 74
Automating the Delivery of System Alerts.........................................75
Viewing System Tasks......................................................................... 75
Understanding the Indicator Lights...................................................75
Viewing Performance Statistics
The BASIC > Status provides an overview of the health and performance of your Barracuda Web Site
Firewall, including:
• Traffic statistics, which shows the number of requests for various types of traffic since the last
system reset.
• Subscription status of Energize Updates.
• Performance statistics, such as CPU temperature and system load. Performance statistics
displayed in red signify that the value exceeds the normal threshold.
• Hourly and daily traffic statistics.
The following table describes the various health indicators displayed for the system:
Performance Indicator Description
Green The component is working fine.
Orange Indicates warning. The component configuration is more or less
than the standard limit.
Red Indicates danger. Needs immediate attention.
Monitoring the Health of Services
The Basic > Services page display the health of your Service.
The following table describes the various health indicators displayed for Services.
Service Health Indicator Description
Green dot Service is up and all servers are responding.
Orange dot Service is up but atleast one server is not responding.
Red dot Service is down and all servers are not responding.
74 Barracuda Web Site Firewall Administrator’s Guide
Page 77

Automating the Delivery of System Alerts
The Basic > Administration page allows you to configure the Barracuda Web Site Firewall to
automatically email notifications to the addresses you specify. To enter multiple addresses, separate
each address with a comma.
System alerts notify you when:
• Your Energize Update subscription is about to expire
• New firmware updates are available
• Your system is low on disk space
Viewing System Tasks
The Advanced > Task Manager page provides a list of tasks that are in the process of being performed
and also displays any errors encountered when performing these tasks.
Some of the tasks that the Barracuda Web Site Firewall tracks include:
• Cluster setup
• Configuration restoration
If a task takes a long time to complete, you can click the
run the task at a later time when the system is less busy.
The Task Errors section will list an error until you manually remove it from the list. The errors are not
phased out over time.
Understanding the Indicator Lights
The Barracuda Web Site Firewall has five indicator lights on the front panel that blink when the
system processes any traffic.
Figure 7.1 displays the location of each of the lights.
Figure 7.1: Indicator Lights
Table 7.1 describes each indicator light.
Cancel link next to the task name and then
Table 7.1: Description of the Indicator Lights
Light Color Description
Red Reserved for future use
Yellow Reserved for future use
Monitoring, Reporting and Logging 75
Page 78

Table 7.1: Description of the Indicator Lights (Continued)
Light Color Description
Traffic Green Blinks when the Barracuda Web Site Firewall
processes traffic.
Data I/O Green Blinks during data transfer.
Power Green Displays a solid green light when the system is
powered on.
76 Barracuda Web Site Firewall Administrator’s Guide
Page 79

Logs
The Barracuda Web Site Firewall has comprehensive logging feature to record occurrence of
significant events. Events related to http traffic, action of web firewall and user actions are captured
and made available to the administrator through the user interface. These log messages enable the
system administrators to:
• obtain information about the Barracuda Web Site Firewall traffic and performance
• analyze logs for suspicious activity
• troubleshoot the problems
The following types of logs are available in Barracuda Web Site Firewall:
• Web Firewall Logs. All the actions/events on the web firewall are logged under web firewall
logs. These logs help the administrator to analyze the traffic for suspicious activity and also fine
tune the web firewall policies.
• Access logs. All web traffic activities are logged under the access logs. These logs helps the
administrator to obtain information about the web site traffic and performance.
• Audit logs. All administration and configuration activities of the administrator are captured
under the audit logs. This information can be used for audit purpose.
Every log in the Barracuda Web Site Firewall has a level associated with it, which indicates the
severity of the logs. An administrator can configure what level of logs should be recorded and control
the volume of logs been persisted.
Apart from persisting the logs in the internal storage, Barracuda Web Site Firewall also has the
capability to configure an external syslog server, for persistent external storage.
Web Firewall Logs
The BASIC > Web Firewall Logs page allows you to view the generated log messages stored in a
syslog server or the buffer. Use the built-in filters to quickly locate specific types of log entries. Click
Preferences to set the number of messages to be displayed per page.
Click
Back or More to toggle between different pages of log entries. The logging of Web Firewall
Logs are enabled by default.
To configure the log level for Web Firewall Logs
1. From the BASIC > Services page, click Edit against the service.
2. On the Edit page, under the Basic Security section, select the Web Firewall Log Level from the
drop-down list. A lower level signifies lesser information logging.
3. Click Save Changes to save the above settings.
Access Logs
The BASIC > Access Logs page allows you to view the generated log messages stored in a syslog
server or the buffer. Use the built-in filters to quickly locate specific types of log entries. Click
Preferences to set the number of messages to be displayed per page.
Monitoring, Reporting and Logging 77
Page 80

Click Back or More to toggle between different pages of log entries. Access Logs are enabled by
default. To disable Access Logs, on
Enable Access Logs parameter to Off.
To disable Access Logs
1. From the BASIC > Services page, click Edit against the service.
2. On the Edit page, under the Services section, set the Enable Access Logs to “Off”.
3. Click Save Changes to save the above settings.
Audit Logs
The BASIC > Audit Logs page allows you to view the generated log messages stored in a syslog server
or the buffer. Use the built-in filters to quickly locate specific types of log entries. Click
to set the number of messages to be displayed per page.
Click
In the following situations there won't be any logout logs in Audit Logs:
• When Barracuda Web Site Firewall is restarted because other critical processes crashed, the
current existing sessions won't be logged out. So audit logs will not have corresponding logout
logs.
• When maintenance command is executed by user or by Barracuda Web Site Firewall, the
current existing sessions won't be logged out. Hence audit logs will not have corresponding
logout logs.
BASIC > Services page, click Edit against the service and set the
Preferences
Back or More to toggle between different pages of log entries.
Syslog
Note
In the following situations there will not be any login logs in Audit Logs:
• When maintenance command is executed by user or by Barracuda Web Site Firewall, a new
login session will be created in maintenance mode, but it won't be logged.
The ADVANCED > Syslog page is a standard UNIX/Linux tool for sending remote system logs and is
available on all UNIX/Linux systems. Syslog servers are also available for Windows platforms from
a number of free and premium vendors. Barracuda Networks has tested with a Windows freeware
syslog server from Kiwi Enterprises (www.kiwisyslog.com). Barracuda Networks makes no
guarantees that your Barracuda Web Site Firewall will be completely compatible with this syslog
server.
To configure System Logs
1. From the ADVANCED > Syslog page, under the System Logs Syslog Configuration section,
enter the IP address to send syslog data related to generic system events.
2. Click Save Changes to save the above settings.
3. Click Monitor Syslog to view the system logs.
This syslog data appears on the local0 facility with events at various priority levels on the specified
syslog server.
78 Barracuda Web Site Firewall Administrator’s Guide
Page 81

To configure Application Logs
1. From the ADVANCED > Syslog page, under the Application Logs Syslog Configuration section,
2. Click Save Changes to save the above settings.
Note
Different facilities are specified to distinguish between the log type as all the log types go to the
same syslog server. They are: Web Firewall Logs: local0; Web Logs: local1; Audit Logs: local2.
Search Logs
You can use filters and the search option to quickly locate specific types of log entries.
To use the search criteria
1. Select the filter column and appropriate operator from the drop-down list and enter the value.
2. Click ‘+’ to add more search fields and ‘-’ to remove it. Multiple search criterion can be
3. Specify the complete timestamp while searching for the log messages generated within the
4. While using multiple search criterion, same fields cannot be specified more than once.
5. Click Back or More to toggle between different pages of log entries.
enter the IP address to send syslog data related to structure Application Logs.
Search, to display the audit logs pertaining to the filter specified.
Click
specified, which will result in an ‘And’ combination of the filters.
specified period.
Note
6. You can specify regular expressions (Regexp) for some selected fields.
The ‘Or’ operation is not supported by Barracuda Web Site Firewall.
Monitoring, Reporting and Logging 79
Page 82

Reports
Available Reports
This section is intended for users who need to configure and generate reports. It describes the
procedures for generating reports on various categories. The generated reports help the system
administrators in their day-to-day security management and statistical analysis of the log messages.
The reporting feature augments the management capabilities available with the Barracuda Web Site
Firewall. Using this module, reports can be generated based on all the logged information.
Reports can be run immediately or queued and emailed after the report is processed. The reports can
be displayed as a pie or (vertical and horizontal) bar chart. The following reports are available in
Barracuda Web Site Firewall:
• Top Denied Clients
• Top Attacked Services
• Top Attacked URLs
• Top Clients by Requests
• Top Services by Requests
• Top URLs by Requests
• Top Clients by Bandwidth
• Top Services by Bandwidth
• Top URLs by Bandwidth
Generate Report
You can generate a report on all the logged information for various events on the Barracuda Web Site
Firewall by specifying the report type and date/time range for the report. The report can be run
immediately or it can be queued and emailed after the report is processed. Only one report is created
at a time, to prevent overloading the Barracuda Web Site Firewall.
Note
Reports run immediately can potentially consume too many system resources on the Barracuda
Web Site Firewall. Due to this potential hazard, reports over 7 days in length can only be generated
through email.
Report Properties
Use the Report Properties settings to change the number of results displayed in a report and the type
of chart used in the report. Apply these settings both to reports sent via email and reports generated
to be viewed on the screen.
80 Barracuda Web Site Firewall Administrator’s Guide
Page 83

Note
Chapter 8
High Availability
This chapter describes the configuration and monitoring tasks you can perform from the Web
interface. The following topic is covered:
• Creating a High Availability (HA) Environment on page 82
For more detailed information about a specific page in the Web interface, view the online help by
clicking the question mark icon on the right side of the interface.
High Availability 81
Page 84

Creating a High Availability (HA) Environment
The ADVANCED > High Availability page allows you to link a second Barracuda Web Site Firewall to
act as a backup to your primary as shown in Figure 8.1. Both systems must be located on the same
network, if the primary unit is down for any reason, the backup unit assumes and inherits the work of
the primary unit. This provides continuous network availability. The Barracuda Web Site Firewall
uses ports 8001 and 8002 to synchronize configuration between linked systems.
Figure 8.1: High Availability Pair of Barracuda Web Site Firewall
Each linked Barracuda Web Site Firewall sends a custom “heartbeat” to the other using UDP, to let
each other know that they are up and running. The backup unit automatically becomes active and
takes over the services of the primary system, if the primary system fails to send a heartbeat for nine
(9) seconds or if it receives a heartbeat with primary unit’s state as “failed”.
Before adding two systems in a cluster, each Barracuda Web Site Firewall must meet the following
requirements:
• Be installed on a unique WAN IP address. The Barracuda Web Site Firewalls use the WAN IP
address (UDP port) to communicate for HA.
• Be able to ping each other on the WAN interface.
• The WAN interface on both Barracuda Web Site Firewall must be on the same switch (or
physical network).
To link two Barracuda Web Site Firewalls together:
1. Complete the installation process for each system as described in Chapter 3 Initial Setup.
2. From the ADVANCED > Task Manager page on Barracuda Web Site Firewall 1, verify that no
processes are running. Complete this step on Barracuda Web Site Firewall 2 as well. No
processes should be running when you link systems together.
3. From the ADVANCED > High Availability page on Barracuda Web Site Firewall 1, enter the
Cluster Shared Secret password, and click
4. From the ADVANCED > High Availability page on Barracuda Web Site Firewall 2:
4a. Enter the Cluster Shared Secret password. Both units in a cluster must have the same
cluster shared secret to communicate. Click
4b. In the Clustered Systems section, enter the WAN IP address of Barracuda Web Site
Firewall 1, and click
Join Cluster. The unit from which the Join Cluster is executed
Save Changes.
Save Changes.
becomes the designated backup unit. That is, Barracuda Web Site Firewall 1 becomes
primary and Barracuda Web Site Firewall 2 becomes backup.
5. Refresh the ADVANCED > High Availability page, and verify that:
• Each system’s WAN IP address appears in the
Clustered Systems list.
• The status is green for both units. This indicates the communication status.
82 Barracuda Web Site Firewall Administrator’s Guide
Page 85

The High Availability Status can be viewed from BASIC > Status > Performance Statistics
6.
page. This shows the role and state of that unit.
Figure 8.2 and Figure 8.3 shows how this section would look before and after the second Barracuda
Web Site Firewall has been clustered with the primary unit.
Figure 8.2: An unclustered Barracuda Web Site Firewall 2
Make sure the
status is green.
IP address of the primary
Barracuda Web Site Firewall
Figure 8.3: Two clustered Barracuda Web Site Firewalls
Make sure the
Make sure both IP addresses
appear in this list.
status is green.
Evaluating System Status
A Barracuda Web Site Firewall can be in a number of system states when it is in cluster. Once two
Barracuda Web Site Firewalls are configured in redundant mode, you can view their system states
Performance Statistics section against High Avail. Status in the BASIC > Status page. When
under
a single unit is deployed High Avail. Status is displayed as Stand-alone.
The following table describes the possible system states.
Table 8.1: System Status
State Description
Active • The Barracuda Web Site Firewall is powered up, all processes are running, the
hardware is operating properly. The unit is capable of actively serving requests
coming for services (if any).
Standby • The Barracuda Web Site Firewall is powered up, all processes are running, the
hardware is operating properly. The unit is ready to assume services (if any).
Failed • The Barracuda Web Site Firewall is powered up, but the physical link status of an
interface (WAN, LAN or Management) is down or Data Path Process has crashed.
If the unit is in failed state, then the services should failover to the other unit, if the
other unit is standby or active.
High Availability 83
Page 86

Failover
Failover is the process of moving active services from the primary unit to the backup unit when the
primary unit is in the failed state. The backup unit should not be in a failed state in order to take over
services. On failover, the backup unit assumes the services of the failed unit. It will continue to
process the traffic until the failed unit is restored. Failover can occur in three ways:
1. Link Down: If the parameter Monitor link for WAN IP Configuration, LAN IP
Configuration and Management IP Configuration is set to “Ye s” in
Configuration
page and when the link is down for any one of these interfaces, then the system
BASIC > IP
goes into a failed state.
2. Data Path Process Crash: If the system had an outage, particularly, if the process has been
crashing frequently, the system will be placed in the failed state. The frequency is measured by
number of crashes in the last 5 minutes. If 3 crashes occur within the last 5 minutes, the system
goes into failed state.
3. Lost Heartbeat: When the backup unit does not receive a heartbeat from WAN interface on the
primary unit for 9 seconds, it concludes that the primary unit is down or dead and it executes
failover.
Failback
Failback is an operation that restores the functioning of services that have failed over from the primary
unit to the backup unit. When the primary unit is returned from a failed state to the active state (that
is, capable of actively serving application requests), the services will be automatically failed back
(released) from the backup unit. The backup unit now goes into standby state.
Data Propagated to Linked Systems
Linking systems together not only makes it easier to manage the two Barracuda Web Site Firewalls,
but it also provides 100 percent redundant coverage of the propagated data. Synchronization of the
configuration takes place every 5 minutes on both units. Table 8.2 identifies the data that is
propagated when two systems are linked.
Table 8.2: Data Propagated Between Linked Systems
Propagated Data Data Not Propagated
Any configuration changes through the
Administration interface.
• System IP configuration (IP address, netmask, gateway, and
DNS server) and Monitor Link information configured on the
BASIC > IP Configuration page.
• System password and time zone as configured on the
BASIC > Administration page.
Updating Redundant Barracuda Web Site Firewalls
Updating the Firmware on a redundant pair of Barracuda Web Site Firewalls can be done without loss
of services.
Do the following to upgrade the Firmware:
1. Download the new version of the Firmware on both units.
2. After downloading, first apply the new version on the backup unit, this reboots the unit. Wait
until backup unit comes up.
84 Barracuda Web Site Firewall Administrator’s Guide
Page 87

Apply the new version on the primary unit, this reboots the unit. For a small period of time,
3.
services may failover to the backup unit (because it may not receive the heartbeat from the
primary unit while it is rebooting, and it will assume services). Once the primary has rebooted
successfully, it will resume services and the backup will relinquish.
Note
For seamless HA functionality, ensure that both the units have the same firmware version. Step 3
can be postponed to a later time, but the caveats of the database version and the heartbeat version
may come into force during the period where there is a mismatch.
Removing units from a cluster
A Barracuda Web Site Firewall can be removed from a cluster at any time. When removing a unit
from a cluster, make sure that none of the units assume the ownership of interfaces and/or services.
This can cause IP conflicts and services to go down.
Do the following to remove the units:
1. Take backups of both the units.
2. Ensure that the primary is active and handling traffic.
3. From the ADVANCED > High Availability page of the backup unit, remove the cluster by clicking
the delete button in the
4. From the ADVANCED > High Availability page of the primary unit, remove the cluster by
clicking the delete button in the
Clustered Systems list. This clears the backup configuration.
Clustered Systems list. This retains the configuration of the
primary unit, but removes the peer information from the configuration database.
Removing the units for RMA
Before attempting RMA, it is required to remove from the cluster. This is because, the serial number
is used to identify the peer and communicate between the two units. A replacement unit with a
different serial number will not be able to automatically become part of the cluster; it has to go
through the clustering procedure.
There are two scenarios for replacing the units:
• when the primary is dead. There are two ways to replace a primary unit:
• backup unit to become the new primary
• the new unit assume the role of the primary
• when the backup unit is dead
To remove the cluster when the primary is dead:
1. To replace backup unit as the new primary unit.
1a. Take a backup on the backup unit.
1b. Ensure that the backup is active and handling traffic.
1c. From the ADVANCED > High Availability page of the backup unit, remove the cluster by
clicking the delete button in the
1d. Configure a new unit with the primary unit’s WAN IP address in BASIC > IP
Configuration
1e. From the ADVANCED > High Availability page of the new unit, enter the WAN IP
page.
address of the new unit, and click
Clustered Systems list.
Join Cluster.
High Availability 85
Page 88

To replace the new unit as primary unit, the pre-requisites are:
2.
• A backup of the primary unit exists before it went down
• A down-time period is planned
2a. Take a backup on the backup unit.
2b. Ensure that the backup is active and handling traffic.
2c. From the ADVANCED > High Availability page of the backup unit, remove the cluster by
clicking the delete button in the
2d. Configure a new unit with the primary unit's WAN IP address.
2e. Clear all configuration on the backup unit (this is required so that the services are
Clustered Systems list.
stopped).
2f. Restore the Primary unit's backup on the new unit. Note that this is not the backup taken
in Step 1. Now, the primary assumes the services.
2g. From the ADVANCED > High Availability page of the old backup unit, enter the WAN IP
address of the new primary unit, and click
Join Cluster.
To remove the cluster when the backup is dead:
1. Ensure that the primary is active and handling traffic.
2. From the ADVANCED > High Availability page of the primary unit, remove the cluster by
clicking the delete button in the
3. Configure the new unit with the old backup unit’s WAN IP address in BASIC > IP Configuration
Clustered Systems list.
page.
4. From the ADVANCED > High Availability page of the new backup unit, enter the WAN IP
address of the new backup unit, and click
Join Cluster.
86 Barracuda Web Site Firewall Administrator’s Guide
Page 89

Note
Chapter 9
Advanced Concepts
This chapter describes the advance security configurations you can perform on the Barracuda Web
Site Firewall. The following topics are covered:
• Deployment on page 88
• Security on page 90
For more detailed information about a specific page in the Web interface, view the online help by
clicking the question mark icon on the right side of the interface.
Advanced Concepts 87
Page 90

Deployment
The ADVANCED > Advanced IP Config pages allows you to configure advanced IP configurations for
the Barracuda Web Site Firewall.
Multiple IP Address Configuration
The Multiple IP Address Configuration section allows you to add virtual interface(s) to the physical
port (WAN or LAN or MGMT) used to communicate with the servers. This interface is a logical exit
point that allows traffic to safely and securely travel between the Barracuda Web Site Firewall and
the servers. This lists all service IP addresses along with the virtual interfaces.
To configure Multiple IP Addresses
1. Specify values for the following fields:
2. Click Add to add the above configurations.
• IP/Network Address. Enter an IP address to communicate with the servers.
• Netmask. Enter an associated netmask for this interface.
• Network Interface. Select the interface over which communication will be transmitted.
To do this, select either WAN or LAN or MGMT. (Back-end traffic is normally over
LAN.)
Static Routes
The Static Routes section allows you to create a static route to specify the exact route to a remote
network. This allows you to route an interface that is located on a different subnet.
To configure Static Routes
1. Specify values for the following fields:
• IP/Network Address. Enter the IP address of the destination in a route entry. An address
of 0.0.0.0 indicates this route applies to any destination IP address.
• Netmask. Enter the mask for the route entry. The destination and the mask together
define the set of destinations that can be reached through this route. An address of 0.0.0.0
indicates this route applies to any destination mask.
• Gateway Address. Enter the IP address of the network gateway.
2. Click Add to add the above configurations.
3. Click Bulk Edit to perform multiple changes to a list of configuration settings in one step. The
above values is translated into CSV (Comma-Separated Values) format and displayed in the
Bulk Edit window. From there, you can manually add, modify or remove as many rows as you
desire and click
Interface Routes
Save Changes.
The Interface Routes section allows you to create an interface route to specify the interface to use for
remote network. This is useful in the bridge mode where the service IP address is not owned by the
Barracuda Web Site Firewall.
88 Barracuda Web Site Firewall Administrator’s Guide
Page 91

To configure Interface Routes
1. Specify values for the following fields:
• IP/Network Address. Enter an IP address which has to be routed through the interface.
• Netmask. Enter an associated netmask for this interface route.
• Network Interface. Select the interface over which communication will be transmitted.
To do this, select either WAN or LAN or MGMT.
2. Click Add to add the above configurations.
Advanced Concepts 89
Page 92

Security
Creating Identity Theft Patterns
The following topics discuss the different data patterns used for advanced security. In addition, a
pattern can also be associated with an algorithm. The algorithm is then run on all strings matching the
regular expression to determine whether they actually conform to this pattern.
The ADVANCED > Libraries > Identity Theft Patterns allows you to add customized Identity Theft
data type apart from the default data types that are available under
page. One or more "patterns" which define the format of the data type can be added to each group.
Identity theft is the unauthorized collection and use of your personal information like name, address,
telephone number, credit card, and so on, for unauthorized and malicious purposes. Your personal
data like Social Security number, bank account or credit card number, telephone calling card number,
and other valuable identifying data can be used to personally profit them at your expense, if they fall
into the wrong hands.
To create customized Identity Theft Data Type
1. Enter the name for the New Group and click Add.
2. Against the newly created group click Add Pattern.
3. Specify values for the following fields:
• Pattern Name. Enter a name for the pattern.
• Status. Select whether to enable or disable this pattern. Only patterns with status set to
"On" are used for actual pattern matching.
• Pattern Regex. Enter the regular expression of the pattern. It recognizes the lexical
patterns in text.
• Pattern Algorithm. Select the algorithm for the pattern from the drop-down list.
• Case Sensitivity. Select whether the pattern regular expression is to be treated as case
sensitive or case insensitive from the drop-down list.
• Pattern Description. Enter the description for the pattern used. For example, Visa credit
card pattern. This indicates that the pattern used here is the visa credit card pattern.
4. Click Add to add the above configurations.
Advanced > View Internal Patterns
The added identity theft pattern becomes available under
Protection
which lists out all the newly added identity theft patterns.
. Select the Identity Theft Type as “<CUSTOM>” and click the Custom Identity Theft Type,
Using Custom Patterns
A pattern describes a data type format. When a data type is bound to an attack, all user input matching
the ACL is scanned for strings corresponding to any enabled pattern. The pattern format is defined
with a regular expression. In addition, a pattern can also be associated with an algorithm. The
algorithm is then run on all strings matching the regular expression to determine whether they actually
conform to this pattern.
Similarly, when a data type is bound to a data theft element, all server pages are scanned for strings
matching any enabled pattern in the data type.
90 Barracuda Web Site Firewall Administrator’s Guide
SECURITY POLICIES > Data Theft
Page 93

Creating Attack Types
The ADVANCED > Libraries > Attack Types allows you to add customized Attack data type apart from
the default data types that are available under
"patterns" which define the format of the data type can be added to each group.
Attack is request based while identity theft is response based. You can define the list of items that a
request should not contain. If a request contains the patterns described here, then the request will be
dropped. For example, the attack can be SQL injection or OS command injection or cross site
scripting.
To create customized Attack Type
1. Enter the name for the New Group and click Add.
2. Against the newly created group click Add Pattern.
3. Specify values for the following fields:
• Pattern Name. Enter a name for the pattern.
• Status. Select whether to enable or disable this pattern. Only patterns with status set to
"On" are used for actual pattern matching.
• Pattern Regex. Enter the regular expression of the pattern. It recognizes the lexical
patterns in text.
• Pattern Algorithm. Select the algorithm for the pattern from the drop-down list.
• Case Sensitivity. Select whether the pattern regular expression is to be treated as case
sensitive or case insensitive from the drop-down list.
• Pattern Description. Enter the description for the pattern used. For example, Visa credit
card pattern. This indicates that the pattern used here is the visa credit card pattern.
4. Click Add to add the above configurations.
Advanced > View Internal Patterns page. One or more
The added attack type pattern becomes available under
Class > Add Custom Parameter Class > Custom Blocked Attack Types
enabled by default. Also it is available under
Blocked Attack Types
Creating Input Types
The ADVANCED > Libraries > Input Types allows you to add customized input type apart from the
default input types that are available under
"patterns" which define the format of the input type can be added to each group.
Includes a collection of pre-defined and custom input data types, which can be used to validate HTTP
Request parameters. This validates the inputs entered in the fields available in the forms used. Most
of the attacks can be prevented by properly validating input parameter values against the expected
input. Input Type validation enforces the expected value type as opposed to looking for malicious
values. Values of configured parameters are validated against the specified Input Type and requests
with failed validations are detected as intrusions and blocked.
Input Types are defined using reg-ex patterns. Input Types for alpha-numeric strings, credit card, date
and positive-long-integer are provided by default. Custom Input Types can be created and used in the
validation.
To create customized Input Type
1. Enter the name for the New Group and click Add.
ADVANCED > Libraries > Custom Parameter
as check box(es), which is
SECURITY POLICIES > Parameter Protection > Custom
as check box(es), which is to be manually selected.
Advanced > View Internal Patterns page. One or more
Advanced Concepts 91
Page 94

Against the newly created group click Add Pattern.
2.
3. Specify values for the following fields:
• Pattern Name. Enter a name for the pattern.
• Status. Select whether to enable or disable this pattern. Only patterns with status set to
"On" are used for actual pattern matching.
• Pattern Regex. Enter the regular expression of the pattern. It recognizes the lexical
patterns in text.
• Pattern Algorithm. Select the algorithm for the pattern from the drop-down list.
• Case Sensitivity. Select whether the pattern regular expression is to be treated as case
sensitive or case insensitive from the drop-down list.
• Pattern Description. Enter the description for the pattern used. For example, Visa credit
card pattern. This indicates that the pattern used here is the visa credit card pattern.
4. Click Add to add the above configurations.
The added input type pattern becomes available under
Class > Add Custom Parameter Class
Custom Input Type Validation, which lists out all the newly added input types.
the
. Select the Input Type Validation as “<CUSTOM>” and click
Creating Custom Parameter Class
The ADVANCED > Libraries > Custom Parameter Class allows you to add customized paramater
classes apart from the internal parameter class that are available under
Patterns
group.
To create customized Parameter Class
1. Click Add Custom Parameter Class. The Add Custom Parameter Class dialog box opens.
2. Specify values for the following fields:
3. Click Add to add the above configurations.
page. One or more "patterns" which define the format of the data type can be added to each
•Name. Enter the name for this custom parameter class.
• Input Type Validation. Select the expected type for the configured parameter from the
drop-down list. Most of the attacks could be prevented by properly validating input
parameter values against the expected input.
• Custom Input Type Validation. Select the expected custom input data type for the
configured parameter. You need to create your own custom types.
• Denied Metacharacters. Enter the meta-characters to be denied in this parameter value.
• Blocked Attack Types. Select the check box(es) to detect malicious patterns in the
configured parameter. An intrusion is detected when the value of the configured
parameter matches one of the specified Attack Types and the request is blocked.
• Custom Blocked Attack Types. Select the custom attack type check box(es) to be used
to detect the intrusions.
ADVANCED > Libraries > Custom Parameter
ADVANCED > View Internal
The added custom parameter class becomes available under
Profile > Param Profile
“<CUSTOM>” and click the
. When you add/edit a param profile, select the Parameter Class as
Custom Parameter Class, which lists out all the newly added custom
parameter classes.
92 Barracuda Web Site Firewall Administrator’s Guide
WEBSITES > Web Site Profile > URL
Page 95

Creating a Customized Response Page for Errors
The ADVANCED > Libraries > Response Pages allows you to create a customized HTML response
page for HTTP requests that violate security policies on the Barracuda Web Site Firewall. You can
either edit the available default response page or add customized response pages that can be shared
among multiple services.
To create customized Response Pages
1. Click Add Response Page. The Add Response Page dialog box opens.
2. Specify values for the following fields:
• Response Page Name. Enter the name for this response page.
• Status Code. Enter the HTTP status code for this response page.
• Headers. Enter the response headers for this response page.
• Body. Enter the response body for this response page.
3. Click Add to add the above configurations.
The added custom response page becomes available under
a new URL ACL, select the
lists out all the newly added response pages. Also it is available under
. Click Edit against any action policy, the Response Page lists out all the newly added response
Policy
pages.
View Internal Patterns
The ADVANCED > View Internal Patterns page displays the details of different regex patterns grouped
under Identity Theft Patterns, Attacked Types, Input Types and Parameter Classes. For detailed
information refer Security on page 90. This is a read only page.
WEBSITES > Allow/Deny. When you add
Deny Response as "Response Page" and click Response Page, which
SECURITY POLICIES > Action
Advanced Concepts 93
Page 96

94 Barracuda Web Site Firewall Administrator’s Guide
Page 97

Chapter 10
Administrating the Barracuda Web Site Firewall
This chapter provides general instructions for administrating and maintaining the Barracuda Web Site
Firewall. This chapter covers the following topics:
• Administrative Settings on page 96
• Maintaining the Barracuda Web Site Firewall on page 99
Administrating the Barracuda Web Site Firewall 95
Page 98

Administrative Settings
This section covers the basic administrative settings for your Barracuda Web Site Firewall.
Controlling Access to the Administration Interface..............................96
Customizing the Appearance of the Web Interface............................ 96
Setting the Time Zone of the System.................................................. 96
Enabling SSL for Administration....................................................... 96
Controlling Access to the Administration Interface
The BASIC > Administration page allows you to perform the following tasks:
• Change the password of the administration account.
• Specify the IP addresses or netmask of the systems that can access the Web interface. All other
systems will be denied access. This is configured in the Administrator IP/Range section.
• Change the port used to access the Web administration interface.
• Change the length of time users can be logged into the Web interface (default is 60 minutes).
Customizing the Appearance of the Web Interface
The ADVANCED > Appearance page allows you to customize the default images used on the Web
interface.
Setting the Time Zone of the System
The BASIC > Administration page allows you to set the time zone of your Barracuda Web Site
Firewall. The current time on the system is automatically updated via Network Time Protocol (NTP).
It is important that the time zone is set correctly because this information is used to coordinate traffic
distribution and in all logs and reports.
Note: The Barracuda Web Site Firewall automatically reboots when you change the timezone.
Enabling SSL for Administration
The ADVANCED > Secure Administration page allows you to configure SSL for the administration
Web interface for your Barracuda Web Site Firewall. Click
SSL not only ensures that your passwords are encrypted, but also ensures that the rest of the data
transmitted to and received from the administration interface is encrypted as well. For users who want
to only allow secured connection, set up SSL.
Save Changes after making any changes.
96 Barracuda Web Site Firewall Administrator’s Guide
Page 99

Note
The SSL configuration referred to here is related only for the Web-based administrative interface.
To enab le S SL
1. Select ADVANCED > Secure Administration.
2. Select Yes to enable HTTPS/SSL access only.
3. Enter the HTTPS port. The default is 443.
The following table describes the fields on the
Advanced > Secure Administration page
Table 10.1: SSL Fields
Field Description
Web Interface HTTPS/SSL Configuration
HTTPS/SSL access only Select Ye s to enable SSL and only allow access to the Web
administration interface via SSL. Select No to use standard
HTTP access.
Web Interface HTTPS/SSL port The SSL port used by the Barracuda Web Site Firewall.
Default port for SSL is 443.
SSL Certificate Configuration
Certificate Type Select one of the following certificates for SSL:
• Default (Barracuda Networks) certificates are free but
generate browser alerts. The default certificate is signed
by Barracuda Networks and provided free as the default
type of certificate.
• Private (self-signed) certificates provide strong
encryption without the cost of purchasing a certificate
from a trusted certificate authority (CA). However Web
browsers cannot verify the authenticity of the certificate
and therefore display a warning every time a user
accesses the administration interface.
• Tr us ted certificates are issued by trusted Certificate
Authorities (CA), which are usually recognized by your
Web browser so no additional configuration is required.
Administrating the Barracuda Web Site Firewall 97
Page 100

Table 10.1: SSL Fields (Continued)
Field Description
Certificate Generation
Organization Info The information stored in your certificates and Certificate
Signing Requests. Provide the following information:
• Common Name is the fully qualified domain name used
to access the administration interface. For example:
“barracuda.yourdomain.com”
• Country is the two-letter country code where your
organization is located.
• State or Province Name is the full name of the state or
province where your organization is located.
• Locality Name is the city where your organization is
located.
• Organization Name is the legal name of your company
or organization.
• Organization Unit Name is an optional field in which to
specify a department or section within your organization.
Trusted Certificate
Upload Signed Certificate After purchasing the certificate, browse to the location of the
certificate and click Upload Now. Once you upload the
certificate, your Barracuda Web Site Firewall automatically
begins using it.
Once you have uploaded your signed certificate, make sure
Tru st ed is selected for the Certificate Type (described above).
Upload Backup SSL Private key After downloading the corresponding private key, browse to
the location of the key and click Upload Now.
98 Barracuda Web Site Firewall Administrator’s Guide
 Loading...