

Page 1

NetContinuum Device Manager
Application Configuration Guide
NetContinuum OS 6.1
449-000018-00-6.1-A
Page 2

Notice
The information contained in this document is subject to change without notice.
UNLESS EXPRESSLY SET FORTH IN A WRITTEN AGREEMENT SIGNED BY AN AUTHORIZED
REPRESENTATIVE OF BARRACUDA NETWORKS, INC., BARRACUDA NETWORKS MAKES NO WARRANTY OR
REPRESENTATION OF ANY KIND WITH RESPECT TO THE INFORMATION CONTAINED HEREIN, INCLUDING
WARRANTY OF MERCHANTABILITY AND FITNESS FOR A PURPOSE. Barracuda Networks assumes no
responsibility or obligation of any kind for any errors contained herein or in connection with the furnishing, performance,
or use of this document.
This document contains information that is the property of Barracuda Networks, Inc. This document may not be copied,
reproduced, reduced to any electronic medium or machine readable form, or otherwise duplicated, and the information
herein may not be used, disseminated or otherwise disclosed, except with the prior written consent of Barracuda
Networks.
NETCONTINUUM is a registered trademark of Barracuda Networks, Inc.
Linux is a registered trademark of Linus Torvalds in the United States and other countries.
Windows is a registered trademark of Microsoft Corporation in the United States and other countries.
Netscape is a registered trademark of AOL Time Warner, Inc. and Netscape Communications Corp. in the United
States and other countries.
All other trademarks and registered trademarks are the property of their respective holders.
Manual Name: NetContinuum Device Manager Application Configuration Guide
Part Number: 449-000018-00
Revision Number: 6.1-A
Release Number: 6.1
Publication Date: December 2007
Barracuda Networks, Inc.
3175 S. Winchester Blvd.
Campbell, CA 95008
Copyright © 2007 Barracuda Networks, Inc. All Rights Reserved.
Page 3

Contents
Preface xv
Revision Information xv
Audience xvi
Notation Conventions xvi
Product Documentation xviii
Customer Support xix
1. Introduction 1–1
Overview 1–1
Configuration Areas 1–2
Application Configuration Features 1–3
Application Objects 1–4
2. Creating a Vsite 2–1
Creating a Vsite 2–1
Creating a Bridged Vsite 2–3
Creating a Private Interface 2–4
Creating a Server Group 2–5
Configuring a Web Server 2–6
Defining a Web Server 2–6
Creating Back-Up Web Server 2–11
Configuring Server-side SSL 2–11
Configuring Redirection Policy 2–13
Configuring In-Band Health Check 2–14
Configuring Out-Of-Band Health Check 2–16
Configure Out-of-Band Monitoring 2–16
Add HTTP Monitoring 2–17
Configuring a Bridged Web Server 2–18
Configuring Response Pages 2–19
Configuring Trusted Hosts 2–20
Configuring Session Identifiers 2–21
Configuring Custom Parameter Classes 2–23
Configuring CRLs 2–28
Configuring Update Schedule 2–29
3. Creating a Web Application 3–1
NetContinuum OS 6.1 Contents iii
Page 4

Contents
Overview 3–1
Creating a Web Application 3–2
Creating a Special Web Application 3–5
OWA Web Application 3–5
Sharepoint Web Application 3–7
OWA HTTPS Web Application 3–8
Oracle Applications Web Application 3–8
Creating a Bridged Web Application 3–8
Confirming Connection 3–8
Creating a Default Route 3–9
4. Encrypting Application Traffic 4–1
Overview 4–1
SSL Features 4–1
SSL Components 4–2
SSL Configuration Types 4–2
Prerequisites 4–3
Creating Certificates 4–3
Modifying a Web Application 4–3
Client-side SSL 4–4
Configuring Client-side SSL 4–4
Client Authentication 4–6
Configuring Client Authentication 4–7
Configuring Allow List 4–9
Configuring a Deny List 4–12
Server-side SSL 4–12
Instant SSL 4–12
Configuring Instant SSL 4–13
5. Web Firewall Policies 5–1
Overview 5–1
Configuring Web Firewall Policy 5–2
Configuring Global URL ACLs 5–3
Configuring Request Limits 5–8
Configuring URL Normalization 5–10
Configuring Cookie Security 5–14
Configuring Default URL Protection 5–16
Configuring Default Parameter Protection 5–19
Configuring Website Cloaking 5–23
Configuring Data Theft Protection 5–25
Default Policies 5–28
Modifying Attack Action 5–32
Configuring Web Firewall 5–34
Configuring Web Firewall General Parameters 5–34
iv Application Configuration Guide (449-000018-00) NetContinuum OS 6.1
Page 5

Session Tracking 5–36
URL ACL 5–37
Configuring URL ACL General Parameters 5–40
6. URL Policies 6–1
Overview 6–1
URL Policies 6–2
Configuring General Parameters 6–2
Configuring Bruteforce Prevention 6–6
Configuring Entry Control 6–7
Configuring Data Theft Protection 6–11
Configuring Anti Crawl Trigger 6–12
Listing Locked-Out Clients 6–13
Configuring Access Control 6–13
Configuring SOAP Security 6–19
Header ACLs 6–20
Configuring a Header ACL 6–20
Configuring Rate Control 6–23
Creating Preferred Clients 6–25
Setting Rate Control Pool 6–26
6–26
Contents
7. Web Address Translation 7–1
Overview 7–1
Configuring URL Translation 7–2
Configuring Request Rewrite 7–4
Configuring Response Rewrite 7–9
Configuring Response Body Rewrite 7–12
8. User Access Control 8–1
Overview 8–1
Authenticating users 8–3
Internal Authentication Database 8–3
LDAP Authentication Database 8–4
RADIUS Authentication Database 8–6
SiteMinder Authentication Database 8–8
RSA AM Authentication Database 8–10
Authenticating Users 8–12
Create a Login Page 8–13
Configure Authentication 8–14
SiteMinder SSO 8–17
RSA AM SSO 8–19
Configuring Access Control 8–20
NetContinuum OS 6.1 Contents v
Page 6

Contents
Multiple Application Authentication 8–20
Troubleshooting 8–21
9. Load Balancing 9–1
Overview 9–1
Configuring Load Balancing 9–2
Configuring Redirection 9–4
Configuring Persistence 9–5
Configure Cookie Persistence 9–6
Configure Source IP/Netmask Persistence 9–9
Using Multiple Load Balancers 9–9
Configure the NC-Gateway 9–10
Configure the Load Balancer 9–10
Configuring Backup Servers 9–11
10. Caching 10–1
Overview 10–1
Configuring Caching 10–1
Purging Cache 10–3
Caching Considerations 10–4
Rule Groups and Dynamic Pages 10–4
Object Freshness 10–5
11. Rules 11–1
Overview 11–1
Creating a Rule Group 11–3
Configuring Bridged Rule Group 11–6
Adding Rules 11–7
Configuring Policies 11–7
12. Creating an FTP Application 12–1
Overview 12–1
Creating an FTP Application 12–2
Configuring PASV Mode 12–3
Configuring SSL 12–4
Configuring FTP Attack Prevention 12–5
Configuring Command Blocking 12–6
Configuring FTP ACLs 12–7
Configuring Load Balancing 12–9
13. Creating a Mail Application 13–1
Overview 13–1
vi Application Configuration Guide (449-000018-00) NetContinuum OS 6.1
Page 7

Creating Mail Application 13–2
Creating Bridged Mail Applications 13–4
Configuring SSL 13–4
Configuring Authentication (SMTP Only) 13–5
Configuring Load Balancing 13–6
Configuring Persistence 13–7
14. Creating a Custom Application 14–1
Overview 14–1
Creating a Custom Application 14–1
Configuring SSL 14–3
Configuring Load Balancing 14–4
Creating Bridged Custom Application 14–5
15. Dynamic Application Profiling 15–1
Overview 15–1
Configuring Learning 15–2
Configuring Learn Rules 15–3
Configuring Application Profile 15–5
Configuring URL Profile 15–7
Configuring Parameter Profile 15–13
Configuring Extended Validation 15–18
Configuring Validation Expressions 15–19
Enforcing the Application Profile 15–19
Contents
16. Compression 16–1
Overview 16–1
Configuring Compression 16–2
Compression Support 16–3
Encoding types 16–3
Content-types 16–3
Caching 16–4
Server communication 16–4
Granularity of configuration 16–4
Browser variations 16–4
Response size 16–5
Compression quality 16–5
17. Templates 17–1
Overview 17–1
Creation of Template 17–2
Configuring Custom Template 17–2
Using Configured Add Template 17–2
NetContinuum OS 6.1 Contents vii
Page 8

Contents
Using Configured Patch Template 17–3
18. Policy Wizard 18–1
Overview 18–1
Creating a Rule 18–1
View the Web Firewall Logs 18–2
Appendix A. Configuration Containers A–1
Appendix B. Syntax Rules B–1
Logical Expressions B–1
Success Condition B–3
Request Rewrite Condition B–4
Response Rewrite Condition B–6
Regular Expression Notation B–7
Regular Expressions of Web Application Firewall B–11
Appendix C. Usage Guidelines C–1
Passive versus Active Mode C–1
Passive Mode C–1
Web Firewall Passive Mode C–1
URL ACLs and Passive Mode C–2
Profile Passive mode C–2
URL Policy Passive Mode C–2
Request Limit Considerations C–2
Cookie Security Considerations C–3
TCP/IP Connection Pooling C–4
No Name Parameters C–5
Domain Names C–6
Macro Definitions C–6
Error Responses C–8
robots.txt Access C–8
Appendix D. Evaluation Policy and Flow D–1
Evaluation Policies D–1
Request Policy Order D–1
Response Policy Order D–4
Execution Flow D–5
HTTP Request D–5
HTTP Response D–7
URL ACL Policies D–8
Rule Matching D–8
viii Application Configuration Guide (449-000018-00) NetContinuum OS 6.1
Page 9

Rule Match Algorithm D–8
Hierarchial Match D–9
Sequential Match D–11
Priority Rules D–13
Appendix E. Metacharacters and Keywords E–1
Blocked Metacharacters E–1
Misused Metacharacters E–1
Misused Keywords E–2
Appendix F. Data Types F–1
Overview F–1
Identity Theft Data Types F–1
Attack Data Types F–3
Input Data Types F–6
Modifying Default Data Types F–7
Creating Additional Data Type F–8
Data Type Patterns F–10
Input and Attack Patterns F–10
Identity Theft Patterns F–11
Contents
Appendix G. Application Wizard G–1
Web Application with proxy network configuration G–1
Web Application with bridged network configuration G–6
Glossary Glossary–1
NetContinuum OS 6.1 Contents ix
Page 10

Contents
x Application Configuration Guide (449-000018-00) NetContinuum OS 6.1
Page 11

Figure 1-1. Simple Data Center Configuration 1–2
Figure 4-1. Instant SSL Diagram 4–13
Figure 5-1. Web Application Attacks 5–2
Figure 5-2. Normalizing Traffic 5–11
Figure 8-1. Authentication Process Diagram 8–2
Figure 9-1. Load Balancer Configuration 9–10
Figure 4-1. Request Policy Order Flowchart D–4
Figure 4-2. Response Policy Order Flowchart D–5
Figures
NetContinuum OS 6.1 Figures xi
Page 12

Table 2-1. Vsite Parameters 2–2
Table 2-2. Private Interface Parameters 2–4
Table 2-3. Web Server Parameters 2–8
Table 2-4. Server Redirection Parameters 2–13
Table 2-5. Server In-Band Health Check Parameters 2–15
Table 2-6. Server Out-of-Band Health Check Parameters 2–17
Table 2-7. Out-of-Band HTTP Monitor Parameters 2–18
Table 2-8. Response Page Parameters 2–20
Table 2-9. Trusted Hosts Container Parameters 2–21
Table 2-10. Session Identifier Container Parameters 2–23
Table 2-11. Custom Parameter Classes Parameters 2–24
Table 2-12. CRLs Parameters 2–28
Table 2-13. Update Schedule Parameters 2–30
Table 3-1. Web Applications Parameters 3–4
Table 3-2. Default Route Parameters 3–10
Table 4-1. SSL Parameters 4–5
Table 4-2. Client Auth Parameters 4–9
Table 4-3. Allow or Deny Client Parameters 4–11
Table 4-4. Instant SSL Parameters 4–14
Table 5-1. Global URL ACLs General Parameters 5–3
Table 5-2. Global URL ACLs container Parameters 5–5
Table 5-3. Request Limits Parameters 5–9
Table 5-4. Double-Encoding variation of the \ character 5–12
Table 5-5. URL Normalization Parameters 5–13
Table 5-6. Cookie Security Parameters 5–15
Table 5-7. Default URL Protection Parameters 5–17
Table 5-8. Default Parameter Protection Parameters 5–20
Table 5-9. Website Cloaking Parameters 5–24
Table 5-10. Data Theft Protection Parameters 5–27
Table 0-1. Attack Action Parameters 5–32
Table 5-11. General Parameters 5–35
Table 5-12. Session Tracking Parameters 5–37
Table 5-13. Sample URL ACL Configuration 5–39
Table 5-14. URL ACLs Parameters 5–42
Table 6-1. URL Policy General Parameters 6–4
Table 6-2. Bruteforce Prevention Parameters 6–7
Table 6-3. Entry Control Parameters 6–9
Table 6-4. Anti Crawl Trigger Parameters 6–12
Tables
NetContinuum OS 6.1 Tab le s xii
Page 13

Table 6-5. Access Control Parameters 6–15
Table 6-6. SOAP Security Parameters 6–20
Table 6-7. Header ACLs Parameters 6–21
Table 6-8. Rate Control Parameters 6–24
Table 6-9. Preferred Clients Parameters 6–25
Table 6-10. Rate Control Pool Parameters 6–26
Table 7-1. URL Translation Parameters 7–3
Table 7-2. Request Rewrite Parameters 7–6
Table 7-3. Response Rewrite Parameters 7–10
Table 7-4. Response Body Rewrite Parameters 7–13
Table 8-1. LDAP Authentication Database Parameters 8–5
Table 8-2. Radius Authentication Database Parameters 8–7
Table 8-3. SiteMinder Authentication Database Parameters 8–9
Table 8-4. RSA AM Authentication Database Parameters 8–11
Table 8-5. Authentication Parameters 8–16
Table 8-6. SiteMinder SSO tab Parameters 8–18
Table 8-7. RSA AM SSO tab Parameters 8–20
Table 9-1. Load Balancing General Parameters 9–3
Table 9-2. Load Balancing Redirect Parameters 9–5
Table 9-3. Load Balancing Persistence Parameters 9–7
Table 10-1. Caching Parameters 10–2
Table 10-2. Object Freshness Calculations 10–5
Table 11-1. Sample Rule Configuration 11–2
Table 11-2. Rule Group Parameters 11–4
Table 12-1. FTP Applications Parameters 12–2
Table 12-2. FTP PASV Mode Parameters 12–4
Table 12-3. FTP Attack Prevention Parameters 12–5
Table 12-4. FTP Command Blocking Parameters 12–6
Table 12-5. FTP ACLs Parameters 12–8
Table 13-1. E-mail Application Parameters 13–3
Table 13-2. SMTP Authentication Parameters 13–6
Table 13-3. Load Balancing General Parameters 13–7
Table 13-4. Load Balancing Persistence Parameters 13–8
Table 14-1. Custom Application Parameters 14–2
Table 15-1. Learning Container Parameters 15–3
Table 15-2. Learn Rules Container Parameters 15–4
Table 15-3. Application Profile Parameters 15–6
Table 15-4. URL Profile Parameters 15–9
Table 15-5. Parameter Profiles Parameters 15–15
Table 15-6. Extended Validation Parameters 15–18
Table 15-7. Validation Expressions Parameters 15–19
Table 16-1. Compression Parameters 16–2
Table 16-2. Compression Quality 16–5
Table 18-1. Web firewall Logs Parameters 18–4
Table A-1. Vsite and Application Containers A–1
Table s
NetContinuum OS 6.1 Tab le s xiii
Page 14

Tables
Table B-1. Regular Expression Values B–7
Table B-2. Operators to support regex in header rules B–11
Table C-1. Macro Definitions C–6
Table D-1. Sample Hierarchical Rule Match D–10
Table D-2. Sample Sequential Rule Match D–11
Table E-1. Blocked Metacharacters E–1
Table E-2. Misused Metacharacters and Keywords E–2
Table E-3. Misused Keywords E–3
Table F-1. Pattern Parameters F–9
xiv CLI Reference Manual (449-000006-00) NetContinuum OS 6.1
Page 15

This guide describes how to create, configure, and protect Web sites and applications
through the NetContinuum Application Security Gateway (NC-Gateway).
NOTE
Unless otherwise noted, the information in this guide
applies to all models of the NC-Gateway.
Revision Information
This is the eleventh edition of the NetContinuum Application Security Gateway
Application Configuration Guide (449-000018-00). This document (for NetContinuum
OS release 6.1.0) incorporates the following changes:
• Chapter 1: Server group updated with other application specific server group
details. Configuration tree image moved to Appendix A.
• Chapter 2: Added the procedure to configure the Response Page, Trusted Host,
CRLs and Custom Parameter Classes sections.
Preface <Preface>Preface
• Chapter 3: Added Special Web Applications section.
• Chapter 5: Many parameter names modified. Added Web Firewall Policies section.
• Chapter 6: Added URL Policies, Session Tracking, Learning and Application Profile
sections.
• Chapter 8: Added SiteMinder authentication database section.
• Chapter 15: Added Learning section.
• Chapter 17: Describes how to create Templates, use of saved Add and Patch
templates for further custom configuration.
• Appendix A: Configuration tree image added.
• Appendix B: Describes logical and regular expression syntax rules.
• Appendix C: Describes usage guidelines.
• Appendix D: Describes evaluation rules and process flow.
• Appendix E: Lists susceptible metacharacters and keywords.
NetContinuum OS 6.1 Preface xv
Page 16

Audience
• Appendix F: Describes the new data types.
• Appendix G: Describes the Web Application wizard.
• Appendix H: Describes the default web-firewall-policies. Attack groups and
associated attack actions.
Audience
This document is intended for administrators and developers who create or manage
Web applications and security. Users should have a background in the following:
• TCP/IP protocol
• Application protocols (HTTP, FTP, SMTP, POP3, IMAP)
• Secure Socket Layer (SSL)
• Certificate management
• Network management
Notation Conventions
This document uses the following conventions and symbols:
• Screen text (not in a menu) is presented in a display:
This is display text
Displays do not include any system prompts (for example, a $ sign) as part of the
text unless explicitly noted in the accompanying general text.
• The following font conventions apply both to general text and to text in displays:
— Courier represents display text:
Broadcast Message from ...
— Courier bold represents user input and Courier italic represents
variables:
show command
• Palatino represents all window titles, fields, and menu names, and menu items in
the GUI system:
Select
xvi Application Configuration Guide (449-000018-00) NetContinuum OS 6.1
Contents from the Help menu.
Page 17
Notation Conventions
• Bold emphasizes words in text:
…does not support…
• Italic introduces or defines new terms and is used in book titles:
A rule group is …
• The notation [Ctrl]–[char] indicates a control–character sequence. For example,
[Ctrl]–[c] means hold down the [Ctrl] key while pressing the [c] key; the letter c does
not appear on the screen.
• Document citations include the document name followed by the document part
number in parentheses:
NetContinuum Application Security Gateway Application Configuration
Guide (449-000018-00)
• Note, Caution, Warning, and Danger notices call attention to essential information.
NOTE
Notes call special attention to essential information, such
as important tips or advice on using a program, device, or
system.
CAUTION
Cautions alert you to conditions that could damage a
program, device, system, or data.
WARNING
Warning notices alert the reader to conditions that are
potentially hazardous to people. These hazards can
cause personal injury if the warnings are ignored.
DANGER
Danger notices alert the reader to conditions that are
potentially lethal or extremely hazardous to people.
NetContinuum OS 6.1 Preface xvii
Page 18

Product Documentation
Product Documentation
An NC-2000 comes with a documentation CD-ROM, online help, and selected printed
documents. To order documentation (or provide comments about the documentation),
contact customer support (see ‘‘Customer Support”). The CD-ROM includes the
following documents:
Licenses
• Notices and License Agreement (449-000037-00)
Quick Start Guide
• Quick Start Guide (449-000038-00)
Overview and Installation
• NetContinuum Application Security Gateway Overview (449-000019-00)
• NetContinuum Application Security Gateway Installation Guide (449-000035-00)
Administration and Configuration
• NetContinuum Application Security Gateway System Administration
Guide (449-000016-00)
• NetContinuum Application Security Gateway PKI Administration
Guide (449-000017-00)
• NetContinuum Application Security Gateway Application Configuration
Guide (449-000018-00)
• NetContinuum Application Security Gateway Web Services Configuration
Guide (449-000029-00)
• NetContinuum Application Security Gateway Logging Guide (449-000028-00)
• NetContinuum Application Security Gateway Command Line Interface (CLI)
Reference Manual (449-000006-00)
• NetContinuum Application Security Gateway Command Line Interface (CLI)
Procedures Guide (449-000036-00)
xviii Application Configuration Guide (449-000018-00) NetContinuum OS 6.1
Page 19

Customer Support
Contact customer support to request assistance or when you need to report a problem.
You can contact customer support in any of the following ways:
Method Enter
phone 1-800-831-2050
E-mail support@netcontinuum.com
Web http://www.barracuda.com/netcontinuum
Click on
support page.
To expedite a support request, have the following information available:
• Serial number: This is located on both the back of the NC-2000 and the packing slip.
• Customer identification (ID): This is located on the packing slip.
NOTE
Keep the packing slip. It has the NC-2000’s serial number
and customer ID number.
Customer Support
Support to access the technical
NetContinuum OS 6.1 Preface xix
Page 20

Customer Support
xx Application Configuration Guide (449-000018-00) NetContinuum OS 6.1
Page 21

Chapter 1
This chapter provides an introduction to configuring Web Application. It includes the
following topics:
• Overview
• Configuration Areas
• Application Configuration Features
• Application Objects
Overview
The NC-Gateway is a network security solution intended to secure web applications
and accelerate communication among devices on a network. The NC-Gateway can be
configured within the heart of a data center to provide communication and security
between front-end clients and back-end resources (Figure 1-1). The NC-Gateway is
designed so that it can be seamless positioned in a network.
The NC-Gateway acts as a proxy server, where each TCP/IP connection is fully
terminated, inspected, and then forwarded, dropped, or redirected as determined
through the inspection. The NC-Gateway processes and analyzes the
application-specific protocols that run over a TCP/IP packet. Supported protocols
include HTTP, HTTPS, FTP, POP3, SMTP, and IMAP. NC-Gateway applications
support these protocols with custom policies used to protect and expedite user traffic.
For example, an application for transmitting POP3 e-mail traffic can be created to
include policies for encrypting and load balancing the traffic.
Introduction
1-
NetContinuum OS 6.1 Introduction 1-1
Page 22
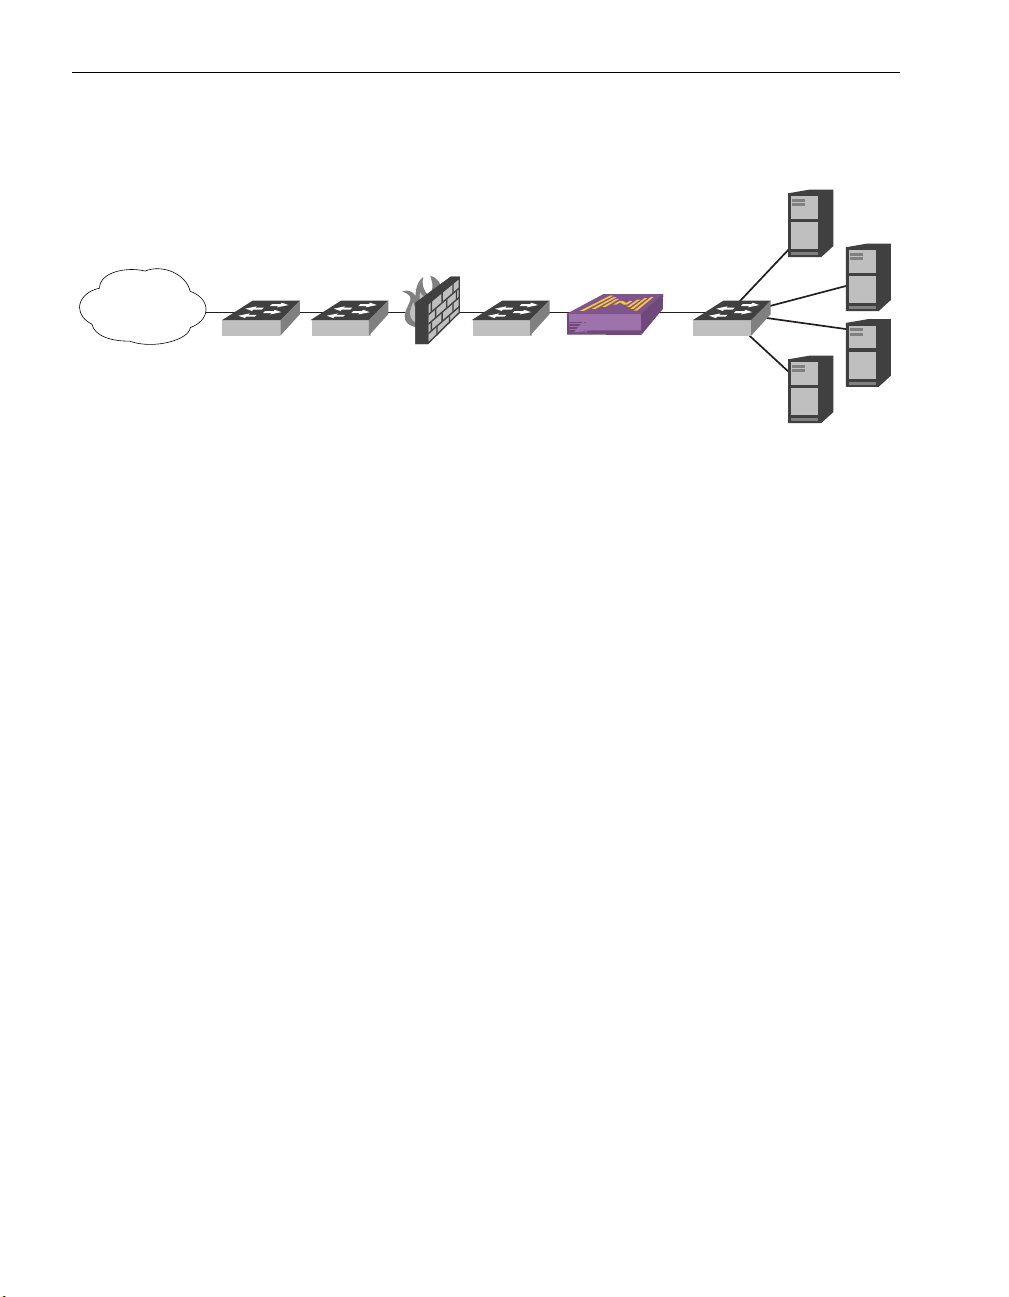
Overview
(Front-end Users)
Server Farm
(Back-end Applications)
Router Switch
Internet
Figure 1-1. Simple Data Center Configuration
Configuration Areas
After system initialization (see the NetContinuum Application Security Gateway
Installation Guide (449-000035-00)), the NC-Gateway is ready to be configured.
Configuration falls into three areas:
• Application Configuration: This relates to the application protocols that are
included in an IP packet, including Hypertext Transfer Protocol (HTTP and HTTPS),
File Transfer Protocol (FTP), Simple Mail Transfer Protocol (SMTP), and Post
Office Protocol (POP). This guide describes how to configure applications.
• PKI Configuration: This is performed on the Public Key Infrastructure (PKI)
objects, which are used for SSL encryption. Objects such as digital certificates and
key pairs are created in a separate PKI administration mode and then exported to
the general administration side for use in encrypting transmission between clients
and Web servers. See the NetContinuum Application Security Gateway PKI
Administration Guide (449-000017-00) for information about creating certificates
and other PKI objects.
Firewall
Switch
Switch
NC-Gateway
• System Configuration: This relates to general processing, that is global to the
NC-Gateway or a virtual site (vsite). Procedures include setting TCP/IP and other
system parameters, configuring NTP and SNMP, configuring network firewalls and
features (ACLs, NATs, Routes, ARPs, and VLAN Ports), performing system
maintenance, and initiating redundancy between two NC-Gateways. See the
NetContinuum Application Security Gateway System Administration
Guide (449-000016-00) for information about configuring and maintaining the
system. See the NetContinuum Application Security Gateway Logging
Guide (449-000028-00) for information about logging.
1-2 Application Configuration Guide (449-000018-00) NetContinuum OS 6.1
Page 23

Application Configuration Features
You can customize and protect an application in a number of areas. The following
features are specific to application configuration:
• Web Firewall Protection: The NC-Gateway provides a variety of Web firewall
protections that you can customize for each Web application:
— URL Normalization and Request Limits: The Web firewall provides various
format controls including normalizing URL strings and enforcing size limits on
request header fields.
— Cookie Security: The Web firewall can apply security features to cookies sent
from back-end servers.
— Data Theft Protection: The Web firewall can protect (by blocking or masking)
outgoing sensitive data such as credit card and social security numbers.
— Rate Control: The Web firewall supports setting the rate control pool limiting
client requests.
— Web Address Translation (WAT): The Web firewall can translate internal
codes, headers, and cookies in responses so that the actual message is
concealed to external users. WAT is an extension of the Network Address
Translation (NAT) implementation (RFC 1631).
Overview
— URL Policies: The Web firewall supports two types of Web access control
lists: URL and header. URL Policies provide numerous controls (entry, format,
failure response, data theft) based on the access location (URL). In addition,
URL Policies can activate Access Control. Header ACLs provide strict
limitations for parameters (such as form fields) and headers to prevent SQL or
operating system command injection, cross site scripting, and other types of
attacks.
— Web Services: The Web firewall supports various parameters which decide
how SOAP requests will be validated.
• SSL and Instant SSL: The NC-Gateway can be used to create and then
incorporate a complete set of digital certificates and key pairs to provide Secure
Socket Layer (SSL) encryption. In addition, the Instant SSL feature provides a
mechanism to convert existing HTTP (port 80) applications into HTTPS (port 443)
applications without having to change back-end resources. See the NetContinuum
Application Security Gateway PKI Administration Guide (449-000017-00) for
information on digital certificates and other SSL objects.
• Authentication: The NC-Gateway can enforce access controls with associated
authentication databases as specified for each application.
• Load Balancing, Caching and Compression: Traffic management settings for
load balancing, caching and Compression can be specified for each application.
NetContinuum OS 6.1 Introduction 1-3
Page 24

Overview
• Web Logging: Events and errors that occur on a Web site can be collected and
sent to a Web application logging server. (The NC-Gateway also supports system,
network firewall, and Web firewall logging.) See the NetContinuum Application
Security Gateway Logging Guide (449-000028-00) for information about logging.
Application Objects
Each application is built around several objects that you configure. The following are
objects that you must create to enable an application.
Vsite
A virtual site (vsite) is created as a portal to a data center that processes all
application-specific traffic sent over a TCP/IP connection. You can create multiple
applications within the vsite to handle various protocols and security requirements. It is
designed to function as an administrative domain that controls access and content to
and from back-end servers.
Private Interface
A private interface is created to define the back-end connection point between the
NC-Gateway and the Web servers. This access point is defined by assigning an IP
address, mask, and back-end port. This interface is a logical exit point that allows traffic
to safely and securely travel between the NC-Gateway and the Web servers.
Server Group
A Web server group is created to associate a set of Web servers (one or more)
accessed through the NC-Gateway. These servers provide the content and other
resources for your applications. Servers that load balance the same content for a Web
site should be members of the same server group, and a vsite can contain multiple
server groups for varying purposes.
The other server group contains the following application specific server groups:
• FTP Server Group: An FTP server group is created to associate a set of FTP
servers (one or more) accessed through the NC-Gateway.
• SMTP Server Group: An SMTP server group is created to associate a set of SMTP
servers (one or more) accessed through the NC-Gateway.
• POP3 Server Group: A POP3 server group is created to associate a set of POP3
servers (one or more) accessed through the NC-Gateway.
• IMAP Server Group: An IMAP server group is created to associate a set of IMAP
servers (one or more) accessed through the NC-Gateway.
• Custom Server Group: A Custom server group is created to associate a set of
custom servers (one or more) accessed through the NC-Gateway.
1-4 Application Configuration Guide (449-000018-00) NetContinuum OS 6.1
Page 25

Overview
Web Server
A Web server entry is created for each server in the server group that specifies
addressing, flow management, health, and security settings for traffic between that
Web server and the NC-Gateway.
Web Application
Controls a Web application (Web site or Web-based program), including Web firewall,
SSL encryption, load balancing, Web logging, authentication, access control, and
caching options.
Other Application
An application is created to define the front-end connection point for clients attempting
to access the back-end servers for a Web or other application. This access point is
defined by assigning a virtual IP (VIP) address, port, server group, front-end port, and
other connection-related parameters. The following applications can be created:
• FTP Application: Controls an FTP application, including PASV mode, attack
prevention (command blocking), SSL encryption, and load balancing options.
• SMTP Application: Controls an SMTP application, including SSL encryption,
authentication, and load balancing options.
• POP3 Application: Controls a POP3 application, including SSL encryption and
load balancing options.
• IMAP Application: Controls a IMAP application, including SSL encryption and load
balancing options.
• Custom Application: Controls an unspecified TCP/IP application. This type of
application simply forwards data from a client to the back-end server; the
NC-Gateway does no parsing. However, you can configure SSL encryption and
load balancing options.
Virtual Site (vsite): Holds both application-specific configuration information and
some system configuration such as network firewall settings. No vsites exist by default;
you must create them.
A vsite (virtual site) is an admin defined portal to a data center. It is similar in concept
to setting up a database view, where users can access only that part of the database
built into the view. In the case of a vsite, you define the resources that control traffic to
and from the data center through the vsite. You can create multiple vsites to address
different conditions, applications, and users. You can configure a vsite to manage any
number of applications and server groups.
Some containers, such as Network Firewall, appear automatically when you create a
vsite. Others, such as a server group or application, must be created explicitly.
NetContinuum OS 6.1 Introduction 1-5
Page 26

Overview
The following resources can be configured under a vsite:
Vsite level containers: Network Firewall, Private Interface, Server Group, Application,
and Authentication Database.
Web Application level containers: Web Firewall, Instant SSL, SSL, Load Balancing,
Web Logging, Authentication, Access Control, Caching and Rule Group.
After creating the vsite the admin creates a private interface to provide a virtual path to
the back-end resources. Then the admin creates a server group to define the actual
Web servers that will be used to support the created vsite. The next step is to create a
Web application and provide the front-end connection for clients attempting to access
the Web site. The Network firewall is configured to protect the network layer attacks by
creating ACL, ARP, static route entry and so on. Web firewall is configured to prevent
the Web attacks. SSL protocol is configured to provide data encryption and server/
client authentication for transmitting private information over the Internet. Syslog server
is configured to allow the user to centrally store and view logs sent from the
NC-Gateway.
Applications are created and configured under a vsite. No applications exist by default;
you must create each application within the appropriate vsite.
NOTE
Containers under the root node are accessible by the
admin user (and optionally other created administrative
users) only; containers under the SSL root node are
accessible by the pkiadmin user only.
Bridged Vsite: In bridge mode, NC-Gateway uses same IP address for the VIP
(application) and the back-end server. The NC-Gateway can be deployed in bridge
mode without any network restructuring and it supports all the application firewall
features. It supports all applications except FTP Application.
The bridged vsite has limitations in comparison to the proxy vsite. The following
features are not available in bridge-mode:
• PIFs
• Network Firewall (No ACLs, No NATs, No Routes, No ARPs)
• TCP Pooling
• OOB Monitoring
• Server Groups
• active-active failover support
1-6 Application Configuration Guide (449-000018-00) NetContinuum OS 6.1
Page 27

Overview
• Backup Rule Group
There is delay in failover/failback for bridged vsites based on the network devices.
Active-Active configuration is not supported for bridged vsites, therefore all bridged
vsites have to be active on the same NC-Gateway so that they failover together.
The "failback" policy can be manual or automatic. It is recommended that the
"failback" set to be manual (especially in the case of active/passive pairing). Otherwise,
the L2 switches on the front and back have to relearn before it can process requests
(delay of 15 seconds or more) again.
Rule groups under bridged-vsite allow you to route your requests to different servers.
By using rule groups, you can also change the behavior of the application with respect
to the following:
a. Caching: For example, disable caching for /dynamic/*
b. Web Logging: For example, disable logging for /*.gif
c. Compression: For example, do not compress /zips/*
In bridged mode, an application for wild card can be created. In this application, an IP
address of 0.0.0.0 is allowed for VIP that represents multiple applications in back-end
which is running on same port as specified in the application.
1. A router is required in the front-end of NC-Gateway to avoid bridging of packets
that are destined for other parts of the network.
2. The parameter ‘bridge-all’ under cluster should be set to ‘yes’.
3. All the wild card applications must be configured in the same bridged vsite.
4. No two wild card applications can have the same port.
NetContinuum OS 6.1 Introduction 1-7
Page 28

Overview
1-8 Application Configuration Guide (449-000018-00) NetContinuum OS 6.1
Page 29

Chapter 2
Creating a Vsite
A virtual site (vsite) represents a Web traffic control center that includes private
interface, server group, server, and application definitions. This chapter provides
instructions for creating a vsite. It includes the following topics:
• Creating a Vsite
• Creating a Bridged Vsite
• Creating a Private Interface
• Creating a Server Group
• Configuring a Web Server
• Configuring a Bridged Web Server
• Configuring Response Pages
• Configuring Trusted Hosts
• Configuring Session Identifiers
• Configuring Custom Parameter Classes
• Configuring CRLs
2-
Procedures for creating applications within a vsite are discussed in subsequent
chapters.
Creating a Vsite
A vsite is an administrator-defined portal to a data center. You define the resources and
rules that control traffic to and from the data center through the vsite. You can create
multiple vsites to address differing conditions, applications, and user populations. The
vsite processes all application-specific traffic that is sent over the TCP/IP connection.
You can create separate applications within a vsite to handle HTTP, HTTPS, FTP,
SMTP, IMAP, and POP3 traffic.
To create a vsite, do the following:
1. From the Configuration Home page, select Vsite from Add drop-down list located
in Vsites table. The Create page opens. In this page, do the following (in the
specified parameter fields).
NetContinuum OS 6.1 Creating a Vsite 2-1
Page 30

Creating a Vsite
a. Name: Enter a name for the new vsite.
b. Primary Gateway: Keep the default setting to the current NC-Gateway. This
c. Redundancy Enabled: Keep the default setting of On. This parameter has no
2. Click Add to save and activate the new settings.
3. Repeat step 1 to add additional vsites.
parameter can be changed only if there is a peer NC-Gateway configured in a
redundant environment (see Chapter 7, “Redundancy Configuration,” in the
NetContinuum Application Security Gateway System Administration
Guide (449-000016-00)).
effect on a standalone system.
4. To make a change, select one of the vsites from Vsite
s table, click Edit... button.
The Edit page opens. In this page, enter the desired value (or select the alternate
value from the drop-down list) for that parameter and then click Update to save and
activate the new setting(s).
The following table lists the vsite container parameters. These parameters can be
changed after a vsite is created.
Table 2-1. Vsite Parameters
Parameter Description Options
Name Sets the name for the vsite. (Names cannot contain
spaces, slashes, punctuation, or special characters.)
Primary
Gateway
Redundancy
Enabled
Sets the NC-Gateway where this vsite will be active,
that is, the NC-Gateway where the
application-specific traffic will be processed. By
default, this is assigned to the current NC-Gateway
where the vsite was created. However, if there is a
peer NC-Gateway in a redundant environment, this
parameter can be set to the peer.
Enables redundancy for this NC-Gateway. It has no
effect on a standalone system. In a redundant
configuration, it has the following effect:
User defined
(default is vsite)
Any
NC-Gateway in
cluster
On (default)
Off
• On: Services will normally be active on the gateway
specified by primary-gateway. If this gateway fails,
services will be taken over by the other gateway.
• Off: Services will only be active on the gateway
specified by primary-gateway. If this gateway fails,
services will NOT be taken over by the other
gateway, and the services will be unavailable till the
first gateway is rebooted.
2-2 Application Configuration Guide (449-000018-00) NetContinuum OS 6.1
Page 31

Creating a Bridged Vsite
In bridge mode, NC-Gateway uses same IP address for the VIP and the back-end
server. It does not use any extra IP address. The NC-Gateway can be deployed in
bridge mode without any network restructuring and it continues to support all the
existing application firewall features. It supports all applications except FTP
Application.
In bridged mode, an application for wild card can be created. In this application, an IP
address of 0.0.0.0 is allowed for VIP that represents multiple applications in back-end
which is running on same port as specified in the application.
1. A router is required in the front-end of NC-Gateway to avoid bridging of packets
that are destined for other parts of the network.
2. The parameter ‘bridge-all’ under cluster should be set to ‘yes’.
3. All the wild card applications must be configured in the same bridged vsite.
4. No two wild card applications can have the same port.
The Bridged vsite has the following limitation in comparison to the proxy vsite. The
following features are not available in bridge-mode:
Creating a Bridged Vsite
• PIFs
• Network Firewall (No ACLs, No NATs, No Routes, No ARPs)
• TCP Pooling
• OOB Monitoring
• Server Groups
• active-active failover support
• Backup Rule Group
There is delay in failover/failback for bridged vsites based on the network devices.
Active-Active configuration is not supported for bridged vsites, therefore all bridged
vsites have to be active on the same NC-Gateway so that they fail over together.
The "failback" policy can be manual or automatic. It is recommended that the
"failback" set to be manual (especially in the case of active/passive pairing). Otherwise,
the L2 switches on the front and back have to relearn before it can process requests
(delay of 15 seconds or more) again.
The process of configuring a Bridged Vsite is similar to configuring a Vsite. Except the
Redundancy Enabled parameter which is not available under Bridged Vsite (Creating
a Vsite).
NetContinuum OS 6.1 Creating a Vsite 2-3
Page 32

Creating a Private Interface
Creating a Private Interface
With a vsite created and saved, the next step is to create a private interface. A private
interface is a back-end address for the NC-Gateway that provides a path to the Web
servers. This interface is a logical exit point that allows traffic to safely and securely
travel between the NC-Gateway and the Web servers.
Do the following to create a private interface:
1. From the Configuration Home page, click vsite and the Private Interfaces tab.
2. To add a new Private Interface, select Private Interface from Add drop-down list
located in Private Interfaces table. The Create page opens. In this page, do the
following (in the specified parameter fields):
a. Name: Enter a name for the private interface. (The default is private
interface.)
b. Status: Keep the default setting of Up.
c. IP Address: Enter an IP address for the private interface. This is the IP address
to communicate with the back-end servers.
d. Mask: Enter an associated netmask for the private interface.
e. Ethernet: Select the port over which communication will be transmitted. To do
this, select either eth1 or eth2. (Back-end traffic is normally over eth2.)
3. Repeat step 2 to add additional Private Interfaces.
4. To make a change, select one of the private interface from Private Interfaces table,
click Edit... button. The Edit page opens. In this page, enter the desired value (or
select the alternate value from the drop-down list) for that parameter and then click
Update to save and activate the new setting(s).
The following table lists the private interface container parameters. These parameters
can be changed after a private interface is created.
Table 2-2. Private Interface Parameters
Parameter Description Options
Name Define a name for the private interface. User defined
private-interface (default)
Status Enables this interface. Up (default)
Down
IP Address Specifies an IP address for the private
interface.
2-4 Application Configuration Guide (449-000018-00) NetContinuum OS 6.1
User defined
Page 33

Table 2-2. Private Interface Parameters
Parameter Description Options
Creating a Server Group
Mask Specifies an associated netmask for the private
interface.
Ethernet Specifies the physical Ethernet port for the
private interface (usually eth2).
Creating a Server Group
After creating a private interface that opens communication to the back-end servers,
the next step is to create a server group. The server group can be a Web server group
or any other application specific server group. The other server group contains the
following application specific server groups:
• FTP Server Group
• SMTP Server Group
• IMAP Server Group
• POP3 Server Group
• Custom Server Group
Do the following to create a Web server group or any application specific server group:
1. From the Configuration Home page, click vsite and the Server Groups tab.
User defined
eth2 (default)
eth1
<NONE>
2. To add a new web server group, select Web Server Group from
Add drop-down
list located in Server Groups table. The Create page opens. In this page, do the
following (in the specified parameter fields):
a. Name: Enter a name for the server group. (The default is
web-server-group)
b. Repeat step 2 to add additional Server Group.
3. To make a change, select one of the server_group from Server Group
s table,
click Edit... button. The Edit page opens. In this page, enter the desired value (or
select the alternate value from the drop-down list) for that parameter and then click
Update to save and activate the new setting(s).
4. Click Add to save the setting.
NetContinuum OS 6.1 Creating a Vsite 2-5
Page 34

Configuring a Web Server
Configuring a Web Server
Once a Web server group is created, any number of Web servers can be configured as
part of that Web server group. The Web servers support the Web applications that will
be running through the vsite (see “Overview” in Chapter 3, “Creating a Web
Application”). Configuring a Web server involves the following steps:
1. Define the Web server (required)
2. Configure SSL for Web server traffic (optional)
3. Configure redirection policy when the Web server is out of service (optional)
4. Configure in-band health check parameters (required but defaults provided)
5. Configure out-of-band health check parameters (optional but recommended)
Defining a Web Server
Do the following to define a Web server in a Web server group or any application
specific server (FTP Server, SMTP Server, POP3 Server, IMAP Server, Custom
Server) in an application specific server group:
1. From the Configuration Home page, click vsite > web-server_group and the
Web Servers tab.
2. To add a new web server, select Web Server from
Web Servers table. The Create page opens. In this page, do the following (in the
specified parameter fields):
a. Name: Enter a name for the Web server. The default is web-server.
b. Status: Keep the default setting of In Service, or set it to one of the Out Of
Service settings if necessary (see Table 2-3).
NOTE
Placing a server in an out-of-service mode for any reason
disconnects all connections to this server. However, there
might be a delay (depending on traffic patterns) if you
place a server in to Out of Service Maintenance or Out of
Service Sticky.
c. IP Address: Enter the IP address of the Web server.
d. Port: Enter a port number to access on the Web server. (default is 80)
Add drop-down list located in
2-6 Application Configuration Guide (449-000018-00) NetContinuum OS 6.1
Page 35

Configuring a Web Server
NOTE
The remaining parameters have default values. See
Table 2-3 for more information about these parameters.
e. Client Impersonation: Select whether the connection to the back-end should
use the originating client’s IP address rather than the private interface address
(default is No) from the drop-down list. In most cases, this should remain off.
f. Max Connections: Enter the maximum number of request that can be sent to
this Web server.
g. Max Requests: Enter the maximum number of request that can be sent to this
Web server (default is 1000).
h. Max Keepalive Requests: Enter the maximum number of requests on a
persistent connection before the connection is shut down, if the Web server
does not close the connection first (default is 0).
i. Max Establishing Connections: Enter the maximum number of connection that
will attempt to connect to this Web server, if the Web server does not close the
connection first (default is 100).
j. Max Spare Connections: Enter the maximum number of pre-allocated
connections that can be sent to this Web server (default is 0). Set this to 0 if
the Web server can only handle one connection at a time.
k. Timeout: Enter the time in millisecond when an unused connection should time
out (default is 300000).
l. Keepalive Timeout: Enter the time in millisecond when a Web server that was
used at least once timed out, if the Web server does not close the connection
first (default is 900000).
m. WRR Weight: Enter the weight (capacity) value for this Web server (default is
1).
n. Backup Server: Select a Web server (from the drop-down list) that should be
used as a backup if this Web server is unavailable from the drop-down list. This
is optional. Only Web servers from a different Web server group are eligible
(default is NONE).
o. Interface: Select the IP address to be used as interface for back-end
connections when there are multiple IP addresses in the same subnet on the
NC-Gateway from the drop-down list.
3. Click Add to save the settings. The operation completed successfully message
appears.
The created web server appears in the Web Server Groups tab.
NetContinuum OS 6.1 Creating a Vsite 2-7
Page 36

Configuring a Web Server
The following table lists the Web server container parameters. These parameters can
be changed after a Web server is created.
Table 2-3. Web Server Parameters
Parameter Description Options
Name Sets a name for the back-end server. (Names cannot
contain spaces, slashes, punctuation, or special
characters.)
Status Sets the server operating condition with the following
meanings:
• In Service: Requests can be forwarded to this server.
Out of Service All: Requests should not be
•
forwarded to this server. The server is excluded from
the group of servers being load-balanced to. All
existing connections to this server are immediately
terminated.
Out of Service Maintenance: Requests should not
•
be forwarded to this server. The server is excluded
form the group of servers being load-balanced to.
Existing connections are terminated only after the
requests in progress are completed.
Out of Service Sticky: Requests that need to be
•
forwarded to the server to maintain persistency (if
persistence is turned on) continue to be sent to the
server. The server is excluded from the group of
servers being load-balanced to for any new requests
without any persistency requirement. Existing
connections are not terminated.
Note: During operation, the following status messages
can appear:
• in-service status message implies the server is
configured in service and the NC-Gateway does not
detect any connection errors.
• out-of-service status message implies the server
is out of service as indicated above (all, maintenance,
or sticky).
• not-in-use status message implies that the server
group containing this server is not bound to any
application or rule group.
User defined
web-server
(default)
In Service
(default)
Out of
Service:
• All
• Maintenance
• Sticky
IP Address Specifies an IP address for the back-end server. User defined
Port Specifies an associated listening port of the back-end
server.
2-8 Application Configuration Guide (449-000018-00) NetContinuum OS 6.1
Range: 0 65535
Default: 80
Page 37

Configuring a Web Server
Table 2-3. Web Server Parameters (Continued)
Parameter Description Options
Client
Impersonation
Max
Connections
Informs the server that the incoming address is
originating from the client’s IP address as source IP, as
opposed to coming from the gateway, itself.
In log messages, the NC-Gateway displays the IP
address from the private interface instead of the source
IP address from the client. To log the actual client’s IP
address, you must enable Client Impersonation for the
server. Before enabling client impersonation, the
following requirements must be satisfied:
• The back-end server IP is on the same network as the
created private interface.
• The back-end server’s gateway “points” to this private
interface.
Sets the maximum number of connections established
to the back-end server at any time. For an apache
server, this value is defined by the MaxClients value
in httpd.conf.
NC-Gateway opens as many connections as necessary
upto Max Connection to the back-end server. These
connections are only opened on a need basis, i.e. when
there is a new request from a client and there is no free
connection to the back-end server, a new connection is
opened.
This value should always be set lower than the
back-end web-server's max clients value. Else there is a
possibility that monitoring connections will not be
accepted by the back-end server since the connection
limit is reached at the back-end server and NC-Gateway
will take the server out-of-service. Set the value of Max
Connections on the NC-Gateway lower than the Max
Clients value at least by 2-3 times the Max Probes value
in the OOB Healthcheck container.
A value of 0 will allow unlimited connections to the
back-end server.
Yes
No (default)
Range: 0 500000
Default:
10000
Max Requests Sets the maximum number of requests that can be
queued.
Max-Requests = 0 is a special case. For this value of
max-requests connection pooling is turned off.
NetContinuum OS 6.1 Creating a Vsite 2-9
Range: 0 3096
Default: 1000
Page 38

Configuring a Web Server
Table 2-3. Web Server Parameters (Continued)
Parameter Description Options
Max Keepalive
Requests
Max
Establishing
Connections
Max Spare
Connections
Sets the maximum number of requests on a persistent
connection before the connection is shut down, if the
real server does not close the connection first.
• Setting keep-alive requests to 0, allows the NC
gateway to reuse the connection until it is closed by the
back-end server.
• The response from the back-end server is a HTTP/1.1
response. A HTTP/1.1 response is implicitly keep-alive
and doesn't need to have the Connection: header.
Hence this connection is being reused until it is closed
by the server or by the NC-Gateway if the
keepalive-timeout expires.
• For an apache server, this value is determined by the
KeepAlive and MaxKeepAliveRequests values in
httpd.conf. Its value is 1 if KeepAlive is “off”; its
value is MaxKeepAliveRequests if KeepAlive is
“on”.
Sets the maximum number of simultaneous
connections that can be established to this server. If the
server can only handle gradual load increases, then
make this value lower; if it can handle rapid load
increases, this value can be higher. The value should
be equal to or lower than the Max Connections value.
Sets the maximum number of pre-allocated
connections. Set this to 0 if the server can handle no
more than one connection at a time.
Range: 0 65535
Default: 0
Range: 1 3096
Default: 100
Range: 0 3096
Default: 0
Timeout (ms) Sets the time in milliseconds that an unused connection
times out. The timeout in the server configuration only
applies to connections that can be pooled. In the case
of custom applications this timeout does not have any
effect, the only timeout that closes the connection is the
one configured on the custom application.
Keepalive
Timeout (ms)
2-10 Application Configuration Guide (449-000018-00) NetContinuum OS 6.1
Sets the time for which a connection could be left idle in
between consecutive requests sent on a connection. If
a connection is idle for more than this time in between
requests, the connection is closed by the NC-Gateway.
Set this to 0 to turn off this feature.
Range: 0 86400000
Default:
300000 (ms)
Range: 0 86400000
Default:
900000 (ms)
Page 39

Configuring a Web Server
Table 2-3. Web Server Parameters (Continued)
Parameter Description Options
WRR Weight Sets the load balancing weight for the server when
using the weighted round-robin (W_RR) algorithm. This
algorithm Ioad balances the incoming requests and
attaches them with weights to each of the back-end
servers. The server with the most WRR Weight will get
the majority of requests. The entered value represents
the capacity of the server.
Backup Server Specifies the backup server that will be enabled if the
configured server fails.
Note: This must be a server from a different server
group in the vsite.
Interface Specifies the IP address to be used as interface for
back-end connections when there are multiple IP
addresses in the same subnet on the NC-Gateway.
Creating Back-Up Web Server
An optional backup Web server can be created and used if the active Web server fails.
Only Web servers from a different Web server group can be used as a backup Web
server. Two different active Web servers can not have the same backup Web server.To
create a backup Web server, do the following:
1. From the Configuration Home page, click vsite and the Server Groups tab.
Range: 1 65535
Default: 1
User defined
(any eligible
server)
Default:
NONE
User defined
Default:
NONE
2. To add a new web server group, select Web Server Group from
Add drop-down
list located in Server Groups table. The Create page opens.
3. For
Name, enter a name for the Web server group. (The default is
web-server-group.).
4. Follow the steps described in section (Defining a Web Server) to create a Web
server, that will be used as a backup Web server.
5. Select the active Web server and select the backup Web server from the “Backup
Server” drop-down list.
Configuring Server-side SSL
You can configure a server so that all traffic to and from the NC-Gateway is encrypted.
(You can also configure encryption per application.) The procedure for configuring
server-side SSL is nearly identical to the procedure for configuring SSL in a Web
NetContinuum OS 6.1 Creating a Vsite 2-11
Page 40

Configuring a Web Server
Application. To encrypt all traffic between the NC-Gateway and a server, do the
following:
NOTE
Before starting SSL configuration, create or obtain a
trusted certificate (which is done by the pkiadmin user),
and export the certificate to make it available during
configuration. See the NetContinuum Application Security
Gateway PKI Administration Guide (449-000017-00) for
more information on certificate management.
1. From the Configuration Home page, click vsite > web-server_group >
web-server and the SSL tab.
2. To make a change, click Edit... button. The Edit page opens. In this page, enter the
desired value (or select the alternate value from the drop-down list) for that
parameter.
a. Status: Select On to enable SSL for back-end connections. If this parameter is
set to "on," SSL is used while communicating with back-end servers (default is
Off).
NOTE
1. Enabling this requires at least one "Trusted
Certificates" entry and a "Server Common Name."
2. If the parameter "Ignore Server Certificate Validation"
is set to "Yes," then "Trusted Certificate" and "Server
Common Name" is not required.
b. Follow the steps in “Configuring Client-side SSL” in Chapter 4, “Encrypting
Application Traffic,” for the SSL3, TLS, RC4-MD5, DES3-SHA, Session
Resumption, Session Timeout, and Max Cached Sessions parameters.
c. Ignore Server Certificate Validation: Specify whether to ignore the validation
for server certificate.
d. Server Common Name: Enter the name used to authenticate this server. It
should match the common name field in the server's certificate.
e. Trusted Certificate: Select the trusted certificate from the drop-down list to be
used with this server.
f. Client Certificate: Select the client certificate from the drop-down list to be used
with this server. This parameter is mandatory only if the NC-Gateway acts as
a client. Most of the time it is left as <NONE>.
3. Click Update to save and activate the new settings.
2-12 Application Configuration Guide (449-000018-00) NetContinuum OS 6.1
Page 41

Configuring Redirection Policy
The server redirect policy defines the redirect response sent when the Load Balancing
module routes a request to a server in an out-of-service state. The server redirect policy
takes effect only when redirect is off and mode is set to REDIRECT in the Load
Balancing container of an application (see Chapter 9, “Load Balancing”). A server will
be in an out-of-service state if the server monitoring has detected a server failure or if
it was configured as out-of-service by the user.
Load Balancing Redirect policy is used when all the servers in the server-group are
out-of-service. Even if one server is in-service, then the redirect response configured
under the Server is used to send a redirect response back to the client.
To configure redirection policy for a server, do the following:
1. Select vsite > web-server_group > web-server and the Redirect tab.
2. To make a change, click Edit... button. The Edit page opens. In this page, enter the
desired value (or select the alternate value from the drop-down list) for that
parameter.
a. Status: Select the On status of server redirect feature from the drop-down list
(default is Off).
Configuring a Web Server
b. URL: Enter the location to which the HTTP request should be redirected. In this
case, the entry must be the full URL, not just the path portion, such as
http://www.netcontinuum.com/redirect/redir.htm.
c. Message: Enter the message associated with the redirect response (default is
Moved).
d. Status Code: Select the associated redirect response status code from the
drop-down list (default is 302).
3. Click Update to save and activate the new settings.
The following table lists the redirection container parameters.
Table 2-4. Server Redirection Parameters
Parameter Description Options
Status Enables server redirection. On
Off (default)
NetContinuum OS 6.1 Creating a Vsite 2-13
Page 42

Configuring a Web Server
Table 2-4. Server Redirection Parameters (Continued)
Parameter Description Options
URL Specifies the location to redirect the request. The
entry must be the full URL, not just the path portion.
For HTTP the format is
http://<host>:<port>/<path>?<searchpart> (Default
entries, such as port 80 for HTTP and no search
requirement, can be omitted.)
Message Sets an associated redirect response message. User defined
Status Code Sets an associated redirect response status code.
Note: A 302 redirect for a POST request could
cause some browsers to treat it as a 303 (See
Other) response, performing a GET on the Location
field value regardless of the original request
method. Using either 301 (Moved Permanently) or
307 (Temporary Redirect) avoids this problem.
Configuring In-Band Health Check
The NC-Gateway monitors the health of data transmissions. In band refers to the user
traffic connections. The in-band health check parameters specify the layer 4 and layer
7 error thresholds. The back-end server connections and responses are monitored for
errors, and when an error threshold is exceeded, the back-end server is marked out of
service.
User defined
default: Moved
301
302 (default)
307
In-Band errors are of the following types:
— timeout. error code = 60
— connection refused. error code = 61
— other errors. error code = < other than 60, 61 >
In-Band monitoring is configured by changing the parameters under Server/IB
Healthcheck. The parameters Max Refused, Max Timedout and Max Other Failure
specify the limit for the number of errors per every 1024 connections. If the errors reach
this number within the last 1024 connections, in-band monitoring makes a server out
of service. A server is taken out of service when any of the limits are reached.
For example, the default value of 10 for Max Refused takes the server out of service if
there are 10 connection refused errors in the last 1024 connection.
You can increase these values to be more tolerant to errors in the server. A value of 0
for these parameters turns off in-band monitoring for each of these errors.
2-14 Application Configuration Guide (449-000018-00) NetContinuum OS 6.1
Page 43

Configuring a Web Server
In-band monitoring is always on, and default parameters are provided, so you do not
need to configure the in-band health check parameters. However, to modify any of
these parameters, do the following:
1. From the Configuration Home page, click vsite > web-server_group >
web-server > Health Check and the IB Healthcheck tab.
2. To make a change, click Edit... button. The Edit page opens. In this page, enter the
desired value (or select the alternate value from the drop-down list) for that
parameter.
a. Max HTTP Errors: Enter the maximum number of HTTP error responses
allowed per 1024 requests before marking the server as out of service. Default
is 0, which means an unlimited number.
b. Max Refused: Enter the maximum number of connection refused errors
allowed per 1024 connections before marking the server as out of service
(default is 10). Setting to 0 means an unlimited number.
c. Max Timedout: Enter the maximum number of connection time-out errors
allowed per 1024 connections before marking the server as out of service
(default is 10). Setting to 0 means an unlimited number.
d. Max Other Failure: Enter the maximum number of other errors allowed per
1024 connections before marking the server as out of service (default is 10).
Setting to 0 means an unlimited number.
3. Click Update to save and activate the new settings.
The following table lists the parameters associated with the in-band Health check.
Table 2-5. Server In-Band Health Check Parameters
Parameter Description Options
Max HTTP
Errors
Max Refused Sets the maximum number of connection refused
Max Timedout Sets the maximum number of connection time-out
NetContinuum OS 6.1 Creating a Vsite 2-15
Sets the maximum number of HTTP error responses
allowed per 1024 requests before marking the server
as out of service. A zero (0) value means there is no
limit.
errors allowed per 1024 connections before marking
the server as out of service. A zero (0) value means
there is no limit.
errors allowed per 1024 connections before marking
the server as out of service. A zero (0) value means
there is no limit.
0 - 1024
default: 0
0 - 1024
default: 10
0 - 1024
default: 10
Page 44

Configuring a Web Server
Table 2-5. Server In-Band Health Check Parameters (Continued)
Parameter Description Options
Max Other
Failure
Sets the maximum number of other errors allowed per
1024 connections before marking the server as out of
service. A zero (0) value means there is no limit.
Configuring Out-Of-Band Health Check
The NC-Gateway periodically monitors server health independent of the data
transmissions. Out of band refers to those connections made outside of the user-traffic
connections. The out-of-band health check parameters specify the layer 4 and layer 7
server monitoring. If this monitoring detects the server is out of service, the server is
removed from the load-balanced server group and then is automatically returned to the
group once monitoring determines the server is back in service.
There are two components to the out-of-band health check monitoring:
1. Out-of-band monitoring at the TCP level is active by default; you do not need to
configure the out-of-band health check parameters. However, you can turn this
monitoring off (not recommended) or modify the monitoring parameters.
2. You have the option of adding HTTP out-of-band monitors, which allow the
NC-Gateway to asses a server’s ability to process HTTP traffic (not just general
TCP traffic).
Configure Out-of-Band Monitoring
0 - 1024
default: 10
To modify the out-of-band health check parameters, do the following:
1. From the Configuration Home page, click vsite > web-server_group >
web-server > Health Check and the OOB Healthcheck tab.
2. To make a change, click Edit... button. The Edit page opens. In this page, enter the
desired value (or select the alternate value from the drop-down list) for that
parameter.
a. Status: Leave the default (On) unless you want to disable out-of-band health
check monitoring.
b. Interval: Enter the interval (in milliseconds) for server monitoring. This
parameter determines how frequently to do a server health check. If HTTP
monitoring is enabled (see ‘‘Configure Out-of-Band Monitoring”), an HTTP
request will be attempted; otherwise, a TCP connection will be attempted.
c. Max Reset: Enter the maximum number of refused errors for the probed
connection before marking the server as out of service (default is 3).
2-16 Application Configuration Guide (449-000018-00) NetContinuum OS 6.1
Page 45

Configuring a Web Server
d. Max Timedout: Enter the maximum number of time-out errors for the probed
connection before marking the server as out of service (default is 3).
e. Max Probes: Enter the maximum number of connections probed during each
interval (default is 3).
3. Click Update to save and activate the new settings.
The following table lists the out-of-band Healthcheck general container parameters.
Table 2-6. Server Out-of-Band Health Check Parameters
Parameter Description Options
Status Enables or disables out-of-band health check
monitoring.
Interval (ms) Sets the duration between (frequency of)
monitoring requests. The interval is specified in
milliseconds.
Max Reset Sets the maximum number of refused errors for the
probed connection before marking the server as
out of service. A zero (0) value means there is no
limit.
Max
Timedout
Max Probes Sets the maximum number of connections probed
Sets the maximum number of time-out errors for
the probed connection before marking the server
as out of service. A zero (0) value means there is
no limit.
during each interval. A zero (0) value means there
is no limit.
Add HTTP Monitoring
To add an HTTP out-of-band health check monitor, do the following:
1. From the Configuration Home page, click vsite > web-server_group >
web-server > Health Check > OOB Healthcheck tab > OOB HTTP Monitors.
On (default)
Off
1000 - 10000000
default: 10000
0 - 100
default: 3
0 - 100
default: 3
0 - 100
default: 3
2. To add a new OOB HTTP monitor, select OOB HTTP Monitor from
Add
drop-down list located in OOB HTTP Monitors table. The Create page opens. In
this page, do the following (in the specified parameter fields):
a. Name: Enter a name for this monitor (default is oob-http-monitor).
b. Method: Select the HTTP method to use (GET, POST, or HEAD) in the probing
request from the drop-down list (default is GET).
NetContinuum OS 6.1 Creating a Vsite 2-17
Page 46

Configuring a Bridged Web Server
c. URL: Enter the path to use in the probing request. such as
/public/index.html.
d. Status Code: Enter the expected HTTP response status code (default is 200).
e. Additional Headers: Enter a value in the text box and click Add (+) button or
select the check box. Click All to select all the check boxes or click None to
clear all the check boxes.
f. Match content String: Enter the content string to match. It searches for the
match from the entire response body. There is no limit for the length of
characters to be searched.
3. Click Add to save the settings. The operation completed successfully message
appears.
The following table lists the out-of-band HTTP monitor container parameters.
Table 2-7. Out-of-Band HTTP Monitor Parameters
Parameter Description Options
Name Specifies the name for this out-of-band HTTP
monitor. (Names cannot contain spaces,
slashes, punctuation, or special characters.)
Method Sets the HTTP method to use in the probing
request.
URL Sets the path to use in the probing request.
Examples:
• /index.html
• /public/index.html
Status Code Sets the expected HTTP response status code. 100 - 999
Additional
Headers
Match content
String
Specifies the additional headers to be sent with
the OOB HTTP request.
Specifies the content string to match. It searches
for the match from the entire response body.
There is no limit for the length of characters to
be searched.
Configuring a Bridged Web Server
User defined
oob-http-monitor
(default)
GET (default)
HEAD
POST
User defined
default: 200
User defined
Length Range: 0 500
User defined
The server-group parameter is not available under bridged vsite. It is replaced by the
‘web-server’ container. The application specific server (SMTP Server, POP3 Server,
2-18 Application Configuration Guide (449-000018-00) NetContinuum OS 6.1
Page 47

Configuring Response Pages
IMAP Server, Custom Server) gets generated while configuring bridged other
applications. The ‘bridged web-server’ container is similar to the ‘web-server’ container
under server-group of vsite with following differences:
• redirect container is not available.
• ib-healthcheck container is not available.
• oob-healthcheck container is not available.
• status and ip-address parameters are not available.
• client-impersonation parameter is not available.
• max-connection parameter is not available.
• max-requests parameter is not available.
• max-keepalive-requests is not available.
• max-establishing-connections parameter is not available.
• max-spare-connections is not available.
• timeout parameter is not available.
• keepalive-timeout is not available.
• wrr-weight is not available.
• backup-server parameter is not available.
The process of configuring SSL is similar to configuring SSL under ‘web-server’
container of vsite. (Configuring Server- side SSL)
Configuring Response Pages
Response Page creates a customized HTML response page for HTTP requests that
violate security policies on the NC-Gateway. Each vsite contains a default response
pages container that contains a set of default and customized response pages that can
be shared among multiple applications.
To configure Response page, do the following:
1. From the Configuration Home page, click vsite > Library > and the Response
Pages tab.
2. To add a new response page, select Response Page from Add drop-down list
located in Response Pages table. The Create page opens. In this page, do the
following (in the specified parameter fields):
a. Name (new dialog only): Enter a name for the new response page.
NetContinuum OS 6.1 Creating a Vsite 2-19
Page 48

Configuring Trusted Hosts
b. Status Code: Enter the HTTP status code for this response page.
c. Headers: Enter a value in the text box and click Add (+) button or select the
check box. Click All to select all the check boxes or click None to clear all the
check boxes.
d. Body: Enter the html definition for the response page.
3. Click Add to save the settings. The operation completed successfully message
appears.
The following table describes the Response Page container parameters.
Table 2-8. Response Page Parameters
Parameter Description Range
Name Defines the name of the new response
page.
Status Specifies the response status for the
request.
Headers Sets the response headers for the request. Length Range: 0 - 4096
Body Defines the html definition for the default
response. Refer Macro Definitions for
Response Page body macros.
The response page container will be displayed under the Response pages container.
Configuring Trusted Hosts
The NC-Gateway allow you the option to designate a trusted host, that is, to specify an
IP address for which authentication is not necessary. In this case, it is assumed that
any request from that address is from an allowed user, and all user requests from that
address are exempt from authentication.
User defined
response-policy (default)
Length Range: 0-500
404 Not Found (default)
User defined
Default:
Connection: Close,
Content-Type: text/html
Length Range: 0 - 16384
User defined
To configure Trusted Hosts, do the following:
1. From the Configuration Home page, click vsite > Trusted Hosts.
2. To add a new trusted host group, select Trusted Host Group from
Add drop-down
list located on the Trusted Hosts page. The Create page opens. In this page, do the
following (in the specified parameter fields):
2-20 Application Configuration Guide (449-000018-00) NetContinuum OS 6.1
Page 49

Configuring Session Identifiers
a. Name (new dialog only): Enter a name for the new trusted host group. (default
is trusted-host-group)
3. Click Add to save the settings. The operation completed successfully message
appears.
The created trusted host group appears in the Trusted Hosts page.
4. To add a trusted host select the created Trusted Host Group container. The
Trusted Host Group page appears.
5. To add a new trusted host, select Trusted Host from
Add drop-down list located
on the Trusted Host Group page. The Create page opens. In this page, do the
following (in the specified parameter fields):
a. Name (new dialog only): Enter a name for the new trusted host. (default is
trusted-host)
b. IP Address: Enter an IP address for the trusted host. This is the IP address to
communicate with the back-end servers.
c. Mask: Enter an associated netmask for the trusted host.
6. Click Add to save the setting. The operation completed successfully message
appears.
The created Trusted Host appears in the Trusted Host Group page.
The following table describes the Trusted Hosts container parameters.
Table 2-9. Trusted Hosts Container Parameters
Parameter Description Range
Name Defines the name of the new trusted host. User defined
trusted-host (default)
IP Address Specifies an IP address for the trusted host. User defined
Mask Specifies an associated netmask for the
trusted host.
User defined
Configuring Session Identifiers
The settings in this container allows the NC-Gateway to recognize the session
identifiers from the requests and responses.
The following are the default Session Identifier containers.
• ASP-DOT-NET-session
NetContinuum OS 6.1 Creating a Vsite 2-21
Page 50

Configuring Session Identifiers
• ASPSESSIONID-session
• ColdFusion-session
• ColdFusionToken-session
• J2EE-JSESSIONID-Cookie-session
• J2EE-JSESSIONID-URL-session
• J2EE-session
• JWS-ID-session
• PHP-BB-MYSQL-session
• PHPSESSID-session
• PHPSESSIONID-session
• SAP-session
To configure session identifier, do the following:
1. From the Configuration Home page, click vsite > Library and the Session
Identifiers tab.
2. To add a new session identifier container, select Session Identifier from the Add
drop-down list located in Session Identifiers table. The Create page opens. In this
page, enter the desired value (or select the alternate value from the drop-down list)
for that parameter.
a. Name (new dialog only): Enter a name for the new session identifier.
b. Session Token Name: Enter the session token name.
c. Session Token Type: Select the session token type from the drop-down list.
d. URL Session Token Start Delimiter: Select the start delimiter for the URL
session from the drop-down list.
e. URL Session Token End Delimiter: Select the end delimiter for the URL
session from the drop-down list.
3. Click Add to save the settings. The operation completed successfully message
appears.
The following table describes the Session Identifier container parameters.
2-22 Application Configuration Guide (449-000018-00) NetContinuum OS 6.1
Page 51

Configuring Custom Parameter Classes
Table 2-10. Session Identifier Container Parameters
Parameter Description Range
Name Defines the name of the new session
identifier container.
Session Token
Name
Session Token
Type
URL Session
Token Start
Delimiter
URL Session
Token End
Delimiter
Specifies the name for session token. User defined
Specifies the type of session token. Parameter
Specifies the start delimiter for the URL
session.
Specifies the end delimiter for the URL
session.
Configuring Custom Parameter Classes
User defined
session-identifier
(default)
Length Range: 0-500
Parameter Suffix
Parameter Prefix
Cookie
Cookie Suffix
Cookie Prefix
Url Path
Url Path Suffix
Url Path Prefix
User defined
Length Range: 0-500
User defined
Length Range: 0-500
These parameters classes are defined by default custom-alpha, custom-alphanumeric,
custom-comments, custom-hex-integer, custom-integer, custom-login,
custom-multibyte, custom-no-validation, custom-password, custom-search and
custom-string.
To configure the custom parameter class, do the following:
1. From the Configuration Home page, click vsite > Library and the Custom
Parameter Classes tab.
2. To add a new custom parameter class container, select Custom Parameter Class
from the Add drop-down list located in Custom Parameter Classes table. The
Create page opens. In this page, enter the desired value (or select the alternate
value from the drop-down list) for that parameter.
a. Name: Enter a name for this parameter class.
NetContinuum OS 6.1 Creating a Vsite 2-23
Page 52

Configuring Custom Parameter Classes
b. Input Type Validation: Select the expected input data type for the parameter
(default is <NONE>) from the drop-down list (see Appendix F, “Data Types”).
c. Custom Input Type Validation: Select the expected custom input data type for
the parameter from the drop-down list (see Appendix F, “Data Types”).
d. Denied Metacharacters: Enter a value in the text box and click Add (+) button
or select the check box. Click All to select all the check boxes or click None to
clear all the check boxes.
e. Keywords Status: Change the status to On (default is Off) to enable keyword
blocking.
f. Denied Keywords: Select the check boxes to set the list of denied keywords.
(Keyword Status must be On to apply this list.)
g. Blocked Attack Types: Select the attack types to block from the drop-down list.
h. Custom Blocked Attack Types: Select the check boxes of the attack types to
block (see Appendix F, “Data Types”).
3. Click Add to save the settings. The operation completed successfully message
appears.
The created Custom Parameter Class appears under Library > Custom Parameter
Classes tab.
The following table describes the Custom Parameter Classes container parameters.
Table 2-11. Custom Parameter Classes Parameters
Parameter Description Range
Name Sets a name for this parameter class.
(Names cannot contain spaces, slashes,
punctuation, or special characters.)
Input Type
Validation
2-24 Application Configuration Guide (449-000018-00) NetContinuum OS 6.1
Sets the expected input data type for the
configured parameter. Several types are
defined by default. You can also create your
own custom types. See Appendix F, “Data
Types” for more information about creating
and using input data types.
User defined
custom-parameter-class
(default)
<CUSTOM>
<NONE> (default)
Numeric
Hex Number
Alpha
Alphanumeric
Credit Cards
Date
String
Name
Page 53

Configuring Custom Parameter Classes
Table 2-11. Custom Parameter Classes Parameters (Continued)
Parameter Description Range
Custom Input
Type Validation
Denied
Metacharacters
Sets the expected custom input data type for
the configured parameter. Several types are
defined by default. You can also create your
own custom types. See Appendix F, “Data
Types” for more information about creating
and using input data types.
Specifies the metacharacters to be denied in
this parameter value (see “Misused
Metacharacters” in Appendix E,
“Metacharacters and Keywords”).
Non-printable characters such as backspace
and UI reserved characters like a question
mark (?) should be URL encoded.
Denied metacharacters are used to detect
SQL injection and cross site scripting
attacks. Some of theses metacharacters
might be valid for specific parameters. In
such cases, valid requests might be blocked.
The metacharacter list should be
appropriately tuned for specific parameters
to avoid this kind of problems. (You can
remove metacharacters from the default list
or add additional metacharacters.)
<None>
custom-string (default)
custom-numeric
custom-name
custom-hex-number
custom-date
custom-credit-cards
custom-alphanumeric
custom-alpha
Default:
%00%04%0a%0d%1b
%08%7f
Keywords
Status
NetContinuum OS 6.1 Creating a Vsite 2-25
Enables keyword blocking for this parameter
class.
On
Off (default)
Page 54

Configuring Custom Parameter Classes
Table 2-11. Custom Parameter Classes Parameters (Continued)
Parameter Description Range
Denied
Keywords
Blocked Attack
Types
Blocks the specified keywords in this
parameter. Denied keywords are used to
detect SQL injection, cross site scripting
attacks, or attacks with embedded host
system commands.
As in the case of metacharacters, some of
the keywords might be valid for some
parameters and the list should be tuned
accordingly for that parameter. (You can
remove words from the default list or add
additional words.) Keywords are not blocked
unless the Keywords Status is On.
The keyword in the string should be
delimited by non alphanumeric and characters.
Example: It matches t(script, but doesn't
match t_script, tscript.
Enables attack prevention for the specified
Attack Types. Attack Types detect malicious
patterns in the configured parameter. Attack
Types are defined by groups of reg-ex
patterns. Any parameter whose value
matches one of the configured reg-ex
patterns is detected as an intrusion and the
request is blocked.
Attack Types for SQL injection, cross site
scripting, and operating system command
injection attacks are provided by default. You
can also create custom Attack Types to
detect additional attack categories. See
Appendix F, “Data Types” for more
information about creating and using attack
prevention data types.
(see “Misused
Keywords” in
Appendix E,
“Metacharacters and
Keywords”)
Default:
cross-site-scripting
sql-injection-medium
os-command-injection
directory-traversal-strict
SQL Injection (Strict)
SQL Injection
OS Command Injection
Directory Traversal
Directory Traversal
(Strict)
Cross Site Scripting
2-26 Application Configuration Guide (449-000018-00) NetContinuum OS 6.1
Page 55

Configuring Custom Parameter Classes
Table 2-11. Custom Parameter Classes Parameters (Continued)
Parameter Description Range
Custom
Blocked Attack
Types
Enables attack prevention for the specified
Attack Types. Attack Types detect malicious
patterns in the configured parameter. Attack
Types are defined by groups of reg-ex
patterns. Any parameter whose value
matches one of the configured reg-ex
patterns is detected as an intrusion and the
request is blocked.
Attack Types for SQL injection, cross site
scripting, and operating system command
injection attacks are provided by default. You
can also create custom Attack Types to
detect additional attack categories. See
Appendix F, “Data Types” for more
information about creating and using attack
prevention data types.
Default:
custom-cross-site-scripti
ng
custom-directory-travers
al-medium
custom-directory-travers
al-strict
custom-os-command-inj
ection
custom-sql-injection-me
dium
custom-sql-injection-stri
ct
The following parameter classes are pre-defined with attributes as described. Note that
these are not custom classes, the learning process uses internally defined parameter
classes only.
Class Validation Meta Keyword SQL XSS
login Alphanumeric No No Yes No
search None No No Yes No
password Alphanumeric No No Yes No
comments Alphanumeric No No No Yes
integer Numeric No No No No
integer-hex Numeric, [a-f][A-F] No No No No
alpha Alpha No No No No
alpha-numeric Alphanumeric No No No No
string ?? Yes No Yes Yes
multi-byte None Yes No Yes Yes
NetContinuum OS 6.1 Creating a Vsite 2-27
Page 56

Configuring CRLs
Class Validation Meta Keyword SQL XSS
no-validation None No No No No
Configuring CRLs
The Certificate Revocation List (CRL) feature enhances the capability of Web
Application Firewall (WAF). It selectively allows or blocks SSL connections from clients
based on the certificates used by the clients. When the base uri for a CRL is modified,
the existing CRL is considered as deleted and the CRL corresponding to the new uri is
to be downloaded.
To configure the CRL, do the following:
1. From the Configuration Home page, click vsite > CRLs.
2. To add a new crl container, select CRL from the Add drop-down list located on the
CRLs page. The Create page opens. In this page, enter the desired value (or select
the alternate value from the drop-down list) for that parameter.
a. Name: Enter the name for the CRL.
b. Base URI: Enter the URI for the CRL.
NOTE
A valid URI should be specified while creating a CRL
container.
c. Trusted Certificate: Select the trusted certificate from the drop-down list to be
used with the client.
d. Auto Update: Select whether to automatically update the CRL from the
drop-down list.
e. Retries: Enter the number of retrials to send packet before giving up.
3. Click Add to save the settings. The operation completed successfully message
appears.
The following table describes the CRL container parameters.
Table 2-12. CRLs Parameters
Parameter Description Range
Name Specifies the name for the CRL. User defined
2-28 Application Configuration Guide (449-000018-00) NetContinuum OS 6.1
Page 57

Configuring CRLs
Table 2-12. CRLs Parameters (Continued)
Parameter Description Range
Base URI Specifies the URI for the CRL.
Example:
http://crl.verisign.com/BTClass1Individual.crl
or
ldap://crl.verisign.com/BTClass1Individual.crl
Trusted
Certificate
Auto Update Specifies whether to automatically update the
Retries Specifies the number of retrials to send packet
Specifies the path to the trusted certificate or
certificate group used to establish ssl
connection. Such certificates are created (or
obtained) and exported by the pkiadmin user.
CRL.
• Yes: if this parameter is set to "Yes", then the
CRL is retrieved as per the settings in the
update-schedule container.
• No: if this parameter is set to "No", then the
CRL needs to be downloaded manually.
before giving up.
Configuring Update Schedule
To configure the Update Schedule, do the following:
User defined
Length Range: 0 500
Available list
<None> (default)
Yes
No (default)
Range: 0 - 10
default: 3
1. From the Configuration Home page, click vsite > CRLs > crl > and the Update
Schedules tab.
2. To add a new update schedule container, select Update Schedule from the Add
drop-down list located on the Update Schedules page. The Create page opens. In
this page, enter the desired value (or select the alternate value from the drop-down
list) for that parameter.
a. Name: Enter a name for the update schedule.
b. Type: Select the type for the update schedule from the drop-down list.
c. Time of day: Enter the time (format: hh:mm) of the day for the update schedule.
d. Day Of Week: Select the day of the week for the update schedule from the
drop-down list.
e. Day Of Month: Enter the day (integer value: 1 - 31) of the month for the update
schedule.
NetContinuum OS 6.1 Creating a Vsite 2-29
Page 58

Configuring CRLs
3. Click Add to save the settings. The operation completed successfully message
appears.
The created Update Schedule appears under CRL page.
The following table describes the Update Schedule container parameters.
Table 2-13. Update Schedule Parameters
Parameter Description Range
Name Specifies the name for the update schedule. User defined
Type Sets the type for the update schedule. Daily
default:
update-schedule
Weekly
Monthly
Time Of day Sets the time of the day for the update
schedule.
Day Of Week Sets the day of the week for the update
schedule.
Day Of Month Sets the day of the month for the update
schedule.
User defined
Time format: hh:mm
Sunday
Monday
Tuesday
Wednesday
Thursday
Friday
Saturday
User defined
Range: 1 - 31
2-30 Application Configuration Guide (449-000018-00) NetContinuum OS 6.1
Page 59

Chapter 3
This chapter describes how to create a Web application. (Other types of applications
are described in later chapters.) This chapter includes the following topics:
• Overview
• Creating a Web Application
• Creating a Special Web Application
• Creating a Bridged Web Application
• Confirming Connection
• Creating a Default Route
Overview
A Web application processes Web (HTTP and HTTPS) traffic between front-end clients
and back-end Web servers. The Web application container defines a transport layer
access point. A front-end virtual IP (VIP) and port number identifies the Web
application. (The back-end private interface is specified elsewhere; see “Creating a
Private Interface” in Chapter 2, “Creating a Vsite.”) The front-end and back-end
parameters identify the external and internal interfaces for the Web application.
Creating a Web Application
3-
A Web application is configured with several policies, each of which is defined by a
container in the Web application. These policies define the processing of HTTP
requests destined to the IP address and port configured on the Web application. Each
policy on a Web Application can be enabled or disabled with the Status parameter in
the policy container.
The following bridged applications are supported in bridge mode except the FTP
Application. They are similar to their proxy application with the differences mentioned
for server-group/server.
• bridged-web-application
• bridged-smtp-application
• bridged-pop3-application
• bridged-imap-application
• bridged-custom-application
NetContinuum OS 6.1 Creating a Web Application 3-1
Page 60

Creating a Web Application
For bridged applications, eth1 is fixed as front-end and eth2 is fixed as back-end.
One-arm configuration is not possible for bridge mode applications.
The following containers are created by default within a Web application:
• Web Firewall: The base Web firewall, which is on by default, provides basic
protection against Web attacks. However, there are additional features that you can
configure to customize the Web firewall. See Chapter 5, “Web Firewall Policies,” for
more information on attack prevention.
• Instant SSL: Converts unencrypted traffic (HTTP) to encrypted traffic (HTTPS)
without having to modify the back-end servers. (This feature is off by default.) See
Chapter 4, “Encrypting Application Traffic,” for more information on SSL and Instant
SSL.
• SSL: Encrypts traffic sent through the Web application. This feature can also be
used for client authentication. (This feature is off by default.)
• Load Balancing: Enables load balancing for defined servers. This feature is on by
default, and it cannot be disabled, but you can customize various load-balancing
features. See Chapter 9, “Load Balancing,” for more information on load balancing.
• Web Logging: Enables Web application access logging. (This feature is off by
default.) See the NetContinuum Application Security Gateway Logging
Guide (449-000028-00) for more information on Web application logging.
• Authentication: Enables authentication. (This feature is off by default).
Authentication is used together with access control.
• Caching: Enables caching of selected objects. (This feature is off by default.) See
Chapter 10, “Caching,” for more information on caching.
• Compression: Sets the Compression policy for this application. (This feature is off
by default.) See Chapter 16, “Compression,” for more information on compression.
Creating a Web Application
Do the following to create a Web application:
NOTE
Before configuring a Web application, the associated
private interface and server group must be defined (see
“Creating a Vsite” in Chapter 2, “Creating a Vsite”).
The Special Web Application includes the OWA Web Application, Sharepoint Web
Application, OWA HTTPS Web Application and Oracle Applications Web Application.
To know more refer to the following:
3-2 Application Configuration Guide (449-000018-00) NetContinuum OS 6.1
Page 61

Creating a Web Application
• OWA Web Application
• Sharepoint Web Application
• OWA HTTPS Web Application
• Oracle Applications Web Application
1. From the Configuration Home page, click vsite and the Applications tab.
2. To add a new web application, select Web Application from
Add drop-down list
located in Applications table. The Create page opens. In this page, do the following
(in the specified parameter fields):
a. Name: Enter a new name for the Web application (default is
web-application).
b. Status: Keep the default setting of Up.
c. VIP: Enter an valid IP address for the Web application. This virtual IP is used
as the access point for clients. If you intend to allow access through the
Internet, this must be a registered address.
d. Mask: Enter a mask for the Web application.
e. Port: Enter the port number for the Web application.
f. Server Group: Select a server group from the drop-down list. This defines the
set of back-end servers to which requests are routed.
g. Front End: Select the front-end port. Select either eth1 or eth2 from the
drop-down list. (default is eth1)
h. Session Timeout: Enter the maximum duration (timeout) in seconds to keep a
persistent connection alive (default is 60).
i. Keepalive Requests: Enter the maximum number of requests allowed on a
persistent HTTP connection (default is 64). A value of 0 allows any number.
j. Ignore Case: Select whether the gateway should make the differentiation for
the upper case and lower case URLs from the drop-down list.
NOTE
The actual server may close the connection first.
3. Click Add to save the settings. The operation completed successfully message
appears.
The created Web application appears under the vsite node and is ready to process
traffic.
NetContinuum OS 6.1 Creating a Web Application 3-3
Page 62

Creating a Web Application
Refer Appendix G, “Application Wizard to understand the procedure for using Web
Application Wizards.
The following table lists the Web application container parameters. These parameters
can be changed after a Web application is created.
Table 3-1. Web Applications Parameters
Parameter Description Options
Name Specifies a name for the Web application.
(Names cannot contain spaces, slashes,
punctuation, or special characters.)
Status Enables the Web application. Up (default)
VIP Specifies a virtual IP address for the Web
application.
Mask Specifies the associated netmask for the
IP address.
Note:
• Do not change this parameter while
configuring in a redundant environment.
• If this parameter is changed in a
stand-alone environment, then you must
reboot the NC-Gateway for the changes
in the route to take effect.
Port Specifies the port for the Web application.
The standard HTTP port is 80, and the
HTTPS port is 443.
Server Group Specifies the server group associated with
this Web application.
Front End Specifies the Ethernet port on the
NC-Gateway used as the front-end
interface. (This is normally eth1)
User defined
web-application
(default)
Down
User defined
User defined
User defined
Range: 1 – 65535
Default: 80
On
Off (default)
eth1 (default)
eth2
Session Timeout
(seconds)
3-4 Application Configuration Guide (449-000018-00) NetContinuum OS 6.1
Specifies the maximum duration (timeout)
in seconds to keep a persistent
connection with a client alive.
Range: 0 – 86400
seconds
Default: 60
Page 63

Creating a Web Application
Table 3-1. Web Applications Parameters (Continued)
Parameter Description Options
Keepalive
Requests
Ignore Case Specifies whether the NC-Gateway should
Sets the number of requests allowed on a
persistent HTTP connection. A value of 0
does not enforce any limit on the number
of requests, allowing the client to control
the number of requests on the connection.
When set to 0, the NC-Gateway also uses
the same connection on the back-end for
all the requests on the persistent front-end
connection. It should be set to 0 to support
NTLM.
make the differentiation for the upper case
and lower case URLs or not.
Enabling this parameter controls the case
sensitivity of URLS in the following:
• URL match parameter under Global URL
ACL
• URL match parameter under URL ACL
• URL match parameter under URL Policy
• URL match parameter under Rule Group
• URL match parameter under Learn Rule
• "Outside Prefix" and "Inside Prefix" in
URL Translation
• URL portion of "Rewrite Condition" in
Request Rewrite and Response Rewrite
• Request URL in the request line
• URLs parsed from the response headers
and data
Range: 0 – 65535
Default: 64
Yes (default)
No
Creating a Special Web Application
OWA Web Application
Microsoft Outlook Web Access (OWA) allows any client with a compatible browser to
access Exchange Server folders. It helps to secure corporate messaging information.
The process of configuring an OWA Web application is similar to configuring a Web
Application, except the first step that is to select the OWA Web Application.
To do this from the Configuration Page expand the vsite, click Add, highlight the
Special Web Application option and select the OWA Web Application from the menu.
The comment field defines which application is being created. (Creating a Web
Application)
NetContinuum OS 6.1 Creating a Web Application 3-5
Page 64

Creating a Web Application
The Outlook Web Access includes the following abilities and features:
• Two-line view
• Context menus view
• Meeting requests can be forwarded
• Desktop Alert and Notification Area icon for new mail
• Add to Contacts feature
• Ability to set number of items to view per page
• Richer support for icons in Mail view
• Control when messages are marked as read in Preview Pane
• Public folders now display in their own window
• Access to Global Address Lists properties sheets within an e-mail message or
meeting request
• Message sensitivity settings on Information Bar
• Meeting invitees can set their preferred reminder time for meetings
• Forms-based authentication
• Support for common rules
• Server-side spelling checker for six languages
• Quick Flags
• Personal Tasks
• Message signatures
• Saved searches
The Outlook Web Access features also include improved keyboard shortcuts and
reorganized toolbars.
To configure the Outlook Web Access (OWA) with HTTPS on the front end and clear
text on the back end, set instant-ssl to "Off" and add a request rewrite rule to insert a
HTTP header "Front-End-Https: On".
See the illustration as below:
1. Set instant-ssl to "Off". (Refer to the Configuring Instant SSL section for more
information)
2. To add a request rewrite rule, select vsite > owa_app > Web Firewall > Web
Address Translation > Request Rewrite tab and the Add button.
3-6 Application Configuration Guide (449-000018-00) NetContinuum OS 6.1
Page 65

Status: On
Sequence Number: 8
Action: Insert Header
Header Name: Front-End-Https
Old Value: *
Rewrite Value: *
Rewrite Condition: *
Continue Processing: Yes
For more information refer to the “Configuring Request Rewrite” in Chapter 7, “Web
Address Translation.
Sharepoint Web Application
Microsoft SharePoint enables enterprises to develop an intelligent portal that
seamlessly connects users, teams, and knowledge so that people can take advantage
of relevant information across business processes to help them work more efficiently.
The process of configuring a Sharepoint Web Application is similar to configuring a
Web Application, except the first step that is to select the Sharepoint Web Application.
To do this from the Configuration Page expand the vsite, click Add, highlight the
Special Web Application option and select the Sharepoint Web Application from the
menu. The comment field defines which application is being created. (Creating a Web
Application)
Creating a Web Application
SharePoint provides an enterprise business solution that integrates information from
various systems into one solution through single sign-on and enterprise application
integration capabilities, with flexible deployment options and management tools. The
portal facilitates end-to-end collaboration by enabling aggregation and search
capabilities for people, teams, and information. Users can find relevant information
quickly through customization and personalization of portal content and layout, as well
as by audience targeting, scan target information, programs, and updates to audiences
based on their role, team membership, interest, security group, or any other
membership criteria that can be defined.
To configure the Sharepoint with HTTPS on the front end and clear text on the back
end refer to the OWA Web Application section.
NetContinuum OS 6.1 Creating a Web Application 3-7
Page 66

Creating a Bridged Web Application
OWA HTTPS Web Application
The process of configuring an OWA HTTPS Web Application is similar to configuring a
Web Application, except the first step that is to select the OWA HTTPS Web
Application. To do this from the Configuration Window expand the vsite, click Add,
highlight the Special Web Application option and select the OWA HTTPS Web
Application from the menu. The comment field defines which application is being
created. (Creating a Web Application)
Oracle Applications Web Application
The process of configuring an Oracle Applications Web application is similar to
configuring a Web Application, except the first step that is to select the Sharepoint Web
Application. To do this from the Configuration Window expand the vsite, click Add,
highlight the Special Web Application option and select the Oracle Applications Web
Application from the menu. The comment field defines which application is being
created. (Creating a Web Application)
To bind oracle-policy to web-application, use the Oracle Applications Web Application
template, as the Ignore Case parameter is set to "No".
NOTE
It is an implicit assumption that Ignore Case parameter is
set as "No" in the Oracle Applications Web Application
template.
Creating a Bridged Web Application
A bridged Web application is created under bridged vsite container. The process of
configuring a bridged Web application is similar to configuring a proxy Web application.
There are few differences though. Bridged Web application does not have a server
group parameter. It bridges the traffic to only one server; IP address of this server is
same as the VIP of the bridged Web application. There is no load balancing to be done
in bridge mode as there is only one server associated with the bridged Web application.
Hence, there is no load balancing container under bridged Web application.(Creating
Web Application)
Confirming Connection
After configuring the access point for the front end (see ‘‘Creating a Web Application”)
and then defining the back-end resources (see “Creating a Private Interface” in
Chapter 2, “Creating a Vsite”), the next step is to confirm that a client can connect to
3-8 Application Configuration Guide (449-000018-00) NetContinuum OS 6.1
Page 67

Creating a Default Route
the Web application through the NC-Gateway. Do the following to confirm a
connection:
1. Connect a client’s browser and the NC-Gateway’s application to the same network.
2. Connect the Web servers and the NC-Gateway’s private interface to the same
network.
3. Enter a valid URL in the browser using the Web application’s VIP. That URL should
now be displayed in the browser.
4. If step 3 fails, do the following:
a. Ping the VIP from a client to ensure proper connectivity to the front end.
b. Ping the private interface from a Web server to ensure proper network
connectivity to the back-end.
c. Turn off the Web firewall. (Sometimes a filtered page can appear as if there is
no connectivity.) In the Configuration Window, select vsite > web_app >
Web Firewall and change the Status field to Off. Then click Upload to save.
If all of the above steps fail, review the configuration and resolve any issues. Contact
NetContinuum’s technical support if you are still having problems connecting to the
network through the NC-Gateway.
Creating a Default Route
To create a default route, do the following:
1. From the Configuration Home page, select cluster_name > Network and the
Routes tab.
2. In the display view, click Add to open the New Route dialog.
a. Name: Enter a name for the route.
b. Status: Select Up to activate the route.
c. Destination: Enter the network address of the destination subnet. An address
of 0.0.0.0 means this route applies to any destination.
d. Mask: Enter an associated address-space mask for the route. (If the source IP
is 0.0.0.0, enter all zeros for the mask as well.)
e. Gateway: Enter the IP address for the network gateway.
f. Interface: If the route is intended for a specific interface (either a specific
application or a single private interface [PIF]), select that application or PIF.
This is optional; leaving it blank means the route applies to the entire vsite.
NetContinuum OS 6.1 Creating a Web Application 3-9
Page 68

Creating a Default Route
3. Click Add to save the configuration.
The following table describes the route parameters.
Table 3-2. Default Route Parameters
Parameter Description Options
Name Sets the name for the route. User defined
Status Sets the status of the route entry. Up (default)
(default is vsite)
Down
Destination Set the IP address of the route entry. A 0.0.0.0
address allows any destination.
Mask Sets the mask for the route entry. Together, the
destination and the mask define the set of
destinations that can be reached through this route.
Note: A mask of 0.0.0.0 means this applies to any
address. Therefore, it should only be used if the
associated IP address is also 0.0.0.0.
Gateway Sets the network gateway for the route entry. Any gateway
Interface Ties the route to a specific application or private
interface. This is optional; the route applies to all
traffic for this vsite if an interface is not specified.
Any legal IP
address.
Any legal
netmask.
address.
User defined
3-10 Application Configuration Guide (449-000018-00) NetContinuum OS 6.1
Page 69

Chapter 4
This chapter describes how to encrypt Web application traffic. (The NC-Gateway also
supports encryption for all other application types.) It includes the following topics:
• Overview
• Client-side SSL
• Client Authentication
• Server-side SSL
• Instant SSL
Overview
The Secure Sockets Layer (SSL) protocol is a method of providing data encryption and
authentication when transmitting private information. Most browsers and Web sites use
this protocol to safely and securely obtain sensitive user data, such as credit card
information, or to allow access to confidential portions of a Web site.
SSL uses a public/private key pair to establish a symmetric key that is used to encrypt
data sent over an SSL connection. The public key is contained within a certificate,
which identifies and authenticates the site to the user. Optionally, users can be required
to present a certificate that will identify and authenticate the user to the Web site.
Encrypting Application Traffic
4-
An SSL transaction starts when a front-end client attempts to establish a secure
connection to a back-end server. The server authenticates itself to the client and then
permits the server and client’s browsers to cooperate in the creation of a symmetric key
used for encryption, decryption, and tamper detection.
SSL Features
The SSL protocol provides the following features:
• Secure connection: Data is transferred only after an initial handshake that
confirms a Web site to the user.
• Authentication: Using asymmetric cryptography, a public key authenticates a
client’s identity.
NetContinuum OS 6.1 Encrypting Application Traffic 4-1
Page 70

Overview
• Reliability: Message transport includes an integrity check. A secure hash feature,
such as SHA or MD5, is used for computation.
SSL Components
There are several components that go into the implementation of an SSL connection.
The NC-Gateway provides a variety of Public Key Infrastructure (PKI) objects that can
be used for SSL encryption. These items can either be created from scratch within the
NC-Gateway or obtained from a trusted third-party company or organization.
The pkiadmin user does the actual configuration and management of the PKI objects.
This user builds a library of PKI objects from a variety of sources and then designs the
right digital certificate to match the special requirements of a Web site or server. Once
a certificate is created or obtained, it is exported for use when configuring SSL
encryption for an application. See the NetContinuum Application Security Gateway PKI
Administration Guide (449-000017-00) for information about creating and managing
the SSL encryption items.
The following components are required for SSL encryption:
• Digital Certificate: A digital certificate is an electronic file that uniquely identifies a
user and Web site.
• Trusted Digital Certificate: A trusted digital certificate is an electronic file that
specifically identifies trusted users. This allows a user to access sensitive portions
of a Web site or Intranet.
Once exported, these certificates will reside within the Exports container.
SSL Configuration Types
The NC-Gateway provides a complete set of SSL and Transport Layer Security
protocol (TLS) features that can be used for standard SSL configuration. It can be
configured on any type of application (Web, FTP, SMTP, POP3, IMAP, or custom). The
NC-Gateway provides four types of SSL configurations:
• Client-side SSL: This secures communication between the user and the
NC-Gateway. This is a general encryption service using a digital certificate to
authenticate the server, which is configured at the application level. The client
provides the certificate to the server to authenticate the client.
• Client authentication: This refers to authenticating clients using a trusted
certificate. This is also configured at the application level through the client auth,
allow list and deny list containers. It works in conjunction with client-side SSL to
provide a basic SSL VPN.
4-2 Application Configuration Guide (449-000018-00) NetContinuum OS 6.1
Page 71

• Sever-side Encryption: This secures communication between the NC-Gateway
and a back-end Web server by establishing a persistent encrypted connection to the
back-end server. Its not configured at application level, rather, it is configured as
part of the server configuration and sets SSL encryption at the server-port level (that
is, all traffic to that server on that port is encrypted).
• Instant SSL: Instant SSL requires the creation of two Web applications with the
same VIP. The first Web application would be a non-SSL service to redirect all the
requests to the second Web application. To redirect all the requests, the instant SSL
policy for the first Web application should have the "redirect-status" set to "on". The
first application does the redirection to port 443/HTTPS. The second application
rewrites an "http:..." request into an "https:..." request and processing the content.
This chapter describes how to configure all four SSL types.
Prerequisites
There are a few required preliminary steps before configuring SSL for either client-side
or server-side encryption.
Creating Certificates
Overview
Before starting SSL configuration, create or obtain digital certificates (which is done by
the pkiadmin user), and export these certificates to make them available during
configuration. The type of certificate required varies by the type of configurations:
• Back-End encryption: Encrypting a server requires a standard X.509 digital
certificate. This certificate can either be created within the NC-Gateway or obtained
from a third-party CA (such as from VeriSign® or Thawte®).
• Front-End encryption: Encrypting a client requires a trusted certificate. This is also
an X.509 certificate; however, this certificate requires that it be set as “trusted.” It
too can be created or obtained from a third-party CA.
See the NetContinuum Application Security Gateway PKI Administration
Guide (449-000017-00) for more information about certificate management.
Modifying a Web Application
In the Web application (see “Creating a Web Application” in Chapter 3, “Creating a
Web Application”), do the following before beginning configuring SSL:
1. Set the Port parameter to 443.
2. Create a second application if you want to process both HTTP (port 80) and
HTTPS (port 443) traffic.
NetContinuum OS 6.1 Encrypting Application Traffic 4-3
Page 72

Client-side SSL
Client-side SSL
Client-side SSL configuration provides a certificate to the client to authenticate the
server.
Configuring Client-side SSL
The General container specifies the client-side policy. At a minimum, the following must
be set to employ back-end (server-side) SSL:
• Enable the SSL3 and/or TLS parameter(s)
• Enable (at least) one cipher suite (RC4-MD5, DES3-SHA, or Export Ciphers)
• Specify an exported certificate
To configure client-side SSL, do the following:
1. From the Configuration Home page, click vsite > web_app > SSL and the
General tab.
2. To make a change, click Edit... button. The Edit page opens. In this page, enter the
desired value (or select the alternate value from the drop-down list) for that
parameter.
a. Status: Select the status On (default is Off) from the drop-down list.
b. SSL3: Keep the default selection of Yes if you want to support the SSL 3.0
protocol.
c. TLS: Keep the default selection of Yes if you want to support the TLS protocols.
NOTE
Either SSL3 or TLS (or both) must be enabled. If both are
set to No, server-side encryption will fail.
d. Certificate: Select the certificate to use from the drop-down list. This is a digital
certificate that was exported by a pkiadmin user. If no certificates are
present, login as a pkiadmin, create (or install) a certificate, and export it.
e. RC4-MD5: Keep the default selection of Yes if you want to support the
RC4-MD5 cipher. (No disables this cipher.)
f. DES3-SHA: Keep the default selection of Yes if you want to support the
DES3-SHA cipher. (No disables this cipher.)
g. Export Ciphers: Set it to Yes (default is No) if you want to allow a low
encryption (40 and 56 bits) to be permitted.
4-4 Application Configuration Guide (449-000018-00) NetContinuum OS 6.1
Page 73

Client-side SSL
NOTE
At least one cipher suite (RC4-MD5, DES3-SHA, or
Export Ciphers) must be enabled. If all are set to No,
server-side encryption will fail.
h. Session Resumption: Keep the default selection of Yes to permit caching for
SSL sessions. Typically, this parameter should be enabled because it
improves performance.
i. Session Timeout: Enter the maximum time in seconds that a cached session
parameter can be reused (default is 300), if the server does not close the
session first. For security reasons, this value should not be too large.
j. Max Cached Sessions: Enter the maximum number of cached sessions (default
is 2048), which sets the size of the session cache. Increasing this value
increases memory usage.
3. Click Add to save the settings.
The following table describes the SSL general container parameters. These
parameters can be changed after SSL is configured.
Table 4-1. SSL Parameters
Parameter Description Options
Status Enables server-side SSL encryption for an
application.
SSL3 Enables support for the SSL 3.0 protocol.
Disabling this prevents older clients from
communicating with the Web Application.
TLS Enables support for the transport layer security
protocol. Typically, this is enabled.
Certificate Specifies the certificate presented by the Web
application when authenticating itself to a browser
or other client.
RC4-MD5 Enables support for the RC4-MD5 cipher. A cipher
suite is the cryptographic algorithm used for
encryption and message digest. (The RC4-MD5,
DES3-SHA and Export Ciphers parameters are
used to configure cipher suites.)
DES3-SHA Enables support for the DES3-SHA cipher. Yes (default)
On
Off (default)
Yes (default)
No
Yes (default)
No
User defined
None (default)
Yes (default)
No
No
NetContinuum OS 6.1 Encrypting Application Traffic 4-5
Page 74

Client Authentication
Table 4-1. SSL Parameters (Continued)
Parameter Description Options
Export Ciphers Enables support for the export ciphers, which are
weaker encryption ciphers. This lets older
browsers and international browsers establish
SSL connections with the application. The
supported ciphers are:
• RSA_EXPORT1024_WITH_DES_CBC_SHA
• RSA_EXPORT_WITH_RC4_40_MD5
• RSA_EXPORT_WITH_DES40_CBC_SHA
Session
Resumption
Session
Timeout
Max Cached
Sessions
Enables caching for an SSL session. It also
reconnects clients who have lost communication
with the service, using the previous session
parameters. Typically, this parameter should be
enabled because it improves performance.
Sets the maximum reuse time (in seconds) of a
cached session parameter. For security reasons,
this value should not be too large.
Sets the maximum size of the session cache
(maximum number of cached sessions). Increase
in its value increases the memory usage.
Client Authentication
Client-side encryption provides a method for creating an SSL virtual private network
(VPN) to sensitive portions of a company’s Web site. Only the clients who were given
a specific trusted certificate are allowed access to these sites. Client-side
authentication is performed in the following containers:
Yes
No (default)
Yes (default)
No
0 – 86400 seconds
Default: 300
32 – 5000
Default: 2048
• Client Auth: Sets client authentication policy and identifies the certificates that are
allowed access.
• Allow List: Identifies users who are allowed access when client-side SSL is
activated. Client-side SSL requires at least one allow list because the default
NC-Gateway policy is to deny all.
• Deny List: Identifies users who are not allowed access. These are users who were
added to an allow list but who should no longer be able to obtain access.
The display order for SSL client Allow / Deny list items are as follows:
• Country
• State
• Locality
4-6 Application Configuration Guide (449-000018-00) NetContinuum OS 6.1
Page 75

• Organization
• Organizational Unit
• Common Name
• Certificate Serial Number
For the above, the matching rule order based on the weight is in reverse order i.e.
Certificate Serial Number gets the highest priority weight while the Country gets the
lowest priority weight.
Configuring Client Authentication
The Client Auth container specifies the client authentication policy. This policy is used
to identify the certificates that are allowed access. The policy specifies several
certificate policy checks.
While most authorizations involve a single certificate, a certificate can be part of a
chain. For example, A is a trusted CA who issues a certificate to B who issues a
certificate to C. When the NC-Gateway receives C’s certificate, it evaluates the entire
chain, not just the certificate from C. In such cases, certificates might contain optional
extensions that provide certificate policies. There are three extensions associated with
certificate policies:
Client Authentication
1. A certificate policy extension contains a sequence of one or more policy
information terms, each of which consists of an object identifier (OID) and optional
qualifiers. These policy information terms indicate the policy under which the
certificate has been issued and the purposes for which the certificate may be used.
2. A certificate policy mapping extension specifies a mapping between the issuer
subject's certificate policies and the issued subject's policies. For example, it
specifies something like A== B, meaning that policy B is treated as equivalent to
policy A from this certificate down the chain. It can only be present in CA
certificates.
3. A policy constraints extension. It specifies what certificate policies can or should
appear in the certificates following this one in the certificate chain. Again, it can only
be present in CA certificates.
The Client Auth container includes several parameters that allow you to specify how
certificate policy extensions should be handled.
To configure client-side SSL, do the following:
NOTE
Configuring client authorization requires only that
be set to On and a certificate is selected from the
NetContinuum OS 6.1 Encrypting Application Traffic 4-7
Status
Trusted
Page 76

Client Authentication
1. From the Configuration Home page, click vsite > app_name > SSL and the
Client Auth tab.
2. To make a change, click Edit... button. The Edit page opens. In this page, enter the
desired value (or select the alternate value from the drop-down list) for that
parameter.
a. Status: Set the status to On (default is Off).
b. Accept Any Policy: Keep the default selection of Yes to allow all policies of a
certificates to be deemed acceptable (that is, any policy is acceptable
irrespective of the values for Certificate Policy Constraints).
Certificate drop-down list. You can ignore step b through
step f (leave the default settings) if you are not concerned
about the certificate policy extensions.
NOTE
Enabling this requires (at a minimum) one
“trusted-certificates” entry and one “allow-client” entry.
c. Explicit Policy Accept: Set this to Yes (default is No) if you require that an
acceptable policy be present in the certificate's policy extension field. At least
one acceptable policy (as specified in Certificate Policy Constraints) must
appear in all certificates in the chain.
d. Certificate Policy Constraints: Enter the acceptable policy values for a
certificate. This is necessary only if you choose not to accept all policies. The
value should be a comma separated list of ASN object identifiers (OIDs).
e. Inhibit Policy Mapping: Keep the default selection of Yes to prevent policy
mapping by certificate authorities (CA) in the certificate chain; that is, no CA in
the chain can declare another policy to be the equivalent of a required policy.
(No allows such mapping.)
f. Inhibit Any Policy: Set this to Yes (default is No) if you want the server to
always do a policy check, even if the certificate accepts any policy. In this case,
no certificate in the chain can blindly permit any policy to appear in the
certificates it signs; it must explicitly specify permitted policies.
g. Trusted Certificate: Select the trusted certificate to use from the drop-down list.
This is a digital certificate that was exported by a pkiadmin user. If no
certificates are available, login as a pkiadmin, create (or obtain) a trusted
certificate, and export it.
h. CRL Binding: Select the check box(es) for the CRL binding.
4-8 Application Configuration Guide (449-000018-00) NetContinuum OS 6.1
Page 77

Client Authentication
3. Click Add to save the settings. The operation completed successfully message
appears.
The following table describes the Client Auth container parameters. These parameters
can be changed after the client authentication container is configured.
Table 4-2. Client Auth Parameters
Parameter Description Options
Status Sets whether client authentication is required by the
application. When enabled, all clients will have to
supply a valid certificate during the SSL “handshake” in
order to use the application.
Note: Enabling this requires at least one exported
trusted certificate and one allow client entry.
Accept Any
Policy
Explicit Policy
Accept
Certificate
Policy
Constraints
Inhibit Policy
Mapping
Inhibit Any
Policy
Trusted
Certificate
Accepts all policies in the certificate policies extension
of the certificate.
Requires that an acceptable policy be present in the
certificate's policy extension field to allow access.
Specifies acceptable policy values for a certificate's
policy extension. The value should be an ASN object ID
(comma separated list of ASN1 object IDs).
Prevents policy mapping by certificate authorities (CAs)
in the certificate chain.
Initiates (always) a policy check, even if intermediate
certificates in a certificate chain accepts “any policy.”
Specifies the path to the trusted certificate or certificate
group used for encryption. Such certificates are created
(or obtained) and exported by the pkiadmin user.
Note: Client-side encryption requires at least one
trusted certificate.
On
Off (default)
Yes (default)
No
Yes
No (default)
User defined
Yes (default)
No
Yes
No (default)
User defined
None (default)
CRL Binding Specifies the CRL Binding. User defined
Configuring Allow List
An allow list is used as an access control mechanism for client authentication. Each
designated entry specifies a client that is allowed access to a Web application. During
SSL negotiation, each value specified (that is, name, state, etc.) is matched (see
‘‘Priority Rules) to a corresponding field in the certificate presented by the client.
The Allow List container records the clients who are allowed access when client-side
SSL is activated. The Allow List container can hold one or more allow client record.
NetContinuum OS 6.1 Encrypting Application Traffic 4-9
Page 78

Client Authentication
Each allow client record specifies a certificate that is allowed access. Client-side SSL
requires at least one allow client rule, because the default NC-Gateway policy is to
deny all.
To create an allow (or deny) client record, do the following:
1. From the Configuration Home page, select vsite > app_name > SSL and the
Allow List (or Deny List) tab.
2. To add a new allow (or deny) client, select Allow (or Deny) Client from
drop-down list located in Allow (or Deny) List table. The Create page opens. In this
page, do the following (in the specified parameter fields):
a. Name: Enter a name for this allowed (or denied) client.
b. Status: Keep the default selection of On to enable this list.
NOTE
An asterisk (*) can be entered for the user-specific
parameters (that is, from Country to Common Name).
The asterisk is a wildcard that allows any value for that
parameter.
c. Country: Enter the country of origin for this allowed (or denied) client.
d. State: Enter the state of origin for this allowed (or denied) client.
e. Locality: Enter the locality of origin for this allowed (or denied) client.
f. Organization: Enter the organization of origin for this allowed (or denied) client.
g. Organizational Unit: Enter the organization unit of origin for this allowed (or
denied) client.
h. Common Name: Enter the common name for this allowed (or denied) client.
Add
i. Certificate Serial Number: Enter the serial number that was assigned for the
given trusted certificate (see step g in ‘‘Configuring Client Authentication”).
3. Click Add to save the setting. The operation completed successfully message
appears. The new allow client record appears in the Allow List (or Denied List)
page.
These parameters can be changed after an allow or deny client record is created. To
do so, click Edit... button, make changes and click Update to activate the new settings.
4-10 Application Configuration Guide (449-000018-00) NetContinuum OS 6.1
Page 79

Client Authentication
The following table describes the Allow List and Denied List container parameters.
Table 4-3. Allow or Deny Client Parameters
Parameter Description Options
Name Specifies the allow or deny client record name.
(Names cannot contain spaces, slashes,
punctuation, or special characters.)
Status Enables this feature, which either allows or denies
access for this client.
Country Defines the country of the client. An asterisk (*)
means allow any value.
State Defines the state of the client. You can enter the
full name or just enter the two-digit country code.
An asterisk (*) means allow any value.
Locality Defines the locality of the client. An asterisk (*)
means allow any value.
Organization Defines the organization of the client. An asterisk
(*) means allow any value.
Organizational
Unit
Defines the organizational unit of the client. An
asterisk (*) means allow any value.
User defined
default: allow-client
On (default)
Off
User defined
Length Range: 0 500
Default: *
User defined
Length Range: 0 500
Default: *
User defined
Length Range: 0 500
Default: *
User defined
Length Range: 0 500
Default: *
User defined
Length Range: 0 500
Default: *
Common
Name
Certificate
Serial Number
NetContinuum OS 6.1 Encrypting Application Traffic 4-11
Defines the common name of the client. An
asterisk (*) means allow any value.
Defines the serial number of the certificate. The
serial number should be of the format hh:hh:..:hh
or d..dd where 'h' is a hex digit and 'd' is a decimal
digit. The decimal digit can be in the range of 1 -
2147483647.
User defined
Length Range: 0 500
Default: *
User defined
Length Range: 0 500
Default: *
Page 80

Server-side SSL
Configuring a Deny List
The Deny List container records the clients who are explicitly denied access when
client-side SSL is activated. The Deny List allows you to deny access to clients who
were previously allowed access but should subsequently be denied access, such as a
former employee. (It is not necessary to explicitly deny access to other clients because
the default NC-Gateway policy is to deny access to all.)
The Deny List container can hold one or more deny client records. The procedure to
create a deny client or an allow client record is identical (see ‘‘Configuring Allow List”).
Server-side SSL
This secures communication between the NC-Gateway and a back-end Web server by
establishing a persistent encrypted connection to the back-end server. Its not
configured at application level, rather, it is configured as part of the server configuration
and sets SSL encryption at the server-port level (that is, all traffic to that server on that
port is encrypted). (See “Configuring Server-side SSL” in Chapter 2, “Creating a Vsite).
Instant SSL
Instant SSL has the capability to provide SSL (HTTPS) access to content on back-end
servers without having to modify the back-end servers or the content on the back-end
servers. In the NC-Gateway this policy specifies the parameters to configure the Instant
SSL support.
Instant SSL requires the creation of two Web applications with the same VIP. The first
Web application would be a non-SSL service to redirect all the requests to the second
Web application. To redirect all the requests, the instant SSL policy for the first Web
application should have the "redirect-status" set to "on". The first application does the
redirection to port 443/HTTPS. The second application rewrites an "http:..." request into
an "https:..." request and processing the content. Figure 4-1 illustrates how Instant SSL
works.
NOTE
1. The first Web application is meant only for the Instant
SSL policy. No other policies (ex: web-logging, ssl,
web-firewall) are effective in this Web application.
These policies are only effective in the second Web
application.
2. The SSL container of the first Web application should
be disabled (set as "off"). The SSL container of the
4-12 Application Configuration Guide (449-000018-00) NetContinuum OS 6.1
Page 81

Instant SSL
second Web application should be enabled (set as
"on").
The instant SSL policy for the second Web application can also rewrite the HTTP
protocol portion of any absolute URL in the responses. To enable this, the
"rewrite-status" parameter should be set to "on" in the second Web application. This
rewrites the HTTP protocol portion of any absolute URLs in the responses from "http:"
to "https:". The "secure-site-domain" parameter also should be set to the domain of the
URLs to be rewritten. After these configurations, if the protocol portion of any absolute
URL matches the domain specified as the "secure-site-domain," then the protocol of
that URL would be rewritten from HTTP to HTTPS in the responses.
Client
HTTP
Web-App
HTTPS
Figure 4-1. Instant SSL Diagram
Configuring Instant SSL
Do the following to configure Instant SSL:
1. Create two Web applications (see “Creating a Web Application” in Chapter 3,
“Creating a Web Application”) in the same vsite. Set the SSL status to Off in the
first Web application while the second Web application should have its SSL status
as ON:
a. Set the first Web application to port 80 (HTTP).
b. Use the same IP address, netmask, and Ethernet port for the second Web
application, but set the port to 443 (HTTPS).
Web-App-2
Web server
NC-Gateway
NetContinuum OS 6.1 Encrypting Application Traffic 4-13
Page 82

Instant SSL
2. On the first (HTTP) Web application, click Instant SSL. The Instant SSL
3. On the second (HTTPS) Web application, click Instant SSL. In the Instant SSL
configuration window appears. See Table 4-4 for information about all the
parameters. In this window, do the following (in the indicated parameter fields):
a. Status: Set to On.
b. Redirect Status: Set to On. This rewrites the HTTP request to an HTTPS
request and redirects it to the second application.
c. Leave the other parameters as Off (or blank), as they are for the HTTPS
application only.
configuration window, do the following (in the indicated parameter fields):
a. Status: Set the status to On.
b. Secure Cookie: Set the secure cookie to On. When this parameter is enabled,
the NC-Gateway puts a secure tag on cookies provided by back-end servers.
Before sending a secure cookie, a browser verifies the connection is secure
(HTTPS); it will not send the cookie if the connection is not secure.
c. Redirect Status: Leave the redirect status as Off. (This parameter is used by
the HTTP application only.)
d. Rewrite Status: Set to On. This rewrites the HTTP protocol portion of any
absolute URLs in responses from “http:” to “https:”. (If this parameter is not
enabled, selecting an embedded HTTP link will display a “Page not Found“
error.) This works in conjunction with Secure Site Domain; responses are
rewritten for the specified domains only.
e. Secure Site Domain: Specify which domain(s) are relevant for Rewrite Status.
Enter a value in the text box and click Add (+) button or select the check box.
Click All to select all the check boxes or click None to clear all the check boxes.
f. Sharepoint Rewrite Support: Set to On to enable the sharepoint rewrite
support.
The following table describes the Instant SSL container parameters. These parameters
can be changed after Instant SSL is configured.
Table 4-4. Instant SSL Parameters
Parameter Description Options
Status Enables Instant SSL for the application.
Note: When status is on, the header Content
Length in responses from a back-end server
will be replaced by Transfer Encoding:
chunked.
On
Off (default)
4-14 Application Configuration Guide (449-000018-00) NetContinuum OS 6.1
Page 83

Table 4-4. Instant SSL Parameters (Continued)
Parameter Description Options
Instant SSL
Secure Cookie Enables encryption for cookies that are sent
from back-end servers. If enabled, the
NC-Gateway puts a secure tag to these
cookies. If a cookie is secure, it will be sent
over a secure (HTTPS) connection only.
Before sending a secure cookie, a browser
verifies the connection is secure (HTTPS); it
will not send the cookie if the connection is not
secure.
Note: This parameter should be enabled on an
HTTPS (port 443) application only.
Redirect Status Enables redirection. This rewrites an HTTP
request to an HTTPS request and redirects it
to a second application.
Note: This parameter should be enabled on an
HTTP (port 80) application only.
Rewrite Status Enables URL protocol rewriting. This rewrites
the HTTP protocol portion of any absolute
URLs in responses from “http:” to “https:”. (If
this parameter is not enabled, selecting an
embedded HTTP link will display a “Page not
Found“ error.) This works in conjunction with
Secure Site Domain; responses are rewritten
for the specified domains only.
On
Off (default)
On
Off (default)
On
Off (default)
Note: This parameter should be enabled on an
HTTPS (port 443) application only.
Secure Site
Domain
NetContinuum OS 6.1 Encrypting Application Traffic 4-15
Specifies the domain names for links
embedded in a request. Sets which absolute
URLs to rewrite in responses when Rewrite
Status is enabled; only URLs from these
domain(s) are rewritten. Asterisk (*) means all
inclusive. (This parameter has no effect when
Rewrite Status is Off.)
Note: This parameter should be enabled on an
HTTPS (port 443) application only.
User defined
Page 84

Instant SSL
Table 4-4. Instant SSL Parameters (Continued)
Parameter Description Options
Sharepoint
Rewrite Support
Provides support for Sharepoint rewrite.
Enabling this supports the Microsoft's
SharePoint Services in the back-end when
using SSL in the front-end for security. This
parameter is effective only if the
"rewrite-status" parameter is enabled ("On").
Enable this parameter only for the second Web
application; disable it for the first Web
application ("Off").
On
Off (default)
4-16 Application Configuration Guide (449-000018-00) NetContinuum OS 6.1
Page 85

Chapter 5
Web Firewall Policies
This chapter describes how to create a Web firewall policy for a vsite and web firewall
for an application. This chapter includes the following topics:
• Overview
• Configuring Web Firewall Policy
• Configuring Global URL ACLs
• Configuring Request Limits
• Configuring URL Normalization
• Configuring Cookie Security
• Configuring Default URL Protection
• Configuring Default Parameter Protection
• Configuring Website Cloaking
• Configuring Data Theft Protection
• Default Policies
• Modifying Attack Action
5-
• Configuring Web Firewall
• Session Tracking
• URL ACL
Overview
Web applications are a prime target for hackers to launch cyber attacks. (See Chapter
1, “What is the Problem?,” in the NetContinuum Application Security Gateway
Overview (449-000019-00) for information about the attack types.) The NC-Gateway
resides between clients and Web servers to mitigate both application and network
attacks (Figure 5-1). It terminates each TCP connection, inspects the
application-specific traffic, and then forwards the content to the appropriate server.
Requests that deviate from set policies are dropped or redirected.
NetContinuum OS 6.1 Web Firewall Policies 5-1
Page 86

Configuring Web Firewall Policy
Front-end
Client
Internet
Hacker
Figure 5-1. Web Application Attacks
The Web Firewall Policies container exists in each vsite that includes the following
containers:
• General: Sets overall Web firewall parameters.
• Global URL ACLs: Sets the Global URL ACLs.
• Request Limits: Sets size limits on request fields.
• URL Normalization: Sets normalization policy for URLs.
router
NC-Gateway:
- application firewall
- network firewall
router
Back-end
Web servers
• Cookie Security: Sets cookie security policy.
• Default URL Protection: Sets the default URL Protection policy.
• Default Parameter Protection: Sets the default Parameter Protection policy.
• Website Cloaking: Sets security policies to cloak a Web site or application.
Conceals parameters in an HTTP header that are typically sent from a Web server.
Whenever content is returned from a Web server, sensitive information about Web
applications could be displayed in the response header. Website cloaking filters an
HTTP response header before the information is sent back to a client.
• Data Theft Protection: Sets rules for blocking or masking response data.
• Action Policy: Sets the action to be taken for a particular type of web attack.
The following sections describe how to configure each of these features.
Configuring Web Firewall Policy
The Web Firewall Policy is intended for configuring the global web firewall policies on
the NC-Gateway. By doing this multiple applications can be integrated with the same
Web Firewall Policy.
5-2 Application Configuration Guide (449-000018-00) NetContinuum OS 6.1
Page 87

Configuring Global URL ACLs
To configure Web Firewall policy, do the following:
1. From the Configuration Home page, click vsite > Web Firewall Policies.
2. To add a new web firewall policy, select Web Firewall Policy from
list located on the Web Firewall Policies page. The Create page opens. In this
page, do the following.
3. For Name, enter a name for the Web Firewall Policy.
4. Click Add to save the setting. The operation completed successfully message
appears.
The created Web Firewall Policy gets displayed in the Web Firewall Policies page.
Configuring Global URL ACLs
Global URL ACLs allow you to define strict access controls to a Website and Web
applications. It is a shareable policy that can be used among multiple applications in a
vsite.
The following table describes the default Global URL ACLs for default-policy,
oracle-policy, owa-policy and sharepoint-policy.
Table 5-1. Global URL ACLs General Parameters
Policy Default Global URL ACLs
default-policy,
owa-policy and
sharepoint-policy
backups-prefix, backups-suffix, favicon.ico, nclogin, phpinfo
robots.txt, translate-f-vulnerability
Add drop-down
NetContinuum OS 6.1 Web Firewall Policies 5-3
Page 88

Configuring Global URL ACLs
Table 5-1. Global URL ACLs General Parameters (Continued)
oracle-policy AppsLocalLogin.jsp, AppsLocalLogout.jsp, AppsLogin,
BufferedAppletBeanInfo.class, JBufferedAppletBeanInfo.class,
KeyboardFocusManager.class, MainBeanInfo.class, OA.jsp,
OAErrorDetailPage.jsp, OAErrorPage.jsp, OALogout.jsp,
OA_JAVA.bmp, OA_JAVA.gif, OA_JAVA.jpeg, OA_JAVA.jpg,
OracleApplications.dat, PopupAppletBeanInfo.class, RF.jsp,
Registry.dat, Sensor.class, SunBufferedAppletBeanInfo.class
SunJBufferedAppletBeanInfo.class, SunMainBeanInfo.class
SunPopupAppletBeanInfo.class, a.jsp, calendarDialog.jsp,
catch-all-deny, diag-pack-vuln, f60cgi, favicon.ico,
find_icx_launch.launch, find_icx_launch.runforms, fndaol.jar
fndbalishare.jar, fndctx.jar, fnderror.jsp, fndewt.jar
fndforms.jar, fndformsi18n.jar, fndlist.jar, fndswing.jar, fndutil.jar,
fndvalid.jsp, formservlet, frameRedirect.jsp, fred.jsp, glahelib.jar,
glhelib.jar, gr.jsp, j-oajinit.exe, oa-html-avi, oa-html-bmp,
oa-html-css, oa-html-gif, oa-html-htm, oa-html-htm.upper,
oa-html-html, oa-html-html.upper, oa-html-jpeg, oa-html-jpg,
oa-html-js, oa-html-xls, oa-html-xss, oa-media-bmp, oa-media-gif,
oa-media-jpeg, oa-media-jpg, oajinit.exe, one.jsp, oracle.jsp,
properties, redirect-help, redirect-root, robots.txt, sso.AppsLogin,
sso.AppsLogout
Do the following to configure the Global URL ACLs policies:
1. From the Configuration Home page, click vsite > Web Firewall Policies >
web_firewall_policy > Global URL ACLs.
2. To add a new global URL ACL, select Global URL ACL from
Add drop-down list
located on the Global URL ACLs page. The Create page opens. In this page, do
the following (in the specified parameter fields):
a. Name (Add parameter only; does not appear on the Edit dialog): Enter a name
for this Global URL ACL.
b. Status: Select the status from the drop-down list. Keep the default to On.
c. URL Match: Enter a URL to match. A value of /* means the ACL applies to
the entire domain.
d. Extended Match: Enter extended match selection criteria (default is an
asterisk). This can be a specific extended match, an expression, or an asterisk
(meaning any extended match).To add or modify the default list, do the
following:
— Click the ellipse (...) button. Do the following (in the indicated parameter fields):
Header Expression: Enter a valid header expression.
5-4 Application Configuration Guide (449-000018-00) NetContinuum OS 6.1
Page 89

Configuring Global URL ACLs
Element Type: Select the appropriate option from the drop-down list.
Element Name: Enter an element name.
Operation: Select the appropriate option from the drop-down list.
Value: Enter a valid expression.
— Select And radio-button to add some more expressions to the existing match
sequence. Select Or radio-button to replace the existing match sequence.
— For more information on the possible operations that can be given in the
expression refer Appendix B, Request Rewrite Condition.
— Click insert and then click Apply.
e. Extended Match Sequence: Enter a sequence number (1 to 1000) to specify an
order for matching the extended-match rules to resolve conflicting URL ACLs
that have the same url-match and extended-match.
f. Action: Select the action to take (Allow, Deny, Redirect or Process)
when a request matches this ACL from the drop-down list. If the action is
Redirect, the redirect URL is specified in the Redirect URL parameter.
g. Deny Response: Select the type of response send to the client, if the action
denies from the drop-down list.
h. Redirect URL: Enter the URL tto be used to redirect the client if the deny
response is set to "redirect". The Redirect URL should be specified when the
status-code in HTTP Status is one of 3xx redirect response codes.
i. Response Page: Select the respective response page from the drop-down list.
3. Click Add to save the settings. The operation completed successfully message
appears.
The following table describes the Global URL ACLs container parameters.
Table 5-2. Global URL ACLs container Parameters
Parameter Description Range
Name Sets a name for the Global URL ACL. User defined
default: global-url-acl
Status Enables or disables the URL ACL container. On (default)
Off
NetContinuum OS 6.1 Web Firewall Policies 5-5
Page 90

Configuring Global URL ACLs
Table 5-2. Global URL ACLs container Parameters
Parameter Description Range
URL Match Specifies the URL. This is used to match the URL
of a HTTP request. The URL should start with a "/"
and can have a maximum of one " * " anywhere in
the key. A value of /* means that the ACL applies
to the entire domain.
Examples:
• /index.html
• /public/index.html
Action Sets the action of the ACL:
• Allow: An "Allow" ACL (i.e., action=allow)
disables all security checks on an incoming
request that matches the ACL. It also disables
Data Theft on such responses.
• Deny: Denies any request matching this ACL.
The request is not subjected to any security
policies. This is an unconditional deny. When a
request is denied, an error response is sent.
• Redirect: Redirects any request matching this
ACL. The request is not subjected to any security
policies. This is an unconditional redirect. (The
NC-Gateway returns a 3xx redirect message to
the client so it can make a new request; it does
not reroute the original request.)
Error responses can be customized by
configuring a redirect policy. See “Error
Responses” in Appendix C, “Usage Guidelines,”
for the default error responses.
• Process: Processes any request matching this
ACL.
User defined
Length Range: 0 5000
Allow
Deny
Redirect
Process (default)
5-6 Application Configuration Guide (449-000018-00) NetContinuum OS 6.1
Page 91

Configuring Global URL ACLs
Table 5-2. Global URL ACLs container Parameters
Parameter Description Range
Extended
Match
Extended
Match
Sequence
Deny
Response
Specifies the HTTP extended match key. It can be
a specific extended match name, an expression
that consists of a combination of HTTP headers
and query string parameters, or an asterisk (*) to
accept any type of headers. If the extended match
parameter refers to an HTTP header, it should be
preceded by the word "header". Non-HTTP
headers should not contain "header". i.e.:
set extended match = "Client-IP eq 99.99.1.2"
set extended match = "Header Connection eq
Keep-Alive"
Examples:
• *
• Header Accept co soap or Header
Soap-Action ex
• Header User-Agent co Mozilla ||
Parameter Userid exists or
HTTP-Version eq 1.0 && Client-IP eq
192.168.1.0/24
This parameter is used to specify an order for
matching the extended-match rules to resolve
conflicting URL ACLs that have the same
url-match and extended-match. For more
information refer Rule Matching.
Specifies the type of response send to the client, if
the action denies.
User defined
Length Range: 0 4096 characters
Default: *
Length Range: 1 –
1000
Default: 1
• Reset
• Custom Response
(default)
• Redirect
Redirect
URL
Response
Page
NetContinuum OS 6.1 Web Firewall Policies 5-7
Sets the URL to be used in a redirect response. A
redirect response is needed when the action is set
to Redirect or when a custom response is set to
one of the 3xx redirect response codes. (The
NC-Gateway returns a 3xx redirect message to
the client so it can make a new request; it does not
reroute the original request.) The entry must be a
full URL or just the path. Examples:
• http://secure.xyz.com/error.html
• http://secure.xyz.com/logerror.cgi
• /exchange
Specifies the response page to be sent to the
client if the deny response parameter is set to
"custom-response".
User defined
Length Range: 0 256
Available list
Page 92

Configuring Request Limits
Configuring Request Limits
Message headers included in an HTTP request describe the contents of each
message. However, the request could include malicious code that a hacker added
(injected) into the message header. Enforcing size limits on the HTTP request header
fields prevents the request with malicious code to pass. (Requests that have fields
larger than the defined lengths are dropped.) Proper configuration of limits helps
mitigate buffer overflow exploits that lead to Denial of Service (DoS) attacks.
Request limits are enabled by default, and the default limit values are chosen with the
assumption that any requests with lengths greater than the defaults are potential buffer
overflow attacks. The defaults are normally appropriate, but you might choose to
change one or more of the default values under certain conditions (see “Request Limit
Considerations” in Appendix C, “Usage Guidelines”).
NOTE
You can make the value of a parameter unlimited by
deleting value of the parameter.
To modify any of the default values, do the following:
1. From the Configuration Home page, click vsite > Web Firewall Policies >
web_firewall_policy > and the Request Limits tab.
2. To make a change, click Edit... button. The Edit page opens. In this page, enter the
desired value (or select the alternate value from the drop-down list) for that
parameter.
a. Status: Select the status from the drop-down list. Retain the default of On.
NOTE
A value of zero (0) for any of the following parameters
disables that length check (not recommended).
b. Max Request Length: Enter the maximum allowable request header length
excluding the request body (default is 32768 bytes).
c. Max Request Line Length: Enter the maximum allowable length of the request
including Method, URI and version (default is 4096 bytes).
d. Max URL Length: Enter the maximum allowable URL length for a request,
including the query string portion of the URL (default is 4096 bytes).
e. Max Query Length: Enter the maximum allowable length for the query string
portion of the URL (default is 4096 bytes).
5-8 Application Configuration Guide (449-000018-00) NetContinuum OS 6.1
Page 93

Configuring Request Limits
f. Max Number of Cookies: Enter the maximum number of cookies in a request.
g. Max Cookie Value Length: Enter the maximum allowable length for a header
inserted into a cookie (default is 4096 bytes).
h. Max Cookie Name Length: Enter the maximum allowable length for name of
any cookie.
i. Max Number of Headers: Enter the maximum number of headers in a request
(default is 20).
j. Max Header Value Length: Enter the maximum allowable length for any
request header (default is 512 bytes). A request header can be either an HTTP
protocol header such as Host or User-Agent or a custom header such as
IIS Translate. A request can contain 0 or more of these headers. Create a
header ACL to set a length limit for a specific header (see “Header ACLs” in
Chapter 6, “URL Policies”).
k. Max Header Name Length: Enter the maximum allowable length for header
name in a request.
3. Click Update to save and activate the new settings.
The following table lists the Request Limits container parameters.
Table 5-3. Request Limits Parameters
Parameter Description Range
Status Enables size limit checks on request headers. This
prevents potentially malicious buffer overflow
attacks. In nearly all cases, the status should be On
as the performance penalty is minimal and DoS
attacks are mitigated.
Max Request
Length (bytes)
Max Request
Line Length
(bytes)
Max URL
Length (bytes)
Sets the maximum allowable request header length
excluding the request body. A request consists of a
request URL, which identifies the resource, and a
variable length header. Headers that are larger
than the defined size are dropped.
Sets the maximum allowable size of the request
including Method, URI and version.
Sets the maximum allowable URL length including
the query string portion of the URL. URLs that are
longer than the defined setting are dropped.
On (default)
Off
1 – 65536 (bytes)
Default: 32768
1 – 65536 (bytes)
Default: 4096
1 – 8192 (bytes)
Default: 4096
NetContinuum OS 6.1 Web Firewall Policies 5-9
Page 94

Configuring URL Normalization
Table 5-3. Request Limits Parameters (Continued)
Parameter Description Range
Max Query
Length (bytes)
Max Number
of Cookies
Max Cookie
Value Length
(bytes)
Max Cookie
Name Length
(bytes)
Max Number
of Headers
Max Header
Value Length
(bytes)
Sets the maximum allowable length for the query
string portion of the URL. A query that is larger than
the defined setting is dropped.
A value of 0 disables this parameter.
Sets the maximum number of cookies in a request. 0 – 1024 (bytes)
Sets the maximum allowable length for a header
inserted into a cookie. Cookie headers that are
larger than the defined setting are dropped.
Sets the maximum allowable length for name of
any cookie.
Sets the maximum number of headers in a request.
Headers exceeding this setting are dropped.
A value of 0 disables this parameter.
Sets the maximum allowable length for any request
header. A request header could be either a
standard HTTP header (such as, Host or
User-Agent) or a custom header (such as, IIS
Translate). A request can contain 0 or more of
these headers. Headers that are larger than the
defined setting are dropped. Create a header ACL
to set a length limit for a specific header (see
“Header ACLs” in Chapter 6, “URL Policies”). When
specified, it overrides this value for the specified
header.
0 – 60000 (bytes)
Default: 4096
Default: 40
1 – 32768 (bytes)
Default: 4096
1 – 1024 (bytes)
Default: 32
0 – 40
Default: 20
1 – 8192 (bytes)
Default: 512
Max Header
Name Length
(bytes)
Sets the maximum allowable length for header
name in a request.
1 – 1024 (bytes)
Default: 32
Configuring URL Normalization
The NC-Gateway normalizes all traffic into a standard or “canonical” form before
applying any security policy string matches (Figure 5-2). In the HTTP world, this means
decoding Unicode, UTF, or Hex to base text. Otherwise, hackers can disguise attacks
within different encoding formats that the firewall might not detect using a string match.
5-10 Application Configuration Guide (449-000018-00) NetContinuum OS 6.1
Page 95

Configuring URL Normalization
Figure 5-2. Normalizing Traffic
Normalization (converting a URL into a canonical form) is always enabled if the Web
firewall is active, but you can customize normalization policy through the URL
Normalization container. The Charset parameter specifies the character set encoding
type for incoming requests. It is set to ASCII by default; to specify an alternate type,
simply select a different type such as Shift-JIS for Japanese characters.
NOTE
1. ASCII character set encoding is always supported.
When Charset is set to a different character set, both
it and ASCII encoding are supported.
2. Additional checks to prevent path traversal and path
disclosure attacks are set in the URL Normalization
container.
There are situations where multiple character set encoding is needed. For example, a
Japanese language site might need both Shift-JIS and EUC-JP encodings. You have
the option of setting the NC-Gateway to automatically add character set encodings as
needed. (It does this by searching all response headers for a META tag that specifies
the character set encoding type and dynamically adding any supported types listed in
the META tags.)
Double encoding is the re-encoding of the encoded data. For example: The UTF-8
escape for the backslash character is %5C, which is a combination of three characters
i.e. %, 5, and C. So the Double encoding is the re-encoding either one or all the 3
characters by using their corresponding UTF-8 escapes as %25, %35, and %63.
NetContinuum OS 6.1 Web Firewall Policies 5-11
Page 96

Configuring URL Normalization
The following table describes double-encoding variations of the \ character.
Table 5-4. Double-Encoding variation of the \ character
Escape Description
%5C Normal UTF-8 escape of the backslash character
%255C %25, the escape for % followed by 5C
%%35%63 The % character followed by %35, the escape for 5, and %63, the
%25%35%63 The individual escapes for %, 5, and C
To activate character set encoding detection, do the following:
1. From the Configuration Home page, click vsite > Web Firewall Policies >
web_firewall_policy > and the URL Normalization tab.
2. To make a change, click Edit... button. The Edit page opens. In this page, enter the
desired value (or select the alternate value from the drop-down list) for that
parameter.
a. Default Character Set: Select the desired base character set encoding from the
drop-down list. This is the character set encoding that will be used if the
NC-Gateway cannot determine the character set encoding from the URL.
escape for C
b. Detect Response Charset: Select Yes from the drop-down list. This starts
character set encoding detection.
c. Double Encoding: Select whether to re-encode the encoded data from the
drop-down list.
d. URL Encoded Parameter Separator: Specifies the URL encoded parameter
separator to be used.
3. Click Update to save and activate the new settings.
The following table describes the URL Normalization container parameters.
5-12 Application Configuration Guide (449-000018-00) NetContinuum OS 6.1
Page 97

Configuring URL Normalization
Table 5-5. URL Normalization Parameters
Parameter Description Option
Default
Character Set
Detect
Response
Charset
Sets a character set encoding method
used to read requests.
Note: ASCII is always supported. If this
parameter is set to a different character
set, the NC-Gateway will encode both
ASCII and that character set.
Enables automatic character set
encoding detection, which learns any
known character set found in a response.
• Yes: The NC-Gateway attempts to
detect the character set encodings of
the response pages through the META
tags and the Content-Type headers.
This is useful when the site needs
multiple character set encodings, but it
requires more processing resources.
• No: The NC-Gateway uses only the
character set encoding specified in the
Charset parameter or the Response
Charset parameter in the URL
Normalization container (when the
NC-Gateway cannot determine the
character set from the URL).
English:
Unicode:
Chinese:
Japanese:
Korean:
No (default)
Yes
ASCII
ISO-8859-1
UTF-8
(default)
GBK
GB2312
HZ
BIG5
EUC-TW
ISO-2022-CN
Shift-JIS
EUC-JP
ISO-2022-JP
EUC-KR
JOHAB
ISO-2022-KR
NetContinuum OS 6.1 Web Firewall Policies 5-13
Page 98

Configuring Cookie Security
Table 5-5. URL Normalization Parameters (Continued)
Parameter Description Option
Double
Encoding
URL Encoded
Parameter
Separator
Specifies whether to re-encode the
encoded data.
• Do Not Apply: Disables the double
encoding detection.
• Apply: After the regular URL
normalization is complete. It again
detects for further encoding of the
characters. If the double-encoding is
there, it tries to decode the encoding. If
decoding fails, the request will be locked
in active mode and log gets generated
in the web firewall logs by using the
Invalid URL encoding Event ID.In
passive mode the request will be
allowed and also the logs gets
generated.
Note: The original URL is passed to the
back-end not the normalized URL.
Specifies the URL encoded parameter
separator to be used.
Configuring Cookie Security
Do Not Apply (default)
Apply
Ampersand And Semicolon
(default)
Ampersand Only
Semicolon Only
A cookie is a simple text file provide by a Web server. Cookies provide a mechanism
to store Web application state information on a client's navigation platforms, such as
browsers and other user agents. Cookies are used to store user preferences, shopping
cart items, and sometimes very sensitive information such as registration and login
information. If the structure of the cookie can be revealed, the user's information is
vulnerable to attack.
A back-end server can send a cookie, which is a packet of whatever information the
server chooses to send (such as information to authenticate or identify a user), to
maintain state between otherwise stateless HTTP transactions. Because cookies are
simple text files, they can easily be altered and then used to launch a Web attack.
Cookies can also be stolen and sensitive information, such as client information, can
be obtained from the message. You have the option to apply security features to the
cookies sent from the back-end servers to the Web users. See “Cookie Security
Considerations” in Appendix C, “Usage Guidelines,” for information about how these
features work.
5-14 Application Configuration Guide (449-000018-00) NetContinuum OS 6.1
Page 99

Configuring Cookie Security
Cookie security is disabled by default. To configure cookie security, do the following:
1. From the Configuration Home page, click vsite > Web Firewall Policies >
web_firewall_policy > and the Cookie Security tab.
2. To make a change, click Edit... button. The Edit page opens. In this page, enter the
desired value (or select the alternate value from the drop-down list) for that
parameter.
a. Status: Set to On to enable cookie security (default is On).
b. Tamper Proof Mode: Select Encrypted to forward an encrypted cookie only
or Signed to forward both encrypted and plain text versions of the cookie from
the drop-down list.
c. Secure Cookie: Set to Yes (default is No) to direct the user agents to send this
cookie back only when they make a secure HTTPS connection to the origin
server.
d. HTTP Only: Set to Yes (default is No) to secure HTTP cookies on a Microsoft
Internet Explorer browser (version 6 SP1 or later).
e. Cookie Max Age: Enter the maximum duration (in minutes) a tamper-proof
cookie can be used before timing out (default is 3600). Enter 0 to make the
duration unlimited.
f. Cookies Exempted: Enter a value in the text box and click Add (+) button or
select the check box. Click All to select all the check boxes or click None to
clear all the check boxes.
g. Cookie Replay Protection Type: Select the cookie replay protection type from
the drop-down list.
h. Custom-Headers: Enter a value in the text box and click Add (+) button or
select the check box. Click All to select all the check boxes or click None to
clear all the check boxes.
3. Click Update to save and activate the new settings.
The following table lists the Cookie Security container parameters.
Table 5-6. Cookie Security Parameters
Parameter Description Range
Status Enables or disables this container.
Note: If Set-Cookie header is added to
Headers to Filter parameter under Website
Cloaking and cookie security status is "On"
under Web Firewall then Set-Cookie header is
not filtered from the response.
NetContinuum OS 6.1 Web Firewall Policies 5-15
On (default)
Off
Page 100

Configuring Default URL Protection
Table 5-6. Cookie Security Parameters (Continued)
Parameter Description Range
Tamper Proof
Mode
Secure Cookie Directs user agents to send this cookie back
HTTP Only Sets security for HTTP cookies on Microsoft
Cookie Max Age
(minutes)
Cookies
Exempted
Sets whether cookies will be encrypted only or
both encrypted and signed (see “Tamper Proof
Mode” in Appendix C, “Usage Guidelines”). If
this parameter is set to "none", the value of the
cookie is not protected, but the "Secure" and
"HttpOnly" attributes are added to the cookie.
only when they make a secure HTTPS
connection to the origin server. (see “Secure
Cookie” in Appendix C, “Usage Guidelines”).
Internet Explorer version 6 SP1 or later (see
“HTTP Only” in Appendix C, “Usage
Guidelines”).
Sets the maximum age for tamper-proof
cookies. This value can be used to time out the
session identified by the cookie. If set to 0, the
NC-Gateway will not insert the max-age
attribute, and the user agent will treat the
cookie as a session cookie with no expiration
time. This cookie will be discarded when the
user agent is killed.
Specifies the cookies to be exempted from this
policy. (None of the parameters apply to
exempted cookies.) This is useful for cookies
inserted by advertising sites usually to track
hits to advertisements hosted on different
sites. This parameter is optional.
Encrypted
None
Signed (default)
Yes
No (default)
Yes
No (default)
0 – 500000 (minutes)
Default: 3600
(minutes)
User defined.
• __utma
• __utmc
• __utmz
• __utmb
Cookie Replay
Protection Type
Custom Headers Specifies the custom header.
Sets the cookie replay protection type. • Ip (default)
• Custom-Headers
• Ip-And-Custom-Hea
ders
User defined
Length Range: 0 -
Example: User-Agent, X-Forwarded-For
500
Configuring Default URL Protection
The settings in this container protects the Web application against web attacks in the
absence of a URL profile.
5-16 Application Configuration Guide (449-000018-00) NetContinuum OS 6.1
 Loading...