

e
Barracuda Spam Firewall Outbound - Quick Start Guid
The Barracuda Spam Firewall is a spam and virus filtering appliance that ensures all
emails leaving your networks is virus-free and legitimate. It prevents individuals from
unintentionally or intentionally using your organiz ation ’s network to send viruses or spam.
It is physically installed on your network and assigned an IP address as a node on your
internal network. It is common for the Barracuda Spam Firewall to be installed in the DMZ
area of your network or behind a traditional firewall. Once configured, any outgoing
message that contains a virus or scored above the quarantine level is automatically
blocked and placed in the Quarantine Box.
Getting Started
This guide provides you with setup instructions for the Barracuda Spam Firewall.
We recommend reading these instructions fully before starting the setup. To
begin setting up your Barracuda Spam Firewall, you will need the following:
• Barracuda Spam Firewall
• AC Power Cord
• Ethernet Cables
• Mounting Rails (model 600/800/900 only)
• VGA Monitor (recommended)
• PS2 Keyboard (recommended)
Physical Installation
To install the Barracuda Spam Firewall:
1. Fasten the Barracuda Spam Firewall to a 19-inch rack or place it in a stable
location.
2. Connect an Ethernet Cable from your network switch to the ethernet port on
the back of the Barracuda Spam Firewall.
3. Connect a Standard VGA Monitor, PS2 Keyboard, and AC power cord to the
Barracuda. Note: Immediately after connecting an AC Power Cord to the
Barracuda, it may power ON for a few seconds and then power OFF. This
is because the Barracuda is designed to automatically return to a
powered ON state in the event of a power outage.
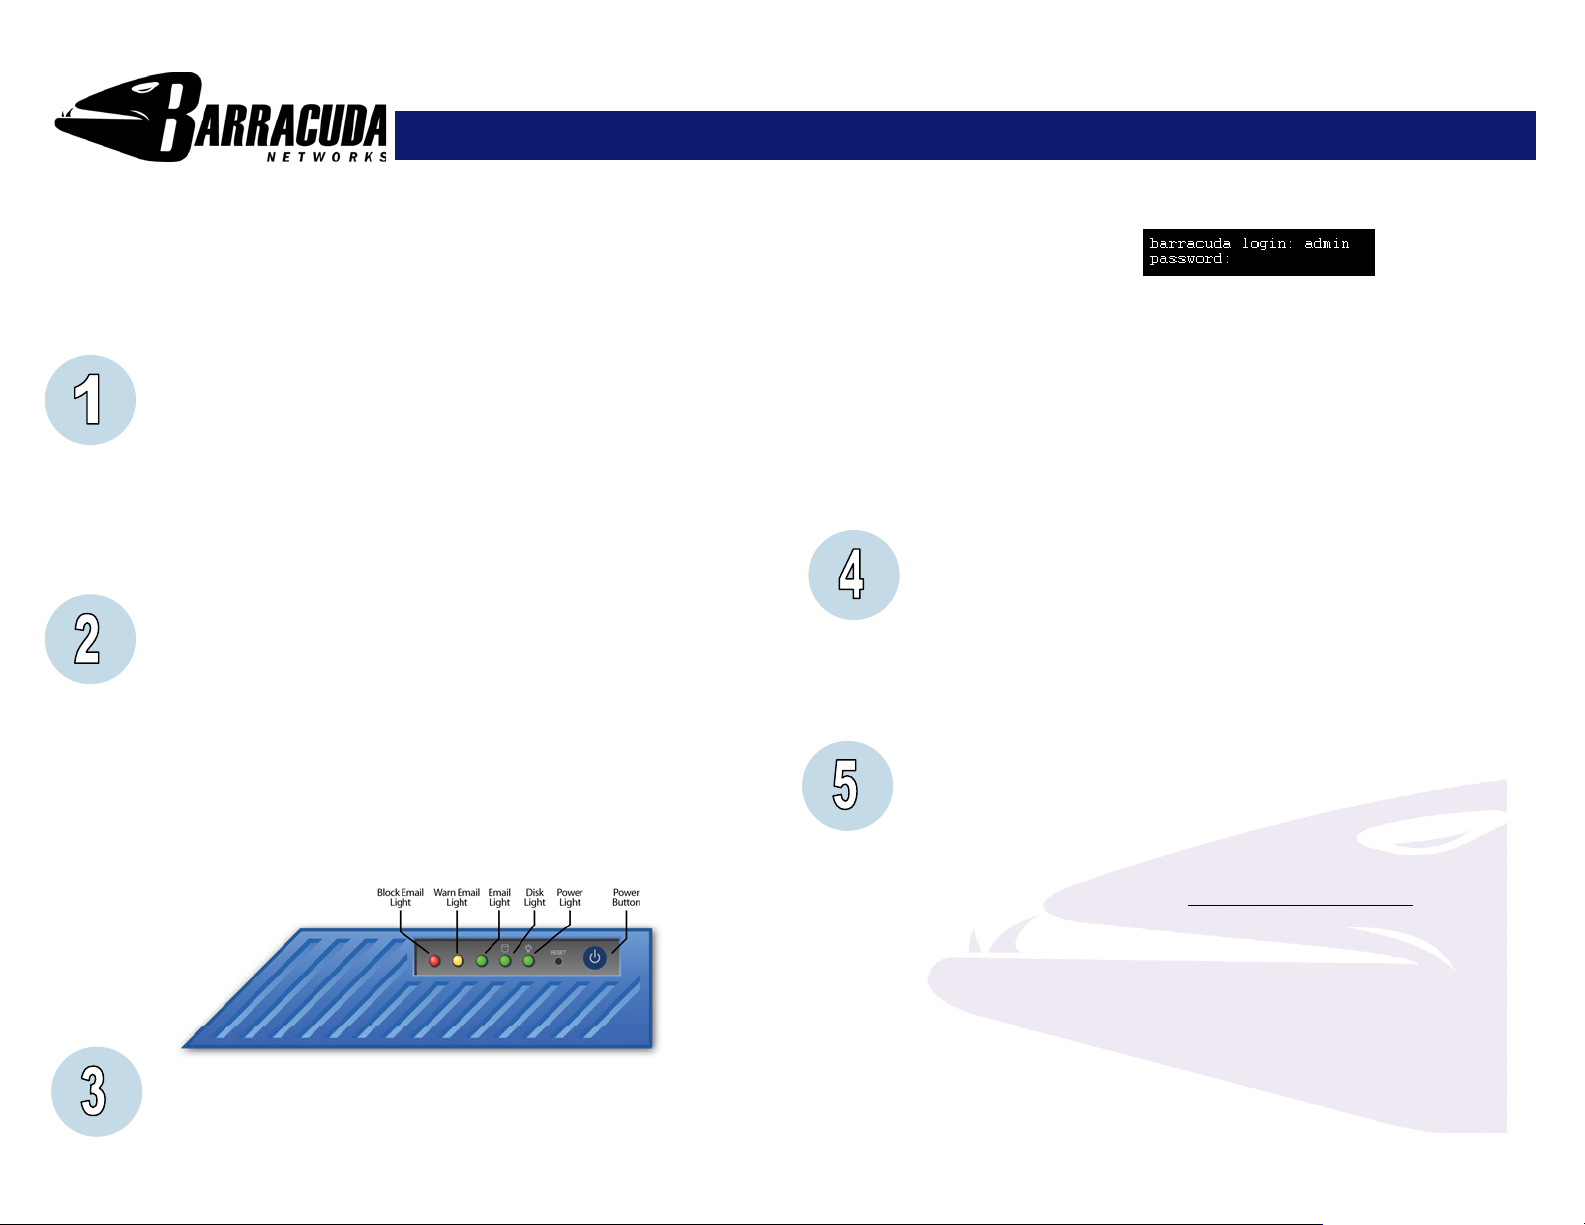
4. Press the POWER button on the front panel to turn the Barracuda on.
Configure IP Address and Network Settings
If you have a monitor connected, the Barracuda Spam Firewall will display the
Boot Menu initially, and the Administrative Console login prompt once fully
booted. To begin the configuration:
1. Login to the Administrative Console using the admin login:
• Login: admin
• Password: admin
2. Configure the IP Address, Subnet Mask, Default Gateway, Primary DNS
Server and Secondary DNS Server as appropriate for your network.
3. Save your changes.
If you do not have a monitor and keyboard and want to set the IP using the
RESET button on the front panel, press and hold the RESET button per the
following table:
IP address Press and hold RESET for…
192.168.200.200 5 seconds
192.168.1.200 8 seconds
10.1.1.200 12 seconds
Opening Firewall Ports
If your Barracuda Spam Firewall is located behind a corporate firewall, open the
following ports on your firewall to ensure proper operation.
Port Direction TCP UDP Usage
25 In/Out Yes No Email and email bounces
53 Out Yes Yes Domain Name Service (DNS)
80 Out Yes No Virus, firmware and spam rule updates**
123 In/Out No Yes Network Time Protocol (NTP)
Barracuda Spam Firewall Configuration
Use a computer with a Web browser that is connected to the same network as
the Barracuda and follow these steps:
1. In your Web browser’s address bar, enter http:// followed by the Barracuda’s
IP address, followed by the default Web Interface HTTP Port (:8000). For
example, if you configured the Barracuda with an IP address of
192.168.200.200, you would type: http://192.168.200.200:8000
2. Log in to the Barracuda Spam Firewall Web interface as the administrator,
Use Username: admin Password: admin
3. Go to the Basic
• Verify that the IP Address, Subnet Mask, and Default Gateway are
correct.
• Enter outbound.mode as the Server Name/IP.
• Verify that the Primary and Secondary DNS Server are correct
• Enter Default Hostname and Default Domain. This is the name that will
be associated with bounced messages. For example, enter barracuda
as the Default Hostname and <yourdomainname>.com as the Default
Domain.
Æ IP Configuration page and perform the following:
e
Barracuda Spam Firewall Outbound - Quick Start Guid
• Enter outbound.mode under Allowed Email Recipient Domain(s).
Click Add after entry.
4. Click any one of the Save Changes buttons to save all of the information.
Update the Firmware
1. Go to Advanced
2. Press Download Firmware. Click OK to acknowledge the download duration
message. To avoid damaging the Barracuda, do not power OFF during an
ÆFirmware Update.
update or download. To view download progress, refresh your browser. You
will be notified when the download is complete.
3. On the Advanced
ÆFirmware Update page, click the Apply Now button to
apply the firmware. This will take a few minutes to complete.
4. Click OK when prompted to reboot.
5. After applying the firmware, Barracuda Networks recommends logging in to
the Web interface again and reading the Release Notes to learn about
enhancements and new features. It is also good practice to verify settings, as
new features may have been included with the firmware update.
Change the Administrator Password
To avoid unauthorized use, we recommend you change the default administrator
password to a more secure password. You can only change the administrator
password for the Web interface. You cannot change the password for the
Administrative Console, but this is only accessible via the keyboard which you
can disconnect at any time.
1. Go to BasicÆAdministration and enter your old and new passwords.
2. Press Save Password.
Product Activation
Verify that the Energize Updates feature is activated on your Barracuda by going
to the Basic
ÆStatus page. Under Subscription Status, make sure the Energize
Updates subscription is Current. If the Energize Updates is Not Activated, click
the corresponding activation link to go to the Barracuda Networks Product
Activation page and complete activation of your subscriptions.
Convert to Outbound
Outbound ensures all email leaving your network is virus-free and legitima te.
1. Go to Basic
Æ Administration scroll to Operation Mode section.
2. Click Convert, a warning message will appear to confirm.
3. Click Yes, system will reboot after complete conversion.
4. Log into the Barracuda, go to Basic Æ Status and verify the outbound
mode conversion when it displays Email Statistics [Outbound].
5. Go to the BasicÆ IP Configuration page and perform the following:
• Verify that the IP Address, Subnet Mask, and Default Gateway are
correct.
Contact and Copyright Information
Barracuda Networks, Inc. 3175 S. Winchester Blvd., Campbell, CA 95008 USA • phon e: 408. 342. 540 0 • fax: 408.342.1061 • www.barracuda.com
Copyright 2005-2007 © Barracuda Networks, Inc. All rights reserved. Use of this product and this manual is subject to license. Information in this document is
subject to change without notice. Barracuda Spam Firewall is a trademark of Barracuda Networks, Inc. All other brand and product names mentioned in this
document are registered trademarks or trademarks of their respective holders. 3410v87-070226-02-0614
• Verify that the Primary and Secondary DNS Server are correct
• Verify Default Hostname and Default Domain is correct.
6. Click any one of the Save Changes buttons to save all of the information.
7.
Barracuda Spam Firewall is now ready to receive any outbound email from
any email relay or server.
8.
To further restrict which mail is allowed to be relayed through the Barracuda
by Sending Domains, IP Addresses or SMTP Authentication, go to the
Æ Allowed Senders page.
Basic
Route Outbound Email to the Barracuda Spam Firewall
To take advantage of the spam and virus filtering features of the Barracuda
Spam Firewall, you must route outgoing email through the Barracuda. Configure
a relay server or smart host for Microsoft Exchange 200x:
1. Start Exchange System Manager.
2. Expand the Administrative Groups container.
3. Click the Administrative Group that you want to work with and expand it.
4. Expand the Routing Groups container.
5. Click the routing group that you want to work with, and expand it.
6. Click the Connectors container. Right-click the SMTP Connector container
and then click Properties.
7. On the General tab, choose Forward all mail through this connector to
the following smart hosts.
8. Put the IP address of the Barracuda Spam Firewall Outbound in square
brackets, for example: [10.0.0.1].
9. Click OK. This will relay all emails to the Barracuda Spam Firewall
Outbound.
Be sure to check out the Barracuda Networks Support Forum at:
http://forum.barracuda.com
helpful tips for setting up and using your Barracuda Spam Firewall. For
additional documentation including an Administrator’s Guide, visit
http://www.barracuda.com/documentation
for Frequently Asked Questions (FAQs) and other
.
 Loading...