


Version 3.x
Barracuda Spam Firewall Administrator’s Guide
Barracuda Networks Inc.
3175 S. Winchester Blvd
Campbell, CA 95008
http://www.barracuda.com

Copyright Notice
Copyright 2004-2008, Barracuda Networks
www.barracuda.com
v3.5-080801
All rights reserved. Use of this product and this manual is subject to license. Information in this document is subject to change without notice.
Trademarks
Barracuda Spam Firewall is a trademark of Barracuda Networks. All other brand and product names mentioned in this document are registered
trademarks or trademarks of their respective holders.
2 Spam Firewall Administrator’s Guide

Contents
Chapter 1 - Introduction . . . . . . . . . . . . . . . . . . . . . . . . . 9
Overview . . . . . . . . . . . . . . . . . . . . . . . . . . . . . . . . . . . . . . 10
Energize Updates Minimize Administration and Maximize Protection . . . . . 10
Understanding Spam Scoring . . . . . . . . . . . . . . . . . . . . . . . . 11
Inbound and Outbound Modes . . . . . . . . . . . . . . . . . . . . . . . . . 12
Technical Support . . . . . . . . . . . . . . . . . . . . . . . . . . . . . . . . 12
Warranty Policy . . . . . . . . . . . . . . . . . . . . . . . . . . . . . . . . . 12
Barracuda Spam Firewall Models. . . . . . . . . . . . . . . . . . . . . . . . . . 13
Chapter 2 - Getting Started . . . . . . . . . . . . . . . . . . . . . . 15
Initial Setup . . . . . . . . . . . . . . . . . . . . . . . . . . . . . . . . . . . . . 16
Checklist for Unpacking . . . . . . . . . . . . . . . . . . . . . . . . . . . . . 16
Required Equipment for Installation . . . . . . . . . . . . . . . . . . . . . . . 16
Install the Barracuda Spam Firewall. . . . . . . . . . . . . . . . . . . . . . . 16
Configure the System IP Address and Network Settings . . . . . . . . . . . . 17
Configure your Corporate Firewall . . . . . . . . . . . . . . . . . . . . . . . 17
Configure the Barracuda Spam Firewall . . . . . . . . . . . . . . . . . . . . 18
Set the Administrative Options . . . . . . . . . . . . . . . . . . . . . . . . . 19
Update the System Firmware . . . . . . . . . . . . . . . . . . . . . . . . . . 20
Verify your Subscription Status . . . . . . . . . . . . . . . . . . . . . . . . . 20
Route Incoming Email to the Barracuda Spam Firewall. . . . . . . . . . . . . 22
Port Forwarding . . . . . . . . . . . . . . . . . . . . . . . . . . . . . . . 22
MX Records . . . . . . . . . . . . . . . . . . . . . . . . . . . . . . . . . 22
Tune the Default Spam Settings. . . . . . . . . . . . . . . . . . . . . . . . . 22
Installation Examples . . . . . . . . . . . . . . . . . . . . . . . . . . . . . . . . 24
Barracuda Spam Firewall Behind Corporate Firewall . . . . . . . . . . . . . . 24
Barracuda Spam Firewall in the DMZ . . . . . . . . . . . . . . . . . . . . . . 25
Changing the Operating Mode to Outbound . . . . . . . . . . . . . . . . . . 26
Basic Configuration . . . . . . . . . . . . . . . . . . . . . . . . . . . . . 26
Setting up your Email Server as a Smart/Relay Host. . . . . . . . . . . . 27
Enable Smart Host . . . . . . . . . . . . . . . . . . . . . . . . . . . . . 27
Disable Smart Host . . . . . . . . . . . . . . . . . . . . . . . . . . . . . 27
Changing Outbound to Inbound Mode . . . . . . . . . . . . . . . . . . . . . 28
Basic Configuration . . . . . . . . . . . . . . . . . . . . . . . . . . . . . 28
Review the Administration Options . . . . . . . . . . . . . . . . . . . . . 28
Route Incoming and Outgoing Email to the Barracuda Spam Firewall . . . 29
Chapter 3 - Basic Tab . . . . . . . . . . . . . . . . . . . . . . . . . . 31
Status . . . . . . . . . . . . . . . . . . . . . . . . . . . . . . . . . . . . . . . . 32
Monitoring System Status . . . . . . . . . . . . . . . . . . . . . . . . . . . . 32
Using the Status page. . . . . . . . . . . . . . . . . . . . . . . . . . . . . . 32
Email Statistics . . . . . . . . . . . . . . . . . . . . . . . . . . . . . . . . . 32
Performance Statistics . . . . . . . . . . . . . . . . . . . . . . . . . . . . . 33
Subscription Status . . . . . . . . . . . . . . . . . . . . . . . . . . . . . . . 34
iii

Hourly and Daily Mail Statistics . . . . . . . . . . . . . . . . . . . . . . . . . 34
Understanding the Indicator Lights . . . . . . . . . . . . . . . . . . . . . . . 34
Message Log . . . . . . . . . . . . . . . . . . . . . . . . . . . . . . . . . . . . 35
Monitoring the Message Log . . . . . . . . . . . . . . . . . . . . . . . . . . 35
Legend . . . . . . . . . . . . . . . . . . . . . . . . . . . . . . . . . . . . . 36
Classifying Messages . . . . . . . . . . . . . . . . . . . . . . . . . . . . . . 36
Overview of the Message Log. . . . . . . . . . . . . . . . . . . . . . . . . . 37
Changing the Viewing Preferences of the Message Log . . . . . . . . . . . . 38
Viewing Message Details . . . . . . . . . . . . . . . . . . . . . . . . . . . . 38
Clearing the Message Log . . . . . . . . . . . . . . . . . . . . . . . . . . . 38
Spam Scoring. . . . . . . . . . . . . . . . . . . . . . . . . . . . . . . . . . . . 40
Configuring the Global Spam Scoring Limits . . . . . . . . . . . . . . . . . . 40
Specifying the Subject Text and Priority of Tagged Messages . . . . . . . . . 41
Changing Notifications to Senders . . . . . . . . . . . . . . . . . . . . . . . 41
Spam Bounce (NDR) Configuration. . . . . . . . . . . . . . . . . . . . . 41
Virus Checking . . . . . . . . . . . . . . . . . . . . . . . . . . . . . . . . . . . 42
Enabling and Disabling Virus Checking and Notification . . . . . . . . . . . . 42
Quarantine . . . . . . . . . . . . . . . . . . . . . . . . . . . . . . . . . . . . . 43
Setting Up Quarantine Policies . . . . . . . . . . . . . . . . . . . . . . . . . 43
Specifying the Quarantine Type . . . . . . . . . . . . . . . . . . . . . . . . . 43
Specifying the Global Quarantine Settings . . . . . . . . . . . . . . . . . . . 44
Specifying the Per-User Quarantine Settings . . . . . . . . . . . . . . . . . . 45
IP Configuration. . . . . . . . . . . . . . . . . . . . . . . . . . . . . . . . . . . 46
Configuring System IP Information . . . . . . . . . . . . . . . . . . . . . . . 46
Administration. . . . . . . . . . . . . . . . . . . . . . . . . . . . . . . . . . . . 48
Controlling Access to the Administration Interface . . . . . . . . . . . . . . . 48
Changing the Password of the Administration Account . . . . . . . . . . . . . 48
Limiting Access to the Administration Interface and API . . . . . . . . . . . . 49
Allowing the Message Body in the Message Log . . . . . . . . . . . . . . . . 49
Changing the Web Interface Port and Session Expiration Length . . . . . . . 49
Shutting Down the System . . . . . . . . . . . . . . . . . . . . . . . . . . . 50
Resetting the System Using the Front Panel . . . . . . . . . . . . . . . . . . 51
Automating the Delivery of System Alerts and Notifications . . . . . . . . . . 51
Changing the Operating Mode of the System . . . . . . . . . . . . . . . . . . 51
Bayesian / Intent . . . . . . . . . . . . . . . . . . . . . . . . . . . . . . . . . . 53
Enabling Users to Classify Messages from a Mail Client . . . . . . . . . . . . 53
Using the Microsoft Outlook and Lotus Notes Plug-in. . . . . . . . . . . . . . 54
Managing the Bayesian Database . . . . . . . . . . . . . . . . . . . . . . . 54
Resetting the Bayesian Database. . . . . . . . . . . . . . . . . . . . . . . . 54
Sending Spam Messages to Barracuda Networks . . . . . . . . . . . . . . . 55
Enabling Intent Analysis. . . . . . . . . . . . . . . . . . . . . . . . . . . . . 55
Reducing Backscatter . . . . . . . . . . . . . . . . . . . . . . . . . . . . . . 55
Additional Information . . . . . . . . . . . . . . . . . . . . . . . . . . . . . . 56
Chapter 4 - Using the Block and Accept Filters . . . . . . . 57
Subscribing to Blacklist Services . . . . . . . . . . . . . . . . . . . . . . . . 57
Blacklist Services Descriptions . . . . . . . . . . . . . . . . . . . . . . . . . 58
What Happens if your Domain or IP Address is on a Blacklist . . . . . . . . . 59
IP Address Filters . . . . . . . . . . . . . . . . . . . . . . . . . . . . . . . . 59
Sender Domain Filters . . . . . . . . . . . . . . . . . . . . . . . . . . . . . 60
Sender Email Address Filters . . . . . . . . . . . . . . . . . . . . . . . . . . 61
iv Barracuda Spam Firewall Administrator’s Guide

Recipient Email Address Filters . . . . . . . . . . . . . . . . . . . . . . . . . 61
Attachment Type Filters . . . . . . . . . . . . . . . . . . . . . . . . . . . . . 62
Subject Line Filters . . . . . . . . . . . . . . . . . . . . . . . . . . . . . . . 63
Body Filters . . . . . . . . . . . . . . . . . . . . . . . . . . . . . . . . . . . 64
Header Filters . . . . . . . . . . . . . . . . . . . . . . . . . . . . . . . . . . 64
Chapter 5 - Managing Accounts and Domains . . . . . . . . 67
How the Barracuda Spam Firewall Creates New Accounts . . . . . . . . . . . 67
Viewing User Accounts . . . . . . . . . . . . . . . . . . . . . . . . . . . . . 68
Using Filters to Locate Accounts . . . . . . . . . . . . . . . . . . . . . . . . 69
Editing User Accounts. . . . . . . . . . . . . . . . . . . . . . . . . . . . . . 69
Removing Invalid User Accounts . . . . . . . . . . . . . . . . . . . . . . . . 70
Assigning Features to User Accounts . . . . . . . . . . . . . . . . . . . . . . 70
Overriding the Quarantine Settings for Specific User Accounts. . . . . . . . . 71
Setting Retention Policies . . . . . . . . . . . . . . . . . . . . . . . . . . . . 72
Adding New Domains . . . . . . . . . . . . . . . . . . . . . . . . . . . . . . 73
Editing Domain Settings. . . . . . . . . . . . . . . . . . . . . . . . . . . . . 73
Chapter 6 - Managing Your Quarantine Inbox . . . . . . . . . 75
Receiving Messages from the Barracuda Spam Firewall . . . . . . . . . . . . 75
Greeting Message. . . . . . . . . . . . . . . . . . . . . . . . . . . . . . . . 75
Quarantine Summary Report . . . . . . . . . . . . . . . . . . . . . . . . . . 76
Using the Quarantine Interface . . . . . . . . . . . . . . . . . . . . . . . . . 76
Logging into the Quarantine Interface. . . . . . . . . . . . . . . . . . . . . . 77
Managing your Quarantine Inbox . . . . . . . . . . . . . . . . . . . . . . . . 77
Changing your User Preferences . . . . . . . . . . . . . . . . . . . . . . . . 78
Changing your Account Password . . . . . . . . . . . . . . . . . . . . . . . 78
Changing Your Quarantine Settings. . . . . . . . . . . . . . . . . . . . . . . 78
Enabling and Disabling Spam Scanning of your Email . . . . . . . . . . . . . 79
Adding Email Addresses and Domains to Your Whitelist and Blacklist . . . 80
Changing the Language of the Quarantine Interface . . . . . . . . . . . . 81
Chapter 7 - Configuring A Domain . . . . . . . . . . . . . . . . . 83
Domain Configuration . . . . . . . . . . . . . . . . . . . . . . . . . . . . . . 83
Chapter 8 - Setting Up LDAP . . . . . . . . . . . . . . . . . . . . . 85
Using LDAP to Authenticate Message Recipients . . . . . . . . . . . . . . . 85
Using LDAP for User Authentication . . . . . . . . . . . . . . . . . . . . . . 85
Impact of a Down LDAP Server . . . . . . . . . . . . . . . . . . . . . . . . . 88
Common LDAP Settings for Standard Mail Servers. . . . . . . . . . . . . . . 88
Chapter 9 - Advanced Administration . . . . . . . . . . . . . . 89
Email Protocol . . . . . . . . . . . . . . . . . . . . . . . . . . . . . . . . . . . 90
Modifying the Email Protocol Settings. . . . . . . . . . . . . . . . . . . . . . 90
Rate Control . . . . . . . . . . . . . . . . . . . . . . . . . . . . . . . . . . . . 92
v

Configuring Message Rate Control . . . . . . . . . . . . . . . . . . . . . . . 92
Explicit Users . . . . . . . . . . . . . . . . . . . . . . . . . . . . . . . . . . . . 93
Activating Individual Accounts. . . . . . . . . . . . . . . . . . . . . . . . . . 93
Backup . . . . . . . . . . . . . . . . . . . . . . . . . . . . . . . . . . . . . . . 94
Backing Up and Restoring System Configuration . . . . . . . . . . . . . . . . 94
Performing Desktop Backups . . . . . . . . . . . . . . . . . . . . . . . . . . 94
Automating Backups (inbound mode only) . . . . . . . . . . . . . . . . . . . 95
Restoring from a Backup File . . . . . . . . . . . . . . . . . . . . . . . . . . 96
Energize Updates. . . . . . . . . . . . . . . . . . . . . . . . . . . . . . . . . . 97
Updating Spam and Virus Definitions Using Energize Updates . . . . . . . . . 97
Spam Definition Updates . . . . . . . . . . . . . . . . . . . . . . . . . . . . 97
Virus Definition Updates. . . . . . . . . . . . . . . . . . . . . . . . . . . . . 97
Firmware Update . . . . . . . . . . . . . . . . . . . . . . . . . . . . . . . . . . 99
Updating the System Firmware Version. . . . . . . . . . . . . . . . . . . . . 99
Appearance . . . . . . . . . . . . . . . . . . . . . . . . . . . . . . . . . . . . 100
Customizing the Appearance of the Administration Interface . . . . . . . . . 100
Syslog. . . . . . . . . . . . . . . . . . . . . . . . . . . . . . . . . . . . . . . 101
Using a Syslog Server to Centrally Manage System Logs . . . . . . . . . . 101
Outbound / Relay . . . . . . . . . . . . . . . . . . . . . . . . . . . . . . . . . 102
Setting up Trusted Relays and SASL/SMTP Authentication . . . . . . . . . 102
Outbound Footer . . . . . . . . . . . . . . . . . . . . . . . . . . . . . . . . . 104
Customizing the Outbound Footer . . . . . . . . . . . . . . . . . . . . . . 104
Advanced IP Configuration . . . . . . . . . . . . . . . . . . . . . . . . . . . . 105
Configuring the Network Interfaces . . . . . . . . . . . . . . . . . . . . . . 105
Configuring Static Routes . . . . . . . . . . . . . . . . . . . . . . . . . . . 105
Clustering . . . . . . . . . . . . . . . . . . . . . . . . . . . . . . . . . . . . . 106
Setting Up Clustered and Standby Systems . . . . . . . . . . . . . . . . . 106
Cluster Set up Process . . . . . . . . . . . . . . . . . . . . . . . . . . . . 106
Data Propagated to the Clustered Systems. . . . . . . . . . . . . . . . . . 107
Field Descriptions for the Clustering Page . . . . . . . . . . . . . . . . . . 108
Impact of Changing the IP Address of a Clustered System . . . . . . . . . . 109
Single Sign-On . . . . . . . . . . . . . . . . . . . . . . . . . . . . . . . . . . .110
Implementing Single Sign-On . . . . . . . . . . . . . . . . . . . . . . . . . .110
SSL . . . . . . . . . . . . . . . . . . . . . . . . . . . . . . . . . . . . . . . . .112
Enabling SSL . . . . . . . . . . . . . . . . . . . . . . . . . . . . . . . . . .112
Regional Settings . . . . . . . . . . . . . . . . . . . . . . . . . . . . . . . . . .115
Detecting Spam in Chinese and Japanese Messages . . . . . . . . . . . . .115
Bounce / NDR Messages . . . . . . . . . . . . . . . . . . . . . . . . . . . . . .116
Customizing Non-Delivery Reports (NDRs) . . . . . . . . . . . . . . . . . . .116
Troubleshooting. . . . . . . . . . . . . . . . . . . . . . . . . . . . . . . . . . .118
Troubleshooting . . . . . . . . . . . . . . . . . . . . . . . . . . . . . . . . .118
Reporting . . . . . . . . . . . . . . . . . . . . . . . . . . . . . . . . . . . . . .119
Generating System Reports. . . . . . . . . . . . . . . . . . . . . . . . . . .119
Displaying and Emailing Reports . . . . . . . . . . . . . . . . . . . . . . . .119
Automating the Delivery of Daily System Reports . . . . . . . . . . . . . . .119
Specifying Report Properties . . . . . . . . . . . . . . . . . . . . . . . . . 120
Example Report . . . . . . . . . . . . . . . . . . . . . . . . . . . . . . . . 121
SMTP / TLS. . . . . . . . . . . . . . . . . . . . . . . . . . . . . . . . . . . . 122
Enabling SMTP over TLS/SSL . . . . . . . . . . . . . . . . . . . . . . . . 122
Task Manager . . . . . . . . . . . . . . . . . . . . . . . . . . . . . . . . . . . 123
Using the Task Manager to Monitor System Tasks . . . . . . . . . . . . . . 123
Recovery Console . . . . . . . . . . . . . . . . . . . . . . . . . . . . . . . . 124
vi Barracuda Spam Firewall Administrator’s Guide

Replacing a Failed System . . . . . . . . . . . . . . . . . . . . . . . . . . 124
Rebooting the System in Recovery Mode. . . . . . . . . . . . . . . . . . . 124
Tasks to Perform Before Rebooting in Recovery Mode . . . . . . . . . . . . 124
Performing a System Recovery or Hardware Test . . . . . . . . . . . . . . 125
Reboot Options . . . . . . . . . . . . . . . . . . . . . . . . . . . . . . . . 126
Chapter 10 - Outbound . . . . . . . . . . . . . . . . . . . . . . . . 127
Tabs and Pages Supporting Outbound Mode . . . . . . . . . . . . . . . . . 127
About Outbound Mode . . . . . . . . . . . . . . . . . . . . . . . . . . . . 128
Viewing Outbound Messages in the Message Log . . . . . . . . . . . . . . 129
Changing the Footers on Outbound Messages . . . . . . . . . . . . . . . . 129
Specifying Allowed Senders. . . . . . . . . . . . . . . . . . . . . . . . . . 130
Specifying Allowed Senders by Domain and IP Address . . . . . . . . . . . 130
Specifying Allowed Senders Using SMTP Authentication. . . . . . . . . . . 131
Additional Email Protocol Settings for Outbound Mode . . . . . . . . . . . . 131
Enabling Intent Analysis and Spam Scoring . . . . . . . . . . . . . . . . . 132
Managing the Quarantine Box . . . . . . . . . . . . . . . . . . . . . . . . 133
Sending NDRs for Quarantined Messages . . . . . . . . . . . . . . . . . . 133
Viewing and Classifying Quarantined Messages . . . . . . . . . . . . . . . 133
Using Filters to Locate Specific Messages . . . . . . . . . . . . . . . . . . 134
Configuring Message Rate Control . . . . . . . . . . . . . . . . . . . . . . 134
Adding a Relay Server . . . . . . . . . . . . . . . . . . . . . . . . . . . . 135
Setting Up Subject and Body Filtering . . . . . . . . . . . . . . . . . . . . 136
Appendix A - Regular Expressions . . . . . . . . . . . . . . . 137
Using Special Characters in Expressions . . . . . . . . . . . . . . . . . . . 138
Examples . . . . . . . . . . . . . . . . . . . . . . . . . . . . . . . . . . . 138
Appendix B - Limited Warranty and License. . . . . . . . . 141
Limited Warranty . . . . . . . . . . . . . . . . . . . . . . . . . . . . . . . 141
Exclusive Remedy. . . . . . . . . . . . . . . . . . . . . . . . . . . . . . . 141
Exclusions and Restrictions . . . . . . . . . . . . . . . . . . . . . . . . . . 142
Software License . . . . . . . . . . . . . . . . . . . . . . . . . . . . . . . 142
Energize Update Software License . . . . . . . . . . . . . . . . . . . . . . 143
Open Source Licensing . . . . . . . . . . . . . . . . . . . . . . . . . . . . 147
Appendix C - Compliance . . . . . . . . . . . . . . . . . . . . . . 153
Notice for the USA . . . . . . . . . . . . . . . . . . . . . . . . . . . . . . 153
Notice for Canada . . . . . . . . . . . . . . . . . . . . . . . . . . . . . . . 153
Notice for Europe (CE Mark) . . . . . . . . . . . . . . . . . . . . . . . . . 153
Index . . . . . . . . . . . . . . . . . . . . . . . . . . . . . . . . . . . . . 155
vii

viii Barracuda Spam Firewall Administrator’s Guide

Chapter 1
Introduction
This chapter provides an overview of the Barracuda Spam Firewall and includes the following topics:
Overview ............................................................................................ 10
Barracuda Spam Firewall Models..................................................... 13
Introduction 9

Overview
The Barracuda Spam Firewall is an integrated hardware and software solution that provides powerful
and scalable spam and virus-blocking capabilities that do not impede the performance of your email
servers. The system has no per-user license fee and can be scaled to support tens of thousands of active
email users.
Using the Web-based administration interface, you can configure up to twelve defense layers that
protect your users from spam and viruses. The twelve defense layers are:
• Denial of service and security protection
• Rate control
•IP Analysis
• Sender Authentication
• Recipient Verification
• Virus Scanning
• Site-specific policies
• Fingerprint Analysis
• Intention Analysis
• Image Analysis
• Bayesian Analysis
• Rule-based spam scoring
The following figure shows each of these defense layers in action
Figure 1.1:
Energize Updates Minimize Administration and Maximize Protection
To provide you with maximum protection against the latest types of spam and virus attacks,
Barracuda Networks maintains a powerful operations center called Barracuda Central. From this
center, engineers monitor the Internet for trends in spam and virus attacks and post updated definitions
to Barracuda Central. These updates are then automatically retrieved by your Barracuda Spam
Firewall using the Energize Updates.
10 Barracuda Spam Firewall Administrator’s Guide
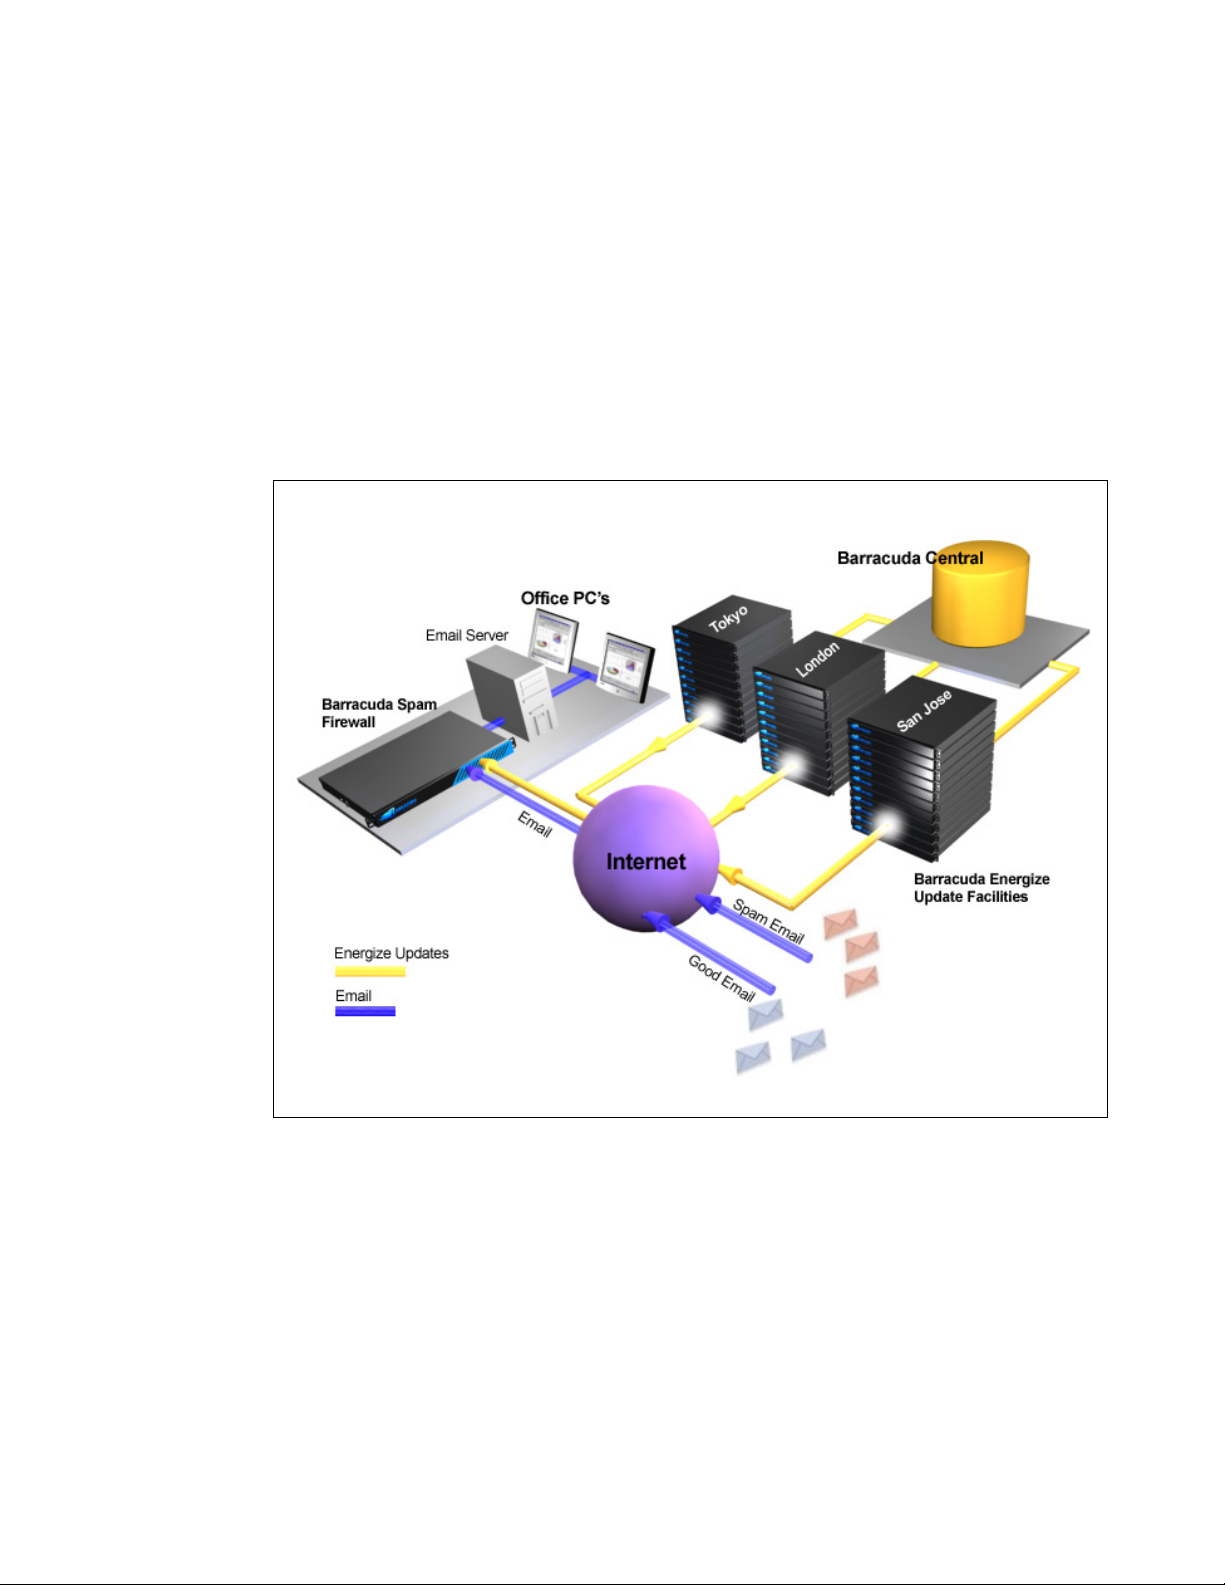
By identifying spam trends at an early stage, the team at Barracuda Central can quickly develop new
and improved blocking techniques and virus definitions that are quickly made available to your
Barracuda Spam Firewall.
Energize Updates provide your Barracuda Spam Firewall with the following benefits:
• Access to known offending IP addresses
• Known spam messages instantly blocked
• Known spam content blocked
• Virus definitions constantly updated
The following figure shows how Barracuda Central provides the latest spam and virus definitions
through Energize Updates.
Figure 1.2:
Understanding Spam Scoring
The Barracuda Spam Firewall scrutinizes all the characteristics of a message and uses a complex
system of scores to determine whether a message is spam. When an email reaches the spam scoring
filter, the Barracuda Spam Firewall assigns scores to all the properties of the message.
For example, the Barracuda Spam Firewall scrutinizes:
• A message’s header and subject line for offensive characters or words
• The percentage of HTML in the message
• Whether a message contains an “unsubscribe” link
Introduction 11

These properties (along with many others) help the Barracuda Spam Firewall determine the spam
score for a message that is displayed on the Message Log page of the administration interface.
Energize Updates keeps the spam rules and scores up-to-date so the Barracuda Spam Firewall can
quickly counteract the latest techniques used by spammers.
Inbound and Outbound Modes
The Barracuda Spam Firewall supports two operating modes:
• Inbound Mode (default) scans all incoming messages for viruses, custom policy, and spam
probability to ensure that all email delivered to your users is virus-free and legitimate. In
inbound mode, the Barracuda Spam Firewall also supports basic outbound mail scanning
through the "Outbound Relay" tab for companies who simply need to perform virus checking,
limited spam scanning capabilities, and appending of footers to outgoing mail. By default,
Barracuda Spam Firewalls are configured for inbound mode when shipped
• Outbound Mode offers more advanced capabilities that include custom outbound mail policy,
more comprehensive outbound spam scanning techniques, and outbound quarantine workflows
for postmasters or compliance officers to sideline mail that violates policy. More advanced
email applications may require deployment of separate Barracuda Spam Firewalls dedicated to
inbound and outbound mail scanning.
For information on how to configure your Barracuda Spam Firewall for outbound mode, refer to
Configuring your System for Outbound Mode on page 33. For information about the specific features
relating to outbound mode, refer to Chapter 10.
Technical Support
To contact Barracuda Networks Technical Support:
• By phone: call 1-408-342-5400, or if you are in the United States, (888) Anti-Spam, or (888)
268-4772
• By email: use support@barracuda.com
• Online: visit http://www.barracuda.com/support and click on the Support Case Creation link.
There is also a Barracuda Networks Support Forum available, where users can post and answer other
users’ questions. Register and log in at http://forum.barracuda.com.
Warranty Policy
The Barracuda Spam Firewall has a one (1) year warranty against manufacturing defects.
12 Barracuda Spam Firewall Administrator’s Guide
Barracuda Spam Firewall Models
The Barracuda Spam Firewall comes in a variety of models. Refer to the following table for the
capacity and features available on each model:
Table 1.1:
Feature
Active email users 1–500 300–1,000 1,000–
Domains 50 250 500 5,000 5,000 5,000
Quarantine Storage 10 GB 50 GB 100 GB 200 GB 250 GB
Compatible with all
email servers
Hardened and secure
OS
Spam blocking
Virus scanning
Outbound Email
Filtering
STARTTLS
encryption support
Per-user settings and
quarantine
Model
200
999999
999999
999999
999999
999999
999999
Model
300
Model
400
5,000
Model
600
3,000–
10,000
Model
800
8,000–
22,000
Model
900
15,000–
30,000
99999
MS Exchange/LDAP
Accelerator
Syslog support
SNMP/API
Per Domain Settings
Clustering
Redundant Disk Array
(RAID)
Per-user score
settings
Customizable
Branding
Hot Swap Redundant
Power Supply
99999
99999
9999
9999
9999
9
Hot Swap Hot Swap Hot Swap
999
999
Hot Swap Hot Swap
Introduction 13

14 Barracuda Spam Firewall Administrator’s Guide

Chapter 2
Note
Getting Started
This chapter covers:
Initial Setup ....................................................................................... 16
Installation Examples ........................................................................ 24
Operating Modes ............................................................................... 26
If you intend to use your Barracuda Spam Firewall to scan outgoing messages ONLY, or in addition
to incoming messages, refer to
Operating Modes on page 26 before you begin configuration.
Getting Started 15
Initial Setup
Warning
Note
Checklist for Unpacking
Thank you for purchasing the Barracuda Spam Firewall. Match the items on this list with the items in
the box.
If any item is missing or damaged, please contact your Barracuda Networks Sales representative.
• Barracuda Spam Firewall (check that
• AC power cord
• Ethernet cables
• Mounting rails (models 600, 800, and 900 only)
you have received the correct model)
Required Equipment for Installation
These are items that are needed for installing the Barracuda Spam Firewall:
•VGA monitor
• PS2 keyboard
Install the Barracuda Spam Firewall
To physically install the Barracuda Spam Firewall:
1. Fasten the Barracuda Spam Firewall to a standard 19-inch rack or other stable location.
Do not block the cooling vents located on the front and rear of the unit.
2. Connect a CAT5 Ethernet cable from your network switch to the Ethernet port on the back of
your Barracuda Spam Firewall.
The Barracuda Spam Firewall supports both 10BaseT and 100BaseT Ethernet. Barracuda
Net
works recommends using a 100BaseT connection for best performance.
The Barracuda Spam Firewall models 600 and higher support Gigabit Ethernet and has two usable
LAN ports. On these models, plug the Ethernet cable into the LAN 2 port.
Do not connect any other cables to the other connectors on the unit. These connectors are for
diagnostic purposes.
3. Connect the following to your Barracuda Spam Firewall:
16 Barracuda Spam Firewall Administrator’s Guide

•Power cord
•VGA monitor
• PS2 keyboard
After you connect the AC power cord the Barracuda Spam Firewall may power on for a few
seconds and then power off. This is standard behavior.
4. Press the Power button located on the front of the unit
The login prompt for the administrative console is displayed on the monitor, and the light on the
front of the system turns on. For a description of each indicator light, refer to
Indicator Lights on page 34.
APC UPS Support
An APC (American Power Conversion) UPS (Uninterruptible Power Supply) device with a USB
interface is supported with the Barracuda Spam Firewall. No configuration changes are needed on the
Barracuda Spam Firewall to use one. When the APC UPS device is on battery power, the Web-based
administration interface will display an alert, and the Barracuda Spam Firewall will shut down safely
when there is an estimated 3 minutes of battery power remaining.
Configure the System IP Address and Network Settings
Understanding the
The Barracuda Spam Firewall is given a default IP address of 192.168.200.200. You can change this
address by doing either of the following:
• Connect directly to the Barracuda Spam Firewall and specify a new IP address through the
console interface.
• Only on Barracuda Spam Firewall models 200, 300, 400, and 600: Push and hold the Reset
button on the front panel. Holding the
192.168.200.200. Holding the
192.168.1.200. Holding the
To connect directly to the Barracuda Spam Firewall to set a new IP address:
1. At the barracuda login prompt enter admin for the login and admin for the password. The
Reset button for 8 seconds changes the IP address to
Reset button for 12 seconds changes the IP address to 10.1.1.200.
User Confirmation Requested window will display the current IP configuration of the system.
2. Using the Tab key, select Yes to change the IP configuration.
3. Enter the new IP address, netmask, and default gateway for your Barracuda Spam Firewall, and
OK when finished.
select
4. Select No when prompted if you want to change the IP configuration. Upon exiting the screen,
the new IP address and network settings will be applied to the Barracuda Spam Firewall.
Configure your Corporate Firewall
Reset button for 5 seconds changes the IP address to
If your Barracuda Spam Firewall is located behind a corporate firewall, you need to open specific
ports to allow communication between the Barracuda Spam Firewall and remote servers.
Getting Started 17

To configure your corporate firewall:
1. Using the following table as a reference. Open the specified ports on your corporate firewall:
Table 2.1:
Port Direction Protocol Used for...
22 In TCP Remote diagnostics and technical
25 In/Out TCP SMTP
53 Out TCP/UDP Domain Name Server (DNS)
80 Out TCP Virus, firmware and spam rule
123 Out UDP NTP (Network Time Protocol)
2.
If appropriate, change the NAT routing of your corporate firewall to route incoming email to the Barracuda Spam Firewall. Consult your firewall documentation or your corporate firewall administrator to make the necessary changes.
Configure the Barracuda Spam Firewall
sup
port services (recommended)
updates
After specifying the IP address of the system and opening the necessary ports on your firewall, you
need to configure the Barracuda Spam Firewall from the administration interface. Make sure the
computer from which you configure the Barracuda Spam Firewall is connected to the same network,
and the appropriate routing is in place to allow connection to the Barracuda Spam Firewall’s IP
address from a Web browser.
To configure the Barracuda Spam Firewall:
1. From a Web browser, enter the IP address of the Barracuda Spam Firewall followed by port
8000.
Example: http://192.168.200.200:8000
2. Log in to the administration interface by entering admin for the username and admin for the
password.
3. Select Basic > IP Configuration and enter the required information.
The following table describes the fields you need to populate.
Table 2.2:
Fields Description
TCP/IP Configuration The IP address, subnet mask, an
Barracuda Spam Firewall.
TCP port is the port on which the Barracuda Spam Firewall
ceives inbound email. This is usually port 25.
re
d default gateway of your
18 Barracuda Spam Firewall Administrator’s Guide
Table 2.2:
Fields Description
Destination Mail Server TCP/IP
Configuration
DNS Configuration The primary and secondary DNS servers you use on your
Domain Configuration Default Hostname is the hostname to be used in the reply address
The hostname or IP address of your destination email server, for
example mail.yourdomain.com. This is the mail server that
receives email after it has been checked for spam and viruses.
You should specify your mail server’s hostname rather than its IP
address so the destination mail server can be moved and DNS
updated at any time without any changes to the Barracuda Spam
Firewall.
TCP port is the port on which the destination mail server receives
all SMTP traffic such as inbound email. This is usually port 25.
If you need to set up more than one domain or mail server, refer
to Adding New Domains on page 73.
network.
It is strongly recommended that you specify a primary and
secondary DNS server. Certain features of the Barracuda Spam
Firewall, such as a Fake Sender Domain detection, rely on DNS
availability.
for email messages (non-delivery receipts, virus alert
notifications, etc.) sent from the Barracuda Spam Firewall. The
hostname is appended to the default domain.
Default Domain is the domain name to be used in the reply
address for email messages (non-delivery receipts, virus alert
notifications, etc.) sent from the Barracuda Spam Firewall.
Allowed Email Recipients
Domain(s)
4. Click Save Changes.
The domains managed by the Barracuda Spam Firewall. Make
sure this list is complete. The Barracuda Spam Firewall rejects all
incoming messages addresses to domains not in this list.
To allow messages for all domains that match your mail server,
put an asterisk (*) in this field.
Note: One Barracuda Spam Firewall can support multiple
domains and mail servers. If you have multiple mail servers, go to
the DOMAINS tab and enter the mail server associated with each
domain.
If you changed the IP address of your Barracuda Spam Firewall, you are disconnected from the
administration interface and will need to log in again using the new IP address.
Set the Administrative Options
To set the Administrative Options:
1. Select Basic > Administration.
2. Assign a new administration password to the Barracuda Spam Firewall.
Getting Started 19
Set the local time zone. The time on the Barracuda Spam Firewall is automatically updated via
Note
Note
Note
3.
NTP (Network Time Protocol) which requires port 123 to be opened for outbound UDP traffic
on the firewall.
It is important that the time zone be set correctly because this information is used to determine the
delivery times for messages and may appear in certain mail reading programs
4. Click Save Changes.
.
Update the System Firmware
Prior to upgrading the firmware on your Barracuda Spam Firewall, it is always recommended that you
read the release notes.
To upgrade the firmware on the Barracuda Spam Firewall:
1. Select Advanced > Firmware Update.
ALWAYS read the release notes prior to downloading a new firmware version. Release notes
provide you with information on the latest features and fixes provided in the updated firmware
version. You can access the release notes from the
2. Click Download Now and then OK on the download duration window.
Advanced > Firmware Update.
Updating the firmware may take several minutes. Do not turn off the unit during this process. If
the
system has the latest firmware version downloaded, the
3. To see the download progress, click the Refresh button that appears next to the completion
percentage. Once the download has finished, that button will turn into an
The apply process takes several minutes to complete. It is important to not power-cycle the unit
during the download. Inbound and outbound traffic for mail continues when the update process is
complete.
4. Click Apply Now to activate the newly-downloaded firmware. This process will automatically
Download Now button is disabled.
Apply Now button.
reboot your system when completed, which can cause your Web interface to disconnect
momentarily. This is normal and expected behavior, so there is no need to perform a manual
reboot. The Web interface should come back up again within 5 minutes, at which point you will
need to log in again.
Verify your Subscription Status
When you install the Barracuda Spam Firewall, your Energize Updates and Instant Replacement
subscriptions are active. It is important you verify the subscription status so your Barracuda Spam
20 Barracuda Spam Firewall Administrator’s Guide
Firewall receives the latest virus and spam updates from Barracuda Central. The Energize Update
Click to activate your
subscription
Note
service is responsible for downloading these virus and spam definitions to your system.
To check your subscription status:
1. Select Basic > Status.
2. In the Subscription Status section, verify the word Current appears next to Energize Updates and
Replacement Service (if purchased).
The following graphic shows t
Figure 2.1:
he location of the Subscription Status section.
3. If the status of your subscription is Not Activated, do the following:
3a. Click the activate link as shown in the following example. This opens the product
activation page.
3b. On the product activation page, fill in the required fields and click Activate. A
confirmation page opens that displays the terms of your subscription.
3c. After a couple minutes, click Refresh in the Subscription Status section of the Basic >
Status page. The status of your subscriptions should now be displayed as Current.
If your subscription status does not change to Current, or if you have trouble filling out the product
activation page, call Barracuda Networks at 1-888-ANTISPAM and ask for a sales representative.
Getting Started 21

Route Incoming Email to the Barracuda Spam Firewall
Note
The next step in setting up your Barracuda Spam Firewall is to route incoming email to the system so
it can scan incoming messages for spam and viruses. You can use either of the following methods to
route messages to your Barracuda Spam Firewall:
• Port forw
arding is used when the Barracuda Spam Firewall is behind a corporate firewall
running NAT (Network Address Translation)
• MX r
ecords are used when your Barracuda Spam Firewall is located in a DMZ with a routable
public IP address
Do not try to route outgoing email through the Barracuda Spam Firewall unless you have
configured the Relay operation or are using the Barracuda Spam Firewall in outbound mode.
After you route incoming email to the Barracuda Spam Firewall, it will start filtering all emails it
receives and route the good email to your email server.
Port Forwarding
When your Barracuda Spam Firewall is behind a corporate firewall, you need to do a port redirection
(also called port forwarding) of incoming SMTP traffic (port 25) to the Barracuda Spam Firewall.
For more information about port forwarding, refer to your firewall documentation or administrator.
MX Records
If your Barracuda Spam Firewall is in the DMZ (not protected by your corporate firewall), do the
following to route incoming messages to the system:
1. Create a DNS entry for your Barracuda Spam Firewall.
The following example sh
ows a DNS entry for a Barracuda Spam Firewall with a name of
barracuda and an IP address of 66.233.233.88:
barracuda.yourdomain.com IN A 66.233.233.88
2. Change your DNS MX Records.
The following example
IN MX 10 barracuda.yourdomain.com
shows the associated MX record with a priority number of 10:
Tune the Default Spam Settings
After you install the Barracuda Spam Firewall, the system begins filtering incoming email based on
the default settings. For example, the unit automatically checks incoming email for viruses and uses
the Barracuda blacklist service to identify spam.
Initially, your Barracuda Spam Firewall is configured to tag most spam by adding the word “[BULK]”
to the subject line of messages. Once you have more experience with the Barracuda Spam Firewall
22 Barracuda Spam Firewall Administrator’s Guide
you can adjust how aggressively the system deals with spam. For example, you may decide to
quarantine spam instead of blocking it.
The following table describes the most common tasks you should perform when first tuning your
system.
Table 2.3: Tuning Tasks
Task Refer to
Monitor and Classify Incoming Emails Classifying Messages on page 36
Verify the Spam Scoring Defaults Configuring the Global Spam Scoring Limits on page 40
Set Up Quarantine (optional) Setting Up Quarantine Policies on page 43
Block Messages from Specific IP
Addresses, Domains or Email Accounts
Chapter 4 Using the Block and Accept Filters
Configuring Basic Scanning of Outgoing Mail (Hybrid mode)
The Barracuda Spam Firewall can be configured to fully process either incoming or outgoing email,
but a Barracuda Spam Firewall in inbound mode may also be configured to relay outgoing email
simultaneously. Outgoing email is scanned, but not as thoroughly as incoming email. The following
checks are performed on outgoing email when in hybrid mode: RBL, rate control, whitelist/blacklist,
virus scan, fingerprinting, and regular expressions that cause the email to be blocked.
Configuring the Barracuda Spam Firewall in this way will increase the load on the system. You may
find that you need to upgrade your system.
To configure your Barracuda Spam Firewall to perform virus checking and limited spam scanning on
outgoing mail, and/or append footers to outgoing mail, enable the “Outbound Relay” feature as
described in Setting up your Email Server as a Smart/Relay Host on page 27 and Setting up Trusted
Relays and SASL/SMTP Authentication on page 102. Outbound messages will not be tagged or
quarantined.
If you want to use this Barracuda Spam Firewall for checking only outgoing email, refer to
Configuring your System for Outbound Mode on page 33.
Getting Started 23
Installation Examples
This section provides example installation scenarios you can reference to help determine the best way
to integrate the Barracuda Spam Firewall into your network environment.
Barracuda Spam Firewall Behind Corporate Firewall
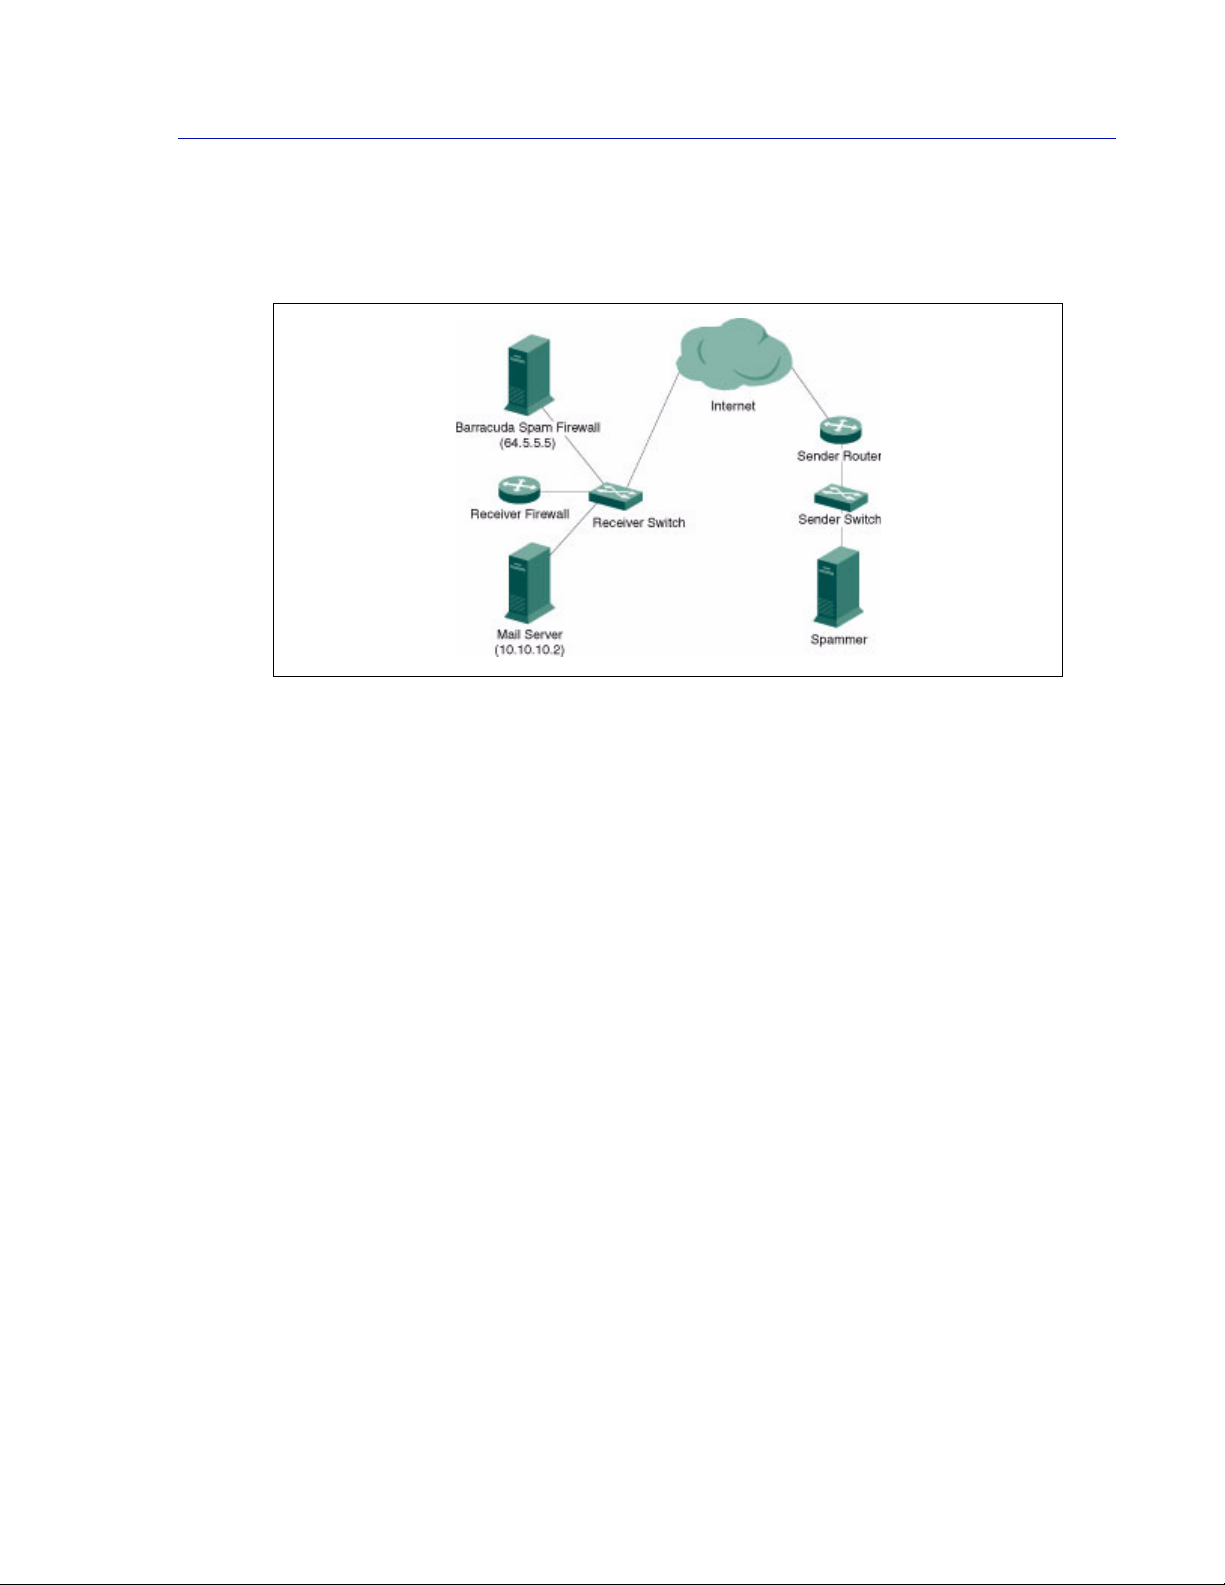
The figure below shows the Barracuda Spam Firewall behind your corporate firewall. In this example,
the Mail Server has an IP address of 10.10.10.2 and the Barracuda Spam Firewall has an IP address
of 10.10.10.3.
Figure 2.2:
In this type of setup, perform the following tasks:
• Forward (port redirection) incoming SMTP traffic on port 25 to the Barracuda Spam Firewall at
10.10.10.3.
• Configure the Barracuda Spam Firewall to forward filtered messages to the destination mail
server at 10.10.10.2.
There is no need to modify any MX records for this type of setup.
24 Barracuda Spam Firewall Administrator’s Guide
Barracuda Spam Firewall in the DMZ
The figure below shows the Barracuda Spam Firewall in front of your corporate firewall in the DMZ.
In this example, the Mail Server has an IP address of 10.10.10.2 and the Barracuda Spam Firewall has
a public IP address of 64.5.5.5.
Figure 2.3:
In this type of setup, perform the following tasks:
• Assign an available external IP address to the Barracuda Spam Firewall.
• Change the MX (Mail Exchange) records on the DNS (Domain Name Server) to direct traffic
towards the Barracuda Spam Firewall. Create an A record and MX record on your DNS for the
Barracuda.
The following example shows a DNS entry for a Barracuda Spam Firewall with a name of
barracuda and an IP address of 64.5.5.5.
barracuda.yourdomain.com IN A 64.5.5.5
The following example shows the associated MX record with a priority number of 10:
IN MX 10 barracuda.yourdomain.com
Getting Started 25

Operating Modes
The Barracuda Spam Firewall supports two operating modes:
• Inbound Mode (default) scans all incoming messages for viruses, custom policy, and spam
probability to ensure that all email delivered to your users is virus-free and legitimate. In
inbound mode, the Barracuda Spam Firewall also supports basic outbound mail scanning
through the "Outbound Relay" tab for companies who simply need to perform virus checking,
limited spam scanning capabilities, and appending of footers to outgoing mail. By default,
Barracuda Spam Firewalls are configured for inbound mode when shipped
• Outbound Mode offers more advanced capabilities that include custom outbound mail policy,
more comprehensive outbound spam scanning techniques, and outbound quarantine workflows
for postmasters or compliance officers to sideline mail that violates policy. More advanced
email applications may require deployment of separate Barracuda Spam Firewalls dedicated to
inbound and outbound mail scanning.
Changing the Operating Mode to Outbound
A Barracuda Spam Firewall can only be configured for one mode. If you choose to change the mode
from inbound to outbound, note the following:
• All your system message log data and quarantine messages are deleted.
• System configuration remains intact. However, you should verify that the configuration options
are appropriate for outbound mode.
To change the mode of your Barracuda Spam Firewall:
1. Select Basic > Administration.
2. In the Operating Mode section, click Convert.
3. Click OK to confirm you want to change the mode of your Barracuda Spam Firewall. A status
bar displays the progress of switching your Barracuda Spam Firewall to outbound mode. Once
the switchover is complete, your Barracuda Spam Firewall automatically reboots.
Basic Configuration
After the system reboots, log onto the Barracuda Spam Firewall and review the changes to the user
interface.
1. Select Basic > IP Configuration.
2. Verify the IP address, subnet mask, and default gateway of your Barracuda Spam Firewall in the
TCP/IP Configuration section. The TCP port is the port in which the Barracuda Spam Firewall
receives inbound email. The default is port 25.
3. Review the DNS servers in your network in the DNS Configuration section. Certain features of
the Barracuda Spam Firewall, such as a Fake Sender Domain detection, rely on DNS
availability.
4. Verify that the Hostname and Domain Name are correct in the Domain Configuration section.
This is the hostname used for email messages (non-delivery receipts, virus alerts notifications,
etc.) sent from the Barracuda Spam Firewall.
5. If you have made any changes to the configuration, click Save Changes.
26 Barracuda Spam Firewall Administrator’s Guide
Setting up your Email Server as a Smart/Relay Host
The last step in setting up your Barracuda Spam Firewall for outbound mode is to configure your
internal mail server to deliver all outgoing messages to the Barracuda Spam Firewall before those
messages are sent out. This is done by setting up your email server as a smart/relay host.
The following Web sites provide instructions on how to set up specific mail servers as a smart/relay
host. For additional information, consult your email server administrator and documentation.
Table 2.4: Email Server Types
E-mail Server Refer to...
Microsoft Exchange Server 200x http://support.microsoft.com/kb/265293
Novell Groupwise Server http://www.novell.com/documentation/gw55/index.html?pag
e=/documentation/gw55/gw55ia/data/a2zi22h.html
Lotus Domino Server http://www-
12.lotus.com/ldd/doc/domino_notes/Rnext/help6_admin.nsf/f
4b82fbb75e942a6852566ac0037f284/14cdfeaa188fa90a85
256c1d003955af?OpenDocument
Enable Smart Host
To enable Smart Host:
1. Connect to your internal Mail Server
2. Open the System Manager (usually located on the Desktop)
3. Select Admin Groups > First Admin Group > Servers > Cuda-Server > Protocols > SMTP
4. Right-click on the Default SMTP Connector and choose Properties
5. Click on the Delivery Tab
6. Click on the Advanced button
7. Enter the IP address of the Barracuda Spam Firewall in the Smart Host field surrounded by []
8. Click OK
9. Click OK again to exit
10. Repeat steps 3 through 8 for the remaining SMTP Connectors (ST1 - ST6)
Disable Smart Host
To disable Smart Host:
1. Connect to your internal Mail Server
2. Open the System Manager (usually located on the Desktop)
3. Select Admin Groups -> First Admin Group -> Servers -> Cuda-Server -> Protocols -> SMTP
4. Right-click on the Default SMTP Connector and choose Properties
5. Click on the Delivery Tab
6. Click on the Advanced button
7. Remove any contents found under Smart Host
8. Click on OK
9. Click on OK again to exit
Getting Started 27

10. Repeat steps 3 through 8 for the remaining SMTP Connectors (ST1 - ST6)
Changing Outbound to Inbound Mode
A Barracuda Spam Firewall can only be configured for one mode. When you change the mode from
Outbound-only back to Inbound, note the following:
• Your message log data and quarantine messages are deleted.
• The system configuration remains intact. However, you will need to verify that the configuration
options are appropriate for inbound mode.
If you wish to scan both inbound and outbound messages, then you can run your Barracuda Spam
Firewall in a hybrid mode, which is inbound mode with the “Outbound Relay” feature turned on. This
“basic outbound” mode will allow basic virus scanning only of all outgoing messages, in addition to
complete spam and virus scanning of all inbound messages.
To change the mode of your Barracuda Spam Firewall:
1. Select Basic > Administration.
2. In the Operating Mode section, click Convert.
3. Click OK to confirm you want to change the mode of your Barracuda Spam Firewall. A status
bar displays the progress of switching your Barracuda Spam Firewall to inbound mode. Once
the switchover is complete, your Barracuda Spam Firewall automatically reboots.
Basic Configuration
After the system reboots, log onto the Barracuda Spam Firewall and review the changes to the user
interface.
1. Select Basic > IP Configuration.
2. Verify the IP address, subnet mask, and default gateway of your Barracuda Spam Firewall in the
TCP/IP Configuration section. The TCP port is the port in which the Barracuda Spam Firewall
receives inbound email. The default is port 25.
3. Review the DNS servers in your network in the DNS Configuration section. Certain features of
the Barracuda Spam Firewall, such as a Fake Sender Domain detection, rely on DNS
availability.
4. Verify that the Hostname and Domain Name are correct in the Domain Configuration section.
This is the hostname used for email messages (non-delivery receipts, virus alerts notifications,
etc.) sent from the Barracuda Spam Firewall.
5. Make sure that the Allowed Email Recipients Domain lists all the domains managed by the
Barracuda Spam Firewall. The Barracuda Spam Firewall rejects all incoming message addresses
to domains not on the list.
6. If you make any changes to the configuration, click Save Changes.
Review the Administration Options
1. Select Basic > Administration.
2. Verify the options on this page and make necessary changes.
28 Barracuda Spam Firewall Administrator’s Guide

3. If you make any changes to the configuration, click Save Changes.
Setting up Basic Outbound
In order to make your Barracuda Spam Firewall perform virus checking and limited spam scanning,
and append footers to outgoing mail, configure inbound mode and enable the “Outbound Relay”
feature as described in Setting up your Email Server as a Smart/Relay Host on page 27 and Setting up
Trusted Relays and SASL/SMTP Authentication on page 102. Note that this mode will not tag or
quarantine any outbound messages.
Route Incoming and Outgoing Email to the Barracuda Spam Firewall
The final step in setting up a Barracuda Spam Firewall is to route both incoming and outgoing email
to the system so that it can scan incoming messages for spam and viruses. For more details, please
see Route Incoming Email to the Barracuda Spam Firewall on page 22.
Getting Started 29

30 Barracuda Spam Firewall Administrator’s Guide

Chapter 3
Basic Tab
This chapter covers basic administration tasks, all of which are performed from the BASIC tab.
Status.................................................................................................. 32
Message Log ...................................................................................... 35
Spam Scoring ..................................................................................... 40
Virus Checking................................................................................... 42
Quarantine ......................................................................................... 43
IP Configuration ................................................................................ 46
Administration ................................................................................... 48
Bayesian / Intent ................................................................................ 53
Basic Tab 31
Status
Monitoring System Status
Using the Status page
You can monitor the status of your Barracuda Spam Firewall by viewing the following:
• Basic > Status page in the administration interface
• Indicator lights on the front of the system
The Basic > Status page provides an overview of the health and performance of your Barracuda Spam
Firewall. From this page you can view:
• Email statistics that display how many messages the system has blocked, quarantined, and
tagged, and allowed
• Performance statistics
• Subscription status
• Mail statistics by hour and by day
Email Statistics
The following table describes the email statistics displayed on the Status page.
Table 3.1:
Statistic Description
Blocked Number of virus and spam messages blocked by the system.
Blocked: Virus Number of virus messages blocked by the system.
Quarantined Number of messages quarantined by the system. This includes
Allowed: Tagged Number of messages tagged by the system. Tagged messages
Allowed Number of messages delivered to the intended recipient without
Total Email statistics for the system since installation or the last reset.
messages sent to the global quarantine address and the number
of messages quarantined by users. By default, the system does
not quarantine messages. To turn on the quarantine feature, refer
to Setting Up Quarantine Policies on page 43.
have their subject line modified based on the settings on the
Spam Scoring page (described on page 40).
being blocked or modified.
Day Email statistics for the current calendar day (from midnight to
32 Barracuda Spam Firewall Administrator’s Guide
midnight).

Note
Table 3.1:
Statistic Description
Hour Email statistics beginning at the top of the current hour. For
example, if it is currently 10:45am, the statistics are for the time
period from 10:00am to 10:45am.
Performance Statistics
The following table describes the system environmental conditions displayed on the Status page.
Statistics displayed in red signify that the value exceeds the normal threshold.
Table 3.2:
Statistic Description
In/Out Queue Size Displayed as a ratio, such as 10/5. The first number represents the amount
of inbound mail, which includes accepted messages waiting for virus and
spam scanning. The second number represents the amount of outbound
mail in the queue.
Click on the inbound or outbound number to see a summary of the
messages currently in the queue.
Average Latency Average elapsed time it takes the system to tag, quarantine, or deliver a
message.
Last Message How long ago the last message was delivered
CPU Fan Speed The fan speed for the CPU
CPU Temperature The temperature of the CPU
Unique Recipients Number of unique recipients receiving email during the last 24 hours. This
number does not include recipients that were rejected
System Load Estimate of the CPU and disk load on the system
100% system load is not unusual, especially when the incoming queue is
large. However, 100% load for long periods of time could indicate an internal
system issue, especially if the incoming queue continues to grow
Redundancy (RAID) Status of the RAID system.
Note: The redundancy statistics do not appear for the 200 and 300 models.
Firmware Storage Amount of disk storage used for various system components
Mail/Log Storage Amount of disk storage used for messages and log storage
The firmware and mail/log storage shows the percent of space used on each partition. The Barracuda
Spam Firewall emails a system alert when utilization approaches 90% on either of these partitions.
Contact Barracuda Networks Technical Support if a partition reaches this threshold.
Basic Tab 33
Subscription Status
This section identifies if the following subscriptions are current or expired:
• Energize update
• Instant Replacement (optional service)
If one or both of these subscriptions has expired, contact your Barracuda Networks Sales
representative to renew your subscription.
Hourly and Daily Mail Statistics
Shows the number of messages blocked, quarantined, and allowed for the last 24 hours and 25 days.
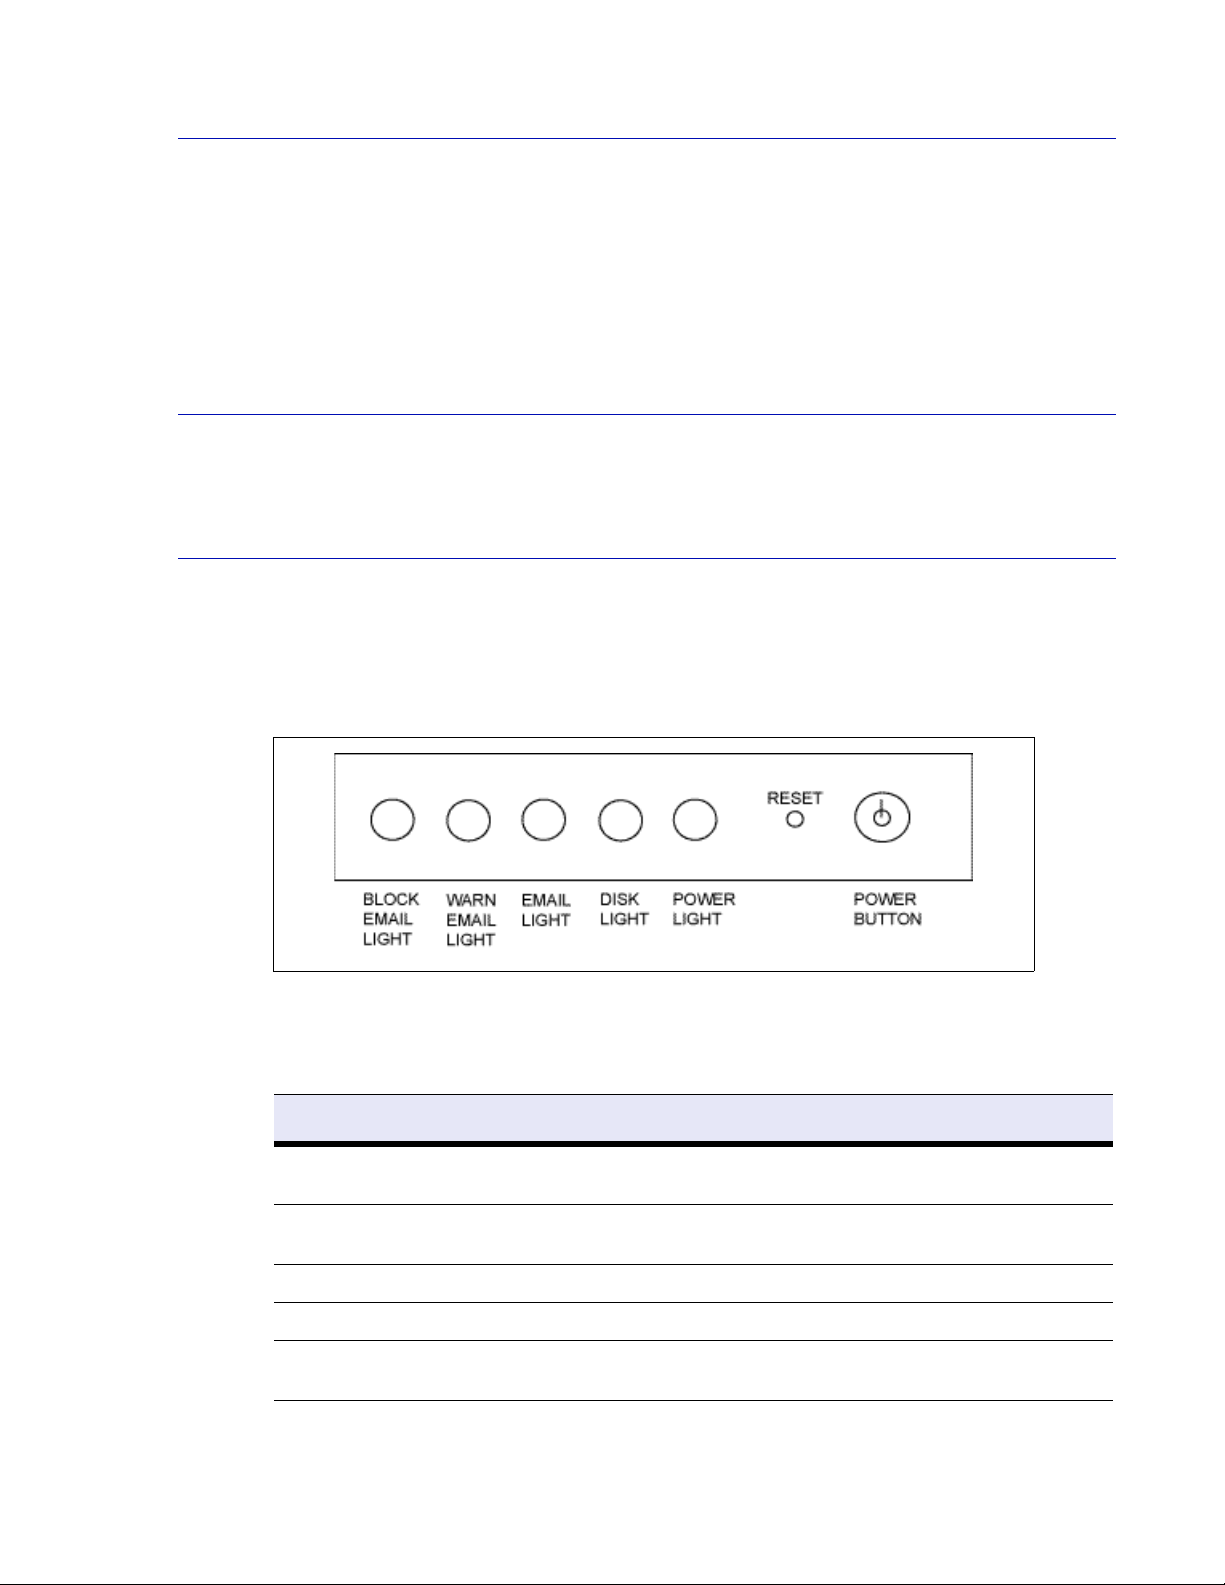
Understanding the Indicator Lights
The Barracuda Spam Firewall has five indicator lights on the front panel that blink when the system
processes email.
The following figure displays the location of each of the lights.
Figure 3.1:
The following table describes each indicator light.
Table 3.3:
Light Color Description
Block Email Red Blinks when email is blocked from either spam or virus
detection.
Warn Email Yellow Blinks for each email that is either tagged as spam or
quarantined.
Email Green Blinks when the unit receives email.
Disk Green Blinks during disk activity.
Power Green Displays a solid green light when the system is powered
34 Barracuda Spam Firewall Administrator’s Guide
on.

Message Log
1
2
3
4
The Message Log displays entries for each message processed by the Barracuda Spam Firewall. In
inbound mode, the Barracuda Spam Firewall may display multiple entries for received messages that
are addressed to multiple recipients.
Monitoring the Message Log
It is recommended that the incoming messages from the Message Log page be monitored on a regular
basis. Classify as many messages as you can as spam or not spam, and also add messages to the global
whitelist.
Classifying messages creates rules in the Bayesian database that determine how the Barracuda Spam
Firewall handles similar messages in the future.
The following figure identifies the main elements of the Message Log.
Figure 3.2:
Basic Tab 35

Legend
1. The timeline lets you select the time frame of the message log.
2. Preferences button lets you customize the message log display.
3. Classification buttons let you mark messages as spam and not spam and add senders to the
global whitelist.
4. List of all messages for the specified time frame. Click an entry to view the message details.
Classifying Messages
Classifying messages is one of the easiest ways to set up rules that determine how the Barracuda Spam
Firewall handles incoming messages. The following table describes the buttons to use when
classifying messages on the Message Log page.
Table 3.4:
Button Description
Spam Classifies the message as spam in the Bayesian database.
The Bayesian database becomes active once 200 spam messages and
200 not spam messages have been classified. At that time, the
Barracuda Spam Firewall begins scanning messages to determine how
closely they match the messages identified as spam. This comparison
determines a message’s spam score.
If per-user quarantine is enabled, message classification performed by
each individual user is also applied to the Bayesian database.
To view the number of messages currently classified as Spam, go to the
> Bayesian / Intent page.
Basic
Note: Note: Messages marked as Spam are sent to Barracuda
Networks for analysis unless the Submit Email to Barracuda Networks
field is set to No on the
Basic > Bayesian / Intent page covered on page 55.
Not Spam Classifies the message as Not Spam in the Bayesian database.
The Bayesian database becomes active once 200 spam messages and
200 not spam messages have been classified. At that time, the
Barracuda Spam Firewall begins scanning messages to determine how
closely they match the messages identified as not spam. This
comparison determines a message’s spam score.
If per-user quarantine is enabled, message classification performed by
each individual user is also applied to the Bayesian database.
To view the number of messages currently classified as Not Spam, go
to the Basic
> Bayesian / Intent page.
Whitelist Adds the sender of the message to the global whitelist. Messages from
36 Barracuda Spam Firewall Administrator’s Guide
whitelisted senders do not receive a spam score.
Messages from whitelisted senders still go through:
• Virus checking
• Attachment type filtering (covered on page lvi)

Table 3.4:
Button Description
Un-Whitelist Removes the sender of the message from the global whitelist.
Clear Message Log Clears all the logs that are currently displayed. This does not clear the
Bayesian database that contains the rules you have set up for incoming
messages.
Overview of the Message Log
The following table describes each column displayed in the message log table.
Table 3.5:
Column Description
Admin Spam
Classification
Sender Whitelisted Identifies if the sender is included in the global whitelist. All messages from
Time Received The date and time the Barracuda Spam Firewall received the email.
From / To The email address of the sender and receiver.
Subject The contents of the message subject line.
Action The action taken on the message.
Score The spam score of the message. This score can range from 0 (definitely not
Reason The reason for the action, such as the sender is on your blacklist or the
Identifies when a message has been classified as Spam or Not Spam. When
you mark a message as Spam or Not Spam using the buttons at the top of
the Message Log, that classification is shown in this column.
whitelisted senders are allowed unless a virus is detected or the message
contains an unallowed attachment type.
spam) to 10 or greater (definitely spam).
message has been identified as spam.
In some cases this column may show “Message Size” as the reason an email
is allowed. When this reason appears it means the Barracuda Spam Firewall
did not scan the message using the spam rules scoring engine because the
message exceeded a size limit. It is extremely rare for a spam message to
exceed this size limit and scanning large messages that have such a low
spam probability is an inefficient use of system resources.
Even though these large messages are exempted from the spam rules
scoring engine, they are always scanned for viruses.
Source IP The IP address or hostname of the sender.
Delivery Status The status of the message in the outbound queue if the message is being
delivered to the destination server.
Delivery Detail Details on the outbound status of the message.
ID Displays a unique identifier number for the message. This identifier number
can be used to locate a message.
Basic Tab 37

Changing the Viewing Preferences of the Message Log
To change the format of the message log, click Preferences on the right side of the page so you can:
• Hide columns you do not want displayed.
• Change the order of the columns so more important columns appear first.
• Increase or decrease the width of the columns.
• Change the number of messages displayed per page.
• Show messages from the local Barracuda Spam Firewall only (clustered environments).
The default behavior is for the message log to display messages from all the Barracuda Spam
Firewalls in your clustered environment. If
message log will not show messages received by other Barracuda Spam Firewalls in the cluster.
Showing only local messages allows the administrator to only view the messages that they can
classify, as opposed to messages from other systems in the cluster that the administrator cannot
classify because the administrator is not logged into those other systems.
Only view local messages is set to Yes, then the
Viewing Message Details
To view more information about a message on the Message Log page, click a message to display the
details window.
From the details window, click the following:
• View Message tab to view the contents of the message
• View Source tab to view the contents including email headers.
• Deliver link to send the message to the intended recipient.
Viewing the message body can help you identify words or characters that you may want to include in
body filtering. For example, if you notice a series of messages that advertise “as seen on TV” in the
body, you can add “as seen on” as keywords that will either block, quarantine or tag messages
containing those words. For more information on body filtering, refer to Body Filters on page lviii.
If you do not want the body of the email displayed for privacy reasons, you can select to hide the body
content using the
Message Log Privacy setting on the Basic > Administration page.
Clearing the Message Log
Clicking Clear Message Log clears all messages from the Message Log, but does not clear the
Bayesian database.
38 Barracuda Spam Firewall Administrator’s Guide

It may take 2 hours to 4 days to completely purge the messages from the system drive. During this
Note
time, disk usage may or may not drop at a noticeable rate.
DO NOT use this functionality to free space on the drive unless no further email is flowing in. In
many cases, email arrives faster than it is purged, thus negating the clearing of the Message Log
for space reasons. If drive space continues to be a problem, contact Barracuda Networks Technical
Support.
Basic Tab 39

Spam Scoring
Note
Configuring the Global Spam Scoring Limits
Once a message passes through the block/accept filters, it is then scored for spam probability. This
score ranges from 0 (definitely not spam) to 10 or higher (definitely spam).
Based on this score, the Barracuda Spam Firewall either tags, quarantines, blocks or allows the
message.
The following table describes the spam scoring settings on the
Basic > Spam Scoring page. A setting
of 10 for any setting disables that option.
On the Barracuda Spam Firewall 400 or above you can set the spam scoring values on a perdomain basis from the DOMAINS tab. For more information, refer to Editing Domain Settings on
page lxvii.
Table 3.6:
Setting Description
Tag score Messages with a score above this threshold, but below the quarantine
threshold, are delivered to the sender with the word [BULK] added to
the subject line.
You can change the default text added to the subject line by entering
w text in the Spam Tag Configuration section (discussed in the next
ne
section).
Any message with a score below the tag threshold is automatically
lowed. The default value is 3.5.
al
Quarantine score Messages with a score above this threshold, but below the block
Block score Messages with a score above this threshold are not delivered to the
40 Barracuda Spam Firewall Administrator’s Guide
threshold, are forwarded to the quarantine mailbox you specify. For
information on specifying the quarantine mailbox, refer to Specifying
the Global Quarantine Settings on
The default setting is 10 (quarantine disabled).
To enable quarantine, this setting must have a value lower than the
ock threshold. For more information, refer to Setting Up Quarantine
bl
Policies on pa
recip
ient and the Barracuda Spam Firewall sends a non-delivery
receipt (NDR/bounce message) to the sender. The default value is 7.
ge 43.
page 44.

Specifying the Subject Text and Priority of Tagged Messages
Note
Basic > Spam Scoring allows you enter the text that appears at the beginning of the subject line of
tagged messages. The default text is “[BULK]”.
The system tags a message when:
• The message’s spam score is over the tag threshold (but below the quarantine threshold).
• The block/accept filters identify a message that should be tagged. For information on setting up
the block/accept filters to tag messages, refer to
If Set Low Priority is set to Yes, any messages that are tagged or quarantined are marked as low
priority.
By default, the Barracuda Spam Firewall sends a notification to senders for any message that is
blocked from delivery to the recipient due to score or content. To turn off automatic notification, set
Send Bounce to No.
You can create rules in many mail clients to place tagged messages in a separate mail folder. For
example, when your users receive spam messages with a subject tag of [BULK], you can configure
their mail clients to deliver these messages to a folder called Possible Spam.
Chapter 5 Using the Block and Accept Filters.
Changing Notifications to Senders
Spam Bounce (NDR) Configuration
This option turns on or turns off notifications to senders when a message is blocked due to spam
scoring, or content filtering. This option should be set to
verified.
Yes until the configuration has been fully
Basic Tab 41

Virus Checking
Enabling and Disabling Virus Checking and Notification
Virus scanning is automatically enabled on the Barracuda Spam Firewall, and the system checks for
definition updates on a regular basis (hourly by default).
Use the
the following table. Click
Basic > Virus Checking to configure the virus checking and notification settings described in
Save Changes after making any modifications.
Table 3.7:
Setting Description
Virus Scanning Enabled When virus scanning is enabled, all messages are automatically
scanned for viruses. The Barracuda Spam Firewall always blocks
a message that contains a virus. The message is never
quarantined and is not delivered to the intended recipient even if
the sender has been whitelisted. It is recommended you keep
virus scanning enabled.
Note: On the Barracuda Spam Firewall 400 or above you can
enable and disable virus checking on a per-domain basis from
the DOMAINS tab. For more information, refer to Editing
Domain Settings on page lxvii.
Notify Sender of Virus Interception Determines whether the Barracuda Spam Firewall notifies the
sender that their email has been blocked because it contained a
virus.
You should keep this option set to No to prevent the Barracuda
Spam Firewall from sending mass email notification traffic in the
event of a widespread virus outbreak.
42 Barracuda Spam Firewall Administrator’s Guide

Quarantine
Note
Note
Setting Up Quarantine Policies
By default, the Barracuda Spam Firewall does not quarantine incoming messages, but you may want
to enable quarantine because it can provide additional security. Unlike tagged messages, quarantined
messages are not delivered to the intended recipients, thus minimizing the risk of a user opening an
infected message and spreading a virus throughout your network.
To set up quarantine policies on your system:
To enable quarantine on an outbound mode system, refer to Chapter 10 Outbound.
1. Enable quarantine using the Spam Scoring Limits on the Basic > Spam Scoring page. For more
2. Select Basic > Quarantine.
3. Select the quarantine type.
4. Click Save Changes.
information, refer to Configuring the Global Spam Scoring Limits o
For global quarantine type, enter the global quarantine delivery address, as described on
page 44.
For per-user quarantine type, co
page 45.
nfigure the per-user quarantine settings, as described on
n page 40.
Specifying the Quarantine Type
The Quarantine Type determines if the Barracuda Spam Firewall delivers a quarantined message to
the global Quarantine Delivery Address, or to a user’s quarantine inbox.
If you have a Barracuda Spam Firewall model 400 or above, you can specify the quarantine type
on a per-domain basis by going to the DOMAINS tab and clicking Edit Domains.
Basic Tab 43

The following table describes the differences between the two quarantine types:
Table 3.8: Quarantine Types
Quarantine Type
Per User
(not available on model
200)
Global Delivers all quarantined messages to a
Location of Quarantined
Messages
Stores quarantined messages in a
user’s quarantine inbox on the
Barracuda Spam Firewall.
The Barracuda Spam Firewall
automatically creates user accounts
with quarantine inboxes when this type
is selected.
global address you specify.
Specifying the Global Quarantine Settings
The following table describes the global quarantine configuration fields on the Basic > Quarantine
page.
Table 3.9:
Quarantine Responsibility
Each end manages their quarantined
messages from their own personal
quarantine inbox.
For information about the tasks a user
can perform from their quarantine
interface, refer to Chapter 7 Using the
Quarantine Interface.
The Barracuda Spam Firewall
administrator manages quarantined
messages from the global quarantine
location.
Field Description
Quarantine Delivery Address The mailbox to which all quarantined messages should be delivered.
This mailbox can either be on the mail server that the Barracuda
Spam Firewall protects (i.e. yourname@yourdomain.com) or a
remote mail server.
Note: If you have a Barracuda Spam Firewall model 400 or above,
you can specify the quarantine delivery address on a per-domain
basis by going to the DOMAINS tab and clicking the Edit Domains
link.
Quarantine Subject Text Enter the text you want placed at the beginning of the subject line of
a quarantined message. The default text is [SPAM].
This allows you to identify quarantined messages when you have
them delivered to a mailbox that also receives non-quarantine
messages.
44 Barracuda Spam Firewall Administrator’s Guide

Specifying the Per-User Quarantine Settings
The following table describes the Per-User Quarantine Configuration settings on the Basic >
Quarantine page. This section does not appear on the Barracuda Spam Firewall 200.
Table 3.10:
Setting Description
Quarantine Reply-To Address The from address that appears in all correspondence sent to users
about their Per User quarantine area. If a user replies to this
correspondence, the reply is sent to this address.
Quarantine Host The IP address or hostname that will be sent to users in all
quarantine correspondence so they can access their quarantine
inbox.
Leave this field blank to use the Barracuda Spam Firewall as the
quarantine host.
If your users need to access a server with an external IP address
and the Barracuda Spam Firewall is not configured with one, you
need to select another server as the quarantine host and enter that
server’s external address in this field.
New User Quarantine State The default state that quarantine accounts are created with.
If set to Enabled, all new accounts will have per-user quarantine
functionality.
If set to Disabled, users do not receive messages in their quarantine
inbox. Instead, messages are delivered to that user’s general inbox
tagged with the Quarantine Subject Text in the subject line.
To enable some users with per-user quarantine functionality (but
have this functionality disabled for all others), set this field to
Disabled and follow the instructions in Configuring System IP
Information on page 46.
Link Domains Determines whether different domains share the same per-user
preferences and quarantine inbox.
If set to Enabled, the same per-user preferences and quarantine
inbox is used for all email addresses with the same name, but
different domains. For example, with domain linking enabled,
someuser@yourdomain.com, someuser@yourdomain.net, and
someuser@corp.yourdomain.com will all share the same
preferences and quarantine inbox.
Note the following about this feature:
• Link Domains is a global setting. You cannot activate domain
linking for only certain domains or certain users.
• This feature does not work for email addresses that have the same
domain, but a different handle. For example,
someuser@yourdomain.com cannot be linked to
s.user@yourdomain.com.
Notification Interval The interval at which the Barracuda Spam Firewall notifies users
about messages in their quarantine.
Notification Start Time The time of day (in hh:mm format) that the Barracuda Spam Firewall
sends the quarantine reports. Changes to this setting take effect the
next day.
Basic Tab 45

IP Configuration
Configuring System IP Information
Basic > IP Configuration contains the network and mail server configuration for your Barracuda
Spam Firewall.
The following table describes each of the sections on this page.
Tab le 3 .11 :
Test Configuration
(inbound mode only)
TCP/IP Configuration The IP address, subnet mask, and default gateway of the Barracuda Spam
Destination Mail Server
TCP/IP Configuration
(inbound mode only)
Click Begin Test to verify that the IP information you entered for your
Barracuda Spam Firewall is correct. A status report displays the results of
the tests.
Firewall.
TCP port is the port on which the Barracuda Spam Firewall receives
inbound email. This is usually port 25.
Note: If your Barracuda Spam Firewall is running firmware version 3.1.x or
earlier and is part of a clustered environment, then changing the IP address
of the system removes it from the cluster. You will need to add the system
back into the cluster after you change the IP address. If your Barracuda
Spam Firewall is running firmware version 3.2.x or above, the system
remains part of its cluster after its IP address changes.
Server Name/IP: The hostname or IP address of your destination email
server, for example mail.yourdomain.com. This is the mail server that
receives email after it has been checked for spam and viruses.
You should specify your mail server’s hostname rather than its IP address
so the destination mail server can be moved and DNS updated at any time
without any changes to the Barracuda Spam Firewall.
TCP port is the port on which the destination mail server receives inbound
email. This is usually port 25.
Valid Test Email Address: To test that the Barracuda Spam Firewall can
successfully send email messages, enter an address in this field and click
Test SMTP Connection. The system sends a message to the email
address you specify. The From address in this email is
smtptest@barracudanetworks.com.
DNS Configuration The primary and secondary DNS servers you use on your network.
You should specify a primary and secondary DNS Server. Certain features
of the Barracuda Spam Firewall, such as Fake Sender Domain detection,
rely on DNS availability.
46 Barracuda Spam Firewall Administrator’s Guide

Tab le 3 .11 :
Proxy Server
Configuration (optional)
(inbound mode only)
Domain Configuration Default Hostname is the hostname to be used in the reply address for
Allowed Email Recipients
Domain(s)
(inbound mode only)
If your Barracuda Spam Firewall is behind a proxy server, then you may
need to enter one or more of the following parameters so the system can
download Firmware and Energize Updates. Incorrect proxy settings can
cause your updates to fail.
• Server Name/IP - The IP address or hostname of the proxy server.
• TCP Port - The port (usually 8080) used for proxy client authentication.
• Username - The proxy username (if any) assigned to your Barracuda
Spam Firewall.
• Password - The proxy password (if any) assigned to your Barracuda
Spam Firewall.
email messages (non-delivery receipts, virus alert notifications, etc.) sent
from the Barracuda Spam Firewall. The hostname is appended to the
default domain.
Default Domain is the domain name used in the reply address for email
messages (non-delivery receipts, virus alert notifications, etc.) sent from the
Barracuda Spam Firewall.
Lists the domains managed by the Barracuda Spam Firewall. Make sure
this list is complete. The Barracuda Spam Firewall rejects messages for
domains that are not listed here.
To allow messages for all domains that match your mail server, put an
asterisk (*) in this field.
Note: One Barracuda Spam Firewall can support multiple domains and mail
servers. If you have multiple mail servers, go to the DOMAINS tab and click
the Edit Domains link to set up a different mail server for each domain.
Basic Tab 47

Administration
Controlling Access to the Administration Interface
This section covers the following tasks you can perform from the Basic > Administration page:
• Changing the Password of the Administration Account.
• Changing the time timezone.
• Changing the default language for the Web GUI.
• Limiting Access to the Administration Interface and API/SNMP.
• Changing the Web Interface Port and Sessions Expiration Length.
• Changing the Message Log privacy so that the message body can or cannot be displayed.
• Changing the email address to receive system alerts and notifications.
• Converting the operating mode from inbound to outbound.
• Resetting and shutting down the system.
Changing the Password of the Administration Account
The Administration page lets you change the password used to access the administration interface by
entering the information requested and clicking
Save Password.
Changing the Time Zone and Default Language
The Time section displays the current local time on the Barracuda Spam Firewall. To change the
timezone used by the Barracuda Spam Firewall, select the desired timezone from the pulldown in the
Time section, and click
You can change the language of the Web interface by selecting the desired language from the dropdown menu in the upper right corner of the window. Supported languages include Chinese, Japanese,
Spanish, French, and others. The language you select here is applied only to your particular browser
session. No other user’s interface is affected.
To change the default language used for reports and other emails from the Barracuda Spam Firewall
such as the New User Quarantine notifications, select the desired language from the pulldown in the
Default Barracuda Locale section and click
enabled on your Barracuda Spam Firewall, then this will also be the language used in all Quarantine
Summary emails unless changed from the
account.
Save Changes. All timezones are identified by their TZ zone name.
Save Changes. If you have User Quarantine accounts
Preferences > Quarantine Settings page for a particular
48 Barracuda Spam Firewall Administrator’s Guide
Limiting Access to the Administration Interface and API
Basic > Administration allows you limit the IP addresses that can access the administration interface
and API, and establish an SNMP connection to the system. The following table describes these
options:
Table 3.12: Administration Interface and API
Field Description
Administrator IP/Range The range of IP addresses from which users can access the
administration interface. Users attempting to log in to the
administration interface from an unallowed IP address receive an
invalid login error.
Allowed SNMP and API
IP/Range
(inbound mode only)
Password The password required for API access.
The range of IP addresses from which users can change
configuration information through the Barracuda API, or access
SNMP on the Barracuda Spam Firewall.
For more information regarding the API, refer to the documentation
on Barracuda Networks Web site under Support -->Documentation.
Additional information:
• To add an individual IP address (instead of an entire network), use a netmask of
255.255.255.255.
• If you do not specify any IP addresses or networks, all systems are granted access.
Changing the Web Interface Port and Session Expiration Length
The following table describes the settings in the Web Interface HTTP Port section on the
Basic > Administration page.
Table 3.13: Web Interface Port and Session Expiration Length
Field Description
Web Interface HTTP Port The port used to access the administration interface from your Web
browser (default is HTTP port 80). Once this value is changed, you will be
automatically logged out, and you will have to manually change the URL
in your Web browser to utilize the new port number in order to re-connect.
Session Expiration Length The length of time users can be logged into the administration interface
before being automatically logged off (default is 60 minutes).
Allowing the Message Body in the Message Log
You can allow the message body to be shown in the Message Log. The recommended setting for the
Message Log Privacy option is
Yes.
Basic Tab 49

Changing the Web Interface Port and Session Expiration Length
Caution
The following table describes the settings in the Web Interface HTTP Port section on the
Basic > Administration page.
Table 3.14: Web Interface Port and Session Expiration Length
Field Description
Web Interface HTTP Port The port used to access the administration interface from your Web
browser (default is HTTP port 80). Once this value is changed, you will be
automatically logged out, and you will have to manually change the URL
in your Web browser to utilize the new port number in order to re-connect.
Session Expiration Length The length of time users can be logged into the administration interface
before being automatically logged off (default is 60 minutes).
Outbound SMTP Host (SmartHost)
If you have a specific mail server through which you wish to route all alerts and notices from the
Barracuda Spam Firewall itself, enter it here. This can be your normal outbound SMTP host or, if
you have a Microsoft Exchange Server, enter your SmartHost. If your SmartHost accepts SMTP
connections on a different port, you can define this in the format: hostname:port.
Shutting Down the System
The System Reload/Shutdown section on the Basic > Administration page lets you set the operational
status of the Barracuda Spam Firewall.
Shutting down, restarting, or reloading the system can cause interruptions in email delivery.
The following table describes each of these options.
Table 3.15:
Button Description
Shutdown Shuts down and powers off the system.
Restart Reboots the system.
Offline Puts the unit into online/offline mode. A unit in offline (Maintainance)
mode will stop accepting incoming mail until it is put back online.
Reload Re-applies the system configuration in the event that the recent
changes have not taken effect.
50 Barracuda Spam Firewall Administrator’s Guide
Caution
Table 3.15:
Button Description
Requeue Requeues all waiting outbound messages.
Resetting the System Using the Front Panel
Pressing the Reset button located on the front panel of the Barracuda Spam Firewall does the
following:
• Reboots the system
• Resets the firmware version to the factory-installed version
Do not push and hold Reset for longer than a few seconds as this changes the IP address of the system.
Pushing and hold
button for 12 seconds changes the IP address to 10.1.1.200.
Shutting down, resetting, or reloading the system can cause interruptions in email delivery.
Reset for 8 seconds changes the default IP address to 192.168.1.200. Holding the
Automating the Delivery of System Alerts and Notifications
The Basic > Administration page lets you configure the Barracuda Spam Firewall to automatically
email daily system status reports and system alerts to the email addresses you specify.
Enter the email addresses (comma separated) in the provided field and click
system status reports are sent out nightly and the system alerts on an as-needed basis.
The daily system status report shows the number of messages blocked, quarantined, tagged and
allowed for each hour of that day.
Save Changes. The daily
Changing the Operating Mode of the System
A Barracuda Spam Firewall can only be configured for one operating mode, inbound or outbound. If
you choose to change the mode from inbound to outbound (or vice versa), note the following:
• All your message log data and quarantine messages are deleted.
• System configuration remains intact. However, you should verify that the configuration options
are appropriate for the new mode.
If you wish to scan both inbound and outbound messages, then you can run your Barracuda Spam
Firewall in a hybrid mode, which is inbound mode with the “Outbound Relay” feature turned on. This
“basic outbound” mode will allow basic virus scanning only of all outgoing messages, in addition to
complete spam and virus scanning of all inbound messages.
To change the mode of your Barracuda Spam Firewall:
1. Select Basic > Administration.
Basic Tab 51

2. In the Operating Mode section, click Convert.
3. Click OK to confirm you want to change the mode of your Barracuda Spam Firewall.
A status bar displays the progress of switching your Barracuda Spam Firewall to outbound
mode. Once the switchover completes, your Barracuda Spam Firewall automatically reboots.
4. Verify the configuration options for this Barracuda Spam Firewall.
52 Barracuda Spam Firewall Administrator’s Guide

Bayesian / Intent
Enabling Users to Classify Messages from a Mail Client
• The Barracuda Spam Firewall provides access to a mail client plug-in that lets end users mark
messages as spam and not spam directly from their Microsoft Outlook or Lotus Notes client. In
addition, the plug-in also automatically creates and maintains a personalized whitelist based on
the user’s behavior.
• The whitelist generated by the plug-in and the classifications made by the user only affect that
’s individual Bayesian database and not the global Bayesian database. Changes to the global
user
Bayesian database can only be accomplished by the administrator on the
page.
• This feature is not available on the Barracuda Spam Firewall 200.
To make the Microsoft Outlook or Lotus Notes client plug-in available to your users:
1. From the Bayesian/Intent page, set the Allow Users to Download Plugins field to Yes.
2. If you’re enabling the Outlook plug-in, select the Outlook plug-in version you want your users
to download.
Table 3.16:
Basic > Message Log
Outlook Plug-In Description
Version 1 Allows users to classify messages as spam and not spam from their
Microsoft Outlook client.
Version 2 Contains all the functionality of version 1 and adds the automatic
whi
telist feature. This feature automatically adds email addresses to the
user’s individual whitelist based on the user’s behavior.
The Outlook plug-in version 2 automatically whitelists the following:
• The recipient address within each message sent by the user after the
new Outlook plug-in is installed. This only applies to messages sent
outside of the local mail server.
• The sender’s email address for messages that the user classifies as
“not spam”.
• Any email address the user adds to their Contact list in Outlook.
Click Save Changes.
3.
A link to the mail plug-i
n appears below the Login button of the Web interface login page so
users can download the plug-in, as shown in the following example:
Basic Tab 53

Figure 3.3:
Using the Microsoft Outlook and Lotus Notes Plug-in
After downloading and installing the plug-in, users can begin classifying messages using these
buttons in their Microsoft Outlook or Lotus Notes client: . The first (green) button marks
messages as not spam and the second (red) button marks messages as spam.
Version 2 of the Outlook Plug-in is configured to automatically:
• Whitelist email addresses associated with sent
• Move spam-declared messages to the Deleted Ite
• Whitelist the 'From:' email address wi
An individual can change the default behavior of the Outlook plug-in by going to the Tools menu in
their Outlook client and selecting Options | Spam Firewall tab.
Managing the Bayesian Database
Basic > Bayesian / Intent allows you to manage the Bayesian database by performing the tasks
described in this section.
Resetting the Bayesian Database
The Bayesian/Intent page lets you reset the Bayesian database, which contains all the rules you have
configured from the Message Log page, such as the messages you consider to be spam and not spam.
The Bayes database significantly improves the spam identification process.
messages and new contacts
ms folder in the user’s Outlook client
thin 'Not-Spam'-declared messages.
If you want to reset the Bayesian database and purge the rules you have configured, click
54 Barracuda Spam Firewall Administrator’s Guide
Reset.

Sending Spam Messages to Barracuda Networks
• When you classify messages as spam in the Message Log, the Barracuda Spam Firewall sends a
copy of the spam message to Barracuda Networks for further analysis. This allows Barracuda
Networks to improve the spam definitions and intent analysis provided in the Energize Updates.
• To configure the system to not send spam messages to Barracuda Networks, go to the
Basic > Bayesian/Intent page and set the Submit Email to Barracuda Networks field to No.
Enabling Intent Analysis
Intention Analysis attempts to match URLs in a message against a database of URLs known for
sending spam. By enabling intent analysis you can block messages that contain such URLs and
significantly reduce the amount of spam received by your users.
Table 3.17:
Field Description
Intent Analysis Whether messages that contain offending URLs should be tagged,
quarantined, or blocked. Selecting to tag or quarantine a message may
result in reduced system performance because the Barracuda Spam
Firewall will continue to process the message in an attempt to filter
possible spam using stricter rules.
To disable intent analysis, select Off (not recommended).
Multi-Level Intent Analysis Allow Intent Analysis to follow suspect URLs.
Realtime Intent Analysis In addition to using the database of URLs that the Barracuda Spam
URL Exemptions Exemptions can be made for specific URLs from Intention Analysis. Any
Reducing Backscatter
By default, your Barracuda Spam Firewall is configured to send a bounce notification (also known as
a non-delivery report) to a sender when the Barracuda Spam Firewall blocks their email.This is done
to alert legitimate senders that their message has not been delivered to the recipient. However, if the
email came from an illegitimate source like a spammer then sending a bounce notification is not
necessary. Sending bounce messages to illegitimate senders is known as backscatter.
Backscatter can increase the load on your Barracuda Spam Firewall and may generate a lot of email
to fake addresses.
Firewall receives from the Energize Updates on an hourly basis, your
system can also communicate with Barracuda Central in real time to
check against the latest lists and block even the newest spam.
Note: Turning this option on can cause a slight increase in mail scanning
time as network (DNS) lookups will need to be performed.
messages containing the exempted URLs will still be scanned, but the
messages will not be blocked, quarantined or tagged.
If your Barracuda Spam Firewall rarely blocks a legitimate email, consider turning off bounce
notification to reduce backscatter.
Basic Tab 55

To turn off notifications:
1. Turn off virus notification:
1a. On the Basic > Virus Checking page, set the two Virus Notification settings to No. 1b. Click Save Changes.
2. Turn off bounce notifications:
2a. On the Basic > Spam Scoring page, set the Send Bounce field to No. 2b. Click Save Changes.
3. Turn off attachment notifications:
3a. On the Block/Accept > Attachment Filtering page, set the Block Notification fields to
No.
3b. Click Save Changes.
Additional Information
Additional information on how to make the best use of your Bayesian database can be found on the
Documentation section of the Barracuda Networks website.
http://www.barracuda.com/documentation.
56 Barracuda Spam Firewall Administrator’s Guide

Chapter 4
Using the Block and Accept Filters
The Block/Accept tab provides a wide range of filters that enhance the default spam and virus
detection capabilities of the Barracuda Spam Firewall. These filters support the use of regular
expressions. For more information on using regular expressions, refer to Appendix A Regular
Expressions.
This chapter covers the following filters you can apply from the
Subscribing to Blacklist Services....................................................... 57
Blacklist Services Descriptions..........................................................58
What Happens if your Domain or IP Address is on a Blacklist........ 59
IP Address Filters .............................................................................. 59
Sender Domain Filters....................................................................... 60
Sender Email Address Filters ............................................................ 61
Recipient Email Address Filters ........................................................61
Subscribing to Blacklist Services
The External Blacklist page (inbound mode only) lets you subscribe to various blacklist services.
External blacklists, sometimes called DNSBLs or RBLs, are lists of Internet addresses from which
potential spam originates. The Barracuda Spam Firewall uses these lists to verify the authenticity of
the messages you receive. If the system receives a message from a sender on a blacklist, the message
is either blocked, quarantined or tagged depending on the blacklist settings.
By default, the Barracuda Spam Firewall uses the Barracuda blacklist service and the spamhaus.org
external blacklist service.
Blacklists can generate false-positives (legitimate messages that are blocked). However, because the
Barracuda Spam Firewall sends notifications when it rejects such messages, the sender will be
notified and legitimate senders will therefore know to re-send their message.
Block/Accept tab:
Subscribing to blacklist services does not hinder the performance of the Barracuda Spam Firewall.
Query response time is typically in milliseconds, so delays are negligible. And once the Barracuda
Spam Firewall queries a blacklist service, that query is cached on your own local DNS for a period of
time, making further queries very fast.
Using the Block and Accept Filters 57

The following table describes each of the blacklist settings on the Block/Accept > External Blacklist
page.
Table 4.1:
Blacklist Setting Description
Barracuda Blacklist Whether the blacklist maintained by Barracuda Networks is enabled.
The Barracuda blacklist contains servers that are manually verified for
sending large amounts of spam.
Common External Blacklists Activate or deactivate blacklist services that are built into the Barracuda
Spam Firewall by changing the selected action for the given blacklist(s)
and clicking the Save Changes button.
Custom External Blacklists Free or subscription blacklists that you want to use. After entering the
external blacklist, specify the action you want performed. Click Add and
then Save Changes when finished.
You can locate blacklists on the Internet by searching for DNSBL or
RBL. However, be cautious and use only trusted blacklists.
Blacklist Options Delay RBL Check—Determines whether RBL checks are performed
after the RCPT TO is given.
Setting this option to Yes causes RBL checks to run after the RCPT TO
is given in the SMTP transaction. This allows the sender/recipient
information to appear in the message log.
Setting this option to No results in only the IP being available in the
message log entry.
Blacklist Using Full Header Scan—Setting this option to Yes allows
the Barracuda Spam Firewall to scan email headers for blacklisted IP
addresses.
Scanning headers can impact system performance because the
Barracuda Spam Firewall needs to do a DNS lookup for each header.
For this reason, you should only enable this feature if email from the
Internet is not delivered directly to the Barracuda Spam Firewall.
Blacklist Services Descriptions
The following table describes the blacklist services that are listed by default.
Table 4.2:
Blacklist Service Description
sbl.spamhaus.org Spamhaus tracks the Internet's Spammers, Spam Gangs and Spam
xbl.spamhaus.org To help stop the increase of spam from illegal exploits, Spamhaus
58 Barracuda Spam Firewall Administrator’s Guide
Services, and provides dependable realtime anti-spam protection for
Internet networks. Spamhaus works with law enforcement agencies to
identify and pursue spammers worldwide
released the Exploits Block List (XBL). This list is a realtime DNSbased database of IP addresses of illegal third-party exploits, including
open proxies, worms/viruses with built-in spam engines, and other
types of trojan-horse exploits used by spammers.

Table 4.2:
Blacklist Service Description
bl.spamcop.net SpamCop is a more aggressive spam service that often errs on the
side of blocking mail. Many mail servers can operate with blacklists in
a tag-only mode, which may be preferable when using SpamCop.
What Happens if your Domain or IP Address is on a Blacklist
If your domain or IP address is on a blacklist that you subscribe to, then your Barracuda Spam
Firewall will not deliver messages from users on that domain. There could be several reason why your
domain is on the list:
• Your email server may have been hijacked by a spammer to be used for spamming.
• Your email server is an open relay meaning anyone can use it to send emails to any recipient
without any authentication.
• Spammers used your domain as a fake sender to send spam to recipients
NOTE: If your domain or IP address is on a blacklist, you will need to contact the blacklist provider
directly to have it removed.
IP Address Filters
IP Block/Accept allows you to filter messages based on the sender’s IP network.
The following table describes the filters on this page.
Table 4.3:
Filter Description
Allowed IP Range Add any IP addresses or networks that you wish to add to your
Blocked IP Range Add any IP addresses or networks to your blacklist. To add an
whitelist. To add an individual IP address, use a netmask of
255.255.255.255.
Whitelisted IP addresses bypass spam scoring as well as all other
blacklists, but do go through virus, attachment, body, and subject
filters.
Click Add after adding each entry, followed by Save Changes.
individual IP address, use a netmask of 255.255.255.255. To help you
calculate the correct subnet mask for a range of addresses, use a
subnet mask calculator.
Blacklisted IP addresses/networks take precedence over all whitelists
with the exception of IP address/network-based whitelists. You can
specify whether the IP/Range should be blocked, quarantined or
tagged.
Click Add after adding each entry, followed by Save Changes.
Using the Block and Accept Filters 59

Note
Use the Comment field to add any notes about the blocked IP address. This is useful if more than
Note
one person manages your Barracuda Spam Firewall.
Sender Domain Filters
Sender Domain Block/Accept allows you to filter messages based on the sender’s email address.
The following table describes the filters on this page.
Table 4.4:
Filter Description
Allowed Sender
Domain/Subdomain
Blocked Sender
Domains/Subdomain
Add any domains or subdomains that you wish to include in your
whitelist. Whitelisting a domain automatically whitelists all subdomains.
For example, adding customer.com allows messages from
joe@customer.com as well as joe@office1.customer.com.
Do not use wildcards (such as *) or the @ sign when entering a domain.
For example, just enter customer.com instead of *@customer.com.
Whitelisted domains/subdomains bypass spam scoring as well as all
other blacklists, but do go through virus, IP block/accept and
body/subject filters.
Click Add after adding each entry, followed by Save Changes.
Add any domains or subdomains that you wish to block. Blocking a
domain automatically blocks all subdomains. For example, adding
spammer.com blocks messages from joe@spammer.com as well as
joe@server1.spammer.com.
Do not use wildcards (such as *) or the @ sign when entering a domain.
For example, just enter customer.com instead of *@customer.com.
Blacklisted domains/subdomains take precedence over all whitelists
with the exception of IP address/network and domain/subdomainbased whitelists. You can specify whether the IP/Range should be
blocked, quarantined or tagged.
Click Add after adding each entry, followed by Save Changes.
Use the Comment field to add any notes about why the specified domains are whitelisted or
blocked. This is useful if more than one person manages your Barracuda Spam Firewall, or if you
frequently add or remove domains.
60 Barracuda Spam Firewall Administrator’s Guide

Sender Email Address Filters
Note
Email Sender Block/Accept allows you to filter messages based on the sender’s email address. The
following table describes the filters on this page.
Table 4.5:
Filter Description
Allowed Email Addresses Add the email address of each sender to include in the global
whitelist. Click Add after adding each entry, followed by Save
Changes.
Whitelisted email addresses bypass spam scoring, Intention Analysis,
Bayesian filtering, and keyword filters, but still go through the IP
address filters, virus scanning, External Blacklists check, and
attachment filters.
Blocked Email Addresses Add the email address of each sender to include in your blacklist, and
specify whether the sender should be blocked, quarantined or tagged.
All email addresses in this list will be blocked unless the whitelist also
contains the same email address. If that happens, then the whitelist
entry will take precedence and the message will not be blocked.
Click Add after adding each entry, followed by Save Changes.
Use the Comment field to add any notes about why the specified addresses are whitelisted or
blocked. This is useful if more than one person manages your Barracuda Spam Firewall.
Recipient Email Address Filters
Email Recipient Block/Accept allows you to filter messages based on a recipient’s email address.
The following table describes the filters on this page.
Table 4.6:
Filter Description
Allowed Email Addresses Add the email address for each recipient you want to include in the
whitelist.
Recipients added to this list will never have their incoming messages
scored for spam, but these messages still go through virus scanning
and attachment filters. Whitelisted recipients can have their incoming
messages blocked if the sender’s IP address, domain, or email
address is blacklisted.
Click Add after adding each entry, followed by Save Changes.
Using the Block and Accept Filters 61

Note
Table 4.6:
Filter Description
Blocked Email Addresses Add the email address for each recipient that you want to include in
your watch list, and specify whether the recipient’s incoming message
should be blocked, quarantined or tagged.
A common reason to block a recipient‘s email address is if that user is
no longer with your company but you want to keep their account active
on your mail server.
Recipients added to this list never receive messages unless an accept
filter has been set up for the sender’s IP address, domain, or email
address.
Click Add after adding each entry, followed by Save Changes.
Use the Comment field to add any notes about why the specified addresses are whitelisted or
blocked. This is useful if more than one person manages your Barracuda Spam Firewall, or if you
frequently add or remove addresses.
Attachment Type Filters
Attachment Filtering allows you to block and quarantine messages if they contain attachments with
certain file extensions.
The default maximum attachment size allowed by your Barracuda Spam Firewall is 100 megabytes.
If a message exceeds this size, the Barracuda Spam Firewall rejects the message and the sending
server notifies the sender that their message did not go through. Contact Barracuda Networks
Technical Support to change this maximum.
All messages, including those from whitelisted senders, go through attachment filtering. This means
that if a sender on your whitelist sends a message containing an unallowed attachment type, that
message is either blocked or quarantined (depending on your settings).
The following table describes the parameters on this tab. Click
Save Changes after making any
changes. You can enter multiple lines for each filter with each line containing one type of file
extension.
Table 4.7:
Filter Description
Attachment Blocking
Blocked Attachment File
Extensions
Add the file extensions (without the preceding dot “.”) to block. The
Barracuda Spam Firewall blocks the entire message if it contains an
attachment with one of these extensions.
Block Extensions in Archives Select Yes to scan the contents of archive files (such as zip files) for the
extensions you want to block. The Barracuda Spam Firewall blocks the
entire message if it has an archive file containing one of these
extensions.
62 Barracuda Spam Firewall Administrator’s Guide

Table 4.7:
Filter Description
Block Password Protected
Archives
Block Notification
Notify intended receiver of
Banned File Interception
Notify sender of Banned File
Interception
Attachment Quarantine
Quarantined Attachment
Extensions
Quarantine Extensions in
Archives
Quarantine Password
Protected Archives
Select Yes for the system to block messages that contain passwordprotected archive files (such as zip files).
Password-protected archives cannot be scanned for file extensions. For
this reason, you may want to block these type of archives.
Select Yes to notify recipients when an incoming email has been
blocked because it contained a banned file extension.
Select Yes to notify senders when one of their emails has been blocked
because it contained a banned file extension.
Add the attachment extensions (without the preceding “.”) to
quarantine. The complete email containing the attachment is sent to the
quarantine account.
Select Yes for the system to scan the contents archive files (such as zip
files) for the extensions you want to quarantine. The Barracuda Spam
Firewall quarantines the entire message if it has an archive file
containing one of these extensions.
Select Yes for the system to quarantine messages that contain
password-protected archive files (such as zip files).
Password-protected archives cannot be scanned for file extensions. For
this reason, you may want to block these type of archives.
Subject Line Filters
Subject Filtering allows you to filter messages based on the contents of a message’s subject line.
The following table describes the parameters on this page. Click
Table 4.8:
Subject Blocking Enter the words, regular expressions, or characters that will cause a
Subject Quarantine Enter the words, regular expressions, or characters that will cause a
Subject Tagging (inbound
mode only)
Subject Whitelisting Enter the words, regular expressions, or characters that will cause a
Note the following about content filtering:
Save Changes after making changes.
message to be blocked if they appear in the subject line.
message to be quarantined if they appear in the subject line.
Enter the words, regular expressions, or characters that will cause a
message to be tagged if they appear in the subject line.
message to be whitelisted if they appear in the subject line.
Using the Block and Accept Filters 63

• You can enter multiple lines for each filter, but each line should contain one regular expression
or word. Each line is applied independently.
• HTML comments and tags imbedded between characters in the HTML source are filtered out so
content filtering applies to the actual words as they appear when viewed in a Web browser.
Body Filters
Body Filtering allows you to filter messages based on the contents of a message’s body.
The following table describes the parameters on this page. Click
Save Changes after making any
changes.
Table 4.9:
Filter Description
Message Content
Blocking
Message Content
Quarantine
Message Content
Tagging
(inbound mode only)
Message Content
Whitelisting
Enter the words, regular expressions, or characters that will cause a
message to be blocked if they appear in the message body.
Enter the words, regular expressions, or characters that will cause a
message to be quarantined if they appear in the message body.
Enter the words, regular expressions, or characters that will cause a
message to be tagged if they appear in the message body.
Enter the words, regular expressions, or characters that will cause a
message to be whitelisted if they appear in the message body.
Note the following about content filtering:
• You can enter multiple lines for each filter, but each line should contain one regular expression
or word. Each line is applied independently.
• HTML comments and tags imbedded between characters in the HTML source are filtered out so
content filtering applies to the actual words as they appear when viewed in a Web browser.
Header Filters
Header Filtering allows you to filter messages based on the contents of a message’s header.
The following table describes the parameters on this page. Click
changes.
Table 4.10:
Header Blocking Enter the words, regular expressions, or characters that will cause a message to
be blocked if they appear in the email header.
64 Barracuda Spam Firewall Administrator’s Guide
Save Changes after making any

Table 4.10:
Header Quarantine Enter the words, regular expressions, or characters that will cause a message to
be quarantined if they appear in the email header.
Header Tagging
(inbound mode only)
Header Whitelisting Enter the words, regular expressions, or characters that will cause a message to
Enter the words, regular expressions, or characters that will cause a message to
be tagged if they appear in the email header.
be whitelisted if they appear in the email header.
Note the following about content filtering:
• You can enter multiple lines for each filter, but each line should contain one regular expression
or word. Each line is applied independently.
• HTML comments and tags imbedded between characters in the HTML source are filtered out so
content filtering applies to the actual words as they appear when viewed in a Web browser.
Sender Authentication
Sender Authentication allows you to configure these sender authentication methods: SPF,
DomainKeys and Invalid Bounce Suppression.
SPF (Sender Policy Framework)
SPF allows domain owners to identify the addresses of their sending mail servers in DNS. When
receiving a message from a domain, the Barracuda Spam Firewall can check the sending mail server
address contained in the message against the domain owner’s DNS records to make sure messages are
coming from a specified server. If this check does not find a record for the sending mail server, the
message is assumed to be spam.
Enabling this feature impacts the performance of the Barracuda Spam Firewall due to the multiple
DNS queries needed to retrieve a domain's SPF or SenderID record (if it exists). Because of this, the
default is that SPF checking is not done.
You may specifiy a list of Trusted Forwarder IP addresses which will be ignored when performing
SPF checks. Trusted Forwarders are mail servers that are set up specifically to forward email to the
Barracuda Spam Firewall from outside sources. The Barracuda Spam Firewall scans the IP addresses
in the Received From headers list of each email and performs an SPF check on the first IP address
that is not in the list of Trusted Forwarders.
DomainKeys Identified Mail (DKIM)
DomainKeys is a method of email authentication that enables a sending domain to cryptographically
sign outgoing messages, allowing the sending domain to assert responsibility for a message. When
receiving a message from a domain, the Barracuda Spam Firewall can check the signature of the
message to verify that the message is, indeed, from the sending domain and that the message has not
been tampered with.
Because there is a performance penalty for using this option due to cryptographic operations and DNS
lookup of public keys DomainKeys inspection is turned off by default.
Using the Block and Accept Filters 65

Invalid Bounce Suppression
Invalid Bounce Suppression is used to determine whether the bounce address specified in a message
is valid. It is designed to reduce the number of bounce messages to forged return addresses. Every
email sent from the Barracuda Spam Firewall is tagged with an encrypted password and expiration
time. Any bounced email that does not include that tag is blocked. Each blocked message is recorded
in the Message Log with reason "Invalid Bounce".
In order to use the Invalid Bounce Suppression feature, the Barracuda Spam Firewall must be in
Outbound mode or in Inbound mode with Outbound Relay configured (hybrid mode). To learn about
how to switch to Outbound mode, refer to Changing the Operating Mode to Outbound on page 26.
For more details about processing outgoing email when in Inbound mode, refer to Configuring Basic
Scanning of Outgoing Mail (Hybrid mode) on page 23.
To configure Invalid Bounce Suppression:
1. Make sure that Outbound Relay has been configured.
2. If in Outbound mode, go to Basic > Sender Identification. If in hybrid mode, go to Block/Accept
> Sender Authentication
3. Set Suppress Invalid Bounces to Yes.
4. Set the Bounce Suppression Shared Secret to a non-null password.
5. Click Save Changes.
.
66 Barracuda Spam Firewall Administrator’s Guide

Chapter 5
Managing Accounts and Domains
This chapter covers the following tasks that you can perform from the Users and Domains tabs (inbound mode only):
How the Barracuda Spam Firewall Creates New Accounts ..............67
Viewing User Accounts ...................................................................... 68
Using Filters to Locate Accounts ...................................................... 69
Editing User Accounts ....................................................................... 69
Removing Invalid User Accounts....................................................... 70
Assigning Features to User Accounts................................................ 70
Overriding the Quarantine Settings for Specific User Accounts....... 71
Setting Retention Policies .................................................................. 72
Adding New Domains ........................................................................ 73
Editing Domain Settings .................................................................... 73
How the Barracuda Spam Firewall Creates New Accounts
The Barracuda Spam Firewall automatically creates a new user account when the following occurs:
• Quarantine is enabled and set to type “per-user”. For more information on enabling quarantine,
refer to
• The Barracuda Spam Firewall receives an email that needs to be quarantined.
When these two circumstances occur, the system does the following:
1. Checks the recipient email address against its database.
To increase security, you can configure the Barracuda Spam Firewall to validate the receiving
email address (using LDAP or the SMTP command RCPT TO) before it creates an account.
This helps prevent the Barracuda Spam Firewall from creating accounts for invalid users.
2. If the address does not exist, the system creates a new user account for the recipient.
The Barracuda Spam Firewall uses the email address of the recipient as the username of the
account and then auto-generates a password.
3. Sends the user the login information so they can access their quarantine inbox.
4. Places the quarantined message in the recipient’s quarantine inbox.
5. Sends a quarantine summary report to the user.
Because the Barracuda Spam Firewall automatically creates user accounts, you should never
need to manually add new accounts to the system.
Setting Up Quarantine Policies on page 43.
Managing Accounts and Domains 67

Viewing User Accounts
The Users > Account View page displays a list of all user accounts on your Barracuda Spam Firewall.
From this page you can:
• Edit a user’s account settings by logging in to their quarantine interface
• Delete user accounts
• Change the password of specific accounts.
The following table describes each column on this page.
Table 5.1:
Column Description
Account Address The email address of the account.
Notify Interval How often the system sends the quarantine summary message to
Quarantine Whether the user has their quarantine account enabled. If this is
Spam Scan Whether the user has spam scoring enabled. If this is set to No,
the user.
set to No, all quarantine messages are delivered to the user with
the subject line altered instead of being placed in quarantine.
this user’s messages are not scanned for spam.
Size (KB) The current size of the user’s quarantine area. This is a good
indicator of which users are not cleaning out their quarantine areas
and taking up system disk space.
Message Count The current number of messages in a user’s quarantine area. This
is another indicator to use when determining which users need to
clean out their quarantine area.
Oldest Message The oldest message in a user’s quarantine area.
Admin Actions Click Edit Account to view that user’s quarantine account so you
can troubleshoot issues and change the user’s preferences and
spam scoring values.
Click Change Password to change the user’s password.
Click Delete to remove the quarantine account from the system
including all of the user’s settings and quarantined messages.
Remove All Invalid Accounts
(button)
This button cleans up all invalid user accounts. It rechecks each
account against the recipient verifier and removes any accounts
which are invalid.
68 Barracuda Spam Firewall Administrator’s Guide

Using Filters to Locate Accounts
To limit the accounts displayed on the Accounts View page, use any of the filters described in the
following table.
Table 5.2:
Filter Description
None Displays all accounts on the system alphabetically.
“Account” (email address) Displays only the account whose email address was entered in the
Pattern textbox.
“Account” (pattern*) Displays only the accounts that match the full or partial usernames
entered in the Pattern textbox. The matches apply across all domains on
the Barracuda Spam Firewall.
Note: The wildcard is applied to the right of the pattern. This means if you
search for 'bob' then bob@domain.com and bobby@domain.com will
match, but not billybob@domain.com.
“Account” (*pattern) Displays only the accounts that match the full or partial usernames
entered in the Pattern textbox. The matches apply across all domains on
the Barracuda Spam Firewall.
Note: The wildcard is applied to the left of the pattern. This means if you
search for 'domain.com' then user@domain.com and
user@corp.domain.com will match, but not user@domain1.com.
“Quarantine Enabled” Displays all accounts that have quarantine enabled.
“Quarantine Disabled” Displays all accounts that have quarantine disabled.
“Spam Scan Enabled” Displays all accounts that have spam scanning enabled.
“Spam Scan Disabled” Displays all accounts that have spam scanning disabled.
Editing User Accounts
In some cases you may need to edit the settings of a specific user account to:
• Check the messages within a user’s quarantine inbox.
• Modify a user’s spam and quarantine settings.
• Add email addresses to a user’s whitelist or blacklist to resolve why that user is not receiving
legitimate email or receiving a large amount of spam.
To make changes to a user’s account:
1. Select Users > Accounts View.
2. In the Administrator Actions column, click Edit Account next to the account you want to
modify.
A new page opens that displays the end user quarantine interface.
3. Use the Quarantine Inbox and Preferences tabs to make the necessary changes.
Managing Accounts and Domains 69

Removing Invalid User Accounts
Note
From the Users > Accounts View page you can remove existing user accounts on your Barracuda
Spam Firewall that your mail server or LDAP server (if enabled) consider to be invalid.
To begin removing invalid accounts, click
Remove All Invalid Accounts. A status page then appears
with an overview of the accounts that are being removed.
Before removing invalid accounts, note the following:
• It can take many hours to remove all invalid accounts. It takes the system about 1-2 seconds to
verify each valid account and about 3-5 seconds to remove an invalid account.
• To stop the removal process, click the stop button in the status/log display that pops up when the
process begins.
• You can close the administration interface at any time without disrupting the account removal
process.
• The Barracuda Spam Firewall also removes all messages stored in an invalid user’s quarantine.
Assigning Features to User Accounts
Users > User Features allows you to specify which features your users can control from their
quarantine interface.
When assigning features to accounts remember that the settings configured by end users override
the default and domain settings configured by the Barracuda administrator.
The following table describes the features on this page.
Table 5.3:
User Feature Description
Quarantine Enable/Disable
Ability
70 Barracuda Spam Firewall Administrator’s Guide
Determines whether your users can enable/disable their quarantine
inbox. If you set this value to No, all messages are quarantined based
on:
• The quarantine type configured on the Basic
• The per-domain quarantine type configured on the DOMAINS tab by
clicking Edit Domain. For more information, refer to Editing Domain
Settings on page 73.
Note: If you set this value to No, the quarantine settings configured by
the user do not take effect.
> Quarantine page, or

Table 5.3:
User Feature Description
Spam Scan Enable/Disable
Ability
Notification Change Ability Determines whether your users can change how often they receive the
Whitelist/Blacklist Ability Determines whether your users can add email addresses and domains
Use Bayesian Ability Determines whether your users can view and edit their Bayesian
Determines whether your users can enable/disable spam scanning of
their incoming messages. If you set this value to No, all users’
messages are scanned for spam based on:
• The settings configured on the Basic
• The per-domain settings configured on the DOMAINS tab by clicking
Edit Domain. For more information, refer to Editing Domain Settings
on page 73.
Note: If this value is set to Yes and a user has disabled spam scanning,
that user’s spam scanning will be re-enabled when you change Spam
Scan Enable/Disable Ability to Yes.
quarantine summary notification. If you set this value to No, all users
receive notifications based on the frequency specified in the Quarantine
Notification setting on the Basic
Note: If this value is set to Yes, and a user changes their notification
interval, that user’s change is preserved when you change the
Notification Change Ability to No.
to their personal whitelist and blacklist.
Note: If this value is set to Yes and a user adds entries to their whitelist
and blacklist, those additions are ignored when you change
Whitelist/Blacklist Ability to No.
database.
> Spam Scoring page, or
> Quarantine page.
Scoring Change Ability Determines whether your users can change the levels at which their
messages are tagged, quarantined, or blocked. If you set this value to
No, all messages are scored based on:
• The settings configured on the Basic
• The per-domain settings configured on the DOMAINS tab by clicking
Edit Domain. For more information, refer to Editing Domain Settings
on page 73.
Note: If this value is set to Yes and a user changes their spam scoring,
that user’s changes are not preserved when you change Scoring
Change Ability to No.
User Features Override Use this section to provide specific user accounts with different features
than specified in the Default User Features section.
In the User Accounts box, enter the email addresses for the accounts
you want to override, and then specify the features for these accounts.
Click Save Changes when finished.
> Spam Scoring page, or
Overriding the Quarantine Settings for Specific User Accounts
The only time you should need to use the Users > User Add/Update page is when you want to override
the quarantine settings for specific users. You should almost never need to create new user accounts
because the Barracuda Spam Firewall automatically creates accounts when you enable the per-user
quarantine feature. For more information, see How the Barracuda Spam Firewall Creates New
Accounts on page 67.
Managing Accounts and Domains 71

Example
Note
One of the most common scenarios for overriding quarantine settings is when you want to provide a
few users with a quarantine inbox on the Barracuda Spam Firewall, and have the rest of your users
receive quarantine messages in their standard email inbox.
Providing a user with a quarantine inbox gives them greater control over how their messages are
quarantined, but also requires them to manage their quarantine queue. For this reason, you may only
want to provide a quarantine inbox to a subset of power users.
In this example, you would do the following:
• Set the quarantine type to per user (for more information, see Specifying the Quarantine Type
on page 43)
• Set the quarantine default to disabled so users are not set up with a quarantine inbox on your
Barracuda Spam Firewall (for more information, see Specifying the Per-User Quarantine
Settings on
page 45)
• Enter the email addresses of the users you want to have a quarantine inbox and set Enable
Qu
arantine Inbox to Ye s . Refer to the next section for more information.
To override the quarantine settings for specific users:
1. In the User Account(s) box, enter the email addresses (one per line) of the user accounts you
want to override.
2. Select whether the user accounts you listed are enabled with the user quarantine feature.
For a description of the user quarantine feature, refer to Specifying the Quarantine Type on
page
43.
If you enable user quarantines, you should disable aliases and public folders so no per-user
accounts are created for these items.
3. Select the option to email login information to the new users. To view an example greeting email
that contains login information, refer to Greeting Message o
4. Click Save Changes.
n page 75.
For information on assigning additional features to user accounts, refer to page 70.
Setting Retention Policies
Retention policies help you automatically manage your users’ quarantine areas by controlling how
much space is available on the Barracuda Spam Firewall for a user’s quarantine messages.
You can control the amount of space used for quarantine areas using:
• Size restrictions that determine the
• Age restrictions that determine the period of time
It is recommended you train your users to manage their own quarantine areas and not rely on the
retention policies to automatically remove messages. Relying on the Barracuda Spam Firewall to
automatically manage quarantine areas can impact system performance.
size each user’s quarantine
messages are kept in a user’s quarantine area
72 Barracuda Spam Firewall Administrator’s Guide

In addition to using retention policies to manage quarantine areas, you can also select User >
Note
Note
Accounts View to view the size of each user’s quarantine area. You can then contact users directly if
they have a large quarantine area that they need to manage.
When you enable retention policies, keep in mind that if your system has been accumulating email
without retention policies then the first day retention policies that are enabled may have an impact
on system performance. The longer a system runs without retention policies the larger the
performance impact. After the first day or two, the load stabilizes as the system is able to keep large
quarantine fluctuations to a minimum. Retention policies are run starting at approximately 02:30
AM.
Adding New Domains
• If your Barracuda Spam Firewall is responsible for filtering messages for more than one email
server or domain, you need to enter the domains associated with each mail server on the
Domains > Domain Manager page.
• If you have the Barracuda Spam Firewall 400, 60
quarantine type and spam/virus checking on a per-domain basis.
To add and configure domains:
1. Select Domains > Domain Manager.
2. In the Advanced Domain Configuration section, enter the domain associated with your other
mail server, and click
Add Domain.
The domain appears in the table.
3. Click Edit Domain next to the domain you just added.
The
Domain Edit page opens.
4. Configure the domain settings, as described in Editing Domain Settings on page 73.
0, or 800 you can also set spam scoring,
Editing Domain Settings
To edit the settings for a specific domain:
1. Select Domains > Domain Manager, click Edit Domain next to the domain to edit.
The
Domain Edit page opens.
2. Specify the per-domain settings described in the following table. These settings are only
available on the Barracuda Spam Firewall 400 and above.
Setting values on a per-domain basis overrides the values configured elsewhere in the administration
interface
.
Managing Accounts and Domains 73

Table 5.4:
Destination Server and
Destination Port
Use MX Records Whether MX lookups are performed on the specified Destination
Valid Test Email Address Enter a valid email address to test whether the Barracuda Spam
Realm Name The name of the realm as displayed to users in the Realm Selector
Tag Score, Quarantine Score,
Block Score
Per-User Quarantine Determines the quarantine type for the domain. Selecting Yes sets
The hostname and destination port of the mail server associated
with the selected domain.
Server.
Firewall can filter messages for the selected domain, and click Test
SMTP Connection.
Then check the Message Log and verify the test message appears
in the log and make sure the message is delivered to the test email
address. The test email has a "from'' address of
smtptest@barracudanetworks.com.
as well as in the Domain Settings for administrators.
A realm is a database of usernames and passwords that identify
valid users, plus the list of roles associated with each valid user.
For information on spam scoring, refer to Configuring the Global
Spam Scoring Limits on page 40.
Note: These domain settings override the global settings
configured on the Basic
spam scoring settings configured by the user in their Preferences
>
Spam Settings page override the domain settings.
the quarantine type to Per-User. Selecting No sets the quarantine
type to Global. For information on quarantine types, refer to
Specifying the Quarantine Type on page 43.
> Spam Scoring page. But the individual
Global Quarantine Email Address Specifies the address for the global quarantine email address for
the domain. For more information, refer to Specifying the Global
Quarantine Settings on page 44.
Spam Scan Enabled, Virus Scan
Enabled
Spoof Protection Whether the Barracuda Spam Firewall prevents outside individuals
3. Click Save Changes.
Lets you enable or disable spam and virus checking for the
domain.
from sending mail using your domains as the “from” address.
Setting this option to Yes blocks all email addressed from a domain
for which the Barracuda Spam Firewall receives email.
You should only enable this option if all email from your domains
goes directly to your mail server and not through the Barracuda
Spam Firewall.
74 Barracuda Spam Firewall Administrator’s Guide

Chapter 6
Managing Your Quarantine Inbox
This chapter describes how you can check your quarantined messages, classify messages as spam and
not spam, and modify your user preferences using the Barracuda Spam Firewall interface. This
chapter is intended for the end user and contains the following topics:
• Receiving Messages from the Barracuda Spam Firewall on page 75.
• Greeting Message on page 75.
• Quarantine Summary Report on page 76.
• Using the Quarantine Interface on page 76.
• Logging into the Quarantine Interface on page 77.
• Managing your Quarantine Inbox on page 77.
• Changing your User Preferences on page 78.
• Changing your Account Password on page 78.
• Changing Your Quarantine Settings on page 78.
• Enabling and Disabling Spam Scanning of your Email on page 79.
Receiving Messages from the Barracuda Spam Firewall
The Barracuda Spam Firewall sends you the following two types of messages:
• Greeting Message
• Spam Quarantine Summary Report
Greeting Message
The first time the Barracuda Spam Firewall quarantines an email intended for you, the system sends
you a greeting message with a subject line of User Quarantine Account Information. The greeting
message contains the following information:
Welcome to the Barracuda Spam Firewall. This message contains the
information you will need to access your Spam Quarantine and
Preferences.
Your account has been set to the following username and password:
Username: <your email address>
Password: <your default password>
Managing Your Quarantine Inbox 75

Access your Spam Quarantine directly using the following link:
Click to access your quarantine
interface to set preferences and
classify messages
Select to deliver, whitelist or
delete quarantined messages
http://
<barracuda system address or name>:8000
The Barracuda Spam Firewall automatically provides your login
information (username and password) and the link to access the
quarantine interface. You should save this email because future
messages from the system do not contain your login information.
Quarantine Summary Report
The Barracuda Spam Firewall sends you a daily quarantine summary report so you can view the
quarantined messages you did not receive. From the quarantine summary report you can also add
messages to your whitelist, delete messages, and have messages delivered to your inbox.
The following figure shows an example of a quarantine summary report.
Figure 6.1:
Using the Quarantine Interface
At the end of every quarantine summary report is a link to the quarantine interface where you can set
additional preferences and classify messages as spam and not spam.
76 Barracuda Spam Firewall Administrator’s Guide

Logging into the Quarantine Interface
To log into your quarantine interface:
1. Click the link provided at the bottom of the Quarantine Summary Report (displayed above).
The login page appears.
2. Enter your username and password, and click Login.
Your login information resides in the greeting message sent to you from the Barracuda Spam
Firewall.
Managing your Quarantine Inbox
After logging into the quarantine interface, select the QUARANTINE INBOX tab to view a list of
your quarantined messages. When you first start using the quarantine interface, you should view this
list on a daily basis and classify as many messages as you can.
The Barracuda Spam Firewall has a learning engine that learns how to deal with future messages
based on the ones you classify as spam and not spam. The learning engine becomes more effective
over time as you teach the system how to classify messages and as you set up rules based on your
whitelist and blacklist.
Clicking on an email displays the message.
The following table describes the actions you can perform from this page:
Table 6.1:
Action Description
Deliver Delivers the selected message to your standard email inbox.
Note: If you want to classify a message or add it to your whitelist,
make sure to do so before delivering the message to your inbox.
Once the Barracuda Spam Firewall delivers a message, it is
removed from your quarantine list.
Whitelist Adds the selected message to your whitelist so all future emails
from this sender are not quarantined unless the message contains a
virus or banned attachment type.
The Barracuda Spam Firewall adds the sending email address
exactly as it appears in the message to your personal whitelist.
Note that some commercial mailings may come from one of several
servers such as mail3.abcbank.com, and a subsequent message
may come from mail2.abcbank.com. See the section on managing
your whitelists and blacklists for tips on specifying whitelists with
greater effectiveness.
Delete Deletes the selected message from your quarantine list. The main
reason to delete messages is to help you keep track of which
quarantine messages you have reviewed.
You cannot recover messages you have deleted.
Managing Your Quarantine Inbox 77

Note
Table 6.1:
Action Description
Classify as Not Spam Classifies the selected message as not spam.
Note: Some bulk commercial email may be considered useful by
some users and spam by others. Instead of classifying bulk
commercial email, it may be more effective to add it to your whitelist
(if you wish to receive such messages) or blacklist (if you prefer not
to receive them).
Classify as Spam Classifies the selected message as spam.
Changing your User Preferences
After logging into your quarantine interface, you can use the Preferences tab to change your account
password, modify your quarantine and spam settings, and manage your whitelist and blacklist.
Changing your Account Password
To change your account password, do one of the following:
• On the quarantine interface login page, click Create New Password, or
• After logging into your quarantine interface, go to Preferences > Password. This option is not
available if single sign on has been enabled via LDAP or Radius.
In the provided fields, enter your existing password and enter your new password twice. Click Save
Changes
Changing your password breaks the links in your existing quarantine summary reports so that you
will not be able to delete, deliver, or whitelist messages from those reports. New quarantine
summary reports that are generated after your password change will contain links that incorporate
the new information, and so will function as expected.
when finished.
Changing Your Quarantine Settings
The following table describes the quarantine settings you can change from the
Preferences > Quarantine Settings page.
78 Barracuda Spam Firewall Administrator’s Guide

Table 6.2:
Quarantine Setting Description
Enable Quarantine Whether the Barracuda Spam Firewall quarantines your
messages.
If you select Yes, the Barracuda Spam Firewall does not deliver
quarantined messages to your general email inbox, but you can
view these messages from the quarantine interface and
quarantine summary reports.
If you select No, all messages that would have been quarantined
for you are delivered to your general email inbox with the subject
line prefixed with [QUAR]:. The Barracuda Spam Firewall
administrator can modify this prefix.
Notification Interval The frequency the Barracuda Spam Firewall sends you
quarantine summary reports. The default is daily. The Barracuda
Spam Firewall only sends quarantine summary reports when one
or more of your emails have been quarantined.
If you select Never, you can still view your quarantined messages
from the quarantine interface, but you will not receive quarantine
summary reports.
Notification Address The email address the Barracuda Spam Firewall should use to
deliver your quarantine summary report.
Default Language The language in which you want to receive your quarantine
notifications.
This setting also sets the default encoding for handling unknown
character sets during filtering. All email notifications from the
Barracuda Spam Firewall are in UTF8 encoding.
Enabling and Disabling Spam Scanning of your Email
If you do not want the Barracuda Spam Firewall scanning your emails for spam content, you can
disable spam filtering from the
change the default spam scoring levels that determine when your emails are tagged, quarantined or
blocked.
When the Barracuda Spam Firewall receives an email for you, it scores the message for its spam
probability. This score ranges from 0 (definitely not spam) to 10 or higher (definitely spam). Based
on this score, the Barracuda Spam Firewall either allows, quarantines, or blocks the message.
A setting of 10 for any setting disables that option.
The following table describes the fields on the
Setting Description
Preferences > Spam Settings page. From this page you can also
Preferences > Spam Settings page.
Spam Filter Enable/Disable
Enable Spam Filtering Select Yes for the Barracuda Spam Firewall to scan your emails for
spam. Select No to have all your messages delivered to you without
being scanned for spam.
Managing Your Quarantine Inbox 79

Setting Description
Spam Scoring
Use System Defaults Select Yes to use the default scoring levels. To configure the
scoring levels yourself, select No and make the desired changes in
the Spam Scoring Levels section described below.
Tag score Messages with a score above this threshold, but below the
quarantine threshold, are delivered to you with the word [BULK]
added to the subject line.
Any message with a score below this setting is automatically
allowed. The default value is 3.5.
Quarantine score Messages with a score above this threshold, but below the block
threshold, are forwarded to your quarantine mailbox.
The default setting is 10 (quarantine disabled).
To enable the quarantine feature, this setting must have a value
lower than the block threshold.
Block score Messages with a score above this threshold are not delivered to
your inbox. Depending on how the system is configured, the
Barracuda Spam Firewall may notify you and the sender that a
blocked message could not be delivered.
The default value is 9.
Barracuda Bayesian Learning
Reset Bayesian Database Click Reset to remove your Bayesian rules learned by the
Barracuda Spam Firewall from the point of installation.
Bayesian Database Backup
Backup Bayesian Database Click Backup to download a copy of your Bayesian database to
your local system. This backup copy can then be uploaded to any
Barracuda Spam Firewall, including this one, in the case of a corrupt
Bayesian installation.
Restore Database Click Browse to select the backup file containing your Bayesian
database, and then click Upload Now to load the Bayesian settings
to this Barracuda Spam Firewall.
The backup file does not need to have originated from this
Barracuda Spam Firewall, nor from the same user database.
Adding Email Addresses and Domains to Your Whitelist and Blacklist
Preferences > Whitelist/Blacklist allows you to specify email addresses and domains from which you
do or do not want to receive emails.
80 Barracuda Spam Firewall Administrator’s Guide

List Type Description
Whitelist The list of email addresses or domains from which you always wish
to receive messages. The only time the Barracuda Spam Firewall
blocks a message from someone on your whitelist is when the
message contains a virus or a disallowed attachment file extension.
Blacklist The list of senders from whom you never want to receive messages.
The Barracuda Spam Firewall immediately discards messages from
senders on your blacklist. These messages are not tagged or
quarantined and cannot be recovered. The sender does not receive
a notice that the message was deleted, and neither do you.
The only time a blacklisted email address is delivered is if the same
email address also appears in your whitelist.
To whitelist or blacklist senders, follow these steps:
1. Select Preferences > Whitelist/Blacklist.
A list of your existing whitelisted and blacklisted addresses appears on this page.
2. To delete a whitelist or a blacklist entry, click the trash can icon next to the address.
3. To add an entry, type an email address into the appropriate field, and click the corresponding Add button.
Tips on specifying addresses
When adding addresses to your whitelist and blacklist, note the following tips:
• If you enter a full email address, such as johndoe@yahoo.com, just that user is specified. If you
enter just a domain, such as yahoo.com, all users in that domain are specified.
• If you enter a domain such as barracudanetworks.com, all subdomains are also included, such as
support.barracudanetworks.com and test.barracudanetworks.com.
• Mass mailings often come from domains that do not resemble the company’s Web site name.
For example, you may want to receive mailings from historybookclub.com, but you will find
that this site sends out its mailing from the domain hbcfyi.com. Examine the From: address of an
actual mailing that you are trying to whitelist or blacklist to determine what to enter.
Changing the Language of the Quarantine Interface
You can change the language of your quarantine interface by selecting a language from the dropdown menu in the upper right corner of the
Quarantine Inbox and Preferences tabs. Supported
languages include Chinese, Japanese, Spanish, French, and others.
The language you select is only applied to your individual quarantine interface. No other user’s
interface is affected.
Managing Your Quarantine Inbox 81

82 Barracuda Spam Firewall Administrator’s Guide

This chapter covers:
Domain Configuration ....................................................................... 83
Domain Configuration
Your Barracuda Spam Firewall will only accept emails addressed to domains that it has been
configured to recognize. Basic configuration of a domain consists of identifying the name of the
domain (and/or a specific sub-domain) and specifying a destination mail server. Additional settings
for a domain are dependent on the model of your Barracuda Spam Firewall, and can include
quarantine type, scoring levels, and retention policies.
Adding a Domain
Chapter 7
Configuring A Domain
There are two ways to add a domain to your Barracuda Spam Firewall:
•From the Basic > IP Configuration page, in the Allowed Email Recipient Domains section near
the bottom the page.
•From the Domains > Domain Manager page, in the Allowed Email Recipient Domains section.
Domains added from either location will be initially configured with whatever you have specified
your default settings to be.
Changing a Domain’s Settings
If you wish to change any setting for a domain that is protected by your Barracuda Spam Firewall,
you can do so from the
that domain. An “Edit Domains” dialog window will appear, where you can make changes to such
things as the destination mail server, quarantine type, virus and spam scoring levels, and LDAP
settings.
Note that should you make and save any changes from this window, then ALL values displayed and
saved at that time will be associated with that domain, and that domain will no longer use any of the
default settings. This means that should any changes be made to the default values of the Barracuda
Spam Firewall, those changes will NOT be applied by the domain that you have just edited.
1. Click Edit Domain.
2. Change the Destination Server if the mail server is different from the default. The default
domain server is taken from the information entered in
Configuration section.
Domains > Domain Manager page, by clicking on the Edit Domain link for
Basic > IP Configuration in the Domain
Configuring A Domain 83

3. Enter a Valid Test Email Address.
Note
Note
Note
4. Click Test SMTP Connection.
5. Click Save Changes.
For Models 400 and higher, set the domain level tag for tag score, quar score, and block score.
6. Specify per user quarantine or global quarantine for domain.
7. Select Yes to enable spam scan.
8. Select Yes to enable the virus scan
9. Select Yes to enable spoof protection.
10. Repeat Steps 1-11 for each additional domain(s).
Models 400 and higher contain support for APIs that can be used to automate the above steps for
multiple domains additions.
For Models 300 and higher, if “Per User Quarantine” is selected then be sure to set a Retention
Policy as well in order to prevent running out of quarantine space on your Barracuda Spam Firewall.
11. Select Users > User Features. Configure the default user features that are appropriate for your
accounts.
12. Enter the email accounts for user features override
13. Select Users > Retention Policies.
14. Set the Retention Policy size limit.
15. Set Age Based Retention Policy. The recommended number of days is 14.
16. Click Save Changes.
84 Barracuda Spam Firewall Administrator’s Guide

Setting Up LDAP
This chapter covers the following tasks that you can perform from the Domains tab:
Using LDAP to Authenticate Message Recipients............................. 85
Using LDAP for User Authentication ................................................ 85
Impact of a Down LDAP Server........................................................ 88
Common LDAP Settings for Standard Mail Servers.......................... 88
Using LDAP to Authenticate Message Recipients
This section describes how to configure your Barracuda Spam Firewall to use an LDAP server for
user authentication. LDAP allows your Barracuda Spam Firewall to verify that the recipients of
incoming email are valid users.
This section contains the following topics:
• Using LDAP for User Authentication on page 85
• Impact of a Down LDAP Server on page 88
• Common LDAP Settings for Standard Mail Servers on page 88
Chapter 8
Using LDAP for User Authentication
To enable your Barracuda Spam Firewall to authenticate users using LDAP:
1. Select Domains > Domain Manager.
2. In the Actions column, click Edit LDAP next to the domain that you want to use LDAP
authentication.
3. Scroll to Edit LDAP settings section and fill in the required information.
The following table describes the fields on this page.
Setting Up LDAP 85
Table 8.1:
LDAP Server The name of your LDAP server to use for authenticating message
recipients.
To specify two LDAP servers for failover purposes, enter the IP
address of each LDAP server separated by a space. The username,
password, filers, search base, and port need to be the same for both
LDAP servers.
Exchange Accelerator / LDAP
Verification
Unify Email Aliases Whether the Barracuda Spam Firewall unifies all email aliases for a
SSL/TLS Mode LDAP supports two modes for secure communications.
Controls whether LDAP lookups are performed for recipient
verification. If set to Yes, the LDAP settings will be used. If set to No,
the Barracuda Spam Firewall defaults to SMTP verification through
RCPT TO commands.
For more information about the Exchange Accelerator feature, read
the text located above this field in the administration interface.
single user. Selecting Yes makes all messages sent to any of the
user’s aliases use the same preferences and same quarantine inbox.
You must have an LDAP server specified on this page for the Unify
Email Aliases feature to work.
This feature is not available in the Barracuda Spam Firewall 200.
The Unify Alias feature links individual aliases together. For example,
if sanderson@acme.com, sandy_anderson@acme.com, and
sanderso@acme.com were all associated with one account, then the
Barracuda Spam Firewall would link all the aliases to the primary
account.
• LDAPS—The original mode typically used with version 2 of the
LDAP protocol. LDAPS is a traditional out-of-band SSL/TLS
connection where SSL/TLS is first negotiated and then the LDAP
protocol is spoken over this channel. The port for LDAPS is usually
636.
• StartTLS—Introduced with version 3 of the LDAP protocol. In this
mode, an unsecured LDAP connection is initially made. The client
then tells the server it wishes to upgrade to SSL/TLS. If the server
supports it and its policy allows StartTLS, then SSL/TLS is
negotiated and all further communication occurs securely. The
StartTLS capability can be offered on the same port as plain-text
LDAP and therefore is typically the default port 389.
If SSL/TLS is off, then LDAP communications will occur in plain-text.
This is often desirable if the network between your Barracuda Spam
Firewall and your LDAP server(s) is private and/or anonymous
authentication is used (meaning no username/DN and password is
sent). Plain-text LDAP is significantly more efficient than LDAP over
SSL/TLS because SSL/TLS can introduce significant processing
delays, especially when connecting to the LDAP server.
86 Barracuda Spam Firewall Administrator’s Guide

Table 8.1:
Require SSL/TLS If SMTP over TLS/SSL is enabled then passwords will not be sent in
clear text if both sending and receiving systems support TLS/SSL. If
one system does not support TLS/SSL, then traffic between the
systems will not be secured/encrypted.
If you enable this option and an LDAP connection cannot be made or
the StartTLS LDAP command is not supported or disallowed, then the
LDAP connection fails.
LDAP Port The LDAP port used to communicate with the Exchange server. By
default, this port is 389.
LDAP / Exchange Username The username for the LDAP/Exchange server.
To determine the fully-qualified username, open Active Directory, go
into Active Directory Users and Computers and double-click on the
user account in question. Under the Account tab, use the User Login
Name plus the @xxx.xxx that follows as the LDAP username.
LDAP / Exchange Password The password for the LDAP/Exchange server.
LDAP Filter The custom LDAP filter to apply to this domain.
LDAP Search Base The starting search point in the LDAP tree. The default value looks up
the 'defaultNamingContext' top-level attribute and uses it as the
search base.
If you have two domains under one forest, and you want to
authenticate both domains using the same LDAP server, use an
LDAP search base of DC=com and LDAP port of 3268. This allows
for a complete search under the .com domain and a Global Catalog
default connection.
LDAP UID This specifies an attribute of the LDAP container found using the
LDAP filter and which provides the Barracuda a unique identifier to
associate with user accounts on the Barracuda. This is primarily used
for Alias Unification and Single Sign-On. Typically this is uid, or on
more recent Active Directory schemas sAMAccountName.
LDAP Primary Email Alias When Unify Email Alias is enabled, this LDAP container attribute
provides the account name under which quarantined messages are
stored and for which the actual recipient address is an alias of. For
Single Sign-On using LDAP (and when Unify Email Aliases is
enabled), this is the account that users will be directed to when
logging in with any of their aliases. This attribute is almost always
mail, and should be a fully qualified address with a local part, an "@"
sign, and a domain component which is configured on the Barracuda
as a valid domain.
Canary Email This email address is used to determine if LDAP lookups are properly
locating valid and invalid email addresses for this domain during the
normal operation of the Barracuda. If at anytime the provided canary
address is not found in the LDAP directory then LDAP recipient
verification (Exchange Accelerator) and Unify Email Aliases will be
disabled for the duration of the failure.
Valid Email (for testing) This email address is used in conjunction with the "Test LDAP" button
to determine whether the LDAP settings can locate the provided
address, and whether the proper attributes for LDAP UID and LDAP
Primary Email Alias have been provided.
Setting Up LDAP 87

4. Click Save Changes.
Impact of a Down LDAP Server
If your LDAP server goes down for any reason, your Barracuda Spam Firewall cannot authenticate
message recipients so the system will create an account for each recipient that receives a message until
the LDAP server is back up. To remove any invalid accounts once the LDAP server is back up, refer
to Overriding the Quarantine Settings for Specific User Accounts on page 71.
If you are using Unify Email Aliases, the Barracuda Spam Firewall returns a 421 retry message to the
connecting (sending) server because the primary email value cannot be found. This prevents duplicate
user account from being created.
Common LDAP Settings for Standard Mail Servers
The following table provides common values you can use for the LDAP username, LDAP filter and
search base for standard mail servers.
Table 8.2:
Mail Server LDAP Settings
Microsoft Exchange 5.x LDAP username: cn=<username>,dc=<domain>,cn=admin
Example: cn=username,cn=users,dc=domain,dc=com
<Domain> should be the NT domain name and not the email domain
(unless they are the same). The "admin" suffix is necessary to validate
hidden recipients.
Leave the LDAP filter and Search Base at the default setting.
Microsoft Exchange 2003 One of the best filters is:
(|(proxyaddresses=smtp:${recipient_email})(mail=${recipient_email}))
Lotus Domino receiving
messages for one domain
Lotus Domino receiving
messages for two domains
LDAP username: username@domain.com
LDAP filter:
(|(mail=${recipient_email})(cn=${recipient_local_part})(shortname=${rec
ipient_local_part})(fullname=${recipient_local_part}))
If your Lotus Domino server receives messages for two domains, but the
Name and Address book is only configured with a single Internet
address for each user, use the following filter so LDAP can authenticate
both domains:
(|(mail=${recipient_email})(cn=${recipient_email})(uid=${recipient_email
}))
Example: UserName@abc.com can receive email addressed to
UserName@abc.com OR UserName@xyz.com and performing an
LDAP test works on UserName@abc.com but fails on
UserName@xyz.com. Using this filter enables LDAP to authenticate
both domains.
Novell Groupwise LDAP username: cn=username,o=organization
88 Barracuda Spam Firewall Administrator’s Guide
Leave the LDAP filter and Search Base the same.

Chapter 9
Note
Advanced Administration
This chapter covers the following tasks that you can perform from the ADVANCED tab:
Email Protocol................................................................................... 90
Rate Control....................................................................................... 92
Explicit Users .................................................................................... 93
Backup ............................................................................................... 94
Energize Updates ............................................................................... 97
Firmware Update............................................................................... 99
Appearance ...................................................................................... 100
Syslog............................................................................................... 101
Outbound / Relay .............................................................................
Outbound Footer..............................................................................
Advanced IP Configuration .............................................................105
Clustering ........................................................................................ 106
Single Sign-On ................................................................................. 110
SSL ................................................................................................... 112
Regional Settings .............................................................................
Bounce / NDR Messages..................................................................
Troubleshooting ...............................................................................
Reporting ......................................................................................... 119
SMTP / TLS...................................................................................... 122
Task Manager ..................................................................................
Recovery Console ............................................................................ 124
102
104
115
116
118
123
In most cases you should not need to change any of the default settings described in this section.
It is recommended that you talk to Barracuda Networks Technical Support before performing any
of these tasks.
Advanced Administration 89
Email Protocol
Modifying the Email Protocol Settings
Advanced > Email Protocol allows you to change the default settings for SMTP checking. The table
below describes each setting on this page. Click
Table 9.1:
Mail Protocol (SMTP) Checking
SMTP HELO Required Whether mail clients connecting to the Barracuda Spam Firewall need
Enforce RFC 821 Compliance Whether the Barracuda Spam Firewall requires that the SMTP "MAIL
Save Changes after making any modifications.
to introduce themselves with a SMTP HELO command.
Selecting Yes for this option may stop automated spam-sending
programs used by spammers.
The default setting is No.
FROM" and "RCPT TO" commands contain addresses that are
enclosed by ‘<‘ and ‘>’. It also requires that the SMTP "MAIL FROM"
and "RCPT TO" commands do not contain RFC 822 style phrases or
comments.
Setting this option to Yes stops messages sent from spam senders but
also from some Windows email programs (such as Microsoft Outlook)
that do not adhere to the RFC 821 standard. For this reason, the
default setting is No.
Require Fully Qualified
Domain Names
Sender Spoof Protection
(inbound mode only)
SMTP Configuration
Incoming SMTP Timeout Sets a limit on the time spent on an incoming SMTP transaction. The
Messages per SMTP session Sets a limit on the number of messages in one SMTP session. If the
Whether the Barracuda Spam Firewall requires fully qualified domain
names.
Whether the Barracuda Spam Firewall prevents outside individuals
from sending email using this domain as the “from” address. Setting
this option to Yes blocks all email addressed from a domain for which
the Barracuda Spam Firewall receives email.
You should only enable this option if all email from your domains goes
directly to your mail server and not through the Barracuda Spam
Firewall.
default is 30 seconds.
Setting a time limit on SMTP transactions prevents spammers from
maintaining open connections to the Barracuda Spam Firewall that can
impact system resources. Messages in SMTP transactions that go
over this threshold show up on the Message Log page as being
blocked with a reason of timeout.
number of messages in one session exceeds this threshold the rest of
the messages are blocked and show up in the message log as being
blocked with a reason of Per-Connection Message Limit Exceeded.
90 Barracuda Spam Firewall Administrator’s Guide

Table 9.1:
SMTP Welcome Banner Whether the Welcome Banner is presented to the SMTP client
connecting to the Barracuda Spam Firewall.
This value should be unique to make it easy for you to identify the
system presenting the Welcome Banner.
This value can be left blank for the Barracuda Spam Firewall to
manage the setting.
Remove Barracuda Headers Removes Barracuda’s custom X-headers that are applied before a
message leaves the system.
It is recommended you do not remove Barracuda headers because
they contain the reason a message is tagged, quarantined or blocked.
This information makes it easier to troubleshoot message handling
issues.
Advanced Administration 91

Rate Control
Configuring Message Rate Control
Rate Control allows you to configure how many connections are allowed from the same IP address in
a half-hour time period. Rate Control protects you from spammers or spam-programs that send large
amounts of email to your server in a small amount of time.
The table below describes each setting on this page. Click Save Changes after making any
modifications.
Table 9.2:
Setting Description
Rate Control Specifies the maximum number of connections allowed from the
same IP address in a half-hour timeframe. This setting is only
taken into consideration when over five unique IP addresses are
connected to the Barracuda Spam Firewall.
When the number goes over the Rate Control threshold, the
Barracuda Spam Firewall blocks further connections/messages.
Legitimate sending email servers will act on this message and
inform the sender or sending mail server to try again later. Spam
senders probably will not do anything with this message and will
stop sending email when they do not get through.
Rate Control Exclude IP/Range Specifies the IP address range that you wish to exclude from
Rate Control. To enter a single IP address (rather than a range),
enter 255.255.255.255 for the netmask.
92 Barracuda Spam Firewall Administrator’s Guide

Explicit Users
Note
Note
This feature is available only on a model 600.
Activating Individual Accounts
When you first start using the Barracuda Spam Firewall you may prefer to only activate a few
accounts so you can familiarize yourself with the system and train a few users before rolling out the
new capabilities to your entire organization.
To activate an individual account:
1. Select Advanced --> Explicit Users.
2. In the Email Address field, enter the email address of the account to activate.
3. Click Add.
Only accounts added to the Email Address list receive spam and virus protection. However, RBLs,
rate control, and recipient validation are applied to all incoming email regardless of this list.
Advanced Administration 93

Backup
Note
Backing Up and Restoring System Configuration
On a regular basis you should back up your system configuration in case you need to restore this
information on a replacement Barracuda Spam Firewall or in the event your current system data
becomes corrupt.
There are two types of backup you can perform from the Advanced > Backup page:
• Desktop backup—A one-time only backup that stores the backup file on your local desktop.
• Automated backups (recommended)—Recurring backups that you schedule.
Do not edit the backup files. Any configuration changes you want to make need to be done through
the administration interface. The configuration backup file (config-backup.bak) contains a
checksum that prevents the file from being uploaded to the system if any changes are made.
The following information is no
t included in the desktop or automated backup:
• System password
• System IP information
•DNS information
Performing Desktop Backups
To perform a desktop backup:
1. From the Desktop Backup section on the Advanced > Backup page, select the components you
want to backup. The following table describes each component.
Table 9.3:
Component Description
Configuration All global and system settings (less system password, system IP, and DNS
information)
User Settings All user settings except the individual user Bayesian databases
Bayesian Data The global Bayesian database, and/or the user’s individual Bayesian
ases
datab
2. Click Backup and save the configuration file to a directory on your local system.
94 Barracuda Spam Firewall Administrator’s Guide

Automating Backups (inbound mode only)
To configure your Barracuda Spam Firewall to automatically backup your system and user
configuration on a regular basis, go to the
the Automated Backups section.
The following table describes the fields in the Automated Backups section.
Table 9.4:
Field Description
Server Type The type of server that will store the backup files. The available options
include FTP or SMB (windows shared drive). Selecting a server type
enables automated backups. Select Off to disable automated backups.
Server Name/IP The IP address or fully qualified domain name of the backup server.
Port The port to use for the FTP or SMB server.
Username The username that the Barracuda Spam Firewall should use to log into
the backup server.
Password The password that the Barracuda Spam Firewall should use to log into
the backup server.
Advanced > Backup page and fill in the fields located in
Folder/Path The folder, path, or share name to store the backup files on the backup
server.
Test Backup Server Before enabling automated backups, we recommend you test the backup
settings you specified by clicking Test Backup Server.
Backup Schedule Lists the components you can include in your backup and the scheduled
backup time for each. You can select the following components to back
up:
• System Configuration—All global and system settings (less system
password, system IP, and DNS information)
• User settings—All user settings except the individual user Bayesian
databases
• Bayesian data—All global Bayesian data
After selecting the components, specify the frequency of the backups
(daily or weekly).
Backups to keep The number of backups to keep on the backup server at one time. When
this limit is reached, the oldest backup file is removed to make room for
the latest.
Advanced Administration 95
Restoring from a Backup File
Note
To restore system configuration from a backup file:
You should perform a system restore during non-business hours when there is less email traffic.
Performing a restore only takes a few minutes, but the Barracuda Spam Firewall will be out of
service during this short amount of time.
1. Go to the Configuration Restore section on the Advanced > Backup page.
2. Do one of the following:
Table 9.5:
To restore from... Then...
A desktop backup file 1. Click Browse next to the Restore Backup File.
2. Locate the configuration backup file (barracuda.conf) and click
Restore.
An automated backup file 1. Click Browse near the Restore Auto Backup field.
2. Locate the auto backup file you want to restore based on the
timestamp, and click Restore.
3. If you are restoring configuration on a replacement Barracuda Spam Firewall, update the
following:
• Virus and spam definitions (from the Advanced > Energize Updates page)
• Firmware (from the Advanced > Firmware Update page)
96 Barracuda Spam Firewall Administrator’s Guide

Energize Updates
Updating Spam and Virus Definitions Using Energize Updates
Advanced > Energize Updates allows you to manually update the current spam and virus definitions,
as well as change the interval at which the Barracuda Spam Firewall checks for updates.
Energize Updates provide the Barracuda Spam Firewall with the latest spam and virus definitions.
Spam Definition Updates
The following table describes the Spam Definition Updates fields on this page. Click Save Changes
after making any changes.
Table 9.6:
Field Description
Current Installed Version Displays the version that is currently running on the Barracuda Spam
Firewall.
Latest General Release Displays the latest version that is available. If the current version
Previously Installed Version Displays the previously installed version that was running on the
Automatically Update Determines the frequency at which the Barracuda Spam Firewall
Subscription Status Informs you if your Energize Updates are current and when your
Virus Definition Updates
The following table describes the Virus Definition Updates fields on the Advanced > Energize
Updates
page. Click Save Changes after making any updates to this page.
running on the Barracuda Spam Firewall is not the latest, click
Update to download the latest version.The Update button is disabled
if the system already has the latest version.
system. To go back to this version of the spam definitions, click
Revert.
checks for updates. To disable automatic updates, select Off.
Hourly updates occur at the beginning of each hour. Daily updates
occur at 12:20am (twenty after midnight) based on the system time
zone.
The recommended setting is Hourly.
subscription expires.
Advanced Administration 97

Table 9.7:
Field Description
Current Installed Version Displays the version that is currently running on the
Barracuda Spam Firewall. To view more information about
the version, click view release notes.
Latest General Release Displays the latest version that is available. If the current
version running on the Barracuda Spam Firewall is not the
latest, click Update to download the latest version.The
Update button is disabled if the system already has the
latest version.
Previously Installed Version Displays the previous version that was running on the
system. To go back to this version of the virus definitions,
click Revert.
Automatically Update Determines the frequency at which the Barracuda Spam
Firewall checks for updates. The recommended setting is
Hourly.
Hourly updates occur at the beginning of each hour. Daily
updates occur at 12:40am (forty minutes past midnight)
based on the system time zone.
Subscription Status Displays the status of Energize Updates and its expiration
date.
98 Barracuda Spam Firewall Administrator’s Guide

Firmware Update
Note
Updating the System Firmware Version
Advanced > Firmware Update allows you to manually update the firmware version of the system or
revert to a previous version. Prior to downloading and installing any new firmware version, it is
always recommended that you do the following .
• Make a complete backup of all of your system and user settings
• Read the release notes for the version that you are downloading
You should never have to revert back to an old firmware version. If you have recently downloaded a
new version that is causing unexpected problems, call Barracuda Networks Technical Support before
reverting back to a previous firmware version.
Applying a new firmware version results in a temporary loss of service. For this reason, you should
apply new firmware versions during non-business hours.
To download the latest firmware version:
1. Read the Release Notes of the latest firmware version to learn about the new features.
2. Click Download Now.
This button will be disabled if the Barracuda Spam Firewall already has the latest firmware
version.
3. Clicking on the Refresh button that will appear will keep you updated on the status of your
download.
4. Once the download has finished, you will see an Apply Now button which you should click to
actually apply the downloaded firmware.
5. Activating the downloaded firmware will cause the Barracuda Spam Firewall to reset (reboot),
which can cause your Web interface to disconnect momentarily. This is normal and expected
behavior, so there is no need to perform a manual reboot. The Web interface should come back
up again within 5 minutes, at which point you will be able to log in as normal, and your email
will automatically continue to be filtered.
Advanced Administration 99

Appearance
Customizing the Appearance of the Administration Interface
Advanced > Appearance allows you to customize the default image used on the administration
interface and in the email quarantine correspondence sent to users. This tab is only displayed on the
Barracuda Spam Firewall 600 and above.
The following table describes the fields on this page. Click Save Changes after making any changes.
Table 9.8:
Field Description
General
Spam Firewall Name The system name that appears on the login screen (above the
Web Interface
username and password fields). The default name is
Barracuda Spam Firewall.
Image Preview Shows the current image that will be used in the administration
interface. This preview updates once you upload a new image
to the system.
Upload New Image To use a custom image on the administration interface, click
Browse, specify the image you want to use, and click Upload
Now.
The uploaded image appears in the upper left corner of the
administration interface. The recommended image size is
160x65 pixels and must be a jpg, gif, or png file under 50k.
Image URL The URL the user goes to when clicking on the custom image.
Reset Reverts back to the default image and URL that came with the
system. The default image is the Barracuda Networks logo.
Quarantine Email
Image Preview Shows the current image that will be used in quarantine
messages sent to users. This preview updates once you upload
a new image to the system.
Upload New Image To use a custom image in quarantine emails, click Browse,
select the image, and click Upload Now. The uploaded image
appears in the upper left corner of the quarantine email. The
recommended image size is 480x66 pixels and must be a jpg,
gif, or png file under 100k.
Header Background Color The color of the table header background used in quarantine
Header Font Color The color of the table header font used in quarantined emails.
Reset Clears custom quarantine settings and reverts back to the
100 Barracuda Spam Firewall Administrator’s Guide
emails. Use a standard HTML hex code for this value.
Use a standard HTML hex code for this value.
default image and colors.
 Loading...