

The Barracuda Load Balancer is a Layer 4 load balancer with the added protection of
Intrusion Prevention which can automatically protect your load balanced servers from any
malicious activity that might happen to pass your other defenses.
Getting Started
This guide provides you with setup instructions for the Barracuda Load Balancer.
We recommend reading these instructions fully before starting the setup. To
begin setting up your Barracuda Load Balancer, you will need the follo wing:
• Barracuda Load Balancer
• AC Power Cord
• Ethernet Cables
• VGA Monitor (recommended)
• PS2 Keyboard (recommended)
Physical Installation
To install the Barracuda Load Balancer:
1. Fasten the Barracuda Load Balancer to a 19-inch rack or place it in a stable
location.
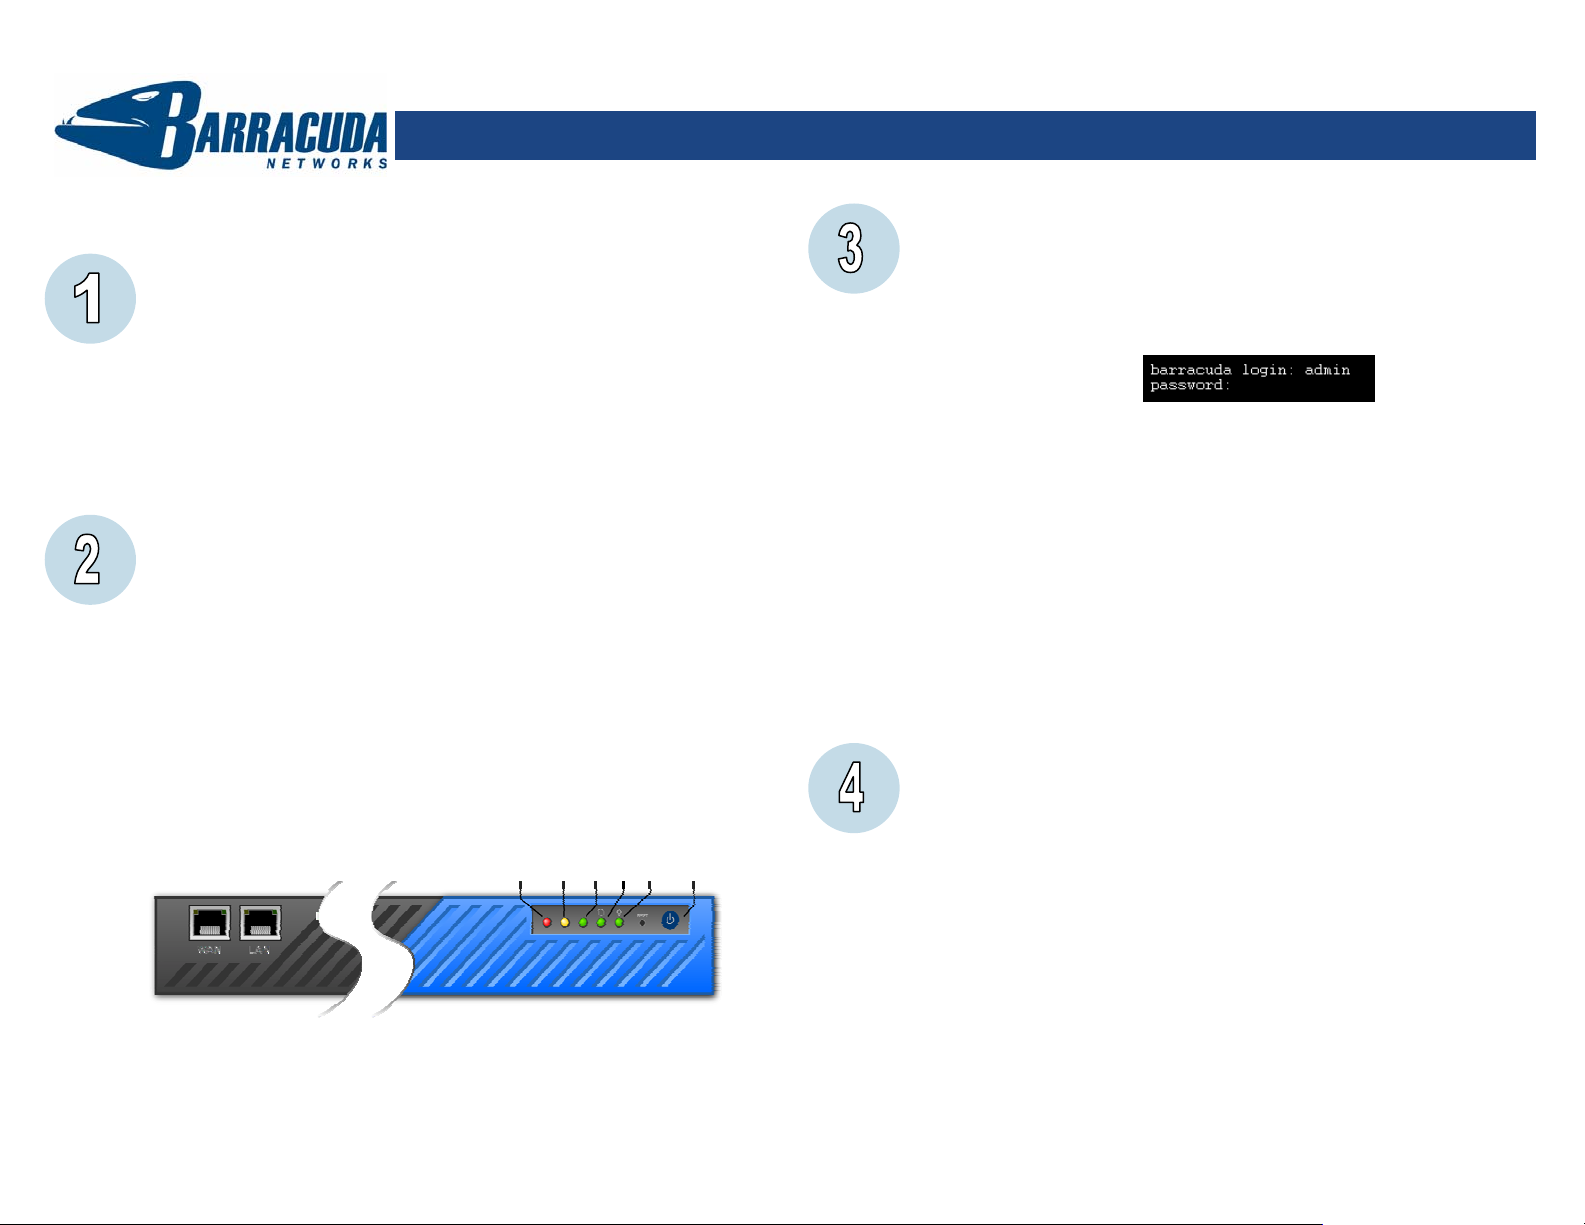
2. Connect an Ethernet Cable from your network switch to the WAN ethernet
port on the front panel of the Barracuda Load Balancer. The LAN port will
be used after the basic configuration is complete.
3. Connect a Standard VGA Monitor, PS2 Keyboard, and AC power cord to the
unit. Note: Immediately after connecting an AC Power Cord to the unit, it
may power ON for a few seconds and then power OFF. This is because
the unit is designed to automatically return to a powered ON state in the
event of a power outage.
4. Press the POWER button on the front panel to turn the unit on.
Barracuda Load Balancer - Quick Start Guide
Configure IP Address and Network Settings
If you have a monitor connected, the Barracuda Load Balancer will display the
Boot Menu initially, and the Administrative Console login prompt once fully
booted. To begin the configuration:
1. Login to the Administrative Console using the admin login:
• Login: admin
• Password: admin
2. Configure the IP Address, Subnet Mask, Default Gateway, Primary DNS
Server and Secondary DNS Server as appropriate for your network.
3. Save your changes.
If you do not have a monitor and keyboard and want to set the IP using the
RESET button on the front panel, press and hold the RESET button per the
following table:
IP address Press and hold RESET for…
192.168.200.200 5 seconds
192.168.1.200 8 seconds
10.1.1.200 12 seconds
Note: Ensure that the WAN interface is connected to your existing network, and that the LAN
interface is connected to a dedicated and separate switch.
Barracuda Load Balancer Configuration
Use a computer with a Web browser that is connected to the same network as
the Barracuda Load Balancer and follow these steps:
1. In your Web browser’s address bar, enter http:// followed by the Barracuda
Load Balancer’s IP address, followed by the default Web Interface HTTP
Port (:8000). For example, if you configured the Barracuda Load Balancer
with an IP address of 192.168.200.200, you would type:
http://192.168.200.200:8000
2. Login to the Barracuda Load Balancer Web interface as the administrator.
Username: admin Password: admin
3. Go to the Basic
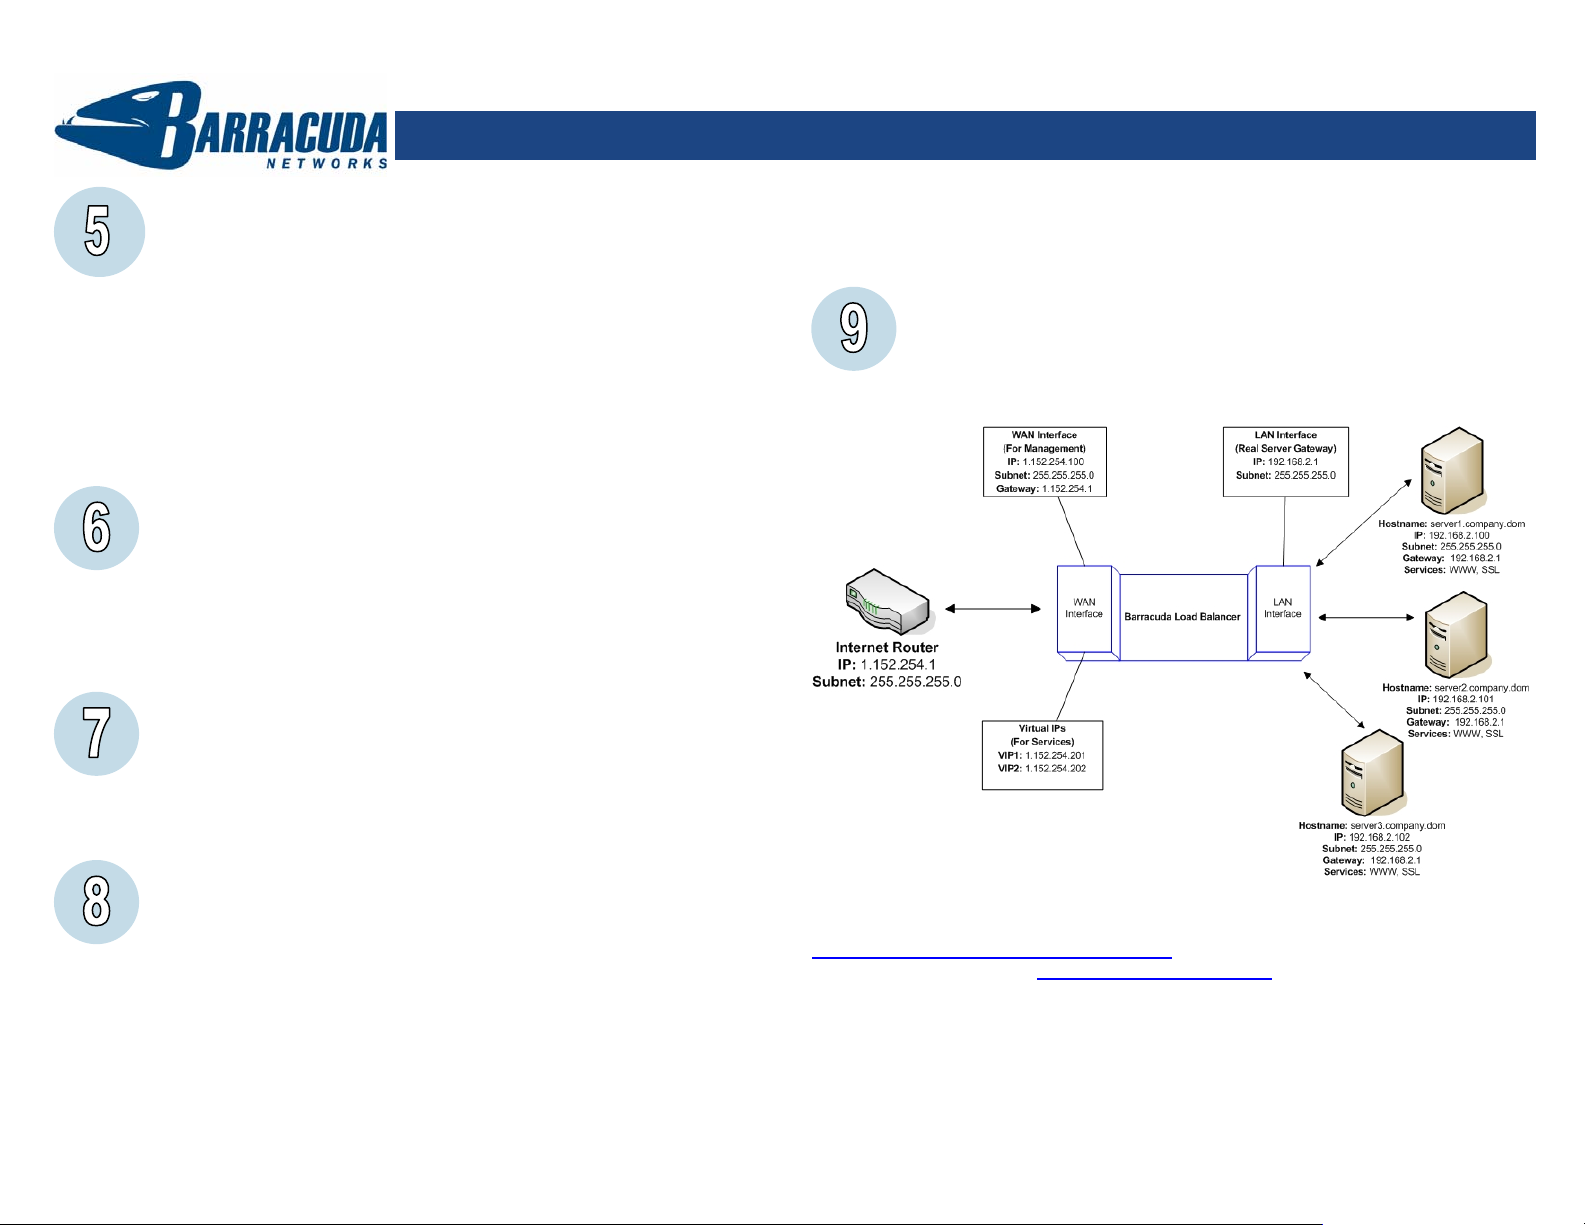
ÆIP Configuration page and configure the following:
• LAN IP: enter the LAN IP ad dress and Subnet Mask that you will connect
all of your Real Servers to later. (Note: this IP will need to be set as the
default gateway on the Real Servers later.)
4. Click any one of the Save Changes buttons to save all of the information.
Load Balancer
Barracuda Load Balancer - Quick Start Guide
Update the Firmware
1. Go to Advanced
2. Press Download Firmware. Click OK to acknowledge the download duration
message. To avoid damaging the Barracuda Load Balancer, do not power
OFF during an update or download. To view download progress, refresh
ÆFirmware Update.
your browser. You will be notified when the download is complete.
3. On the Advanced
ÆFirmware Update page, click the Apply Now button to
apply the firmware. This will take a few minutes to complete.
4. Click OK when prompted to reboot.
5. After applying the firmware, Barracuda Networks recommends logging in to
the Web interface again and reading the Release Notes to learn about
enhancements and new features. It is also a good practice to verify settings,
as new features may have been included with the firmware update.
Change the Administrator Password
To avoid unauthorized use, we recommend you change the default administrator
password to a more secure password. You can only change the administrator
password for the Web interface. You cannot change the password for the
Administrative Console, but this is only accessible via the keyboard which you
can disconnect at any time.
1. Go to BasicÆAdministration and enter your old and new passwords.
2. Press Save Password.
Product Activation
Verify that the Energize Updates feature is activated on your Barracuda Load
Balancer by going to the Basic
ÆStatus page. Under Subscription Status, make
sure the Energize Updates subscription is Current. If the Energize Updates is
Not Activated, click the corresponding activation link to go to the Barracuda
Networks Product Activation page and complete activation of your subscriptions.
Configure your first services
The Barracuda Load Balancer is now ready for testing. For route-path
deployment*, connect one or more servers you wish to load balance to the
switch plugged into the LAN interface. Ensure that their IP addresses are within
the LAN IP and Subnet Mask defined in Step 4, and that they have the IP
address specified in the LAN IP section as their default gateway.
1. Go to Basic Æ Services screen.
2. In the top configuration line, enter a name for the service you wish to create. (This is a
name you can use to identify the service in the future, but does not affect load
balancing.)
3. In the next input box enter a Virtual IP for the service. This IP address will live on the
WAN interface and become the IP address used by the clients to reach the load
balanced service. Also, define the port for the given service. If the service uses
multiple ports, “ALL” can be used.
* NOTE: Deployment methods and strategies are discussed in detail in the Barracuda
Load Balancer Administrator’s Guide. This and other documentation is available at
http://www.barracuda.com/documentation
Networks Support Forum at http://forum.barracuda.com
(FAQs) and other helpful tips for setting up and using your Barracuda Load Balancer.
Contact and Copyright Information
Barracuda Networks, Inc. 3175 S. Winchester Blvd., Campbell, CA 95008 USA • phone: 408.342.5400 • fax: 408.342.1061 • www.barr ac uda.com
Copyright 2007-2008 © Barracuda Networks, Inc. All rights reserved. Use of this product and this manual is subject to license. Information in this document is
subject to change without notice. Barracuda Load Balancer is a trademark of Barracuda Networks, Inc. All other brand and product names mentioned in this
document are registered trademarks or trademarks of their respective holders. 080111-21v29
4. In the final box, under “Real Servers,” enter the IP addresses for the servers which
hold the application or content. In route-path, these servers must be on a separate
subnet than the Virtual IPs and have the Load Balancer’s LAN interface configured as
their default gateway.
Test Connectivity
You should verify network connectivity by utilizing a machine in your existing
network to access the service you just defined on the Virtual IP you chose
earlier. You connect to the Virtual IP in the same way you used to go to the
single server.
. Be sure to check out the Barracuda
for Frequently Asked Questions
Load Balancer
 Loading...