

Page 1
Barracuda Backup - Quick Start Guide
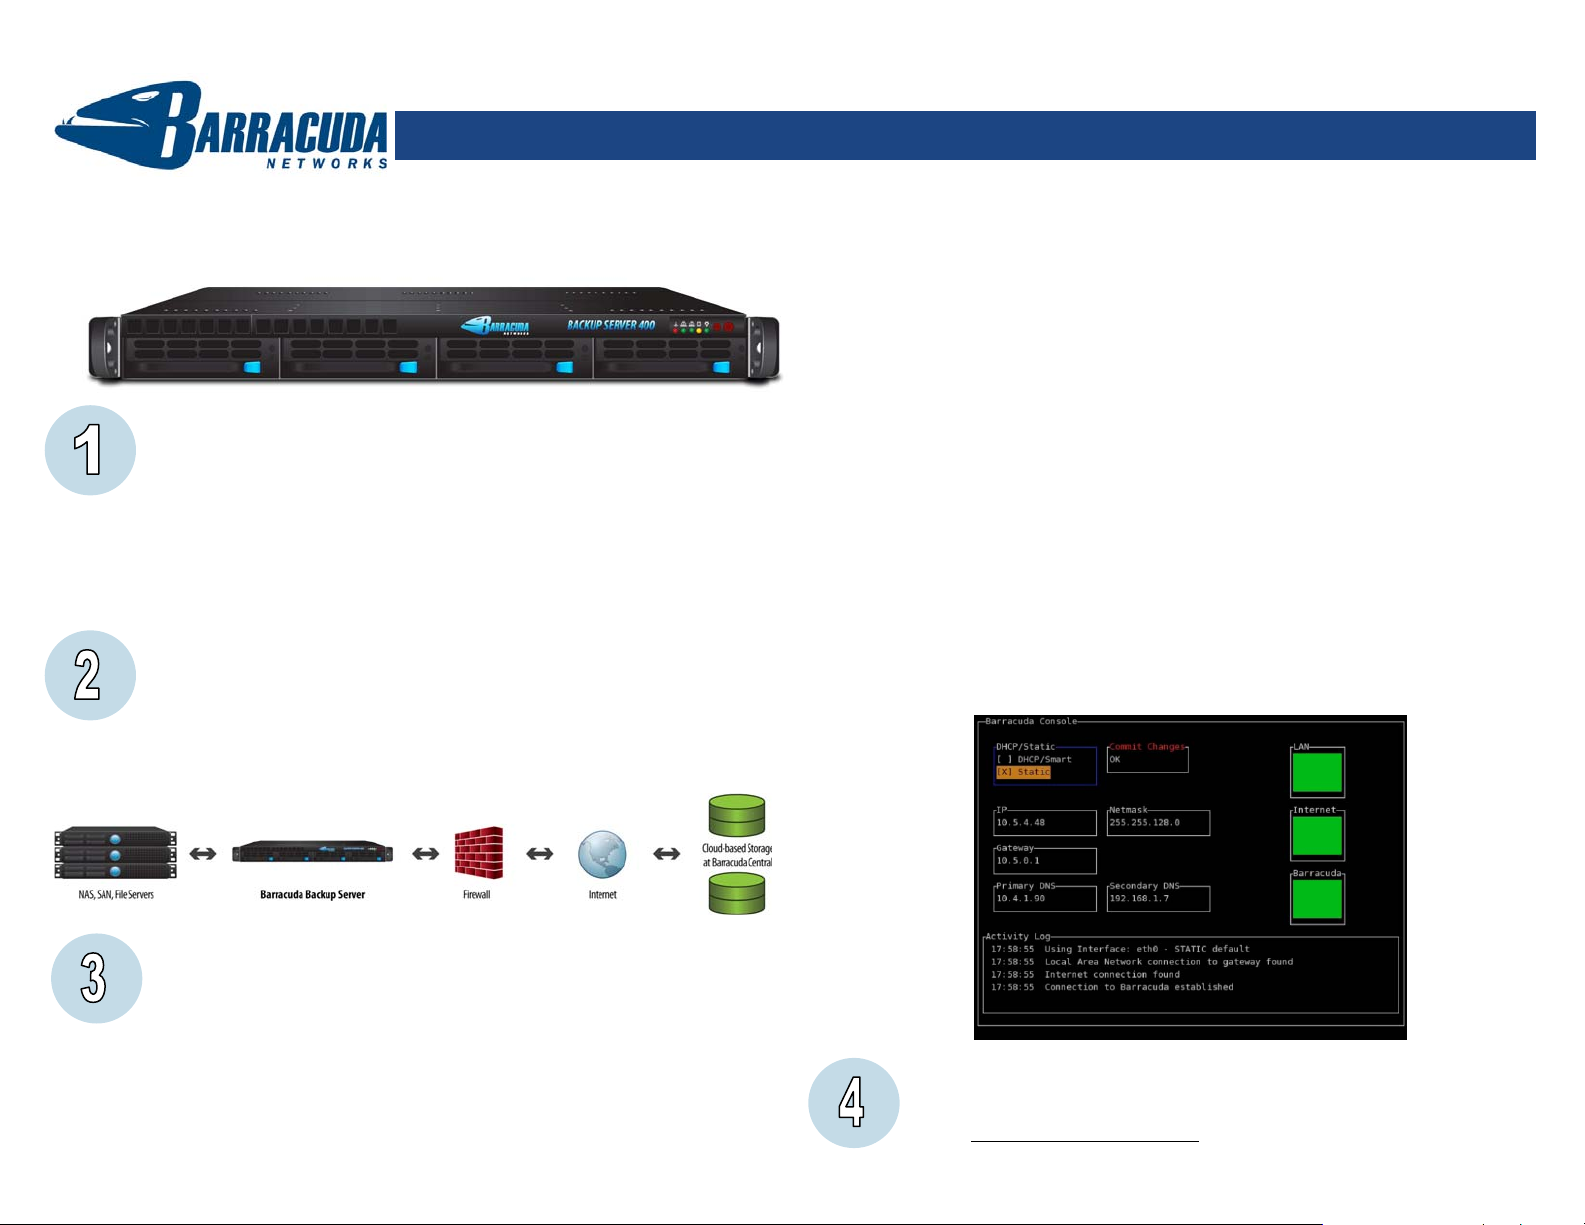
Barracuda Backup is an affordable, integrated local and offsite data
backup solution that combines the Barracuda Backup Server for rapid
restoration on the local network with the Barracuda Backup Service,
cloud-based backup to two offsite data centers for redundancy.
Getting Started
This guide provides you with setup instructions for the Barracuda Backup. We
recommend reading these instructions fully before starting the setup. To begi n
setting up your Barracuda Backup, you will need the following:
• Barracuda Backup Server
• AC power cable
• Ethernet cables
• Barracuda Backup Server serial number and linking code (on reverse)
• Connectivity and access information for servers to backup
Physical Installation
To install the Barracuda Backup Server:
1. Fasten the Barracuda Backup Server to a 19-inch rack or place it in a stable
location.
2. Connect an Ethernet Cable from your network switch to the WAN ethernet
port on the back panel of the Barracuda Backup Server.
3. Press the POWER button on the front panel to turn the unit on.
Optional IP Address and Network Settings Configuration
By default, your Barracuda Backup Server is configured to obtain an IP address
on your network using DHCP. If you need to specify a static IP, you can use the
console administration interface by connecting a monitor and keyboard to the
Barracuda Backup Server.
This interface allows you to change network settings on the Barracuda Backup
Server through direct physical access to the appliance.
A Barracuda Backup Server is considered online when all three boxes shown on
the screen, LAN, Internet, and Barracuda, are green. It is possible to have
connectivity to the LAN and Internet but not to Barracuda Central. This would
most likely be caused by a LAN firewall blocking the necessary outbound TCP
port 1194. Encrypted traffic is sent out across this port to Barracuda Central.
If you would like to restrict the outbound network traffic on port 1194 to
Barracuda’s specific IP range, please contact Barracuda Networks Technical
Support for a listing of required IP addresses to allow. If a firewall is blocking
outbound traffic on this port, the Barracuda Backup Server will not be able to
connect to Barracuda Central. Use the following keyboard commands to
navigate and make changes in the console.
• Arrow keys change field highlighting
• Spacebar selects DHCP or Static for IP assignment type
• Red headings are disabled fields due to the current mode
• Press Enter on Commit Changes when finished
• Connection will be attempted after any changes are committed
Select DHCP/Smart or Static for your IP address assignment preference. Enter
the IP Address, Netmask, Default Gateway, Primary DNS Server and
Secondary DNS Server as appropriate for your network. The activity log will
show you what is happening during the process. Changes will not take effect
until the “Commit Changes” button is highlighted and Enter is pressed on the
keyboard.
Linking your Barracuda Backup Server
Your Barracuda Backup Server needs to be linked in your account online before
you can initiate data backups and your offsite storage subscription plan.
1. Go to http://backup.barracuda.com
Barracuda Backup Server Console Administration Interface:
Barracuda Backup
Page 2
Barracuda Backup - Quick Start Guide
2. Login to an existing account and go to step 4. OR Click Create a New
Account, follow the account creation instructions and login.
3. Once logged in, Click Account on the left of the page and click Link Server.
4. Enter the serial number and the linking code for your Barracuda Backup
Server from the sticker below on the Validation page and click Continue.
5. Complete the form and choose your storage subscription plan.
PLACE STICKER WITH SERIAL NUMBER
AND LINKING CODE HERE BEFORE
SHIPMENT
Verify Connection to Barracuda Central
To verify your Barracuda Backup Server came online successfully, login at
http://backup.barracuda.com
and click the “Locations” tab on the left side of the
screen. You should see a Barracuda Backup Server listed for each location
where one has been linked to your account. The Barracuda Backup Server you
have just installed and powered on should indicate UP with a green up arrow to
the right of its name and location. If your Barracuda Backup Server indicates UP,
please continue on to the next step. Otherwise, either call Barracuda Networks
Technical Support or consult Step 3 to fix your network settings.
Identify Servers with Data to Backup
Follow these instructions to setup servers that you desire to backup, which are
on the same network your Barracuda Backup Server is installed.
1. Login at http://backup.barracuda.com
to the Web user interface.
2. Go to the Settings section and click Backup Data Management.
3. Click Add Server at the top right of the page.
4. If you have multiple Barracuda Backup Servers managed through your
account, you will need to select the Barracuda Backup Server you are adding
backup data for in the drop down list.
5. Enter a description of the server that will help you easily identify the Server
on the Locations page in the future. This field does not impact actual network
connectivity and can be called anything you would like.
6. Enter the exact Hostname or IP address of the server you would like your
Barracuda Backup Server to connect to and backup data from. This field
Note: Your initial backup will take some time to complete. You can view the status of your
backups in the Reports section of the Web user interface at http://backup.barracuda.com.
Contact and Copyright Information
Barracuda Networks, Inc. 3175 S. Winchester Blvd., Campbell, CA 95008 USA • phone: 408.342.5400 • fax: 408.342.1061 • www.barr ac uda.com
Copyright 2007-2008 © Barracuda Networks, Inc. All rights reserved. Use of this product and this manual is subject to license. Information in this document is
subject to change without notice. Barracuda Backup Server is a trademark of Barracuda Networks, Inc. All other brand and product names mentioned in this
document are registered trademarks or trademarks of their respective holders. 080111-21v29
must be exactly the name your server resolves to on the network or the exact
IP of the server on a shared subnet with your Barracuda Backup Server.
7. Select the Server Type you are backing up from in the drop down list. If you
would like to add a server type for backup that is not listed, please contact
Barracuda Networks Technical Support.
8. Enter the connection information requested depending on the Server Type
you chose. For Windows servers, you will need to enter a username (include
“domain\” if the server is part of a Windows domain) and password that the
Barracuda Backup Server can use to make a SMB/CIFS network connection
to the server in order to access your data.
9. Click Save Changes.
Repeat this process for every server that you intend to backup using Barracuda
Backup Server.
Identify Areas (Data Shares) of your Servers to Backup
Follow these instructions in the Barracuda Backup Web user interface to identify
the data shares on your servers, which Barracuda Backup will protect.
1. Go to the Settings section an d click Backup Data Management.
2. Click Add Share at the top right of the page.
3. Select the serv er you would like to add a Share to.
4. Enter a description of the server that will help you easily identify the Share on
the Locations page in the future. This field does not impact actual network
connectivity and can be called anything you would like.
5. Enter the exact name of the Share on your server.
6. Choose a d efa ult User access policy for the backups made of this Share.
7. Click Sav e Ch anges.
Repeat this process for every data share that you intend to backup using
Barracuda Backup Server.
Add Backup Schedules
Follow these instructions in the Barracuda Backup Web user interface to setup
your Backup Schedules.
1. Go to the Settings section and click Backup Schedules.
2. Click Add a Schedule at the top right of the page.
3. Enter a descriptive schedule name for your future reference. T he schedule
name is a short description of when this schedule will run. The more
descriptive you are, the easier it will be to tell at a glance what it does later.
4. Check each day you want this backup schedule to run.
5. Indicate when you would like a backup to be run on the d ays you have
selected above. Optionally, you can also repeat the backup process at a
certain interval throughout the day to achieve continuous protection.
Barracuda Backup
 Loading...