

Baron xXx BIG AIR KIT Yamaha V-Star 650 User Manual
xXx BIG AIR KIT (BAK) - Yamaha V-Star 650
Page: 1LA-2311-00 - LA2311-00B
Revision: 4.1 - 03/16/2012
Install Time: 1.5 Hours
INCLUDED IN THE KIT:
(1) Tube Rubber Cement
(1) Chrome or Black xXx Cover
(1) Chrome Mesh Cover
(1) xXx Backing Plate
(1) Black Air Filter Retaining Cover
(1) Performance Re-Usable Air Filter
(3) L-Shaped Aluminum Stand Offs
(2) Stainless Steel Mounting Arms
TOOLS REQUIRED:
3, 4 & 5 mm Allen Wrenches
10mm Open-End Wrench
CAUTION! We Strongly recommend that a qualified technician install this kit
if you do not completely understand the instructions prior to the installation.
(1) 1/4x20x1/2 Polished Stainless Steel Flathead Allen
(3) 1/4x20x3/4 Caphead Allen Bolt
(3) 1/4x20x3/4 Flathead Allen Bolt
(2) M6-1.0 x12 Chrome Button Head Screws
(2)M6X18 Chrome Fender Washer
(3)M5X10 Stainless Button Head Screw
(1) M8-1.25x30 Stainless Button Head Screw
Phillips & Flat Screwdrivers
Factory Service Manual
Pliers (Std. & Needle-nose)
(1) Tube Rubber Cement
10/12mm Sockets & Driver
INSTRUCTIONS:
BE ADVISED: This Big Air Kit requires the installation of a special needle and Jet kit for proper air fuel
mixture. The Baron Custom Accessories Needle/Jet Kit BA-2410-00 comes with the properly calculated
configuration and is available separately from your dealer or at Baronscustom.com or LAChoppers.com.
NOTE: Inventory all items listed above to confirm complete kit contents. If you are missing any items, please
contact us for assistance.
NOTE: At this point, you should install the Needle/Jet Kit you have purchased separately. Then continue with
the installation of your new xXx Big Air Kit assembly.
1. Remove fuel tank and air filter assembly per Yamaha service manual procedures.
2. Remove the air silencer box under the tank.
3. Install jet kit according to the instructions in the jet kit package.
4. Reinstall the air silencer box under the tank.
5. Attach the (3) 1/2" x 2 1/2" aluminum standoff spacers to the aluminum backing plate using the (3) 1/4-20 x
3/4" caphead allen bolts and it is important you use Blue Locktite on the threads.
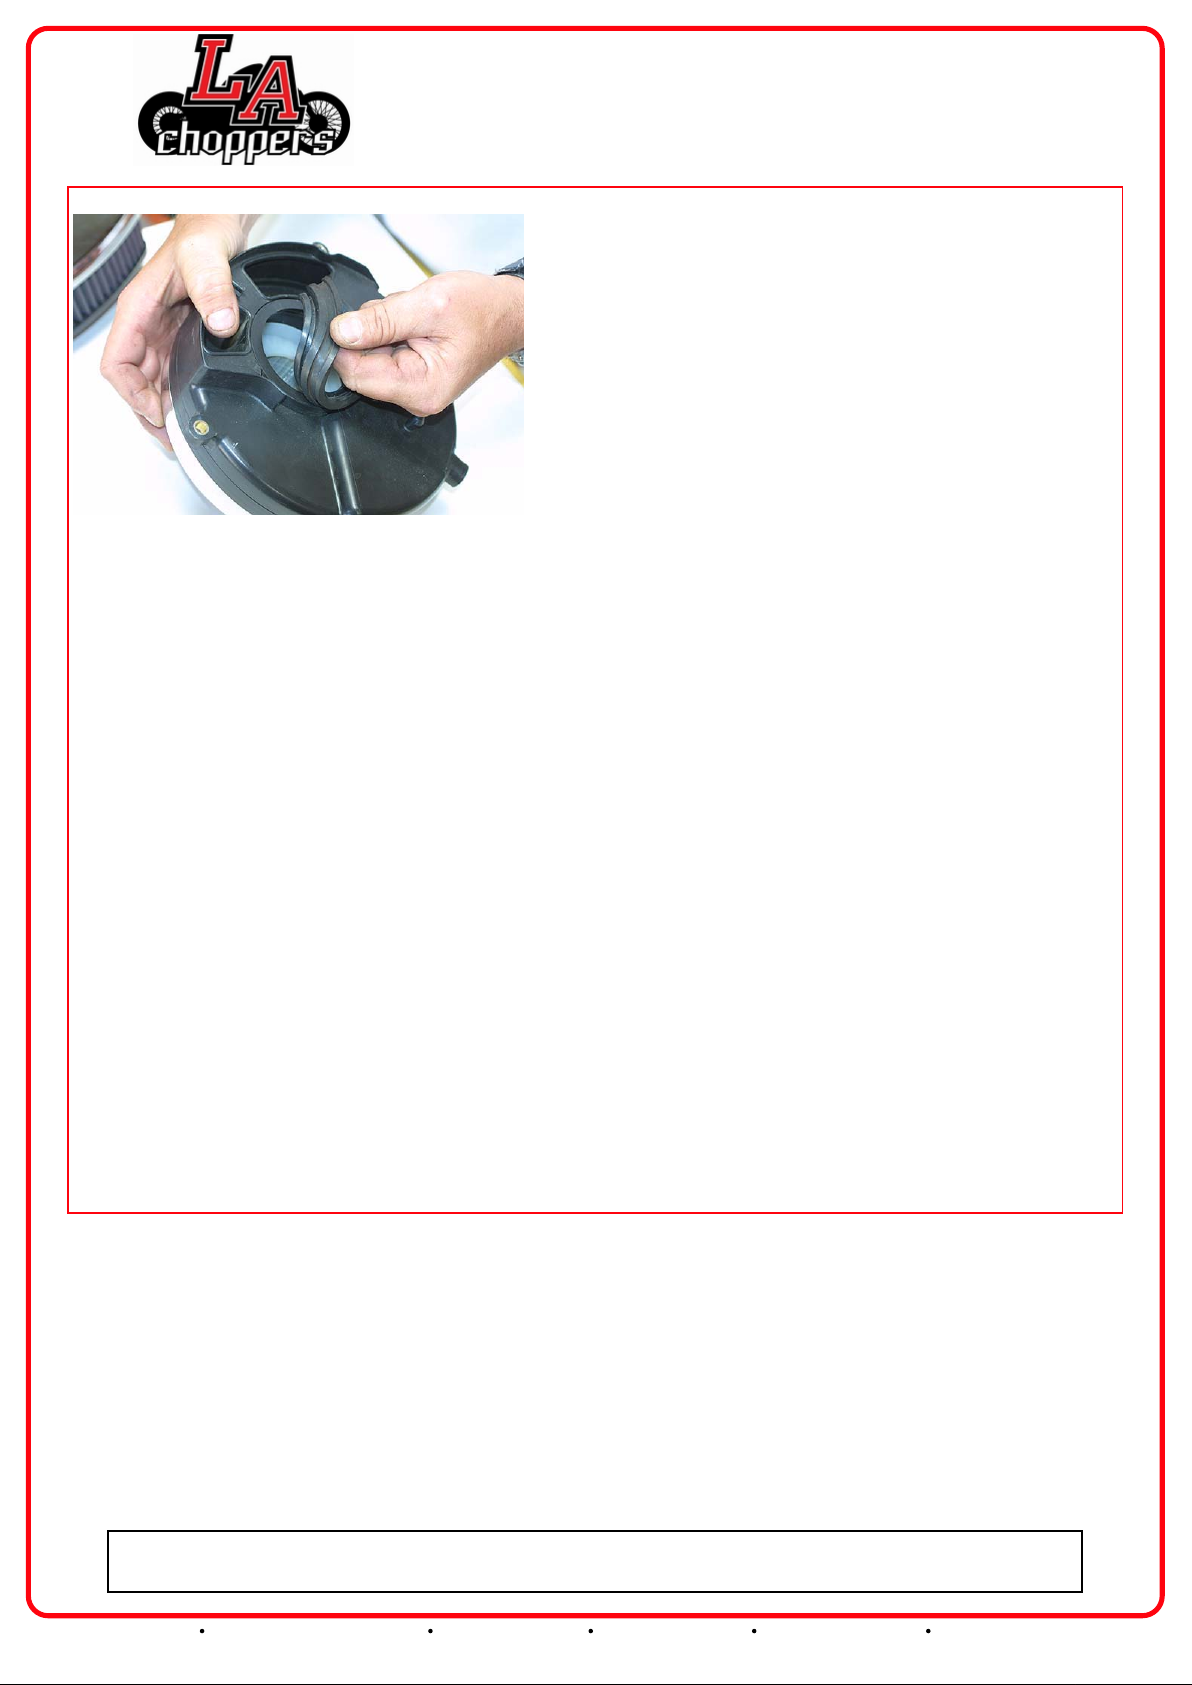
6. Remove the rubber boot from the stock air box. It is glued-in from the factory, but will come loose if gently
Our install guides provide a basic outline on the proper installation of our products. Further tuning and/or
fitment may be required. LA Choppers bears no responsibility on installation costs associated with this product.
© 2013 LA Choppers
5221 Oceanus Drive Huntington Beach, CA 92649 (925)583-2499 - Ph. (714)901-0520 - Fax www.lachoppers.com tech@lachoppers.com
Page: 2LA-2311-00 - LA2311-00B
xXx BIG AIR KIT (BAK) - Yamaha V-Star 650
persuaded. See photo #1
7. Install the stock rubber boot into your new Baron air filter backing plate with the supplied glue. Squeeze glue
liberally into sealing groove in stock rubber boot and allow the glue to set up for 10 to 20 minutes before
installing it into the groove on the new xXx backing plate.
8. Place the performance air filter on the backing plate being sure the filter seal sits into the groove. Place Blue
Locktite in the open ends of the (3) standoff threads and then place the black air filter mount plate in position
being sure it fits properly in the filter seal. Align the three standoff holes (Note the holes are not symmetrical so
you will need to rotate the filter plate until all (3) holes align). Thread the (3) 1/4-20 x 3/4" flathead bolts and
tighten.
9. Install the (2) supplied mounting arms onto the rear of the backing plate at the 10:00 & 2:00 positions using
the (3) supplied M5 screws. Use Blue Locktite® on the threads.
10. Install the threaded lower mount stud(M8x1.25x30) in the lower mount ear of the backing plate.
11. Install the assembly onto the engine, aligning the rubber boot with the lower airbox intake while aligning
the (2) mount arms with their mount points on the engine and the threaded stud with the rubber grommet
equipped mount sitting low between the cylinders. Us the stock boot clamp to compress the boot and the airbox,
use the (2) M6-1.0 x 12MM chrome button head bolts & chrome washers. The lower mount stud inserts into the
grommet and you will use an M8 Nylock nut and washer to attach.
12. Reinstall your fuel tank and you are ready to ride.
Our install guides provide a basic outline on the proper installation of our products. Further tuning and/or
fitment may be required. LA Choppers bears no responsibility on installation costs associated with this product.
© 2013 LA Choppers
5221 Oceanus Drive Huntington Beach, CA 92649 (925)583-2499 - Ph. (714)901-0520 - Fax www.lachoppers.com tech@lachoppers.com
 Loading...