

Page 1

Panzer V
Shown with optional accessories.
Safety Guidelines General Information
Assembly Guides Warranty Information
Trouble Shooting Care and Maintenance
Manual Includes the Following:
Page 2

2
Page 3

ongratulations! You are now the proud owner of a
C
C
quality Barnett crossbow.
Please follow all safety, assembly and trouble
shooting instructions contained in the manual. It is
extremely important to read and follow the
instructions before attempting to use your crossbow.
Serious injuries to yourself or others, damage to
your crossbow or poor performance from your
crossbow could result from failure to thoroughly read
and understand these instructions. If any part of this
manual is unclear to you contact the service
department at 800-237-4507. After assembly of your
crossbow, please keep manual for future reference.
As with any other high performance equipment,
meticulous care and a regular maintenance schedule
must be maintained.
Manual Contents
Parts Checklist 4
Specifications 4
Parts List all Components 5
Parts Picture 5
Safety Guidelines 6
Assembly 7-8
Crossbow Operation 9-10
Trouble Shooting 11-12
Care and Maintenance 13
Warranty 14
Notes 15
Warranty Registration 16
3
Page 4

SPECIFICATIONS
Feet per Second 245
Power Stroke 12.5”
Draw Weight 150 lbs.
Physical Weight 4.2 lbs.
Width 29”
Length 37.5”
String Length 27.5”
Number of Strands 32
String Stock No. 16013
Panzer V
PARTS LIST
Before beginning to assemble your crossbow, take a moment to
organize these parts and ensure you have everything you need.
If you are missing any of the above parts, contact the Barnett
Sales Department at 1-800-237-4507.
Quantity Part Name
3 Bolts with Hex nuts
2 Front Sight Screws (Not included when bow ships in
Package)
1 Front Sight Bracket (Not included when bow ships in
Package)
1 Rear Peep Sight (Not included when bow ships in
Package)
1 Disk Pressure Pad
1 Spring Clip
1 Foot Stirrup
1 String
1 Stringing Cable
1 Lube Wax
4
Page 5
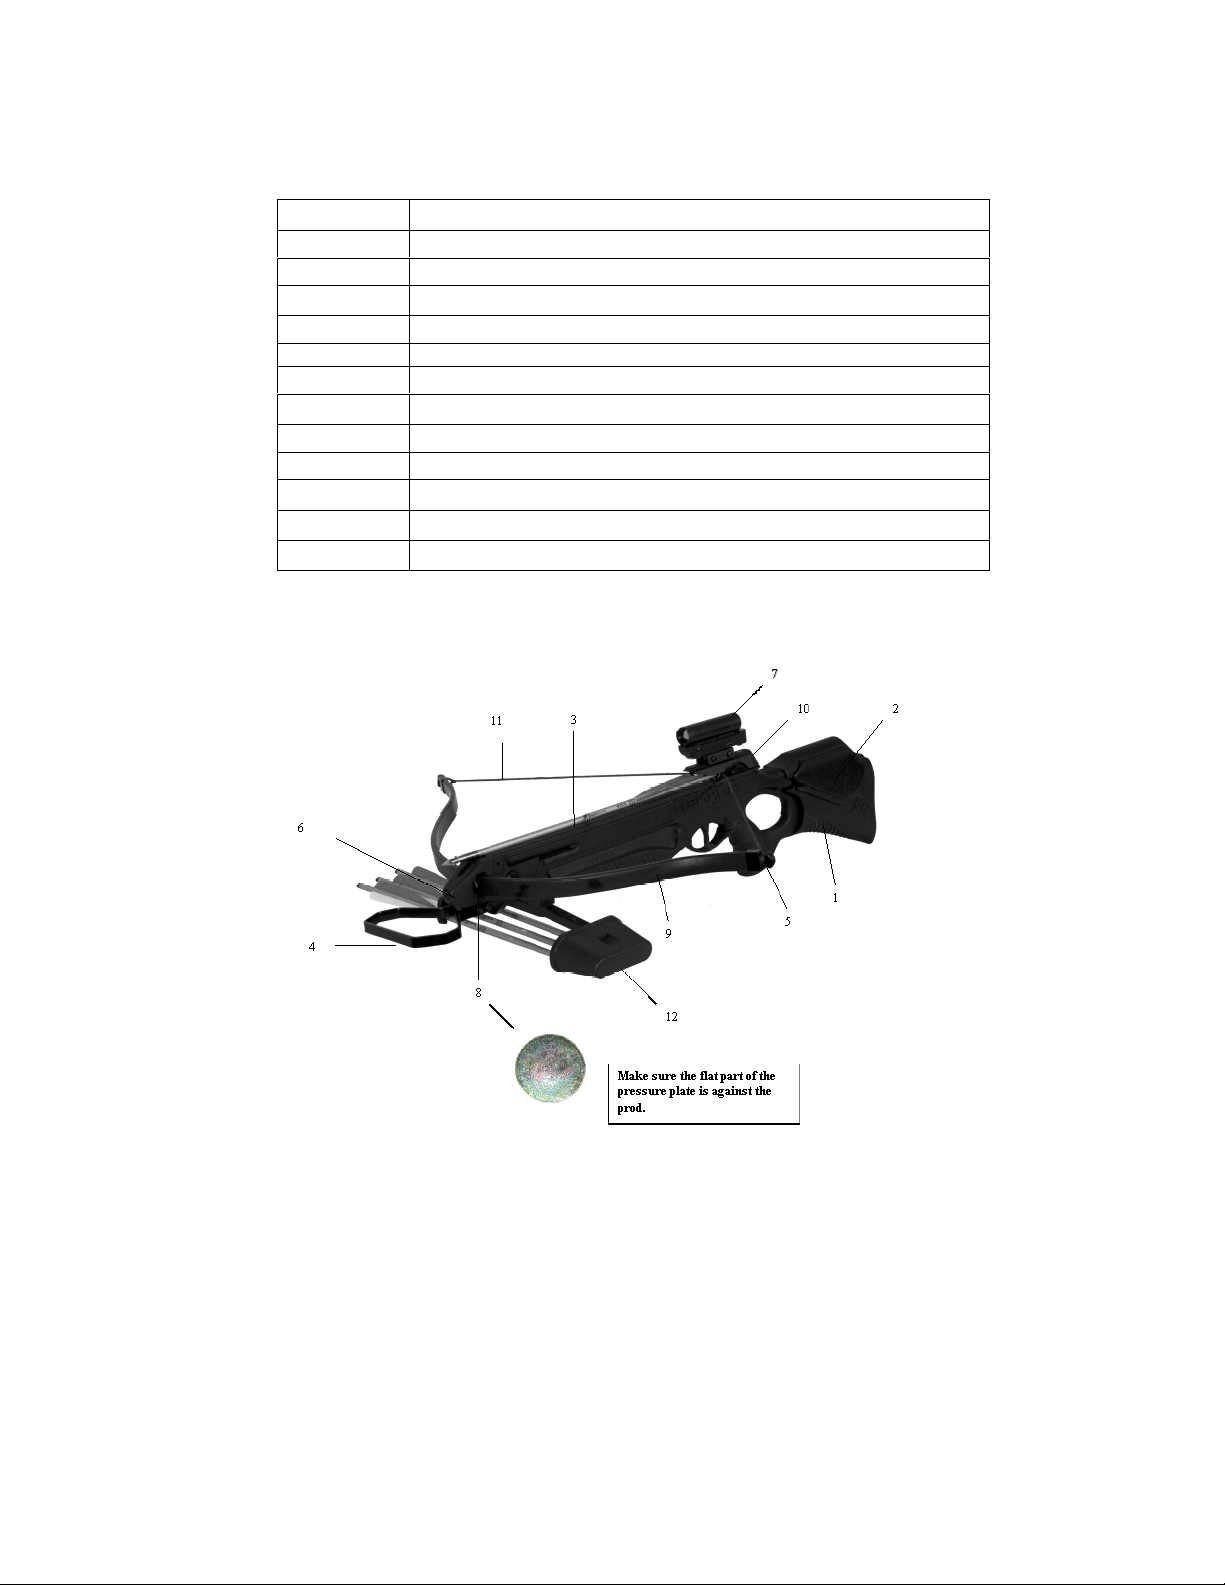
CROSSBOW BREAKDOWN
Item Description
1 Panzer V Stock
2 Cheek Pieces
3 Flight Track
4 Foot Stirrup
5 Nock End
6 Nose Bolt
7 Red Dot Scope (Only included if Package is Purchased)
8 Pressure Pad
9 Limb
10 Scope Mount
11 String
12 Quiver (Only included if Package or Kit is Purchased)
5
Page 6

SAFETY GUIDELINES
FOR: Panzer V
The Panzer V is equipped with an automatic safety, which
engages every time the crossbow is cocked. The safety must be
released before each shot. This, as with any other mechanical
device does not guarantee total safety, as no safety device is a
substitute for common sense and safe handling. NEVER pull the
trigger on a crossbow when the safety is in the “safe” position
or anywhere between “safe” and “fire”. Do not attempt to alter
or modify the trigger mechanism, doing so will void your
warranty and may cause personal injury to yourself or others.
The following rules should be followed at all times:
EXTREME CAUTION SHOULD BE USED AT ALL TIMES
WHEN HANDLING A CROSSBOW. FAILURE TO FOLLOW
THESE RULES COULD RESULT IN SERIOUS INJURY OR
DEATH.
! Always keep your fingers below the flight track
and out of the path of the strings when firing the
crossbow.
! Never dry-fire the crossbow (shoot without an
arrow). Dry firing will void the warranty and
result in damage to the limb, cable and string
possibly causing personal injury.
! Never fire the crossbow until you are sure of your
target.
! Always use an adequate target and backstop when
target shooting.
! Always use suitable crossbow arrows, such as
Barnett's 16” crossbow arrows. Arrows of
improper stiffness or mass weight may damage
the limb and cable assembly, voiding the warranty
and possibly cause personal injury.
! Always inspect the crossbow and arrows before
firing. Bent or damaged arrows are not safe to fire
and should be discarded or repaired.
6
Page 7

ASSEMBLY
Panzer V
Installing Prod
1. Open prod latch on bottom side of stock.
2. Instert stock through strung prod with string facing
upward.
3. Rotate prod where the string lays on top of the flight
track,insert prod into the opening the prod latch
provided.
4. Close prod latch and insert nut into recess on opposite
side. Insert screw through prod latch and tighten
5. Slide pressure pad in between the nose bolt and the
prod. Tighten until prod is firmly seated.
IMPORTANT Do not over tighten the nose bolt. When the
screw makes contact with the pressure plate tighten only
enough to prevent unwanted movement. Over tightening
will crush the fiberglass and permanently damage the
prod/limb.
Attaching Foot Stirrup
1. Line up mounting holes underneath the nose of the
crossbow with the foot stirrup. Attach using hex head
bolts supplied in hardware kit.
Stringing the crossbow
Important do not attempt to string your crossbow by
exerting downward pressure on the stock or prod! This
may cause breakage and will void your warranty. Use
only the cable stringer method. Make sure the nockends
are firmly seated on prod
1. Place loops of the black steel cable stringer over the
prod nockends, just as you would with a bowstring.
Some hand tension may be kept on cable stringer to
keep it properly seated.
2. Cock the crossbow, using the foot
stirrup for stability. The safety is now
automatically engaged.
3. Insert bowstring loops through the
loops of cable stringer and seat over
nock ends.
.
See Figure 1
Fig. 1
7
Page 8

4. Release safety catch.
5. Pull back firmly on the string, removing all tension from
the cable stringer.
6. Pull trigger while holding string, letting string down. Use
caution, as the string will have much tension on it. At
this point the stringer will have no tension on it.
7. Making sure each loop of the bowstring is firmly seated
on the nock ends, pull the cable stringer loop off each
end. Use caution it may be necessary to partially cock
crossbow to remove stringer. When properly strung the
string should be at right angles to the stock.
8. Re-inspect bowstring loops for proper seating on nock
ends.
Note: Before loading to ensure proper arrow flight you must
be sure that your string is marked on both sides of the
outside flight track. When shooting the string should be
pulled back equally on both sides. If this is not done one
side of the limb may be under greater tension causing the
arrow to shoot right or left.
To Remove String
1. Cock the crossbow. The safety will engage
automatically.
2. Insert the black steel coated cable stringer loops
through the loops of the bowstring. Make sure cable
stringer loops are securely seated on nock ends.
3. Release safety.
4. Pull back on the bowstring firmly. Then pull the trigger
letting the bowstring down slowly to braced position.
Use caution as the bowstring will have a lot of tension
on it.
5. At this point the cable stringer will have no tension on it.
Recheck cable stringer loops for proper seating on nock
ends.
6. Cock the crossbow using the cable stringer. Use caution
not to tangle cable stringer in bowstring.
7. The bowstring will have no tension on it. Recheck
stringer loops for proper seating. Remove bowstring
loops off prod nock ends.
8. Pull trigger carefully while holding cable stringer, letting
cable stringer down. Use caution as the stringer will
have a lot of tension on it.
8
Page 9

CCRROOSSSSBBOOWW OOPPEERRAATTIIOONN
Loading the Crossbow
Prior to every shooting session it is recommended
that a complete check of the prod, string, bolts, nuts
screws and foot stirrup be made. Before cocking your
crossbow make sure your foot stirrup has been
attached in accordance with the assembly
instructions. Cocking your crossbow with an
incorrectly attached foot stirrup may cause bodily
injury. Be sure to apply Barnett lubewax to the center
string serving and the flight track area from the string
to the trigger area.
Place the foot stirrup on the ground with the stock end
resting in your mid-section. See Figure 2
4.) Place your foot firmly in the foot stirrup. Place both
hands on the bowstring on each side
about one inch on each side of the
crossbow body.
5.) Using both hands with even tension,
pull the string back until it locks into
trigger mechanism with an audible
“click”.
6.) The crossbow is now cocked.
1.) Verify your string markings are an
equal distance on either side of the flight track. Place
the arrow forward under the front sight bracket and lay
the arrow on the flight surface. When using arrows with
moon nocks, be sure that the odd colored fletch is
placed in the flight grove and that the concaved nock is
parallel to the string.
2.) Slide the arrow back under the arrow retaining spring
and fully into the trigger mechanism. Note: The
arrow retaining spring should only exert enough
pressure to hold the arrow in place without lifting it from
its position on the flight surface.
7.) 3.)
Firing your Crossbow
To fire the arrow from your crossbow:
1. Point the crossbow in a safe direction and slide the
safety forward. See Photos for correct usage page 11.
Fig. 2
9
Page 10

2. The crossbow will now fire when the trigger is pulled.
The safety MUST be disengaged prior to every shot.
BE SURE TO KEEP YOUR FINGERS BELOW THE FLIGHT
TRACK WHILE SHOOTING.
This will prevent your hands from being struck by the
string as it travels forward. The velocity of the string
hitting your fingers will cause severe injury.
Unloading your Crossbow
By far, the safest and only recommended way to un-cock your
cocked crossbow is to load an arrow and fire it into a target or
into the ground away from debris, loose rocks or other people.
CORRECT
CORRECT
INCORRECT
INCORRECT
10
Page 11

TROUBLESHOOTING
Arrow Flight
Possibly the greatest variable in accuracy are the arrows.
These differ greatly and have totally different fight
characteristics. Generally speaking, target arrows are
more accurate than hunting arrows. Because of the
surface area of the fixed bladed broadheads used in
hunting there is a tendency for the arrow to “plane”. To
help overcome this we suggest that practice be made
well in advance of the hunting season with the type of
arrows you will be using to achieve consistent groupings.
Consider the following when selecting arrows; heavy,
stiff spined arrows with fletching hold more energy for
humane harvesting at reasonable ranges (15-35 yards).
Lighter arrows are much faster however hold less
energy.
1. If the string has been changed was it a Barnett string?
2. Are the arrows straight and fletches (vanes) in good
condition?
3. Does the arrow lie flat (true) on the flight groove? Is the
arrow retainer to tight or twisted? (Adjust bolt retainer
with a pair of needle nose pliers – USE CAUTION)
4. Does the arrow slide smoothly and evenly into the
trigger mechanism?
5. When cocking your crossbow, are you pulling equally on
each side of the string? (Mark your new strings on each
side of the flight track as stated earlier) After cocking
the crossbow, make sure the marks are showing evenly
on each side of the trigger mechanism.
6. When cocking your crossbow make a conscious effort to
hold the string on the flight track so as not to lift over
the arrow retainer.
7. Are you putting one fletching down in the flight groove?
8. When using broadheads, line up the blades with the
fletches on the arrow (using o-ring).
String Fraying
1. Are you using Barnett lubewax on the center string
serving and every 5-10 shots and on the flight track
when needed?
11
Page 12

2. Keep the trigger mechanism and flight surface free of
obstruction.
Limb Weak or Losing Power
1. Has the crossbow been dry fired? (could cause limb to
crack)
2. Inspect the limb for splits or cracks.
3. Are you using a Barnett string? (the proper length)
Helpful Information
• Use 16” arrows with offset, straight or helical fletch and
moon nock.
• Recommended broadheads – Any three blade low profile
broadhead with a cutting diameter no more than 1 ½”.
• Mechanical broadheads that simulate the flight of a field
point may be used where legal.
• When using broadheads, the blades must be aligned
with arrow fletching. This can be done by placing a
rubber o-ring between the broadhead and the arrow
front insert.
IMPORTANT
Because of the power of the Panzer V Crossbow and the
inconsistent properties of wooden shafts, which have a
tendency to warp, vary in spine stiffness; density; moisture
absorption, all of which result in inaccuracy. Barnett
International DO NOT RECOMMEND their use under any
circumstance.
12
Page 13

CARE AND MAINTENANCE
Care of String
The owners kit contains a tube of lube wax that should be
applied to the center serving and flight track every 5 – 10
shots. If the crossbow has been exposed to excessive moisture
you may need to apply wax sooner.
Apply lubewax to the center serving of string, rolling string
forwards and backwards to ensure even application of wax.
Apply lubewax to the flight track in order to extend string life
and reduce friction.
Keeping your Crossbow Peak Condition/Maintenance
• Always store your crossbow in a safe, dry place.
Do not expose your crossbow to extreme heat, such as
•
closed, hot vehicles or near heat sources.
• Inspect string for signs of wear. String showing wear
should be replaced immediately.
Periodically put a few drops of quality lightweight
•
machine oil in the trigger mechanism.
• Keep the flight track and the string serving waxed,
reducing friction.
• Your prod can be left strung indefinitely although we do
not recommend that the bow be left in the cocked
position for periods longer than four hours.
With reasonable care of your equipment and diligent practice,
your Crossbow will remain an accurate, highly efficient hunting
weapon.
13
Page 14

WWAARRRRAANNTTYY IINNFFOORRMMAATTIIOONN
The stock, trigger mechanism and limb are covered under a
limited lifetime warranty. Our liability extends to parts, labor
and return transportation to the consumer.
Not covered are: strings, arrows, transportation of product to
our Service Center; damage caused by abuse, modification or
failure to perform normal maintenance; or any other expense,
consequential damages, coincidental damages, or incidental
expenses including damage to property or person.
There are no other warranties expressed or implied. This
warranty gives you specific legal rights and you may also have
other rights, which vary from state to state.
Warranty Registration Card must be mailed within 10 days of
purchase to validate the warranty.
To obtain service: Please call for a return authorization number
prior to sending the unit and write the RA# on the outside of
the package. Return the unit to an authorized Service Center or
directly to the factory. For a listing of authorized service
centers please call the factory at the toll free number listed
below. Attach to the product your name, address, telephone
number and a letter describing the problem. Carefully package
and return product prepaid.
For further inquiries contact the Service Dept through the toll
free number: 1-800-237-4507.
How to reach us:
Barnett International, Inc.
13447 Byrd Drive or
PO Box 934
Odessa, FL, 33556
Phone 813-920-2241
Fax 813-920-5400
E-mail barnett@barnettcrossbows.com
14
Page 15

NOTES
15
Page 16

N
Cut out and mail immediately to:
Barnett International, Inc.
P.O. Box 934
Odessa, FL 33556
––––––––––––––––––––––––––––––––––––
ame______________________________ Age______
Address______________________________________
City____________________ State______ Zip_______
Date of Purchase__________ Phone # _____________
Place of Purchase__________________ Price Paid____
Purchase Address______________________________
City____________________ State _____ Zip _______
Registration completed by: Dealer ( ) Consumer ( )
Sales Representatives Name:
Registration No. _____________________________________
WARRANTY CARD
16
 Loading...