

Page 1
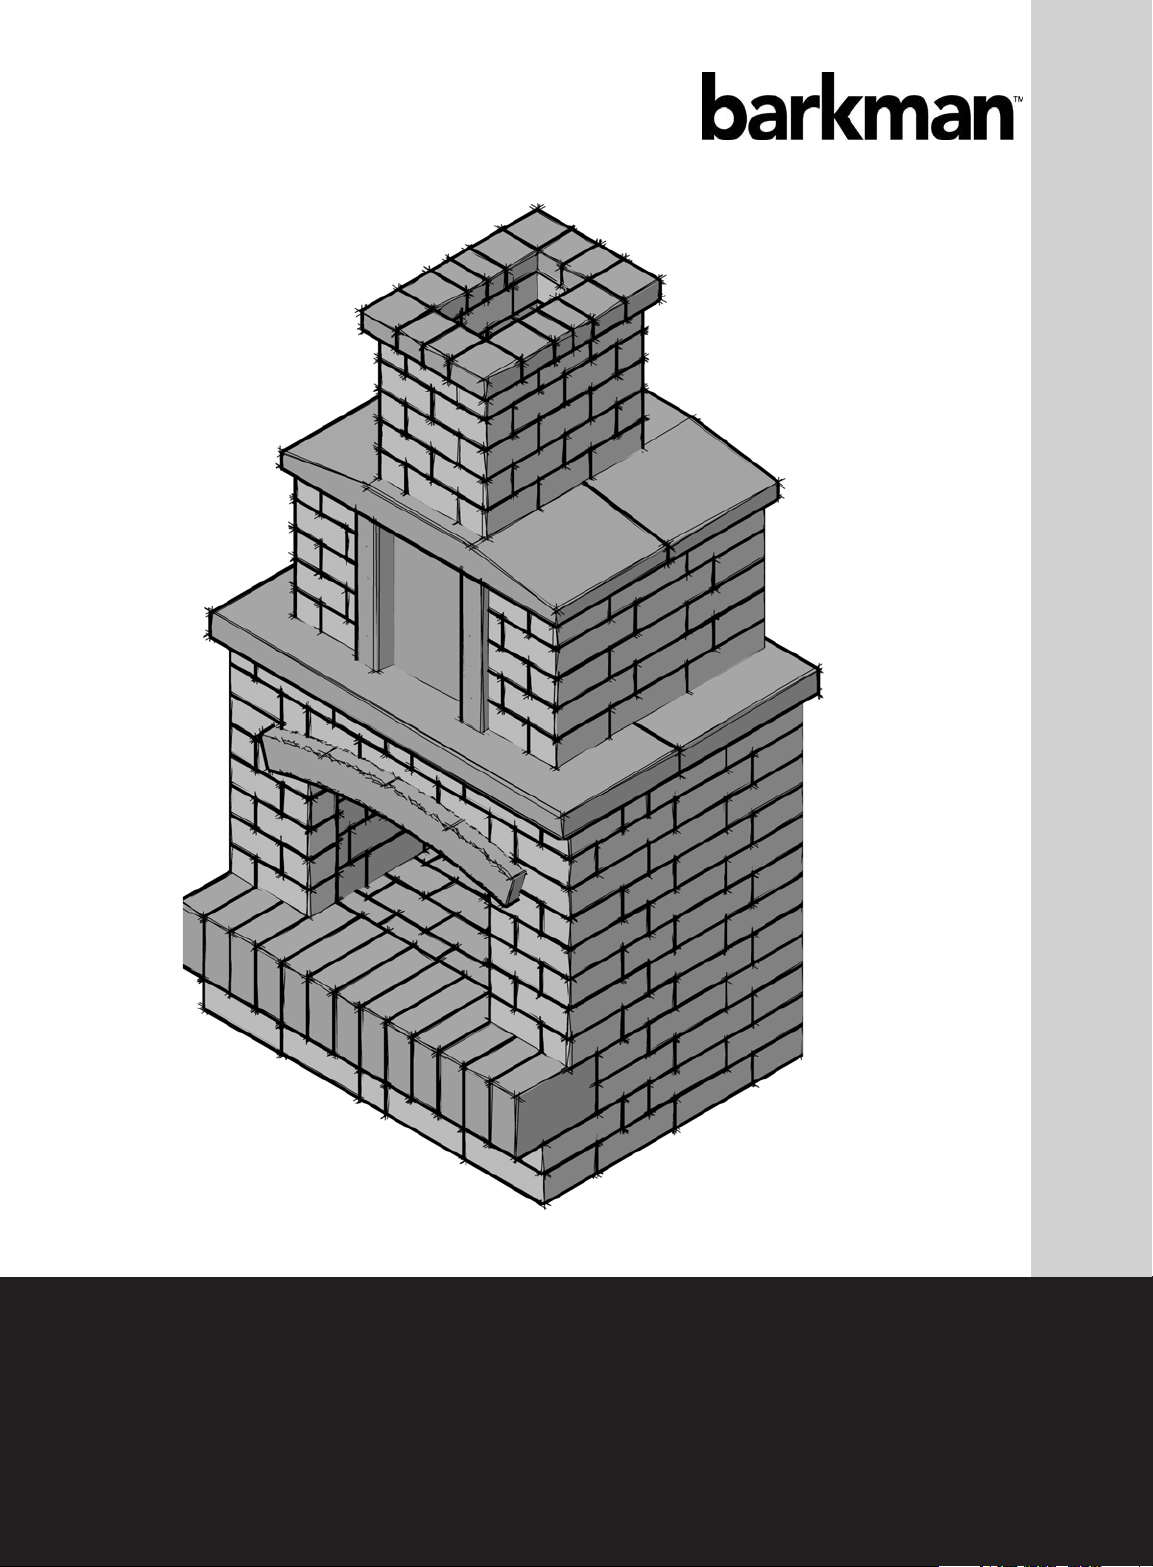
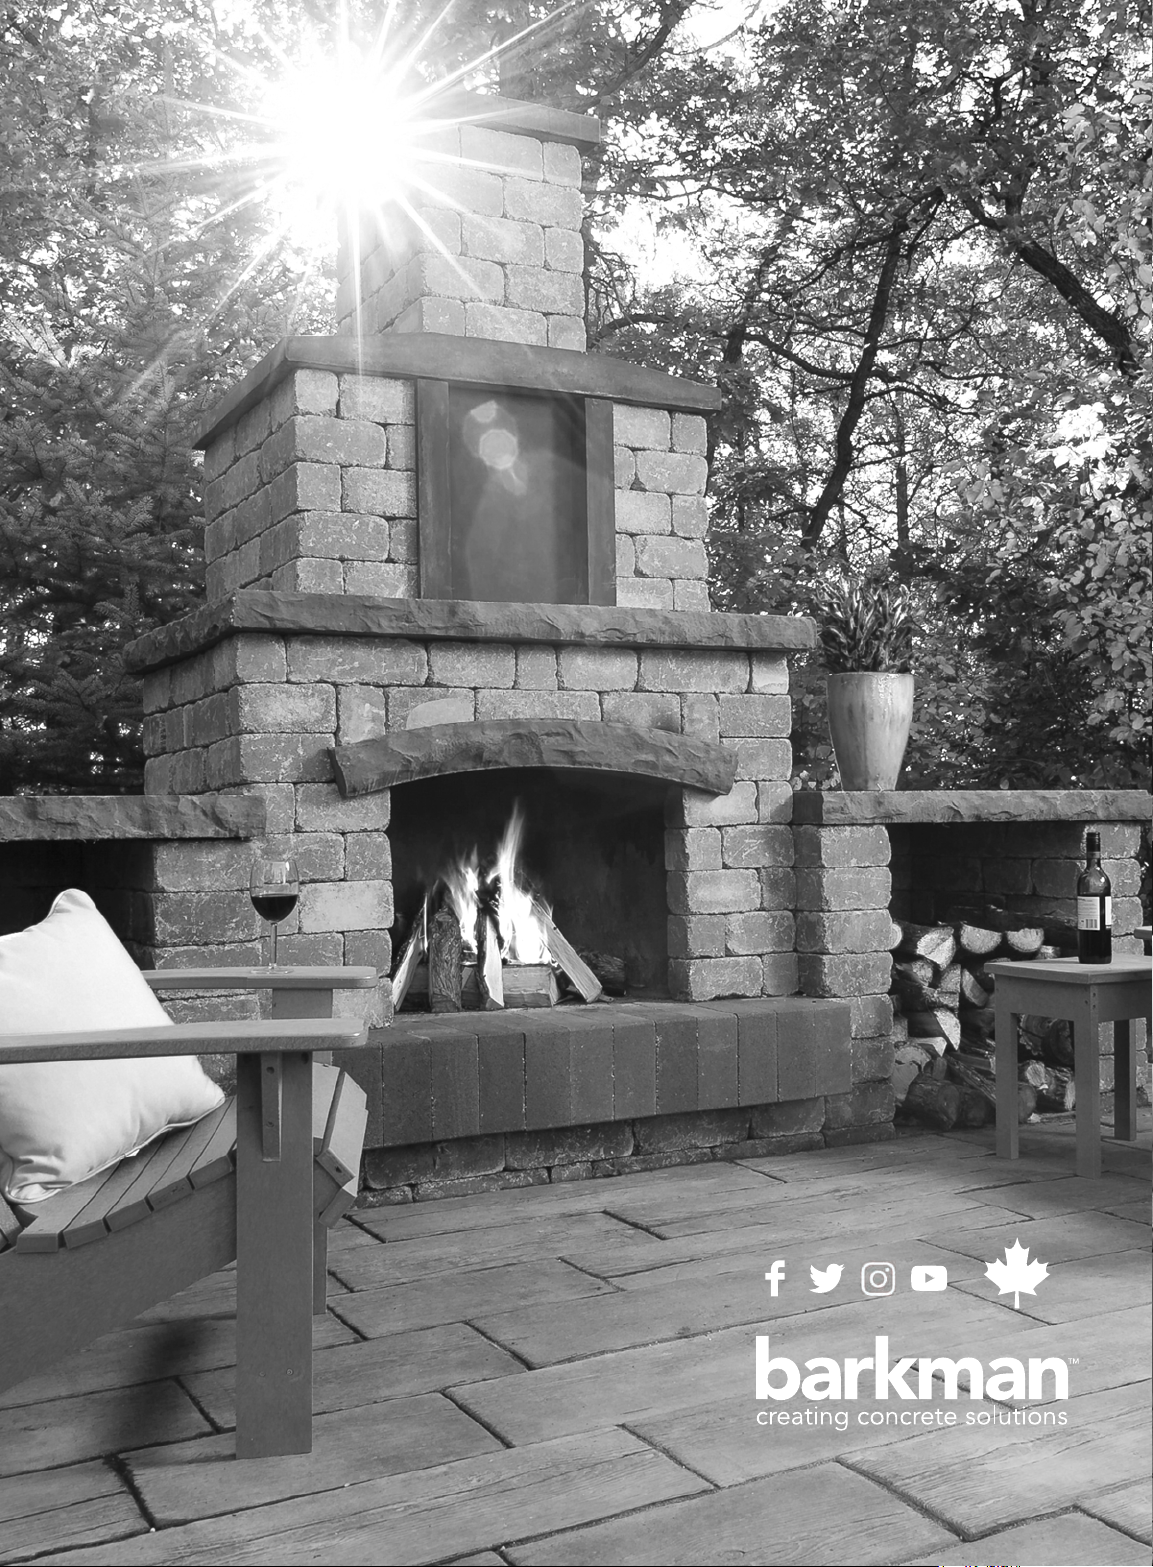
stone oasis collection
oasis fireplace
assembly, operation and maintenance guide
Page 2

IMPORTANT: READ PRIOR TO INSTALLATION
It is the responsibility of the consumer to read and follow the proceeding information.
WARNING:
1. FAILURE TO FOLLOW THESE INSTRUCTIONS COULD RESULT IN FIRE OR
EXPLOSION, WHICH COULD CAUSE PROPERTY DAMAGE, PERSONAL INJURY OR
DEATH.
2. IMPROPER INSTALLATION OR MAINTENANCE OF THIS PRODUCT MAY RESULT IN
DAMAGE TO PROPERTY, INJURY OR DEATH.
3. Read the installation, operation and maintenance instructions thoroughly before
installing or servicing this equipment.
Barkman Concrete Ltd. is not liable for any property damage or bodily injury caused
by failure to follow the installation instructions, improper use of the product or any
negligence or carelessness of the consumer.
INSTALLATION AND USE:
1. Improper installation, adjustment, alteration, service or maintenance can cause injury,
or property damage. Read the installation instructions thoroughly before installing the
fireplace.
2. DO NOT TOUCH AREAS IF FIRE IS BURNING, SEVERE BURNING MAY RESULT.
CLOTHING IGNITION MAY RESULT.
3. Carefully supervise children near the fireplace.
4. Keep clothing, furniture, draperies and other combustibles away from the fireplace.
5. Fireplace is for outdoor use only. Place the fireplace in an area where wind won’t
disturb the flames.
6. DO NOT OBSTRUCT THE OPENING OF THE FIREPLACE, OR OTHERWISE
OBSTRUCT THE FLOW OF AIR.
7. FIREBOX-RELATED FIRE CAN OCCUR WHEN THERE IS A FAILURE TO MAINTAIN
THE REQUIRED CLEARANCES (AIR SPACES) TO COMBUSTIBLE MATERIALS.
8. Certain steps in the installation process will require more than one person.
9. Curing is crucial to the operation of your fireplace. Ensure to follow the direction on
page 14 of the instruction guide.
10. Plan to install the fireplace a week before intended use to allow enough time for the
2
curing process.
Page 3

11. Never leave the fireplace unattended when in use.
12. We strongly recommend the installation of a steel fireplace grate on the floor of the
fireplace before starting to make fires. This makes it easier to ignite the fire, directing
heat away from the floor which extends the life of the floor by inhibiting the formation
of small cracks from excess heat.These grates are available at hardware and building
supply outlets.
DANGERS OF FIRE:
1. If the information in these instructions is not followed exactly, a fire or explosion may
result in property damage, injury or death.
2. Beware of flying sparks from mouth of the fireplace. Make sure that no combustible
materials are within range from the flames at any time.
3. Beware of extremely high temperatures in the fireplace when in use and for hours
after use. DO NOT PUT UNPROTECTED HANDS OR ARMS INSIDE WHILE FIREPLACE
IS LIT.
4. DO NOT USE CHARCOAL, PRESSURE TREATED LUMBER, CHIPPED WOOD
PRODUCTS, SAPPY WOOD (SUCH AS PINE), LAMINATED WOOD, OR ANY MATERIAL
OTHER THAN DRY MEDIUM OR HARD NATURAL FIREWOOD.
5. DO NOT USE LIQUID FUEL (firelighter fluid, gasoline, kerosene or similar liquids) TO
START OR MAINTAIN A FIRE.
PROXIMITY TO BUILDINGS AND OTHER COMBUSTIBLE MATERIALS:
1. The fireplace should be used in accordance with the by-laws, regulations, local
building codes and laws of your jurisdiction. Please confirm that use of this product is in
compliance with the by-laws, regulations and laws of your jurisdiction before installing or
using it.
2. Make sure that you locate your respective gas lines, wires, water pipes and/or any
above ground and underground services in your area and install your fireplace in the
proper distance away from them. Check with your provider for location and distance
requirements prior to installation.
This manual must be kept by the customer as long as they own their fireplace kit. Check
with your insurance provider concerning the installation, use, value implications and/or
any other considerations in regards to your fireplace kit.
FIRE WARNING:
DO NOT USE LANDSCAPE GLUE TO SEAL FIREBRICKS. ONLY
USE SILICONE TO FILL IN GAPS BETWEEN THE QUARRY STONES
AND APPLY FROM THE INTERIOR OF THE FIREPLACE.
DO NOT OVERLOAD WOOD IN THE FIREPLACE WHEN IN USE.
3
Page 4

This kit measures 52”W x 40”D x 97 3/8”H.
Materials Included:
4”x 4” quarry stone - 23 pieces
4”x 8” quarry stone - 84 pieces
8”x 8” quarry stone - 21 pieces
8” x 12” quarry stone - 149 pieces
8” x 12” accent stone - 13 pieces
4” x 5 1/2” quarry stone - 2 pieces
8” x 4 1/2” quarry stone - 2 pieces
12” x 4” quarry stone - 2 pieces
12” x 3 1/2” quarry stone - 1 piece
2 ½”x9”x4 ½” Firebrick - 70 pieces
2 ½”x6”x4 ½” Firebrick - 8 pieces
2 ½”x4 ½”x4 ½” Firebrick - 4 pieces
2 ½’x4”x4 ½” Firebrick - 4 pieces
2 ½”x3 ½”x4 ½” Firebrick 6 pieces
2 ½”x1.5”x9” Firebrick - 4 pieces
front mantle (small)
back mantle (large)
arch
recess panel
spark arrestor
roof front and back
fireplace cap (2 pieces)
plastic and steel shims
3 tubes of landscape glue
4 tubes of high temperature silicone
gloves
instruction guide
4 x 4 quarry stone 4 x 8 quarry stone
8 x 8 quarry stone
4 x 5 1/2 quarry stone
Note:
If installing your oasis fireplace on an unstructured
base, please ensure to follow these steps:
• Excavate area approx. 9” below grade
• Excavate approx. 6” larger than your actual
kit dimensions to ensure a stable base.
• Fill with ¾” down limestone and compact
firmly
• Level out ½” of sand and install kit as per the
instruction guide.
• If you are installing on a solid base such as
an existing patio and/or base prep is not
necessary, then you can proceed to the first
step.
These instructions may not refer to all base
conditions. As this kit is incredibly heavy, base
prep will greatly depend on existing ground
conditions and may require alternate techniques.
This manual is updated on September 2017. Please check www.barkmanconcrete.com/resources for any manual updates.
4
8 x 12 quarry stone
8 x 4 1/2 quarry stone
12 x 4 quarry stone
12 x 3 1/2 quarry stone
Page 5
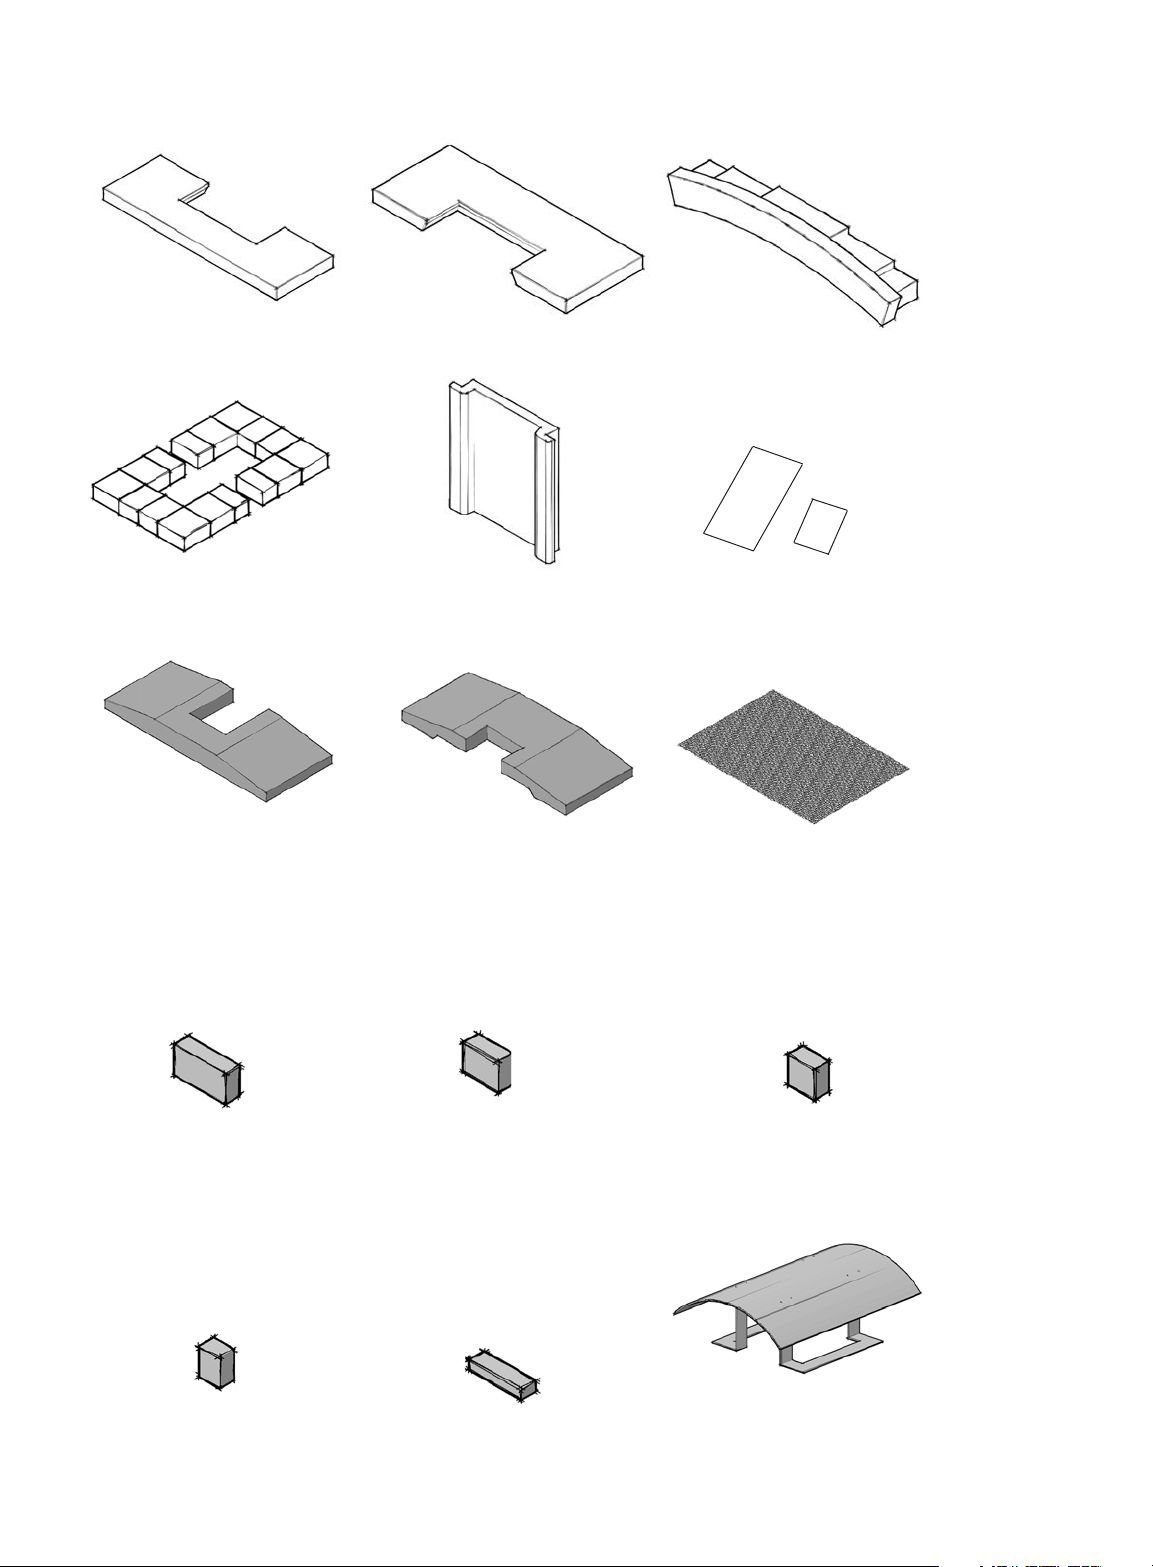
front mantle (small)
back mantle (large)
arch
fireplace cap (2 pieces)
roof front
Firebricks:
2 1/2” x 9” x 4 1/2”
recess panel
roof back
2 1/2” x 6” x 4 1/2”
plastic and steel shims
spark arrestor
2 1/2” x 4” x 4 1/2”
2 1/2” x 3 1/2” x 4 1/2”
2 1/2” x 1.5” x 9”
To help protect your chimney from snow and rain,
an optional fireplace rain cap (not included in kit) is
available for purchase at your nearest dealer. Find
your nearest dealer at
barkmanconcrete.com/find-a-dealer
5
Page 6
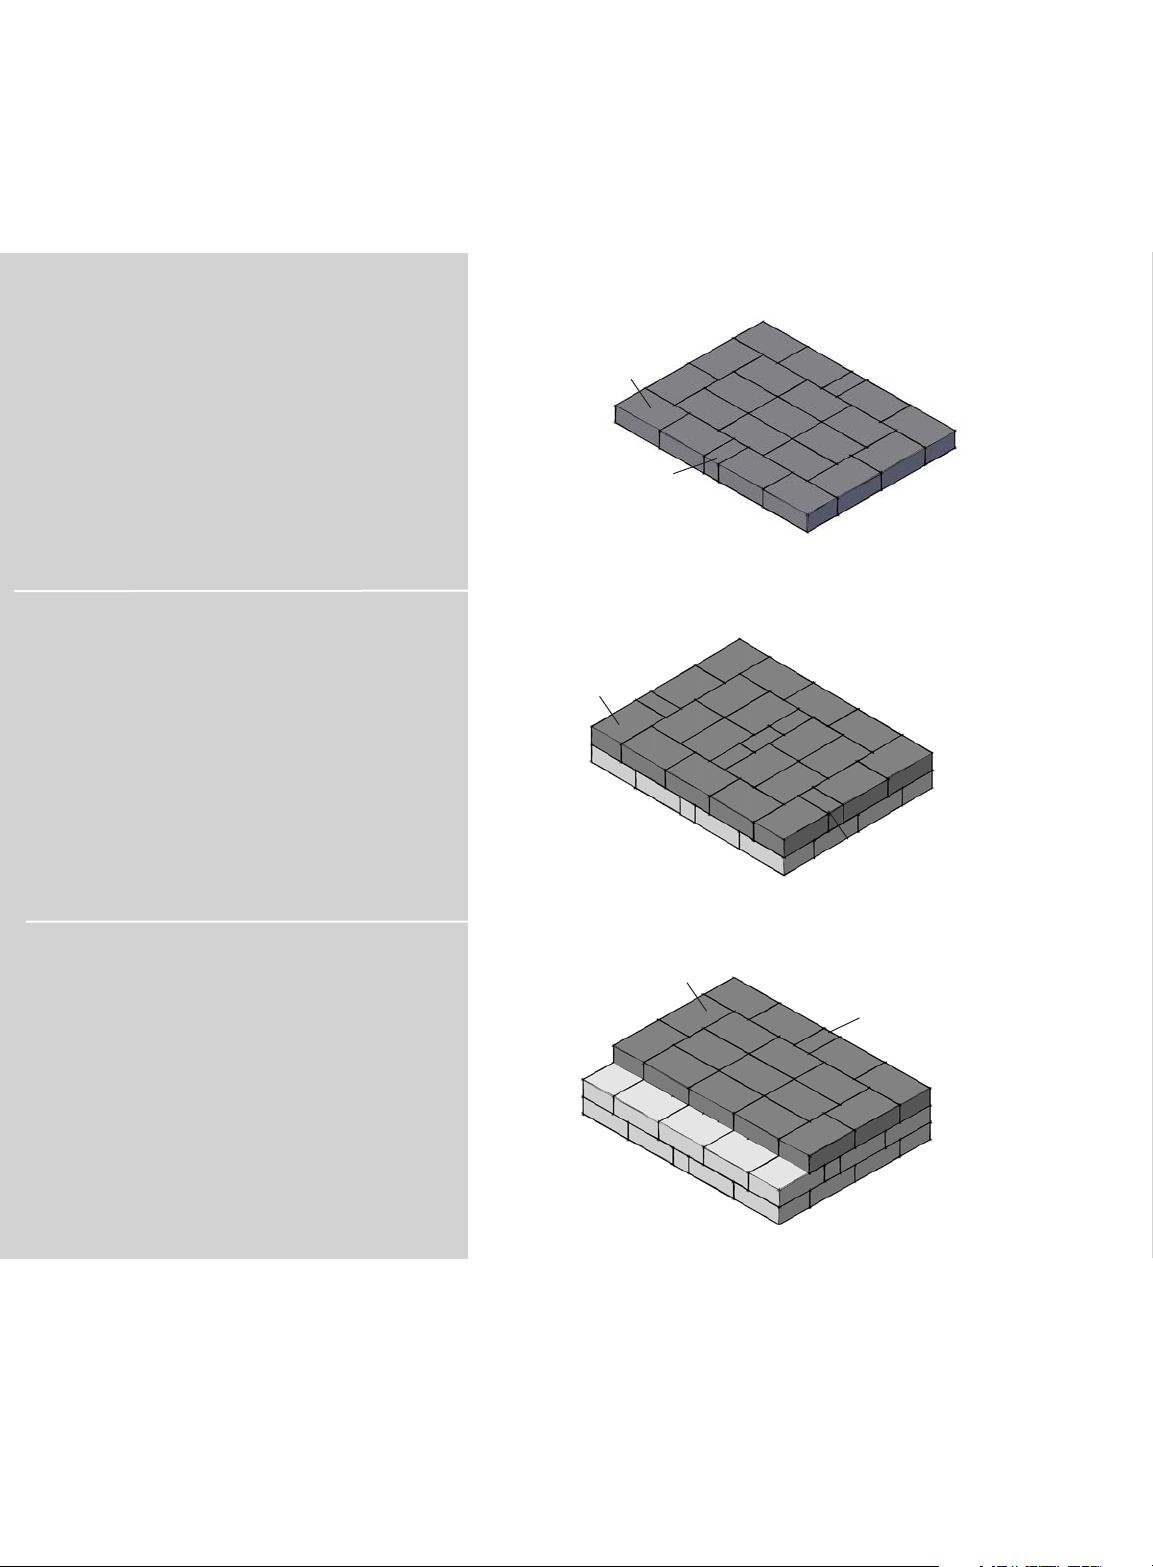
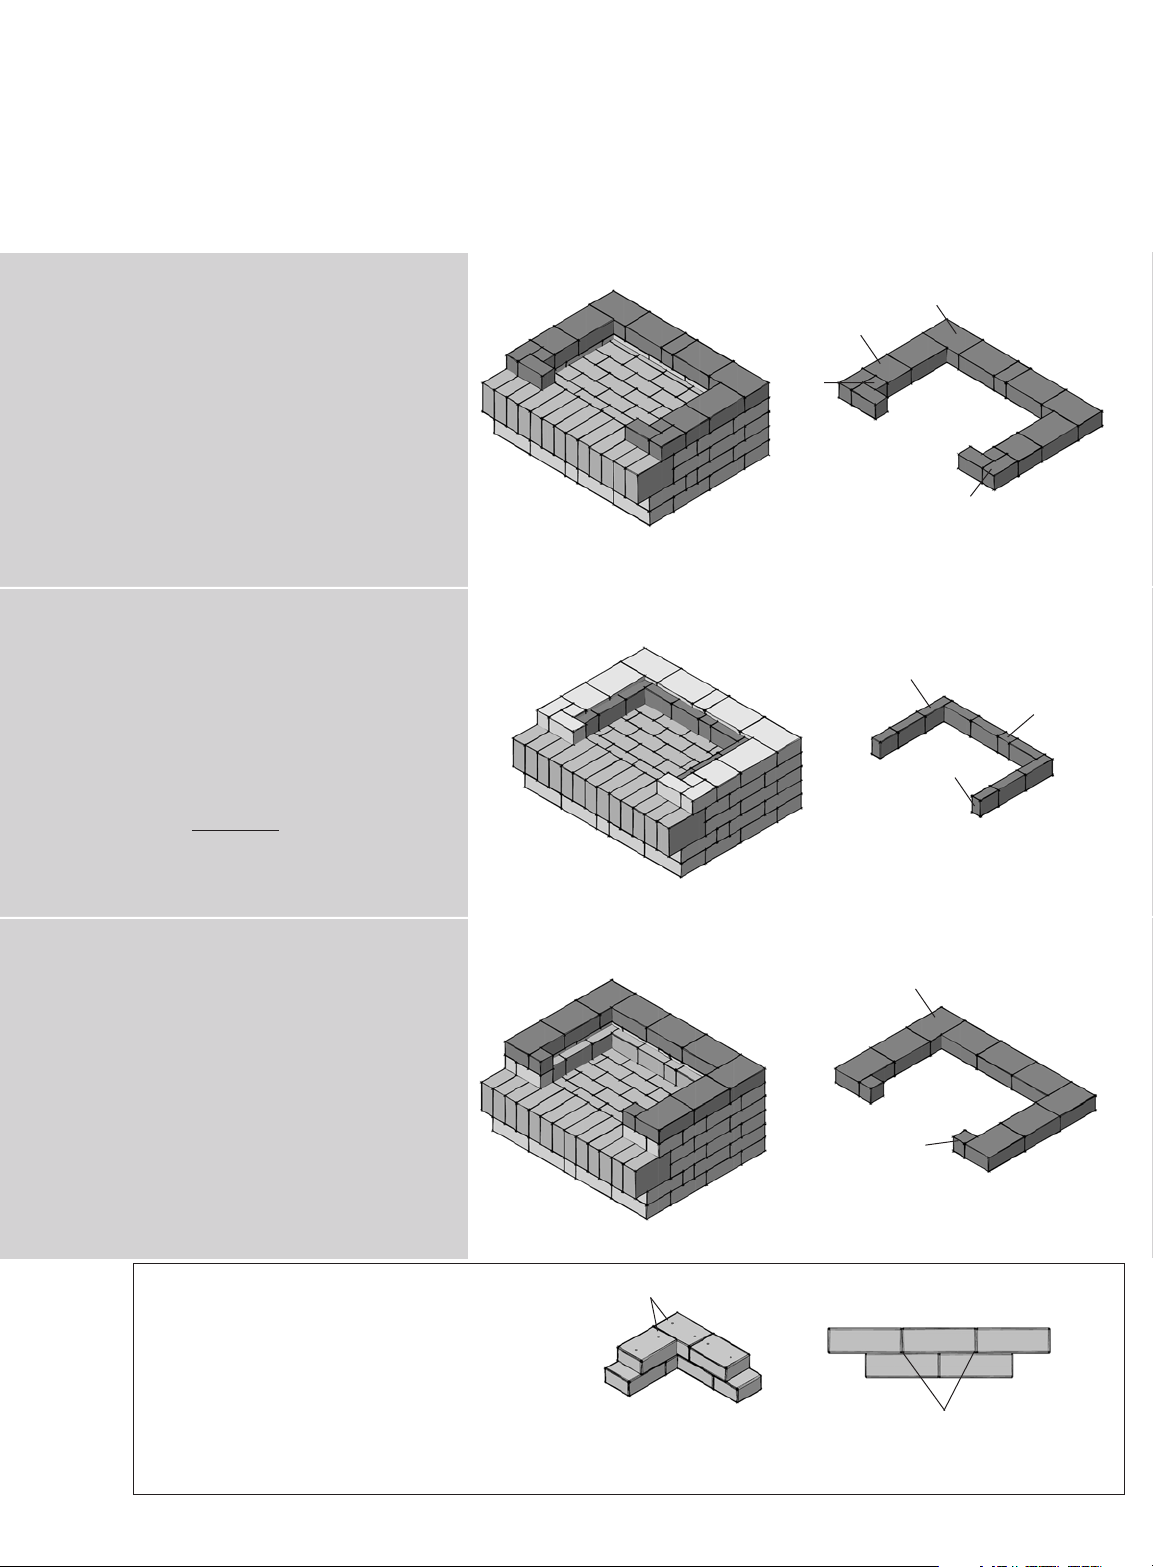
Section A - Fireplace Base & Firebox
1. On your prepared level base, lay out
the first layer as in the diagram.
8 x 12 (21)
4 x 8 (2)
IMPORTANT: Periodic checks must be
made to ensure that the layers remain
level. If layers are not level, use the
included shims to adjust as necessary.
2. Lay out the second layer directly on
top of the first.
8 x 12 (20)
4 x 8 (5)
8”x12”
4”x8”
8”x12”
4”x8”
3. Lay out the third layer directly on top
of the second.
8 x 12 (17)
4 x 8 (1)
6
8”x12”
4”x8”
Page 7
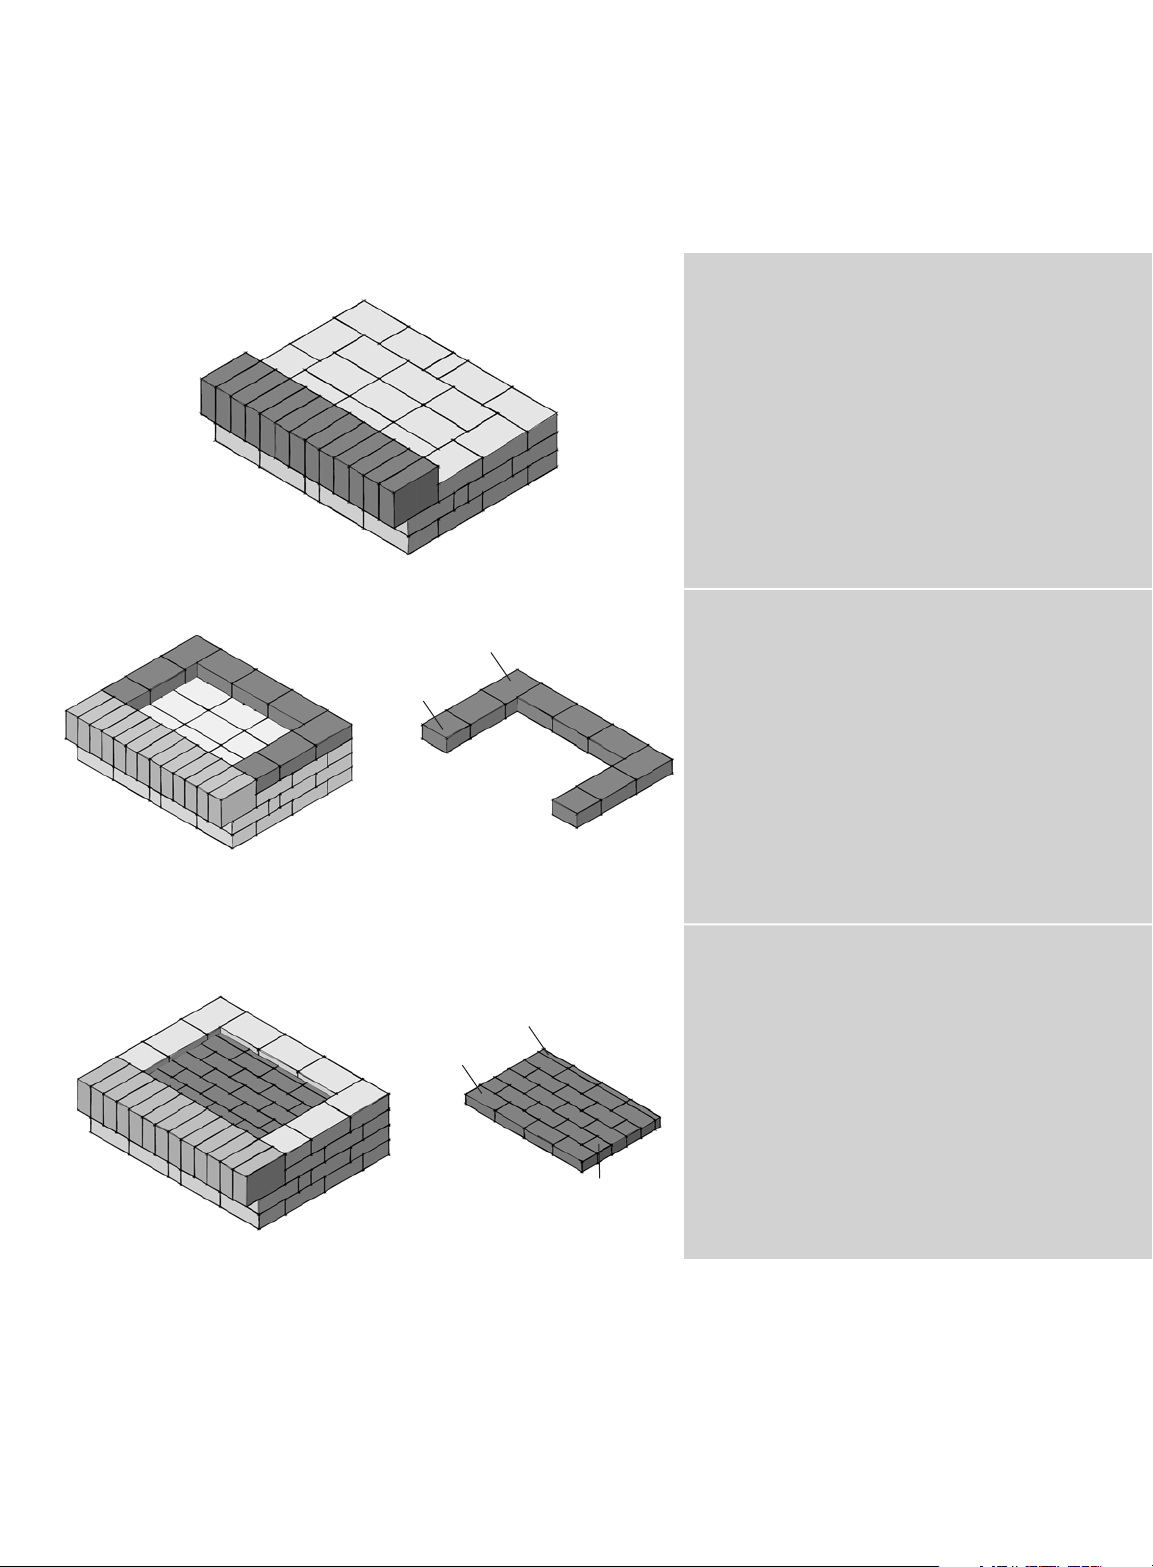
8”x8”
8”x12”
4. Lay out the accent band as indicated
in the image. Glue the accent band in
place where it contacts the quarry
stone behind and below using the
included landscape glue.
8 x 12 accent stone (13)
5. Lay out the fourth layer of the wall
surround as indicated in the diagram.
Glue this layer down using the
included landscape glue.
8 x 12 (7)
8 x 8 (2)
2 ½”x1 ½”x9”
2 ½”x9”x4 ½”
2 ½”x4 ½”x4 ½”
6. Lay out the following firebricks as
indicated. Using a mallet, ensure the
outer quarry stone fits tightly around
the firebrick.
2 ½”x9”x4 ½” firebrick (18)
2 ½”x4 1/2”x4 ½” firebrick (4)
2 ½”x1 1/2”x9” firebrick (4)
NOTE: Do not put silicone on any of the
firebrick. They should only be dry stacked,
allowing for any bricks to be replaced if
necessary. Fill any gaps between the quarry
stones with silicone. Fill these gaps from the
interior of the fireplace so no silicone is shown
from the outside.
7
Page 8
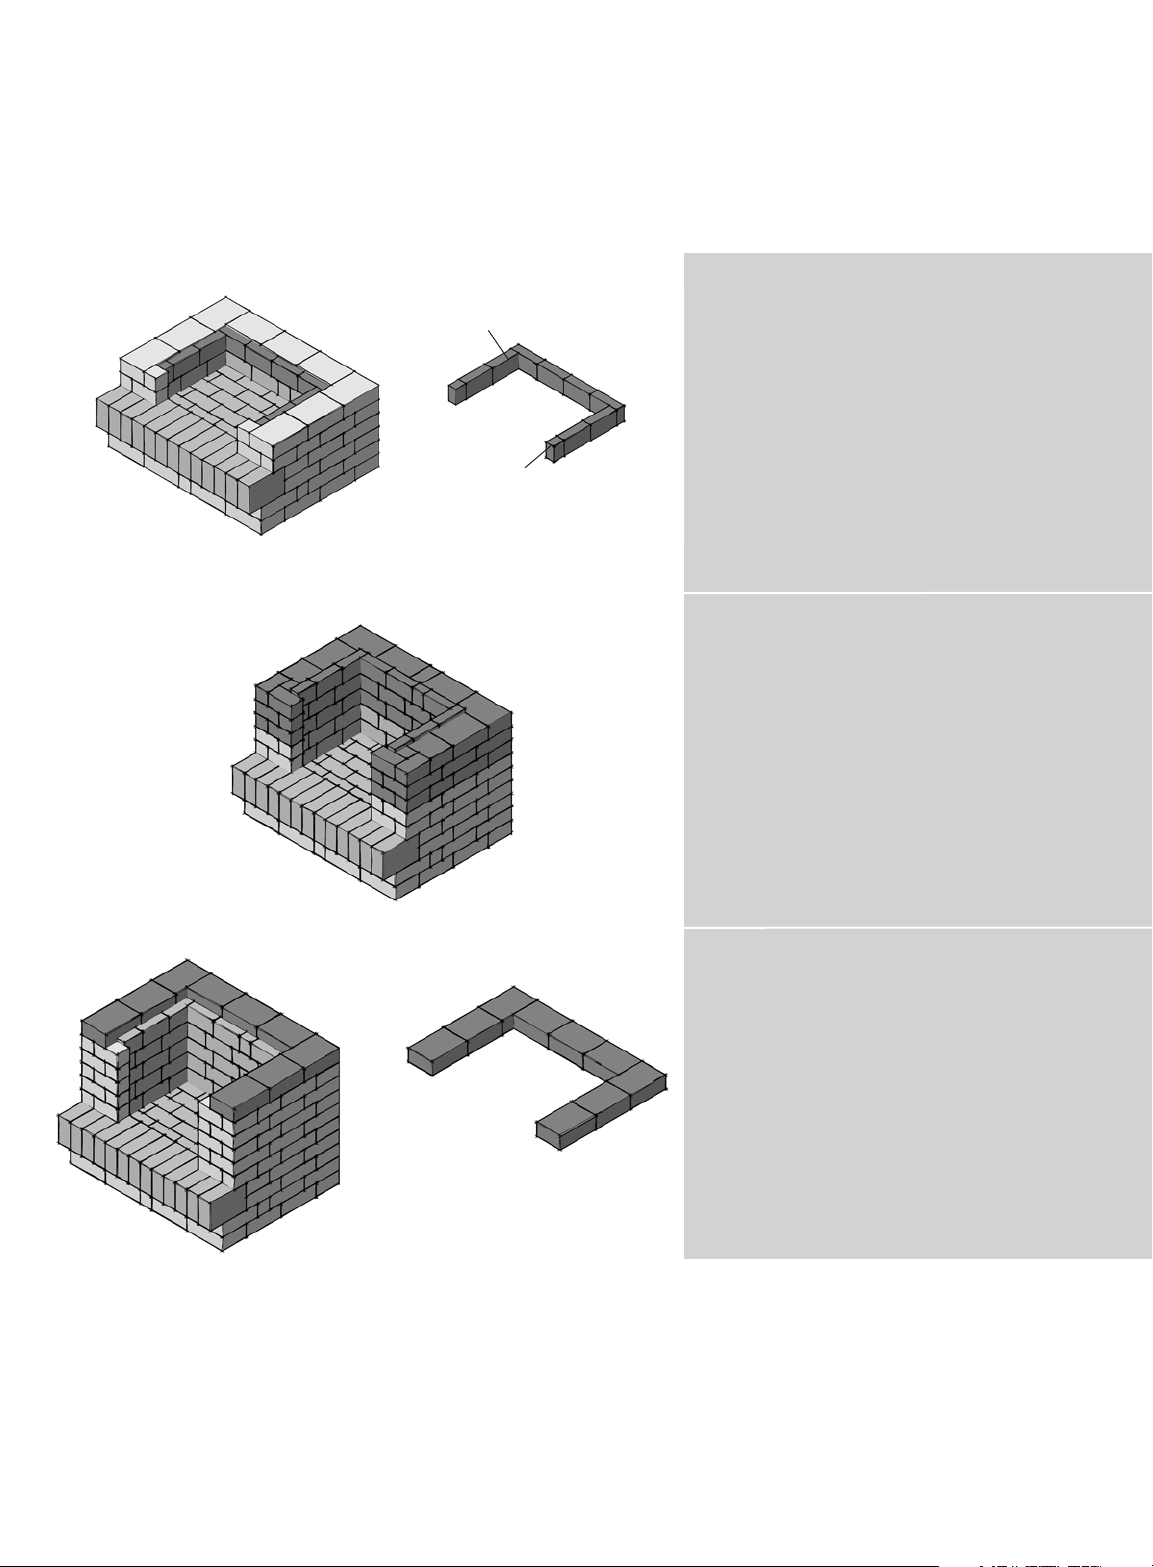
Section B - Opening Surround & Mantle
8”x12”
8”x8”
1. Lay out the first layer of the wall
surround as indicated in the diagram.
Glue this layer down using the
included landscape glue.
8 x 12 (6)
8 x 8 (2)
4 x 8 (5)
4 x 4 (2)
2. Place the first row of firebrick as
indicated. Using a rubber mallet,
tap quarry stone to tightly fit against
firebrick.
2 ½”x9”x4 ½” firebrick (7)
2 ½”x6”x4 ½” firebrick (2)
2 ½”x4”x4 ½” firebrick (1)
IMPORTANT: DO NOT USE LANDSCAPE
GLUE TO SEAL FIREBRICK.
NOTE: Firebricks are very light and heat resistant but
must be handled with care to avoid chipping upon
installation.
4”x4”
8”x4”
2 ½”x9”x4 ½”
2 ½”x4”x4 ½”
2 ½”x6”x4 ½”
3. Lay out the second layer of the wall
surround as indicated in the diagram.
Glue the 4x4 quarry stone down using
the included landscape glue.
8 x 12 (9)
4 x 4 (2)
IMPORTANT: Periodic checks must be made
to ensure that the layers remain level. If layers
are not level, use the included shims to adjust
as necessary.
APPLYING GLUE AND SILICONE:
Add 2 small dots of landscape glue to each quarry
stone on the center of the brick. Press each quarry
stone into place so that there is no gap between
bricks. If a shim is used on a quarry stone apply a line
of landscape glue across the entire brick.
8
8”x12”
4”x4”
dots of landscape glue
Apply silicone in the quarry stone
gaps from the fireplace interior to
fill spaces in between so no light
passes through.
Page 9
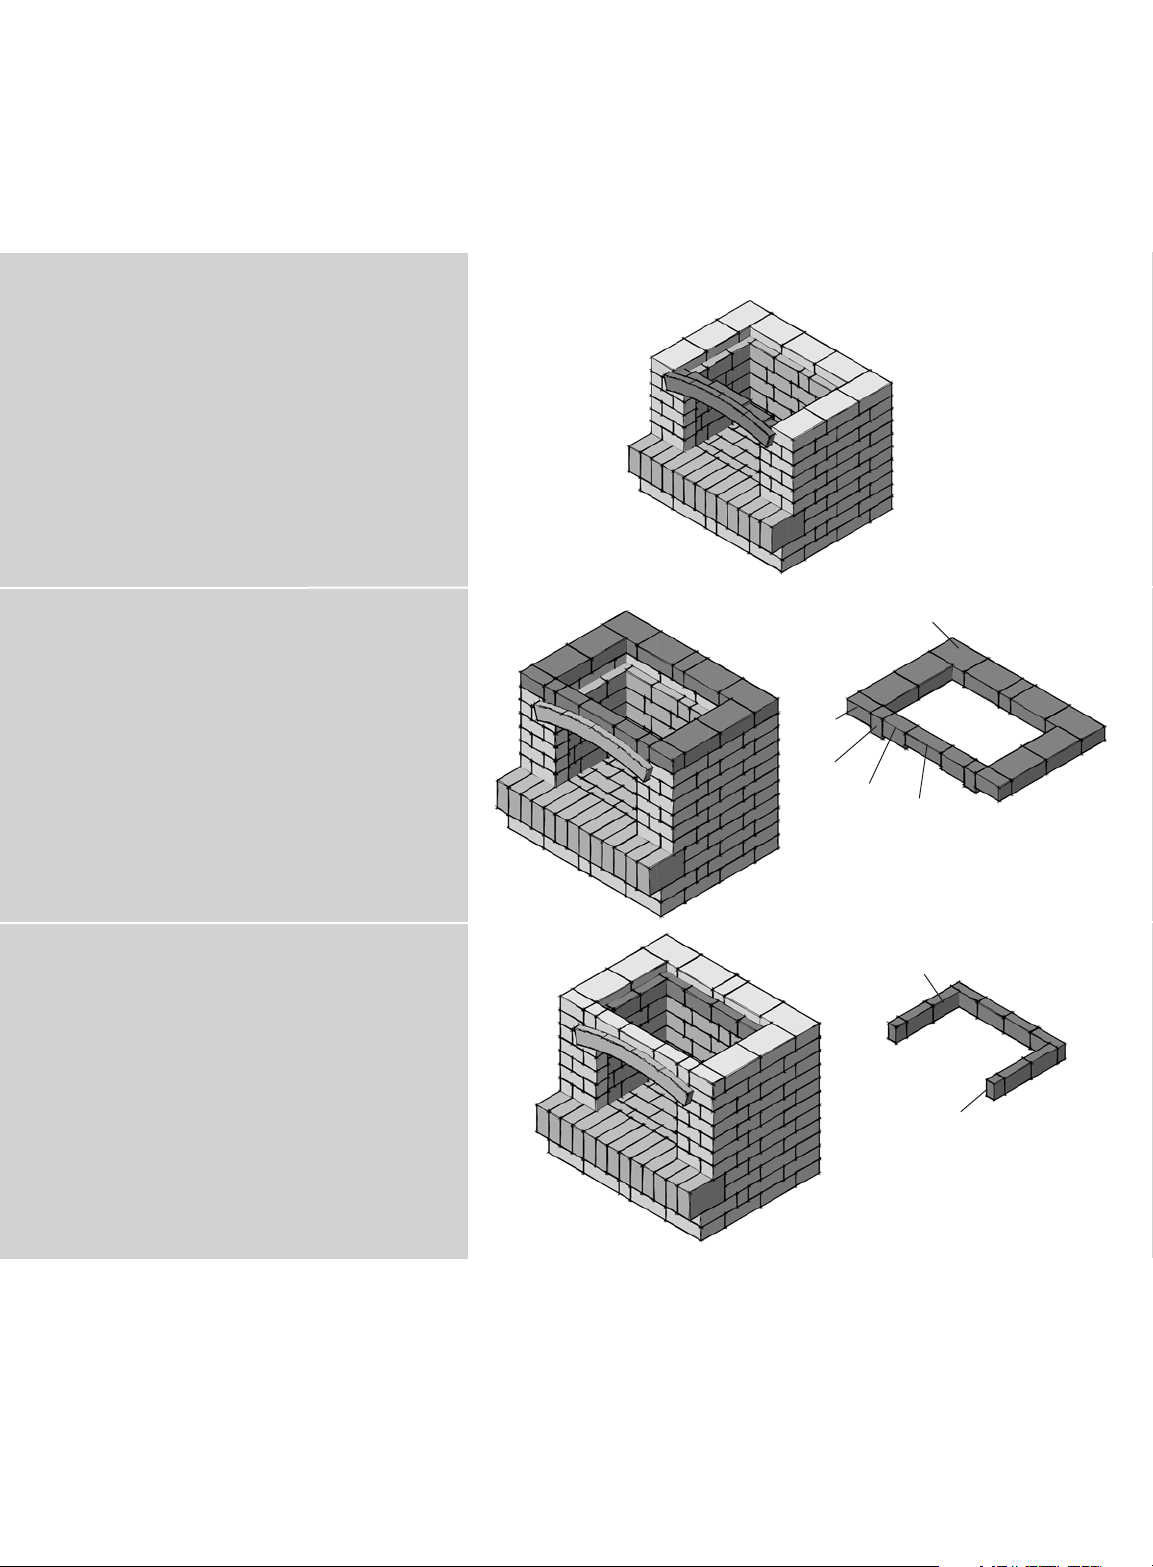
2 ½”x9”x4 ½”
4. Place the second row of firebrick
as indicated. Using a rubber mallet,
tap quarry stone to tightly fit against
firebrick.
2 ½”x3 ½”x4 ½”
2 ½”x9”x4 ½” firebrick (8)
2 ½”x3 ½”x4 ½” firebrick (2)
5. Repeat patterns from steps 1-4 of
section B to a height of 5 layers.
6. Lay out the sixth layer of the wall
surround as indicated in the diagram.
8 x 12 (9)
9
Page 10
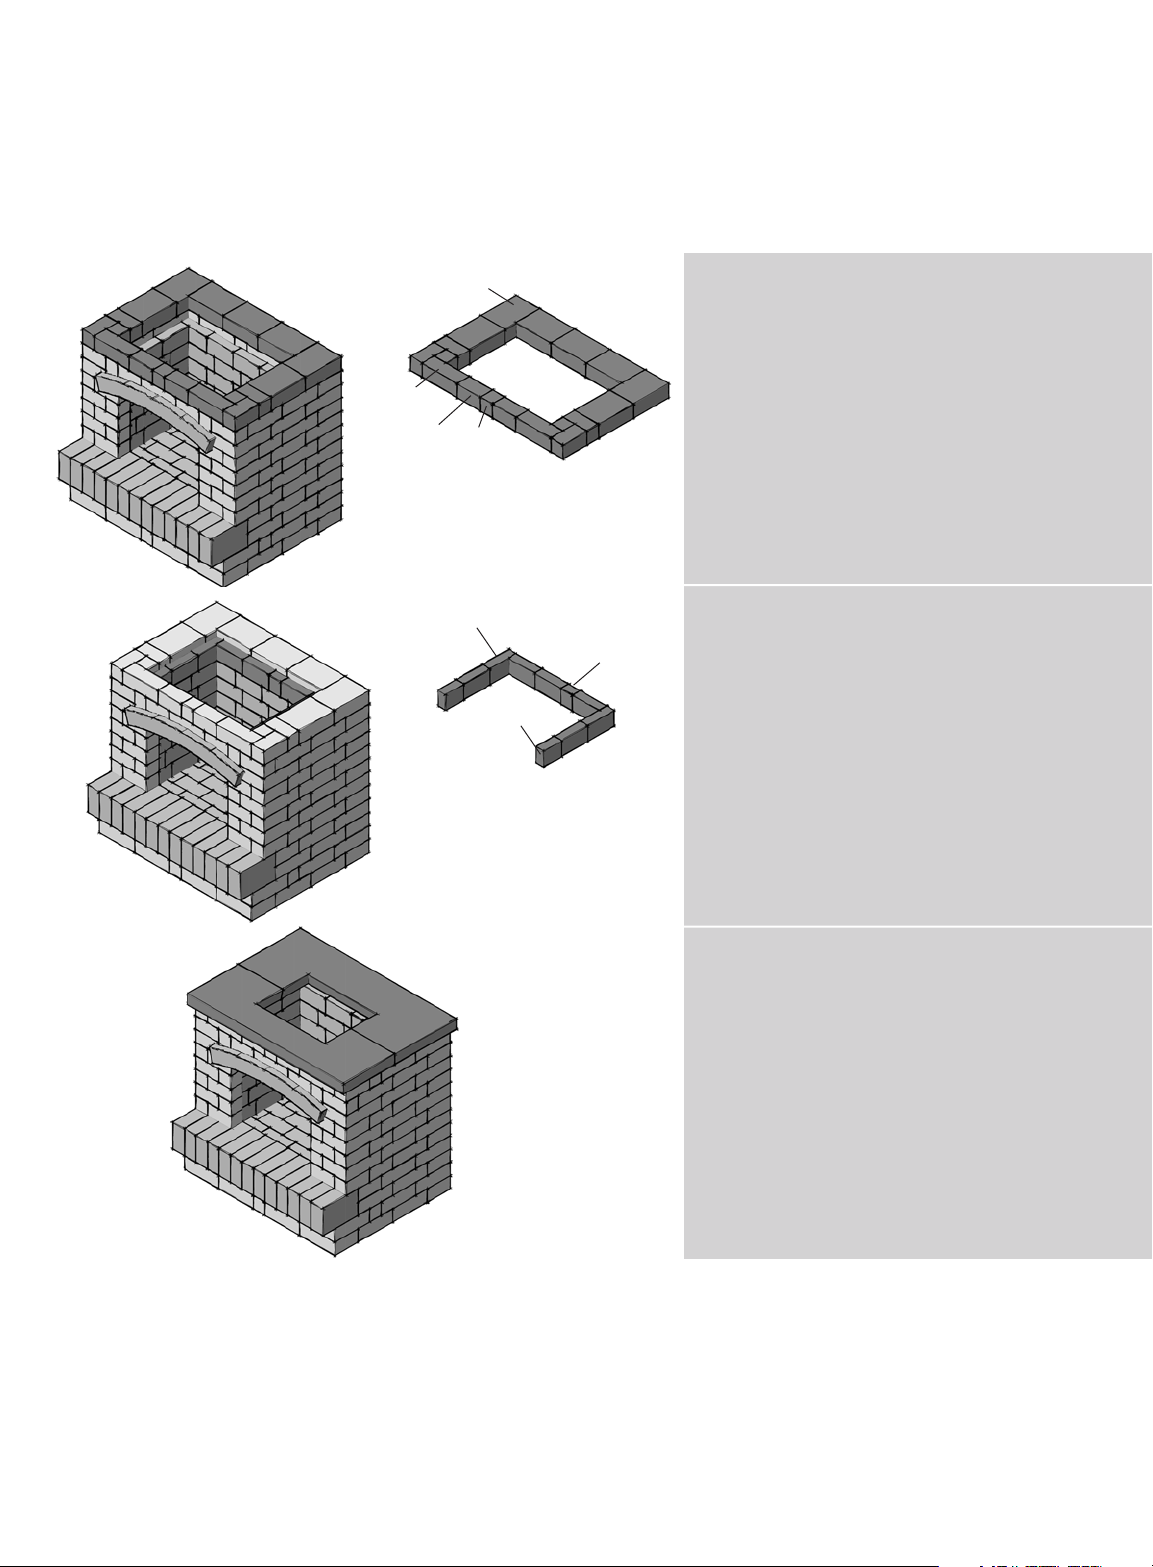
7. Place the arch into the seventh
layer as indicated in the diagram.
Glue the arch down where it
contacts the quarry stone below
using the included landscape glue.
IMPORTANT: Be sure to hold the arch
in place until the next layer of quarry
stone is set atop of it. Only use steel
shims above the arch.
8. Lay out the seventh layer of the wall
surround as indicated in the diagram.
8 x 12 (8)
4 x 8 (3)
4 x 5 1/2 (2)
8 x 4 1/2 (2)
12 x 3 1/2 (1)
NOTE: Fill in any large gaps between
the quarry stone above the arch with
high temperature silicone from the
interior of the fireplace.
9. Place the sixth row of firebrick as
indicated in the image. Using a
rubber mallet, tap quarry stones to
tightly fit against firebrick.
2 ½”x9”x4 ½” firebrick (8)
2 ½”x3 ½”x4 ½” firebrick (2)
4”x8”
4”x 5 1/2”
8” x 4 1/2”
8”x12”
12” x 3 1/2”
2 ½”x9”x4 ½”
2 ½”x3 ½”x4 ½”
10
Page 11
12”x 4”
4”x8”
8”x 12”
4”x4”
10. Lay out the eighth layer of the wall
surround as indicated in the diagram.
Glue this layer down using the
included landscape glue.
8 x 12 (7)
4 x 8 (6)
4 x 4 (3)
12 x 4 (2)
2 ½”x9”x4 ½”
2 ½”x6”x4 ½”
2 ½”x4”x4 ½”
11. Place the seventh row of firebrick as
indicated. Using a rubber mallet,
tap quarry stone to tightly fit against
firebrick.
2 ½”x9”x4 ½” firebrick (7)
2 ½”x6”x4 ½” firebrick (2)
2 ½”x4”x4 ½” firebrick (1)
NOTE: The gap at the top between
the firebrick and mantle is normal. This
allows for space to remove and replace
the firebrick/s if needed.
12. Install the mantle pieces as
indicated in the diagram. Adjust the
mantle as needed to ensure that it is
centered with a 2” overhang at the
front.
NOTE: Fill in any gaps between the
quarry stones and mantels with high
temperature silicone from the interior of
the fireplace, allowing no light to pass
between the quarry stones.
11
Page 12
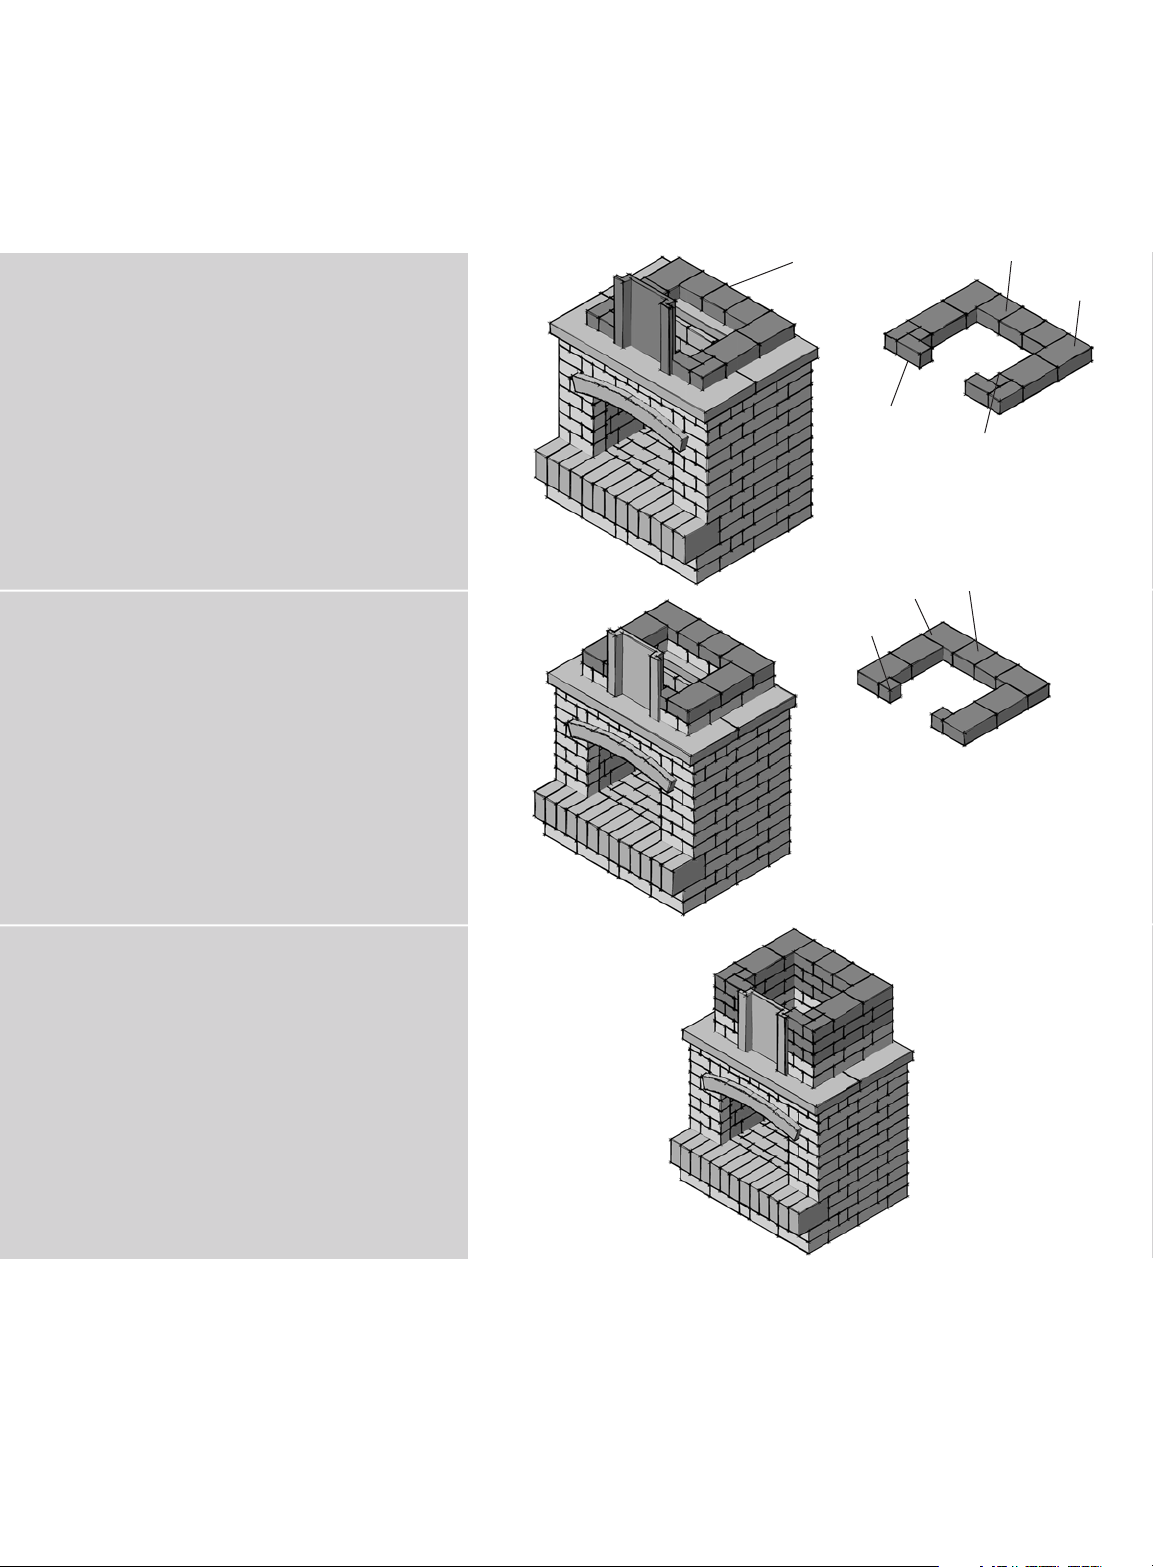
Section C – Chimney Surround & Roof
1. Centre the recess panel on the
mantle and lay out the first layer of
the wall surround. Quarry stone sits in
recess panel notch in all 5 layers.
Adjust as needed. Glue this layer
down using the included landscape
glue, except for the recess panel in
case you want an access point to the
chimney.
8 x 12 (4) 4 x 8 (4)
8 x 8 (3) 4 x 4 (2)
IMPORTANT: Periodic checks must
be made to ensure that the layers
remain level. If layers are not level, use the
included shims to adjust as necessary. Fill
any large gaps between the quarry stone
with the included silicone.
2. Lay out the second layer of the wall
surround as indicated in the diagram.
Match distance from
back edge with
quarry stone beneath
the mantle.
4”x8”
8”x12”
4”x4”
8”x8”
8”x12”
4”x4”
8”x8”
8 x 12 (6)
8 x 8 (2)
4 x 4 (2)
3. Repeat the patterns from Steps
1&2 to a height of 5 layers above
the mantle, checking the layers
remain level. Glue the 5th layer down
using the included landscape glue.
IMPORTANT: Allow glue to set for at
least 2 hours before installing the roof.
Check to ensure the glue has begun to
set so that the roof does not move any
blocks underneath. Blocks should be
steady when moved.
12
Page 13
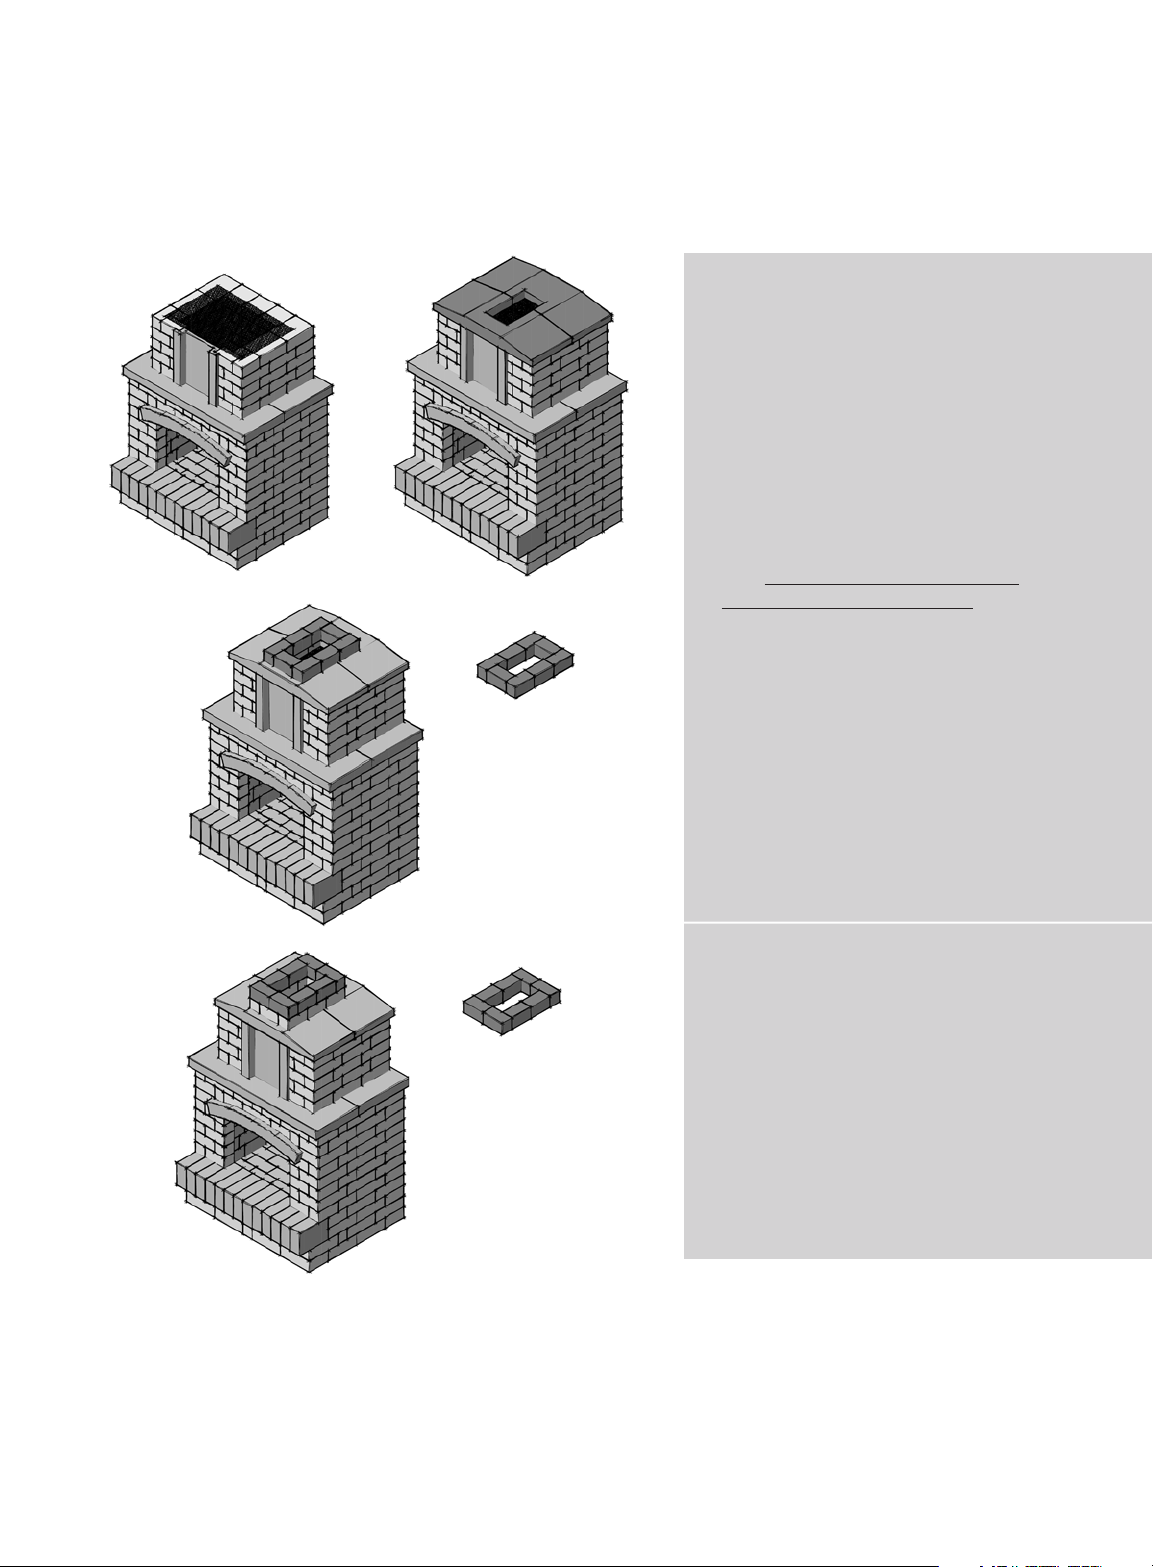
#4 #5
#6
4. Place the spark arrestor at the top of
the fireplace setup as shown.
5. Carefully place both front and back
pieces of the roof on the wall surround,
ensuring that the opening for the
chimney is facing the front and aligned
with the opening below it.
IMPORTANT: Each side of the roof
weighs approx. 85kgs. and is heavy to
lift. One recommended install technique
is to use wood 2”x4” studs to lift
spanning the roof widthwise. Lower the
roof down with the 2”x4” studs, align
the roof, and move the wood studs out
one at a time while ensuring that the
spark arrestor stays in place.
6. Lay out the first layer of the chimney
surround as indicated in the diagram.
Glue this layer down using the
included landscape glue.
4 x 8 (8)
7. Lay out the second layer of the
chimney surround as indicated in the
diagram.
4 x 8 (8)
13
Page 14
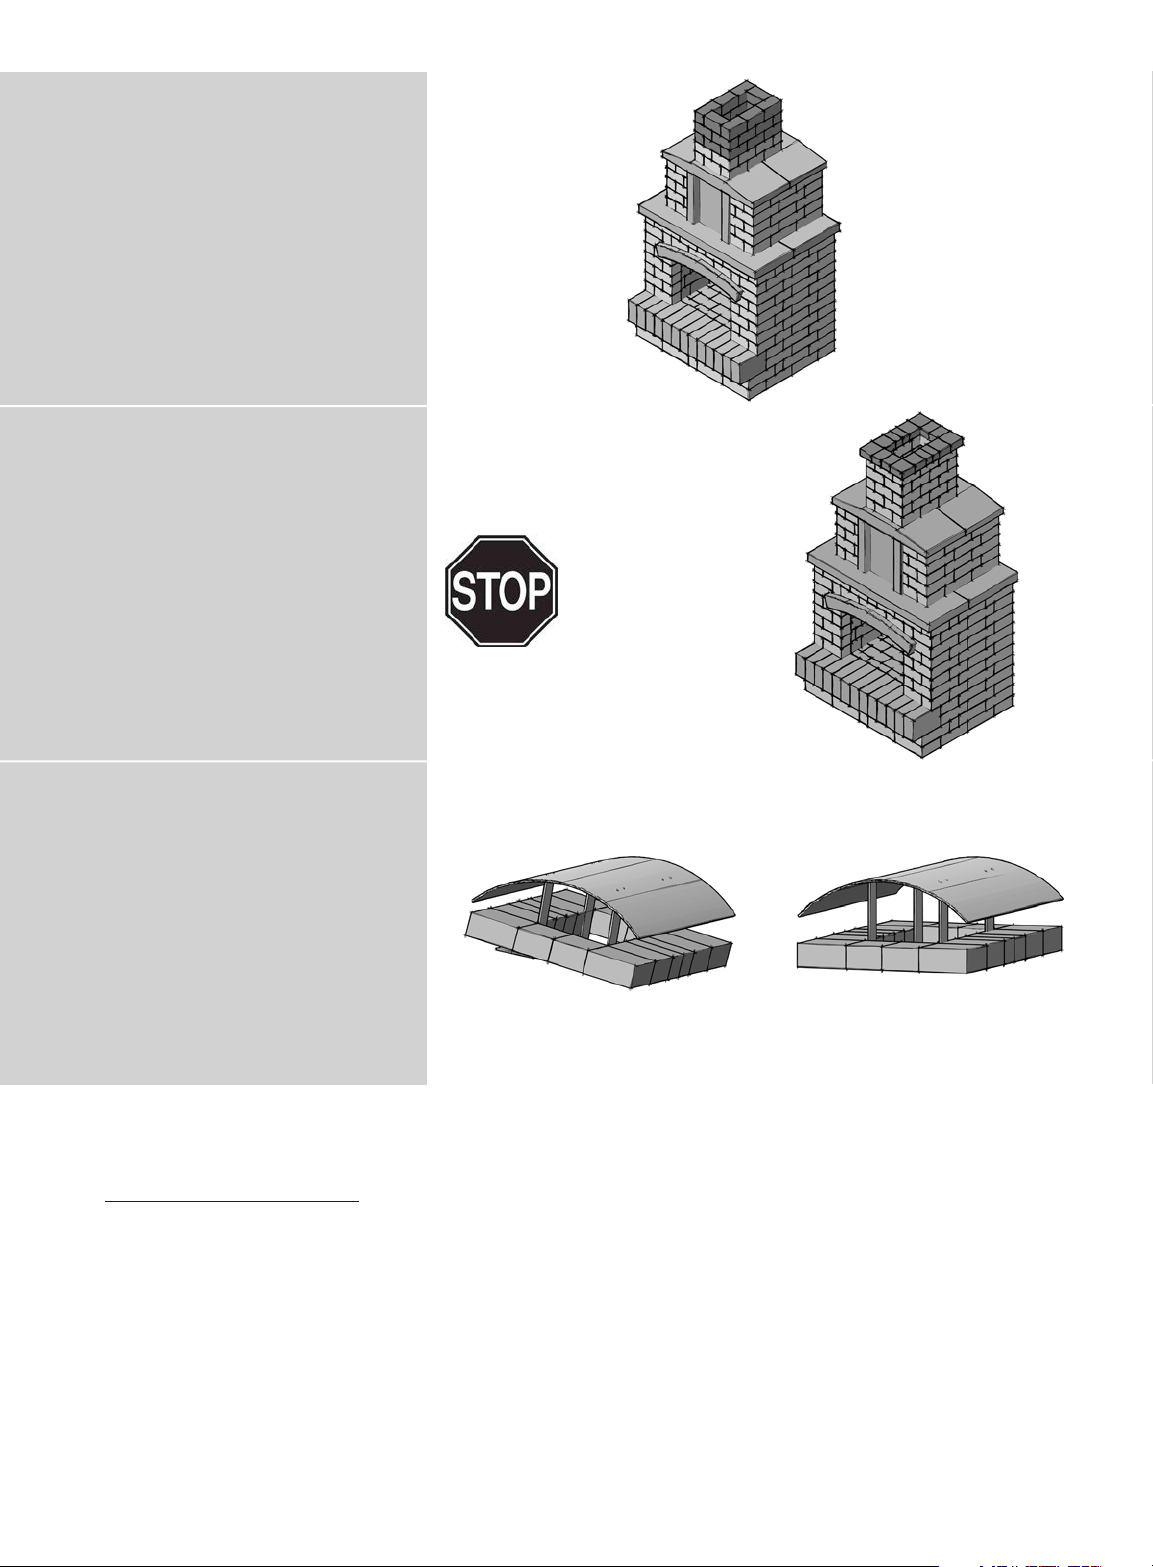
8. Repeat the previous two steps to
a height of 5 layers above the roof,
checking that the layers remain level.
Glue the 5th layer down with
landscape glue.
9. Install the two-piece fireplace cap
as indicated in the diagram. Adjust
the cap as needed to ensure that it
is centred with a 1 3/8” overhang on
all sides. Glue this layer down using
the included landscape glue.
NOTE: Do not glue down fireplace
cap if the rain cap is still going to be
installed.
Allow 72 hours for glue and silicone
to set before first use.
OPTIONAL RAIN CAP INSTALL:
Lift one side of the fireplace cap
and place one side of the rain cap
underneath. Lift the other side of the
fireplace cap and place the other
side of the rain cap underneath. Glue
fireplace cap in place with the included
landscape glue.
AFTER INSTALLATION:
CURING INSTRUCTIONS:
Upon installation of your new fireplace, there are still small amounts of moisture needing
to work their way out of the fireplace. If you immediately begin to build large fires in your
fireplace, you will compromise its longevity and can ultimately cause damage, including
cracking. It is then important to build fires slowly to cure the fireplace in preparation for use.
The first day of firing, the inside temperature should stay close to 100˚C without exceeding it.
A suggested way to do so is by building a fire in a separate location, and placing the hot coals
into the inside floor of the fireplace. Gradually build up from this point to larger and larger fires
for 4-5 days.
14
Page 15
Due to thermal expansion and contraction, surface cracks may appear inside the fireplace. This is
normal, and will not affect the quality of your fireplace.
OPERATING INSTRUCTIONS:
Your fireplace is designed to be used with natural, dry wood products only. DO NOT USE
CHARCOAL, PRESSURE TREATED LUMBER, CHIPPED WOOD PRODUCTS, SAPPY WOOD (SUCH
AS PINE), LAMINATED WOOD, OR ANY MATERIAL OTHER THAN DRY MEDIUM OR HARD
NATURAL FIREWOOD. Using wood that is not dry will cause the fireplace to emit a considerable
amount of smoke and could also cause permanent damage.
WARNING: DO NOT ADD ANY ACCELERANTS OR OTHER NON-WOOD
PRODUCTS FOR FIRING, AS THIS CAN COMPROMISE THE INTEGRITY
OF THE FIREPLACE, LEADING TO RISK OF PRODUCT FAILURE AND
PERSONAL INJURY. MAKE SURE TO AVOID EXTREME HEAT WHEN IN
USE TO PROLONG THE LIFE OF YOUR FIREPLACE.
DO NOT USE LIQUID FUEL (firelighter fluid, gasoline, kerosene or similar liquids) TO START OR
MAINTAIN A FIRE. Do not use water to lower the temperature or extinguish fire in the fireplace.
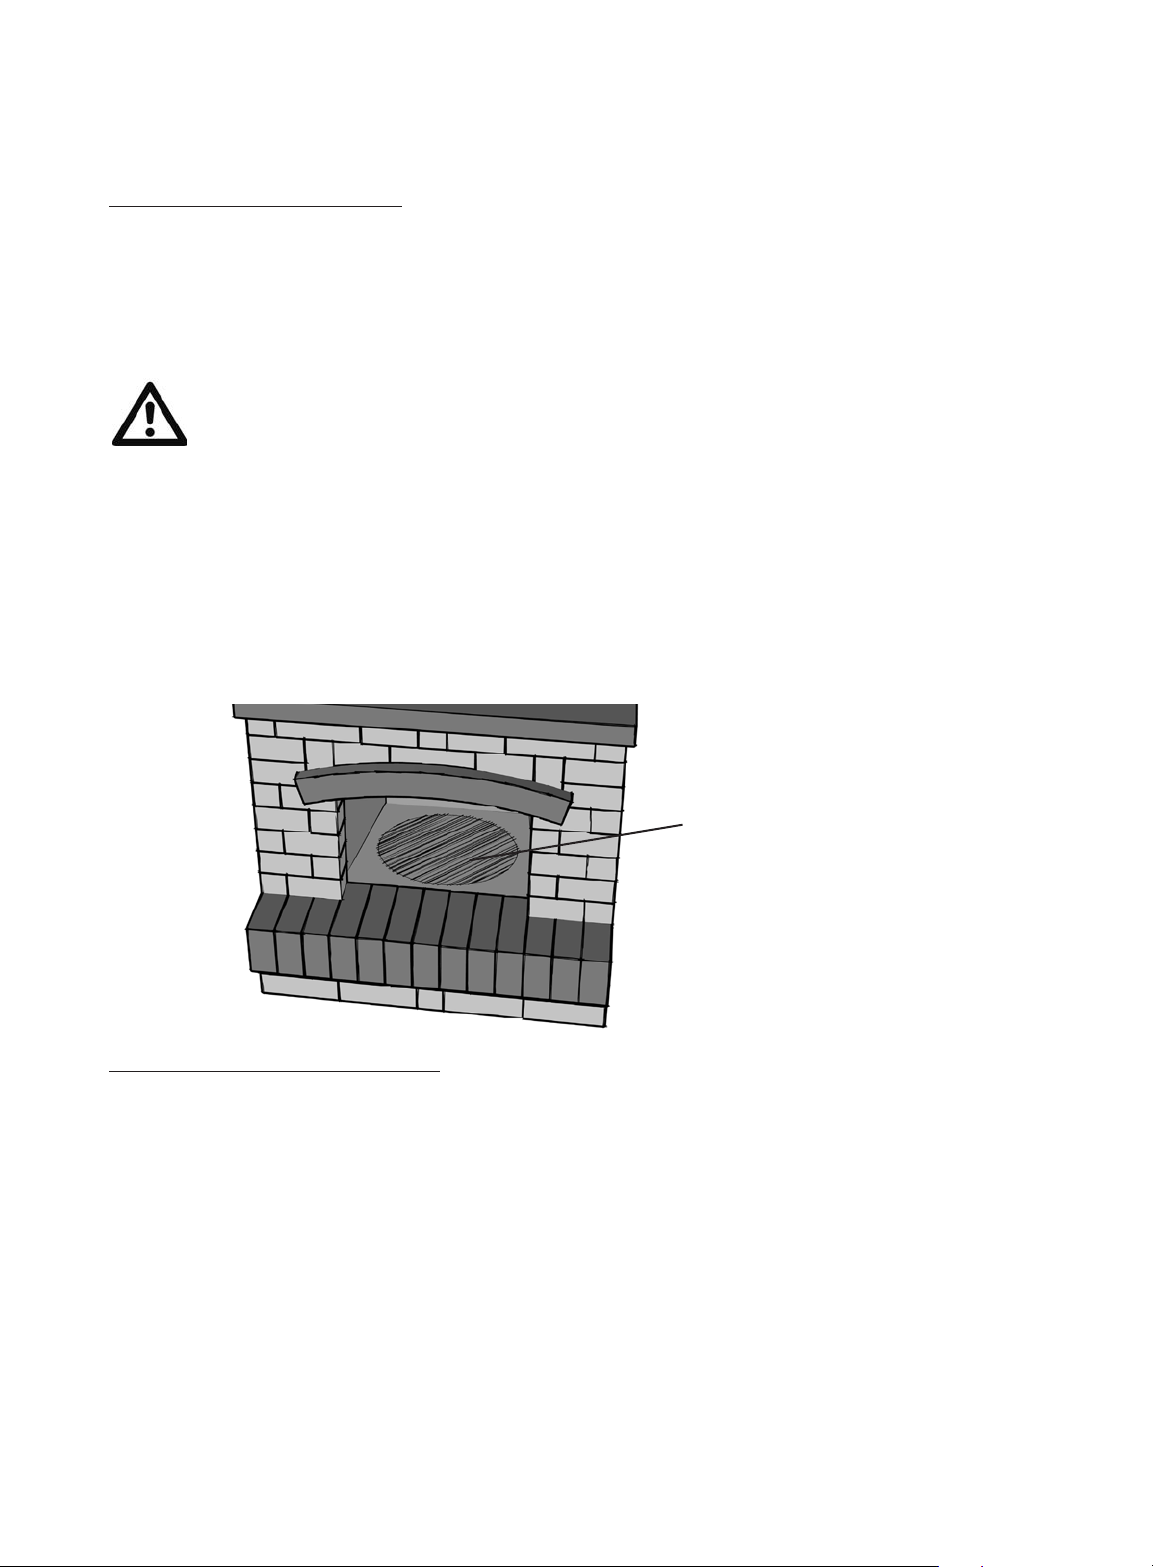
Size of fire should never be bigger than the back of the firebox. DO NOT BUILD THE FIRE WHERE
FLAMES EXIT THE FIREPLACE OPENING. See illustration below:
Fire should be limited to the
interior of the fireplace, as
the shaded circle shows.
MAINTENANCE INSTRUCTIONS:
1. Make sure that your fireplace is completely cool before inspecting and cleaning it. If fire
previously made was a large one, probe through the ashes with a poker or fireplace shovel. Slowly
shovel the ashes into a metal container with a tight-fitting lid. This container should be stored
on a non-combustible surface, away from fire hazards. Ensure ashes are completely cold before
disposing of them appropriately.
2. Use a wire brush to clean the firebox floor.
3. If you have doubts on your ability to clean the chimney, have it cleaned by a professional. If you
were to clean it yourself, make sure to use a brush to clean the inside and outside of the chimney.
4. If smoke marks begin to appear on the exterior of the fireplace, apply the silicone provided from
the interior of the fireplace to fill in any gaps between the quarry stones.
15
Page 16
BARKMAN CONCRETE LIMITED
Steinbach Office
152 Brandt Street,
Steinbach, MB R5G 0R2
T 204 326 3445 or 1 800 461 2278
F 204 326 5915
[email protected]
Winnipeg Office
901 Gateway Road,
Winnipeg, MB R2K 3L1
T 204 667 3310 or 1 800 342 2879
F 204 663 4854
[email protected]
Calgary Office
813 McCool Street, Box 1136,
Crossfield, AB T0M 0S0
T 403 946 4630
F 403 946 4631
[email protected]
Vancouver Office
2104-290 Newport Drive,
Port Moody, BC V3H 5N2
T 778 689 7670 or 1 800 461 2278
F 604 949 0321
[email protected]
O
Y
L
W
I
M
N
A
E
F
D
N
A
I
D
A
N
A
C
A
C
Y
S
8
4
I
N
9
C
1
E
www.barkmanconcrete.com
O
M
P
A
N
Made in Canada.
 Loading...