

Page 1

E X S T R E A M E R
1 0 0
Quick Install Guide Version 1.2
Multiformat network audio decoder
Package contents
a Exstreamer 100
b Power supply
c RCA Stereo cable
Cable Set AUDIO (not included)
d Earphone
e RCA Stereo cable
f Network cable
g Serial cable
Firmware
This device comes preloaded with the standard Exstreamer firmware. Alternative
firmware, such as the Streaming Client, can be downloaded from www.barix.com.
Support
For support please contact your local dealer or visit www.barix.com.
© Barix AG 8/2009, all rights reserved. All information is subject to change
without notice. All mentioned trademarks belong to their respective owners
and are used for reference only. Barix, Exstreamer and SonicIP are trade-
marks of Barix AG, Switzerland, and are registered in certain countries.
Page 2
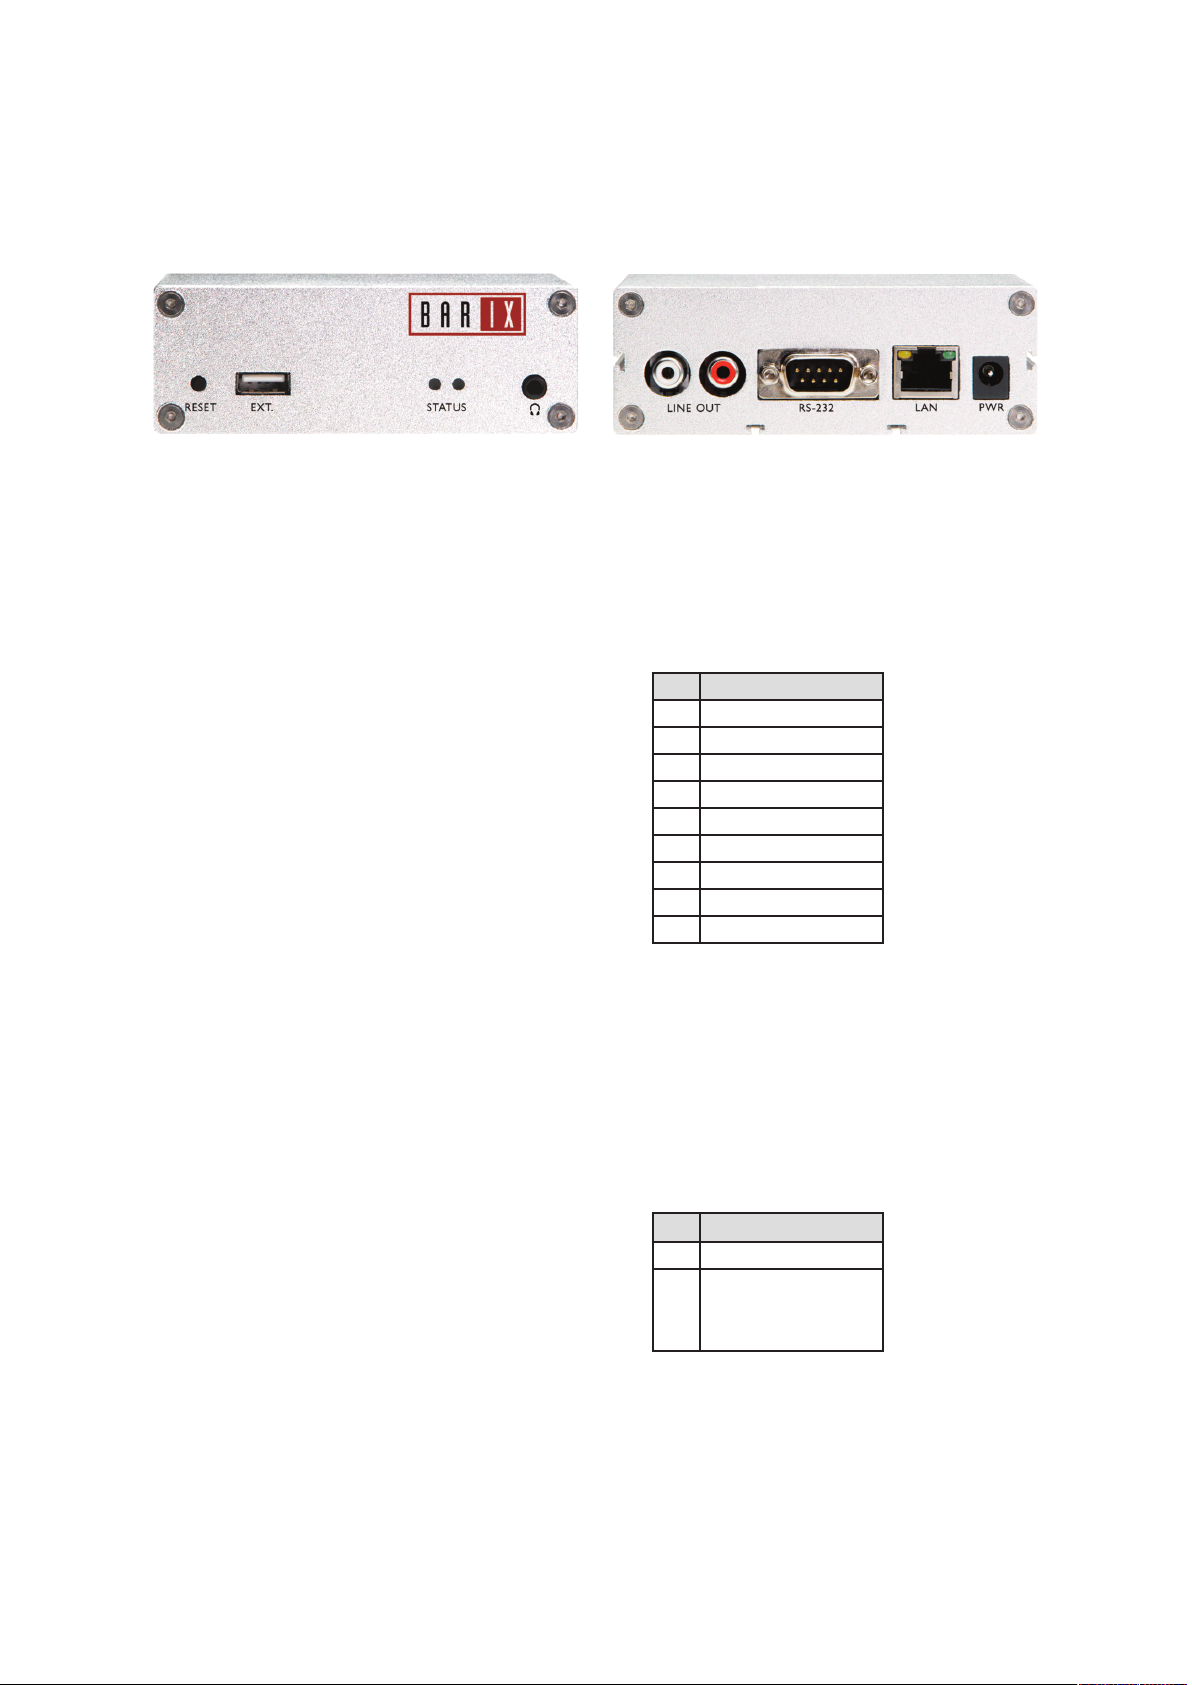
Front view
Rear view
1 2 3 4
1 Reset button
A brief press of the button will reset the device.
Holding the reset button pressed in for
approximately 10 seconds will reset the device
and restore the factory default settings when the
button is released.
2 EXT.
USB interface solely for flash memory sticks
(not supplied)
3 Status LEDs
Green and red LEDs for status display
4 Headphone out
Standard stereo mini jack (3.5 mm)
A B C D
A Line out
Stereo RCA line outputs
B RS-232 serial port (DSub 9 pin male)
Pin Description
1 Not connected
2 Receive Data [RxD]
3 Transmit Data [TxD]
4 V+ 12V*, 100mA max
5 Ground [GND]
6 Not connected
7 Ready to Send [RTS]
8 Clear to Send [CTS]
9 Not connected
* Pin 4 will provide 2.6V less than the supplied
voltage on Vin+ (D) but not more than 12V.
C LAN port 10/100 (RJ45)
Standard RJ45 Ethernet socket
D Power
Pin Description
1 Vin - (ring)
2 Vin+ (center pin)
9..30 VDC
12..24 VAC
Page 3

1 Installation 2 Network configuration
by web browser
TEP 1
S
Plug a standard (straight) network cable (e, not included)
into the network port (C) of the Exstreamer and the
other end into your hub or switch. You can also use a
crossover network cable (not included) for a direct
connection to your PC.
TEP 1
S
Open your web browser.
STEP 2
Enter the IP address that was announced by the
Exstreamer and press Enter. Example: 192.168.0.12
STEP 2
i) Plug standard headphones or the earphone (d, not
included) into the headphone output (4) and put it in
your ear.
or
ii) Plug the RCA cable (c) into the LINE OUT outputs
(A) and connect the cable to inputs of your mixing
console or monitoring device.
STEP 3
Connect the Power supply (b) to the device (socket D)
and then to an appropriate electrical outlet.
STEP 4
The Exstreamer will now search for a DHCP server to get
an IP address and announce it over the audio outputs.
Example:192.168.0.12 (Voice: one nine two…)
Make sure you write this IP address down. Proceed to
section “2 Network configuration by web browser”.
If you do not have a DHCP server running on your
network you will still be able to configure the Exstreamer. This will involve assigning an IP address to the unit
using one of 3 methods:
ARP (see section 3 of this guide), Telnet, or a serial cable:
refer to the manual for these procedures.
STEP 3
Click on the Config link:
STEP 4
Enter an IP address into the 4 IP address fields. At default
it is 0.0.0.0 for automatic discovery (BootP, DHCP).
STEP 5
In normal operating conditions leave the Netmask as is.
STEP 6
The Gateway, primary and alternative DNS IP addresses
as well as Sonic IP can be left at default for now.
STEP 7
Hit the Apply button to save all changes. The Exstreamer
will reboot with the Static IP address. Please continue
with section “4 Next steps” on the last page.
Troubleshooting
If no DHCP server is found then our IPzator function
will search the network for a free IP address (this could
take up to 5 minutes). If the IP address is not announced
check if the right hand LED of the network port (C) is
lit green. If it stays dark check your network cabling.
If the front LEDs (3) stay dark check the power cabling
(step 3).
If still no IP address has been announced, revert the
device to its factory default settings by pressing the
Reset button for about 10 seconds while the device is
powered.
Page 4

3 Setting temporary IP address
using ARP command
his procedure is used to temporarily set the IP address
T
for first time browser access to the Exstreamer, in the case
where you have no audio cables connected, and hence do
not know the current IP address of the Exstreamer.
nd hit the “Enter” key (replace the digits according to
a
your devices MAC address).
On a OSX or Linux system type into the terminal
arp -s 192.168.0.6 00:08:E1:00:B1:77
Attention: After this procedure the temporary IP will
be active only as long as the Exstreamer stays powered.
After a restart the procedure has to be repeated unless
you have configured the IP address as described in the
previous chapter.
Preparation
Use either a “crossover” network cable between the
Exstreamer and the PC or use two network cables to
connect the Exstreamer and the PC to a network switch
and power the Exstreamer.
STEP 1
Make sure that you have a valid IP address configured on
your PC (e.g. 192.168.0.2)
STEP 2
Open a command window.
Windows : click on “Start”, click on “Run..”, in the “Open”
field type cmd , click on “OK”.
OSX / Linux : Open a terminal window.
STEP 3
Please proceed to step 4 if you used a “crossover”
network cable in the preparation step above.
To ensure that we use a free IP address (not already used
by another device in the network) we have to use the
Ping command. In this example we assume the PC to
have the IP address “192.168.0.2” and want to check if
“192.168.0.6” is free.
To do so type ping 192.168.0.6 and hit the
“Enter” key.
If you get a reply (IP already used) then try to ping
another IP until you find one that is not used.
If the request times out (no reply) then the “pinged” IP
is free and we can continue with the next step.
STEP 5
Now we have to make the Exstreamer listen to the IP
address “192.168.0.6” using the Telnet command.
To do so type into the command window
telnet 192.168.0.6 1 and hit the “Enter” key
(the number “one” must be there for this command to
work correctly !!!)
The Exstreamer will refuse the connection on port 1
immediately but will be available for web access on the
IP address used as long as the device stays powered.
STEP 6
To check if the Exstreamer is responding you can use
the ping command again. To do so type
ping 192.168.0.6 and hit the “Enter” key.
If you do get a reply the IP address 192.168.0.6 can be
used to access the Exstreamer using a web browser.
Please go back to section “2 Network configuration by
web browser”.
If you do get “request timed out” then please repeat
step 6 carefully (you most likely mistyped the telnet
command) or repeat the entire procedure.
4 Next steps
Download the user manual from www.barix.com.
Read it to configure the Exstreamer for your purpose.
Check out the Barix user forum on www.barix.com for
additional information.
For information about our products, manuals, technical
documentations and latest version of firmware please visit
www.barix.com.
STEP 4
Look for the Exstreamer’s MAC address printed on a
label placed on the bottom of the device (12 hex digits,
separated by a hyphen every 2 digits)
Type into the windows command window
arp -s 192.168.0.6 00-08-E1-00-B1-77
Barix AG
Seefeldstrasse 303
8008 Zürich
SWITZERLAND
www.barix.com
 Loading...