

Page 1
BARIX EXSTREAMER GOLD
Network amplified audio player
for digital audio streaming in
custom home installations
and commercial applications
User Manual Version 01.01
For Release 02.02 (03. Dec. 2004)
(Firmware Version 06.04)
EXSTREAMER
Page 2

Page 3

Barix Exstreamer Gold User Manual Version 01.01
Page 1
Table of Content
1 INTRODUCTION............................................................................................... 3
2 FEATURES........................................................................................................... 3
3 PACKAGE CONTENT........................................................................................ 4
4 GETTING TO KNOW YOUR BARIX EXSTREAMER ........................................ 4
5 INSTALLATION ................................................................................................. 5
5.1 INSTALLING THE MUSIC SERVER PROGRAM .....................................................................5
5.2 CONNECTING THE BARIX EXSTREAMER TO YOUR AUDIO EQUIPMENT ............................6
5.3 INSTALLING THE BARIX EXSTREAMER TO YOUR NETWORK .............................................6
6 CONTROLLING THE BARIX EXSTREAMER..................................................... 7
6.1 USER CONTROL INTERFACE ............................................................................................7
6.2 SYNCHRONIZATION CONTROL ......................................................................................8
6.3 PLAYLISTS .......................................................................................................................8
6.4 AUDIO ADJUSTMENT INTERFACE .....................................................................................9
6.5 CONTROLLING THE CIFS/SAMBA APPLICATION............................................................10
7 DEVICE CONFIGURATION............................................................................. 11
7.1 CONFIGURATION OVERVIEW .......................................................................................11
7.2 NETWORK SETTINGS ....................................................................................................11
7.3 STREAMING SETTINGS “STANDARD” .............................................................................12
7.4 STREAMING SETTINGS “CIFS/SAMBA” ...........................................................................13
7.5 AUDIO SETTINGS ..........................................................................................................14
7.6 PLAYLIST SETTINGS .......................................................................................................14
7.7 CONTROL SETTINGS .....................................................................................................15
7.8 SERIAL SETTINGS ...........................................................................................................15
7.9 SECURITY SETTINGS ......................................................................................................16
7.10 REVERTING TO FACTORY DEFAULTS ...........................................................................17
7.11 REBOOTING THE DEVICE.............................................................................................17
7.12 UPDATING THE DEVICE...............................................................................................18
8 THE STEP BY STEP “HOW TO”...................................................................... 19
8.1 HOW TO SET A STATIC IP ADDRESS ..............................................................................19
8.2 HOW TO SET THE BARIX EXSTREAMER TO STREAM MUSIC FROM YOUR PC ...................19
8.3 HOW TO SET THE BARIX EXSTREAMER TO STREAM MUSIC FROM A SPECIFIC PC............19
8.4 HOW TO SET THE BARIX EXSTREAMER TO STREAM MUSIC FROM A WEB SERVER ............20
8.5 HOW TO SET THE BARIX EXSTREAMER TO BE A STREAMING PULLER..............................20
8.6 HOW TO SET THE BARIX EXSTREAMER TO BE A STREAMING RECEIVER ..........................20
9 IR REMOTE CONTROL ................................................................................... 21
10 ADVANCED USER SECTION ........................................................................ 22
10.1 NETWORK CONFIGURATION USING SUPPLIED SERIAL CABLE .......................................22
10.2 NETWORK CONFIGURATION USING TELNET ...............................................................23
10.3 CONTROL APIS FOR SERIAL AND ETHERNET...............................................................23
10.4 AUTOMATIC DISCOVERY SETTINGS .............................................................................23
11 FAQ AND TROUBLESHOOTING.................................................................. 25
12 TECHNICAL SPECIFICATIONS ..................................................................... 25
13 DICTIONARY................................................................................................. 27
Page 4

Barix Exstreamer Gold User Manual Version 01.01
Page 2
Page 5

Barix Exstreamer Gold User Manual Version 01.01
Page 3
1 Introduction
Congratulations on the purchase of your Barix Exstreamer Gold from Barix AG.
What exactly is the Barix Exstreamer? It is an audio network interface for your home
stereo system that streams MP3s from your PC and radio stations from the internet.
Even though possible, the Barix Exstreamer is not meant to be plugged directly into your
computer but rather into your network.
The Barix Exstreamer brings MP3 to a whole new level using sophisticated technology
which we kept as affordable as possible for you.
We designed this device so that you are not limited to listen to your MP3s being stuck in
front of a computer or having to listen to high quality music through low quality
computer speakers. The Barix Exstreamer let you enjoy your music in any room of your
home.
To make this manual easier to understand we have included a dictionary at the end of the
manual that links to each technical word (example: DHCP).
2 Features
• Streams MP3s from computers, digital audio servers and the internet
• Built-in stereo speaker amplifier 2 x 20 W
• Plays MP3s from a Linux/Windows share (BETA)
• 10/100 Mbit Ethernet connection
• Plays internet radio
• Controllable via a standard web browser (PC, PDA, Web tablet), via a serial port
and Infrared Remote control
• High quality RCA and headphone out
• Features SonicIP
®
and IPzator ™ technology
• Features Infrared Gateway function
• Easy integration into home automation systems
Page 6
Barix Exstreamer Gold User Manual Version 01.01
Page 4
3 Package content
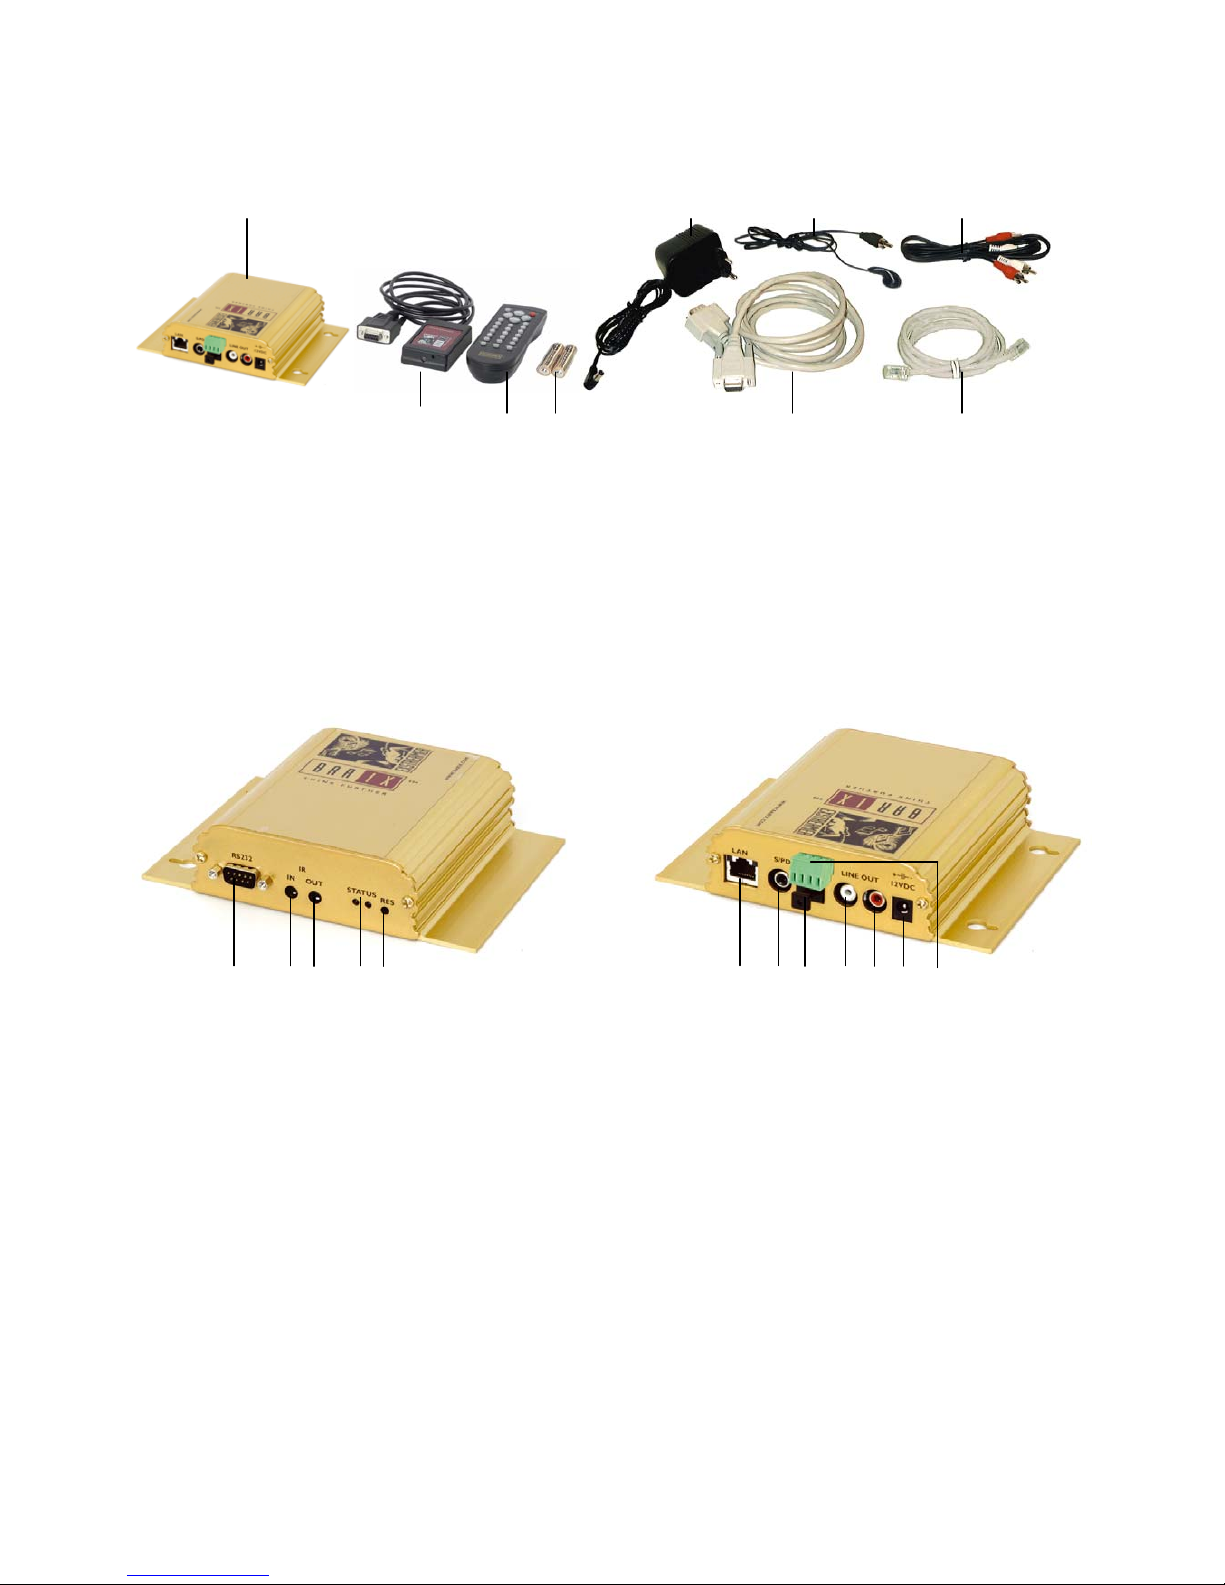
a b c d
e f g h i
a Barix Exstreamer Gold d RCA stereo cable g Batteries
b Power supply e Serial IR Receiver h Serial cross cable
c Earphone f IR remote control i Network cable
4 Getting to know your Barix Exstreamer
1 2 3 4 5
1 DSub9 male, serial port (RS-232)
This port is for a serial connection to your computer.
2 IR IN for Infrared-Receiver
3 IR OUT for Infrared-Transmitter
4 Red and green LED for status display
Red - If the light is blinking, it means that the Barix
Exstreamer either lost connection to or can’t find the
zServer.
Green - If the light is static, it means that the Barix
Exstreamer found the zServer. If the light is blinking, it
means that the Barix Exstreamer is streaming.
5 Reset button
Press this button to restart the device. If you press it until
the red light flashes (about 5 seconds) the device settings
will be restored to the factory defaults.
A B C D E F G
A RJ45 for LAN 10/100 Half/Full duplex
This port is for the connection to your network.
B S/PDIF Coaxial digital OUT
C S/PDIF Optical digital OUT
D white RCA for left line output
E red RCA for right line output
Ports B to E are for connection to your home audio
equipment.
F Power in (center: +20 VDC, ring: Ground)
This port is for connection to the power supply
(Only provided power supply should be used)
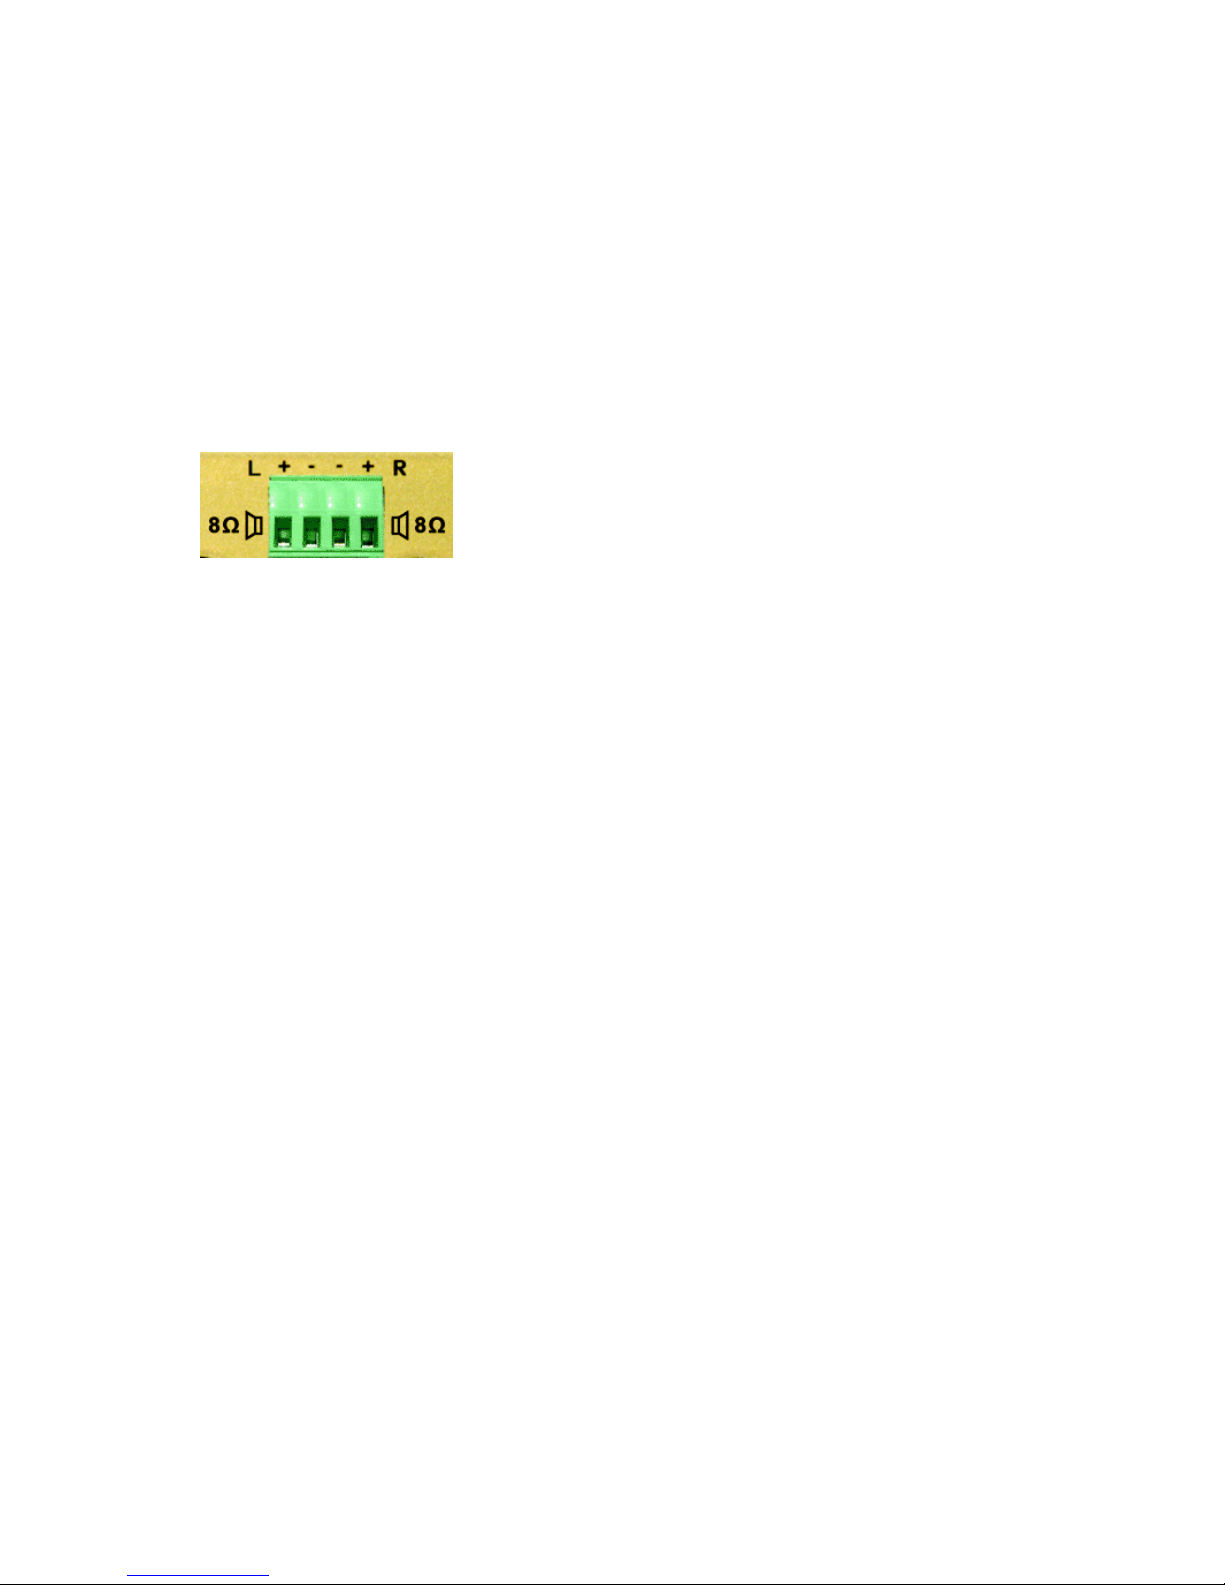
G Speaker out (detachable screw block)
Speaker left +, left -, right -, right +
(use wire up to 16AWG / 1.6mm²)
Page 7

Barix Exstreamer Gold User Manual Version 01.01
Page 5
5 Installation
Once the Barix Exstreamer is connected to your network,
it will automatically receive an IP address from your DHCP
server (Internet gateways run usually a DHCP server).
If no DHCP server can be reached, our IPzator function
will search the network for a free IP address.
The Barix Exstreamer will announce the IP address using
SonicIP technology.
To prepare the usage of the Barix Exstreamer we
recommend installing first our free Music Server software
called zServer.
5.1 Installing the Music Server
program
Our free Music Server software called zServer can be
downloaded from our website www.barix.com
.
The music server finds your playlists and streams your
locally stored MP3s to the Barix Exstreamer. If you don’t
have any playlists or .m3u files then the music server can
create them for you.
STEP 1
The music server program requires a Java VM plug-in.
If you don’t have a Java VM plug-in or if you are not sure,
then download J2SE (Version 1.3.0 or above) from
www.java.sun.com
and install it.
STEP 2
Download the setup file of the music server program
zServer from www.exstreamer.com
STEP 3
Run the self extracting zServer.exe file. It automatically will
suggest the path C:\Program Files\zServer but you can also
indicate a preferred path for the installation.
Select <unzip> to extract.
STEP 4
A configuration wizard should start. If not, then manually
execute the file configz.bat in the installed zServer folder.
STEP 5
You will be asked for the location of your playlists. In case
you already have playlists in the standard .m3u format
generated by MP3 software hit the <browse> button and
show the program where these playlists are. After the
correct path is entered click on <set>. Skip the next step.
If you don’t have any playlists created hit the <browse>
button and click on the <create folder> icon to create a
playlist folder for later use.
STEP 6
This is the playlist creation utility.
The first window asks for the location of your MP3s files.
Hit the upper <browse> button and show the program
where they are. If you click on a folder with subdirectories
then all the songs in the subdirectories will become one
playlist.
The second window asks for the location you want your
playlist files to be stored. Hit the lower <browse> button
and show the program the folder you made in step 5 since
you registered that folder to the zServer as your playlist
folder.
Now you can generate the playlist by pressing the
<generate> button. You can generate more playlists by
repeating this step. You could group music by year or
mood into separate folders and then make playlists from
them after you have grouped them.
The <subdirectory scan deep> tells the generator how
many subdirectories will be scanned down to generate a
playlist from.
If <include subdirectories> is activated then all MP3s in the
current directory and all in its subdirectories will be
included in that playlist.
Count of subdirectories for playlist name tells the
generator how many directory names back of the current
one will be used for the name of the playlist.
The separator between the directories is the separator in
the playlist name between the directory and subdirectories.
STEP 7
Run the file startz.bat in the zServer folder. The music
program is now ready to stream your MP3s to your Barix
Exstreamer.
NOTE
The startz.bat file must always run in order for you to use
the Barix Exstreamer. If you reboot your PC you will not
be able to use the Barix Exstreamer until you again run the
startz.bat file.
To stop the zServer simply close its window.
Page 8
Barix Exstreamer Gold User Manual Version 01.01
Page 6
5.2 Connecting the Barix Exstreamer
to your audio equipment
Connection to your audio equipment is possible by offering
three different audio output options.
A. Loudspeakers
To simplify the task of connecting the loudspeakers the
screw block connector (F) can be unplugged.
Use speaker cables (not included) with a maximal wire
thickness of 16AWG / 1.6mm².
1 2 3 4
Connect the positive wire of your left speaker to L+ (1)
and the negative wire of the left speaker to L- (2).
Connect the positive wire of the right speaker to R+ (4)
and the negative wire to R- (3).
Make sure that no wire touches another one to prevent a
short circuit of the amplifier outputs.
Plug the screw block connector (F) back on.
Hint:
Wiring one speaker incorrectly (e.g. interchanging + and -)
results in poor performance in the middle and bass range
(deletion of sound) and can be observed best when placing
both speakers close to each other face to face.
Warning:
To not damage any equipment only loudspeakers that are
rated for 20 Watts or higher should be connected!
B. Analog connection
For connection to an analog home stereo system, the
Exstreamer features a stereo RCA output (D+ E ).
Simply connect the included stereo RCA cables (d) to
your audio input on your stereo.
C. Digital connection
For connection to a digital home stereo system, the
Exstreamer features two S/PDIF outputs (B+ C ).
Simply connect a coaxial (output B) or an optical S/PDIF
(output C) to your digital audio input on your stereo (both
cables are not included).
5.3 Installing the Barix Exstreamer to
your network
STEP 1
Plug the included network cable (i) into the network port
of the Barix Exstreamer (a) and the other end into your
hub or switch. You can also use a crossover network cable
(not included) for a direct connection to your PC.
STEP 2
Plug the included earphone (c) into a RCA output ( D o r
E) and put it in your ear.
Get the pen and paper ready to write down the IP address
that will be announced in the step 5.
The announcement of the IP address is called SonicIP.
STEP 3
Plug the power supply (b) into the
power jack (F) of the
Barix Exstreamer and the other end into the power outlet
of the wall.
NOTE
When power cycling the Barix Exstreamer we recommend
to disconnect/connect the power supply at the wall socket.
To prevent electrical overload of the device the power
supply should only be plugged into the wall socket with the
power supply connected to the Barix Exstreamer first.
STEP 4
The Barix Exstreamer will now search for a DHCP server
to get an IP address and announce this address over
the earphone.
Example: 192.168.0.12 (Voice: one nine two dot …)
Make sure you write this IP address down. If no DHCP
server is found then our IPzator function will search the
network for a free IP address (this could take up to 5
minutes).
NOTE
Your Barix Exstreamer is now ready to start working, we
recommend, however, that you set a Static IP address so
that the IP address will not change every time you power
up the Barix Exstreamer.
To set a static IP see section 8.1.
Page 9
Barix Exstreamer Gold User Manual Version 01.01
Page 7
6 Controlling the
Barix Exstreamer
The Barix Exstreamer has a local web server built in.
You can control the Barix Exstreamer from anywhere on
your network using a standard web browser (from your
PC, PDA or web tablet).
STEP 1
Open your web browser.
STEP 2
Type in the IP address of the Barix Exstreamer in the
address bar then press Enter
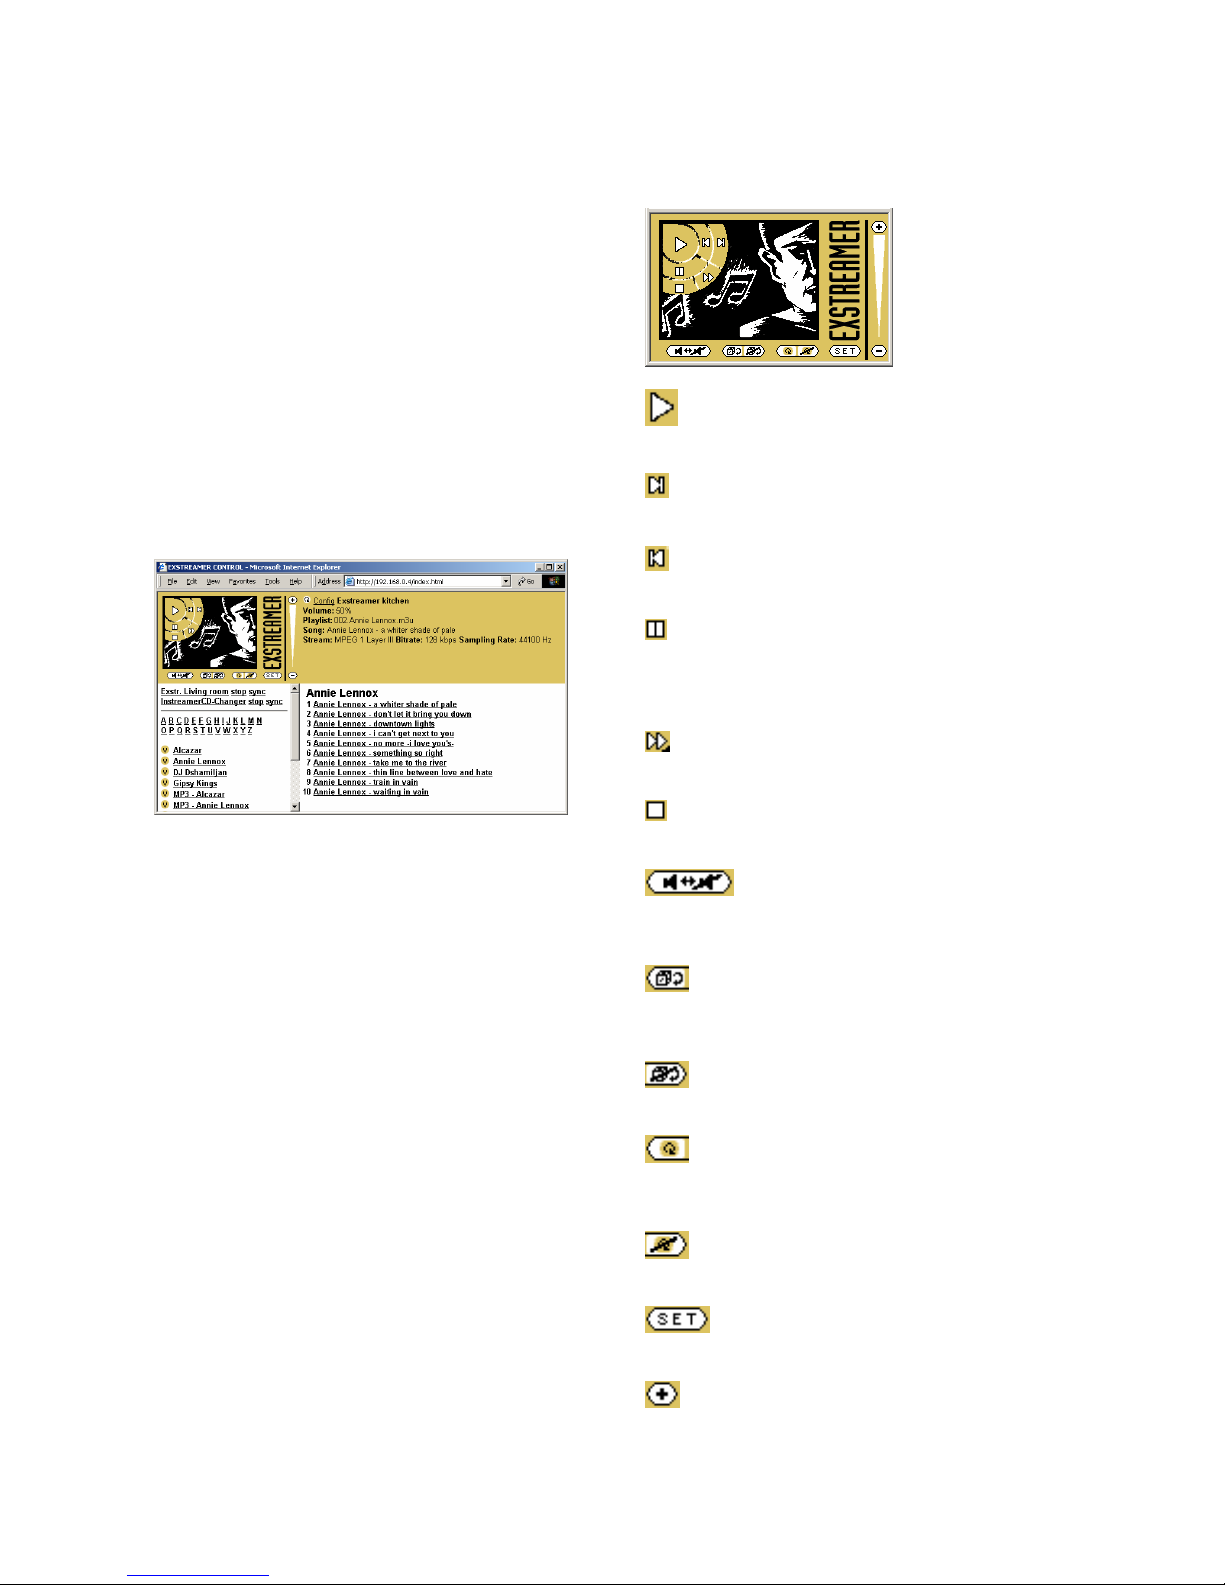
You should now see the control panel of the Barix
Exstreamer and all the playlists in the browser window:
F1 USER CONTROL INTERFACE
This frame shows the play control options.
F2 FILE INFO
This frame shows the file information of the current song.
A click on the arrow picture refreshes this frame. If a name
for the Barix Exstreamer was configured it will be showed
on top.
F3 PLAYLISTS
This frame shows the playlists that the music server has
found.
F4 SONG LIST
This frame shows the songs of the current playlist.
To start playing music, use the navigation control panel on
the top left corner. To see what each button does, place
the mouse cursor on top of the selected button and it will
inform you of its function. Click on the playlist title to start
playing it. You can also adjust the sound properties of the
Barix Exstreamer by clicking on the <SET> button.
6.1 User control interface
PLAY
This action plays the media file.
NEXT TRACK
This action skips to the next media file in the playlist.
PREVIOUS TRACK
This action skips to the previous media file in the playlist.
PAUSE
This action stops playing the media file but keeps the
progress at the spot it was at when the player was paused
so you can continue listening from the same position.
FAST FORWARD
This action forwards within the media file.
STOP
This action stops playing the media file.
MUTE
This action mutes the audio output. Click again to activate
audio or click on the volume slider.
SHUFFLE PLAY
This action automatically shuffles the media files inside a
playlist and plays them randomly.
SHUFFLE PLAY OFF
This action terminates the shuffle play mode.
REPEAT
By clicking this button you can toggle between repeat song,
repeat playlist or repeat off.
REPEAT OFF
This action terminates the repeat play mode.
SET
This action brings you to the audio adjustment interface.
( + )
This action increases the volume by increment.
F1
F2
F4
F3
Page 10
Barix Exstreamer Gold User Manual Version 01.01
Page 8
VOLUME SLIDER
This action lets you adjust the volume level. Click closer to
the + (plus) sign for higher volume or closer to the – (dash)
sign for lower volume.
( - )
This action decreases the volume by increment.
EXSTREAMER
A click on the Barix Exstreamer logo will bring you to the
Barix homepage (www.barix.com
).
6.2 Synchronization control
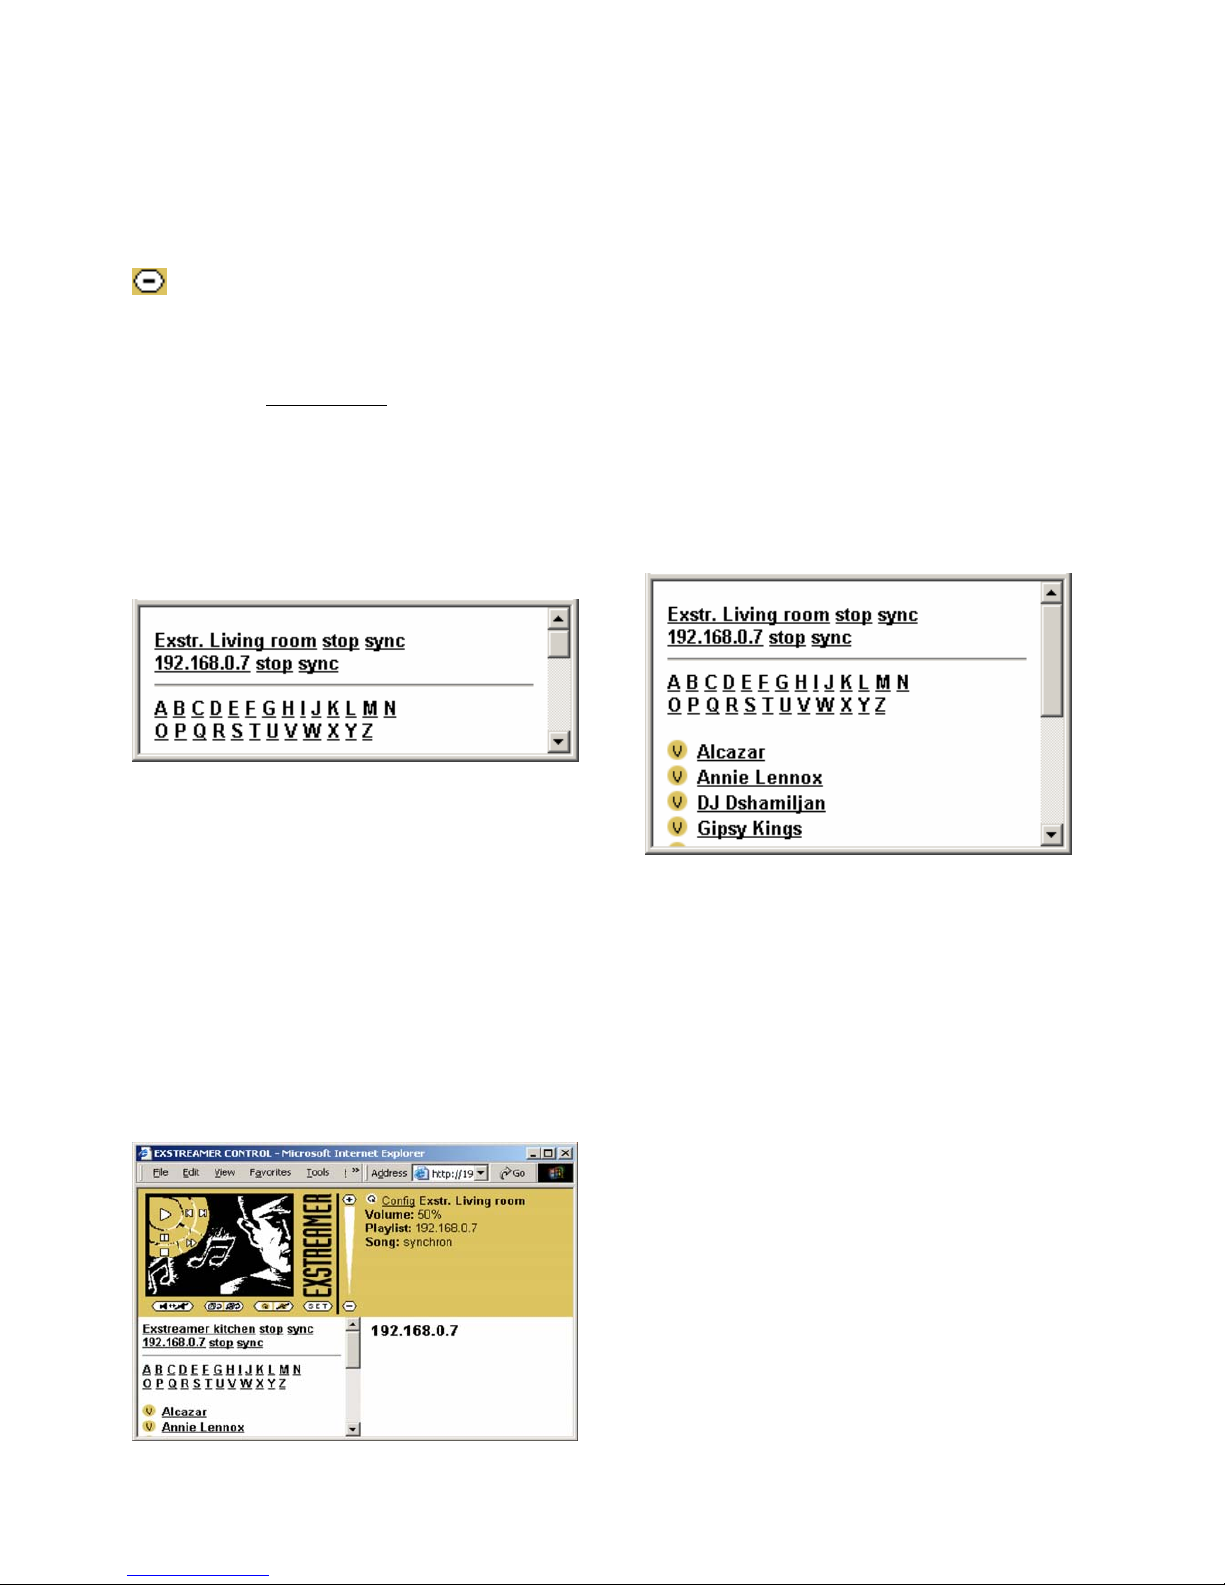
If other Barix Exstreamer or Instreamer devices are found
in the network they will be displayed on top of the playlist
frame.
When “Own name” is set then this name will be displayed
instead of the devices IP address.
A click on the name or the IP address will bring you to the
control panel of the selected device making it easy to
navigate to all devices in the network.
A click on the sync link will cause the viewed Barix
Exstreamer to synchronize with the selected device to
allow both devices to play the same sound at the same
time.
In other words: While viewing the control panel of Exstr.
Living room, clicking the Exstreamer kitchen’s “sync”
link will make Exstr. Living room a sync slave. Control of
the sound that both play is possible only on Exstreamer
kitchen which becomes the sync master.
Once synchronized the name or the IP address of the sync
master is displayed in the song list frame:
Click on the “stop” link to stop the synchronization.
To control the sync master click on the name of the device
you have synchronized to.
When viewing the control panel of a sync master clicking
any stop link will cancel the synchronization to all sync
slaves and will also stop the playback on the sync master.
6.3 Playlists
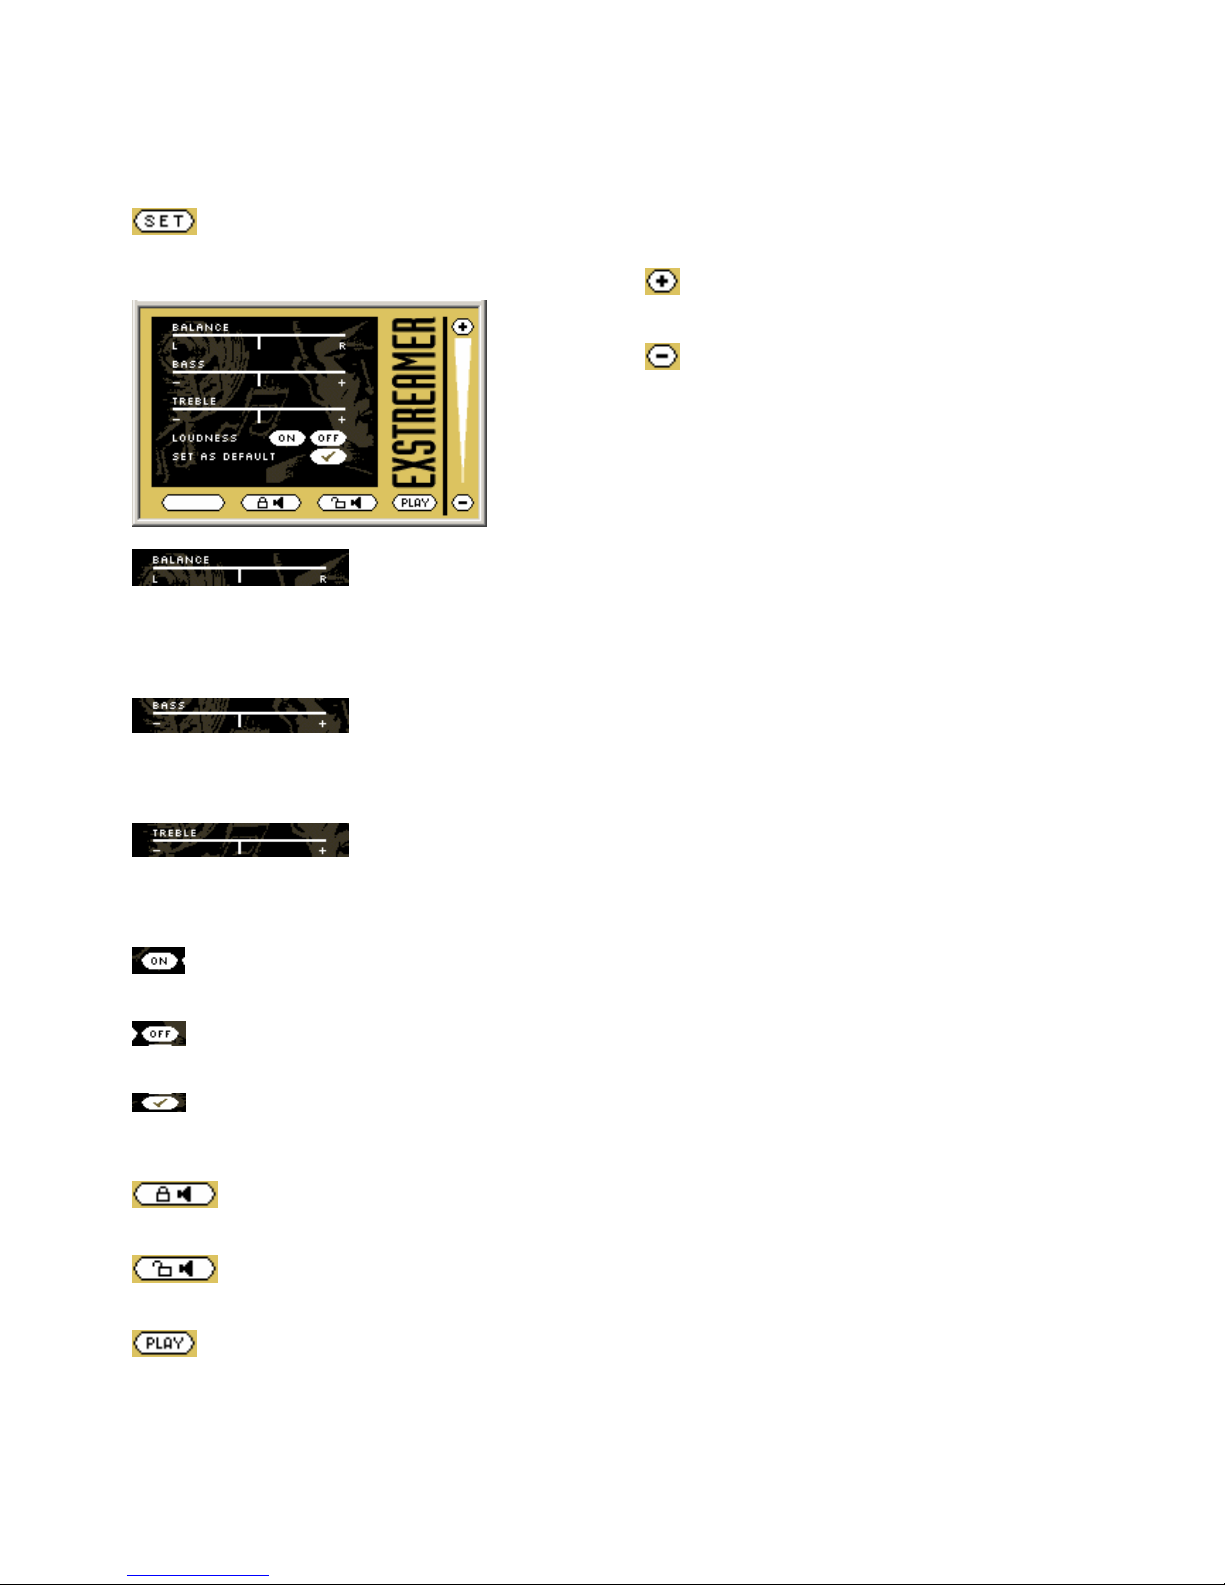
In the playlist frame you can select the playlist you would
like to listen to.
A click on the playlist starts playing the selected playlist
immediately
A click on the symbol to the left of the playlist gives you a
preview of the songs in the Songlist frame.
A click on one of the alphabetical letters on top creates a
filtered list that only shows the playlists that start with the
selected letter.
The Barix Exstreamer only can show a few playlists at a
time. To see the rest of them click on “…next playlists…”,
“…previous playlists…” or “top”.
If there is more than one Barix Exstreamer in your
network and all of them have names, these names will be
showed on top of the playlists. A click on one of the names
moves you direct to the control page of the selected Barix
Exstreamer.
Page 11
Barix Exstreamer Gold User Manual Version 01.01
Page 9
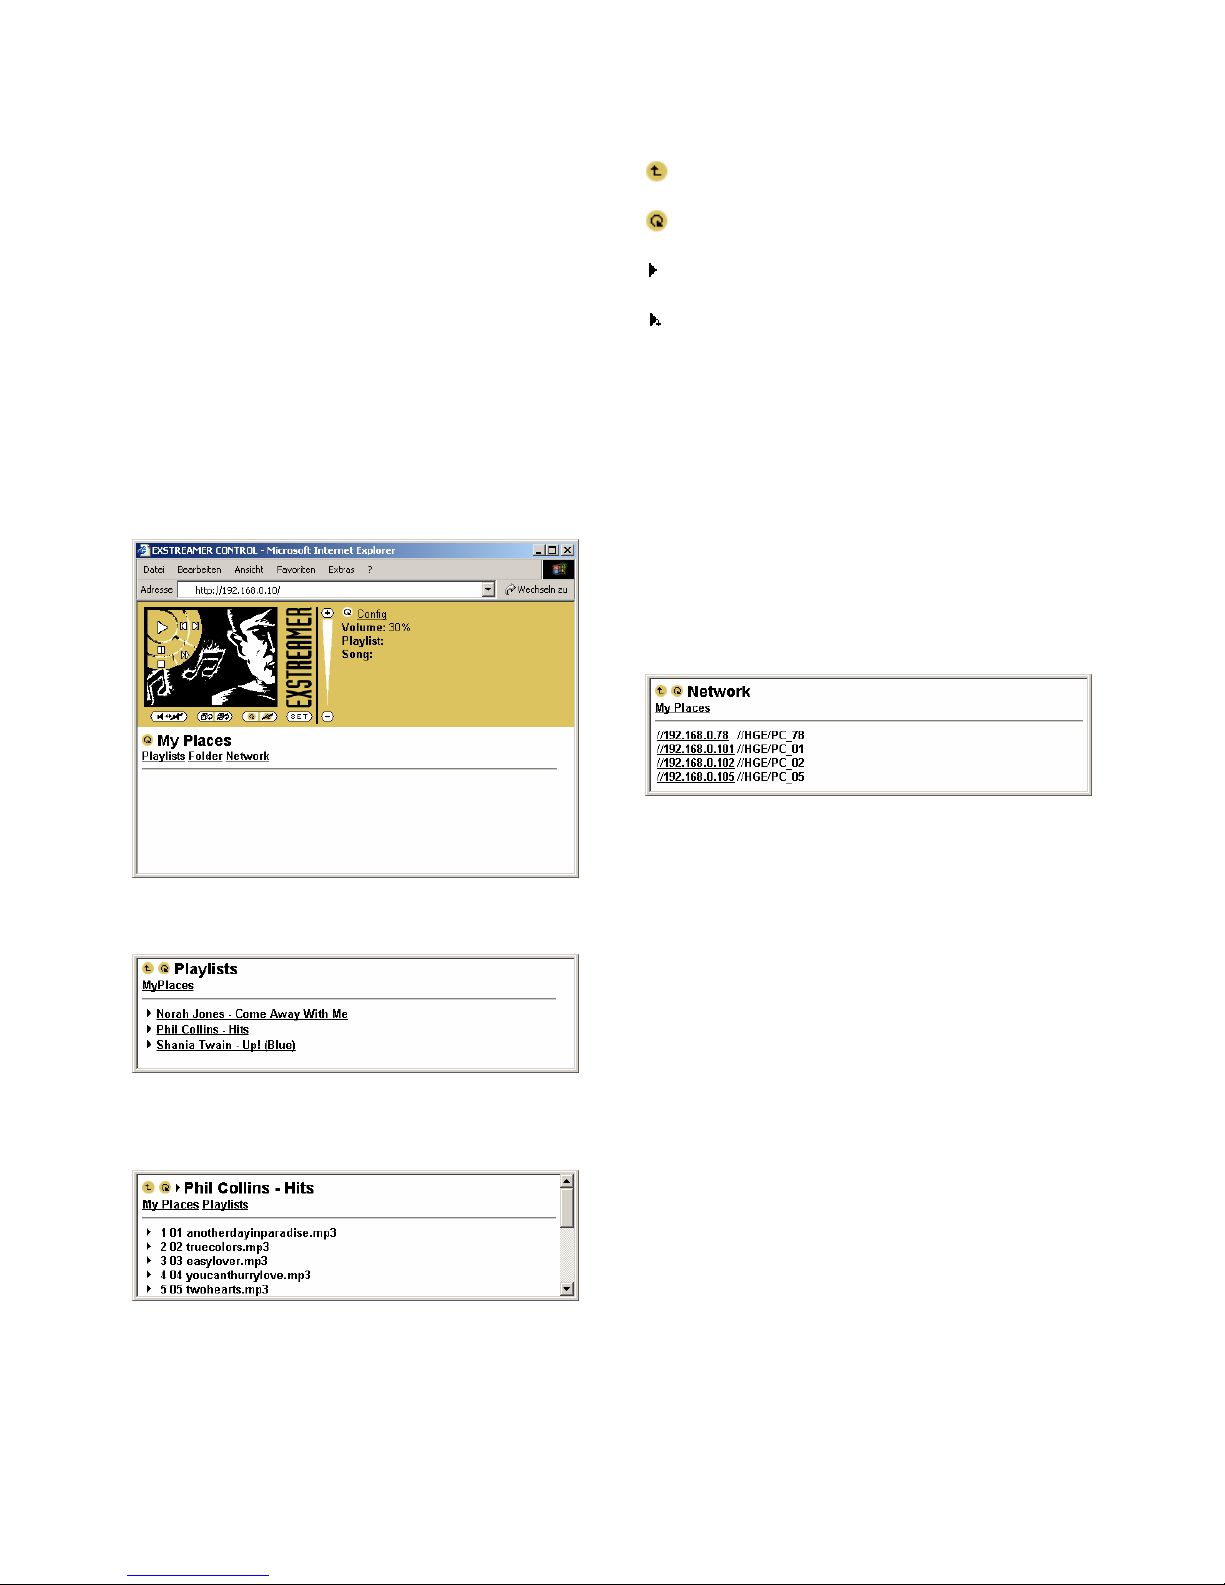
6.4 Audio adjustment interface
Click on the SET button in the control interface to switch
to the audio adjustment interface:
BALANCE
This action adjusts the Left and Right audio balance.
Click into the Balance bar to set the balance to a specific
position or click <L> or <R> to move the position to the
appropriate side in steps.
BASS
This action adjusts the bass level. Click into the Bass bar to
set the bass to a specific level or click <+> or <-> to
increment/decrement the bass level in steps.
TREBLE
This action adjusts the treble level. Click into the Treble
bar to set the treble to a specific level or click <+> or <->
to increment/decrement the treble level in steps.
LOUDNESS ON
This action turns on the loudness level.
LOUDNESS OFF
This action terminates the loudness level.
SET AS DEFAULT
This action saves the current settings as default. Every time
you restart the Exstreamer it will use these settings.
LOCK VOLUME
This action locks the volume level so it cannot be adjusted.
UNLOCK VOLUME
This action unlocks the volume level.
PLAY
This action brings you back to the user control interface.
VOLUME SLIDER
This action lets you adjust the volume level. Click closer to
the + (plus) sign for higher volume or closer to the – (dash)
sign for lower volume.
( + )
This action increases the volume by increment.
( - )
This action decreases the volume by increment.
EXSTREAMER
Clicking on the Barix Exstreamer logo will bring you to the
Barix homepage.
Page 12
Barix Exstreamer Gold User Manual Version 01.01
Page 10
6.5 Controlling the CIFS/Samba
application
This feature allows the Barix Exstreamer to use shared
network resources (Samba/Linux or CIFS/Windows). In
this case no zServer is needed.
Note, this feature has currently Beta status and is provided
as is. The functionality might differ in the final release.
Open your Browser and type the Barix Exstreamer´s IP
address in the address field and press Enter.
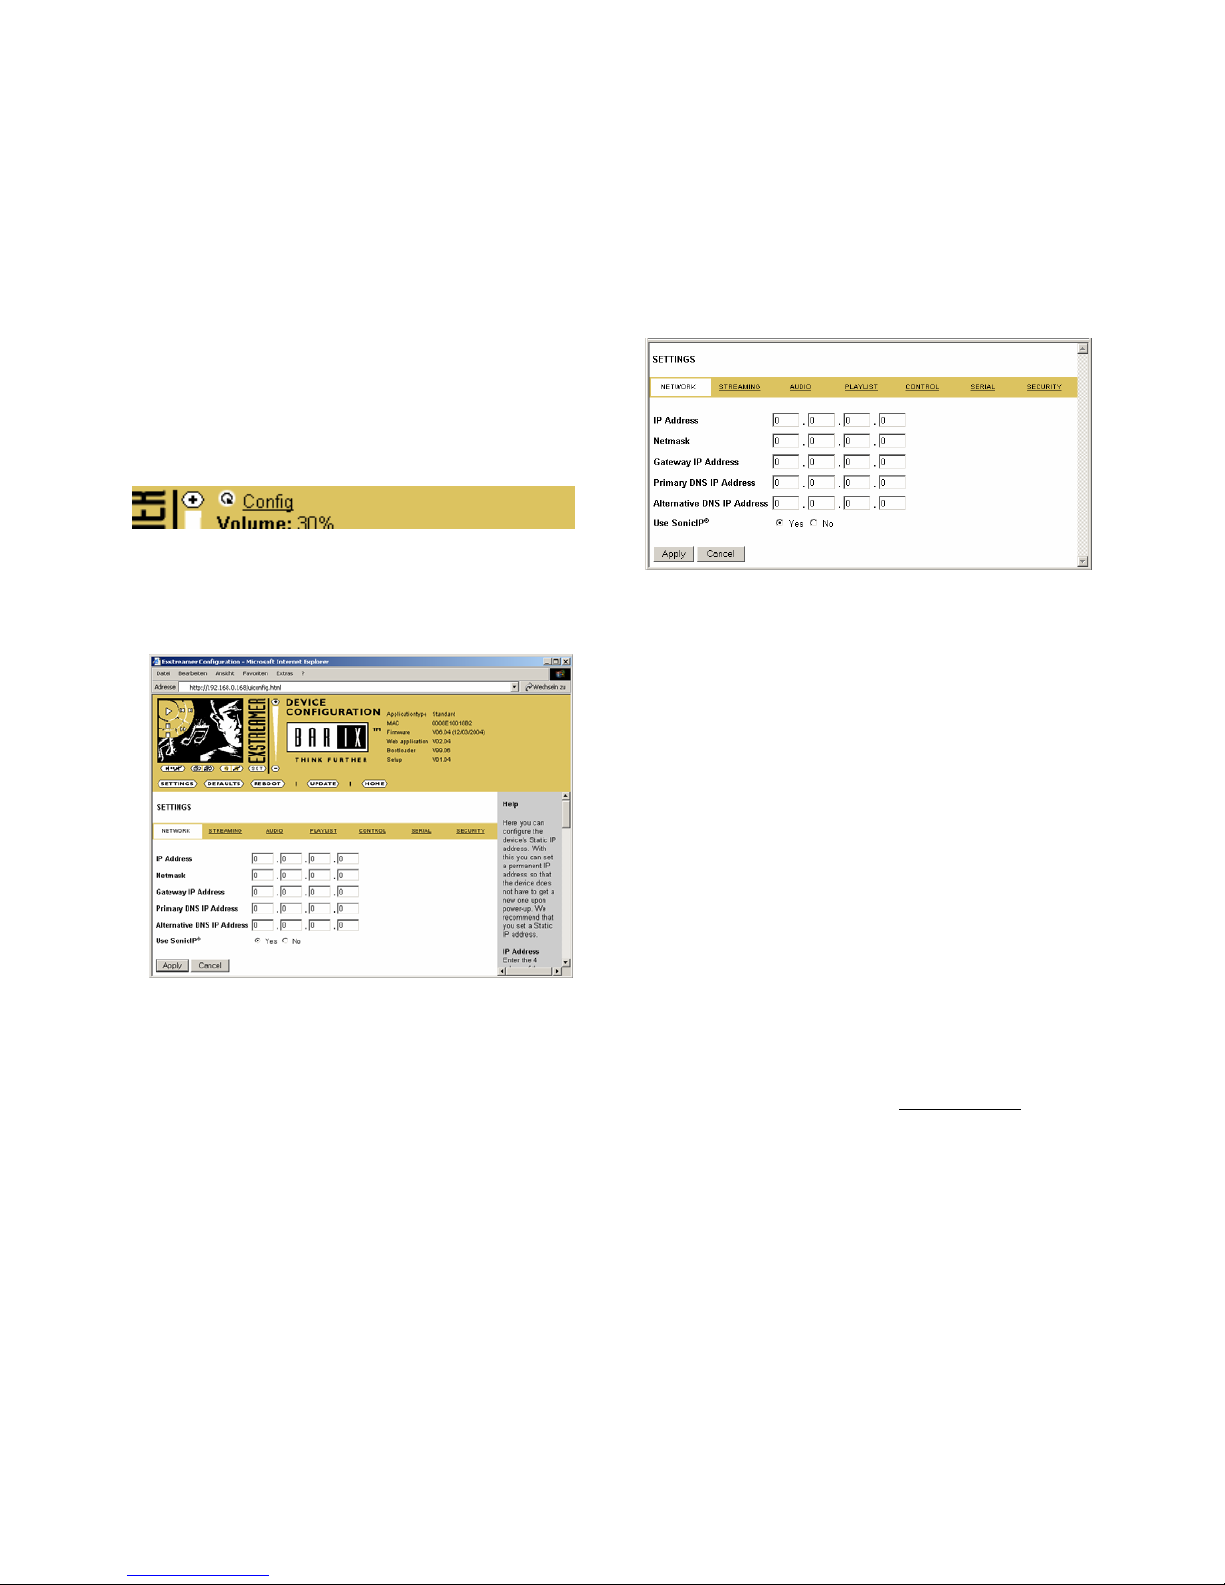
If CIFS/Samba is selected in the streaming settings (see
section 7.4) the following Barix Exstreamer homepage will
appear:
Clicking the “Playlists” link will display your playlists of the
defined folder, if you have right place in the setup defined.
Clicking “My Places” will bring you back to your starting
point. Clicking one of the playlists will show you the titles
of this playlist.
Click it to go back or the folder above
Click it to refresh the current list
Click it to play the song or playlist
Click it to play the subdirectory
If a song, a playlist or a subdirectory is playing, it will appear
the link “Current Playlist”. Clicking this link will bring you
to folder of the playing song, playlist or folder above the
subdirectory.
Clicking “Folder” in the starting menu allows you to
browse in the folder of the defined shared network
resource.
Clicking on “Network” starts a discovering on your
network, click on one of the found IP addresses to check
for shared network resources on this PC. When your are
browsing in a PC’s share appears the link “shares” which
can you bring back to the list of shares of this PC.
Note
The discovering in your network can take a while (up to
few minutes).
Page 13
Barix Exstreamer Gold User Manual Version 01.01
Page 11
7 Device Configuration
To enter the Barix Exstreamer configuration mode you can
log onto its local web server.
STEP 1
Open your web browser
STEP 2
Type in the Barix Exstreamer´s IP address and press Enter
Example: 192.168.0.12
STEP 3
Click on the Config link
7.1 Configuration Overview
A INFO FRAME
This frame shows the Barix Exstreamer´s Application type,
MAC address and the installed version of Firmware, Web
application, Bootloader, Setup. The Application type can be
“Standard” or “CIFS/Samba”, see streaming settings.
B MENU FRAME
This frame shows the available menu icons.
A click on SETTINGS brings you to the settings page when
you are on the DEFAULTS, REBOOT or UPDATE page.
A click on HOME brings you to the device status page.
C SETTING TABS
This bar shows the available tabs within the settings menu.
D HELP FRAME
This frame shows the help for all settings and menus.
7.2 Network settings
Here you can configure the Barix Exstreamer´s Static IP
address. With this you can set a permanent IP address so
that the device does not have to get a new one upon
power-up.
We recommend that you set a Static IP address.
IP Address
Enter the 4 values of the desired device IP address e.g.:
"0.0.0.0" for automatic discovery
(in this order: BOOTP, DHCP, IPzator, AutoIP.
See also section 10.4 Automatic discovery settings.)
"192.168.0.12" for an internal LAN
Netmask
Enter the 4 values of the desired Static IP e.g.:
"0.0.0.0" for a default Netmask depending on the used
IP Address.
"255.255.255.0" for a C class network
Gateway IP Address
Enter the 4 values of the desired Gateway IP address e.g.:
"0.0.0.0" for no Gateway
"192.168.0.1" for a Gateway in a LAN
Primary DNS IP Address
Enter the 4 values of the desired primary DNS IP address:
"0.0.0.0" for no DNS,
"192.168.0.111" for a DNS
Note: A correct setting of the primary DNS IP address is
needed to connect to URLs (e.g. www.radio.com
).
Alternative DNS IP Address
Enter the 4 values of the desired alternative DNS IP
address e.g.:
"0.0.0.0" for no alternative DNS
"192.168.0.111" for a DNS
Note: An alternative DNS IP address is needed in case the
primary DNS is not reachable.
Use SonicIP
If set to yes, the Barix Exstreamer will announce its IP
address over the audio output during start up.
To store these settings click on Apply button.
The device will restart with the new settings.
A
B
D
C
Page 14
Barix Exstreamer Gold User Manual Version 01.01
Page 12
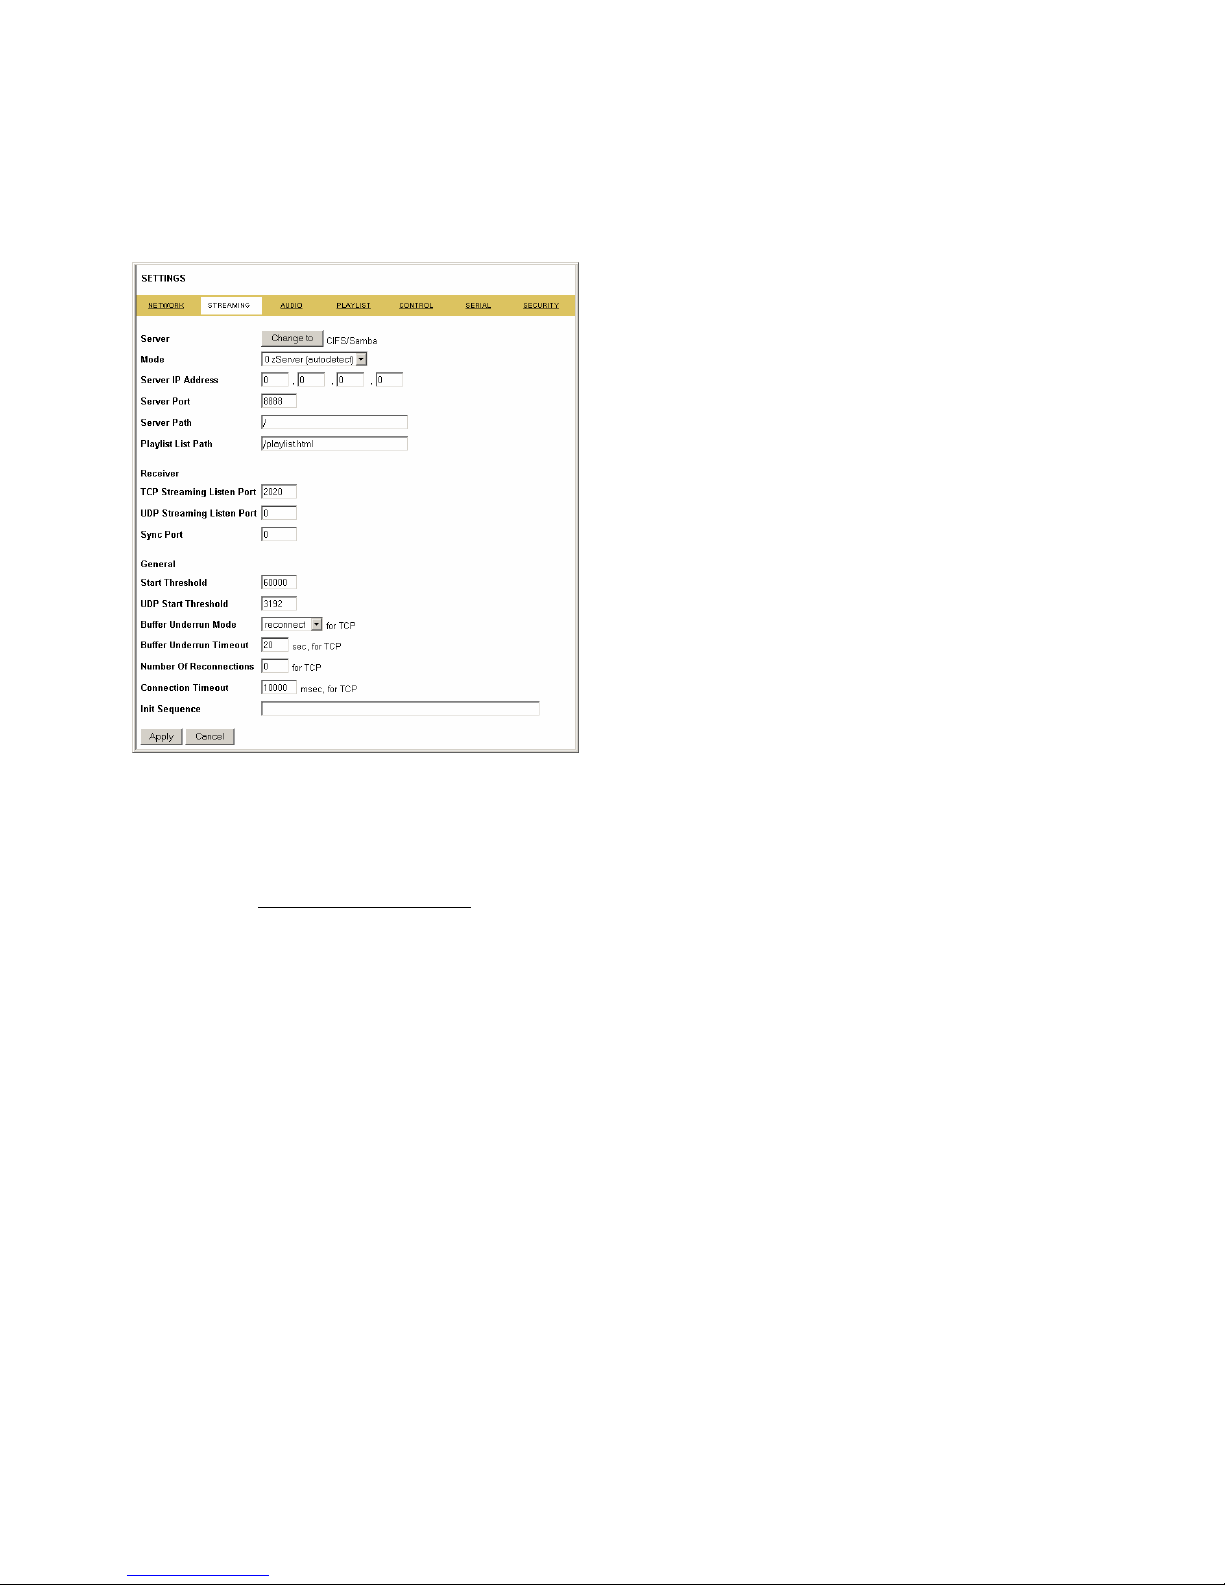
7.3 Streaming settings “Standard”
These settings adjust the way Barix Exstreamer will get its
stream.
Server settings
Press the button to change to the CIFS/Samba application.
The Barix Exstreamer basically supports 5 different
operating modes. To follow step by step some example
instructions see The step by step “How To”
section.
Mode 0 zServer (auto detect)
In Mode 0 the Barix Exstreamer works as a Network MP3
Player using the zServer. It will automatically detect the
zServer. To work correctly the following settings are
needed.
Server IP Address Always 0.0.0.0
Server Port Always 8888
Server Path Always /
Playlist List Path Always /playlist.html
Mode 1 zServer (fix)
In Mode 1, the Barix Exstreamer works as a Network MP3
Player with the zServer IP address configurable. Here the
user is able to manually configure the IP address of the
target zServer. This Mode is used running multiple zServers
on your network.
Server IP Address
Input the 4 values of the IP address of the PC on which
zServer is running.
Server Port Always 8888
Server Path Always /
Playlist List Path Always /playlist.html
Mode 2 Web server
In Mode 2 the Barix Exstreamer gets the playlists and music
from a standard web server.
Server IP Address
In this field you have to enter the IP address of your web
server.
Server Port
In this field you have to enter the port number on which
your web server is communicating (standard web server’s
work on port 80). A zero in this field indicates the default
value port 80.
Server Path
In this field you have to enter the path where your playlists
are stored on the web server. Please note that you have to
put a "/" in front and at the end of the path. A single "/" in
the field indicates the root directory of the Web server.
Example: /Music/
Playlist List Path
In this field you have to enter the path where your list of
playlists is stored on the web server.
Example: /Music/playlist.txt
Mode 3 Streaming Puller
In Mode 3 the Barix Exstreamer works as a Streaming
Puller. This enables the Barix Exstreamer to stream MP3s
from most brands of MP3 jukeboxes on the market.
Server IP Address
In this field you have to enter the IP address of your MP3
server or your MP3 jukebox.
Server Port
In this field you have to enter the port number of your
MP3 server or your MP3 jukebox.
Server Path
Some jukeboxes allow you to choose between different
virtual streaming servers. Enter the path of the streaming
server here. If the jukebox does not support this feature
you then enter a single "/".
Mode 4 Streaming Receiver
In Mode 4 the Barix Exstreamer works as a simple passive
Streaming Receiver. See section Receiver settings on next
page. The parameters Server IP Address, Server Port,
Server Path and Playlist List Path are ignored in this
mode.
Page 15
Barix Exstreamer Gold User Manual Version 01.01
Page 13
Receiver settings
TCP Streaming Listen Port
Use this parameter to configure the TCP streaming listen
port on which the Barix Exstreamer is listening for a
stream. The listener is always active in Barix Exstreamer
Mode 4. In all other modes the listener is active when the
Barix Exstreamer is stopped.
UDP Streaming Listen Port
Use this parameter to configure the UDP streaming listen
port on which the Barix Exstreamer is listening for a
stream. The listener is always active. The Barix Exstreamer
has to be stopped before a stream can be sent to this port.
Sync Port
This parameter should only be changed if you use a firewall.
Enter the used port number for the sync stream (between
0 and 65535). When set to 0 the port is calculated by an
algorithm.
General settings
Start Threshold
The Start Threshold is the amount of bytes the Barix
Exstreamer will buffer the TCP stream before starting the
playback. Valid is a value from
"0"
to
"65535"
.
UDP Start Threshold
The Start Threshold is the amount of bytes the Barix
Exstreamer will buffer the UDP stream before starting the
playback. Valid is a value from
"0"
to
"65535"
.
Buffer Underrun Mode
The Buffer Underrun Mode defines the action if the
streaming buffer underruns during an open TCP
connection. In this case one possibility is to
"disconnect"
the TCP connection. The other option is to
"reconnect"
again the same stream.
Buffer Underrun Timeout
The Buffer Underrun Timeout defines the amount of time
in seconds since the streaming buffer is empty until the
Buffer Underrun Mode action will be executed.
Number Of Reconnections
The Number Of Reconnections defines how many times a
reconnection will be tried on a streaming buffer underrun if
the Buffer Underrun Mode is set to
"reconnect". "0"
means
forever.
Connection Timeout
The Connection Timeout defines how many milliseconds to
wait for a TCP streaming connection.
Init Sequence
This command sequence is always executed immediately
after startup. See the Barix Exstreamer Technical
Documentation for a complete list of commands.
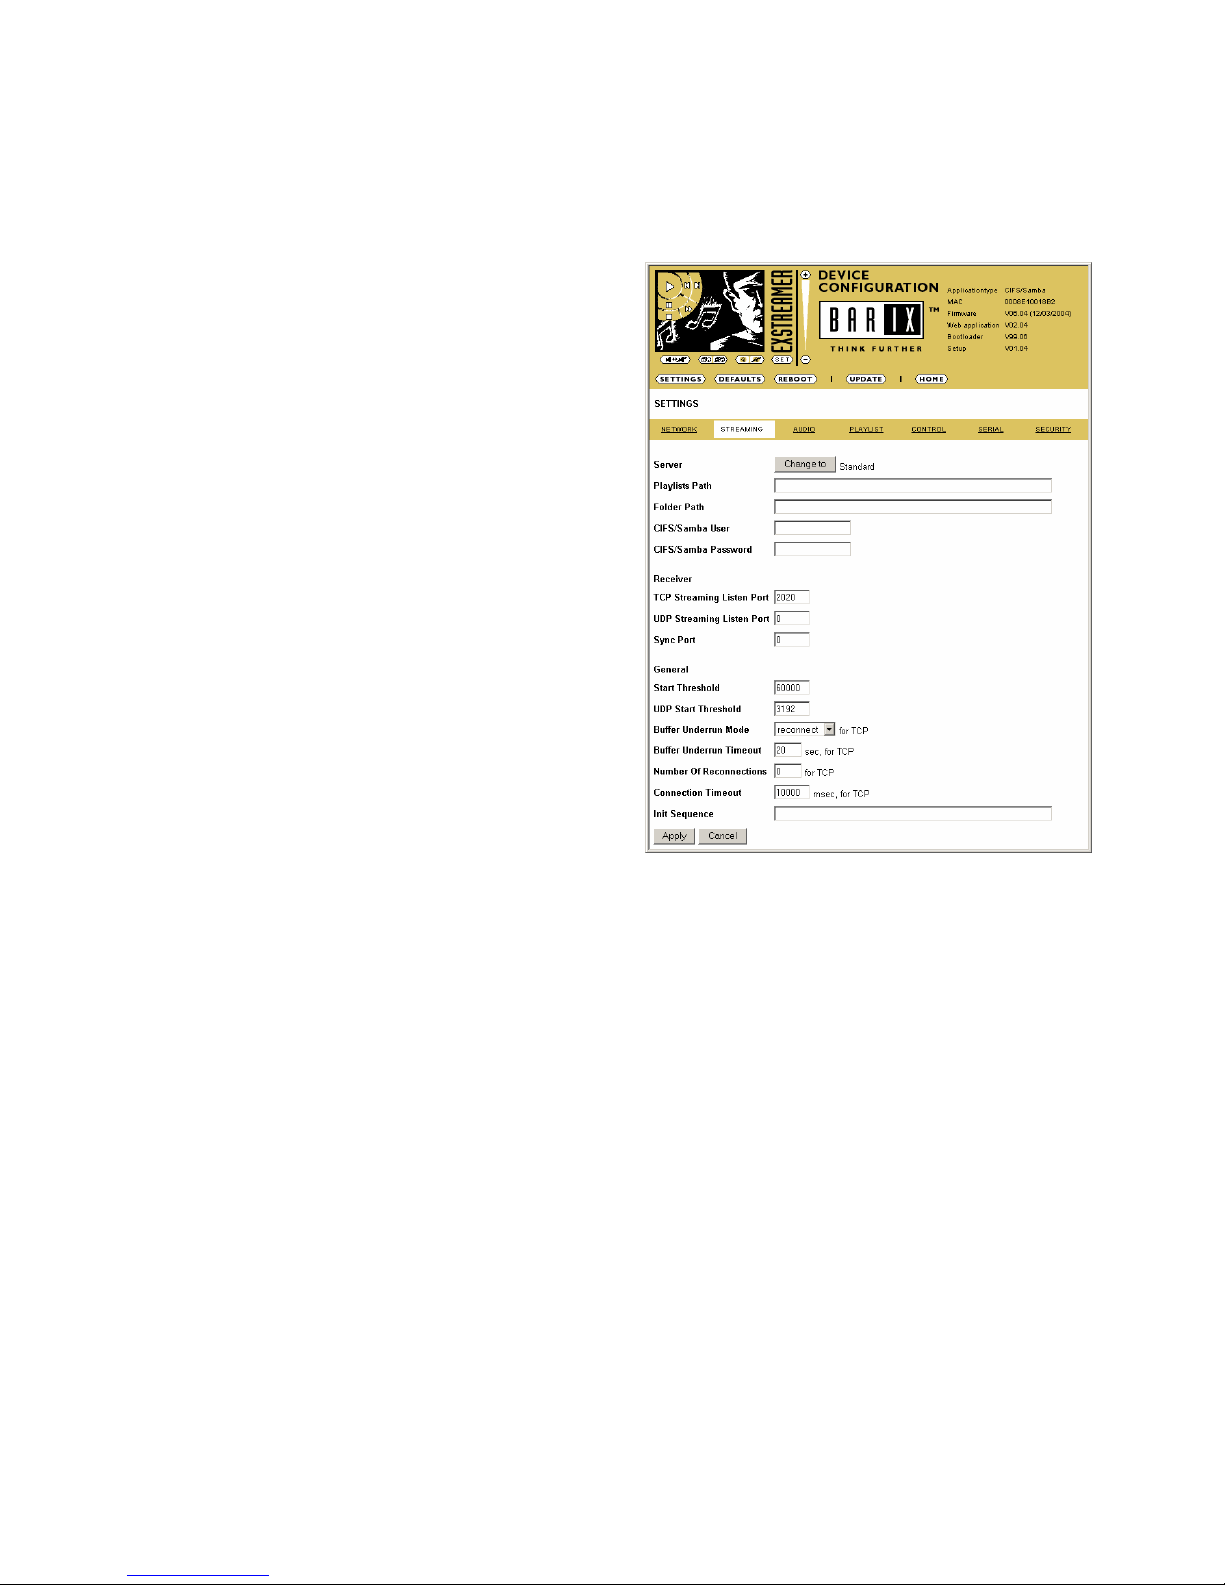
7.4 Streaming settings “CIFS/Samba”
This feature will use a simple Windows or Linux share,
no zServer is needed!
Server settings
Press the button to change to the “Standard” application.
Playlists Path
This is the path to the share for the playlists directory.
Example: //192.168.2.10/media/playlists
Folder Path
This is the path to the share for the folder directory.
Example: //192.168.2.10/media
CIFS/Samba User / Password
Enter the user name and password that has at least read
access to the shares of the Playlists Path and Folder Path.
The Receiver settings and the General setting are equal to
the application type “Standard”!
Page 16
Barix Exstreamer Gold User Manual Version 01.01
Page 14
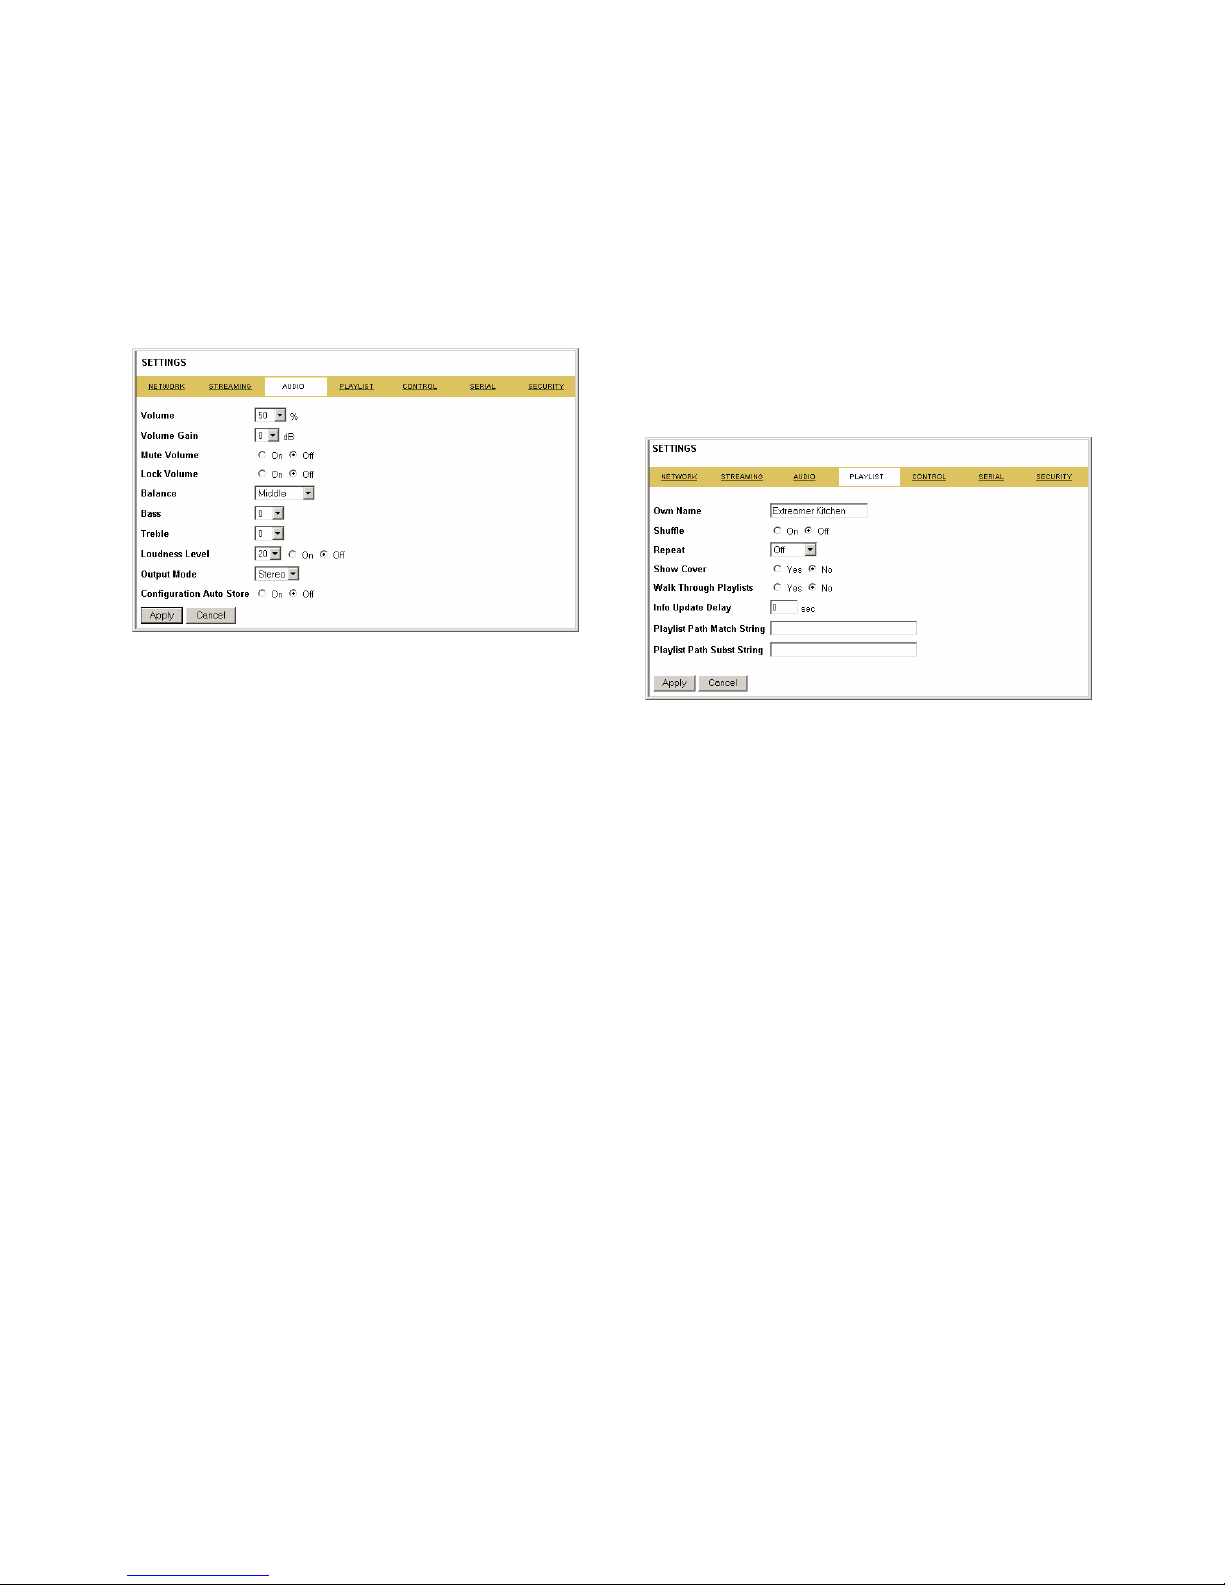
7.5 Audio settings
You only need to adjust this section if you would like your
Barix Exstreamer to start up with custom sound
adjustments. For example you would like your Barix
Exstreamer to always start with maximum bass, than you
could adjust that here to become default. These
adjustments will be stored even if the unit looses power.
Volume
Select the preferred volume (power up value).
Volume Gain
Select "0", "-3" or "-6" dB to adjust the line output level to
the sensitivity of the attached device. Select "-6" to prevent
distortion when driving 4 Ohm speakers at a high volume
setting.
Mute Volume
Choose "On" to mute the sound output at startup else
choose "Off".
Lock Volume
Choose "On" to lock volume on the control interface. This
denies the volume control by the user. "Off" allows free
volume control.
Balance
Choose between "Left max." and "Right max." (L10..R10).
Bass
Choose between "-10" and "10".
Treble
Choose between "-10" and "10".
Loudness Level
Choose between "0" and "20".
Loudness
Switch the Loudness "On" or "Off".
Output Mode
Select Stereo, Mono or Bridge. If Mono is selected the
audio output is always mono. On Bridge mode the right
channel is inverted and audio output is mono. The Bridge
mode is used to allow a bigger output signal.
Configuration Auto Store
Stores the configuration automatically 30 sec after the last
change in the control interface. The stored parameters are
volume, mute, volume lock, balance, bass, treble, loudness
on/off, shuffle and repeat.
7.6 Playlist settings
These settings adjust the playlist properties.
Own Name
You can enter the name of the Barix Exstreamer here. This
name is displayed in the file info frame on the device status
page. This name will be returned when using the
DISCOVER command (see technical documentation) and
will be used for the SYNC function by other Barix
Exstreamers.
Shuffle
This action automatically shuffles the media files inside a
playlist and plays them randomly non stop.
Repeat
If "Off" then nothing is repeated. If "Song" is selected the
actual song is played non stop. If "Playlist" is selected the
actual playlist is repeated non stop.
Show Cover
If enabled a cover image of the selected playlist is shown on
the right side of the playlist. The name of the cover file has
to match the name of the playlist file but using a ".jpg"
extension and must be stored in the same directory as the
playlist itself.
Walk Through Playlists
If set to "Yes", then it will play the next playlist after the
last one finishes. With "Yes" all playlists will play back to
back automatically.
Info Update Delay
If set to zero, the info frame will not be updated. Else every
n second the file info will be updated.
Playlist Path Match String / Subst String
If the path of a song in a playlist starts with the match
string, it will be replaced with the subst string.
Page 17
Barix Exstreamer Gold User Manual Version 01.01
Page 15
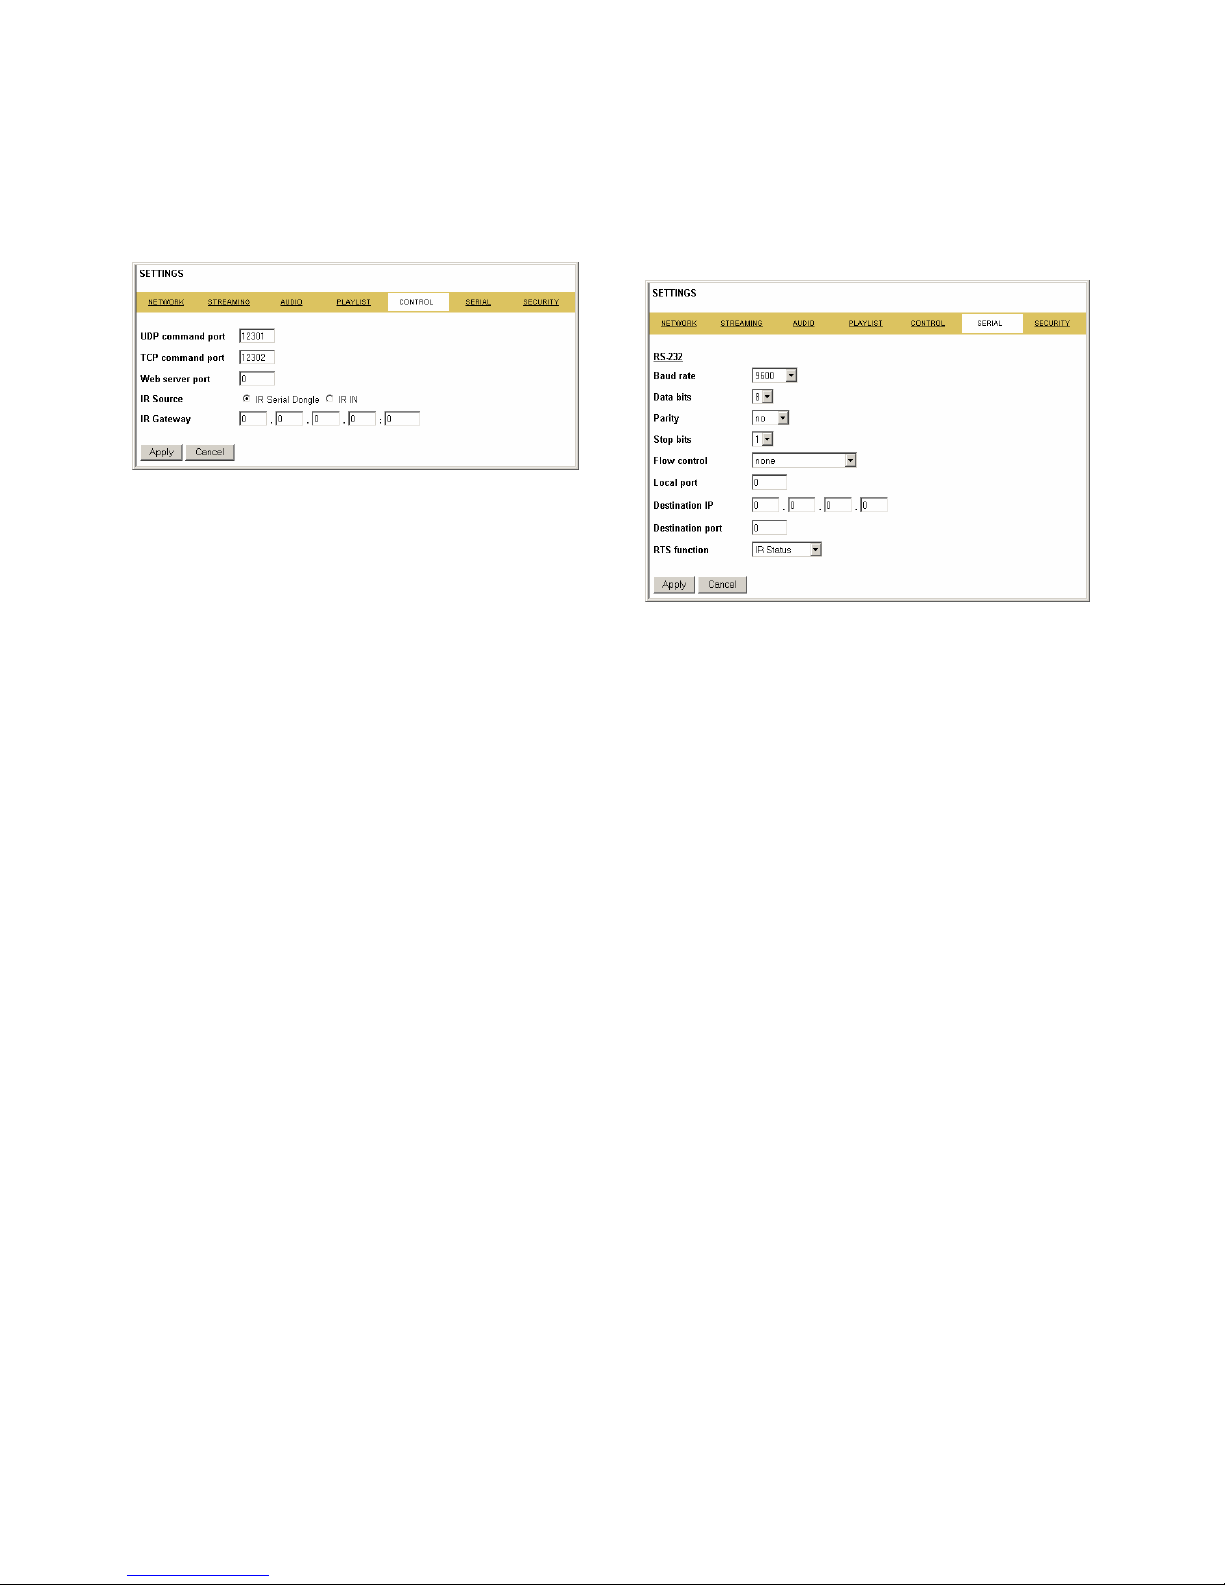
7.7 Control settings
These settings adjust the control ports, IR source and IR
gateway properties.
UDP command port
Define the port on which the device will receive commands
via UDP.
TCP command port
Define the port on which the device will receive commands
via TCP.
Web server port
Defines the port where the web server of the Barix
Instreamer can be reached. If set to
"0"
the default HTTP
port (80) is used.
IR Source
Select "IR IN" when attaching an IR Receiver on the IR IN
jack or "IR Serial Dongle" when using the supplied Serial
Receiver.
IR Gateway
When activated all received IR remote control commands
will be transmitted to other Barix devices IR OUT output.
Leaving the IP address at 0.0.0.0 and setting a valid port
(not 0) will broadcast the IR commands in the LAN.
To direct to a specific device set the IP Address of the
device and the port (
Example: 192.168.0.24:12301
).
To disable the IR Gateway set the IP address to 0.0.0.0 and
the port to 0.
7.8 Serial settings
These settings adjust the serial port, serial gateway and IR
Dongle LED properties.
Baud rate
Select the serial transmission speed (300 to 115200 Baud).
Data bits
Select 7 or 8 data bits.
Parity
Select no, even or odd parity.
Stop bits
Select 1 or 2 stop bits.
Flow control
Select the type of flow control:
none, software (XON/XOFF) or hardware (RTS/CTS).
Local port
Defines the port on which the serial port can be accessed
for serial gateway application. Only when "Local port" is set
to "0" the serial port can be used as a command interface.
If the active serial gateway is enabled and the "Local port" is
set to a value then this will be the source port of the TCP
connection. On
"0"
a random source port is used.
Destination IP
To have this Barix Instreamer actively establish a serial
gateway select the destination IP address to the device
where the serial data will be transmitted to (and received
from).
Select "0.0.0.0" when the serial port is only used local.
Destination port
Defines the port for the active serial gateway function (see
destination IP).
Notes
Both settings, "Destination IP" and "Destination port" have
to be set to enable the gateway function.
RTS function
Select the function of the RTS output pin.
On "IR Status" the LED on the connected IR Dongle will
flash upon reception of an IR Remote Control (default
setting). On "activate AVR" RTS is on during streaming and
60 sec after the last streaming. It can be used to activate an
Audio Video Receiver or Amplifier. On "RTS" it can be
used for flow control as usual or as an additional output.
Page 18
Barix Exstreamer Gold User Manual Version 01.01
Page 16
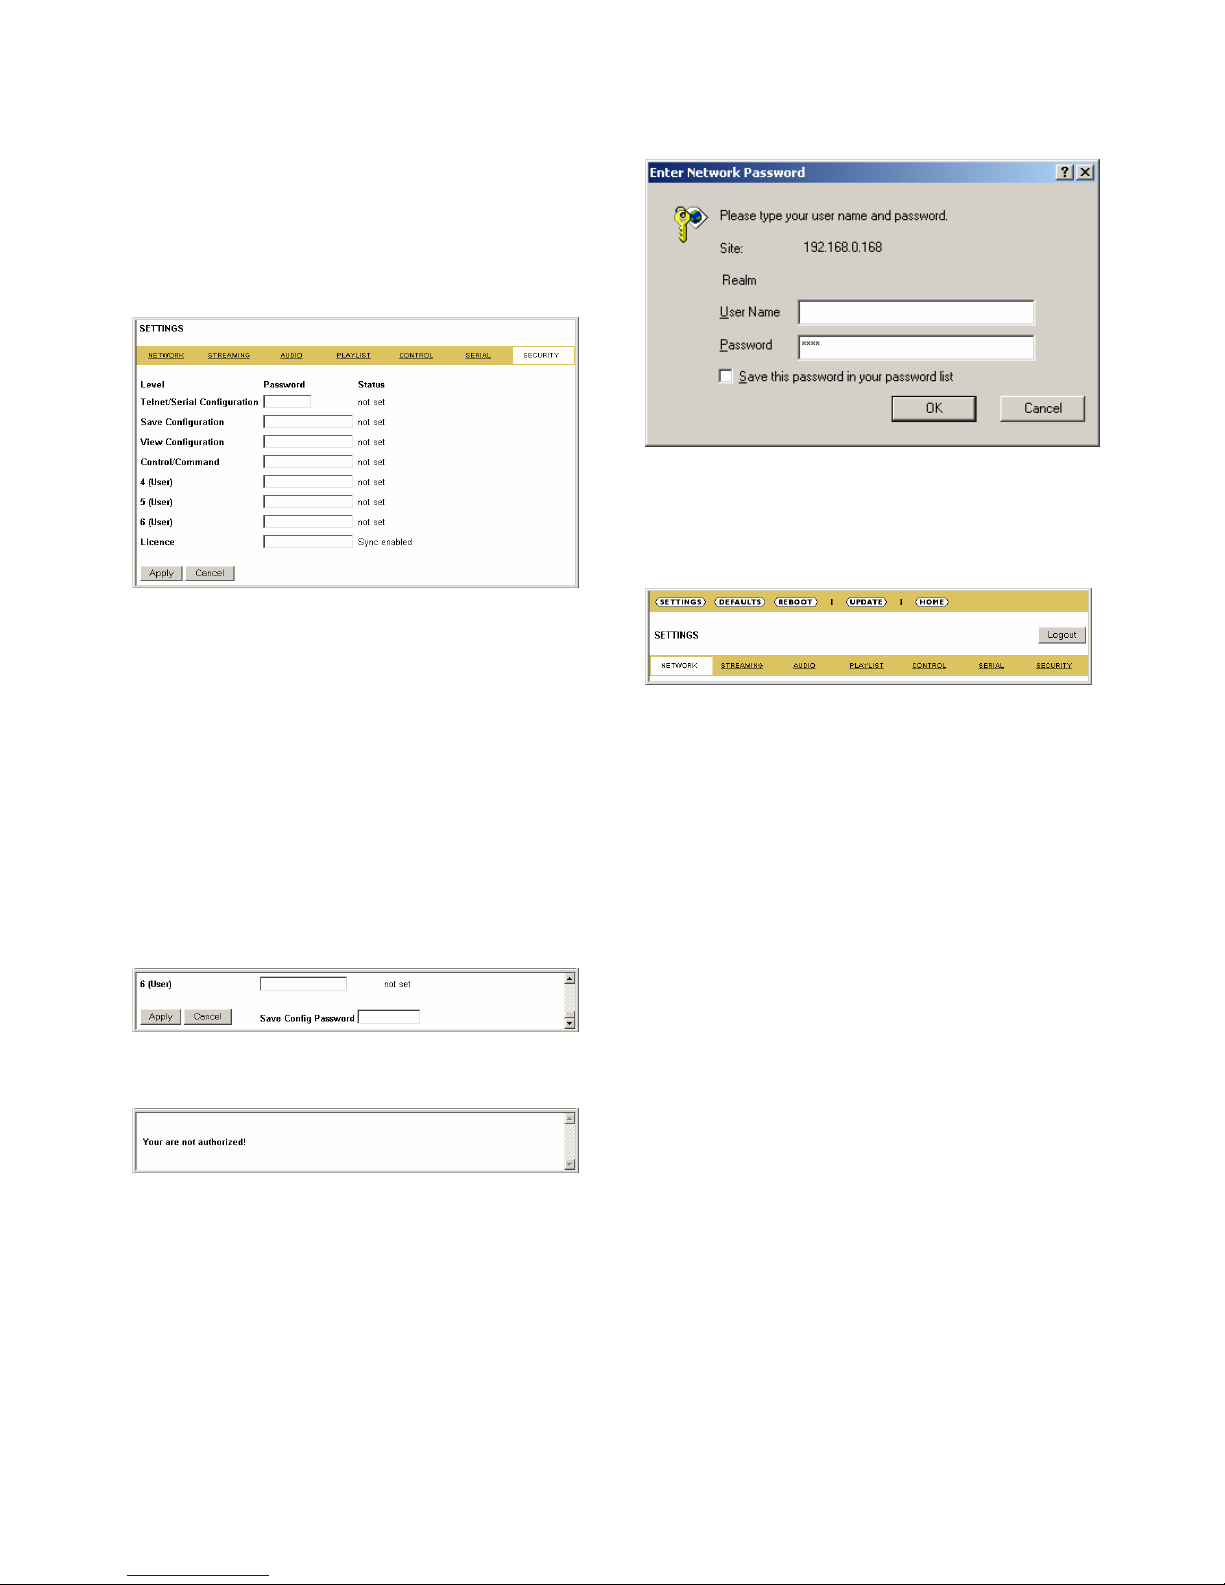
7.9 Security settings
These settings can be used to secure the access to the
Barix Exstreamer on several levels. The status is shown
next to each password (set or not set). Access is free for
levels without a password (default setting).
Telnet / Serial configuration
Enter up to 7 characters to secure the access to the Telnet
and Serial configuration. Without a valid password the
network configuration cannot be changed.
Enter 8 characters to erase the current password.
Save configuration
Enter up to 24 characters to secure the saving of the
device configuration (Clicking on Apply). Without a valid
password the device configuration cannot be saved!
Enter 25 characters to erase the current password.
Save configuration password usage
When the password is set the user has to type in the
password in the "Save Config Password field" before hitting
the "Apply" button.
Otherwise a warning will be displayed without saving the
changes made.
View configuration
Enter up to 24 characters to secure the viewing of the
device configuration (Clicking on Config link). Without a
valid password the device configuration cannot be viewed!
Enter 25 characters to erase the current password.
View configuration password usage
When the password is set the user clicking on the "Config"
link has to type in the password in the password field of
the pop up window (the user name does not matter).
Only one user can log in at a time. Further connections will
be refused while one user is logged in.
To log out click on the "Logout" link next to the
"SECURITY" tab in the menu bar.
Please hit your browser’s Reload button if the "Logout" link
is not visible while logged in.
Control / Command
Enter up to 24 characters to secure the access to all
control and command interfaces (WEB/CGI, Serial, TCP
and UDP). Without a valid password the device cannot be
controlled. Enter 25 characters to erase the current
password.
Note
This security option should be used very carefully and is
intended for advanced users only. Since the CGI commands
used in the web interface do not make use of passwords,
setting this password would disable any control of the
Barix Exstreamer using a browser.
Level 4 to 6 (User)
Enter up to 24 characters to secure the access to
customized web pages in 3 levels. Intended for advanced
users only, for details see the Barix Exstreamer Gold
Technical Documentation). Without a valid password these
user web pages can not be viewed.
Enter 25 characters to erase the current password.
License
Type here the license you've received to enable the related
functionality.
Page 19
Barix Exstreamer Gold User Manual Version 01.01
Page 17
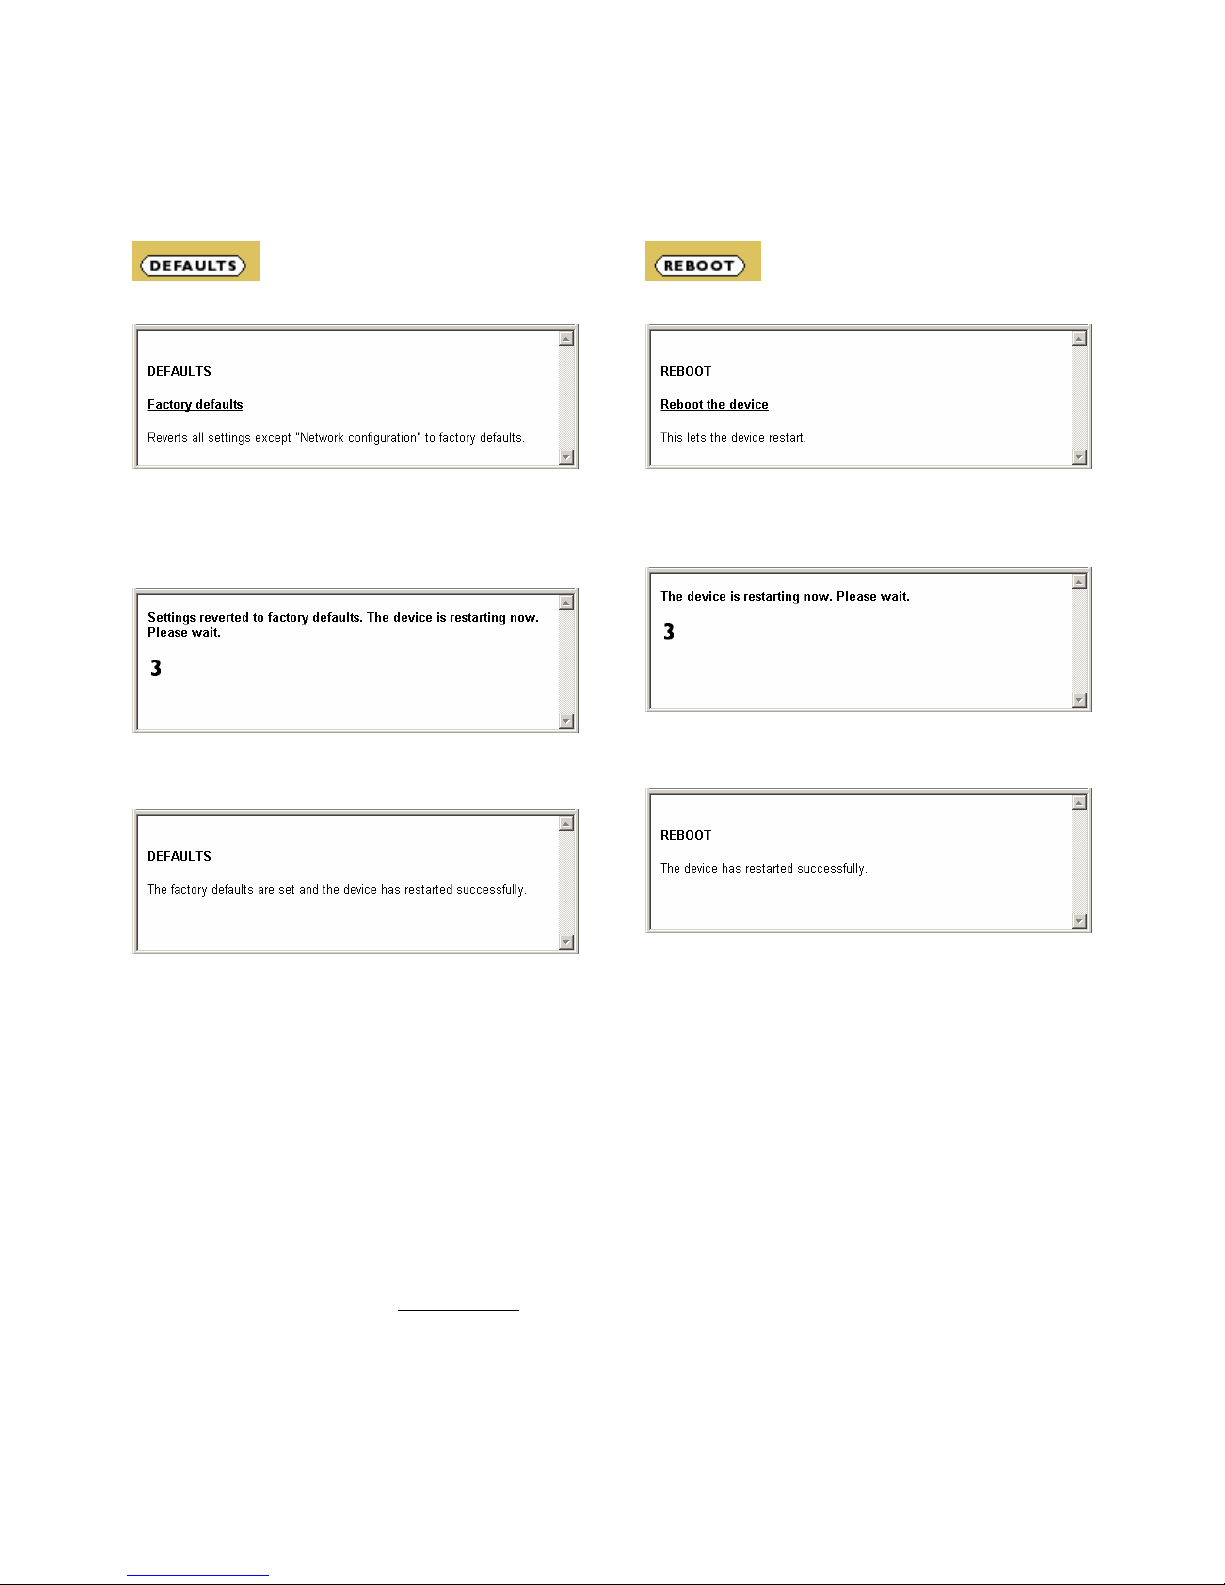
7.10 Reverting to factory defaults
Click on the DEFAULTS button to enter the defaults page.
You will see the following screen:
Click on "Factory defaults" to revert all settings except
"Network configuration" to factory defaults.
While restarting the device the following screen appears
showing a number counting down:
Upon start up the following screen appears stating the
successful reverting to factory defaults:
Hard default settings
To revert all settings (including the network settings) to
factory defaults the Reset button has to be pressed for
about 5 seconds while the Barix Exstreamer is powered.
Important note
Use this method if connection to the Barix Exstreamer
cannot be established.
This can happen if you have set a Static IP address once,
switched off SonicIP and then forgotten the IP address.
The hardware default settings reverts the IP Address to
automatic discovery (0.0.0.0) and enables SonicIP.
If this fails we recommend downloading the Barix
Exstreamer Gold Rescue Kit from www.barix.com
. This
Rescue Kit reloads the entire firmware using the supplied
serial cable.
Unzip the Kit and read "readme1st.txt" for instructions.
7.11 Rebooting the device
Click on the REBOOT button to enter the reboot page.
You will see the following screen:
Click "Reboot the device" to restart the Barix Exstreamer.
While restarting the device the following screen appears
showing a number counting down:
Upon start up the following screen appears stating the
successful restart:
Page 20
Barix Exstreamer Gold User Manual Version 01.01
Page 18
7.12 Updating the device
Barix constantly enhances the capabilities of their products.
Therefore we recommend keeping the software on the
Barix Exstreamer up-to-date.
To download the latest firmware version please visit
www.barix.com
.
Click on Support, click on DOWNLOAD SECTION
and scroll down to the Barix Exstreamer Gold. Download
the Firmware Rescue Kit. Check the "readme1st.txt" for
instructions. The Rescue Kit reloads the entire firmware,
resets the device to factory default settings using the
supplied serial cross cable and a PC running W2K or XP.
It also holds a binary file that can be used in the following
steps to update the device using a web browser.
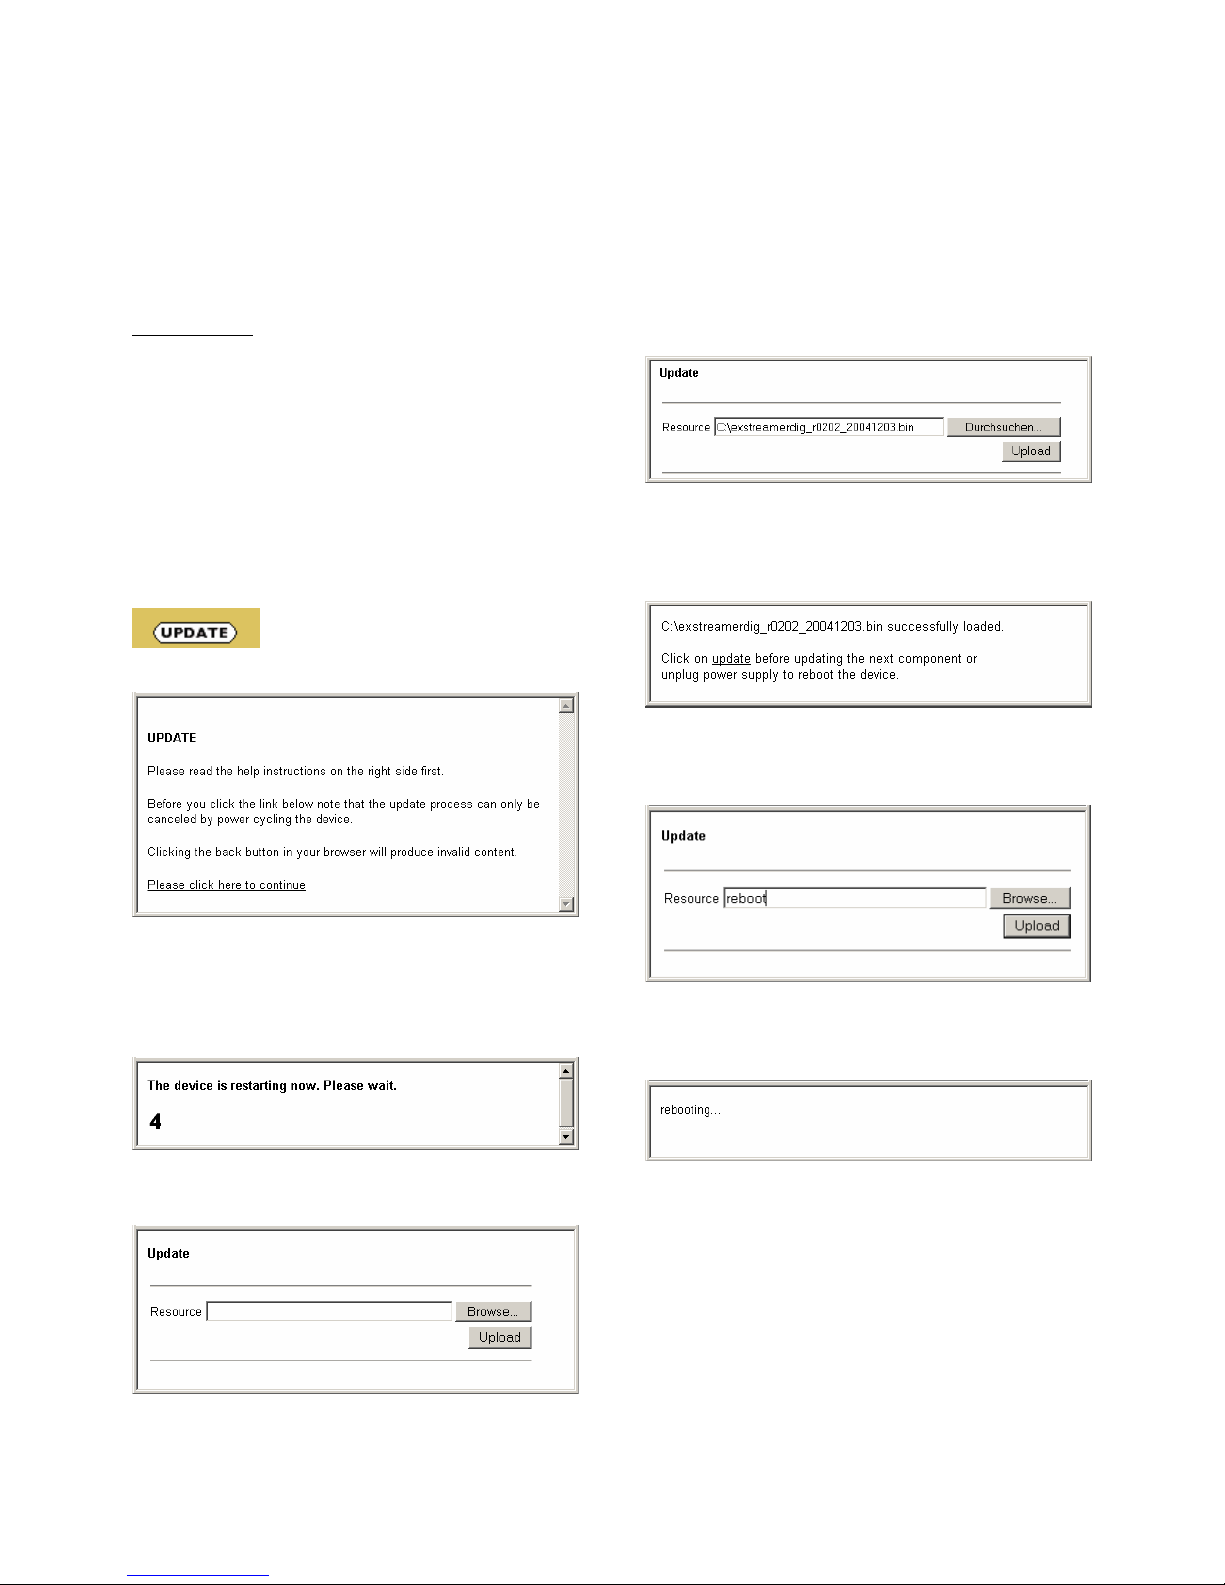
STEP 1
Click on the UPDATE button to enter the update page.
You will see the following screen:
STEP 2
Click on "Please click here to continue" to launch the
update process. The device will restart in a special mode
called Bootloader and the following screen appears
showing a number counting down:
Upon start up the following screen appears ready for the
update process.
STEP 3
To upload an update click on "Browse..." to locate the file
you want to update.
The file is named exstreamerdig_
version_date
.bin
Example: exstreamerdig_r0202_20041203.bin
If you load the wrong file the device will not work and then
the Rescue Kit must be used.
Once selected, click on "Upload".
This process can take a few minutes.
After a successful upload the following window appears:
Click on the update link before updating the next
component. Unplug power supply to reboot the device or
type "reboot" in the resource field (without the ")
and click on "Upload".
The following screen appears:
STEP 4
Close the browser window. After the device has rebooted
open a new browser window to continue.
Page 21

Barix Exstreamer Gold User Manual Version 01.01
Page 19
8 The step by step “How To”
8.1 How to set a static IP address
STEP 1
Open your Web Browser.
STEP 2
Enter the Barix Exstreamer´s IP address and press Enter.
Example: 192.168.0.12
STEP 3
Click on the Configuration button.
STEP 4
Enter an IP address into the 4 IP address fields. At default it
is 0.0.0.0 for automatic. You can use the address that was
announced by the Barix Exstreamer.
STEP 5
In normal operating conditions leave the Netmask as is.
STEP 6
The Gateway can be left at default in normal operating
conditions. The Gateway enables the Barix Exstreamer to
connect to the internet (For advanced users).
STEP 7
Hit the Apply button to save all changes. The Barix
Exstreamer will reboot and has now a Static IP address.
8.2 How to set the Barix Exstreamer
to stream music from your PC
The Barix Exstreamer is in this operating mode by default.
Follow these steps to ensure correct settings.
STEP 1
You must have the zServer running on a computer (see
section 5.1)
STEP 2
Open your Web Browser
STEP 3
Enter the Barix Exstreamer´s IP address and press Enter.
Example: 192.168.0.12
STEP 4
Click on the Config link.
STEP 5
Click on the SERVER tab in the SETTINGS menu
STEP 6
Choose "0 zServer (auto detect) " in the Mode field.
STEP 7
Make sure that Server Port says: 8888
STEP 8
Make sure that Server Path says: /
STEP 9
Make sure that Playlist List Path says: /playlist.html
STEP 10
Hit the Apply button to save the changes. The Barix
Exstreamer will reboot.
STEP 11
After the reboot wait until the green LED stays steady
(zServer was found), click on the HOME icon to get to the
main page. You should see now your playlists served by the
zServer. Clicking on a playlist will start the music.
8.3 How to set the Barix Exstreamer
to stream music from a specific
PC
Fixed zServer selection when running multiple zServers.
STEP 1
You must have the zServer running on the computer you
want to stream from.
STEP 2
Open your Web Browser
STEP 3
Enter the Barix Exstreamer´s IP address and press Enter.
Example: 192.168.0.12
STEP 4
Click on the Config link.
STEP 5
Click on the SERVER tab in the SETTINGS menu
STEP 6
Choose "1 zServer (fix)" in the Mode field.
STEP 7
Enter the IP address of the computer you want to stream
from in the Server IP Address field.
Example: 192.168.0.99
STEP 8
Make sure that Server Port says: 8888
STEP 9
Make sure that Server Path says: /
STEP 10
Make sure that Playlist List Path says: /playlist.html
STEP 11
Hit the Apply button to save the changes. The Barix
Exstreamer will reboot.
STEP 12
Click on the HOME icon to get to the main page. You
should see now your playlists served by the zServer.
Clicking on a playlist will start the music.
Page 22

Barix Exstreamer Gold User Manual Version 01.01
Page 20
8.4 How to set the Barix Exstreamer
to stream music from a web
server
For use with standard web servers
STEP 1
Open your Web Browser
STEP 2
Enter the Barix Exstreamer´s IP address and press Enter.
Example: 192.168.0.12
STEP 3
Click on the Config link.
STEP 4
Click on the SERVER tab in the SETTINGS menu
STEP 5
Choose "2 Web server" in the Mode field.
STEP 6
In the Server IP Address field enter in the IP address of the
target web server the Barix Exstreamer should stream
from.
STEP 7
In the Server Port field you have to enter the port number
of which your web server is communicating (standard web
servers work on port 80). Example: 80
STEP 8
In the Server Path field you have to enter the path where
your playlists are stored on the web server. Please note
that you have to put a "/" in front and at the end of the
path. A single "/" in the field indicates the root directory of
the Web server. Example: /Music/
STEP 9
In the Playlist List Path field you have to enter the path
where your list of playlists is stored on the web server.
Example: /Music/playlist.txt
STEP 10
Hit the Apply button to save the changes. The Barix
Exstreamer will reboot.
STEP 11
Click on the HOME icon to get to the main page. You
should see now your playlists served by the web server.
Clicking on a playlist will start the music.
8.5 How to set the Barix Exstreamer
to be a streaming puller
For use with standard MP3 jukeboxes or many Web radio
stations.
STEP 1
Open your Web Browser
STEP 2
Enter the Barix Exstreamer´s IP address and press Enter.
Example: 192.168.0.12
STEP 3
Click on the Config link.
STEP 4
Click on the SERVER tab in the SETTINGS menu
STEP 5
Choose "3 Streaming Puller" in the Mode field.
STEP 6
In the Server IP Address field enter in the IP address of the
target jukebox or radio station the Barix Exstreamer
should stream from.
STEP 7
In the Server Port field enter in the port number required
by the jukebox (check the jukebox documentation) or
radio station.
STEP 8
In the Server Path field you have to enter a "/".
Some Jukeboxes allow you to distinguish between different
server Paths: Example: /music2
STEP 9
Hit the Apply button to save the changes. The Barix
Exstreamer will reboot.
STEP 10
After the reboot the Barix Exstreamer will start pulling
music from your Jukebox or Web radio station.
8.6 How to set the Barix Exstreamer
to be a streaming receiver
For use with applications sending a stream.
STEP 1
Open your Web Browser
STEP 2
Enter the Barix Exstreamer´s IP address and press Enter.
Example: 192.168.0.12
STEP 3
Click on the Config link.
STEP 4
Click on the SERVER tab in the SETTINGS menu
STEP 5
Choose "4 Streaming receiver" in the Mode field.
STEP 6
Hit the Apply button to save the changes. The Barix
Exstreamer will reboot.
STEP 7
After reboot the Barix Exstreamer will wait for a stream
on the selected TCP and/or UDP Streaming Listen Port.
Page 23
Barix Exstreamer Gold User Manual Version 01.01
Page 21
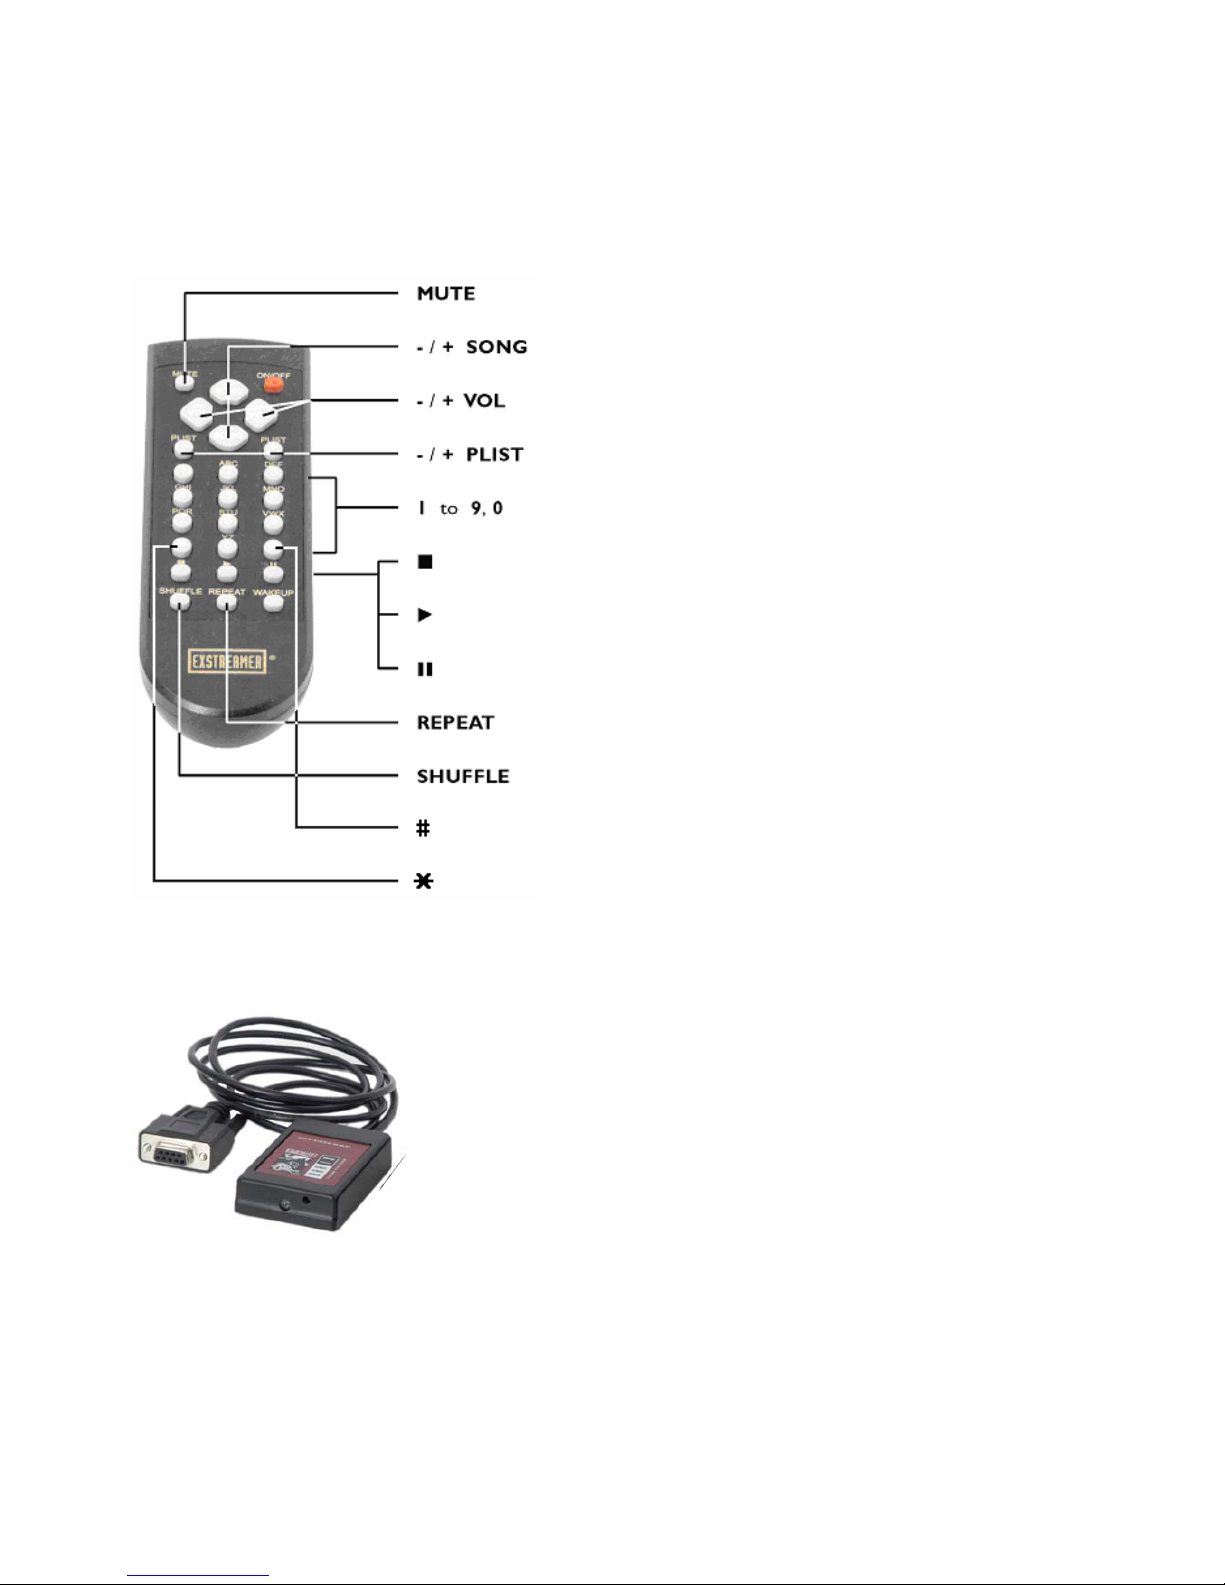
9 IR Remote control
Follow these instructions if you have purchased the
optional IR Remote control kit.
To prepare the IR Remote Control for usage open the
battery compartment and check the signs of polarity.
Insert the two batteries accordingly into the IR remote
control. The IR Remote Control is now ready to operate.
Connect the serial cable of the IR Serial receiver to the
serial port of the Barix Exstreamer. Make sure you have
lign of sight with the IR Serial receiver from where you
want to use the IR remote control.
On power up the blue LED will be on until the Barix
Exstreamer has set the network and announced the IP
Address. The function of this LED can be changed in the
configuration Serial settings by the field "RTS function" (see
section 7.9 Serial settings). The Installation is completed.
The Exstreamer can now be controlled through your IR
remote control. Enjoy the comfort and ease of use!
Mute / Unmute the Barix Exstreamer´s Output.
Switch to previous / next song in the current playlist.
Decrease /Increase volume of Barix Exstreamer Output.
Switch to first song of previous / next playlist.
Play playlist one to ten.
Stop the current song.
Play the current song.
Pause the current song.
REPEAT Toggle repeat mode for song / playlist / off.
SHUFFLE Toggle shuffle mode on / off.
Refreshes the list of playlists entries on the control page
SYNC with first discovered Barix SYNC master device
The following keys are currently not being used (ready for
future use): ON/OFF | WAKEUP
Page 24
Barix Exstreamer Gold User Manual Version 01.01
Page 22
10 Advanced user section
10.1 Network configuration using
supplied serial cable
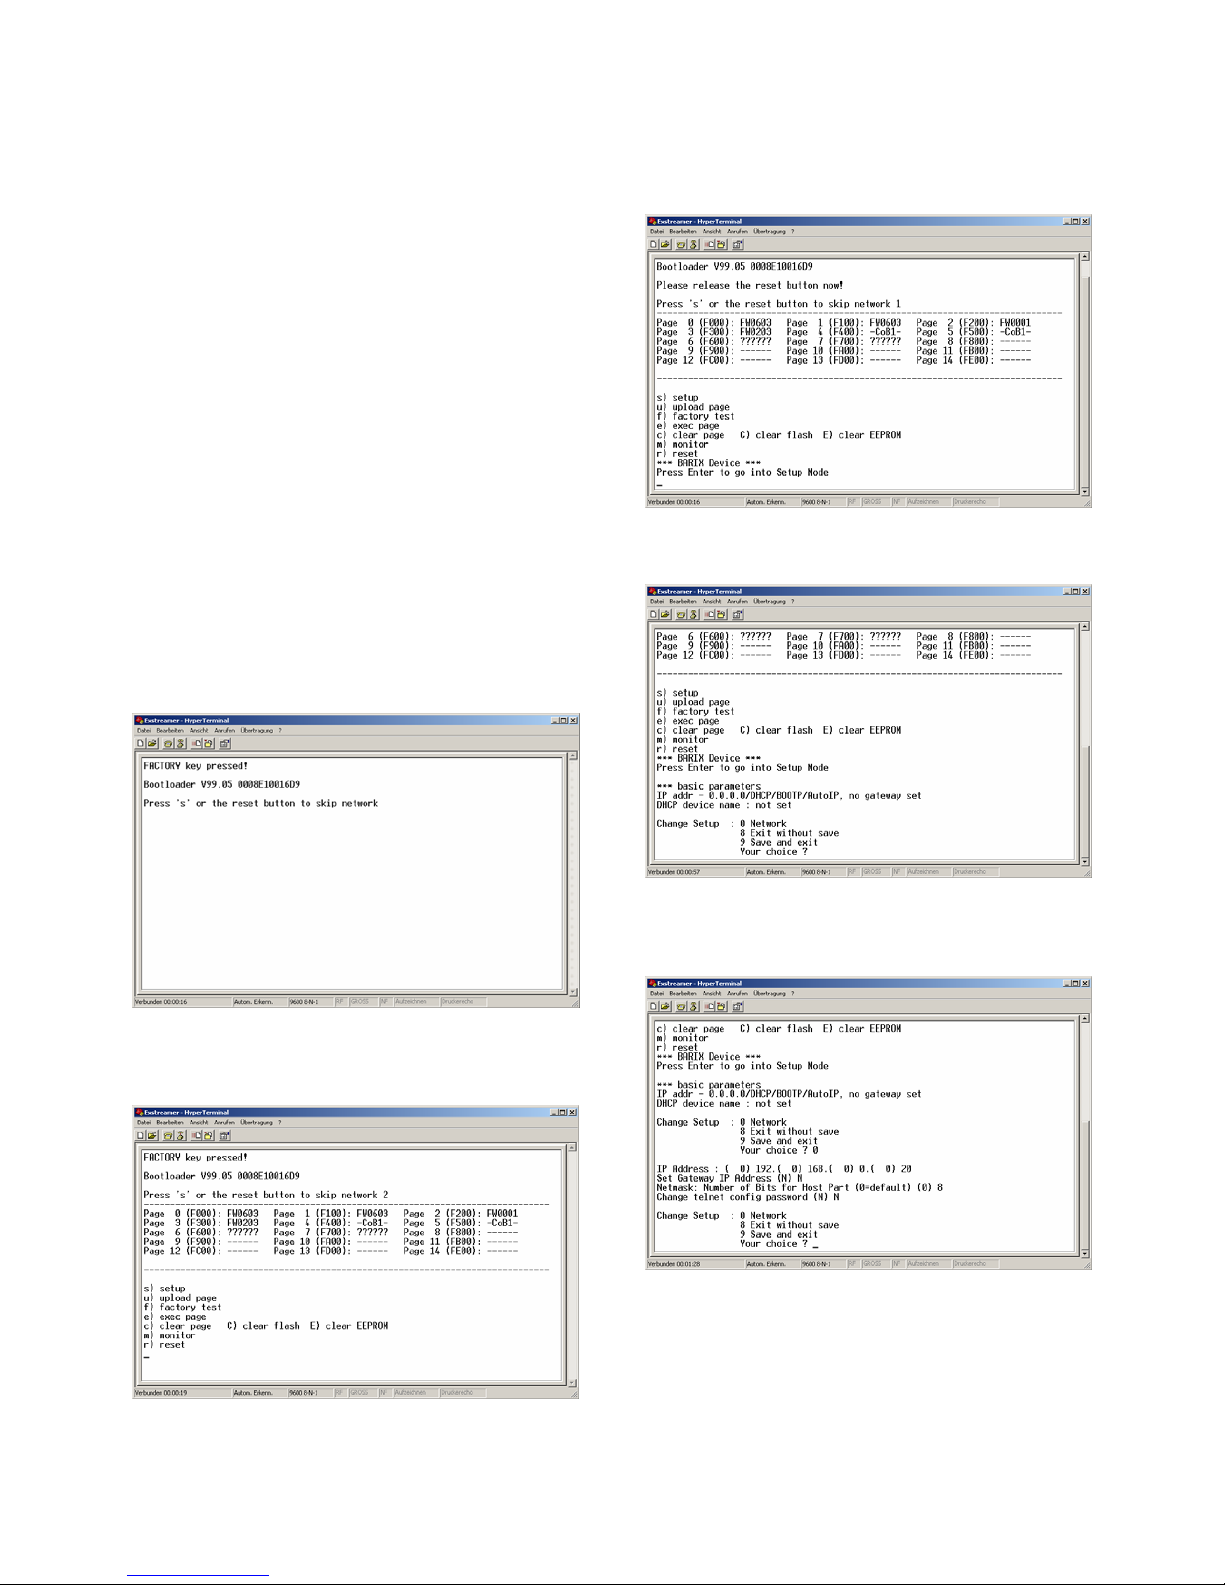
STEP 1
Open a Terminal program.
STEP 2
Go to the settings menu and adjust the following settings:
Baud rate 9600 bit/sec, 8 Data Bits, no Parity and 1 Stop
bit.
STEP 3
Unplug the power supply of the Barix Exstreamer.
STEP 4
Connect the supplied serial cable to your PC’s COM port
and to the serial port of the Barix Exstreamer.
STEP 5
Keep the Reset button pushed and plug in the power
supply. Release the Reset button as soon as you see
following screen:
STEP 6
Hit <s> to skip network discovery if not connected to a
network and the following screen appears:
STEP 7
Hit <s> to get to the Barix Exstreamer´s setup.
STEP 8
Hit <enter> to enter the Barix Exstreamer setup mode.
STEP 9
Type in <0> and hit <enter> to enter the Network
configuration. Enter all requested values:
STEP 10
Type in <9> and hit <enter> to save the Network
configuration.
Page 25
Barix Exstreamer Gold User Manual Version 01.01
Page 23
10.2 Network configuration using telnet
STEP 1
Unplug the power supply of the Barix Exstreamer.
STEP 2
Keep the Reset button pushed and plug in the power
supply. Release the Reset button after 5 seconds.
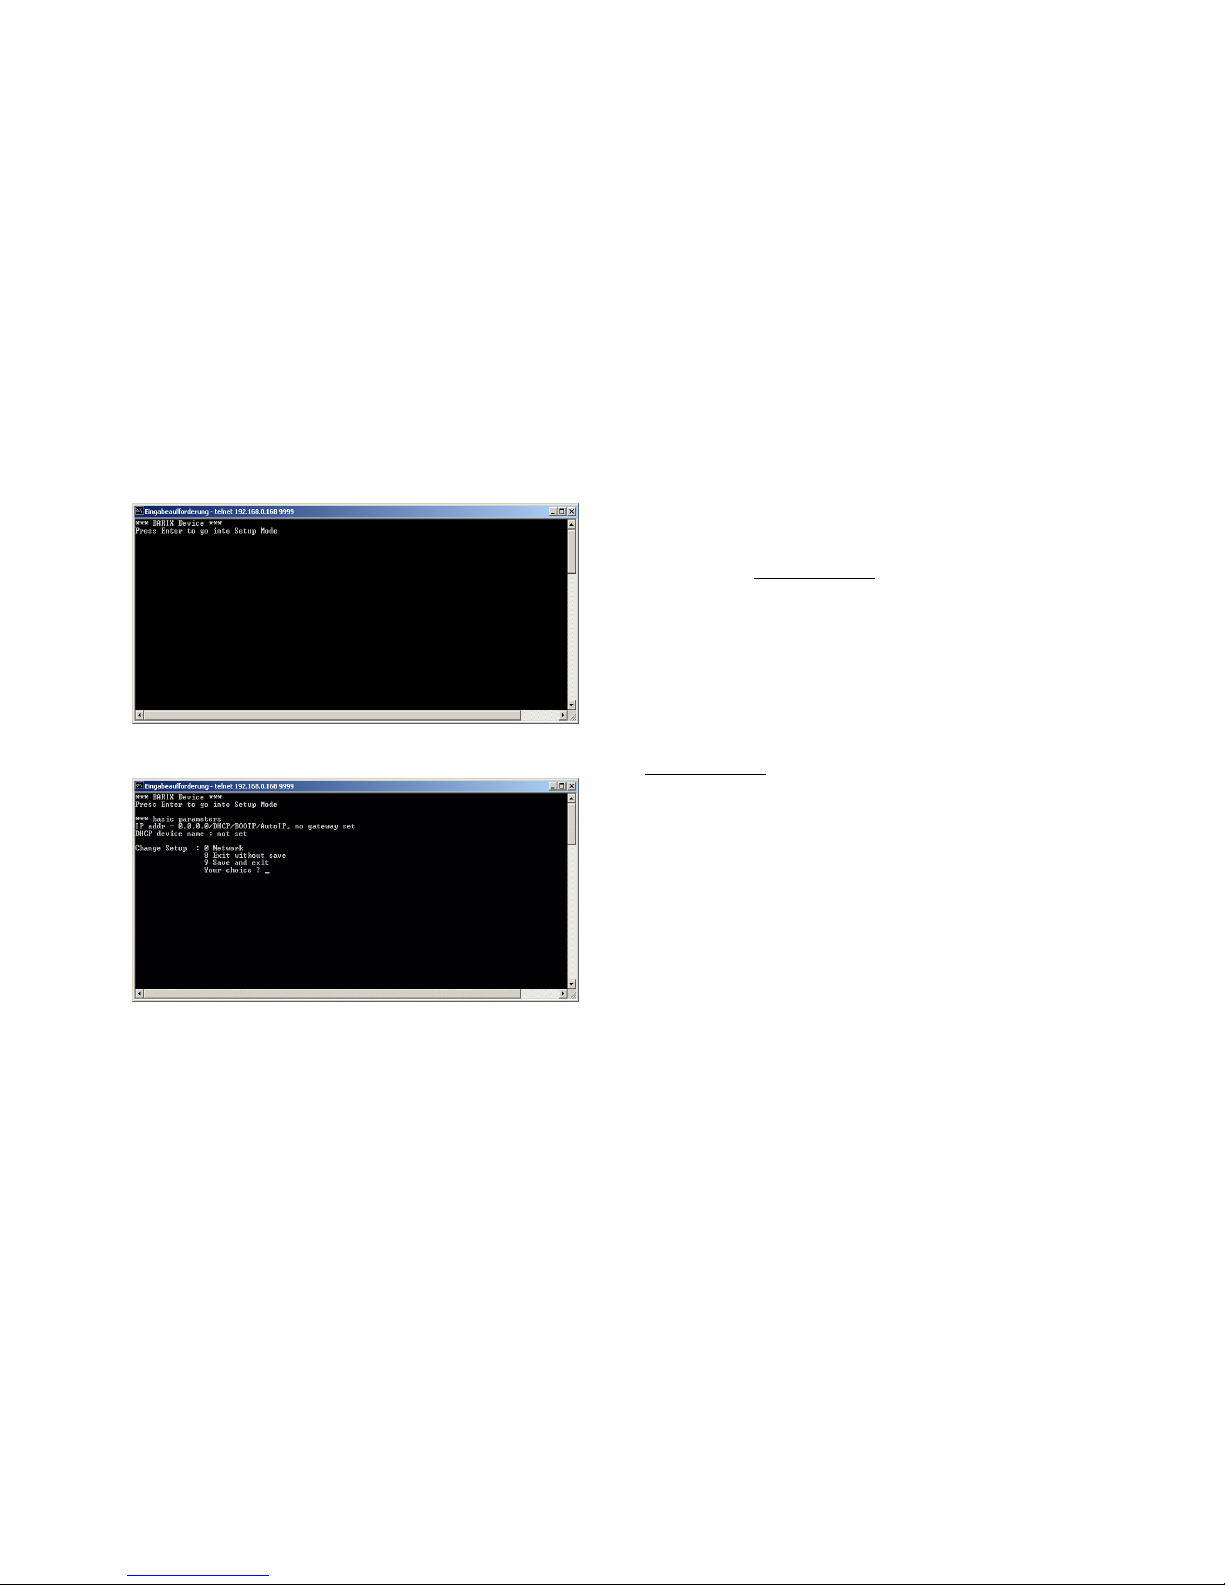
STEP 3
Run a command session. Type Telnet with the IP address
announced by SonicIP on port 9999.
Example: telnet 192.168.0.168 9999
You will see the following screen:
Hit <enter> to access the setup mode.
STEP 4
Type in <0> and hit <enter> to enter the Network
configuration. Enter all requested values.
STEP 5
Type in <9> and hit <enter> to save the Network
configuration.
10.3 Control APIs for serial and
Ethernet
For integration of the Barix Exstreamer into various
control applications and home automation systems, Barix
has developed a control API (Application Protocol
Interface) for the serial port and Ethernet UDP and TCP
control.
Serial Port control API
The serial port on the Barix Exstreamer can be used to
send control commands from a home automation system
and other PC or embedded applications. In the device
configuration the serial port can be adjusted to suit your
application.
For a detailed list of serial commands refer to the
Exstreamer Technical Documentation available on the
Barix website www.barix.com
Ethernet UDP or TCP control commands
The same control commands used on the serial port can be
used as UDP or TCP commands over Ethernet.
For more information and a detailed list of UDP and TCP
control commands refer to the Barix Exstreamer Gold
Technical Documentation available on the Barix website
www.barix.com
10.4 Automatic discovery settings
The automatic discovery functions are not executed if a
static IP address is set. To enable automatic discovery but
disable certain IP discovery functions set all but the third
value to zero. For each function you want to disable add
the value from the table below:
0.0.1.0 to disable AutoIP
0.0.2.0 to disable BOOTP
0.0.4.0 to disable DHCP
0.0.8.0 to disable IPzator
Example: 0.0.3.0 disables AutoIP and BOOTP
0.0.11.0 disables all but DHCP
Warning:
0.0.15.0 disables all discovery functions which locks you out
unless you reset the device to factory defaults by pressing
the reset button for about 5 seconds.
Page 26

Barix Exstreamer Gold User Manual Version 01.01
Page 24
Page 27

Barix Exstreamer Gold User Manual Version 01.01
Page 25
11 FAQ and Troubleshooting
Q: I don’t see any status lights on at all.
A: Make sure the power cable is correctly plugged into the
unit and make sure the power supply is plugged into the
wall.
Q: Red status light is flashing red.
A: Make sure the network cable is plugged into the unit.
The status light on the jack indicates if you are connected
to the network or not. Make sure the Music Server
program is running on the network. You can also ping the
device to see if it’s on your network.
Q: How do I ping the Barix Exstreamer to see if it’s on my
network?
A: You can ping any device on your network by opening a
DOS command box.
Type ping and the IP address of the unit to see if you can
get a response.
Example: ping 192.168.2.10
The proper response would be to see the message “reply
from 192.168.2.10”.
If you see the message “request timed out”, it means that
the Barix Exstreamer is not on your network or that you
have entered the wrong numbers for the IP address.
Q: When I type in the IP address in the browser I get a
“This Page Cannot Be Displayed” message
A: This means that you can not connect to the Barix
Exstreamer. There could be a couple of different reasons.
Make sure you are typing in the IP address correctly.
Check the cables to make sure the Barix Exstreamer is
properly connected to the network.
Q: Will the Barix Exstreamer work on my operating
system?
A: The Barix Exstreamer works on virtually any operating
system because the zServer software is a portable java
application that was designed to run regardless of which
operating system it is on. To control the Barix Exstreamer
a standard web browser is all you need.
12 Technical specifications
Audio Format:
MP3 (up to 320 kBit), uncompressed formats (WAV) in
future versions
Audio Interfaces:
Stereo RCA 4.2Vpp max, 2 x 20W speaker out (8Ω,
4Ω @ 60% max vol.)
wire up to 16AWG / 1.6mm²,
S/PDIF out (optical, RCA),
level, bass and treble adjustable by browser
Network Interface:
RJ45 10/100 Mbit Ethernet (Auto), TCP/IP, UDP, ICMP,
DHCP, BOOTP, AutoIP, SonicIP
®
, IPzator™, SMB/CIFS,
integrated web server for control and configuration
Control Interfaces:
DSub 9pin male (9600 Baud 8, N, 1), Two 1/8”
(3.5mm) jacks for IR receiver and emitter diodes
Misc:
Two LED (red and green) status indicators
Reset/Factory default button
Power requirements:
20 VDC 3 Amps, 100 - 240 VAC 50/60 Hz power supply
included, consumption up to 50W
Case:
Aluminum, 400 grams
6.5" x 1.4" x 5.5"
165 mm x 36 mm x 140 mm
Environmental conditions:
Temperature: 32 ~ 104° F / 0 ~ 40° C
Humidity: 0 ~ 70% relative humidity non-condensing
Certifications:
FCC A, CE A
User Interface:
Browser based (integrated web server), serial port or
Ethernet control API for home automation systems
Page 28

Barix Exstreamer Gold User Manual Version 01.01
Page 26
Page 29

Barix Exstreamer Gold User Manual Version 01.01
Page 27
13 Dictionary
DHCP
Short for Dynamic Host Configuration Protocol, DHCP is a
protocol used to assign an IP address to a device
connected to a Network.
DOS
Microsoft DOS (Disk Operating System) is a command line
user interface. MS-DOS 1.0 was released in 1981 for IBM
computers. While MS-DOS is not used commonly today, it
still can be accessed from Windows 95, XP, Windows 98
or Windows NT by clicking Start / Run and typing
command or CMD in Windows 2000.
IP
Short for Internet Protocol, the IP is an address of a
computer or other network device on a network using IP
or TCP/IP. Every device on an IP-based network requires
an IP address to identify its location or address on the
network.
Example: 192.168.2.10
IPzator
Barix IPzator™ technology is designed for the purpose that
the Barix Exstreamer can create its own IP address
according to the network structure in case it can’t receive
one from your network. If DHCP, AUTOIP or BOOTP fail,
IPzator will create an IP address within the subnet and test
it. If the address works and is not being used by another
device on the network, it will give the address to the Barix
Exstreamer.
MAC address
Abbreviation for Medium Access Control, a MAC is a
unique address number formatted in hexadecimal format
and given to each computer and/or network device on a
computer network. Because a MAC address is a unique
address a computer network will not have the same MAC
address assigned to more than one computer or network
device.
Example: A1:B2:C3:D4:E5:F6
Netmask
A number used to identify a sub network so that an IP
address can be shared on a LAN (Local Area Network).
A mask is used to determine what subnet an IP address
belongs to. An IP address has two components, the
network address and the host address. For example,
consider the IP address 150.215.17.009. Assuming this is
part of a Class B network, the first two numbers (150.2)
represent the Class B network address, and the second
two numbers (.017.009) identify a particular host on this
network. The Netmask would then be 255.255.0.0
Ping
Ping is a basic Internet program that lets you verify that a
particular IP address exists and can accept requests.
Example: ping 192.168.2.10
SonicIP
Barix SonicIP® technology is designed to vocally announce
the Barix Exstreamer´s current IP address. This makes it
easier and faster to obtain the necessary network
information. To make use of SonicIP plug in the included
earphone into RCA audio out, connect the network and
plug in the power supply. It will announce the address over
the earphones right after power up.
Static IP
A Static IP is a fixed IP address that you assign manually
to a device on the network. It remains valid until you
disable it.
Telnet
Telnet is a user command and an underlying TCP/IP
protocol for accessing remote computers. On the Web,
HTTP and FTP protocols allow you to request specific files
from remote computers, but not to actually be logged on
as a user of that computer. With Telnet, you log on as a
regular user with whatever privileges you may have been
granted to the specific application and data on that
computer.
Example: telnet 192.168.2.10
Page 30

Barix Exstreamer Gold User Manual Version 01.01
Page 28
Page 31

Barix Exstreamer Gold User Manual Version 01.01
Page 29
© 2004 Barix AG, Zurich, Switzerland.
All rights reserved.
All information is subject to change without notice.
All mentioned trademarks are belonging to their respective owners and are used for
reference only.
Barix, Exstreamer, Instreamer, SonicIP and IPzator are trademarks of Barix AG,
Switzerland and are registered in certain countries.
For information about our devices and the latest version of this manual please visit
www.barix.com.
Barix AG
Seefeldstrasse 303
8008 Zurich
SWITZERLAND
Phone: +41 43 433 22 11
Fax: +41 1 274 2849
Internet
web: www.barix.com
email: [email protected]
 Loading...