

Page 1

EXSTREAMER
STORE & PLAY
Quick Install Guide
Version 1.0
Networked IP Audio Decoder
Package contents
a Exstreamer Store & Play
b Power supply (except NoPSU version)
c MicroSD internal storage (except NoSD version)
Cable Set AUDIO (not included)
d Earphone
e RCA Stereo cable
f Network cable
g Serial cable
Firmware
This device comes preloaded with standard Store & Play firmware and is ready to be used out
of the box without having to install any additional software. Check for available latest firmware
updates at www.barix.com
Support
For support please contact your local dealer or visit www.barix.com.
© Barix AG 2/2014, all rights reserved. All information is subject to chang e without noti ce. All m entioned trademarks be long
to their re spective owners and are us ed for reference only. Barix, E xstreamer and SonicIP are trademarks of Barix AG, Swit zerland,
and are registe red in certain cou ntries.
Page 2
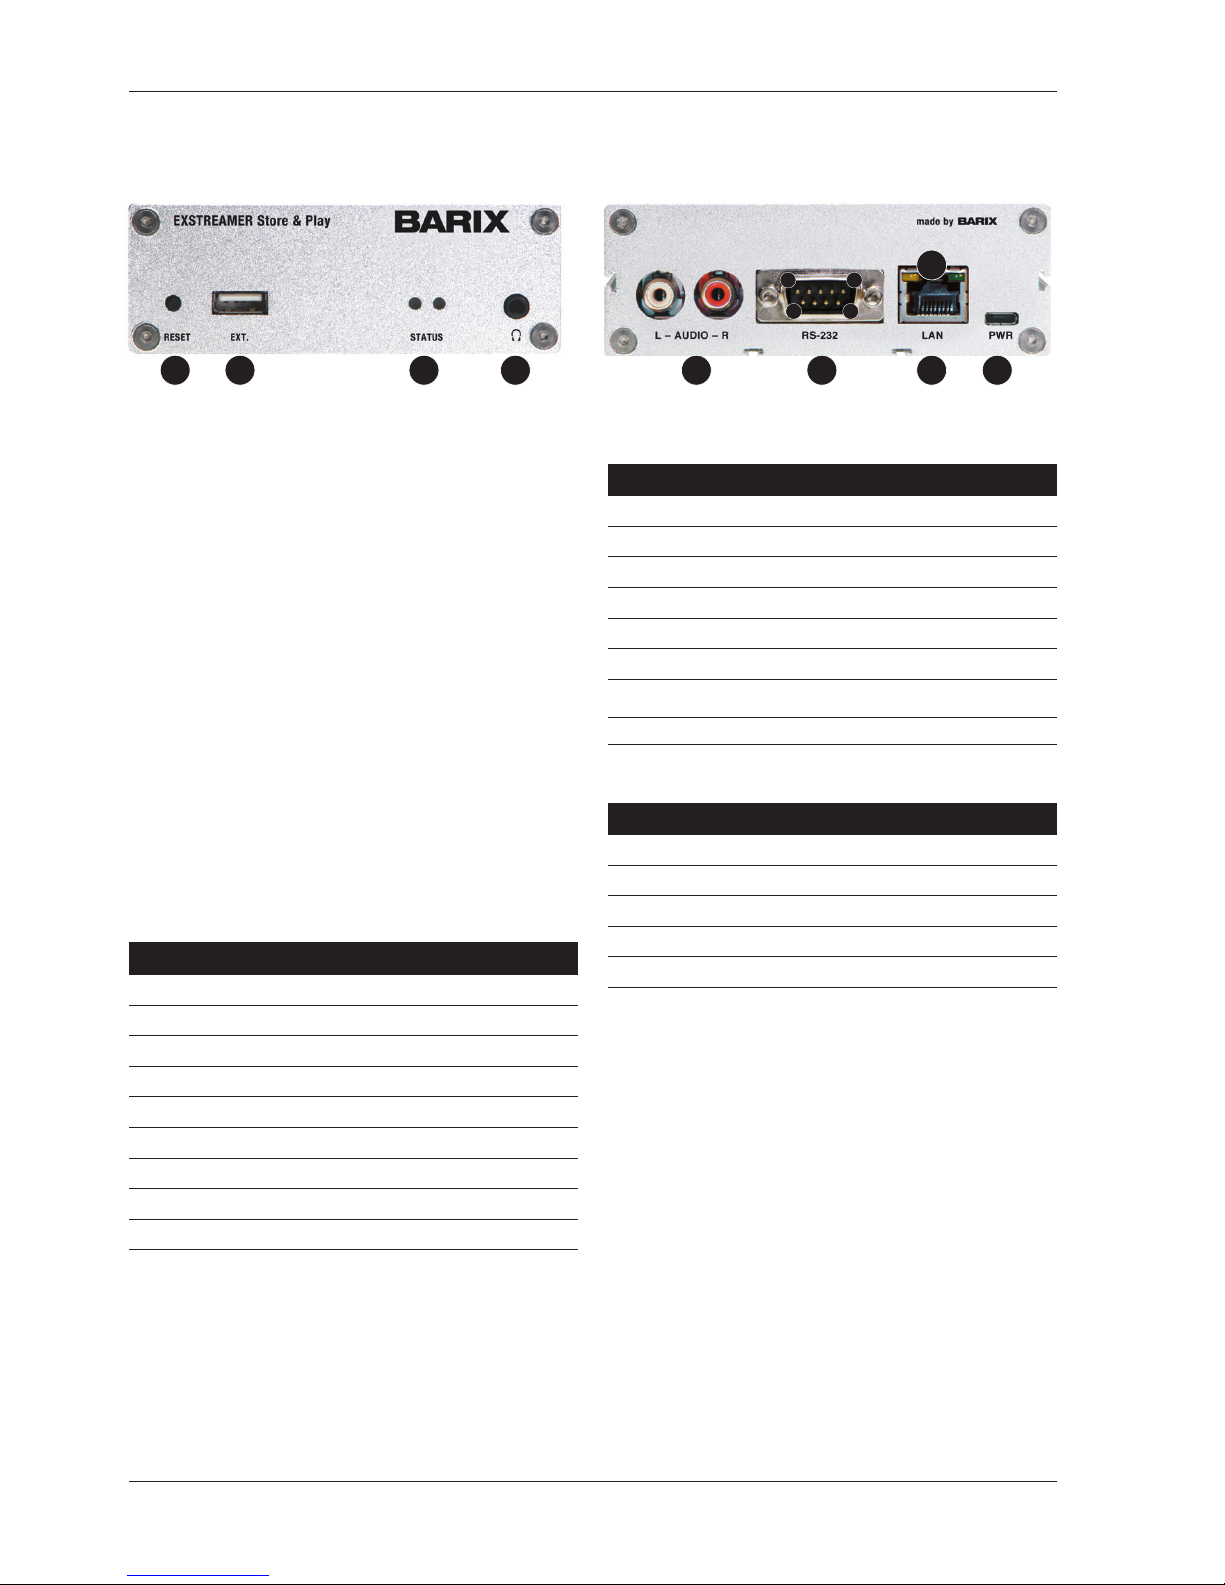
Front view
A Reset button
A brief press of the button will reset the device.
Holding the reset button pressed in for approximately
10 seconds (until red LED star ts flashing) will reset the
device and restore the factory default settings when the
button is released.
B E X T.
USB 2.0 interface for flash memory sticks
(not supplied)
C Status LEDs
Green and red LEDs for status display
D Headphone out
Standard stereo mini jack (3.5 mm)
E Line out
Stereo RCA line outputs
F RS-232 serial port (DSub 9 pin male)
Pin Description
1 Not connected
2 Receive Data [RxD]
3 Transmit Data [ TxD]
4 V+ 5V, 100mA max
5 Ground [GND]
6 Not connected
7 Ready to Send [RTS]
8 Clear to Send [CTS]
9 Not connected
Rear view
G LAN por t 10/100 (RJ45 Ethernet socket)
Pin Description
1 Tx +
2 Tx -
3 Rx +
4 Not connected
5 Not connected
6 Rx -
7 Not connected
8 Not connected
H Power (Standard microUSB, 2 Watt max.)
Pin Description
1 V+ 5V
2 Not connected
3 Not connected
4 Not connected
5 Ground (GND)
I LAN status LEDs
Green LED for Link status, yellow LED for Activity status
DBA C E GF H
I
1
6
5
9
Page 3
1 Installation
STEP 1
Plug a standard (straight) network cable (f, not included)
into the network port (G) of the Exstreamer and the
other end into your hub or switch. You can also use a
crossover network cable (not included) for a direct
connection to your PC.
STEP 2
i) Plug standard headphones or the earphone (d, not
included) into the headphone output (D) and put it in
y o ur ear.
ii) Plug the RCA cable (e) into the LINE OUT outputs
(E) and connect the cable to inputs of your mixing
console or monitoring device.
STEP 3
Connect the Power supply (b) to the device (socket H)
and then to an appropriate electrical outlet.
STEP 4
i) The Exstreamer Store & Play will now acquire an IP
address and announce it over the audio outputs. DHCP
is the default method for acquiring automatically an IP
address from the DHCP ser ver in the network.
ii) If you did not connect any audio outputs in step 2 or you
couldn’t hear the announced acquired IP address by the
device, we recommend using the “Barix Discovery Tool”
Java application (download the latest version from ww w.
barix.com under “Software Tools” in “Downloads”
section) on your computer (Windows, Mac or Linux)
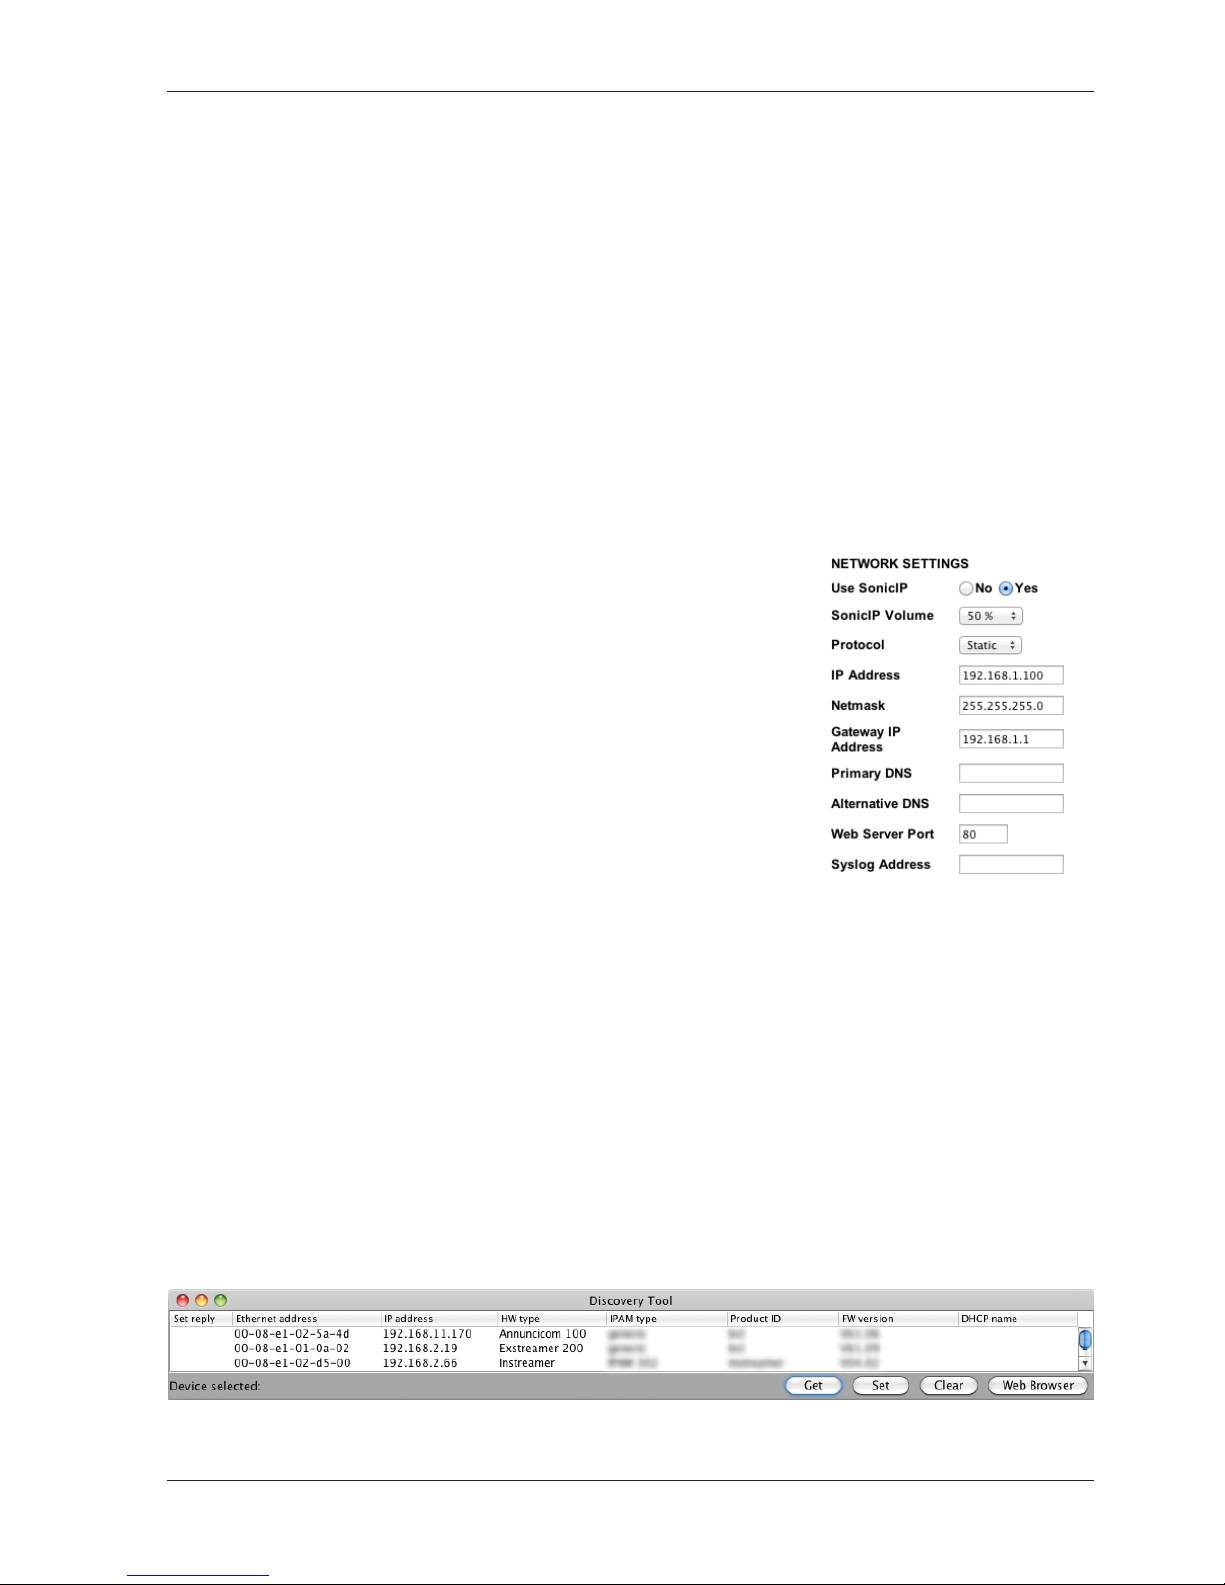
and click the “Get” button to find out which IP address
the device has obtained (see picture at the bottom of the
page). Make sure that the Ethernet address (MAC)
matches your device (see label on the bottom of the
device).
Now that you know the IP address proceed to the nex t
section “Network configuration from web browser”.
If you were not able to obtain the device’s current
IP address with the previous steps see section
”Troubleshooting”.
2 Network configuration
from web browser
BARIX Store & Play application does not require any initial
network configuration since it’s using DHCP by default to
configure network settings dynamically. If you need to use
static (fixed) network settings follow steps 1 to 3, other wise
continue from step 4.
STEP 1
Open your web browser.
STEP 2
Enter the IP address that was announced by the Exstreamer
during boot-up (e.g.: 192.168.0.12) and press Enter. Click on
the “SE TTINGS” tab and look at the NETWORK SET TINGS
“Protocol” field that by default is set to “DHCP”.
device, please inser t the destination IP address of the Syslog
messages where you will be collecting them.
STEP 4
To complete the application setup, please download
the Store & Play documentation from www.barix.com.
Download the product manual for additional information
about the hardware installation, technical and mechanical
details as well as instructions on updating the Store & Play
application firmware.
STEP 3
Click on the drop-down
menu next to “Protocol”
field and select “Static”.
You will need to set the
IP Address, Netmask,
Gateway,
Primary DNS and Alter-
native DNS and finally you
can also specif y the web
server port you want to
use (by default the HTTP
port used is 80). If you
want to receive Syslog
messages from the
Page 4

3 Troubleshooting
• If the status LEDs (C) stay dark check the power
cabling (installation step 3).
• Check if the green LINK LED (I) is lit, if it is not then
check your network cabling (network port G)
• If you have doubts about the current device settings
you can rever t the device to its factory defaults by
pressing the Reset but ton (A) until the red status LED
(C) blinks (takes about 10 seconds). The device
will restore the factory defaults once the button is
released.
For information about our products, manuals, technical
documentation, latest firmware, support and access to
the user forum please visit www.barix.com.
Barix AG, Seefeldstrasse 303, CH-8008 Zürich
P +41 43 433 22 11
[email protected], www.barix.com
 Loading...