

Page 1

ANNUNCICOM
100
Quick Install Guide
Version 2.0
IP Intercom, Public Address and Paging Device
Package contents
a Annuncicom 100
b Power supply
c RCA adapter for earphone
d Screw block terminals
Cable Set AUDIO (not included)
e Earphone
f RCA stereo cable
g Network cable
h Serial cable
Firmware
This device comes preloaded with standard firmware.
Alternative firmware can be downloaded from www.barix.com.
Support
For support please contact your local dealer or visit www.barix.com.
© Barix AG 3/2013, all r ights reser ved. All informati on is subjec t to change with out notice. A ll mentione d trademar ks belong
to their res pective own ers and are us ed for referen ce only. Barix, E xstreamer and So nicIP are trad emarks of Ba rix AG, Switze rland,
and are reg istered in ce rtain cou ntries.
Page 2
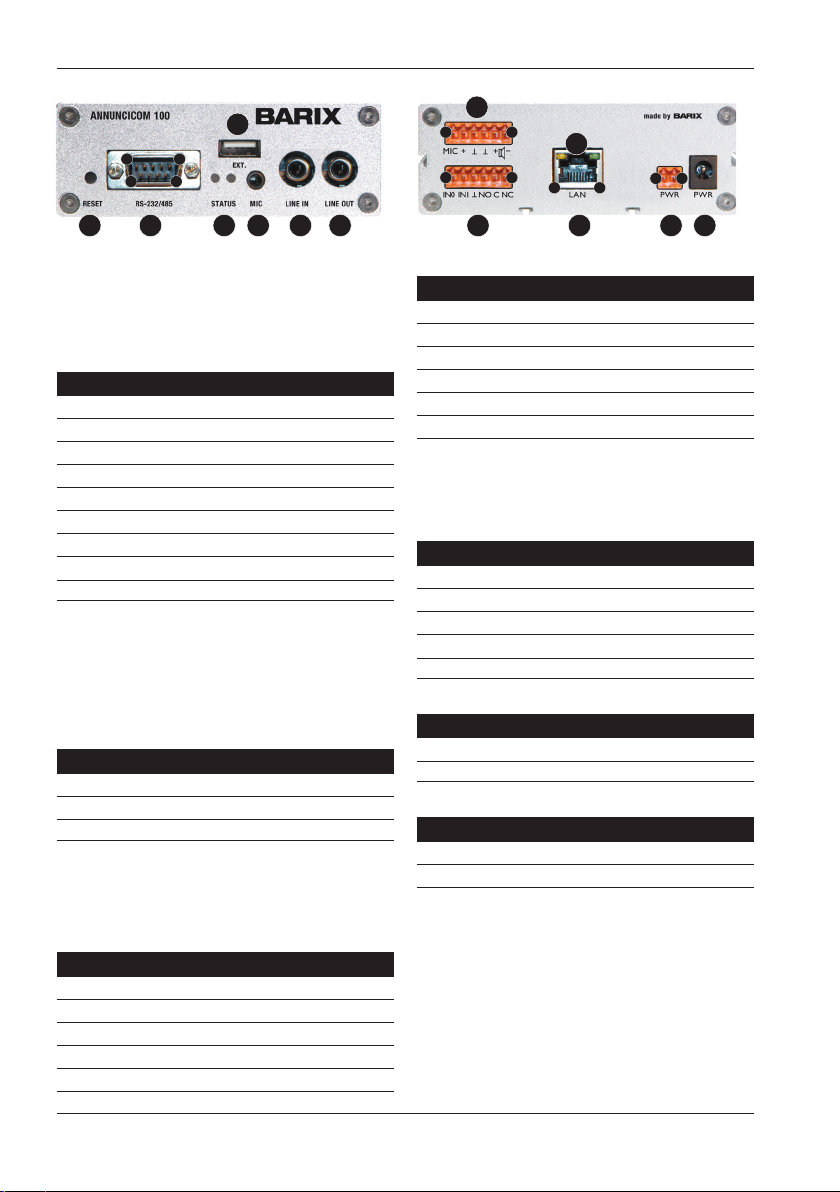
Front view
1 5
Rear view
D
96
H
61
1
6
J
1 2
18
EBA C
A R eset but ton
A brief press of the button will reset the device.
Holding the reset button pressed in for approximately
10 seconds will reset the device and restore the factory
default settings when the button is released.
B RS-232 /485 seri al port (DSub 9 pin male)
Pin Description
1 Not connected
2 Recei ve Data [RxD]
3 Transmit Dat a [TxD]
4 V+ 14.6V, 100mA ma x
5 Ground [G ND]
6 RS-485 A
7 Ready to Se nd [RTS]
8 Clear to S end [CTS]
9 RS-485 B
C Gr een and red LEDs
For device status display
D E XT.
USB inter face sol ely for flash memor y sticks
(not supplied)
E M ic inpu t Jack (Stereo mini Jack)
Pin Description
tip Microphone input
ring Bi as Power (2.7 VDC)
end Ground [G]
F Lin e input (RCA socket)
G Line o utput (RCA socket)
(Earphone out using RCA adapter)
H Mic & S peaker
Pin Description
1 Microphone input
2 Bias Mic P ower (2.7 VDC)
3,4 Ground [G ]
5 Speake r + (4..32 Ω)
6 Speake r - (2W@4 Ω)
I
K MLF G
I Inpu ts & Relay
Pin Description
1 Dry co ntact inpu t 0 *
2 Dry co ntact inpu t 1 *
3 Ground [G ]
4 Relay op en [NO]
5 Relay common **
6 Relay closed [NC]
* pull-u p 4.7 KOhmto 5VDC ** Rel ay 50V 1A
J L AN stat us LEDs
Green LED for Link, ye llow LED for Activity
K LAN port 10/100 (RJ45 Ethernet socket)
Pin Description
1 Tx +
2 Tx -
3 Rx +
4,5,7,8 Not connected
6 Rx -
L Power (8 Watt ma x)*
Pin Description
1 Ground [G ]
2 +9..3 0VDC /12..24VAC
M Power (8 Watt ma x)*
Pin Description
ring Ground [G]
cen t. +9..30V DC/12..24VAC
* L and M are co nnected in ternally s o one can be us ed as an
output f or other devi ces.
Page 3
1 Installation
STEP 1
Plug a standard (straight) network cable (g, not included)
into the network port (K) of the Annuncicom and the
other en d into your hub o r switch. You can al so use a
crossover network cable (not included) for a direct
connection to your PC.
STEP 2
Plug the RCA adapter (c) into the RCA line ou tput (G) and
an earp hone (e, not in cluded) i nto the adapte r. Put the
earph one in your e ar. Alternati vely you can use a standard
mini jack headset or headphones.
STEP 3
Conne ct the Power su pply (b) to the d evice (soc ket M)
and then to an appropr iate elec trical ou tlet.
STEP 4
i) The A nnuncic om will now ac quire an IP address an d
an nounce it ov er the spea ker and line output (if no DHCP
se rver is ava ilable this can take up to 5 m inutes).
ii) If you did not connect any audio outp uts in step 2,
either see the next page for the ARP command
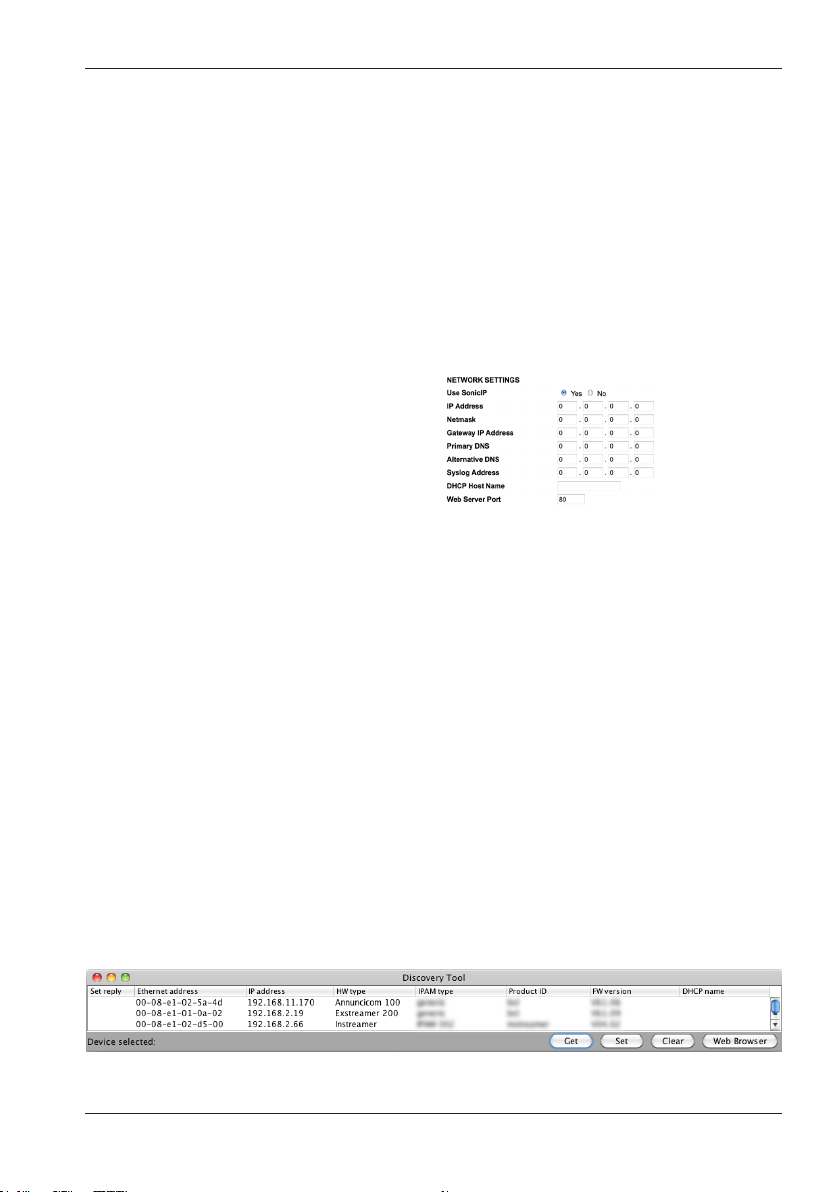
pro cedure, or u se the “Bar ix Discovery Tool” Java
application (download the latest version from
w ww.barix.co m) on your com puter (W indows, Mac
or L inux) and c lick the “Ge t” button to f ind out which
IP ad dress the d evice has o btained (see picture a t the
bot tom of the page). Make sure that t he Etherne t
add ress (MAC) m atches your d evice (see l abel on the
bot tom of the device).
2 Network configuration
by web browser
Most Barix applictaions require no configuration but use
DHCP to configure network settings dynamically.
If you nee d to use static (fixed) net work set tings foll ow
steps 1 to 3, oth erwise c ontinue f rom step 4.
STEP 1
Open your web browse r.
STEP 2
Enter the I P address th at was annou nced by the A nnuncic om
and press Enter. Examp le: 192.168.0.12 Click on th e
Configuration button, then on Advances Settings/Network.
STEP 3
In order to m ake the appl ication wo rk the follo wing parameters
must be set (check with your netwo rk admini strator):
• static IP addres s (the default «0.0.0.0 » sets au tomatic
discovery: BootP, DHCP) and netmask
If you your d evices are connec ted via route rs also:
• Gateway I P addres s
Hit the «A pply» but ton to save all ch anges. Th e device will
reboot w ith the conf igured IP a ddress.
Now that yo u know the IP ad dress proceed to the nex t
section “Network configuration by web browser”.
If you were n ot able to obta in the device’s current
IP addre ss with the previous ste ps see sec tion
«Troubleshooting».
STEP 4
To complete the application setup, download the firmware
documentation from www.barix.com. Download the
product manual for additional information about the
hardware installation, technical and mechanical details
as well as i nstructi ons on updating or cha nging the loaded
application firmware.
Page 4

3 Setting temporary IP address
using ARP command
This pro cedure will work onl y in a local n etwork.
After th is proced ure the temp orary IP w ill be acti ve
only until restar t/rebo ot. After a res tart the p rocedur e
has to be repeated.
STEP 1
Either use a network cable to link the Annuncicom and
the PC directly, or connect the Annuncicom to the PC
via your n etwork sw itch and powe r the devic e. Make
sure that you have a valid s tatic IP add ress conf igured on
your PC (e.g. 192.168.0.2)
STEP 2
Window s : For a comma nd window. cli ck on «Star t», click
on «Run..», in the «O pen» fie ld type cm d , click on «O K».
OSX / Linu x : Open a term inal wind ow.
STEP 3
Please proceed to step 4 if you linke d the PC dire ctly to
the devi ce in step 1. To ensure that you use a free I P
addres s (not already used by another devi ce in the net work)
please use the Ping command. To verify availability in
this example we assu me the PC to have th e IP addres s
«192.168.0.2» an d want to chec k if «192.168.0.6» is f ree.
Typ e p in g 1 92.168.0.6 and hit th e «Enter» key. You
should get no reply w hich give s you reaso nable ass ertion
that the «p inged» IP is availabl e.
STEP 4
Look for th e Annunc icom’s MAC addre ss printed o n a
label o n the bottom of t he device (12 hex dig its, separ ated
by a hyphe n every 2 digits). Type into the windows com-
mand window
arp -s 192.168.0.6 00-08-E1-00-B1-77
or on a OSX or L inux syste m type into th e terminal
arp -s 1 92.168.0.6 00:08:E1:00:B1:77
and hit th e «Enter» key (replace the dig its accord ing to your
devices MAC address). You must have administrative rights
to be able to d o so (sudo on OSX / L inux).
STEP 5
Now we have to ma ke the Annu ncicom listen to the IP
addres s «192.168.0.6» using the Telnet command. To do so
type into the comma nd window telnet 192.168.0.6 1
and hit th e «Enter» key (the n umber «on e» must be there
for this command to work correctly !!!). The Annuncicom
will immediately refuse the connection on port 1, but will
be available for brow ser acce ss as long as the device stays
powered.
STEP 6
To check if the A nnunci com is resp onding you c an use
the ping c ommand ag ain. To do so type p in g 1 92.168.0.6
and hit th e «Enter» key. If you do ge t a reply the IP a ddress
192.168.0.6 can be us ed to acces s the Annun cicom usi ng a
web brows er. Please go back to section «2 Network configura-
tion by web b rowser» to confi gure a static IP address . If you do
get «req uest time d out» then ple ase repea t step 5 caref ully (you
most like ly misty ped the telnet comma nd) or repe at the entire
procedure. If the AR P method does not work for y ou, refer to
the user manual for further methods.
4 Troubleshooting
• If the s tatus LED s (C) stay d ark che ck the pow er
cabling (installation step 3).
• Check if the green LINK LED (J) is l it, if it i s not the n
check your network cabling (network port K).
• If you h ave doubts about th e curren t device setting s
you can revert the de vice to its factory defa ults by
press ing the Reset button (A) until the red s tatus LED
(C) blink s rapidly (t akes abou t 10 seconds). The device
will reb oot once th e button is re leased.
For information about our products, manuals, technical
documentation, latest firmware, support and access to
the user forum please visit www.barix.com.
Barix AG, Seefeldstrasse 303, CH-8008 Zürich
P +41 43 433 22 11
[email protected], www.barix.com
 Loading...