

Page 1
BARIGO E7/E7S
_____________________
Operating instructions
Page 2
BARIGO E7/E7S
2
Note:
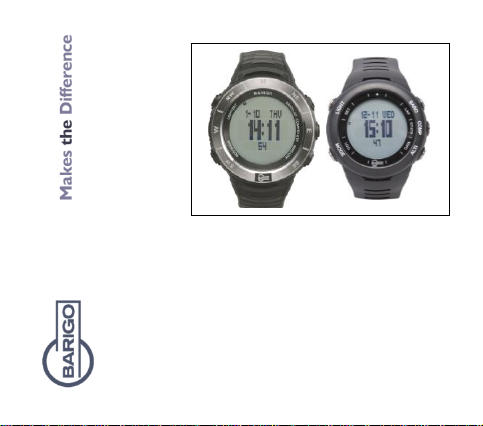
All illustrations throughout this manual represent the BARIGO E7.
The BARIGO E7S works exactly the same way.
Thank you for deciding for a high quality product from our
company.
Your new BARIGO E7/E7S is an easy to use precision
instrument. We have described the functions in detail on the
following pages.
Please carefully read through this operating manual and get
to know the different functions of the BARIGO E7/E7S.
Keep this manual in a safe place for future reference.
We wish you a lot of fun with your new BARIGO E7/E7S.
Page 3

BARIGO – Makes the Difference
3
Table of Contents
1 Safety instructions ...................................................................... 9
2 Basic functions ......................................................................... 16
2.1 Arrangement of the function buttons .................................................... 16
2.2 Name of symbols ................................................................................. 18
2.3 Basic functions .................................................................................... 19
2.4 Other button functions ......................................................................... 20
2.5 Energy-saving mode ............................................................................ 21
3 Time .......................................................................................... 22
3.1 Navigation in the main- and sub-menu ................................................ 23
3.2 Navigation in normal mode (watch mode) ........................................... 24
3.3 Setting the time, date and key tone ..................................................... 25
3.4 Setting a second time zone (T2) .......................................................... 27
Page 4
BARIGO E7/E7S
4
3.5 Setting the alarm and hour signal ........................................................ 29
3.6 Stopwatch ............................................................................................ 33
3.6.1 Performance summary ................................................................ 38
3.6.2 Deleting readings ........................................................................ 40
3.7 Countdown timer ................................................................................. 41
3.7.1 Using the countdown timer .......................................................... 44
4 Other settings ........................................................................... 46
5 Barometer ................................................................................. 47
5.1 Absolute and relative atmospheric pressure ........................................ 48
5.2 Navigation in setting mode for the altitude and atmospheric pressure
sea level ....................................................................................................... 50
5.3 Barometer functions ............................................................................ 51
5.3.1 Weather icon ................................................................ ............... 53
Page 5

BARIGO – Makes the Difference
5
5.3.2 Changing the weather icon.......................................................... 56
5.4 Atmospheric pressure graph................................................................ 57
5.5 Refreshing the atmospheric pressure graph (Reset) ........................... 58
6 Compass .................................................................................. 61
6.1 Compass functions .............................................................................. 61
6.2 Calibrating the compass and correcting the magnetic declination ....... 65
6.3 Setting the magnetic declination .......................................................... 69
6.4 Setting the declination angle................................................................ 71
6.5 Using the compass .............................................................................. 72
6.5.1 Direction indicator ....................................................................... 72
6.5.2 Arrangement on a map................................................................ 74
7 Altimeter ................................................................................... 76
7.1 Altitude measurement .......................................................................... 77
Page 6
BARIGO E7/E7S
6
7.2 What is "AltiSpeed"? ............................................................................ 80
7.3 Synchronising altitude readings (1) ..................................................... 81
7.3.1 Entering the current altitude ........................................................ 82
7.4 Synchronising altitude readings (2) ..................................................... 83
7.4.1 Entering the atmospheric pressure at sea level .......................... 84
7.5 The relationship between altimeter, barometer and temperature ........ 85
7.6 Saving the altitude point (POINT) ........................................................ 88
7.7 Memory log (LOG) ............................................................................... 89
7.7.1 Saving the log ............................................................................. 89
7.7.2 Ending log recording ................................................................... 90
7.7.3 Viewing the saved logs and altitude points.................................. 93
8 Setting the units (UNIT) .......................................................... 100
9 Battery replacement ............................................................... 102
Page 7

BARIGO – Makes the Difference
7
10 Care and maintenance ........................................................... 105
10.1 Tips and tricks for care ...................................................................... 106
11 Warranty ................................................................................. 107
12 FAQs ...................................................................................... 108
13 Technical data ........................................................................ 113
14 Recycling and disposal .......................................................... 115
15 Glossary ................................................................................. 117
Page 8
BARIGO E7/E7S
8
Intended use
The BARIGO E7/E7S is intended as a watch with alarm, timer and
chronograph functions. Special functions are built in for hobby and
leisure activities, such as an altimeter, barometer, thermometer,
digital compass and a weather forecast display.
The product is not to be used for professional measurement purposes. The product's readings/displays are not suitable for commercial
areas of application. The manufacturer does not assume any liability
for incorrect displays or readings nor for the consequences which
could arise from the same. Using the product except as described
above can cause damage, and other hazards.
The watch is splash-water proof for outdoor use. However, it is not
suitable for wearing in the shower, or while swimming or diving.
The entire project must not be changed or modified.
Page 9
BARIGO – Makes the Difference
9
1 Safety instructions
Use
The BARIGO E7/E7S is intended as a chronometer with additional
functions such as compass, altimeter, thermometer, weather forecast, data log, two time zones, two alarm functions and EL backlight.
It is not suitable for commercial areas of application.
DANGER for children
• Batteries can be life-threatening if swallowed. Therefore store
your batteries and your BARIGO E7/E7S so that they cannot be
reached by small children. If a battery is swallowed, seek medical
assistance immediately.
• Keep children away from the packaging.
Danger of suffocation!
Page 10
BARIGO E7/E7S
10
DANGER caused by batteries
• Before inserting the battery, make sure that the contacts in the
BARIGO E7/E7S are clean - clean them if necessary!
• Only use new batteries.
• Pay attention to the polarity (+/-) when inserting the battery.
• Never try to recharge batteries. Danger of explosion!
• Store the batteries in a cool, dry place. Direct heat may damage
the batteries. Do not expose the BARIGO E7/E7S to strong heat
sources.
• Do not short-circuit the battery.
• Never throw the battery into a fire.
Page 11

BARIGO – Makes the Difference
11
• Remove the battery when not using the BARIGO E7/E7S for a
longer period of time.
• Immediately remove any leaking batteries form the BARIGO
E7/E7S. Clean the contacts with a dry towel before you insert a
new battery. Danger of acid burns from the battery acid!
• Also remove empty batteries from the BARIGO E7/E7S.
• Do not throw away empty batteries in the household waste,
dispose of them properly.
• Only use the battery type specified in the technical data.
BEFORE FIRST USE
Your BARIGO E7/E7S was specially developed for leisure pursuits
such as trekking, hiking, climbing or similar activities.
Page 12
BARIGO E7/E7S
12
First remove the protective film from the glass clock face and rear of
the watch.
If you purchased the watch new, it will be switched off even though
the battery has already been inserted.
To turn on the watch press the following buttons at the same
time S1 [BARO/LAP], S3 [ALTI/DATA], S4 [MODE/LOG] and S5
[LIGHT/SET].
The altitude readings displayed by the BARIGO E7/E7S come from
atmospheric pressure calculations
The CR2032, which comes with a pre-installed lithium battery, was
originally used for testing purposes and may have a short life.
Page 13
BARIGO – Makes the Difference
13
Caution
- Set up the current time before use.
- The digital compass must be calibrated before use. And also after
changing the battery. (Observe the instructions in Section 6.2
Calibrating the compass in Chapter 6 Compass.
- The wrist strap of the BARIGO E7/E7S is made from polyurethane
(PUR). This material may cause skin irritations in certain persons.
Therefore, before wearing the wrist strap, wipe the inside of the
strap with a slightly damp cloth.
Warning
This watch is designed for leisure activities. Do not use it to carry out
measurements which should be performed with professional and
calibrated precision measurement equipment. Do not use for aeroplanes, paragliders, para-sport, gyrocopters, parachuting or similar
uses.
Page 14
BARIGO E7/E7S
14
When performing risky activities such as mountain climbing, hiking,
etc., we recommend you also take along a field compass and map
of the area.
Precautions before use
The altitude reading is based on calculations made by the barometer
(the difference between the local atmospheric pressure and the
atmospheric pressure at sea level which is pre-set as the reference
value).
Atmospheric pressure at sea level more or less changes all the time.
As a result the displayed altitude reading on the watch also changes.
When using the watch outdoors, you should from time to time
compare the altitude reading at a point whose altitude you already
know, or is marked on the (rambler's) map, etc. In terms of the
Page 15

BARIGO – Makes the Difference
15
relationship between altitude, atmospheric pressure and temperature used in the calculation, see the description in Chapter 7.5 "The
relationship between altimeter, barometer and temperature" (page
85).
The wrist strap can be attacked by aggressive sweat. Therefore, you
must clean the strap after wearing the watch.
Scope of supply
The sales packaging contains
1 BARIGO E7/E7S watch
1 Mini CD-ROM with this operating manual
1 Lithium button battery CR2032 (pre-installed)
If any of the above is missing, please get in touch with the dealer
from whom you bought the watch.
Page 16
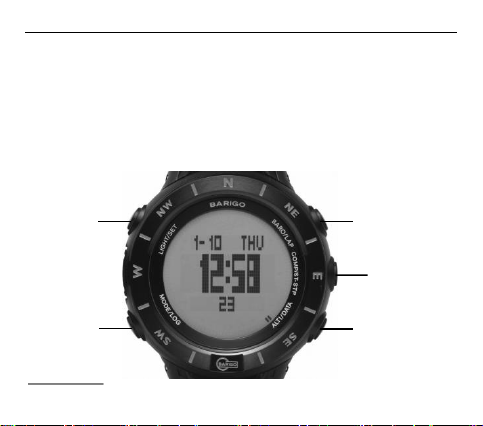
BARIGO E7/E7S
16
S1
S3
S4
S5
S2
2 Basic functions
Your BARIGO E7/E7S is equipped with five function buttons (S1S5).
2.1 Arrangement of the function buttons
Page 17
BARIGO – Makes the Difference
17
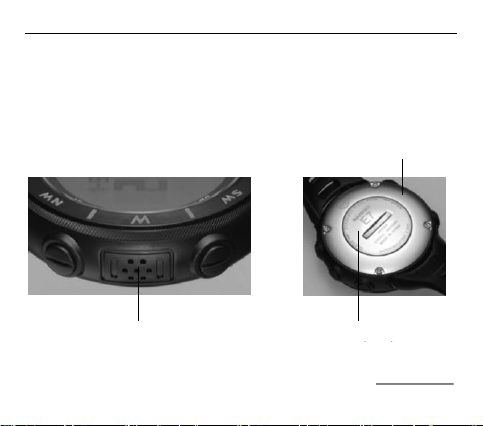
Sensor cover
Case floor
Cover of battery
S1 = BARO/LAP (atmospheric pressure or lap display)
S2 = COMP/ST-STP (compass of stopwatch display)
S3 = ALTI/DATA (altitude or DataLog display)
S4 = MODE/LOG (setting modes and log function on/off)
S5 = LIGHT/SET (background lighting and key lock)
Page 18
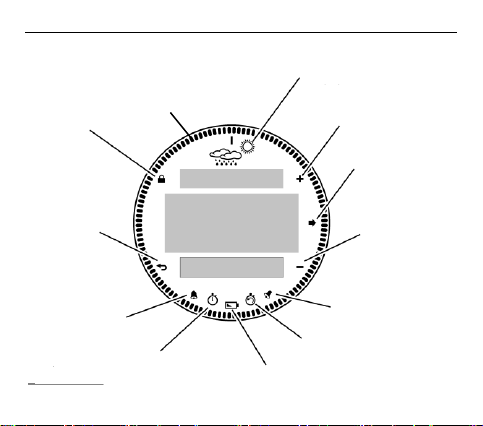
BARIGO E7/E7S
18
Weather
Enter
+ (Plus) sign
- (Minus) sign
Top row
Hours signal
Medium row
Bottom row
Key lock
Back
Alarm
Stopwatch
Battery life
warning
Countdown timer
Segments showing
seconds and compass
2.2 Name of symbols
Page 19
19
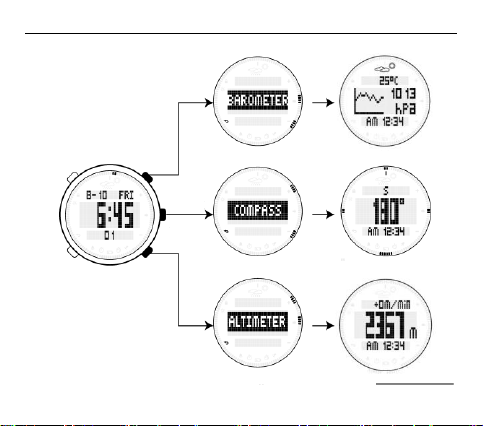
2.3 Basic functions
Watch function
(Normal mode)
Barometer
Compass
Altitude
S3
S1
S2
BARIGO – Makes the Difference
Page 20
BARIGO E7/E7S
20
2.4 Other button functions
Press the S5 button to switch on the backlit display for approx. 3
seconds. In watch mode keep the S5 button pressed down for
approx. 2 seconds to activate the key lock which locks all five
buttons. The key lock can be removed by pressing the S5 button
again for approx. 2 seconds.
In setting mode, which is activated by pressing and holding the S4
button for approx. 2 seconds, scroll through the menu up with the S1
button and downwards with the S3 button. Confirm your selection
with the S2 button.
The BARIGO E7/E7S automatically quits setting mode if there are
no button presses within a minute.
Page 21

BARIGO – Makes the Difference
21
2.5 Energy-saving mode
Pressing the S1, S3, S4 and S5 buttons at the same time activates
energy-saving mode. The display switches itself off completely and
all buttons are locked. In energy-saving mode, your settings as well
as the current time is retained. Pressing this key combination again
exits energy-saving mode.
Page 22
BARIGO E7/E7S
22
3 Time
Time functions
Current time (12/24 hour format)
Current date (calendar to 2059)
Time 2 (for a second time zone– T2)
Daily alarm
Timer (countdown)
Stopwatch
Split storage
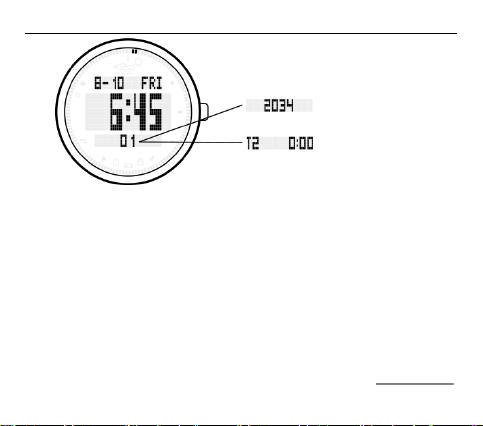
When the watch is in normal mode, the current time is shown in the
middle row. The current date information, such as month, day and
day of the week, are displayed in the top row of the display. The
view in the bottom row can be toggled between seconds, the year,
and the second time zone (T2) by pressing the S4 button.
Page 23
BARIGO – Makes the Difference
23
Toggle the display
in watch mode by
pressing the S4
button
3.1 Navigation in the main- and sub-menu
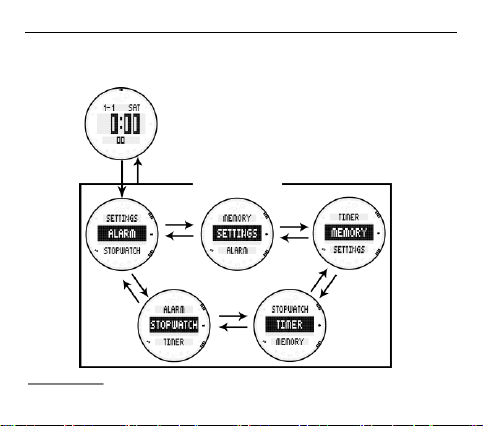
In normal mode (watch mode), keep the S4 button pressed down in
order to access the main selection menu. The S1 and S3 buttons
allow you to scroll forwards and backwards through the individual
menu items. The menu item, which is displayed in the middle row,
can be selected by pressing the S2 button.
To return to normal watch mode, press the S4 button.
Page 24
BARIGO E7/E7S
24
Keep S4
pressed
down
Display menu
S1
S1
S1
S1
S1
S3
S3
S3
S3
S3
S4
3.2 Navigation in normal mode (watch mode)
Page 25

BARIGO – Makes the Difference
25
3.3 Setting the time, date and key tone
The setting is made in the following order:
Hours → Minutes → Seconds → Year → Month → Date → Keytone.
The day of the week is set automatically.
All of these data are set by pressing the S1 (+) or S3 (-) button.
Press the S2 button to confirm your entry each time. This will take
you to the next available setting in the order shown above.
Setting, step by step guide:
1. Keep the S4 button pressed down in normal mode.
2. Use S1 or S3 to scroll to the SETTINGS menu item (Settings) until it is shown in reverse in the middle of the display.
3. To make a selection, press the S2 button.
4. Use S1 or S3 to scroll to the sub-menu item TIME-DATE
(Time-date) and press the S2 button.
5. The hour flashes in the middle row of the display. Each
time you press S1 will increase the hour by 1. Each time
Page 26
BARIGO E7/E7S
26
you press S3 will reduce the hour by 1. To move through
the hours more quickly, keep the S1 or S3 buttons pressed
down.
6. Press the S2 button again to set the following functions in
this order as described for the hours (see above): Minutes,
seconds, year, month, day and keytone ON/OFF.
7. After selecting the keytone function, pressing the S2 button
will take you back automatically to the submenu for the settings (SETTINGS).
8. Press the S4 button twice to return to Normal mode (watch
mode) or press the S1 and S3 buttons to make additional
settings.
Note
While making settings, you can scroll back a display at
any time by pressing the S4 button.
When setting the seconds, pressing the S1 or S3 button
to set the seconds to "00" which will start counting right
away.
The time and date format are set in the submenu item
UNITS (see page 100).
Page 27

BARIGO – Makes the Difference
27
Your BARIGO E7/E7S automatically quits setting mode if no button
is pressed for around one minute.
3.4 Setting a second time zone (T2)
Setting, step by step guide:
1. Keep the S4 button pressed down in Normal mode.
2. Use S1 or S3 to scroll to the SETTINGS menu item (Settings) until it is shown in reverse in the middle of the display.
3. To make a selection, press the S2 button.
4. Use S1 or S3 to scroll to the sub-menu item DUAL-TIME
(second time entry) and press the S2 button.
5. The hour flashes in the middle row of the display. Each
time you press S1 will increase the hour by 1. Each time
you press S3 will reduce the hour by 1. To move through
the hours more quickly, keep the S1 or S3 buttons pressed
down. Confirm the hour selection by pressing the S2 button.
Page 28
BARIGO E7/E7S
28
6. The minutes flash in the middle row of the display. Each
time you press S1 the minutes will increase by 1. Each
time you press S3 the minutes will decrease by 1. To move
through the hours more quickly, keep the S1 or S3 buttons
pressed down. Confirm the minute selection by pressing
the S2 button. After selecting the minutes, pressing the S2
button will take you back automatically to the Settings
submenu (SETTINGS).
7. Press the S4 button twice to return to Normal mode (watch
mode) or press the S1 and S3 buttons to scroll through the
entries to make additional settings.
In watch mode you can view the time in the second time zone by
pressing the S4 button twice. The time will appear to the right of the
bottom row of the display next to the label T2.
Page 29
BARIGO – Makes the Difference
29
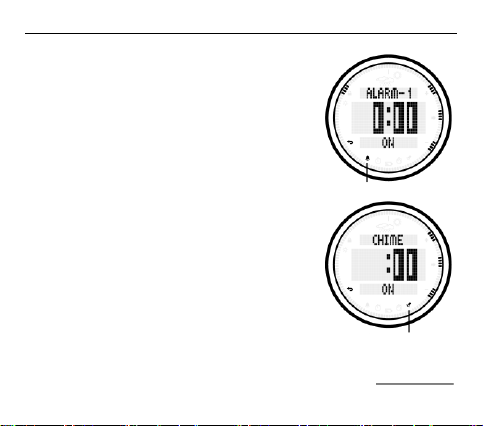
Alarm symbol
Chime symbol
3.5 Setting the alarm and hour signal
Your BARIGO E7/E7S can save three (daily)
alarms which are independent on each other.
If you have activated the hour signal, a short
beep will sound each full hour.
To select the alarm settings, press the S4
button to access the main menu. Choose the
ALARM option by pressing the S2 button.
Press the S1 or S3 button to select Alarm 1,
Alarm 2, Alarm 3 or the hour signal (CHIME).
Press the S2 button to switch the chime on or
off (ON/OFF).
Page 30

BARIGO E7/E7S
30
Setting: a step by step guide:
1. Keep the S4 button pressed down in normal mode.
2. Use S1 or S3 to scroll to the ALARM menu item until it is
shown in reverse in the middle of the display unless it is not
already displayed.
3. To make a selection, press the S2 button.
4. Use S1 or S3 to scroll to the option (Alarm 1/2/3 or chime)
you want to set.
5. For setting the chime, continue from Step 12.
6. Keep the S5 button pressed down until the hours in the
middle row of the display flash.
7. Each time you press S1 the hour will increase by 1. Each
time you press S3 the hour will decrease by 1. To move
through the hours more quickly, keep the S1 or S3 buttons
pressed down.
8. Press the S2 button to set the minutes, as described for the
hours (see above).
9. Next, confirm the alarm you set with the S5 button.
Page 31

BARIGO – Makes the Difference
31
10. You can now switch the alarm on and off by pressing the
S2 button.
11. You can now set another alarm (see Step 4 and subse-
quent steps), select the Chime option using the S1 or S3
buttons or continue with Step XX
12. After selecting the chime function (CHIME), press the S2
button to activate the chime (ON). Pressing this button
again deactivates the chime (OFF).
13. Press the S4 button twice to return to Normal mode (watch
mode) or press the S1 and S3 buttons to make additional
settings.
Your BARIGO E7/E7S automatically exits setting mode if a button is
not pressed for approx. one minute.
Page 32
BARIGO E7/E7S
32
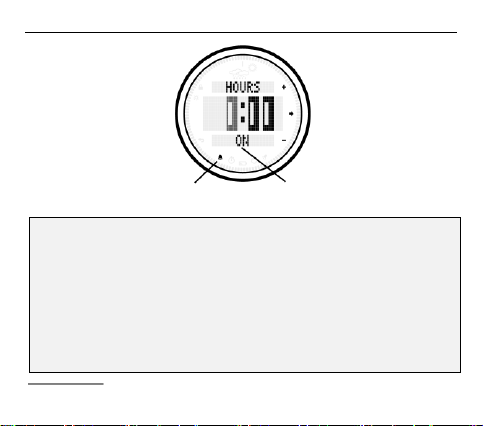
Alarm symbol
Alarm switched on
Note
When the alarm is activated, a signal will sound for 30
seconds. You can switch the alarm off at any time by
pressing any button. The alarm will remains active and
will go off at the same time on all following days unless
you deactivate it (see Steps 1 - 4 and 8).
After you set the alarm time, the alarm is activated auto-
matically.
Page 33
BARIGO – Makes the Difference
33
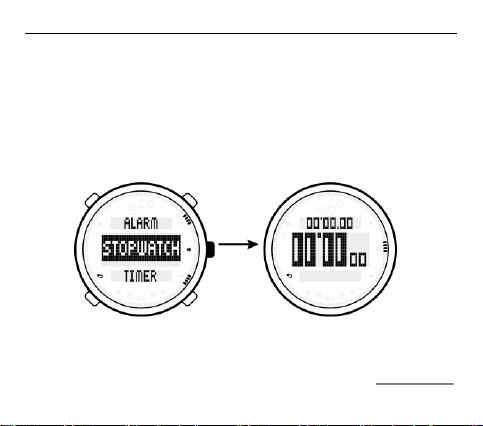
Selection menu
Stopwatch display
press S2
to start
3.6 Stopwatch
The stopwatch has a range of values of up to 99 hours, 59 minutes
and 59 seconds, including the function for the split times.
To select the stopwatch function, press the S4 button to access the
main menu. Choose the STOPWATCH (stopwatch) function.
To start the stopwatch press the S2 button. The middle row of the
display displays the time that has passed. The bottom row shows
Page 34
BARIGO E7/E7S
34
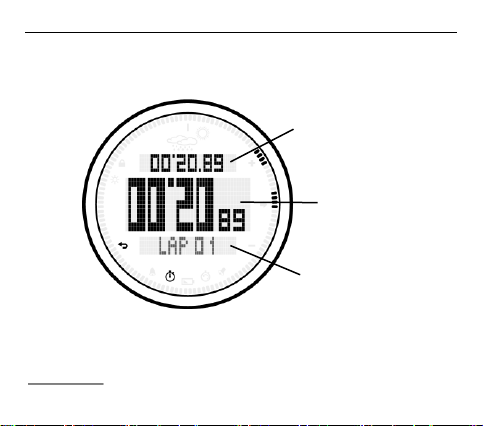
Lap time, split
time
Total time
Lap number
the number of laps (LAP-XX). The top row of the display displays the
lap time (split time) of the current lap.
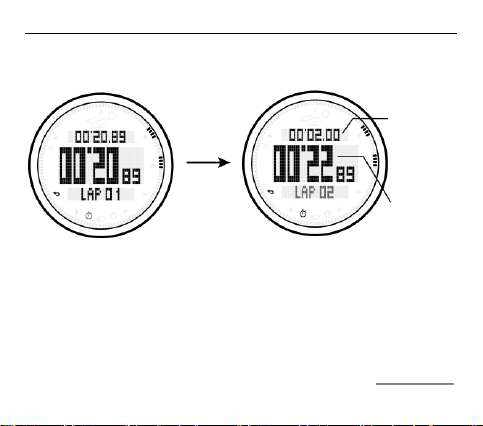
You can save the split time (lap time) by pressing the S1 button
while the stopwatch is running. The split time for the completed lap
is then displayed for approx. 2 seconds. At the same time, the time
Page 35
BARIGO – Makes the Difference
35
2 seconds
after pressing
the S1 button
elapsed time for
second lap
total elapsed
time
for the next lap starts from zero again and then appears in the top
row.
During the first hour, the time is measured to 1/100th of a second,
afterwards it is measured to the second.
Press the S2 button to stop time measurement by the stopwatch.
(As long as the display stopwatch times have not been cleared, you
can resume timing from the same point by pressing the S2 button
again.)
Page 36
BARIGO E7/E7S
36
Note
When time measurement by the stopwatch was
stopped/paused after the S2 button was pressed, the
stopwatch mode is automatically exited if no button is
pressed for approx. one minute. If you return to stopwatch mode again, the previously measured times will be
retained. Press the S2 button to resume measurement
from this point.
The stopwatch continues timing in the background if you
decide to leave stopwatch mode to move into a different
mode while time measurement is still active.
The watch stops timing after 99 hours, 59 minutes and
59 seconds.
The watch can save up to 50 laps (LAPS). If, after the
50th lap, you try to save a new lap, the message "LAP
FULL" will appear on the display which informs you that
the lap memory is full.
Page 37
BARIGO – Makes the Difference
37
If your BARIGO E7/E7S is put into energy-saving mode,
all stopwatch timings will be stopped automatically.
Page 38
BARIGO E7/E7S
38
3.6.1 Performance summary
After the stopwatch timings were stopped by pressing the S2 button,
various data, such as split times per lap, can be viewed in a performance review.
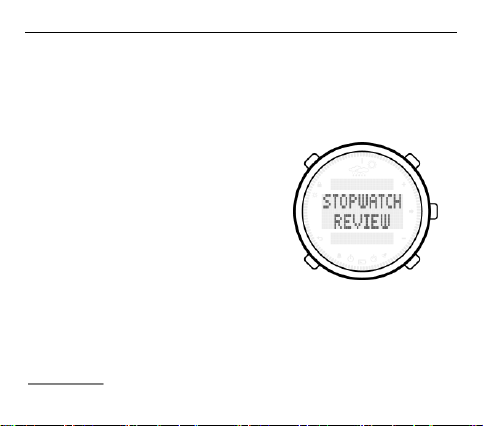
Keep the S3 button pressed down for
approx. two seconds. The title STOPWATCH REVIEW (stopwatch review) is
displayed briefly. Afterwards, LAP 01
(lap 01) is shown on display. Press the
S1 and S3 buttons to scroll backwards
and forwards through the individual lap
times.
After the information about the last lap, the best lap time (BEST
LAP) is shown followed by the average lap time (AVG LAP).
Page 39
BARIGO – Makes the Difference
39
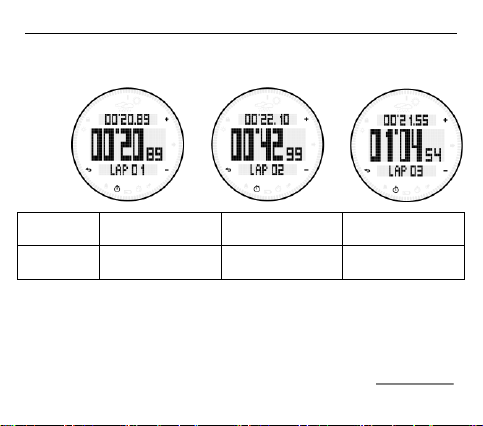
Lap time
Lap 1 = 20.89
secs.
Lap 2 = 22.10
secs.
Lap 3 = 21.55
secs.
Total
time
After lap 1 =
20.89 secs.
After lap 2 =
42.99 secs.
After lap 3 =
1:04.54 mins.
If the best time was achieved in more than one lap, the watch only
shows the first lap in which the best time was achieved.
If the timing data were deleted by pressing the S1 button, the Stopwatch review (STOPWATCH REVIEW) function will no longer be
Lap 1: 20.89 secs. / lap 2: 20.10 secs. / lap 3: 21.55 secs.
Page 40
BARIGO E7/E7S
40
available. It will not be available until a new time measurement with
lap times is started and completed again.
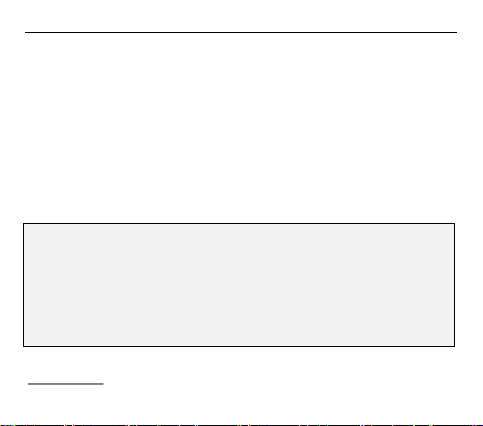
3.6.2 Deleting readings
You can only delete the stopwatch information by stopping timing by
pressing the S2 button. Keep the S1 button pressed down to delete
all of the stopwatch readings.
Hint
You can work with two end times when you do without the measurement of the split times. For example, when runner 1 reaches the
finish line, press the S1 button, and when runner 2 finishes, press
the S2 button. "LAP-01" is the finish time for runner 1 and the
stopped overall time is the finish time for runner 2.
Page 41

BARIGO – Makes the Difference
41
3.7 Countdown timer
You can set the countdown timer in the range 1 second to 100
hours. A signal tone sounds when the countdown timer reaches
00:00:00. The timer can be set to the second.
To select the timer function, press the S4 button to access the main
menu. By pressing the S1 or S3 button select the TIMER option.
Confirm your selection with the S2 button.
Page 42

BARIGO E7/E7S
42
Setting: a step by step guide:
1. Keep the S4 button pressed down in normal mode.
2. Use S1 or S3 to scroll to the TIMER menu item until it is
shown in reverse in the middle of the display.
3. To make a selection, press the S2 button.
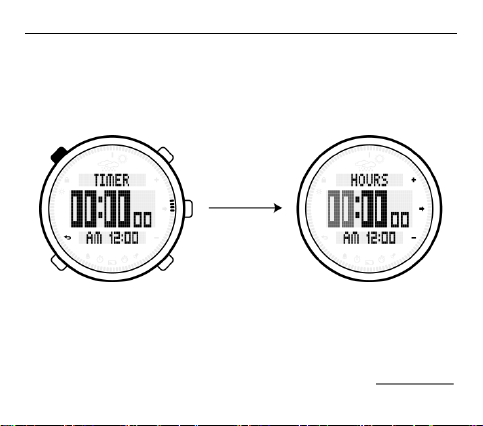
4. Keep the S5 button pressed down until the hours in the
middle row of the display flash.
5. Each time you press S1 the hour will increase by 1. Each
time you press S3 the hour will decrease by 1. To move
through the hours more quickly, keep the S1 or S3 buttons
pressed down.
6. Press the S2 button to set the minutes, as described for the
hours (see Step 5).
7. Press the S2 button to set the seconds, as described for
the hours (see Step 5).
8. Next, confirm the start time you set with the S5 button.
9. Press the S4 button twice to return to normal mode (watch
mode) or press the S1 and S3 buttons to make additional
settings.
Page 43
BARIGO – Makes the Difference
43
S5
must be
kept
pressed
down
Your BARIGO E7/E7S automatically exits setting mode if a button is
not pressed for approx. one minute.
Page 44
BARIGO E7/E7S
44
3.7.1 Using the countdown timer
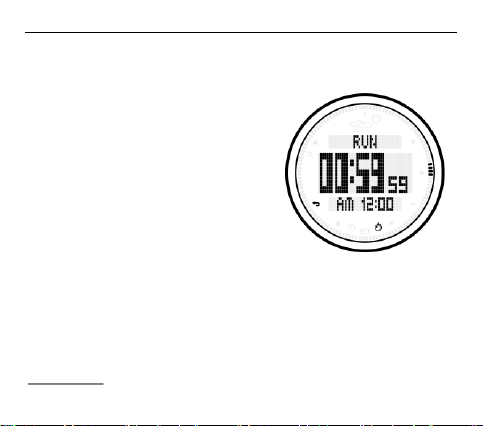
In timer mode, press the S2 button to start the countdown timer.
When you have reached the end
of the countdown, the alarm will
sound for five seconds or until it
is deactivated by pressing any
button. The set countdown time
is automatically reset to the initial
value after the alarm was
switched off.
Press the S2 button while the
countdown is running to stop it,
i.e. to pause it. Press the S2 button again to resume the countdown.
To stop the countdown operation completely, first stop it by
pressing the S2 button, followed by S1. This will reset the
countdown time to its initial value.
Page 45
BARIGO – Makes the Difference
45
Caution
The timer uses the watch function to measure the time to reduce
battery consumption. This can lead to a minor discrepancy of approx. one second, depending on when the button was pressed.
Page 46
BARIGO E7/E7S
46
4 Other settings
As well as the above time functions, your BARIGO E7/E7S has
many other features including ALTI-BARO (altitude and atmospheric
pressure measurement), UNIT (units), DUAL TIME (second time
zone) and COMPASS (compass). The settings for them are adjusted in the SETTINGS menu.
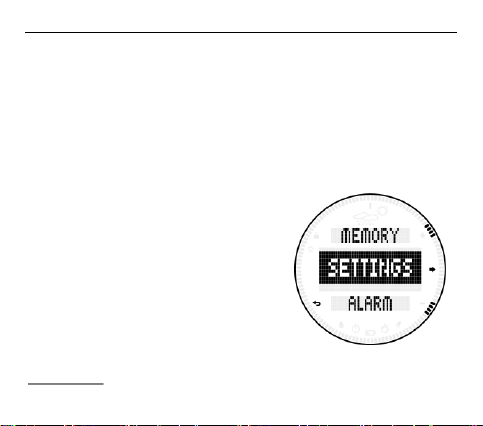
In Normal mode (watch mode), keep
the S4 button pressed to call up the
menu. Use the S1 and S3 buttons to
scroll through the individual menu
items. Press the S2 button to select the
SETTINGS item. If you selected the
COMPASS menu item, the calibration
mode immediately begins for the
compass.
Page 47
BARIGO – Makes the Difference
47
5 Barometer
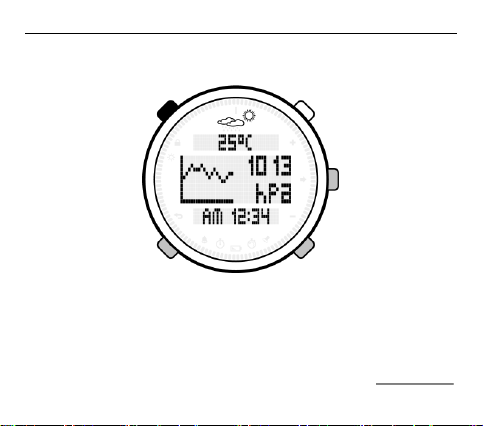
You can access barometer mode by pressing the S1 button, regardless of whether the BARIGO E7/E7S is in time-, compass- or altimeter mode.
Page 48
BARIGO E7/E7S
48
A graph appears in the display which allows you to track changes to
atmospheric pressure (i.e. the absolute atmospheric pressure at the
point of measurement) over the past 20 hours. Information about the
current temperature, time and weather forecast also appears.
The exact absolute atmospheric pressure reading (in hPa or in Hg)
at your current location is displayed to the right of the graph.
5.1 Absolute and relative atmospheric pressure
Before we come to the settings for the barometer on your watch, we
would like to discuss absolute and relative atmospheric pressure, as
your BARIGO E7/E7S uses these two values to calculate the current
height at your measuring location.
Since atmospheric pressure decreases with increasing altitude, and
increases with decreasing altitude, and temperature differences are
unavoidable, fluctuations in the calculation of the current altitude will
naturally occur. According to the barometric elevation formula, in the
lowest altitudes up to 1,000 metres, the atmospheric pressure
changes by around 1 hPa for every 8 metre increase in altitude. The
Page 49

BARIGO – Makes the Difference
49
lower the air temperature, the higher the value. Since the decrease
in atmospheric pressure is based on the log scale, the difference at
an altitude of 5.5 km increases by as much as approx. 16 metres per
1 hPa.
To counteract any fluctuations in the altitude shown by the
watch, you should enter the correct value when reaching a
point whose altitude is known from a (rambler's) map, information sign or is indicated on the path, etc.
Page 50
BARIGO E7/E7S
50
S2
S2
S2
S2
S4
S4
S4
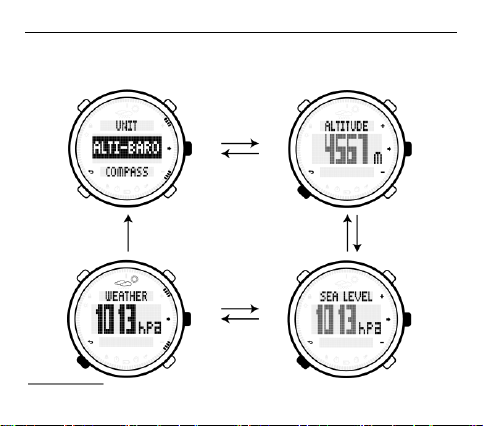
5.2 Navigation in setting mode for the altitude
and atmospheric pressure sea level
Page 51

BARIGO – Makes the Difference
51
5.3 Barometer functions
Current (absolute) atmospheric pressure
Range of values: 300 – 1,100 hPa (8.86 – 32.48 in Hg)
Measurement cycles: the first 3 minutes = every 5 sec-
onds, after 3 minutes = every 2 minutes.
After 12 hours, the watch switches back to watch mode.
20 hour graph
Temperature in °C/°F
Setting the atmospheric pressure at sea level (NN) for
measuring the altitude
Weather forecast
To launch barometer mode, press the S1 button in watch, altitude or
compass mode. If you cannot launch the barometer mode by
pressing S1, press the S4 button followed by the S1 again.
The barometer display has a weather icon which indicates the
current weather forecast. The current temperature reading is shown
in the top row. A graph showing the change in atmospheric pressure
Page 52
BARIGO E7/E7S
52
over the last 20 hours appears in the left half of middle row; in the
right half, the current atmospheric pressure at the measuring location is shown. The bottom row displays the current time.
If you leave the watch in barometer mode, it will automati-
cally be exited after 12 hours. The watch then returns to
Normal mode (watch mode).
If the atmospheric pressure reading lies outside of the
watch's range of values "- - -" will appear.
If the reading is less than the minimum, the information
"LO" (low) is displayed; if the reading exceeds the maximum, "HI" (high) appears on display.
If the DataLog memory is activated, the barometer mode is
not available.
Caution
The temperature of the wearer's body influences the watch's temperature sensor. To get an accurate temperature reading, remove
the watch from your wrist and place it on a well-ventilated spot in the
Page 53

BARIGO – Makes the Difference
53
shade. The case of your BARIGO E7/E7S needs around 15 to 30
minutes to adjust to the current ambient temperature in order to
deliver an accurate temperature reading.
5.3.1 Weather icon
The displayed weather icon is merely a forecast of the weather in
the coming hours. This forecast is taken solely from the atmospheric
pressure measurements of previous hours. Be aware that a weather
forecast is based on more variables than the difference in atmospheric pressure.
The BARIGO E7/E7S has four weather symbols indicating
the weather forecast:
sunny/bright/cloudy/rainy
Page 54
BARIGO E7/E7S
54
To get a more accurate weather forecast, we recommend
you stay in the same location for at least six hours.
Increasing your altitude normally brings about a change in
the atmospheric pressure. This also has a greater effect on
the weather icon display.
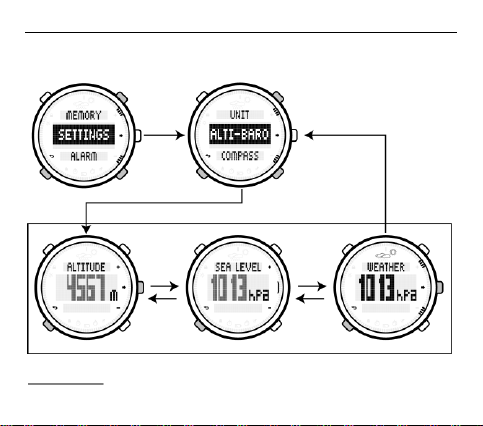
If necessary, the weather icon can be adjusted to the actu-
al weather at your measuring location. In Normal mode
(watch mode), keep the S4 button pressed until the selection menu appears. Press the S1 or S3 buttons to select
the SETTINGS title. Confirm by pressing the S2 button.
Next, select ALTI-BARO and confirm your entry by pressing the S2 button.
Next, press the S2 button twice to go to the setting display
for the weather icon.
WEATHER (Weather) appears in the top row with a flashing weather icon above it. You can now use the S1 or S3
Page 55

BARIGO – Makes the Difference
55
button to adjust the weather icon to the current weather situation.
(See image on following page)
Page 56
BARIGO E7/E7S
56
S2
S2
S2
S2
S4
S4
5.3.2 Changing the weather icon
Page 57
BARIGO – Makes the Difference
57
5.4 Atmospheric pressure graph
The atmospheric pressure graph shows earlier pressure readings
from up to 20 hours. The time appears on the horizontal axis of the
graph with each line representing an hour. The point on the extreme
right, i.e. the last one on the graph, is the most recent reading.
The atmospheric pressure is shown on the vertical axis. Each line
corresponds to the relative distance between this reading and the
one for the next line. Each line corresponds to 1 hPa.
Due to the limited space for displaying the graph, in the event of
large fluctuations in the atmospheric pressure, the upper or lower
sequence of the graph may appear as a horizontal line.
Caution
During or after a hike or any other change in altitude, do
not rely on the displayed atmospheric pressure graph nor
the weather icon.
Page 58
BARIGO E7/E7S
58
You need to be well informed about the weather in order to
be able to carry out your outdoor activities safely.
The readings on the left of the graph are the older ones,
whereas the right end of the curve represent the last (most
recent) reading.
The barometer graph can be refreshed.
5.5 Refreshing the atmospheric pressure graph (Reset)
After a hike or other change in altitude, the atmospheric pressure
graph no longer reflects the changes in pressure at the current
measuring location.
For this reason, refresh the atmospheric pressure graph once you
have reached a point where you are going to stay for several hours,
e.g. mounting hut, camping site, etc.
Page 59
BARIGO – Makes the Difference
59
S5
must be
kept
pressed
down
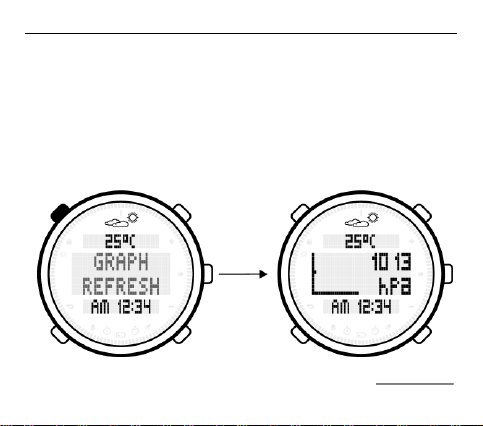
When descending from the top of a mountain, the atmospheric
pressure increases; when climbing it will decrease.
To refresh (redraw) the atmospheric pressure graph, keep the S5
button pressed down while in barometer mode. The "GRAPH REFRESH" (refresh graph) message appears on display. Afterwards,
the chart is deleted.
Page 60
BARIGO E7/E7S
60
The BARIGO E7/E7S uses "two" atmospheric pressure values. One
for the current atmospheric pressure at the measuring location, and
the other for the pressure of the atmosphere at sea level.
The barometer on your BARIGO E7/E7S displays the actual atmospheric pressure at your measuring location. Weather forecasters
normally provide the atmospheric pressure at sea level. With most
barometers, the atmospheric pressure at sea level is displayed at
each point (in other words the relative atmospheric pressure); the
pressure is calculated at the current measuring location taking into
account the current atmospheric pressure.
Page 61
61
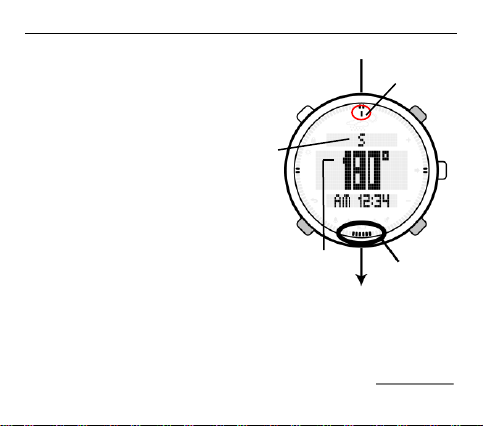
6 Compass
North pointer
12 o'clock
Direction
indicator
Angle
The built-in direction sensor on your
BARIGO E7/E7S identifies magnetic
North and displays one of 16 directions in the display.
6.1 Compass functions
Angles: 0° to 359°
The marks on the outer ring
represent the North-South
and East-West direction (the
North pointer has 6 segments).
Magnetic declination correc-
tion
Precision: ± 10° (to take the
bearings, place the watch on a flat surface, or, if you are
wearing the watch, make sure your wrist is horizontal (to
BARIGO – Makes the Difference
Page 62
BARIGO E7/E7S
62
the horizon).
To start compass mode, press the S2 button in watch, barometer-,
or altitude mode. If you start launch compass mode by pressing S2,
press the S4 button followed by S2 again.
In compass mode, the angle is displayed in the middle row of the
display. The direction indicator in the upper row displays its bearings. The current time is shown in the bottom row.
Caution
You should calibrate the compass before using the compass function for the first time and after every battery replacement (see Page
65) or if the direction indication does not seem to be correct.
Page 63
63
N
North
349°-11°
NNE
North-north east
12°-33°
NE
North east
34°-56°
ENE
East-north east
57°-78°
E
East
79°-101°
ESE
East-south east
102°-123°
SE
South-east
124°-146°
SSE
South-south east
147°-168°
S
South
169°-191°
SSW
South-south west
192°-213°
SW
South west
214°-236°
WSW
West-south west
237°-258°
W
West
259°-281°
WNW
West-north west
282°-303°
NW
North west
304°-326°
NNW
North-north west
327°-348°
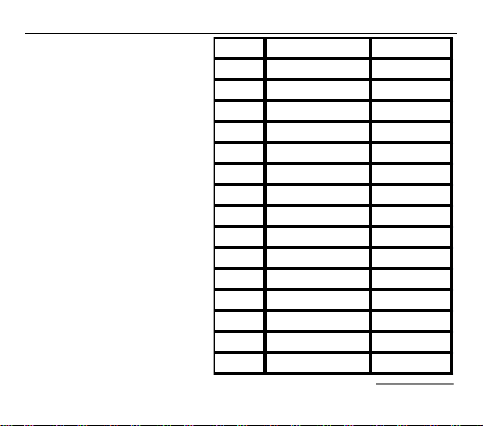
The table below lists the
points of the compass as
shown in the direction
indicator, with associated
angles.
BARIGO – Makes the Difference
Page 64
BARIGO E7/E7S
64
Note
The compass function uses a lot of battery power and is switched off
again after approx. 15 seconds, i.e. your BARIGO E7/E7S returns to
watch mode. You can view the compass again at any time by
pressing the S2 button.
The compass must be re-calibrated before using the compass
function for the first time, or after each battery replacement.
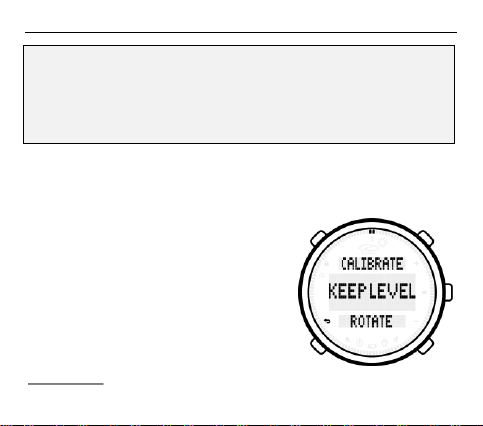
The figure to the right shows the compass calibration display.
Page 65
BARIGO – Makes the Difference
65
S2
Marks on the edge
of the display
6.2 Calibrating the compass and correcting the magnetic
declination
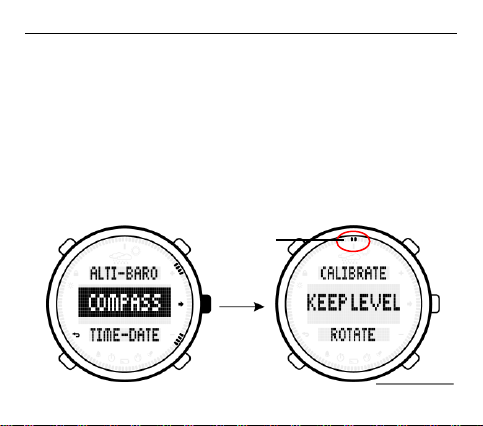
To access calibration mode, while in watch mode, keep the S4
button pressed down until the selection menu appears. Use the S1
and S3 buttons to scroll to the SETTINGS menu item. Confirm your
selection by pressing the S2 button.
Next, use the S1 and S3 buttons to scroll to the COMPASS menu
item. Press S2.
Page 66
BARIGO E7/E7S
66
changes automatically
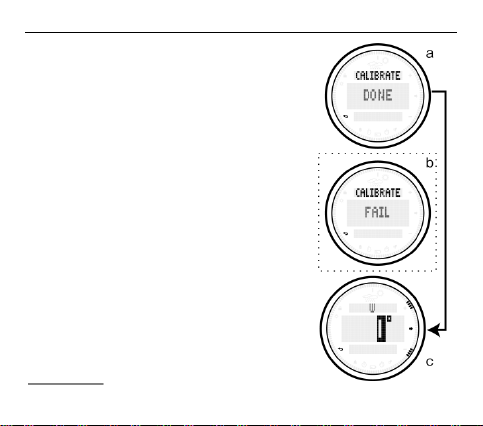
After the message CALIBRATE – KEEP
LEVEL – ROTATE appears on the display,
the segments along the edge of the display
will begin to form a circle, moving in a
clockwise direction. This happens twice.
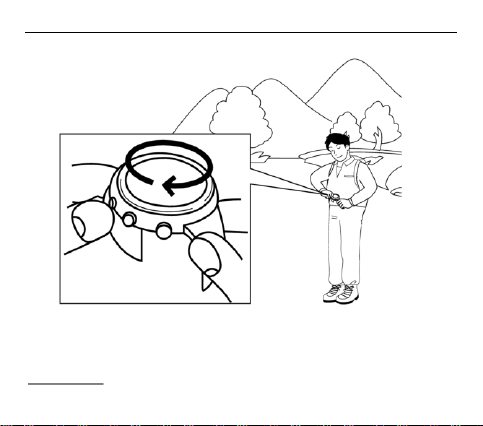
Place the watch down on a flat surface and
rotate it around its own axis at the same
speed with which the marks form a circle.
While making these two rotations, make
sure you keep the watch at the same level.
After the second rotation, calibration of the
compass is complete. If the calibration was
successful, the message DONE will appear
in the middle row. If the message FAIL
appears, you will have to repeat the calibration described above.
Page 67

BARIGO – Makes the Difference
67
If FAIL continues to be shown, please do the following:
Place the watch upside down on the table (watch out: no metal
frame should be close) and rotate slowly in clockwise or counter
clockwise direction twice at least within 30 seconds time.
Keep rotating slowly until 30 seconds have passed.
If still not successful, please repeat this procedure outdoors to
improve strength of magnetic field.
It is recommended to do this procedure (calibration) outdoor and
where there are no magnetic objects, steel objects and/or something
that could affect the compass function.
Page 68
BARIGO E7/E7S
68
After calibration is successful the watch will automatically switch to
the setting area for magnetic declination (declination). If the magnetic declination does not require correction, press the S4, button twice
to complete the calibration process and return to watch mode.
Page 69

BARIGO – Makes the Difference
69
6.3 Setting the magnetic declination
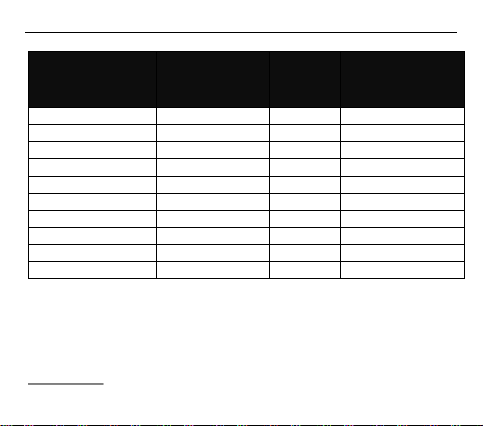
All maps are based on the geographic North Pole. The compass
needle however points to the magnetic North Pole. This
deviates from the geographical North Pole by approx. 2,000 km and
is continuously changing position. This deviation is termed the
magnetic declination.
You can find the current values from the maps or from isogonestables, e.g. from the Internet.
Bear in mind that these values are changing continuously.
Page 70
BARIGO E7/E7S
70
Country
City
Magnetic
declina-
tion
value to enter
Australia
Canberra
12 E
E12
China
Peking
6 W
W6
Germany
Berlin
2 E
E2
France
Paris
1 W
W1
Great Britain
London
3 W
W3
Japan
Tokyo
7 W
W7
Canada
Ottawa
14 W
W14
Mexico
Mexico City
6 E
E6
Norway
Oslo
0
0
USA
Washington
10 W
W10
Page 71

BARIGO – Makes the Difference
71
6.4 Setting the declination angle
To allow your watch to display the points of the compass precisely
with respect to the geographical North Pole, we recommend you
enter the declination angle.
Your BARIGO E7/E7S automatically goes to the entry of the declination angle after successful calibration of the compass (see Fig. C,
page 66).
Press the S1 or S2 button to select "E" or "W" based on the declination table. Confirm your selection by pressing the S2 button. Next,
enter the corresponding angle for the magnetic declination by
pressing the S1 or S3 button. Then confirm your entry by pressing
the S2 button.
The compass on your BARIGO E7/E7S is now ready to use. Press
the S4 button twice to return to watch mode (normal mode).
To launch the compass function press the S2 button.
Page 72
BARIGO E7/E7S
72
It does not matter if the BARIGO E7/E7S is in time-, compass- or
altimeter mode.
Caution
To take the bearings, place the watch on a flat surface, or, if you are
wearing the watch, make sure your wrist is horizontal (to the horizon). Failure to do so could lead to major measurement errors.
6.5 Using the compass
6.5.1 Direction indicator
1. Point the 12 o'clock position of your BARIGO E7/E7S in the
direction to be measured. Make sure the watch lies on a
flat surface, or, if you are wearing the watch, make sure
your wrist is horizontal to the horizon.
2. Press the S2 button to start taking the compass bearing.
Page 73
BARIGO – Makes the Difference
73
3. After a brief time, the direction to which the 12 o'clock position of the watch is pointing will appear in the display. Both
as a point of the compass in the top row and an angle in
the middle row.
4. The compass automatically continues displaying the direction every second for up to 15 seconds.
5. While carrying out a measurement with the compass, the
watch displays a direction indicator, rid bearing (angle) and
four direction indicators which move dynamically when the
watch is moved.
Caution
If direction measurement is carried out in the vicinity of a strong
magnetic field, incorrect results may be the result. Accurate direction
indications in closed rooms are also impossible.
Page 74
BARIGO E7/E7S
74
(Map)
(Map)
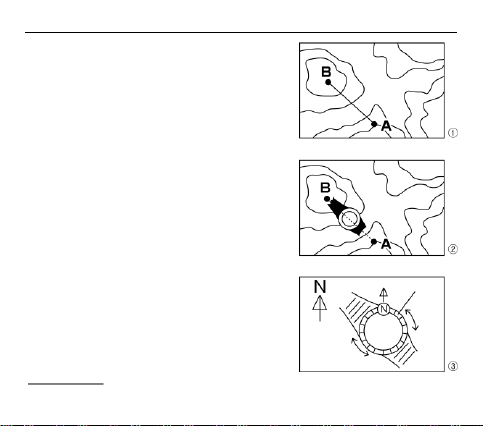
6.5.2 Arrangement on a map
To determine the direction where the
destination (B) lies from the current
measuring location (A).
(for E7 only)
1. On your map, draw a line between your location (A) and
the destination (B).
2. Place your watch on the A-B
line with the 12 o'clock position
in direction B.
3. Turn the bezel on the watch so
that the North (N) marking
points in the Northerly direction
on the map.
4. Next, take the watch in your
hand and activate the compass by pressing the S2 but-
Page 75
BARIGO – Makes the Difference
75
ton.
5. Turn the watch until the North indicator (the 6 marks on the
outer ring of the display) points to the North marking (N) of
the bezel.
6. You can reach your destination B by going in the direction
to which the 12 o'clock position of your BARIGO E7 is
pointing.
Note
With declination setting (chapter 6.3) N will be in line with N on the
map. Without declination setting it will be in line with magnetic
North.
Page 76
BARIGO E7/E7S
76
7 Altimeter
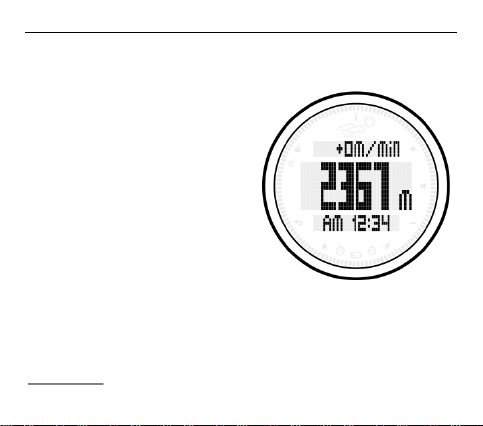
The watch's altimeter uses the
pressure sensor to determine the
atmospheric pressure which is
then used to estimate the current
height based on a pre-set value
for the ISA (International Standard
Atmosphere) from the ICAO
(International Civil Aviation Organization). You can also enter a
reference height which will be
used to calculate the current
height.
You can access the altimeter by pressing the S3 button, regardless
of whether the BARIGO E7/E7S is in time-, compass- or atmospheric pressure mode. After the word ALTIMETER appears on the
display, the watch is in altimeter mode.
Page 77

BARIGO – Makes the Difference
77
The current height is shown in the middle row of the display while
the upper row displays the height difference in the previous minute
(in m/ft – ft = foot). The current display row indicates the current
time. – The displayed altitude reading switches to "- - -" when the
measured altitude lies outside the range -500 m and 9,000 m.
If you press the S3 button and do not access altimeter mode, press
the S4 button followed by the S3 button again.
7.1 Altitude measurement
The altitude measurement is based on the atmospheric pressure.
The current altitude is calculated from the difference between the
current atmospheric pressure and the entry for the atmospheric
pressure at sea level.
An altitude calculation is carried out every five seconds within the
first five minutes, afterwards only once per minute.
Page 78
BARIGO E7/E7S
78
The altimeter display is ended automatically after 24 hours unless
stopped earlier. The watch then returns to Normal mode (watch
mode).
IMPORTANT
Your watch uses the difference in atmospheric pressure between
the relative atmospheric pressure (at sea level) and the current
atmospheric pressure (at your measuring point). As a result, the
altitude reading can vary at the same location if the atmospheric
pressure changes.
The pressure sensor used in the watch is also affected by the
temperature. When measuring the altitude, you should therefore
ensure that your watch is not exposed to any temperature fluctuations.
To prevent such temperature fluctuations during measurements,
always wear the watch on your wrist with direct contact with your
skin.
Page 79
BARIGO – Makes the Difference
79
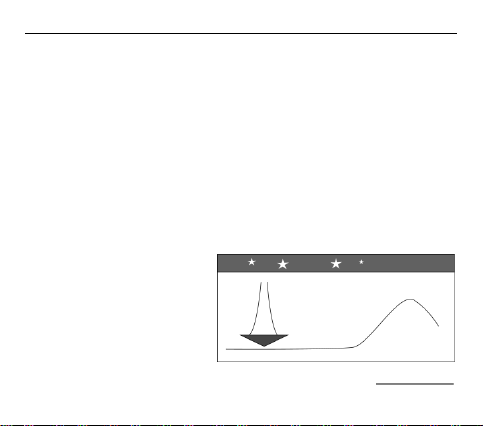
Atmospheric pressure
HIGH
Do not use this watch's altimeter for measurements requiring professional levels of accuracy.
Also bear in mind that the cabin pressure in an aeroplane is kept
constant. The altitude reading on your watch therefore does not
concur with the altitude readings of the aeroplane indicated on
display on by their captain.
To enter as precise a height of your location as possible, use the
height information from your map or indicated along the hiking path.
The atmospheric pressure
is the weight of the air
which applies at one
location. The higher the
altitude, the lower the
weight of air at this location, i.e. the pressure at
higher altitudes is low.
Page 80
BARIGO E7/E7S
80
7.2 What is "AltiSpeed"?
"AltiSpeed" combines two parameters- the time and the altitude
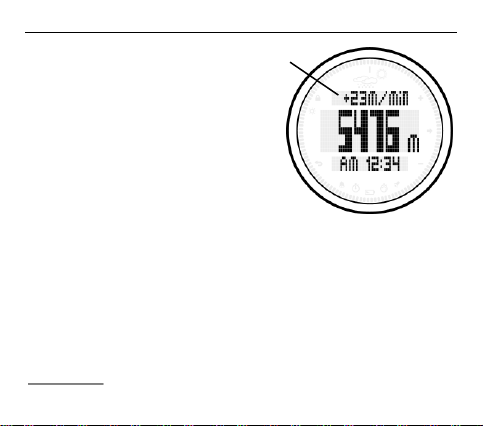
By regularly measuring the atmospheric pressure and the increase/decrease in the measured
pressure differences, "AltiSpeed"
calculates the altitude change per
minute. Your BARIGO E7/E7S always displays the distance covered
in the last minute. The measurement in the first minute is displayed
as 0 m. This value is refreshed after the first minute.
With the altimeter on your BARIGO E7/E7S, the distance covered
per minute appears in the upper row of the display. This reading is
very useful during a mountain hike if you want to maintain an even
tempo during the ascent or descent.
Page 81
BARIGO – Makes the Difference
81
S5
The measuring range for AltiSpeed lies between -300 m and +300
m. If the reading exceeds either range limit, only the maximum of /+300m per minute is displayed.
7.3 Synchronising altitude readings (1)
If the displayed altitude differs from the real altitude, carry out a
synchronisation as follows.
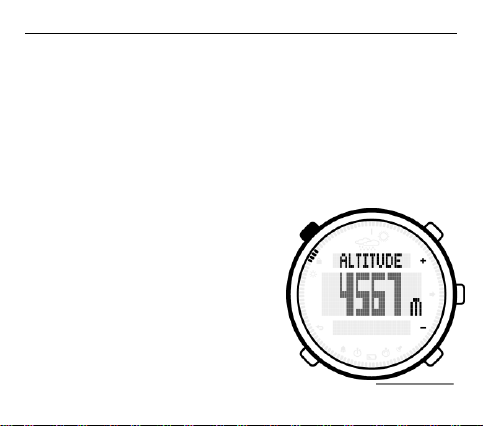
Keep the S5 button pressed in altimeter mode until ALTITUDE appears in
the top row and the altitude reading
flashes. Press the S1 or S2 button to
change this value (altitude reading).
Save the entered reading by pressing
S5.
Even after the current synchronisation
of the altitude reading, slight changes
Page 82

BARIGO E7/E7S
82
in the pressure can indirectly change the reading you just set.
Synchronising the altitude reading means synchronising with the
pressure value at sea level which serves as the basis for calculating
the altitude. This atmospheric pressure at sea level value remains
unchanged if the "Synchronisation of the altitude reading" or the
"Synchronisation of the atmospheric pressure at sea level" have not
been calibrated.
The altitude reading can be synchronised in watch mode.
7.3.1 Entering the current altitude
Setting: a step by step guide:
1. Keep the S4 button pressed down until you are in the
main selection menu.
2. Scroll through the menu using the S1 or S3 button and
select SETTINGS - press S2.
3. Next, press S2 to select ALTI-BARO.
Page 83

BARIGO – Makes the Difference
83
4. The altitude entry display appears immediately and the
displayed altitude flashes.
5. Press the S1 or S3 button to enter the altitude for your
current location. Afterwards press the S4 button to go
7.4 Synchronising altitude readings (2)
The altitude reading is calculated from the atmospheric pressure at
the measuring location and the set atmospheric pressure at sea
level. If the entered atmospheric pressure value at sea level clearly
differs from the current atmospheric pressure, as a result, the
altitude reading differs from the actual altitude at the measuring
location.
If the current height is not determined and cannot be entered in your
BARIGO E7/E7S, but you find the current atmospheric pressure
reading at sea level for example from a weather report, you can use
this figure to determine the current altitude.
back to watch mode.
Page 84

BARIGO E7/E7S
84
However, it is not easy to find precise and up-to-date information
about the atmospheric pressure at sea level. For this reason, synchronising this measuring value can also differ from the altitude
determined in this way.
You can obtain readings of the atmospheric pressure at sea level
from the radio or Internet. Bear in mind that this is not necessarily
the most up-to-date information.
7.4.1 Entering the atmospheric pressure at sea level
Setting: a step by step guide:
1. Keep the S4 button pressed down until you are in the
main selection menu.
2. Scroll through the menu using the S1 or S3 button and
select SETTINGS - press S2.
3. Next, press S2 to select ALTI-BARO.
4. The altitude entry display appears immediately and the
displayed altitude flashes.
Page 85

BARIGO – Makes the Difference
85
5. Once the current altitude is displayed, press the S4 but-
ton to return to watch mode. Otherwise, continue with
the next step.
6. Press the S2 again to go to the display for entering the
atmospheric pressure at sea level.
7. Press the S1 or S3 button to now enter the current value
for the atmospheric pressure at sea level. Afterwards
BARIGO E7/E7S will now calculate an approximate figure for the
altitude.
7.5 The relationship between altimeter,
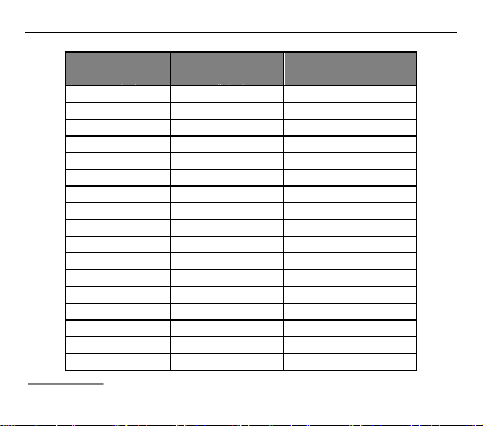
Your BARIGO E7/E7S calculates the altitude reading using the
current atmospheric pressure at your measuring location and the
atmospheric pressure at sea level. The temperature at both altitudes
(i.e. your current measuring location and at sea level) is pre-defined
in standards and is based on "0 m = 1.013 hPa" (see following
table).
press the S4 button to return to watch mode.
barometer and temperature
Page 86
BARIGO E7/E7S
86
Height above
"null"
Standard atmos-
pheric pressure
Standard temperature
(°C)
0
1,013
15.0
200
989
13.7
400
966
12.4
600
943
11.1
800
921
9.8
1,000
899
8.5
1,200
877
7.2
1,600
856
5.9
1,800
815
4.6
2,000
795
3.3
2,400
756
2.0
2,800
719
-0.6
3,000
706
-3.2
3,400
666
-4.5
3,800
633
-9.7
4,000
616
-11.0
4,500
577
-14.3
Page 87
BARIGO – Makes the Difference
87
Height above
"null"
Standard atmos-
pheric pressure
Standard temperature
(°C)
5,000
540
-17.5
5,500
505
-20.8
6,000
472
-24.0
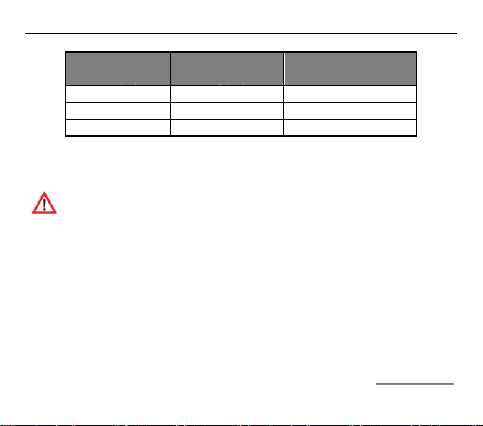
Caution
The standard atmospheric pressure of all altitudes is based on the
predefined standard temperature. Higher or lower temperatures
cause changes in atmospheric pressure. It is said that a difference
of 1°C leads to a miscalculation of 0.2%. This tends to be because
the altitude reading is lower in summer (high temperatures) and
higher in winter (lower temperatures).
Page 88
BARIGO E7/E7S
88
S3
7.6 Saving the altitude point (POINT)
This function is used to save altitude information with the date and
time. This function is useful in practice for example to keep a record
of the altitude point at the start of a hike and upon reaching the
summit.
To save the altitude point, do the following:
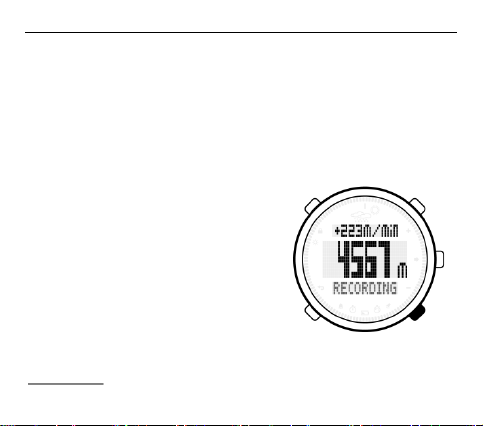
1. In altimeter mode, keep the
S3 button pressed down.
2. The word RECORDING
flashes in the bottom row of
the screen.
3. Keep the S3 button
pressed down until the
word RECORDING is replaced by the current time.
4. The altitude point is now
saved.
Page 89
BARIGO – Makes the Difference
89
Elapsed time
The memory can save up to 50 altitude points. When saving more
than 50 altitude points, the oldest ones get overwritten.
7.7 Memory log (LOG)
Use this function to save the altitudes along the entire hike, e.g. the
minimum and maximum altitude (MIN/MAX), overall difference in
height on the ascent/descent during recording.
The memory can save up to 30 logs.
7.7.1 Saving the log
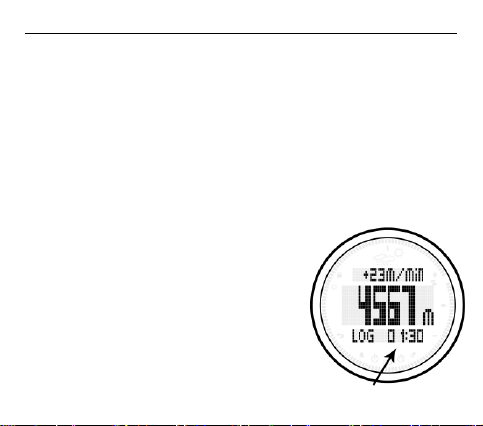
To switch on the memory to begin a log,
hold the S4 button pressed down in the
altimeter mode until the log time, e.g.
"LOG 0:00" appears in the bottom row
of the display.
Page 90
BARIGO E7/E7S
90
The time elapsed since the recording began and the current time are
alternately displayed in this row - this will continue until recording
has stopped.
7.7.2 Ending log recording
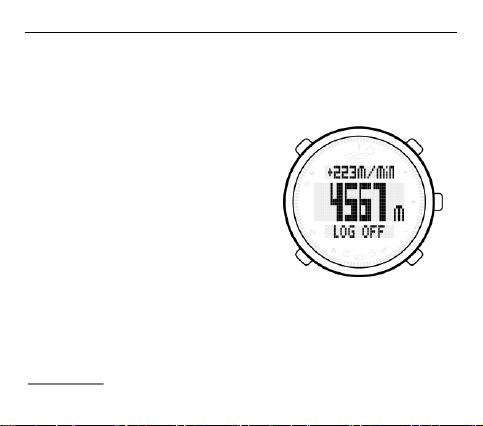
To end the recording, keep the S5
button pressed down in altimeter
mode until the message "LOG OFF"
appears in the bottom row of the
display.
Display of the elapsed time
since the beginning of the hike: In the first hour, the
elapsed time in minutes and seconds is shown, afterwards
in hours and minutes.
Recording to the log ends automatically after 24 hours
(time-out) or when the watch is put into energy-saving
mode.
Page 91
BARIGO – Makes the Difference
91
The barometer function is not available during log record-
ing. In the time and compass mode, if you press the S1
button for the barometer, the message LOG MEMORY
ACTIVE appears. After, the display returns to the mode
you were in when you pressed the S1 button down.
The memory can record up to 30 logs. When saving more
than 30 logs, the oldest logs get overwritten.
Caution
Temporary changes in altitude, such as climbs or descents
under a minute, are not recorded by the memory.
Slight changes in height, such as 1-3 metres, are ignored
by the memory since they may have been caused by a
change in the weather (atmospheric pressure). As a result,
hikes in a flat environment, where more than 50 altitude
points are not recorded within one to two hours, are not
picked up by the memory.
Page 92

BARIGO E7/E7S
92
In order to minimise changes to the altitude, when you
spend a longer time in a location, the memory will ignore
altitude changes of 1-3 metres during its regular comparison of the altitude reading.
Page 93
BARIGO – Makes the Difference
93
7.7.3 Viewing the saved logs
The altitude points and log data recorded during your hikes are saved to
memory and can be viewed as follows.
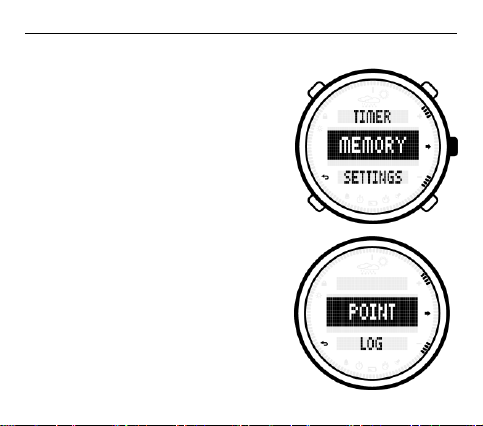
In normal mode (watch mode), keep
the S4 button pressed until the main
selection menu is displayed. Use the
S1 or S3 button to scroll to the
MEMORY menu item. Next, confirm
your selection by pressing the S2
button.
Viewing saved altitude points
If you selected MEMORY in the main
selection menu, afterwards, press the
S2 button again. Now press the S2
and altitude points
Page 94
BARIGO E7/E7S
94
button to select the submenu POINT (altitude point).
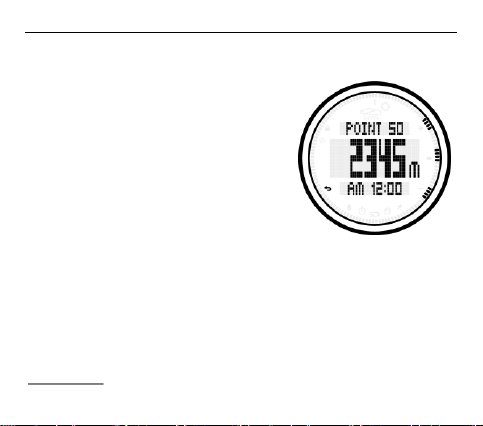
The most recently altitude point now
appears in the following screen display
if you have saved more than one
altitude point.
If you want to view more altitude points,
press the S1 or S3 button to scroll
through the individual altitude points.
Press the S1 button to bring the display
to the first altitude point. Each time you
press this button will take you to the next altitude point. Press the S3
button to scroll backwards from the altitude point which was set
most recently.
The consecutive number (1 to 50) of the altitude point is shown in
the upper row of the display; the altitude is shown in the middle row;
and the date and time when the altitude point was set in the lower.
Page 95
BARIGO – Makes the Difference
95
Deleting altitude points
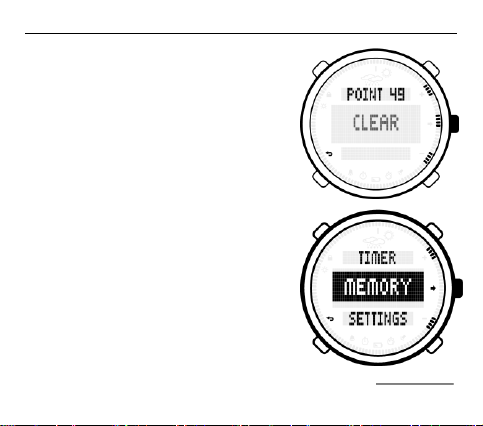
To delete the altitude points, keep the
S2 button pressed down until the
CLEAR message appears.
You can only delete one altitude point
per deletion. If you want to delete additional altitude points, repeat the process.
When the submenu name POINT appears, the altitude point memory is
empty.
Viewing saved logs
If you selected MEMORY in the main
selection menu, afterwards, press the
S2 button again. Now press the S1 or
S3 button to select the submenu point
LOG (log).
Page 96
BARIGO E7/E7S
96
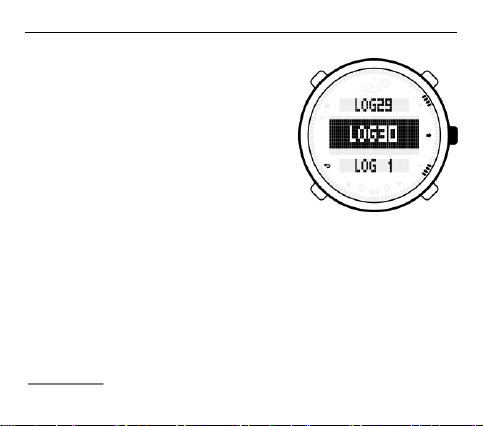
The most recently saved log record
appears in the middle row of the
following display if you have saved
more than one record.
If you want to view other records, press
the S1 or S3 button to scroll through the
individual records.
If you want to open a particular data
record, navigate to it in the middle row of the display and press the
S2 button.
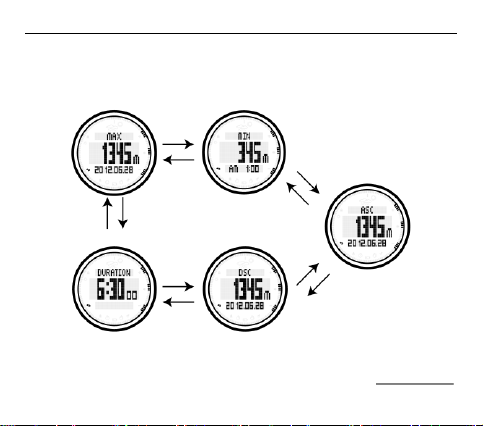
Each log for a selected record contains data about the maximum
altitude (MAX) reached during this session; the minimum altitude
(MIN); the total altitude of the ascent (ASC); the total height of the
descent (DSC); and the session duration (DURATION). The time
and date information when these altitudes were achieved is also
shown for the MAX and MIN entries. Press the S1 and S3 buttons to
scroll backwards and forwards in the log.
Page 97
97
S3
S3
S3
S3
S3
S1
S1
S1
S1
S1
Navigation within a log record
BARIGO – Makes the Difference
Page 98
BARIGO E7/E7S
98
If no button is pressed inside the view of a log record, the BARIGO
E7/E7S will automatically return to normal (watch) mode.
Caution
For example, you start at an altitude of 500 m and you manage to
reach 600 m after a constant ascent.
Assumptions: Due to changes in the weather at 600 m, the altitude
reading displayed on the watch will change as follows, 601 m - 602
m - 603 m - 604 m - 605m - 606 m - 607 m - 608 m. – Now, if you
descend from your initial starting point to 500 m, the log record may
have the following entries: MAX = 608 m, MIN = 500 m indicated in
the display, ASC = 100 m and DSC = 100 m even though the actual
difference between MAX and MIN is 108 m.
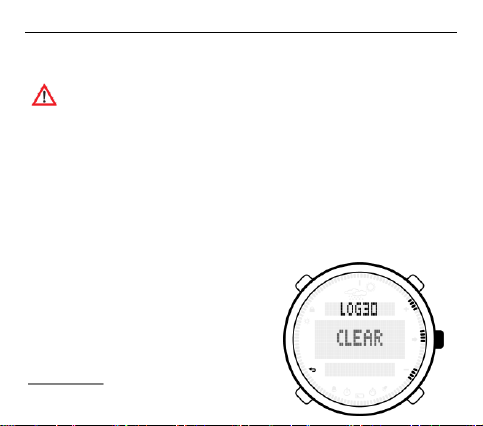
Deleting log records
To delete a log record, use the S1 or
S3 buttons to scroll to the record you
wish to delete until it appears in the
middle row of the screen. Next, press
the S2 button to open the record to
be deleted. Keep S2 pressed down
Page 99
BARIGO – Makes the Difference
99
until the message CLEAR appears for the selected record and the
display returns to the record selection.
You are only allowed to delete only one log record per deletion. If
you want to delete more logs, repeat the process. When the submenu name LOG appears, the log record memory is empty.
Hint
It is definitely useful to activate key tones on your BARIGO E7/E7S.
Key tones can act as a confirmation after many actions which
require entries, e.g. starting and ending log recordings, setting and
deleting altitude points, deleting entries, and many others.
Page 100
BARIGO E7/E7S
100
8 Setting the units (UNIT)
Your BARIGO E7/E7S provides the option of setting the different
units to suit your own needs. You can change the units for the
altitude (m/ft), atmospheric pressure (hPa/in Hg), temperature
(°C/°F) and time- (12/24) and date formats (DD-MM/MM-DD). To
open the setting menu, do the following:
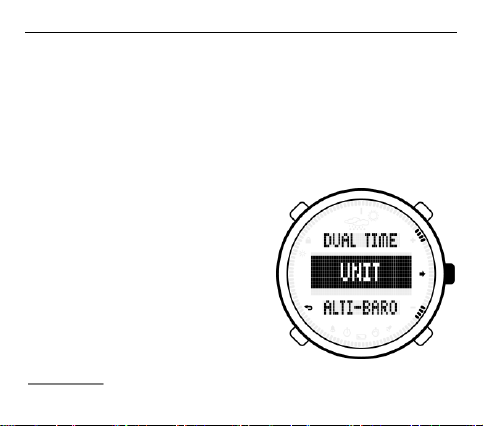
1. In normal watch mode,
keep S4 pressed down until the main menu appears.
2. Use the S1 and S3 buttons
to scroll to the menu item
SETTINGS and press the
S2 button to open the submenu.
3. Next, use the S1 and S3
buttons to scroll to the
submenu item UNITS.
Confirm your selection with S2.
 Loading...