

Bard FC085V42A, FH110V60A, FC085V42A,FH085V42A,FH110V48A,FH110V60A, FH085V42A, FH110V48A Installation Instructions Manual
...Page 1
OIL FURNACE
INSTALLATION INSTRUCTIONS
MODELS
FC085V42A FH085V42A FH110V48A
FH110V60A FLF085V42A FLF110V48A
FLF110V60A FLR085V42A FLR110V48A
FLR110V60A FLR140V60A
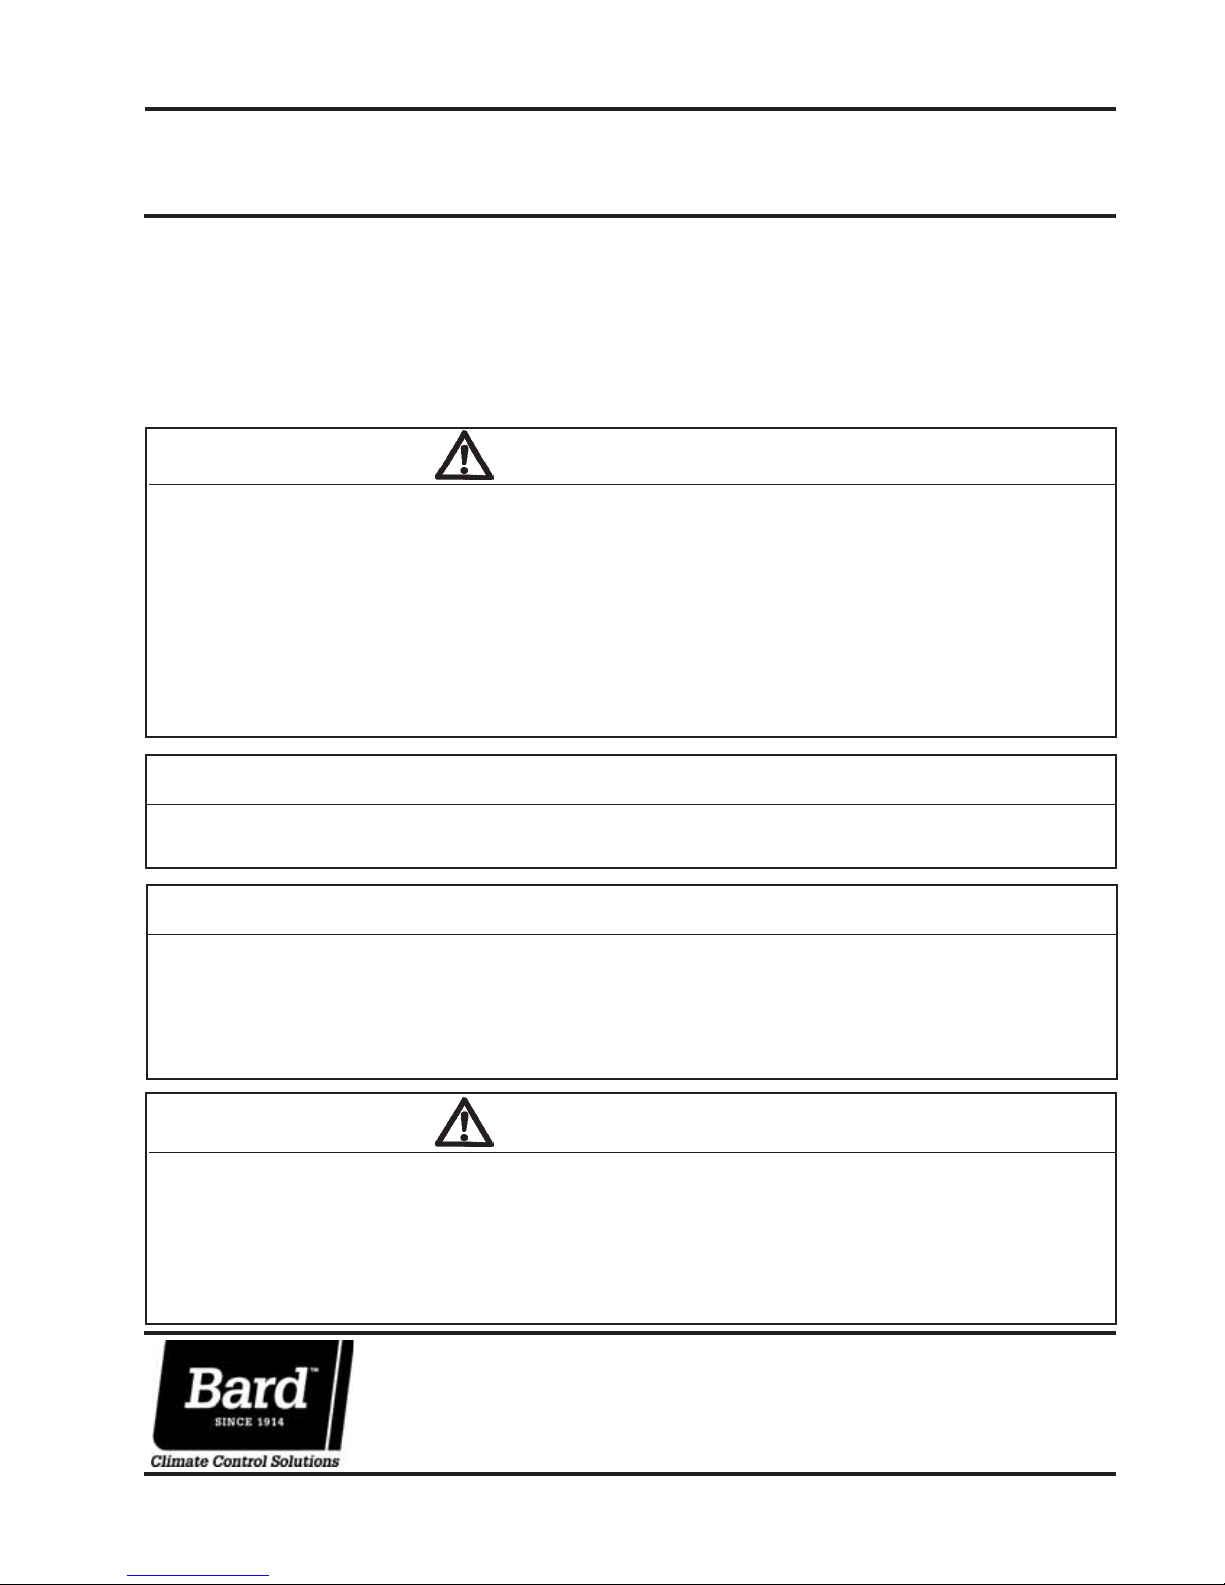
WARNING
READ ALL INSTRUCTIONS CAREFULLY BEFORE BEGINNING THE INSTALLATION.
THIS INSTALLATION MUST COMPLY WITH THESE INSTRUCTIONS AND THE REQUIREMENTS
OF ALL GOVERNING CODES AND ORDINANCES FOR THE INSTALLATION LOCATION.
IT IS THE RESPONSIBILITY OF INSTALLER TO KNOW AND UNDERSTAND ALL OF THESE
REQUIREMENTS.
FAILURE TO DO SO COULD CREATE A HAZARD RESULTING IN PROPERTY DAMAGE, BODILY
INJURY OR DEATH.
FOR YOUR SAFETY
DO NOT STORE OR USE GASOLINE OR OTHER FLAMMABLE VAPORS OR LIQUIDS IN THE
VICINITY OF THIS OR ANY OTHER APPLIANCE.
IMPORTANT NOTICE
THIS FURNACE IS NOT INTENDED FOR USE AS A CONSTRUCTION HEATER. USE OF THIS
FURNACE DURING CONSTRUCTION AND FINISHING PHASES OF A STRUCTURE IS
CONSIDERED AS "OPERATION IN A CORROSIVE ATMOSPHERE" AND "UNUSUAL,
NEGLIGENT OR IMPROPER USE" AND AS SUCH ARE CONSIDERED EXCLUSIONS BY THE
BARD MANUFACTURING COMPANY LIMITED WARRANTY.
WARNING
CARBON MONOXIDE POISONING HAZARD
FAILURE TO FOLLOW THIS WARNING COULD RESULT IN PERSONAL INJURY OR DEATH.
Carbon Monoxide is invisible, orderless and toxic! Bard Manufacturing recommends a carbon
monoxide alarm in your home, even if you do not own a gas appliance. Locate the carbon
monoxide alarm in the living area of your home and away from doorways to attached garages.
Follow the alarm manufacturer’s instructions included with the alarm.
Bard Manufacturing Company, Inc.
Bryan, Ohio 43506
Since 1914...Moving ahead just as planned.
Manual: 2100-540D
Supersedes: 2100-540C
File: VOL. I, TAB 3
Date: 04-24-13
Manual 2100-540D
Page 1 of 45
Page 2

CONTENTS
Getting Other Information and Publications ........ 3
Installation and Operating Instructions
Equipment Selection............................................. 4
Locating the Furnace ............................................ 4
Installing the Furnace ........................................... 8
Duct Work ............................................................. 8
Installing a Cooling Unit ........................................ 8
Wiring .............................................................. 9
Oil Line Piping..................................................... 12
Beckett AFG Oil Burner .............................. 12 & 13
Beckett “CleanCut” Oil Pump.............................. 13
Beckett Solid State Igniter................................... 13
Beckett GeniSys 7505 ...........................14 & 16-17
Burner States, Reset Button Op., Priming the Pump, Cad
Cell Resistance Indicator, Reset Restricted Lockout
Troubleshooting GE ECM2.3......................... 21-23
Burner Setup and Adjustments ...................... 24-26
Short Form Adjustment Procedure ..................... 26
Combustion Air Requirements ............................ 30
Louvers and Grilles............................................. 35
Venting Options .................................................. 35
Thermostat.......................................................... 35
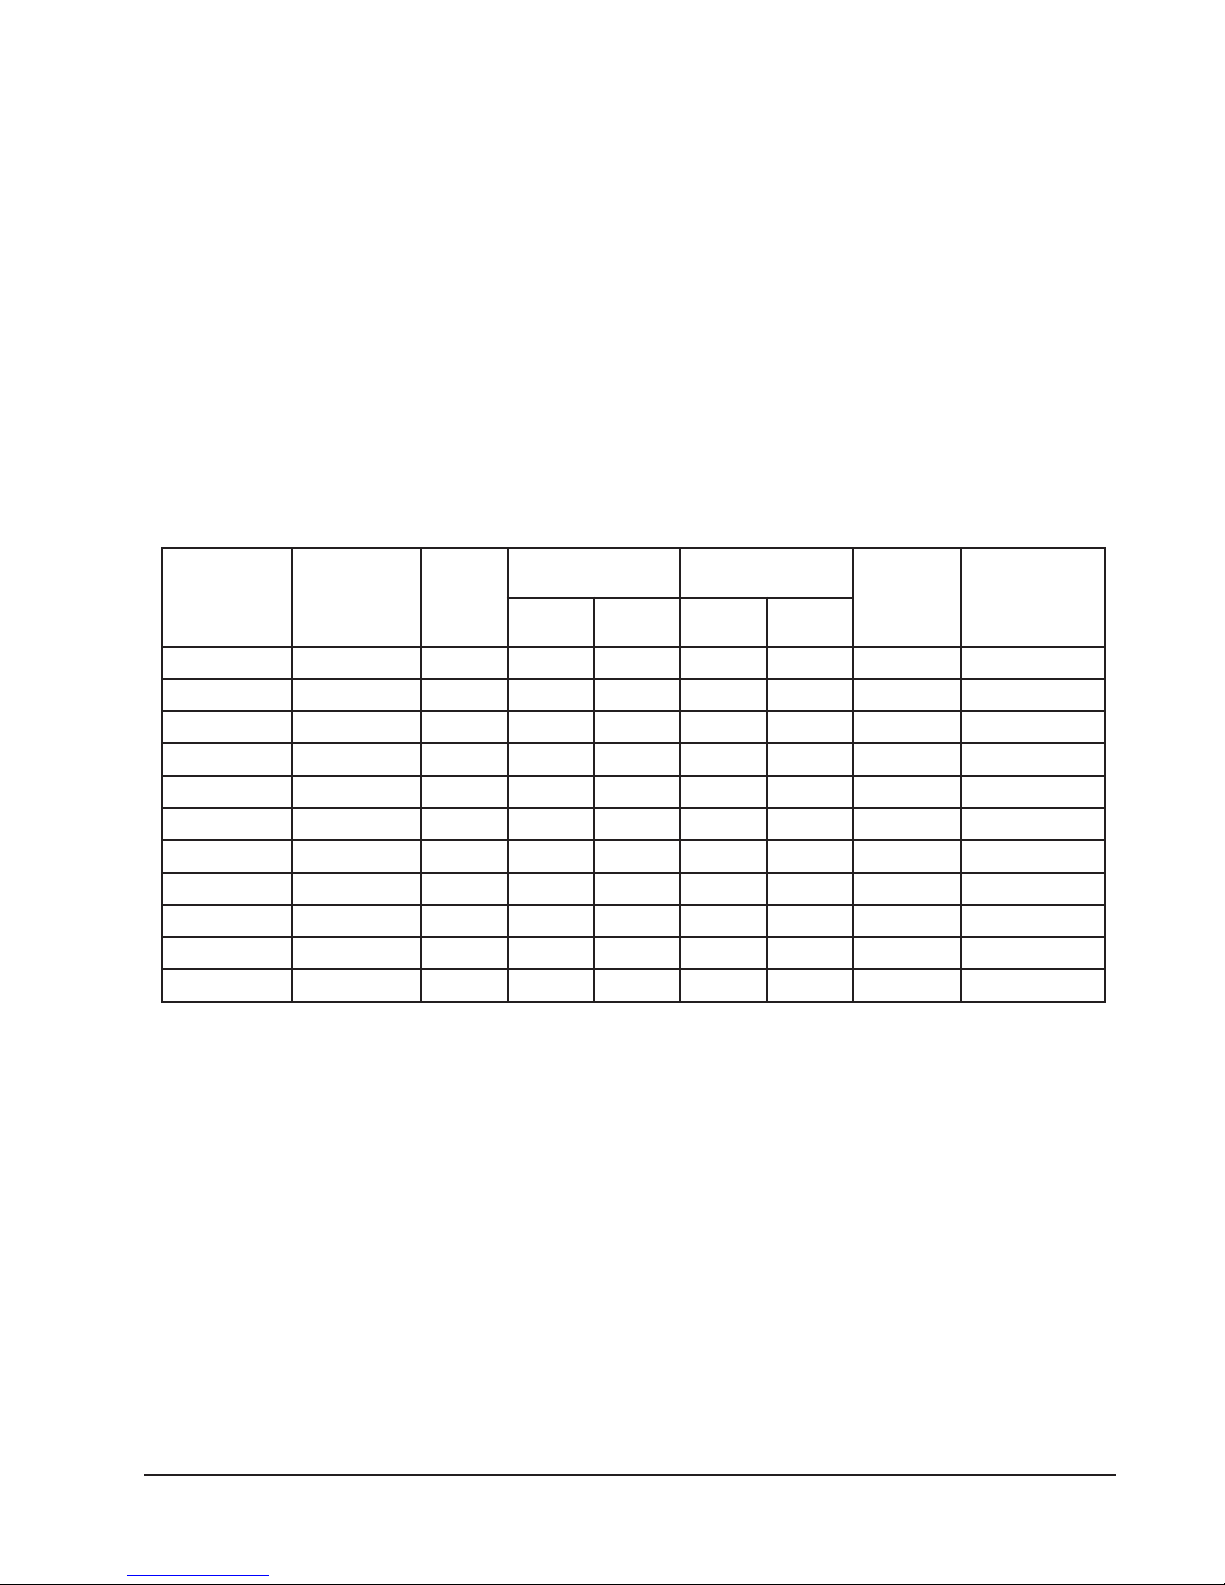
T ABLES
Table 1 Minimum Clearances.............................4
Table 2 Dimensions FLF/R Models ................... 5
Table 3 Electrical Data........................................9
Table A Reset Button Operation ....................... 15
Table B Status Lights ........................................15
Table C Heating Tap Select Settings................. 19
Table D Cooling Tap Select Settings .................19
Table E Adjustment Tap Selects ....................... 20
Table F Heating Delay Profile Taps .................. 20
Troubleshooting GE ECM2.3............... 21
Table 4 Furnace Data.......................................24
Table 5 Correlation of % of CO
Reserve Air .......................................... 29
, O2 and
2
Table 6 No. 2 Fuel Oil Efficiency Chart.............29
Table 7 Recommended Start-Up Settings ........29
Table 8 Sq.Ft. Required as
Unconfined Sp ace ............................... 32
Table 9 Minimum Ventilation Openings ............33
Table 10 Temperature Rise Ranges, Limit
Control Settings, and
Heating Blower Speeds ....................... 36
Table 11 Filter Sizes for Oil Furnaces ................ 37
Manual 2100-540D
Page 2 of 45
Filters
Lo-Boy Models – Filter Locations.................37-38
Maintenance
Lubrication .......................................................... 39
Inspect Air Filter .................................................. 39
Final Inspection and Test .................................... 39
Service Hints....................................................... 39
Combination Combustion Chamber/Burner
Mounting System ................................................ 40
To Remove Burner Only ..................................... 41
To Remove Entire Combustion Chamber
Mounting System ................................................ 41
Common Causes of Trouble............................... 42
Care of Finish ..................................................... 42
Cleaning of the Heat Exchanger......................... 42
Wiring Diagrams ............................................43-45
FIGURES
Figure 1 FLF/R Models Dimensions ................ 5
Figure 2 FH Models Dimensions .....................6
Figure 3 FC Models Dimensions .....................7
Figure 4 Typical Unit Setup - FLF..................10
Figure 5 Typical Flue Inst allation
Requirements - FLF ........................ 11
Figure 6 Typical Single Inside
Tank Installation............................... 12
Figure 7 Electronic Blower Control ................18
Figure 8 Control Disassembly .......................23
Figure 9 Winding Test....................................23
Figure 10 Drip Loop......................................... 23
Figure 11 Typical Smoke-CO
Characteristic .. 27
2
Figure 12 Pressure Gauge Connection to
Bleed Port ....................................... 28
Figure 13A Electrode Adjustments-AFG............30
Figure 13B Electrode Adjustments-NX .............. 30
Figure 14 Combustion Air Boot Assembly .......31
Figure 15 All Air From Inside Building ............. 32
Figure 16 All Air From Outdoors ...................... 33
Figure 17 All Air From Outdoors Through
Ventilated Attic.................................34
Figure 18 All Air From Out doors - Inlet Air
From Ventilated Crawl Space and
Outlet Air to Ventilated Attic .............34
Figure 19 Typical Installation of FR26 and FR27.
Filter Rack ....................................... 37
Figure 20 Typical Inst allation of FR25 Filter
Kit ....................................................37
Figure 21 Filter Installation - Lo-Boy Models ... 38
Figure 22 Removal of Burner Only ..................40
Figure 23 Removal of Entire Combustion
Chamber Mounting System.............41
Page 3

GETTING OTHER INFORMATION and PUBLICATIONS
These publications can help you install the furnace. You
can usually find these at your local library or purchase
them directly from the publisher. Be sure to consult
current edition of each standard.
National Fuel Gas Code.............. ANSI Z223.1/NFPA54
National Electrical Code.........................ANSI/NFPA 70
Standard for the Installation................. ANSI/NFPA 90A
of Air Conditioning and Ventilating Systems
Standard for Warm Air ........................ ANSI/NFPA 90B
Heating and Air Conditioning Systems
Standard for Chimneys, Fireplaces, Vents...... NFPA 211
and Solid Fuel Burning Appliances
Load Calculation for ..............................ACCA Manual J
Residential Winter and Summer Air Conditioning
FOR MORE INFORMATION, CONTACT THESE
PUBLISHERS:
ACCA Air Conditioning Contractors of America
1712 New Hampshire Ave. N.W.
Washington, DC 20009
Telephone: (202) 483-9370
Fax: (202) 234-4721
ANSI American National Standards Institute
11 West Street, 13th Floor
New York, NY 10036
Telephone: (212) 642-4900
Fax: (212) 302-1286
ASHRAE American Society of Heating Refrigerating,
and Air Conditioning Engineers, Inc.
1791 Tullie Circle, N.E.
Atlanta, GA 30329-2305
Telephone: (404) 636-8400
Fax: (404) 321-5478
Duct Design for Residential................. ACCA Manual D
Winter and Summer Air Conditioning
and Equipment Selection
NFPA National Fire Protection Association
Batterymarch Park
P.O. Box 9101
Quincy, MA 02269-9901
Telephone: (800) 344-3555
Fax: (617) 984-7057
Manual 2100-540D
Page 3 of 45
Page 4
INSTALLATION and OPERATING INSTRUCTIONS
EQUIPMENT SELECTION
An accurate heating load calculation must be conducted
using American Society of Heating, Refrigeration and
Air Conditioning Engineers (ASHRAE) or Air
Conditioning Contractors of America (ACCA)
manuals. Do not add a large safety factor above the
calculated value. If the calculated heating load
requirement exceeds the heating capacity rating of a
given model, use only the next larger size available.
Never increase by any more than absolutely necessary
based upon available equipment heating capacities.
Always select based upon heat capacity (output), never
use input capacities.
NOTE: It is the personal responsibility and obligation
of the purchaser to contract a qualified
installer to assure that installation is adequate
and is in conformance with governing codes
and ordinances.
LOCATING THE FURNACE
When installing the furnace be sure to provide adequate
space for easy service and maintenance. Locate the
furnace as close to the chimney as practical, giving
consideration to the accessibility of the oil burner,
controls, and blower for service. Allow a minimum of
24 inches at front of furnace for servicing oil burner.
Allow adequate room for filter and blower
maintenance. Clearance from combustible material as
stated on the furnace and repeated in Table 1 must be
maintained. For damp basement installations, a raised
concrete pad is recommended. This will help keep the
bottom of the furnace dry and reduce the risk of rusting.
An oil burner must have a generous supply of
combustion air to operate properly. The flow of
combustion and ventilating air must not be obstructed
from reaching the furnace. See “Combustion Air
Requirements” section.
The furnace area must be kept clear and free of
combustible materials, gasoline and other flammable
vapors and liquids.
This unit is not designed for mobile home or trailer
installations. Always install furnace in a level position.
TABLE 1
MINIMUM CLEARANCES
sehcnI—secanraelCnoitallatsnImuminiM
1
ledoM
A24V580CF 6 122229CN ** 42——
A24V580HF
A84V011HF
A06V011HF
4V011FLF
1
For the first three (3) feet from plenum. After three (3) feet, no clearance required.
C
Combustible flooring
NC
Noncombustible floor
*
Maintained on one side or the other to achieve filter access and/or blower service.
**
Floor must be noncombustible. For furnace only installation can be installed on combustible
flooring only when installed on special base part no. CFB7 available from factory. When air
conditioning coil cabinet DCB23-22 is used then use special base part no. CFB23.
4
4
4
A24V580FLF
6
A8
6
6
A06V011FLF
6
A24V580RLF
6
A84V011RLF
A06V011RLF
6
A06V041RLF
6
1
1
1
0
0
0
81
81
81
81
2
2
2
2
2
2
2
2
2
2
2
2
2
2
2
2
2
2
2
2
2
2
2
2
2
2
2
2
2
2
tcuD
2
2
2
2
2
2
2
2
2
2
eulF
epiProolFtnorFkcaBsediSpoTsediStnorFkcaBsediS
—
9
9
9
9
9
9
9
9
9
9
C
C
C
CN
CN
CN
CN
CN
CN
CN
42
—
42
—
42
42
42
42
42
42
42
42
42
42
42
42
42
42
42
ecivreSmuminiM
secnaraelCecanruFmunelP
—
—
—
*81
*81
*81
*81
*81
*81
*81
Manual 2100-540D
Page 4 of 45
Page 5
Washable type filter 1” nom. thickness
ledoM
rebmuN
tenibaC
munelP
sgninepOnoitcennoCeulFsretliFriA 1
A
htdiW
B
htpeD
C
thgieH
ExD
ylppuS
FxD
nruteRnoitacoL
G
.aiDH
J eziS
.oN
desU
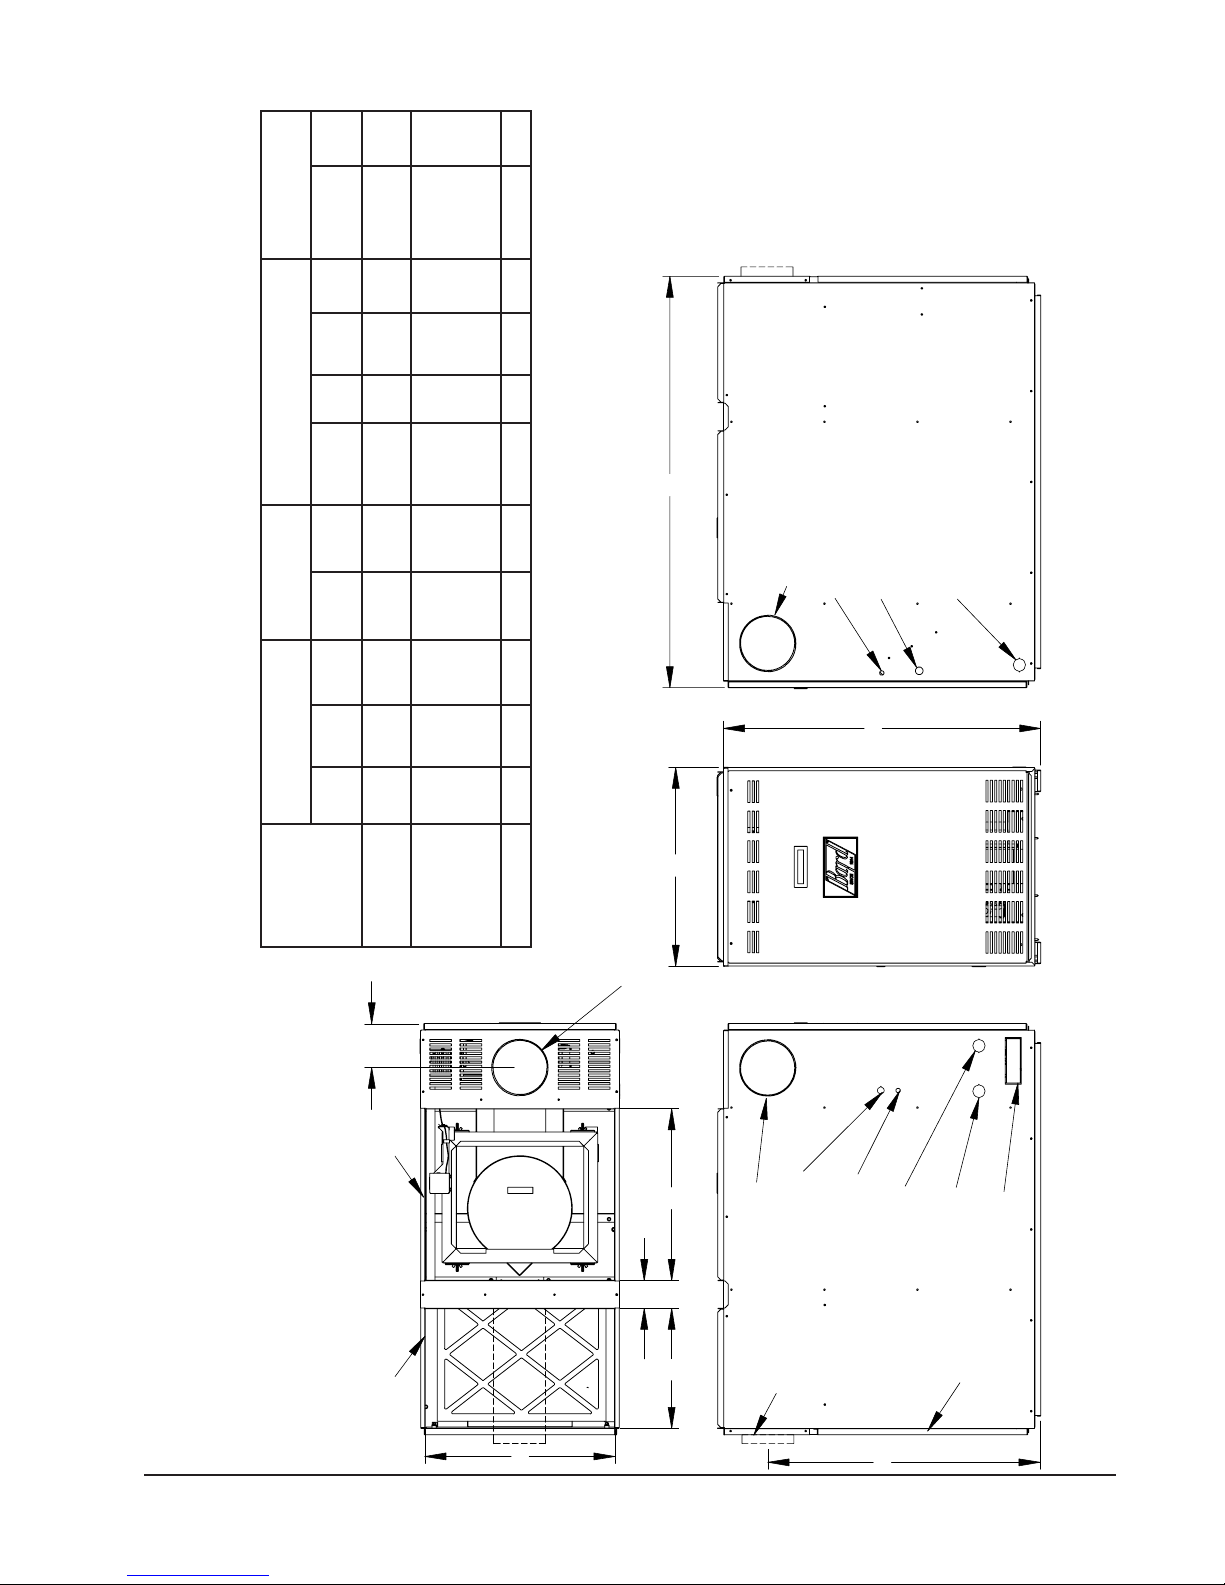
A24V580FLF
A24V580RLF
32
32
521.84
521.84
526.63
526.63
02x22
02x22
41x22
41x22
tnorF
raeR
6
6
526.13
526.13
521.5
521.5
1x02x61
1x02x61
1
1
A84V011FLF
A06V011FLF
A84V011RLF
A06V011RLF
323232
32
521.84
521.84
521.84
521.84
526.04
526.04
526.04
526.04
02x22
02x22
02x22
02x22
41x22
41x22
41x22
41x22
tnorF
tnorF
raeR
raeR
666
6
526.53
526.53
526.53
526.53
521.5
521.5
521.5
521.5
1x02x02
1x02x02
1x02x02
1x02x02
111
1
A06V041RLF62052.05526.7402x5261x52raeR6
521.24— 1x52x021
1
B
MIS-1815 A
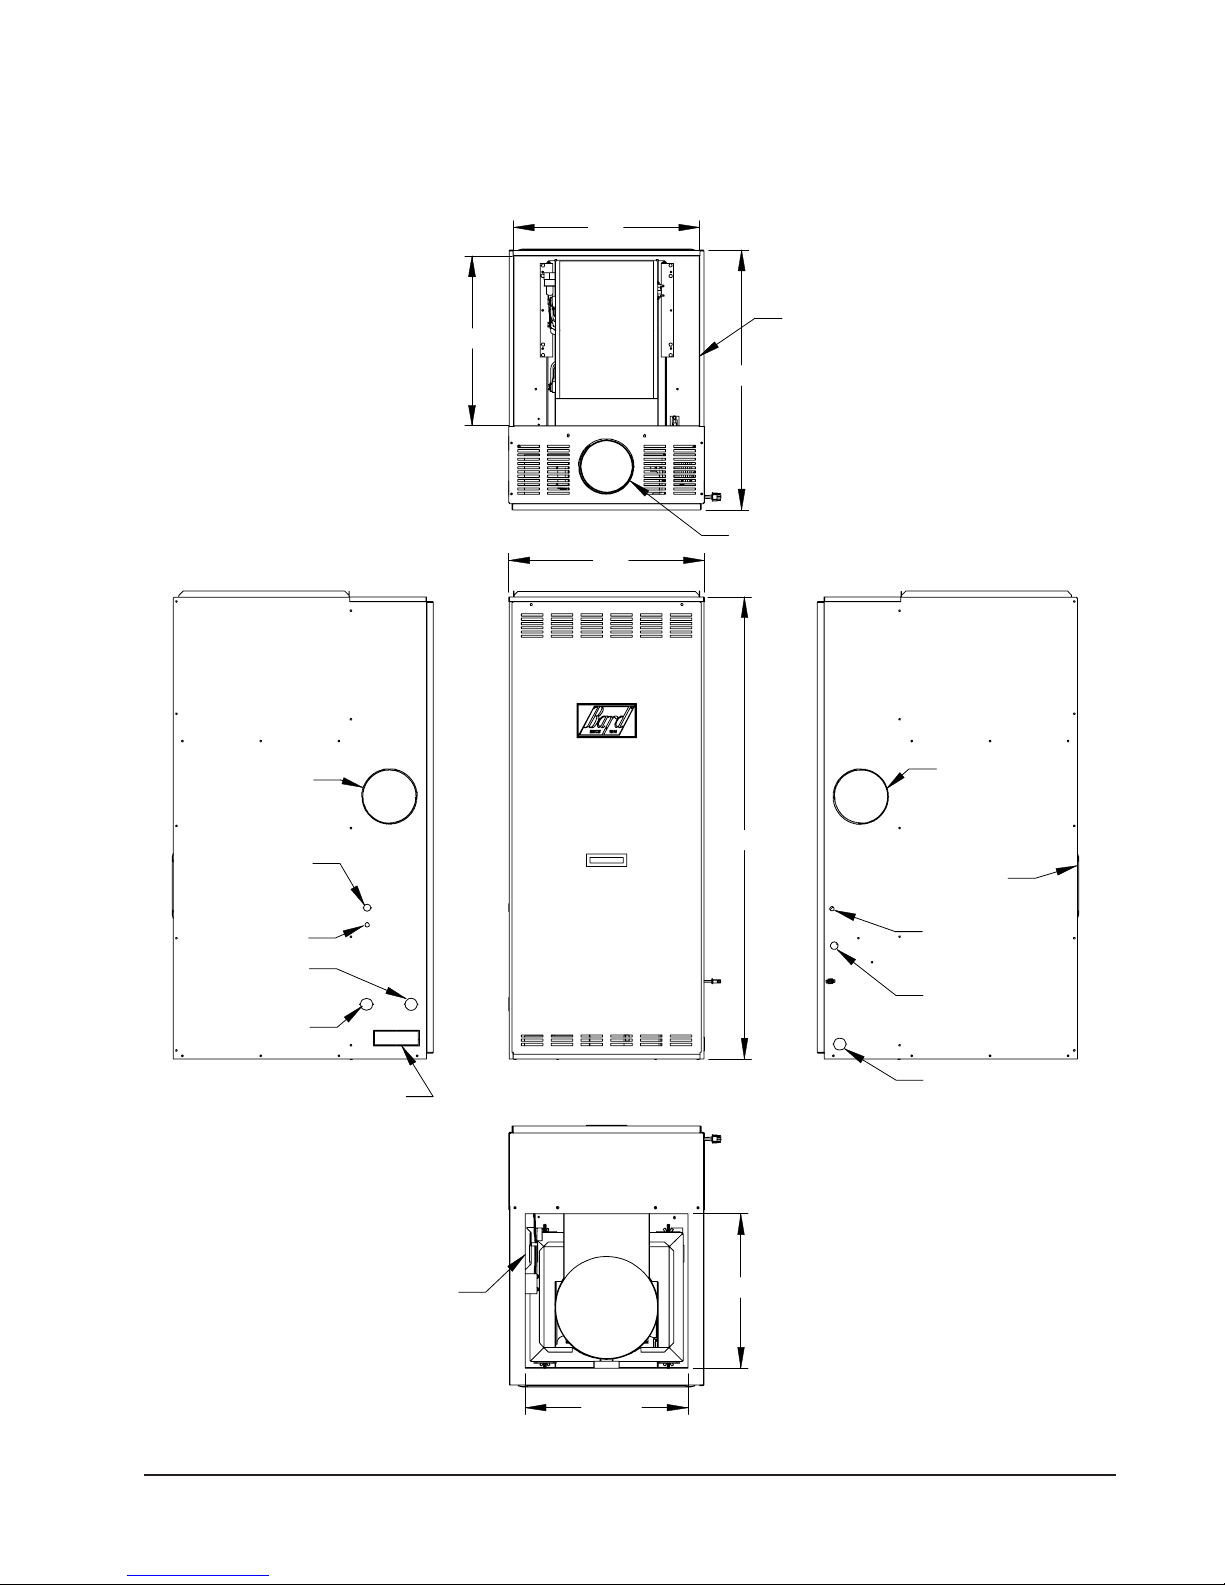
RIGHT SIDE VIEWFRONT VIEWLEFT SIDE VIEW
TABLE 2
FLF/R MODELS DIMENSIONS (INCHES)
"FLF" FLUE
KNOCKOUT
LOW VOLTAGE
ENTRANCE
ENTRANCE
HIGH VOLTAGE
C
OPTIONAL
OIL ENTRANCE
FIGURE 1
A
FLF/R MODELS DIMENSIONS
SPECIFICATION SHEET
FLF/FLR 085, 110 AND 140
J
DUCT
SUPPLY
TOP VIEW
DUCT
RETURN
"FLF" FLUE
KNOCKOUT
EF
OIL
OPTIONAL
"FLF" FLUE
KNOCKOUT
G
D
REAR FLUE
OPTIONAL
ENTRANCE
HIGH VOLTAGE
ON "FLR" MODELS
ENTRANCE
LOW VOLTAGE
H
OIL
OPTIONAL
ENTRANCE
FILTER
ENTRANCE
FRESH AIR
KNOCKOUT
DOOR
Manual 2100-540D
Page 5 of 45
Page 6
FH085 AND FH110
SPECIFICATION SHEET
RETURN
OPENING
(CUT OUT)
MIS-1814 A
RIGHT SIDE VIEW
SUPPLY
OPENING
FIGURE 2
21 7/8"
FH MODELS DIMENSIONS
19 7/8"
TOP VIEW
30 1/2"
FLUE
KNOCKOUT
23"
FLUE
FLUE
KNOCKOUT
KNOCKOUT
OPTIONAL
HIGH VOLTAGE
HIGH
DOOR
REAR CLEANOUT
ENTRANCE
VOLTAGE
OPTIONAL
ENTRANCE
LOW VOLTAGE
ENTRANCE
53" (FH085)
OIL
OPTIONAL
ENTRANCE
LOW VOLTAGE
59" (FH110)
OIL
ENTRANCE
OPTIONAL
ENTRANCE
FRESH AIR
KNOCKOUT
OIL
ENTRANCE
DOOR
VESTIBULE
FRONT VIEW
Manual 2100-540D
Page 6 of 45
19 1/4"
RETURN
OPENING
(CUT OUT)
16"
LEFT SIDE VIEW
Page 7
COUNTERFLOW
FIGURE 3
FC085 MODEL DIMENSIONS
22"
20"
RETURN
OPENING
SPECIFICATION
SHEET
FLUE
KNOCKOUT
OPTIONAL
HIGH VOLTAGE
ENTRANCE
OPTIONAL
LOW VOLTAGE
ENTRANCE
OIL ENTRANCE
OPTIONAL
OIL ENTRANCE
23"
30 5/8"
TOP VIEW
FLUE
KNOCKOUT
54 1/4"
FLUE
KNOCKOUT
REAR
CLEANOUT
DOOR
LOW VOLTAGE
ENTRANCE
HIGH VOLTAGE
ENTRANCE
FRESH AIR
KNOCKOUT
LEFT SIDE VIEW
SUPPLY
OPENING
BOTTOM VIEW
FRONT VIEW
19 1/8"
OPTIONAL
OIL ENTRANCE
RIGHT SIDE VIEW
18 1/8"
MIS-1826 A
Manual 2100-540D
Page 7 of 45
Page 8

INSTALLING THE FURNACE
INSTRUMENTS REQUIRED FOR PROPER
SETUP OF THE FURNACE
It is important that a set of instruments capable of the
following requirements be used for the setup of this
furnace to ensure proper and safe operation:
1. Oil pump pressure gauge that measures up to
150 PSI.
2. Smoke gun to pull smoke samples from flue.
3. Draft gauge that will measure -.02" water column
(W.C.)
4. Duct static pressure gauge 0-1.0" W.C. range.
5. Temperature gauge that can read from 50° F up to
700° F.
6. A gauge to measure CO2 or O2.
DUCT WORK
The air distribution system should be designed and
installed in conformance with manuals published by
Air Conditioning Contractors of America (ACCA) as
set forth in Manual D, or ASHRAE publications.
IMPORTANT
When a furnace is installed so that supply
ducts carry air circulated by the furnace to
areas outside the space containing the
furnace, the return air must also be handled
by a duct(s) sealed to the furnace casing and
terminating outside the space containing the
furnace This is to prevent drawing possible
hazardous combustion products into the
circulated air.
INSTALLATION
A typical installation is shown in Figures 4 and 5. All
parts of the furnace installation (furnace, oil tank and
piping systems, combustion and ventilation air, venting,
etc.) must comply with NFPA31, Installation of Oil
Burning Equipment -- latest edition. This drawing
shows the typical connecting parts needed to correctly
install this furnace. Make sure that all parts of the
heating system comply with the local codes.
Check the furnace and your load calculation to verify
that the unit is properly sized. (Refer to “Equipment
Selection” section on Page 4.)
The correct size of unit needed may be substantially
smaller than the unit being replaced due to home
improvements and technology advancements since the
initial installation.
INADEQUATE SUPPLY AIR and/or RETURN
AIR DUCT SYSTEMS
Short cycling because of limit control operation can be
created by incorrectly designed or installed supply and/
or return air duct systems.
The duct systems must be designed using ASHRAE or
ACCA design manuals and the equipment CFM and
external static pressure ratings to ensure proper air
delivery capabilities.
On replacement installations, particularly if equipment
is oversized, the duct systems can easily be undersized.
Modifications may be required to assure that the
equipment is operating within the approved
temperature rise range when under full rated input
conditions, and that no short cycling on limit controls is
occurring.
INSTALLING A COOLING UNIT
When the furnace is used in connection with a cooling
unit*, the furnace shall be installed parallel with or on
the upstream side of the cooling unit to avoid
condensation in the heating element. With a parallel
flow arrangement, the dampers or other means used to
control flow of air shall be adequate to prevent chilled
air from entering the furnace, and if manually operated,
must be equipped with means to prevent operation of
either unit, unless the damper is in the full heat or cool
position.
* A cooling unit is an air conditioning coil, heat
pump coil or chilled water coil.
When installing a cooling unit above an FH or FL
(below on an FC) series furnace, the coil must be
spaced far enough from the furnace outlet to assure
proper operation of the furnace. Bard supplied coils,
when used with Bard supplied coil cabinets, are
automatically positioned.
For top discharge FH and FL models, when coils are
installed without using Bard coil cabinets or coils of
another brand are used, the coil drain pan should be
located a minimum of four (4) inches above the top of
the furnace cabinet. If a greater clearance is specified
by the coil manufacturer then it would apply.
NOTE: IF DRAIN PAN IS ANYTHING OTHER
THAN A STEEL PAN PARTICULAR
ATTENTION MUST BE GIVEN TO THE
INSTALLATION INSTRUCTIONS FOR
THE COIL TO MAKE SURE IT IS
ACCEPTABLE FOR USE WITH THESE
OIL FURNACES HAVING MAXIMUM
OUTLET AIR TEMPERATURE OF 200° F.
See Cooling Tap Select Table D (Page 19) for CFM at
static pressures for additional information.
Manual 2100-540D
Page 8 of 45
Page 9
WIRING
FACTORY WIRING
All units are fully factory wired. Multispeed blowers
are factory wired on high speed for cooling/manual fan
operation. Heating speeds are wired for the largest
input and may need lower speed for field installed low
input nozzle. If replacement wire is necessary, use 105
degrees C minimum. See electrical data, Table 3.
ELECTRICAL DATA
FIELD WIRING
All wiring must conform to the National Electrical
Code and all local codes. A separate fuse or breaker
should be used for the furnace.
TABLE 3
rotoMrewolBrotoMrenruB
latoT
ledoMHP-ZH-stloV
A24V580CF1-06-5116.82/19.67/17.13.0151
A24V580HF1-06-5116.82/19.67/17.13.0151
A84V011HF1-06-5113.014/36.87/17.15.2151
A06V011HF1-06-5112.511
A24V580FLF1-06-5116.82/19.67/17.13.0151
A84V011FLF1-06-5113.014/36.87/17.15.2151
A06V011FLF1-06-5112.511
A24V580RLF1-06-5116.82/19.67/17.13.0151
A84V011RLF1-06-5113.014/36.87/17.15.2151
A06V011RLF1-06-5112.511
A06V041RLF1-06-5115.4118.217/17.17.7102
spmA
PHALFPHALF
5.317/17.16.8102
5.317/17.16.8102
5.317/17.16.8102
muminiM
tiucriC
yticapmA
emiT.xaM
esuFyaleD
RCAHro
rekaerBtiucriC
Manual 2100-540D
Page 9 of 45
Page 10
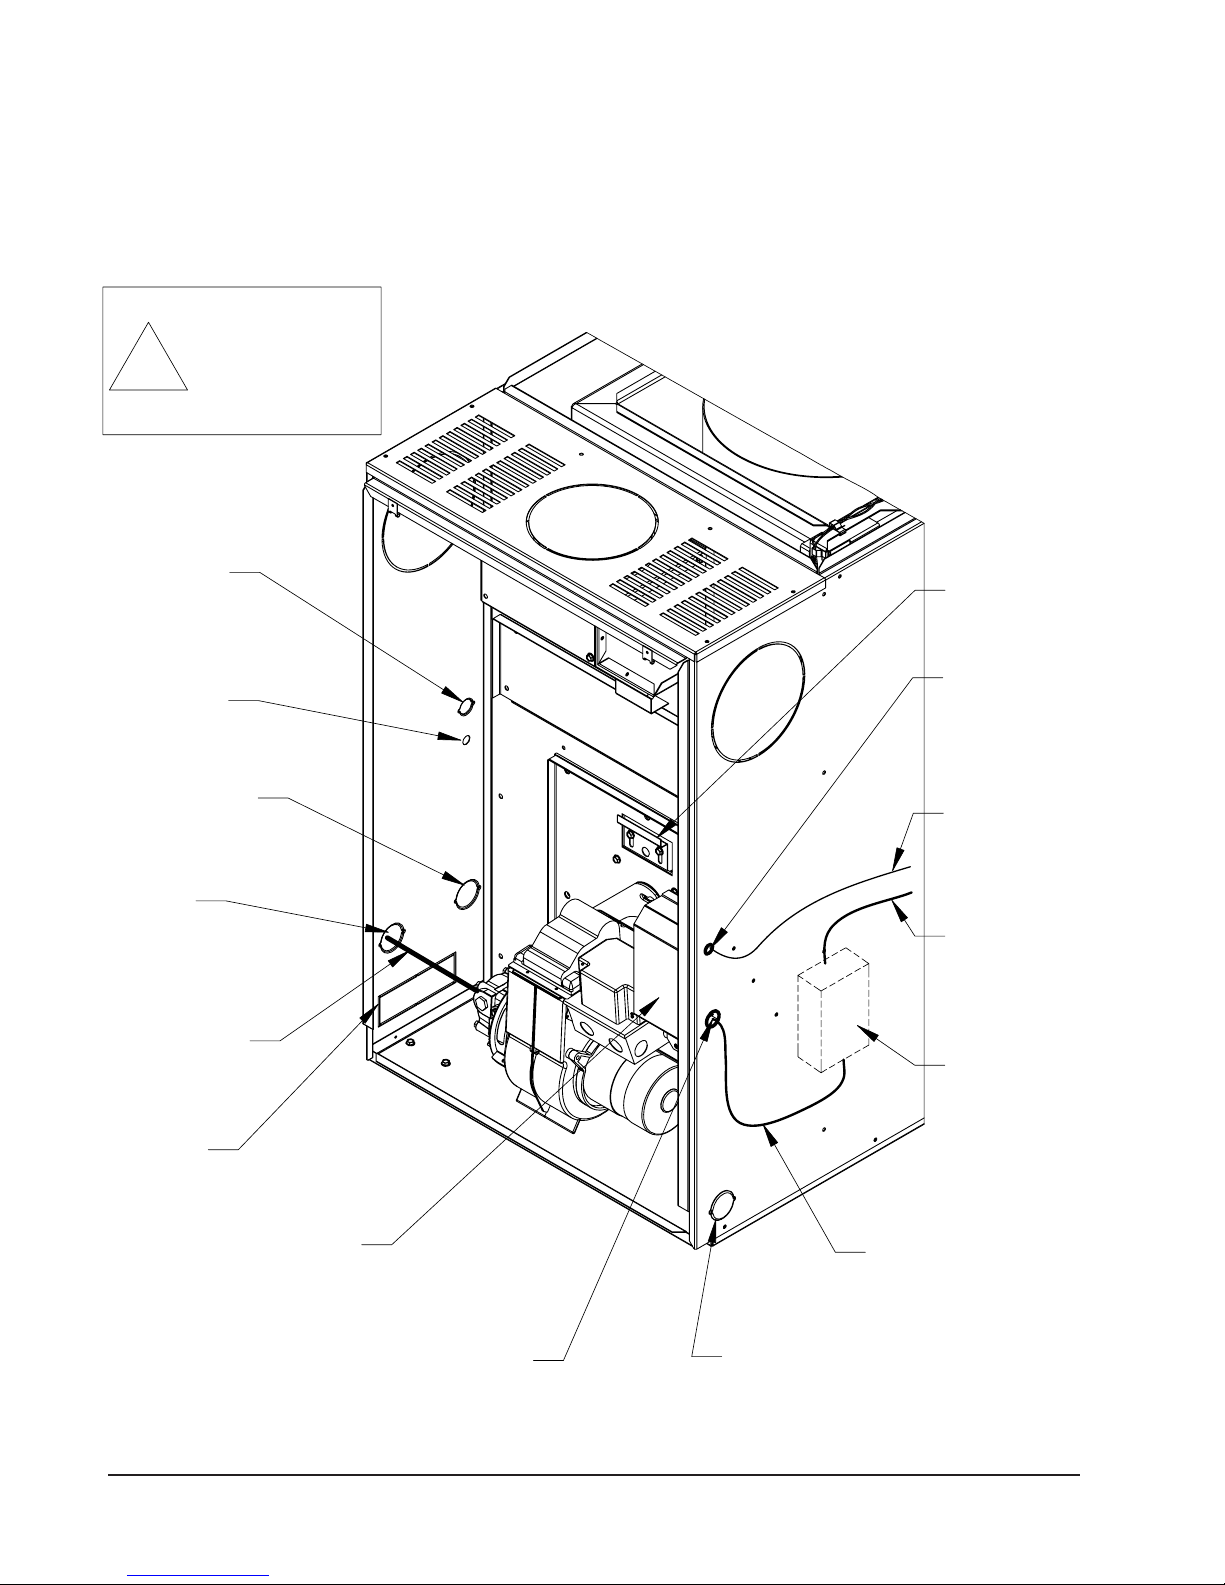
FIGURE 4
TYPICAL UNIT SETUP
FLF UNIT SHOWN
WARNING
ALL WIRING MUST
CONFORM TO THE
NATIONAL ELECTRIC
!
CODE AND ALL LOCAL
Left side
high voltage
(unit power)
entrance
Left side
low voltage
(thermostat)
entrance
Left side oil
line entrance
for opt. air boot
Left side
oil line
entrance
CODES.
TYPICAL UNIT
SETUP
(FLF UNIT SHOWN)
Inspection
door
Right side
low voltage
(thermostat)
entrance
To thermostat
and optional
A/C unit
Oil line
(see burner
pump inst. for
hookup info.)
Air Boot
knockout
(optional)
Control panel
(junction box
in FH units)
Manual 2100-540D
Page 10 of 45
Right side
high voltage
(unit power)
entrance
Right side
oil line
entrance
To power
source
Shut off switch
(if not fused,
power line must
include fuse or
circuit breaker)
Power Wires:
Black (HOT)
White (NEUTRAL)
Green (GROUND)
MIS-1836
Page 11
FIGURE 5
TYPICAL FLUE INSTALLATION REQUIREMENTS
FRONT FLUE LO-BOY MODEL SHOWN
(REPRESENTS ALL MODELS)
L
i
n
e
d
C
h
i
m
n
Thimble
1/4 inch per
1 foot rise
INSTALLER NOTE:
Follow all appropriate
standards for installing
needed venting system.
Draft Regulator
(Be sure to follow
installation inst.
supplied with
regulator).
90° Rotatable
Flue Box on front
flue models
(remove appropriate
cabinet knockout).
Mounting screws
located under flue
box cover.
Flue Box
Cover
Optional
Flue
Locations
e
y
Clean-out Door
(keep closed)
∨
∨∨
∨∨
Note: This accessory is not currently available for Bard Models:
FH110V48A, FH110V60A, FLF110V48A, FLF110V60A with NX Burners
Optional Fresh
Air Boot (remove
rect. knockout).
Oil Burner
MIS-1825
Manual 2100-540D
Page 11 of 45
Page 12
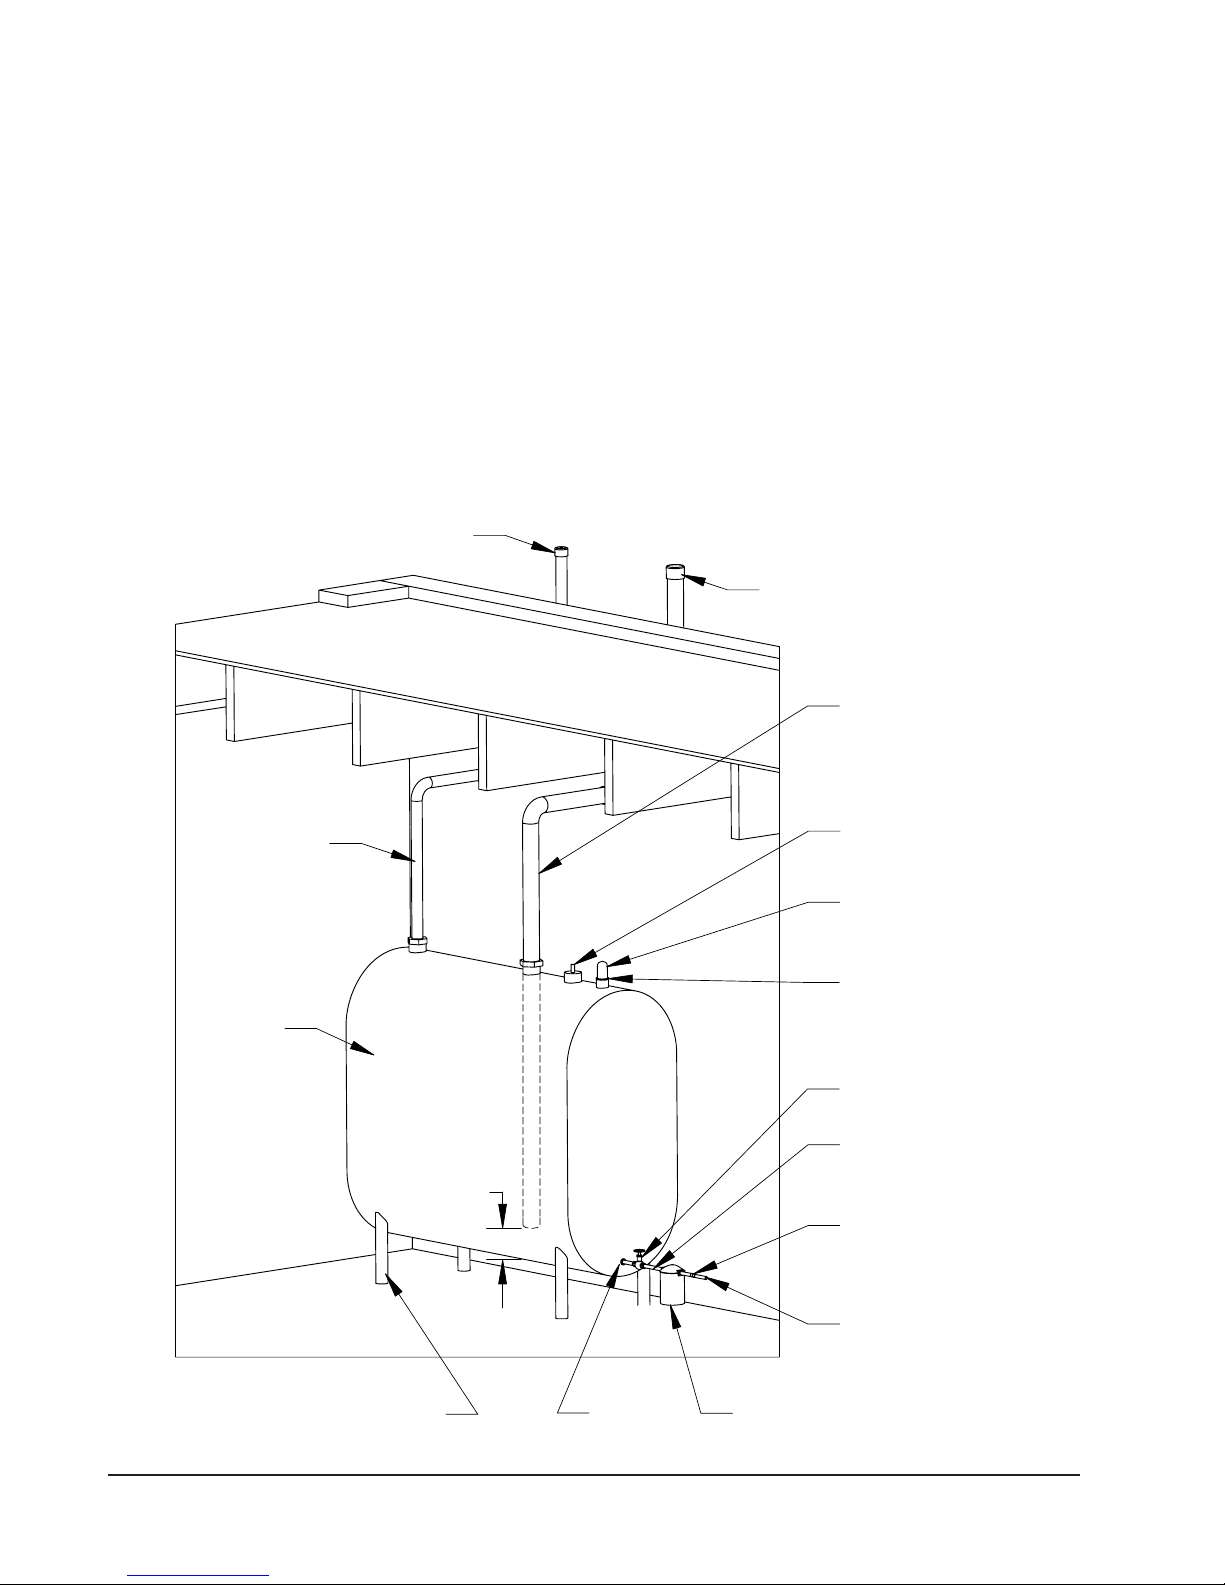
OIL LINE PIPING
First determine whether the pipe system is to be a
single line system or a two line system. All
connections must be absolutely air tight or you will
have a malfunction of the burner. When installing the
piping, a good oil filter should be installed close to the
burner. A single line system is recommended for
gravity feed.
A typical single inside tank installations shown in
Figure 6. For installation details for this and other tank
configurations, refer to NFPA31 -- latest edition. All
tank and pipe setups must comply with NFPA31.
TYPICAL SINGLE INSIDE TANK INSTALLATION
Vent Cap
BECKETT AFG OR NX OIL BURNER
This furnace is equipped with a high static Beckett AFG
or Beckett NX oil burner which is designed to produce
adequate draft in nearly any vertically vented
application. The burner employs the latest time tested
controls of the highest quality. The controls consist of a
high voltage Beckett solid state igniter, a Beckett
“CleanCut” oil pump with an integral solenoid valve,
and a Genisys 7505 primary control.
FIGURE 6
2" Cap
1-1/4"
Vent Pipe
Oil
Tank
2" Fill Pipe
Return Line
Guage
Bushing,
2" x 1-1/2" or
1-1/4"
Gate Valve
3/8" x 4"
nipple
6"
3/8" x 3/8"
Adapter
Legs (either 1-1/4"x10"
or 1-1/2"x10" nipples)
Manual 2100-540D
Page 12 of 45
Bushing
Oil Filter
3/8" O.D. Copper
Fuel Tubing
MIS-1823
Page 13

These controls were selected for their proven high
quality, dependability, and serviceability. With proper
maintenance this burner assembly will provide many
years of reliable service.
All units are shipped with the oil burner installed, and
with high rate oil nozzle installed designed for use with
No. 1 or No. 2 fuel oil. Inspect firepot refractory
before firing to be sure it has not been jarred out of
position in shipment. Burner air tube must not
extend beyond inside surface of firepot. Burner
head should be centered on the combustion chamber
opening.
WARNING
Never attempt to use gasoline in your
furnace. Gasoline is more combustible than
fuel oil and could result in a serious explosion
causing damage, injury or death.
BECKETT SOLID STATE IGNITER
This igniter differs from the traditional iron core
transformer in that it produces a 14,000 volt spark
instead of a 10,000 volt spark of the iron core
transformer. This hotter spark provides for cleaner,
faster ignitions. Being solid state technology this
igniter is less susceptible to problems caused by voltage
variations. It also has a greater ability to ignite cold
and/or inconsistent oil. The solid state igniter is wired
to the primary control the same as an iron core
transformer.
GENISYS 7505 PRIMARY CONTROL
The Genisys 7505 Interrupted Electronic Oil Primary is
a line voltage, safety rated, interrupted ignition oil
primary control for residential oil burners. The Genisys
7505 used with a cad cell flame sensor, operates the oil
burner and oil valve. The primary controls fuel oil,
senses flame, controls ignition spark and is designed to
notify a remote alarm circuit before going into lockout
when equipped with a flame monitoring system.
The following is a detailed explanation of each control
included in the Beckett AFG Oil Burner, how each
operates, how to set up the burner, and how to
troubleshoot problems should they occur.
BECKETT “CLEANCUT” OIL PUMP
This oil pump is equipped with an oil solenoid valve
installed in the pump housing. This feature provides
quick cutoffs resulting in reduction in smoke after the
burner shuts down. This is a time proven pump design
and is capable of both one and two pipe systems. All
installation and set up instructions are outlined in the
“Oil Pump Specification” section of the installation
instructions manual.
This primary control possesses the latest technology, is
a very simple control to operate and provides additional
troubleshooting features to ease service and reduce
down time. The operational guide for the Genisys 7505
primary control is provided following on Page 14.
Manual 2100-540D
Page 13 of 45
Page 14

BECKETT GENISYS
MODEL 7505
MIS-2491
PRIMARY OPERATIONAL GUIDE
BECKETT GENISYS 7505
Sequence of Operation
BURNER STATES
1. Standby: The burner is idle, waiting for a call
for heat.
2. Valve-On Delay (Prepurge): The igniter and
motor are on while the control delays turning on
the oil solenoid valve for the programmed time.
3. Trial for Ignition: The fuel valve is opened. A
flame should be established within the factory
set trial for ignition time (“lockout time”).
4. Lockout: The control has shut the burner down
for one of the following safety reasons:
• The trial for ignition (lockout) time expires
without flame being established.
• The cad cell detects flame during Valve-On
Delay.
• The Recycle mode 30-second time budget
expires (see “Recycle” section for complete
explanation of recycle time budget).
If the control locks out three times without
completing a successful call for heat, the control
enters Restricted (Hard) Lockout, and must be reset
by a technician. Hold the reset button for 15
seconds until the red light shuts off to reset from
Restricted Lockout.
5. Ignition Carryover: Once flame is established,
the igniter remains on for 10 additional seconds
to ensure flame stability.
6. Run: The flame is sustained until the call for
heat is satisfied. The burner is then sent to
Motor-Off Delay (Postpurge), if applicable, or it
is shut down and sent to Standby.
7. Recycle: If the flame is lost while the burner is
firing, the control shuts down the burner, enters
a 60-second recycle delay and then repeats the
ignition sequence. The control will continue to
Recycle each time the flame is lost until the
accumulated oil-flow-without-flame time
reaches 30 seconds, at which point the control
will go into lockout. This feature prevents
excessive accumulation of oil in the appliance
firing chamber.
8. Motor-Off Delay: If applicable, the fuel valve is
closed and the control delays turning the motor
off for the set motor-off delay time before the
control returns to standby.
9. Pump Prime: The igniter and motor are on with
the oil valve open for up to 4 minutes. During
Pump Prime mode, the cad cell is disregarded,
allowing the technician to prime the pump
without having to jumper the cad cell.
RESET BUTTON OPERATION
• Table A explains what action the control
will take when the reset button is pressed for
different lengths of time during the various
burner operating states.
Manual 2100-540D
Page 14 of 45
Page 15

TABLE A
RESET BUTTON OPERATION
ehtnisirenrubehtfI
:etatswoleb
kcilCnottuB
)dnoces1<sserp(
tuokcoLtuokcoLtfoSmorfteseR tuokcoL)draH(detcirtseRmorfteseR
,yaleDno-evlaV
,noitingIroflairT
revoyrraCnoitingI
)ffotuhssiretingi(nuR
ybdnatS,yaleDffO-rotoMnoitcaoN
emirPpmuPnoitcaoNybdnatSotnruterdnaedomemirPpmuPtixE
emirPpmuPotoG
)woleBees(
otsehsalfDELwolleY
.ecnatsiserllecdacetacidni
ecnatsiseRlleCdaC"eeS
foelbatrof"rotacidnI
.seulavecnatsiser
dloHnottuB
)dnoces1>sserp(
:renruBehtelbasiD
,gninnursirenrubehtemitynA
nottubteserehtdlohdnasserp
.renrubehtelbasidot
saffoniamerlliwrenrubehT
.dlehsinottubehtsagnol
TABLE B
STATUS LIGHTS
:lliwnottubteseRehtgnihsuP
dloHnottuB
)sdnoces+51sserp(
:gnimirPpmuPselbanE
rofdlehneebsahnottubteserehtretfA
ebnehtnacnottubeht,sdnoces51
ecneuqesnoitingitxenehtgniruddeppat
.edomemirPpmuPretneot
DEL
roloC
ylsuounitnoCnOgnihsalF
deRtuokcoL)drah(detcirtseRtuokcoLtfoS
neerG)thgilyartsroemalfebdluoC(detceteDemalFelcyceR
wolleY
edomemirPpmuPnisilortnoC ro
sdnoces+51rofdlehyltnerrucnottubteseR
"rotacidnIecnatsiseRlleCdaC"eeS.ecnatsiserlleCdaC
.seulavecnatsiserfoelbatrofnoitces
Manual 2100-540D
Page 15 of 45
Page 16

PRIMING THE PUMP
WARNING
Hot Gas Puff-Back & Heavy Smoke Hazard
Failure to bleed the pump properly could
result in unstable combustion, hot gas puffback and heavy smoke.
• Do not allow oil to spray into a hot combustion
chamber while bleeding air from the pump.
• Install a gauge in the nozzle discharge port
tubing or fully open the pump bleed valve to
prevent oil spray from accumulating in the
combustion chamber during the air bleed
procedure.
• Ensure that all bubbles and froth are purged
from the oil supply system before tightening the
pump air bleed valve.
5. At burner start up, tap the reset button within
the first 10 seconds of the ignition cycle. This
will transition the control to a dedicated Pump
Prime mode, during which the motor, igniter
and valve are powered for four minutes. The
yellow LED will be on.
6. Bleed the pump until all froth and bubbles are
purged. If desired, hold the reset button for at
least one second to exit Pump Prime mode and
return to Standby.
7. At the end of 4 minutes, the yellow LED will
turn off and the control will automatically return
to standby mode.
8. If prime is not established during the four
minute pump prime mode, return to step 5 to
re-enter Pump Prime mode. Repeat steps 5
through 7 until the pump is fully primed and the
oil is free of bubbles.
9. Terminate the call for heat, and the control will
resume normal operation.
1. Prepare the burner for priming by fully opening
the pump bleed port and attaching a clear
plastic hose over the bleed port fitting. Use a
suitable container to collect purged oil.
2. Initiate a call for heat.
3. After the burner starts, press and hold the reset
button for 15 seconds until the yellow LED
turns on. This indicates that the button has
been held long enough.
4. Release the reset button. The yellow LED will
turn off and the burner will start up again.
CAD CELL RESISTANCE INDICATOR
• During the burner Run state, tap the reset button
(less than 1 second) to check the cad cell
resistance range. The yellow LED will flash 1 to 4
times depending on the amount of light detected
by the cad cell. See chart below:
sehsalFDELwolleYegnaRnoitceteDemalF
1)smho004-0(lamroN
2)smho008-004(lamroN
3)smho0061-008(lamroN
4)tuokcoL-smho0061(detimiL
Manual 2100-540D
Page 16 of 45
Page 17

RESETTING FROM RESTRICTED LOCKOUT
• If the control locks out three times without a
satisfied call for heat, or due to other significant
events such as a relay contact weld, the Lockout
becomes restricted in order to prevent repetitious
resetting by the homeowner.
CAUTION
Before resetting the control from restricted
lockout state, troubleshoot the heating
system for the root cause(s) of lockout and
make necessary repairs or adjustment to
ensure a safe start condition.
• Then, to reset, hold the button down for 15
seconds until the red light turns off and the yellow
LED turns on. Observe at least one full control
sequence of operation from startup to shutdown.
Simulate a flame failure lockout by following the
procedure (within this manual). If the operation is
erratic, or not to specifications, then replace the
control. Always verify the control functions
according to all specifications before leaving the
installation site.
DISABLE FUNCTION
• Any time the burner is running, press and hold the
reset button to disable the burner. The burner will
remain off as long as the button is held.
Electronic Blower Control Interface
This furnace is equipped with an Electronic Blower
Control Interface, which through its set points
determines what the blower does with the 24 VAC
inputs from the home thermostat.
There are dip switches that control the ECM motor for:
1. Heating Airflow
2. Cooling Airflow
3. Heating On/Off Delay
4. A
+10% adjustment for heating airflows.
(See to Figure 7 for the location of these switches.)
The Electronic Blower Control Interface also
performs the additional functions of having a
diagnostic light, which indicates a safety limit is
open, and also has a relay which isolates the T-T
signal from the oil primary control.
Required 24 VAC inputs for various functions:
Continuous Blower: “R” to “G”
Heating with Oil Furnace: “R” to “W”
Cooling Single Stage: “R” to “G”, “Y1” & “Y2”
Cooling Two-Stage, Part Load: “R” to “G” & “Y1”
Cooling Two-Stage, Full Load: “R” to “G”, “Y1” & “Y2”
Heat Pump Single Stage: “R” to “G”, “Y1”, “Y2” & “O”
Heat Pump Two-Stage, Part Load: “R” to “G”, “Y1” & “O”
Heat Pump Two-Stage, Full Load: “R” to “G”, “Y1”, “Y2” & “O”
Burner Option – Flame Quality Monitor
This control is trained to recognize and remember a
good flame based on initial burner set up. Control
then monitors the flame via the CAD cell signal for
deviation in the combustion characteristics of the
burner. If the control senses a deviation on the high
side or on the low side from the original set up
condition for three consecutive cycles, it will trigger
an alarm circuit which can be tied to an audible local
device to signal the home owner or into the home
security system. Upon being notified of the alarm,
the security agency will notify the dealer of choice
based upon information supplied by the home
owner. The system will also be capable of being
connected to a phone line that will contact the dealer
directly with the alarm. This alarm will typically
sound 3 to 5 days prior to the primary control going
into lockout giving the service agency a prior notice
before a sooting condition or other failure can occur
resulting in untold savings. This monitor system is
available through your local distributor under the
Honeywell Part #QS7100F.
Manual 2100-540D
Page 17 of 45
Page 18

FIGURE 7
ELECTRONIC BLOWER CONTROL
COOLING SPEED
TAP SELECT
SWITCHES
HEATING SPEED
TAP SELECT
SWITCHES
HEATING BLOWER
DELAY SELECT
SWITCHES
+/- ADJUSTMENT
TAP SELECT
SWITCHES
CFM BLINK LIGHT
(100 CFM/BLINK)
LINE VOLTAGE
"HOT"
LINE VOLTAGE
"NEUTRAL"
CONNECTION
HUMIDIFIER 120 VAC
LINE VOLTAGE OUTPUT
TERMINAL (ENERGIZES
WITH OIL BURNER MOTOR)
TRANSFORMER
24V SECONDARY
CONNECTIONS
3 AMP FUSE
LIMIT LIGHT
REMOVE FACTORY INSTALLED
JUMPER WIRE FOR 2-STAGE AIR
CONDITIONER OR HEAT PUMP
INPUT SIGNAL
LIGHTS
THERMOSTAT CONNECTIONS
MIS-2869
Manual 2100-540D
Page 18 of 45
Page 19

TABLE C
HEATING TAP SELECT SETTINGS BY MODEL
ledoMtupnIHPGretteLpaT1#hctiwS2#hctiwS
A24V580CF
A24V580HFBNOFFO5301
A24V580FLF56.0CFFONO039
A24V580RLF55.0DNONO097
A84V011HF
A84V011FLF
A84V011RLFDNONO0601
A06V011HF
A06V011FLF
A06V011RLFDNONO0601
A06V041RLF
57.0
00.1
58.0
00.1
58.0
52.1
01.1
A FFO FFO 5701
A FFO FFO 0821
BNOFFO5221
CFFONO0601
A FFO FFO 0821
BNOFFO5221
CFFONO0601
A FFO FFO 0681
BNOFFO0971
CFFONO5461
DNONO5461
TABLE D
COOLING TAP SELECT SETTINGS BY MODEL
MFCgnitaeH
).P.S.E"5.0-"0(
COLUMN A COLUMN B COLUMN C
HPG
ledoM
A24V580CF
A24V580HFBNOFFO3 0021058006
A24V580FLF56.0C FFONO5.20001527005
A24V580RLF55.0D NONO2 008575004
A84V011HF
A84V011FLF
A84V011RLFDNONO5.20001527005
A06V011HF
A06V011FLF
A06V011RLFDNONO3 0021058006
A06V041RLF
paT
tupnI
57.0
00.1
58.0
00.1
58.0
52.1
01.1
retteL1#hctiwS2#hctiwS
A FFO FFO 5.3 0041 0001 007
A FFO FFO 4 0061 0511 008
BNOFFO5.300410001007
CFFONO3 0021058006
A FFO FFO 5 0002 0541 0001
BNOFFO4 00610511008
CFFONO5.300410001007
A FFO FFO 5 0002 0541 0001
BNOFFO4 00610511008
CFFONO5.300410001007
DNONO3 0021058006
lanimoN
gnilooC
egannoT
gnilooC
MFCdaoLlluF
).P.S.E"5.0-"0(
gnilooC
MFCdaoLtraP
).P.S.E"5.0-"0(
MFC
Note: Part Load Airflow for 2-stage A/C or HP systems is achieved when removing the factory installed jumper
wire on the Electronic Blower Control Interface Board that is (installed) between the thermostat connection
screws “Y2” and “Y1” dependent upon the tap selected. This allows for 2-stage A/C or HP systems to be installed
with this product. (See Figure 7 or the Wiring Diagrams.)
ylnOrewolB
lanimreT"G"
For 1-stage compressor systems requiring lower airflow than shown in Column A, remove “Y1-Y2” jumper to
achieve Column B airflow delivery.
Manual 2100-540D
Page 19 of 45
Page 20

TABLE E
ADJUSTMENT TAP SELECTS
ledoMretteLpaT1#hctiwS2#hctiwSnoitcnuF
AFFOFFOegnahCoN
LLA
BNOFFOwolfriAgnitaeH%01+
CFFONOwolfriAgnitaeH%01-
DNONOegnahCoN
TABLE F
HEATING DELAY PROFILE TAPS
nuR-erP
paT
ledoM
LLA
retteL1#hctiwS2#hctiwS
AFFOFFO030060500328
BNOFFO0300605042001
CFFONO540 0210500388
DNONO0600 001081001
yaleDnO
sdnoceS
yaleDnO
MFC%
emiT
sdnoceS
nuR-erP
MFC%
yaleDffO
sdnoceS
yaleDffO
MFC%
Manual 2100-540D
Page 20 of 45
Page 21

,gnitaeHpmuP
taeHegatS-2
daoLlluF
2
,gnitaeHpmuP
taeHegatS-2
daoLtraP
2
egatSelgniS
pmuPtaeH
gnitaeH
1
pmuPtaeHegatS-2
,gnilooC
daoLlluF
2
,gnilooCpmuP
taeHegatS-2
daoLtraP
2
XXXXX
TROUBLESHOOTING GE ECM 2.3™ MOTORS
egatSelgniS
pmuPtaeH
gnilooC
1
,gnilooC
daoLlluF
egatS-2
2
,gnilooC
daoLtraP
egatS-2
2
gnilooC
elgniS
egatS
1
ecanruF
liO
suounitnoC
rewolB
FFO
tatsomrehT
noitarepO
foedoM
.dezigrenEsyawlA;langiS)nommoC("C"CAV42
— "G" "W" "1Y","G" "1Y","G" "2Y","1Y","G" "O","1Y","G" "O","1Y","G" "O","2Y","1Y","G" "O","1Y","G" "O","1Y","G" "O","2Y","1Y","G"
tupnICAV42
slangiS
1#niP
.dezigrenEsyawlA;langiS)nommoC("C"CAV42
2#niPX
3#niP
.)egannoT(sgnitteSnopUdesaBslangiSevaW-flaHdeiraV;selbaTtceleSpaTlooC
.sgnitteSnopUdesaBslangiSevaW-flaHdeiraV;seliforPpaTtnemtsujdA
.sgnitteSnopUdesaBslangiSevaW-flaHdeiraV;seliforPpaTyaleD
.MFCotnoitalerroCtceriDnituptuO"-"stloVCD
XXXXXXXXX
4#niP
5#niP
6#niP
7#niP
8#niP
9#niP X
.egannoTnopUdesaBslangiSevaW-flaHdeiraV;selbaTtceleSpaTtaeH
XXXXX
.noitcnuFrofdemmargorPyltnerruCtoN;esUerutuF
.dezigrenEsyawlA;langiS"R"toHCAV42
.sruccOpirTtimiLnehWdezigrenE
11#niP
01#niP
21#niP
31#niP
41#niPX
.MFCotnoitalerroCtceriDnituptuO"+"stloVCD
51#niP X XXXXXXXXX
61#niP
16-PIN BLOWER TAP SELECT CONTROLS - OUTPUTS BASED UPON MODE
1 .ecafretnIrewolBdetargetnInodellatsnieriwrepmuj"2Y"ot"1Y"seriuqeR
2 .ecafretnIlortnoCrewolBcinortcelEnoeriwrepmuj"2Y"ot"1Y"dellatsnIyrotcaFfolavomerseriuqeR
Manual 2100-540D
Page 21 of 45
Page 22

TROUBLESHOOTING GE ECM 2.3
™
MOTORS
CAUTION:
Disconnect power from unit before removing or replacing
connectors, or servicing motor. To avoid electric shock
from the motor’s capacitors, disconnect power and wait at
least 5 minutes before opening motor.
Symptom Cause/Procedure
Motor rocks slightly • This is normal start-up for ECM
when starting
Motor won’t start • Check blower turns by hand
• No movement
• Motor rocks, • Check for loose or compliant motor mount
but won’t start
Motor oscillates up • It is normal for motor to oscillate with no
load & down while being on shaft
tested off of blower
Motor starts, but
runs erratically
• Varies up and down • Check line voltage for variation or “sag”
or intermittent • Check low voltage connections
• “Hunts” or “puffs” at • Does removing panel or filter reduce
high CFM (speed) “puffing”?
• Stays at low CFM • Check low voltage (Thermostat) wires and
despite system call connections
for cool or heat CFM • Verify fan is not in delay mode; wait until
• Stays at high CFM • “R” missing/not connected at motor
• Blower won’t shut off •
Excessive noise • Determine if it’s air noise, cabinet, duct or
• Air noise • High static creating high blower speed?
• Check power at motor
• Check low voltage (24 Vac R to C) at motor
• Check low voltage connections
(G, Y, W, R, C) at motor
• Check for unseated pins in connectors on
motor harness
• Test with a temporary jumper between R - G
• Check motor for tight shaft
• Perform motor/control replacement check
• Perform Moisture Check
• Make sure blower wheel is tight on shaft
• Perform motor/control replacement check
(G, Y, W, R, C) at motor, unseated pins in
motor harness connectors
• Check “Bk” for erratic CFM command (in
variable-speed applications)
• Check out system controls, Thermostat
• Perform Moisture Check
- Reduce restriction
- Reduce max airflow
delay complete
• “R” missing/not connected at motor
• Perform motor/control replacement check
• Is fan in delay mode? - wait until delay time
complete
• Perform motor/control replacement check
Current leakage from controls into G, Y or W?
Check for Triac switched thermostat or solid state relay
motor noise; interview customer, if necessary
- Is airflow set properly?
- Does removing filter cause blower to slow
down? Check filter
- Use low-pressure drop filter
- Check/correct duct restrictions
Symptom Cause/Procedure
• Noisy blower or cabinet • Check for loose blower housing, panels, etc.
• “Hunts” or “puffs” at • Does removing panel or filter reduce
high CFM (speed)
Evidence of Moisture
• Motor failure or • Replace motor and
malfunction has occurred
and moisture is present
• Evidence of moisture • Perform Moisture Check
present inside air mover
• High static creating high blower speed?
- Check for air whistling through seams in
ducts, cabinets or panels
- Check for cabinet/duct deformation
“puffing”?
- Reduce restriction
- Reduce max. airflow
Perform Moisture Check
Do Don’t
• Check out motor, controls, • Automatically assume the motor is bad.
wiring and connections
thoroughly before replacing
motor
• Orient connectors down so • Locate connectors above 7 and 4 o’clock
water can’t get in positions
- Install “drip loops”
• Use authorized motor and • Replace one motor or control model # with
model #’s for replacement another (unless an authorized replacement)
• Keep static pressure to a • Use high pressure drop filters some have
minimum: H20 drop!
- Recommend high • Use restricted returns
efficiency, low static filters
- Recommend keeping filters
clean.
- Design ductwork for min.
static, max. comfort
- Look for and recommend
ductwork improvement,
where necessary
• Size the equipment wisely • Oversize system, then compensate with low
• Check orientation before • Plug in power connector backwards
inserting motor connectors • Force plugs
airflow
Moisture Check
• Connectors are oriented “down” (or as recommended by equipment
manufacturer)
• Arrange harness with “drip loop” under motor
• Is condensate drain plugged?
• Check for low airflow (too much latent capacity)
• Check for undercharged condition
• Check and plug leaks in return ducts, cabinet
Comfort Check
• Check proper airflow settings
• Low static pressure for lowest noise
• Set low continuous-fan CFM
• Use humidistat and 2-speed cooling units
• Use zoning controls designed for ECM that regulate CFM
• Thermostat in bad location?
½"
Manual 2100-540D
Page 22 of 45
Page 23

TROUBLESHOOTING GE ECM
™
MOTORS CONT’D.
Replacing ECM Control Module
To replace the control module for the GE variable-speed indoor blower
motor you need to take the following steps:
1. You MUST have the correct replacement module. The controls are
factory programmed for specific operating modes. Even though they look
alike, different modules may have completely different functionality.
USING THE WRONG CONTROL MODULE VOIDS ALL PRODUCT
WARRANTIES AND MAY PRODUCE UNEXPECTED RESULTS.
2. Begin by removing AC power from the unit being serviced. DO NOT
WORK ON THE MOTOR WITH AC POWER APPLIED. To avoid
electric shock from the motor’s capacitors, disconnect power and wait at
least 5 minutes before opening motor.
3. It is not necessary to remove the motor from the blower assembly, nor
the blower assembly from the unit. Unplug the two cable connectors to the
motor control assembly. There are latches on each connector. DO NOT
PULL ON THE WIRES. The plugs remove easily when properly
released.
4. Locate the screws that retain to t
sheet metal of the unit and remove them. Remove two (2) nuts that
retain the control to the bracket and then remove two (2) nuts that
retain sheet metal motor control end plate. Refer to Figure 8.
5. Disconnect the three (3) wires interior of the motor control by
using your thumb and forefinger squeezing the latch tab and the
opposite side of the connector plug, gently pulling the connector. DO
NOT PULL ON THE WIRES, GRIP THE PLUG ONLY. Refer to
Figure 8.
6. The control module is now completely detached from the motor.
Verify with a standard ohmmeter that the resistance from each motor
lead (in the motor plug just removed) to the motor shell is >100K
ohms. Refer to Figure 9. (Measure to unpainted motor end plate.) If
any motor lead fails this test, do not proceed to install the control
module. THE MOTOR IS DEFECTIVE AND MUST BE
REPLACED. Installing the new control module will cause it to fail
also.
he motor control bracket to the
7. Verify that the replacement control is correct for your
application. Refer to the manufacturer's authorized replacement list.
USING THE WRONG CONTROL WILL RESULT IN
IMPROPER OR NO BLOWER OPERATION. Orient the control
module so that the 3-wire motor plug can be inserted into the socket in
the control. Carefully insert the plug and press it into the socket until
it latches. A SLIGHT CLICK WILL BE HEARD WHEN
PROPERLY INSERTED.
8. Reverse the steps #5, 4, 3 to reconnect the motor control to the
motor wires, securing the motor control cover plate, mounting the
control to the bracket, and mounting the motor control bracket back
into the unit. MAKE SURE THE ORIENTATION YOU SELECT
FOR REPLACING THE CONTROL ASSURES THE
CONTROL'S CABLE CONNECTORS WILL BE LOCATED
DOWNWARD IN THE APPLICATION SO THAT WATER
CANNOT RUN DOWN THE CABLES AND INTO THE
CONTROL. DO NOT OVERTIGHTEN THE BOLTS.
9. Plug the 16-pin control plug into the motor. The plug is keyed.
Make sure the connector is properly seated and latched.
10. Plug the 5-pin power connector into the motor. Even though
the plug is keyed, OBSERVE THE PROPER ORIENTATION. DO
NOT FORCE THE CONNECTOR. It plugs in very easily when
properly oriented. REVERSING THIS PLUG WILL CAUSE
IMMEDIATE FAILURE OF THE CONTROL MODULE.
11.
Final installation check. Make sure the motor is installed as follows:
a. Motor connectors should be oriented between the 4 o’clock
and 8 o’clock positions when the control is positioned in its
final location and orientation.
b. Add a drip loop to the cables so that water cannot enter the
motor by draining down the cables. Refer to Figure 10.
The installation is now complete. Reapply the AC power to the
HVAC equipment and verify that the new motor control module is
working properly. Follow the manufacturer's procedures for
disposition of the old control module.
Only remove
Hex Head Bolts
ECM 2.0
Note:
Use the shorter
bolts and
alignment pin
supplied when
replacing an
ECM 2.0
control.
Figure 8
Figure 3
Control Disassembly
Push until
Latch Seats
Over Ramp
ECM
2.3/2.5
Hex-head Screws
From Motor
Circuit
Board
Motor
Motor Conne c tor
(3-pin)
Control Connector
(16-pin)
Power Connector
(5-pin)
Motor Connector
(3-pin)
Back of
Control
Figure 9
Figure 4
Winding Test
Motor OK when
R > 100k ohm
Figure 10
Figure 5
Drip Loop
Connector Orientation
Between 4 and 8 o'clock
Drip Loop
Manual 2100-540D
Page 23 of 45
Page 24

TABLE 4
FURNACE DATA
ledoM
rebmuN
A24V580CF
A24V580HF
A84V011HF
A06V011HF
A24V580FLF
A84V011FLF
A06V011FLF
A24V580RLF
A84V011RLF
A06V011RLF
A06V041RLF
renruB
epyT
GFAwolfretnuoC
GFAyoB-iH
XNyoB-iH
XNyoB-iH
GFAyoB-oL
XNyoB-oL
XNyoB-oL
GFAyoB-oL
GFAyoB-oL
GFAyoB-oL
GFAyoB-oL
ecanruF
epyT
eziSepyTerusserPpmuP
57.0 *
56.0000,19000,67
55.0000,77000,46
57.0 *
56.0000,19000,67
55.0000,77000,46
58.0 *
57.0000,911000,99
58.0 *
57.0000,911000,99
57.0 *
56.0000,19000,67
55.0000,77000,46
58.0 *
57.0000,911000,99
58.0 *
57.0000,911000,99
57.0 *
56.0000,19000,67
55.0000,77000,46
00.1 *
58.0000,911000,99
00.1 *
58.0000,911000,99
52.1 *
01.1000,451000,721
elzzoN
wolloH°07GISP001
wolloH°07GISP001
diloS°06GISP051
diloS°06GISP051
wolloH°07GISP001
diloS°06GISP051
diloS°06GISP051
wolloH°07GISP001
wolloH°07GISP001
wolloH°07GISP001
wolloH°07GISP001
gnitaeH
tupnI
HUTB
000,501 000,78
000,501 000,78
000,041 000,611
000,041 000,611
000,501 000,78
000,041 000,611
000,041 000,611
000,501 000,78
000,041 000,611
000,041 000,611
000,571 000,541
gnitaeH
tuptuO
HUTB
* Factory Installed Nozzle. Also shown are optional approved nozzle size/type.
BURNER SETUP AND ADJUSTMENT
PROCEDURES
All oil burner installations should be performed by a
qualified installer in accordance with regulations of the
National Fire Protection Standard for Oil-Burning
Equipment, NFPA31 -- latest edition, and in complete
compliance with all local codes and authorities having
jurisdiction. A qualified installer is an individual or
agency who is responsible for the installation and
adjustments of the heating equipment and who is
properly licensed and experienced to install oil-burning
equipment in accordance with all codes and ordinances.
The proper installation and adjustment of any oil burner
requires technical knowledge and the use of combustion
test instruments. The following procedure must be
followed to correctly adjust the burner to match the
specific characteristics of the installation.
Manual 2100-540D
Page 24 of 45
IMPORTANT
Always use combustion test instruments when
making burner adjustments and draft gauge
when setting the barometric damper. It is
virtually impossible to make accurate and
reliable adjustments using the “eyeball” method.
Check all oil lines and connections for leaks.
Connect pressure gauge by removing bleed fitting and
screwing in pressure gauge. See Figure 12.
Page 25

1. PREPARATION STEPS
A. Calibrate and Check Operation of
Measuring Equipment Follow
manufacturer’s recommended procedures for
calibration and equipment check out.
B. Prepare Heating Unit for Testing Drill two
1/4 inch holes in the flue between the heating
plant and the barometric draft regulator. If
space permits, the holes should be located in a
straight section of the flue, at least two flue
diameters from the elbow in the flue pipe and
at least one diameter from the draft regulator.
The purpose of the two holes in the flue pipe is
to speed up testing and reduce instrument
handling.
C. Clean and Seal Heating Plant Make sure the
burner blast tube, fan housing, and blower
wheel are clear of dirt and lint. Seal any air
leaks into the combustion chamber.
D. Nozzle Inspection Annual replacement of
nozzle is recommended. The nozzle size
should match the design load. DO NOT
OVERSIZE. (Determination of oversizing can
be determined prior to your adjustment. If the
firing rate should be reduced refer to Table 4.)
Short cycles and low percent “on” time result
in higher overall pollutant emissions and lower
thermal efficiency. An in-line oil filter will
reduce service problems due to nozzle
clogging.
The filter should be located as close as possible
to the oil burner. Care should be taken to
prevent air leakage in the oil suction line. Use
continuous runs of copper tubing and use
minimum number of joints and fittings.
Always use flare fittings.
E. Adjustment of Electrodes Adjust ignition
electrodes as specified in Figures 13A & 13B.
F. Operate Burner Operate burner, adjust air
setting for good flame by visual observation,
and run for at least 10 minutes or until
operation has stabilized.
G. Check Burner Pressure Bleed air from
pump and nozzle piping. Check pump
pressure and adjust to nameplate pump
pressure, if necessary.
2. COMBUSTION ADJUSTMENT STEPS
H. Set Draft Check the draft reading over the
fire with a draft gauge through a hole in the
inspection door. The hole is above the flame
level. Adjust the barometric draft regulator on
the flue to give the over fire of -.02" W.C.
I. Check Smoke Readings After burner has
been operating 5 or 10 minutes, take a smoke
measurement in the flue, following the smoke
tester instructions. Oily or yellow smoke spots
on the filter paper are usually a sign of
unburned fuel, indicating very poor combustion
(and likely high emissions of carbon monoxide
and unburned hydrocarbons). This condition
can sometimes be caused by too much air, or by
other factors. If this condition cannot be
corrected, major renovation or even burner
replacement may be necessary.
J. Develop Smoke - CO2 Curve Record
measurements of smoke and CO
Then establish the smoke - CO
from the flue.
2
curve by taking
2
readings over a range of air settings, as shown
in Figure 11.
To do this, start with the air gate set at nearly
full open and then take smoke and CO
readings at progressively lower air settings, as
necessary to visualize the general shape of the
curve. (The CO2 readings will increase as the
air setting is decreased, unless combustion is
incomplete.) Do not set the air gate to give a
smoke reading above No. 4 or No. 5. Plot the
points on graph paper, as in Figure 11. Usually
3 or 4 readings are enough to establish the
curve.
In adjusting each air setting, it is helpful to note
the various positions of air gate at which
measurements are made so that the final setting
can be located quickly.
K. Adjust Air Setting Examine the smoke - CO
plot and, keeping in mind the curve of Figure 11,
note the location of the “knee” where the smoke
number begins to rise sharply. Noting the air
gate position marks, adjust the air setting to a
CO2 level 1/2 to 1 percent lower than the CO
level at the “knee”. (This provides a tolerance
against possible shifts in the setting over a
period of time.) Do not increase the air setting
any more than necessary on the lower portion
of the curve below the “knee”.
The characteristic curve for some burners may
not yield a distinct “knee” in the curve. In such
cases, the setting should be made near the
minimum smoke, (using judgement).
Lock the air adjustment and repeat draft,
CO2 and smoke measurements to make sure
the setting has not shifted.
3. COMBUSTION DIAGNOSIS
L. Check Performance A well-matched and
well-tuned burner should be capable of
operation with smoke not greater than No. 2
and at a CO2 level not less than 10%.
If this cannot be reached, check the following:
2
2
2
Manual 2100-540D
Page 25 of 45
Page 26

1. Air leaks into the combustion chamber or
heat exchanger can dilute the combustion
gases and prevent normal CO
readings.
2
Such leaks should be sealed with furnace
cement or other high-temperature sealant.
To check for dilution by leakage, measure
the CO2 at as high a point as possible over
the fire, using a stainless steel tube
inserted through the fire door sample hole
(as described earlier for overfire draft
measurements), and compare this with the
CO2 measured in the flue. A difference of
more than 1 percent CO2 between the flue
and overfire reading usually indicates air
entry through leaks that have not been
properly sealed.
Seal between the probe and inspection door
sample hole during test. The inspection
door hole should be sealed when not being
used to avoid leakage of air through it.
(See Step H.)
2. If the CO2 level of 10% cannot be reached
without exceeding No. 2 smoke, poor
mixing of air and fuel is likely.
It may be necessary to replace the
combustion head or try different settings.
4. FINAL CHECKS
M. Measure Stack Temperature Operating the
unit at an excessive firing rate will generate
more heat than the heat exchanger can utilize
and result in unnecessary heat loss up the
chimney. Other causes of excessive heat loss
are badlysooted heat exchanger surfaces and
excessive draft. The temperature of the flue gas
provides an indication of these heat losses.
SHORT FORM ADJUSTMENT
PROCEDURE
Some burner service organizations may wish to
perform a shorter procedure for the adjustment of oil
burners. The following is an example of such a short
form prepared by the National Association of Oil Heat
Service Managers.
1. SERVICE AND CLEAN BURNER
Follow company procedure to complete the
cleaning and servicing. Operate burner for ten
minutes while tools are gathered and are cleaned.
2. CHECK DRAFT
Set draft regulator, if necessary. Regulator should
be adjusted to achieve a -.02" W.C. over fire
condition. The more restricted and lengthy the
flue, the higher the draft necessary to obtain the
accepted over fire conditions.
3. SMOKE TEST
Follow the instructions of the manufacturer of the
smoke tester and take a smoke sample. Adjust the
air to obtain a preliminary reading of about No. 3
spot. Then readjust the air to obtain the lowest
possible reading, but do not open the air adjustment
more than absolutely necessary to obtain a trace or
No. 0 spot.
4. CO2 TEST
Check CO2 levels. This level should be between
10% and 12%.
Measure flue temperature by subtracting the
room air temperature from the thermometer
reading. Excessive stack loss is indicated if the
net stack temperature during steady operation
exceeds 600°F.
N.
Check Ignition Check operation over repeated
cycles to ensure prompt ignition on starting.
O. Check Pump Cutoff Slow pump cutoff at the
end of a firing cycle can cause smoke and other
pollutant emissions. Check for prompt pump
cutoff by observing flame or by testing smoke
at shutdown. If poor cutoff is observed, make
sure air is purged from the pump and nozzle
line. Air trapped in the pump or nozzle line
will expand when heated, thus causing oil to
drip into the combustion chamber after
shutdown. If poor cutoff persists, repair or
replace pump. Also make sure the pump
solenoid is working - if not replace.
Manual 2100-540D
Page 26 of 45
Page 27

TYPICAL SMOKE – CO
FIGURE 11
CHART WITH ADJUSTMENT RANGE
2
High
8
6
Normal
adjustment
4
range
Tolerance
Bacharach Smoke Number
to "knee"
"Best" air
2
setting
Plotted point
0
6
8
Air Settings
Plotted point
"Knee"
10
Percent CO in Flue Gas
2
12
CO Curve
from plotted
points
Plotted point
Low
2
14
8
6
4
Bacharach Smoke Number
2
0
6
810
12
Percent CO in Flue Gas
2
Technician's
plotting area
14
MIS-1827
Manual 2100-540D
Page 27 of 45
Page 28

FIGURE 12
PRESSURE GAUGE CONNECTION TO BLEED PORT
Remove Bleed
Port to attach
pressure guage.
Manual 2100-540D
Page 28 of 45
Pressure Gauge
MIS-1660
Page 29

TABLE 5 — CORRELATION OF PERCENT OF CO2, O2 AND RESERVE AIR
edixoiDnobraCnegyxO).xorppA(riAevreseR
4.51
0.51
5.41
0.41
5.31
0.31
5.21
0.21
5.11
0.11
5.01
0.01
0.0
6.0
2.1
0.2
6.2
3.3
0.4
6.4
3.5
0.6
7.6
4.7
0.0
0.3
0.6
0.01
0.51
0.02
0.52
0.03
0.53
0.04
0.54
0.05
TABLE 6 — NO. 2 FUEL OIL EFFICIENCY CHART (NET STACK TEMP. DEGREES F)
2
O%
16.984.883.782.681.580.489.287.186.085.974.873.772.677.41
24.982.880.789.587.486.384.282.181.089.877.776.674.570.41
32.989.787.685.583.481.389.187.084.972.870.778.576.472.31
49.887.784.681.588.386.283.180.087.875.772.679.476.375.21
57.883.780.686.483.380.286.083.979.776.673.579.376.277.11
64.880.785.581.487.283.189.975.870.776.572.478.274.170.11
70.885.680.585.380.285.080.975.770.675.470.375.170.073.01
002052003053004054005055006056007057008O%
2
TABLE 7 — RECOMMENDED START-UP SETTINGS
ledoM
rebmuN
A24V580CF
A24V580HF
A84V011HF
A06V011HF
A24V580FLF
A84V011FLF
A06V011FLF
A24V580RLF
A84V011RLF
A06V011RLF
A06V041RLF
elytSrenruB
.oNtraP
eziSepyTerusserPpmuP
57.0 *
040-0209/GFA
56.005—
55.005—
57.0 *
040-0209/GFA
56.005—
55.005—
58.0 *
440-0209/XN
57.0——3
58.0 *
440-0209/XN
57.0——3
57.0 *
040-0209/GFA
56.005—
55.005—
58.0 *
440-0209/XN
57.0——3
58.0 *
440-0209/XN
57.0——3
57.0 *
140-0209/GFA
56.005—
55.005—
00.1 *
240-0209/GFA
58.008—
00.1 *
240-0209/GFA
58.008—
52.1 *
340-0209/GFA
01.106—
elzzoN
wolloH°07GISP001
wolloH°07GISP001
diloS°06GISP051
diloS°06GISP051
wolloH°07GISP001
diloS°06GISP051
diloS°06GISP051
wolloH°07GISP001
wolloH°07GISP001
wolloH°07GISP001
wolloH°07GISP001
0 6 —
0 6 —
— — 57.3
— — 57.3
0 6 —
— — 57.3
— — 57.3
0 6 —
2 01 —
2 01 —
0 8 —
dnaBriA
gnitteS
riA
rettuhS
gnitteS
riA
tnemtsujdA
etalP
gnitteS
* Factory Installed Nozzle. Also shown are optional approved nozzle size/type.
Manual 2100-540D
Page 29 of 45
Page 30

SPACING OF ELECTRODES
The electrodes should be spaced 5/32" apart. They
should extend 1/16" beyond the end and 5/16" above the
center of the nozzle tip as shown in Figures 13A & 13B.
GUN ASSEMBLY ADJUSTMENT
The gun assembly can be adjusted in the slot inside of
fan housing by loosening screw holding slot cover in
position. Nozzle tip should ordinarily be located 1-1/8"
behind the front face of the cone.
REMOVING GUN ASSEMBLY
Disconnect the oil line at the fan housing and remove
lock nuts on copper tube fitting. Loosen igniter hold
down clamps, then swing igniter up and backward. Gun
assembly can now be removed through this opening.
FIGURE 13A
ELECTRODE ADJUSTMENTS — AFG BURNERS
COMBUSTION AIR REQUIREMENTS
This furnace must be installed in a location where a
sufficient supply of combustion air is available for the
complete combustion of the fuel oil. Keep in mind that a
certain amount of excess air is required as well to ensure
complete combustion of the fuel oil.
When structures are constructed too tightly to supply
sufficient combustion air, air from outside the structure
is required to be brought in directly to the furnace. This
furnace has been conveniently designed to accept a
combustion air boot which is attached directly to the
outdoors by means of a 4" pipe. This pipe can be rigid or
flexible, but it is recommended that a metallic material
be used. Refer to Figure 14. The air boot used for this
design is a Field Controls model number CAS-2B-90E
that can be purchased through your local distributor.
Follow all installation procedures as specified in the
instructions packaged with the air boot kit.
NOTE - This accessory is not currently available for
Bard Models: FH110V48A, FH110V60A,
FLF110V48A and FLF110V60A with NX burners.
ELECTRODE ADJUSTMENTS — NX BURNERS
Manual 2100-540D
Page 30 of 45
FIGURE 13B
Page 31

FIGURE 14
KNOCKOUT
AIR BOOT
FOR OIL LINE
BOOT AND SECURE
INSERT OUTER AIR
USE THIS
ASSEMBLE INNER
FLANGE TO UNIT
FOR AIR BOOT.
ACCORDING TO MANUAL
IN LEFT SIDE
REMOVE KNOCKOUT
MAKE ALL SETTINGS
REMOVE PUMP TO
INTAKE
AIR
TUBE
MIS-1833
AFG BURNER
COMBUSTION
AIR BOOT
ASSEMBLY
AFG
BURNER
ASSEMBLY
COMBUSTION AIR BOOT ASSEMBLY
Note: This accessory is not currently available for Bard Models:
FH110V48A, FH110V60A, FLF110V48A, FLF110V60A with NX Burners
Manual 2100-540D
Page 31 of 45
Page 32

APPLIANCES LOCATED IN CONFINED
SPACES
In unconfined spaces in buildings, infiltration may be
adequate to provide air for combustion, ventilation, and
dilution of flue gases. However, in buildings of
unusually tight construction, additional air shall be
provided using the method described under “All Air
From Outdoors” in Figure 16.
An unconfined space (such as an open basement) must
have a minimum volume of 50 cubic feet per 1,000
BTUH of total of all appliances in area. Adjoining
rooms may be counted as one area only if there are not
doors between the rooms.
Shown in Table 8 are the required minimum areas in
square feet to qualify as an unconfined space for
various total BTUH input ratings. The table is based
on a room(s) with 8 foot ceiling heights.
If the unconfined space is within a building having
insufficient air because of tight construction, the air for
combustion and ventilation shall be obtained from
outdoors or from spaces freely communicating with the
outdoors. Under these conditions a permanent opening
or openings have a total free area of not less than one
square inch per 5,000 BTU per hour (28 square inches
per hour ) of total input rating of all appliances shall be
provided. For combustion air options see “Combustion
Air Requirements”.
FIGURE 15
APPLIANCES LOCATED
IN CONFINED SPACES
ALL AIR FROM INSIDE THE BUILDING
TABLE 8
SQUARE FEET REQUIRED TO
QUALIFY AS UNCONFINED SPACE
latoT
HUTB
tupnI
000,06
000,08
000,58
000,501
000,511
000,021
000,041
000,541
000,061
000,002
573
005
135
656
917
057
578
609
0001
0521
ecapSdenifnocnU
nIaerAmuminiM
teeFerauqS
thgieHgnilieC'8
ALL AIR FROM INSIDE BUILDING
The confined space shall be provided with two
permanent openings, one near the top of the enclosure
and one near the bottom. Each opening shall have a
free area of not less than one square inch per 1,000
BTU per hour (140 square inches per gallon per hour)
of the total input rating of all appliances in the
enclosure freely communicating with interior areas
having in turn adequate infiltration from the outside.
(See Figure 15.) Also see Table 9 on the following
page for specific ventilation opening requirements for
the furnace only.
Manual 2100-540D
Page 32 of 45
The flow of combustion and ventilating air must not
be obstructed from reaching the furnace.
NOTE: Each opening shall have a free area of
not less than one square inch per 1,000
BTU per hour (140 square inches per
gallon per hour) of the total input rating
of all appliances in the enclosure.
Page 33

TABLE 9
MINIMUM VENTILATION OPENINGS
noitalitneV.niM
gninepO
ledoM
A24V580HF04261x8821
A84V011HF08281x9261
A06V011HF08281x9261
A24V580FLF09291x8251
A24V580RLF09291x8251
A84V011FLF
A06V011FLF
A84V011RLF
A06V011RLF
A06V041RLF06391x5.9081
A24V580CF04261x8821
hcnIerauqS
04391x9171
04391x9171
eziS.nI.qS
ALL VENTILATION AIR FROM OUTDOORS
A. The confined space shall be provided with two
dednemmoceR
gninepO
)deriuqeR2(
permanent openings, one in or near the top of the
enclosure and one in or near the bottom. The
openings shall communicate directly, or by means
of ducts with outdoors or to such spaces (crawl or
attic) that freely communicate with outdoors. (See
Figures 16, 17, & 18.)
B. When directly communicating with outdoors or by
means of vertical ducts, each opening shall have a
free area of not less than one square inch per 4,000
BTU per hour (35 square inches per gallon per
hour) of total input rating of all appliances in the
enclosures. If horizontal ducts are used, each
opening shall have a free area of not less than one
square inch per 2,000 BTU per hour (70 square
inches per gallon per hour) of total input of all
appliances in the enclosure.
FIGURE 16
APPLIANCES LOCATED IN CONFINED SPACES
ALL AIR FROM OUTDOORS
NOTE: Each air duct opening shall have a
free area of not less than one square
inch per 2,000 BTU per hour (70
square inches per gallon per hour) of
the total input rating of all appliances
in the enclosure.
Manual 2100-540D
Page 33 of 45
Page 34

FIGURE 17
APPLIANCES LOCATED IN CONFINED SPACES
ALL AIR FROM OUTDOORS THROUGH VENTILATED ATTIC
NOTE: The inlet and outlet air openings shall
each have a free area of not less than
one square inch per 4,000 BTU per hour
(35 square inches per gallon per hour)
of the total input rating of all
appliances in the enclosure.
FIGURE 18
APPLIANCES LOCATED IN CONFINED SPACES
ALL AIR FROM OUTDOORS
INLET AIR FROM VENTILATED CRAWL SPACE AND OUTLET AIR TO VENTILATED ATTIC
NOTE: The inlet and outlet air openings shall
each have a free area of not less than
one square inch per 4,000 BTU per hour
(35 square inches per gallon per hour)
of the total input rating of appliances in
the enclosure.
Manual 2100-540D
Page 34 of 45
Page 35

LOUVERS AND GRILLES
In calculating free area for ventilation and combustion
air requirements, consideration shall be given to the
blocking effect of louvers, grilles, or screens protecting
openings. Screens used shall not be smaller than 1/4
inch (6.3 mm) mesh and shall be readily accessible for
cleaning. If the free area through a design of louver or
grille is known, it shall be used in calculating the size
opening required to provide the free area specified. If
the design and free area is not known, it may be
assumed that wood louvers will have 30-35 percent free
area and metal louvers and grilles will have 60-75
percent free area.
A barometric damper is supplied with the furnace and
must be installed in the flue pipe observing the
instructions packaged with the damper control. The
barometric damper opening must be located in the same
atmospheric pressure zone as the combustion air inlet to
the furnace. The furnace must not be vented into the
same chimney with any solid fuel burning appliance
such as a wood burner or pellet burner. Masonry
chimneys must be lined with a listed system or other
approved material that will resist corrosion, softening
or cracking from flue gas temperatures up to 1800°F.
See Standard for Installation of Oil Burning Equipment
NFPA31 latest edition and Standard for Chimneys
NFPA211 latest edition for additional information.
VENTING OPTIONS
This furnace is designed to be vented conventionally
into a vertical chimney or horizontally through a side
wall with an optional Field Controls side wall power
venting system.
Note that the FH, FC and FLF series furnaces have
been designed to allow for bringing the vent system
through the cabinet side for increased venting
flexibility. To take advantage of this feature, simply
remove the desired knockout from either side or top of
unit and rotate flue box accordingly by removing four
(4) screws under cleanout plate as shown in Figure 4.
Make sure smoke pipe gasket is in place before
reinstalling flue box screws.
VERTICAL VENTING
If the unit is to be vertically vented make sure the flue
pipe from the furnace to the chimney is the same size
diameter as the flue outlet of the furnace which is 6".
The flue pipe must have no reductions in diameter, be
made of a corrosion-resistant material having an
upward pitch of 1/4" for every foot of horizontal run,
and be made of material capable of handling
temperatures up to 1800°F.
HORIZONTAL VENTING
This furnace is designed to be horizontally vented
through a side wall with an optional side wall power
vent. The recommended side wall vent is the Field
Controls model number SWG-4HDS for 085 and 110
models, and SWG-5S for 140 models only. This vent
can be purchased through your local distributor.
Follow all installation instructions packaged with the
vented system.
THERMOSTAT
These furnaces are designed to be controlled with any
24V heating or heating/cooling thermostat. The
heat/cool thermostats must be designed for independent
heat/cool transformer circuits to assure that the 24V
transformer built into the oil primary control does not
conflict with the main furnace 24V transformer. The
heat anticipator should be set at 0.20A. This is a
nominal setting. The thermostat circuit should be
checked to verify setting.
Manual 2100-540D
Page 35 of 45
Page 36

TABLE 10
TEMPERATURE RISE RANGES, LIMIT CONTROL SETTINGS,
AND HEATING BLOWER SPEEDS
ledoM
rebmuN
A24V580CF
A24V580HF
A84V011HF
A06V011HF
A24V580FLF
A84V011FLF
A06V011FLF
A24V580RLF
A84V011RLF
A06V011RLF
A06V041RLF
renruB
epyT
GFA
GFA
eziSepyTerusserPpmuP
57.0 *
56.0001-07C
55.0001-07D
57.0 *
56.0001-07C
55.0001-07D
58.0 *
XN
57.0001-07C
58.0 *
XN
57.009-06C
57.0 *
GFA
56.009-06C
55.009-06D
58.0 *
XN
57.009-06C
58.0 *
XN
57.009-06C
57.0 *
GFA
56.009-06C
55.009-06D
00.1 *
GFA
58.009-06C
00.1 *
GFA
58.009-06C
52.1 *
GFA
01.109-06C
elzzoN
wolloH°07GISP001
wolloH°07GISP001
diloS°06GISP051
diloS°06GISP051
wolloH°07GISP001
diloS°06GISP051
diloS°06GISP051
wolloH°07GISP001
wolloH°07GISP001
wolloH°07GISP001
wolloH°07GISP001
segnaResiR
09-06
09-06
09-06
09-06
09-06
09-06
09-06
09-06
09-06
09-06
09-06
mumixaM
riAteltuO
)F°(pmeT
002
002
002
002
002
002
002
002
002
002
002
gnitaeH
rewolB
paT
A
A
A
A
A
A
A
A
A
A
A
* Factory Set Point.
Manual 2100-540D
Page 36 of 45
Page 37

AIR FILTERS
Only Lo-Boy models are shipped with air filters. Filter
kits are available from your local distributor for
Upflow and Counterflow models. Knockouts are
provided in the sides of the FH series models to
facilitate the cutting of the return openings.
The upflow filter kit part numbers are FR23 for a
16x25x1 filter size and FR24 for a 20x25x1 filter size.
These filter kits come complete with the filter and all
necessary brackets for installing on the furnace. Each
comes with a washable aluminum mesh filter. When
installing a five ton AC unit on the furnace, one FR24
or Two FR23 must be used due to the high airflow
requirements. It is important to note that a minimum of
one inch spacing is required between the filter and the
unit side. Do not exceed 400 fpm for fiberglass
(disposable) type filters and 575 fpm for washable type
filters. See Figure 19.
The counterflow filter kit part number FR25 comes
with two washable filters. If not installing the FR25 kit
remember not to exceed 400 fpm for fiberglass
(disposable) type filters and 575 for washable type
filters. See Figure 20.
See Table 11 for filter sizes and quantities.
TABLE 11
FILTER SIZES FOR OIL FURNACES
ledoMeziS
A24V580HF
yoB-iH
yoB-iH
yoB-iH
syoB-oL
syoB-oL
yoB-oL
wolfretnuoC
)1(1x52x61
A84V011HF
)1(1x52x61
A06V011HF
)1(1x52x02
A24V580FLF
A24V580RLF
)1(2x02x61
A84V011FLF
A84V011RLF
A06V011FLF
)1(2x02x02
A06V011RLF
A06V041RLF
)1(2x52x02
A24V580CF
)2(1x02x61
FIGURE 19
TYPICAL INSTALLATION OF FR26 AND
FR27 FILTER RACKS
19 1/4"
(2) screws
Filter
FIGURE 20
TYPICAL INSTALLATION OF FR25
FILTER KIT
Optional
Filter
Box
"FC"
Unit
70 5/16"
16"
Filter
Frame
Filter
Door
MIS-1839 A
MIS-1841
Manual 2100-540D
Page 37 of 45
Page 38

LO-BOY MODELS – FILTER LOCATIONS
Lo-boy models have the filter installed in the return air cabinet section of the furnace. It is accessible from the rear of
the furnace by removing the blower/filter access door. The electrical switch should be turned “off” prior to removing
the access door. Refer to Figure 21 below.
FIGURE 21
FILTER INSTALLATION – LO-BOY MODELS
UNIT FILTER SIZE
FLF/FLR085 16 x 20 x 2
FLF/FLR110 20 x 20 x 2
FLR140 20 x 25 x 2
STEP 3:
SLIDE FILTER OUT
TOWARDS BLOWER
DOOR
STEP 2:
REMOVE BLOWER DOOR
BY PULLING OUT ON
SWELL LATCHES AND
TILTING OUTWARDS
Manual 2100-540D
Page 38 of 45
STEP 1:
UNFASTEN SWELL
LATCHES BY PULLING
HANDLES OUTWARD
MIS-1835 A
Page 39

MAINTENANCE
LUBRICATION
No lubrication is required for either the burner or the
blower motor. Both are permanently lubricated.
INSPECT AIR FILTER
Replace filters before each heating season begins. It is
recommended that filters also be replaced at least twice
during the heating season.
Be sure the new filters are set securely in the filter rack
so there can be minimal leakage around them.
FINAL INSPECTION AND TEST
Final inspection and test of an installation shall be
made to determine that the work has been done in full
accordance with regulations and according to the
highest standards for safety, performance and
appearance. Such an inspection and test should
indicate the following as a minimum:
1. Determine that all parts of the oil storage and
circulating system, including tank, piping and
burner, are free from oil leaks. Be sure that no oil
discharges from the nozzle when burner is not
operating.
2. Be sure that the suction line and pump have been
entirely vented of air so that the burner has
instantaneous oil shutoff at the nozzle and so that
the pump operates without an air noise.
3. Check the flame adjustment to determine that the
flame is clear, quiet, free of odor and oil nozzle is
of proper size for the furnace.
4. Test operation of burner by operating the
thermostat. First, set the thermostat above room
temperature. Burner should start. Second, set
thermostat below room temperature. Burner will
stop.
5. Check operation of burner primary control in
accordance with manufacturer’s instructions
included with the control. Following is the method
we recommend in checking the safety switch in
this primary control.
A. Flame Failure – Simulate by shutting off oil
supply manual valve while burner is on.
Within 9 seconds the control will shut the
burner down and flash a diagnostic code of
1/2 second on / 1/2 second off. Ignition and
motor stop and oil valve closes.
B. Ignition Failure – Test by closing oil supply
while burner is off. Run through starting
procedure. The primary control will attempt
three trials for ignition. After three attempts,
the control will lockout.
C. Power Failure – Turn off power supply
while burner is on. When burner goes out,
restore power and burner will restart.
D. If operation is not as described, check wiring
and installation first. If trouble appears to be
in the control circuit, replace the flame
detector. If trouble still persists, refer to
“Common Causes of Trouble” section.
SERVICE HINTS
Preventive maintenance is the best way to avoid
unnecessary expense, inconvenience, and retain
operating efficiency of your furnace. It is advisable to
have your heating system and burner inspected at
periodic intervals by a qualified serviceman. If trouble
develops, follow these simple checks before calling the
serviceman.
1. Make sure there is oil in tank and valve is open.
2. Make sure thermostat is set above room
temperature.
3. Make sure electrical supply to furnace is on and
fuses are not blown or circuit breakers tripped.
4. Reset safety switch of burner primary control.
CAUTION
Reset three (3) times only . More than three
resets can cause excessive oil to be pumped
into combustion chamber which could result
in explosion upon ignition.
5. Make sure air filters are in place and are clean.
6. Make sure all air openings in furnace, all
ventilation and combustion air openings, all return
air grilles, and all warm air registers are
unobstructed and open.
Manual 2100-540D
Page 39 of 45
Page 40

COMBINATION COMBUSTION
CHAMBER/BURNER MOUNTING
SYSTEM
The furnace has been designed with a combustion
chamber mounting system that enables service
personnel to remove the combustion chamber, its
mounting system, and burner assembly as one unit for
inspection and/or service on the bench. It has also been
designed to remove the burner assembly independently
from the mounting system to perform basic annual
service and inspection. The mounting system is
completely adjustable so exact alignment between the
burner tube and combustion chamber may be assured
prior to installation into the furnace. See Figures 22
and 23.
REMOVAL OF BURNER ONLY
DANGER
!
*ELECTRICAL SHOCK HAZARD
*DISCONNECT POWER BEFORE
SERVICING.
WARNING
The procedures described in Figures 22 & 23
should be conducted only by a qualified
service technician.
Improper servicing could cause electric shock
hazard, fires or explosion resulting in damage,
injury or death.
FIGURE 22
BURNER REMOVAL
INSTRUCTIONS
STEP 2:
LOOSEN (3) BOLTS
ENOUGH TO ROTATE
BURNER ASSEMBLY.
STEP 4:
PULL BURNER STRAIGHT
OUT TO PREVENT DAMAGE
TO CHAMBER DURING
REMOVAL.
Manual 2100-540D
Page 40 of 45
STEP 3:
ROTATE BURNER
COUNTER-CLOCKWISE
STEP 1:
DISCONNECT "T-T" WIRES,
POWER CONNECTIONS, AIR
BOOT (OPTIONAL) AND OIL
LINES TO BURNER.
MIS-1834
Page 41

TO REMOVE BURNER ONLY
Disconnect fuel line, power cord and wires from T, T
on primary control. Loosen (3) 1/4 inch bolts securing
burner mounting flange. Twist burner
counterclockwise and pull straight back away from the
furnace. (See Figure 22.)
REMOVAL OF ENTIRE COMBUSTION CHAMBER MOUNTING SYSTEM
DANGER
!
*ELECTRICAL SHOCK HAZARD
*DISCONNECT POWER BEFORE
SERVICING.
TO REMOVE THE ENTIRE COMBUSTION
CHAMBER MOUNTING SYSTEM
Disconnect fuel line, power cord and wires from T, T
on primary control. Remove (6) 5/16 inch bolts from
around front plate. Next remove (2) 5/16 inch nuts
from upper right and left hand corners of the front
plate. Pull entire assembly straight back away from
furnace. BE CAREFUL NOT TO TIP ASSEMBLY
UP OR DOWN AS IT MAY DAMAGE THE
COMBUSTION CHAMBER. (See Figure 23.)
FIGURE 23
BURNER AND COMB. CHAMBER
MOUNTING SYSTEM
REMOVAL INSTRUCTIONS
STEP 3:
REMOVE (2) NUTS
IN THE TOP LEFT
AND RIGHT CORNERS
OF BURNER PLATE.
STEP 4:
PULL BURNER ASSEMBLY
STRAIGHT OUT TO PREVENT
DAMAGE TO CHAMBER
DURING REMOVAL.
CHAMBER
BURNER
PLATE
STEP 2:
REMOVE (6) BOLTS
AROUND PERIMETER
OF BURNER PLATE
STEP 1:
DISCONNECT "T-T" WIRES,
POWER CONNECTIONS, AIR
BOOT (OPTIONAL) AND OIL
LINES TO BURNER.
MIS-1837 A
Manual 2100-540D
Page 41 of 45
Page 42

COMMON CAUSES OF TROUBLE
CAUTION
PUMP SQUEALS OR CHATTERS
This may be caused by air in pipes. Check all joints in
the oil supply pipe for leaks. Check strainer in pump; if
dirty, clean.
To avoid accidents, always open main switch
(OFF position) when servicing the burner.
BURNER WILL NOT PRODUCE FLAME
Check oil level gauge to see that there is sufficient oil
in tank or tanks. Check the burner mounted relay
control. Do not adjust this control.
Check position of electrodes – incorrect position will
cause slow or delayed ignition. Clean electrodes and
nozzle. Check and clean strainer in pump. If oil line
filter is used, check filter condition.
If burner runs but there is no flame the fuel pump may
be air bound. Follow instructions for bleeding fuel
pump.
Check and make sure the solenoid valve on the oil
pump is being energized and opening.
BURNER STARTS OR STOPS TOO OFTEN
Check heat anticipator setting on thermostat.
NOZZLE PRODUCES A STRINGY FLAME
Worn tangential grooves in nozzle. Replace nozzle.
BASEMENT TANK HUM
Occasionally with a two-pipe installation there may be
a low return line hum. Eliminate hum by installing a
special anti-hum valve in the return line near pump.
HEAVY FIRE OR PULSATING FLAME.
These may occur after burner starts. It may be caused
by a slight oil leak in the fuel pump and cannot be
corrected except by replacing the pump. This happens
only when the burner is started.
CHATTERING SOUND OR HIGH PITCH NOISE
This noise from motor can usually be traced to where a
conduit or BX cable is fixed rigidly or attached to some
part of the building. Relieving this strain may eliminate
noise.
INSUFFICIENT HEAT
Check limit control setting. It may be that flame is not
allowed to stay on long enough to generate sufficient
heat in furnace to heat the house properly. If the proper
size furnace has been selected according to house
requirements and satisfactory heat is not obtained,
recheck the heating plant for size and capacity in
relation to house. Check for clogged filters.
Check and make sure the heat anticipator on the
thermostat is set correctly.
CARE OF FINISH
This furnace cabinet is made with a very durable and
corrosion resistant finish. With normal cleaning it will
last for many years.
WARNING
Under no circumstance should a soot
deterioration device be used in the
combustion chamber. These product s known
as “soot busters” or “soot sticks” are
comprised of chemicals that burn at very high
temperatures, which may exceed the
temperature rating of the combustion
chamber material.
Use of these products are detrimental to the
life expectancy of the combustion chamber
and will destroy the chamber. Refer to the
“Cleaning of Furnace” section for proper
cleaning methods.
CLEANING OF THE HEAT EXCHANGER
All of these units have four clean out plugs for easy
cleaning of the heat exchanger. They are accessible
from the front and back of these units by removing the
clean out access cover in the burner compartment and at
the back of unit. The furnace should be checked
annually by a qualified service technician.
Manual 2100-540D
Page 42 of 45
Page 43

FH SERIES
*ELECTRICAL SHOCK HAZARD
*DISCONNECT POWER BEFORE
SERVICING.
DANGER
!
L2 (IGN)
TW
TR
IGNITER
BURNER
MOTOR
OIL
VALVE
CAD
CELL
L1 - LIMIT
L2 (VLV)
CAD
CELL
L2
VALVE
L2 (MTR)
MOTOR
IGNITER
CONDITIONER OR HEAT
1
NOTES
2
IF PRIMARY LIMIT WIRES
ARE TO BE REPLACED,
USE WIRE WITH INSUL.
TEMP. RATING OF 200°C.
REMOVE PURPLE JUMPER
WIRE FOR 2 STAGE AIR
PUMP.
ORANGE
16 PIN WIRING
HARNESS DETAIL
BLACK
YELLOW
BLUE/BLACK
GRAY
BLACK/WHITE
BROWN
BLACK/WHITE
YELLOW/BLACK
65471382
911 101214 131516
BLUE
PURPLE/WHITE
RED
RED/WHITE
RED/YELLOW
PURPLE
YELLOW /RED
IF ANY OF THE ORIGINAL WIRE AS
SUPPLIED WITH THIS APPLIANCE
MUST BE REPLACED, IT MUST BE
REPLACED WITH WIRING MATERIAL
HAVING A TEMP. RATING OF AT
LEAST 105°C EXCEPT PRIMARY
LIMIT WIRES. SEE NOTE "1".
WARNING
!
White
White
White
White
White
White
NEUTRAL
White
Purple
Purple
Purple
Purple
Orange
Orange
GROUND
Green
9
24 VAC C
Red/White
8
Red
Red
Red
Red
1
23
4
56
7
HEATING DELAY PROFILE TAPS
MODEL
SWITCH #1SWITCH #2ON DELAY
SECONDS
ON
DELAY
% CFM
PRE-RUN
TIME
SECONDS
PRE-RUN %
CFM
OFF DELAY
SECONDS
OFF
DELAY
% CFM
ALL
OFF OFF 30 0 60 50 300 82
ON OFF 30 0 60 50 240 100
OFF ON 45 0 120 50 300 88
ON ON 60 0 0 100 180 100
BLOWER
Black
BLOWER
BACKUP
ASSEMBLY
HOT
2112
34567
12
8
9
345
7
PLUG
Black
Black
Black
3 PIN
CONTROL
9 PIN
PLUG
CONTROL PA NEL
VOLTAGE
HIGH
HEAT EXCHA NGER AREA
UNIT
WIRING
PRIMARY
AND COND. UNIT 24V CONNECTIONS
CFM INDICA T OR
(RED LED 6)
21
OFF
ON
HEAT
21
OFF
ON
ADJ.
21
OFF
ON
COOL
21
ON
5
FIELD CONNECTIONS TO THERMOSTAT
(GREEN LED 7)
LIMIT SWITCH
CONTROL PLUG
Y1C
Y/Y2
OFF
DELAY
NEUTRALS
16 PIN BLOWER
CONTROL PLUG
3
24V
120V COM
TRANSFORMER
DOOR SWITCH
GDH
Black/White
PLUG
14
5 PIN
LOW
Black
Black
3
W
Black
VOLTAGE
LIMIT
RETURN AREA
FIELD
Black/White
R
20
16 PIN BLOWER
Black
LIMIT
CONTROL
Black
17
1
2
BURNER
ASS'Y
16
4
O
120 VAC
9
18
21
4047-121 A
120 VAC
HUM
22
DIP SW1 DIP SW2
0.75 60°-90° OFF* OFF* 1075
0.75 60°-90° ON OFF 1035
0.65 60°-90° OFF ON 930
0.55 60°-90° ON ON 790
1 60°-90° OFF* OFF* 1280
1 60°-90° ON OFF 1225
0.85 60°-90° OFF ON 1060
0.85 60°-90° ON ON 1060
HEATING
CFM
HEAT SWITCH SETT INGS
HEAT SWITCH
UNIT
GPH
INPU
FH085V42A
FH110V48A
FH110V60A
TEMP.
RISE
DIP SW1 DIP SW2 FULL PART
3.5* OFF* OFF* 1400 1000
3 ON OFF 1200 850
2.5 OFF ON 1000 725
2 ON ON 800 5 75
4* OFF* OFF* 1600 1150
3.5 ON OFF 1400 1000
3 OFF ON 1200 850
2.5 ON ON 1000 725
5* OFF* OFF* 2000 1450
4 ON OFF 1600 1150
3.5 OFF ON 1400 1000
3 ON ON 1200 850
COOL S WIT CH SETTIN GS
CFM LOAD
FH110V60A
FH085V42A
FH110V48A
UNIT
(TONS)
COOL SWITCH
WIRING DIAGRAM
NOM. A/C
Manual 2100-540D
Page 43 of 45
Page 44

CFM
HEATING
HEAT SWITCH
DIP SW1 DIP SW2
RISE
TEMP.
HEAT SW ITCH SETT INGS
0.75 60°-90° OFF* OFF* 1075
0.75 60°-90° ON OFF 1035
GPH
INPU
UNIT
FLF/R085V42A
PRIMARY LIMIT
16
RED
FLF/R SERIES
WIRING DIAGRAM
BACKUP LIMIT
OFF
DELAY
% CFM
SECONDS
OFF DELAY
% CFM
PRE-RUN
TIME
PRE-RUN
SECONDS
ON
DELAY
% CFM
SECONDS
ON DELAY
#2
SWITCH
#1
ON OFF 30 0 60 50 240 100
OFF OFF 30 0 60 50 300 82
SWITCH
MODEL
HEATING DEL AY PROFILE TAPS
ALL
0.65 60°-90° OFF ON 930
OFF ON 45 0 120 44 300 88
0.55 60°-90° ON ON 790
ON ON 60 0 0 100 180 100
BLACK/WHITE
BROWN
BLACK/WHITE
CFM LOAD
* FACTORY SETTINGS
16 PIN WIRING
HARNESS DETAIL
COOL SWITCH
DIP SW1 DIP SW2 FULL PART
3 ON OFF 1200 850
2 ON ON 800 575
3 OFF ON 1200 850
4 ON OFF 1600 1150
4* OFF* OFF* 1600 1150
2.5 OFF ON 1000 725
3.5 ON OFF 1400 1000
1 60°-90° OFF* OFF* 1280
1 60°-90° ON OFF 1225
0.85 60°-90° OFF ON 1060
FLF/R110V48A
FLF/R110V60A
HEAT EX. AREA
1.1 60°-90° OFF ON 1645
0.85 60°-90° ON ON 1060
1.1 60°-90° ON ON 1645
1.25 60°-90° OFF* OFF* 1860
1.25 60°-90° ON OFF 1790
FLR140V60A
RED
COOL SWI TCH SETTI NGS
20
3.5* OFF* OFF* 1400 1000
(TONS)
NOM. A/C
UNIT
FLF/R085V42A
2
ADJ.
Y1
OFF
Y/Y2
G
DELAY
OFF
2.5 ON ON 1000 725
FLF/R110V48A
12
HEAT
ON
ON
OFF
12
COOL
ON
ON
OFF
3 ON ON 1200 850
5* OFF* OFF* 2000 1450
3.5 OFF ON 1400 1000
DANGER
!
FLR140V60A
FLF/R110V60A
1
2
Black
120 VAC
1
2
Black
White
GRAY
BLUE/BLACK
YELLOW
BLACK
YELLOW/BLACK
*ELECTRICAL SHOCK HAZARD
*DISCONNECT POWER BEFORE
SERVICING.
Black
14
911 1012
65471382
14 13
1516
NOTES
White
Green
19
1
IF PRIMARY LI MIT WIRES ARE TO BE REPLACED,
1
120V
BLUE
PURPLE/WHITE
RED
RED/WHITE
RED/YELLOW
PURPLE
ORANGE
YELLOW/RED
ADJU STMEN T
DELAY SWITCH
ADJUSTMENT SWITCH SET TINGS
REMOVE PURPLE JUMPER WIRE FOR 2 STAGE AIR
CONDITIONER OR HEAT PUMP.
USE WIRE WITH INSUL. TEMP. RATING OF 200°C.
2
4047-123 A
DETAILS
ON OFF +10% CFM
ON ON NO CHANGES
OFF ON -10% CFM
OFF* OFF* NO CHANGES*
DIP SW1 DIP SW2
24V
HUM
120 VAC
7
98
Orange
ASS'Y
BURNER
CAD
CAD
White
15
COM
TRANSFORMER
9
Red/White
3
16 PIN WIRE HARNESS
7
17
Black/White
10
18
RED
5 PIN
PLUG
4
3
251
CONTROL PANEL
5
BLACK
CELL
BLACK
16 PIN BLOWER
CONTROL PLUG
CELL
DOOR
SWITCH
RETURN AREA
BLOWER ASSEMBLY
CFM BLINK
WODH
(GREEN LED 7)
R
AND COND. UNIT 24V CONNECTIONS
FIELD CONNECT IONS TO THERMOST AT
C
BLACK
4
BLOWER
CONTROL
16 PIN BLOWER
CONTROL PLUG
(RED LED 6)
LIMIT SWITCH
NEUTRALS
White
1
Black
54
6
32
C24 VAC
BLACK
1
3
2
PLUG
3 PIN
Black
Orange
Purple
L2 (IGN)
MOTOR
IGNITER
White
L2
L2 (VLV)
L2 (MTR)
VALVE
L1 - LIMIT
Purple
IGNITER
TR
MOTOR
BURNER
TW
OIL
VALVE
Manual 2100-540D
Page 44 of 45
Page 45

CFM
HEATING
HEAT SWITCH
DIP SW1 DIP SW2
RISE
TEMP.
HEAT SWITCH SET T INGS
0.75 60°-90° OFF* OFF* 1075
GPH
INPUT
UNIT
FC SERIES
PRIMARY LIMIT
WIRING DIAGRAM
1
RED
16
OFF
DELAY
% CFM
OFF
DELAY
PRE-RUN
PRE-RUN
ON
2ONON800575
ON DELAY
SWITCH
SWITCH
HEATING DEL AY PROFILE TAPS
20
2
Y1
Y/Y2
G
TIME
DELAY
MODEL
SECONDS
% CFM
SECONDS
% CFM
SECONDS
#2
#1
ON ON 60 0 0 100 180 100
ON OFF 30 0 60 50 240 100
OFF ON 45 0 120 50 300 88
OFF OFF 30 0 60 50 300 82
ALL
12
ADJ.
ON
OFF
12
DELAY
ON
OFF
CFM LOA D
COOL SW ITCH
DIP SW1 DIP SW2 FULL PART
3 ON OFF 1200 850
2.5 OFF ON 1000 725
3.5* OFF* OFF* 1400 1000
0.75 60°-90° O N OFF 1035
COOL SWI TCH SETTING S
0.65 60°-90° OFF ON 930
0.55 60°-90° O N O N 790
FC085V42A
(TONS)
NOM. A/C
UNIT
FC085V42A
HEAT EX. AREA
HEAT
COOL
DETAILS
ADJUSTMENT
16 PIN WIRING
HARNESS DETAIL
ON OFF +10% CFM
ON O N NO CHANGES
OFF ON -10% CFM
OF F * OF F* NO CH ANGES*
DELAY SWITCH
DIP SW1 DIP SW2
ADJUSTMENT SWITCH SETT INGS
4
BLOWER
1
2
ON
OFF
120 VAC
1
2
ON
OFF
CONTROL
Black
White
BLACK/WHITE
BROWN
BLACK/WHITE
GRAY
BLUE/BLACK
YELLOW
BLACK
YELLOW/BLACK
DANGER
!
Black
14
911 1012
65471382
14 13
1516
*ELECTRICAL SHOCK HAZARD
*DISCONNECT POWER BEFORE
SERVICING.
NOTES
White
Green
19
BLUE
PURPLE/WHITE
RED
RED/WHITE
RED/YELLOW
PURPLE
ORANGE
YELLOW/RED
REMOVE PURPLE JUMPER WIRE FOR 2 STAGE AIR
CONDITIONER OR HEAT PUMP.
IF PRIMARY LI MIT WIRES ARE TO BE REPLACED,
USE WIRE WITH INSUL. TEMP. RATING OF 200°C.
2
1
4047-122 A
120V
24V
White
3
24 VAC
Orange
RED
15
Black
BLACK
16 PIN WIRE HARNESS
7
BLACK
BLACK
COM
TRANSFORMER
9
Red/White
Black/White
10
18
RED
5 PIN
PLUG
4
3
251
CONTROL PANEL
5
CFM BLINK
WODH
RED
AND COND. UNIT 24V CONNECTIONS
FIELD CONNECT IONS TO THERMOST AT
(GREEN LED 7)
R
C
White
(RED LED 6)
NEUTRALS
LIMIT SWITCH
1
54
6
32
C
HUM
120 VAC
7
98
16 PIN BLOWER
CONTROL PLUG
Black
White
1
3
2
PLUG
3 PIN
Black
Orange
White
BURNER
ASS'Y
Purple
L2 (IGN)
MOTOR
IGNITER
Purple
IGNITER
BURNER
MOTOR
L2 (MTR)
L2
L1 - LIMIT
TR
TW
VALVE
OIL
VALVE
CAD
CELL
L2 (VLV)
CAD
BACKUP LIMIT
CELL
17
16 PIN BLOWER
CONTROL PLUG
DOOR
SWITCH
RETURN AREA
BLOWER ASSEMBLY
Manual 2100-540D
Page 45 of 45
 Loading...