

Page 1

- 1 -
Contents
BARCODE READER
BLASTER LINE
USER MANUAL
Page 2

- 2 -
Set Up Flow Chart ........................................2
. Systems Information
1.1 Set All Default .................................................3
1.2 Version Information .........................................3
. Systems Setting
2.1 Interfaces ...................................................4
2.1.1 Keyboard Wedge Setting ...............................5
2.1.2 RS-232 Communication Parameters ...........10
2.2 Scanning Mode ...............................................14
2.3 Beep Setting...................................................17
2.4 Character Setting ............................................18
2.5 Others Setting ..............................................20
. Code ID Set Up
3.1 UPC-A........................................................22
3.2 UPC-E.........................................................24
3.3 EAN-13.......................................................26
3.4 EAN-8.........................................................28
3.5 Code 39.......................................................30
3.6 Codabar.......................................................33
3.7 Code 93.......................................................35
3.8 Code 128/EAN-128 ....................................37
3.9 Interleaved 2 of 5 .....................................39
3.10 Industrial 2 of 5 ........................................41
3.11 Matrix 2 of 5................................................43
3.12 China Post Code .........................................45
3.13 MSI/Plessey.................................................47
3.14 Code 32........................................................49
3.15 Code 11........................................................51
3.16 RSS (Optional)
Appendix A .......................................................53
Appendix B .......................................................55
EAN / UPC ADD ON AUTO ............................57
Page 3
- 3 -
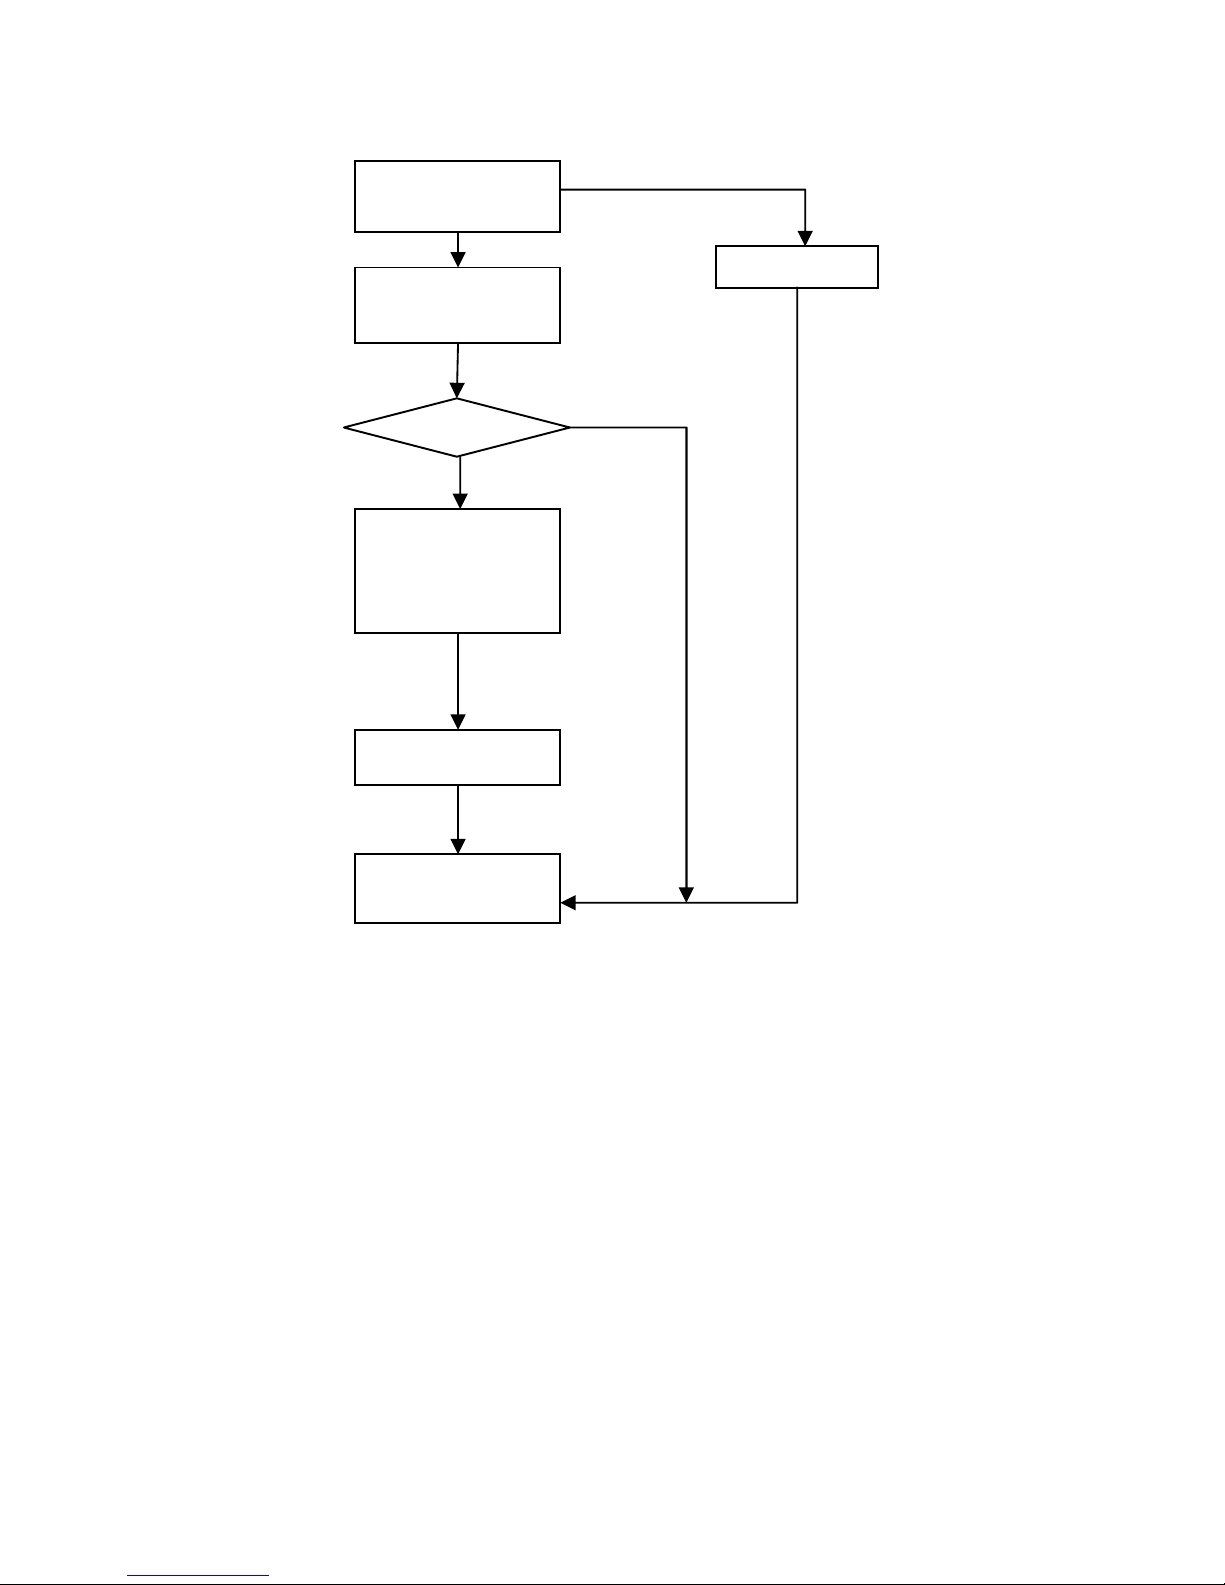
Barcode Scanner Install Flow Chart
Remark:
Scan “Software Version” to get the software
version number.
Scan “Serial Number” to get the serial number.
Scan the “END” barcode
Scan the barcode of “Start
Configuration”
Scan the necessary
barcode meet application
Scan two digits (HEX) in
the Appendix A to be an
ASCII code
Appendix
Scan the barcode of “End
Configuration”
Reset the parameter
NO
YES
Page 4
- 4 -
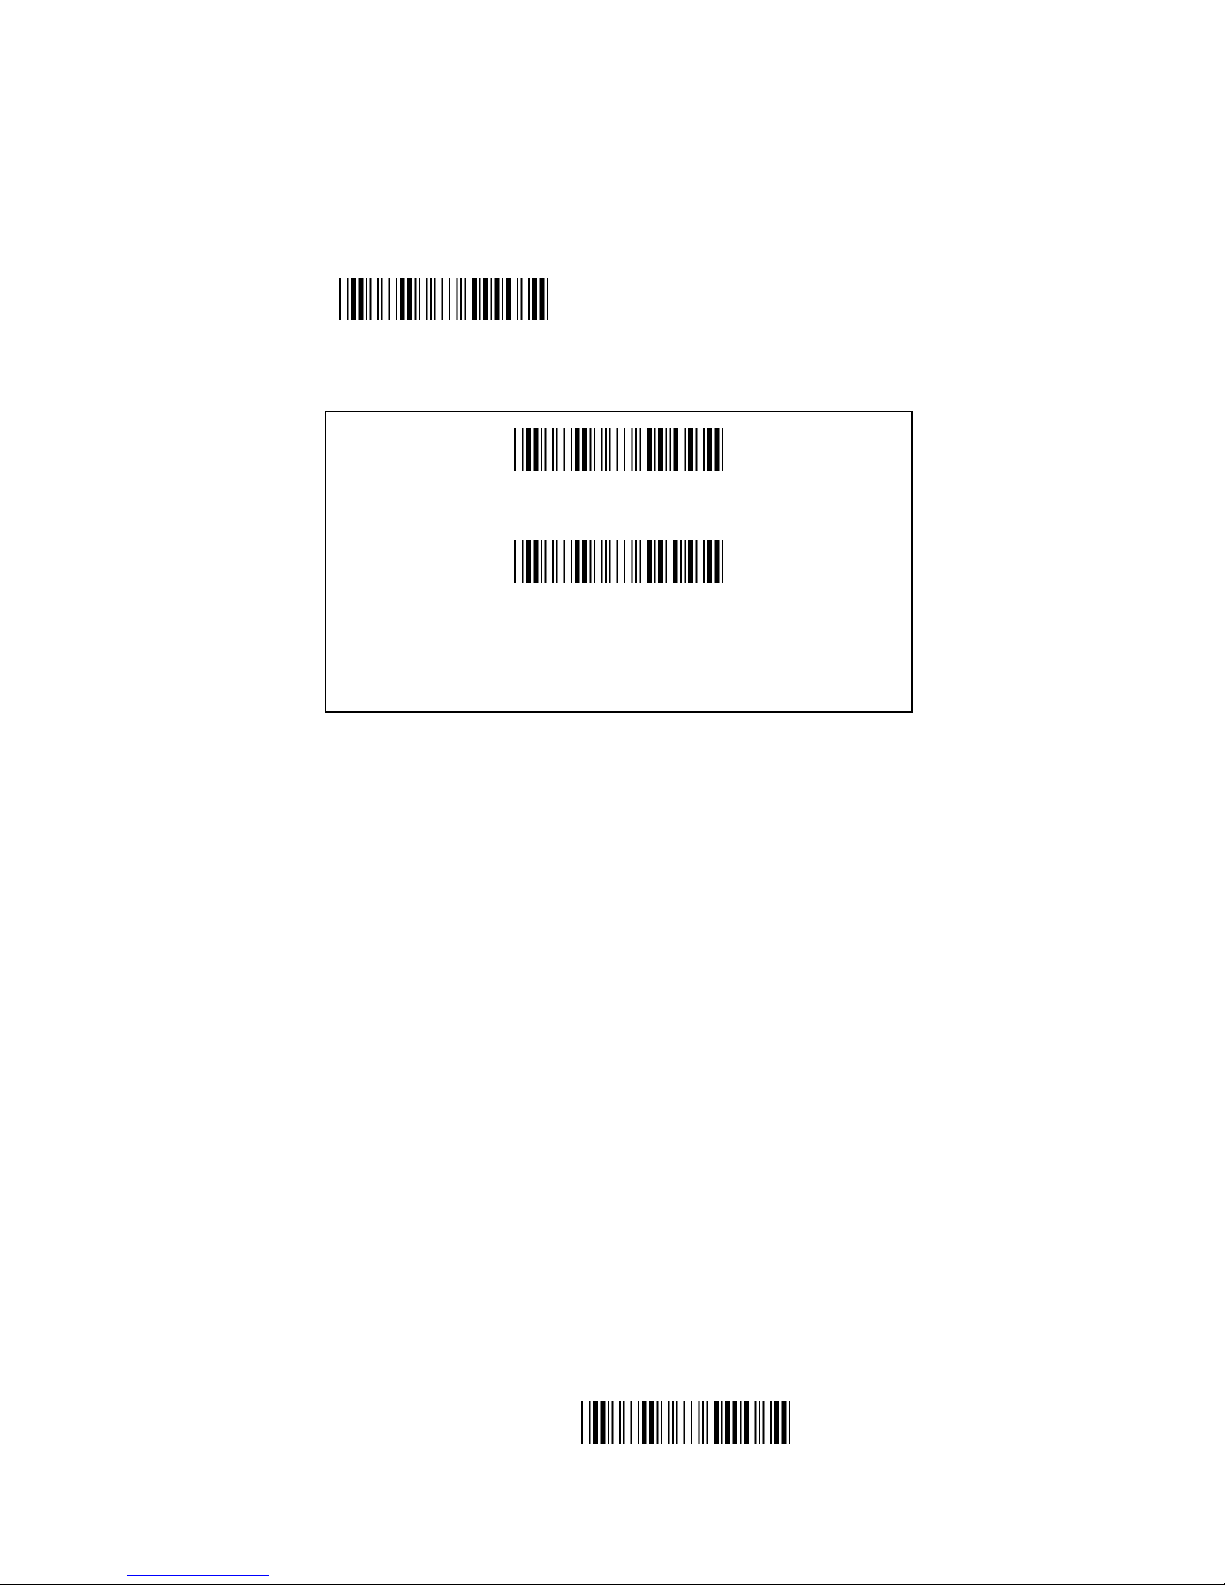
: Systems Information
1.1 Default
1.2 Version Information
Start Configuration
Set All Default
Version
End Configuration
Page 5
- 5 -
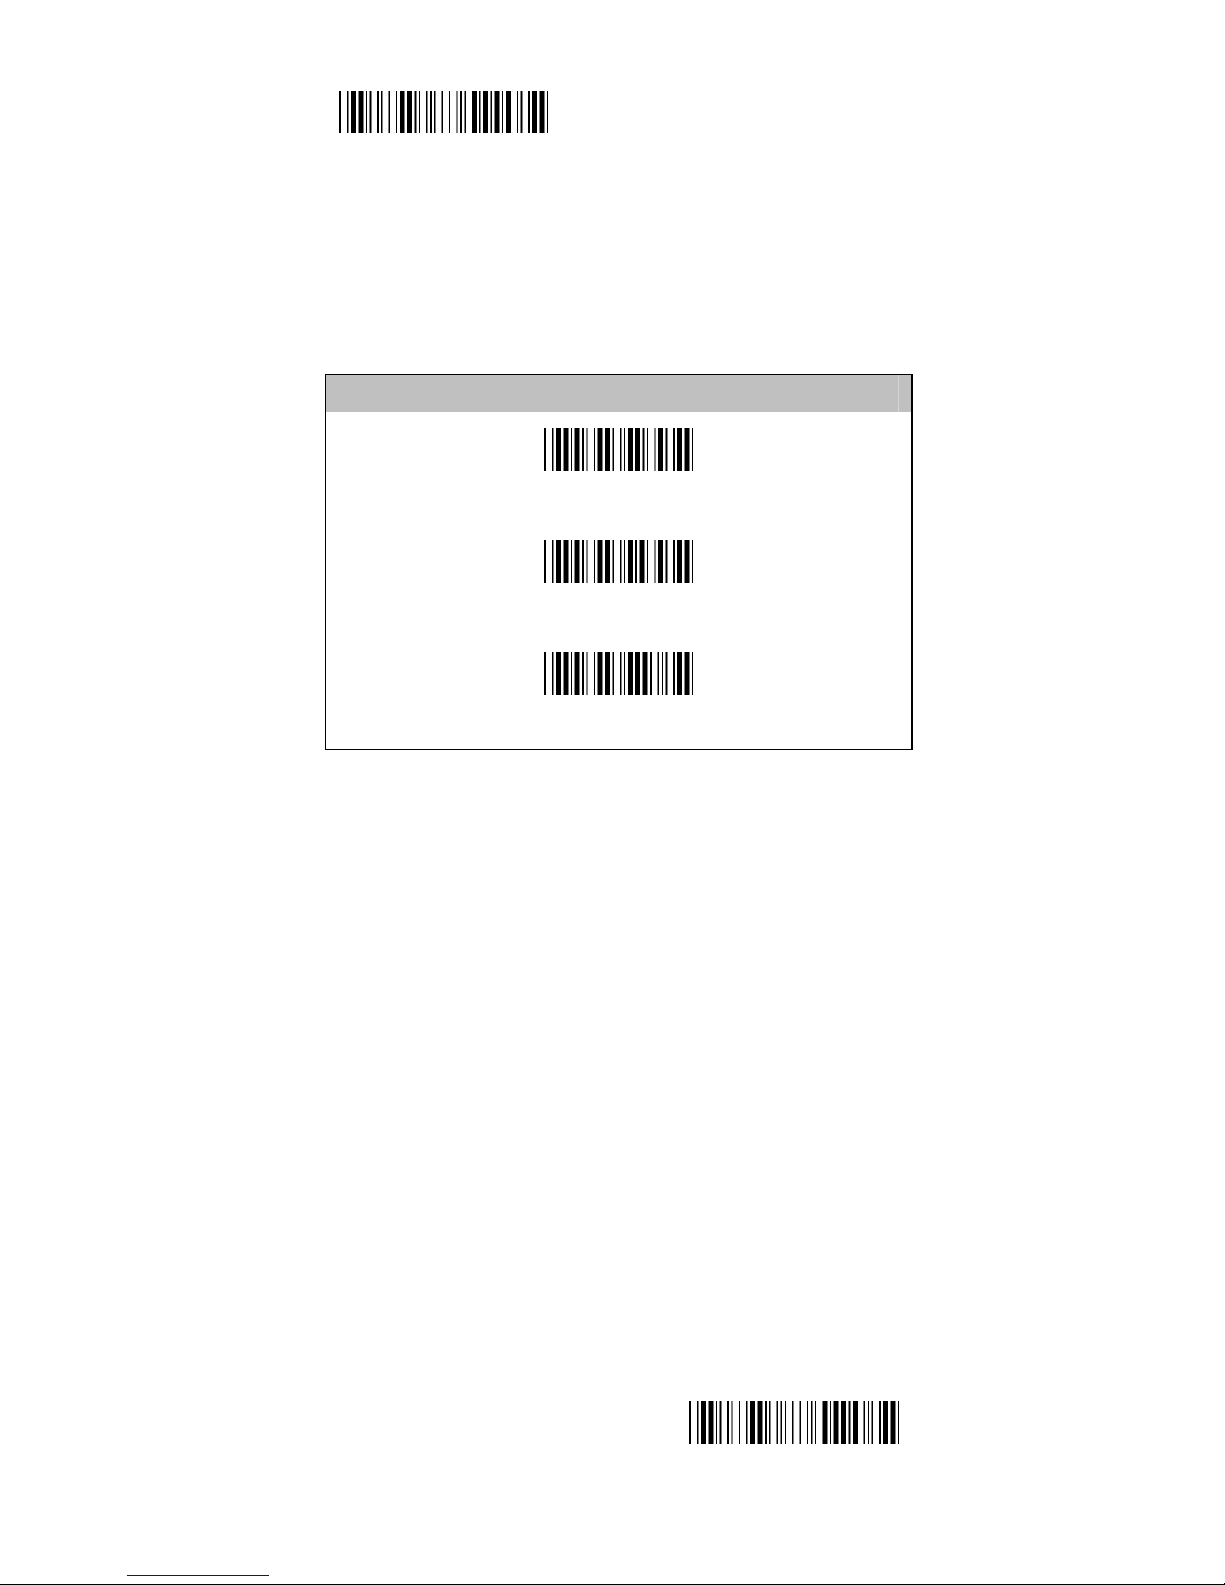
Start Configuration
: Systems Setting
2.1 Interfaces
Interface Selection
(Keyboard)
RS-232
USB
End configuration
Page 6
- 6 -
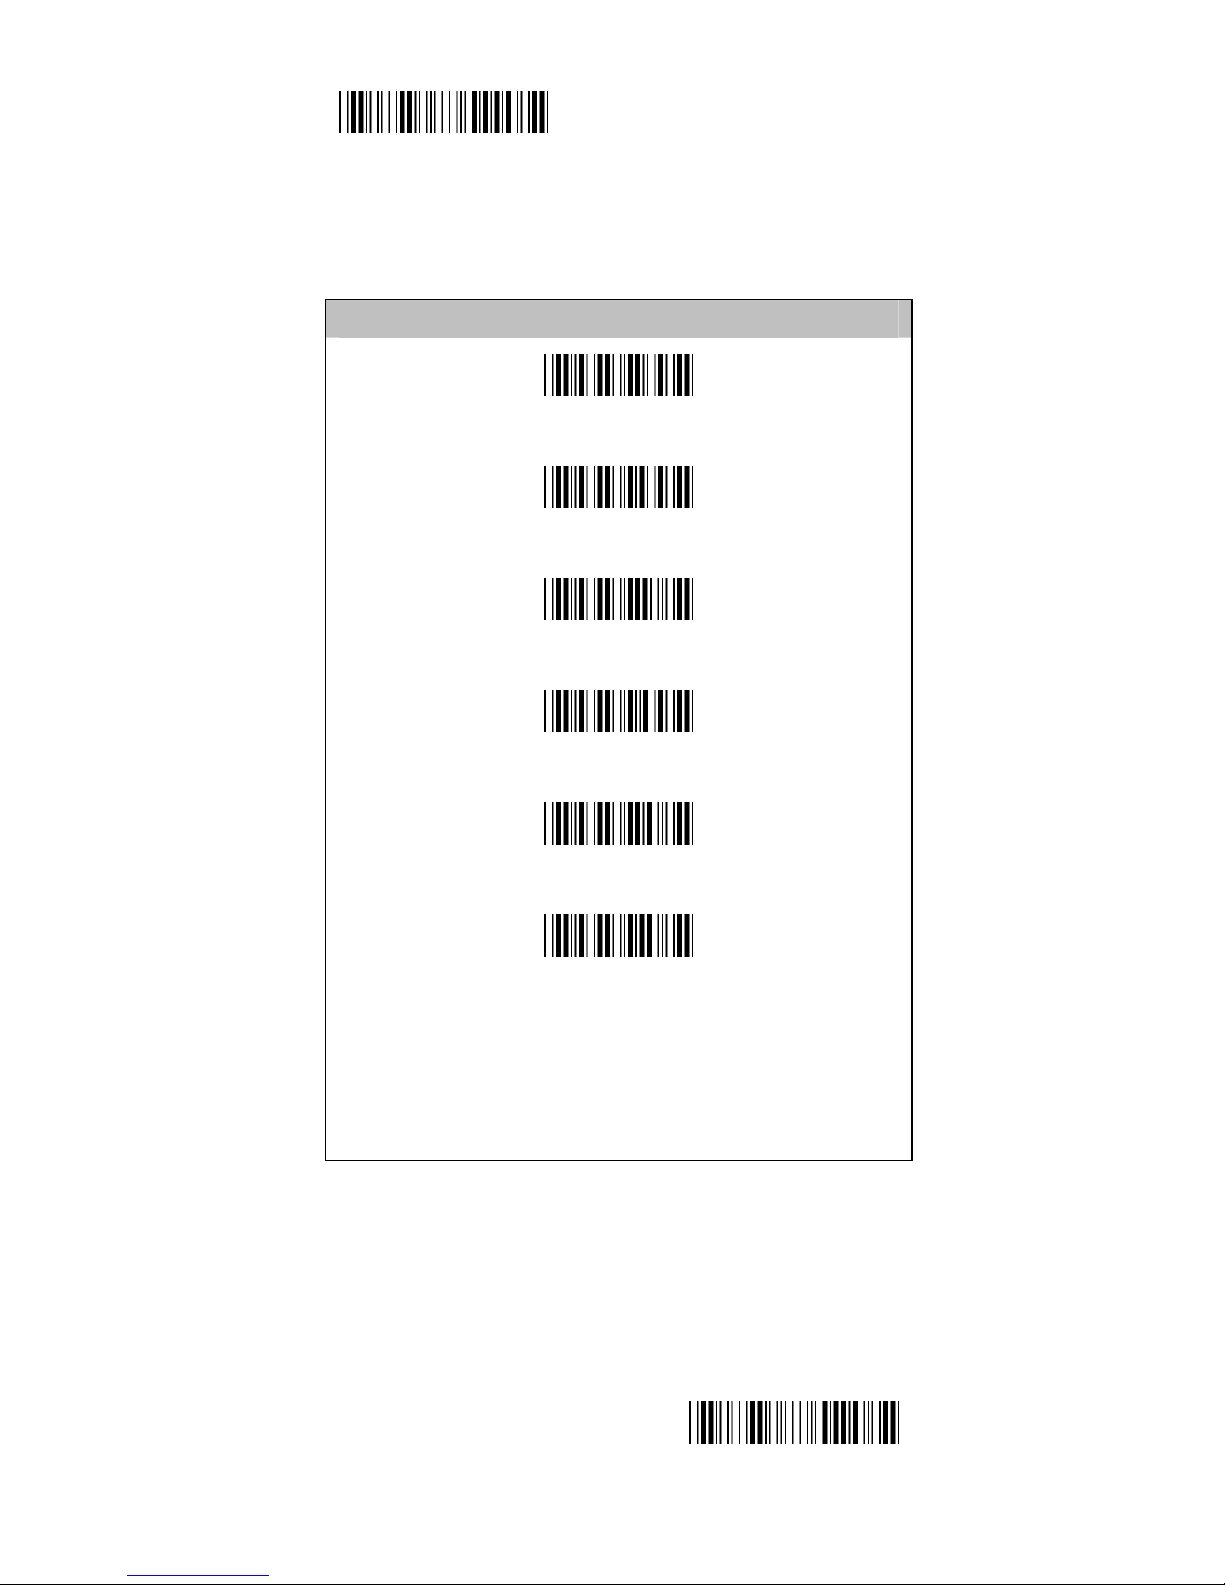
Start Configuration
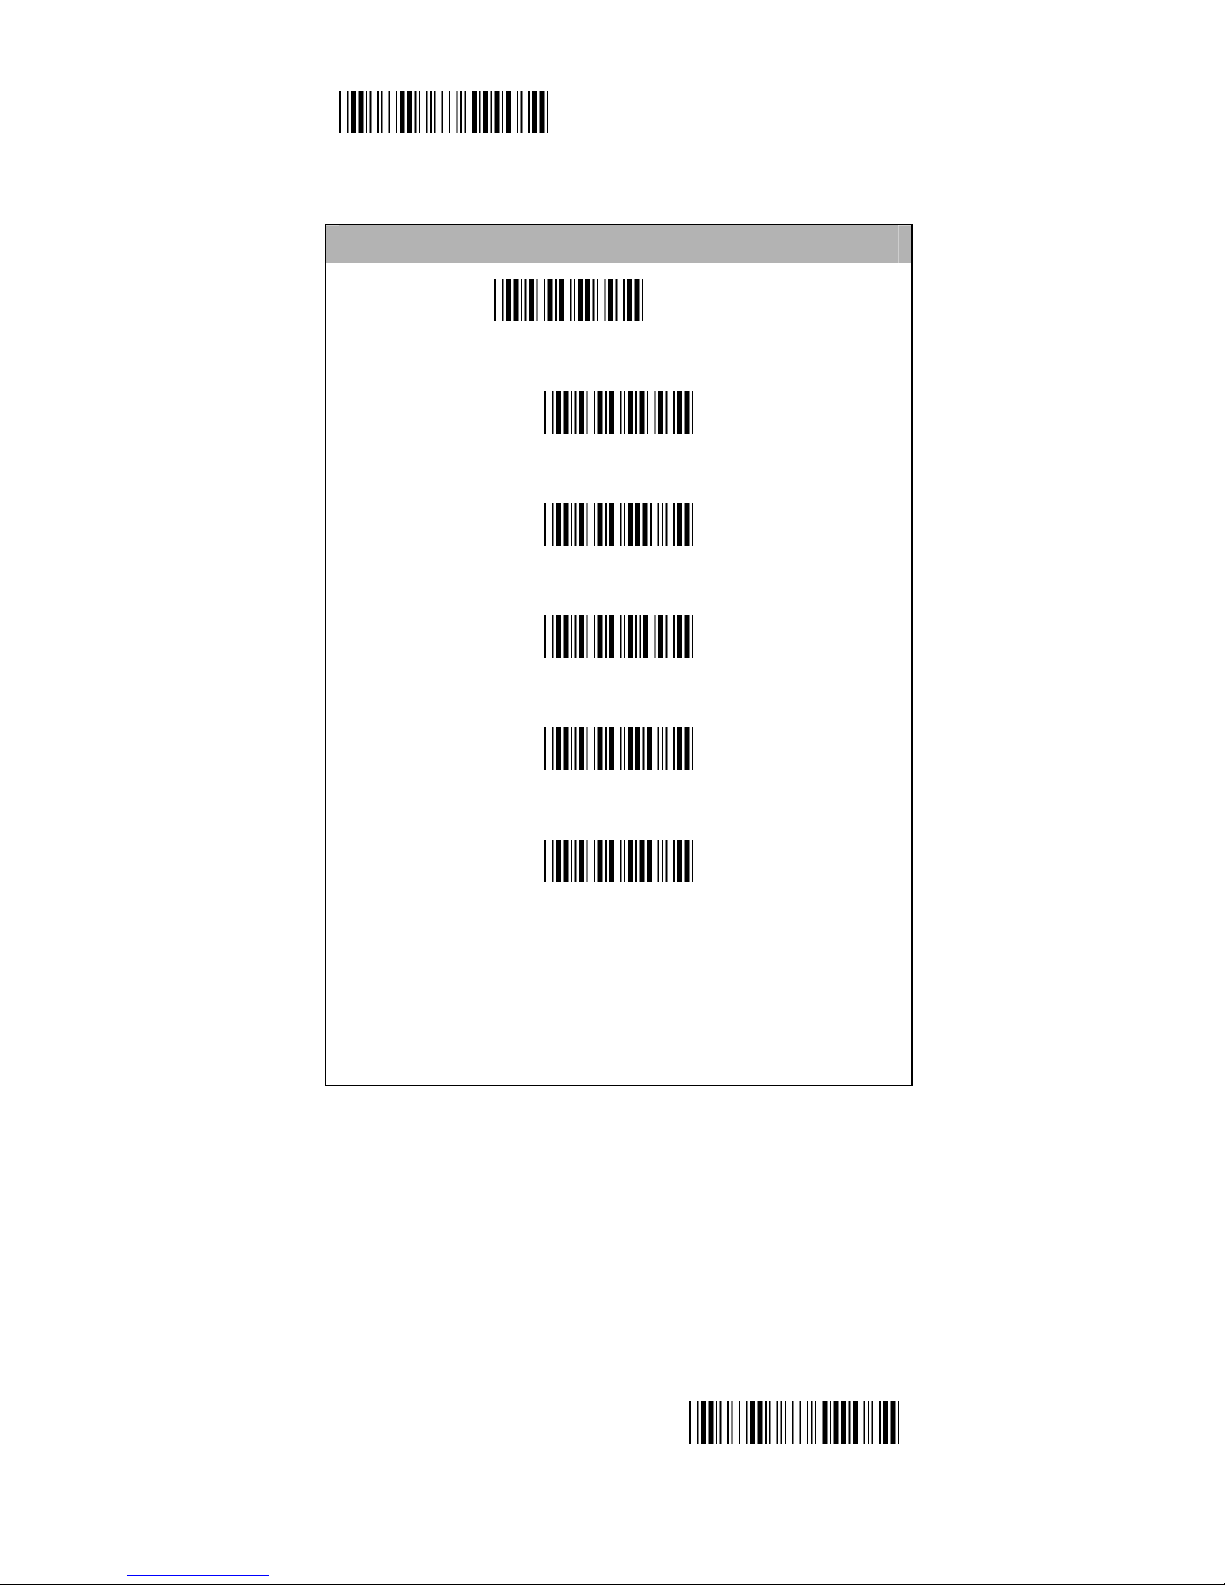
2.1.1 Keyboard Wedge Setting
Terminals Type
(IBM AT)
IBM XT
IBM PS/2 30-80
IBM 5550
PS/2 2530
NEC 9801
End Configuration
Page 7
- 7 -
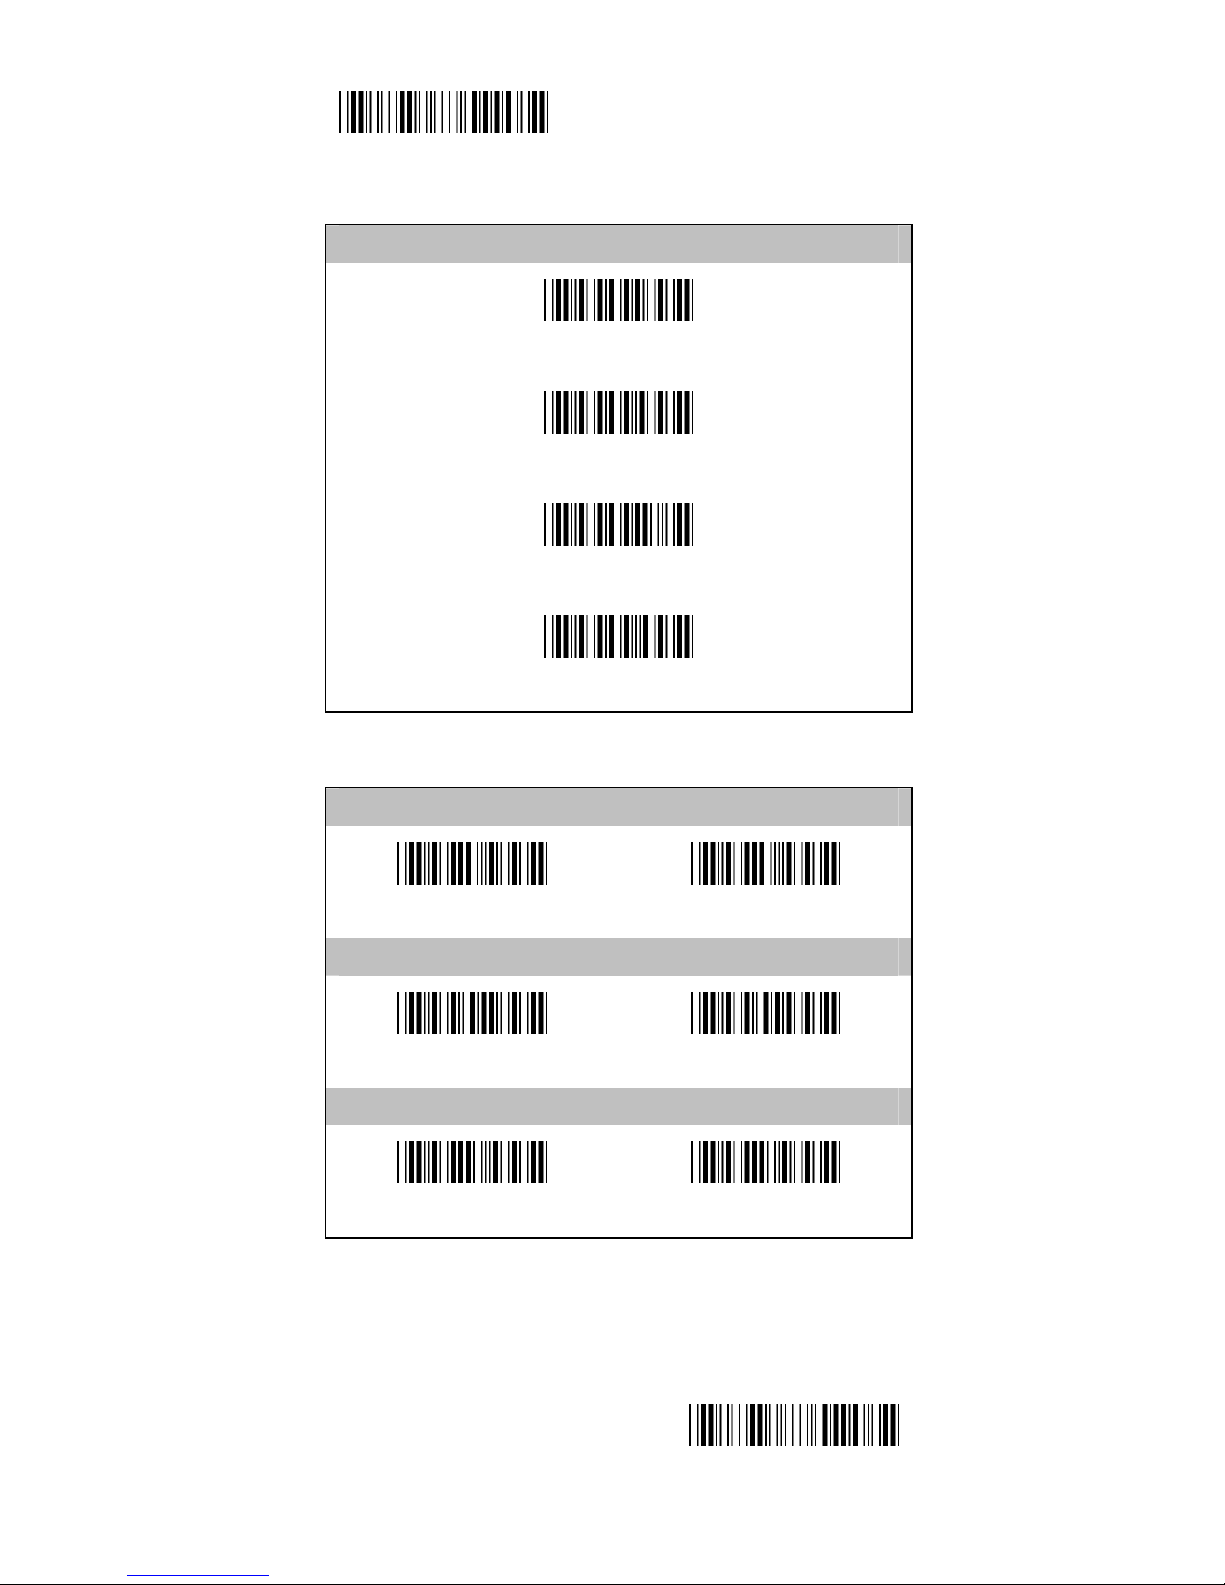
Start Configuration
Languages
(US)
Italian
Spanish
French
Germany
Japan
End Configuration
Page 8
- 8 -
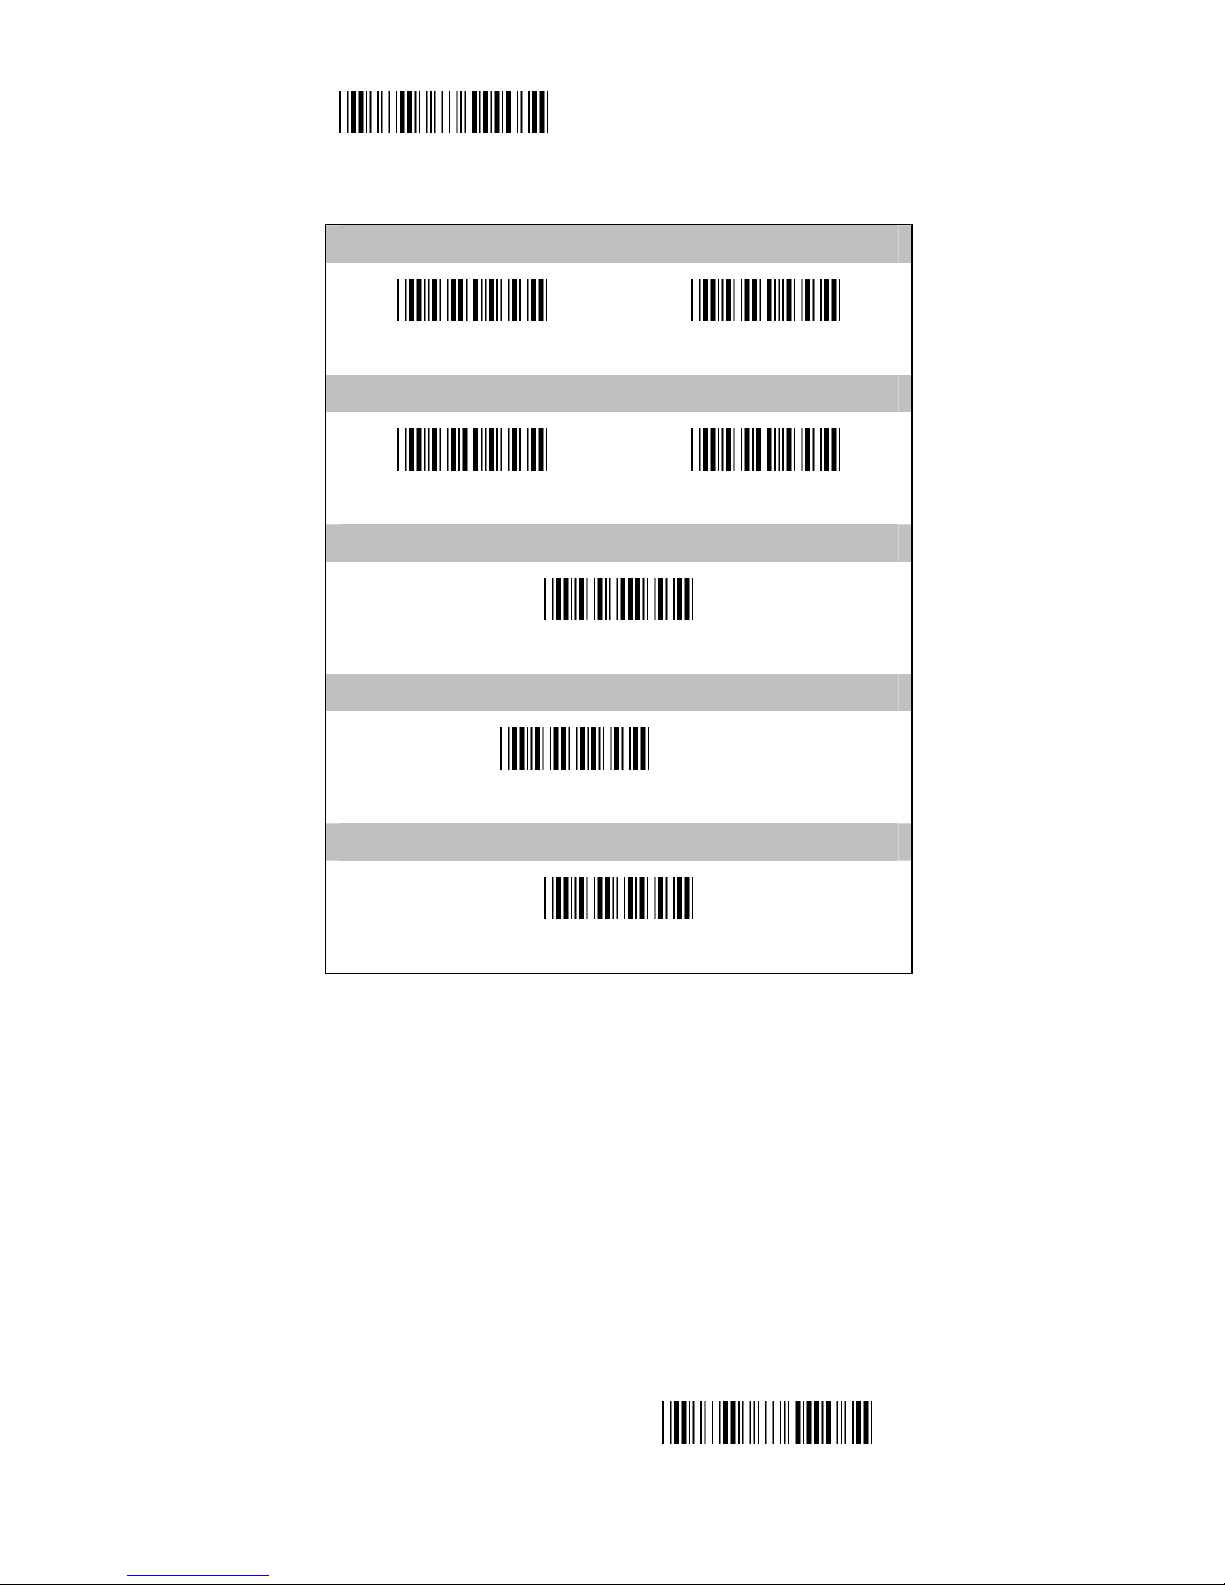
Start Configuration
Keyboard Terminator
None
(CR)
Tab
ESC
Function Key Emulation
(OFF)
ON
Keyboard Emulation
(OFF)
ON
ALT mode
(OFF)
ON
End Configuration
Page 9
- 9 -
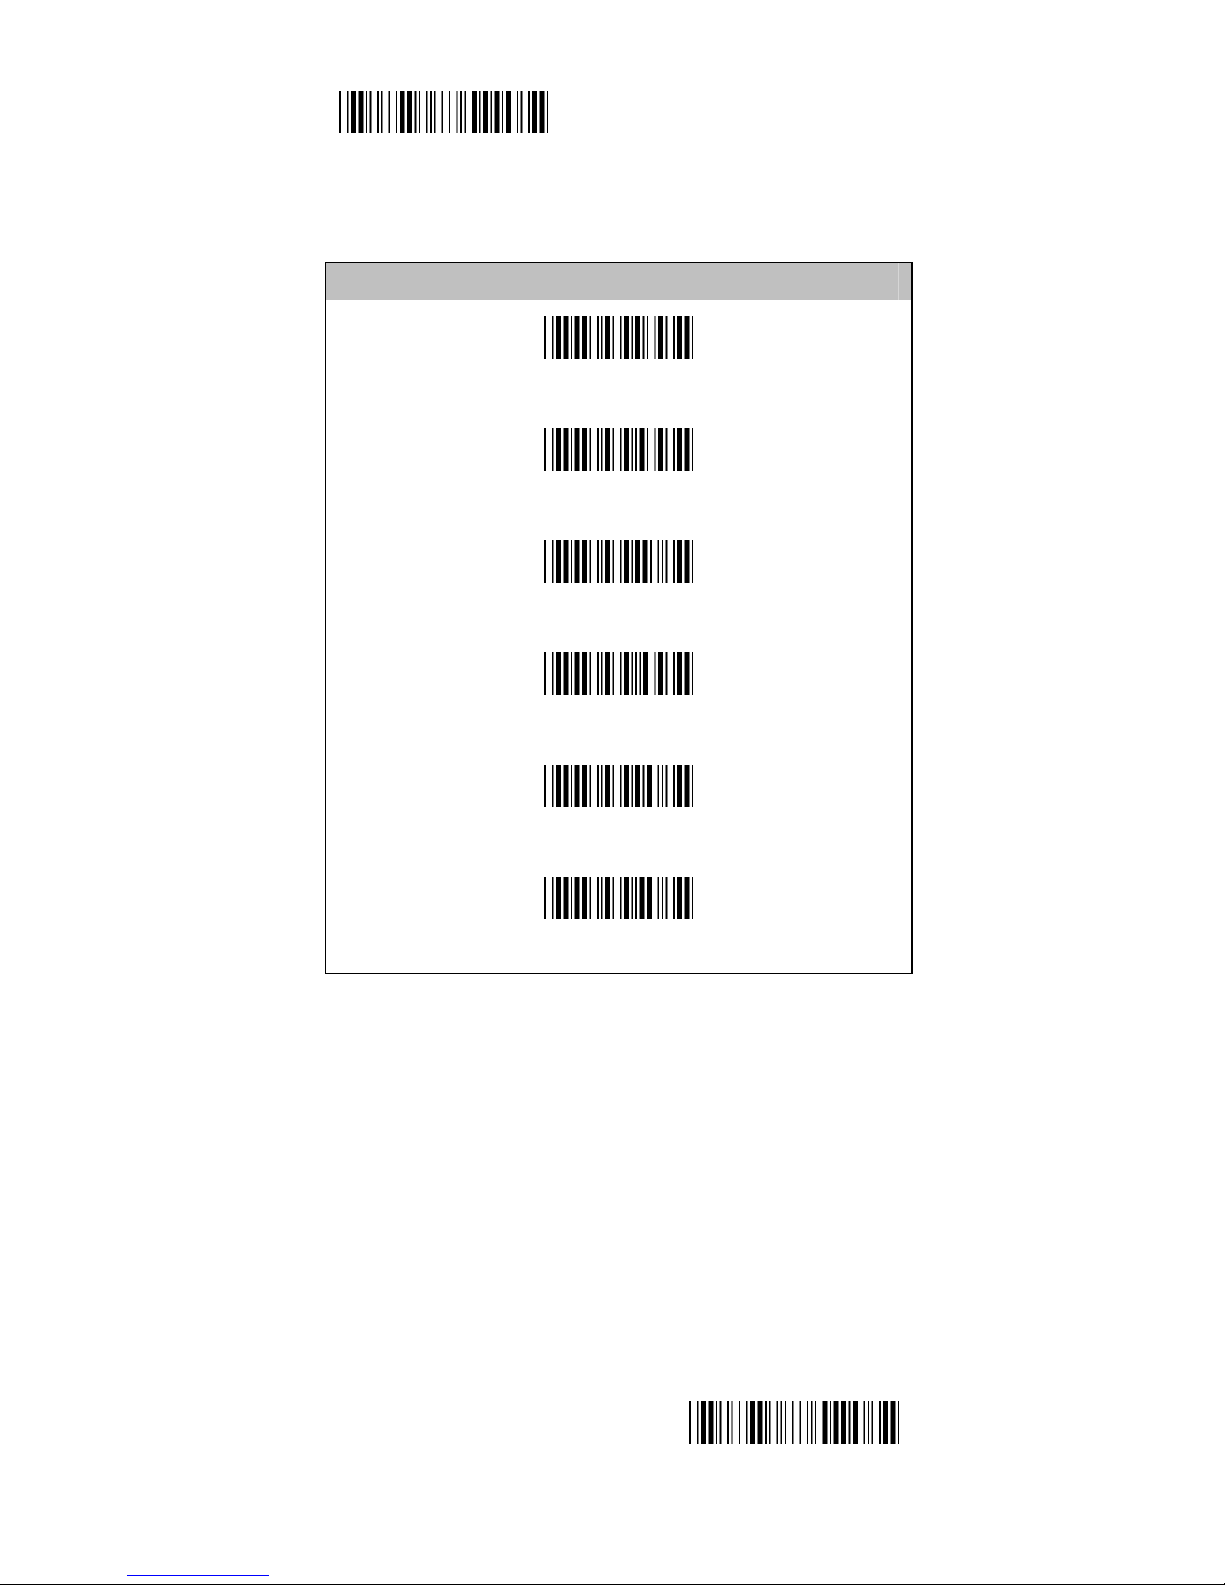
Start Configuration
Caps Lock
(OFF)
ON
Num Lock
(OFF)
ON
Inter-character delay
00H00-64H*1ms
Inter-Message Delay
00H00-0AH*100ms
Keyboard Speed
00H00-08H
End Configuration
Page 10
- 10 -
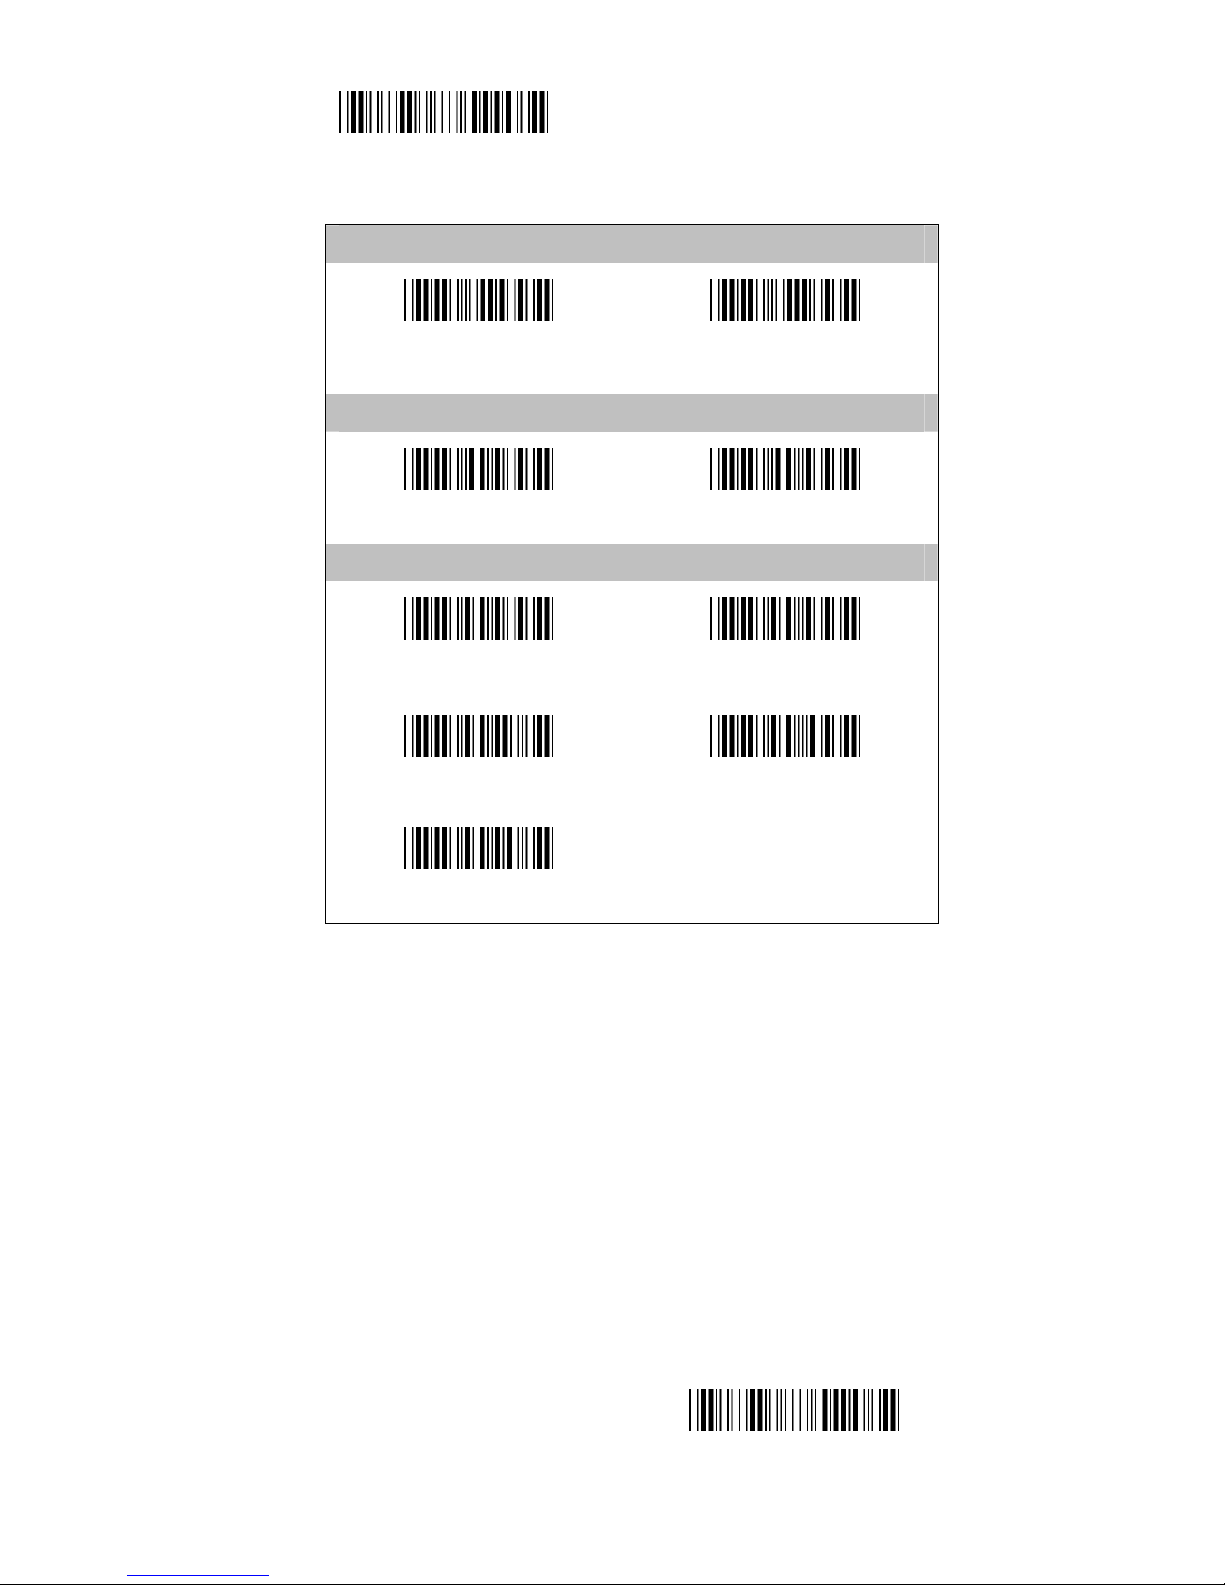
Start Configuration
2.1.2 RS-232 Communication Parameters
Baud Rate
1200
2400
4800
(9600)
19200
38400
End Configuration
Page 11
- 11 -
Start Configuration
Data Bits
7
(8)
Data Stop
1
2
Parity
(None)
Even
Odd Mark
Space
End Configuration
Page 12
- 12 -
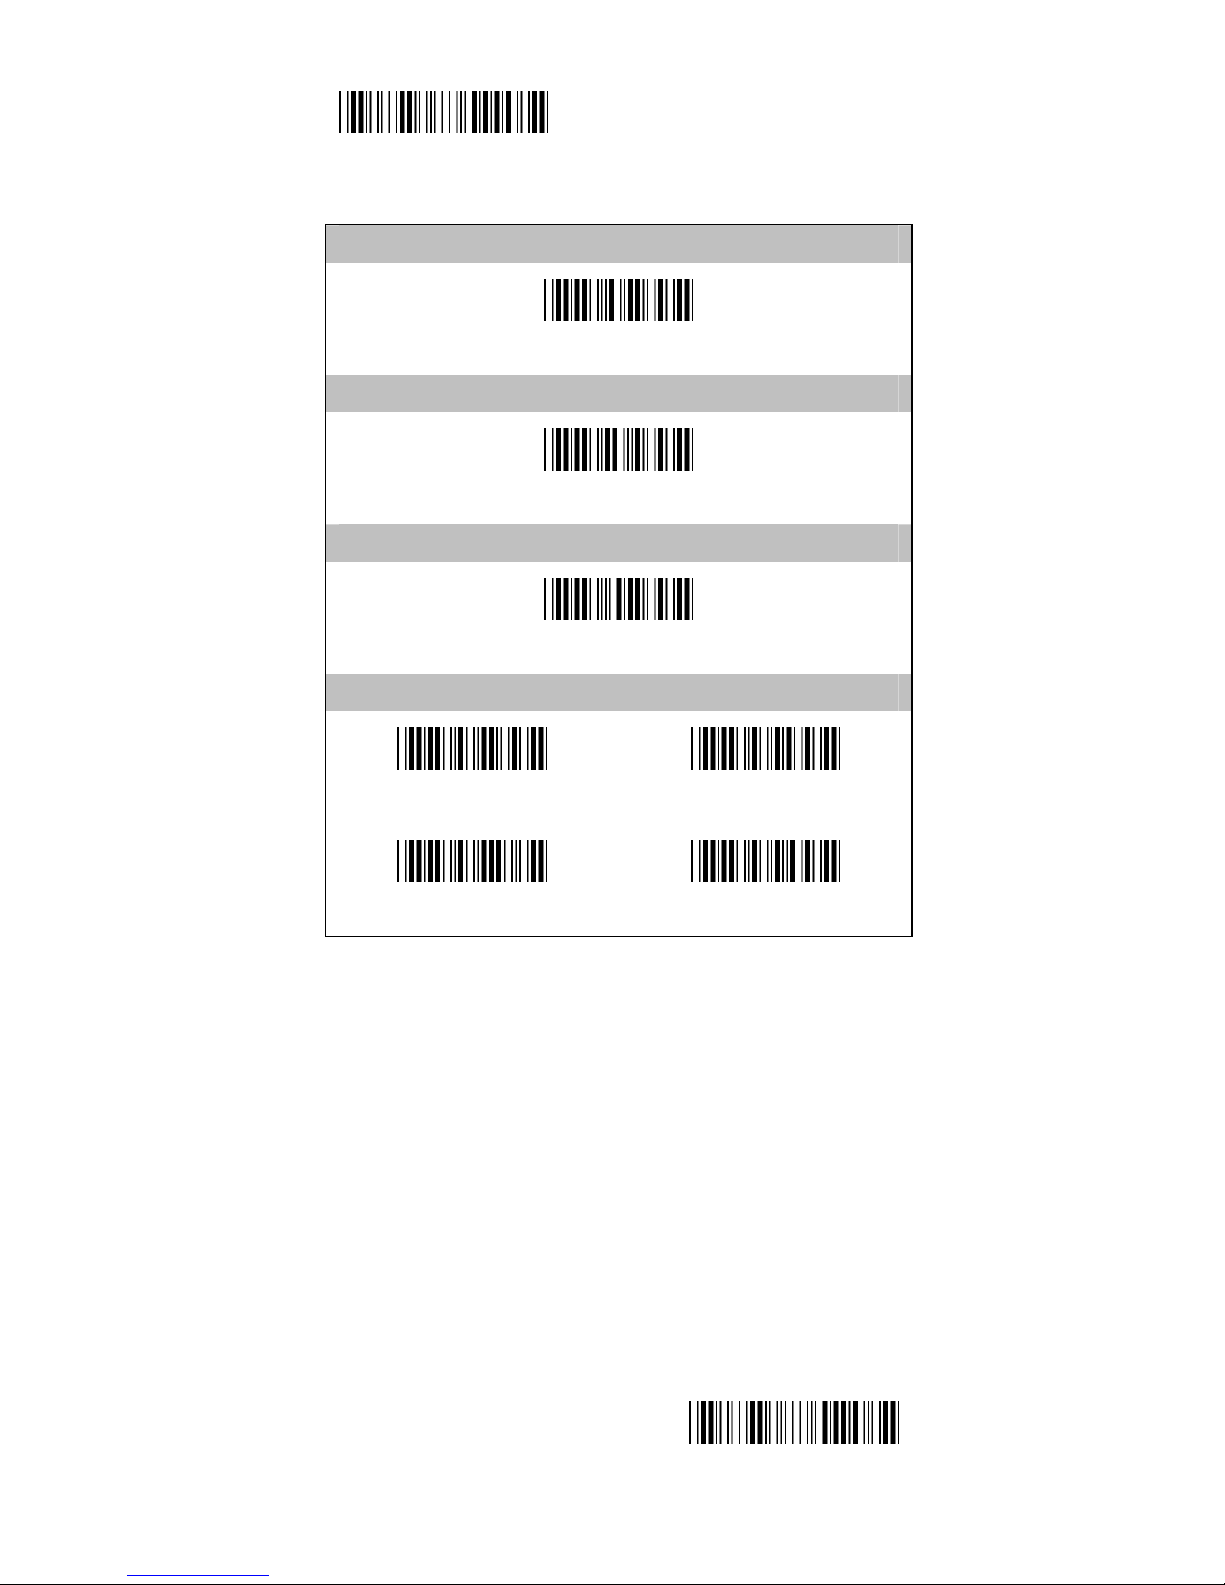
Start Configuration
Inter-Character Delay
00-64H*1(ms)
Inter-Message Delay
00-0AH*100(ms)
Handshaking Delay
00-0AH*100(ms)
Handshaking
(None)
RTS/CTS
ACK/NAK Xon/Xoff
End Configuration
Page 13
- 13 -
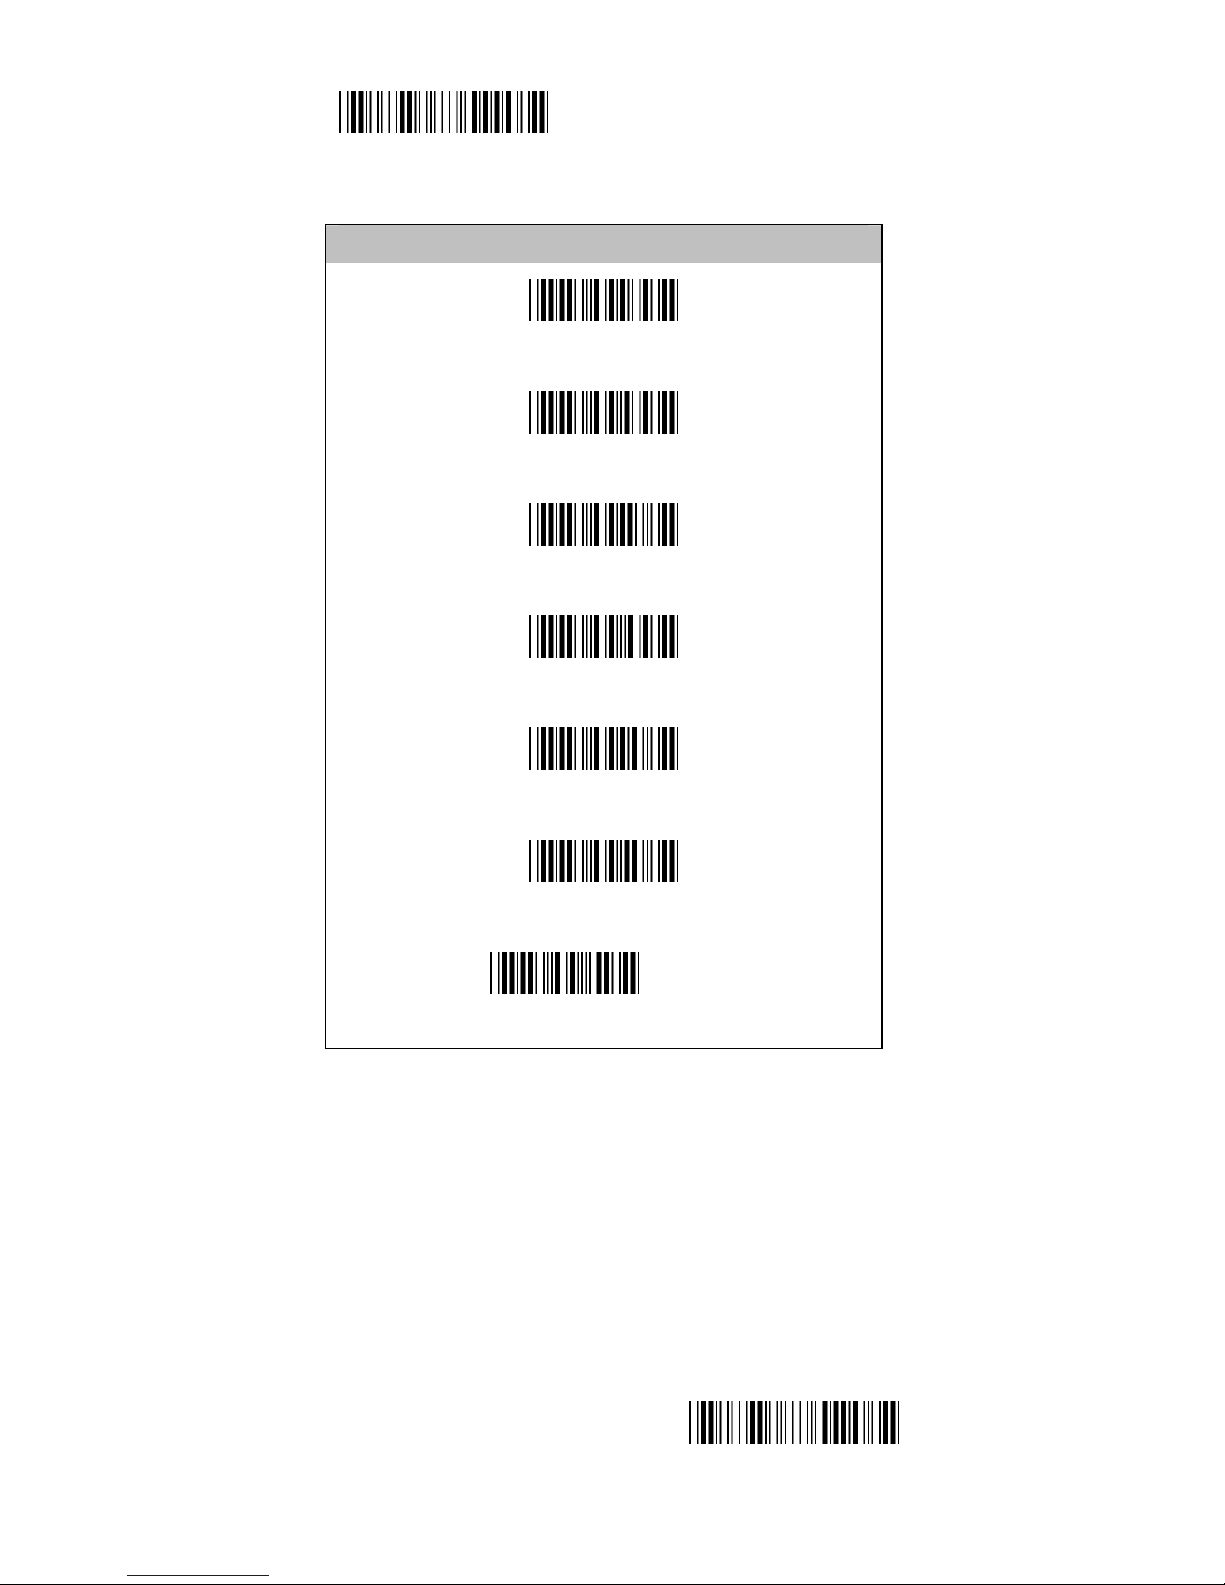
Start Configuration
Character Parameter
None
(CR+LF)
CR
LF
Tab
STX/ETX
EOT
End Configuration
Page 14

- 14 -
2.2 Scan Mode
Trigger Mode
Press the trigger and start to scan. The scan will be
end once you loose the trigger or decode the barcode.
Repeat the action to start the next decodes.
Auto Power off Mode
Press the trigger and start to scan. The scan will be
end once the time is up or decode the barcode.
Continuous/Trigger OFF Mode
Press the trigger and start the continuous scan. This
mode can scan the different barcode continuously and
you just scan the same barcode for one time. Remove
the light; you can re-scan the same barcode. Press the
trigger again; you can end the Continued Power on
Mode.
Test Mode
Press the trigger and start to test. Scan the barcode
continuously and press the trigger to end the test.
Continuous/LED ON Mode
Press the trigger and start the continuous scan. The
light is always on and you can press the trigger to read
it. This mode will be end when you choose the other
scan mode.
Continuous/Timeout OFF Mode
The scanning method is the same as the
Continuous/Trigger OFF mode but you have to scan it
within the compulsory time, otherwise the mode will
be end. You can press the trigger to start the next
scan
Page 15

- 15 -
. Timeout Set-Up
1. Scan the barcode of “Continuous/Timeout OFF
Mode”
2. Scan 2 digits of the ASCII code of the Appendix
A
3. Scan the “End” of the Appendix A
4. Scan the End Configuration to end the procedure
5. The settings unit is a second. Ex:0*40 stands for 1
minute
The Timeout Default is 0*B4, about 3 minutes
Page 16
- 16 -
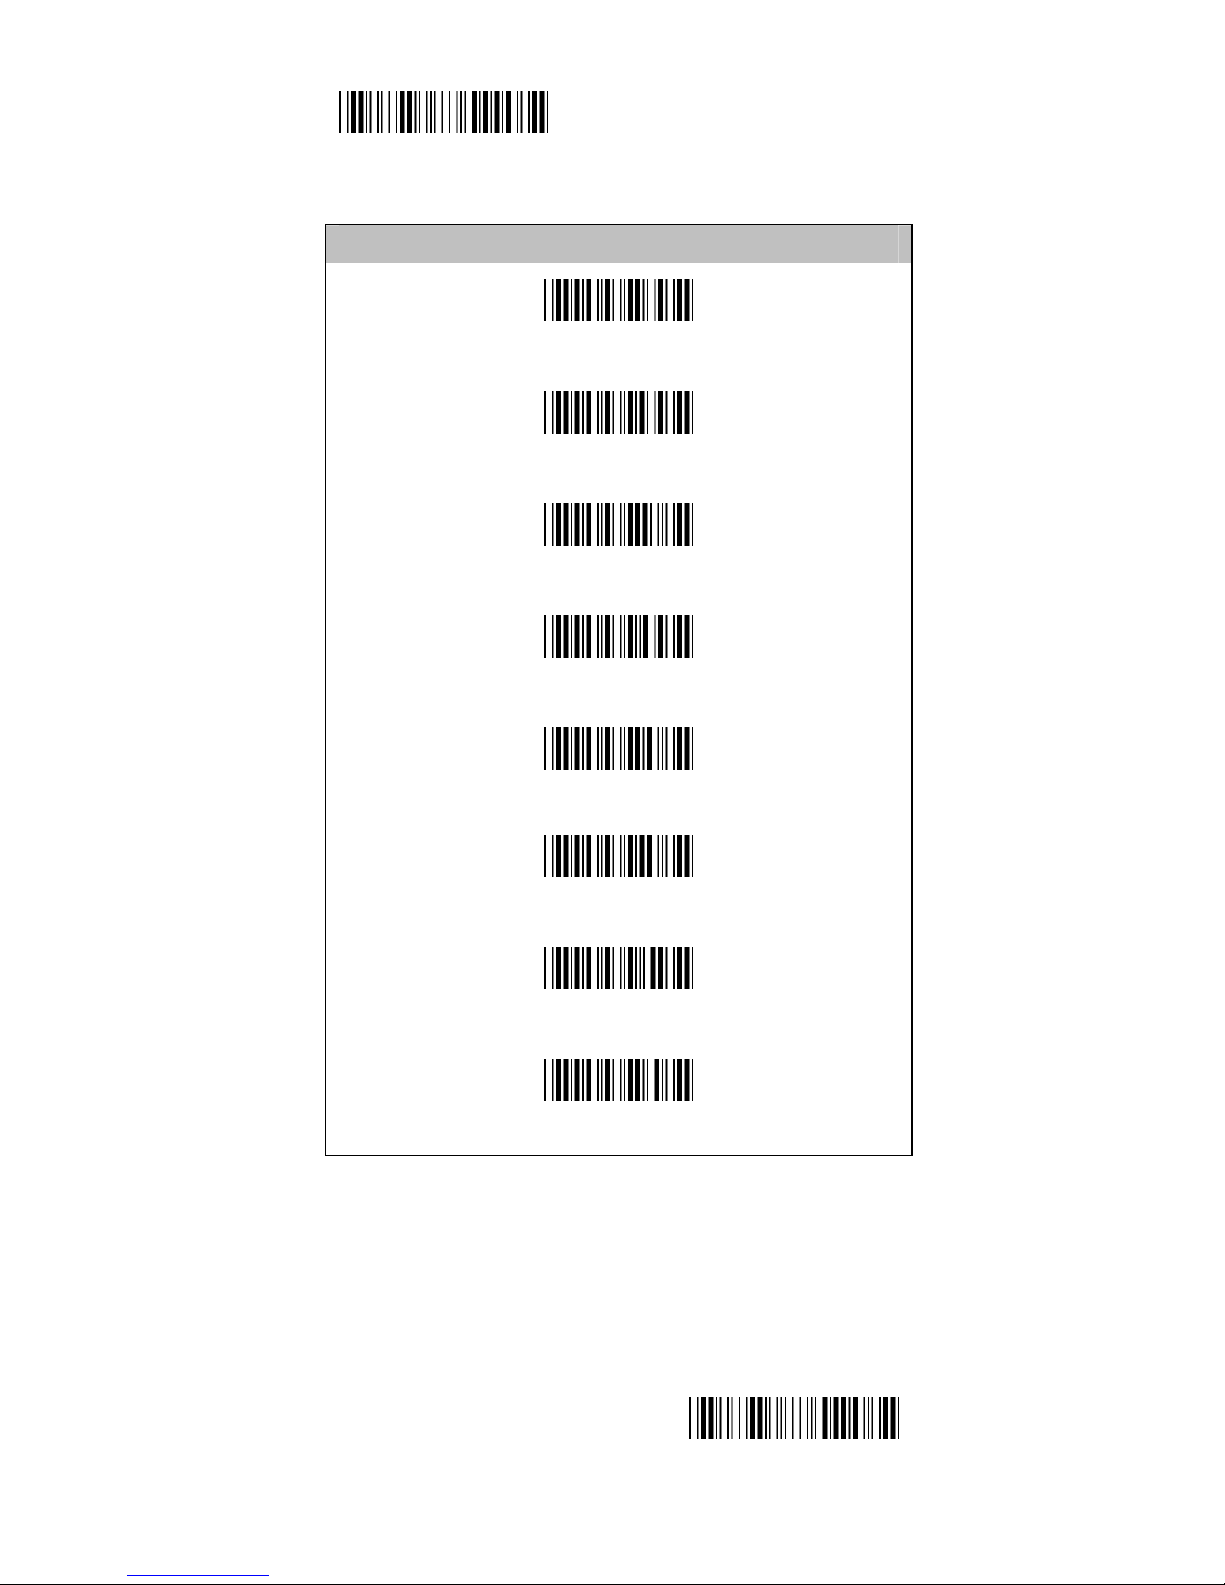
Start Configuration
Scan Mode
Trigger On/Off
(
Trigger On/Good read off
)
Continuous/Trigger Off
Testing
Continuous/LED always On
Continuous/Timeout Off
Flash On
Continuous/No Trigger
End Configuration
Page 17
- 17 -
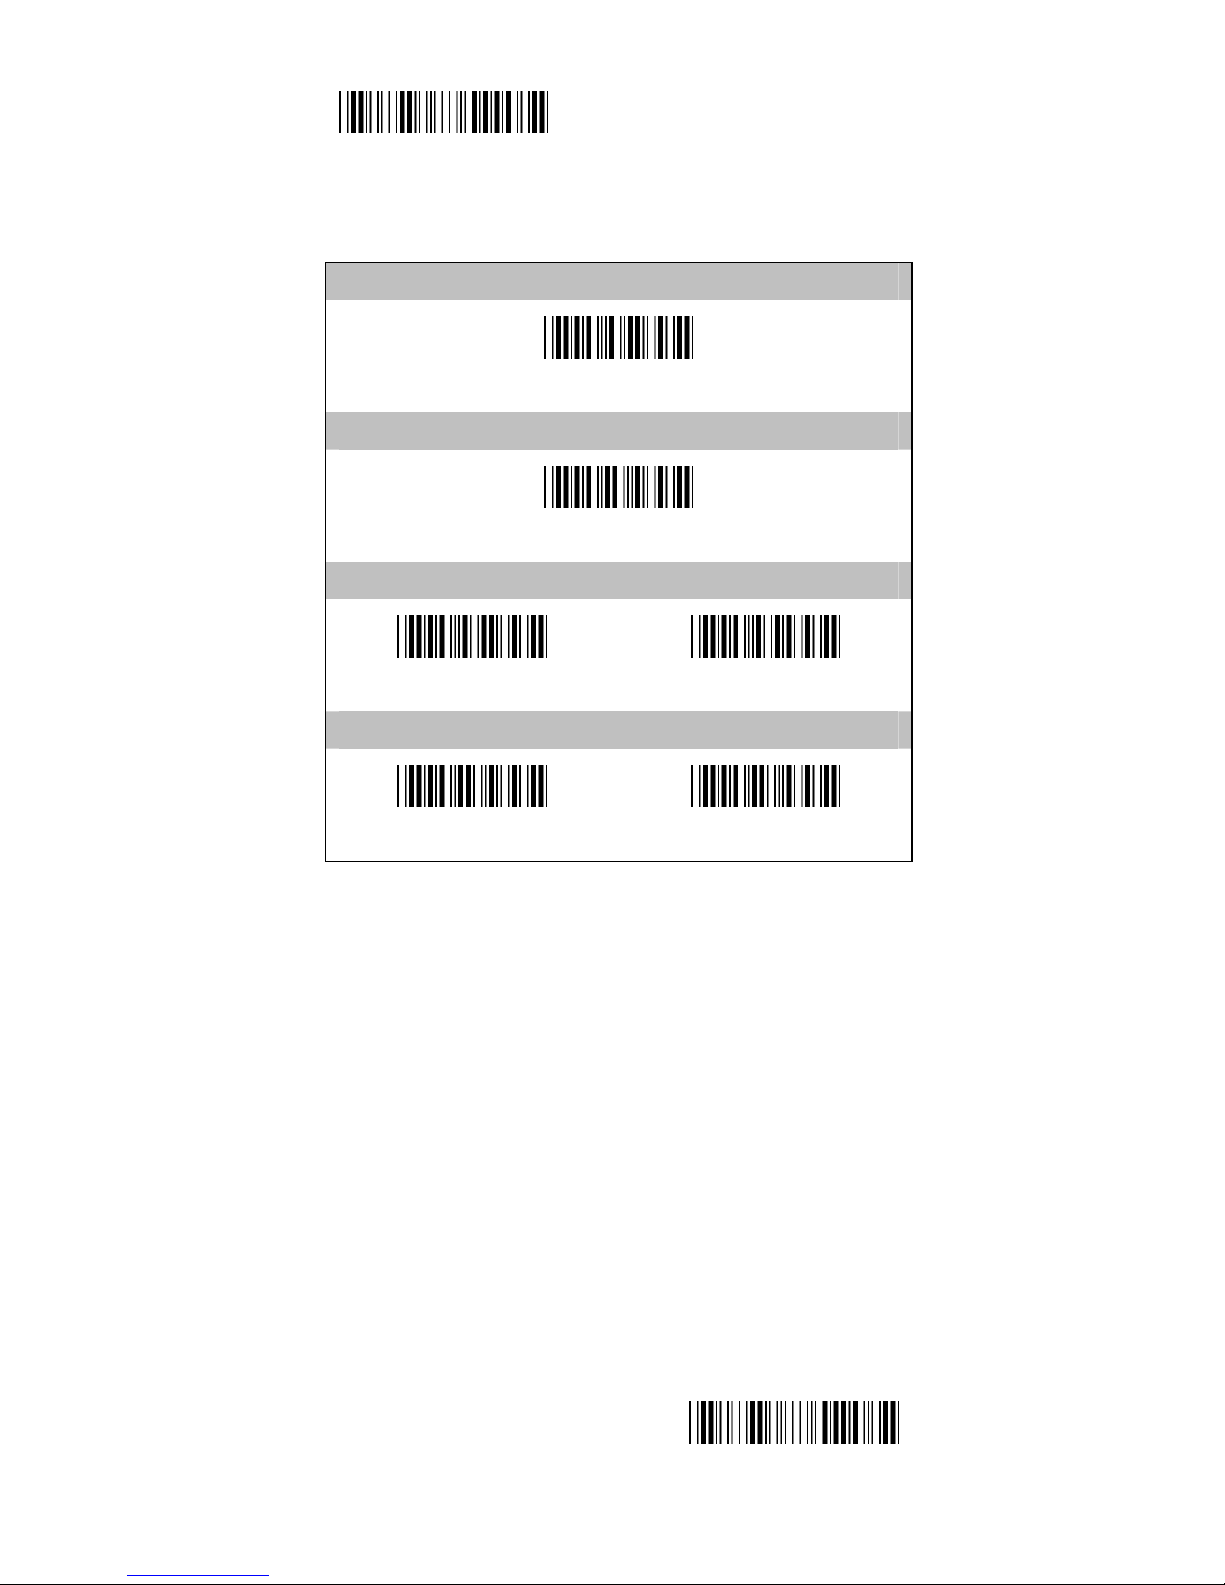
Start Configuration
2.3 Beep Setting
Buzzer Frequency
(00-0A-10H)
Buzzer Beep Tone
(00-05-10H)
Power Up Tone
(OFF)
ON
Good read Beep
(OFF)
ON
End Configuration
Page 18

- 18 -
2.4
Character Installation
The first and last character: You can put 10 ASCII at
most in front of the barcode data. When the
installation is “0” that means you don’t need to add the
first and last character. Please find the format as
below:
The First Character Barcode The Last Character
The process for adding the first and last character to
the barcode:
1. Scan the barcode of “Start Configuration” and
“The First Character Installation”.
2. Check the ASCII table to get the ASCII code of
the first and last character.
3. Scan the barcode of ASCII in the Appendix.
4. Scan the “End Configuration”.
G1/G2 character Insertion: You can put 10 ASCII at
most in front of the barcode data. When the
installation is “0” that means you don’t need to add the
first and last character.
1. Scan the barcode of the “Start Configuration” and
“G1 Insert Character”.
2. Check the ASCII table to get the ASCII code of
the first and last character.
3. Scan the barcode of ASCII in the Appendix.
4. Scan the “End Configuration”.
5. Repeat the same process to the G2 insertion.
6. Scan the “End Configuration”.
The position of G1/G2 character insertion: To select a
character insert to the barcode. You can’t insert any
character while the installation is “0”
1. Scan the barcode of the “Start Configuration” and
“G1 character insertion position”
2. Check the ASCII table to get the corresponding
ASCII code of the insertion position.
Page 19

- 19 -
3. Scan the “End Configuration”.
4. Repeat the same process to the G2 character
insertion position.
5. Scan the “End Configuration”.
Code Transmission: If your application needs to
transmit the code (barcode type ID), you have to set
“ON” for this feature and the format is ID + Barcode
data.
Page 20
- 20 -
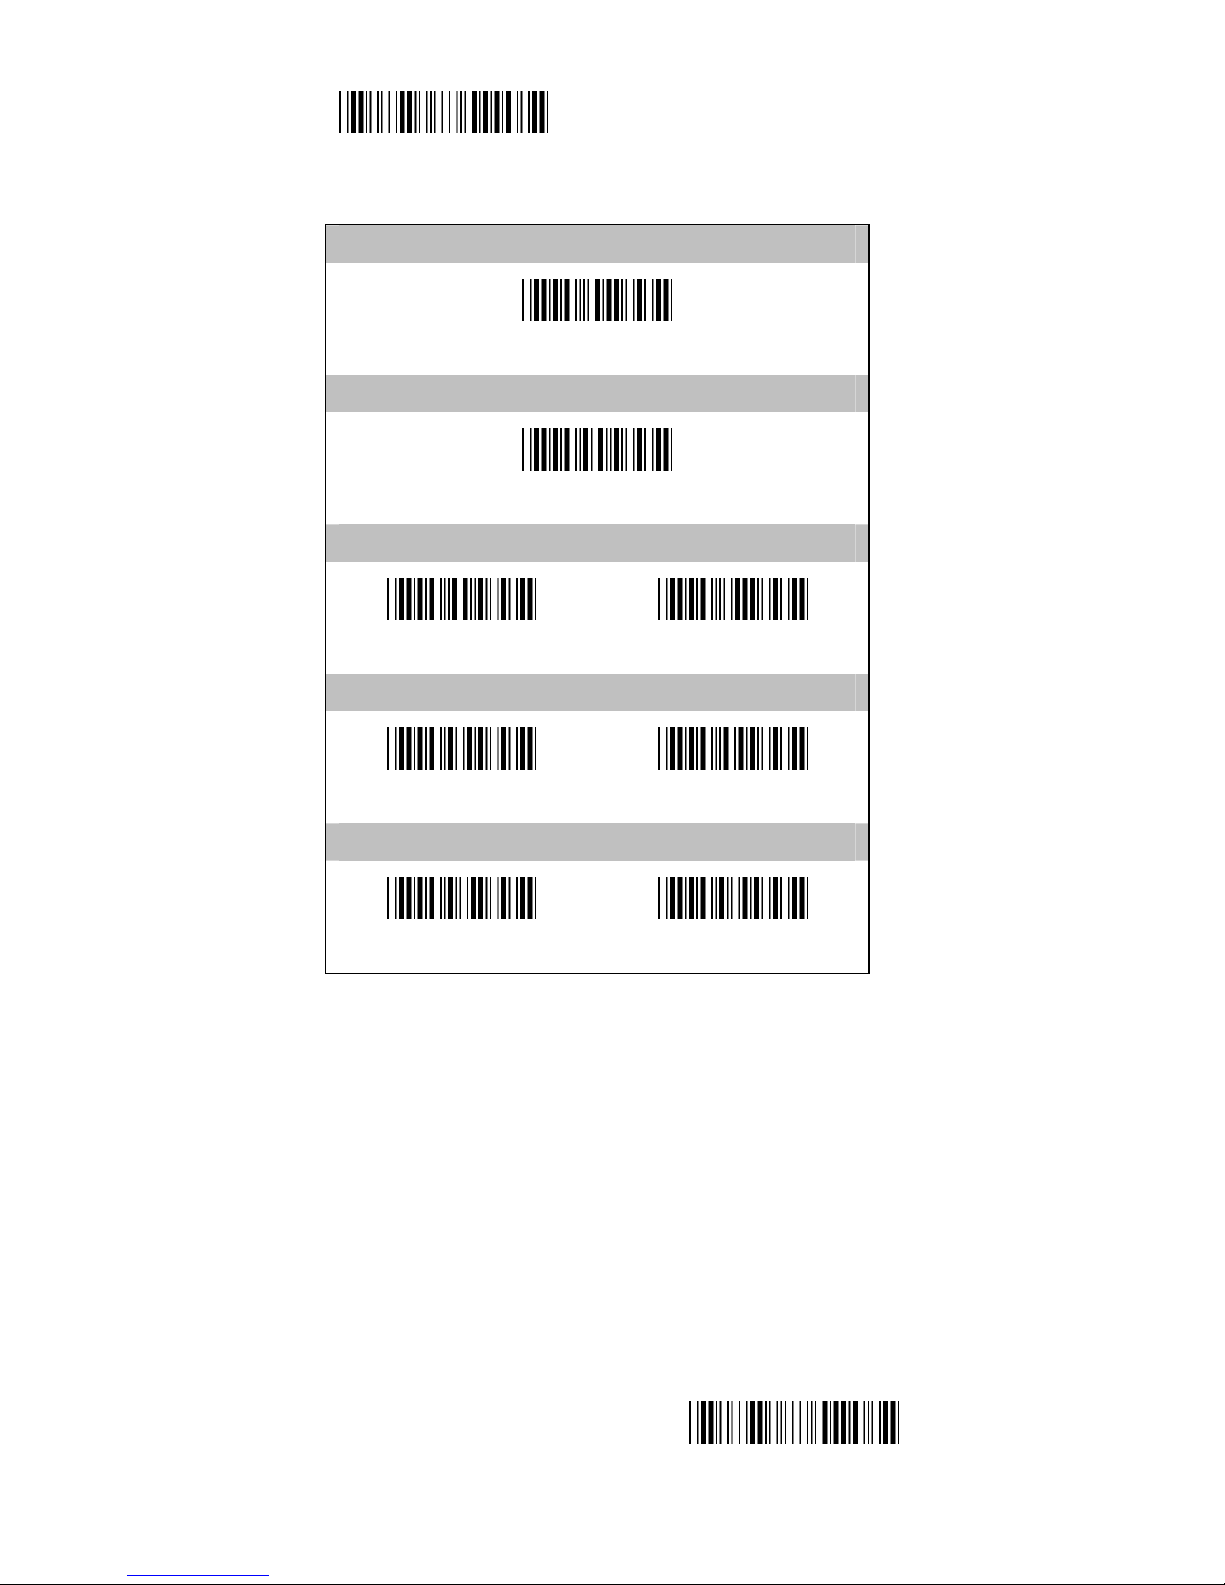
Start Configuration
Preamble Setting
(00)
Postamble Setting
(00)
Character Insertion
G1(00) G2(00)
Character Insertion Position
G1(00) G2(00)
Code ID Transmission
ON
(OFF)
End Configuration
Page 21
- 21 -
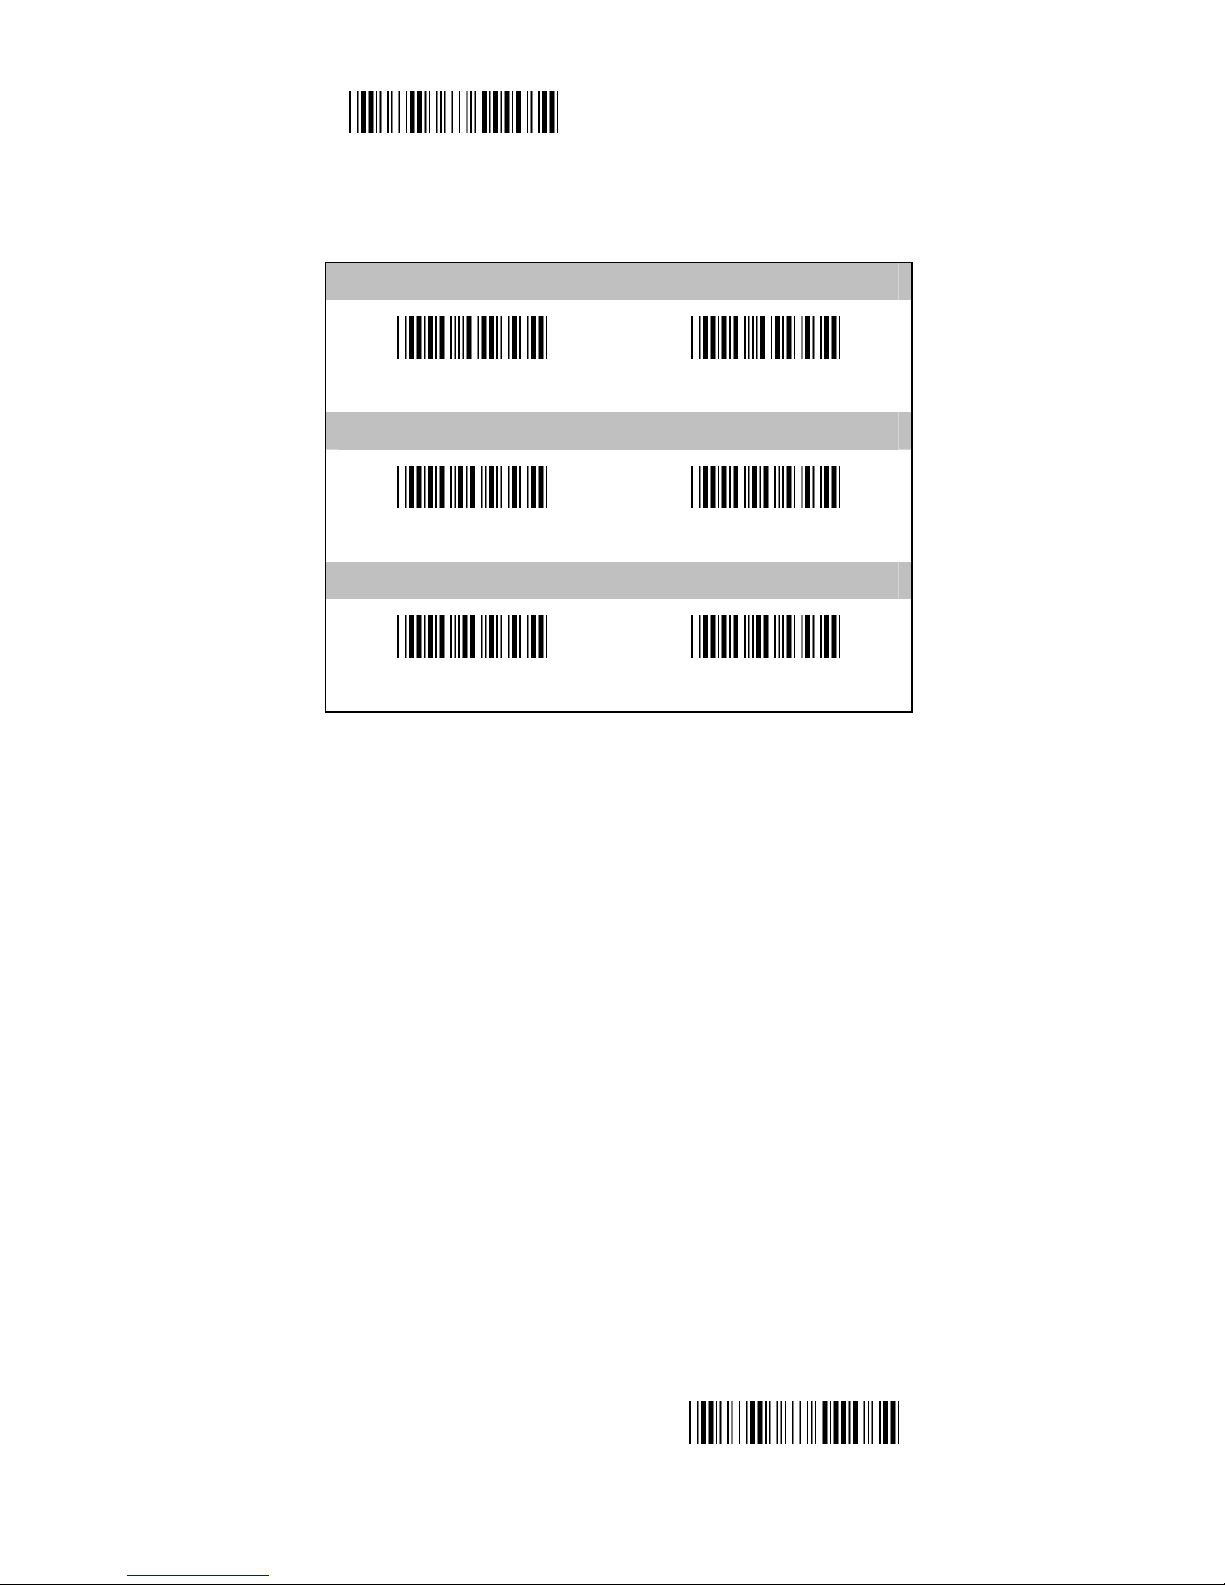
Start Configuration
2.5 Others Setting
Verify Scanning
(Single)
Double
Bar Space Setting
(Bar High)
Bar Low
Laser Data Scan Speed Up
ON OFF
End Configuration
Page 22
- 22 -
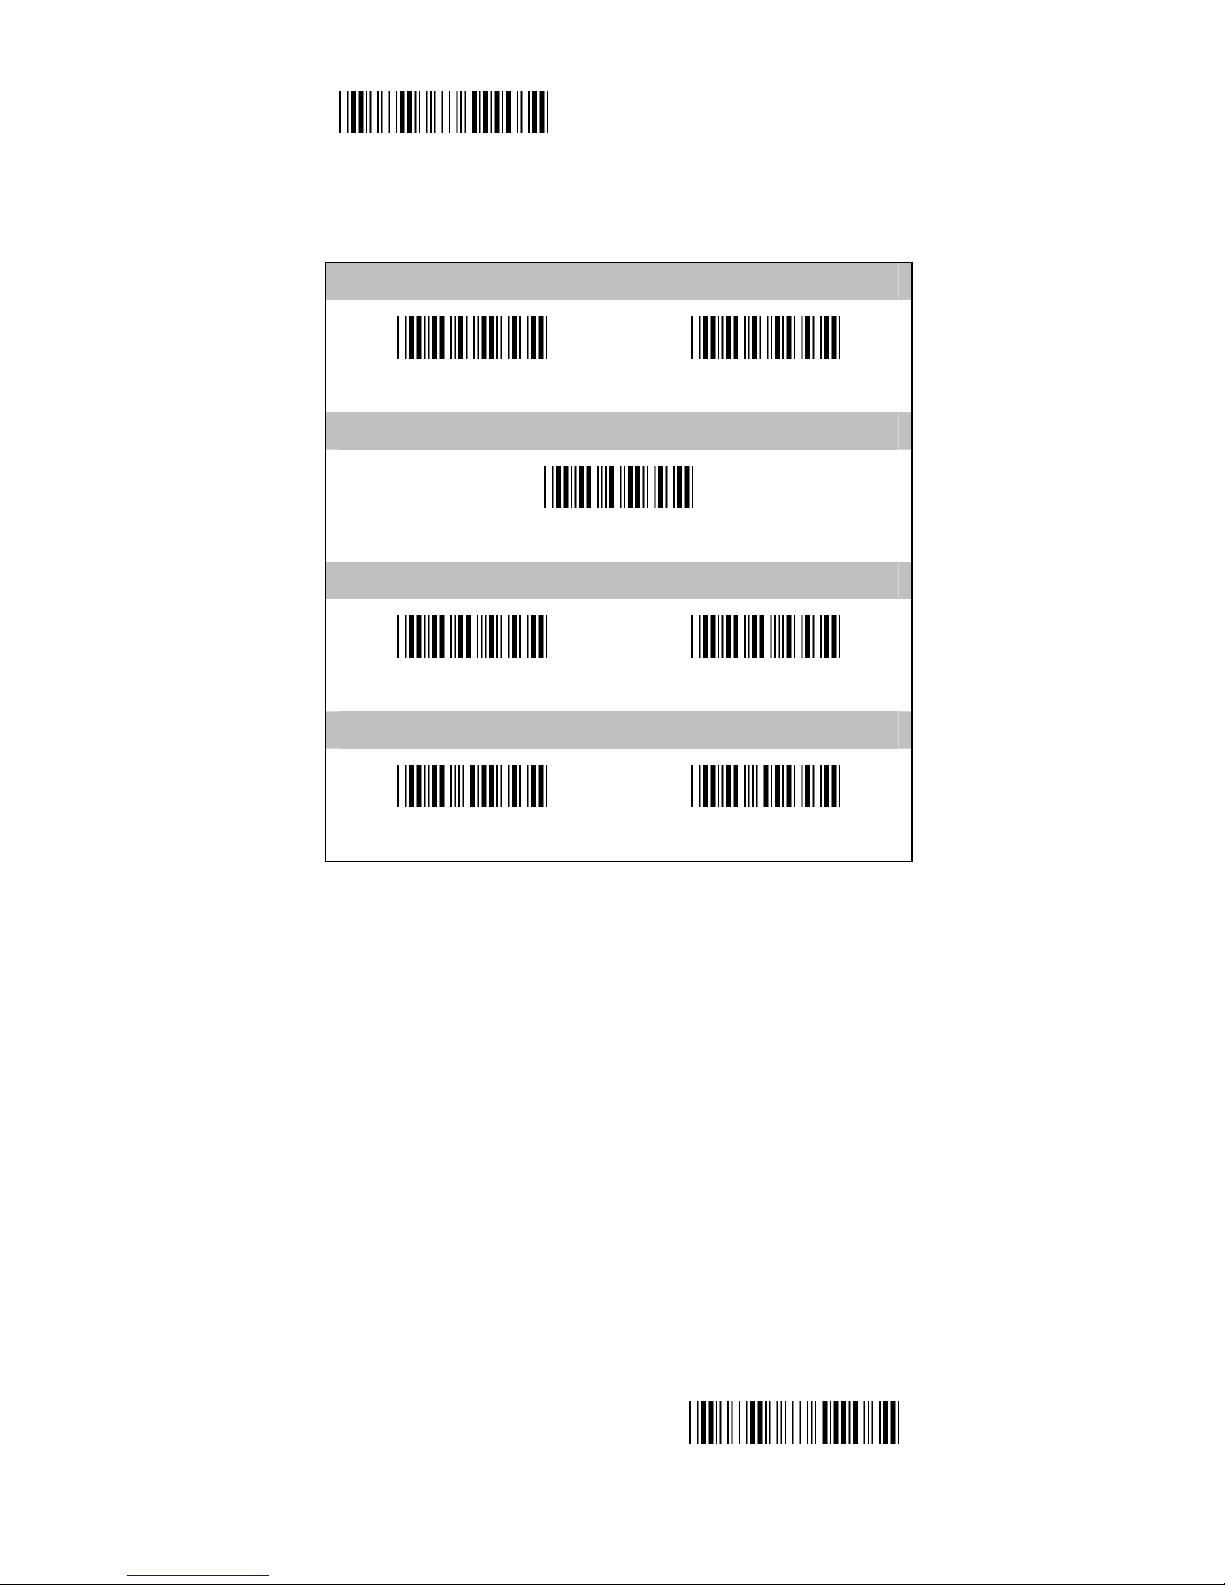
Start Configuration
3.1 UPC-A
Reading
OFF
(ON)
Code ID
46H (20-7EH)
UPC-A Convertor to EAN-13
(OFF)
ON
Transmit Check Char.
OFF
(ON)
End Configuration
Page 23
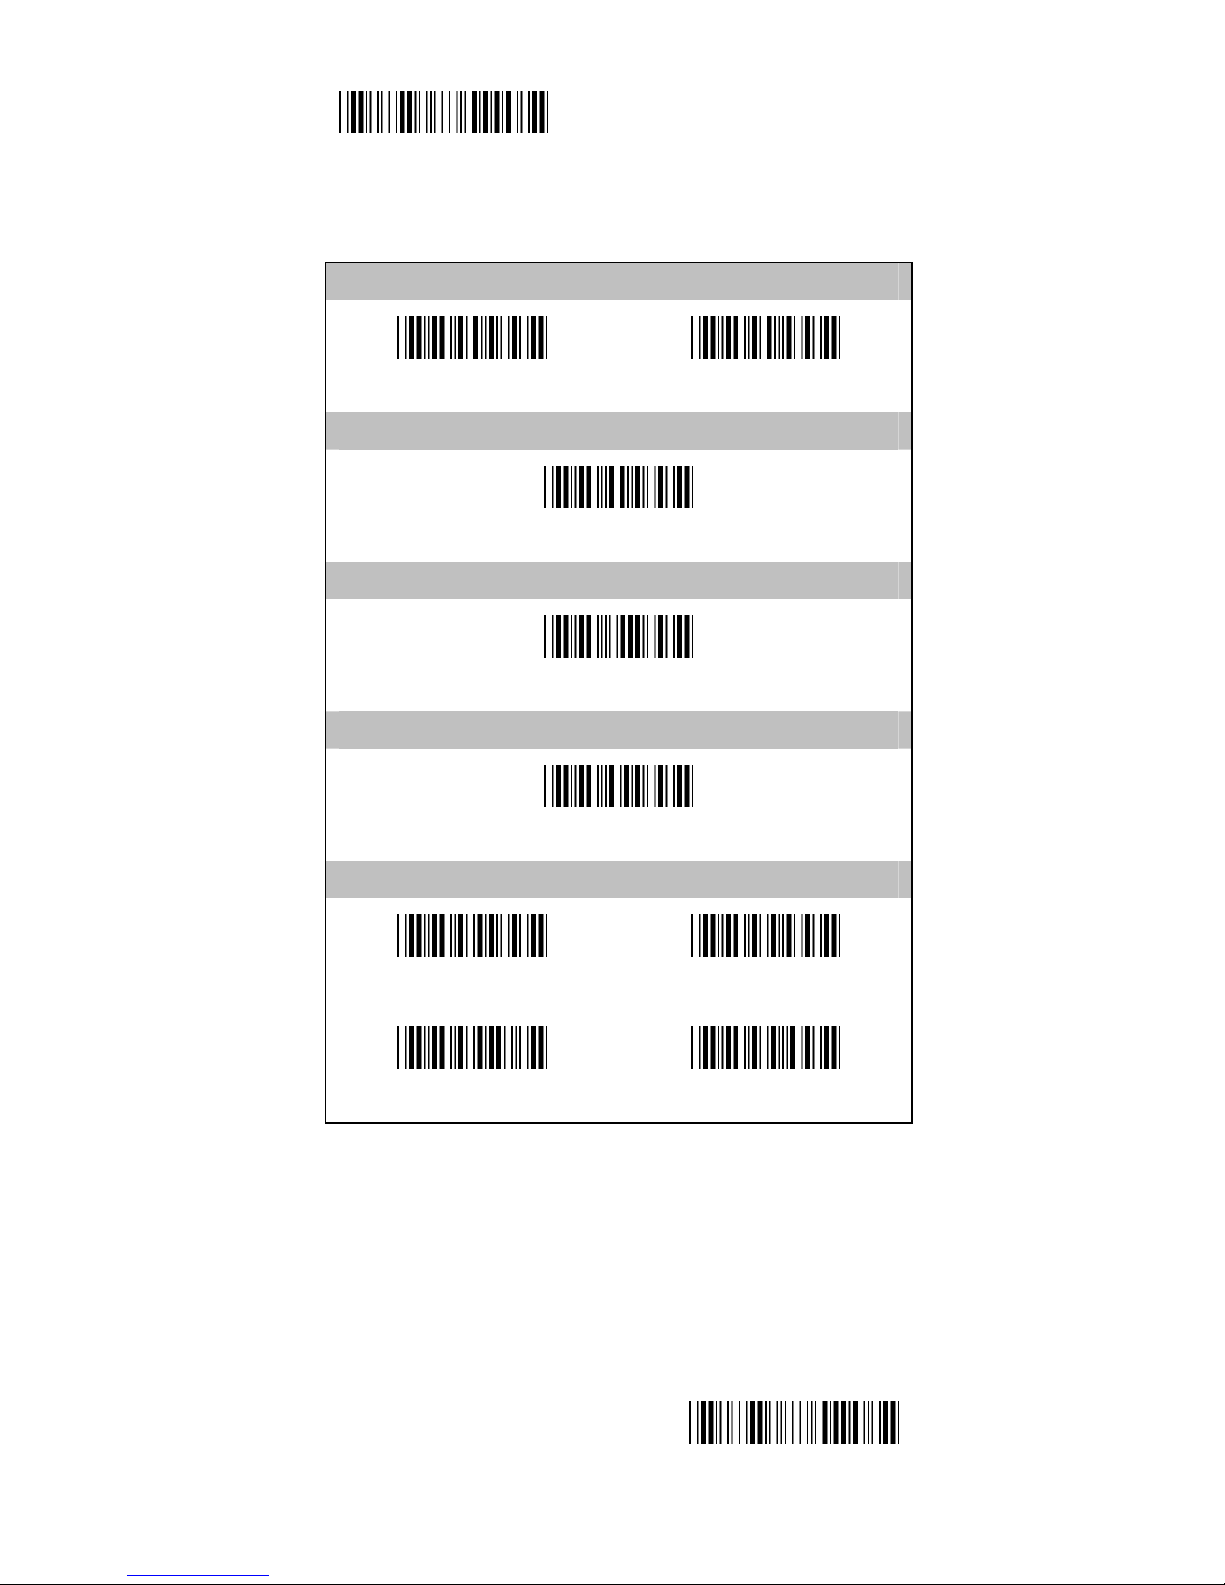
- 23 -
Start Configuration
UPC-A
Truncate Leading Zero
(OFF)
ON
Truncate Leading Digit
00H (00-0DH)
Truncate Last Digit
00H (00-0DH)
Select Insertion Code
00H (00-02H
Add-on 2/5
(None)
2
5 2/5
End Configuration
Page 24
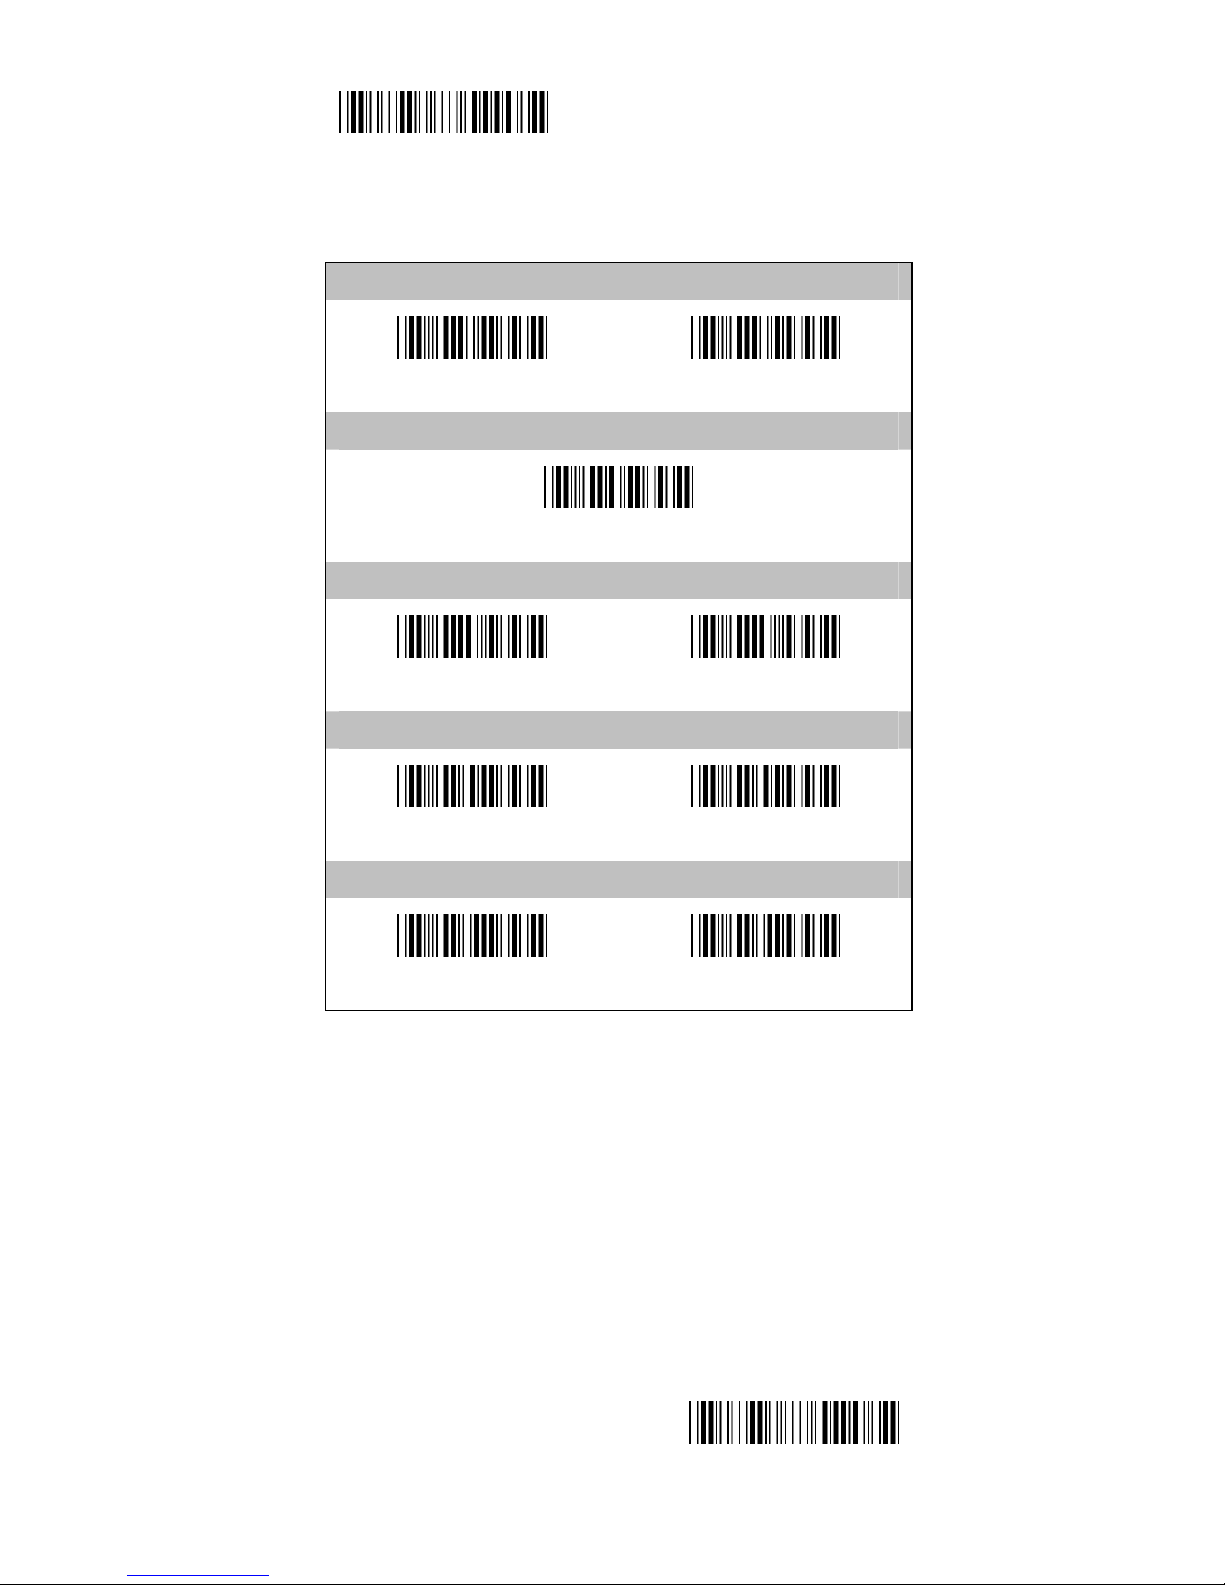
- 24 -
Start Configuration
3.2 UPC-E
Reading
OFF
(ON)
Code ID
47H (20-7EH)
UPC-E Convertor to UPC-A
(OFF)
ON
Transmit Check Char.
OFF
(ON)
Truncate Leading Zero
(OFF)
ON
End Configuration
Page 25
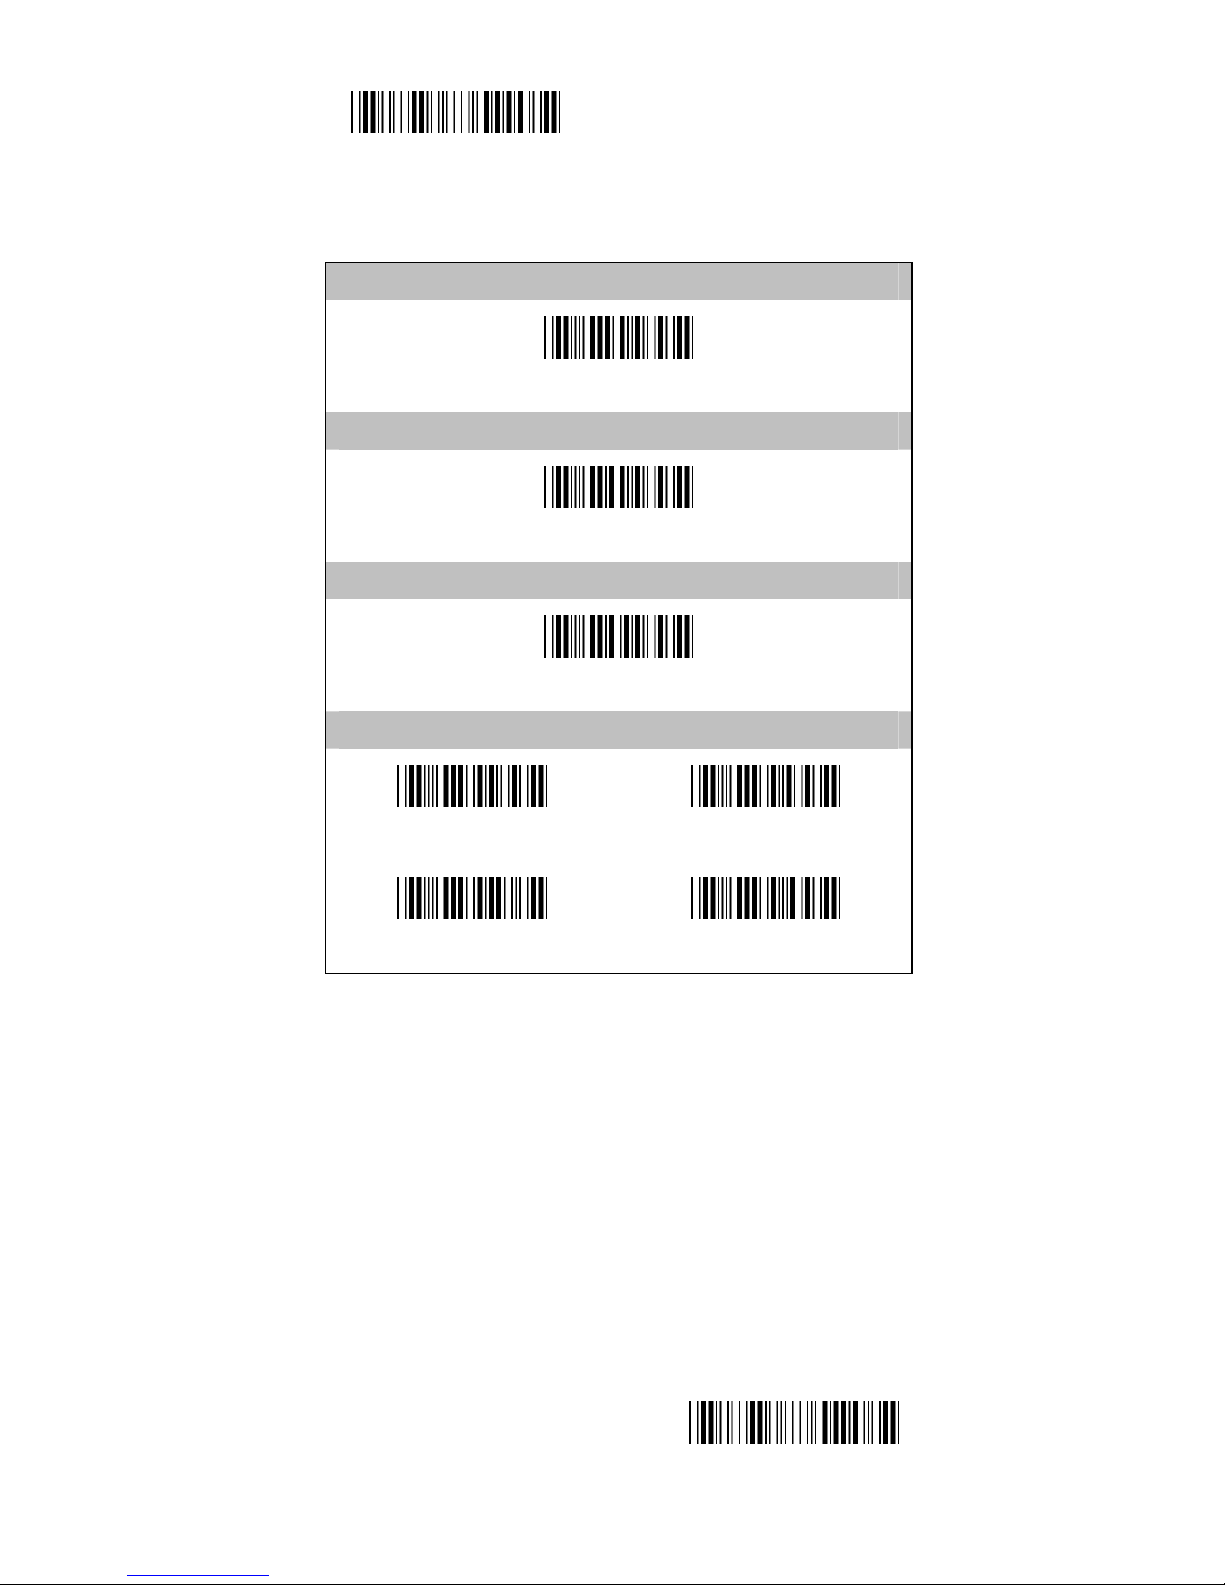
- 25 -
Start Configuration
UPC-E
Truncate Leading Digit
00H (00-08H)
Truncate Last Digit
00H (00-08H)
Select Insertion Code
00H (00-02H)
Add-on 2/5
(None)
2
5 2/5
End Configuration
Page 26
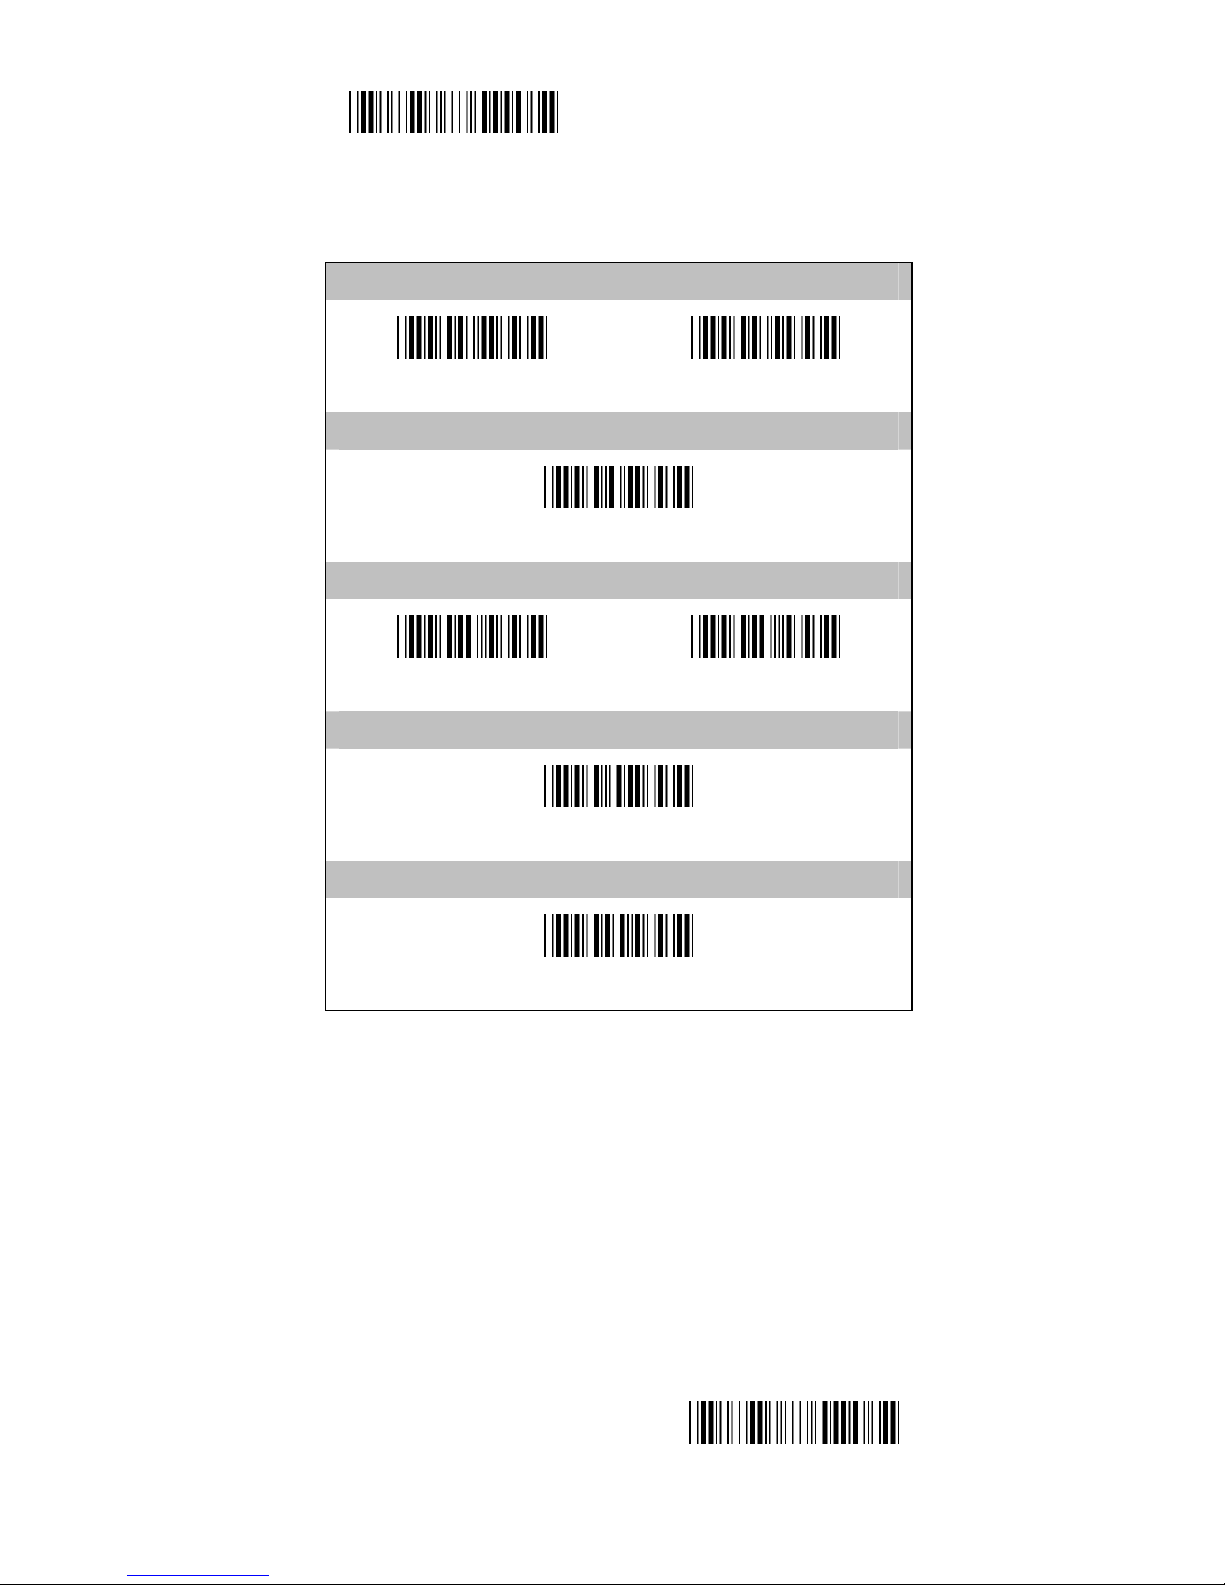
- 26 -
Start Configuration
3.3 EAN-13
Reading
OFF
(ON)
Code ID
48H (20-7EH)
Transmit Check Char.
OFF
(ON)
Truncate Leading Digit
00H (00-0DH)
Truncate Last Digit
00H (00-0DH)
End Configuration
Page 27
- 27 -
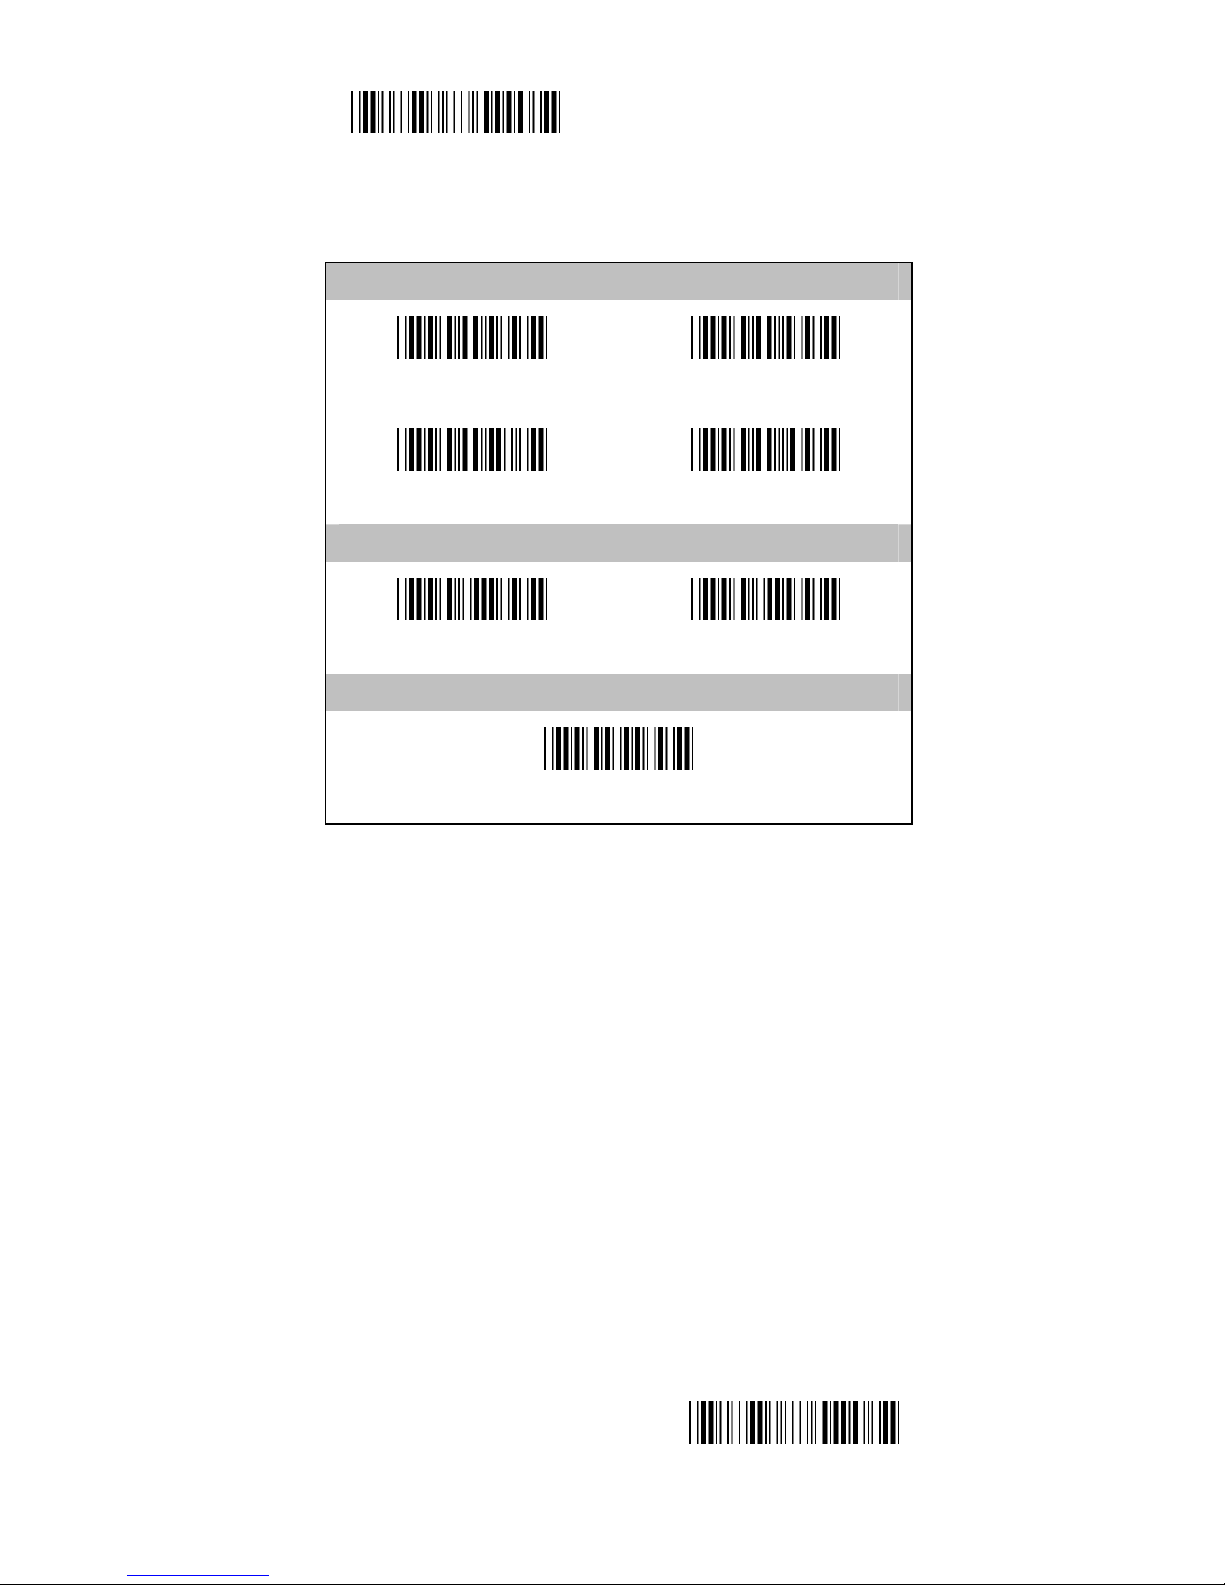
Start Configuration
EAN-13
Add-on 2/5
(None)
2
5 2/5
ISBN/ISSN Convert
(OFF)
ON
Select Insertion Code
00H (00-02H)
End Configuration
Page 28
- 28 -
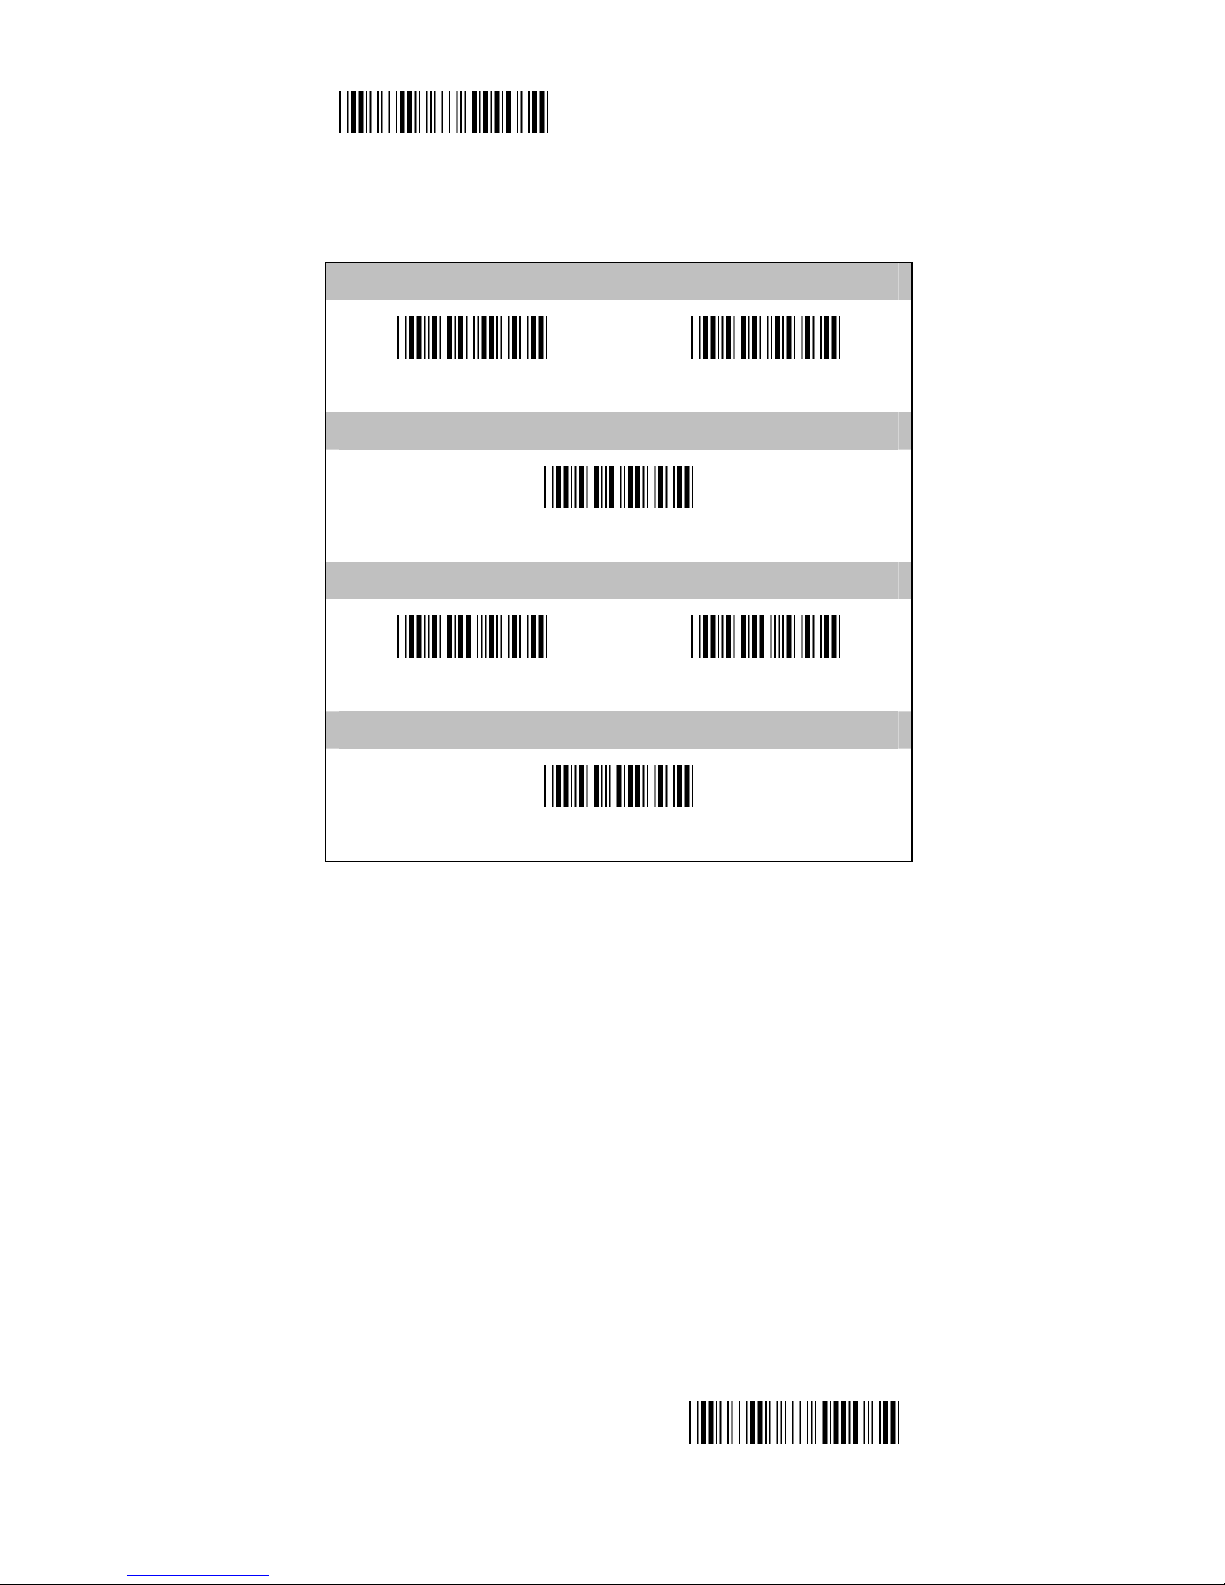
Start Configuration
3.4 EAN-8
Reading
OFF
(ON)
Code ID
49H (20-7EH)
Transmit Check Char.
OFF
(ON)
Truncate Leading Digit
00H (00-08H)
End Configuration
Page 29
- 29 -
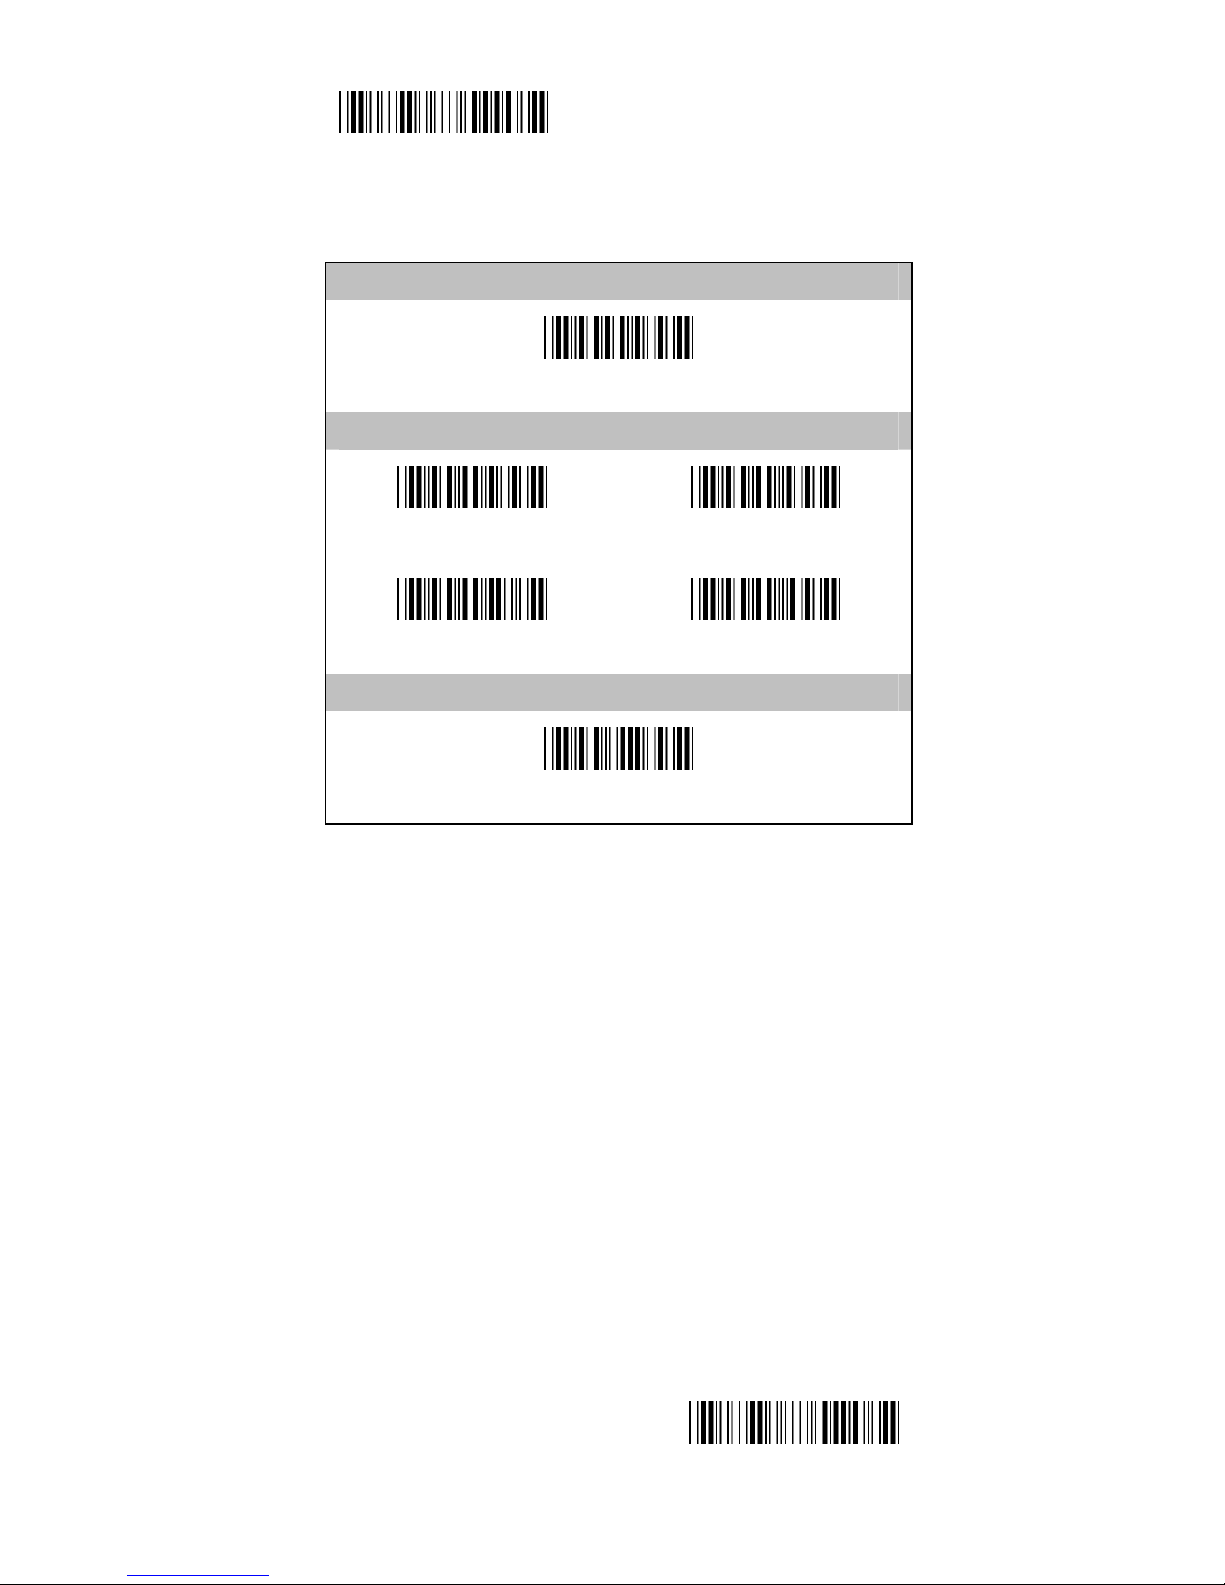
Start Configuration
EAN-8
Truncate Last Digit
00H (00-08H)
Add-on 2/5
(None)
2
5 2/5
Select Insertion Code
00H (00-02H)
End Configuration
Page 30
- 30 -
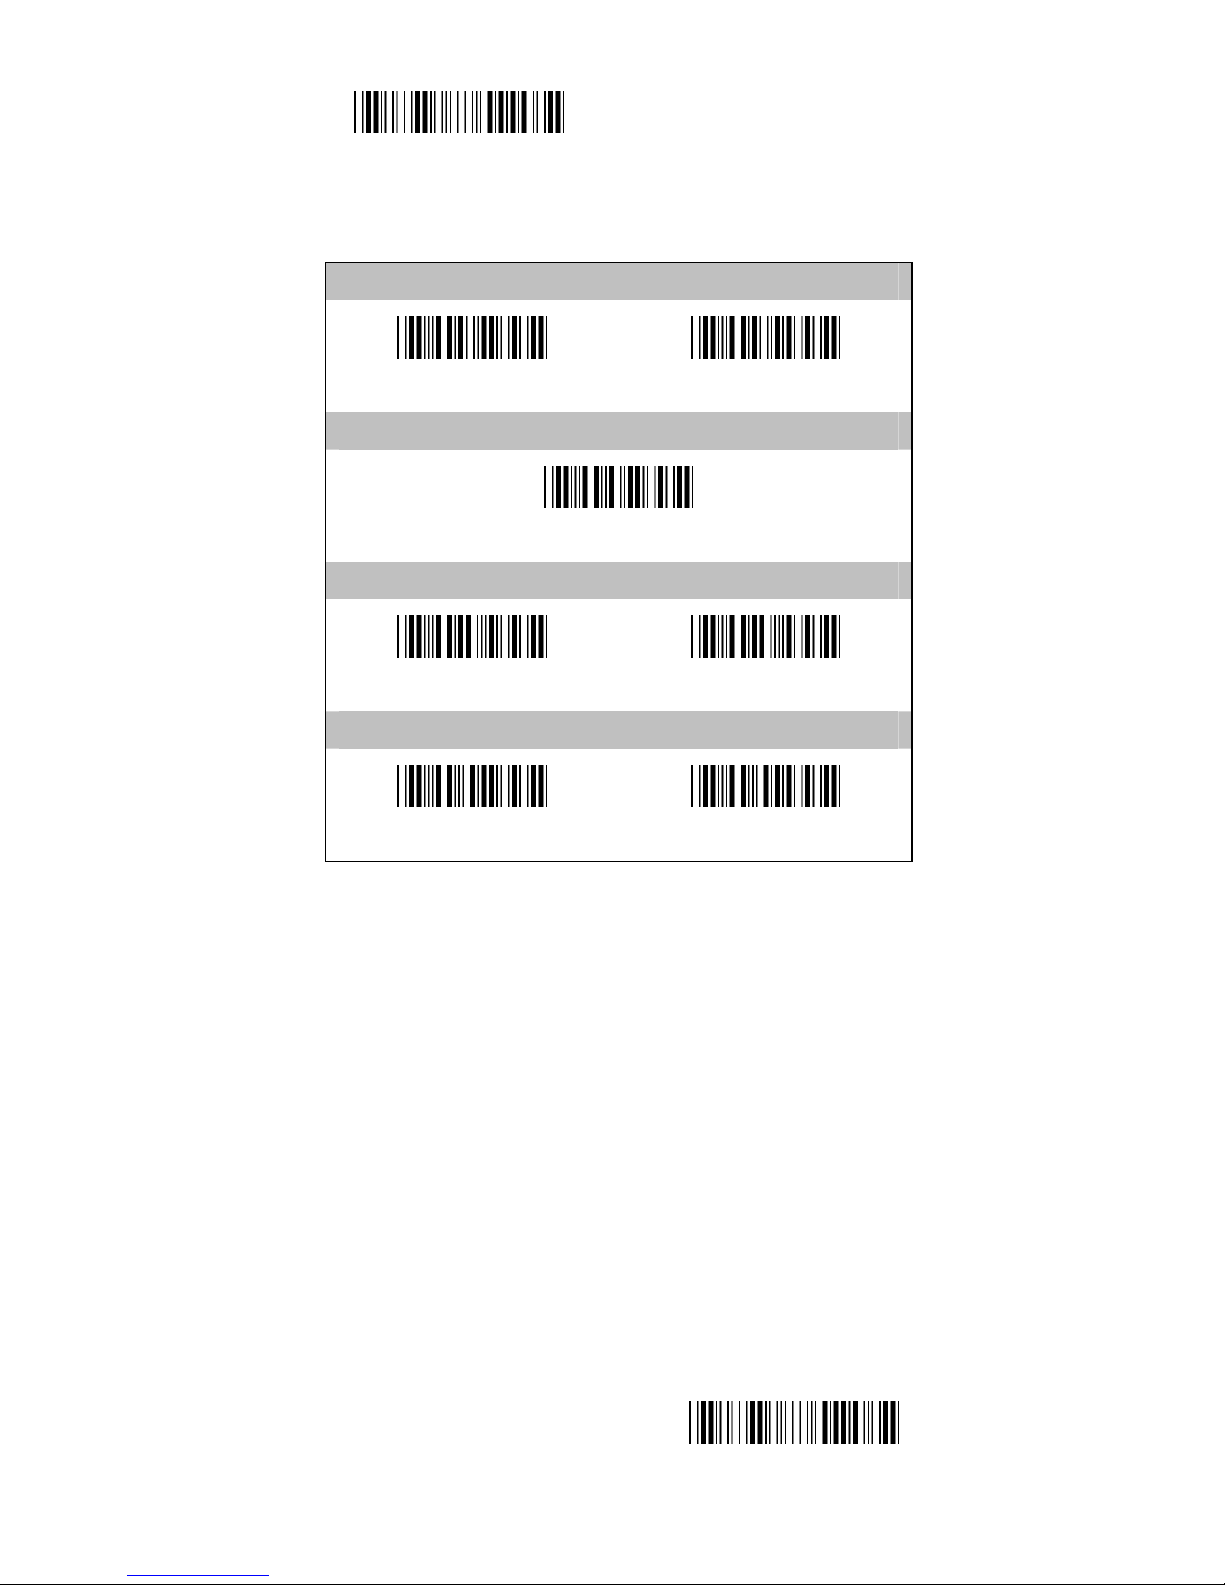
Start Configuration
3.5 Code 39
Reading
OFF
(ON)
Code ID
4AH (20-7EH)
Verify Checksum
(OFF)
ON
Transmit Check Char.
OFF
(ON)
End Configuration
Page 31
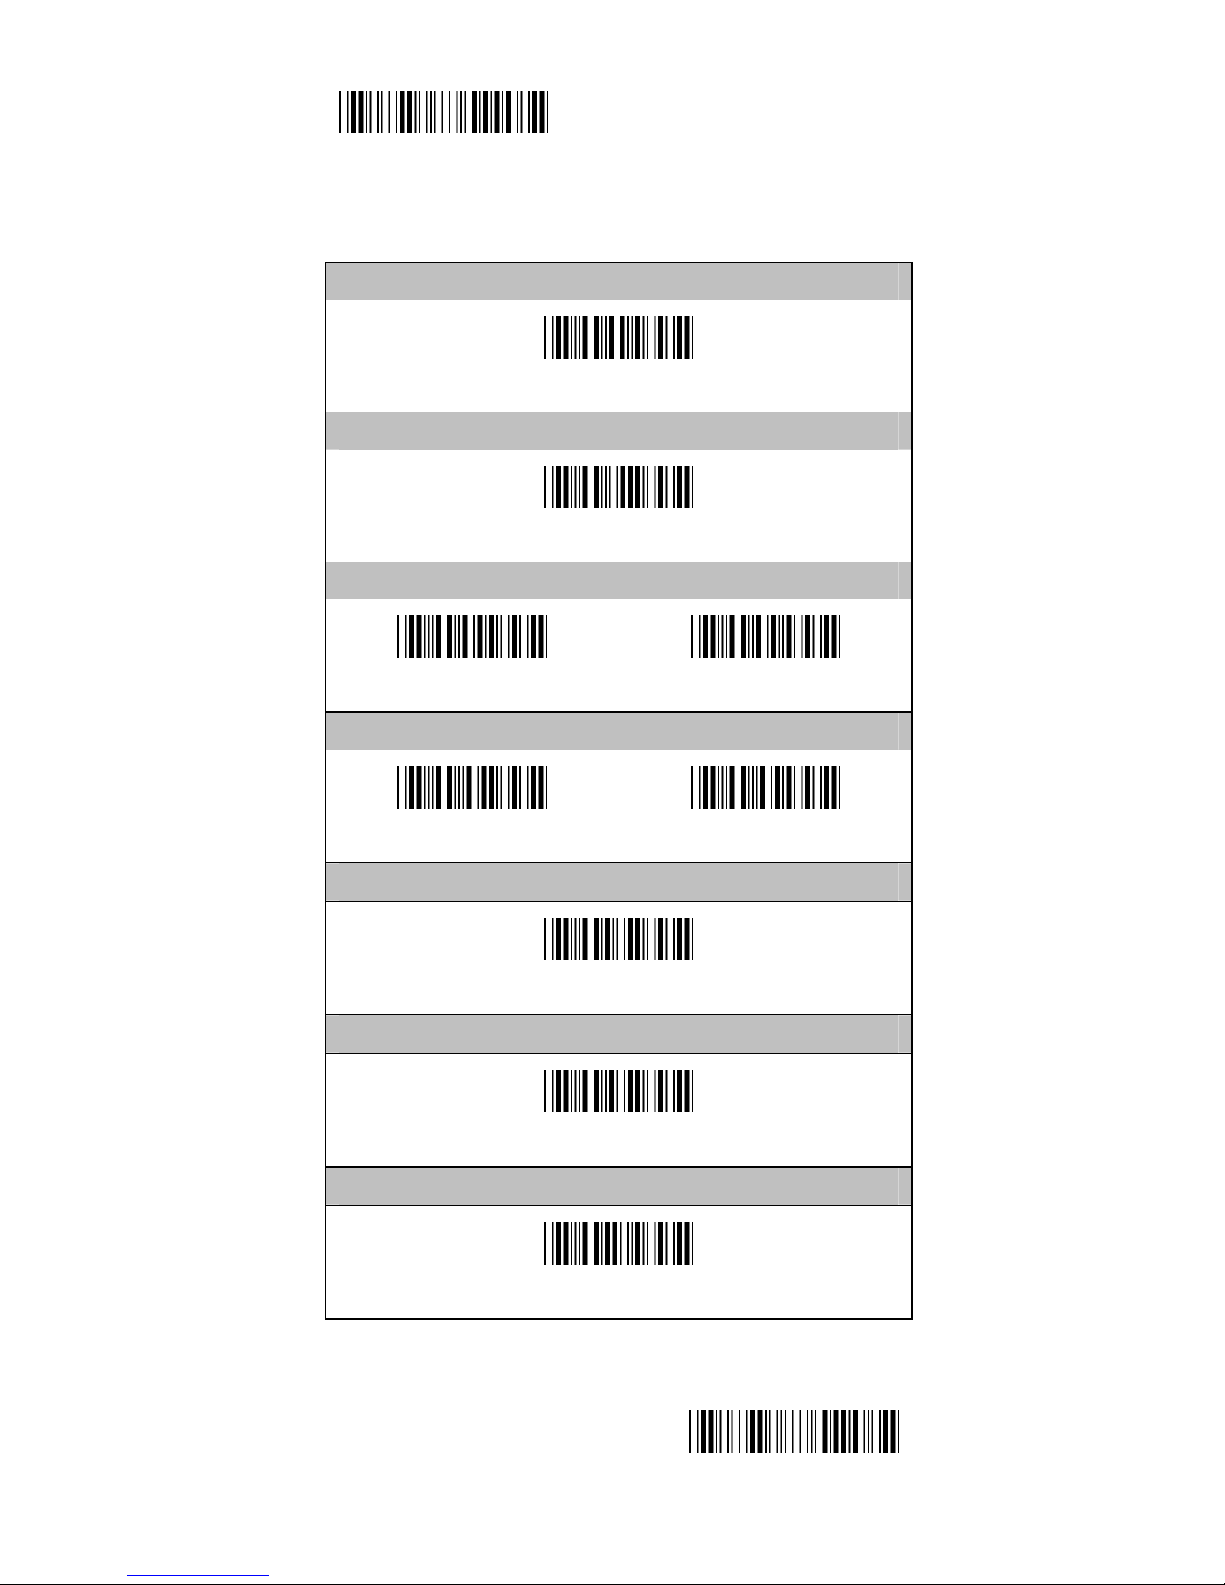
- 31 -
Start Configuration
Code 39
Min. Length
00H (00-32H)
Max. Length
32H (00-32H)
Format
(Standard)
Full ASCII
Transmit Start/End Char.
(OFF)
ON
Truncate Leading Digit
00H (00-32H)
Truncate Last Digit
00H (00-32H)
Select Insertion Code
00H (00-02H)
End Configuration
Page 32
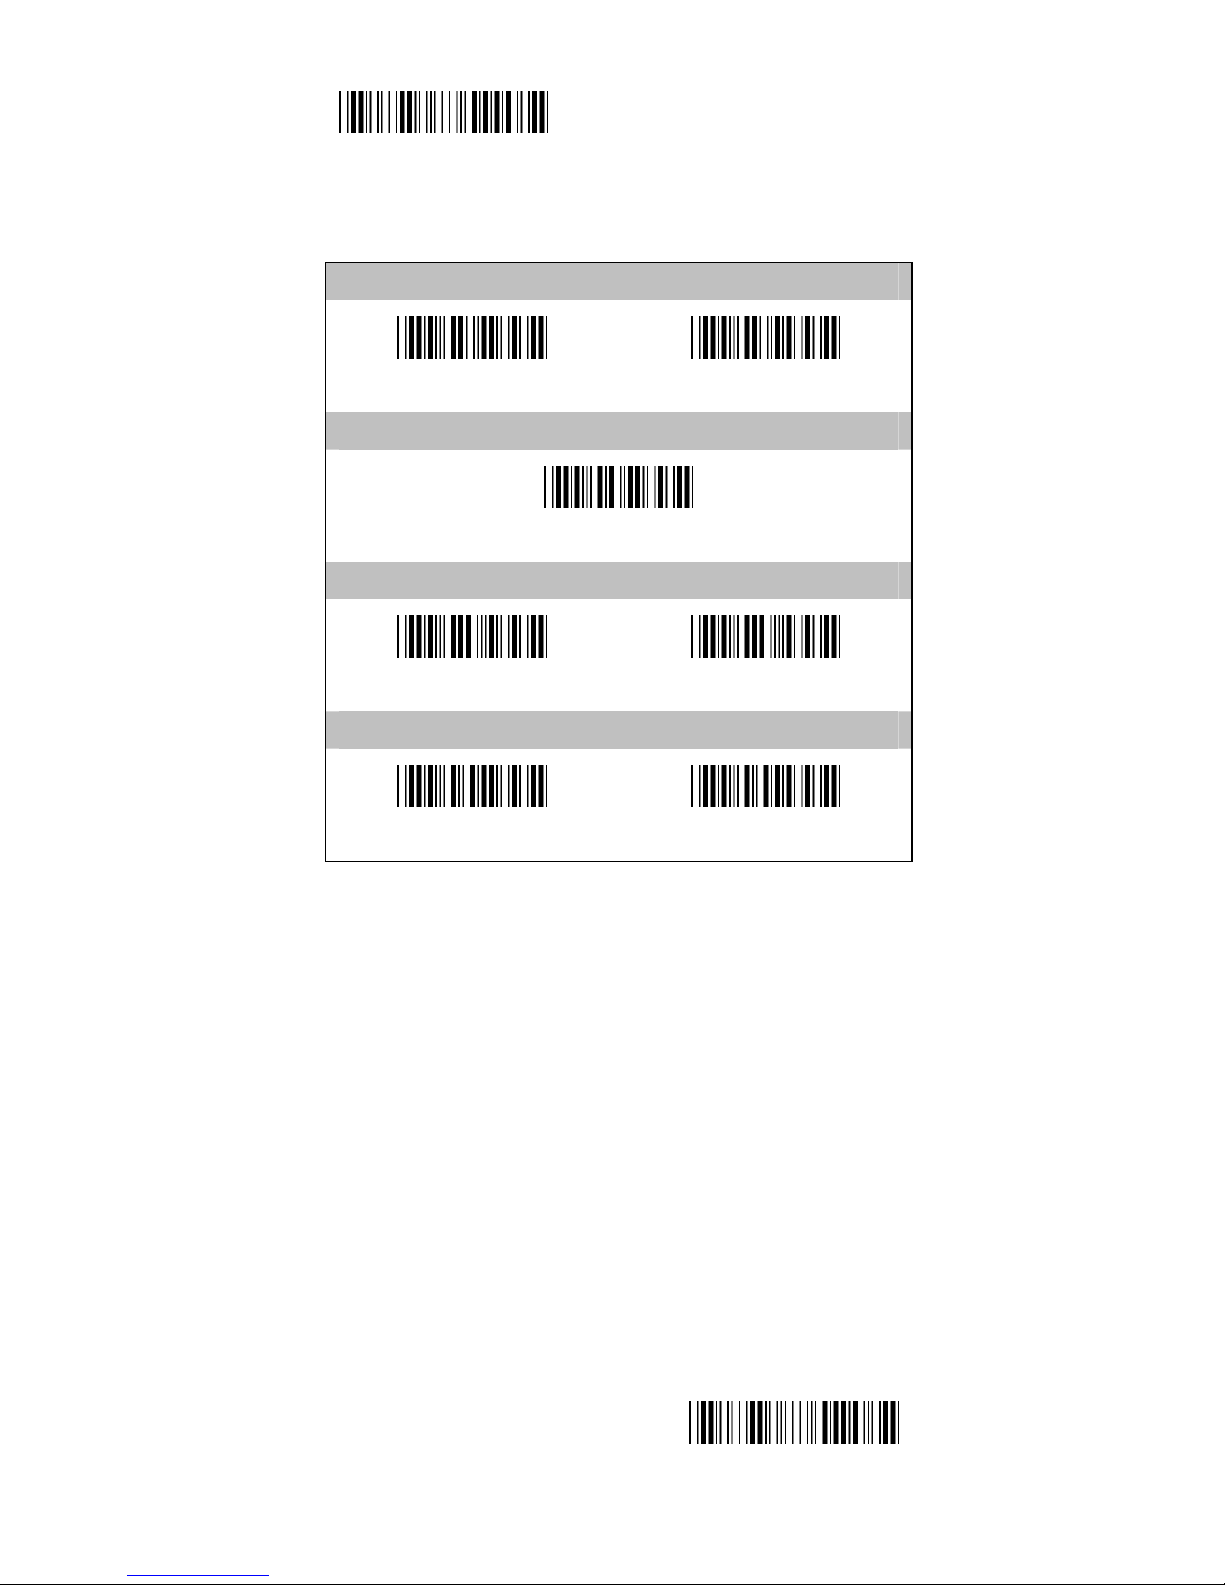
- 32 -
Start Configuration
3.6 Codabar
Reading
OFF
(ON)
Code ID
4BH (20-7EH)
Verify Checksum
OFF
(ON)
Transmit Check Character
(OFF)
ON
End Configuration
Page 33
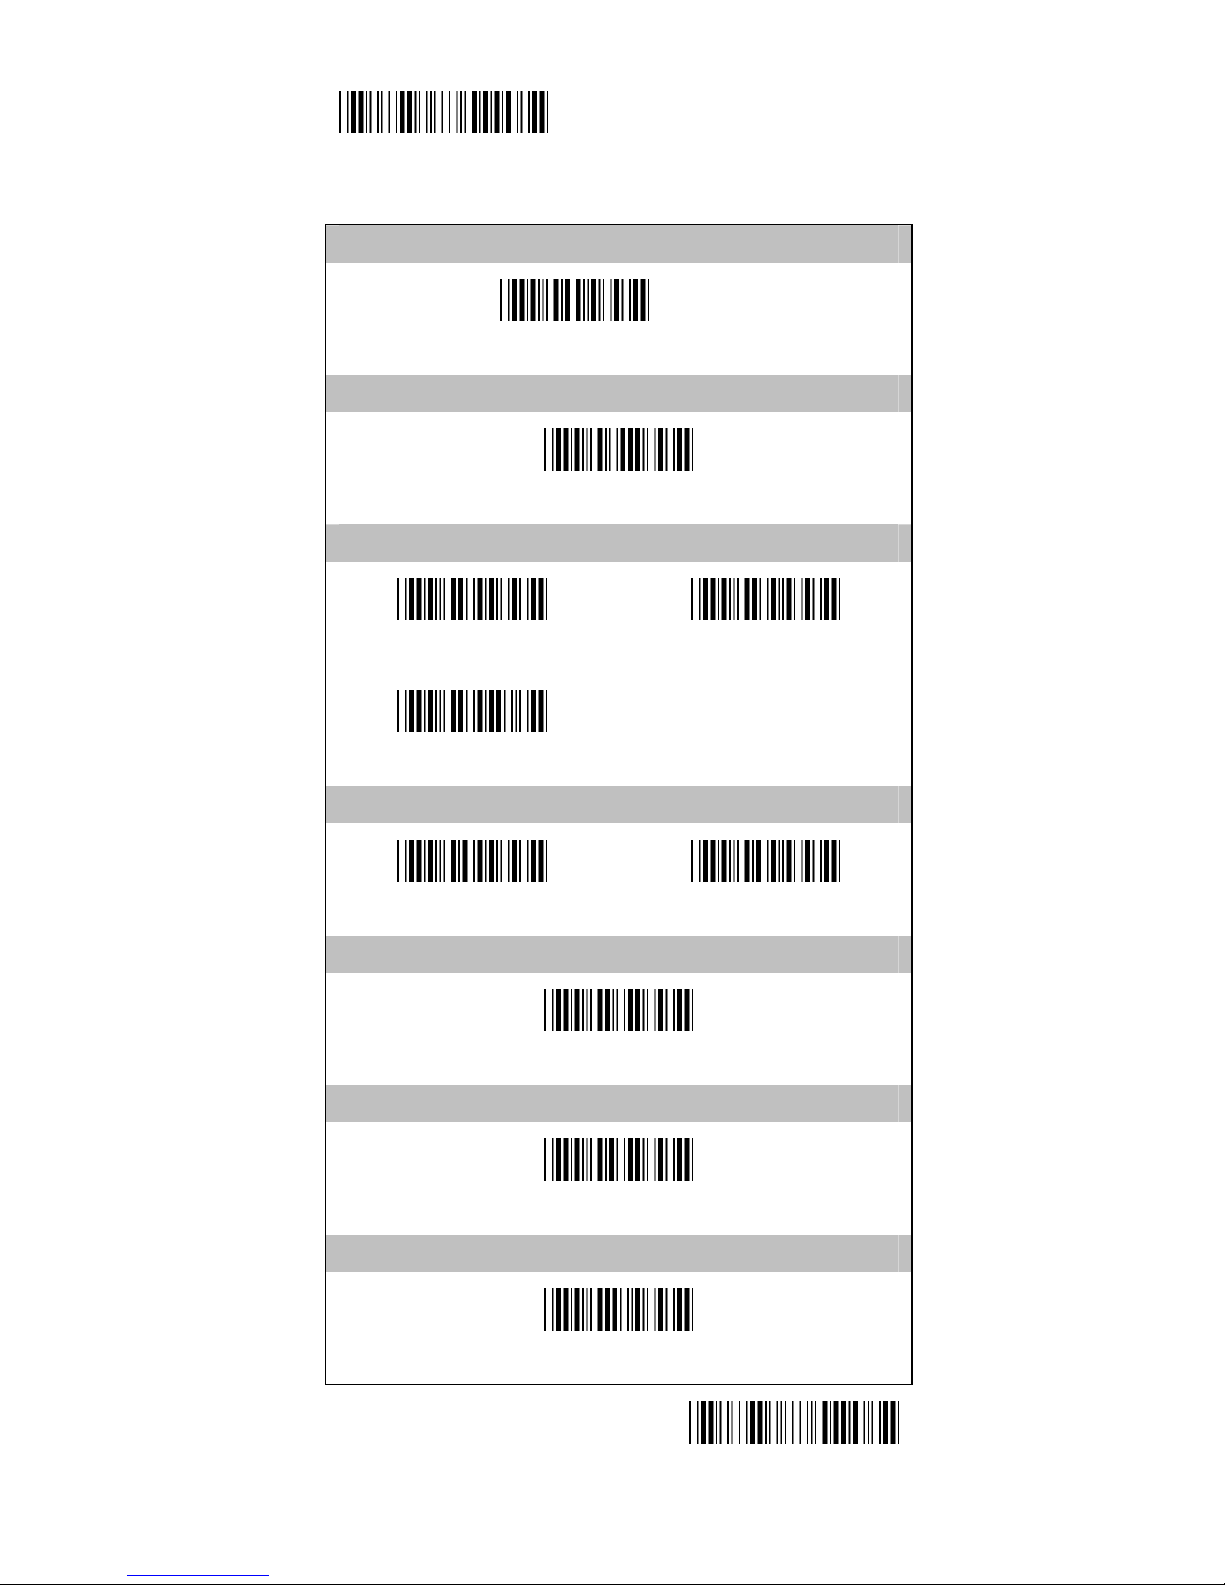
- 33 -
Start Configuration
Codabar
Truncate Leading Digit
00H (00-7EH)
Truncate Last Digit
00H (00-7EH)
Transmit Start/End Character
(ABCD/ABCD)
abcd/abcd
abcd/tn*e
Transmit Start/End Character
(OFF)
ON
Min. Length
00H (00-3CH)
Max. Length
3CH (00-3CH)
Select Insertion Code
00H (00-02H)
End Configuration
Page 34
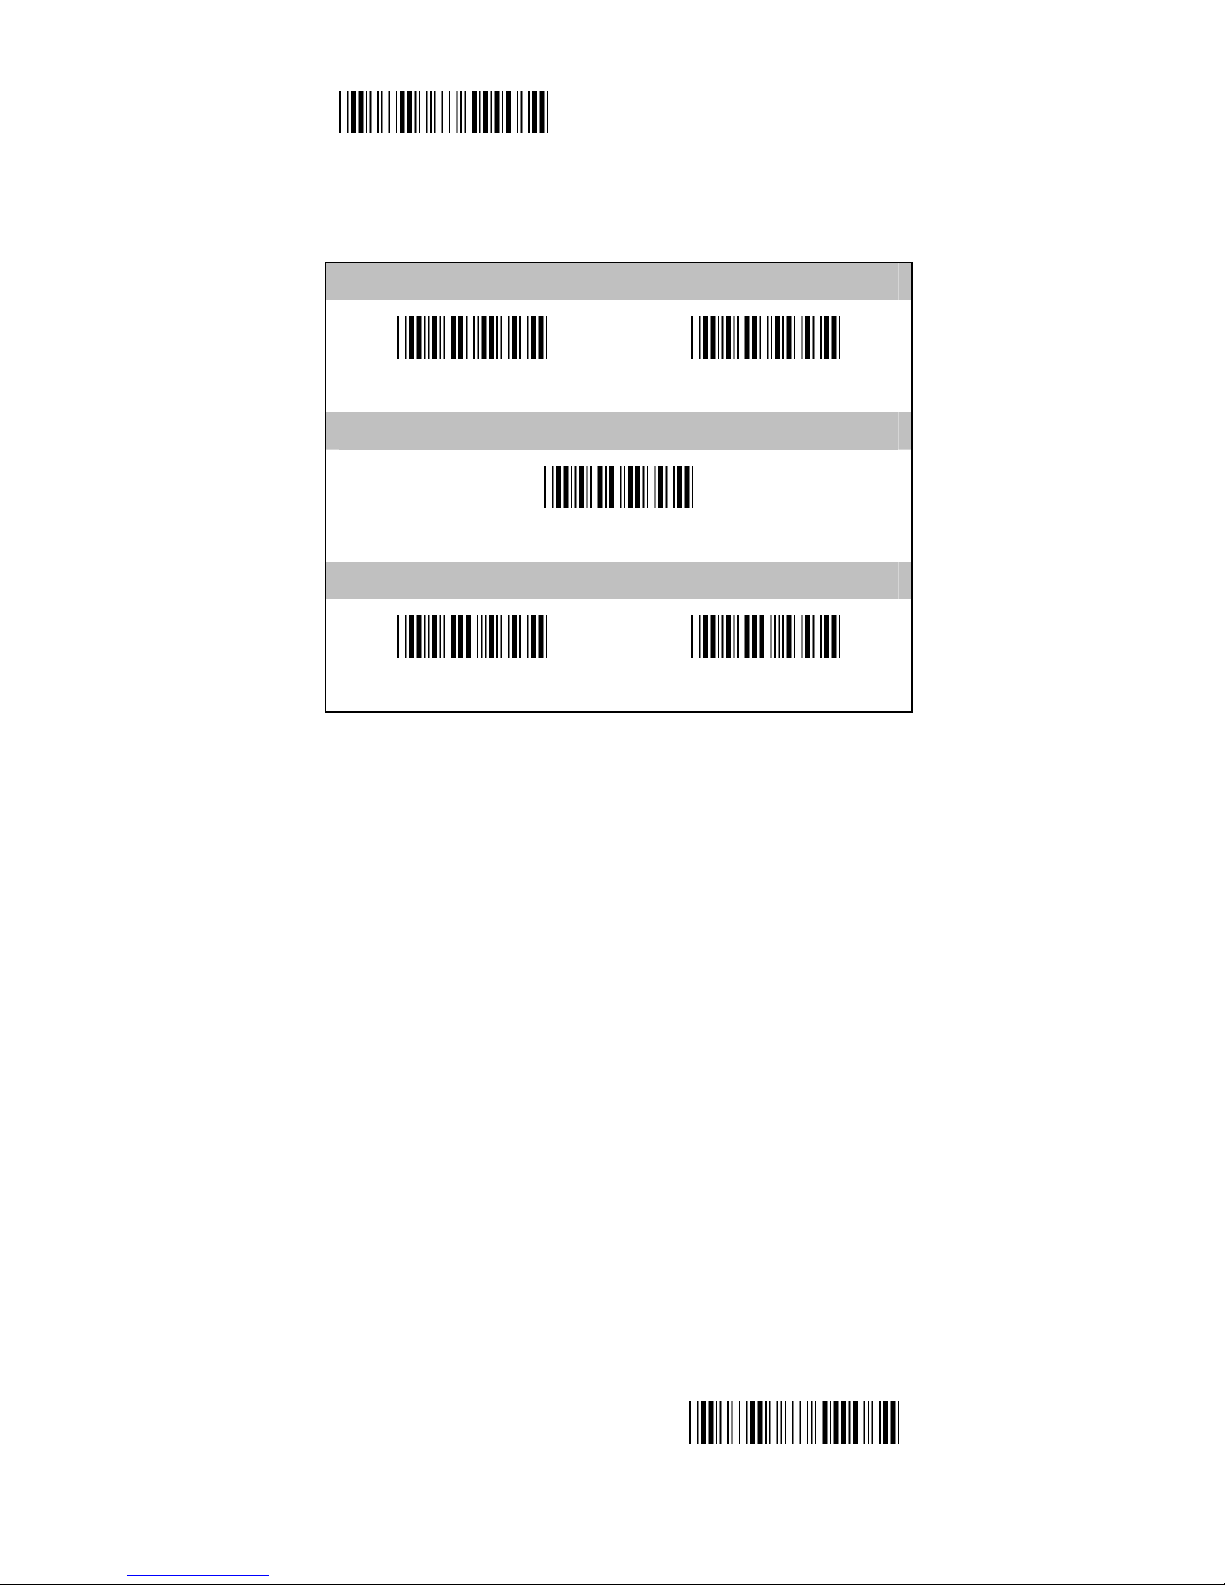
- 34 -
Start Configuration
3.7 Code 93
Reading
OFF
(ON)
Code ID
4CH (20-7EH)
Verify Checksum
OFF
(ON)
End Configuration
Page 35
- 35 -
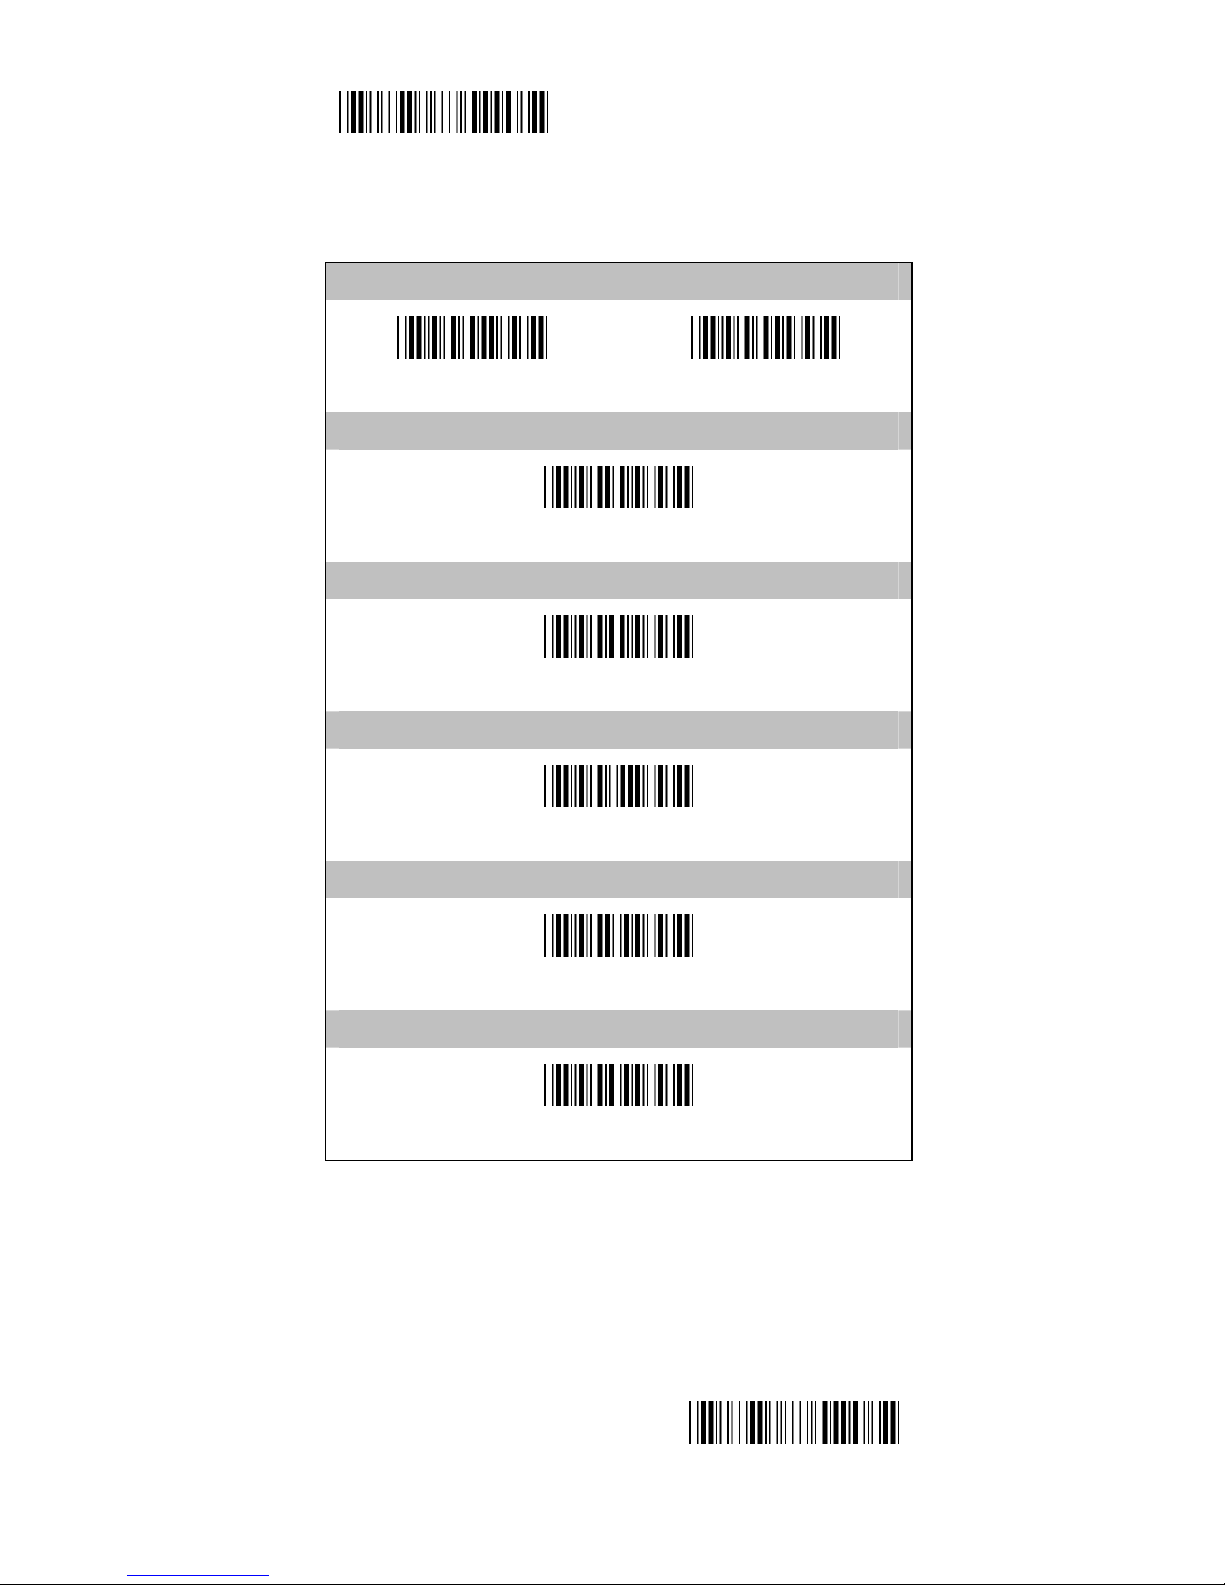
Start Configuration
Code 93
Transmit Check Character
(OFF)
ON
Min. Length
00H (00-50H)
Max. Length
50H (00-50H)
Truncate Leading Digit
00H (00-50H)
Truncate Last Digit
50H (00-50H)
Select Insertion Code
00H (00-02H)
End Configuration
Page 36
- 36 -
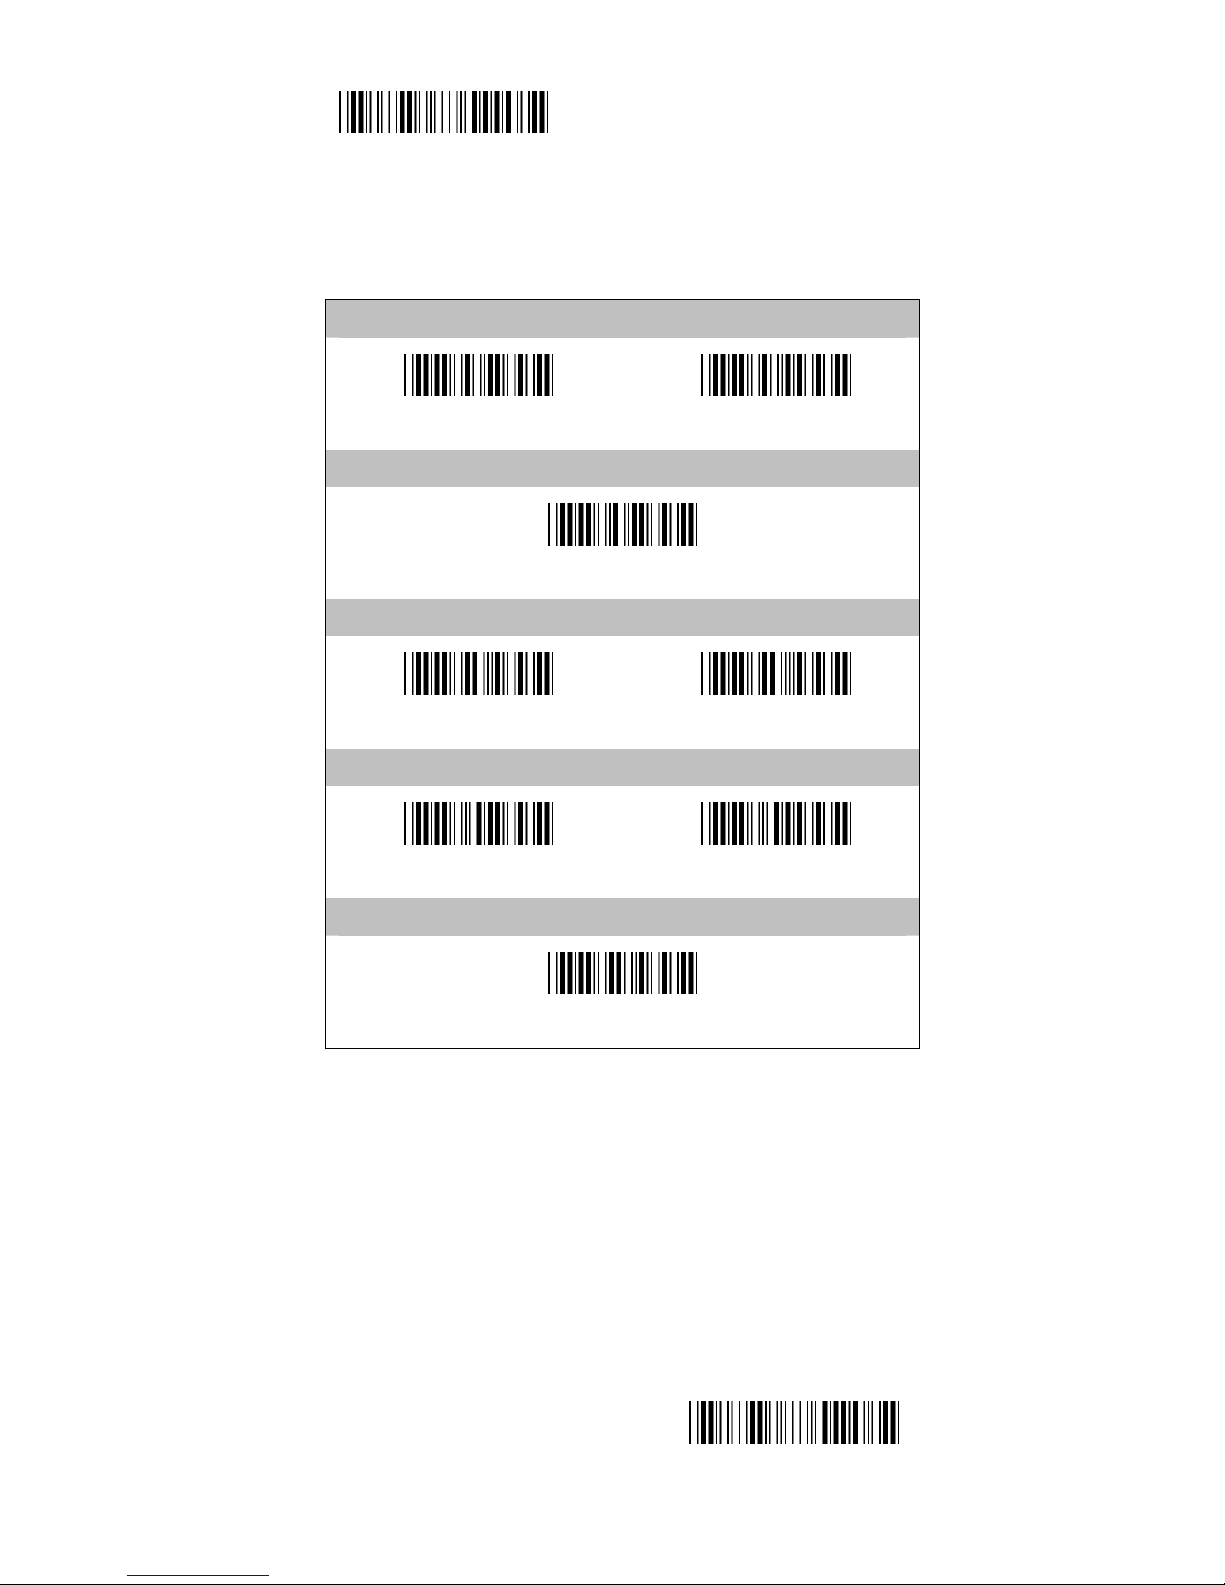
Start Configuration
3.8 Code 128
End Configuration
Reading
OFF
(ON)
Code ID
4DH (20-7EH)
Verify Checksum
OFF
(ON)
Transmit Check Character
(OFF)
ON
Select Insertion Code
00H (00-02H)
Page 37
- 37 -
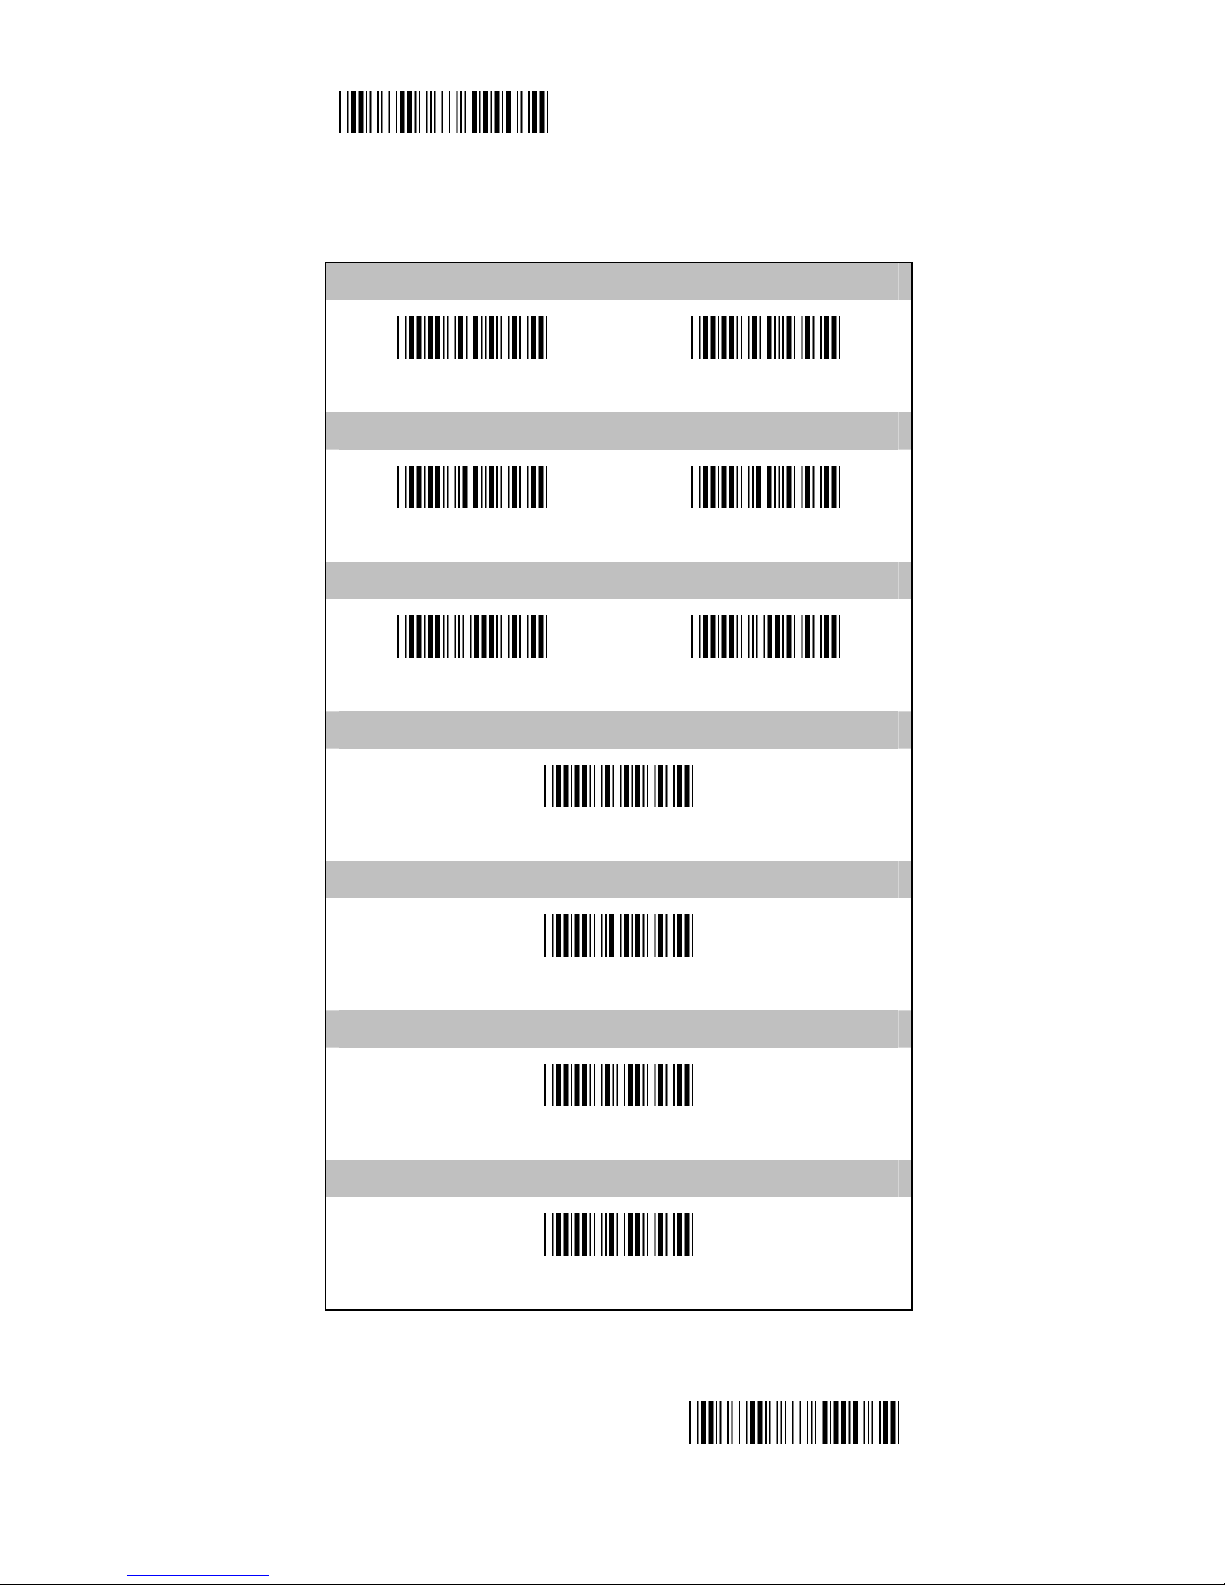
Start Configuration
Code 128
FNC2
(OFF)
ON
UCC/EAN128
(OFF)
ON
FNC1
(OFF)
ON
Truncate Leading Digit
00H (00-7FH)
Truncate Last Digit
00H (00-7FH)
Min. Length
00H (00-7FH)
Max. Length
7FH (00-7FH)
End Configuration
Page 38
- 38 -
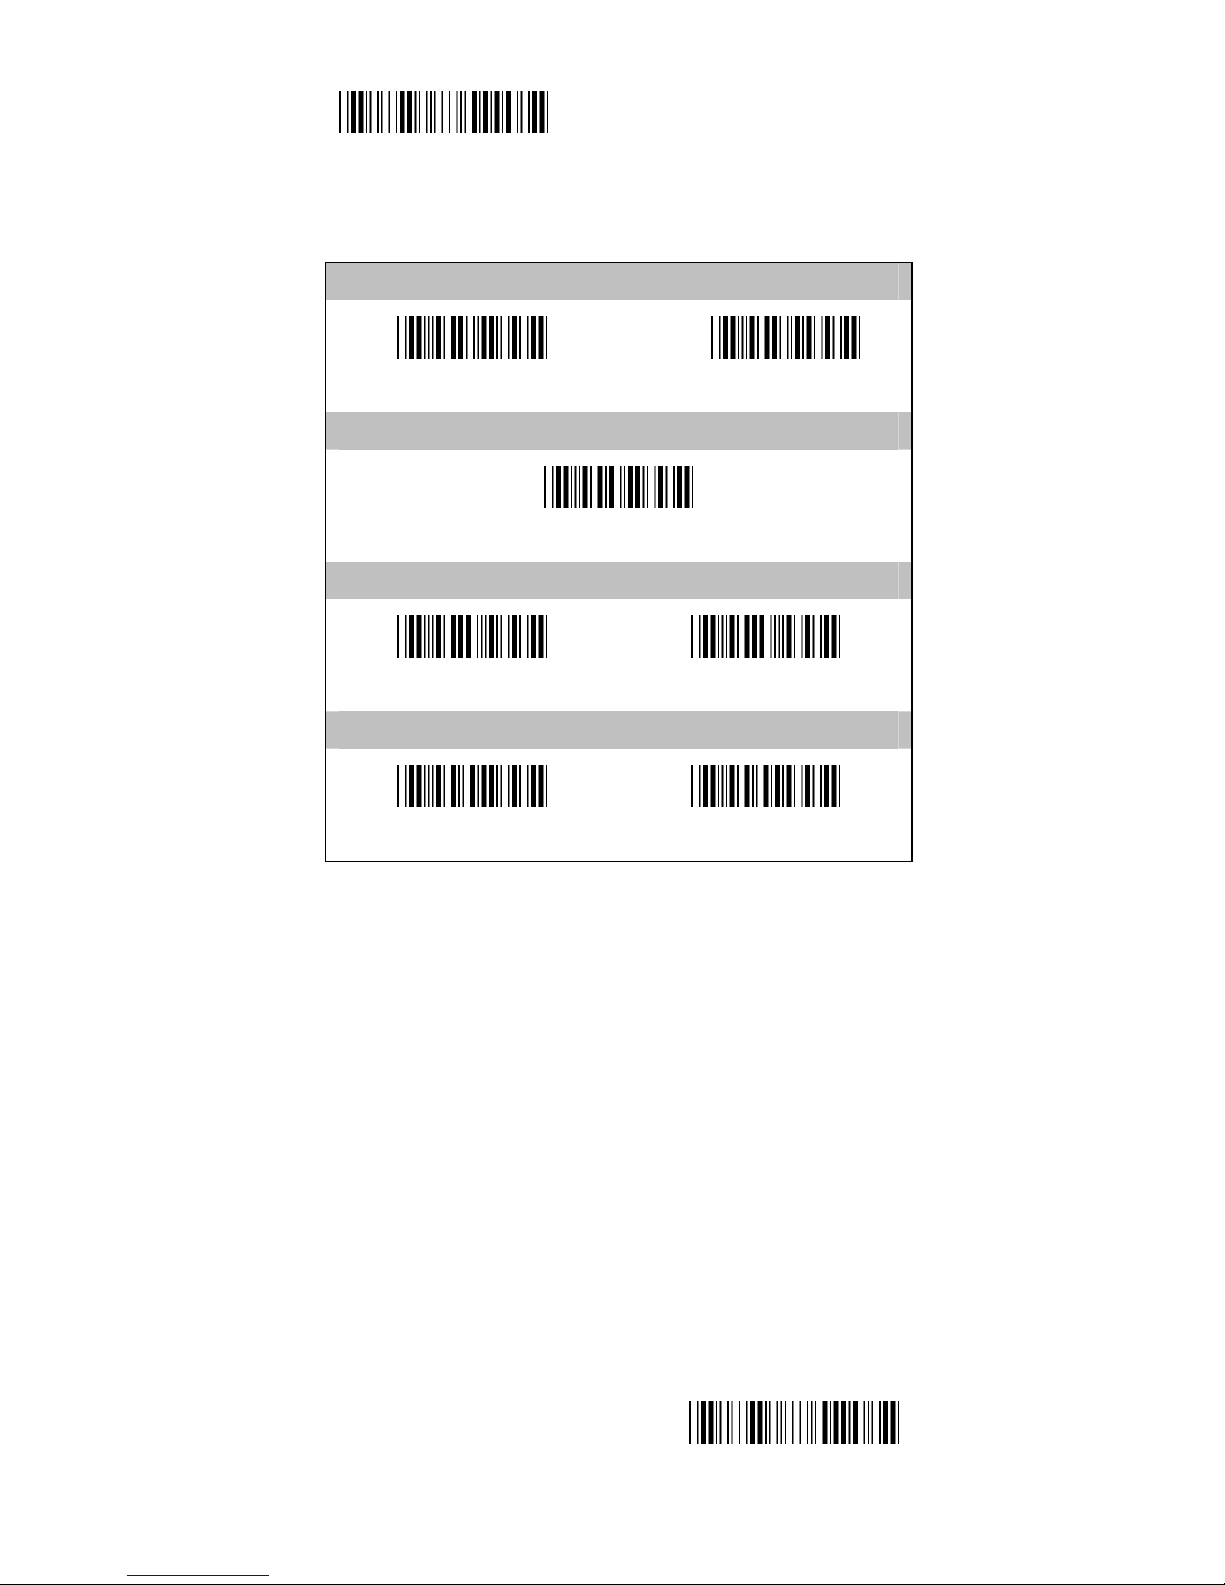
Start Configuration
3.9 Interleaved 2 of 5
Reading
OFF
(ON)
Code ID
4EH (20-7EH)
Verify Checksum
(OFF)
ON
Transmit Check Character
OFF
(ON)
End Configuration
Page 39
- 39 -
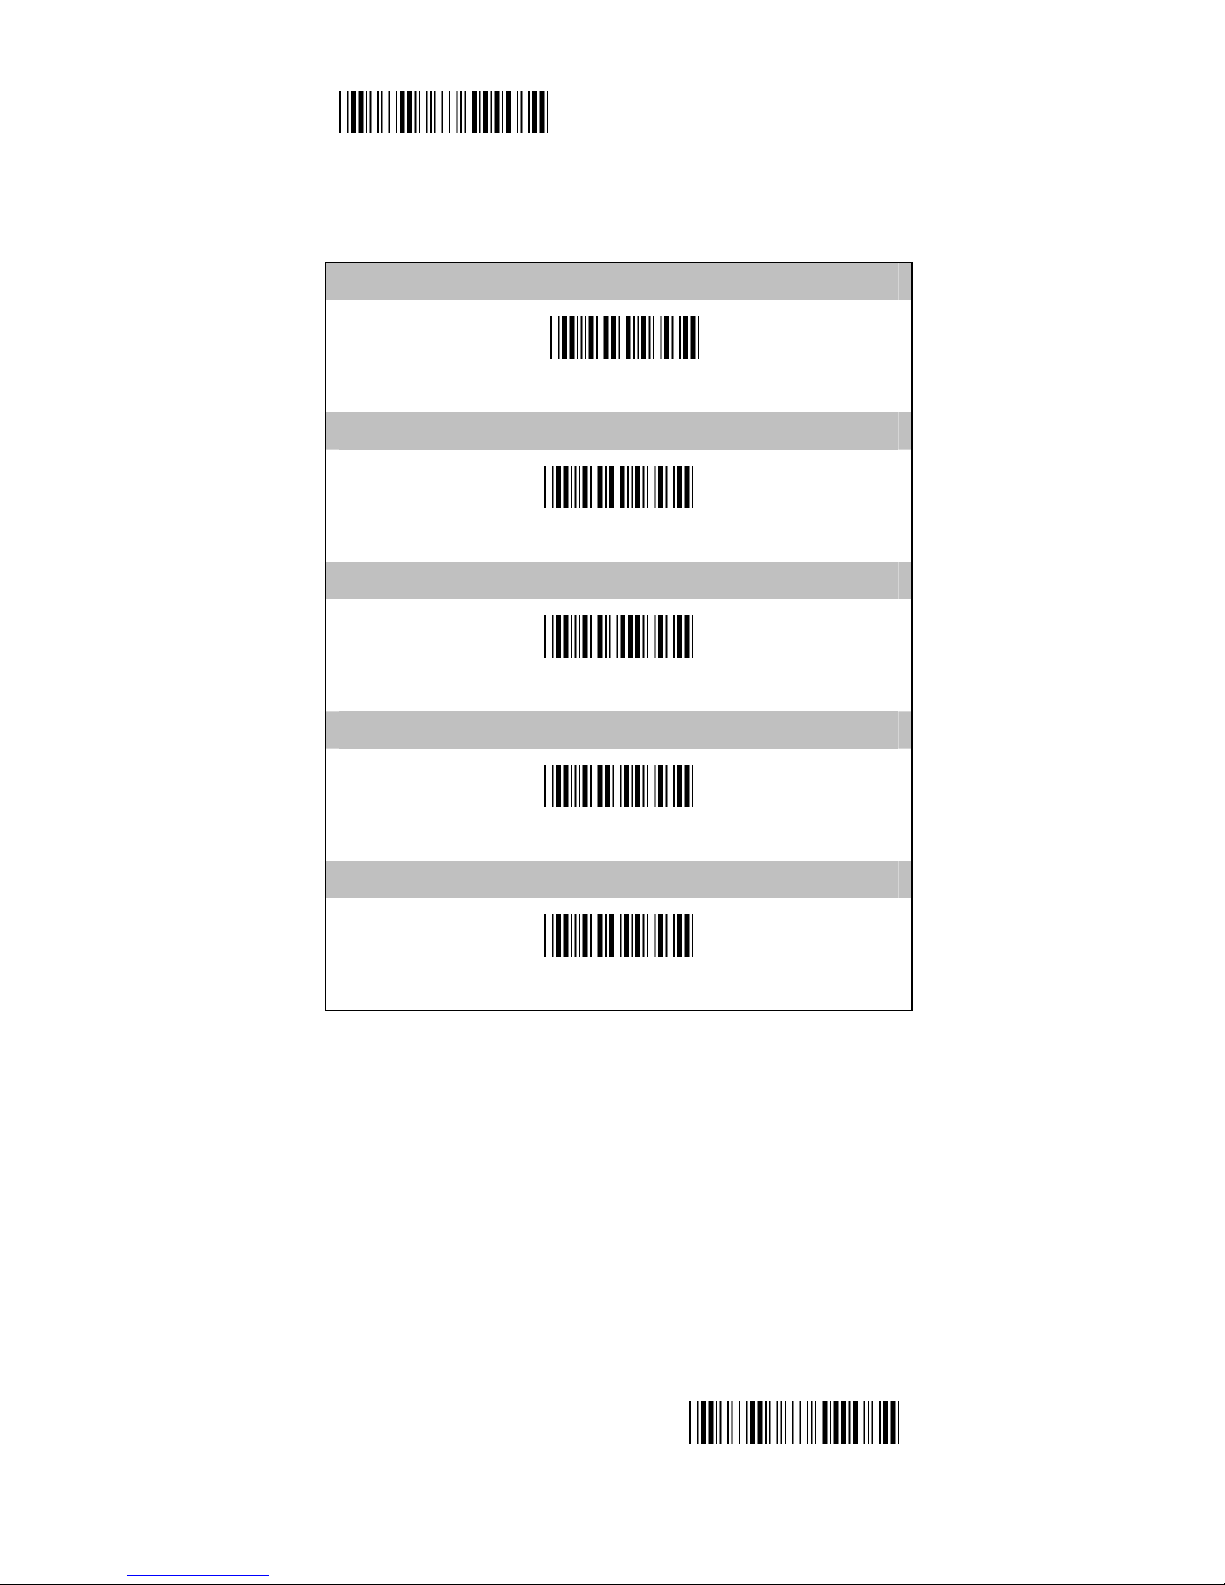
Start Configuration
Interleaved 2/5
Truncate Leading Digit
00H (00-7EH)
Truncate Last Digit
00H (00-7EH)
Min. Length
00H (00-50H)
Max. Length
50H (00-50H)
Select Insertion Code
00H (00-02H)
End Configuration
Page 40
- 40 -
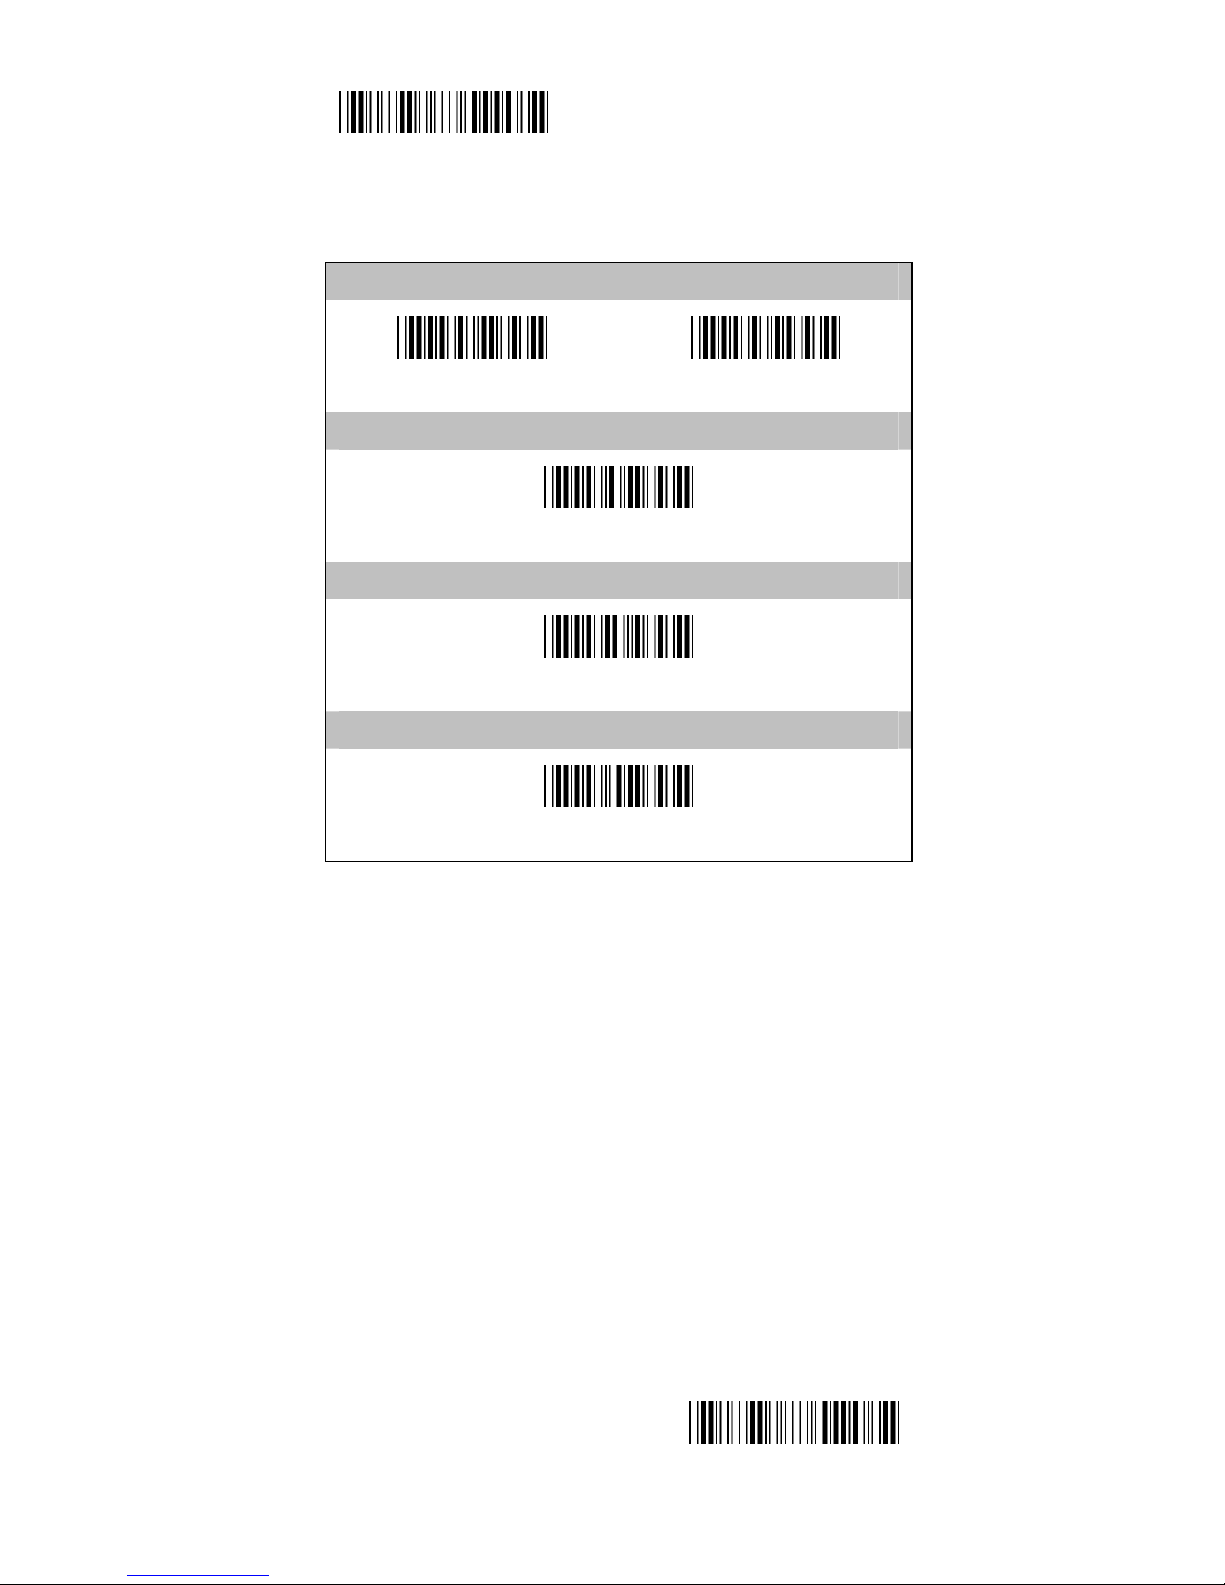
Start Configuration
3.10 Industrial 2 of 5
Reading
(OFF)
ON
Code ID
4FH (20-7EH)
Min. Length
00H (00-32H)
Max. Length
32H (00-32H)
End Configuration
Page 41
- 41 -
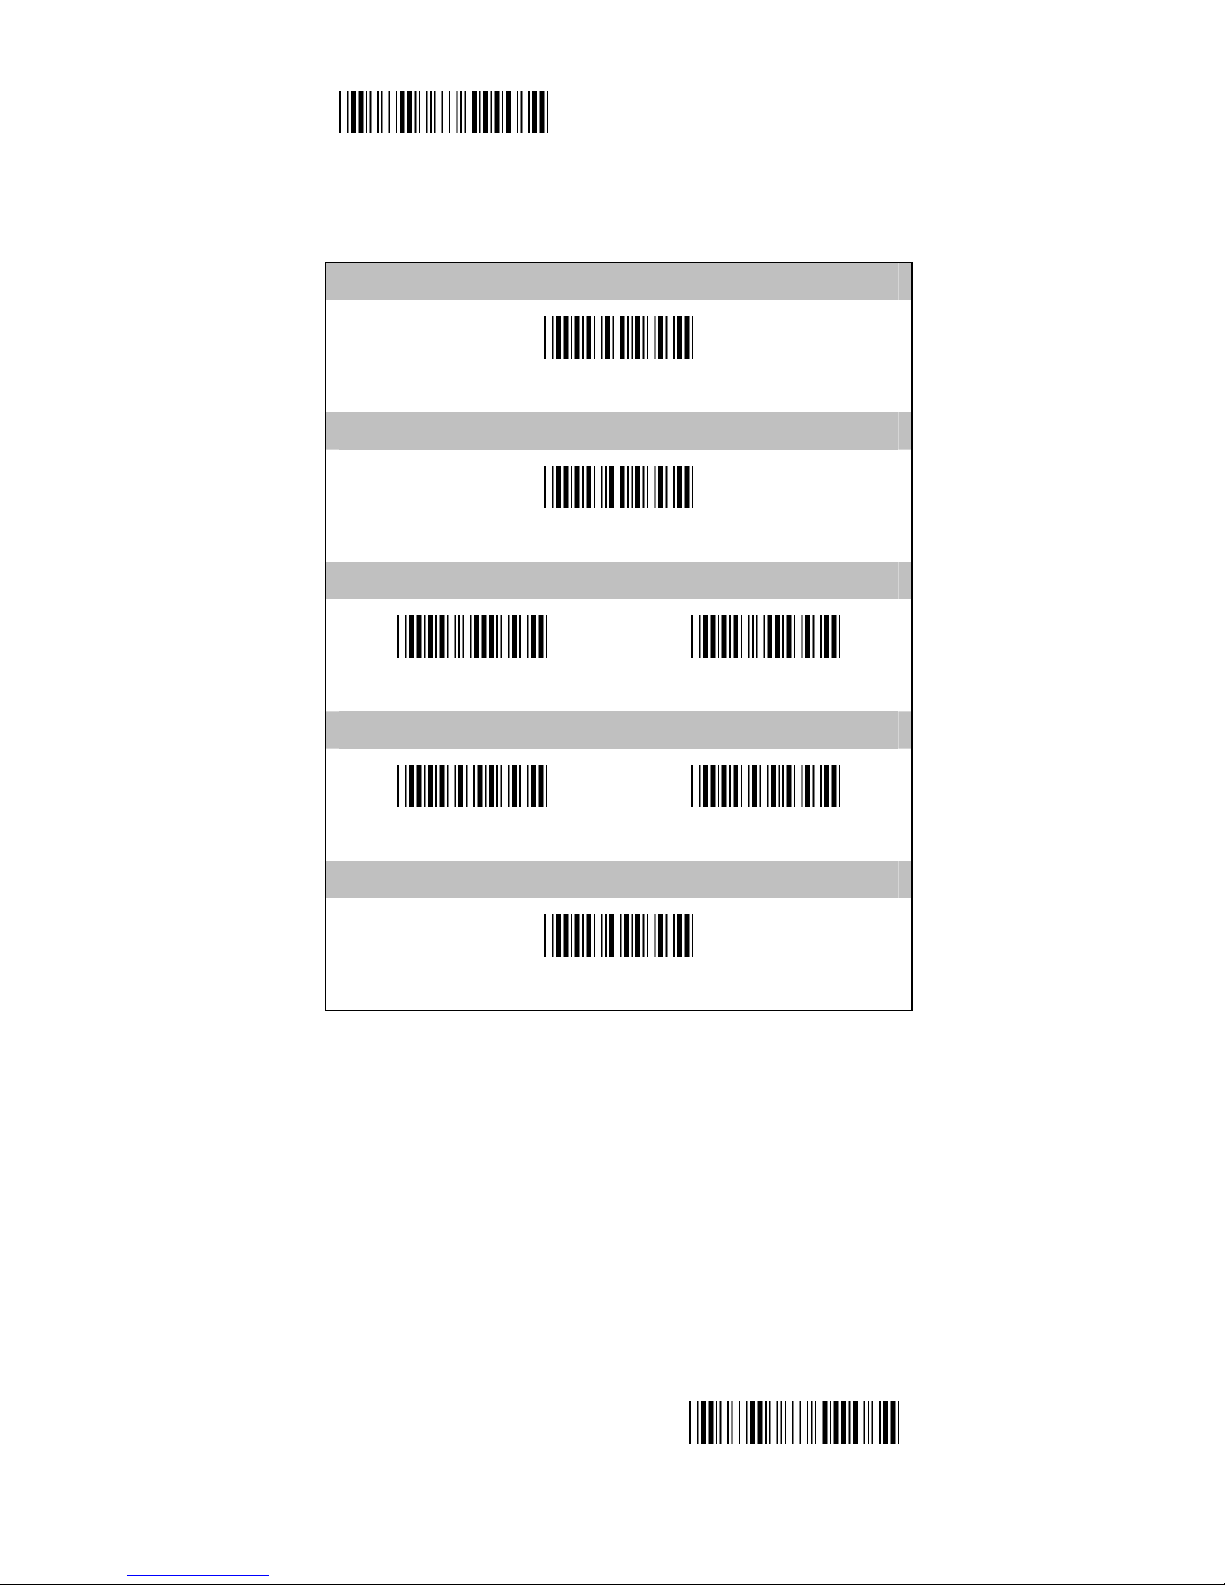
Start Configuration
Industrial 2 of 5
Truncate Leading Digit
00H (00-32H)
Truncate Last Digit
00H (00-32H)
Verify Checksum
(OFF)
ON
Transmit Check Character
(OFF)
ON
Select Insertion Code
00H (00-02H)
End Configuration
Page 42
- 42 -
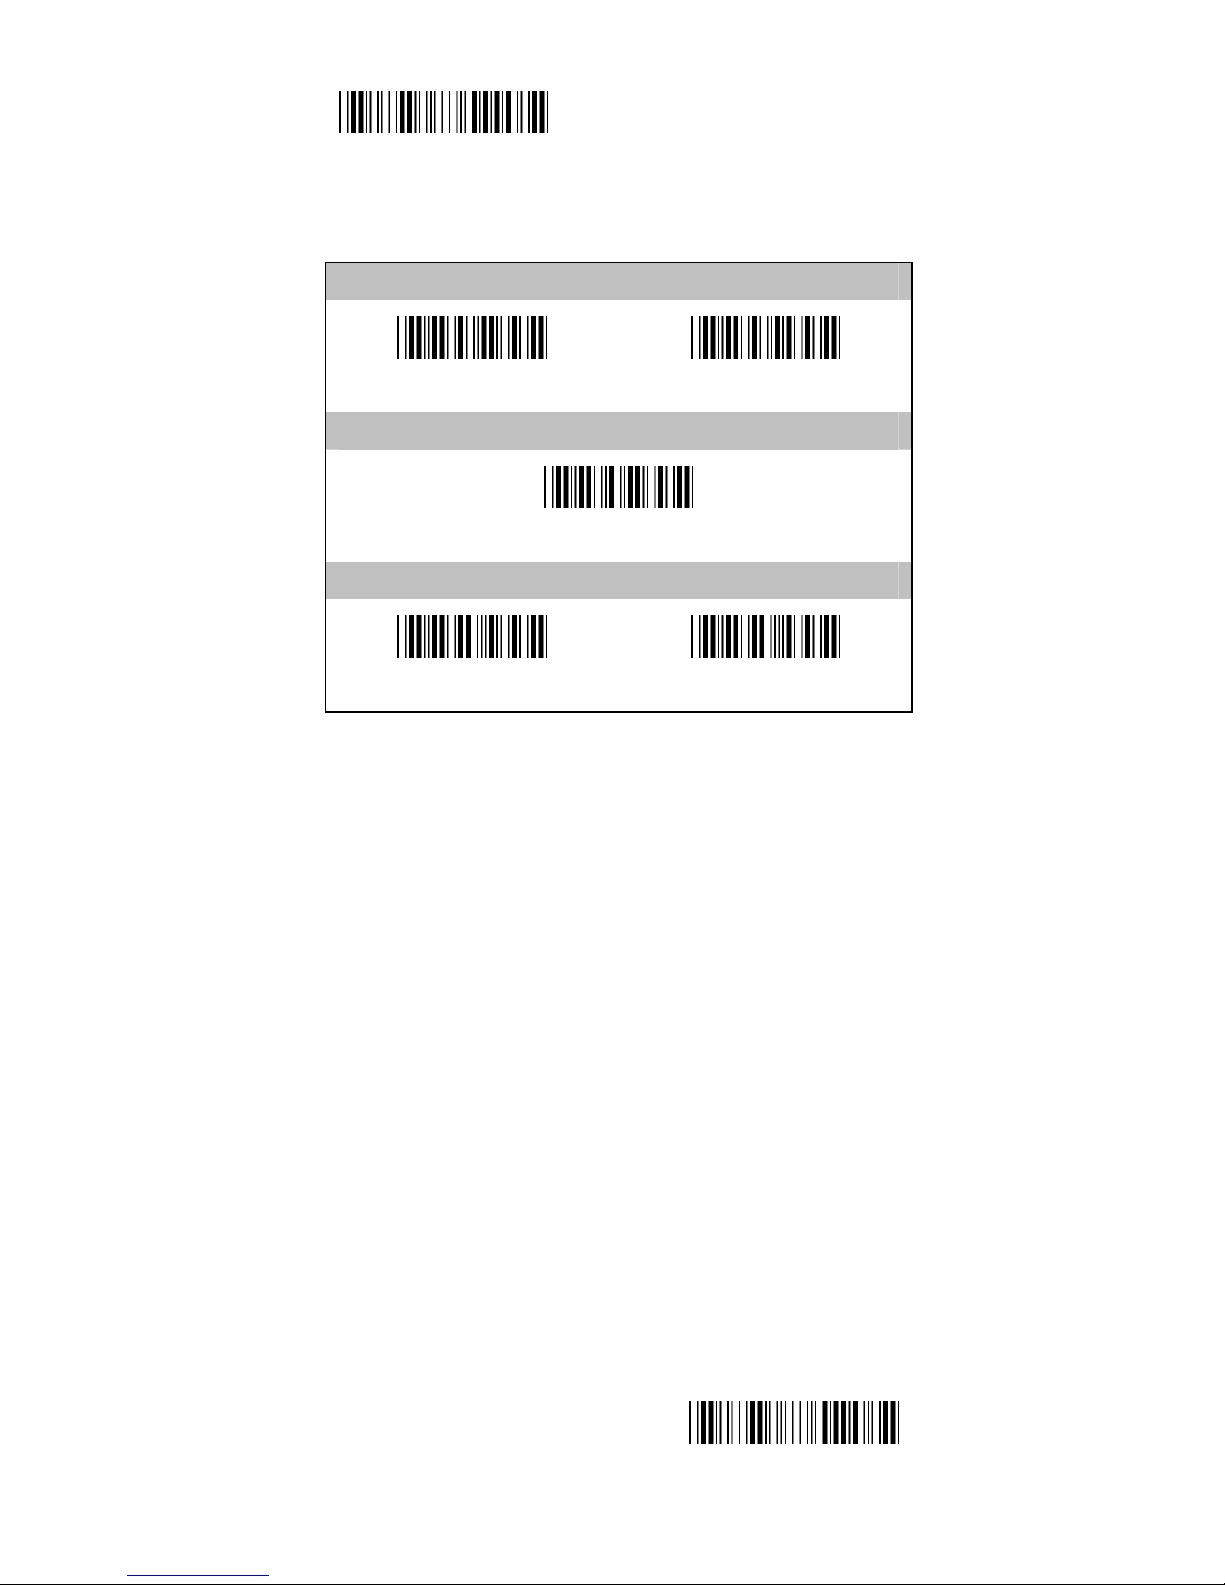
Start Configuration
3.11 Matrix 2 of 5
Reading
(OFF)
ON
Code ID
50H (20-7EH)
Verify Checksum
(OFF)
ON
End Configuration
Page 43
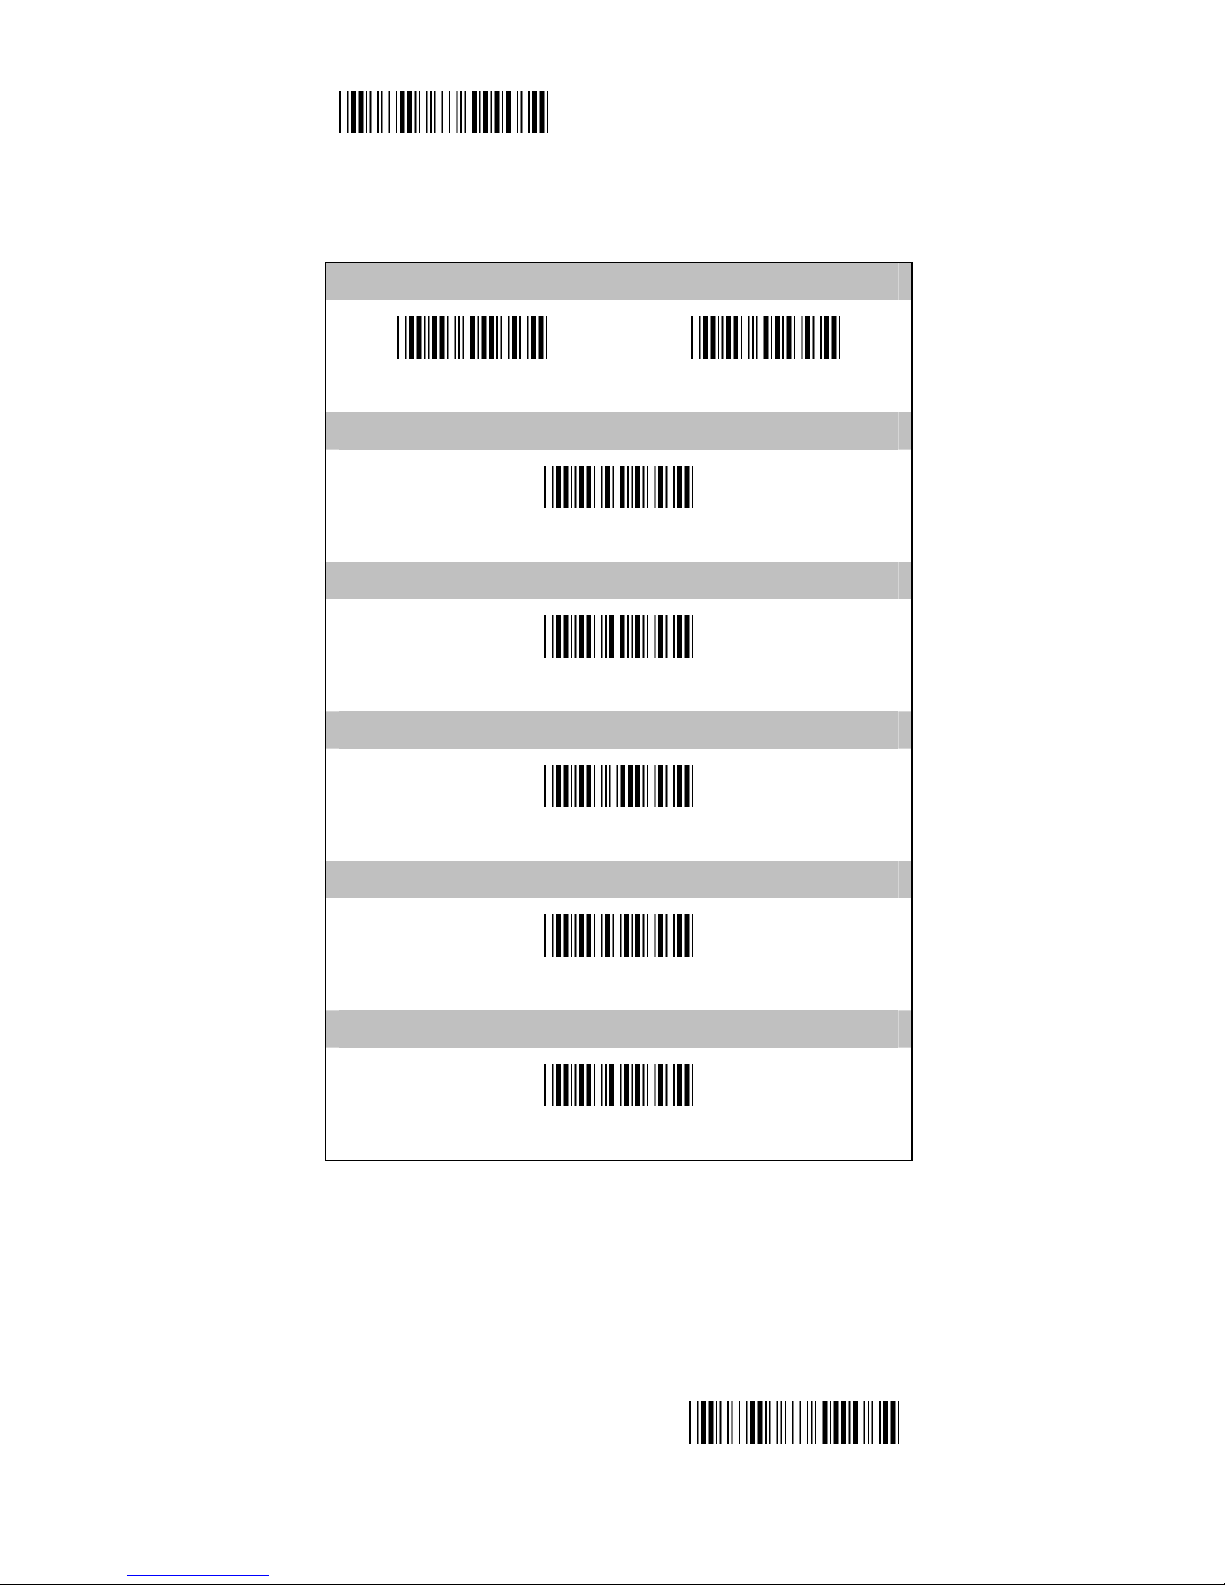
- 43 -
Start Configuration
Matrix 2of 5
Transmit Check Character
OFF
(ON)
Truncate Leading Digit
00H (00-50H)
Truncate Last Digit
00H (00-50H)
Min. Length
00H (00-50H)
Max. Length
50H (00-50H)
Select Insertion Code
00H (00-02H)
End Configuration
Page 44
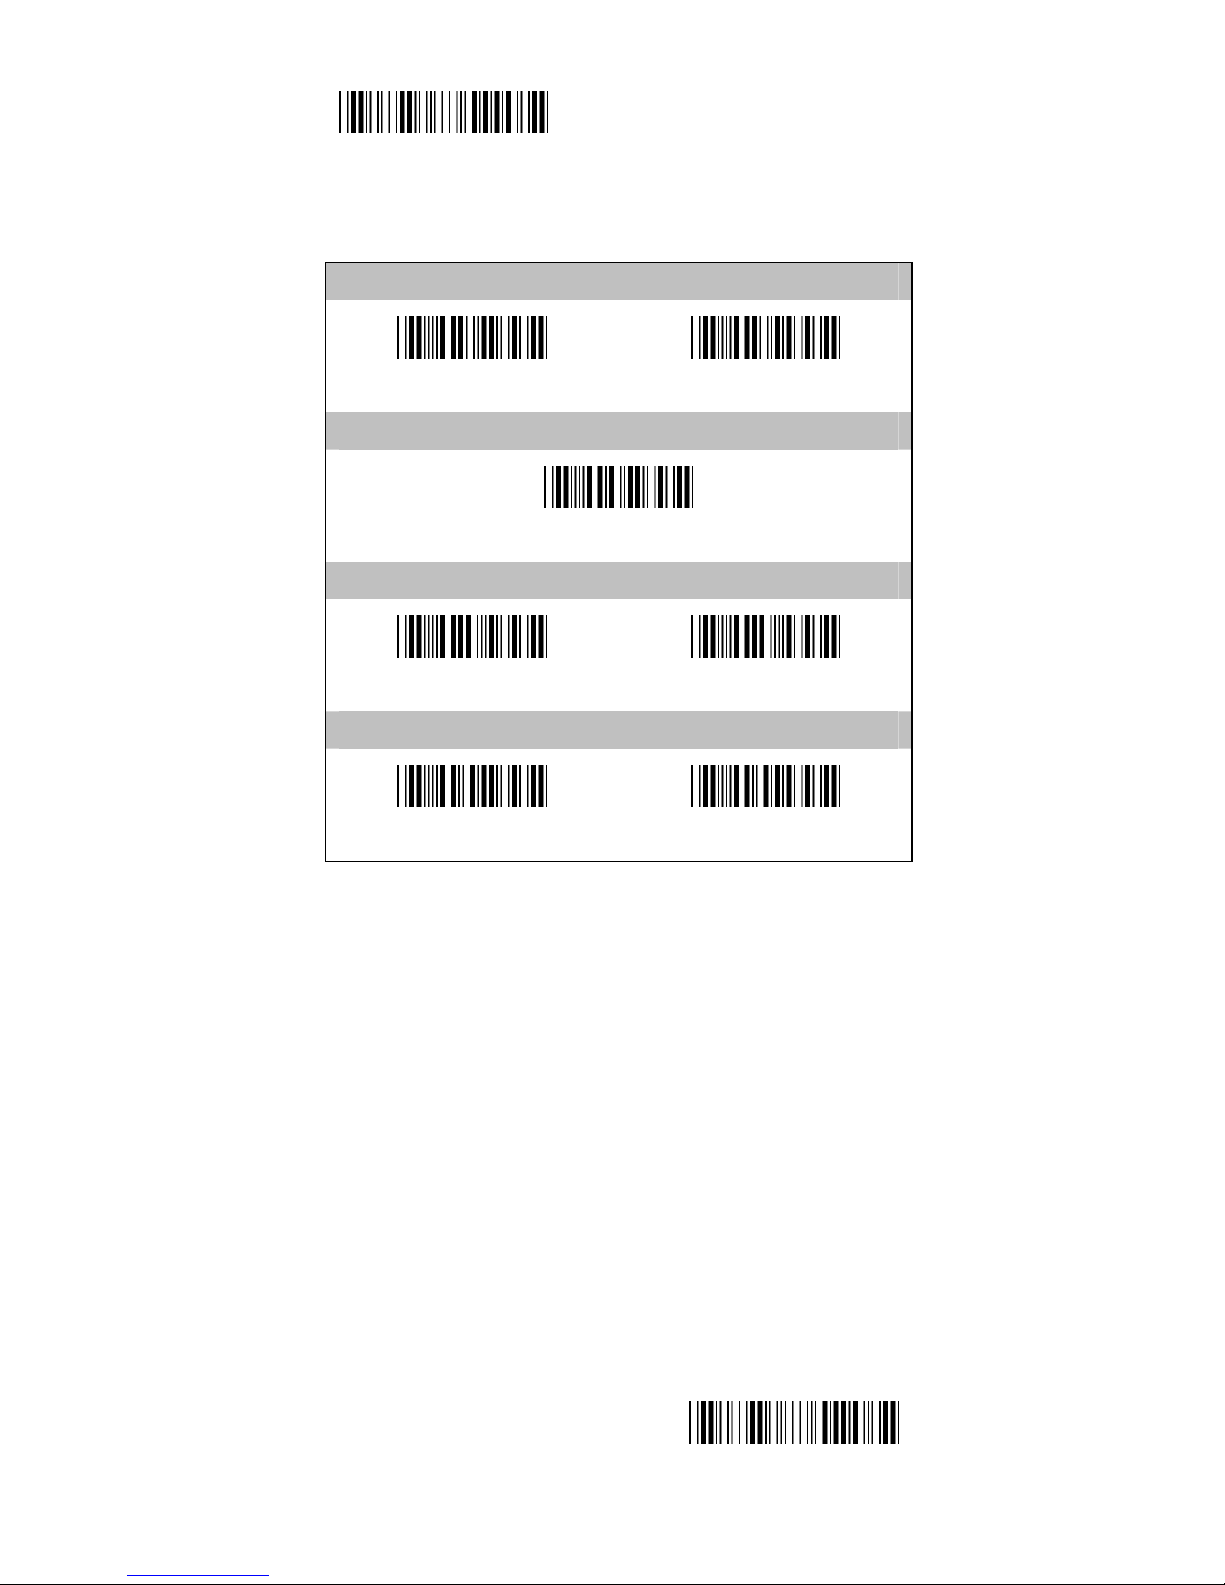
- 44 -
Start Configuration
3.12 China Post Code
Reading
(OFF)
ON
Code ID
00H 51(20-7EH)
Verify Checksum
(OFF)
ON
Transmit Check Character
(OFF)
ON
End Configuration
Page 45
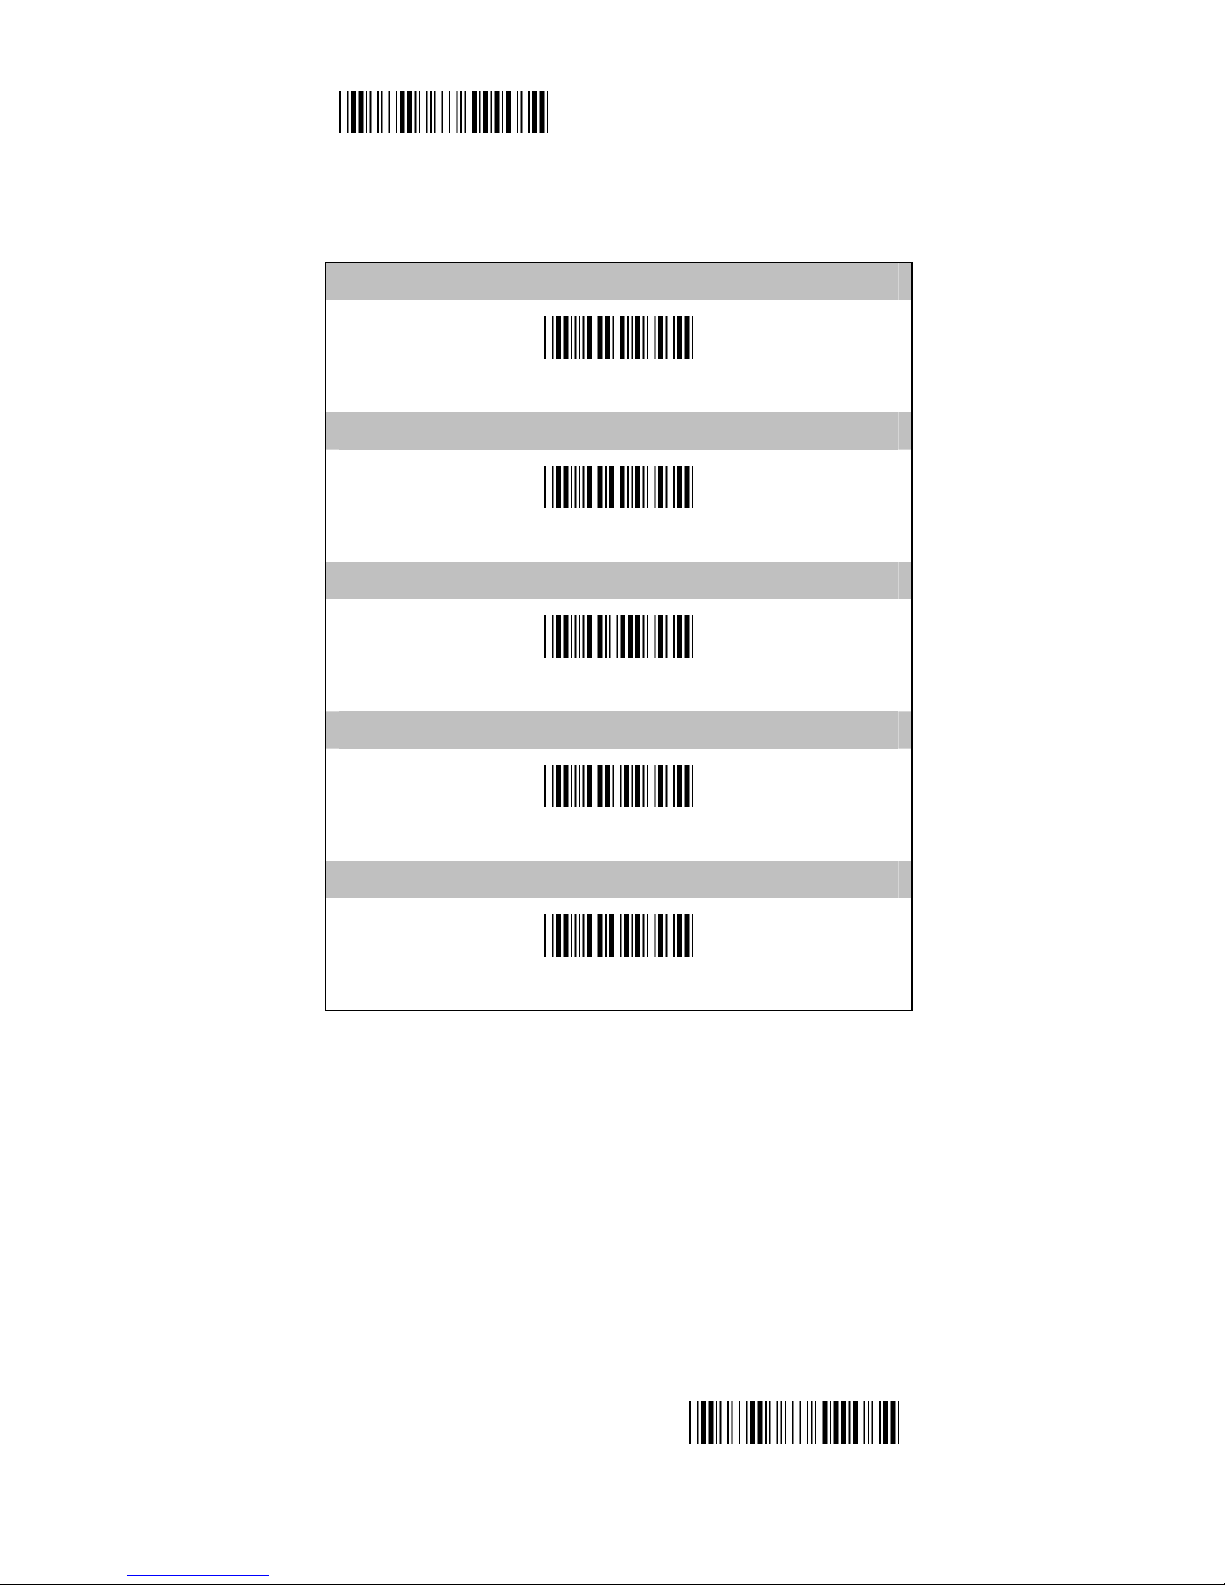
- 45 -
Start Configuration
China Post Code
Truncate Leading Digit
00H (00-50H)
Truncate Last Digit
00H (00-50H)
Min. Length
00H (00-50H)
Max. Length
50H (00-50H)
Select Insertion Code
00H (00-02H)
End Configuration
Page 46
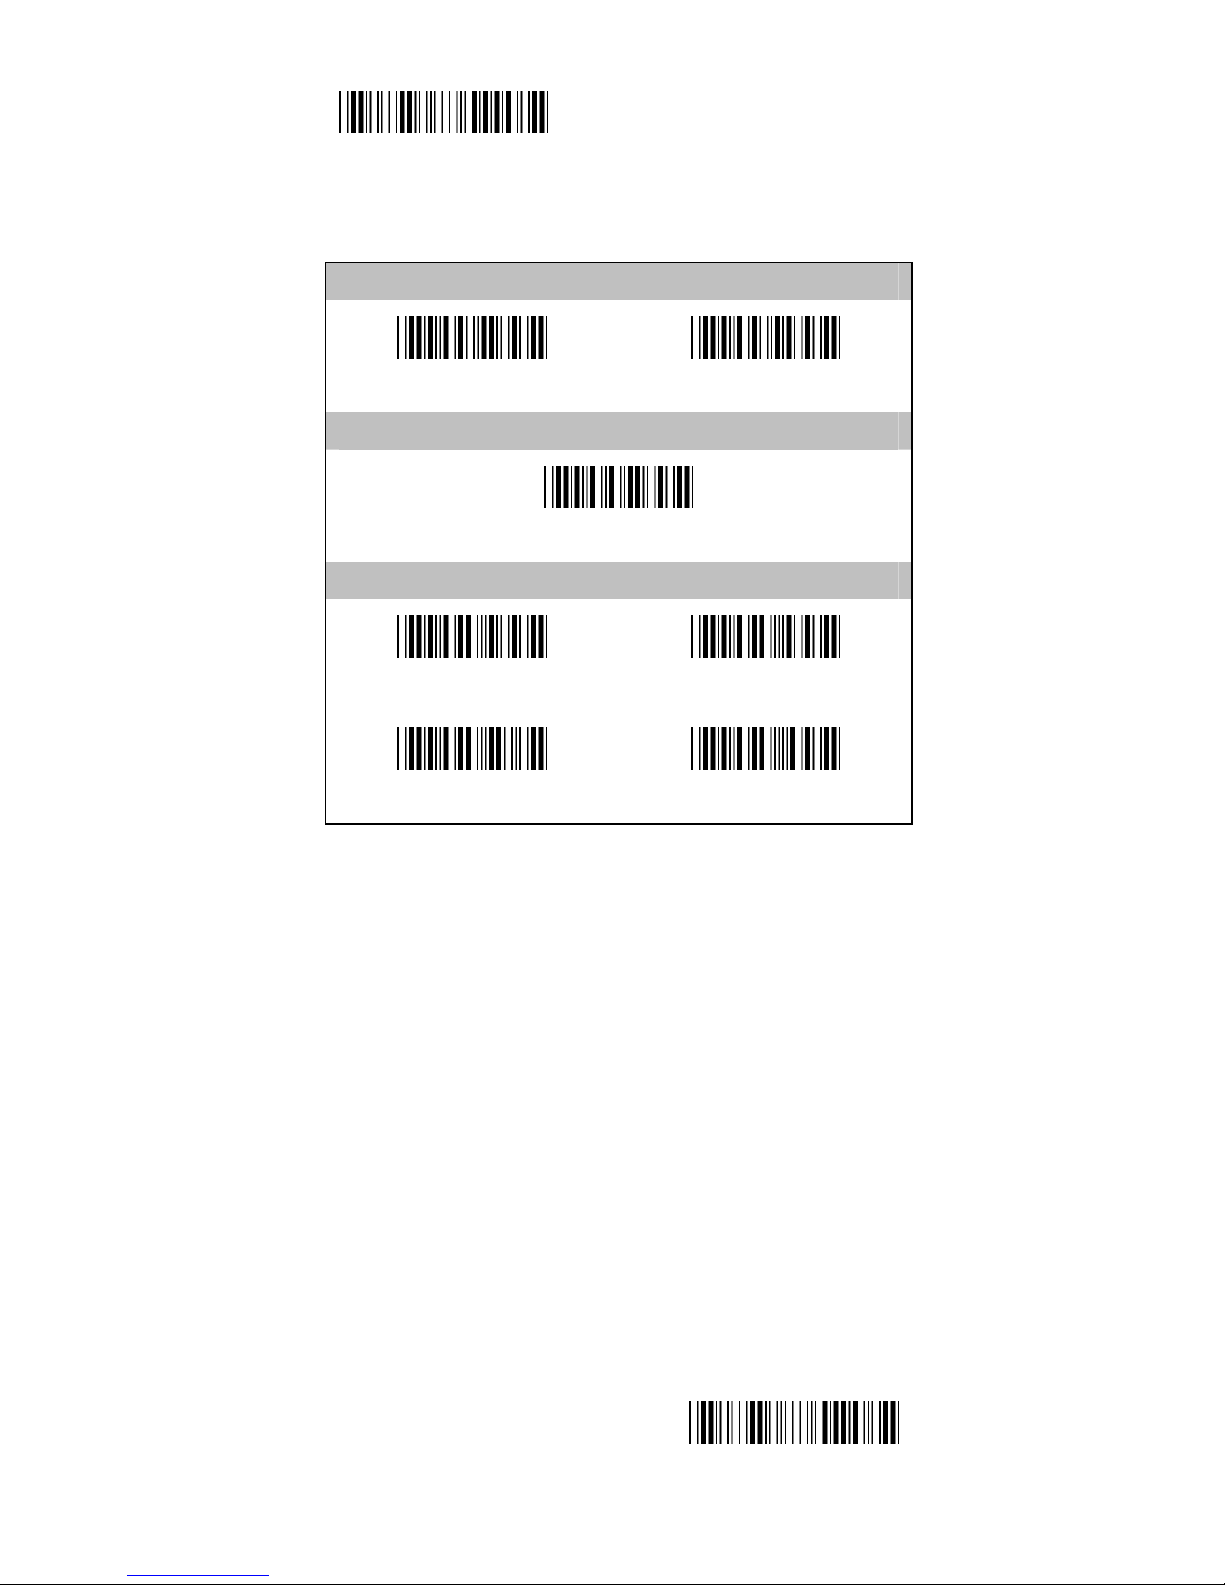
- 46 -
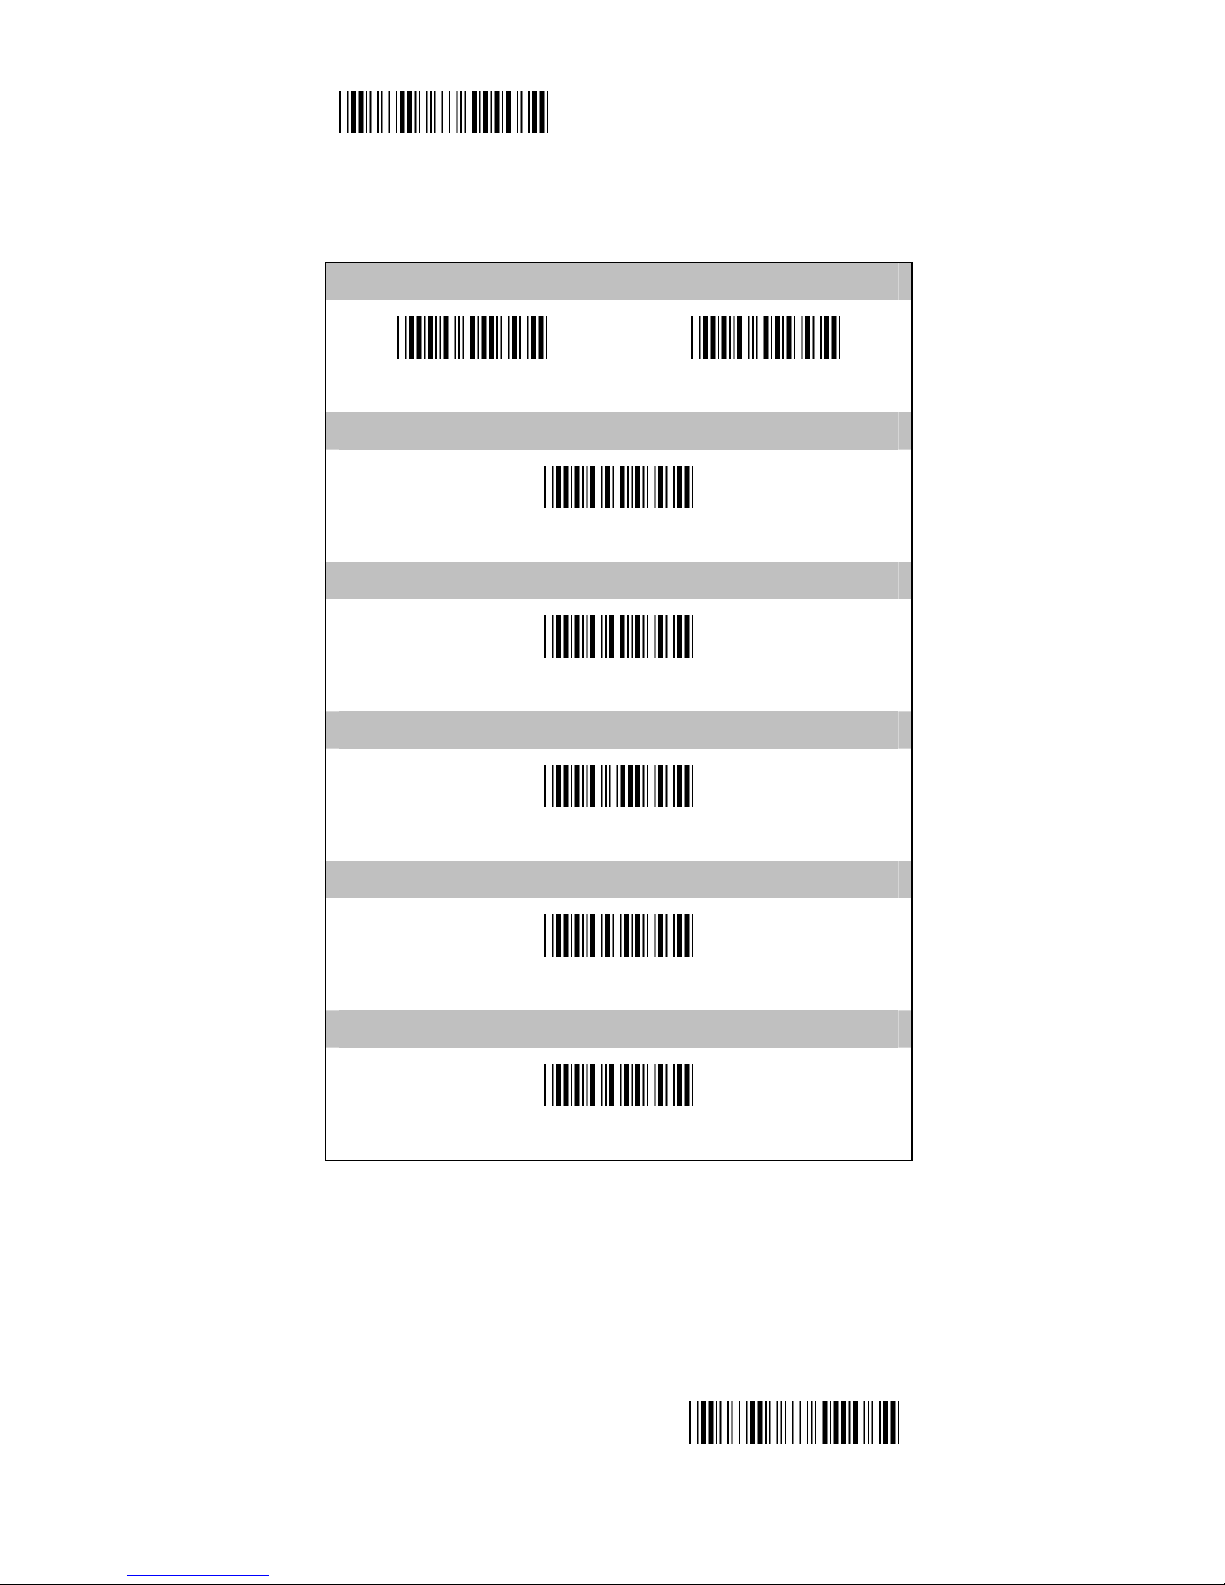
Start Configuration
3.13 MSI/Plessey
Reading
(OFF)
ON
Code ID
52H (20-7EH)
Verify Checksum
(OFF)
MOD 10
MOD 10/10 MOD 11/10
End Configuration
Page 47
- 47 -
Start Configuration
MSI/Plessey
Transmit Check Character
OFF
(ON)
Truncate Leading Digit
00H (00-3CH)
Truncate Last Digit
00H (00-3CH)
Min. length
00H (00-3CH)
Max. Length
3CH (00-3CH)
Select Insertion Code
00H (00-02H
End Configuration
Page 48
- 48 -
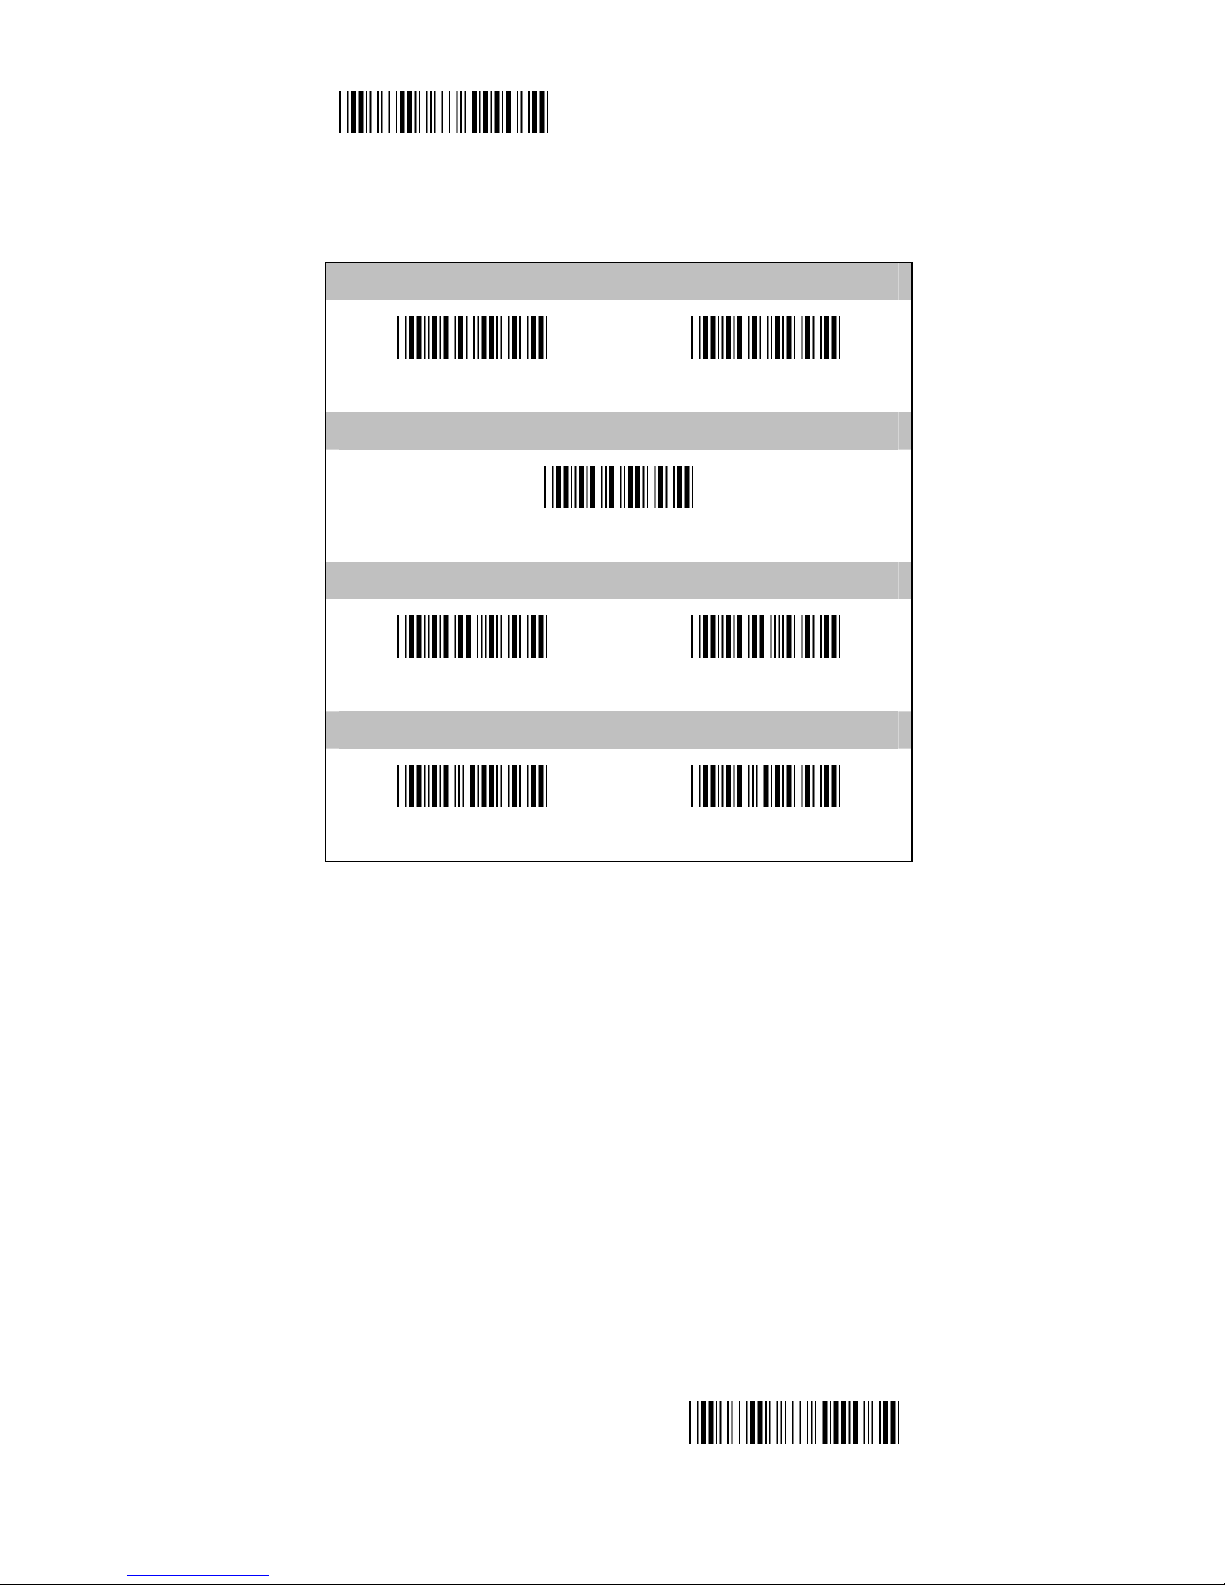
Start Configuration
3.14 Code 32
Reading
(OFF)
ON
Code ID
53H (20-7EH)
Verify Checksum
OFF
(ON)
Transmit Check Character
OFF
(ON)
End Configuration
Page 49
- 49 -
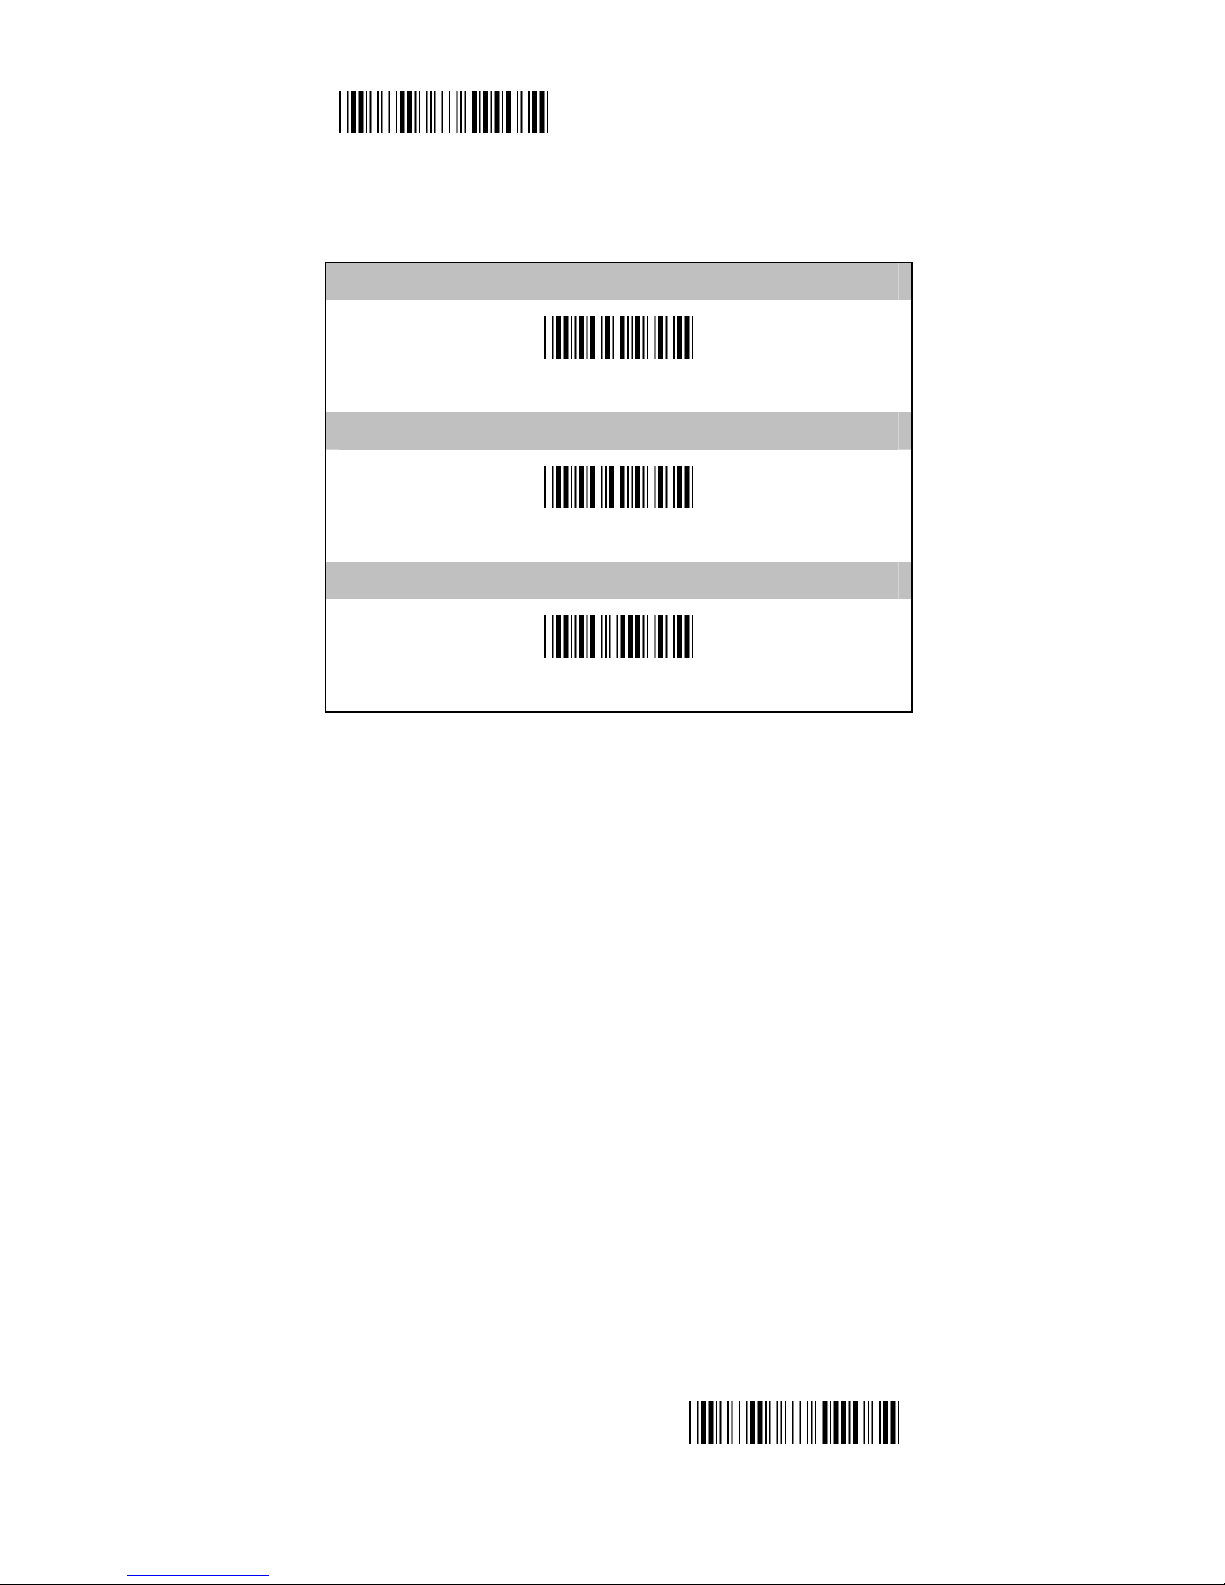
Start Configuration
Code 32
Truncate Leading Digit
00H (00-0AH)
Truncate Last Digit
00H (00-0AH)
Select Insertion Code
00H (00-02H)
End Configuration
Page 50
- 50 -
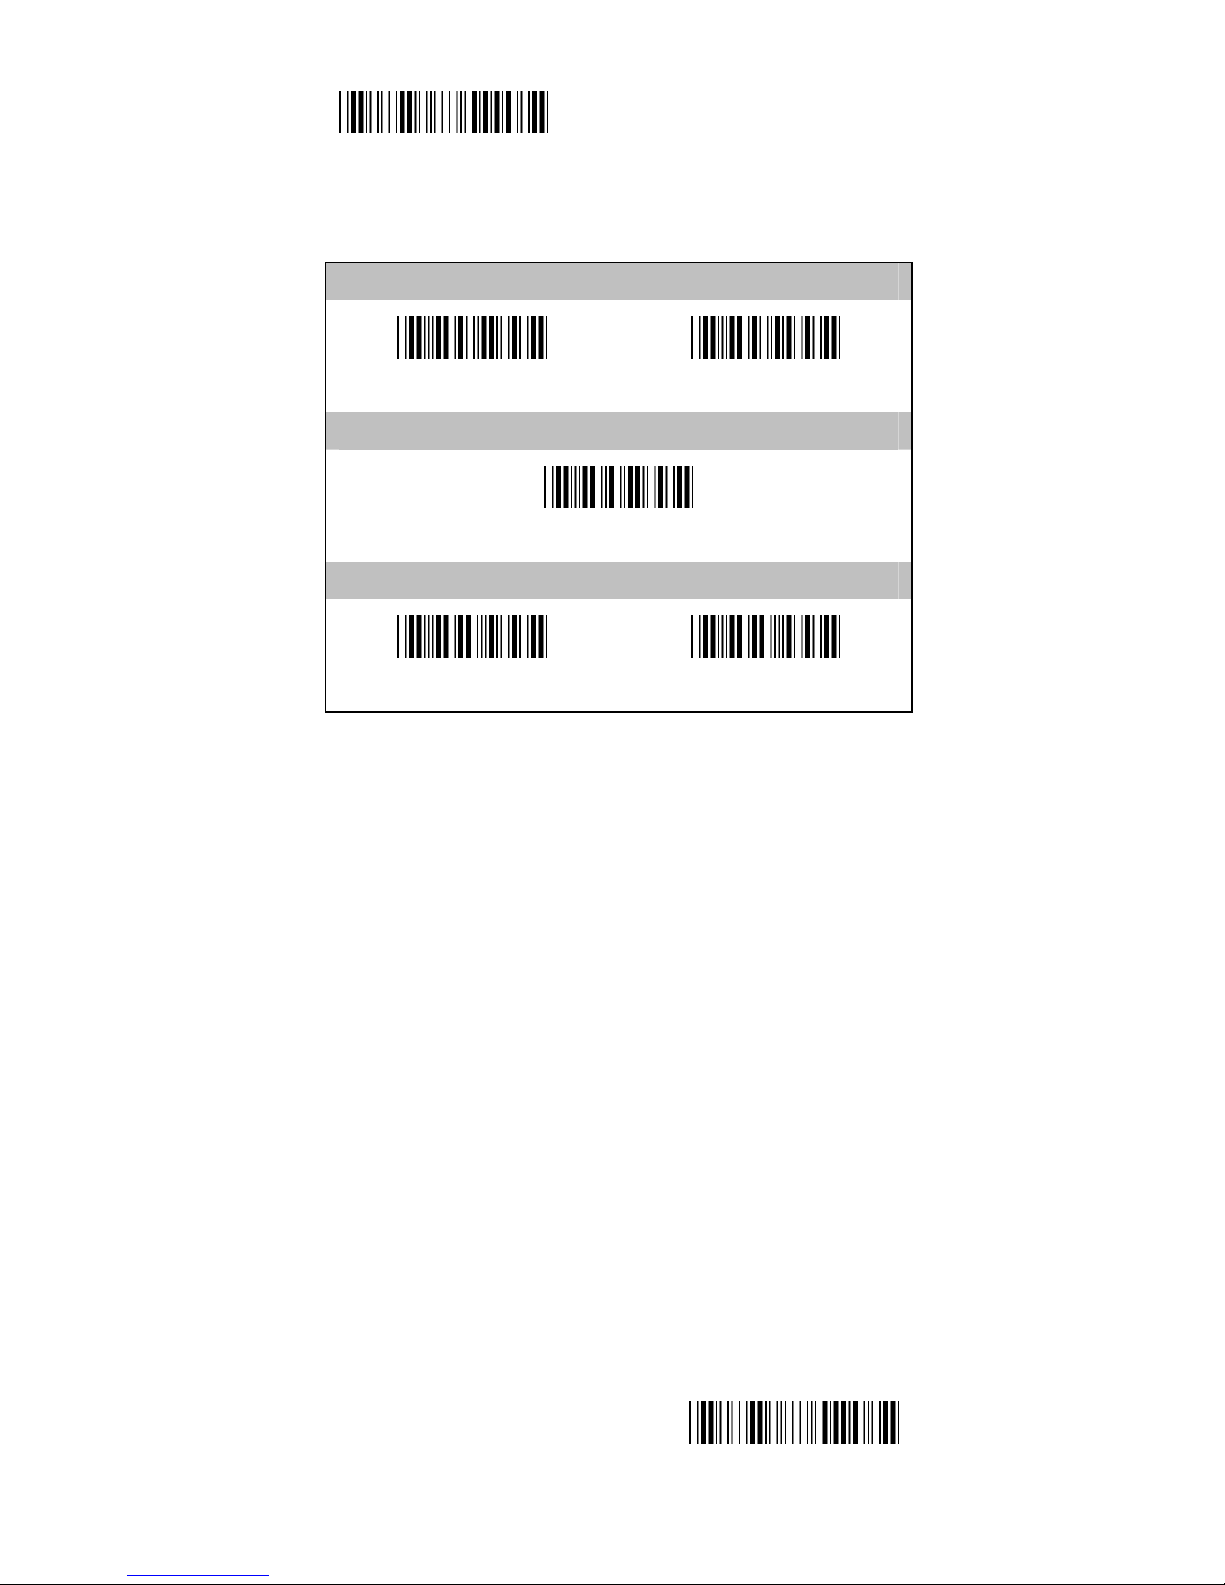
Start Configuration
3.15 Code 11
Reading
(OFF)
ON
Code ID
54H (20-7EH)
Verify Checksum
OFF
(ON)
End Configuration
Page 51
- 51 -
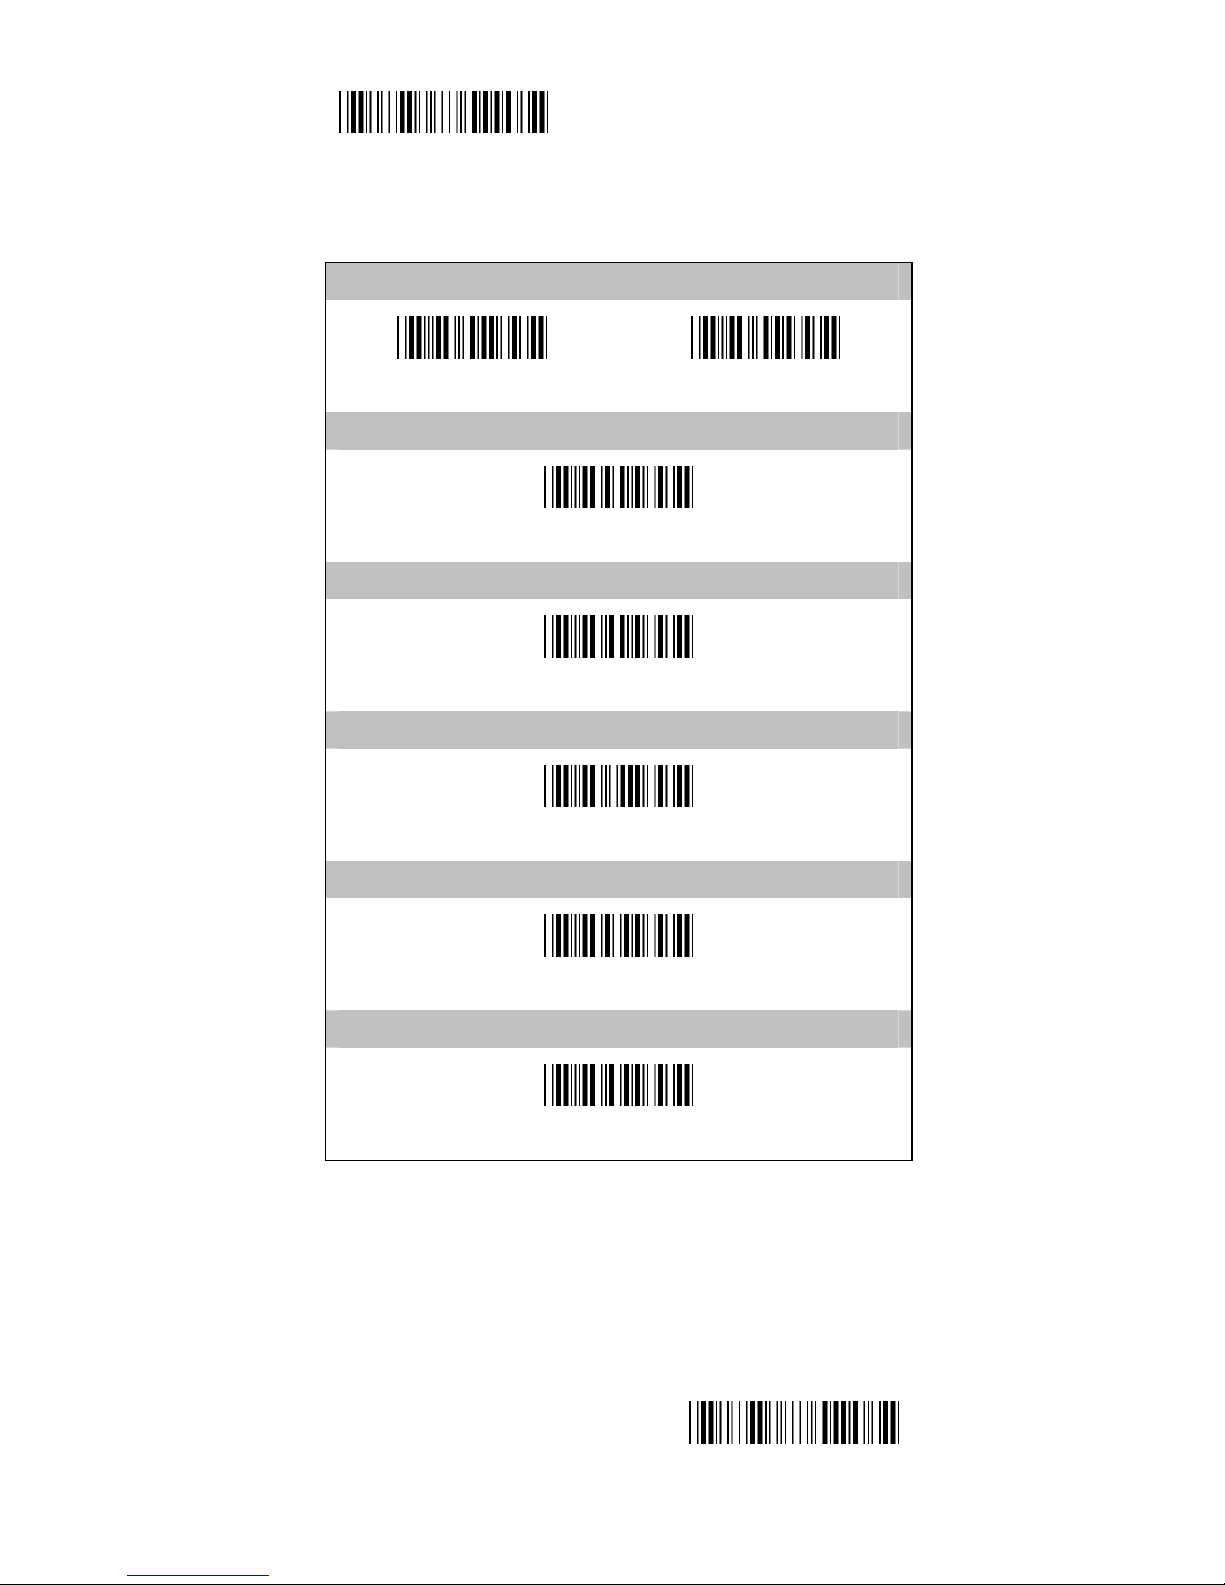
Start Configuration
Code 11
Transmit Check Character
(OFF)
ON
Truncate Leading Digit
00H (00-50H)
Truncate Last Digit
00H (00-50H)
Min length
00H (00-50H)
Max. length
50H (00-50H)
Select Insertion Code
00H (00-02H)
End Configuration
Page 52
- 52 -
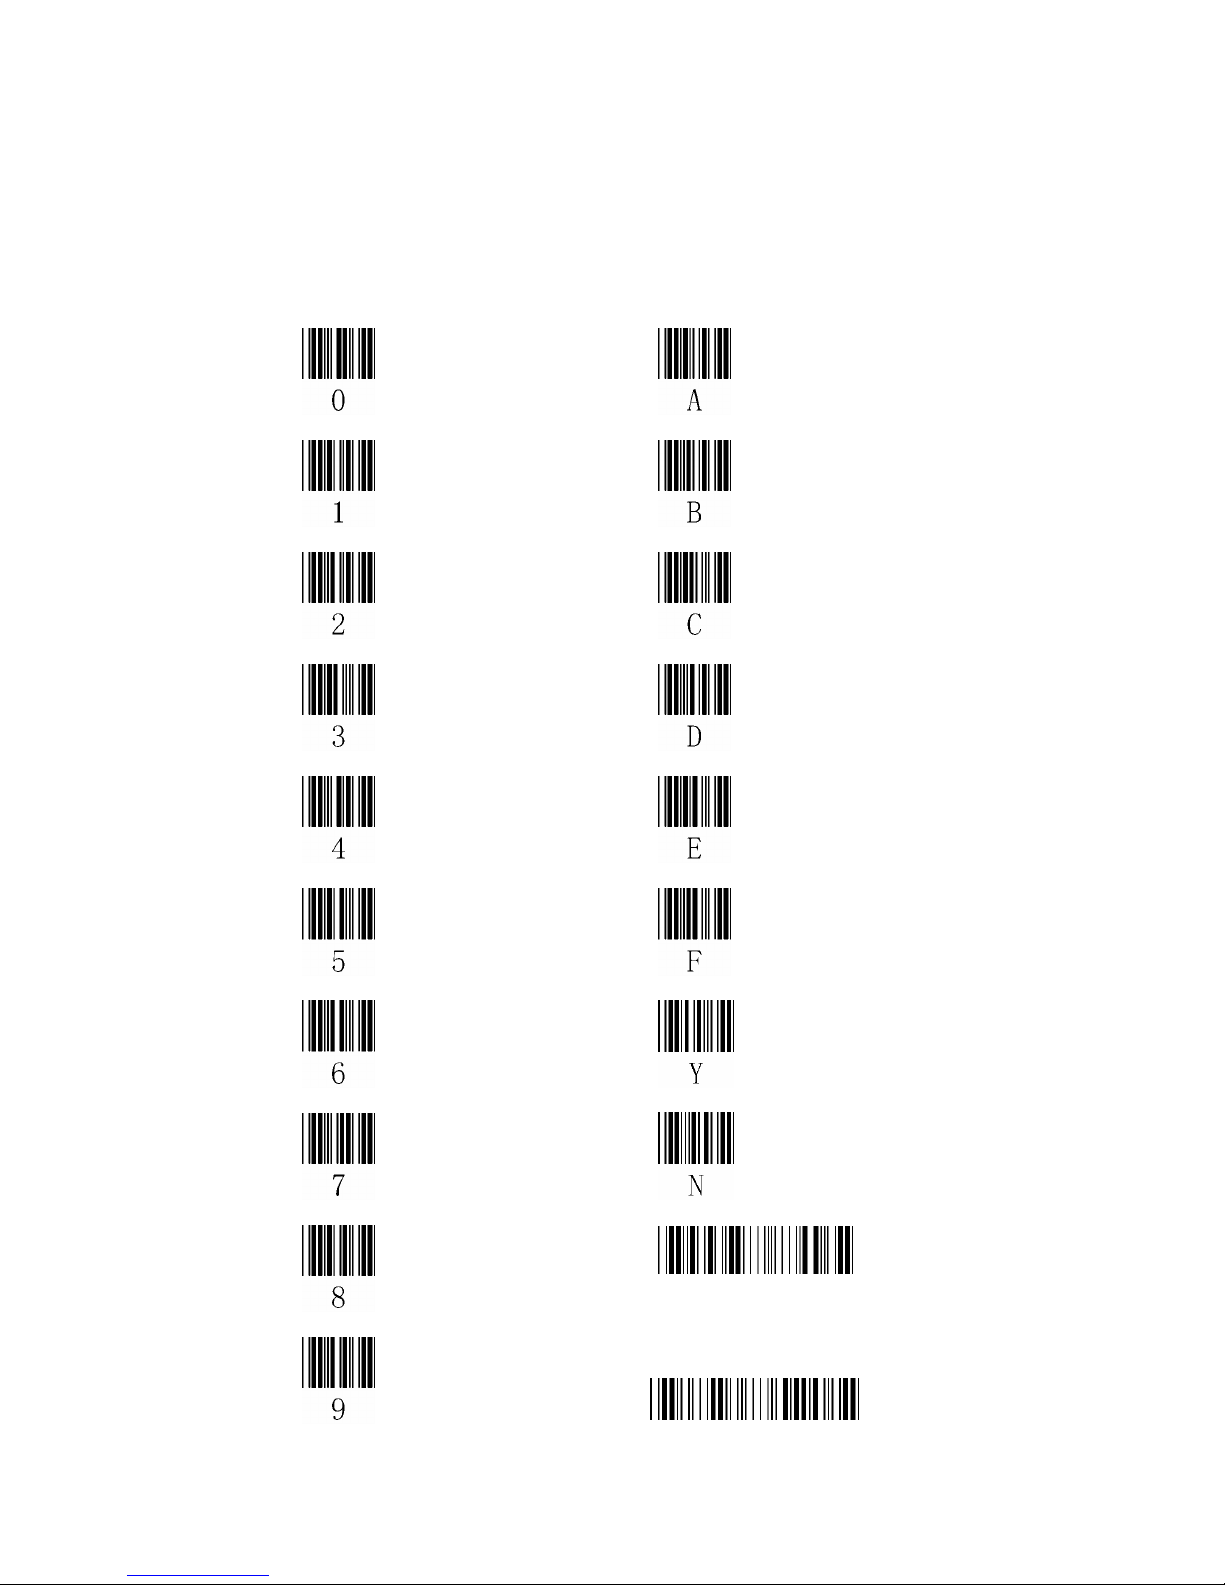
Appendix A ASCII code
Confirm
End Configuration
Page 53

- 53 -
ASCII table
0 1 2 3 4 5 6 7
0 NUL DLE SP 0 @ P ` p
1 SOH DC1 ! 1 A Q a q
2 STX DC2 “ 2 B R b r
3 ETX DC3 # 3 C S c s
4 EOT DC4 $ 4 D T d t
5 ENQ NAK % 5 E U e u
6 ACK SYN & 6 F V f v
7 BEL ETB ‘ 7 G W G w
8 BS CAN ( 8 H X h x
9 HT EM ) 9 I Y i y
A LF SUM * : J Z j z
B VT ESC + ; K [ k {
C FF FS , < L \ l |
D CR GS - = M } m }
E SO RS . > N ^ n ~
F SI US / ? O _ o DEL
Page 54

- 54 -
Appendix BFunction Key Code table
0 1
0 NULL
1 UP F1
2 DOWN F2
3 LEFT F3
4 RIGHT F4
5 PAGE UP F5
6 PAGE
DOWN
F6
7 F7
8 BS F8
9 TAB F9
A F10
B HOME ESC
C END F11
D ENTER F12
E INSERT
F DELETE
Page 55
- 55 -
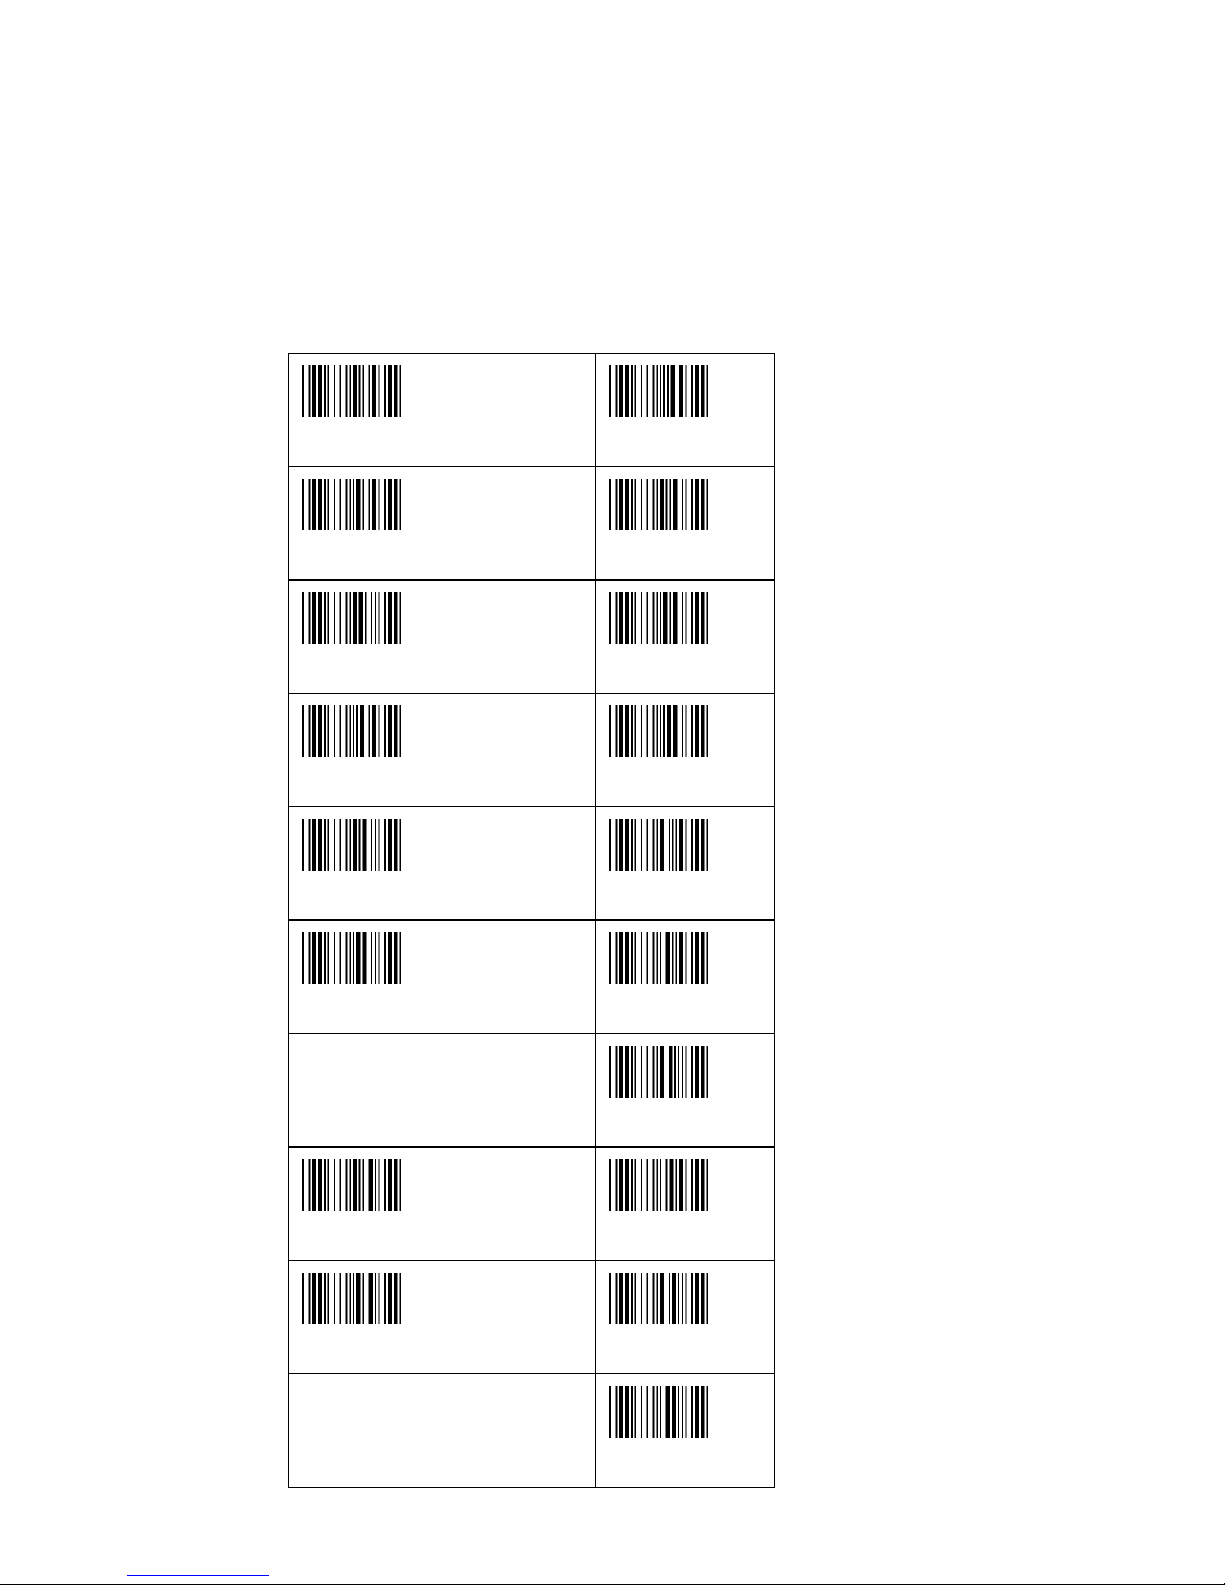
Function Key Code
Before scanning barcode, please turn on Full ASCII CODE 39
UP($A)
F1($Q)
DOWN($B)
F2($R)
LEFT($C)
F3($S)
RIGHT($D)
F4($T)
PAGE UP($E)
F5($U)
PAGE DOWN($F)
F6($V)
F7($W)
BS($H)
F8($X)
TAB($I)
F9($Y)
F10($Z)
Page 56
- 56 -
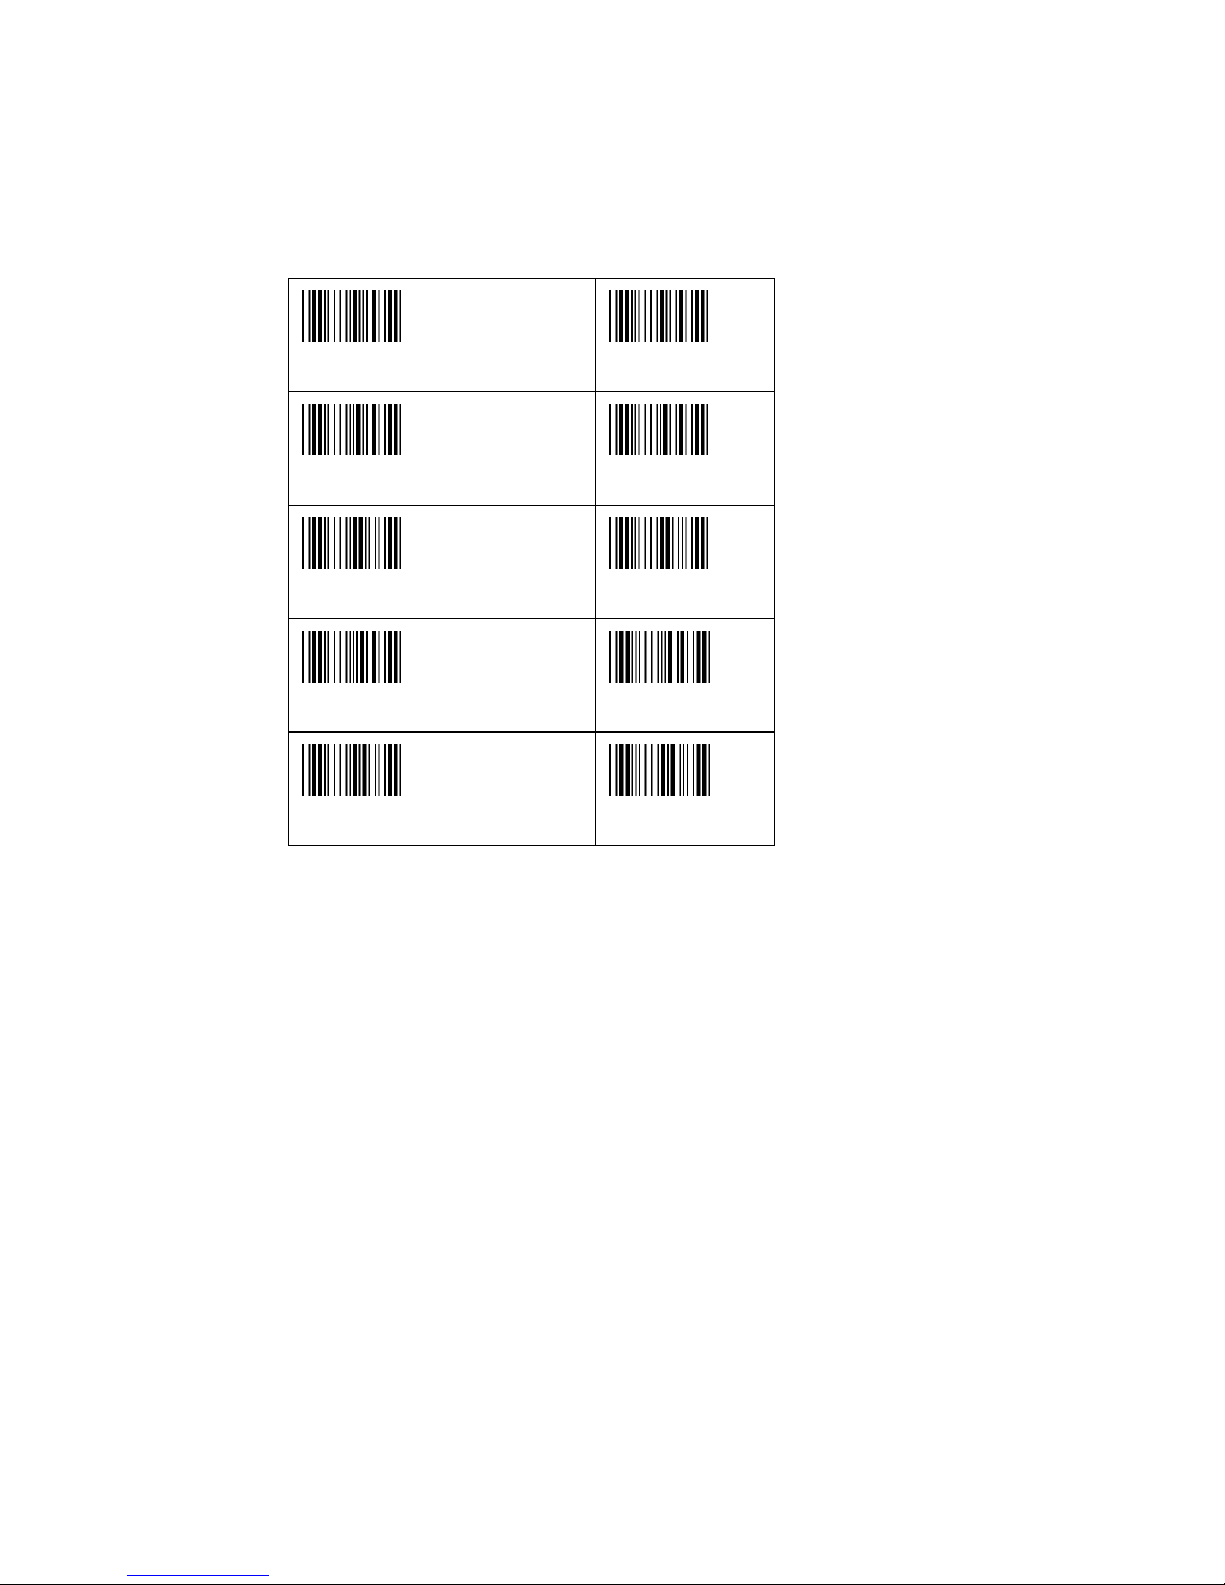
HOME($K)
ESC(%A)
END($L)
F11(%B)
ENTER($M)
F12(%C)
INSERT($N)
F13(%D)
DELETE($O)
F14(%E)
Page 57
- 57 -
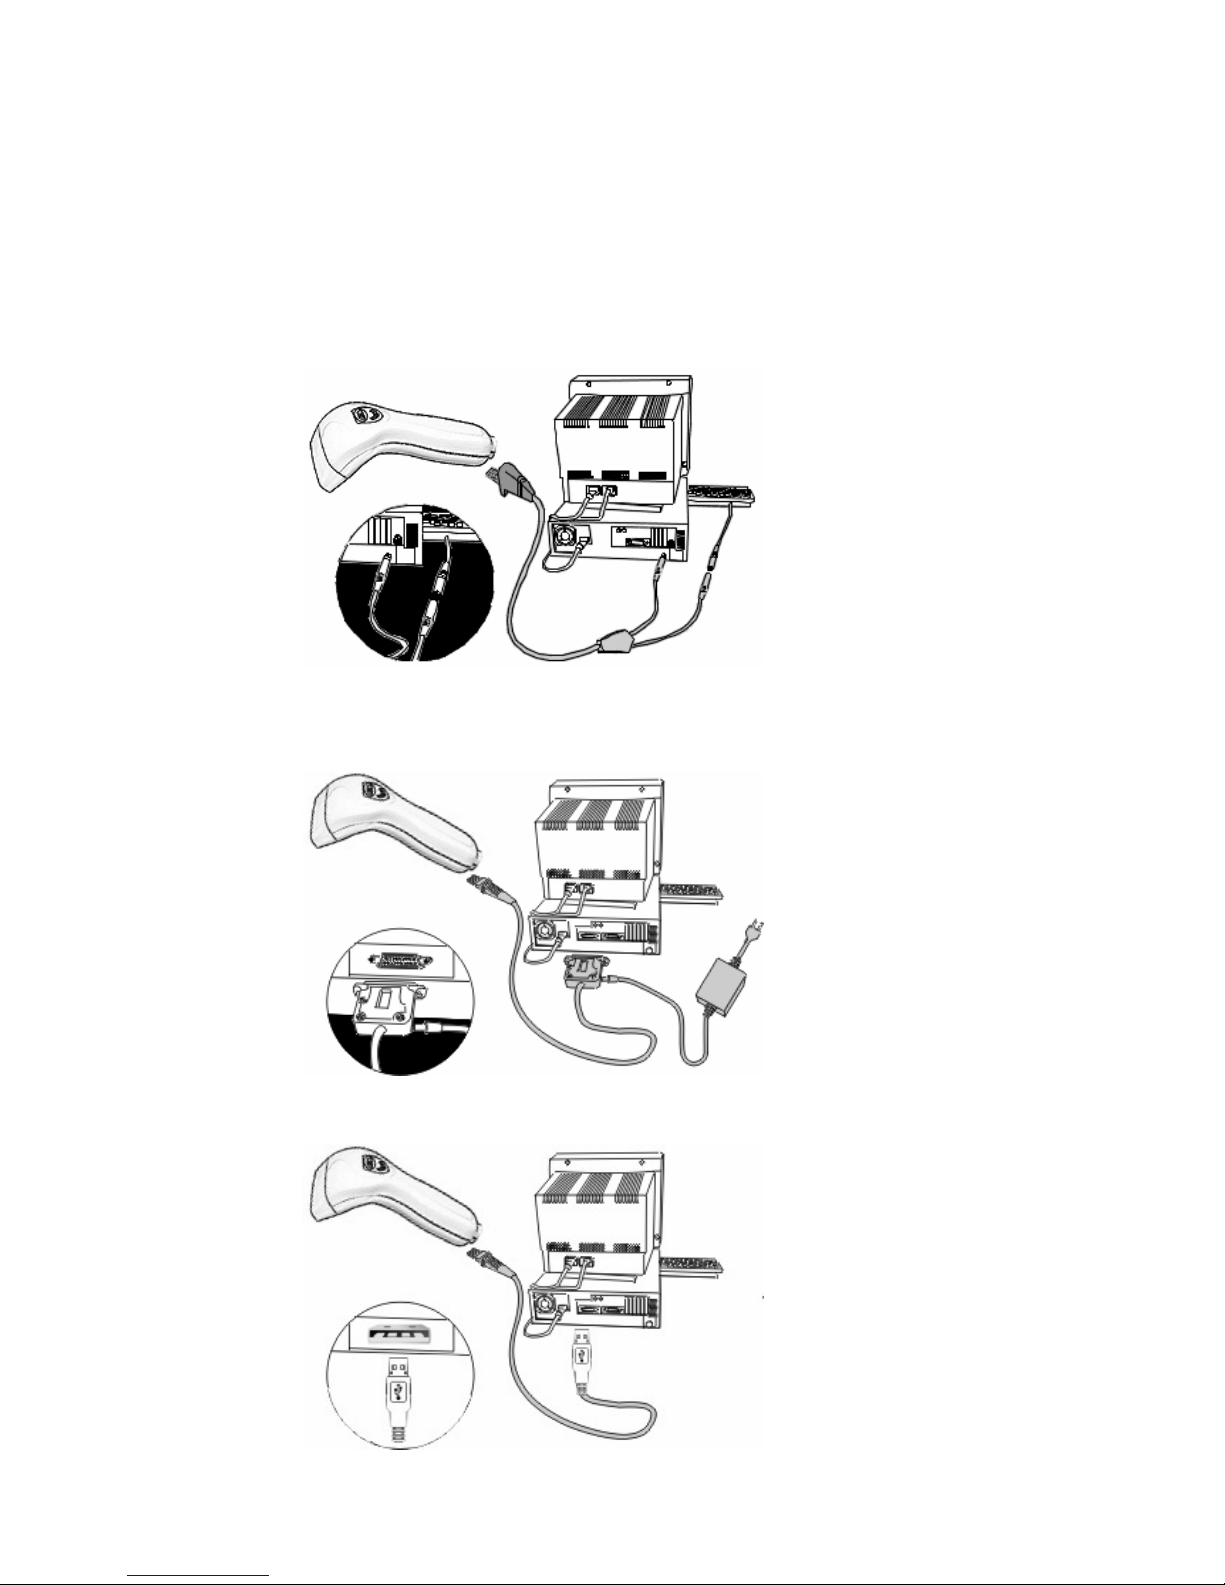
INSTALLATION OF YOUR DEVICE
PS-2 Connection
RS-232 Connection (need 5Volts power supply)
USB Connection
Page 58

- 58 -
http://www.barcodeyes.com
 Loading...