


UnionNet SP2100
BLUETOOTH BARCODE SCANNER
User’s Guide
Copyright© 2012-2013 BarcodeGuy.com®
(Version 2.25RA.5)

BarcodeGuy.com® - UnionNet SP2100 User’s Guide
TABLE OF CONTENTS
1. Welcome / Warnings / Cautions / Warranty
1.1 User's Guide Nomenclature - Notes & Warnings
2. Getting to know your SP2100
2.1 What’s in the box
2.2 Parts of the UnionNet SP2100
2.3 Charging your SP2100
2.4 SP2100 Power Modes
2.5 The SP2100 Status Bar
2.6 Scanning Barcodes with the SP2100
2.7 Using the System Menu of the SP2100
2.7.1 System Menu Notation
2.8 Bluetooth Connection Types - Revisiting the SP2100 Status Bar
3. Getting Started with HID connections
3.1 Using the SP2100 as a Bluetooth Keyboard
3.2 Apple iOS HID Connection Instructions (iPad, iPhone, iPod Touch)
3.3 Android HID Connection Instructions
3.4 Windows HID Connection Instructions
3.5 HID Tips & Tricks with the SP2100
3.6 Disconnecting / Reconnecting Bluetooth
3.7 Bluetooth HID - Setting Transmission Delays
3.8 HID Batch Data from SP2100 to Host
3.9 Other System Menu Options for Bluetooth
4. Managing Memory
4.1 Storage & Transmit Modes
4.2 Display Memory Used
4.3 Stored Data - Review with Side Buttons
4.4 Stored Data - Delete All Data with System Menu
5. Data Formatting
5.1 Introduction to Suffixes and Prefixes
5.2 Using a Custom Suffix - Stating and Example
5.3 Default Suffix and Introduction to ASCII & Hexdecimal Equivalents
5.4 SP2100 System Menu for Pre/Suffix - The Carriage Return Suffix
5.5 Using a Custom Suffix - Using ASCII-HEX Conversion Table
5.6 Using a Custom Suffix - Design the ASCII-HEX
5.7 Test the Suffix Settings from Section 5.6 Design
5.8 Summarizing Custom Prefixes and Suffixes
6. SP2100 Factory Defaults
Appendix A: ASCII to HEX Conversion
Appendix B: SP2100 Factory Default Settings
Appendix C: Barcode Symbologies Suppoerted
Appendix D: iOS UniLinker and SP2100 in MFi Mode
Appendix E: Unilinker Android
Appendix F: Updating SP2100 Firmware
2
BarcodeGuy.com® - UnionNet SP2100 User’s Guide
1.0 - Welcome / Warnings / Cautions / Warranty
Congratulations on receiving the BarcodeGuy.com®- UnionNet SP-2100! The SP2100 is the most durable, configurable
and economical bluetooth barcode scanner on the market today. Use this Guide to find the feature you need, or read it cover
to cover. We’ve tried to make it concise and exciting. We’ll be updating the Guide as the features you request are made
available. Let us know if you have suggestions. We encourage you to check the Support Section of our web site often.
Warnings:
● Opening the SP2100 case will cause damage and void the warranty.
● When storing or using the SP2100 in extreme environments, the temperature range should be between +20º F & 120º F.
Storing the SP2100 at extreme temperatures may cause damage or reduced battery life.
Cautions:
● The SP2100 should be charged when you take it out of the box. Charge the battery for 2 hours before first use. We
recommend you use the factory supplied cable for charging.
● To avoid eye injury, never look directly into the scanner aperture where the scan beam originates.
● Although the SP2100 is durable, protect it by using the lanyard provided to keep the SP2100 from falling on the floor.
● Do not expose the SP2100 directly to water.
● Do not expose the SP2100 to strong magnets, especially near the front of the case.
● Keep the scanner or imager window clean
LIMITED WARRANTY AND DISCLAIMERS - BY OPENING THE PACKAGE OF THIS PRODUCT YOU AGREE TO BECOME BOUND BY THE LIABILITY AND WARRANTY
CONDITIONS AS DESCRIBED BELOW.
Serial Number - A serial number appears on the SP2100 label which is the unique registration number of the device purchased. Do not remove the Serial Number marking - it
will automatically void the warranty. Do not operate a SP2100 without a serial number label. Warranty / Warranty Period / Liability - UnionNet, Inc. (“UnionNet”) manufactures
its hardware products in accordance with industry-standard practices. Unless otherwise agreed in a contract, th SP2100 is warranted for a period of two years after purchase,
covering defects in material and workmanship except rechargeable battery and other accessories. UnionNet will repair or, at its option, replace products that prove to be
defective in material or workmanship under proper use during the warranty period. UnionNet will not be liable in cases (i) in which the unit has been repaired or altered unless
done or approved by UnionNet, (ii) in which the unit has not been maintained in accordance with any operating or handling instructions supplied by UnionNet, (iii) in which the
unit has been subjected to unusual physical or electrical stress, misuse, abuse, power shortage, negligence or accident or (iv) in which the unit has been used other than in
accordance with the product operating and handling instructions. Preventive maintenance is the responsibility of the customer and is not covered under this warranty. Under no
circumstance will UnionNet be liable for any direct, indirect, consequential or incidental damages arising out of use or inability to use either the hardware or software, even if
UnionNet has been informed about the possibility of such damages. Warranty Coverage and Procedure - During the warranty period, UnionNet will repair or replace defective
products returned to UnionNet warehouse. International customers should contact the BarcodeGuy.com offices or support center. If warranty service is required,
BarcodeGuy.com will issue a Return Material Authorization Number. No returned product will be accepted or acknowledged without an RMA number clearly marked o
the outside of the box or on the shipping label. Products must be shipped in the original package, shipping and insurance charges prepaid. UnionNet will ship the repaired or
replacement product freight and insurance prepaid. Customer accepts full responsibility for its software and data including the appropriate backup thereof. Repair or replacement
of a product during warranty will not extend the original warranty term.
1.1 - User’s Guide Nomenclature - Notes & Warnings
Throughout the Guide, we’ve tried to make important things stand out from the details. We do this by using Warnings and
Notes to emphasize them. Here’s what they’ll look like:
WARNING Contains critical or important information or warnings / cautions for the section.
NOTE: This type of box contains “nice to know” information to help you understand faster or be more efficient. It will contain little tips and
tricks that you might miss if left in the Guide’s normal text.
We hope you find this methodology helpful. Just give us a call if you have a suggestion to make it better!
3
BarcodeGuy.com® - UnionNet SP2100 User’s Guide
2.0 - Getting to Know Your SP2100
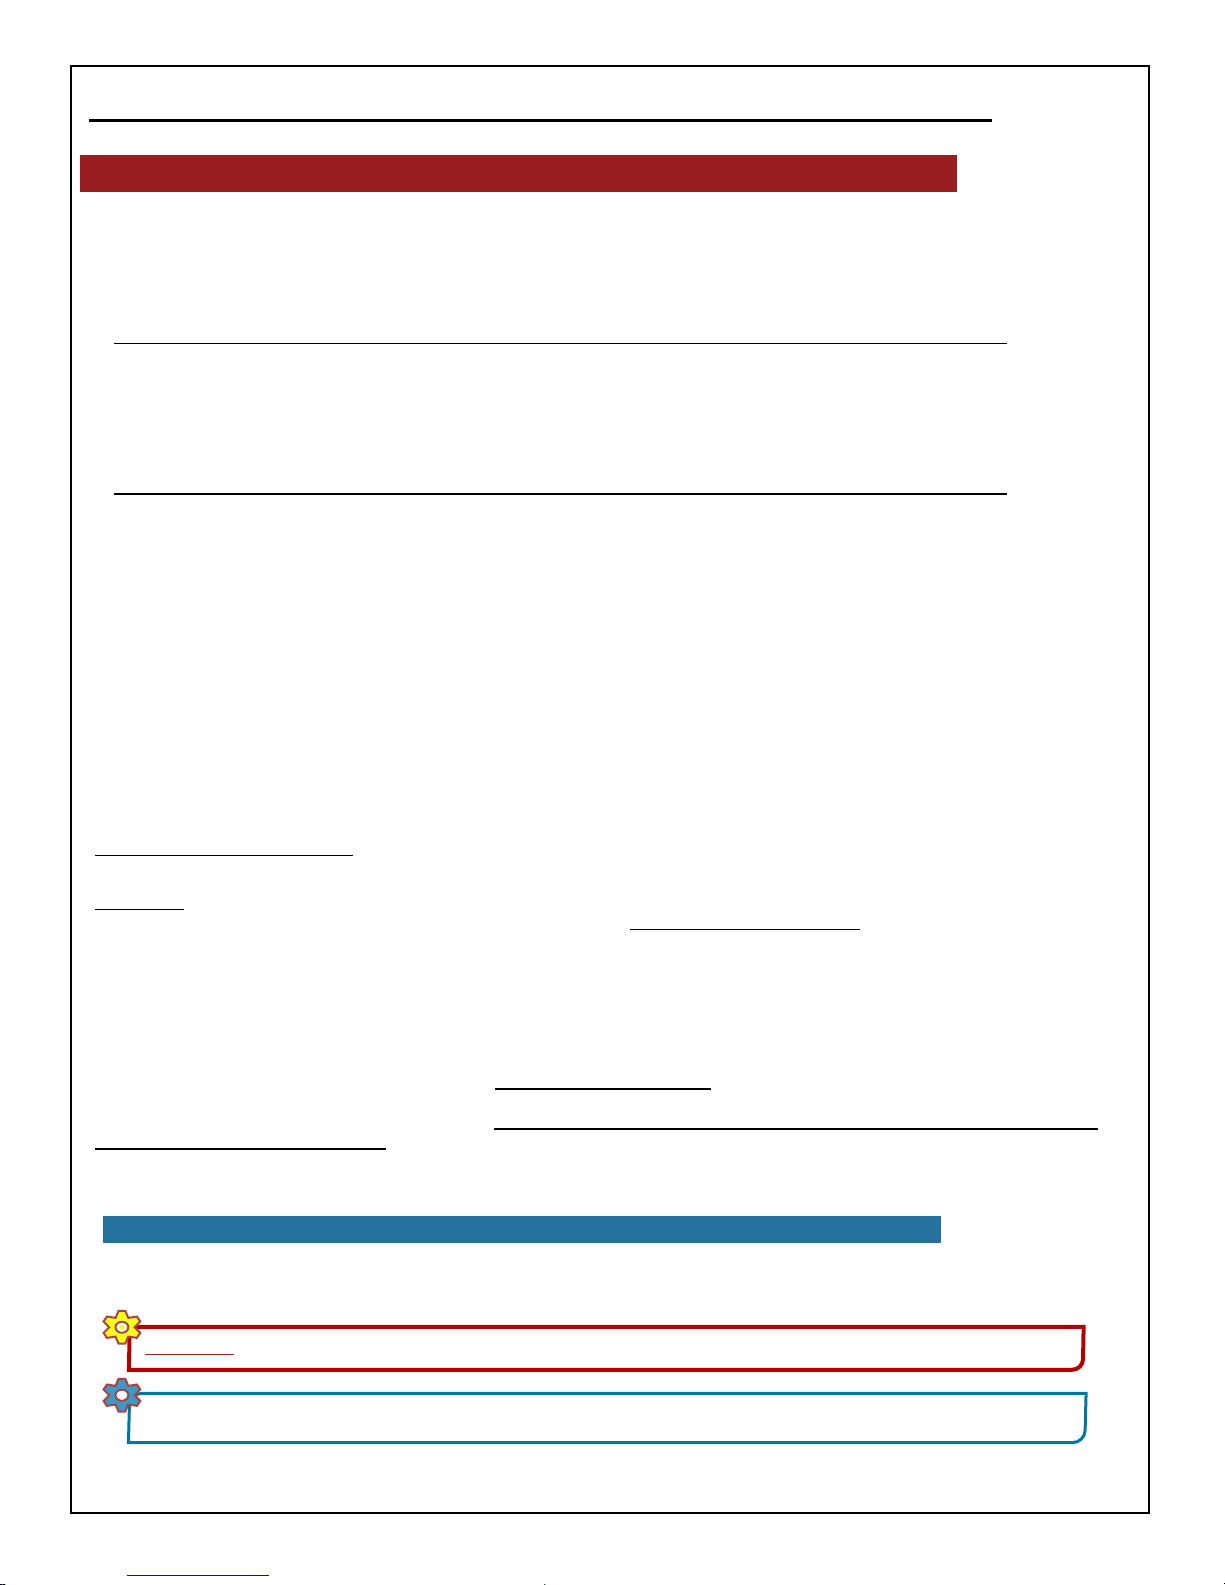
2.1 - What’s in the Box…
When you purchase from BarcodeGuy.com® you’ll find we
make it easy because each we’ve been exactly where you
are now; solving problems with new technology. That’s why
we’ve bundled your UnionNet SP2100 with everything you
need to get started right away.
Here’s what you’ll find in the box:
● UnionNet SP2100 - note the screen protector over the
display.
● Mini-USB Charge Cable - plug one end into the
Resource CD
Barcode
Guy
800-880-7495
.
com
®
bottom of your SP2100 and the other into a Type A
USB Port of your PC or power supply to recharge your
scanner. The cable is also used update SP2100’s
firmware when necessary.
● AC to USB Power Supply - The AC to USB power
supply is the most efficient way to recharge your SP2100.
UNIONNET SP2100
figure 2.1
HID QuickStart Card
● Car Charger - As mobile professionals, we’ve all been in the car on the way to a commitment when we
discover a gadget that needs a charge before we get there. BarcodeGuy.com® makes it easy for you with a
handy cigarette to USB charger.
● Lanyard - Yes, it looks goofy. The SP2100 is conveniently small, & misplaced. In fact, boss BarcodeGuy
®
lost his for months after it fell through the cord hole in his desk. The lanyard prevents your SP2100 from being
lost or damaged. The round thing with our logo on it is a spring-reeled retractable cord that allows you to use
the SP2100 at arms length while keeping it tethered. On the back of the reel is a steel snap clip. Detach the neck
lanyard and use the snap clip to attach the SP2100 to your belt, waist band, pocket, purse or just about any other
thin surface. You can attach the reel to your belt, & tuck the scanner into your pocket. The SP2100 is in your
hand quickly and conveniently. You can even remove the steel clip and put velcro on the back! (by the way, when
the boss BarcodeGuy®‘s lost SP2100 was found, it was still fully charged!)
● HID QuickStart Card - You probably know it already, but the HID QuickStart Card gets you started
connecting your SP2100 to your PC, Tablet or SmartPhone as a bluetooth keyboard.
● Resource CD - contains this User’s Guide, PC communication software, USB Serial Emulation Drivers and other
detailed information about your SP2100.
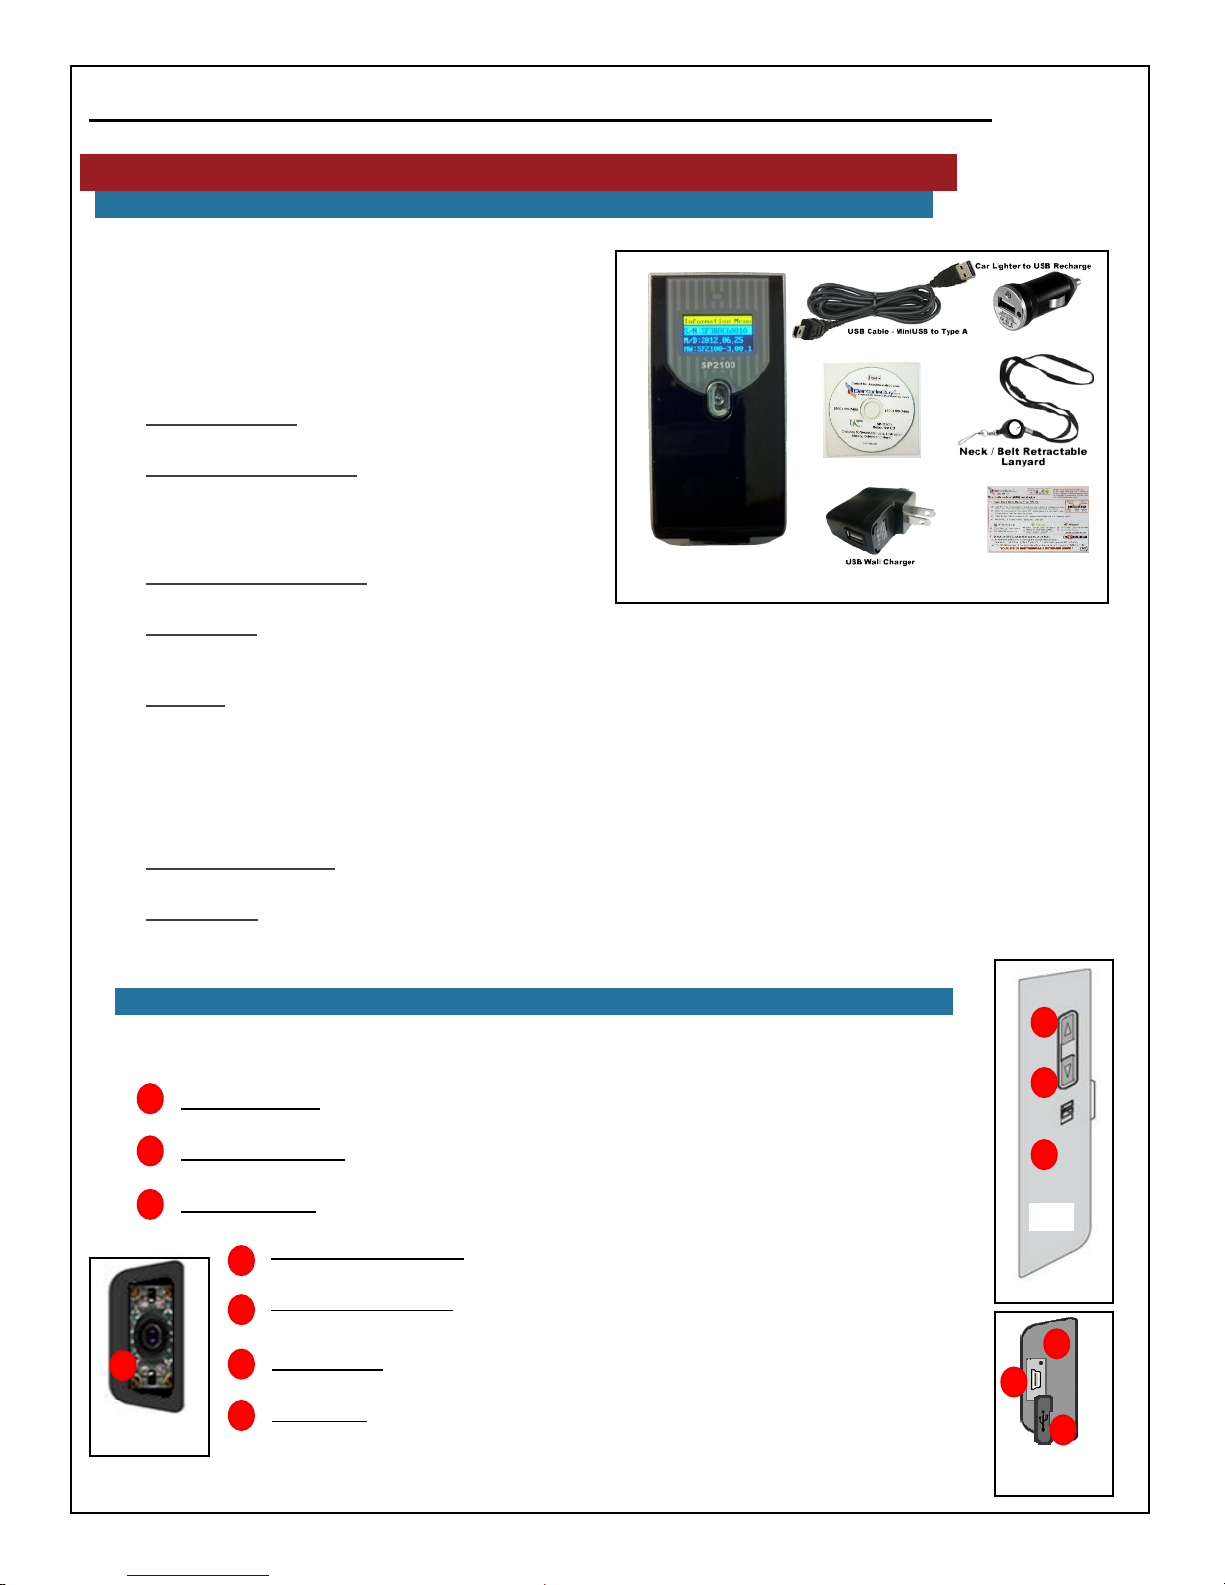
2.2 - Parts of the UnionNet SP2100
Let’s take a few seconds to talk about where everything is physically on your BarcodeGuy® SP2100, and
what we call it throughout the User’s Guide:
● Top Side Button - Press once to activate Memory Review Mode. Press and hold 3 seconds to enter
1
the SP2100 System Menu. Scrolls through Menus and stored barcode data
● Bottom Side Button - Disconnects / Reconnects Bluetooth in some modes & down scrolls through
2
Menus and stored barcode data.
● Beeper Speaker - Called the Buzzer in the System Menu, you can control its volume.
3
● Scan Imager Aperture - Where the scan beam originates. Covered with a clear
4
window that protects the area / linear imager.
● Mini-USB Connector - Use a standard or the supplied cable to recharge your SP2100.
5
Also allows direct serial connection through a Window’s PC USB connector
● Reset Button - Only to be used under the direction of BarcodeGuy.com Tech Support,
4
Top
figure 2.4
6
it is used to update the SP2100’s firmware when required.
● Port Cover - Made of rubber, the port cover protects the SP2100’s USB connector
7
and keeps dust & moisture from entering the housing
1
2
3
Left
figure 2.2
6
5
7
Bottom
figure 2.3
4
BarcodeGuy.com® - UnionNet SP2100 User’s Guide
2.2 - Parts of the UnionNet SP2100, con’t
8
n Scan / Power Button - the front Scan Button has 3 important functions:
10
9
8
7
figure 2.5
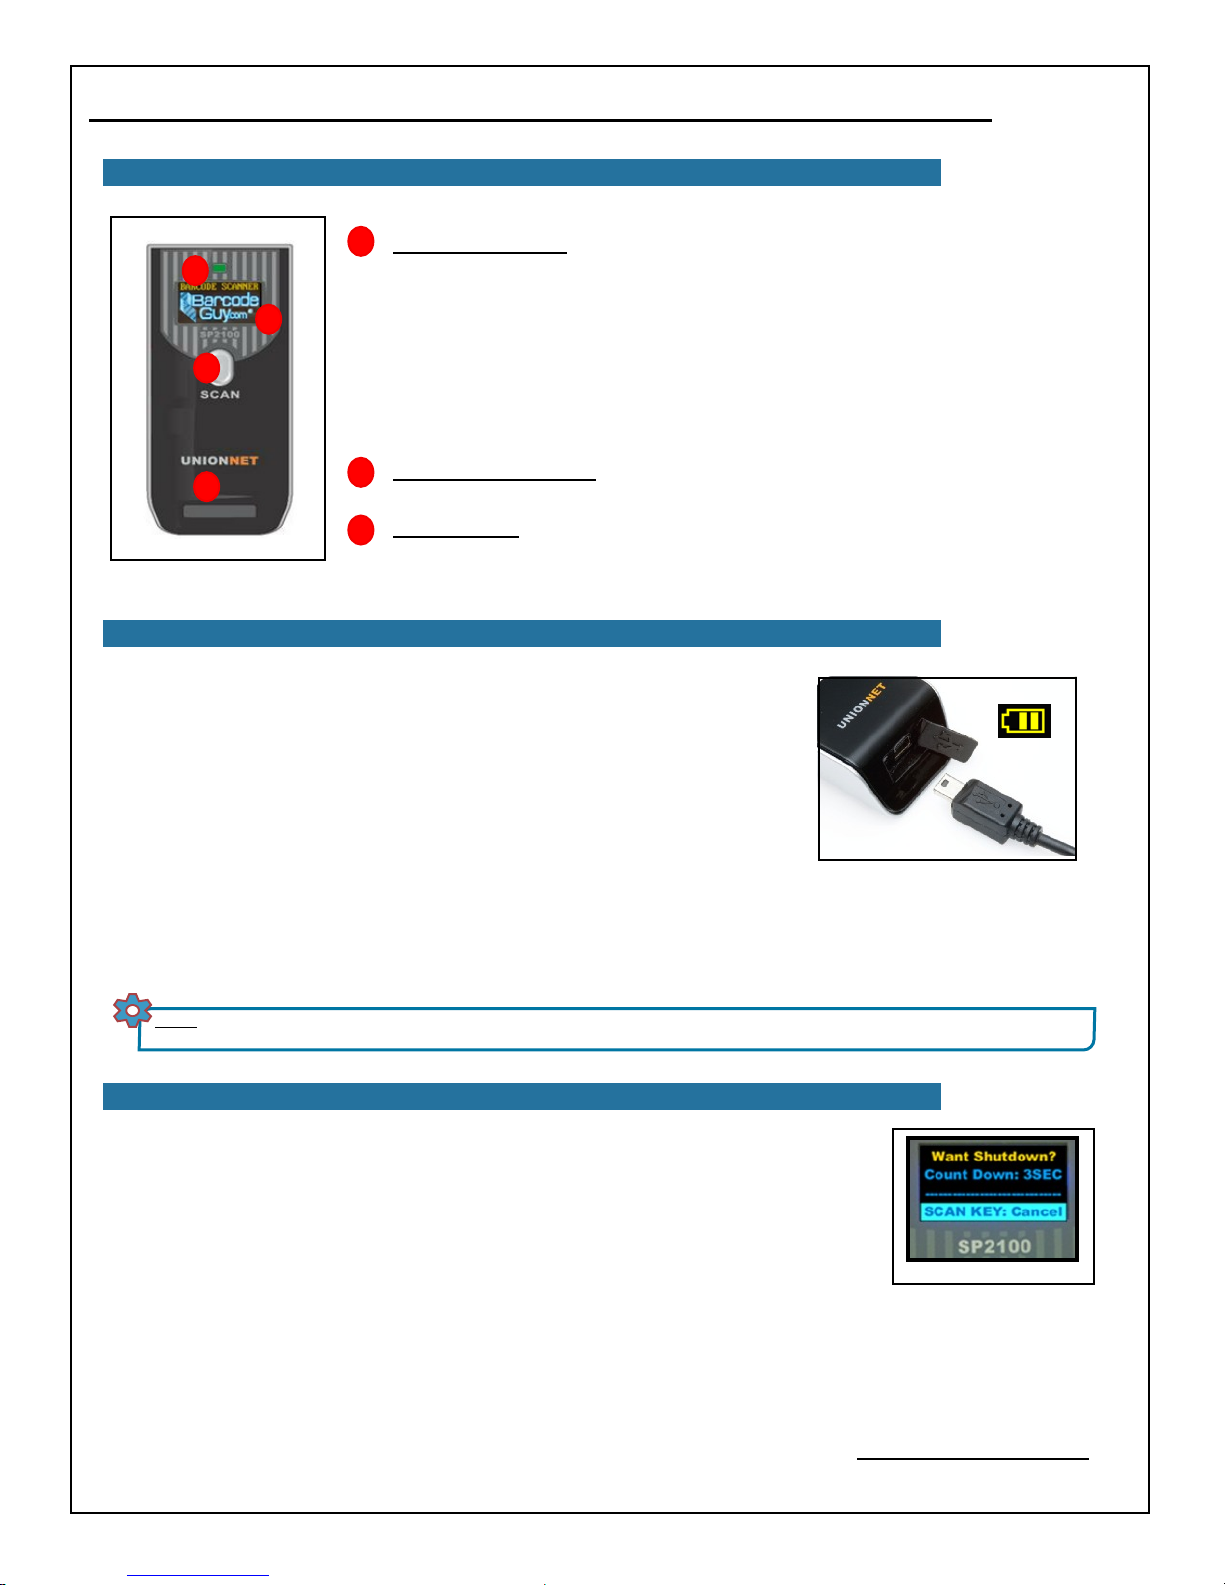
2.3 - Charging your SP2100
To charge your BarcodeGuy.com®SP2100, gently pull the rubber port cover out
and swing it away from the housing, revealing the USB charging /
communications port. Plug the mini-usb end of the supplied cable into the port as
shown in figure 6. Plug the TypeA USB connector on the other end of the cable
to a USB compliant PC port or the supplied BarcodeGuy.com®AC Adapter or
Car Charger.
�
● POWER ON - Press & Hold for 3 seconds until the logo appears and the scanner
beeps, then release.
● SCAN BARCODE - Press & hold to scan a barcode. If the SP2100 is in a power
saving mode, press the Scan Button TWICE - once to “wake up” the scanner and
then press & hold to activate the imager.
● CANCEL SLEEP MODES - if the SP2100 is in any low power mode, press once
to bring it to full power. The display will temporarily appear
n Display with Status Bar - Displays yellow Status Bar in top line, scanned barcode
9
below. Displays System Menu options when activated.
n LED Indicator - Visual indicator of scan success and bluetooth status.
10
If your SP2100 is powered when you make a connection, you’ll see the battery
indicator on the right of the Information Bar of the screen of the SP2100 start to
flash. If you’ve connected to a PC or Laptop to recharge, you may see the host
attempt to install drivers for the SP2100. You can just ignore any driver messages because we’re simply recharging.
Full recharge time is about 2½ hours using a standard 500mAh USB compliant connection. If your SP2100 is
powered down, there will be no visual indication that the scanner is recharging, but it doesn’t have to be “on” to receive a
charge. Please note that we recommend you use the cable and power supplies included with the BarcodeGuy.com® SP2100
kit you received.
NOTE: If you have an active HID Connection established (see Section 3.0 ), the Status Bar will display “USB” but the HID bluetooth connection
will be maintained while your SP2100 recharges!
2.4 - SP2100 Power Modes
Lets power on your SP2100; but before we do, lets talk about power modes. In order to give
you the longest useful life possible, the SP2100 is designed with 3 power modes:
figure 2.6
● Full-Power-OFF - All power to the SP2100 is off, the display is black and there is no
color to the LED indicator. Press & hold the Scan Button and a confirmation screen
(figure 2.7) will appear
● Full-Power-ON - The SP2100 is fully powered and bluetooth radio energized and the
display is on, with the display’s Status Bar visible.
● Power-On-Power-Saver - The SP2100 is fully powered but the display and Scan Imager are in “sleep” mode. If a
Bluetooth connection was established, the connection remains and is indicated by the LED Indicator flashing green.
A flashing red LED indicator means there is no Bluetooth Connection. The screen may dim based on the System
Menu >>Settings>>LCD Power Off value.
Note that when your BarcodeGuy.com®SP2100 is in Power-Saver Mode, a single press of the Scan Button will bring the
display and Scan Imager back to life.
Also note that to scan a barcode when the SP2100 is in Power-Saver Mode, you will need to press the scan button twice to
scan a barcode: the first button press to take the SP2100 into Full-Power Mode, the second to activate the Scan Imager.
figure 2.7
5
BarcodeGuy.com® - UnionNet SP2100 User’s Guide
2.4 - SP2100 Power Modes, con’t
Moving between the BarcodeGuy.com® SP2100’s power modes is easy! Here’s how:
● From Full-Power-Off to Full-Power-ON - Press and hold the Scan Button for 3 seconds until the SP2100 beeps
and the BarcodeGuy.com® appears on the display. The SP2100 will display its hardware and firmware version, then
drop to the “Normal Mode” indicated by MUX displayed on the SP2100’s Information Bar. Communication Modes
such as MUX and HID will be covered later in the manual.
● From Full-Power-On to Full-Power-Off - Press and hold the Scan button for approximately 5 seconds. You’ll be
presented with the Power Down option screen. If you don’t press the Scan Button in 5 seconds, the SP2100 will go
into “Full Power Off” mode .
● From Full-Power-On to Power-Saver - You don’t have to do anything. The SP2100 will switch itself into Power-
Saver mode based on the the value set in the System Menu. The default value is 5 minutes. You can change this
setting by using the System Menu (see below). Then select >>2. Settings>>1. Power Auto Off and manipulate the time
setting by using the Side Buttons.
● From Power-Saver to Full-Power-On - Press and release the Scan Button once. You will then see the Display
turn on with the Status Bar visible.
When the SP2100 enters Power-Saver mode the bluetooth connection will remain active - as indicated by the LED Indicator
over the Display flashing green. If the host (what you’re sending data to) is no longer available, the LED Indicator will flash
red.
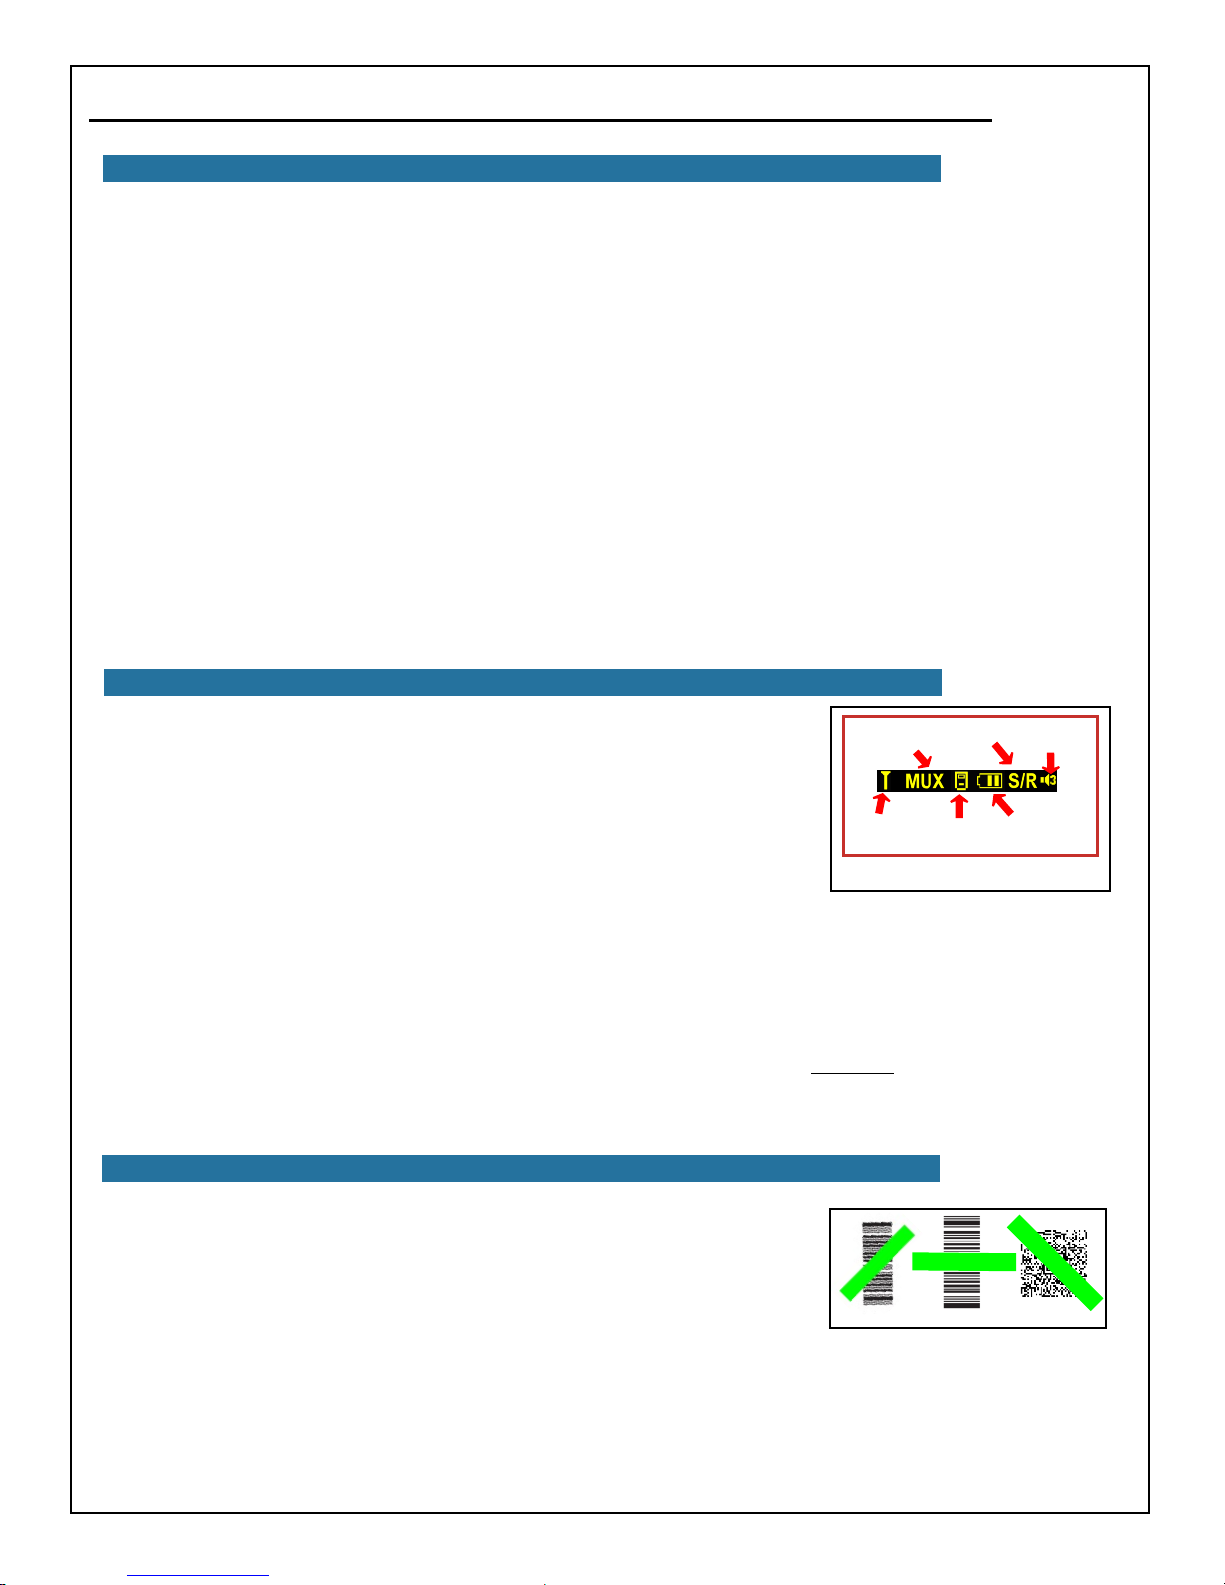
2.5 - The SP2100 Status Bar
The SP2100’s Status Bar is important because it allows you to see exactly what’s
happening with your SP2100 at a glance. The Status Bar is illustrated in figure 2.8 with
Bluetooth
Mode
Memory
Mode
Beep/Buzz
Status
each of its 6 components labeled. There is a lot of information in this little display, and
we’ll reference the it as we go through the User’s Guide and describe the various
SP2100 features and specific instructions on using them. Here’s a brief introduction to
the SP2100’s Status Bar, from left to right:
● Signal Mode & Strength: This indicated the current connection strength and
special connection types to the host. Figure 2.8 shows that there is no
Signal
Strength
Scanner
Ready
figure 2.8
Battery
Indicator
connection although the SP2100’s bluetooth radio is active.
● Bluetooth Mode: The SP2100 will automatically switch bluetooth communications modes. By default, and with no
connection, the SP2100 operates in “multiplexer” or MUX mode.
● Scanner State: In Figure 8, the scanner is shown in the “ready” state.
● Battery Indicator: Shows the amount of battery power remaining in 3 display bars. In figure 2.8, the indicator is
showing between 60 and 70 percent charge.
● Memory Mode: Shows which of the three data store/send modes are set (See Section 4.1). In figure 2.8, the Status Bar
shows that the data will be both sent to the host over the connection & stored in the SP2100’s internal memory.
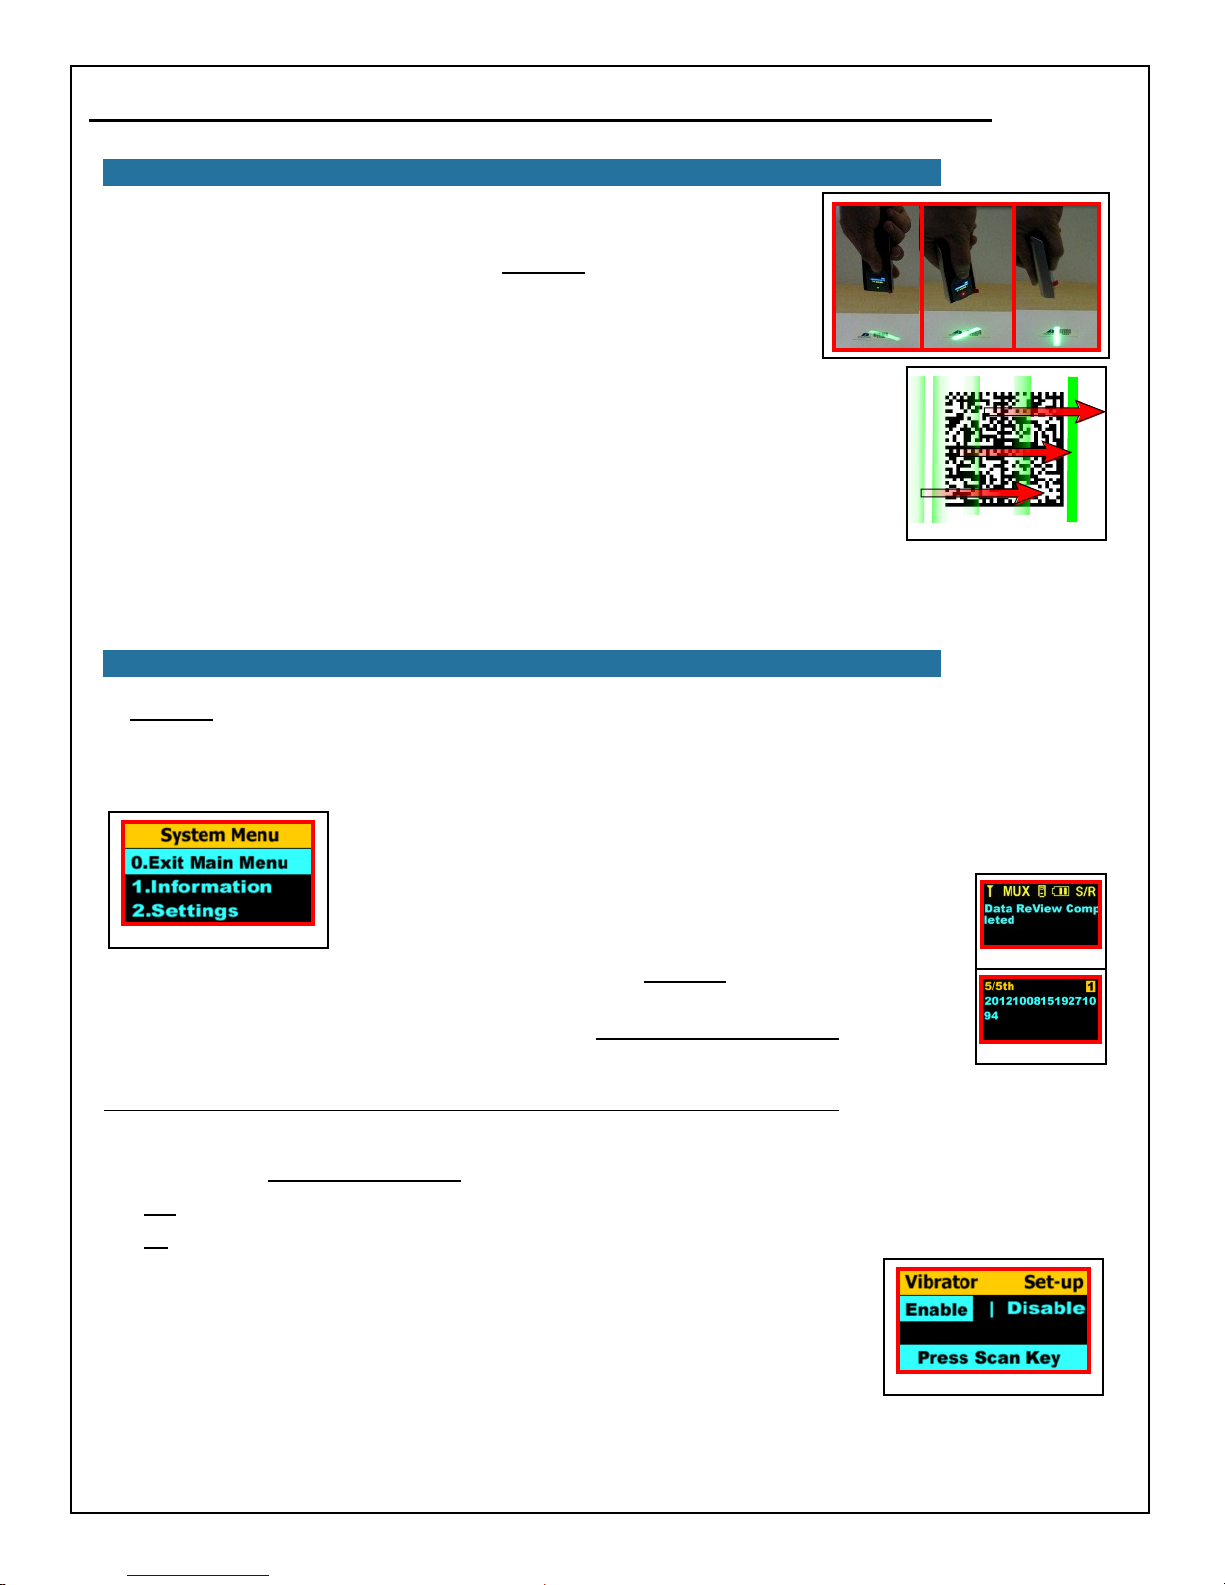
2.6 - Scanning Barcodes with the SP2100
Scanning barcodes with the SP2100 is fast and easy. One of the most powerful features
of the SP2100 is that it gives you full imager performance at a laser’s price. That means
that the SP2100 can scan both 1 and 2-Dimensional barcodes (figure 2.9).
Press & hold the Scan Button and the SP2100 projects a square of red light with a
green Aiming Line in the center. Just line up any 1-Dimensional or 2-Dimensional
figure 2.9
barcode with the green “aiming line” overlapping each side of the barcode and the SP2100 will read it! To indicate a
successful read, the SP2100: a) Gives a single, short, high-toned beep; b) Displays the decoded barcode data on the screen and
c) Turns on the green LED indicator. If the option enabled, the SP2100 will vibrate when the barcode is decoded.
Optically, any barcode scanner works just like a pair of glasses. It has a focal length near and far range where it can see the
barcode. For standard resolution bar codes (ie a 1” wide UPC code), the working distance for the SP2100 is around 3.5” to
10”. You can scan from directly over the barcode or on angles up to 55° from perpendicular (See SP2100 Data Sheet).
6
BarcodeGuy.com® - UnionNet SP2100 User’s Guide
2.6 - Scanning Barcodes with the SP2100, con’t
Having Problems? This section is for problems where the SP2100 times out while
trying to scan, not with problems with transferring the barcode data to a HID connected
bluetooth host. (for HID transmission problems, see Section 4.1):
● With the SP2100 directly above the barcode, press and hold the Scan Button and
center the green Aiming Line on the center of the barcode. Slowly pull the SP2100
away while holding the Scan Button. As it gets further away from the barcode, the
SP2100 will eventually focus and decode the barcode.
● With “glossy” codes decrease reflected light by varying the perpendicular angle
between the SP2100 and the barcode.
● On 2-Dimensional barcodes, the SP2100 will sometimes read quicker if you “raster” the
aiming light over the barcode (figure 2.10) . Just start at the non-printed end of one side of
the 2D barcode, press the Scan Button and drag the green Aiming Line from one side of the
barcode to the other.
As you start getting comfortable with your SP2100, you’ll learn the focal point for the different
figure 2.10
barcodes you use. Instinctively, like muscle memory, you’ll learn the proper focal length for the
combination of the SP2100 and the particular densities of the barcodes you normally scan.
If you have a circumstance where the SP2100 will consistently not read a particular type of barcode, email us a picture of it
and we’ll give you a call. In most cases we can troubleshoot the problem right from the picture.
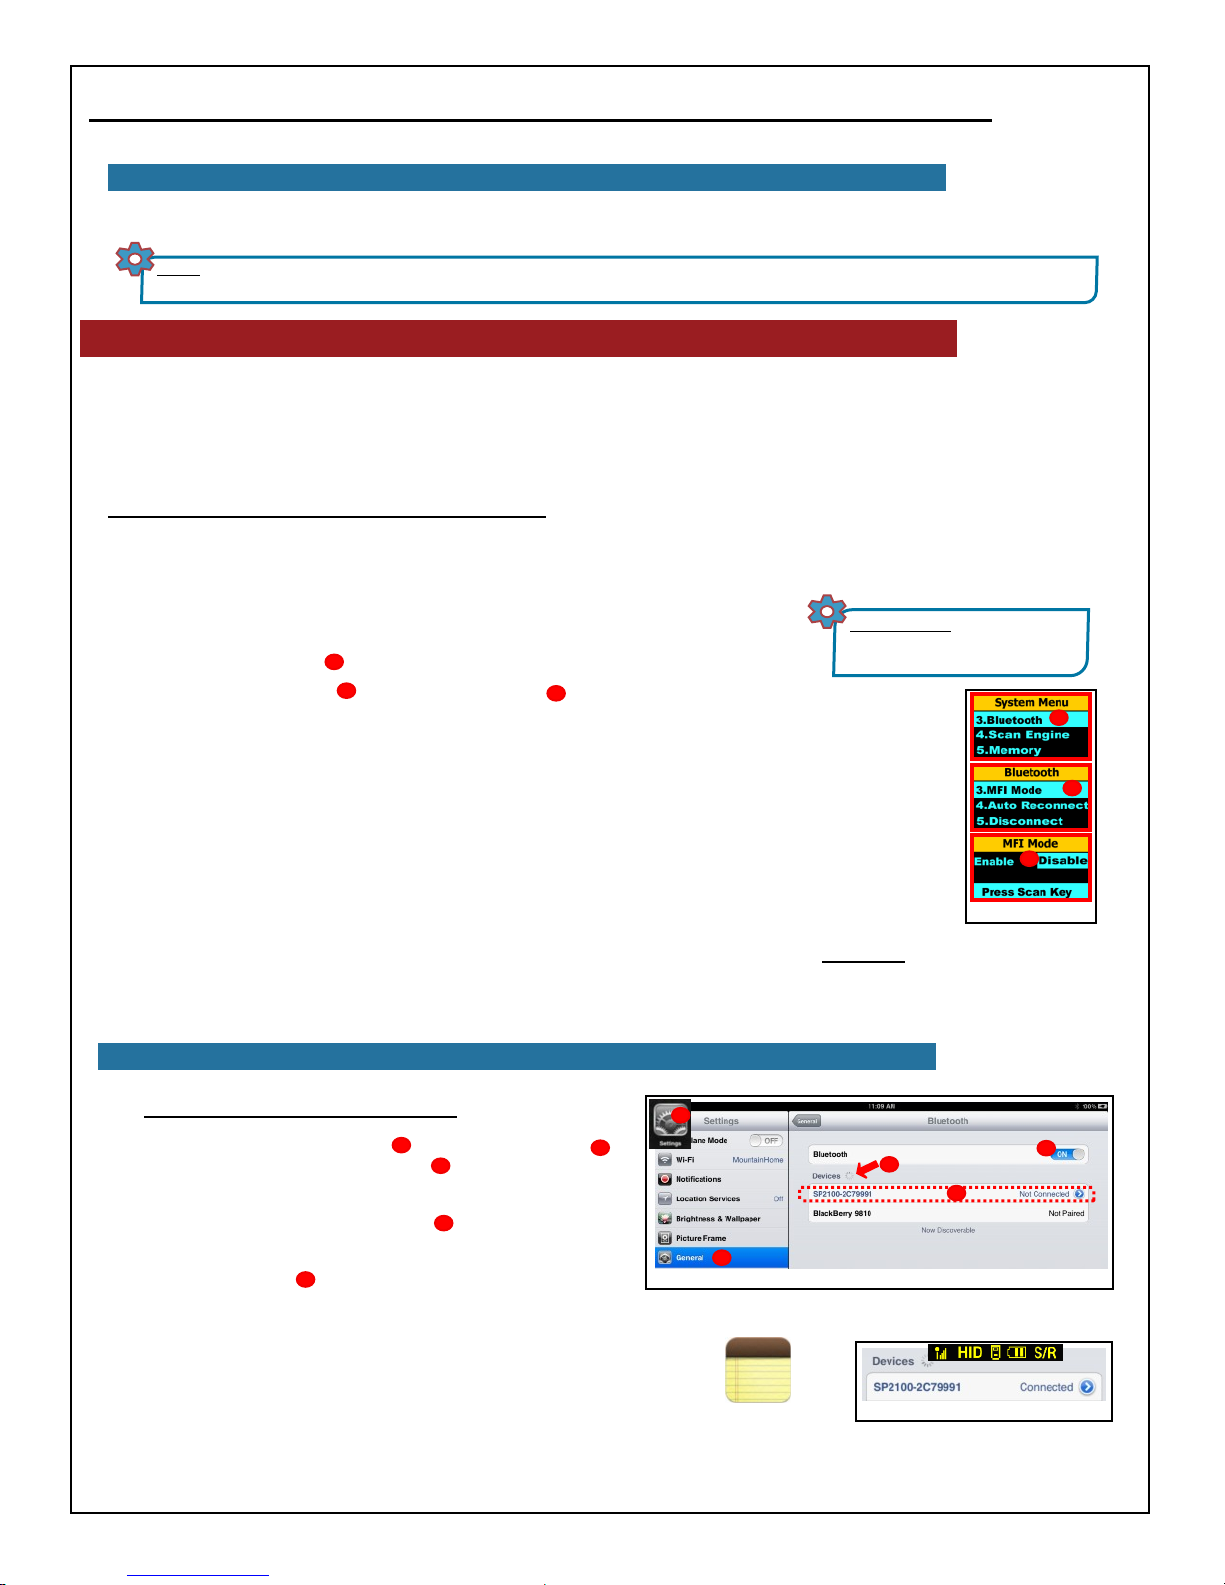
2.7 - Using the System Menu of the SP2100
In Section 2.4, we referenced the LCD timeout setting in the SP2100’s System Menu. The System Menu allows you to
change general things like the power off time and screen brightness, but it also allows powerful granular control of settings
like bluetooth communications mode, suffixes & prefixes, and the SP2100’s memory storage options. Changing the System
Menu settings allows you to customize the SP100 for your application needs. As we move through the User’s Guide, we’ll
continue to refer System Menu options. Lets explore the System Menu.
To enter the System Menu press and hold the Top Side button on the SP2100 until
the System Menu screen (figure 2.11) appears.
If you press the Top Side button quickly, the SP2100 scanner enters Data
Review mode, allowing you to see and delete the scanned data stored in its
figure 2.11
on board memory. If you haven’t scanned anything, you’ll see the Date
ReView Completed screen as depicted in figure 2.12. If scanned barcodes
are stored in the SP2100, you’ll see the last barcode scanned on a screen
figure 2.12
similar to the one in figure 2.13. See Section 4.3 for details on the SP2100’s
data review mode.
The memory capabilities of the SP2100 are covered fully in Section 4.0 - Managing Memory later in this
User’s Guide.
figure 2.13
System Menu Notation - Short-Hand for this Guide & BarcodeGuy® Support
Sometimes when we answer a service question via email, customers will literally ask “What the heck does that mean?”.
That’s because we’ve developed a sort of short-hand way of navigating the SP2100’s System Menu. You’ve already seen
some short-hand in Section 2.4 - Power Mode. Here’s how the shorthand works:
● SM - means enter the System Menu by pressing and holding the Top Side Button until the System Menu appears
● >> - means you perform 2 actions. First, use the Side Buttons to highlight the System Menu or Sub-Menu option, then
press the Scan Button to select it.
For example, to turn on the SP2100’s vibrator here’s the shorthand notation:
SM>>2.Settings>>8.Vibrator>>Enable>>0.Exit Sub Menu>>0.Exit Main Menu
Or SM>>2>>8>>Enable>>0>>0
If there are multiple options to choose from on a single line at the bottom of the menu, use the
Side Buttons to highlight the one you want and press the Scan Button to select it (figure 2.14).
The User’s Guide will use the longer form of the shorthand, but you can see how it can save time and effort versus
spelling out the entire System Menu sequence or making up screen shots to show you how to manipulate the SP2100’s
firmware settings.
figure 2.14
7

BarcodeGuy.com® - UnionNet SP2100 User’s Guide
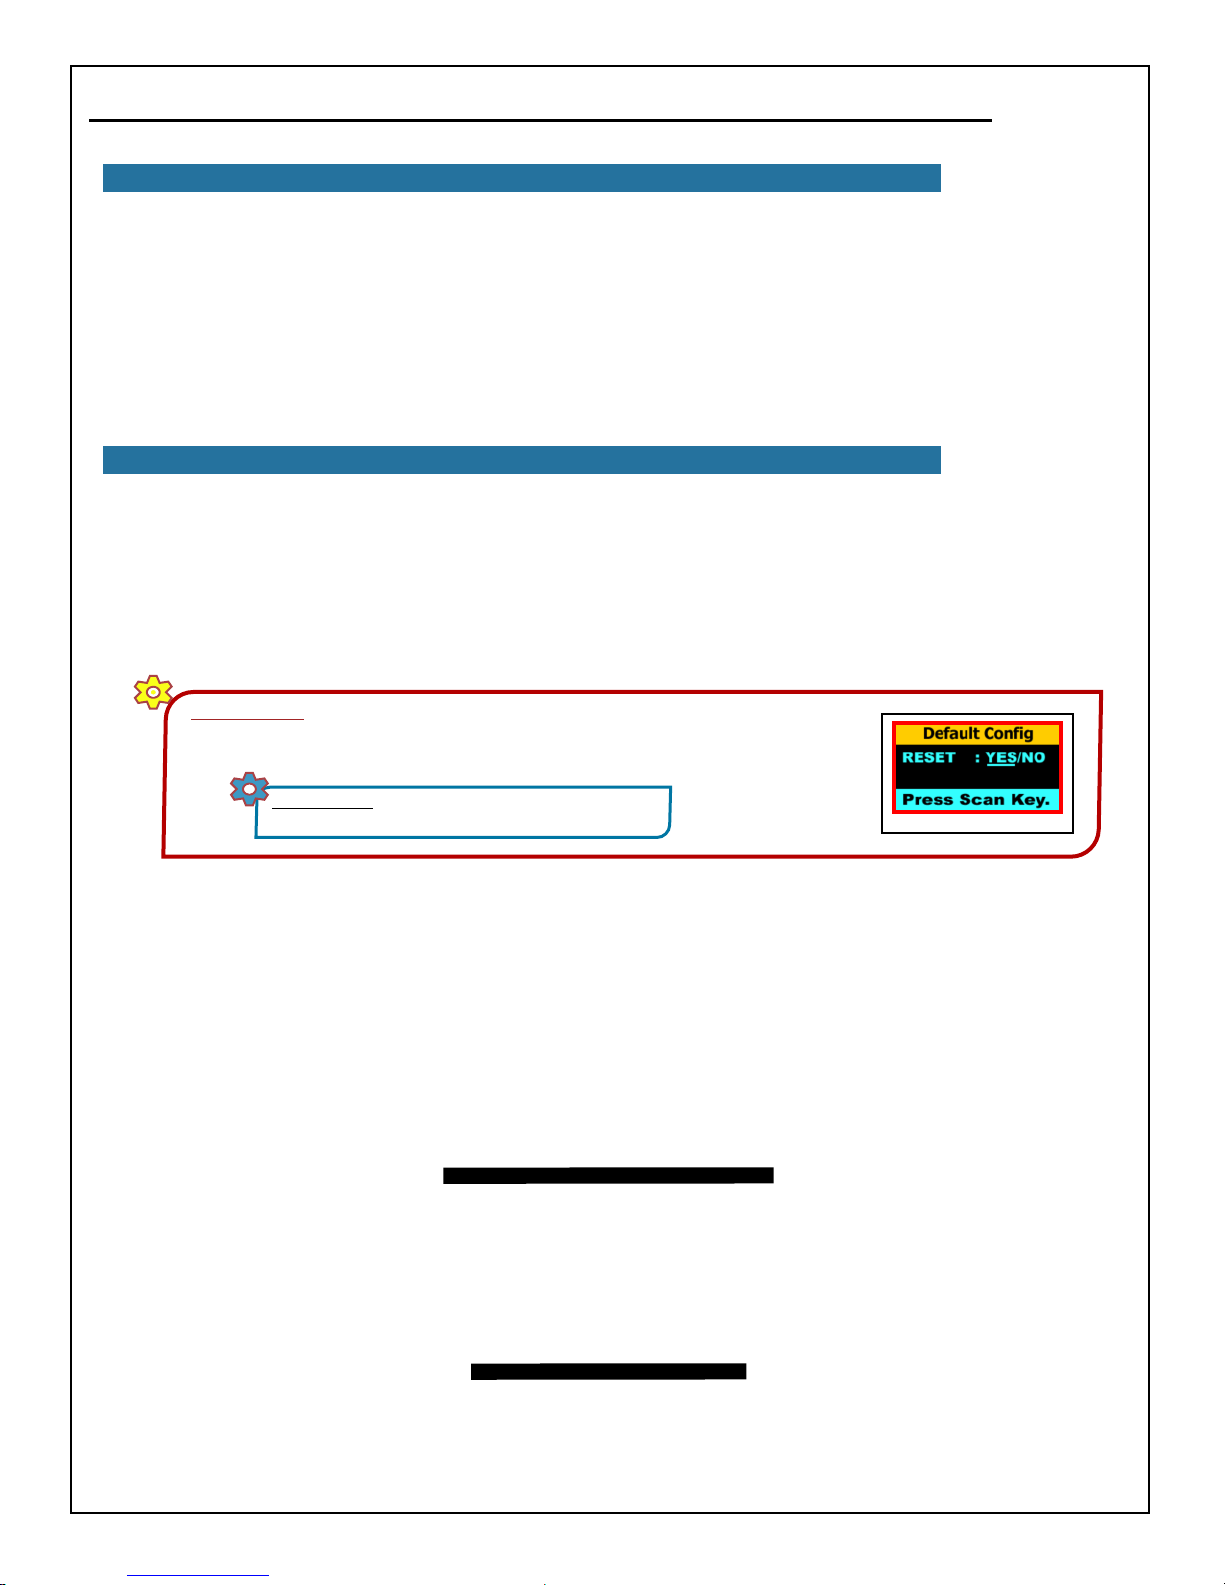
2.8 - System Menu - Reset Factory Defaults
Whiile changing the settings on the SP2100, you might want to quickly clear all the values you set in the System Menu
and reset the SP2100 to the settings you received it in. Just use the System Menu to reset the default configuration - your
stored data will not be affected.
Here’s the shorthand in a Warning Box that will be easy to find later:
IMPORTANT! If you’ve made changeS to your SP2100’s System Menu and it’s not acting like it
did when you started initially or the way you’d expect it to with the System Menu changes you’ve
made, just reset the Factory Defaults. Here’s how - refer to figure 41:
SHORTHAND: SM>>2.Settings>>9.Default Config>>
Side Buttons “YES”>>Scan Button
2.9- BLUETOOTH CONNECTION TYPES - Revisiting the SP2100 Status Bar
Your SP2100 has powerful bluetooth connectivity options and has the
ability to sense what type of connection is available and connect to the one
that is seeking to pair. There are two types of bluetooth connections that a
host can make to a compatible device:
NOTE: “Host” means the device or PC the
SP2100 connects to. It can be a PC, notebook,
tablet or Smart Phone.
figure 41
1. HID or Bluetooth Keyboard - HID stands for Human Input Device, most commonly a keyboard or mouse. HID
devices can be any data acquisition device such as a joystick, test instrument, equipment controller or data logger.
In the case of the SP2100, it’s a keyboard.
2. Serial Port Protocol (SPP) - Also known as Serial Emulation. In olden times anything other than a keyboard or
mouse was connected via a serial COM port. Serial Emulation allowed USB ports to replace the 9-pin serial
connector. The same Serial Port Emulation protocols were then extended to bluteooth communications.
All bluetooth communications use HID, SPP or a variation of SPP (Apple iOS aka iPhone aka MFi). Now that you
understand the 2 types of communications, here are the modes that the SP2100 supports and displays in the Status Bar:
● MUX or Multi-Plexing - The SP2100 in MUX mode is waiting a connection. Multiplexing allows the SP2100 to sense
and understand what mode of communications is being requested by the PC, tablet of smart phone and can automatically
switch the connection to accommodate the host.
● HID or Bluetooth Keyboard - This connection is the fastest way to put your SP2100 to work. When you connect in
HID mode to an Apple or Android or Windows or Windows Mobile device, scanning a barcode acts just like using the
keypad or keyboard. HID connections are discussed in detail in Section 3.0. Note that with HID you can set prefixes and
suffixes as well (Section 5.0).
● SPP or Serial Port Protocol - The host has assigned a COM port for communications and the SP2100 is
communicating using the Seral Port standard, but using bluetooth as communications medium.
● MFI or Made for Ipad, iPhone and iPod - MFi stands for “Made for iPad/iPhone/iPod”. The SP2100 is Apple
Certified. MFi is an SPP connection (see above) and adds an iPhone security check which confirms that the accessory is
Apple Certified and Approved. The SP2100 is fully approved and certified as a “Made for iPxx” accessory.
NOTE: You have to enable MFi mode using the System Menu: SM>>3.Bluetooth>>3.MFI Mode>>Enable>>0.Exit Sub
Menu>>0.Exit Main Menu.to use an AppStore application that sends messages to the SP2100 screen.
MUX mode with MFI disabled
The SP2100 tells you what connection is current using the left third of the Status Bar
(refer to the red circled area in figure 2.15). Lets take a look at the different connection
type indicators that you’re likely to see in the Status Bar.
figure 2.15
In figure 2.15 the Status Bar shows the default MUX
bluetooth mode & indicates there is no connection. When
you choose the MFi option from the System Menu of the
SP2100 (figure 2.16) , the antenna on the far left of the Status Bar will change to an “i”. The
dot represents the SP2100 is set to communicate with Apple iOS devices.
Standard HID Connected
HID MFi Connected
figure 2.17
8
MUX mode with MFI Enabled
*Note the antenna*
figure 2.16
MFi ConnectedSPP (Serial Port) Connected
USB Connected, Charging
See Note Below
BarcodeGuy.com® - UnionNet SP2100 User’s Guide
2.9- BLUETOOTH CONNECTION TYPES - Revisiting the SP2100 Status Bar, con’t
Figure 2.17 shows the various connection types you’ll see displayed on your SP2100.
NOTE: At this time, there is technically no USB communications mode. USB shown in the Status Bar is an indication that your SP2100 is
plugged in and charging in the USB port only. If you have an active bluetooth connection established, it will be maintained.
3.0 - Getting Started with HID Connections
The BarcodeGuy SP-2100 works like a bluetooth keyboard to Apple mobile iOS, Android, Windows and Windows Mobile
tablets, smart phones, PC’s and laptops. Connecting as a bluetooth keyboard is commonly referred to as a HID (human
input device) connection. Starting out with a HID connection is not only a way to get instant gratification, but its the easiest
way to understand how your SP2100 works. The cut down version of making a HID connection is on the Quickstart Card
included in the box. Below are the detailed instructions.
IMPORTANT FOR ALL HID CONNECTIONS…On the SP2100 -
Make sure your SP2100 is turned on (press the Scan button for 3-5 seconds). Press the SP2100’s front Scan Button and
verify that it isn’t currently connected to a host device.
Before you get started making the HID connection, make sure your SP2100 is set
with MFI Mode disabled (refer to figure 3.1):
1. Press & hold the Top Side button until the System Menu appears.
2. Select 3.Bluetooth and press the Scan Button to select the option.
3. Select 3.MFI Mode , then highlight Disable & press the Scan Button to
1
2
3
SHORTHAND: SM>>3.Bluetooth
>>3.MFI Mode >>Enable>>0.Exit
Sub Menu>>0.Exit Main Menu
select.
4. Select 0.Exit Sub Menu then 0.Exit Menu. The SP2100’s LED Indicator will flash red.
NOTES:
● If the SP2100 displays anything other than MUX it is currently connected to another device. Find
the device and turn off the bluetooth radio to break the connection to the SP2100.
● If the SP2100 displays MUX as in figure 15 above, you’re ready to continue to connect. The red
LED Indicator should be flashing indicating that the SP2100 is in “Discovery” mode and is ready to
3
1
2
connect to the new host. Select host OS below.
● If the SP2100 displays anything other than MUX, it is currently connected to another device. Find
the device and turn off the bluetooth radio or manually disconnect the SP2100 (See Section 3.9).
Select your tablet, smart phone or laptop’s Operating System below.
3.1- Apple iOS HID Connection Instructions
On the iPad - iPhone - iPod Touch - Refer to figure 3.2
1. Select the “Settings” icon , then select “General”
Make sure the Bluetooth slider is set to on.
1
3
2
2. The iPxx will search for new bluetooth devices as
indicated by the swirling circle .
4
3. The iPxx will find the SP2100 and list it as “SP2100XXXXXXX” where the last 7 digits are the serial
5
1
4
5
2
Figure 3.2
number of the barcode scanner.
4. Press on the “SP2100” line. After a few moments the iPxx will display “Connected”. The SP2100 will beep and
display HID in the Status Bar - see figure 3.3.
Your SP2100 is now connected to your Apple iOS device! Test it out by
pressing the “Home” button on the bottom center of the iPxx and launch
the “Notes” application.
Figure 3.3
When Notes starts, be sure to press on a yellow line so you can see the cursor flashing…. Then scan a barcode!
Figure 3.1
3
9

BarcodeGuy.com® - UnionNet SP2100 User’s Guide
3.2 - Android HID Connection Instructions
On the Android Phone or Tablet - Refer to figure 3.4 to figure 3.7
1. Select the “Settings” icon from the Android device’s home or apps screen .
2. Select the “Wireless Networks” from the “Settings” menu.
3. Turn Bluetooth on by checking the box next to “Bluetooth” . Then select “Bluetooth settings” to enter the
2
3
1
1
4
bluetooth connections screen.
4. When the “Bluetooth settings” screen appears, the check box next to “Bluetooth” should be checked from Step 3
5
above . Now select the checkbox next to “Discoverable” and then select “Scan for Devices” . Note that
when you enter this screen, the SP2100 is not visible .
6
8
7
5. The Android device and the SP2100 will find each other. The SP2100 will show up at the bottom of the
“Bluetooth devices” list . Press on the SP2100-XXXXXX entry and “Pairing…” will appear underneath the
9 10
SP2100’s title.
6. When the SP2100 and your Android device pair, the “Bluetooth devices” list will have the “SP2100-xxxxxxx”
2
3
4
Note no SP2100!
5
6
7
8
9
11
10
Figure 3.4
entry at the top with the caption “Connected to hid” underneath. There will be a keyboard icon to the right of
Figure 3.5
Figure 3.6
11
Figure 3.7
the SP2100 listing.
7. The SP2100 will beep and display HID in the Status Bar - see figure 3.8.
Figure 3.8
Your SP2100 is now connected to your Android device! Test it out by pressing the “Home” button on the bottom center of
the Android phone or tablet! To try it out, launch Gmail and compose a new message. Make sure the cursor is flashing in
the body of the email, then scan a barcode! The text shows up where the cursor was, just like you used the soft keypad to
type it in!
On Windows PC or Laptop - Make sure your bluetooth card or dongle on the PC is active. You should see the
3.3 - Windows HID Connection Instructions
IMPORTANT! These instructions apply to using the SP2100 with a wireless Bluetooth connection to a Windows PC or laptop. Do not
attempt to make this type connection with the USB cable plugged in. The USB connection is used only for charging and in special
circumstances for the update of your SP2100’s firmware programming.
bluetooth icon in the Systems Tray (aka Notification Area) on the bottom right of the Windows
screen by the clock (figure 3.9). Consult the appropriate guide to turn the host bluetooth radio on and
have it in “Discovery” mode.
When you’ve confirmed that bluetooth is active on the PC, refer to figure 3.10 and figure 3.11 for
Steps 1-4 below:
Figure 3.9
10

BarcodeGuy.com® - UnionNet SP2100 User’s Guide
3.3 - Windows HID Connection Instructions, con’t
1. Press “Start” , “Devices & Printers” , “Add a Device” (figure 3.10)
1
2 3
2. The “New Device Wizard” will open. Windows will search for active
bluetooth devices in range (figure 3.11’s window).
3. The SP2100 and the PC will find each other. The SP2100 will be displayed
with a keyboard icon identified as “SP2100-XXXXXXX” . Note that the
4
last 5 digits are the SP2100’s serial number. Highlight the SP2100 and press
the “Next” button. Windows will search for and automatically install
5
the appropriate drivers for the SP2100 to be used as a HID & serial device
through the USB cable. You’ll see balloon in the bottom right corner by the
clock indicating driver installation , then one that says that the drivers are
6
installed and the SP2100 is ready to use.
4. Note that Windows may take a while to identify the
6
serial driver. If you’re presented with a security
message that Windows cannot verify the publisher of
the driver, select “Install this driver anyway” option to
4
continue.
5. When the drivers are finished installing, the final screen
of the “New Device Wizard” on the PC will display
5
Figure 3.11
“This device has been successfully added to this
computer”. Note the keyboard icon assigned your
SP2100. Now just press the “Finish” button to complete
the wizard.
6. The SP2100 will beep and display HID in the Status Bar - see figure 3.12.
1
3
2
Figure 3.10
Figure 3.12
CONGRATULATIONS! Your SP2100 is now connected to your Windows PC! Test it out by starting your favorite data
entry application, make sure the cursor is flashing where you want the barcode data. Then just press the SP2100’s Scan
Button until the imager reads the barcode. The SP2100 is just like a keyboard, but you don’t have to type anything in!
3.4 - Mac HID Connection Instructions
3.5 - HID Tips & Tricks with the SP2100
As you probably saw on the YouTube video or from our web site, the SP2100 has some built-in features that make its use
very convenient. Note that the HID features vary somewhat by operating system, (See Section 4.1 and figure 3.14 for OS
differences) below are the major SP2100 HID features:
● Pop-Up the soft keypad by pressing the SP2100’s Bottom Side Button for 1-3 seconds then release to show the
device’s soft keypad.
● Mixed-Mode Data Entry- Once you have the device keypad up, you can scan barcodes and use the SP2100 at the
same time (iOS only).
● Don’t forget that when the SP2100 is in “Power Saver” mode, you’ll need to press the Scan Button twice to scan;
once to bring the SP2100 to Full Power Mode, then once again to activate the imager.
● By Default, the SP2100 is set to “Send and Store” - The SP2100 lets you pick what you’re going to do with the
scanned barcode data. You have the option to store, send and store or send only. See Section 4.1 for detailed
information on memory storage modes.
● Use Your SP2100 without your PC, Tablet of Phone - You don’t need to be connected to a host to scan barcodes -
you can scan them into memory, then download them to your device later. See Section 3.6 and Section 3.7 for detailed
instructions..
● Read Barcodes From your Computer or Mobile Device Screen - Because it’s a 2D imager, the SP2100 allows
you to read barcodes directly from a computer or mobile device screen. There are some rules to keep in mind if
you’re going to do this regularly. See Section XXX.XX for detailed information.
● Change the “terminator” - By default, the SP2100 sends a “Carriage Return” at the end of the barcode(ASCII
Chr(13)), but you can set it to just about anything you’d like. See Section 5.0 for instructions.
11

BarcodeGuy.com® - UnionNet SP2100 User’s Guide
3.6 - HID Tips & Tricks with the SP2100, con’t
● Easily Move from Host to Host - although the SP2100 does best (actually, its just less confusing to us) in a one-
to-one relationship with a single host, you can easily move between different tablets, smart phones and PC’s. All
you have to do is shut off the bluetooth radio on the currently connected host, causing the SP2100 to switch into
MUX mode, then turn on the radio of the host you now want to connect with. Either pair the SP2100 if the host is
new, or the SP2100 will automatically reconnect if it’s been paired with that specific host before.
IMPORTANT! In a production environment with multiple SP2100’s in the same area, it’s a good idea pair one SP2100 with one host.
Multiple host pairings can cause headaches if you turn on an SP2100 & it pairs with an unintended host. Multi-host works best for an
individual (i.e. pairing to Joe’s laptop, Joe’s iPad and Joe’s Android phone). Make sure just the host you want is the only one available.
MARGIN
RIGHT
NOTE!
Mode is strictly for Apple AppStore application programs (including B2B) that communicate using MFi (secured SPP) bluetooth protocols.
IMPORTANT!
communications. In such cases, refer to
When the SP2100 is set to MFi mode, it may not be able to connect (or have the features of) the normal HID connection. MFi
In rare instances, barcodes may be incorrectly received by the host or even skipped due to lags in bluetooth
Section 3.7 - Setting Transmission Delays
3.7 - Disconnecting / Reconnecting Bluetooth
Your SP2100 is programmed so you can manually disconnect the active bluetooth connection. This not only gives you the
ability to save battery power on the scanner and tablet, smart phone or laptop, it allows you to do remote data collection
with the scanner only. As mentioned above, in many SP2100 installations, it is used without a host, storing barcode data in
memory for download later. With its rugged design, convenient size and long battery life, remote data collection is an ideal
use for the SP2100.
To Disconnect from the Current HID Connection: PRESS & HOLD the Bottom Side button for 3-5 seconds. The
SP2100 double-beeps, the Staus Bar displays the default “MUX” configuration and the LED indicator flashes red.
NOTE: You’ll probably also find that the SP2100 is so convenient that you’ll walk out of the 30 foot bluetooth connection radius with
it in your pocket or hanging around your neck. Don’t worry, the SP2100 is smart enough to shut down the bluetooth radio by itself to
save power. When you come back in range, just follow the reconnect instructions below.
To Reconnect to the Last Active HID Connection: PRESS the Bottom Side Button for less than
a second and release it. The SP2100 will beep, the Status Bar will change from MUX to HID and “No
Data & Reconnection” will be briefly displayed on the screen (figure 3.13). The green LED Indicator
flashes indicating an active bluetooth connection.
NOTE: If your SP2100 has been connected to multiple hosts and the bluetooth radio of the last
connected host is not available, the SP2100 will not connect to any of the other hosts, even if available.
figure 3.13
In Section 2.8, we discussed different bluetooth connection
modes. The Bottom Side button disconnect feature works with
HID, SPP and MFI connections. UnionNet provides Android
and Apple iOS sample applications that use SPP and MFi to
control the SP2100 on a “granular” level. The demos are
provided for software developers and are meant to demonstrate
the features of the SDK.
Refer to figure 31 for Bottom Side button press results in HID,
SPP and MFi bluetooth connection types.
Windows
Bluetooth
Profile
HID
SPP
Mfi - not
recognized
To Disconnect To Reconnect
Bottom Side Button PRESS
& HOLD 3 seconds
Bottom Side Button PRESS
& HOLD 3 seconds
N/A N/A N/A
Bottom Side Button
PRESS & RELEASE
Bottom Side Button
PRESS & RELEASE
Toggle Soft
Keypad
N/A
N/A
12
Bluetooth
Profile
SPP - not
recognized
Bluetooth
Profile
Mfi - not
recognized
figure 3.14
Apple iOS
Bottom Side Button PRESS
HID
MFi
& HOLD 3 seconds
Bottom Side Button PRESS
& HOLD 3 seconds
Android
Bottom Side Button PRESS
HID
SPP
& HOLD 3 seconds
Bottom Side Button PRESS
& HOLD 3 seconds
To Disconnect To Reconnect
Bottom Side Button
PRESS & RELEASE
N/A N/A N/A
Bottom Side Button
PRESS & RELEASE
To Disconnect To Reconnect
Bottom Side Button
PRESS & RELEASE
Bottom Side Button
PRESS & RELEASE
N/A N/A N/A
Toggle Soft
Keypad
Press &
Release
Press &
Release
Toggle Soft
Keypad
N/A
N/A

BarcodeGuy.com® - UnionNet SP2100 User’s Guide
3.8 - Bluetooth HID - Setting Transmission Delays
Dropped / changed barcode characters or missing barcode strings is an uncommon occurrence with the SP2100 and the
universe of different device OS’s, core processors, memory, keyboard buffer processing speeds and the precedence of HID
bluetooth input processing by the host. The SP2100 defaults normally work flawlessly. Changing the delay options are
sometimes necessary when the host application program is slow. Examples of slower host applications could be delayed
response web or database programs or RDM (remote desktop management) where the tablet of smart phone is running a PC
or Mac. RDM applications are notorious for slowing, ignoring or changing HID and keyboard buffer input to maximize
bandwidth towards a goal of a faster appearing User Interface.
Since different OS’s and even devices within the same OS version have differing performance even running the same
application, sometimes there’s a problem in the timing of how the HID string is received by the host. The SP2100 allows
some flexibility for accommodating the timing of the host device’s processing by allowing you to change delays between
the barcode strings sent and delays between the individual characters in a barcode string. You can find the character and
string delay options for HID under the SM>>Bluetooth section of the System Menu:
● HID Char Delay- Certain applications cannot process HID or keyboard input fast enough because of other processes
running at the time the character is received. You may experience an application that tends to lose or garble characters
as they are received by the host. To compensate, increase the HID CHAR Delay by the next highest value from the
current value and test the application under production conditions. If the problem persists, continue to increase the
delay incrementally. The delays available are 10, 20, 50, 100, 200, 500 (msec). Note this option is for HID only.
● HID String Init - Sometimes the keyboard buffer on the host device can’t process the scanned barcode strings as fast
as the bluetooth radio on the host is receiving them. You will notice that full barcode strings are missing from the
scanned data. If your host application has this problem, increase the delay before and after the barcode string is sent
using HID String Init. This should give the host enough time to process the barcode before receiving the next one. The
default is set at 200 msec. The string delay options are None, 100, 200, 500 (msec), 1, 2, 5 (sec). This is a HID mode
only option.
If you have a situation where you can’t get the barcode data to go to your host application after varying the delays in the
Bluetooth System Menu, just give us a call and we’ll figure out what’s going on.
3.9 - HID Batch Data from the SP2100 to Host
Once you have data in your SP2100, you can download it into your favorite application on your
tablet, smart phone or PC. Here’s how - (refer to the screens in figure 3.15):
1. Make sure you’re you have an active bluetooth connection - the LED Indicator on the
SP2100 should be flashing green and HID visible in the Status Bar.
2. Enter the System Menu by pressing and holding the Top Side Button
SHORTHAND: SM>>>>3.Bluetooth>>2.HID BATCH>>Yes>>0.Exit Sub Menu>>0.Exit Main Menu
3. Select 3.Bluetooth by using the Side Buttons and press the Scan Button. Then select HID
Batch using the Side Buttons and press the Scan Button.
4. You’ll be presented with a confirmation screen. Make sure that the cursor is flashing in the
application on your connected host where you want the data to be sent. On the SP2100,
highlight Yes and press the Scan Button.
figure 3.15
The SP2100 will send the data to the host, delimited by the suffix (default is <CR>). You can stop the transfer at any
time by pressing the SP2100’s Bottom Side button.
The transmitted data will remain in the SP2100 after transmission. See Section 4.3 to clear the SP2100’s memory.
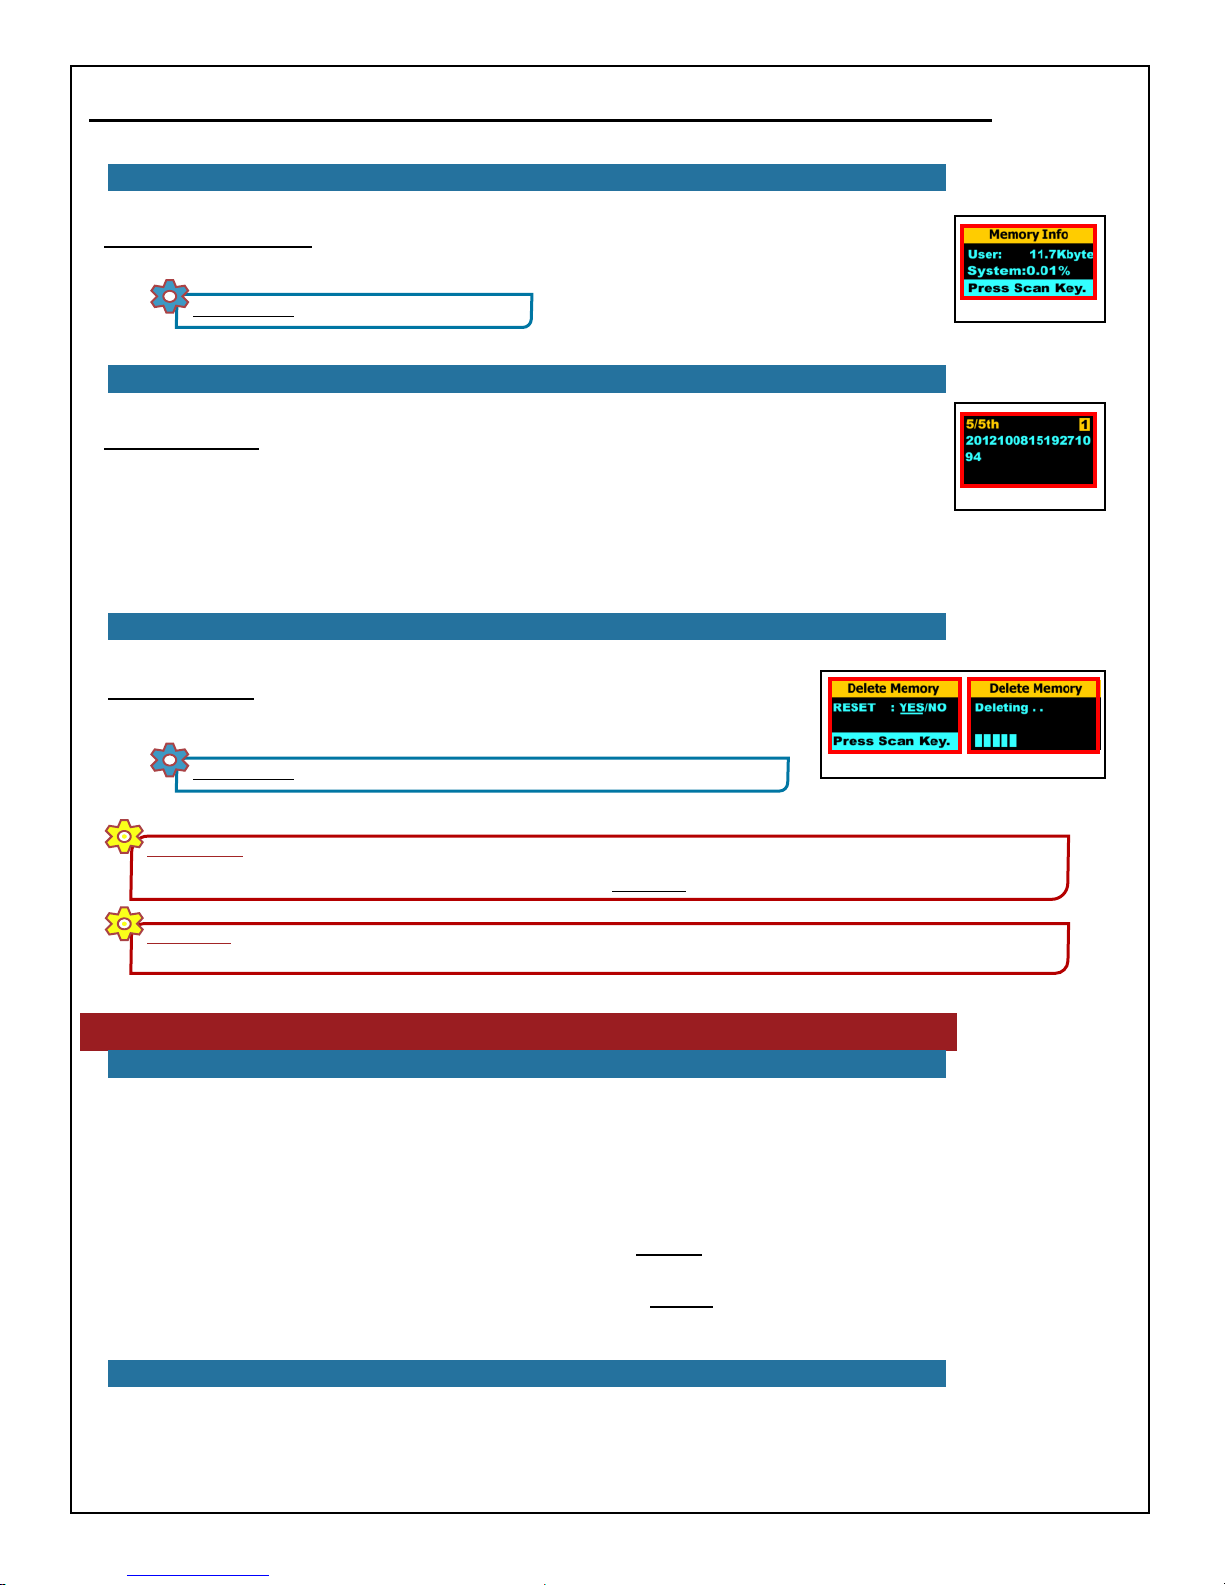
3.A - Other System Menu Options for Bluetooth
The System Menu of the SP2100 has a variety of other options associated with bluetooth configuration that can be helpful
These options are in the System Menu under SM>>Bluetooth.
● Auto Reconnect - Enable / Disable the Bottom Side button single press which normally reconnects to the last bluetooth
host.
● Disconnect - Manually disconnect from the currently connected host (Same as pressing Bottom Side Button).
13

BarcodeGuy.com® - UnionNet SP2100 User’s Guide
3.A - Other System Menu Options for Bluetooth - con’t
● HID Date Add: - Enable / Disable appending the date/time from the SP2100’s clock as a 14 character prefix to the
barcode characters. When enabled, the date/time string’s format is as follows: yyyymmddhhmmss. Note that the
hours are in military or 24 hour format.
● Trans Language: - Change the language keyboard characters. Use the Side Buttons to toggle the international
keyboard for languages English French, Danish & Swedish.
● HID Select - Changes HID options depending on general keyboard conditions. Normal for English, Special for
Japanese & Chinese.
4.0 - Managing Memory
4.1 - Storage & Transmit Modes
Your SP2100 has an 8mb data storage area, which represents the ability to store somewhere between 25,000 and 35,000
individual barcodes. Although up to this point we’ve been describing HID connections (Section 3.0) as the easiest way to
get up and running with your SP2100, you may have a data collection need where you don’t want to mess around with
making sure you always have your tablet, phone or PC within the 30’ range of the bluetooth radio.
The SP2100 is ideal for HID applications, but is also tailor made for the truly mobile worker that wants to store barcodes
and download them later. You can just tuck it in your pocket, read barcodes where ever you are and later - even weeks
later - make the connection to the host where you want them to go and send them there! Let’s take a look.
Lets access the Memory sub-menu of the System Menu - See Section 2.5. Here’s the shorthand:
SHORTHAND: SM>>5.Memory>>Data Save
The SP2100 comes with 3 memory storage modes - “SR”, “SN” and “PR” (figure 4.1). OK, we admit
the labeling may not be intuitive, but the power of the options are. Remember that you select the option
you want by using the Side Buttons to highlight it, then press the Scan Button to select it. Here are the
details of each option:
● “SR” - SEND AND STORE: This is the default memory setting. When connected via
bluetooth, the SP2100 will send the scanned characters to the host and will store them in
memory. Great idea, right? It is, but with the following caveat:
If you’re counting on the scans being in the SP2100’s memory for later use, be careful.
There’s a risk you’ll completely fill up the SP2100’s memory and it will erase all the data
and start over! You’ve got a lot of memory to fill; at least 25,000 barcodes, but you need
to be aware of the memory limitation because there’s still a risk that you’ll lose data. See
the next section to check memory remaining and deleting.
● “SN” - Store Only, DO NOT SEND: When SN is set, the SP2100 doesn’t care if it’s connected
to a host - it won’t send anything. With SN set, the SP2100 just stores the barcode in memory
and that’s it. Why would you want to do that? Imagine that you have to scan a whole warehouse
of different items for a year-end inventory, and you don’t want the hassle of moving your tablet
or notebook around with you. With SN mode, you’d just use the scanner to collect the data.
Just like with SR mode, with SN mode you have to be aware of that although the SP2100
can store a lot of barcodes, it has a limit. See the next section to check memory
remaining and deleting.
Memory Mode
● “PR” - Send Only, DO NOT STORE: With the PR memory option selected, the
SP2100 will scan and send the data to the host, BUT the data is not stored in memory.
The PR option is useful when you’ve got a SP2100 working HID to the same host all
the time. Most likely, you’re looking at the host’s screen when you scan to make sure
the data goes in or the next screen for data entry appears. In that usage, there’s just no reason for the SP2100 to
store anything.
NOTE: The memory storage option is displayed in the Status Bar, on the far right hand side (figure 4.2).
figure 4.1
figure 4.2
14
BarcodeGuy.com® - UnionNet SP2100 User’s Guide
4.2 -Display Memory Used
Display Memory Used: You can use the System Menu to see how much memory of the SP2100’s
memory you’ve used (figure 4.3). Here’s the shorthand:
SHORTHAND: SM>>5.Memory>>Memory Info
4.3 - Stored Data - Review with Side Buttons
figure 4.3
Memory Review: To review the data stored your SP2100 (SM or SR mode), just press the upper
side button and quickly release. The last scan will be shown on the display (figure 4.4). Scroll through
the scanned data by pressing the Top Side Button to back up through the list and the Bottom Side
Button to move forward through the list. If you’re at the end of the list and try to go further, the
figure 4.4
SP2100 will display a “NO DATA” message.
When you’re ready to stop reviewing data, just press the Scan Button to scan or press and hold the Top Side Button to
enter the System Menu.
4.4 - Stored Data - Delete All Data with System Menu
Delete Memory: This System Menu option allows you to delete all the scanned data
stored in the SP2100’s on board memory. Here’s the shorthand (figure 4.5):
SHORTHAND: SM>>5.Memory>>Memory Delete>>select option & Press Scan Button
WARNING! With either of the two memory storage modes SR or SM you can store 20-30 thousand scans. When the SP2100’s memory is
filled, IT WILL DELETE ALL DATA AND OVERWRITE STARTING AT THE FIRST STORED SCAN OR RECORD. If it seems like you’ve scanned a
lot of barcodes, just use the Display Memory Used System Menu option (Section 2.2) to display remaining memory.
figure 4.5
CRITICAL! When you delete the data using this option, IT IS GONE FOREVER!!! Painfully pedantic perhaps, but pertinent perchance
somehow you didn’t know!
5.0 - Data Formatting
5.1 - Introduction to Suffixes and Prefixes
The SP2100 is factory configured with a Carriage Return (CR) suffix when in HID mode. Like most barcode scanners,
after the SP2100 sends the characters in the barcode to the connected host, the ending CR suffix is just like the user
pressing the <ENTER> key on the keyboard or soft keypad.
Barcode scanners (and your SP2100 is no exception) give you the ability to set a prefix and suffix. We need to define
them for usage purposes:
● Prefix - characters, including control characters, that are put in front of the barcode characters on each barcode
decoded or read.
● Suffix - characters, including control characters that are put at the end of the barcode characters on each barcode
decoded or read
5.2- Using a Custom Suffix - Stating an Example
Sounds pretty simple, but its really pretty powerful. Lets take a common example. Suppose this is your data collection
challenge:
15
BarcodeGuy.com® - UnionNet SP2100 User’s Guide
5.2- Using a Custom Suffix - Stating an Example - con’t
“Using a HID connection, scan barcodes into a worksheet. Column 1 contains the asset barcode,
column 2 contains the character “Y”, indicating that the asset was present during the asset inventory.”
We could scan all the barcodes into the worksheet and enter the “Y” in the column next to it after each scan or before we
send the worksheet to where it will be used. But with a little thought we can have the SP2100 do the work for us using
suffixes.
5.3- Default Suffix and Introduction to ASCII & Hexdecimal Equivalents
Historically, the characters on the keyboard are defined as having standard hexdecimal equivalents. Each character is
assigned the same hex number regardless of input device. That way the host’s keyboard buffer can understand what its
being sent from the keyboard. Hexdecimal numbers are base 16. The numbers representing what we understand to be the
ones column in our decimal numbers are represented by the numbers 0-9. In Hexdecimal, the ones column is represented by
the numbers 0-E, where the letters A-E represent the decimal equivalents of 10-15 in decimal math. This ASCII standard
goes back to the 1960’s in an effort to make keyboards and HID devices standardized in the way they talk to a host. You
can find the ASCII standard characters and their hexdecimal equivalents listed in the chart in Appendix A of this Guide. As
an example, the capital letter “A” converts to hexdecimal “41” while lower case “a” converts to hexdecimal “61”. The
ASCII standard makes sure that there’s a standard conversion between keyboard characters the user types (on any input
device) and what the host computer understands. Each time you press a key on a keyboard, soft keypad or peripheral that
enters characters, this hexdecimal conversion number is sent to the host.
HID connected barcode scanners that are programmed to send a <CR> or Carriage Return at the end of the barcode
characters demonstrates the most common usage of suffixes. After all the characters are converted to hexdecmal and sent to
the host, the SP2100 by default is programmed to send a <CR>; equivalent to the user pressing the <Enter> key on the
keyboard or soft keypad of the device. The Carriage Return is a hexdecimal 0D. In most applications this either drops the
cursor to the next line or hits the “action key” for the program or application (i.e. sends the form data to the web
application).
5.4- SP2100 System Menu for Pre/Suffix - The Carriage Return Suffix
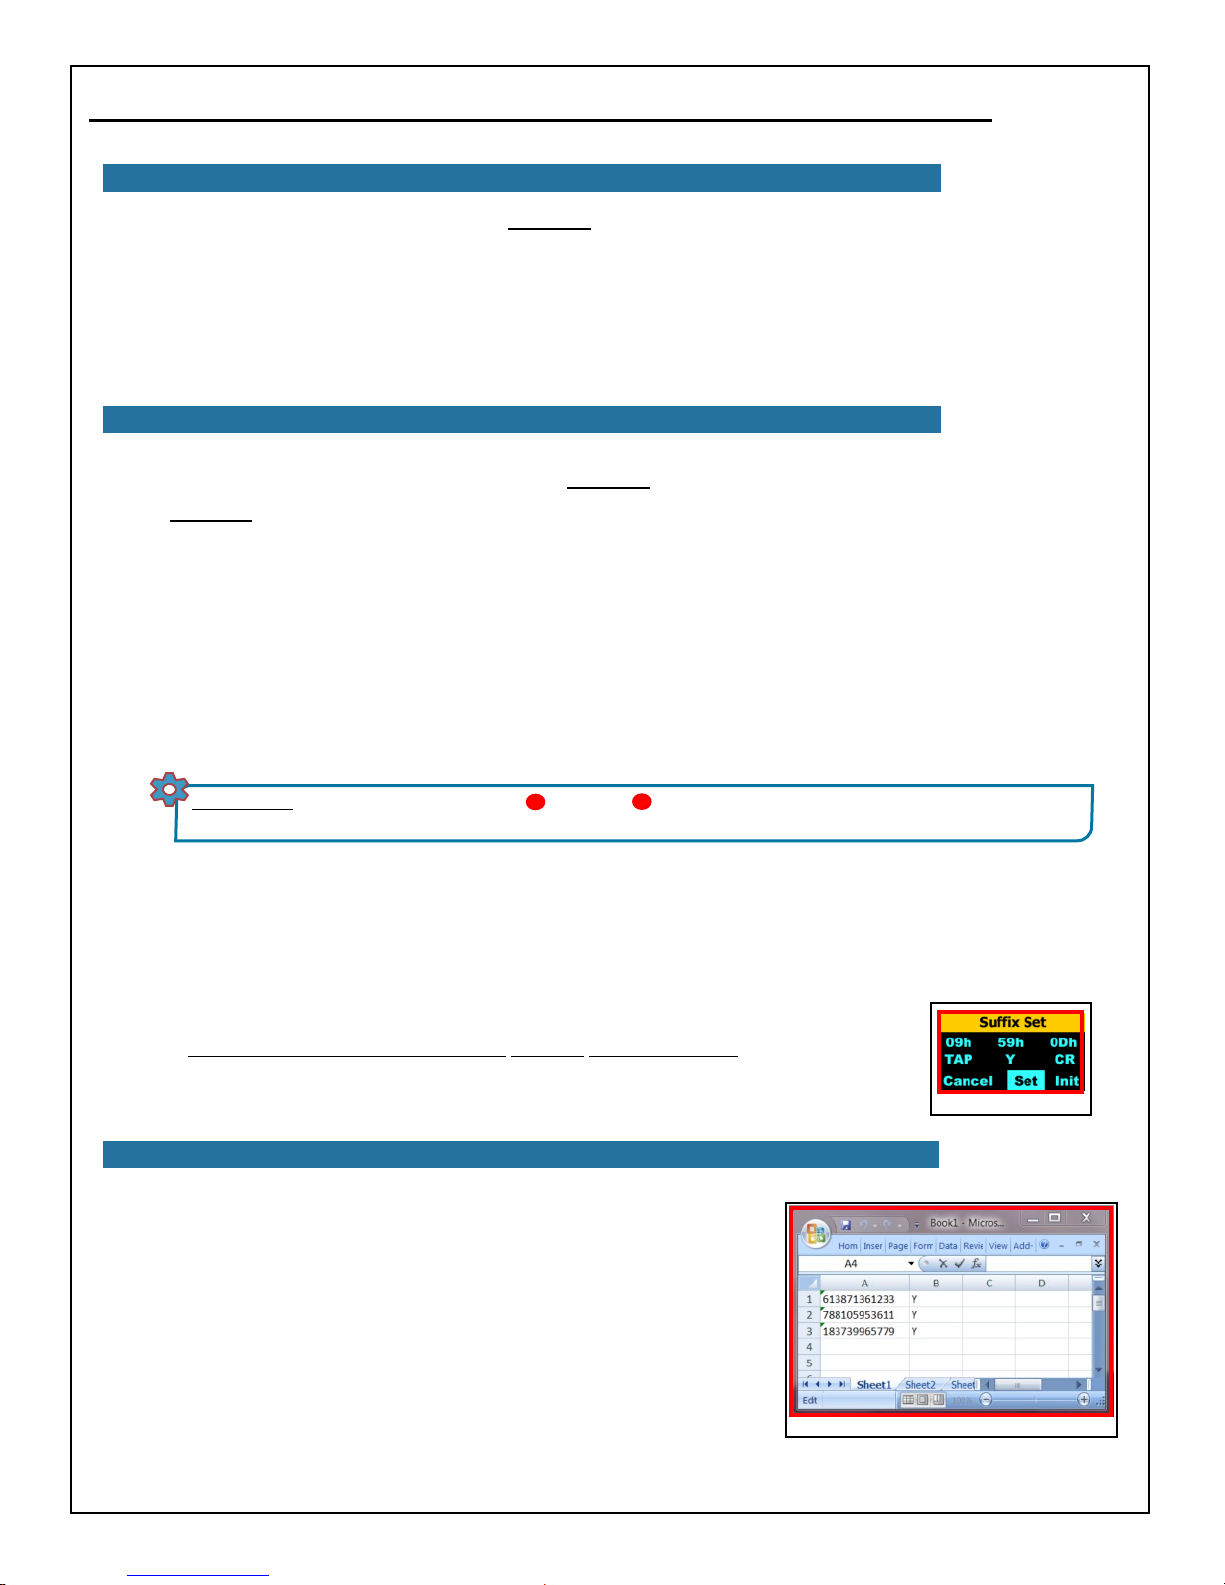
Let’s take a quick look at the SP2100’s System Menu the <CR> setup. The shorthand to get to the Suffix Menu within the
System Menu is below. Refer to figure 38 for the discussion that follows:
SHORTHAND: SM>>2.Settings>>Pre/Suffix Set >>Suffix Set Now press the scan button 6 times, indexing through each of
the six 0’s in the prefix ASCII settings and highlighting “Cancel”. Then press the Scan Button bringing up the “Suffix Set” screen.
You can see that the first Hexdecimal Group ( circled in red in figure
5.1) is “0D”. Underneath the first hexdecimal number you’ll see the
1
3
2
Suffix Default Setting = Carrige Return
HexDecimal “0D” is ASCII Carriage Return
1
2
ASCII equivalent - in this case <CR> (Carriage Return). You change the
hexdecimal digit by manipulating the Side Buttons of the SP2100 and
the ASCII equivalent will change as well. But for now….
Just note the options at the bottom of the Prefix Set and Suffix Set
3
4
screens (figure 5.2). Here’s the function of each:
● Cancel: Exits the screen, preserving the settings prior to
entering the set screen
figure 5.1
● Set: Sets the currently displayed values to what’s displayed in the Hexdecimal Group
at the top of the screen. This will erase the previous settings, if any.
● Init: Erases all the values in the Hexdecimal group and sets the value of each to NOT.
Let’s get out of the menu system by pressing the Scan Button six times to index through
Figure 5.2
the hexdecimal digits, then once more to highlight “Cancel” option, then again to exit the Pre/Suffix Set System Menu
option. The SP2100 will display a “Completed Setting” screen before returning to the Main Menu.
4
16
BarcodeGuy.com® - UnionNet SP2100 User’s Guide
5.5- Using a Custom Suffix - Using the ASCII-HEX Conversion Table
Before completing the custom suffix defined in Section 5.2, we need to define how to convert a keyboard character into its
hexdecimal equivalent: Referring to Appendix A here’s how to do it:
a. Locate the keyboard character in the white part of the chart - in this case <CR> for carriage return, represented by
the <Enter> key.
b. The first digit of the hexdecimal equivalent is the top column heading, and the second digit is the left row
heading. In the case of the carriage return, the first digit is 0, the second digit is D. The hexdecimal equivalent of a
<CR> is “0D”
5.6 - Using a Custom Suffix - Design the ASCII / HEX for the Section 5.2 Example
Now let’s go back to our data collection problem from Section 5.2 and find the solution using suffixes.
From Section 5.2, here’s the problem statement:
“Using a HID connection, scan barcodes into a worksheet. Column 1 contains the asset barcode, column 2 contains
the character “Y”, indicating that the asset was present during the asset inventory.”
Think about how you would enter the data into the worksheet using the keyboard. Column 1 contains the barcode data,
so we’re OK with no suffix yet. When we’ve finished entering the barcode number, we need to move to Column 2. We
can easily do this by typing a <TAB> (ASCII equivalent <HT> or horizontal tab). Now we need to type a “Y” character in
column 2. Then we want to move to the next row, which is a CR or carriage return. So our suffix is going to be the
hexdecimal equivalent of barcode data (done automatically), TAB Y CR or looking at Appendix A the hexdecimal
equivalent of 09 59 0D. Now that we know the hexdecimal suffix we want, let’s set it and see how it works!
Use the shorthand below to get to the Suffix Set option of the System Menu, Settings option, referring to figure 38
where required:
SHORTHAND: SM>>2.Settings>>Pre/Suffix Set >>Suffix Set Now press the scan button 6 times, indexing through each of
the six 0’s in the prefix ASCII settings and highlighting “Cancel”. Then press the Scan Button bringing up the “Suffix Set” screen.
1
2
Referring to figure 5.1, On the “Suffix Set” screen with the first digit of the first hexidecimal group highlighted, it is a 0, so
no change is required. Press the Scan Button to index to and highlight the second digit of the hexdecimal pair. Now use the
side buttons to change the value to 9 and press the scan button. Remember that the 09 represents the hexdecimal equivalent
of <TAB>, the ASCII equivalent <HT> or horizontal tab.
Follow the same procedure to enter the next 2 hexdecimal pairs: 59 0D which are the ASCII characters Y and <CR> the
ASCII equivalent of pressing the <ENTER> key.
When you finish, the “Cancel” option will be highlighted. Use the Bottom Side button to highlight
“Save”. Make sure your SP2100 screen looks like figure 5.3 Before Continuing!
Press the Scan Button a final time to finish. The SP2100 will present you with the “Completed
Setting” screen to confirm the change is complete.
5.7 - Test the Suffix Settings from the Section 5.6 Design
figure 5.3
For this example, we’re going to assume a HID connection to a Microsoft
Windows PC, using Microsoft Excel, but you can tailor your suffix to match
whatever host / application you’re using. In Excel, when you scan a barcode the
data should be presented in column A, followed by a “Y” in column B and the
<CR> should move the cursor’s focus down a line and back to Column A. See
figure 5.4.
As you can see, the suffix provides you with a pretty powerful tool to modify
the actions of the host’s cursor after you send in the barcode data.
NOTE: The SP2100 is capable of setting only 3 ASCII characters for each the
prefix and suffix using the System Menu. If you need more than 3, give us a call
and we’ll help you use a different method of setting the suffix and prefix to meet
your needs.
figure 5.4
17
BarcodeGuy.com® - UnionNet SP2100 User’s Guide
5.8 - Summarizing Custom Prefixes and Suffixes
Prefixes are designed and implemented in the same way as the suffix example shown above. If you’re just starting
with barcode scanning, it may be difficult to imagine how the SP2100’s ability to add keystrokes before and after the
barcode characters is often essential in getting the scanner to integrate and work well with the software you’re using for
data collection. The example usage of suffixes serves as only an introduction to what can be done using only the
SP2100’s three character Prefix & Suffix. It may be hard to image when you’re first starting, but the ability to add a
prefix and suffix to the scanned barcode data is sometimes essential to get the barcode scanner to integrate properly as a
HID into the software you’re using.
Don’t forget, if there’s something you need the SP2100 to do in the area of formatting, prefixes or suffixes, we’re only a
phone call away. We love challenging problems and all the BarcodeGuy(s) are experienced and love a challenge!
6.0- SP2100 Factory Defaults
There are many options accessible through the SP21000’s System Menu. Each setting comes from the factory set what’s
thought as the most useful settings for you to get started with a HID connection. The default settings are shown in
Appendix B. Each setting is accessible through the System Menu and how they are set when the barcode scanner is
delivered to you.
You can customize the settings in the System Menu however you want or need to in order to set up the SP2100 and we
encourage you to do so. Just be aware that changing some settings in combination with others may lead to some
unpredictable and surprising results. Just take your time and be methodical about the way you make the System Menu
changes on your SP2100.
IMPORTANT! If you’ve made changed to your SP2100’s System Menu and its not acting like it
did when you started initially or the way you’d expect it to with the System Menu changes you’ve
made, just reset the Factory Defaults. Here’s how - refer to figure 42:
SHORTHAND: SM>>2.Settings>>9.Default Config>>
Side Buttons “YES”>>Scan Button
Intentionally
figure 42
Left Blank
18

BarcodeGuy.com® - UnionNet SP2100 User’s Guide
APPENDIX A - ASCII TO Hex Decimal Conversion
Right Digit of HEX Value
R
L
0
1
2
3
4
5
6
7
8
9
0 1 2 3 4 5 6 7
NUL DLE SPACE
SOH DC1 !
STX DC2 "
ETX DC3 #
EOT DC4 $
ENQ NAK %
ACK SYN &
BEL ETB '
BS CAN (
HT EM )
0 @ P
1 A Q a q
2 B R b r
3 C S c s
4 D T d t
5 E U e u
6 F V f v
7 G W g w
8 H X h x
9 I Y i y
Left Digit of HEX Value
`
p
A
B
C
D
E
F
LF SUB *
VT ESC +
FF FS ,
CR GS -
SO RS
SI US
. > N ^ n ~
/ ? O
: J Z j z
; K [ k {
< L \ l |
= M ] m }
_
o DEL
How to use this chart - HexDecimal equivalents of ASCII or keyboard characters are 2 digits, from 0 to E.
No matter what character or control code you’re looking up, it will always be represented by a 2-digit hex
decimal number. In the white cells starting in Row2, Column2, look up the character you want to find.
Then follow the column up to the blue column heading to get the right digit and to the left to the purple
row heading to get the left digit. For example:
To find the HexDecimal equivalent of “V” (capital V), the Right digit is “5” and the left digit is “6” so the
HexDecimal conversion is “56”
19

BarcodeGuy.com® - UnionNet SP2100 User’s Guide
APPENDIX B - SP2100 Factory Default Settings
System Menu Option Sub Menu Option
Information
Settings
S/N,M/D,H/W,F/W,BOOTLOAD,MEMORY None N/A
Power Auto Off 1min – 10min 5 mins
LCD Auto Off 1sec – 60sec 10 mins
Backlight 10%-100% 60%
RealTime Clock
Pre/Suffix Set Setup Pre/Suffix
Language English/Korean Eaglish
Buzzer Variable Volume: 3 | 2 | 1 | OFF 3
Vibrator Enable / Disable Enable
Default Config. Yes/No NO
Information BT Config Info N/A
BT Profiles
HID Batch Enable N/A
Mfi Mode Enable / Disable Enable
yyyy/mm/dd
hh:mm
MUX / HID / SPP
Mfi for iOS
SP2100 Default
Value
Current (EST)
Prefix: NULL
Suffix CR (OD)
MUX
Bluetooth
Scan Engine
Memory
Battery
Service
Auto Reconnect Enable / Disable Enable
Disconnect Enable N/A
HID DateAdd Enable / Disable Disable
Trans Language Eng-Fr-Dan-Swe English
HID Select Normal / Special Normal
HID Char Delay
HID String Int
Information None N/A
Engine Setup SE340, EM1500, EM3000V2 N/A
Continue Mode Auto / Manual Manual
Duplicate Data Enable / Disable Enable
Data Save SR / SN / PR SR
Memory Info Shows Memory Used N/A
Delete Memory Yes / No N/A
Power View Percent Remaining N/A
Who to Call BarcodeGuy.com (800) 880-7495
msecs:10,20
50,100,200,500
msecs: 10,20
50,100,200,500 Seconds:1, 2, 5
None (no delay)
200 msecs
20
BarcodeGuy.com® - UnionNet SP2100 User’s Guide
APPENDIX C - Supported Barcode Symbologies
SP-2100-1D SP-2100-2D
Code128
EAN-13
EAN-8
Code39
UPC-A
UPS-E
Codabar
ISBN
Code 93
GS1 Datarbar
UCC/EAN-128
Interleaved2 of 5
and etc.
1D Barcodes
Code128, EAN-13, EAN-8, Code39,
UPC-A, UPS-E, Codabar,
Interleaved2 of 5, ISBN, Code 93,
UCC/EAN-128, GS1 Datarbar, etc.
2D Barcodes
AztecCode, AztecRunes, CodablockF,
Code16K, Code49, DataMatrix, MaxiCode,
MicroPDF, PDF417, QRCode,
and HanXin Code
21

BarcodeGuy.com® - UnionNet SP2100 User’s Guide
APPENDIX D - iOS UniLinker and SP2100 in MFi Mode
NOTE! This procedure may not work correctly if you’ve already made a HID connection with your iOS device. To clear the iOS to SP2100 relationship:
1. On the iOS device, go to Settings, General, Bluetooth and find the SP2100 bluetooth connection. Press the blue arrow in the blue bordered white circle
at the far right. From the screen that appears, press the “Forget this Device” button.
2. Now reset the iPad by pressing the Home Button (screen side, bottom center) and the Power Button at the same time until the white Apple logo
appears.
D.1- UniLinker: MFi Demo of Programmatic Control of the SP2100
In Section 2.9, we talked about the bluetooth connection methods between the SP2100 and host devices. Of the different
connection types, MFi was defined as an acronym for “Made for iPad/iPhone/iPod”. MFi is basically an SPP (serial port
protocol) connection with the iPhone security check added. This security check confirms that the accessory is Apple
Certified and Approved. The SP2100 is certified as a MFi or “Made for iPxx” accessory.
The MFi connection gives Application Developers granular control of the settings and operation of the SP2100. Using this
connection, you can access all the settings of the SP2100’s System Menu and control them programmatically. In addition,
you can not only receive the scanned barcode data, but you can format and send a text string to be displayed on the
SP2100’s 2-color OLED screen. Displaying on-screen instructions allows the user to use the SP2100 for information and
instruction instead of having to view the host.
To make development easier, we provide support for the SP2100’s free Software Developer’s Kit
(SDK). Application developers can download and install UnionNet’s UniLinker program from the
AppStore. UniLinker, with the corresponding source code, is the quickest way for a developer to
understand how to control the SP2100 using the MFi bluetooth connection to an Apple iOS device. Below are the
instructions to install and run the AppStore version of UniLinker and connect the SP2100 via Mfi.
D.2 - Install UniLinker from the Apple AppStore
Download UniLinker from the AppStore - see figure D1 at right
1. On your iPad, iPhone or iPod Touch, locate and launch the AppStore
1
1
2
application
2. Type “unilinker” in the search box at the top right hand side of the screen .
2
Then press the “search” button on the soft keypad and select iPhone Apps.
3. The UniLinker App will be displayed. Press the “FREE” button to the right of
the application name . The button caption will change to “INSTALL APP”.
Press to install the application . The Unilinker application will be
downloaded to your device.
4. Press the “Home” button of the device, and locate BUT DON’T LAUNCH the
“UniLinker” icon.
D.3 - Set Bluetooth MFi Mode on the SP2100
3
4
4
figure D1
5
On the SP2100 -
Make sure your SP2100 is turned on (press the Scan button for 3-5 seconds). Press the SP2100’s front Scan Button and
verify that it isn’t currently connected to a host device. If the SP2100 displays anything other than MUX it is currently
connected to another device. Find the device and turn off the bluetooth radio to break the connection to the SP2100
Before you get started making the HID connection, make sure your SP2100 is set with MFI Mode
enabled (refer to figure D2):
1. Press & hold the Top Side button until the System Menu appears.
2. Select 3.Bluetooth and press the Scan Button to select the option.
3. Select 3.MFI Mode, then highlight Enable & press the Scan Button to select.
4. Select 0.Exit Sub Menu then 0.Exit Menu.
5. There should now be an “i” on the far left of the Status Bar (circled in green in figure D2. The
SP2100’s LED Indicator will flash red.
NOTE:
● If the SP2100 displays anything other than MUX it is currently connected to another device. Find
the device and turn off the bluetooth radio to break the connection to the SP2100. (See Section 3.9)
figure D2
3
5
22

BarcodeGuy.com® - UnionNet SP2100 User’s Guide
APPENDIX D - iOS UniLinker and SP2100 in MFi Mode
D.3 - Set Bluetooth MFi Mode on the SP2100, con’t
If the SP2100 displays MUX and there is an “i” on the far left of the Status Bar as circled in green in figure D2, continue by
scanning the Bundle and Protocol barcodes in the instructions below.
Set the Bundle and App (protocol) ID’s -
In order for the SP2100 to recognize that it supposed to work with the UniLinker application, the iOS device needs to know
the Bundle and App ID’s. An App ID is the ID number of the Unilinker program in the AppStore, and the BundleID is
used by iOS on the host to uniquely identify the application. We’ll scan barcodes to set each.
Bundle ID Command
^ikr.co.unionnet.unilinker
figure D3
App ID Command
^pkr.co.unionnet.unilinker
Refer to figure D3 and figure D4 above:
1. Scan the BundleID barcode on the left side of figure D3 above. The SP2100 will momentarily display the
“Setup Bundle ID” screen , then return to the main screen and Status bar.
1
2. Scan the AppID barcode on the right side of figure D3 above. The SP2100 will momentarily display the
“Setup Apple ID - RESET BLUETOOTH” screen.
2
You can now set up the bluetooth connection between the SP2100 and your Apple mobile device.
D.4 - Make the Mfi Bluetooth Connnection
On the iPad - iPhone - iPod Touch - Refer to figure D5
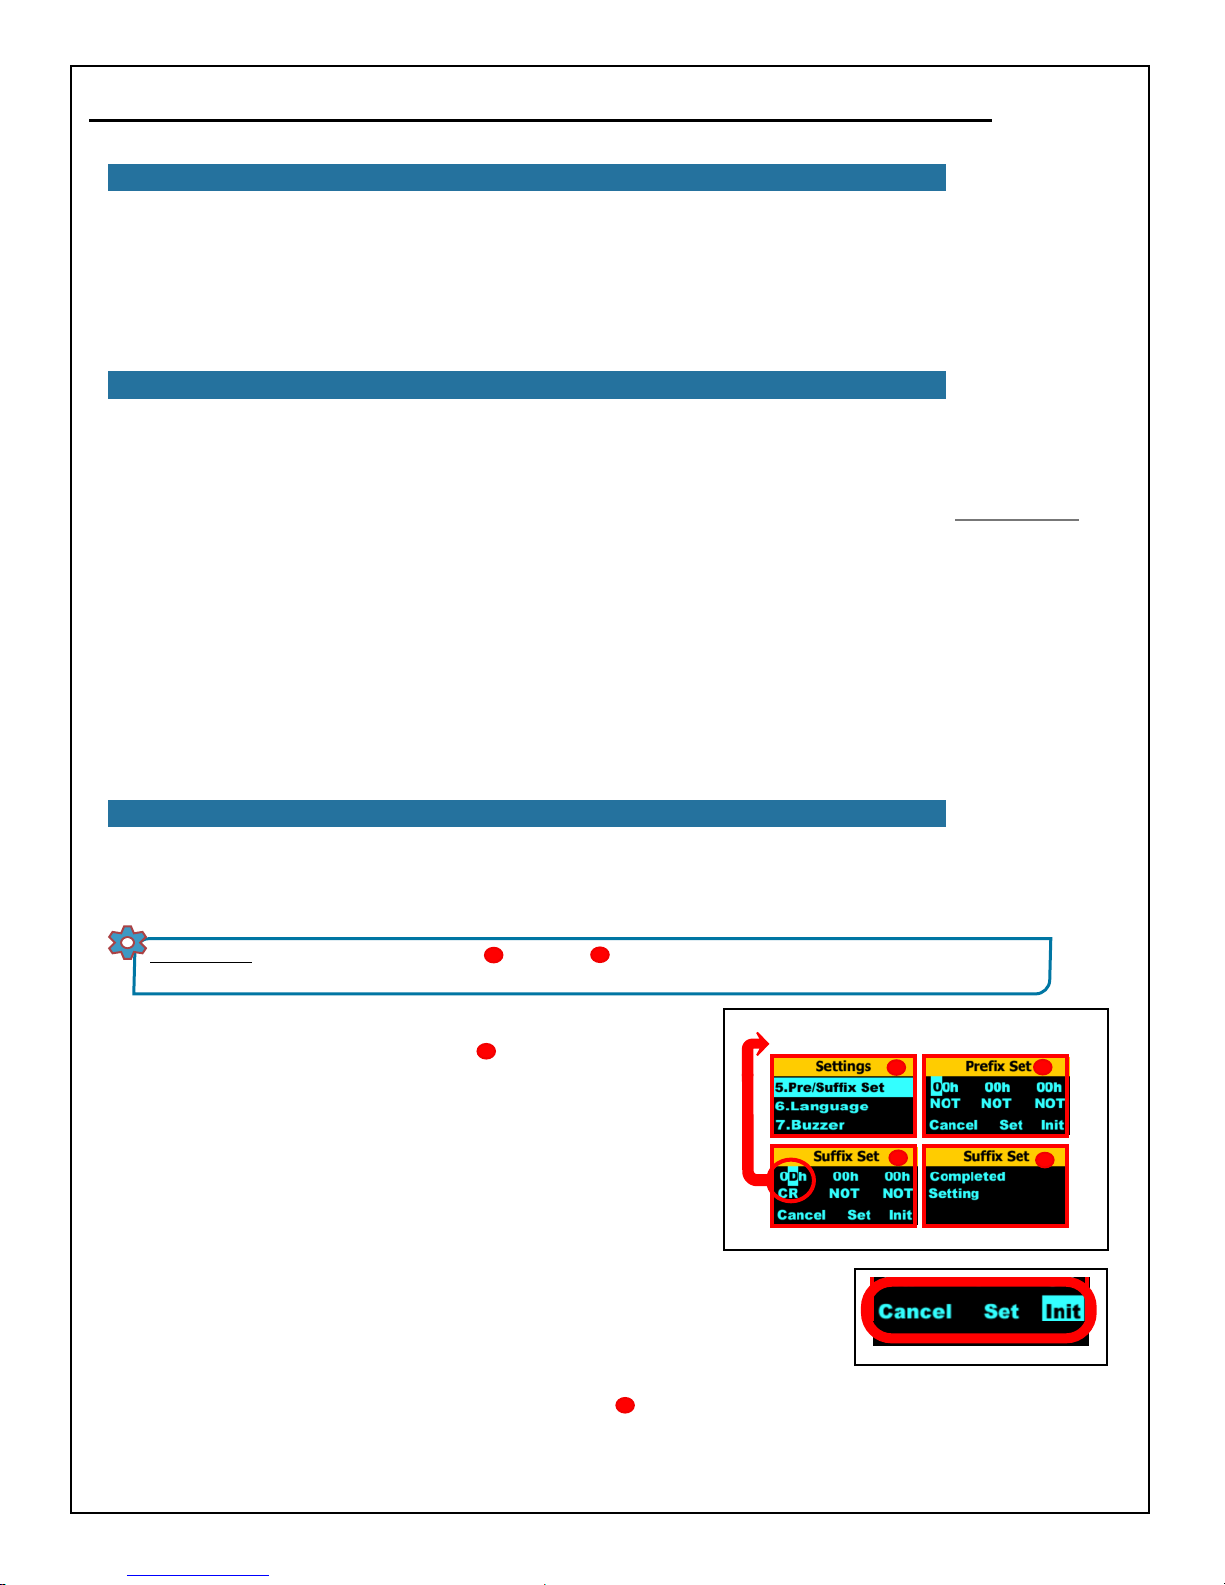
1. Select the “Settings” icon , then select “General”
Make sure the Bluetooth slider is set to on.
1
3
2
1
figure D5
2. The iPxx will search for new bluetooth devices as
indicated by the swirling circle .
1
2
figure D4
3
3. The iPxx will find the SP2100 and list it as “SP2100-
XXXXXXX” where the last 7 digits are the serial
4
number of the barcode scanner.
4. Press on the “SP2100” line. After a few moments the iPxx
will display “Connected” . The SP2100 will beep and display HID in the Status
6
Bar .
5
5. A few moments after the HID connection is displayed on the SP2100, the iOS
device will display a message “UniLinker would like to communicate with the
UnionNet SP2100. Press the “Allow” button
7
6. The SP2100 will beep once and the Status Bar will change from HID to MFi .
UniLinker will automatically launch.
The UniLinker program is mostly self-explanatory. We suggest that before you scan anything, that
you go into the settings tab at the bottom of the program and play around there to start. And don’t
forget, if you have any questions, don’t hesitate to give us a call.
END OF PROCEDURE
4
2
5
6
8
7
8
figure D5
23

BarcodeGuy.com® - UnionNet SP2100 User’s Guide
APPENDIX E - Android UniLinker and SP2100 in SPP Mode
24

BarcodeGuy.com® - UnionNet SP2100 User’s Guide
APPENDIX F - Updating SP2100 Firmware
Your SP2100 contains both device and bluetooth firmware that controls communications, the System Menu, display of the
Status Bar, memory storage and other features. This firmware can be updated in the field using GCC’s SimpleTerm, a serial
communications program similar to HyperTerminal but tailored to connect to and communicate with the SP2100. Since the
SP2100’s firmware can be upgraded in the field, you will have access to the latest features, bug fixes and improvements
available in the most recent firmware. This allows you to make sure when you deploy multiple SP2100’s that they all look
and operate in the same way, even if you’re using a prior or custom version of the firmware.
WARNING! The following Firmware Upgrade Instructions are provided for illustrative purposes only.
FOREVER! Failing to have a BarcodeGuy tech guide you through the process will void your manufacturer’s warranty. After your support call,
the technician will update the history for your SP2100’s serial number to reflect the firmware upgrade & date.
A mistake in the sequence or method may render your SP2100 unusable…
1. Refer to figure F1 and check the firmware version currently installed on the SP2100 using the
System Menu, Information option. Note that you have to use the Bottom Side Button to display
the F/W version.
2. Verify the latest firmware version and hardware compatibility on the BarcodeGuy website at
http://www.barcodeguy.com/Downloads.htm
3. If the version of your firmware not the current version listed & you want to take advantage of the
new/improved firmware features download the firmware “.bin” file from the BarcodeGuy.com,
call BarcodeGuy tech support for assistance with steps 4 and greater below.
4. In order to communicate with the SP2100 via Serial Port Emulation over
USB to update the firmware, we will use the communications program from
the firmware development tool suite called “GCC Developer Lite” as an
equivalent to Hyperterminal, the default
serial communications program no
longer provided with Windows. The
installation file “GDLFull2.3.2.1.exe”
can be found in the “\UpdateFirmware”
folder of the product Resource CD that
came with your SP2100 kit or can be
downloaded from our web site at
http://www.barcodeguy.com/
Downloads.htm.
figure F2
figure F1
4.1 Double-click the installer package “GDLFull2.3.2.1.exe”. Select “Run” from the dialogue box that appears (figure
F2).
4.2 Press “Run” or “OK” if any other Warning screen that appears.
NOTE: For the following steps, refer to figure F3.
5. Follow the installation screen prompts for , , , and .
6. On installation screen , uncheck all of the options except “SIMPLE TERM”. The default installation options will
5
install the full development environment including processor profiles, IDE and compiler. We just want to be able to do
serial communications with the SP2100 using the SIMPLE TERM program.
7. Continue following the installation screen prompts until is displayed. Now press the “Finish” button to complete
the installation of “Simple Term”.
1
1
2
2
figure F3 - NOTE: Continued on Next Page
43
9
25
3

BarcodeGuy.com® - UnionNet SP2100 User’s Guide
APPENDIX F
4
7
-
Updating SP2100 Firmware
5
8
figure F3 - Continued from prior page
6
9
8. CAUTION: Follow this step explicitly!
8.1 Power off the SP2100 by pressing the Scan Button for 5 seconds. “Want Shutdown” message will be displayed on
the SP2100 screen (figure F4 ). Allow the scanner to fully power down.
1
8.2 With the SP2100 powered off, plug one end of the USB cable (supplied in the kit) into the bottom port of the
SP2100 (figure F4 ). Plug the other end of the cable into a Type A USB port on the PC where you installed
2
“SIMPLE TERM” IN Steps 4 through Step 7.
1
Press & Hold Scan Button until
Power Off Screen Appears. Allow
Power-Down.
Then plug
Type A
Connector
into your
Windows PC
figure F4
8.3 Refer to figure F4 Press and hold the Top Side button
3
2
Insert USB
of the SP2100
8.4 While holding the Top Side button in, press the SP2100’s
Scan button. The scanner will respond by rapidly flashing
the LED indicator green. Release both buttons on the
SP2100.
9. With the LED indicator flashing green on the SP2100, look at
the System Tray of the PC on the bottom right of the screen
down by the clock. You should see the message “Installing
device driver software” (figure F5 ).
1
9.1 If you’re running Windows 7 with an Internet
connection, Windows Update will search online until it
finds and installs the appropriate driver - ”AT91 USB to
Serial Converter”. Note that this may take up to 10 minutes
to locate and install. If you get a warning about Windows not
being able to verify the Publisher of the driver, choose “Install
this driver software anyway”.
9.2 When the driver is finished installing, you will see a
System Tray balloon down by the clock that says “Your
Cable ..
Press & Hold Top
3
Side Button then
press Scan Button.
LED Indicator will
Flash green.
1
2
4
Serial Port Assigned in Device Manager
figure F5
3
NOT
26
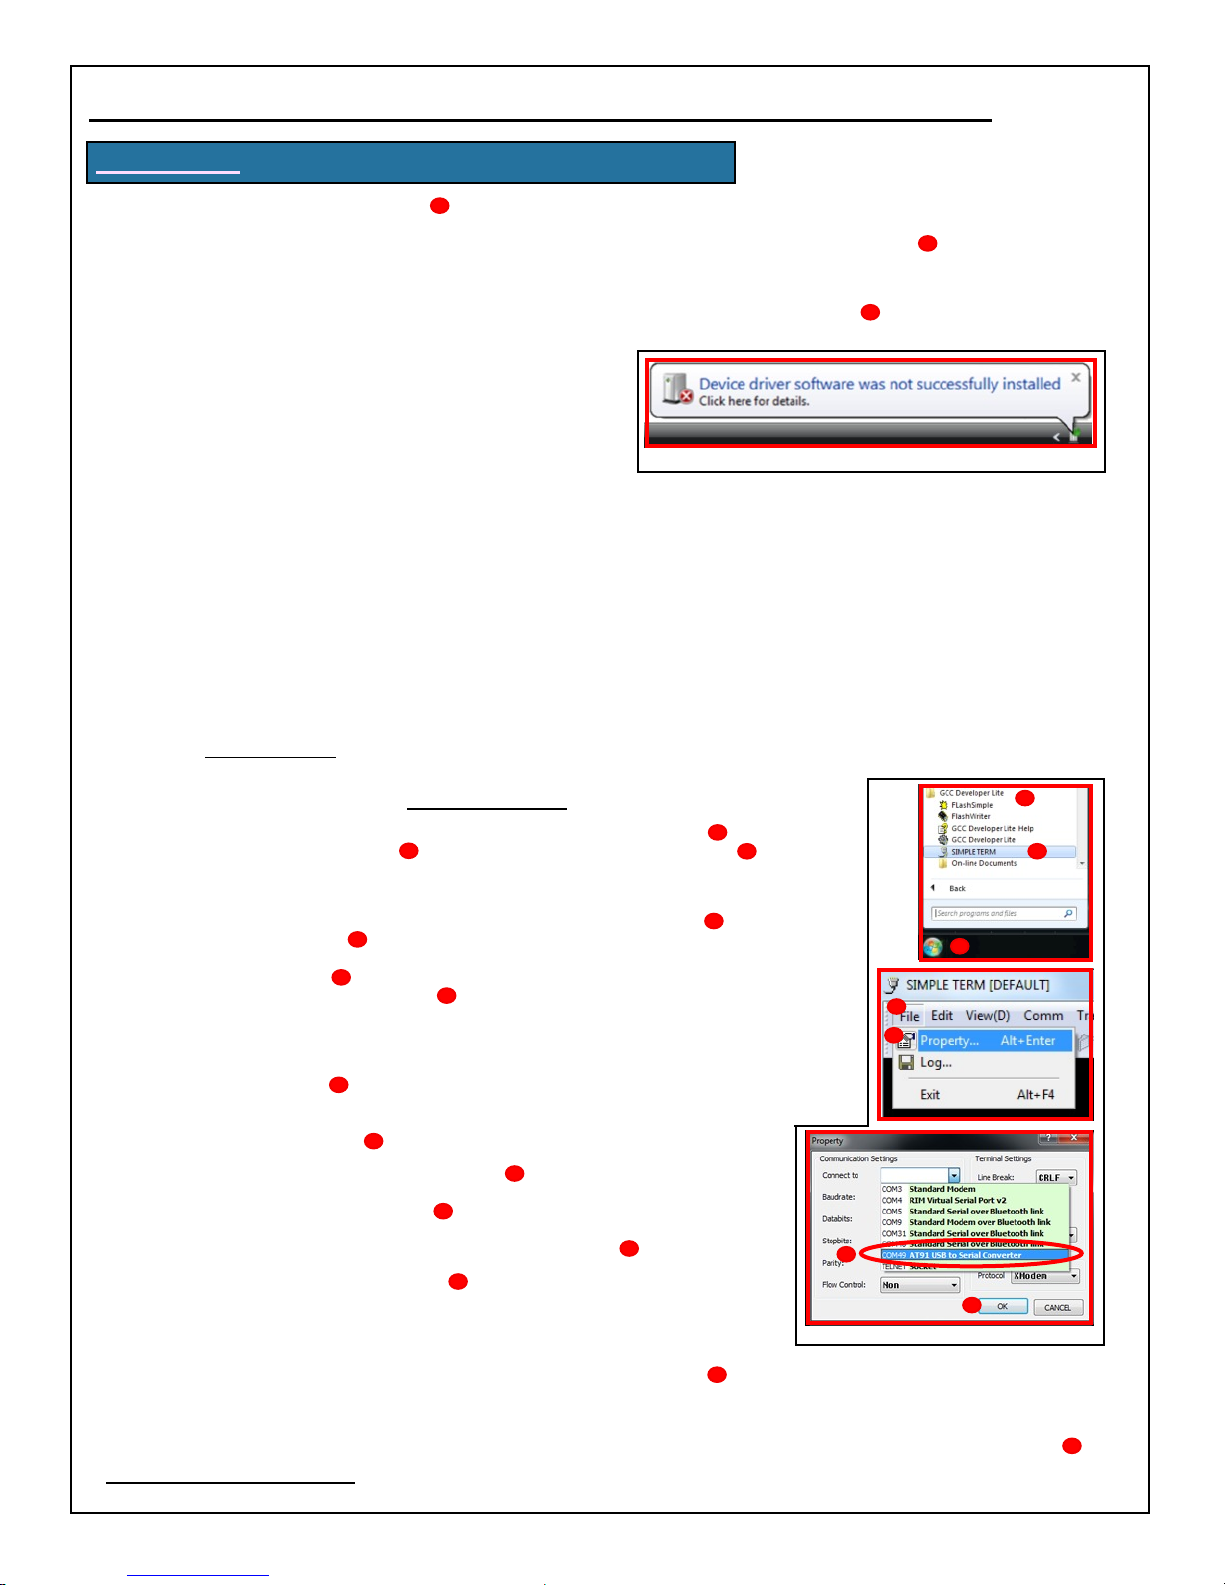
BarcodeGuy.com® - UnionNet SP2100 User’s Guide
APPENDIX F - Updating SP2100 Firmware, con’t
Device is Ready to Use” (figure F5 ). To check if you’ve missed the message, click on the arrow on the System
2
Tray. If the driver installed correctly, you’ll see the USB icon with a checkmark next to it not the moving green
ball on the computer which means Windows is still searching / installing the driver (figure F5 ).
3
9.3 Before continuing, press the “start” icon on the PC and type “Device Manager” into the search bar and start
Device Manager. Find the “Ports” icon in the System Tree and click on it. Verify the COM port assigned to the
”AT91 USB to Serial Converter” entry and make a note of the port number (figure F5 ) . You will need it when
4
you run the SIMPLE TERM program installed in Step 7.
9.4 If the driver installed successfully, proceed to Step 10. If
the driver did not install properly, you will see a System
Tray balloon down by the clock that says “Device driver
software was not successfully installed” (figure F6). The
driver will have to be manually installed from either the
SP2100 kits Resouce CD or from the BarcodeGuy web
site at http://www.barcodeguy.com/Downloads.htm. You
can check the internet to get instructions on how to install a driver manually for your Windows operating system.
figure F6
What follows is a brief description of how to manually install the driver.
9.4.1 Unplug the SP2100 from the USB conector of your PC. The LED indicator will stop flashing and the SP2100
will be in Power-Off mode.
9.4.2 For Windows XP, go to the Control Panel and run the Add New Hardware Wizard. For Windows 7 and Vista,
create a desktop shortcut to “Cmd.exe”. Then right-click the shortcut and select “Run as Administrator”. From the
command prompt, run “Hdwwiz.exe” then click “Next”.
9.4.3 Select “Advanced Options” and then click “Next”. Click “Show all Devices” then click “Next”. Click on the
“Have Disk” option, and press the Browse button. Navigate to the “\sp-2100\” folder of the Resource CD or the
folder where you stored the downloaded driver, Select the file “6119.inf” and press “Open”, “OK”, then “Next” on
the next two wizard pages, then click the “Finish” button to complete the installation.
9.4.4 IMPORTANT! When you plug in the SP2100’s USB cable to the PC, be sure to either use a different USB
port than what you used originally, or reboot the PC!!!
9.4.5 Restart this procedure at Step 8 of Appendix F of these instructions.
10. Start the Simple Term program. Press the Windows “Start” (figure F7 ) button, select
“GCC Developer Lite” (figure F6 ), then select “Simple Term” (figure F7 ) from the
2
1
3
sub-programs.
10.1 When Simple Term opens, set the communications port and protocols. On the
menu bar at the top of the program window, press “File” (figure F7 ), then
“Properties” (figure F7 ) and select the COM port you noted from the Windows
5
Device Manager in Step 9.3 that will have the description ”AT91 USB to Serial
Converter” (figure F7 ). There is no need to set the default values, as they are
correct. Press the “OK” (figure F7 ) button.
Refer to figure F8 for the following steps
6
7
4
1
4
5
10.2 Press the connect button, represented by a telephone icon in the icon bar under the
menu bar (figure F8 ). Simple Term will connect to the SP2100 and the
1
scanner will respond with the following message displayed on the Simple
Term screen: “[Unionnet SP-2100 Bootloader Version.1.0]” and “<Please
Downloader.>” (figure F8 )
10.3 Now press the “Transfer To” (figure F8 ) icon represented as the first
2
3
file folder on the left in the icon bar under the menu bar of Simple Term. A
dialogue box will open (figure F8 ), allowing you to navigate to the new
4
firmware file. Note that all firmware files have a file extension of “bin”.
Highlight the file and press the “Open” button (figure F8 ).
10.4 Note the Progress Bar (figure F8 )at the bottom of the Simple Term
6
program window. It will show the firmware file being transferred into the
SP2100.
5
6
7
figure F7
10.5 When the firmware transfer is complete, the SP2100 will display
“<COMPLETED DOWNLOADER.> <NOW POWER OFF.> (figure F8 ). There is no need to do anything. The
SP2100 will power off on its own.
7
10.6 Disconnect the USB cable from the SP2100 and power it on by pressing he Scan Button for 3-5 seconds. After the
new firmware version will be displayed on the Information Menu screen after the logo startup screen (figure F8 ).
END OF PROCEDURE
2
3
8
27

BarcodeGuy.com® - UnionNet SP2100 User’s Guide
APPENDIX F - Updating SP2100 Firmware, con’t
1
3
2
7
6
figure F8
4
5
8
Intentionally
Left Blank
28
 Loading...