

Page 1

BARCOPROJECTION
SCENERGIX
R9840870 - R9840880
R9840890 - R9841500
R9841510
OWNERS MANUAL
ScenergiX for SLM and ELM
14052002 R5976464/00
Page 2

Barco nv Events
Noordlaan 5, B-8520 Kuurne
Phone: +32 56.36.89.70
Fax: +32 56.36.88.24
E-mail: events@barco.com
Visit us at the web: www.barco.com
Printed in B elgium
Page 3
1. SCENERGIX
Scenergix is only available as an o ption.
Overview
• Order information
• Order information
• Introduction
• Preparations
• Scenergix
• ScenergiX overlap zone (horizontal scenergix)
• ScenergiX overlap zone (vertical scenergix)
• ScenergiX size adjus tm ent
• Adjusting the black level of the images
1.1 Order information
1. ScenergiX
Order numbers
R9840870
1.2 Order information
Order numbers
SLM G5 R9840880
SLM R6
SLM G8/G10
SLM R8/R10
R9840890
R9841500
R9841510
1.3 Introduction
When available ?
ScenergiX is only available as an option, some menu items will be grayed out when this option is not installed.
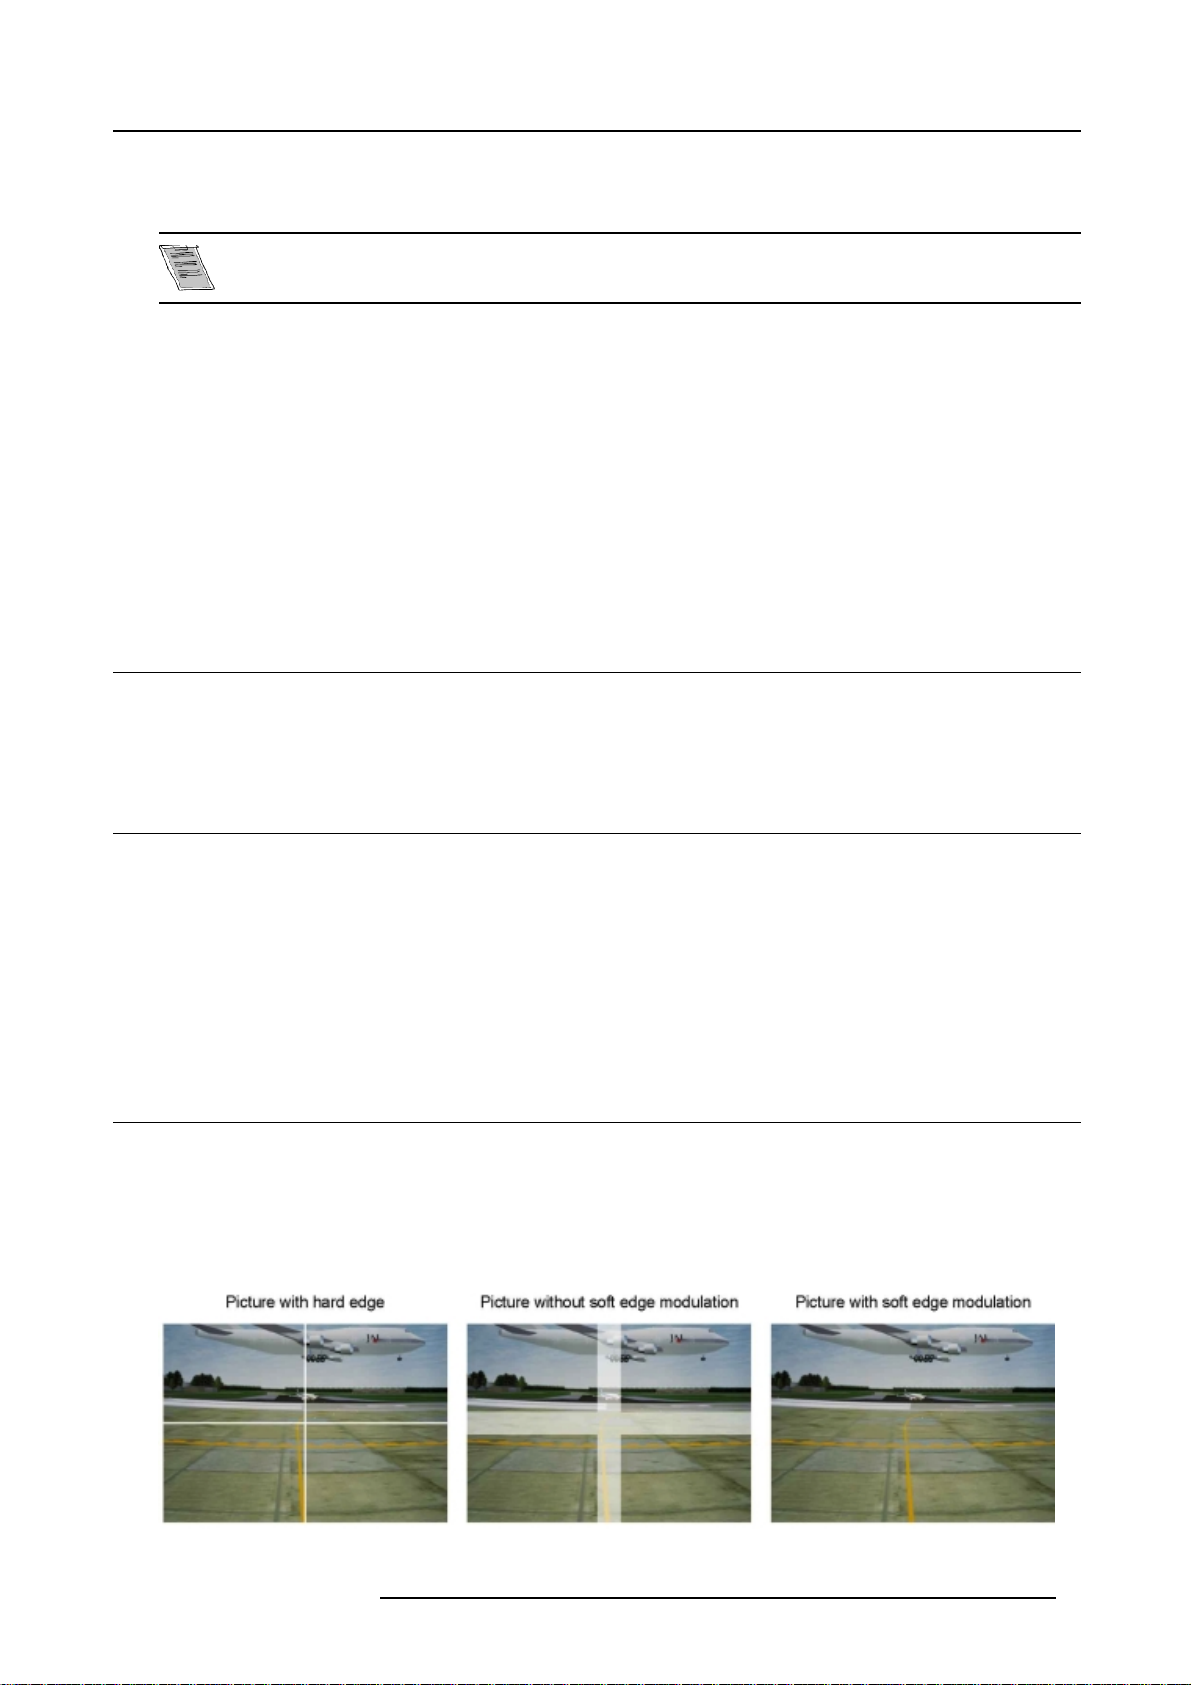
Why ScenergiX ?
When working in a multichannel setup the Barco E LM R18 and its Soft E dge possibilities enable an image blending that gives the
appearance of a single view, thus achieving realistic immersion for the majority of wide screen applications.
Image 1-1
Why Soft Edge?
R5976464 SCENERGIX 14052002 1
Page 4

1. ScenergiX
What is the Basic Principal of ScenergiX ?
The principle of edge blending is archived by linear modulation of the light output in the overlap zone so that the light output in that
zone equals the light output of the rest of the image.
Adjustable overlapping area
Light output per image
100%
50%
image 2image 1
Total composite light output
100%
Image 1-2
ScenergiX Basic Princ iple
50%
image 2image 1
1.4 Preparations
ScenergiX Preparations
To ensure proper ScenergiX adjustment, be sure that the following adjustments are done perfectly on all projectors:
• Convergence (E lectronic Convergence).
• Geometry
• Color Matching (Color Temperature, Input Balance, Gamma)
1.5 Scenergix
How to activate Scenergix?
1. Push the cursor key ↑ or ↓ to highlight Scenergix. (menu 1-1)
2. Press ENTER to select.
3. Push the c ursor key ↑ or ↓ to highlight Status. (menu 1-2)
4. Press ENTER to toggle between ON and OF F.
ON scenergix is active
OFF
03:
2 R5976464 SCENERGIX 14052002
scenergix is not active
RANDOM ACCESS
ADJUSTMENT MODE
FILE SERVICE
PICTURE TUNING
GEOMETRY
SCENERGIX
PIP
STEREO OPTIONS
Select with ↑ or ↓
then <ENTER>
<EXIT> to return
03:
SCENERGIX
STATUS [ON]
- size TOP
BOTTOM
LEFT
RIGHT
- black level LEVEL
Select with ↑ or ↓
then <ENTER>
<EXIT> to return
Page 5

1.6 ScenergiX overlap zone (horizontal scenergix)
Definitions
Image 1-3
Scenergix set up
Overlap : n umber of pixels that overlap
Horizontal resolution of 1 projector : 1024 for Grap hics versions, 1280 for Reality versions.
Total horizontal screen resolution : [(horizontal resolution of 1 projector) x 2] minus overlap.
Horizontal Resolution source : number of a ctive pixels of the source.
1. ScenergiX
Adjustment of Active pixels (Pact) of the first projector
1. Go to File –> E dit menu of first projector.
2. Enter value for horizontal → active (= Pact) as follow :
Pact = [(Horz. res olution of 1 projector)/(Total horz. screen resolution)] x (horz. resolution source)
3. Horizontal → start (= Pstart) remains the sam e.
Adjustment of Active pixels (Pact) of second projector
1. Go to File –> Edit menu of second projector.
2. Enter value for horizontal → active (= Pact) as f ollow :
Pact = [(Horz. res olution of 1 projector)/(Total horz. screen resolution)] x (horz. resolution source)
3. Horizontal → start (= Pstart) = original start + [(Horz. resolution source) minus (newly calculated Pac t)]
Example
Horizontal resolution source : 1600 pixels
horizontal resolution projector 1 & 2 : 1024 pixels
Overlap : 100 pixels
Total horizontal screen size in pixels : 1948 pixels
Pact projector 1 = [(1024 / 1948)] x 1600 = 841 pixels
Pact projector 2 = [(1024 / 1948)] x 1600 = 841 pixels
Pstart projector 2 = P start projector 1 + (1600 – 841)
R5976464 SCENERGIX 14052002
3
Page 6

1. ScenergiX
1.7 ScenergiX overlap zone (vertical scenergix)
Definitions
Image 1-4
Scenergix overlap zone vertical
Overlap : n umber of pixels that overlap
Vertical resolution of 1 projector : 768 for Graphics versions, 1024 for Re ality versions.
Total vertical screen resolution : [(Vertical resolution of
Vertical Resolution source : number of active lines of the source
1 projector) x 2] minus (overlap)
Adjustment of Active lines (Lact) of the first projector
1. Go to File –> E dit menu of first projector.
2. Enter value for vertical → act (= Lact) as follow :
Lact = [(vert.. resolution of 1 projector)/(Total Vert.. screen resolution)] x (Verti. resolution source)
3. Vertical → start (= Lstart) rem ains the same.
Adjustment of Active lines ( Lact) of second projec
1. Go to File –> Edit menu of second projector.
2. Enter value for vertical → act (= Lact) as follow :
Lact = [(Vert.. resolution of 1 projector)/(Total vert.. screen resolution)] x (vert. resolution source)
3. Vertical → start (= Lstart) = original start + [(Vert. resolution source) minus (newly calculated Lac t)]
tor
Example
Vertical resolution source : 1200 lines
Vertical resolution 1projector : 768 lines
Overlap : 50 lines
Total vertical screen size : 1486 lines
Lact projector 1 = (768 / 1486) x 1200 = 620 lines
Lact projector 2 = ( 768 / 1486/) x 1200 = 620 lines
Lstart projector 2 = Lstart projector 1 + (1200 – 620)
1.8 ScenergiX size adjustment
What can be done with the ScenergiX size menu?
Within this menu the w idth of the blending zone is set up.
4
R5976464 SCENERGIX 14052002
Page 7

How to adjust the size?
Only accessible when the status is in the O N position.
1. Push the cursor key ↑ or ↓ to highlight one of the four size adjustments, Top, Bottom, Left or Right. (menu 1-3)
2. Press ENTER to select.
A pattern with the different areas will be displayed. (image 1-5)
3. Use the cursor keys to move the border of the overlap ar ea to the d esired position (value betw een 0 and 255).
Set first the width of the f irst projector and repeat for the second one. (image 1-6, image 1-7)
SCENERGIX
STATUS [ON]
- size TOP
BOTTOM
LEFT
RIGHT
- black level LEVEL
Select with ↑ or ↓
then <ENTER>
<EXIT> to return
03:
1. ScenergiX
Image 1-5
Width selections
R5976464 SCENERGIX 14052002 5
Page 8

1. ScenergiX
Image 1-6
Width set up for proj ector 1
Image 1-7
Width set up for proj ector 2
1.9 Adjusting the black level of the images
Why
For dark images, the overlap zone will be brighter then the rest of the images. Therefore we can rise the black level of the remaining
image (excluding the overlap zone).
6
R5976464 SCENERGIX 14052002
Page 9

How to adjust?
1. Push the c ursor key ↑ or ↓ to highlight Level. (me nu 1-4)
2. Press ENTER to activate.
3. Adjust the black level of area A until the black level of area A, B and C are equal. (image 1-8)
SCENERGIX
STATUS [ON]
- size TOP
BOTTOM
LEFT
RIGHT
- black level -
LEVEL
Select with ↑ or ↓
then <ENTER>
<EXIT> to return
03:
1. ScenergiX
R
G
B
Image 1-8
Black level adjustment
A
RGB
112
113
111
Image 1
B
C
Image 2
R5976464 SCENERGIX 14052002 7
 Loading...