

Page 1

R9830350
Installation and User’s Guide
OCTOPUS
Page 2

R9830350
Title: OCTOPUS – Installation and User’s Guide
ID-no.: R9830350
Date: 2001-08
Release: O
chapter 1 new
chapter 2 new
chapter 3 new
chapter 4 new
chapter 5 new
chapter 6 new
chapter 7 new
chapter 8 new
chapter 9 new
new: The corresponding chapters are new or completely revised.
corr.: Passages of the corresponding chapter were corrected; see modification bars.
add.: Passages of the corresponding chapter were added; see modification bars.
CTOPUS 2.1 Service Release 1
main issue update
Document History
Modifications which result in a new version are indicated by a vertical bar.
Version
This manual refers to OCTOPUS Software Release 2.1 Service Release 1
Keep this sheet!
Page 3

Trademarks
Brand and product names mentioned in this manual may be trademarks, registered trademarks or
copyrights of their respective holders. All brand and product names mentioned in this manual serve as
comments or examples and are not to be understood as advertising for the products or their
manufacturers.
Copyright © 2000 by Barco Control Rooms
Die Weitergabe sowie die Vervielfältigung aller Unterlagen, die von uns überlassen werden, deren
Verwertung und Mitteilung ihres Inhaltes an Dritte ist nicht gestattet, soweit dies nicht ausdrücklich
zugestanden ist. Urheberrechte, insbesondere auch solche an Software, werden nur insoweit übertragen,
als es für die Erreichung des speziellen Vertragszwecks erforderlich ist. Zuwiderhandlungen können zu
Schadensersatz verpflichten. Alle Rechte aus der Erteilung eines Patents oder der Eintragung eines
Gebrauchsmusters verbleiben bei uns.
Copyright © 2000 by Barco Control Rooms
All rights reserved. No part of this document may be copied, reproduced or translated. It shall not
otherwise be recorded, transmitted or stored in a retrieval system without the prior written consent of Dr.
Seufert GmbH.
Guarantee and Compensation
Barco Control Rooms provides a guarantee relating to perfect manufacturing as part of the legally
stipulated terms of guarantee. On receipt, the purchaser must immediately inspect all delivered goods for
damage incurred during transport, as well as for material and manufacturing faults. Barco Control Rooms
must be informed immediately in writing of any complaints.
The period of guarantee begins on the date of transfer of risks, in the case of special systems and software
on the date of commissioning, at the latest 30 days after the transfer of risks. In the event of justified
notice of complaint, Barco Control Rooms can repair the fault or provide a replacement at its own
discretion within an appropriate period. If this measure proves to be impossible or unsuccessful, the
purchaser can demand a reduction in the purchase price or cancellation of the contract. All other claims,
in particular those relating to compensation for direct or indirect damage, and also damage attributed to
the operation of software as well as to other services provided by Barco Control Rooms, being a
component of the system or independent services, will be deemed invalid provided the damage is not
proven to be attributed to the absence of properties guaranteed in writing or due to the intent or gross
negligence on the part of Barco Control Rooms.
If the purchaser or a third party carries out modifications or repairs on good delivered by Barco Control
Rooms, or if the goods are handled incorrectly, in particular if the systems are commissioned or operated
incorrectly or if, after the transfer of risks, the goods are subject to influences not agreed upon in the
contract, all guarantee claims of the purchaser will be rendered invalid. Not included in the guarantee
coverage are system failures which are attributed to programs or special electronic circuitry provided by
the purchaser, e. g. interfaces. Normal wear as well as normal maintenance are not subject to the
guarantee provided by Barco Control Rooms either.
The environmental conditions as well as the servicing and maintenance regulations specified in this
manual must be complied with by the customer.
Page 4

Revision sheet
To:
Barco Control Rooms GmbH
An der Rossweid 5 • D-76229 Karlsruhe • Germany
Phone (49) (721) 6201-0 • Fax (49) (721) 6201-298
E-mail
info.de.bcd@barco.com Web www.barcocontrolrooms.de
BARCO N.V. Projection Systems
Noordlaan 5 • B-8520 Kuurne • Belgium
Phone (32) (56) 36-8414 • Fax (32) (56) 36-8526
E-mail
sales.bcd@barco.com• Web www.barcocontrolrooms.com
From:
Date:
Please correct the following points in this documentation (R9830350):
page wrong correct
Page 5

Contents
1 Introduction.................................................................................................................................1-1
1.1 How this manual is organized ..................................................................................................1-2
1.2 Styles And Symbols .................................................................................................................1-3
2 Summary .....................................................................................................................................2-1
2.1 The Software Octopus..............................................................................................................2-2
3 Getting Started ............................................................................................................................3-1
3.1 Octopus Software Installation ..................................................................................................3-2
3.1.1 Hardware Prerequisites..........................................................................................................3-2
3.1.2 Software Prerequisites...........................................................................................................3-2
3.1.2.1 Central Installation vs. Individual Installations..................................................................3-2
3.1.2.2 Administered Use vs. Non-administered Use.....................................................................3-2
3.1.2.3 Network Topology .............................................................................................................3-3
3.1.2.4 Gathering information before installation ..........................................................................3-3
3.1.3 General Installation Guidelines.............................................................................................3-4
3.1.4 Octopus Server Installation Considerations ..........................................................................3-8
3.1.5 Client Installation Considerations .........................................................................................3-8
3.1.6 Administration Client Installation Considerations ................................................................3-8
4 Operating.....................................................................................................................................4-1
4.1 Octopus Server.........................................................................................................................4-2
4.1.1 Application startup................................................................................................................4-2
4.1.2 Application use......................................................................................................................4-3
4.2 Octopus Client..........................................................................................................................4-3
4.2.1 Application startup................................................................................................................4-3
4.2.2 Application use......................................................................................................................4-4
4.2.3 Activate .................................................................................................................................4-6
4.2.4 Operation while active ..........................................................................................................4-6
4.2.5 Queued ..................................................................................................................................4-6
4.2.6 De-activating the client .........................................................................................................4-7
4.2.7 Multiple server operation ......................................................................................................4-7
4.2.8 Octopus Client options..........................................................................................................4-7
4.2.9 Connecting To A Unix Server...............................................................................................4-9
4.2.10 Not redirectable keys.........................................................................................................4-10
4.3 Octopus Administrator...........................................................................................................4-10
4.3.1 Application Startup ...............................................................................................................4-1
4.3.2 Connecting to an Octopus Server..........................................................................................4-1
4.3.3 Viewing access information..................................................................................................4-2
4.3.4 Control Room Computer Organization .................................................................................4-5
4.3.4.1 User Access Management from Administrator Interface ...................................................4-8
5 Hotline.......................................................................................................................................5-10
6 Octopus server license.................................................................................................................6-1
7 Octopus Server on MS Windows 2000 / X Window System......................................................7-1
7.1 Summary ..................................................................................................................................7-2
8 Troubleshooting ..........................................................................................................................8-1
8.1 Logfiles ....................................................................................................................................8-2
8.2 Known Incompatibilities..........................................................................................................8-2
9 Table of Figures ..........................................................................................................................9-3
Page 6

1 Introduction
OCTOPUS is a software system which allows an operator sitting at his or her Windows NT workstation to
control the mouse and keyboard of a networked Windows NT computer. This feature gives operators in a
control room the ability to manipulate a shared wallboard display as though it is the display on the desk in
from of him or her. Octopus has been designed to be easy to install, easy to use, and easy to integrate into
a control room setting.
This manual will cover the following topics:
Installation hardware requirements
Pre-installation preparation
Startup, shutdown and usage of each of the software components
R9830350 Octopus User Guide (2001-08) 1-1
Page 7

1.1 How this manual is organi zed
This manual is divided into 9 chapters:
Introduction
explains the structure of the manual itself and the used typographic styles and symbols.
Summary
provides an overview of the features of OCTOPUS software
Getting Started
lists the installation requirements and introduces the installation modes
Operating
explains the operation of OCTOPUS software
Hotline
lists the addresses to contact if any problems occur.
License information
lists the procedure and the addresses to get a license key.
Octopus Server on Windows NT/2000 / X Window Systems
gives an overview of the options which are only available on Windows NT/2000 or on X Window
Systems.
Troubleshooting
lists hints and incopatibilities.
Table of Figures
gives an overview of the screenshots included in the manual.
Numbering
Chapters, pages, figures and tables are numbered separately. Chapters are indicated by a »point syntax«,
e. g.
4.2.3, pages by a »dash syntax«, e. g. 2-1, as figures and tables are, e. g. Figure 5-4.
R9830350 Octopus User Guide (2001-08) 1-2
Page 8
1.2 Styles And Symbols
The typographic styles and the symbols used in this document have the following meaning:
Helvetica bold
Labels, menus and buttons are printed in the Helvetica bold font.
Condensed
Links to both other chapters of this manual and to sites in the Internet are printed condensed. In the on-line
version of this manual all hyperlinks appear
teal.
Courier
Names of files and parts from programs are printed in the Courier font.
Courier bold
Inputs you are supposed to do from the keyboard are printed in Courier bold font.
Within a piece of programming code this arrow marks a line, that must be
made up in two lines, though meant to be one line.
This arrow marks tips and notes.
This symbol denotes actions or information which need to be taken or
understood to make the software work properly.
R9830350 Octopus User Guide (2001-08) 1-3
Page 9

2 Summary
This chapter introduces the OCTOPUS software.
R9830350 Octopus User Guide (2001-08) 2-1
Page 10
2.1 The Software Octopus
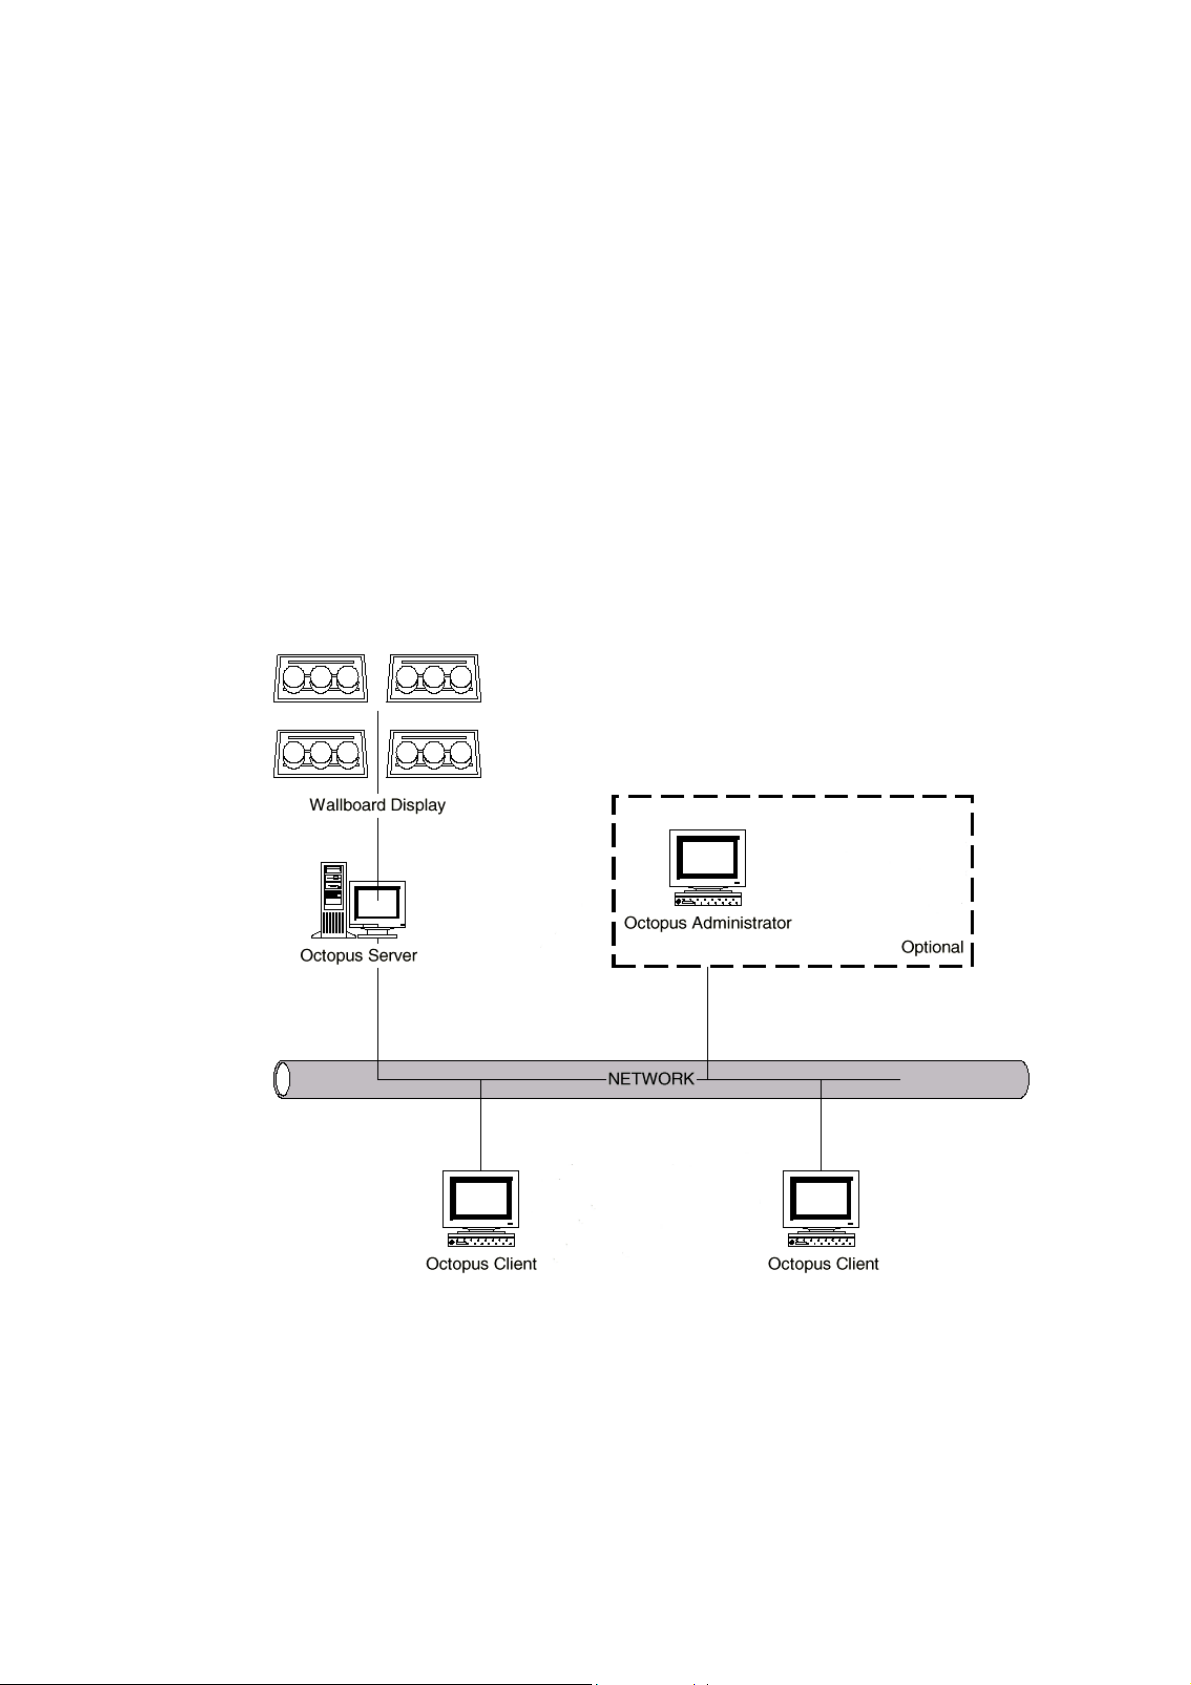
The O
CTOPUS software system is separated into three distinct software modules, each of which has
specific installation and operation requirements, these modules are:
O
CTOPUS CLIENT is software that is installed on the operators workstation. This software package is the
user interface to the system, allowing operators to move between manipulating their local desktop and
that of the remote wallboard.
O
CTOPUS SERVER is a software service/application that is installed on the wallboard display system. This
software accepts network connections from both the O
CTOPUS CLIENT and the OCTOPUS ADMINISTRATOR
client. It communicates mouse movements and keyboard input received from the OCTOPUS CLIENT to the
wallboard. The server also implements the prioritization requests sent to it via the O
CTOPUS
ADMINISTRATOR.
O
CTOPUS ADMINISTRATOR is optional software that implements prioritization of access to the wallboard.
Windows NT is an inherently single user system, and thus if there are several operators which require
access to the wallboard display, this can only be accomplished in a serial fashion. The O
CTOPUS
ADMINISTRATOR software permits an administrator to establish rules of access, allowing some users
access to the wall, and others not. In addition to access rights, it also implements override priorities,
where certain users can have privileged access to the wallboard. This software is typically installed on an
administrators workstation, and should only be accessible to administrative personnel.
Octopus simplified network view
R9830350 Octopus User Guide (2001-08) 2-2
Figure 1
Page 11

3 Getting Started
This chapter lists the installation requirements and introduces the installation modes.
R9830350 Octopus User Guide (2001-08) 3-1
Page 12

3.1 Octopus Software Installation
Before installing Octopus 2.1 Service Release, please de-install all earlier versions
of Octopus!
Use the Add/Remove Software Option from the Windows Control Panel to uninstall
Octopus!
3.1.1 Hardware Prerequisites
Pentium or Pentium II computer, 200MHz minimum recommended CPU
CDROM reader
32MB RAM minimum
2MB free disk space per module
Network card
3.1.2 Software Prerequisites
Windows NT 4.0 (SP3 or higher) or Windows
TCP/IP support
Administrator privileges
Installation of the O
CTOPUS software generally requires some decisions to take place prior to actual
installation. Here is a synopsis of the decisions to be taken:
3.1.2.1 Central Installation vs. Indivi d ual Installations
The binary software for each of the O
CTOPUS modules can be installed in a central location, on an
application server (this can be the wallboard processor), or installed on each client machine as needed.
We recommend installing the software in a central location to ease maintenance of the software as
upgrades and patches are made available. This will require that all computers that are going to use the
software have access to the directories that contain the installed software. In MS Windows operating
systems, this means that the installation directories must be shared with each user having sufficient
permission to read the directories.
If you plan to install the software on each computer individually (e.g.: in a small control room), then these
restrictions do not apply, although each machine must have it's own CDROM reader.
3.1.2.2 Administered Use vs. Non-a dministered Use
The O
CTOPUS software can operate in essentially two modes, one where all users have identical access
rights, and where each user has a defined priority level. When the software is installed, a default priority
is granted to all users which if left as it is will permit first-come-first-serve access to the wallboard. If this
is not a desired effect, then it is possible to assign each user, user and computer, or a global category a
priority level, which will determine access rights to the wallboard. On order to facilitate this process, it is
worthwhile to write down each of the users names, the machine names from which they will access the
wallboard, and the roles each will play in the operation of the wallboard system. The issues surrounding
this decision will be elaborated upon in a subsequent section of this manual.
R9830350 Octopus User Guide (2001-08) 3-2
Page 13
3.1.2.3 Network Topology
Although this manual is not meant to be general treatise on network setup, it should be noted that there
are some rules of thumb which make setting up a control room with O
CTOPUS software easier.
Specifically, the more homogeneous the organization of the control room computer facilities, the better.
Users, in general, should be in the same domain or workgroup. Duplicate user names across different
domains or workgroups should be avoided. O
CTOPUS privilege levels should parallel those of the
network, i.e. users with greater network authority should most likely have greater access authority to the
wallboard. User names should differ from group names and the name "All" should be avoided for both
computer and users, as it is used as the global name
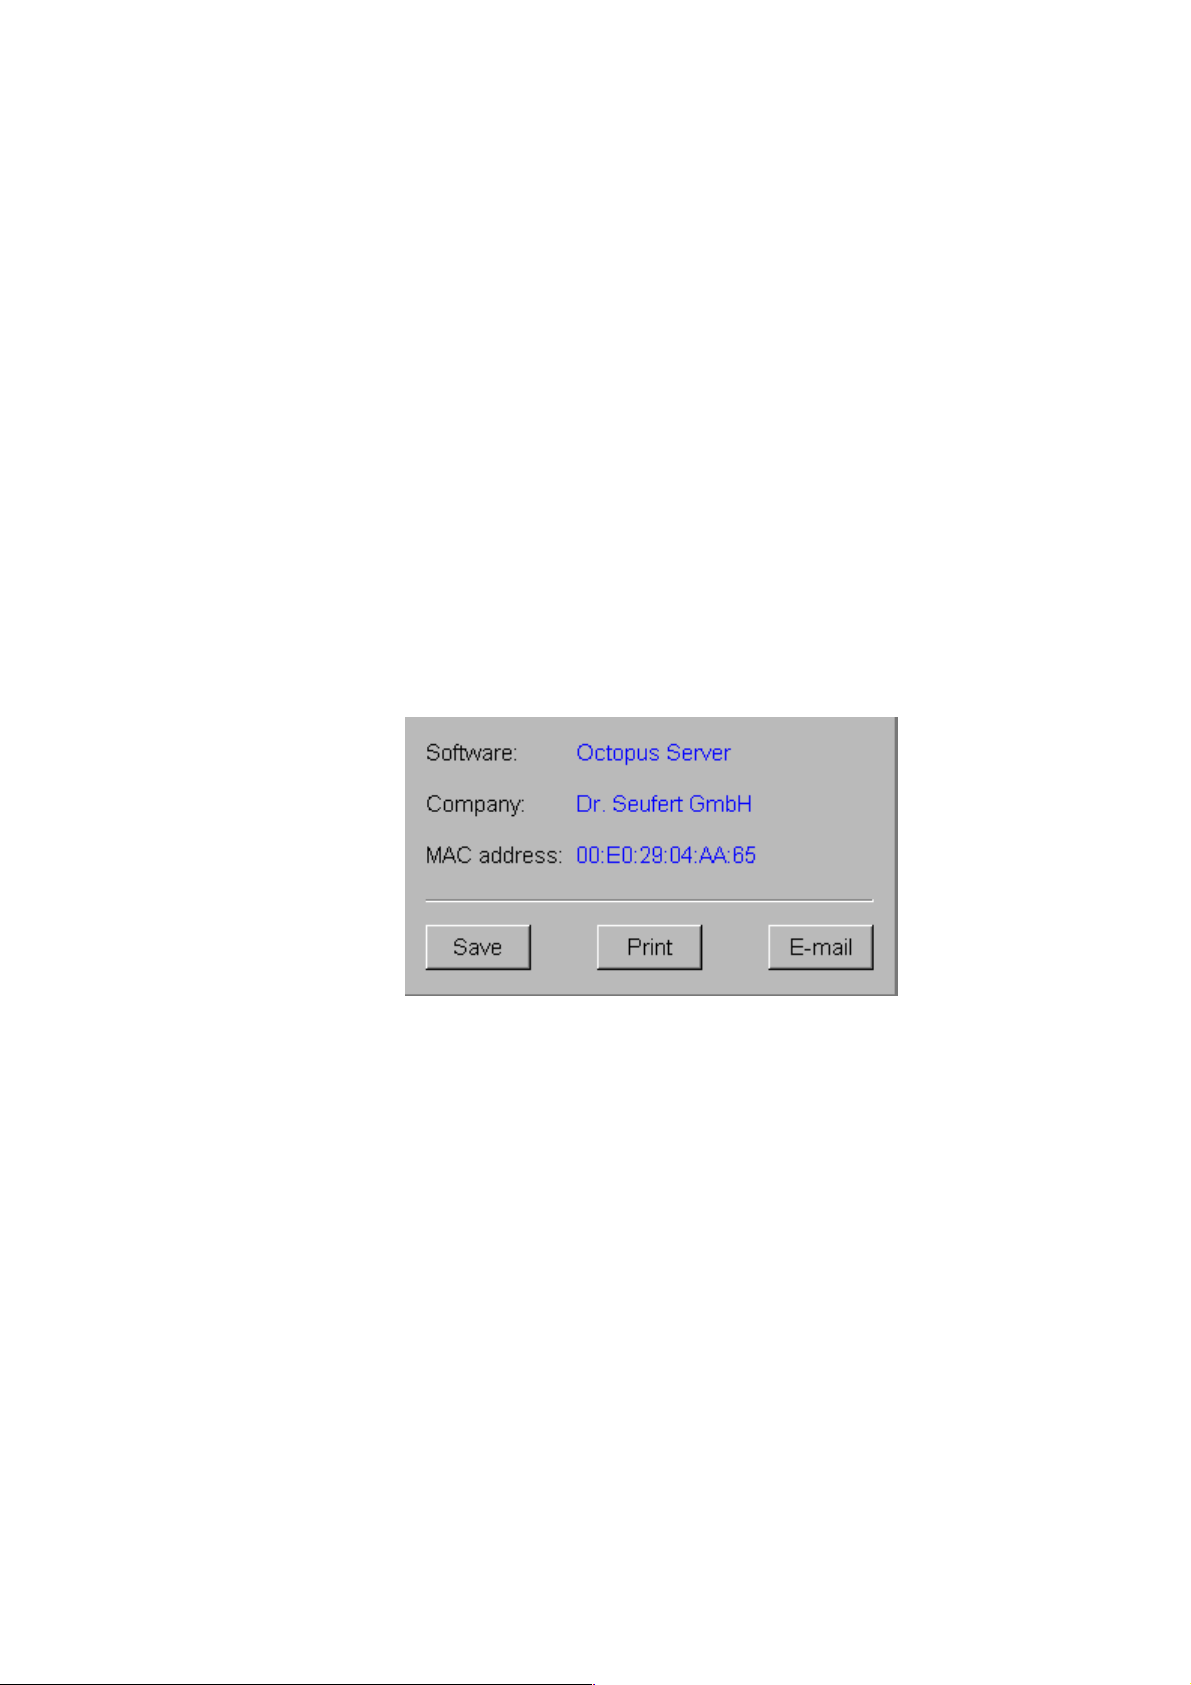
3.1.2.4 Gathering information before installation
The O
CTOPUS software is protected by license key mechanism. In order to get a license key from Barco
Control Rooms, one must provide certain information which identifies the computer. We require the
MAC address of the computer's network card along with the name of your company. During installation,
a dialog will be displayed containing all of this information, which can be printed, e-mailed or saved to
file for later use. Be aware that depending on the configuration of your e-mail client, some of the
information might be missing from the e-mail message body. In that case, go in the message body part
and paste the data there using <SHIFT-INS> or <CTRL-V> (the information is already in the clipboard).
This license key is only needed for the O
CTOPUS SERVER. Send this information to Barco Control Rooms
(support).
License information for Octopus Server
Figure 2
Once you have gathered this information and sent it, the license key can be delivered to you via e-mail,
fax, or over the telephone. Please see
R9830350 Octopus User Guide (2001-08) 3-3
6 Octopus server license, where all necessary addresses are listed.
Page 14
3.1.3 General Installation Guidelines
For the installation of the OCTOPUS software you'll need to log in as local administrator of your NT-PC.
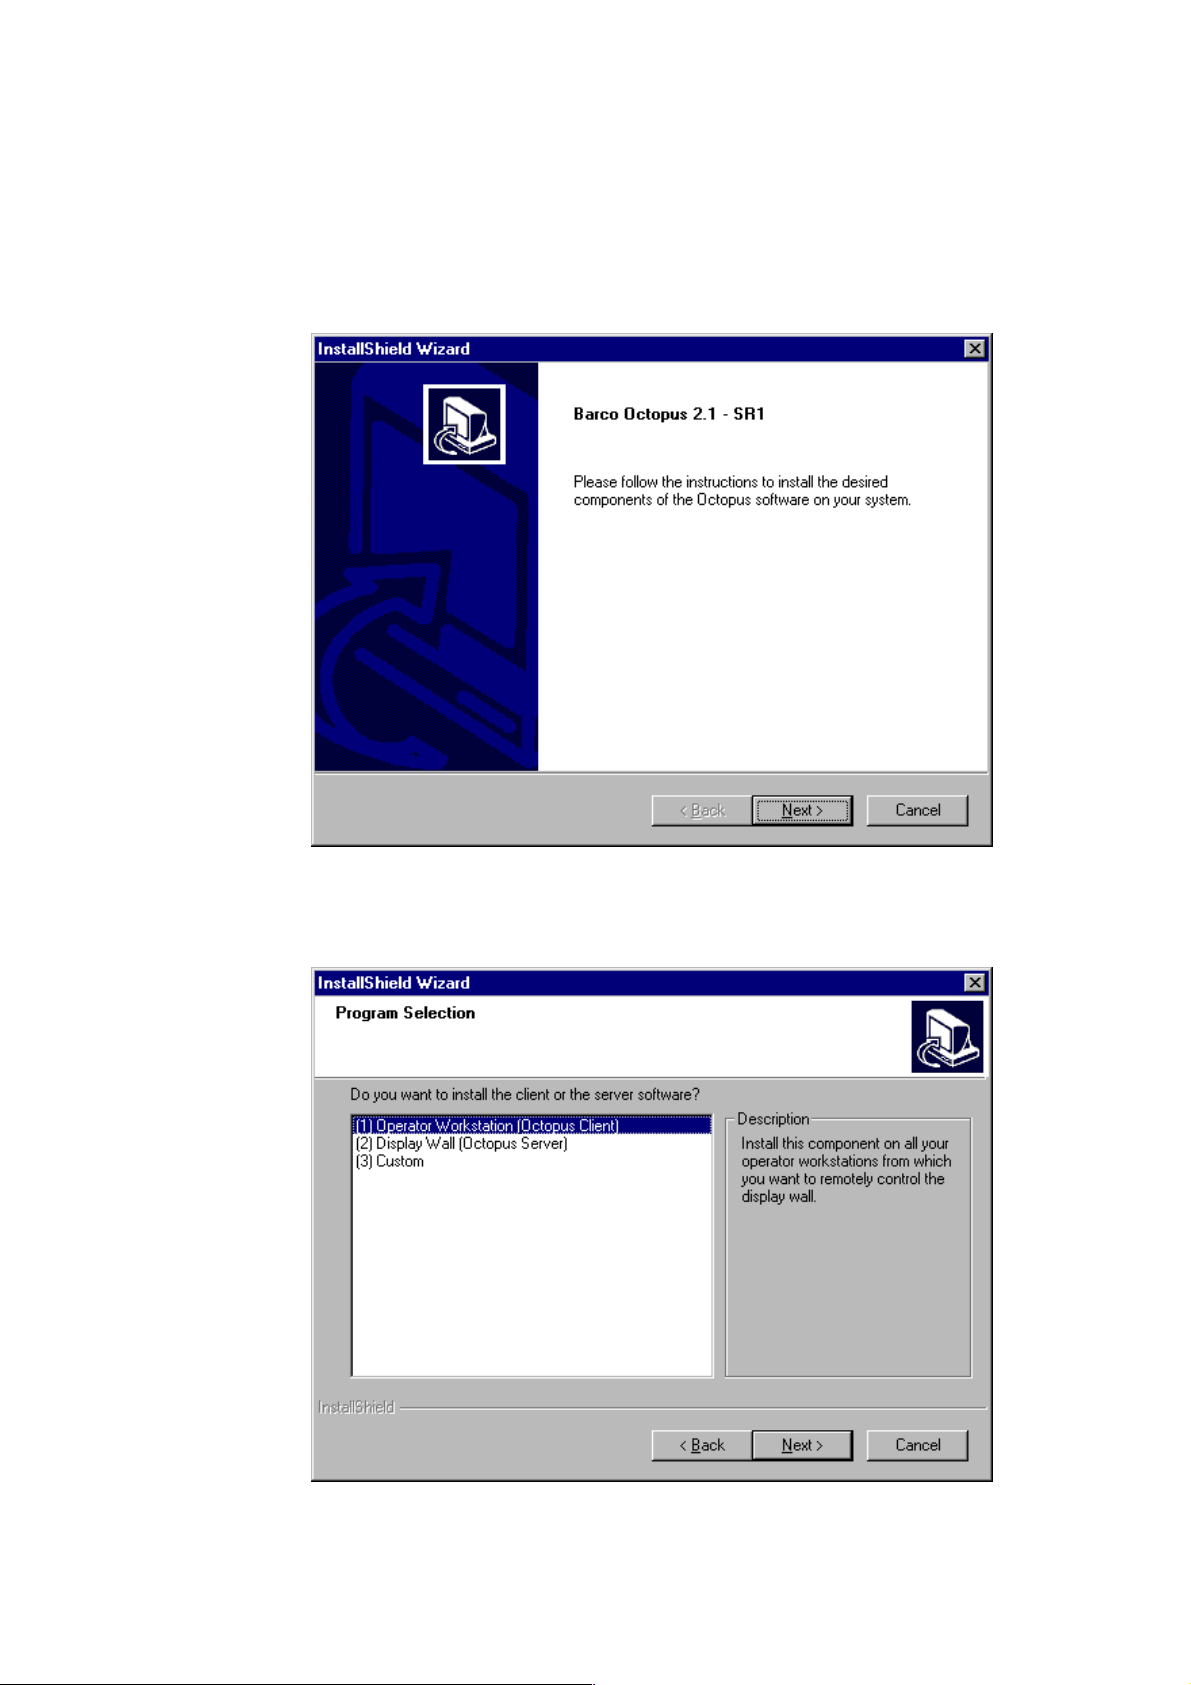
To start the installation, insert the O
CTOPUS CDROM in your computer's CDROM drive (if you are
sharing a CDROM over a network, insert the CDROM into the appropriate drive).
Click on
appropriate drive and path and
setup.exe in the Octopus folder on the CDROM or use the shortcut Start|Run and enter the
setup.exe. The following dialog pops up:
installation of Octopus
On the next dialog you are asked which software modules of Octopus you want to install:
Figure 3
Program selection
R9830350 Octopus User Guide (2001-08) 3-4
Figure 4
Page 15

Custom to install OCTOPUS CLIENT and OCTOPUS SERVER and/or OCTOPUS ADMINISTRATOR.
Select
Custom installation of Octopus
Figure 5
The installation of OCTOPUS software is follows the same steps for each of the modules (the OCTOPUS
SERVER has license key information, the other modules don't), here are the steps you will be asked to
perform during the installation:
License Agreement. Please read it carefully.
License Agreeement dialog
R9830350 Octopus User Guide (2001-08) 3-5
Figure 6
Page 16

User Information (only for O
CTOPUS SERVER).
User Information entry dialog
After accepting Barco's software license agreement, you will need to license the software by typing
in a license key provided by Barco Control Rooms. The license key is only required for the
O
CTOPUS SERVER. If you do not type in a license key, an evaluation license key will be generated by
the software. That key is good for 30 days, after which the O
CTOPUS SERVER will not execute
anymore.
License Key (only for O
CTOPUS SERVER).
Figure 7
License Key entry dialog
R9830350 Octopus User Guide (2001-08) 3-6
Figure 8
Page 17

If you don’t have a valid license key, an evaluation license key is generated which is
valid for 30 days.
If a new license key is required (either because of an invalid evaluation license key
or because the network card has been replaced), Octopus has to be completely
uninstalled and re-installed again with the new license key.
Choose Installation Directory
You can change the drive or directory where you are going to install the software. If you are
satisfied with the default location (<windrive>:\Program Files\Barco\module name>), then you can
ignore this.
Installation directory entry dialog
Figure 9
Finish Installation
If you're installing the O
When installed as a service, the O
CTOPUS SERVER, you can install it either as a service or as an application.
CTOPUS SERVER will be started automatically before any users can
logon and will have the same advantages and restrictions as any standard Windows NT service.
To make use of the remote login it is mandatory to install OCTOPUS SERVER as
service!
The decision whether to install OCTOPUS SERVER as service or application is final and cannot be
changed without a complete uninstallation and re-installation.
When installing O
R9830350 Octopus User Guide (2001-08) 3-7
CTOPUS SERVER as an application, it can be put in your startup.
Page 18

During installation for every application shorcuts are generated. Use these shortcuts to start the
required application.
shortcuts generated during installatin
3.1.4 Octopus Server Installation Co nsiderations
The OCTOPUS SERVER software is to be installed on the computer that will be controlled by operators in a
control room. This is typically the wallboard display controller, although it can be any Windows NT 4.0 /
Windows 2000 system (please see hardware/software requirements). You have the option of installing the
O
CTOPUS SERVER as a service. This will allow a user to login using a remote workstation running the
O
CTOPUS CLIENT. During the installation of a Barco wallboard display, this software will be installed by
Barco personnel. Follow the general instructions above.
3.1.5 Client Installation Considerations
The client software can be installed two versions of Microsoft Windows: Windows 2000 and
Windows NT.
3.1.6 Administration Client Installat ion Considerations
The Administration client application can be installed on Windows NT and Windows 2000 computers.
Additionally the application should be installed on the computer from which a supervisor can have
control over access to the wallboard, within visual range of the wallboard itself. If your control room does
not require any level of prioritization of user access to the wallboard, then it is safe to not install this
application.
Figure 10
R9830350 Octopus User Guide (2001-08) 3-8
Page 19

4 Operating
This chapter explains startup, shutdown and operation of the OCTOPUS Software
R9830350 Octopus User Guide (2001-08) 4-1
Page 20

4.1 Octopus Server
The O
CTOPUS SERVER is the central application in the OCTOPUS remote control software. This software,
installed on a wallboard display server, will communicate with O
CTOPUS CLIENT and Administrator
applications. In its communications, it will translate messages sent to it from the client into mouse
movements and keyboard events on the wallboard display server. All events that can be input into a local
computer will be sent to the wallboard display. This effectively allows computer users sitting at his/her
workstation to control a wallboard display, using the keyboard and mouse on the desk in front of him.
4.1.1 Application startup
The OCTOPUS SERVER application can be placed in the startup folder of the computer on which it is
installed. Being in the
startup folder makes the application execute automatically after somebody logs on
to the machine.
You can tell if the O
where you will see the O
is possible to select the application from the
CTOPUS SERVER application or service is running by looking at the system tray,
CTOPUS icon. If the application has not been placed in the startup folder, then it
Start menu.
startup of Octopus Server from Start menu
R9830350 Octopus User Guide (2001-08) 4-2
Figure 11
Page 21

4.1.2 Application use
There is no graphical interface available with the OCTOPUS SERVER, although you can click the right hand
mouse button over the icon and select one of two menu items:
Close item is not there for the OCTOPUS SERVER service).
Selecting
About will bring up a dialog window that lists general information about the application,
Close and About Octopus Server (the
including the version number, and contacts for support.
Selecting the
Close button quits the application.
the Octopus Server icon in the tooltray
4.2 Octopus Client
CTOPUS CLIENT is the main user interface to the OCTOPUS system. The client interface enables a
The O
user to control a multiple wallboard displays with his/her own keyboard and mouse, via the network. In
addition to this, the client has a number of features that make control of a remote display an intuitive and
easy task.
4.2.1 Application startup
Much like the other applications in the OCTOPUS suite, the client application is generally started from the
Windows
Start menu.
The application starts as a toolbar window on the top of the display. There will be a pixel size window
over the top of the display, moving your mouse into this window will make the full toolbar appear.
Moving the mouse out of the window will cause the window to shrink back to one pixel in size.
client main interface window
button
description
Quit application
Figure 12
Figure 13
Options menu
Activate button
Message area
Cancel connection
R9830350 Octopus User Guide (2001-08) 4-3
Page 22

4.2.2 Application use
The OCTOPUS CLIENT operates in essentially four modes: not connected, inactive, queued, and active. A
non-connected client is not capable of controlling a remote wallboard display, as it is not in
communication with any O
O
CTOPUS server, although it is not actively sending mouse and keyboard information. A queued client is
one where activation has been requested, but there is already an
CTOPUS server. An inactive client is in communication with at least one
active client with a higher or equal
priority using the display. In the queued case, a message is displayed in the message area of the main
toolbar interface stating where in the wait queue the O
redirecting all keyboard and mouse activity to a single connected O
remotely controlling the wallboard display. An
CTOPUS CLIENT has been placed. An active client is
CTOPUS server, this has the effect of
active client can have other non-active connections to
other servers.
Status of the application is reflected in the message area. Messages include:
Status: Not connected
Status: Connected to <hostname> - Inactive
Status: Connected to <hostname> - Active
Status: Connected to <hostname> - #1 in queue
The OCTOPUS client, by default, starts as in an unconnected state. To control a wallboard display, it is
necessary to connect the client to the O
This is done via the
Configure Connections dialog that can be displayed from the Options menu in the
CTOPUS server that is running on the wallboard display computer.
main interface.
client options menu
R9830350 Octopus User Guide (2001-08) 4-4
Figure 14
Page 23

Configure Connections dialog allows the user to specify the computer(s) on the network that is the
The
wallboard display. In an environment where there are multiple computers to be accessed, it is possible to
connect to multiple servers simultaneously.
Configure Connections dialog
Figure 15
The Configure Connections dialog has several functional areas:
Server information area: this lists all of the servers that can be accessed by the OCTOPUS client. Each of
the computers is entered manually via the
Add Server button and the Add server dialog. The server
information area has five columns:
Server: the name of the computer that is running the OCTOPUS SERVER application.
Status: this indicates whether the client is in one of three states, with respect to the server: Not
connected
display by activating the client. Its default state is
then the activate button will pertain to that server. There can only be one
Startup: this item indicates whether the client should automatically connect to the server the next
time the client is executed. This automates the application startup process. Its default state is
Reconnect: this item indicates whether the client should try to reconnect to the server if the
connection is broken because of a network error. Its default state is
Fallback: this item indicates which server the client is going to switch to in case the connection with
, connected, selected. When connected, it is possible for the user to control the wallboard
Not connected. If the server is in selected state,
selected server.
OFF.
OFF.
the current selected server is broken by a network error. Only one server can be the fallback. By
default there is no fallback server.
Add Server and Del Server buttons: these buttons allow the addition or removal of OCTOPUS servers from
the server information area.
Server action buttons: these buttons are available only when the operation is permitted, otherwise they
are grayed-out.
Server action buttons action
Select to make the highlighted server the default for activation.
Connect/Disconnect to connect/disconnect the highlighted server.
Startup toggle whether this server is to be reconnected at application startup
Reconnect toggle whether the client will try to reconnect to the server if the connection is
broken by a network failure.
For Windows NT/2000 OCTOPUS SERVER only!
Fallback toggle whether the client will switch to the server if the current connection is
broken by a network failure.
For Windows NT/2000 OCTOPUS SERVER only!
R9830350 Octopus User Guide (2001-08) 4-5
Page 24

To connect to a server, it is first necessary to add that server to the
server information area. Click the Add
button to pop up Add server dialog that will allow you to add the server name to the list. No verification
of the computer name, its connection to the network, and whether it is running the O
CTOPUS SERVER is
done at this point. The server name is placed in the information area with default values.
Adding server dialog
Figure 16
Selecting the line in the server information area containing the server, you will be able to connect to it by
pressing the Connect button. While the connection is being made, a dialog will inform you to wait.
wait for connection dialog
Figure 17
If the computer is down, the server is not running on that computer, or there is some other network error,
then it is possible for the dialog to remain up for up to 30 seconds. This error will be noted in an error
dialog, and the computer will remain not connected: you will be required to remedy the error in order to
continue.
If the connection to the server is rejected, this is caused by having insufficient permissions. Either the
administrator has installed an access rule that disallows your username or access from the computer.
4.2.3 Activate
Once the client is connected to at least one server, it is then possible to activate the client, and take control
of a remote wallboard.
There are several methods to activate the O
Pressing the
If the
Activate button on the main toolbar interface. This will activate the Selected server.
Server buttons option is checked, then there will be a button labeled with each of the
CTOPUS client:
connected server in the main toolbar interface. Pressing any of these buttons has the effect of
activating that particular server.
If the
4.2.4 Operation while active
Administrator client is connected to the same server your OCTOPUS client is, it is then possible
for the operator of the
Administrator client to activate the client.
Once the client is active, the mouse image on the local display will no longer be visible. Any movement
of the local mouse will be translated into movement on the O
CTOPUS server computer display.
Analogously, any keyboard input will become keyboard input on the remote display.
4.2.5 Queued
It is possible to be placed in a waiting queue when active, this condition occurs when a user already has
access to the wallboard display and has a higher priority than you do.
R9830350 Octopus User Guide (2001-08) 4-6
Page 25

4.2.6 De-activating the client
To de-activate the client, and restore local control to the operator, it is necessary to perform one of the
following actions:
Use the
Deactivate toggle key combination (default: CTRL-F5).
Press the
The
Return from server button if available on the wallboard display.
Administrator client can de-activate the client from the Administrator client interface.
A user with a higher priority on the currently active server can de-activate your client by activating
his/her client interface.
4.2.7 Multiple server operation
As it was mentioned earlier in the manual, it is possible to connect the OCTOPUS client to multiple servers
simultaneously. It is possible to toggle, once in the active state, from one connected server to another via
a pair of toggle keys combinations,
Next server and Previous server. This allows the convenient and
quick access to more than one wallboard display in a facility.
In addition to this, if the
activate from a list of buttons on the main toolbar interface. This is only available when the O
Server buttons function is toggled on, then it is possible to select the server to
CTOPUS
client is in the inactive state.
Also, if the client workstation and the server have multiple network adapters, it's possible to connect all of
them at the same time; just use each adapter's IP address when connecting instead of the computer name.
This setup allows one of the adapter to be a
fallback if the main connection is broken because of a
network failure.
4.2.8 Octopus Client options
The OCTOPUS client has several operational options available to the user to customize the behavior of the
application.
Mouse sensitivity is configurable from the
Mouse sensitivity dialog.
Mouse Sensitivity dialog
Figure 18
In the least sensitive position, each movement of mouse translates into exactly the same amount of
movement on the wallboard. This is referred to pixel-for-pixel movement. In the most sensitive position,
each pixel of movement of the local mouse translates into several pixels of movement on the wallboard
display. This can be useful for very large displays, where movement of the mouse would be difficult
without the translation.
R9830350 Octopus User Guide (2001-08) 4-7
Page 26

All of the special key combinations are configurable from the
Special keys dialog.
Special keys dialog
Figure 19
Changing the default special keys is allowed to remove possible conflicts with running applications, or as
a simple user preference. It is not possible to assign more than one function to the same special key.
Log-In emulation is only available for a MS Windows NT/2000 OCTOPUS SERVER!
The
Options menu also has the following on/off menu items:
Toggle on/off options
Figure 20
Toggling the Auto hide Octopus bar menu item will turn on or off the automatic hiding of the main
toolbar interface when the local mouse is not in the window. A check mark denotes that the function is
on. The default state of this item is
Toggling the
Server buttons in Octopus bar menu item will turn on or off the creation of a named button
for each server to which the O
Toggling the
Locator window on client desktop menu item will turn on or off the creation of a mouse-
ON.
CTOPUS client is connected. The default state of this function is OFF.
tracking window on the local display when the client is active. The window shows a cross-hair cursor that
specifies the relative position of the mouse on the remote display. This can be used to determine where on
a large display the mouse is actually being displayed. The default state of this menu item is
Toggling the
Return button (MS Win) server desktop menu item will turn on or off the creation of a big
OFF.
button on the wallboard. Clicking on that button while you are controlling the wallboard using your local
mouse (O
as using the
O
CTOPUS SERVER!
CTOPUS CLIENT activated) will return control to your local workstation. This as the same effect
Deactivate toggle key (default CTRL-F5). This applies only for a MS Windows NT/2000
R9830350 Octopus User Guide (2001-08) 4-8
Page 27

4.2.9 Connecting To A Unix Server
OCTOPUS client can connect to an OCTOPUS server that runs on a Unix bases EOS wallboard processor
from Barco. EOS is capable of maintaining multiple simultaneous input streams and cursor images on the
wallboard: this alleviates the need to have a queuing mechanism for O
CTOPUS clients. The OCTOPUS
client remote pointer image can also be configured so that it looks different from other users on the
wallboard. This allows multiple simultaneous users to differentiate from one another.
An additional option in the
Options menu will appear when connecting to a Unix OCTOPUS server. All
other menu items are always visible!
new Pointer option in menu
Figure 21
The Pointer on (Xwin) Server option is only available to configure the remote pointer when connected to a
Unix host. Selecting this option, you can choose the bitmap (from a list) for the remote pointer, its
background and foreground color. The color of the text reflects the current background and foreground
colors. To change them, push the
Change button. This will spawn the Windows Color dialog. You can
select any color you desire from there.
Remote pointer setup dialog
Figure 22
R9830350 Octopus User Guide (2001-08) 4-9
Page 28

4.2.10 Not redirectable keys
The following list of System Keys can't be redirected to the server:
ALT-TAB
CTRL-ALT-DEL
CTRL-WIN-E
WIN-BREAK
WIN-SHIFT-M
WIN-TAB
WIN-E
WIN-F
WIN-F1
WIN-M
WIN-R
WIN means the key between the CTRL and ALT key on Microsoft keyboards. For CTRL-ALT-DEL a toggle
key can be defined via the
Options menu.
4.3 Octopus Administrator
CTOPUS ADMINISTRATOR is used to define access rights for operators within a control room. This
The O
tool allows administrative personnel to have control over who has access to the wallboard display and
thus, the applications being displayed therein.
Access to the wallboard is determined by priority level. If a user with a certain priority is currently is
using the wallboard, only users with a higher priority can take control of the wallboard away.
Additionally, if a user does not fall into a list of allowed users, then that user's connection to the
wallboard will be rejected.
If a user does not have higher priority than the currently active user, then that user is placed in a wait
queue until the currently active user relinquishes control. The
Administrator client has complete control
over the access queue and access rights, and can override the status of the wallboard at any time.
The
Administrator client uses the native NT operating system networking tools to determine access
priorities. The NT domain names, the computer name, the user login name, and group association all tie
together to uniquely identify users within the control room. It is assumed that the network will be
administered, maintained and setup by professional computer personnel in a consistent manner.
R9830350 Octopus User Guide (2001-08) 4-10
Page 29

4.3.1 Application Startup
To start the OCTOPUS ADMINISTRATOR client, one need only to double click on the OCTOPUS
ADMINISTRATOR
icon, or start it from the start menu in a similar manner to the OCTOPUS SERVER (above).
Once the application has started, you will be presented with a simple graphical user interface which will
allow you to control access rights to a particular O
CTOPUS SERVER.
Octopus Administrator main interface
4.3.2 Connecting to an Octopus Server
To change the access rights to a particular OCTOPUS server, you must first connect the Administrator
client to it. This is done by selecting the Connect menu item from the Options menu. You will then be
presented with a dialog box where you are to type the network name (or IP address) of the computer that
is running the O
CTOPUS SERVER software.
connect to Server dialog
If you plan to connect to only one OCTOPUS SERVER (and hence, only one wallboard display), you can
toggle the
you will automatically connect to that server. When successfully connected to an O
Connect to selected server at startup check box. Next time you start the Administrator client,
CTOPUS server, the
name of that machine will be displayed in the title bar of the Administrator client window.
If the server is not running, the computer is down, or the network name you just typed does not exist, the
administrator client will seem to hang for a short period. This waiting period is due to the system looking
for that particular computer on the network and can last up to 30 seconds. After the connection is
established, a couple of options will now be enabled. One of them is
name implies, will kill the O
CTOPUS SERVER (both application and service).
Terminate Server which, like its
Figure 23
Figure 24
R9830350 Octopus User Guide (2001-08) 4-1
Page 30

4.3.3 Viewing access information
Once connected to an OCTOPUS SERVER, it possible to view the access rights defined for that server. This
can be done by selecting the
Server access... menu item from the Options menu on the main OCTOPUS
administrator window.
servers access menu item
Selecting this menu item will pop up a dialog box, which is where you can change the access
prioritization of the server.
Figure 25
server access dialog
Figure 26
The selection list on the left of the server access dialog lists each of the top-level NT domains available
on the network. Within each of those domains, a list of computers will be available, each by name. In a
Windows NT environment, a computer can only belong to one domain. Clicking the left mouse button
over the
R9830350 Octopus User Guide (2001-08) 4-2
+ control will expand that list of computers in the list.
Page 31

Listing all computers in BACOEUROPE domain
Figure 27
You may note that the Access list on right side of the dialog box lists all of the access rules that are in
effect on this particular server. In this case, it reads
ALL@ALL -> Users, which means all users on all
computers have the Users group priority. By default, the Users group has a priority of five. The priority
scale is from 1 to 9, the higher the number, the higher the priority.
Selecting a particular computer within the domain will list all users listed on that computer within that
domain.
list of all computer users on KARCLT4H
R9830350 Octopus User Guide (2001-08) 4-3
Figure 28
Page 32

Each of the happy face icons represent a user listed on this computer - domain combination
BARCOEUROPE\KARCLT4H). Selecting a particular user will list each of the NT groups which that user
(
is a member.
list of groups user ROK belongs
Figure 29
In this figure the user named ROK was selected, and it is shown that ROK belongs to Users groups. Note,
that to select all users on a particular machine, one can use the username
All. To determine what priority
level each of these groups are given, you can double click on the group name.
Figure 30
group priority box
You can change the priority level of this group by using the arrow toggles or by typing the desired
priority level into the entry area. Note that changing the priority for a group will change it for all users in
that same group listed in the access rules. Press the
OK button to accept the change in priority, or Cancel
to leave the dialog without saving the changes.
To place a new rule in the access list, select the group that will represent this particular user and machine
combination and then press the right pointing arrow in the center of the dialog box. This will place the
new rule in the rules list.
R9830350 Octopus User Guide (2001-08) 4-4
Page 33

4.3.4 Control Room Computer Organization
Network identification within a control room is key to determining the roles and responsibility of
operators. Under Windows NT, there are several pieces of information that can be used to identify an
operator. These identifying characteristics are:
User Name: Network name the person uses to log into the computer. This is not the login name used
for some applications.
Domain Name: The NT domain the user logs onto the network with.
Computer Name: The network name of the computer.
Group Name: Name of NT group or groups to which the user belongs.
All of these characteristics together give the supervisor the ability to uniquely identify each operator.
Using only a portion of those characteristics can create more general prioritization conditions.
Rules in the access list are parsed from left to right and from specific to general
matching criteria. First, the program attempts to find rules where the username is
specified directly, if this fails, it then looks for rules where the user name is "All". If
there are no matches to this point, then the connection is rejected. From the list of
rules that have matched thus far, the computer name is matched. If there is no
match with the computers the connection is rejected, otherwise the group name
and priority that is in the first match is used to identify this user connection.
A few examples of network setup should be useful to illuminate the possible applications of the
Administration client.
EXAMPLE: SUPERVISOR ACCESS ONLY
This is the example where there is a relatively static wallboard, which needs to be interacted with
infrequently, and then only by supervisory personnel. To accommodate this setup, one needs only to grant
access to the supervisor, and deny access to all others. The O
CTOPUS SERVER defaults to allow all people
access to the wall at identical priority, this default behavior needs to be changed to support the above
access profile.
To do this, you must first determine which user on your systems will act as supervisor for the control
room, with respect to the wallboard. For this exercise, this will be the user
KARCLT4H, who will be the only person with access to the OCTOPUS Server computer, KARCLT8M.
ROK on the computer
R9830350 Octopus User Guide (2001-08) 4-5
Page 34

First, one must connect to the computer KARCLT8M with the
menu, select the Connect menu item:
Administrator client. From the Options
connect to the Octopus server computer
Figure 31
Once the OK button is pressed, then the dialog will disappear, and the main Administrator window title
bar will reflect the connectivity status:
connected to the Octopus server computer
Figure 32
Once connected, it will be necessary to establish the connection rules, in this case only allowing ROK to
connect from
access
KARCLT4H. First you must bring up the Server access dialog by selecting the Server
menu item from the Options menu. The server access dialog will appear:
server access dialog
R9830350 Octopus User Guide (2001-08) 4-6
Figure 33
Page 35

In it's default state, the
Administrator allows ALL users on ALL machines access under the Users priority.
To enable restrictions, one must first remove the default open access rule from the access list. This is
done by selecting a that particular (
ALL@ALL --> Users) line in the Access list and then subsequently
pressing the left pointing arrow button in the center of the dialog. The access rule will be removed from
the list.
It is now time to add the one user,
access level is not important in this case, as
ROK, who uses the computer named KARCLT4H, into the list. The
ROK will be the only user to be granted access to the
wallboard.
First, select the domain where this user/computer resides. In our example it is in the
BARCOEUROPE
domain. Below the selected domain, all of the computers in that domain will be listed:
select KARCLT4H
KARCLT4H, once selected, will list all users able to log into that computer in that domain. In this
example, we will scroll down to
ROK
Figure 34
user ROK selected with Users priority
R9830350 Octopus User Guide (2001-08) 4-7
Figure 35
Page 36

Expanding the user
Selecting a particular group and then clicking the
ROK@KARCLT4H --> Users in the access list.
Pressing the
ROK will list all of the NT groups to which the user ROK belongs on this domain.
--> arrow in the center of the dialog will place
OK button on the dialog will save those changes, pressing Cancel will leave the access list as
it was prior to making the changes.
If you are interested in giving a particular user access from whatever computer he/she is logged into (as
opposed to a single computer
KARCLT4H, as in the example above). One can select the item ALL from the
list of computers in a domain, and continue as before.
Conversely, if you are interested in giving a particular computer access rights, regardless of who is logged
into the computer, you could add a rule such as
ALL@KARCLT4H --> Users. This will allow all users on
that particular computer access to the wallboard display with Users priority level.
access rule to allow ROK to access server from ALL computers
Figure 36
4.3.4.1 User Access Management fr om Administrator Interface
The O
CTOPUS administrator also allows the supervisor to control access to the OCTOPUS server in real
time. This is done via the main interface, which will list all individuals who are connected to the server,
who currently has active control, and where each user is in queue, if there are users waiting for access.
client KARCLT8L connected to KARCLT8M
Figure 37
The IP address you see next to the client is the IP address of the server it's connected to. This is necessary
in case a client with more than 1 network card connects to a server with more than 1 network card (each
network card has a different IP address). From this interface, a supervisor has complete control over who
R9830350 Octopus User Guide (2001-08) 4-8
Page 37

has access to the wallboard. After selecting a user from the list, the following operations can be
performed:
Activate: Pressing this button makes that user's OCTOPUS Client interface active, and thus that user
has control of the wallboard. If another user is currently active, then he/she is placed in the waiting
queue.
Deactivate: This will make a currently active user inactive. If there is someone in the waiting queue,
then that user is promoted to an active state. If there are no waiting users, then all users are inactive.
Disconnect: This completely disconnects a user from the server. That person's OCTOPUS Client
interface continues to be a process on the client computer, and the user can re-connect later.
R9830350 Octopus User Guide (2001-08) 4-9
Page 38

5 Hotline
Please feel free to contact us if you encounter any problems.
Barco Control Rooms GmbH
An der Rossweid 5 • D-76229 Karlsruhe • Germany
Phone (49) (721) 6201-0 • Fax (49) (721) 6201-298
E-mail
info.de.bcd@barco.com Web www.barcocontrolrooms.de
BARCO N.V. Projection Systems
Noordlaan 5 • B-8520 Kuurne • Belgium
Phone (32) (56) 36-8414 • Fax (32) (56) 36-8526
E-mail
sales.bcd@barco.com• Web www.barcocontrolrooms.com
R9830350 Octopus User Guide (2001-08) 5-10
Page 39

6 Octopus server lice nse
Fill out the required information:
Company
MAC address
Number of Users
There are three ways to get your License key:
Please fax this page to on of the following addresses:
European Support Center 0800-1700CET (32)(56)36-8639
North American Support Center 0800-
(1)(562)598-5380
1700PST
Please mail the information to the following address (mind the subject header, please!)
email address support.bcd@barco.com
subject header: Octopus Server License
Please call for your License key at the following numbers:
Europe and Asia (0800-1700CET) (32)(56)36-8441
North America (0800-1700PST) (1)(800)655-8766-28
R9830350 Octopus User Guide (2001-08) 6-1
Page 40

7 Octopus Server on MS Windows 2000 / X Window System
R9830350 Octopus User Guide (2001-08) 7-1
Page 41

7.1 Summary
The following table lists a the differences:
Feature (Octopus Server) MS Windows 2000/NT X Window System
Options|Configure Connections|Reconnect x -
Options|Configure Connections|Fallback x -
Options |Retun Button an Server Deskopt x -
Options| Special keys|Log In emulation x
Options|Pointer on (Xwin) Server - x
R9830350 Octopus User Guide (2001-08) 7-2
Page 42

8 Troubleshooting
R9830350 Octopus User Guide (2001-08) 8-1
Page 43

8.1 Logfiles
During operation of Octopus, log files are created to assist the support people in error tracking.
The log files are restricted in size and will be completely overwritten if the entries exceed 500kB.
If problems occur, please send the following log files to the support of Barco Control Rooms:
<ActiveSystemTEMPDirectory>\OctopusLog\OctopusServer.log
<ActiveSystemTEMPDirectory>\OctopusLog\OctopusClient.log
<ActiveSystemTEMPDirectory>\OctopusLog\OctopusAdministrator.log
8.2 Known Incompatibilities
On Windows NT/2000, when installing Octopus Server as service, the system DLL
winnt\System32\MSGina.dll will be replaced by BVSGina.dll.
Other application also use the
winnt\System32\MSGina.dll (e.g. Novell Client Software), and OCTOPUS
SERVER service can not run on such systems.
To avoid these problems, install Octopus Server as an application!
R9830350 Octopus User Guide (2001-08) 8-2
Page 44

9 Table of Figures
Figure 1 Octopus simplified network view.....................................................................................................2-2
Figure 2 License information for Octopus Server...........................................................................................3-3
Figure 3 installation of Octopus......................................................................................................................3-4
Figure 4 Program selection.............................................................................................................................3-4
Figure 5 Custom installation of Octopus ........................................................................................................3-5
Figure 6 License Agreeement dialog .............................................................................................................. 3-5
Figure 7 User Information entry dialog ..........................................................................................................3-6
Figure 8 License Key entry dialog..................................................................................................................3-6
Figure 9 Installation directory entry dialog.....................................................................................................3-7
Figure 10 shortcuts generated during installatin .............................................................................................3-8
Figure 11 startup of Octopus Server from Start menu....................................................................................4-2
Figure 12 starting the Octopus Server service ..................................................Error! Bookmark not defined.
Figure 13 the Octopus Server icon in the tooltray ..........................................................................................4-3
Figure 14 Octopus Administrator main interface............................................................................................4-1
Figure 15 connect to Server dialog .................................................................................................................4-1
Figure 16 servers access menu item................................................................................................................4-2
Figure 17 server access dialog........................................................................................................................4-2
Figure 18 Listing all computers in BACOEUROPE domain..........................................................................4-3
Figure 19 list of all computer users on KARCLT4H......................................................................................4-3
Figure 20 list of groups user ROK belongs.....................................................................................................4-4
Figure 21 group priority box...........................................................................................................................4-4
Figure 22 connect to the Octopus server computer.........................................................................................4-6
Figure 23 connected to the Octopus server computer.....................................................................................4-6
Figure 24 server access dialog........................................................................................................................4-6
Figure 25 select KARCLT4H.........................................................................................................................4-7
Figure 26 user ROK selected with Users priority...........................................................................................4-7
Figure 27 access rule to allow ROK to access server from ALL computers ..................................................4-8
Figure 28 client KARCLT8L connected to KARCLT8M .............................................................................. 4-8
Figure 29 client main interface window..........................................................................................................4-3
Figure 30 client options menu.........................................................................................................................4-4
Figure 31 Configure Connections dialog........................................................................................................4-5
Figure 32 Adding server dialog ......................................................................................................................4-6
Figure 33 wait for connection dialog..............................................................................................................4-6
Figure 34 Mouse Sensitivity dialog ................................................................................................................4-7
Figure 35 Special keys dialog.........................................................................................................................4-8
Figure 36 Toggle on/off options .....................................................................................................................4-8
Figure 37 new Pointer option in menu............................................................................................................4-9
Figure 38 Remote pointer setup dialog...........................................................................................................4-9
R9830350 Octopus User Guide (2001-08) 9-3
 Loading...