

Page 1

HOME CINEMA
BARCO CINE7
R9010040
R9010050
OWNERS MANUAL
26022003 R5976584/00
Page 2

Barco nv Home Cinema
Noordlaan 5, B-8520 Kuurne
Phone: +32 56.36.84.30
Fax: +32 56.36.88.62
E-mail: salesassistantht.bci@barco.com
Visit us at the web: www.homecinema.barco.com
Printed in Belgium
Page 3

Changes
Barco provides this manual “as is” without warranty of any kind, either expressed or im plied, including but not limited to the implied warranties or merchantability and fitness for a particular purpose. Barco may make improv ements and/or changes to the product(s) and/or the
program(s) desc ribed in this publication at any time without notice.
This publication could contain technical inaccuracies or typographical errors. Changes are periodically made to the information in this
publication; these changes are incorporated in new editions of this publication.
Copyright ©
All rights reserved. No part of this document may be copied, reproduced or translated. It shall not other
stored in a retrieval system without the prior written consent of BARCO.
wise be recorded, transmitted or
Trademarks
Brand and product names mentioned in this manual may be trademarks, registered tradem arks or copyrights of their respective holders.
All brand and product names me ntioned in this man ual serve as comments or examples and are not to be understood as advertising for
the products or their m anufactures.
Page 4

Page 5

Table of contents
TABLE OF CONTENTS
1. Safety Instructions.......... ................ ................ ................ ................ ................ ........ 5
1.1 Safety Instructions ...................................................................................................................... 5
2. AC Power ... ................ ................ ................ ................ ................ ................ .......... 9
2.1 AC Power Cord Connection ............................................................................................................ 9
2.2 AC Power Voltage....................................................................................................................... 9
2.3 Switching ON/OFF ...................................................................................................................... 9
3. Source Connections.......................... ......... ....... ............................................ .........11
3.1 Input Locations.........................................................................................................................11
3.2 Connecting a Composite Video source................................................................................................12
3.3 Connecting a S-Video source. .........................................................................................................13
3.4 Connecting a RGB Analog source with composite sync.............................................................................. 15
3.5 Connecting a RGB Analog source with Tri level composite sync .................................................................... 16
3.6 Connecting a Component source with composite sync............................................................................... 17
3.7 Connecting a Component source with Tri level composite sy nc .....................................................................18
3.8 RS232 Connection.....................................................................................................................19
3.9 Com munica tion Port for C om munication With Peripherals...........................................................................20
3.1012V Trigger output..................................................................................................................... 20
4. Getting Started......................................................................................................21
4.1 Batteries................................................................................................................................21
4.1.1 Battery installation............................................................................................................... 21
4.1.2 Battery replacement.............................................................................................................21
4.2 RCU & Local keypad...................................................................................................................22
4.3 Terminology overview..................................................................................................................23
4.4 Switching on the projector .............................................................................................................25
4.5 Using the RCU .........................................................................................................................26
4.6 Projector Address ......................................................................................................................27
4.6.1 Controlling the projector.........................................................................................................27
4.6.2 Displaying and Programming addresses .......................................................................................28
4.7 Controlling the projector ...............................................................................................................28
4.7.1 Input selection................................................................................................................... 28
4.7.2 Picture controls ..................................................................................................................28
5. Start up of theadjustment mode ................................................................................31
5.1 How to start up the adjustm ent mode .................................................................................................31
5.2 How to adjust an analog control.......................................................................................................32
6. Main Menu .... ................ ................ ................ ................ ................ ................ .......33
6.1 Main Menu Overview .................................................................................................................. 33
6.2 Image Control .......................................................................................................................... 33
6.2.1 Starting up the image controls ..................................................................................................34
6.2.2 Line Multiplier....................................................................................................................34
6.2.2.1 Changing the Multiplier setting ...........................................................................................34
6.2.2.2 Multiplier mode............................................................................................................ 35
6.2.2.3 MotionProcessing On/Off................................................................................................36
6.2.2.4 Video Equalizing ..........................................................................................................36
6.2.2.5 Noise Reduction .......................................................................................................... 37
6.2.2.6 Contrast Enhancement ...................................................................................................38
6.2.3 Color Adjust, Color temperature set up.........................................................................................38
6.2.4 Format Select....................................................................................................................39
6.2.4.1 Selecting a Format........................................................................................................39
6.2.4.2 Adding a name to a Format ..............................................................................................39
6.2.4.3 Storing the settings to a new Format..................................................................................... 40
6.3 IRIS Control ............................................................................................................................40
6.3.1 Starting up the IRIS Controls ................................................................................................... 41
6.3.2 IRIS Touch Up ................................................................................................................... 41
6.3.3 IRIS Auto Converge .............................................................................................................41
6.3.4 IRIS FullAlignment..............................................................................................................42
6.4 Sound Control..........................................................................................................................42
6.5 Function Keys ..........................................................................................................................43
6.6 Service Menus ......................................................................................................................... 43
7. Entering the service menus ......................................................................................45
7.1 The Adjustment menus ................................................................................................................ 45
7.2 Password Protection...................................................................................................................46
8. Random Access Adjustment Mode ..................................... .......................... ..............49
8.1 Introduction.............................................................................................................................49
8.2 Random Access Overview............................................................................................................. 50
8.3 Selecting Setup Pattern................................................................................................................ 51
8.4 Random Access mode selection menu ...............................................................................................52
R5976584 BARCO CINE7 26022003
1
Page 6

Table of contents
8.5 Picture Tuning..........................................................................................................................52
8.5.1 Starting up Picture Tuning ......................................................................................................53
8.5.2 Color Balance ................................................................................................................... 53
8.5.2.1 Selecting the Color Balance..............................................................................................53
8.5.2.2 Set a Fixed Color Balance................................................................................................54
8.5.2.3 Custom Color Balance, White Balance adjustment ..................................................................... 54
8.5.2.4 Custom Color Balance, Black Balance adjustment......................................................................55
8.5.3 Sync mode: Fast/Slow ..........................................................................................................55
8.5.4 Decoding......................................................................................................................... 55
8.5.5 Port 2 Video/S-Video (Optional) ................................................................................................56
8.5.6 Peaking .......................................................................................................................... 56
8.5.7 Line Multiplier Settings ..........................................................................................................57
8.5.7.1 Starting up Line Multiplier settings .......................................................................................57
8.5.7.2 Switching the multiplier ON/OFF.........................................................................................58
8.5.7.3 MotionProcessing On/Off................................................................................................58
8.5.7.4 OutputMode..............................................................................................................59
8.5.7.5 Video Equalizing ..........................................................................................................59
8.5.7.6 Noise Reduction .......................................................................................................... 60
8.5.7.7 Contrast Enhancement ...................................................................................................60
8.5.7.8 Split Screen On/Off.......................................................................................................61
8.5.7.9 Advanced Settings........................................................................................................61
8.5.7.9.1 Starting Up Advanced Settings ....................................................................................62
8.5.7.9.2 Time Base Correction .............................................................................................. 62
8.5.7.9.3 Luminance Delay ................................................................................................... 62
8.5.7.9.4 Vertical Sync Reference............................................................................................ 63
8.5.7.9.5 Clamp Gating .......................................................................................................63
8.5.7.10Limo Pro Options .........................................................................................................64
8.5.7.10.6Starting Up Limo Pro Options......................................................................................64
8.5.7.10.7Coring...............................................................................................................64
8.5.7.10.8LTI ..................................................................................................................65
8.5.7.10.9CTI..................................................................................................................66
8.6 Geom etry Adjustments ................................................................................................................68
8.7 Convergence Adjustment.............................................................................................................. 80
8.5.7.10.10Factory Presets ...................................................................................................67
8.6.1 StartingUp Geometry ...........................................................................................................68
8.6.2 HorizontalPhase Adjustment...................................................................................................68
8.6.3 Raster Shift Adjustment.........................................................................................................69
8.6.4 Left-Right (East-West) Adjustment .............................................................................................70
8.6.5 Top-Bottom (Nord-South) Adjustment ..........................................................................................73
8.6.6 Size Adjustment................................................................................................................. 76
8.6.7 Vertical Linearity Adjustment....................................................................................................78
8.6.8 Blanking Adjustments ........................................................................................................... 79
8.7.1 StartingUp Convergence .......................................................................................................80
8.7.2 Convergence Adjustment .......................................................................................................81
9. Service Mode..... ................ ................ ................ ................ ................ ................ ...83
9.1 Introduction.............................................................................................................................83
9.2 Service Mode Overview ...............................................................................................................84
9.3 Projector Setup........................................................................................................................ 84
9.3.1 Starting Up Projector Set-Up....................................................................................................85
9.3.2 Identification ..................................................................................................................... 85
9.3.3 Total RunTime ..................................................................................................................85
9.3.4 Change Password...............................................................................................................86
9.3.5 Change Language...............................................................................................................86
9.3.6 Change Projector Address ......................................................................................................87
9.3.7 Change Baudrate................................................................................................................ 87
9.3.8 Power Up Mode O per ating/Stand-By...........................................................................................88
9.3.9 Common Address ............................................................................................................... 88
9.3.10Barco Logo ...................................................................................................................... 89
9.4 Memory Management..................................................................................................................90
9.4.1 StartingUp Memory Management.............................................................................................. 91
9.4.2 Copy a Block .................................................................................................................... 91
9.4.3 Delete a Block ...................................................................................................................91
9.4.4 Delete All Blocks ................................................................................................................92
9.4.5 All Settings to Midposition.......................................................................................................92
9.4.6 R & B Convergence to Midpos ition .. ...........................................................................................93
9.4.7 Green Convergence to Midpos ition............................................................................................. 94
9.5 Common Settings......................................................................................................................95
9.5.1 Starting Up Common Settings ..................................................................................................95
9.5.2 G2 Adjustment...................................................................................................................95
9.5.3 CRT Run In Cycle ............................................................................................................... 95
9.5.4 Projector Warm Up..............................................................................................................96
9.5.5 Memory Banks...................................................................................................................96
9.6 I2C Diagnostics ........................................................................................................................97
2
R5976584 BARCO CINE 7 26022003
Page 7

Table of contents
10.Programmable Function Keys .... ........................... ....... ........... ....... ........... ................99
10.1Programming a Function Keys........................................................................................................99
10.2Different function which can be programmed........................................................................................ 100
11.Messages,Warningsand Failures . ................ ................ ................ ................ ........... 101
11.1Messages.............................................................................................................................101
11.2Warnings ..............................................................................................................................101
11.3Failures ...............................................................................................................................102
A. Source Numbers 81 — 86and 91 — 96.. ................ ................ ................ ................ ..... 103
A.1 Projector without any 800 peripheral connected.....................................................................................103
A.2 Projector with a 800 peripheral connected ...........................................................................................103
A.2.1 Source numbers 91 — 96......................................................................................................103
A.2.2 Source numbers 81 — 86......................................................................................................104
Glossary ...... ................ ................ ................ ................ ................ ................ ......... 105
Index....... ................ ................ ................ ................ ................ ................ ............. 107
R5976584 BARCO CINE7 26022003 3
Page 8

Table of contents
4 R5976584 BARCO CINE 7 26022003
Page 9
1. Safety Instructions
1. SAFETY INSTRUCTIONS
Overview
• Safety Instructions
1.1 Safety Instructions
Notice on Safety
This equipment is built in accordance with the requirements of the internationalsafetystandardsEN60950,UL1950 and CSA C22.2
No.950, which are the safety standards of information technology equipment including electri
standards impose important requirements on the use of safety c ritical components, materials and isolation, in or der to protect the
user or ope rator against risk of electric shock and energy hazard, and having access to live parts. Safety standards also impose
limits to the internal and external temperature rises, radiation levels, mechanical st
protection against the risk of fire. Simulated s ingle fault co ndition testing ens ures the safety of the equipment to the user even when
the equipment’s nor mal operation fails.
ability and strength, enclosure construction and
Installation Instructions
Before operating this equipment please read this manual thoroughly, and retain it for future reference. Installation and preliminary
adjustments should be performed by qualified BARCO personnel or by authorized BARCO service dealers.
Owner’s Record
The part number and serial number are located at the back side of the projector. Record these numbers in the spaces provided
below. Refer to them whenever you call upon your BARCO dealer regarding this pr oduct.
cal business equipment. Thesesafety
Part Number:
Ser. Number:
Dealer:
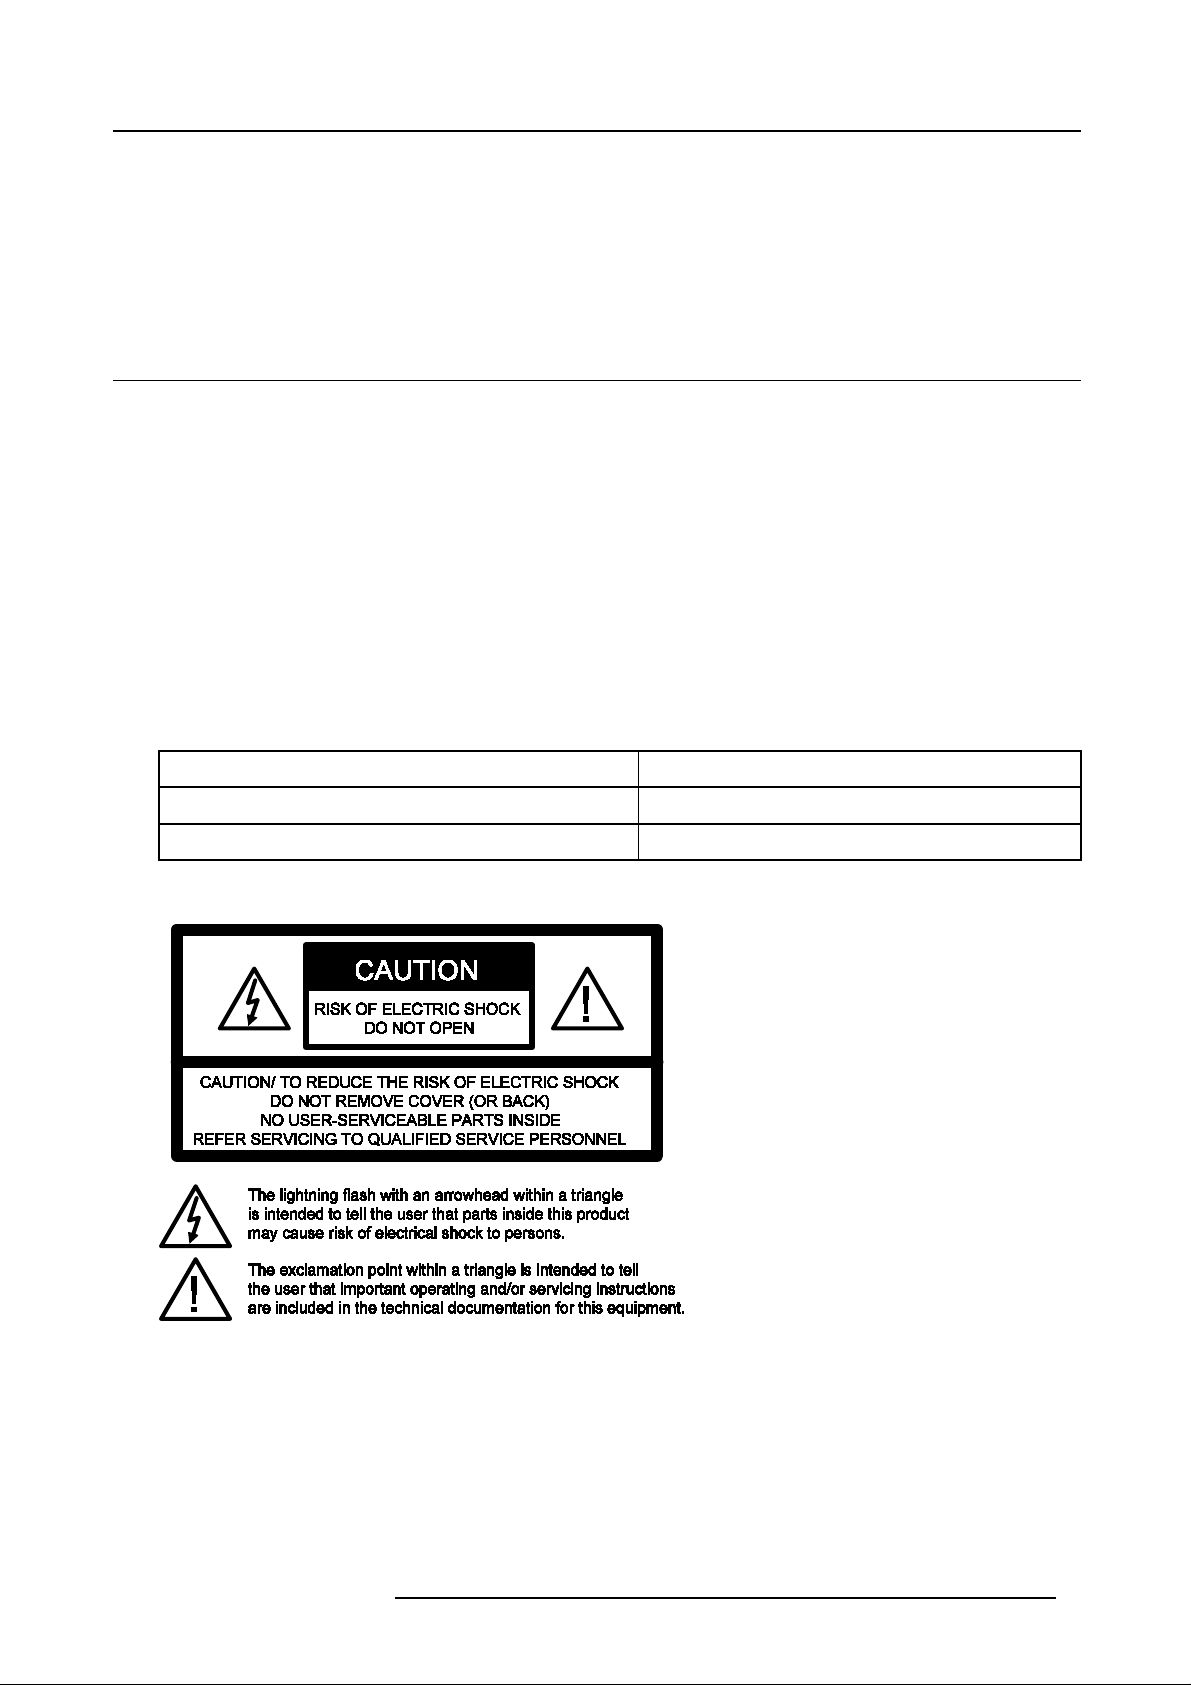
Safety Indication on the Product
Image 1-1
Safety Indication
Safety Warning
TO PREVENT FIRE OR ELECTRICAL SHOCK HAZARD , DO NOT EXPOSE THIS EQUIPMENT TO RAIN OR M OISTURE !
Federal Communication Commission (FCC Statement)
This equipment has been tested and found to comply with the limits of a class A digital device, pursuant to Part 15 of the FCC
Rules. The se limits are designed to provide reasonable protection against harmful interference when the equipment is operated in
a commercial environment. This equipment generates, uses and can radiate radio frequency energy and, if not installed and used
in accordance with the instruction manual, may cause h armful interference to radio c omm unications. Operation of this equipment
R5976584 BARCO CINE7 26022003
5
Page 10
1. Safety Instructions
in a residential area is likely to cause harmful interference in which case the user w ill be required to correct the interference at his
own expense.
The use of shielded cables is required to comply within the limits of Part 15 of FCC rules and EN55022.
• All the safety and operating instructions should be read before using this unit.
• The safety and operating instructions manual should be retained for future reference.
• All warnings on the equipment and in the documentation manuals should be adhered to.
• All instructions for operating and use of this equipment must be followed precisely.
On Safety
• This product should be operated from an AC power source. Power input is autoranging from 90 V to 230V.
• All equipment in the system is equipped with a 3-wire grounding plug, a plug having a third (grounding) pin. T h
fit into a grounding-type power outlet. T his is a safety feature. If y ou are unable to insert the plug into the outlet, contact your
electrician to replace your obsolete outlet. Do not defeat the purpose of the gr ounding-type plug.
• Do not allow anything to rest on the power cord. Do not locate this product where persons will walk on the cord. Todisconnect
the cord, pull it out by the p lug. Never pull the cord itself.
• If an extension c ord is used with this product, make sure that the total of the ampere ratings on the products plugged into the
extension cord does not exceed the extension cord ampere rating.
• Never push objects of any kind into this product through cabinet slots as they may touch dangerous voltage points or short out
parts that could result in a risk of fire or electrical shock.
• Never spill liquid of any kind on the product. Should any liquid or solid object fall into the ca binet, unplug the set and have it
checked by qualified service personnel before resuming operations.
• Lightning - For added protection for this video product during a lightning storm, or when it is left unattended and unused for
long periods of time, unplug it from the wall outlet. This will prevent damage to the projector due to lightning a nd AC power-line
surges.
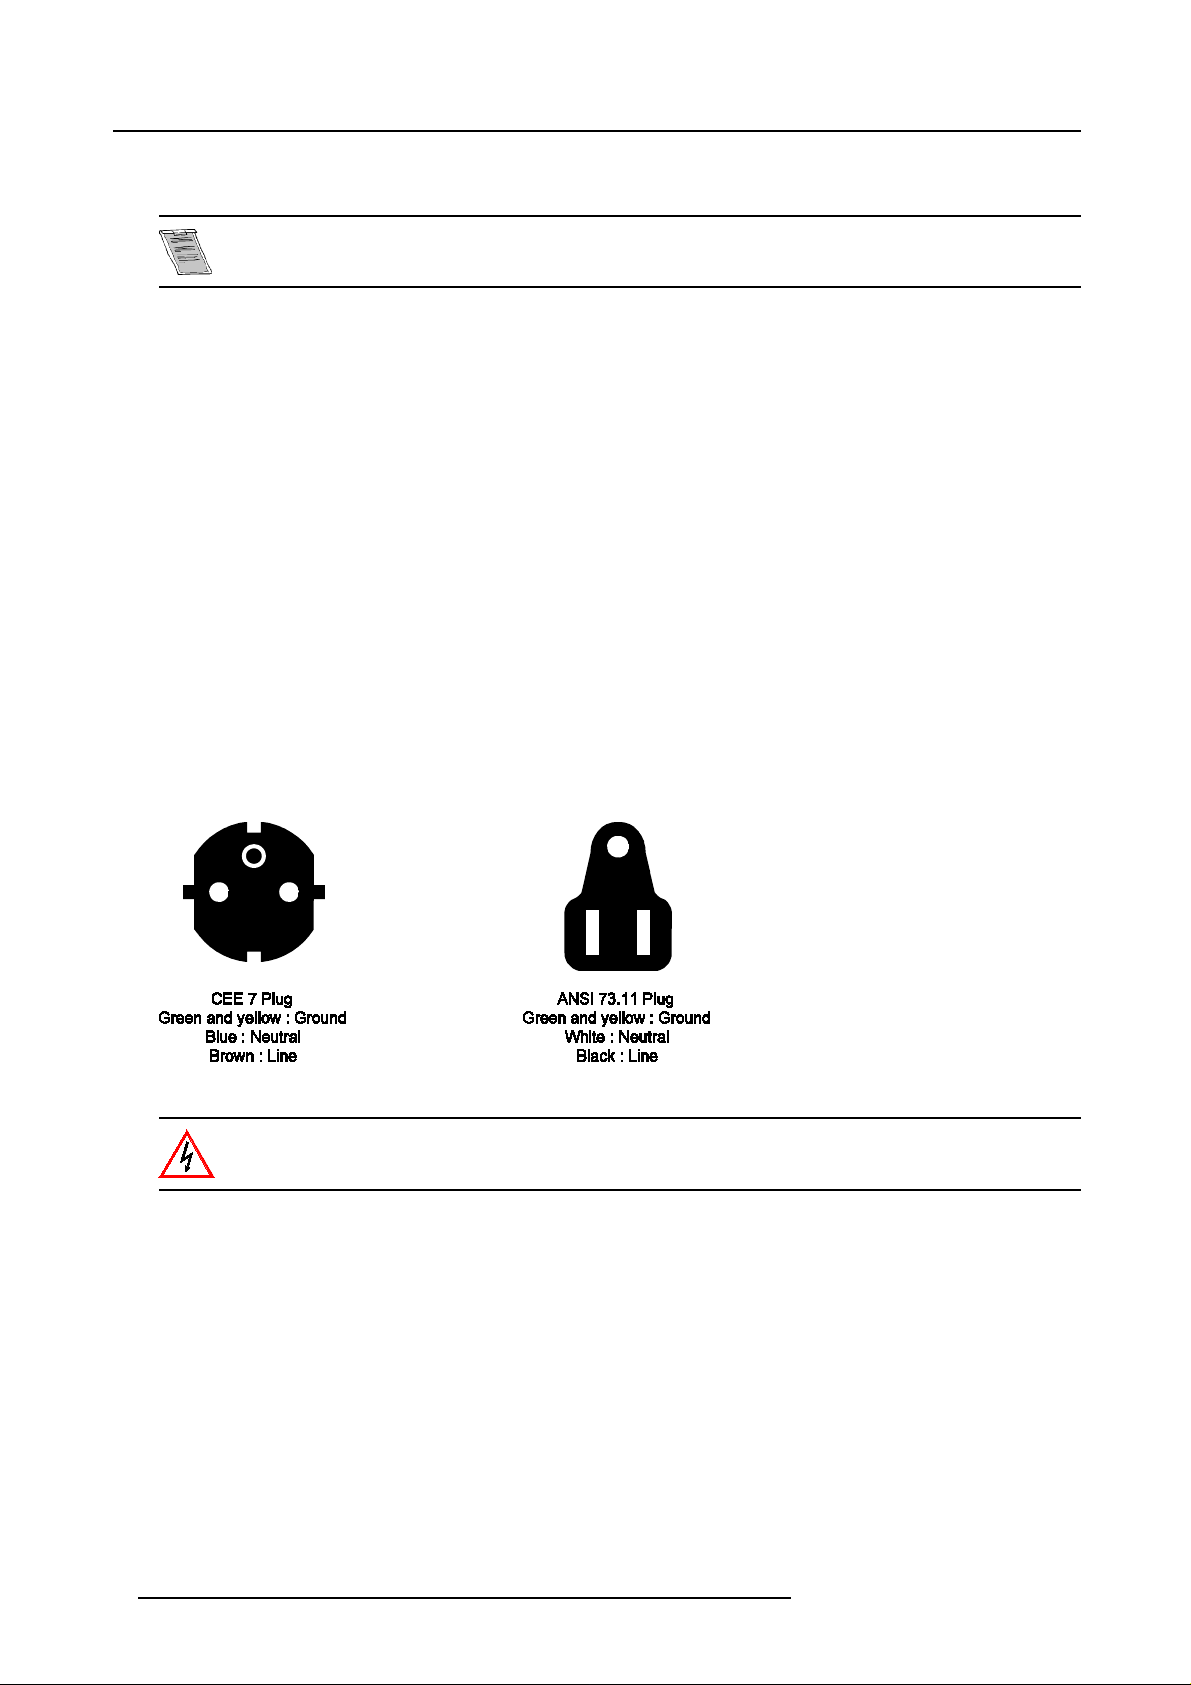
• The wires of the main lead are colored in accordance with the following code.
is plug will only
Image 1-2
Power cord plugs
This apparatus must be grounded (earthed) via the s
power cable is not the correct one, consult your dealer.
upplied 3 conductor AC power cable. If the supplied
Caution on Fire Hazard
DO NOT PLACE FLAMMABLE OR COM BUS TIBLE MATERIALS NEAR THE PROJ ECTOR !
BARCO large screen projection products are designed and manufactured to meet the most stringent safety regulations. This pro-
jector radiates heat on its external surfaces and from ventilation ducts during normal operation, which is both normal and safe.
Exposing flammable or combustible materials to the close proximity of this projector could result in the spontaneous ignition of that
material, resulting ina fire. For this reason, it is absolutely necessary to leave an "exclusion zone" around all external surfaces ofthe
projectorwherebynoflammableorcombustiblematerials are present. The exclusion zone must be not less that 10 cm (4") forBarco
Retro Projectors. Do not cover the pr ojector with any material while the projector is in operation. Keep flammable and combustible
materials aw ay from the projector at all times . Mount the projector is a well ventilated area away from sources of ignition and out
of direct sun light. Never expose the projector to rain or excessive moisture. In the event of fire, use sand, CO
extinguishers; never use water on an electrical fire. Always hav e service performed on this projector by authorized BARCO service
personnel. Always insist on genuine BARCO replacement parts. Never use non-BARCO replacement parts as they may degrade
the safety of this projector.
6
R5976584 BARCO CINE 7 26022003
, or dry powder fire
2
Page 11

1. Safety Instructions
On Installation
• Do not place this equipment on an unstable cart, stand, or table. The product may fall, causing serious damage to it.
• Do not use this equipment near water.
• Slots and openings in the cabinet and the back or bottom are provided for ventilation;toens ure reliable operation of the product
and to protect it from overheating, these openings must not be blocked or covered. The openings should never be blocked by
placing the product on a bed, sofa, rug, or other similar surface. This product should never be placed near or over a radiator or
heat register. The projector should not be placed in a built-in installation or enclosure unless proper ventilation is provided.
• Do not block the projector cooling fans or free air mov ement under and around the projector. Loose papers or other objects
may not be nearer to the projector than 4" on any side.
On Servicing
Do not attempt to service this product yourself, as opening or removing covers may expose you to dangerous voltage potentials and
risk of electric s hock!
Refer all servicing to qualified service personnel.
Unplug this product from the wall outlet and refer servicing to qualified service personnel under the following conditions:
• When the powe r cord or plug is damaged or frayed.
• If liquid has been spilled into the equipment.
• If the product has been exposed to rain or water.
• If the product does n ot operate normally when the operating instructions are followed. Adjust only those controls that are
covered by the operating instructions since improper adjus tment of the other controls may result in damage and will often
require extensive work by a qualified technician to restore the product to normal operation.
• If the product has been droppe d or the cabinet has been damaged.
• If the product exhibits a distinct change in performance, indicating a need for service.
• Replacement par ts: W hen replacement parts are required, be sure the service technician has used original B ARC O replacement parts or authorized replacement parts which have the same characteristics as t
substitutions may result in degraded performance and reliability, fire, electric shock or other hazards. Unauthorized substitutions may void warranty.
• Safety check: Upon completion of any service or repairs to this projector, ask the service technician to perform safety checks
to determine that the product is in proper operating condition.
he BARCO original part. Unauthorized
On Cleaning
Unplug this product from the wall outlet before c leaning. Do not use liquid cleaners or aerosol cleaners. Use a damp cloth for
cleaning. To keep the cabinet looking brand-new, periodically clean it with a soft cloth. Stubborn stains may be removed with a cloth
lightly dampened with mild detergent solution. Never use strong solvents, such as thinner or benzine, or abrasive cleaners, since
these will damage the cabinet. Toens ure the highest optical performance and resolution, the projection lenses are s pecially treated
with an anti-reflective coating, therefore, avoid touching the lens. To remove dust on the lens, use a soft dry cloth. Do not use a
damp cloth, detergent solution, or thinner.
On Repacking
Save the original shipping carton and packing material; they will come in handy if you ever hav e to ship your equipment. For maximum pr otection, repack your s et as it was originally packed at the factory.
On Illumination
In order to obtainthebestq uality for the projected image, it is essential thattheambientlightwhichisallowed to fall on the screen be
kept toan absolute minimum. When installing theprojectorand screen, care must betakento avoid exposure toam bient light directly
on the screen. Avoid adverse illumination on the scre
ambient lighting, such as incandescent spot light o r a dimmer, is recommended for proper room illumination. Where possible, ca re
should also be taken to ensure that the floors and walls of th e room in which the projector is to be installed are non-reflecting, dark
surfaces. Brighter surfaces will tend to reflect
the screen.
and diffuse the ambient light and hence reduce the contrast of the projected image on
en from direct sunlight or fluorescent lighting fixtures. The use of controlled
R5976584 BARCO CINE7 26022003
7
Page 12

1. Safety Instructions
8 R5976584 BARCO CINE 7 26022003
Page 13
2. AC POWER
Overview
• AC Power Cord Connection
• AC Power Voltage
• Switching ON/OFF
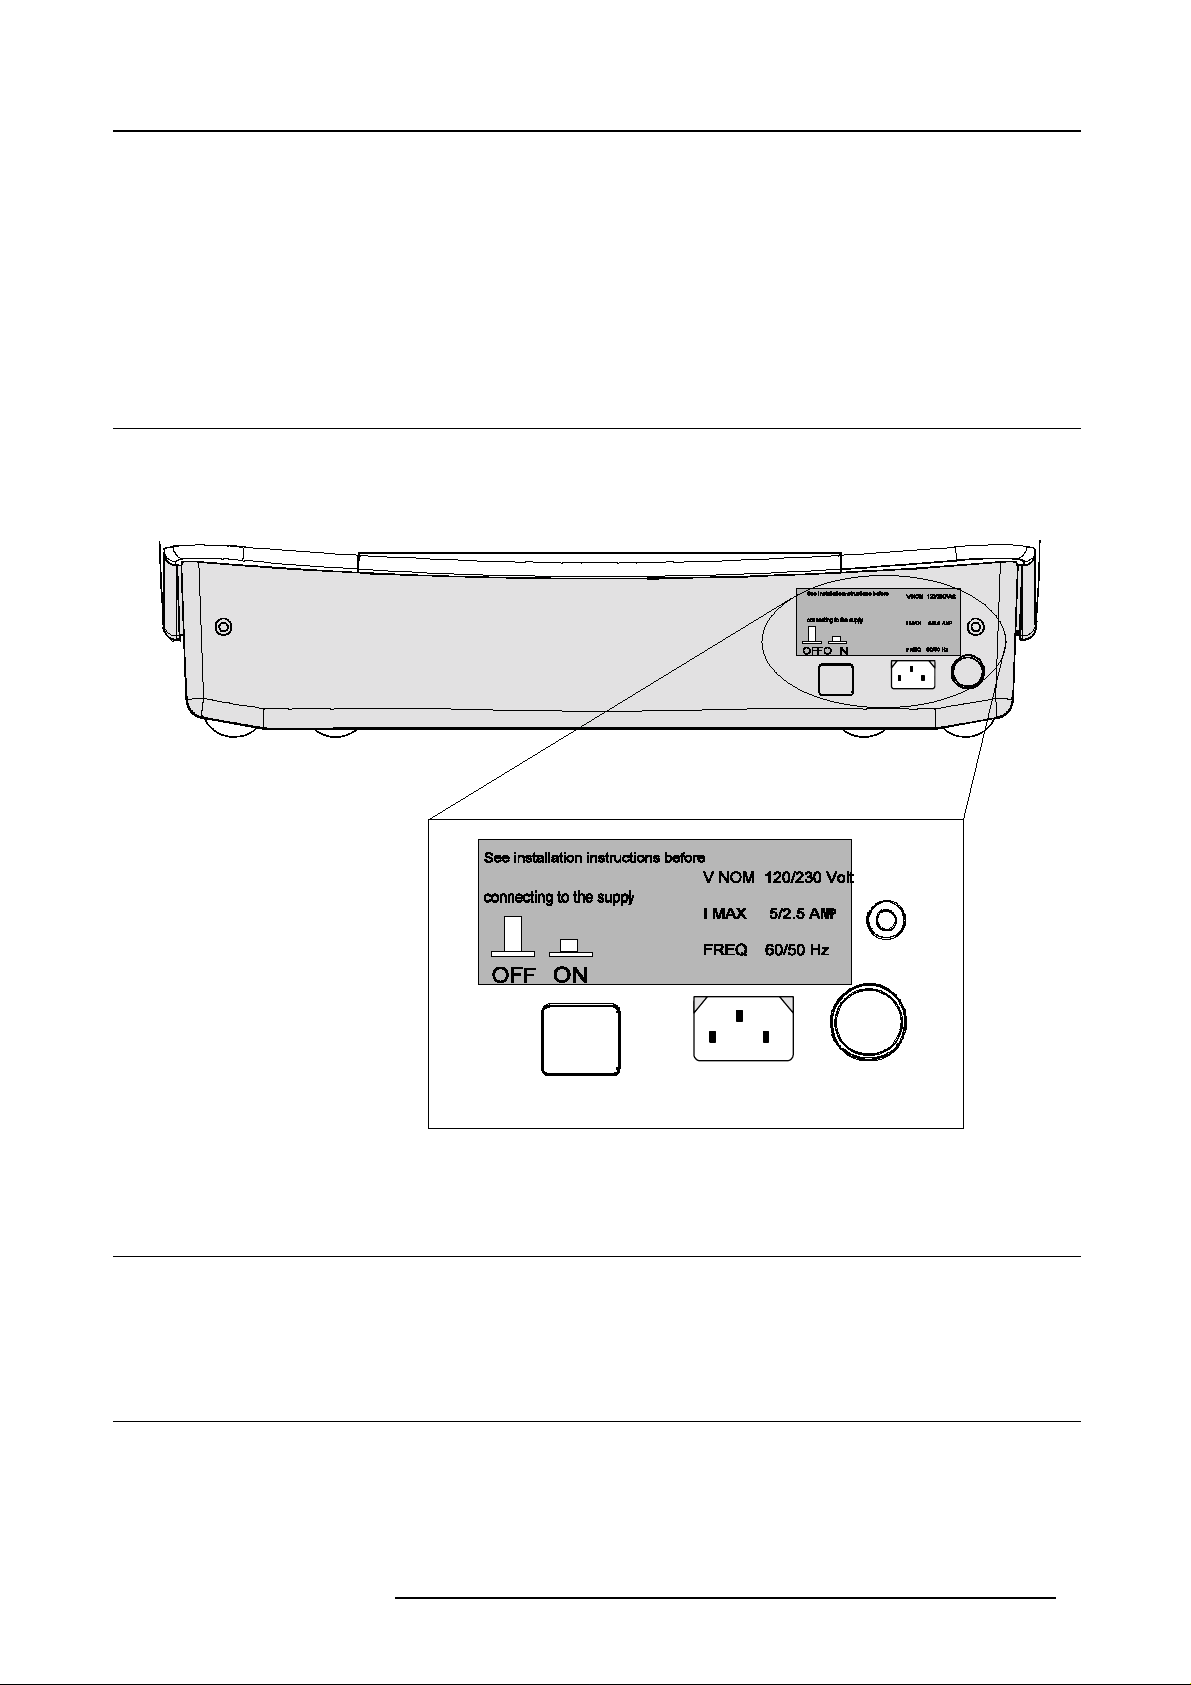
2.1 AC Power Cord Connection
How to connect the AC Power Cord?
Use the supplied power cord to connect your projector to the wall o utlet.
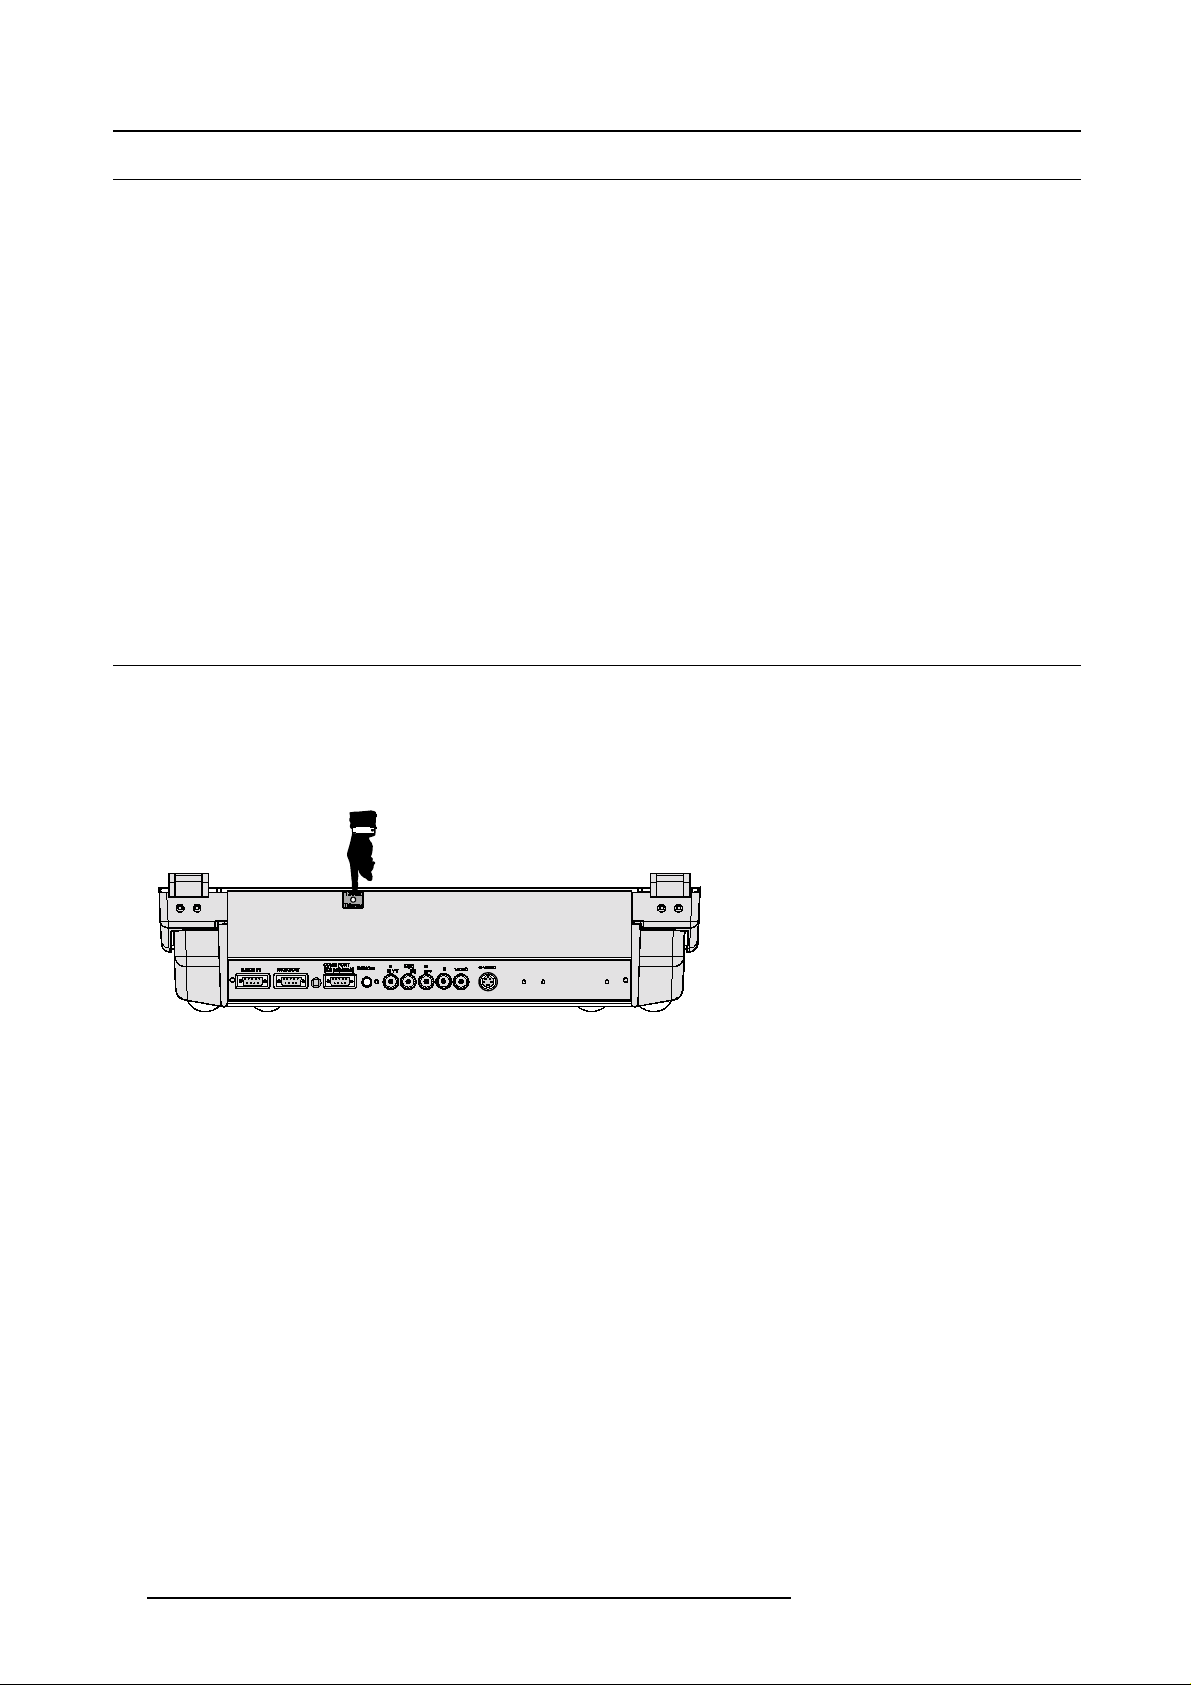
1. Plug the female power connector into the male c onnector at the front side of the electronic block. (image 2-1)
2. AC Power
Image 2-1
Power connection
2.2 AC Power Voltage
What is the AC Power Voltage?
The power input voltage is autoranging between 100V (-10%) and 240V (+6%).
2.3 Switching ON/OFF
Switching and led indication
The projector is switched ON and OFF using the power (mains) switch ON/OFF.
• Pressed : ON
• Not pressed : OFF
R5976584 BARCO CINE7 26022003 9
Page 14

2. AC Power
The projector can start now in the ’operational mode’ (image displayed) or in the ’stand by mod e’, depending on the software setup.
Stand by indication lamp :
• no light up : projector in operational m ode
• red : projector is in stand by.
Leds on the front plate of the projector
Image 2-2
10 R5976584 BARCO CINE 7 26022003
Page 15
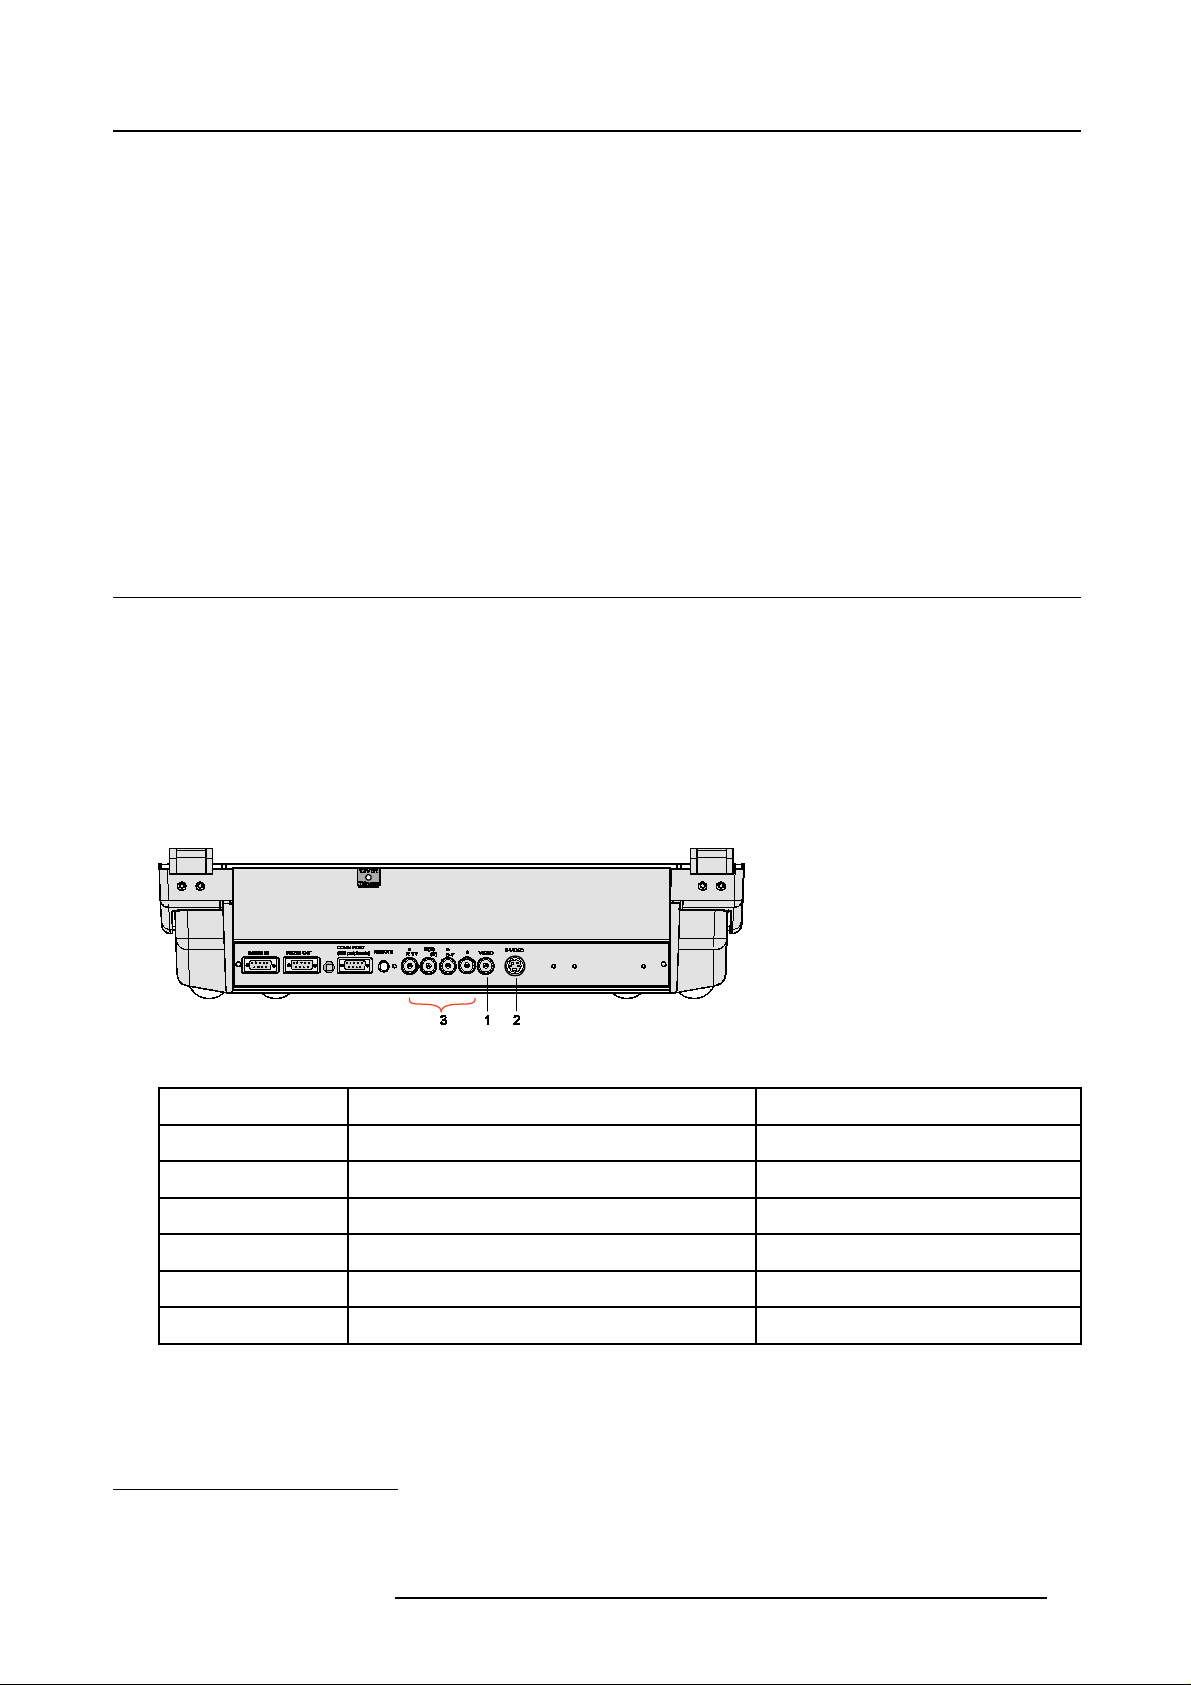
3. SOURCE CONN ECTIONS
Overview
• Input Locations
• Connecting a Composite Video source.
• Connecting a S-Video source.
• Connecting a RGB An alog source with composite sync
• Connecting a RGB Analog source with Tri level composite sync
• Connecting a Componen t source with composite sync
• Connecting a Component source with Tri level composite sync
• RS232 Connection
• Communication Port for Commun ication With Peripherals
• 12V Trigger output
3.1 Input Lo cations
Input Facilities
• Composite Video
• S-Video
•RGBSorRG
• RGB3S or RG
• (R-Y)Y(B-Y)S or (R-Y)Y
• (R-Y)Y(B-Y)3S or (R-Y)Y
B
S
B
3S
(B-Y) [Com ponent Input]
S
(B-Y) [Component Input]
3S
3. Source Connections
Which source to which input
Image 3-1
This table gives an overview of the relation between Input Port #, Source Type and Selection Keys on the RCU:
Input Port # Source Type Selection Keys on the RCU
1 Composit Video 1
2 S-Video
3 RGBs or RG sB
3 RGB w ith tri level sync
3 Component video
3 Component video with tri level sync
Table 3-1
Input Port #, Source type and Selection Keys on the RCU
1
2
3
4
5
2
3
4
5
6
1. Input signal Y/C (luma/chroma)
2. Input signal : R, G and B with automatic sync detection betweenseperate sync (separate compositesync or with separate hor and vert. sync) orsync on green (composite sync).
3. Input signal : R, G and B with separate tri level sync or with tri level sync on green.
4. Input signal : R-Y, Y and B-Y with separate sync or with compositesync.
5. Input signal : R-Y, Y and B-Y with separate tri level sync or with composite tri level sync.
R5976584 BARCO CINE7 26022003 11
Page 16
3. Source Connections
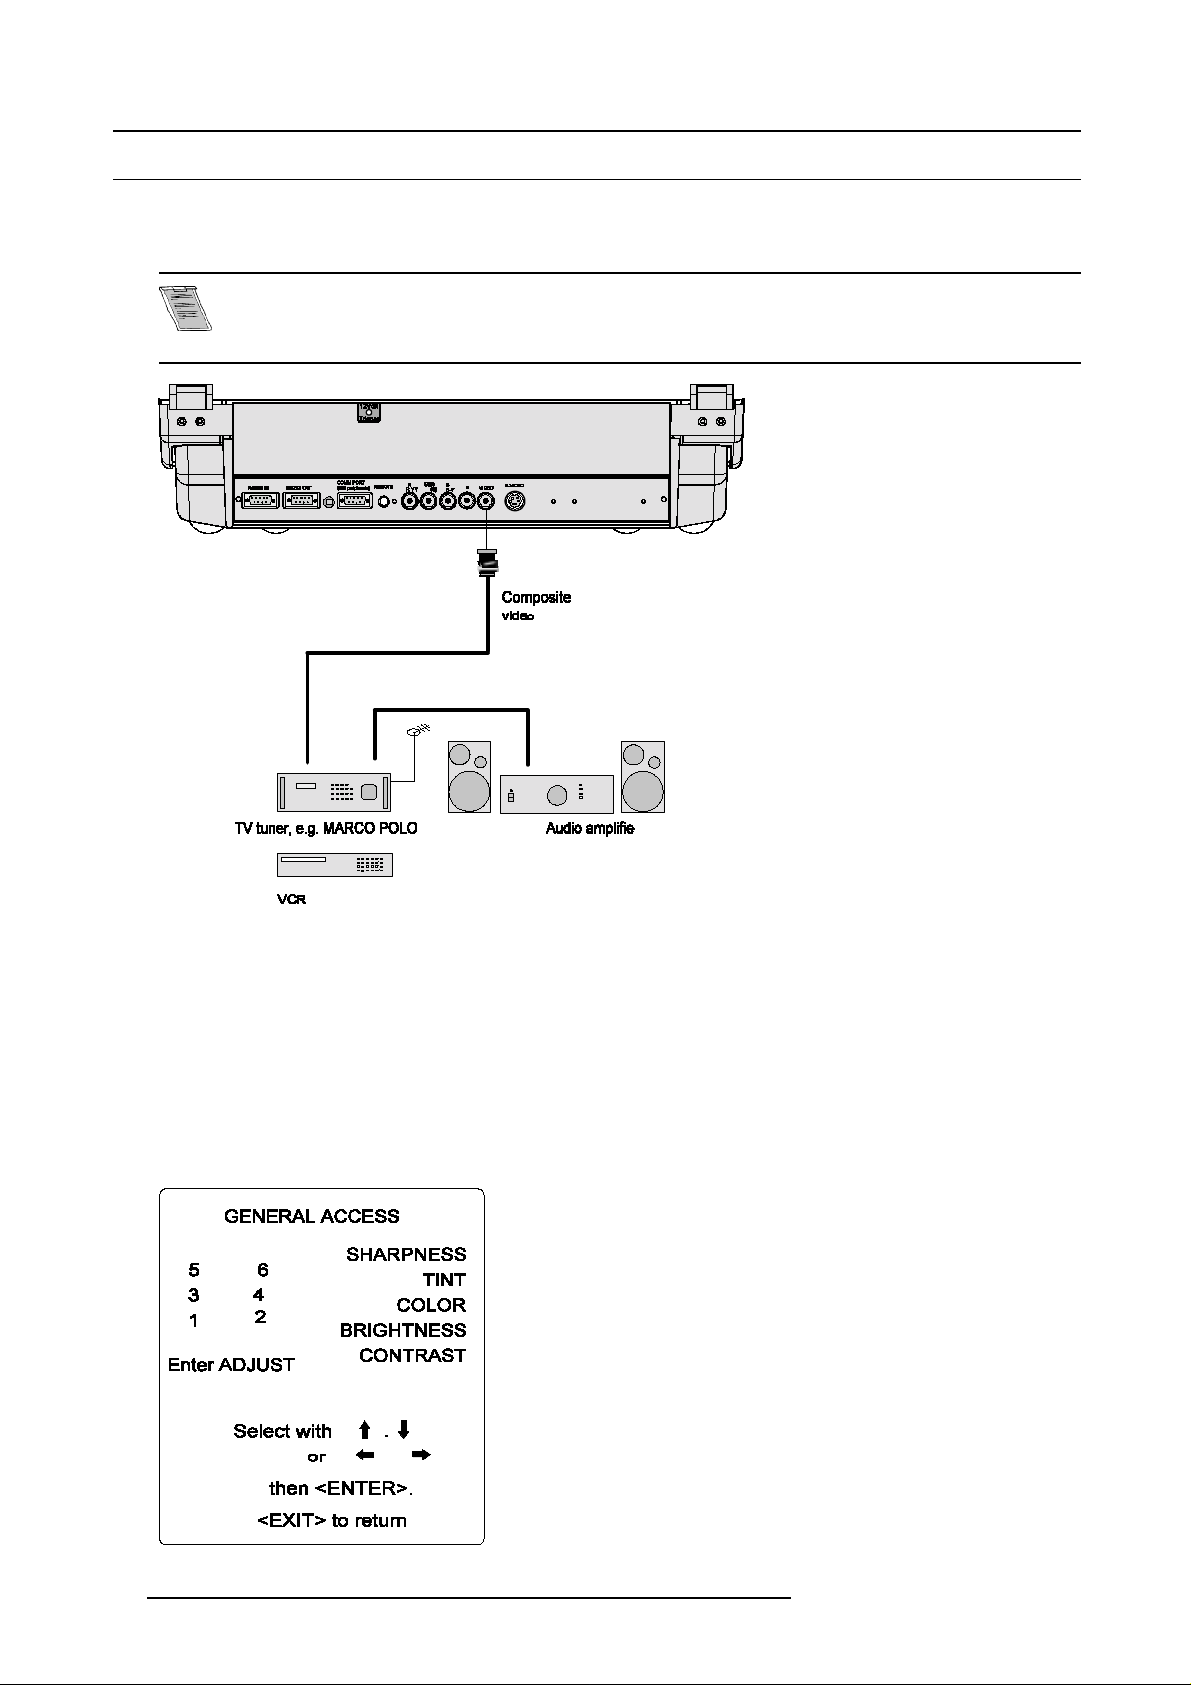
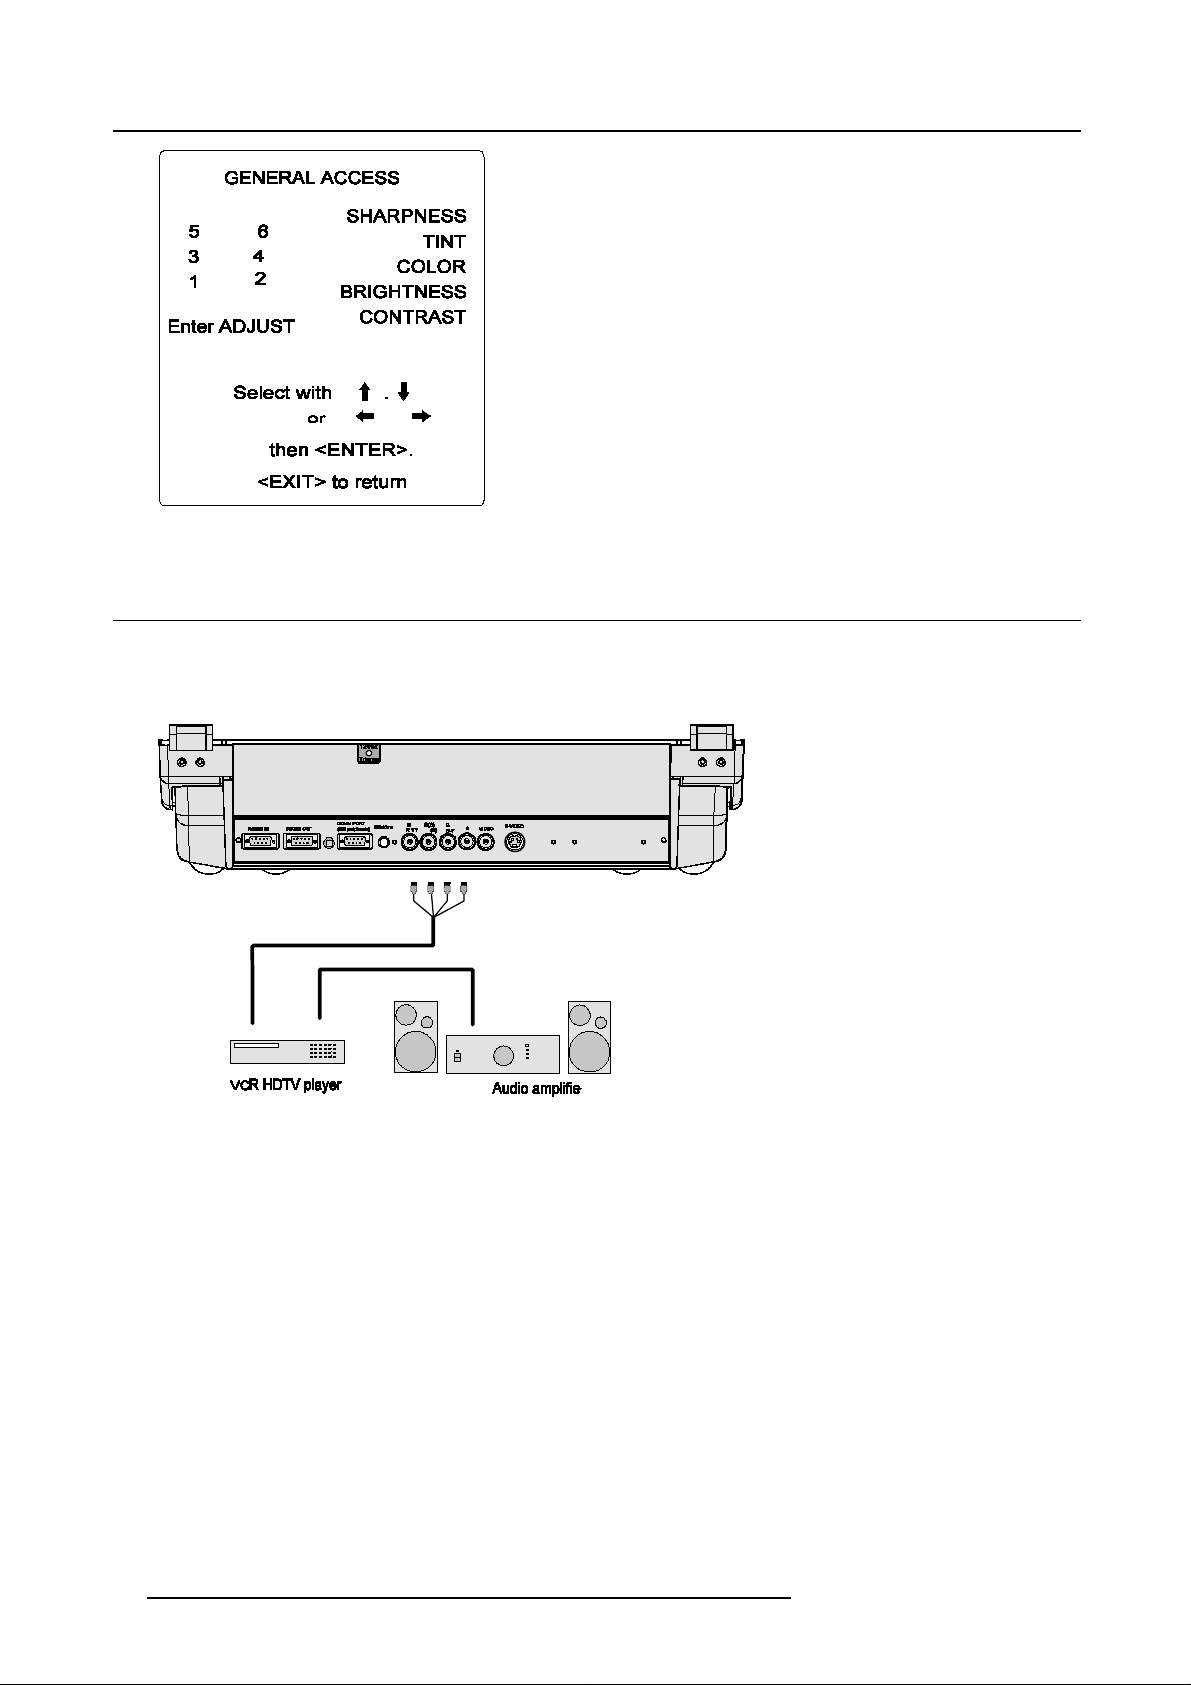
3.2 Connecting a Composite Video source.
Which signal to the video input?
Connect Compos ite video signals from a VCR, OFF air signal decoder, etc..
If a line multiplier is built in, the default position of this line multiplier soft option is ON (active). The video
input signal will be displayed as a no n interlaced im age (= improved image stability). To enable or to disable
this function, enter the adjustment mode and change the position of the ON/OFF toggle s witch (see chapter
’Random access’ adjustment mode).
Image 3-2
Video connection
Video input selection via the RCU
1. P ress digit button 1
Video input selection via the keypad
1. p ress ADJUS T ke y.
The General access menu is displayed on the screen. (image 3-3)
2. U se th e cursor keys to highlight 1.
3. P ress ENTER to select the h ighlighted source.
Image 3-3
12 R5976584 BARCO CINE 7 26022003
Page 17
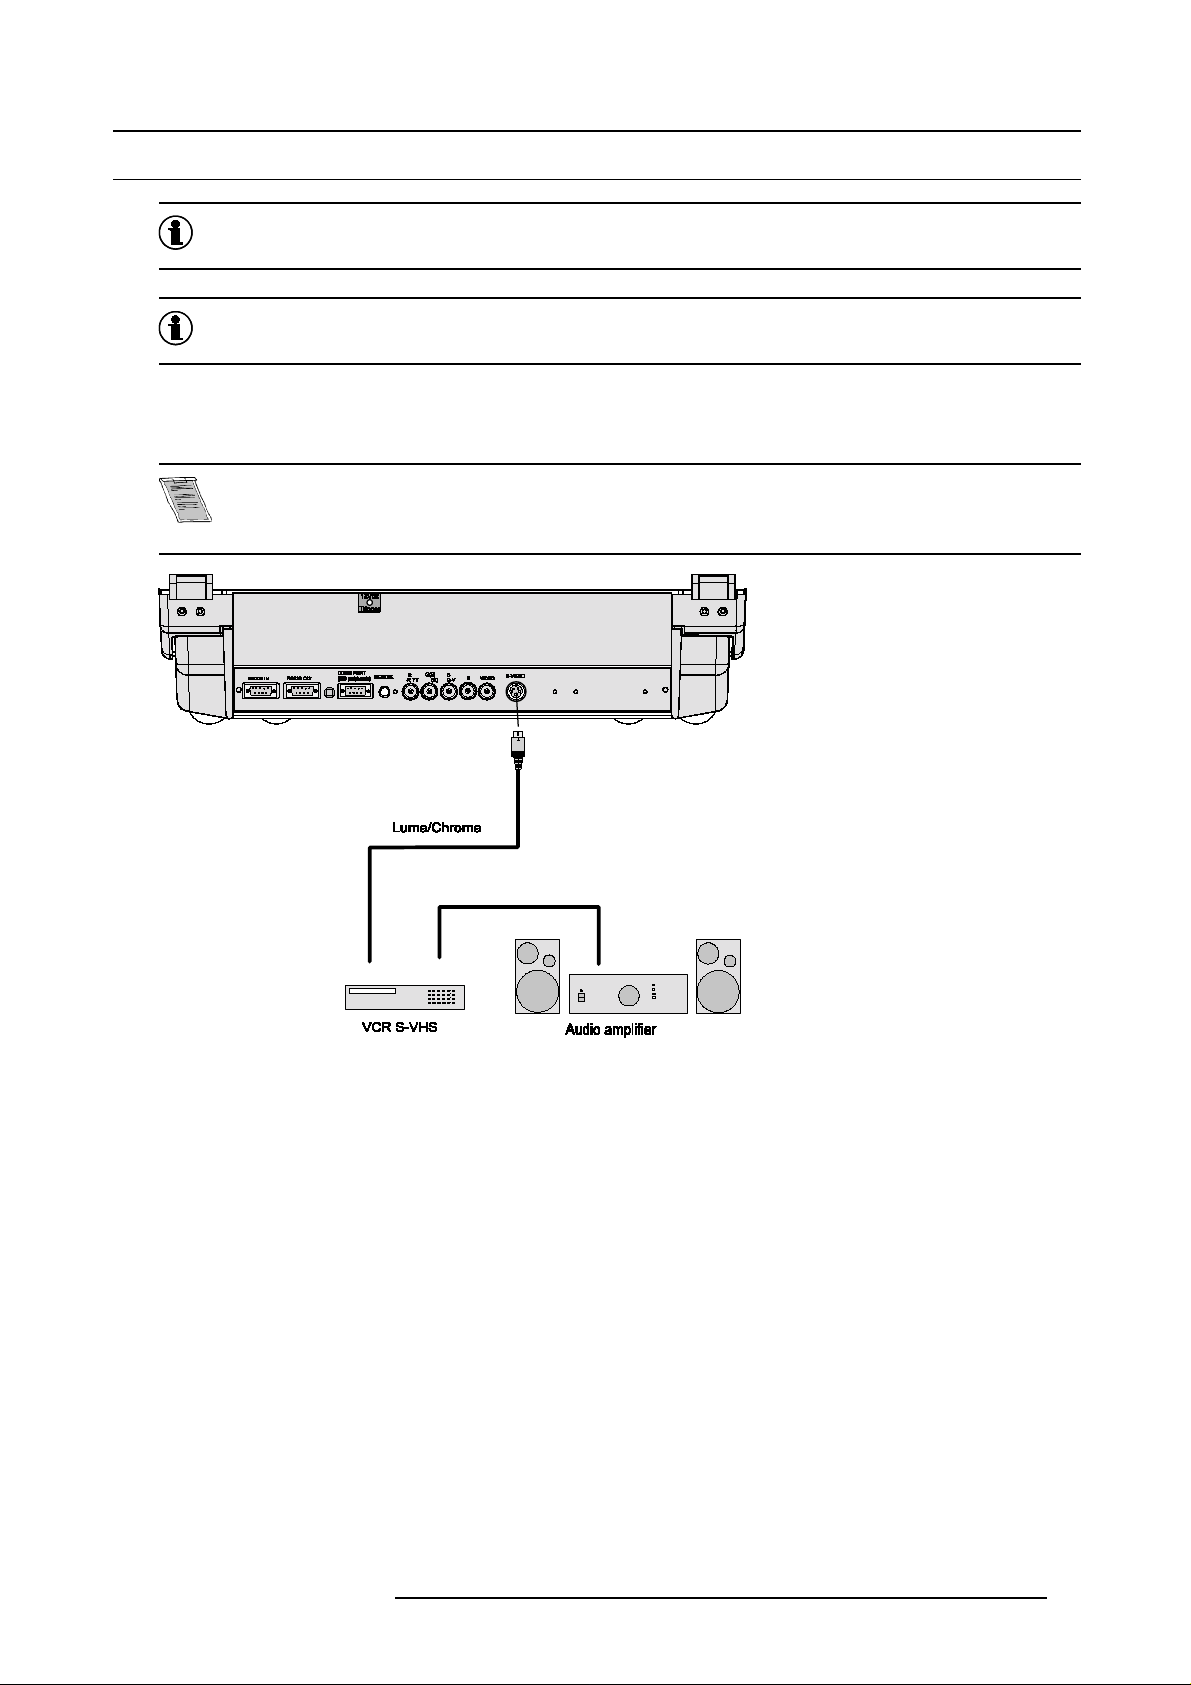
3.3 Connecting a S-Video source.
Chrominance
The color component of a video signal that includes information about tint and saturation.
Luminance
The component of a video signal that includes information about its brightness.
Which signal to the S-video input?
Separate Y-luma/C-chroma signals for higher quality playback of Super VHS signals.
If a line multiplier is built in, the default position of this line multiplier soft option is ON (active). The video
input signal will be displayed as a no n interlaced im age (= improved image stability). To enable or to disable
this function, enter the adjustment mode and change the position of the ON/OFF toggle s witch (see chapter
’Random access’ adjustment mode).
3. Source Connections
Image 3-4
S-Video input selection via the RCU
1. P ress digit button 2
Video input selection via the keypad
1. p ress ADJUS T ke y.
The General access menu is displayed on the screen. (image 3-5)
2. U se th e cursor keys to highlight 2.
3. P ress ENTER to select the h ighlighted source.
R5976584 BARCO CINE7 26022003
13
Page 18
3. Source Connections
Image 3-5
Input priority setting
Depending on the prioritysettinginthe ’Picture Tuning menu’, Video or S-Video can be displayed. If the setting is not correct, handle
as follow :
1. P ress ADJUST key to start up the adjustment m ode.
The main menu will be displayed. (menu 3-1)
2. S elect S ervice Menus.
3. P ress ENTER to select.
A w arning menu, risk of incorrect adjustment, will be displayed. (m
4. P ress ENTE R to continue if you are qualified, or EXIT if not.
When ENTER is pressed, the Adjustment main menu will be displayed. (menu 3-3)
5. S elect Random Access.
6. P ress ENTER to select.
The Choose a setup pattern menu will be displayed. (menu 3-4)
7. S elect S elected source.
8. P ress ENTE R to display the Random Access menu. (menu 3-5)
9. S elect P icture Tuning.
10.Press ENTER to display the picture tuning menu. (menu 3-6)
11.Select Port2 : Video.
12.Press ENTER to toggle between VIDEO or S-VIDEO.
13.Press ADJUST to return to operational mode.
enu 3-2)
14
R5976584 BARCO CINE 7 26022003
Page 19
3. Source Connections
Menu 3-1
Menu 3-5
MAIN MENU
Image control
Iris control
Sound control
Function keys
Service menus
Select with↑or
then <ENTER>
<EXIT> to return
RANDOM ACCESS
ADJUSTMENT MODE
PICTURE TUNING
GEOMETRY
CONVERGENCE
COLOR SELECT
Select with↑or
then <ENTER>
<EXIT> to return
Risk of incorrect adjustment
of the projector
The following
SERVICE menus
are reserved to,
and to be performed only
by qualified personnel !
If qualified, press
<ENTER> to continue, or
↓
if not, <EXIT> to return.
Menu 3-2
↓
Menu 3-6
Warning
PICTURE TUNING
COLOR BALANCE
SYNC : FAST
DECODING : EBU
PORT2 : VIDEO
LINE MULTIPLIER : ON
Select with↑or
then <ENTER>
<EXIT> to return
ADJUSTMENT MODE
Select a path from below :
AUTO IMAGE
RANDOM ACCESS
INSTALLATION
SERVICE
Source 01
Select with↑or
then <ENTER>
<EXIT> to return
↓
Menu 3-3
↓
Choose a setup path
INTERNAL # PATTERN
Select with↑or
Menu 3-4
from below :
SELECTED SOURCE
GENLOCKED PATTERN
Source 01
then <ENTER>
<EXIT> to return
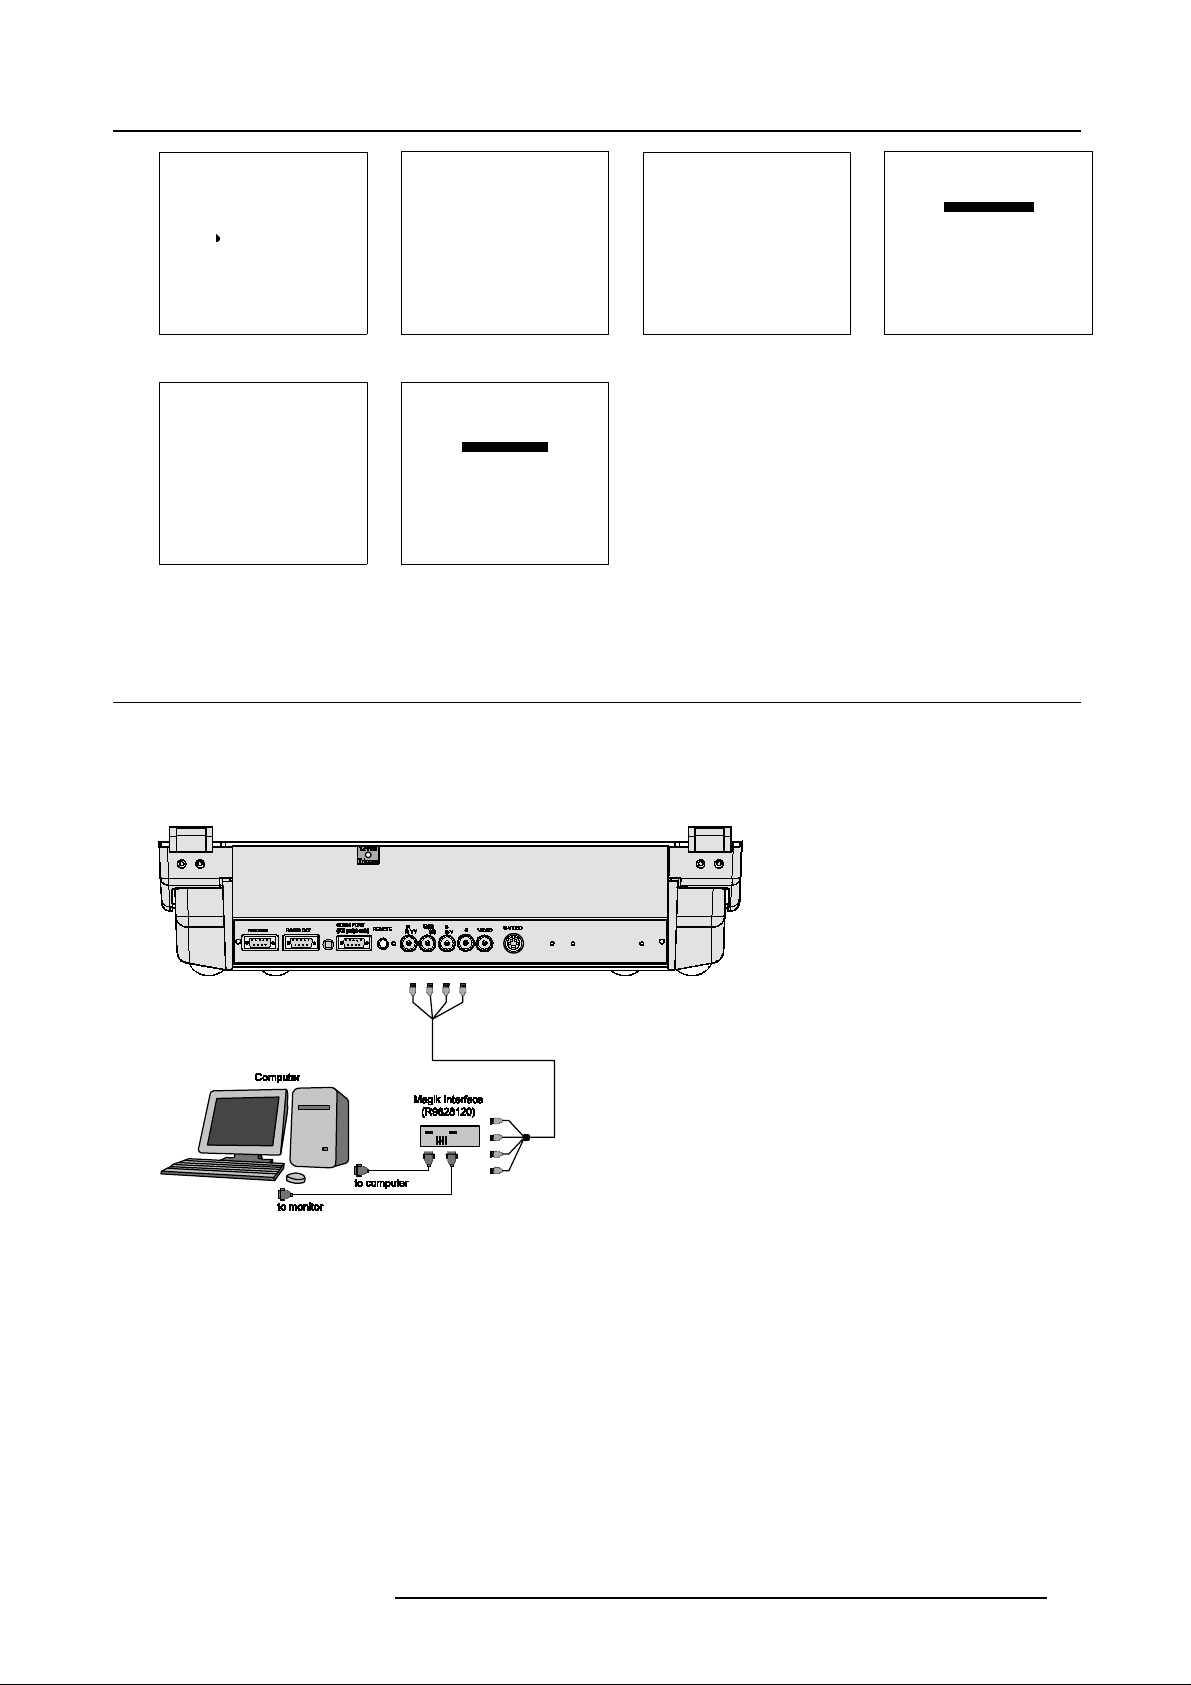
3.4 Connecting a RGB Analog source with composite sync
Which signals can be connected to the input
Connect your RGB source with sync on green, composite or separate sync via an interface to RGBS input. Always use an interface
(e.g. Barco Magik Interface R9828120) when a computer and local monitor have tobe connectedtotheprojectora s the signal cable
coming from the computer is limited to 60 cm due to interferences.
↓
Image 3-6
RGBS or RGsB selection via the RCU
1. P ress digit button 3.
RGBS or RGsB selection via the local keypad
1. P ress ADJUST key to start up the adjustment m ode.
The General access m enu will be displayed. (image 3-7)
2. Use the cursor keys to highlight 3
3. P ress ENTER to select the h ighlighted source.
R5976584 BARCO CINE7 26022003
15
Page 20
3. Source Connections
Image 3-7
3.5 Connecting a RGB Analog source with Tri level c omposite sync
Which signal can be connected to the input?
RGB analog input terminals w ith tri level sync input or with tri level s ync on green (BNC terminals). The projector detects automatically where the sync signal is loc ated.
Image 3-8
RGB3S or RG3sB connection
RGB3S or RG3sB selection via the RCU
1. P ress digit button 4.
RGB3S or RG3sB selection via the local keypad
1. P ress ADJUST key to start up the adjustment m ode.
The General Access menu will be displayed. (image 3-9)
2. Use the cursor keys to highlight 4
3. P ress ENTER to select the h ighlighted source.
16
R5976584 BARCO CINE 7 26022003
Page 21
3. Source Connections
Image 3-9
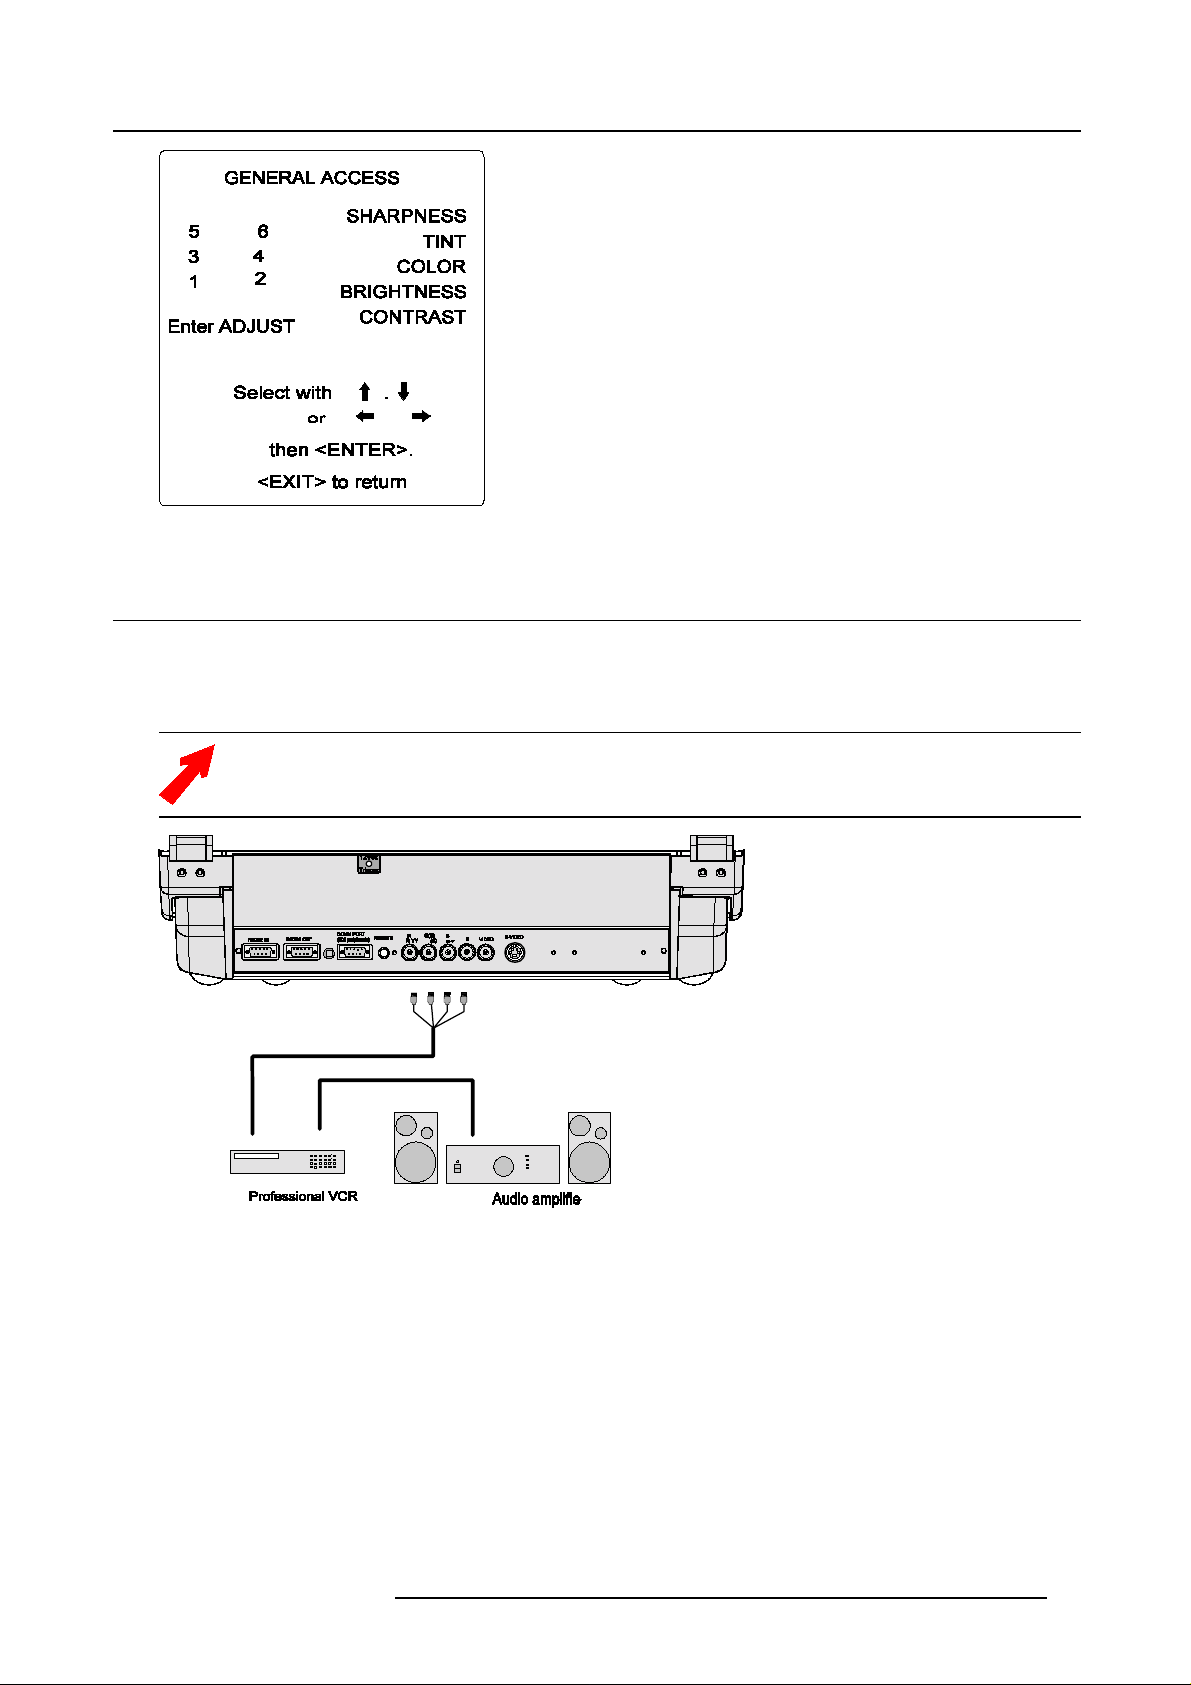
3.6 Connecting a Componen t source with composite sync
Which signal can be connected to the input?
(R-Y)Y(B-Y) analoginputterminalswith sync input or withsyncongreen(BNC terminals). The projector detects automatically where
the sync signal is located.
Always use an interface (e.g. Ba rco Magik Interface R9828120) when a computer and local monitor have to be
connected to the projector as the signal cable coming from the co mputer is limited to 60 cm due to interferences.
Image 3-10
Component input selection via the RCU
1. P ress digit button 5.
Component input selection via the local keypad
1. P ress ADJUST key to st a rt up
The General Access m enu will be displayed. (image 3-11)
2. Use the cursor keys to highlight 5
3. P ress ENTER to select the h ighlighted source.
the adjustment mode.
R5976584 BARCO CINE7 26022003 17
Page 22
3. Source Connections
Image 3-11
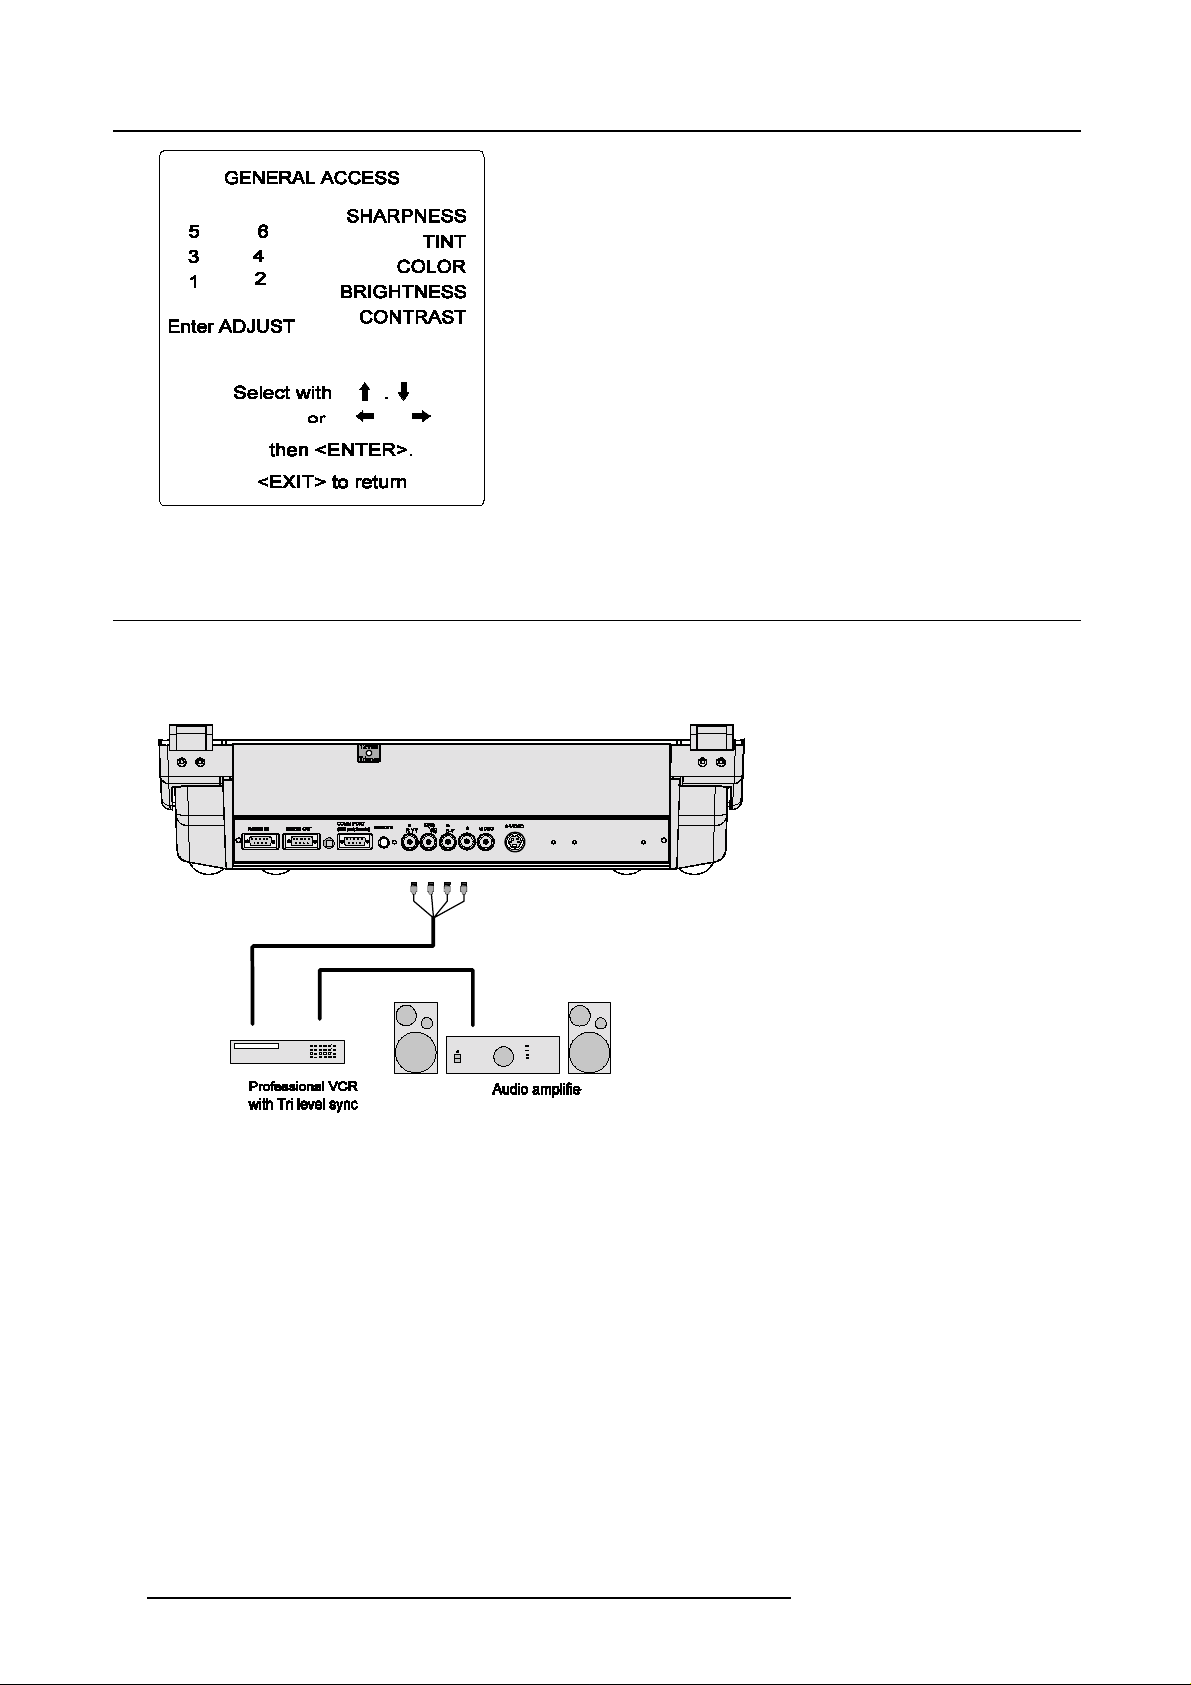
3.7 Connecting a Component source with Tri level composite sync
Which signal can be connected to the input?
(R-Y)Y(B-Y) analog input terminals with tri level sync input or with tri level sync on green (BNC terminals). The projector detects
automatically where the sync signal is located.
Image 3-12
Component input selection via
1. P ress digit button 6.
the RCU
Component input selection via the local keypad
1. P ress ADJUST key to start up the adjustment m ode.
The General Access m enu will be displayed. (image 3-13)
2. Use the cursor keys to highlight 6
3. P ress ENTER to select the h ighlighted source.
18
R5976584 BARCO CINE 7 26022003
Page 23
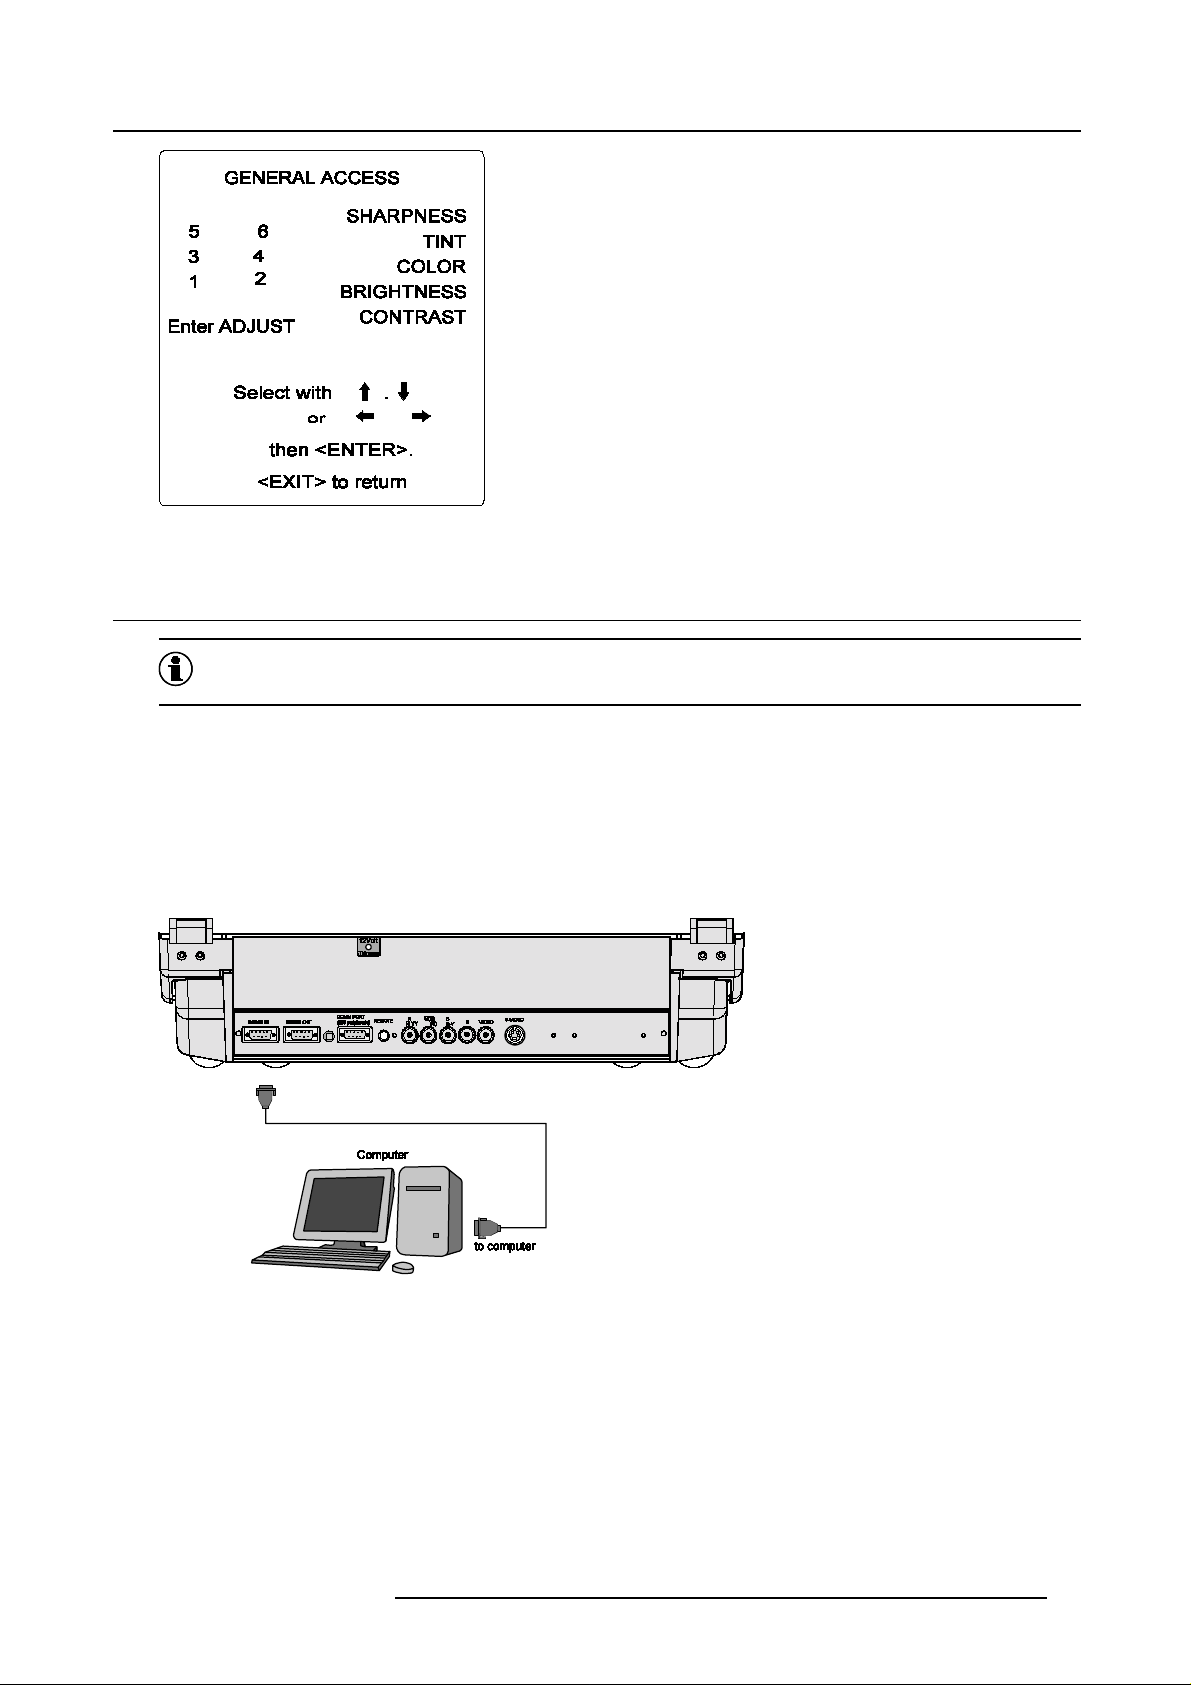
Image 3-13
3.8 RS232 Connection
RS232
A standard, single-ended (unbalanced) interconnection scheme for serial data communications.
3. Source Connections
RS232 Input and RS232 Output of the projector
The projector is equ ipped with a RS232 port that allows them to commu nicate with a computer.
• Easy adjustment of the projector via a computer.
• Allow storage of multiple projector configurations and set ups.
• Wide range of control possibilities.
• Address range from 0 to 255.
• Sending data to th e projector or copying the data from the projector to a hard memory d evice.
Image 3-14
RS232 connection
How to set up the baud rate for the communication with a computer?
See changing the baud rate in the chapter Service Mode of the Owner’s Manual.
R5976584 BARCO CINE7 26022003
19
Page 24
3. Source Connections
3.9 Communication Port for Communication With Peripherals
Connecting a RCVDS 05 switcher to the projector
• Up to 10 inputs (20 inputs when video and S-video) with the RCVDS 05 switcher (R9827880) and up to 9 0 inputs when 10
RCVDS switchers are linked via the 5-cable output modules.
• Serial com mu nication with the projector.
• Remote control buttons on the RCV DS to control the projector (source selection and analog settings).
• Theselectedsourcenumberwillbedisplayedona2digitdisplayandtheselectedinput modules will be indicated with a LED
on the rear.
Connecting a VS05 switcher to the projector
The VS05 can switch up to 5 Composite Video sources, 3 S-Video Sources and 1 RGB analog or component Video source to the
projector. In addition, the audio signal proper to the source, can be switched to an audio amplifier. Order n umber : R 9827890.
Connecting an IR Remote Receiver to the projector
This infraredreceiverunitmake s it possible to control the projectorfroma nother room. There is acommunication linec able between
the IR receiver and the projector or the RCVDS. The control information from the RCU c an now be sent to the IR Remote Receiver.
The IR Remote Receiver displays the selected source on a 7-segmen t display.
3.10 12V Trigger output
What can be done?
12 V output voltage to trigger external equipment such as screen up/down, curtains open/close etc.
This voltage is available when the projector sw itches from standby to operational mode.
When the projector returns into standby mode, the 12V trigger voltage disappears too.
Image 3-15
20 R5976584 BARCO CINE 7 26022003
Page 25

4. GETTING STARTED
Overview
• Batteries
• RCU & Local keypad
• Ter minology overview
• Switching on the projector
• Using the RCU
• Projector A ddress
• Controlling the projector
4.1 Batteries
Overview
• Battery installation
• Battery replacement
4.1.1 Battery installation
4. Getting Started
How to i nstall the battery
Two batteries are packed together with the RCU. B efore using your RCU, install first these batteries.
1. R emov e the battery cover on the backside by pushing the handle a little towards the bottom of the RCU.
2. L ift up the top side of the cover at the same time.
3. Insert the batteries as indicated in the RCU.
4. P ut the battery cover on its place.
4.1.2 Battery replacement
How to replace the batteries in the RCU
To replace the batteries :
1. R emov e the battery cover on the backside by pushing the handle a little towards the bottom of the RCU.
2. L ift up the top side of the cover at the same time.
3. P ush on the + side of the battery towards the - side
4. L ift up the battery at the same time.
5. R epeat for the second battery.
6. Insert the batteries as indicated in the RCU (battery type AA or LR6 or equivalent).
7. P ut the battery cover on its place. (ima ge 4-1)
R5976584 BARCO CINE7 26022003
21
Page 26
4. Getting Started
Image 4-1
Note, only important if more than one projector is installed in the room.
The common address can be zero (0) or one (1). The standard RCU are setup for common address zero. To
change the common address of the RCU, contact a BARCO service center. If it is necessary to program the
projector address into the RCU, see chapter ’Getting S tarted’.
Projector address has to b e reprogrammed every time the battery is changed, the RCU will always switch to
the default address.
4.2 RCU & Local keypad
How controlling the projector ?
The projector can be controlled by the loc al keypad or by the remote control unit.
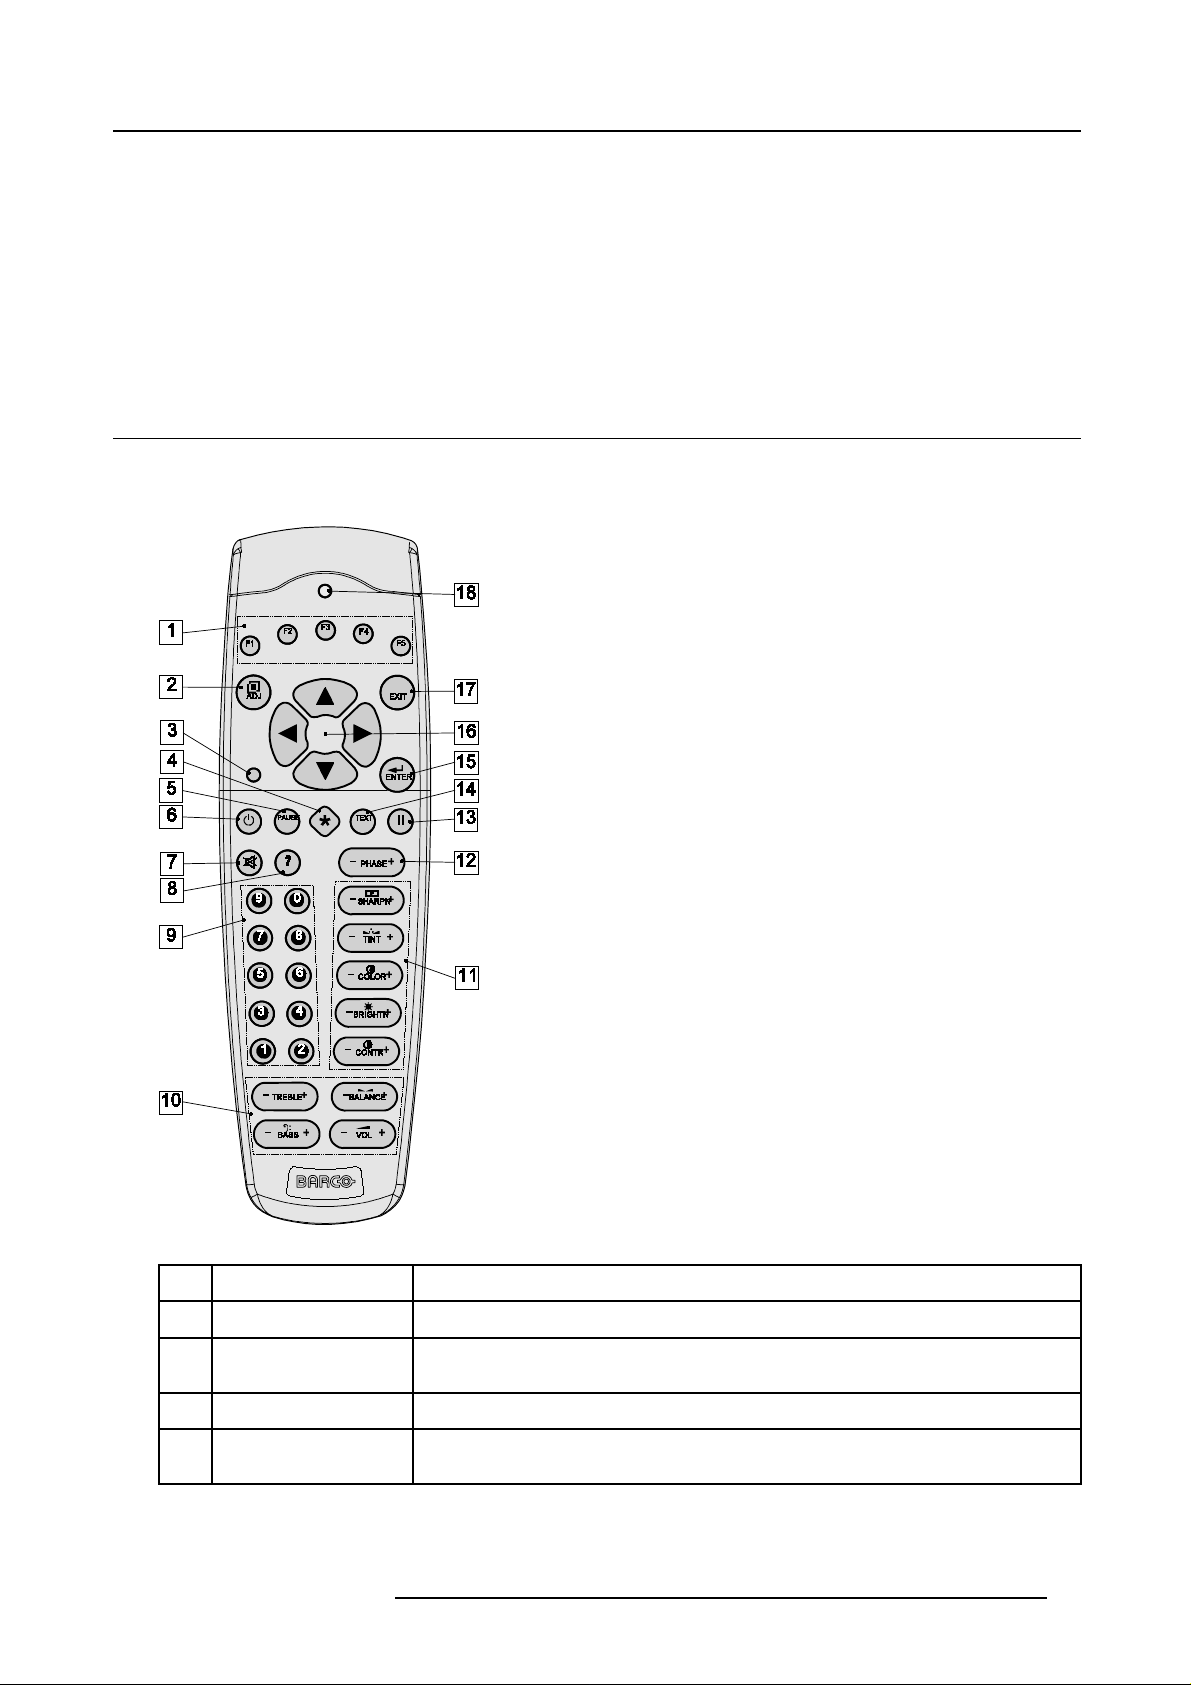
Location of the local keypad ?
The local ke ypad is located on the top side of the projector and is coverd by a door on which the projector logo is screened.
To open this doo r, push as indicated on next drawing and turn it to the front side of the projector.
Image 4-2
22 R5976584 BARCO CINE 7 26022003
Page 27
4. Getting Started
Remote control functions.
This remote control includes a battery powered infrared (IR) transmitter that allows the user to c ontrol the projector remotely. This
remote control is used for source selection, control, adaptation and set up. It includes automatic storing of picture controls (Brightness, Sharpness...) and settings.
Other functions of the remote control are :
• switching between stand by and operational mode.
• switching to "pause" (blanked picture, full power for immediate restarting)
• direct access to all connected sources.
4.3 Terminology overview
Overview
The following table gives an overview of the different functionalities of the keys.
Image 4-3
RCU function indication
1 Function keys user programm able keys with functions for direct access.
2 ADJ. Adjust key, to enter the adjustment m ode
3 Address key (recessed key), to enter the addr ess of the projector (between 0 and 9). Press the recessed
4 Selection key (*) to direct access the zoom/focus/shift functions.
5 PAUSE to stop projection for a short time, press ’PAUSE’. The image disappears but full power is
R5976584 BARCO CINE7 26022003 23
address key with a pencil, followed by pressing one digit button between 0 and 9.
retained for immediate restarting.
Page 28
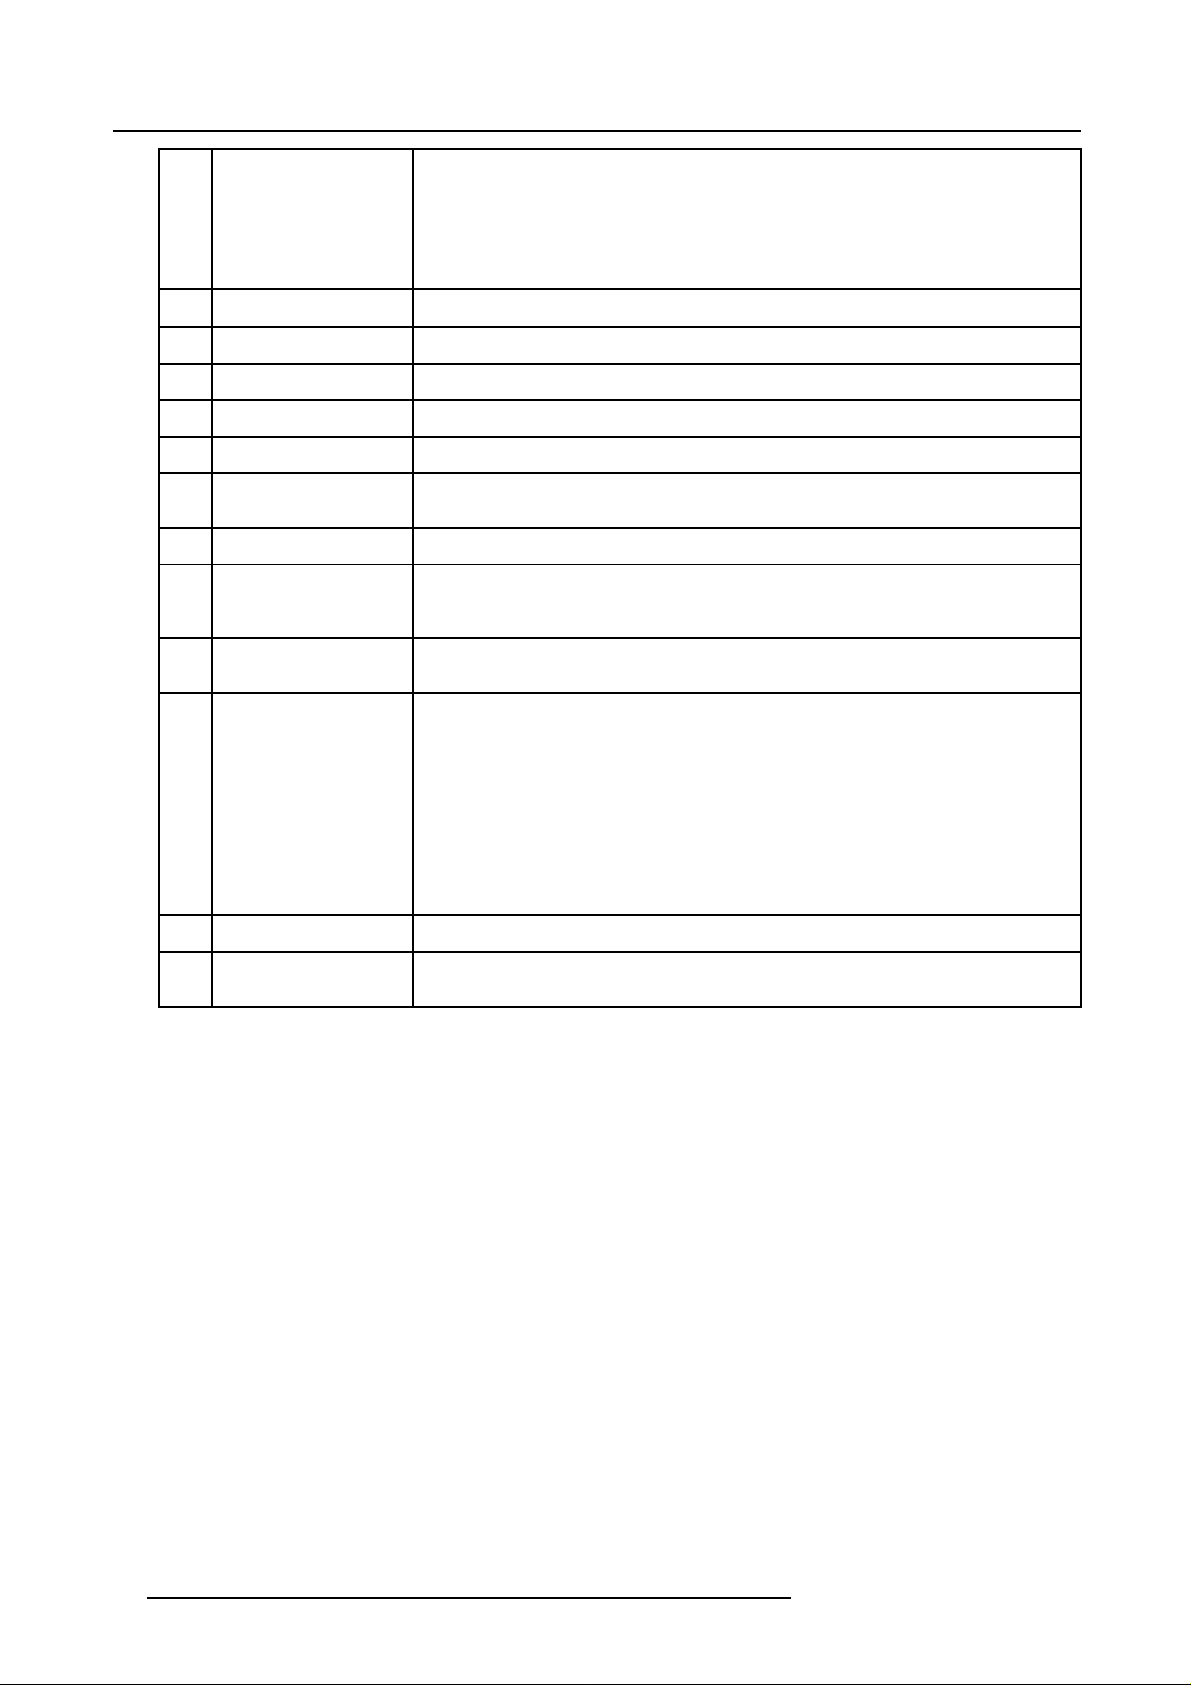
4. Getting Started
6 STBY standby button, to start projector when the power switch is switched on and to s witch off the
7 MUTE to interrupt the sound reproduction.
8 ? Auto image, to center the image on the active LCD s urface.
9 Digit buttons direct input selection.
10 Audio controls use these buttons to obtain the desired sound level.
11 Picture controls press to adjust the projected image.
12 Phase be sure the projector is warmed up for at least 15 min before adjusting the phase, press to
13 FREEZ press to freeze the projected image.
14 TEXT when adjusting one of the image, e.g. controls during a meeting, the displayed bar scale
15 ENTER to start up the adjustment mode or to confirm an adjustment or selection in the adjustment
16 Cursor keys to make menu selections when in the adjustment mode or to zoom /focus when the direct
projector without switching off the power switch.
Attention : Switching to Standby. When the projector is running and you want to
go to standby, press the standby key for 2 seconds until the message ’Sav ing data,
please wait’ is displayed. Do not press any longer on the standb y key otherwise
the projector w ill restart.
adjust the phase of the projected image.
can be removed by pressing ’TEXT’ key first. To re-display the bar scale on the screen,
press ’TEXT’ key a gain.
mode.
access is active.
Comparison between the cursor keys and the use of the ’+’ and ’-’ key s on the loc al keypad
: RCU = local keypad
cursor key up = ’+’ key up
cursor key down = ’-’ key down
cursor key right = ’+’ key right
cursor key left = ’-’ key left
17 EXIT to leave the adjustment mode or to scroll upwards when in the adjustment mode.
18 RC operation indication lights up when a button o n the remote control is pressed. (This is a visual indicator to
Table 4-1
check the operation of the remote control)
24 R5976584 BARCO CINE 7 26022003
Page 29
4. Getting Started
4.4 Switching on the projector
Howtoswitchontheprojector?
1. P ress the mains ON/OFF switch to switch on the projector.
Pressed ON
Not Pressed OFF
Table 4-2
Mains Power Switch
The Stand by indication lam p will show the status of the projector:
No light up Switched O F F
Green color Operational mode
Red color Stand By mode
Table 4-3
Status lamp
The switching on modes
When switching on with the power switch, the projector can start in 2 different modes depending on the “Powe r Up” setting in the
Service mode:
• Operational mode (Picture display ed).
• Stand By mode.
Starting up in Operational Mode
The projector can start up with the selected source or the projector can start up with a war m up cycle message.
PROJECTOR WARM UP
A FULL WHITE PATTERN WILL BE
GENERATED FOR x MIN.
FOR IMMEDIATE USE OF THE
PROJECTOR, PRESS <EXIT>
WARNING: SKIPPING THIS
PROCEDURE CAN REDUCE THE
INITIAL PICTURE QUALITY OF THE
PROJECTED IMAGE;
YOU CAN ADJUST THE IMAGE
DIMENSIONS WITH THE ARROW
KEYS TO AVOID SCANNING ON
THE EDGES OF THE CRT’S;
THIS OPTION CAN BE DISABLED IN
THE SERVICE MENU
with <ENTER>
<EXIT> to return
Menu 4-1
When this warm up cycle message appears on the screen, the m enu offers the possibility to start with a x minutes taking warm up
period (press ENTER)ortoskipthiscycle(pressEXIT). The x minutes and the horizontal frequency can be programmed in the
’Service mode’ under the item ’Projector Set Up’.
This warm up period is built in so that the projector can rea ch its maxim um specifications and minimize all
distortions.
When starting this warm up period, a full white image is shifted on the CRT faceplate to avoid a burn in. Every 30 seconds a text
box will be displayed on another place on the screen with the remaining time to go. The image dimensions can be adjusted with the
cursor keys to avoid scanning on the edges of the CRT’s.
How to interrupt the warm up period?
1. P ress EXIT on the RCU.
The warm up menu will be displayed with the remaining time indication.
2. P ress EXIT again to quit the warm up cycle and to display the source.
Starting up in Stand By Mode
The projector starts up in stand by. Press a digit key corresponding to the de sired source or press STBY key. The projector displays
the selected source or the warm up cycle message. When this warm up message appe ars on the screen, handle as described in
’Start up in O per ational Mode’.
R5976584 BARCO CINE7 26022003
25
Page 30

4. Getting Started
Do not display a stationary image with fullbrightness and contrastfor longer than 20 min., otherwise you risk
damage to the CRT’s.
How to switch off the projector?
1. U se the same power switch to switch off the projector.
4.5 Using the RCU
Pointing to the reflective screen
1. P oint the front of the RC U to the screen surface. (image 4-4)
Image 4-4
Hardwired Remote Input
1. P lug one end of the remote cable in the connector on the bottom of the RCU. (image 4-5)
2. P lug the other end in the connector on the rear panel labelled ’Rem ote’.
Image 4-5
Directly to the IR sensors
When using the wireless remotecontrol,makesureyouarewithin the effective operating distance (30m, 100ft inastraightline). T he
remote c ontrol unit will not function properly if strong light strikes the sensor window or if there are obstacles between the remote
control unit and the projector’s IR sensor.
26
R5976584 BARCO CINE 7 26022003
Page 31

Image 4-6
4.6 Projector Address
4. Getting Started
4.6.1 Controlling the projector
Projector address
Address installed in the projector to be individually controlled.
Common address
Default address. Projector will always execute the command coming from a RCU programmed with that common
address.
Why a projector address ?
As more than one projector can be installed in a room, the separate projector should be separately addressable with an RCU or
computer. There for eac h projector has its own address.
Set up an individual Projector Address.
The set up of a projector address can be done via the software. See ’Cha nge projector address’ in chapter ’Service mode’.
Projector controlling.
Every projector requires an individual address between 0 and 255 which can be set in the Service mode.
When the ad dress is set, the projector c an be controlled now:
• RCU for addresses between 0 and 9.
• computer, e.g. IBM PC (or compatible), A pple MAC, etc. for addresses between 0 a nd 255.
A projector will respon d to a RCU set to the common address (’0’ or ’1’) regard less of what address is set in
the projector itself.
The RCU is default programmed with address 0 or 1, ’common address’. With that ’commo n address’ programmed into the RCU, every projector, without exception will listen to the commands given by this RCU. If
it is necessary to control a specific projector, than enter the p rojector address into the RCU (only when that
address is between 0 an d 9). The projector with the corresponding address will listen to that specific RCU.
Common Address
Every projector has a common a ddress ’0’ or ’1’. The choice between ’0’ and ’1’ can be selected in the Service mode.
R5976584 BARCO CINE7 26022003
27
Page 32

4. Getting Started
4.6.2 Displaying and Programming addresses
Displaying the Projector Address on the Screen.
1. P ress Address key (recessed key on the RCU) with a pencil.
The projector’s address will be displayed in a ’Text box’
To continue using the RCU with that specific address, it is n ecessary to enter the sa m e address with the
digit buttons (address between 0 and 9) within 5 seconds after pushing the address key. For examp le : if the
Address key displays projector address 003, then press "3" digit button on the RCU to set the RCU’s address
to match the projector’s address. Do not press 003 digits. This will address the remote control to ’0’ and
control all projectors in the room. If the address is not entered within5seconds, theRCU returns to itsdefault
address (zero address) and control all pro jectors in the room.
How to Program an Address into the RCU?
1. P ress the Address key (recessed key on the RCU) with a pencil.
2. E nter the address with the digit buttons within 5 seconds after pushing the address key.
Note: That address can be any digit between 0 and 9.
4.7 Controlling the projector
4.7.1 Input selection
Input Se lection via the RC U
1. K ey in the corresponding slot number with the digit keys on the RCU.
The selected source will be displayed.
Input Selection via the Local Keypad
1. P ress the ADJUST key to display the Genera l access menu.
2. H ighlight the desired source number by pushing the control disc up, down, to the left or the right. Push the control disc up or
down to move the cursor up and down, push the control disc to the left ortotherighttomov e the cursor to the left and to the right.
3. P ress ENT ER to confirm your selec tion.
When the source is selected
When a valid and available source is selected, there will be information displayed on the screen about that source. T his information
includes :
• Source number
• Horizontal frequency
• Vertical frequency
When the entry is a non valid source number, a wa rning appears on the screen : input not available.
When a valid source number is selected, the projector will display this source or it will wait on the selected source number until the
source becomes available. A message source not available will be displayed for a short time.
4.7.2 Picture controls
Access via the RCU
The control keys are located on the left side of the key panel of the RCU and indicated with the name of the control and an icon.
When an image control is pressed, a text b ox with bar scale and the function name of the control, e.g. ’brightness...’ appears on
the s creen (only if text is ON) . The length of the bar scale indica tes the current mem orized setting for this source. The bar s cale
changes a s the + or - side of the button of the control are pressed.
Access via the local keypad
1. P ress the ADJUST key to display the Genera l access menu.
2. U se the cursor keys to highlight the desired an
3. P ress ENTER to select.
28
alog c ontrol.
R5976584 BARCO CINE 7 26022003
Page 33

4. Getting Started
Overview Picture controls
When an image control is pressed, a text box with a bar scale, icon and function name of the control, e.g. ’brightness...’ appears on
the screen (only if text is ON). See example sc reen. The length of the bar scale and the value of the numeric indication indicate the
current memorized setting for this source. The bar scale changes as the control stick on the RCU is pressed or the + or - buttons
on the local keypad.
Brightness A correct ’brightness’ setting is important for g ood image reproduction.
Use the + button for a higher brightness.
Use the - button for a lower brightness.
Contrast A correct ’contrast’ setting is important for good image rep roduction. Adjust the contrast to the level
Color Color saturation is only ac tive for Video and S-Video. Adjust the color intensity of the picture.
Tint Tint is only active for Video and S-Video when using the NTSC 4.43 or NTS C 3.58 system.
Sharpness Use the + button for a sharper picture.
Phase Use the + or - button to adjust the phase.
Freez Press Freez to freeze the displayed image.
you p refer, according to room lighting conditions.
Use the + button for a higher contrast.
Use the - button for lower contrast.
Use the + button for richer colors.
Use the - button for lighter colors.
Use the + button
Use the - button.
Use the - button for a softer picture.
Overview Sound Controls
Only when a sound unit is built in.
When a sound control is pressed, a text box with a bar scale, icon and function name of the control, e.g. ’volume...’ appears on the
screen (only if text is ON). See example screen. The length of the bar scale indicates the current memorized setting for this source.
The bar s cale changes as the + or - buttons of the control are pressed. The sound controls can only be adjusted with the RCU.
Volume Volume control adjusts the volume.
Use the + button for a higher volume.
Use the - button for a lower v olume.
Bass Bass control adjusts the bass level (low tones).
Use the + button for more low tones.
Use the - button for less low tones.
Treble Treble control adjusts the treble level (h igh tones).
Use the + button for more high tones.
Use the - button for less high tones.
Balance Is only effective if a external am plifier with loudspeakers is connected to the audio output. The balance
control adjust the sou nd level between the left and the right box.
Use the + button for a higher sound level on the right box than on the left on e.
Use the - button for a higher sound level on the left box than on the right one.
The Pause Key
When the Pause key is pressed, the image projection is stopped, a blue or black screen will be display ed and the projector rem ains
with full pow er for immediate restart. The sound is not interrupted. The dis play on front of the projector will sh ow a "P".
R5976584 BARCO CINE7 26022003
29
Page 34

4. Getting Started
To restart the image :
•PressPause key.
•PressEXIT key
• Select a source number.
TheFreezekey(OnlywithLineMultiplier)
When the Freeze key is pres sed, the image is frozen until this key is pressed a gain (only with built in Line Multiplier).
30
R5976584 BARCO CINE 7 26022003
Page 35

5. Start up of the adjustment mode
5. START UP OF THE ADJUSTMENT MODE
5.1 How to start up the adjustment mode
Start up using the RCU
1. P ress the ADJU ST ke y.
The projector dis plays the main menu. (menu 5-1)
MAIN MENU
Image control
Iris control
Sound control
Function keys
Service menus
↓
Menu 5-1
Select with↑or
then <ENTER>
<EXIT> to return
Start up using the local keypad
1. P ress the ADJU ST ke y.
The projector displays the General Access menu. (image 5-1)
2. U se the cursor keys to highlight entern ADJUST.
3. P ress ENTER.
The projector dis plays the main menu (menu 5-1).
Image 5-1
Toadjust the Analog picture controls with the local keypad while in the ’Adjustment mode’, press the ADJUST
key. The next General Access menu will be displayed.
Possible paths
Depending on the projector configuration the following paths are possible with the ’Main menu’.
• Image Control - Allows to change the color temperature of the image and to select another f ormat (adjustment) for the image.
• IRIS-Control - This selection will only be av ailable when the autoconvergence unit IRIS is b uilt in into the projector. This control
will allow to align the projector automatically.
• Sound Control - Allows to select the sound mode (only when a sound unit is built in).
• Function Keys - Gives an overview of the pr ogramm ed function for ea ch key.
• Service Menus - Installation and adjustm
R5976584 BARCO CINE7 26022003
ent menus to set up the projector. Be fore entering a warning will be displayed.
31
Page 36

5. Start up of the adjustment mode
5.2 How to adjust an analog control
How to handle
1. P ush the cursor keys up or down to select the analog control to be adjusted.
2. P ress ENTER to confirm.
When the analog control is adjusted the projector returns automatically to the General access m e nu. When
you want to return to the Adjustment mode, press EXIT, otherwise select quit ADJUST and press ENTER to
return to operational mode.
32 R5976584 BARCO CINE 7 26022003
Page 37

6. MAIN MENU
Overview
• Main Menu Overview
• Image Control
• IRIS Control
• Sound Control
• Function Keys
• Service Menus
6.1 Main Menu Overview
Main Menu Overview
• Image control
- Line multiplier
- Color adjust
- Format select
• Iris control
- Iris Touch up
- Iris auto converge
- Iris full alignment
• Sound control
-Normalstereo
- Spacial stereo
- Pseudo stereo
• Function keys
-F1
-F2
-F3
-F4
-F5
• Service menus
-Iris
-Guided
- Random Access
- Installation
-Service
6. Main Menu
6.2 Image Control
Overview
• Starting up the image controls
• Line Multiplier
• Color Adjust, Color temperature set up
• Format Select
R5976584 BARCO CINE7 26022003
33
Page 38

6. Main Menu
6.2.1 Starting up the image controls
To start up
1. P ush the cursor key ↑ or ↓ to select Image Control. (menu 6-1)
The selected item will change in color and a marker will be displayed in front of it.
2. P ress ENTER to select.
The Image Control menu will be displayed. (menu 6-2)
Menu 6-1
MAIN MENU
Image control
Iris control
Sound control
Function keys
Service menus
Select with↑or
then <ENTER>
<EXIT> to return
↓
Menu 6-2
IMAGE CONTROL
Image Processing
Color Adjust
Format Select
Select with↑or
then <ENTER>
<EXIT> to return
6.2.2 Line Multiplier
Overview
• Changing the Multiplier setting
• Multiplier mode
• Motion Processing On/Off
• Video Equalizing
• Noise Reduction
• Contrast Enhancement
6.2.2.1 Changing the Multiplier setting
Line multiplying isonly possible for Video,S-Video, Component Video images onstandard linefrequency and
RGB signals on 15 kHz.
The setting of the line multiplier will be saved together with the source number. Each time this source number
is selected, the last saved version will be loaded.
↓
Why line m ultiplying
If a line multiplier is built in and in the ON state, video images can be displayed with different line and frame rates. That will improve
the video image quality.
How to change the Multiplier setting
1. P ush the cursor key ↑ or ↓ to select Image Processing. (menu 6-3)
2. P ress ENTER to select the Image Pr o ce ssing menu.
The Image Processing menu will be displayed. (m enu 6-4)
IMAGE CONTROL
Image Processing
Color Adjust
Format Select
↓
Menu 6-3
Select with↑or
then <ENTER>
<EXIT> to return
34 R5976584 BARCO CINE 7 26022003
IMAGE PROCESSING
Line Multiplier : ON
Multiplier Mode
Motion Processing : ON
Video Equalizing
Noise Reduction
Contrast Enhancement
Select with↑or
then <ENTER>
<EXIT> to return
Menu 6-4
↓
Page 39

Line Multiplier ON/OFF
1. P ush the cursor key ↑ or ↓ to select Line Multiplier. (menu 6-5)
2. P ress ENTER to toggle between ON and OFF.
When in the ON state, all multiplier functions are selec table.
IMAGE PROCESSING
Line Multiplier : ON
Multiplier Mode
Motion Processing : ON
Video Equalizing
Noise Reduction
Contrast Enhancement
6. Main Menu
↓
Menu 6-5
Select with↑or
then <ENTER>
<EXIT> to return
6.2.2.2 Multiplier mode
What can be selected?
The multiplier menu makes it possible to select different scan rate for the connected video signal.
Interlaced
Short for interlaced scanning. Also called line interlace. A system of video scanning whereby the odd- and evennumbered lines of a picture are transmitted c onsecutively as two separate interleaved fields. Interlace is a form of
compression.
Progressive
Short for progressive scanning. A system of video scanning whereby lines of a picture are transmitted consecutively,
such as in the computer world
Start up the Multiplier mode
1. P ush the cursor key ↑ or ↓ to select Multiplier mode. (menu 6-6)
2. P ress ENTER to select.
One of the different Multiplier mode menus will be displayed. (menu 6-7)
IMAGE PROCESSING
Line Multiplier : ON
Multiplier Mode
Motion Processing : ON
Video Equalizing
Noise Reduction
Contrast Enhancement
Select with↑or
then <ENTER>
<EXIT> to return
Menu 6-6
↓
MULTIPLIER MODE
50Hz 625 lines P
50Hz 935 lines P
100Hz 625 lines P
50Hz 1250 lines P
100Hz 1250 lines I
Select with↑or
then <ENTER>
<EXIT> to return
Menu 6-7
MULTIPLIER MODE
60Hz 525 lines P
60Hz 785 lines P
120Hz 525 lines P
60Hz 1050 lines P
120Hz 1050 lines I
↓
Menu 6-8
Select with↑or
then <ENTER>
<EXIT> to return
↓
R5976584 BARCO CINE7 26022003 35
Page 40

6. Main Menu
Changing the scan rate
1. P ush the cursor key ↑ or ↓ to select a new scan rate. (menu 6-9)
2. P ress ENT ER to activate this scan rate.
50Hz Vertical frequency of the image
1250 Lines Quantity of horizontal lines
P = Non Interlaced = Progressive Scan
Interlace mode
I=Interlaced
MULTIPLIER MODE
50Hz 625 lines P
50Hz 935 lines P
100Hz 625 lines P
50Hz 1250 lines P
100Hz 1250 lines I
↓
Menu 6-9
Select with↑or
then <ENTER>
<EXIT> to return
6.2.2.3 Motion Processing On/Off
What can be done?
With this function it is possible to recognize whether the source m aterial was originally film or video. That prevents the creation of
motion artifacts.
How to toggle Motion Processing On/Off?
1. P ush the cursor key ↑ or ↓ to select Motion Processing. (menu 6-10)
2. P ress ENTER to toggle M otion Processing On/Off.
IMAGE PROCESSING
Line Multiplier : ON
Multiplier Mode
Motion Processing : ON
Video Equalizing
Noise Reduction
Contrast Enhancement
↓
Menu 6-10
Select with↑or
then <ENTER>
<EXIT> to return
6.2.2.4 Video Equalizing
What can be done?
The sharpness of the image can be adjusted for 3 frequency bands (low, medium and high) separately. In addition to the 7 preprogrammed factory presets a customized adjustment of the sharpness for 3 ranges is also possible.
36
R5976584 BARCO CINE 7 26022003
Page 41

6. Main Menu
How to adjust Video Equalizing?
1. P ush the cursor key ↑ or ↓ to select Video Equalizing and press ENTER to select. (menu 6-11)
The Video Equalizing menu will be displayed. (image 6-1)
2. P ush the ← or → keys to select the desired frequency band (Low, Mid or High) or the Factory Preset : x.
3. P ush the cursor key ↑ or ↓ to adjust the sharpness in the chosen frequency band (Low, Mid or High) or to scroll through the
factory presets (x = 1 to 7).
Note: Factory preset 8 is equal to the custom adjustment as made with low, m id and high.
4. P ress EXIT to return to the Image Processing menu.
IMAGE PROCESSING
Line Multiplier : ON
Multiplier Mode
Motion Processing : ON
Video Equalizing
Noise Reduction
Contrast Enhancement
Select with↑or
then <ENTER>
<EXIT> to return
Menu 6-11
Image 6-1
Video Equalizing menu
↓
6.2.2.5 Noise Reduction
What can be done?
Noisy, lower quality video images can be ameliorated by use of the Noise Reduction feature.
How to adjust Noise Reduction?
1. P ush the cursor key ↑ or ↓ to select Noise Reduction and press ENTER to select. (menu 6-12)
The Dynamic Noise Reduction bar scale will be displayed. (image 6-2)
2. P ush the cursor key ↑ or ↓ to adjust the Noise Reduction.
3. P ress EXIT to return to the Image Processing menu.
IMAGE PROCESSING
Line Multiplier : ON
Multiplier Mode
Motion Processing : ON
Video Equalizing
Noise Reduction
Contrast Enhancement
↓
Menu 6-12
Select with↑or
then <ENTER>
<EXIT> to return
R5976584 BARCO CINE7 26022003 37
Page 42

6. Main Menu
Image 6-2
Dynamic Noise Reduction bar scale
6.2.2.6 Contrast Enhancement
What can be done?
Enhancing the contrast results in a more dynamic image.
How to adjust the Contrast Enhancement?
1. P ush the cursor key ↑ or ↓ to select Contrast Enhancement and press ENTER to select. (menu 6-13)
The Contrast Enhancement bar scale will be displayed. (image 6-3)
2. P ush the cursor key ↑ or ↓ to adjust the Contrast Enhancement.
3. P ress EXIT to return to the Image Processing menu.
IMAGE PROCESSING
Line Multiplier : ON
Multiplier Mode
Motion Processing : ON
Video Equalizing
Noise Reduction
Contrast Enhancement
Select with↑or
then <ENTER>
<EXIT> to return
Menu 6-13
Image 6-3
Contrast Enhancement bar scale
↓
6.2.3 Color Adjust, Color temperature set up
What can be done?
The color temperature of the image can be installed. The customer has the choice between 4 factory preset color t emperatures and
one custom. This custom color temperature has to be adjusted in the Random Access A djustment Mode.
38
R5976584 BARCO CINE 7 26022003
Page 43

How to change the color temperature
1. P ush the cursor key ↑ or ↓ to select Color Adjust. (menu 6-14)
2. P ress ENTE R to display the Color Adjust menu. (menu 6-15)
3. P ush the cursor key ↑ or ↓ to select the desired color temperature.
4. P ress ENTER to activate that color temperature.
6. Main Menu
Menu 6-14
IMAGE CONTROL
Image Processing
Color Adjust
Format Select
Select with↑or
then <ENTER>
<EXIT> to return
↓
Menu 6-15
COLOR ADJUST
Broadcast 3200
Film 4900
Video 6500 K
Computer 9300 K
Custom
Select with↑or
then <ENTER>
<EXIT> to return
K
K
↓
6.2.4 Format Select
Overview
• Selecting a Format
• Adding a name to a Format
• Storing the settings to a new Format.
6.2.4.1 Selecting a Format
What can be done
For one source, up to 8 different sets of settings can be stored. A set of settings is called ’Format’. A ’Format’ can be ’available’ or
’free’. ’Available’ when settings ar e stored in this location. ’Free’ when no setting are stored in this location. This location can be
used for storing new adjustment settings for this source. When ’available’, a name of 8 characters can be programm ed by the us er.
How selecting a Format.
1. P ush the cursor key ↑ or ↓ to select Format. (menu 6-16)
2. P ress ENTER to display the Format List. (menu 6-17)
3. P ress ENTER to select.
Menu 6-16
IMAGE CONTROL
Image Processing
Color Adjust
Format Select
Select with↑or
then <ENTER>
<EXIT> to return
↓
Menu 6-17
FORMAT LIST
Source 01 Video
Format 1 Available xxxxxx
Format 2 Free xxxxxx
Format 3 Available xxxxxx
Format 4 Free xxxxxx
Format 5 Free xxxxxx
Format 6 Free xxxxxx
Format 7 Free xxxxxx
Format 8 Free xxxxxx
Select with↑or
then <ENTER>
<EXIT> to return
<TEXT> to enter a name
6.2.4.2 Adding a name to a Format
What can be done?
A name can be added to an av ailable format.
↓
R5976584 BARCO CINE7 26022003
39
Page 44

6. Main Menu
How t o add a name?
1. P ush the cursor key ↑ or ↓ to select the Format to which a name has to be added. (menu 6-18)
2. P ress TEXT to display the c ompo se menu. (menu 6-19)
3. Th e position of the character which will be edited, will be indicated with a digit. Push the cursor keys ↑, ↓, ← or → to select the
first character.
4. P ress ENTER to select the chosen character.
This character will be inserted on the indicated position. The edit c haracter indication will be incremented with one.
5. C ontinue in the same way for the other characters.
6. W he n the name is completed, press EX IT to return to the ’Format List’ menu. (menu 6-20)
FORMAT LIST
Source 01 Video
Format 1 Available xxxxxx
Format 2 Free xxxxxx
Format 3 Available xxxxxx
Format 4 Free xxxxxx
Format 5 Free xxxxxx
Format 6 Free xxxxxx
Format 7 Free xxxxxx
Format 8 Free xxxxxx
Select with↑or
then <ENTER>
<EXIT> to return
<TEXT> to enter a name
Menu 6-18
ABCDEFGHI
JKLMNOPQR
STUVWXYZ
\:0123456789
Edit character 1
↓
Menu 6-19
COMPOSE
xxxxxxxx
Select with↑or
then <ENTER>
<EXIT> to return
6.2.4.3 Storing the settings to a new Format.
How to store
1. P ush the cursor key ↑ or ↓ to select a free format. (menu 6-21)
2. P ress ENTER to activate.
3. M ake any adjustment to the image.
4. Q uit the adjustment mode by pressing ADJUST.
The selected fo rmat will change from free to available.
FORMAT LIST
Source 01 Video
Format 1 Available xxxxxx
Format 2 Free xxxxxx
Format 3 Available xxxxxx
Format 4 Free xxxxxx
Format 5 Free xxxxxx
Format 6 Free xxxxxx
Format 7 Free xxxxxx
Format 8 Free xxxxxx
Select with↑or
then <ENTER>
<EXIT> to return
<TEXT> to enter a name
↓
FORMAT LIST
Source 01 Video
Format 1 Available xxxxxx
Format 2 Free xxxxxx
Format 3 Available BARCO
Format 4 Free xxxxxx
Format 5 Free xxxxxx
Format 6 Free xxxxxx
Format 7 Free xxxxxx
Format 8 Free xxxxxx
↓
Select with↑or
then <ENTER>
<EXIT> to return
<TEXT> to enter a name
Menu 6-20
↓
Menu 6-21
6.3 IRIS Control
Overview
• StartinguptheIRISControls
• IRIS Touch Up
• IRIS Auto Converge
• IRIS Full Alignment
What is possible?
With the IRIS functions it is possible to ameliorate the convergence and alignment of the image.
40
R5976584 BARCO CINE 7 26022003
Page 45

6.3.1 Starting up the IRIS Controls
Before starting one of the IRIS functions, b e sure the projector has w armed up for at least 20 min. Only after
20 m in the projector has reached its full specifications.
How to start up
1. P ush the cursor key ↑ or ↓ to select IRIS control. (menu 6-22)
2. P ress ENTER to select.
The IRIS control menu will be displayed. (menu 6-23)
6. Main Menu
Menu 6-22
MAIN MENU
Image control
Iris control
Sound control
Function keys
Service menus
Select with↑or
then <ENTER>
<EXIT> to return
↓
Menu 6-23
IRIS CONTROL
IRIS Touch Up
IRIS Auto Converge
IRIS Full Alignment
Select with↑or
then <ENTER>
<EXIT> to return
↓
6.3.2 IRIS Touch Up
What can be done?
If you discover in the m iddle of the image a convergenc e misalignment between red, green and blue, the s tatic convergence of this
currently selected source can be adjusted with the touch up function.
Start up the IRIS touch up
1. P ush the cursor key ↑ or ↓ to select IRIS Touch Up. (menu 6-24)
2. P ress ENTER to activate the touch up function.
The process starts and when success fully completed, the projector will return to image display of the current source.
IRIS CONTROL
IRIS Touch Up
IRIS Auto Converge
IRIS Full Alignment
↓
Menu 6-24
Select with↑or
then <ENTER>
<EXIT> to return
6.3.3 IRIS Auto Converge
What can be done?
The autoconvergence on the current source will be carried out automatically,starting from the existing settings. By projecting alternately red and blue lines, 25 convergence areas are aligned onto the green pattern.
R5976584 BARCO CINE7 26022003
41
Page 46

6. Main Menu
Starting the IRIS Auto Converge
1. P ush the cursor key ↑ or ↓ to select IRIS Auto Converge. (menu 6-25)
2. P ress ENTE R to activate the autoconvergence function.
The process starts and when success fully completed, the projector will return to image display of the current source.
IRIS CONTROL
IRIS Touch Up
IRIS Auto Converge
IRIS Full Alignment
↓
Menu 6-25
Select with↑or
then <ENTER>
<EXIT> to return
6.3.4 IRIS Full Al ignment
What can be done?
The IRIS full alignment function adjust the geometry of the image (coarse geometry alignment).
This pr ocedure takes about 45 seconds.
Starting up the IRIS Full Alignment
1. P ush the cursor key ↑ or ↓ to select IRIS Full Alignment. (menu 6-26)
2. P ress ENTER to activate the auto alignment function.
The process starts and when successfully completed, the projector will return to the IRIS c ontrol menu.
IRIS CONTROL
IRIS Touch Up
IRIS Auto Converge
IRIS Full Alignment
Select with↑or
then <ENTER>
<EXIT> to return
↓
Menu 6-26
6.4 Sound Control
What can be done?
When the sound option is available, the following sound modes can be selected : normal stereo, spatial stereo, pseudo stereo or
mono.
42
R5976584 BARCO CINE 7 26022003
Page 47

Selecting the sound control.
1. P ush the cursor key ↑ or ↓ to select Sound Control. (menu 6-27)
2. P ress ENTER to select the Sound Control function.
The Sound Control m enu will be displayed. (menu 6-28)
6. Main Menu
Menu 6-27
MAIN MENU
Image control
Iris control
Sound control
Function keys
Service menus
Select with↑or
then <ENTER>
<EXIT> to return
↓
Menu 6-28
SOUND CONTROL
Select sound mode :
Normal Stereo
Spacial Stereo
Pseudo Stereo
Mono
Select with↑or
then <ENTER>
<EXIT> to return
↓
6.5 Function Keys
What can be done?
Quick access keys to customer pre-programmed adjustments. Almost any adjustment can be added to a function key. To program
a function key, it is necessary to enter into the ’Service Menu’. To activate a function key, just press the corresponding key.
The following functions are factory pre-programmed :
• F1 = IRIS Touch up
• F2 = Convergence Red on Green
• F3 = Convergence Blue on Green
• F4=H&VSize
• F5 = Color Balance
To get an overview of the programmed keys
1. P ush the cursor key ↑ or ↓ to select Function Keys. (menu 6-29)
2. P ress ENTER to display an overview of the function keys. (menu 6-30)
Menu 6-29
MAIN MENU
Image control
Iris control
Sound control
Function keys
Service menus
Select with↑or
then <ENTER>
<EXIT> to return
↓
Menu 6-30
FUNCTION KEYS
F1: IRIS Touch-up
F2: Covergence Red on Green
F3: Convergence Blue on Green
F4:H&VSize
F5: Color Balance
<EXIT> to return
6.6 Service Menus
What can be done?
With the c omplete set of Service men us such as IRIS, Gu ided, Random Access, Installation and Service it is possible to adjust t he
projector c ompletely.
When enteringtheService Menus, a warning willbedisplayed mentioning that only qualifiedservice personnel may enter theService
menus.
R5976584 BARCO CINE7 26022003
43
Page 48

6. Main Menu
How to enter the Service Menus
1. P ush the cursor key ↑ or ↓ to select Service Menus. (menu 6-31)
A warning will be displayed. (menu 6-32)
"Risk of incorrect adjustment of the projector. The following SERVICE menus are reserved to and to be performed only by
qualified personnel ! If qualified, pre ss ENTER to continue, or if not, EXIT to return.
2. If qualified, press ENTER. (menu 6-33)
If not qualified, press EXIT.
Menu 6-31
MAIN MENU
Image control
Iris control
Sound control
Function keys
Service menus
Select with↑or
then <ENTER>
<EXIT> to return
WARNING
RISK OF INCORRECT
ADJUSTMENT OF THE
PROJECTOR.
The following
SERVICE menus
are reserved to,
and to be performed only
by qualified personnel !
↓
If qualified, press
<ENTER> to continue, or
if not, <EXIT> to return.
Menu 6-32
ADJUSTMENT MODE
Select a path from below :
IRIS
GUIDED
RANDOM ACCESS
INSTALLATION
SERVICE
Source 01
Select with↑or
then <ENTER>
<EXIT> to return
Menu 6-33
↓
44 R5976584 BARCO CINE 7 26022003
Page 49

7. Entering the service menus
7. ENTERING THE SERVICE MENUS
Overview
• The Adjustment menus
• Password Protection
7.1 The Adjustment menus
What is available in the Adjustment menus
A complete set of adjustments divided in different m odes are available to adjust the projector, these different modes are:
IRIS To autoalign and autoconverge the projector.
Guided Guided should be selected if the user intends to perform a com plete alignment of the projected
image. All the necessary geometry and convergence adjustments are executed in a predetermined
sequence.
Random Acc ess Should only be accessed if the user is highly qualified and knows the sequence of adjustments.
Has to be used to adjust the image.
Installation S hould only be selected if the pr ojector is relocated and/or a different screen size is desired. When
selecting Installation the user or operator w ill be warned to call a qualified technician to perform
the ins tallation procedure.
Service Should only be selected if the user intends to change the predefined settings.
How to enter the Adjustment menus with the RCU?
1. P ress the ADJU
The Main menu will be displayed. ( menu 7-1)
2. P ush the cursor key ↑ or ↓ to s elect Service menus.
3. P ress ENTER to select.
A warning will be displayed. (menu 7-2)
4. If qualified, press ENTER to continue.
The Service main menu will be displayed. (menu 7-3)
MAIN MENU
Image control
Iris control
Sound control
Function keys
Service menus
Select with↑or
then <ENTER>
<EXIT> to return
ST key.
↓
WARNING
RISK OF INCORRECT
ADJUSTMENT OF THE
PROJECTOR.
The following
SERVICE menus
are reserved to,
and to be performed only
by qualified personnel !
If qualified, press
<ENTER> to continue, or
if not, <EXIT> to return.
ADJUSTMENT MODE
Select a path from below :
IRIS
GUIDED
RANDOM ACCESS
INSTALLATION
SERVICE
Source 01
Select with↑or
then <ENTER>
<EXIT> to return
↓
Menu 7-1
Menu 7-2
How to enter the Adjustment menus with the local keypad?
1. P ress the ADJU ST ke y.
The project
2. U se the cursor keys to highlight enter ADJUST.
3. P ress ENTER to select.
The Main menu will be displayed (m enu 7-1).
4. C ontinue as described in How to enter the Ad justment menus with the RCU.
R5976584 BARCO CINE7 26022003
or d isplays the General Access Menu. (image 7-1)
Menu 7-3
45
Page 50

7. Entering the service menus
Image 7-1
7.2 Password Protection
Password Protection
Some items in the Service menus are password protected. While selecting such an item, the projector asks to enter your password.
Password Protection is only a vailable when the password strap on the controller module is on. Contact a
Barco authorized technician when no password is requested during the adjustmen t procedure and Password
Protection is desired.
Entering the Password via the RCU
The Password contains 4 digits, when the projector asks to enter your password:
1. E nter the digits with the numeric keys on the RCU (e.g.: 2319).
For each digit entered, a ’X’ appears on the screen under the disp layed text ’enter password’ (menu 7-4)
enter password
XXXX
Menu 7-4
When the password is correctly entered, all other password protected items are accessible without reentering
the password. When reen tering the adjustment mode, it will be necessary to en ter your p assw ord again when
selecting a passw ord protected item.
When the password is wrong, the error message “Wrong Password !!!” will
be displayed.
46 R5976584 BARCO CINE 7 26022003
Page 51

Entering the Password via the local keypad
When the c ompos e password menus is displayed:
1. S elect with the cursor the first digit of your password. (menu 7-5)
2. P ress ENTER to select.
3. S elect the next digit of your password.
4. P ress ENTER to select.
5. H andle in the same way for the third and fourth digit.
COMPOSE PASSWORD
????
789
456
123
0
7. Entering the service menus
Menu 7-5
Select with↑or
←or→
then <ENTER>
<EXIT> to return
↓
When the password is correctly entered, all other password protected items are accessible without reentering
the password. When reen tering the adjustment mode, it will be necessary to en ter your p assw ord again when
selecting a passw ord protected item.
When the password is wrong, the error message “Wrong Password !!!” will be displayed.
R5976584 BARCO CINE7 26022003 47
Page 52

7. Entering the service menus
48 R5976584 BARCO CINE 7 26022003
Page 53

8. Random Access Adjustment Mode
8. RANDOM ACCESS ADJUSTMENT MODE
Overview
• Introduction
• Random Access Overview
• Selecting Setup Pattern
• Random Access mode selection menu
• Picture Tuning
• Geometry Adjustments
• Convergence Adjustment
8.1 Introduction
How to start up Random Access Adjustment Mode?
1. P ress the ADJUST key to start up the Adjustment Mode.
The main Adjustment Mode menu will be disp layed.
2. P ush the cursor key ↑ or ↓ to highlight Random Access and press ENTER to select. (menu 8-
ADJUSTMENT MODE
Select a path from below :
IRIS
GUIDED
RANDOM ACCESS
INSTALLATION
SERVICE
Source 01
1)
Menu 8-1
Select with↑or
then <ENTER>
<EXIT> to return
↓
Some items in the Random access mode are password protected (when the p asswo rd function is enabled).
Enter your password to co ntinue. All other password protected items are now also available if you stay in the
adjustment mode.
R5976584 BARCO CINE7 26022003 49
Page 54

8. Random Access Adjustment Mode
8.2 Random Access Overview
Random A ccess Overview
• Picture Tuning
- Color Balance
- Decoding
-Sync
- Peaking
o
Off
o
Low Source Frequency
o
Mid Source Frequency
o
High Source Frequency
- Clamp Mode
-Port2
- Line Multiplier (Optional)
o
Motion Processing
o
Output Mode
o
Video Equalizing
o
Noise Reduction
o
Contrast Enhancement
o
Split Screen
o
Advanced Settings
o
Time Base Correction
o
Luminance Decay
o
VSyncRef
o
Clamp Gating
o
Limo + Options
o
Coring
o
LTI
o
CTI
o
Factory Preset
• Geometry
- H-Phase
- Raster Shift
o
Coarse Green
o
Coarse Red Horizontal
o
Coarse Blue Horizontal
o
Fine Green
o
Fine Blue
- Left / Right
o
Vertical Centerline Bow
o
Vertical Centerline Skew
o
Side Bow
o
Side Keystone
o
Seagull Correction
- Top / B ottom
o
Horizontal Centerline Bow
o
Horizontal Centerline Skew
o
Top Keystone
o
Top Bow
o
Bottom Keystone
o
Bottom Bow
o
Seagull Correction
-Size
- Vertical Linearity
- Blanking
• Convergence
• Color Select
50
R5976584 BARCO CINE 7 26022003
Page 55

8. Random Access Adjustment Mode
8.3 Selecting Setup Pattern
HowtoselecttheSetupPattern?
If an external source is connected to the projector,the following screen will be displayed. To select the desired setup pattern, handle
as follow:
1. A n external source is connected to the projector.
Push the ↑ or ↓ keys to highlight the des ired setup pattern and press ENTER to select. (menu 8-2)
Selected Source External source
Genlocked Pattern Internally generated pattern, locked on the external source, the pa ttern changes with the adjustment
selection.
Internal # Pattern Internally generated pattern, locked on internal generated sync signals. (No external source
necessary)
If no, The internal pattern menu will be displayed.
Choose a setup pattern from
Menu 8-2
below:
SELECTED SOURCE
GENLOCKED PATTERN
INTERNAL # PATTERN
Select with↑or
then <ENTER>
<EXIT> to return
↓
When using the Internal # Pattern?
The Internal # Pattern menu will be displayed if the Internal Cross Hatch Pattern has been selected or if no source is connected to
the projector.
Available Factory Preset Frequencies
The table below lists the 16 fixed factory preset frequencies available. Another 8 blocks are c ustom programmable.
15.6/50 PAL/SECAM
15.7/60 NTSC
31.2/50 EDTV
31.5/60 IDTV
31.2/50 HDTV EUREKA
31.5/60 HDTV ATV
33.7/60 HDTV HIVISION
15.8/60 EGA1
21.8/60 EGA2
31.5/60 VGA3
31.5/60 XGA 1.2
35.5/87 VGA 4
44.2/70 Super VGA 2
48.5/60 Super VGA 1
61.0/76 Super VGA 3
R5976584 BARCO CINE7 26022003 51
Page 56

8. Random Access Adjustment Mode
72.1/67 Super VGA 4
63.9/76 APOLLO
How to select the desired Cross Hatch Frequency?
To select a desired cross hatch frequenc y, h andle as follow:
1. P ush the cursor key ↑ or ↓ to highlight the desired Cross Hatch Frequency. (menu 8-3)
2. P ush the ← or → keys to scroll to another page
3. P ress ENTER if the desired block is selected.
INTERNAL # PATTERN
k
Hz/Hz
15.6/50 PAL
15.6/60 NTSC
31.2/50 EDTV
31.5/60 IDTV
31.2/50 HDTV EUREKA
31.5/60 HDTV ATV
.
↓
→
Menu 8-3
Select with↑or
scroll with←or
<ENTER> to accept
<EXIT> to return
The menus in this m anual are created for an external source, connected to one of the inputs, and the ’Genlocked Pattern’ is selected.
8.4 Random Access mode selection menu
Possibilities
This is the main menu for the Random Access adjus tment mode.
Through this menu, the following
• Picture tuning
• Geometry
• Convergence
• Color select
RANDOM ACCESS
ADJUSTMENT MODE
PICTURE TUNING
GEOMETRY
CONVERGENCE
COLOR SELECT
adjustments and features are a ccessible :
↓
Menu 8-4
Select with↑or
then <ENTER>
<EXIT> to return
8.5 Picture Tuning
Overview
• Starting up Picture Tuning
• Color Balance
• Sync mode: Fast/Slow
•Decoding
• Port 2 Video/S-Video (Optional)
• Peaking
• Line Multiplier Settings
52
R5976584 BARCO CINE 7 26022003
Page 57

8.5.1 Starting up Picture Tuning
How to start up Picture Tuning?
1. P ush the cursor key ↑ or ↓ to highlight Picture Tuning and press ENTER to select. (menu 8-5)
The Picture Tuning m enu will be displayed. (menu 8-6)
Depending on the input source, this menu will display different items:
- Co lor B alance
- S ync: Slow/Fast
- De coding E BU/IRE
- P ort 2: Video/S-Video
- Line Multiplier
- P eaking
8. Random Access Adjustment Mode
Menu 8-5
RANDOM ACCESS
ADJUSTMENT MODE
PICTURE TUNING
GEOMETRY
CONVERGENCE
COLOR SELECT
Select with↑or
then <ENTER>
<EXIT> to return
↓
Menu 8-6
PICTURE TUNING
COLOR BALANCE
SYNC: FAST
DECODING : EBU
PORT2 : VIDEO
PEAKING
LINE MULTIPLIER : ON
Select with↑or
then <ENTER>
<EXIT> to return
↓
8.5.2 Color Balance
8.5.2.1 Selecting the Color Balance
What can be done?
The Color Balance function is used to select or adjust the color temperature of a projected white image by the projector.
The Color Balance can be adjusted on two different ways:
• By means of a fixed color balance. Youhave the choice between 3200 K (reddish), 5400 K, 6500 K (white) or 9300 K (bluish).
• By means of a cus tom white and black balance.
How to select Color Balance
1. P ush the cursor key ↑ or ↓ to highlight Color Balance. (menu 8-7)
2. P ress ENTER to select.
The color balanc e menu will be displayed. (menu 8-8)
LINE MULTIPLIER : ON
Select with↑or
<EXIT> to return
Menu 8-7
PICTURE TUNING
COLOR BALANCE
SYNC: FAST
DECODING : EBU
PORT2 : VIDEO
PEAKING
then <ENTER>
↓
Menu 8-8
COLOR BALANCE
FIXED COLOR BALANCE
3200 5400 6500 9300
CUSTOM WHITE BALANCE
RED & BLUE GREEN
CUSTOM BLACK BALANCE
RED & BLUE GREEN
Select with arrow keys
then <ENTER>
adjust red with↑or
Blue with←or
<EXIT> to return
→
↓
R5976584 BARCO CINE7 26022003 53
Page 58

8. Random Access Adjustment Mode
8.5.2.2 Set a Fixed Color Balance
How to select
1. H ighlight one of the 4 preprogrammed color temperatures w ith the c ursor keys. (menu 8-9)
2. P ress ENTER to display the image with the desired color balance.
COLOR BALANCE
FIXED COLOR BALANCE
3200 5400 6500 9300
CUSTOM WHITE BALANCE
RED & BLUE GREEN
CUSTOM BLACK BALANCE
RED & BLUE GREEN
Select with arrow keys
adjust red with↑or
Blue with←or
<EXIT> to return
Menu 8-9
then <ENTER>
↓
→
8.5.2.3 Custom Color Balance, White Balance adjustment
How to adjust
1. Push the cursor keys ↑, ↓, ← or → to select Red & B lue below Custom white Balance. (menu 8-10)
2. P ress ENT ER to activate the adjustment.
3. P ush the cursor key ↑ or ↓ to adjust the red gain.
4. P ush the cursor key ← or → to adjust the blue gain.
A bar scale indicates the amount of adjustment.
5. P ress ENTER to return to the Color Balance menu.
6. P ush the cursor keys ↑, ↓, ← or → to select Green below Custom white Balance.
7. P ress ENT ER to activate the adjustment.
8. P ush the cursor key ↑ or ↓ to adjus t the green gain.
9. P ress ENTER to return to the Color Balance menu.
COLOR BALANCE
FIXED COLOR BALANCE
3200 5400 6500 9300
CUSTOM WHITE BALANCE
RED & BLUE GREEN
CUSTOM BLACK BALANCE
RED & BLUE GREEN
Select with arrow keys
then <ENTER>
adjust red with↑or
Blue with←or
<EXIT> to return
Menu 8-10
↓
→
54 R5976584 BARCO CINE 7 26022003
Page 59

8. Random Access Adjustment Mode
8.5.2.4 Custom Color Balance, Black Balance adjustment
How to adjust
1. Push the cursor keys ↑, ↓, ← or → to select Red & B lue below Custom black Balance. (menu 8-11)
2. P ress ENT ER to activate the adjustment.
3. P ush the cursor key ↑ or ↓ to adjust the red cut-off.
4. P ush the cursor key ← or → to adjust the blue cut-off.
A bar scale indicates the amount of adjustment.
5. P ress ENTER to return to the Color Balance menu.
6. P ush the cursor keys ↑, ↓, ← or → to select Green below Custom black Balance.
7. P ress ENT ER to activate the adjustment.
8. P ush the cursor key ↑ or ↓ to adjust the green cut-off.
9. P ress ENTER to return to the Color Balance menu.
COLOR BALANCE
FIXED COLOR BALANCE
3200 5400 6500 9300
CUSTOM WHITE BALANCE
RED & BLUE GREEN
CUSTOM BLACK BALANCE
RED & BLUE GREEN
Select with arrow keys
then <ENTER>
adjust red with↑or
Blue with←or
<EXIT> to return
↓
→
Menu 8-11
8.5.3 Sync mode: Fast/Slow
What can be done?
The Sync function is used to minimize horizontal jittering or tearing at the top to the displayed image.
The Sync Slow/Fast function is only available for RGBS, RGsB, component, tri level and component tri level
sources.
How to adjust the Sync mode?
1. Push t h e cursor key ↑ or ↓ to highlight Sync. (menu 8-12)
2. P ress ENTER to toggle between Fast or Slow.
Note: Syncisnormally set to Slow. The Fast positionisused to compensate for unsteadysyncpulses from older videoplayback
equipment.
PICTURE TUNING
COLOR BALANCE
SYNC: FAST
DECODING : EBU
PORT2 : VIDEO
PEAKING
LINE MULTIPLIER : ON
Select with↑or
then <ENTER>
<EXIT> to return
↓
Menu 8-12
8.5.4 Decoding
What can be done?
Only for NTSC signals.
R5976584 BARCO CINE7 26022003 55
Page 60

8. Random Access Adjustment Mode
Thepossibilityis offered todecodetheNTSC video signals via thenor mal American IRE standard orviathe European EBU standard.
How to set up ?
How to set up ?
1. P ush the cursor key ↑ or ↓ to select Decoding. (menu 8-13)
2. P ress ENTER to toggle between IRE and EBU.
EBU European standard of decoding color images
IRE American standard of decoding color images
PICTURE TUNING
COLOR BALANCE
SYNC: FAST
DECODING : EBU
PORT2 : VIDEO
PEAKING
LINE MULTIPLIER : ON
↓
Menu 8-13
Select with↑or
then <ENTER>
<EXIT> to return
8.5.5 Port 2 Video/S-Video (Optional)
What can be done?
Port 2 can be used as Video or S-Video input.
How to c onfigure Port 2?
1. Push t h e cursor key ↑ or ↓ to highlight Port2. (menu 8-14)
2. P ress ENTER to toggle between Video or S-Video.
PICTURE TUNING
COLOR BALANCE
SYNC: FAST
DECODING : EBU
PORT2 : VIDEO
PEAKING
LINE MULTIPLIER : ON
↓
Menu 8-14
Select with↑or
then <ENTER>
<EXIT> to return
8.5.6 Peaking
What can be done?
Peaking improves the contours in an projected image.
The Peaking function is only available for RGBS, RGsB, co mponen t, tri level and component tri level sources.
56 R5976584 BARCO CINE 7 26022003
Page 61

8. Random Access Adjustment Mode
How to adjust Peaking?
1. P ush the cursor key ↑ or ↓ to highlight Peaking and press ENTER. (menu 8-15)
Note: During the creation of new settings for a RGB source the corresponding peaking is switched on as default.
The Peak ing menu will be displayed. (menu 8-16)
The following frequency areas are available:
Low F requency Peaking 15–45Hz
Mid Frequency Peaking 45–85Hz
High F requency Peaking 85–110Hz
2. Push the cursor key ↑ or ↓ to s elect the des ired frequency area or off and press ENTER to activate.
3. P ress EXIT to return to the Picture Tuning menu.
PICTURE TUNING
COLOR BALANCE
SYNC: FAST
DECODING : EBU
PORT2 : VIDEO
PEAKING
LINE MULTIPLIER : ON
↓
Menu 8-15
Select with↑or
then <ENTER>
<EXIT> to return
8.5.7 Line Multiplier Settings
Overview
• Starting up Line M ultiplier settings
• Switching the multiplier ON/O FF
• Motion Processing On/Off
• Output Mode
• Video Equalizing
• Noise Reduction
• Contrast Enhancement
• Split Screen On/Off
• Advanced Settings
Menu 8-16
PEAKING
OFF
LOW FREQUENCY
MID FREQUENCY
HIGH FREQUENCY
Select with↑or
then <ENTER>
<EXIT> to return
↓
8.5.7.1 Starting up Line Multiplier settings
What can be done?
The multiplier eliminates the video line patterns and improves the image stability.
In addition:
• The time base correction virtually eliminates the timing jitter caused by the common videocassette recorders.
• De-interlacing gets rid of line flicker.
• Film mode processing makes sure that material that has been converted from 24 Hz cinema to video (2:2 and 3:2 pull down) is
displayed without artifacts.
• Dynamic noise reduction can be used to im prove noisy video sources.
• Static contrast enhancement allows the user to adjust the image contrast to personal taste.
• Several detail-enhancing filters bring out details.
Line multiplying isonly possible for Video,S-Video, Component Video images onstandard linefrequency and
RGB signals on 15 kHz.
The setting of the line multiplier will be saved together with the source number. Each time this source number
is selected, the last saved version will be loaded.
R5976584 BARCO CINE7 26022003 57
Page 62

8. Random Access Adjustment Mode
How to start up the Line Multiplier settings?
1. P ush the cursor key ↑ or ↓ to highlight Line Multiplier and press ENTER to select. (m enu 8-17)
The Image Processing menu will be displayed. (menu 8-18)
LINE MULTIPLIER : ON
Select with↑or
<EXIT> to return
Menu 8-17
PICTURE TUNING
COLOR BALANCE
SYNC: FAST
DECODING : EBU
PORT2 : VIDEO
PEAKING
then <ENTER>
↓
IMAGE PROCESSING
LINE MULTIPLIER : ON
MOTION PROCESSING: ON
VIDEO EQUALIZING
NOISE REDUCTION
CONTRAST ENHANCEMENT
SPLIT SCREEN: OFF
ADVANCED SETTINGS
Select with↑or
then <ENTER>
<EXIT> to return
Menu 8-18
OUTPUT MODE
↓
8.5.7.2 Switching the multiplier ON/OFF
How to switch
1. P ush the cursor key ↑ or ↓ to select Line Multiplier. (menu 8-19)
2. ENTER to toggle between Line Multiplier : ON and Line Multiplier: OFF.
When the line multiplier is on, all items in the menu are accessible.
IMAGE PROCESSING
LINE MULTIPLIER : ON
MOTION PROCESSING: ON
OUTPUT MODE
VIDEO EQUALIZING
NOISE REDUCTION
CONTRAST ENHANCEMENT
SPLIT SCREEN: OFF
ADVANCED SETTINGS
Select with↑or
then <ENTER>
<EXIT> to return
↓
Menu 8-19
8.5.7.3 Motion Processing On/Off
What can be done?
With this function it is possible to recognize whether the source m aterial was originally film or video. That prevents the creation of
motion artifacts.
How to toggle Motion Processing On/Off?
1. P ush the cursor key ↑ or ↓ to highlight Motion Processing. (menu 8 -20)
2. P ress ENTER to toggle M otion Processing On/Off.
3. P ress EXIT to return to the Picture Tuning menu.
IMAGE PROCESSING
LINE MULTIPLIER : ON
MOTION PROCESSING: ON
OUTPUT MODE
VIDEO EQUALIZING
NOISE REDUCTION
CONTRAST ENHANCEMENT
SPLIT SCREEN: OFF
ADVANCED SETTINGS
↓
Menu 8-20
Select with↑or
then <ENTER>
<EXIT> to return
58 R5976584 BARCO CINE 7 26022003
Page 63

8. Random Access Adjustment Mode
8.5.7.4 Output Mode
What can be done?
Within the output m ode menu, it is possible to select a new output mode for a given input signal.
The input signal can be:
• interlaced.
• non-interlaced.
How to adjust the Output Mode?
1. P ush the cursor key ↑ or ↓ to highlight Output Mode and press ENTER to select. (menu 8-21)
If your input s ignal is PAL or SEC AM signal following menu will be displayed: (menu 8-22)
If it is a NTSC signal following men u will be displayed: (menu 8-23)
2. P ush the cursor key ↑ or ↓ to highlight the desired scan rate e.g. 100H z 6 25 Lines NI and press ENTER to ac tivate. (menu 8-24)
50Hz Vertical frequency of the image
1250 Lines Quantity of horizontal lines
N I = Non Interlaced = Progressive Scan Interlace mode
3. P ress EXIT to return to the Image Processing menu.
IMAGE PROCESSING
LINE MULTIPLIER : ON
MOTION PROCESSING: ON
VIDEO EQUALIZING
NOISE REDUCTION
CONTRAST ENHANCEMENT
SPLIT SCREEN: OFF
ADVANCED SETTINGS
Select with↑or
then <ENTER>
<EXIT> to return
Menu 8-21
OUTPUT MODE
↓
Menu 8-22
LINE MULTIPLIER
OUTPUT MODE
50Hz 625 Lines NI
50Hz 935 Lines NI
100Hz 625 Lines NI
50Hz 1250 Lines NI
100Hz 1250 Lines I
Select with↑or
then <ENTER>
<EXIT> to return
LINE MULTIPLIER
OUTPUT MODE
60Hz 525 Lines NI
60Hz 785 Lines NI
120Hz 525 Lines NI
60Hz 1050 Lines NI
120Hz 1050 Lines I
↓
Menu 8-23
Select with↑or
then <ENTER>
<EXIT> to return
↓
Menu 8-24
LINE MULTIPLIER
OUTPUT MODE
50Hz 625 Lines NI
50Hz 935 Lines NI
100Hz 625 Lines NI
50Hz 1250 Lines NI
100Hz 1250 Lines I
Select with↑or
then <ENTER>
<EXIT> to return
8.5.7.5 Video Equalizing
What can be done?
The sharpness of the image can be adjusted for 3 frequency bands (low, medium and high) separately. In addition to the 7 preprogrammed factory presets a customized adjustment of the sharpness for 3 ranges is also possible.
How to adjust Video Equalizing?
1. P ush the cursor key ↑ or ↓ to highlight Video Equalizing and press ENTER to select. (menu 8-25)
The Video Equalizing menu will be displayed. (image 8-1)
2. P ush the ← or → keys to select the desired frequency band (Low, Mid or High) or the Factory Preset : x.
3. P ush the cursor key ↑ or ↓ to adjust the sharpness in the chosen frequency band (Low, Mid or High) or to scroll through the
factory presets (x = 1 to 7).
Note: Factory preset 8 is equal to the custom adjustment as made with low, m id and high.
4. P ress EXIT to return to the Image Processing menu.
↓
IMAGE PROCESSING
LINE MULTIPLIER : ON
MOTION PROCESSING: ON
OUTPUT MODE
VIDEO EQUALIZING
NOISE REDUCTION
CONTRAST ENHANCEMENT
SPLIT SCREEN: OFF
ADVANCED SETTINGS
↓
Menu 8-25
Select with↑or
then <ENTER>
<EXIT> to return
R5976584 BARCO CINE7 26022003 59
Page 64

8. Random Access Adjustment Mode
Image 8-1
Video Equalizing menu
8.5.7.6 Noise Reduction
What can be done?
Noisy, lower quality video images can be ameliorated by use of the Noise Reduction feature.
How to adjust Noise Reduction?
1. P ush the cursor key ↑ or ↓ to highlight Noise Reduction and press ENTER to select. ( menu 8-26)
The Dynamic Noise Reduction bar scale will be displayed. (image 8-2)
2. P ush the cursor key ↑ or ↓ to adjust the Noise Reduction.
3. P ress EXIT to return to the Image Processing menu.
IMAGE PROCESSING
LINE MULTIPLIER : ON
MOTION PROCESSING: ON
OUTPUT MODE
VIDEO EQUALIZING
NOISE REDUCTION
CONTRAST ENHANCEMENT
SPLIT SCREEN: OFF
ADVANCED SETTINGS
Select with↑or
then <ENTER>
<EXIT> to return
Menu 8-26
Image 8-2
Dynamic Noise Reduction bar scale
↓
8.5.7.7 Contrast Enhancement
What can be done?
Enhancing the contrast results in a more dynamic image.
60
R5976584 BARCO CINE 7 26022003
Page 65

8. Random Access Adjustment Mode
How to adjust the Contrast Enhancement?
1. P ush the cursor key ↑ or ↓ to highlight Contrast Enhancement and press ENTE R to select. (menu 8-27)
The Contrast Enhancement bar scale will be displayed. (image 8-3)
2. P ush the cursor key ↑ or ↓ to adjust the Contrast Enhancement.
3. P ress EXIT to return to the Image Processing menu.
IMAGE PROCESSING
LINE MULTIPLIER : ON
MOTION PROCESSING: ON
OUTPUT MODE
VIDEO EQUALIZING
NOISE REDUCTION
CONTRAST ENHANCEMENT
SPLIT SCREEN: OFF
ADVANCED SETTINGS
↓
Menu 8-27
Select with↑or
then <ENTER>
<EXIT> to return
Image 8-3
Contrast Enhancement bar scale
8.5.7.8 Split Screen On/Off
What can be done?
When the split screen is ’on’, the left half of the image will be displayed without enhancements, the right half shows the image with
all selected image processing enabled.
How to toggle Split Screen On/Off?
1. P ush the cursor key ↑ or ↓ to highlight Spit Screen. (menu 8-28)
2. P ress ENTER to toggle Split Screen On/Off.
IMAGE PROCESSING
LINE MULTIPLIER : ON
MOTION PROCESSING: ON
OUTPUT MODE
VIDEO EQUALIZING
NOISE REDUCTION
CONTRAST ENHANCEMENT
SPLIT SCREEN: OFF
ADVANCED SETTINGS
↓
Menu 8-28
Select with↑or
then <ENTER>
<EXIT> to return
8.5.7.9 Advanced Settings
Overview
• Starting Up Advanced Settings
• TimeBaseCorrection
• Luminance Delay
• Vertical Sync Reference
• Clamp Gating
•LimoProOptions
• Factory Presets
R5976584 BARCO CINE7 26022003
61
Page 66

8. Random Access Adjustment Mode
8.5.7.9.1 Starting Up Advanced Settings
How to start up Advanced Settings?
1. Push the cursor key ↑ or ↓ to h ighlight Advanced Settings and press EN T E R to select. (menu 8-29)
The Advanced settings menu will be displayed. (menu 8-30)
IMAGE PROCESSING
LINE MULTIPLIER : ON
MOTION PROCESSING: ON
VIDEO EQUALIZING
NOISE REDUCTION
CONTRAST ENHANCEMENT
SPLIT SCREEN: OFF
ADVANCED SETTINGS
Select with↑or
then <ENTER>
<EXIT> to return
Menu 8-29
OUTPUT MODE
↓
LINE MULTIPLIER
TIME BASE CORRECTION
LUMINANCE DELAY
V SYNC REF: INDIRECT
CLAMP GATING: OFF
LIMO PLUS OPTIONS
FACTORY PRESET
WARNING: ADVANCED
ADJUSTMENT SHOULD BE
PERFORMED ONLY BY QUALIFIED
PERSONNEL
Select with↑or
then <ENTER>
<EXIT> to return
Menu 8-30
↓
8.5.7.9.2 Time Base Correction
What can be done?
With the Time Base Correction function it is possible to cleanup low quality videotape noise to obtain a more stable image.
How to toggle Time Base Correction On/Off
1. P ush the cursor key ↑ or ↓ to highlight Tim e Base C o rre ction. (menu 8-31)
2. P ress ENTER to toggle Time Base Correction On/Off.
LINE MULTIPLIER
TIME BASE CORRECTION
LUMINANCE DELAY
V SYNC REF: INDIRECT
CLAMP GATING: OFF
LIMO PLUS OPTIONS
FACTORY PRESET
WARNING: ADVANCED
ADJUSTMENT SHOULD BE
PERFORMED ONLY BY QUALIFIED
PERSONNEL
Select with↑or
then <ENTER>
<EXIT> to return
↓
Menu 8-31
8.5.7.9.3 Luminance Delay
When is it necessary?
When a color shift is recognized on the sc reen. e.g. if color bars are projected and a line between the colors is recognized.
62
R5976584 BARCO CINE 7 26022003
Page 67

8. Random Access Adjustment Mode
How to adjust Luminance Delay?
1. P ush the cursor key ↑ or ↓ to highlight Luminance Delay and press ENTER to select. (menu 8-32)
The Luminance Delay b ar scale will be displayed. (image 8-4)
2. P ush the cursor key ↑ or ↓ to adjust the Luminance Delay u ntil the color shift is e liminated.
3. P ress EXIT to return to the Line Multiplier menu.
LINE MULTIPLIER
TIME BASE CORRECTION
LUMINANCE DELAY
V SYNC REF: INDIRECT
CLAMP GATING: OFF
LIMO PLUS OPTIONS
FACTORY PRESET
WARNING: ADVANCED
ADJUSTMENT SHOULD BE
PERFORMED ONLY BY QUALIFIED
PERSONNEL
↓
Menu 8-32
Select with↑or
then <ENTER>
<EXIT> to return
Image 8-4
Luminance Delay bar scale
8.5.7.9.4 Vertical Sync Reference
What can be done?
The Vertical Sync Reference can be set in 2 modes:
Direct This sync processing has the disadvantage that glitches and other disturbances in the video signal
sometimes get passed and hence m ay cause problems in the image.
Indirect This sync processing throws away any disturbances that are not really sy nc signals. By source switching a
rolling effect on the image can occur. This sync processing is preferred es pecially with low quality material.
How to toggle Vertical Sync Reference Direct/Indirect?
1. P ush the cursor key ↑ or ↓ to highlight Vertical Sync Reference. (menu 8-33)
2. P ress ENTE R to toggle Vertical Sync Reference Direct/Indirect.
LINE MULTIPLIER
TIME BASE CORRECTION
LUMINANCE DELAY
V SYNC REF: INDIRECT
CLAMP GATING: OFF
LIMO PLUS OPTIONS
FACTORY PRESET
WARNING: ADVANCED
ADJUSTMENT SHOULD BE
PERFORMED ONLY BY QUALIFIED
PERSONNEL
Select with↑or
then <ENTER>
<EXIT> to return
↓
Menu 8-33
8.5.7.9.5 Clamp Gating
When is it necessary?
Clamp Gating is useful when protection s ignals are present in the vertical interval of the video signal (macrovision), that would
otherwise confuse the Limo Pro, causing horizontal brightness differences near the top of the screen.
R5976584 BARCO CINE7 26022003
63
Page 68

8. Random Access Adjustment Mode
How to toggle Clamp Gating On/Off?
1. P ush the cursor key ↑ or ↓ to highlight Clamp Gating. (menu 8-34)
2. P ress ENTER to toggle Clamp Gating On/Off.
Note: Default Clamp Gating is set to Off.
Suggested default settings:
Time Base Correction On
Vertical Sync Reference Indirect
Clamp Gate Off
LINE MULTIPLIER
TIME BASE CORRECTION
LUMINANCE DELAY
V SYNC REF: INDIRECT
CLAMP GATING: OFF
LIMO PLUS OPTIONS
FACTORY PRESET
WARNING: ADVANCED
ADJUSTMENT SHOULD BE
PERFORMED ONLY BY QUALIFIED
PERSONNEL
↓
Menu 8-34
Select with↑or
then <ENTER>
<EXIT> to return
8.5.7.10 Limo Pro Options
Overview
• StartingUpLimoProOptions
•Coring
•LTI
•CTI
8.5.7.10.6 Starting Up Limo Pro Options
When available?
This menu item is only available when the projector is equipped with a line multiplier.
How to start up Limo Pro Options?
1. P ush the cursor key ↑ or ↓ to highlight Limo Pro Options and press ENTER to select. (menu 8-35)
The Limo Pro Options menu will be displayed .
LINE MULTIPLIER
TIME BASE CORRECTION
LUMINANCE DELAY
V SYNC REF: INDIRECT
CLAMP GATING: OFF
LIMO PLUS OPTIONS
FACTORY PRESET
WARNING: ADVANCED
ADJUSTMENT SHOULD BE
PERFORMED ONLY BY QUALIFIED
PERSONNEL
Select with↑or
then <ENTER>
<EXIT> to return
↓
Menu 8-35
8.5.7.10.7 Coring
What can be done?
With c oring, a noise threshold will be set for all filters.
64 R5976584 BARCO CINE 7 26022003
Page 69

8. Random Access Adjustment Mode
How t o adjust Coring?
1. P ush the cursor key ↑ or ↓ to highlight Coring and press ENTER to select. (menu 8-36)
The Coring bar scale w ill be displayed. (image 8-5)
2. P ush the cursor key ↑ or ↓ to adjust the Coring.
3. P ress EXIT to return to the Limo Pro Options menu.
LINE MULTIPLIER
CORING
LTI
WARNING: ADVANCED ADJUSTMENT
SHOULD BE PERFORMED ONLY BY
CTI
QUALIFIED PERSONNEL
↓
Menu 8-36
Image 8-5
Select with↑or
then <ENTER>
<EXIT> to return
8.5.7.10.8 LTI
LTI
Luminance transient improvement.
What can be done?
This function makes the luminance transients sharper (from dark areas to highlight areas) without overshoot, undershoot or ringing.
Image 8-6
LTI basic principle
R5976584 BARCO CINE7 26022003 65
Page 70

8. Random Access Adjustment Mode
How to adjust LTI?
1. P ush the cursor key ↑ or ↓ to highlight LTI and press ENTER to select. (menu 8-37)
The Coring bar scale w ill be displayed. (image 8-7)
2. P ush the cursor key ↑ or ↓ to adjust the LTI value.
Note: Only 7 steps are possible.
3. P ress EXIT to return to the Limo Pro Options menu.
LINE MULTIPLIER
CORING
LTI
CTI
WARNING: ADVANCED ADJUSTMENT
SHOULD BE PERFORMED ONLY BY
QUALIFIED PERSONNEL
Select with↑or
Menu 8-37
Image 8-7
LTI bar scale
then <ENTER>
<EXIT> to return
↓
8.5.7.10.9 CTI
CTI
Color transient improvement. To improve the transition from one color to another.
What can be done?
This function makes the chrominance transients (from one color to another) sharper without overshoot, undershoot or ringing.
Image 8-8
CTI principle
66 R5976584 BARCO CINE 7 26022003
Page 71

8. Random Access Adjustment Mode
How t o adjust CTI?
1. P ush the cursor key ↑ or ↓ to highlight CTI and press ENTER to select. (menu 8-38)
The LTI bar scale will be displayed. (im age 8-9)
2. P ush the cursor key ↑ or ↓ to adjust the CTI v alue.
Note: Only 7 steps are possible.
3. P ress EXIT to return to the Limo Pro Options menu.
LINE MULTIPLIER
CORING
LTI
CTI
WARNING: ADVANCED ADJUSTMENT
SHOULD BE PERFORMED ONLY BY
QUALIFIED PERSONNEL
Select with↑or
<EXIT> to return
Menu 8-38
Image 8-9
CTI bar scale
then <ENTER>
↓
8.5.7.10.10Factory Presets
What can be done?
All settings for the Line Multiplier can be set to the Factory Presets.
These Factory Presets settings are:
Time Base Correction On
Luminance Delay 0
Vertical Sync Reference Indirect
Clamp Gating Off
How to set to the Factory Presets?
1. P ush the cursor key ↑ or ↓ to highlight Factory Presets. (menu 8-39)
2. P ress ENTER to set to the Factory Presets?
3. P ress EXIT to return to the Image Processing menu.
LINE MULTIPLIER
TIME BASE CORRECTION
LUMINANCE DELAY
V SYNC REF: INDIRECT
CLAMP GATING: OFF
LIMO PLUS OPTIONS
FACTORY PRESET
WARNING: ADVANCED
ADJUSTMENT SHOULD BE
PERFORMED ONLY BY QUALIFIED
PERSONNEL
Select with↑or
then <ENTER>
<EXIT> to return
Menu 8-39
R5976584 BARCO CINE7 26022003 67
↓
Page 72

8. Random Access Adjustment Mode
8.6 Geometry Adjustments
Overview
• Starting Up Geometry
• Horizontal Phase Adjustment
• Raster Shift Adjustment
• Left-Right (East-West) Adjustment
• Top- Bottom (Nord-South) Adjustme nt
• Size Adjustment
• Vertical Linearity Adjustment
• Blanking Adjustments
8.6.1 StartingUpGeometry
What can be done?
The geometry adjustments have to be done only on the green image. These adjustments are automatically implemented for the
other color images.
The following adjustme nts can be adjusted:
• Left-Right (East-West) Corrections.
• Top- Bottom (North-South) Corrections.
• Blanking.
• Horizontal Amplitude.
• Vertical Amplitude.
• Vertical Linearity .
• Horizontal Phase.
The convergence corrections are disabled during geometry corrections. The blanking corrections are only
enabled d uring the blanking adjustments.
How to start up Geometry?
1. P ush the cursor key ↑ or ↓ to highlight Geometry and press ENT ER to select. (menu 8-40)
The Ge ometry menu will be displayed. (menu 8-41)
Menu 8-40
RANDOM ACCESS
ADJUSTMENT MODE
PICTURE TUNING
GEOMETRY
CONVERGENCE
COLOR SELECT
Select with↑or
then <ENTER>
<EXIT> to return
↓
Menu 8-41
GEOMETRY
H PHASE
RASTER SHIFT
LEFT-RIGHT (E-W)
TOP-BOTTOM (N-S)
SIZE
V LINEARITY
BLANKING
Select with↑or
then <ENTER>
<EXIT> to return
↓
8.6.2 Horizontal Phase Adjustment
No horizontal phase adjustment is available on the Internal # Pattern. If the genlocked pattern was selected
during the start up of the random access mode, the external source w ill be d isplayed.
68 R5976584 BARCO CINE 7 26022003
Page 73

8. Random Access Adjustment Mode
How to adjust the Horizontal Phase?
1. P ush the cursor key ↑ or ↓ to highlight Horizontal P hase and press ENTER to select. (menu 8-42)
The Horizontal Phase Tex t box will be projected in the middle of the external image. A bar scale and a number indicator (between
0 and 100) on the screen g ive a visual indication of the horizontal phase adjustment. (image 8-10)
2. If the raster shift is correctly adjusted, the H Phase text box is projected in the middle of the raster. At that moment, the "><" icon
indicates the middle of the raster.
Press the ← or → keys to adjust the H Phase "><" icon to coincide with the middle of the projected image.
3. P ress EXIT to return to the Geom etry menu.
GEOMETRY
H PHASE
RASTER SHIFT
LEFT-RIGHT (E-W)
TOP-BOTTOM (N-S)
SIZE
V LINEARITY
BLANKING
Select with↑or
then <ENTER>
<EXIT> to return
Menu 8-42
Image 8-10
Horizontal Phase Text Box
↓
8.6.3 Raster Shift Adjustment
Itisnecessary to look intothe lenses to performthese adjustments. Toavoideye discomfort while lookinginto
the lenses, reduce the contrast and gradually increase the brightness level until the raster becom es visible
on the face of the CRT.
What has to be done?
The raster of the separate colors must be centered both horizontally and vertically on the center of the CRT surface. To center the
raster, look into the lens of the respective color and use the cursor keys to m ove the raster.
R5976584 BARCO CINE7 26022003
69
Page 74

8. Random Access Adjustment Mode
Image 8-11
How to adjust the Raster Shift?
1. P ush the cursor key ↑ or ↓ to highlight Raster Shift and press ENTER to select. (me nu 8-43)
The Raster Shift m enu will be displayed.
2. First push the ↑ or ↓ keys to highlight C oarse Green and press ENTER to select. (menu 8-44)
3. U se the cursor keys to perform a Coarse Raster S hift and press ENT E R to continue.
4. P ush the ↑ or ↓ keys to highlight Coarse Red Horz and press ENTER to select.
5. U se the cursor keys to shift the Red Raster until Red is almost on Green.
6. R epeat step 4 till 5 for Coarse Blue Horz.
7. If necessary repeat step 4 till 5 to perform a Fine Raster Shift until the colors math each other.
Note: Horizontaland Vertical shiftsfor Red and Blue should endupwith a setting closeto50%. If thesesettingsare significantly
greater or lesser than 50%, contact a B ARCO authorized service technician.
8. P ress EXIT to return to the Geom etry menu.
Menu 8-43
GEOMETRY
H PHASE
RASTER SHIFT
LEFT-RIGHT (E-W)
TOP-BOTTOM (N-S)
SIZE
V LINEARITY
BLANKING
Select with↑or
then <ENTER>
<EXIT> to return
↓
Menu 8-44
RASTER SHIFT
COARSE GREEN
COARSE RED HORZ
COARSE BLUE HORZ
FINE GREEN
FINE RED
FINE BLUE
Select with↑or
then <ENTER>
<EXIT> to return
↓
8.6.4 Left-Right (East-West) Adjustment
What can be adjusted ?
Left-right and center adjustments affect only the vertical lines of the projected image. The skew, the bow, the keystone and the
seagull distortion can be adjusted.
70
R5976584 BARCO CINE 7 26022003
Page 75

Start up
1. P ush the cursor key ↑ or ↓ to highlight LEFT-RIGHT. (menu 8-45)
2. P ress ENTER to select.
The Left-Right men u will be displayed. (menu 8-46)
8. Random Access Adjustment Mode
Menu 8-45
GEOMETRY
H PHASE
RASTER SHIFT
LEFT-RIGHT (E-W)
TOP-BOTTOM (N-S)
SIZE
V LINEARITY
BLANKING
Select with↑or
then <ENTER>
<EXIT> to return
↓
Menu 8-46
LEFT-RIGHT (E-W)
V CENTERLINE BOW
V CENTERLINE SKEW
RIGHT BOW
RIGHT KEYSTONE
LEFT BOW
LEFT KEYSTONE
SEAGULL CORRECTION
Select with↑or
then <ENTER>
<EXIT> to return
↓
Only the green image is displayed w h ile making left-right adjustments. The red and b lue im ages will automatically be corrected in the same manne r.
Convergence corrections are autom atically disabled for the duration of these adjustments.
Possible adjustments
The following adjustme nts can be executed
• Vertical centerline bow
• Vertical centerline skew
• side keystone (left-right)
• side bow (left-right)
All adjustment are indicated on the screen with the function name, a bar scale and a number between 0 an d 100. Adjust the next
alignments until the vertical lines are straight.
R5976584 BARCO CINE7 26022003
71
Page 76

8. Random Access Adjustment Mode
Image 8-12
(A) Vertical Centerline bow
(B) Vertical Centerline skew
(C) Right bow
(D) Right keystone
(E) Left bow
(F) Left ke ystone
How to enter an alignment?
1. P ush the cursor key ↑ or ↓ to highlight a function.
2. P ress ENT ER to activate this function.
3. P ress EXIT to return.
What can be done with the Seagull correction
Use this correction only if, after adjusting the vertical lines with the s ide bow or side keystone, still a ’S ’ deformation is visible on the
left and the right side of the image.
The default value on the bar scale for this correction is 50.
72
R5976584 BARCO CINE 7 26022003
Page 77

8. Random Access Adjustment Mode
How to adjust the Seagull correction
1. P ush the cursor key ↑ or ↓ to h ighlight SEAGULL CORRECTION. (menu 8-47)
2. P ress ENTER to activate.
Eliminate the deformation by pushing the cursor key ← or → un til a straight line is obtained (im age 8-13)
LEFT-RIGHT (E-W)
V CENTERLINE BOW
V CENTERLINE SKEW
RIGHT BOW
RIGHT KEYSTONE
LEFT BOW
LEFT KEYSTONE
SEAGULL CORRECTION
Select with↑or
then <ENTER>
<EXIT> to return
Menu 8-47
Image 8-13
Seagull correction
↓
8.6.5 Top-Bottom (Nord-South) Adjustment
What can be adjusted ?
Top-B ottom and center adjustments affect only the horizontal lines of the projected image. The skew, the bow, the keystone and the
seagull deviation can be adjusted.
Start up
1. P ush the cursor key ↑ or ↓ to highlight LEFT-RIGHT. (menu 8-48)
2. P ress ENTER to select.
The Top-bottom menu will be displayed. (menu 8-49)
Menu 8-48
GEOMETRY
H PHASE
RASTER SHIFT
LEFT-RIGHT (E-W)
TOP-BOTTOM (N-S)
SIZE
V LINEARITY
BLANKING
Select with↑or
then <ENTER>
<EXIT> to return
↓
Menu 8-49
TOP-BOTTOM (N-S)
H CENTERLINE BOW
H CENTERLINE SKEW
TOP KEYSTONE
TOP BOW
BOTTOM KEYSTONE
BOTTOM BOW
SEAGULL CORRECTION
Select with↑or
then <ENTER>
<EXIT> to return
↓
Only the green image is displayed w h ile making left-right adjustments. The red and b lue im ages will automatically be corrected in the same manne r.
Convergence corrections are autom atically disabled for the duration of these adjustments.
R5976584 BARCO CINE7 26022003 73
Page 78

8. Random Access Adjustment Mode
Possible adjustments
The following adjustme nts can be executed
• Horizontal centerline bow
• Horizontal centerline skew
• Top bow
• Top keystone
• Bottom bow
• Bottom keystone
All adjustment are indicated on the screen with the function name, a bar scale and a number between 0 an d 100. Adjust the next
alignments until the vertical lines are straight.
74
R5976584 BARCO CINE 7 26022003
Page 79

8. Random Access Adjustment Mode
Image 8-14
Top-Bottom corrections
(A) Vertical centerline Bow
(B) Vertical centerline Skew
(C) Top Bow
(D) Top Keystone
(E) Bottom Bow
(F) B ottom Ke ystone
How to enter an alignment?
1. P ush the cursor key ↑ or ↓ to highlight a function.
2. P ress ENT ER to activate this function.
3. P ress EXIT to return.
R5976584 BARCO CINE7 26022003
75
Page 80

8. Random Access Adjustment Mode
What can be done with the Seagull correction
Use this correction after the image has been adjusted with top and bottom bow an d keystone. If still a deformation (like a seagull)
on top and bottom of the image is visible, proceed to the seagull correction. Due to interaction, it is possible that the top and bottom
bow have to be readjusted after adjusting the seagull correction to obtain an im proved image.
The default value on the bar scale of this correction is 50.
How to adjust the Seagull correction
1. P ush the cursor key ↑ or ↓ to h ighlight SEAGULL CORRECTION. (menu 8-50)
2. P ress ENTER to activate.
Eliminate the deformation by pushing the cursor key ← or → un til a straight line is obtained (im age 8-15)
TOP-BOTTOM (N-S)
H CENTERLINE BOW
H CENTERLINE SKEW
TOP KEYSTONE
TOP BOW
BOTTOM KEYSTONE
BOTTOM BOW
SEAGULL CORRECTION
Select with↑or
then <ENTER>
<EXIT> to return
Menu 8-50
Image 8-15
Seagull correction
↓
8.6.6 Size Adjustment
What can be done?
To adjust (correct) a little bit the horizontal and vertical picture s ize (when the pr ojector is on its correct position) in regard with the
installed screen.
76
R5976584 BARCO CINE 7 26022003
Page 81

8. Random Access Adjustment Mode
Image 8-16
Size adjustment
A Vertical size adjustment
B Horizontal size adjustment
In order to avoid loss of resolution in the projected image and to ensure maximum CRT longevity, do not use
an excessively small size setting.
If theinternal # pattern was selected, this patternremains on the screen, if the genlockedpatternwas selected,
the ext ernal source w ill be displayed.
How to adjust the Size?
1. P ush the cursor key ↑ or ↓ to highlight Size and press ENTER to select. (menu 8-51)
A bar scale and a numeric indicator will help to gauge the size adjustment. (image 8-17)
2. P ush the ← or → keys to adjust t he horizontal size until the exact image width is obtained. (image 8-18)
3. P ush the ↑ or ↓ keys to adjust the vertical size until the exact image height is obtained. (image 8-19)
4. P ress EXIT to return to the Geom etry menu.
GEOMETRY
H PHASE
RASTER SHIFT
LEFT-RIGHT (E-W)
TOP-BOTTOM (N-S)
SIZE
V LINEARITY
BLANKING
↓
Menu 8-51
Select with↑or
then <ENTER>
<EXIT> to return
R5976584 BARCO CINE7 26022003 77
Page 82

8. Random Access Adjustment Mode
Image 8-17
Image 8-18
Horizontal Size Adjustment
Image 8-19
Vertical Size Adjustment
8.6.7Vert
Wha
ical Linearity Adjustment
t can be done?
The vertical linearity adjustment functioncorrectsforverticalno n-linearities which extend from the center of the image to the top and
bottom of the image.
Start up
1. P ush the cursor key ↑ or ↓ to highlight V Linearity. (menu 8-52)
2. P ress ENTER to activate.
3. A djust the vertical linearity with the cursor keys until the distances between the horizontal lines of the set up pattern are equal
from top to bottom. (image 8-20)
GEOMETRY
H PHASE
RASTER SHIFT
LEFT-RIGHT (E-W)
TOP-BOTTOM (N-S)
SIZE
V LINEARITY
BLANKING
↓
Menu 8-52
Select with↑or
then <ENTER>
<EXIT> to return
78 R5976584 BARCO CINE 7 26022003
Page 83

8. Random Access Adjustment Mode
Image 8-20
Vertical linearity
8.6.8 Blanking Adjustments
What can be done?
Blanking adjustments affect only the edges of the projected image and are used to frame the projected image on to the screen and
to hide or black out unwanted information.
The following blanking adjustments are available:
• Top.
• Bottom.
• Left.
• Right.
Image 8-21
Blanking
A Top Blanking
B Bottom Blanking
C Left Blanking
D Right Blanking
If the internal # pattern was selected, this pattern remains on the screen.
If the genlocked pattern was selected, the external source will be displayed.
R5976584 BARCO CINE7 26022003 79
Page 84

8. Random Access Adjustment Mode
How t o adjust the Blanking?
1. P ush the cursor key ↑ or ↓ to highlight Blanking and press ENTER to select. (menu 8-53)
The Blanking menu will be displayed. (menu 8-54)
2. P ush the c ursor key ↑ or ↓ to highlight the desired blanking position and press ENTER to select. (image 8-22)
3. P ush the cursor keys to adjust the blanking and press ENTER to confirm.
4. P ress EXIT to return to the Geom etry menu.
Menu 8-53
GEOMETRY
H PHASE
RASTER SHIFT
LEFT-RIGHT (E-W)
TOP-BOTTOM (N-S)
SIZE
V LINEARITY
BLANKING
Select with↑or
then <ENTER>
<EXIT> to return
BLANKING
TOP
BOTTOM
LEFT
RIGHT
↓
Menu 8-54
Select with↑or
then <ENTER>
<EXIT> to return
↓
Image 8-22
Blanking Adjustments
8.7 Convergence Adjustment
Overview
• Starting Up Convergence
• Convergence Adjustment
8.7.1 Starting Up Convergence
What has to be done?
Convergence adjustments affect both the horizontal and vertical lines of the setup pattern. These adjustments are per formed on the
green image first, if green convergence is available, until these lines or straight and then on the red image while s uperimposed on
the green image and on the blue image while superimposed on the green image. Adjust the red and blue until they exactly m atch
with the green lines.
80
R5976584 BARCO CINE 7 26022003
Page 85

8. Random Access Adjustment Mode
Image 8-23
Convergence Adjustment
Adjustment order
Adjust first the green only when av ailable and continue with red on green and blue on green.
How to start up Convergence?
1. P ush the cursor key ↑ or ↓ to highlight Convergence and press ENT ER to select. (menu 8-55)
The C onvergence menu will be displayed. (menu 8-56)
Menu 8-55
RANDOM ACCESS
ADJUSTMENT MODE
PICTURE TUNING
GEOMETRY
CONVERGENCE
COLOR SELECT
Select with↑or
then <ENTER>
<EXIT> to return
↓
Menu 8-56
CONVERGENCE
GREEN ONLY
RED ON GREEN
BLUE ON GREEN
Select with↑or
then <ENTER>
<EXIT> to return
↓
8.7.2 Convergence Adjustment
Adjustment Order
When green convergence is available, start always with ’green only’ and continue with ’red on green’ and ’blue on green’.
How to perform a Convergence Adjustment?
1. Push the cursor key ↑ or ↓ to highlight the des ired adjustment press ENTER to select.
2. U se the cursor keys to select one of the 25 a reas and press ENTER to confirm and to toggle the cursor keys to the adjustment
mode. (image 8-24)
Tip: For t he best result, start by adjusting zone 1 and follow the default order as shown in the image.
3. U se the cursor k eys to make horizontal or vertical adjustments in the selected zone.
4. P ress ENTER to finish convergence adjustment and to toggle the cursor keys to the selection mode.
5. R epeat step 2 till 4 for each area that needs an adjustment.
6. P ress EXIT to return to the Convergence.
7. R epeat the same procedure for Red on Green and Blue on Green.
8. P ress EXIT to return to the Random Access Adjustment Mode m enu.
R5976584 BARCO CINE7 26022003
81
Page 86

8. Random Access Adjustment Mode
Image 8-24
25 Coarse Convergence Areas
82 R5976584 BARCO CINE 7 26022003
Page 87

9. SERVICE MODE
Overview
• Introduction
• Service Mode Overview
•ProjectorSetup
• Memory Management
• Common Settings
• I2C Diagnostics
9.1 Introduction
How to start up Service Mode?
1. P ush the cursor key ↑ or ↓ to highlight Service and press ENTER to select. (menu 9-1)
The Service menu will b e displayed. (menu 9-2)
9. Service Mode
ADJUSTMENT MODE
Select a path from below :
Menu 9-1
IRIS
GUIDED
RANDOM ACCESS
INSTALLATION
SERVICE
Source 01
Select with↑or
then <ENTER>
<EXIT> to return
Some items in the S ervice mode are password protected (when the p asswo rd function is active). E nter your
password to continue. All other password protected items are now also available if you stay inthead justmen t
mode.
SERVICE MODE
PROJECTOR SET UP
MEMORY MANAGEMENT
COMMON SETTINGS
I2C DIAGNOSTICS
↓
Menu 9-2
Select with↑or
then <ENTER>
<EXIT> to return
↓
R5976584 BARCO CINE7 26022003 83
Page 88

9. Service Mode
9.2 Service Mode Overview
Service Mode Overview
•ProjectorSetUp
- Identification
- Total Run Time
- Change Password
- Change Language
- Change P rojector Address
- Change Baudrate
- P ro je ctor Warm Up
- Power Up Mode
- Comm on Address
- BARCO Logo
• Memory Management
- Copy a Block
- Delete a Block
- Deletion All Blocks
- All Se ttings to Midpos ition
- R & B Convergence Mid
- G R C onvergence Mid
• Common Settings
- G 2 A djustment
- CRTRunInCycle
- P ro je ctor Warm up
- Mem ory B anks
2
C Diagnostics
•I
9.3 Projector Set up
Overview
• StartingUpProjectorSet-Up
• Identification
• Total R un Time
• Change Password
• Change Language
• Change Projector Address
• Change Baudrate
• Power Up Mode Operating/Stand-By
• Common Address
• Barco Logo
84
R5976584 BARCO CINE 7 26022003
Page 89

9.3.1 Starting Up Projector Set-Up
Start up
1. P ush the cursor key ↑ or ↓ to highlight Projector Set-Up and press ENTER to select. (menu 9-3)
The Projector Set-Up menu will be displayed. (men u 9-4)
9. Service Mode
Menu 9-3
SERVICE MODE
PROJECTOR SET UP
MEMORY MANAGEMENT
COMMON SETTINGS
I2C DIAGNOSTICS
Select with↑or
then <ENTER>
<EXIT> to return
↓
PROJECTOR SET-UP
IDENTIFICATION
TOTAL RUN TIME
CHANGE PASSWORD
CHANGE LANGUAGE
CHANGE PROJECTOR ADDRESS
CHANGE BAUDRATE
POWER UP MODE: operating
COMMON ADDRESS: 0
BARCO LOGO
Select with↑or
then <ENTER>
<EXIT> to return
Menu 9-4
↓
9.3.2 Identification
What can be seen?
The Identification screen gives information concerning:
• Projector address, to change the address of your projector, contact a qualified service technician.
• Software v ersion.
• Configuration, possible installations: F ront-ceiling, Front-table, Rear-ceiling, Rear-table.
• Baud rate PC: transfer s peed for com munication with an IBM PC (or compatible) or MAC. The baud rate of the projector must
be the same as the baud rate of the connected computer. When there is a difference, contact a qualified service technician to
make the appropriate changes.
• Tex t On/Off: indicates in operational mod e if the bar scale an d number indicator will be displaye d and if warnings and failures
will be displayed (ON: displayed, OFF: not displayed). T he s tatus can be changed by pressing the TEXT key once on the RCU.
• Serial No. : indicates the fabrication number of the projector. This number can be useful w hen calling for technical assistance.
How to start up Identification?
1. P ush the cursor key ↑ or ↓ to highlight Identification and press ENTER to select. (menu 9-5)
The Identification screen will be displayed. (menu 9-6)
2. P ress EXIT to return to the Projector Set-Up menu.
PROJECTOR SET-UP
IDENTIFICATION
TOTAL RUN TIME
CHANGE PASSWORD
CHANGE LANGUAGE
CHANGE PROJECTOR ADDRESS
CHANGE BAUDRATE
POWER UP MODE: operating
COMMON ADDRESS: 0
BARCO LOGO
Select with↑or
then <ENTER>
<EXIT> to return
Menu 9-5
↓
Menu 9-6
BARCO
CINE 7
Proj. address: 001
Soft. Version: 2.11
Config.: Ceiling
Front
Baudrate PC: 9600
Text: ON
Serial No.: 1035895
9.3.3 Total Run Time
What can be seen?
The total sy stem run time since the first start up can be displayed plus the run time of the separate CRT’s since the last reset.
All projectors leave the factory a fter a burn-in period of approximately 100 hours.
R5976584 BARCO CINE7 26022003 85
Page 90

9. Service Mode
How to start up Total Run Time?
1. P ush the cursor key ↑ or ↓ to highlight Total Run Time and press ENTER to select. (menu 9-7)
The Total Run Time screen will be displayed, the System Runtime indicates the amoun t of time the projector has played since its
first start up at the factory. (menu 9-8)
PROJECTOR SET-UP
IDENTIFICATION
TOTAL RUN TIME
CHANGE PASSWORD
CHANGE LANGUAGE
CHANGE PROJECTOR ADDRESS
CHANGE BAUDRATE
POWER UP MODE: operating
COMMON ADDRESS: 0
BARCO LOGO
Select with↑or
then <ENTER>
<EXIT> to return
Menu 9-7
↓
Menu 9-8
RUN TIME
120 h
9.3.4 Change Password
What can be done?
The password code (4 digits) can be changed to a new one. This item is password protected. First the actual password should be
entered before continuing.
Password function is only active if the jumper on the controller is in the ’On’ position. Contact a qualified
BARCO technician to activate the password if needed.
The default password is 0000.
How to Change the Password?
1. P ush the cursor key ↑ or ↓ to highlight Change Password and press ENTER to select. (menu 9-9)
Note: If it is the first time you enter a password protected item, enter your password and press ENTER.
The current Password will be displaye d in the Password menu. (menu 9-10)
2. P ush the ← or → keys to highlight the digit to be changed.
3. P ress a numeric key to enter the new digit.
4. R epeat s tep 2 till 3 for the other digits.
5. P ress ENT ER to save the new password.
Before saving the new password, a confirmation screen will be displayed.
6. P ress ENTE R to confirm, press EXIT to cancel the saving.
PROJECTOR SET-UP
IDENTIFICATION
TOTAL RUN TIME
CHANGE PASSWORD
CHANGE LANGUAGE
CHANGE PROJECTOR ADDRESS
CHANGE BAUDRATE
POWER UP MODE: operating
COMMON ADDRESS: 0
BARCO LOGO
Select with↑or
then <ENTER>
<EXIT> to return
Menu 9-9
↓
Menu 9-10
PASSWORD
Enter new password:
0000
Use←and→to select,
and reprogram
with numeric keys.
<ENTER> to confirm
<EXIT> to return
9.3.5 Change Language
What can be done?
The ’Change Language’ function offers the possibility to change the language of the screen menus to English, Spanish, French and
German.
86
R5976584 BARCO CINE 7 26022003
Page 91

What c an be done?
1. P ush the cursor key ↑ or ↓ to highlight Change Language. (menu 9-11)
2. P ress ENTE R to display the language menu. (menu 9-12)
3. P ush the cursor key ↑ or ↓ to highlight the desired language.
4. P ress ENT ER to change to that language.
9. Service Mode
PROJECTOR SET-UP
IDENTIFICATION
TOTAL RUN TIME
CHANGE PASSWORD
CHANGE LANGUAGE
CHANGE PROJECTOR ADDRESS
CHANGE BAUDRATE
POWER UP MODE: operating
COMMON ADDRESS: 0
BARCO LOGO
Select with↑or
then <ENTER>
<EXIT> to return
Menu 9-11
↓
Menu 9-12
LANGUAGE
ENGLISH
ESPANOL
FRANCAIS
DEUTSCH
Select with↑or
then <ENTER>
<EXIT> to return
↓
9.3.6 Change Projector Address
What can be done?
Every projector requires an individual address between O and 255. T his address can be set by the software.
How to Change the Projector Address?
1. P ush the c ursor key ↑ or ↓ to highlight Cha nge Projector Password and press ENTER to select. (menu 9-13)
The cu rrent Projector Add ress will be displayed in the Projector Address menu. (menu 9-14)
2. P ush the ← or → keys to highlight the digit to be changed.
3. P ress a numeric key to enter the new digit.
4. R epeat s tep 2 till 3 for the other digits.
5. P ress ENT ER to save the new password.
PROJECTOR SET-UP
IDENTIFICATION
TOTAL RUN TIME
CHANGE PASSWORD
CHANGE LANGUAGE
CHANGE PROJECTOR ADDRESS
CHANGE BAUDRATE
POWER UP MODE: operating
COMMON ADDRESS: 0
BARCO LOGO
Select with↑or
then <ENTER>
<EXIT> to return
Menu 9-13
↓
PROJECTOR ADDRESS
Enter new projector
address:
Use←and→to select,
and reprogram
with numeric keys.
Highest address is 255
<ENTER> to confirm
<EXIT> to return
Menu 9-14
000
9.3.7 Change Baudrate
What can be done?
The communication speed between projector and computer has 8 possible speeds. The baud rate speed can be software set up.
The following baud r ates are available:
• 9600
• 4800
• 2400
• 1200
• 600
• 300
• 150
• 110
R5976584 BARCO CINE7 26022003
87
Page 92

9. Service Mode
By d efault the Baudrate is set to 9600.
How to Change the Baudrate?
1. P ush the cursor key ↑ or ↓ to highlight Change Baudrate and press ENTER to select. (m enu 9-15)
The Baudrate menu will be displayed, the actual Baudrate will be highlighted. (menu 9- 16)
2. P ush the cursor key ↑ or ↓ to highlight the desired Baudrate and press ENTER to confirm.
3. P ress EXIT to return to the Projector Set-Up menu.
PROJECTOR SET-UP
IDENTIFICATION
TOTAL RUN TIME
CHANGE PASSWORD
CHANGE LANGUAGE
CHANGE PROJECTOR ADDRESS
CHANGE BAUDRATE
POWER UP MODE: operating
COMMON ADDRESS: 0
BARCO LOGO
Select with↑or
then <ENTER>
<EXIT> to return
Menu 9-15
Select new
baudrate:
9600 4800
2400 1200
600 300
150
↓
Menu 9-16
BAUDRATE
Select with arrow
keys:
<ENTER> to accept
<EXIT> to return
9.3.8 Power Up Mode Operating/Stand-By
What can be done?
When pressing the power switch, the projector can start up in ’operating mode’ or in ’stand-by mode’.
Operating The projector start up and displays image.
Stand-By The projector start up in stand-by and waits until the stand-by button or a digit key is pre ssed
How to toggle Power Up Mode Operating/Stand By?
1. P ush the cursor key ↑ or ↓ to highlight Power Up M ode .. (menu 9-17)
2. P ress ENTER to select to toggle between Operating and Standby.
PROJECTOR SET-UP
IDENTIFICATION
TOTAL RUN TIME
CHANGE PASSWORD
CHANGE LANGUAGE
CHANGE PROJECTOR ADDRESS
CHANGE BAUDRATE
POWER UP MODE: operating
COMMON ADDRESS: 0
BARCO LOGO
Select with↑or
then <ENTER>
<EXIT> to return
↓
Menu 9-17
9.3.9 Common Address
What can be done?
Every projector listens to a common address. This common address can be set to ’0’ or ’1’. When a RCU is pro grammed with that
common address, every projector with that same common address will follow up the commands given by that RCU.
Why 2 different Common Addresses?
The reason to have the choice to select betw een common addresses is, to avoid controlling of other IR controlled units, e.g. a TV
set w ith standard common address 0.
88
R5976584 BARCO CINE 7 26022003
Page 93

How to change the Common Address?
1. P ush the ↑ or ↓ keys to highlight Common Address.
2. P ress ENTER to toggle the Common Address between ’0’ and ’1’. (menu 9- 18)
3. P ress EXIT to return to the Service Mode menu.
PROJECTOR SET-UP
IDENTIFICATION
TOTAL RUN TIME
CHANGE PASSWORD
CHANGE LANGUAGE
CHANGE PROJECTOR ADDRESS
CHANGE BAUDRATE
POWER UP MODE: operating
COMMON ADDRESS: 0
BARCO LOGO
↓
Menu 9-18
Select with↑or
then <ENTER>
<EXIT> to return
9.3.10 Barco Logo
What can be done?
The BARCO logo can be added to the image, in overlay or in background, on any place on the screen.
Continuous use of the BARCO logo damages the RED CRT.
9. Service Mode
R5976584 BARCO CINE7 26022003 89
Page 94

9. Service Mode
How to add the Barco Logo
1. P ush the cursor key ↑ or ↓ to highlight Barco Logo. (menu 9-19)
2. P ress ENTER to select.
The BARCO logo menu will be displayed on the screen. ( menu 9-20)
Within this m enu, four toggle settings are available.
Mode[ON/OFF] Select mod e and toggle with ENTER between ON and OFF
ON : BARCO logo will be displayed on the screen when leaving the adjustment mode. To position
the logo on the screen, push the cursor key up, down, to the left or to the right until the desired
position is reached.
OFF : No BA RCO logo displayed on the screen when leaving the adjustment mode.
Size[ON/OFF] Select size and toggle with ENTER between SMALL and LARGE
SMALL : Sm all BARCO logo will be displayed if m ode is on.
LARGE : Large (double size) BARCO logo w ill be displayed if mode is on.
Background[ON/OFF] Select background and toggle with ENTER between ON and OFF
ON : BARCO logo will be displayed on a black background. BARCO
OFF : BARCO logo will be displayed w ithout any background. B ARC O
Orbiting[ON/OFF] S elect orbiting and toggle with ENTER between ON and OFF
ON : the BARCO logo will orbit a round its axis.
OFF : no orbit of the BARCO logo.
PROJECTOR SET-UP
IDENTIFICATION
TOTAL RUN TIME
CHANGE PASSWORD
CHANGE LANGUAGE
CHANGE PROJECTOR ADDRESS
CHANGE BAUDRATE
POWER UP MODE: operating
COMMON ADDRESS: 0
BARCO LOGO
↓
Menu 9-19
Select with↑or
then <ENTER>
<EXIT> to return
9.4 Memory Management
Overview
• Starting Up Memory Management
• Copy a Block
• Delete a Block
• Delete All Blocks
• All Settings to Midposition
• R & B Convergence to Midposition
• Green Convergence to Midposition
SIZE : SMALL
BACKGROUND : ON
ORBITTING : ON
You can move the logo
on the screen using
the arrow keys.
WARNING : continuous
use of the BARCO logo
damages the RED CRT !
Select with↑or
then <ENTER>
<EXIT> to return
Menu 9-20
BARCO LOGO
MODE : ON
↓
90
R5976584 BARCO CINE 7 26022003
Page 95

9.4.1 Starting Up Memory Management
How to start up the Memory Management?
1. P ush the cursor key ↑ or ↓ to highlight Memory M anagem ent and press ENTE R to select. (menu 9-21)
The Memor y Management menu will be displayed. (menu 9-22)
9. Service Mode
Menu 9-21
SERVICE MODE
PROJECTOR SET UP
MEMORY MANAGEMENT
COMMON SETTINGS
I2C DIAGNOSTICS
Select with↑or
then <ENTER>
<EXIT> to return
↓
MEMORY MANAGEMENT
COPY A BLOCK
DELETE A BLOCK
DELETE ALL BLOCKS
ALL SETTINGS TO MIDPOS
R & B CONVERGENCE MID
GR CONVERGENCE MID
Select with↑or
then <ENTER>
<EXIT> to return
Menu 9-22
↓
9.4.2 Copy a Block
What can be done?
This will copy the settings of the selected block into the active block.
HowtoCopyaBlock?
1. P ush the cursor key ↑ or ↓ to highlight Copy a Block and press ENTER to select. (menu 9-23)
The Copy M ode menu will be display ed.
2. P ush the cursor key ↑ or ↓ to to select a block. (menu 9-24)
3. P ress ENTER to copy the settings of the selected block to the active block you are working on.
Note: All current settings will be overwritten with the settings of the block which is copied.
A confirmation s creen will be displayed.
4. P ress ENTE R to confirm, press EXIT to cancel the saving.
MEMORY MANAGEMENT
COPY A BLOCK
DELETE A BLOCK
DELETE ALL BLOCKS
ALL SETTINGS TO MIDPOS
R & B CONVERGENCE MID
GR CONVERGENCE MID
Select with↑or
then <ENTER>
<EXIT> to return
Menu 9-23
9.4.3 Delete a Block
This item is pa ssw ord protected.
What can be done?
This will delete the se lected block.
COPY MODE
N
r.Src Fh Fv Inp Conf
1 1 15.6 50 Video FC
2 3 31.2 60 RGB3S RT
3 - 15.6 50 Intern FC
4 2 31.5 50 RGB3S FC
5 - 33.7 60 Intern FC
6
7
8
Active block nr. 1
↓
Menu 9-24
Select with↑or
then <ENTER>
<EXIT> to return
↓
R5976584 BARCO CINE7 26022003
91
Page 96

9. Service Mode
How to Delete a Block?
1. P ush the cursor key ↑ or ↓ to highlight Delete a Block an d press ENTER to select. (menu 9-25)
The DeleteaBlockmenu will be displayed. (menu 9-26)
2. P ush the cursor key ↑ or ↓ to to select a block.
3. P ress ENTER to delete the selected b lock.
A confirmation s creen will be displayed.
4. P ress ENTE R to confirm, press EXIT to cancel the deletion.
MEMORY MANAGEMENT
COPY A BLOCK
DELETE A BLOCK
DELETE ALL BLOCKS
ALL SETTINGS TO MIDPOS
R & B CONVERGENCE MID
GR CONVERGENCE MID
Select with↑or
then <ENTER>
<EXIT> to return
Menu 9-25
↓
Menu 9-26
DELETE MODE
N
r.Src Fh Fv Inp Conf
1 1 15.6 50 Video FC
2 3 31.2 60 RGB3S RT
3 - 15.6 50 Intern FC
4 2 31.5 50 RGB3S FC
5 - 33.7 60 Intern FC
6
7
8
Active block no. 1
Select with↑or
then <ENTER>
<EXIT> to return
↓
9.4.4 Delete All Blocks
What can be done?
This will delete all blocks.
How to Delete All Blocks?
1. P ush the cursor key ↑ or ↓ to highlight Delete All Block s. (menu 9-27)
2. P ress ENT ER to delete all bloc ks.
A confirmation s creen will be displayed.
3. P ress ENTE R to confirm, press EXIT to cancel the deletion.
MEMORY MANAGEMENT
COPY A BLOCK
DELETE A BLOCK
DELETE ALL BLOCKS
ALL SETTINGS TO MIDPOS
R & B CONVERGENCE MID
GR CONVERGENCE MID
↓
Menu 9-27
Select with↑or
then <ENTER>
<EXIT> to return
9.4.5 All Settings to Midposition
What can be done?
All adjustment settings (geometry and convergence) can be set to mid position.
This item is pa ssw ord protected.
92 R5976584 BARCO CINE 7 26022003
Page 97

How to set All settings to Midposition?
1. P ush the cursor key ↑ or ↓ to highlight All Settings to Midpos. (menu 9-28)
2. P ress ENTER to select.
A confirmation s creen will be displayed.
3. P ress ENTE R to confirm, press EXIT to cancel the reset.
MEMORY MANAGEMENT
COPY A BLOCK
DELETE A BLOCK
DELETE ALL BLOCKS
ALL SETTINGS TO MIDPOS
R & B CONVERGENCE MID
GR CONVERGENCE MID
9. Service Mode
↓
Menu 9-28
Select with↑or
then <ENTER>
<EXIT> to return
How to Undo All settings to M idposition?
As long as the projector is playing on the same source (= same adjustment block) it is possible to return to the previous settings.
Undo All Settings to Midpos is displayed in stead off All Settings to Midpos.
1. P ush the cursor key ↑ or ↓ to highlight Undo All Settings to Midpos. (menu 9-29)
2. P ress ENTE R to reset the All settings to the previous settings.
MEMORY MANAGEMENT
COPY A BLOCK
DELETE A BLOCK
DELETE ALL BLOCKS
UNDO ALL SETTINGS TO MIDPOS
R & B CONVERGENCE MID
GR CONVERGENCE MID
↓
Menu 9-29
Select with↑or
then <ENTER>
<EXIT> to return
9.4.6 R & B Convergence t o Midposition
What can be done?
All convergence settings for red and blue are set to midposition.
This item is pa ssw ord protected.
How to set R & B Convergence to Midposition?
1. P ush the cursor key ↑ or ↓ to highlight R&B Convergence Mid. ( menu 9-30)
2. P ress ENTER to select.
A confirmation s creen will be displayed.
3. P ress ENTE R to confirm, press EXIT to cancel the reset.
MEMORY MANAGEMENT
COPY A BLOCK
DELETE A BLOCK
DELETE ALL BLOCKS
ALL SETTINGS TO MIDPOS
R & B CONVERGENCE MID
GR CONVERGENCE MID
Select with↑or
then <ENTER>
<EXIT> to return
Menu 9-30
R5976584 BARCO CINE7 26022003 93
↓
Page 98

9. Service Mode
How to Undo Convergence R & B to Midposition?
As long as the projector is playing on the same source (= same adjustment block) it is possible to return to the previous settings.
Undo R&B Convergence to Mid is displayed in stead off R&B Convergence to Mid.
1. P ush the cursor key ↑ or ↓ to highlight Undo R&B Conver gence to Mid. (menu 9-31)
2. P ress ENTE R to reset the All settings to the previous settings.
MEMORY MANAGEMENT
COPY A BLOCK
DELETE A BLOCK
DELETE ALL BLOCKS
ALL SETTINGS TO MIDPOS
UNDOR&BCONVERGENCE MID
GR CONVERGENCE MID
↓
Menu 9-31
Select with↑or
then <ENTER>
<EXIT> to return
9.4.7 Green Convergence to Midposition
What can be done?
All convergence settings for green are s et to midposition.
This item is pa ssw ord protected.
How to set Green Convergence to Midposition?
1. P ush the cursor key ↑ or ↓ to highlight GR Convergence Mid. (menu 9-32)
2. P ress ENTER to select.
A confirmation s creen will be displayed.
3. P ress ENTE R to confirm, press EXIT to cancel the reset.
MEMORY MANAGEMENT
COPY A BLOCK
DELETE A BLOCK
DELETE ALL BLOCKS
ALL SETTINGS TO MIDPOS
R & B CONVERGENCE MID
GR CONVERGENCE MID
↓
Menu 9-32
Select with↑or
then <ENTER>
<EXIT> to return
How to Undo Green Convergence to Midposition?
As long as the projector is playing on the same source (= same adjustment block) it is possible to return to the previous settings.
Undo GR Convergence to Mid is displayed in stead off GR Convergence to Mid.
1. P ush the cursor key ↑ or ↓ to highlight Undo GR Convergence to Mid. (m enu 9-33)
2. P ress ENTE R to reset the All settings to the previous settings.
MEMORY MANAGEMENT
COPY A BLOCK
DELETE A BLOCK
DELETE ALL BLOCKS
ALL SETTINGS TO MIDPOS
R & B CONVERGENCE MID
UNDO GR CONVERGENCE MID
Select with↑or
then <ENTER>
<EXIT> to return
Menu 9-33
94 R5976584 BARCO CINE 7 26022003
↓
Page 99

9.5 Common Settings
Overview
• Starting Up Common Settings
• G2 Adjustment
•CRTRunInCycle
•ProjectorWarmUp
• Memory Banks
9.5.1 Starting Up Common Settings
How to start up Common Settings?
1. P ush the cursor key ↑ or ↓ to highlight Common Settings and press ENTER to select. (menu 9-34)
The Comm on Settings menu will be displayed. (m enu 9-35)
9. Service Mode
Menu 9-34
SERVICE MODE
PROJECTOR SET UP
MEMORY MANAGEMENT
COMMON SETTINGS
I2C DIAGNOSTICS
Select with↑or
then <ENTER>
<EXIT> to return
↓
Menu 9-35
COMMON SETTINGS
G2 ADJUSTMENT
CRT RUN IN CYCLE
PROJECTOR WARM UP
MEMORY BANKS
Select with↑or
then <ENTER>
<EXIT> to return
↓
9.5.2 G2 Adjustment
G2 adjustment should be performed by BARCO personnel, or BARCO a uthorized dealers
How to start up G2 adjustment?
1. P ush the cursor key ↑ or ↓ to highlight G2 Adjustment and press ENTER to select. (menu 9-36)
If you are qualified, press ENTER to continue.
If not qualified, press EXIT to return to the Common settings menu.
Further description of the G2 adjustment is given in the Installation manual.
Item is password protected.
COMMON SETTINGS
G2 ADJUSTMENT
CRT RUN IN CYCLE
PROJECTOR WARM UP
MEMORY BANKS
↓
Menu 9-36
Select with↑or
then <ENTER>
<EXIT> to return
9.5.3 CRT Run In Cycle
When necessary?
Only nece ssary when a new picture tube is installed.
When available?
CRT Run In Cycle can only be activated when one or more memory blocks on an internal # pattern are available.
R5976584 BARCO CINE7 26022003
95
Page 100

9. Service Mode
If no such a block is available, the projector cannot run CRT Run In Cycle and leaves the adjustm ent mode. If you still want to run
CRT run in cycle, create first a memory block on an internal # pattern and restart CRT Run In Cycle .
What i s done?
A flashing white image (5sec. on, 5 sec. off) is generated for 5 min. on the first internal block. In the next 5 min., the ne xt internal
block available will be used to gener ate the flashing white image.
The imag e will also be shifted in a vertical way to prevent a CRT burn in.
How to s elect CRT Run In Cycle?
1. P ush the cursor key ↑ or ↓ to highlight CRT Run In Cycle and press ENTER to select. (menu 9-37)
The CRT Run In Cycle menu will be displayed. (menu 9-38)
2. P ress EXIT to quit the CRT Run In Cycle.
Menu 9-37
COMMON SETTINGS
G2 ADJUSTMENT
CRT RUN IN CYCLE
PROJECTOR WARM UP
MEMORY BANKS
Select with↑or
then <ENTER>
<EXIT> to return
↓
CRT RUN IN CYCLE
A flashing white pattern will
generated until <EXIT> is
The projector only uses memory
blocks adjusted on an internal
# pattern: if no such block
available, the projector can’t
the procedure and leaves the
Menu 9-38
be
pressed.
is
run
adjustment mode.
<ENTER> to continue
<EXIT> to cancel
9.5.4 Projector Warm Up
What can be done?
When in the ON position (and the CRT run in cy cle is OFF), the projector can start up with a warm up period of 20 minutes. During
the start up a warm up menu will be displayed. Th is menu offers the possibility to skip the warm up period anyway by pressing the
EXIT key and offers the possibility toadjustthe horizontaland verticalamplitudeof this whiteimage with the controldisc. During this
warm up period, a full white image is shifted on the CRT faceplate to avoid a burn in. Every 30 seconds a text box will be displayed
on another place on the screen with the remaining time to go. When EXIT is pressed d uring this w arm up period, the warm up menu
will be redisplayed with the remaining time indication. Press another time EXIT to interrupt the warm up cycle. When the warm up
option is OFF, when switching on the projector, it starts immediately with the projection of the selected source.
How to select
1. Push the cu rsor key ↑ or ↓ to highlight Projector Warm Up. (menu 9-39)
2. P ress ENTER to select.
The projector warm up menu will be displayed. (m enu 9-40)
3. P ress ENTER to toggle the O N/O FF option.
Menu 9-39
COMMON SETTINGS
G2 ADJUSTMENT
CRT RUN IN CYCLE
PROJECTOR WARM UP
MEMORY BANKS
Select with↑or
then <ENTER>
<EXIT> to return
↓
PROJECTOR WARM UP
OPTION : ON
A FULL WHITE PATTERN
WILL BE GENERATED FOR
20 MINUTES AT POWER UP
AFTER THIS PROCEDURE
THE PROJECTOR IS READY
TO PERFORM IN OPTIMUM
CONDITIONS
TOGGLE OPTION ON OR OFF
with <ENTER>
<EXIT> to return
Menu 9-40
9.5.5 Memory Banks
What can be done?
The user has the pos sibility to create 8 different memory banks (formats) for each sou rce. B ut, the max imum allowed quantity of
memory banks for all sources together is 32. The option to create different memory banks for the same source can be switched ON
or OFF.
96
R5976584 BARCO CINE 7 26022003
 Loading...