

Page 1
MGP 15 Medical Grade Projector
Owners Manual
R9003110
R5976741/00
28/04/2004
Page 2

BarcoView
enslaan 106, B-8500 Kortrijk
Th. Sev
Phone: +32 56.23.32.44
Fax: +32 56.23.33.74
sales.medical.barcoview@barco.com
E-mail:
Visit us at the web: www.barcomedical.com
PrintedinBelgium
Page 3

Federal Communications Commission (FCC Statement)
This equipment has been tested and found to comply with the limits for a class A digital device, pursuant to Part 15 of the FCC rules.
These limits are designed to provide reasonable protection against harmful interference when the equipment is operated in a commercial
environment. This equipment generates, uses, and can radiate radio frequency energy and, if not installed and used in accordance with
the instruction manual, may cause harmful interference to radio communications. Operation of this equipment in a residential area may
cause harmful interference, in which case the user will be responsible for correcting any interference.
Trademarks
Brand and product names mentioned in this manual may be trademarks, registered trademarks or copyrights of their respective holders.
All brand and product names mentioned in this manual serve as comments or examples and are not to be understood as adverti
the products or their manufactures.
sing for
Page 4

Page 5

Table of contents
TABLE OF CONTENTS
1. About this manual................................................................................................... 5
1.1 Objective............................................................................................................................... 5
2. Packaging and Dimensions ....................................................................................... 7
2.1 Boxcontent............................................................................................................................ 7
2.2 ProjectorPackaging................................................................................................................... 7
2.3 Lens Packaging . . ..................................................................................................................... 8
2.4 Dimensions............................................................................................................................ 8
3. Installation Guidelines............................................................................................. 11
3.1 Safety warnings...................................................................................................................... 11
3.2 Installation guidelines................................................................................................................ 11
3.3 Projectorconfigurations..............................................................................................................12
3.4 Lenses . . ..............................................................................................................................16
3.4.1 Lenses . . . ......................................................................................................................16
3.4.2 Lens formulas . .................................................................................................................16
3.4.3 Lens installation ...............................................................................................................17
3.4.4 Removing thelens.............................................................................................................17
3.4.5 Cleaning the lens . . ............................................................................................................18
3.5 Batteries..............................................................................................................................18
3.5.1 Battery installation.............................................................................................................18
4. Connections.........................................................................................................19
4.1 Power connection . ...................................................................................................................19
4.2 Input Source connections . ...........................................................................................................20
4.2.1 Input section ...................................................................................................................20
4.2.2 Input facilities . . . ...............................................................................................................20
4.2.3 5-Cable input...................................................................................................................20
4.2.4 Composite Video Input . . . .....................................................................................................21
4.2.5 S-Video input ..................................................................................................................22
4.2.6 Digital Visual Interface (DVI) input ............................................................................................23
4.2.7 Computer input . ...............................................................................................................24
4.3 Communications Connections.......................................................................................................24
4.3.1 RS232 IN connection .. . . . .....................................................................................................24
4.4 Connecting the MGP in Dicom Theatre
®
...........................................................................................25
5. Getting started......................................................................................................27
5.1 Quickstartup .........................................................................................................................27
5.2 RCU& Local keypad.................................................................................................................29
5.3 Terminology overview................................................................................................................31
5.4 Switchingon..........................................................................................................................32
5.5 Lamp runtime.........................................................................................................................32
5.6 Quickset up adjustments ............................................................................................................33
5.6.1 Quick lens Adjustment.........................................................................................................34
5.6.2 Using the RCU.................................................................................................................34
5.7 Projector address . ...................................................................................................................35
5.7.1 Address setting................................................................................................................35
5.7.2 Displaying andProgramming addresses into the RCU ......................................................................36
5.8 Digital Zoom..........................................................................................................................36
5.9 Menu structure .......................................................................................................................37
5.10 Using the menu.......................................................................................................................37
5.11 Using the Dialogboxes ...............................................................................................................38
6. Introduction to Medical Visualization systems ...............................................................41
6.1 DICOM conformance.................................................................................................................41
6.2 Architectureof a typical medical visualization system ..............................................................................41
6.3 Overview of Barco’s DICOM THEATRE
6.4 Introduction to MGP configuration . . . ................................................................................................42
6.4.1 MGP maingrayscale configuration tools .....................................................................................42
®
...........................................................................................42
7. Main Menu...........................................................................................................45
7.1 Autosetup.............................................................................................................................45
8. Adjustments.........................................................................................................47
8.1 Contrast...............................................................................................................................47
8.2 Brightness ............................................................................................................................48
8.3 Phase.................................................................................................................................49
8.4 Gamma ...............................................................................................................................49
8.5 Custom color temperatureadjustment ..............................................................................................49
8.6 Scaling................................................................................................................................50
8.7 Aspect ratio...........................................................................................................................51
8.8 Positioning............................................................................................................................52
8.9 Imagesettings........................................................................................................................53
R5976741 MGP 15 MEDICAL GRADE PROJECTOR 28/04/2004
1
Page 6

Table of contents
8.10 RGB LowPass filter..................................................................................................................56
8.11 Standby Timer . ... . ...................................................................................................................57
8.12 Blanking ..............................................................................................................................58
8.13 Autosetup parameters ...............................................................................................................60
9. Input Selection ......................................................................................................63
9.1 Input selection . . . ....................................................................................................................63
9.2 Displaying the Logo ..................................................................................................................64
9.3 Pause.................................................................................................................................65
9.4 Freeze ................................................................................................................................66
10.Settings ..............................................................................................................67
10.1 Color temperature ...................................................................................................................67
10.1.1 Color temperatures in greyscale mode reproduction. . . ......................................................................67
10.1.2 Color temperature in a standalone projector setup. . ... ......................................................................67
10.1.3 Color temperature in a closed loop medicalvisualizationsystem ...........................................................68
10.2 Display function ......................................................................................................................69
10.2.1 Display function in a standalone projector setup .............................................................................69
10.2.2 Displayfunctionin a closed loop medicalvisualization system..............................................................70
10.3 Restoring thefactory settings........................................................................................................71
10.4 Black and white selection............................................................................................................71
10.5 UserControl..........................................................................................................................73
10.6 Lampmode selection ................................................................................................................74
10.7 Runtime warning .....................................................................................................................75
10.8 Input Balance . ... ....................................................................................................................76
10.9 AGC on Video ........................................................................................................................80
10.10Manual Gain Control .................................................................................................................80
10.11Lamps ................................................................................................................................81
10.11.1History..........................................................................................................................81
10.11.2Reset runtime..................................................................................................................82
11.Tools..................................................................................................................85
11.1 Source switching mode ..............................................................................................................85
11.2 PictureinPicture .....................................................................................................................86
11.2.1 Introduction to PiP.............................................................................................................86
11.2.2 Preferences....................................................................................................................87
11.3 PiPselect.............................................................................................................................88
11.4 Addwindow...........................................................................................................................89
11.5 Remove window......................................................................................................................90
11.6 PiPLay-out ...........................................................................................................................91
11.6.1 PiPSave .......................................................................................................................91
11.6.2 PiP rename layout . ............................................................................................................92
11.6.3 PiPdelete layout...............................................................................................................92
11.7 PiPAdjust ............................................................................................................................93
11.8 Background...........................................................................................................................94
11.9 Logo ..................................................................................................................................95
12.Video formats .......................................................................................................97
12.1 Introduction ...........................................................................................................................97
12.2 Load ..................................................................................................................................97
12.3 Edit....................................................................................................................................98
12.4 Rename..............................................................................................................................100
12.5 Copy.................................................................................................................................101
12.6 Delete................................................................................................................................102
13.Information ........................................................................................................ 105
13.1 Product identification................................................................................................................105
13.2 Configuration ........................................................................................................................105
13.3 Runtimes ............................................................................................................................106
13.4 Current Input format... ..............................................................................................................106
13.5 Diagnostics ..........................................................................................................................107
13.6 Quick acces keys....................................................................................................................108
14.Installation..........................................................................................................111
14.1 Lens adjustments . ..................................................................................................................111
14.2 Projector address . ..................................................................................................................112
14.3 Orientation...........................................................................................................................113
14.4 Portrait / Landscape.. ...............................................................................................................114
14.5 Language . . ..........................................................................................................................115
14.6 RS232 baudrate . . ...................................................................................................................116
14.7 Security..............................................................................................................................116
14.8 Change password...................................................................................................................118
14.9 AutoMenu Exit......................................................................................................................119
14.10Automaticstartup....................................................................................................................120
14.11Textbox ..............................................................................................................................121
14.12Menu barposition...................................................................................................................122
14.13Status bar position ..................................................................................................................122
2
R5976741 MGP 15 MEDICAL GRADE PROJECTOR 28/04/2004
Page 7

Table of contents
14.14Sliderboxposition ...................................................................................................................123
15.Cleaning the dustfilters ......................................................................................... 125
15.1 Dustfilters............................................................................................................................125
15.2 Cleaning .............................................................................................................................125
16.Standard Image Files ............................................................................................ 127
16.1 Table overview ......................................................................................................................127
R5976741 MGP 15 MEDICAL GRADE PROJECTOR 28/04/2004
3
Page 8

Table of contents
4 R5976741 MGP 15 MEDICAL GRADE PROJECTOR 28/04/2004
Page 9

1. ABOUT THIS MANUAL
1.1 Objective
This manual is dedicated to the Barco MGP LCD projector and describes the way the projector should be
operated and the use of the software menus .
In the practice the MGP is to be implemented in a total medical visualization system . For this reason a chapter
is inserted giving a brief introduction to medical systems and in particular the Barco’s DICOM THEATRE
The aim of the chapter being only the illustration of the role to be played by the projector in such a system,
and that way trying to give a better image of the use of some parameters within the menustructure.
For more details about the system refer to the system manual.
1. About this manual
®
.
R5976741 MGP 15 MEDICAL GRADE PROJECTOR 28/04/2004 5
Page 10

1. About this manual
6 R5976741 MGP 15 MEDICAL GRADE PROJECTOR 28/04/2004
Page 11

2. PACKAGING AND DIMENSIONS
Overview
• Box content
• Projector Packaging
• Lens Packaging
• Dimensions
2.1 Box content
CEE7
European power plug to connect the power cord to the wall outlet.
ANSI 73.11
American power plug to connect the power cord to the wall outlet.
Content
2. Packaging and Dimensions
• 1 projector (weight ± 12,6 kg or 27.8 lbs)
• 1 remote control unit RCU + 2 batteries.
• 2 power cables with outlet plug type CEE7 and ANSI 73.11.
• 1 owners manual
• 1 safety manual
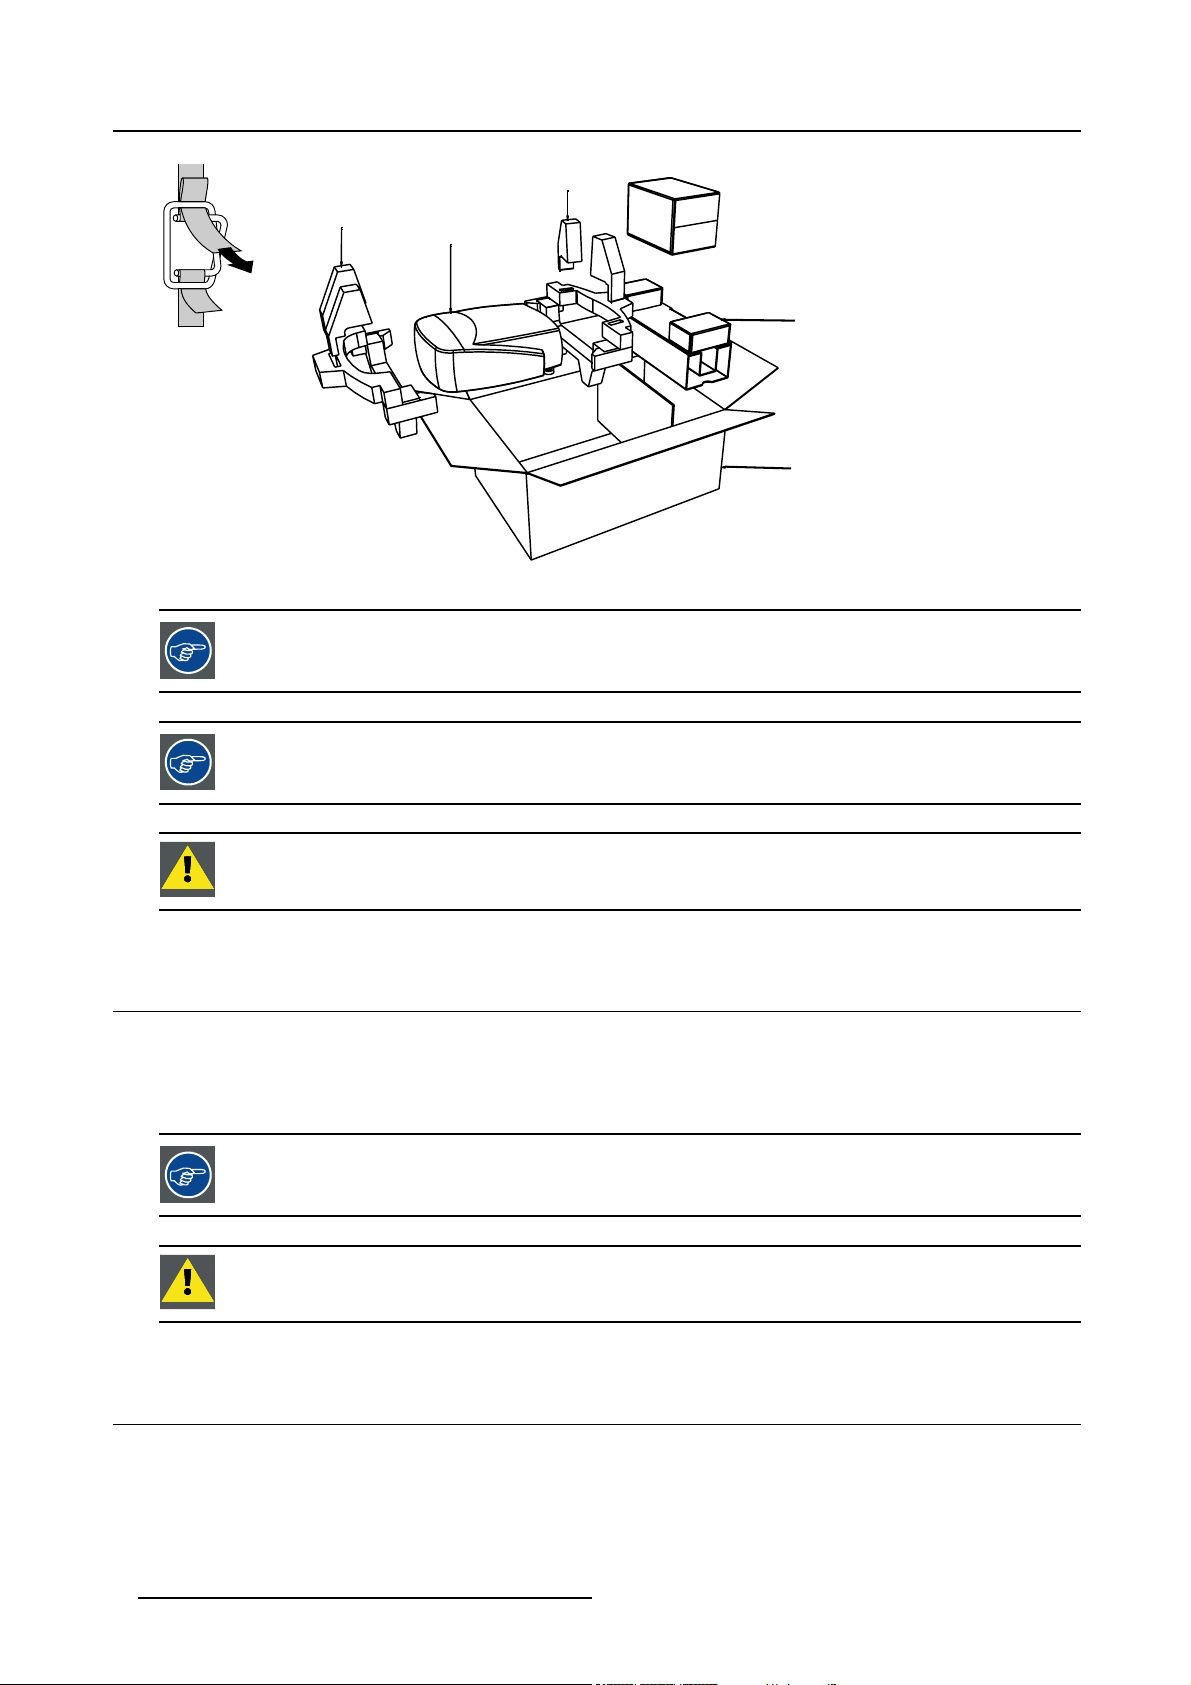
2.2 Projector Packaging
Way of Packaging
The projector is packed in a carton box. To provide protection during transpor
package is secured with banding and fastening clips.
To unpack
1. Release the fastening clips. (image 2-1)
2. Remove the banding. Handle as shown in the drawing.
3. Take the projector out of its shipping carton and place it on a table. (image 2-2)
tation, the projector is surrounded with foam. The
R5976741 MGP 15 MEDICAL GRADE PROJECTOR 28/04/2004
7
Page 12
2. Packaging and Dimensions
8
R824562
PULL
TO OPE
Image 2-1
Image 2-2
Save the original shipping carton and packing material, they will be necessary if you ever have to ship your
projector. For maximum protection, repack your projector as it was originally packed at the factory.
IQ
R824561
R824518
R825784
(+ cable basket R72440
Save the original shipping carton and packing material, they will be necessary if you ever have to ship your
projector. For maximum protection, repack your projector as it was originally packed at the factory.
CAUTION: Never transport the projector with the lens mounted on it !
Always remove the lens before transporting the projector.
2.3 Lens Packaging
Way of Packaging
Lenses are supplied as an individual item.
arepackedinacartonbox.
They
the original shipping carton and packing material, they will be necessary if you ever have to transport
Save
the lens.
CAUTION: Never transport the projector with the lens mounted on it !
ays remove the lens before transporting the projector.
Alw
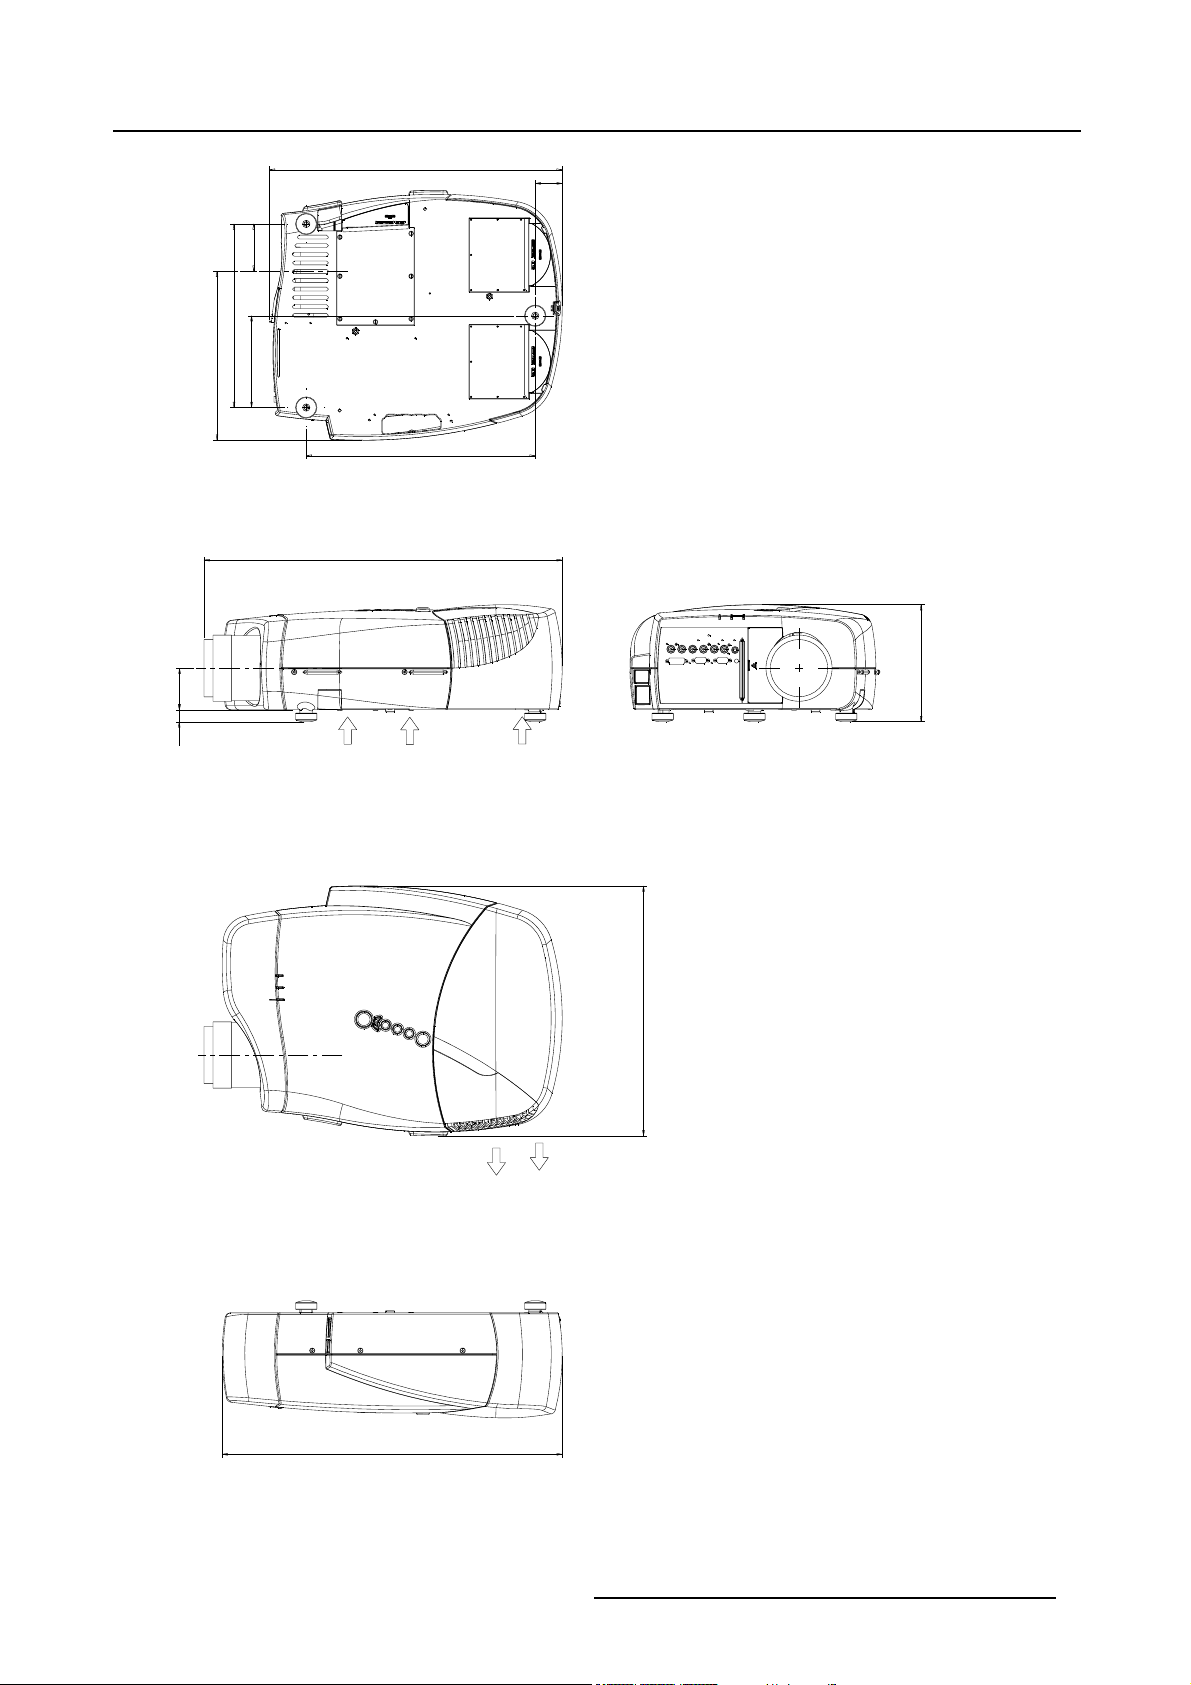
2.4 Dimensions
Dimensions overview
Dimensions are given in mm (1 inch = 25.4 mm)
8 R5976741 MGP 15 MEDICAL GRADE PROJECTOR 28/04/2004
Page 13
2. Packaging and Dimensions
206
9
487
8
7
5
0
3
1
2
8
5
2
1
380
Length with different lenses, see table
45
5
9
1
Cold air in
Hot air out
5
1
4
565
Image 2-3
R5976741 MGP 15 MEDICAL GRADE PROJECTOR 28/04/2004 9
Page 14

2. Packaging and Dimensions
Lens
SVD(2-2.5:1)
QVD(1.3-1.8:1)
QVD(1.9-2.6:1)
QVD(3.0-6.0:1)
QVD(0.85:1)
QVD(7.0:1)
length of projector
545mm
600mm
590mm
620mm
545mm
540mm
combinable with cable
basket
YES
YES
YES
YES
NO
YES
Remarks
Length with cable basket = 565mm
Length with cable basket = 560mm
10 R5976741 MGP 15 MEDICAL GRADE PROJECTOR 28/04/2004
Page 15
3. Installation Guidelines
3. INSTALLATION GUIDELINES
Overview
• Safety warnings
• Installation guidelines
• Projector configurations
• Lenses
• Batteries
3.1 Safety warnings
WARNING: Before installing the projector, read first the safety instructions in the safety manual (R5975258)
delivered with the projector.
Insure that the projector is installed in an easy to evacuate room in case of a lamp explosion.
Mercury Vapor Warnings
Keep the following warnings in mind when using the projector. The lamp used in the projector contains mercury. In case of a lamp
rupture, explosion there will be a mercury vapor emission. In order to minimize the potential risk of inhaling mercury vapors:
• Ensure the projector is installed only in ventilated rooms.
• Replace the lamp module before the end of its operational life.
• Promptly ventilate the room after a lamp rupture, explosion has occurred, evacuate the room (particularly in case of a pregnant
woman).
• Seek medical attention if unusual health conditions occur after a lamp rupture, explosion, such as headache, fatigue, shortness
of breath, chest-tightening coughing or nausea.
3.2 Installation guidelines
Ambient temperature check
Careful consideration of things such as image size, ambient light lev
the optimum use of the projection system.
Max. ambient temperature : 40 °C or 104 °F
Min. ambient temperature : 0 °C or 32 °F
The projector will not operate if ambient air temperature falls outside this range (0°C- 40°C or 32°F-104°F).
Environment
Do not install the projection system in a site near heat sources
excessive dust or humidity. Be aware that room heat rises to the ceiling; check that temperature near the installation site is not
excessive
CAUTION: Harmful Environmental Contamination Precaution
Environment condition check
A projector must always be mounted in a manner which ensures the free flow of clean air into the projectors ventilation inlets as well
as free flow at the ventilation outlets. The installati
For installations in environments where the projector is subject to airborne contaminants such as that produced by smoke machines
or similar (these deposit a thin layer of greasy residue upon the projectors internal optics and imaging electronic surfaces, degrading
performance), then it is highly advisable and d
air supply. Devices or structures to extract or shield contaminated air well away from the projector are a prerequisite, if this is not
a feasible solution then measures to relocate the projector to a clean air environment should be considered. Make sure that the
projector never runs with dirty dustfilters
dustfilters on a regular basis and to replace them at any lamp change. Barco reserves itself the right to refuse warranty replacement
of consumables if they have been used in a projector with dirty airfilters. Only use the manufactures recommended cleaning kit which
as this will dramatically reduce the lifetime of the consumables. It is advised to clean the
on must also allow easy access to the consumable parts ( dustfilters, lamps, ...)
esirable to have this contamination removed prior to it reaching the projectors clean
el, projector placement and type of screen to use are critical to
such as radiators or air ducts, or in a place subject to direct sunlight,
R5976741 MGP 15 MEDICAL GRADE PROJECTOR 28/04/2004
11
Page 16
3. Installation Guidelines
has been specifically designed for cleaning optical parts, never use industrial strength cleaners on a projectors optics as these will
degrade optical coatings and damage sensitive optoelectronics .
Failure to take suitable precautions to protect the projector from the effects of persistent and prolonged air contaminants will culminate in extensive and irreversible ingrained optical damage. At this stage cleaning of the internal optical units will be non-effective
and impracticable. Damage of this nature is under no circumstances covered under the manufactures warranty and may deem the
warranty null and void. In such a case the client shall be held solely responsible for all costs incurred during any repair. It is the
clients responsibility to ensure at all times that the projector is protected from the harmful effects of hostile airborne particles in the
environment of the projector. The manufacture reserves the right to refuse warranty repair if a projector has been subject to wantful
neglect, abandon or improper use.
What about ambient light ?
The ambient light level of any room is made up of direct or indirect sunlight and the light fixtures in the room. The a
light will determine how bright the image will appear. So, avoid direct light on the screen. Windows that face the screen should be
covered by opaque drapery while the set is being viewed. It is desirable to install the projection system in a room whose walls and
floor are of non-reflecting material. The use of recessed ceiling lights and a method of dimming those ligh
is also important. Too much ambient light will ‘wash out’ of the projected image. This appears as less contrast between the darkest
and lightest parts of the image. With bigger screens, the ‘wash out’ becomes more important. As a general rule, darken the room to
the point where there is just sufficient light to read or write comfortably. Spot li
interference with the screen is minimal.
ghting is desirable for illuminating small areas so that
mountofambient
ts to an acceptable level
Which screen type ?
There are two major categories of screens used for projection equipment. Those used for front projected images and those for rear
projection applications. Screens are rated by how much light they reflect (or transmit in the case of rear projection systems) given a
determined amount of light projected toward them. The ‘GAIN’ of a screen is the term used. Front and rear screens are both rated
in terms of gain. The gain of screens range from a white matte screen with a gain of 1 (x1) to a brushed aluminized screen with a
gain of 10 (x10) or more. The choice between higher and lower gain screens is largely a matter of personal preference and another
consideration called the Viewing angle. In considering the type of screen to choose, determine where the viewers will be located
and go for the highest gain screen possible. A high gain screen will provide a brighter picture but reduce the viewing angle. For
more information about screens, contact your local screen supplier.
Image size
The projector is designed for projecting an image
4to3.
size with a screenwidth from 1.00m (3.3ft) to 6.00m (19.7ft) with an aspect ratio of
3.3 Projector configurations
The different configurations
The MGP can be installed in either a single or dual projector configuration..
The MGP projector can be operated in either Portrait or Landscape mode.
A
B
Image 3-1
A portrait mode
B landscape mode
12
R5976741 MGP 15 MEDICAL GRADE PROJECTOR 28/04/2004
Page 17
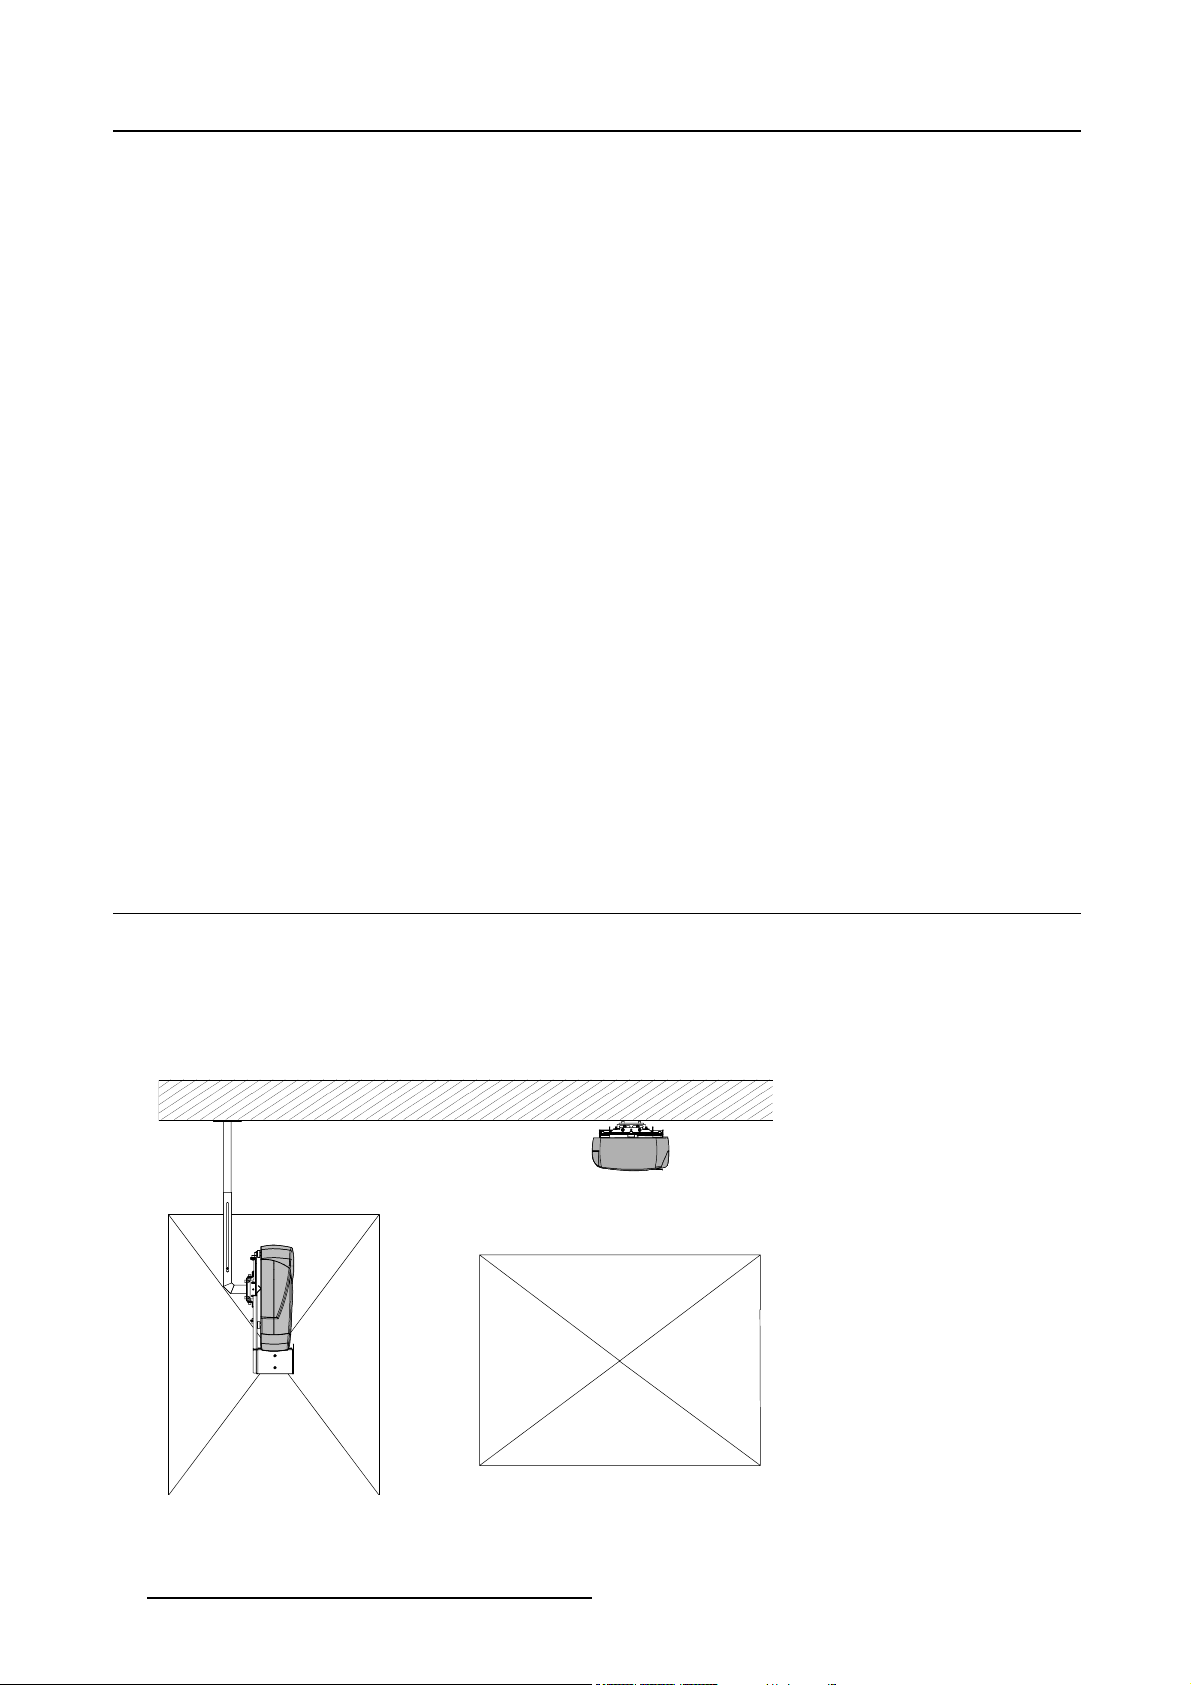
Refer to the Installation manual for more info on how to install the ceiling mounts
Image 3-2
Dual head setup in portrait mode
3. Installation Guidelines
Lens range to be used in combination with the MGP Ceiling mount Kit for fr
Only on axis projection since vertical shift is impossible (vertical shift becomes horizontal shift).
Rear projection is also possible within a dedicated rear structure.
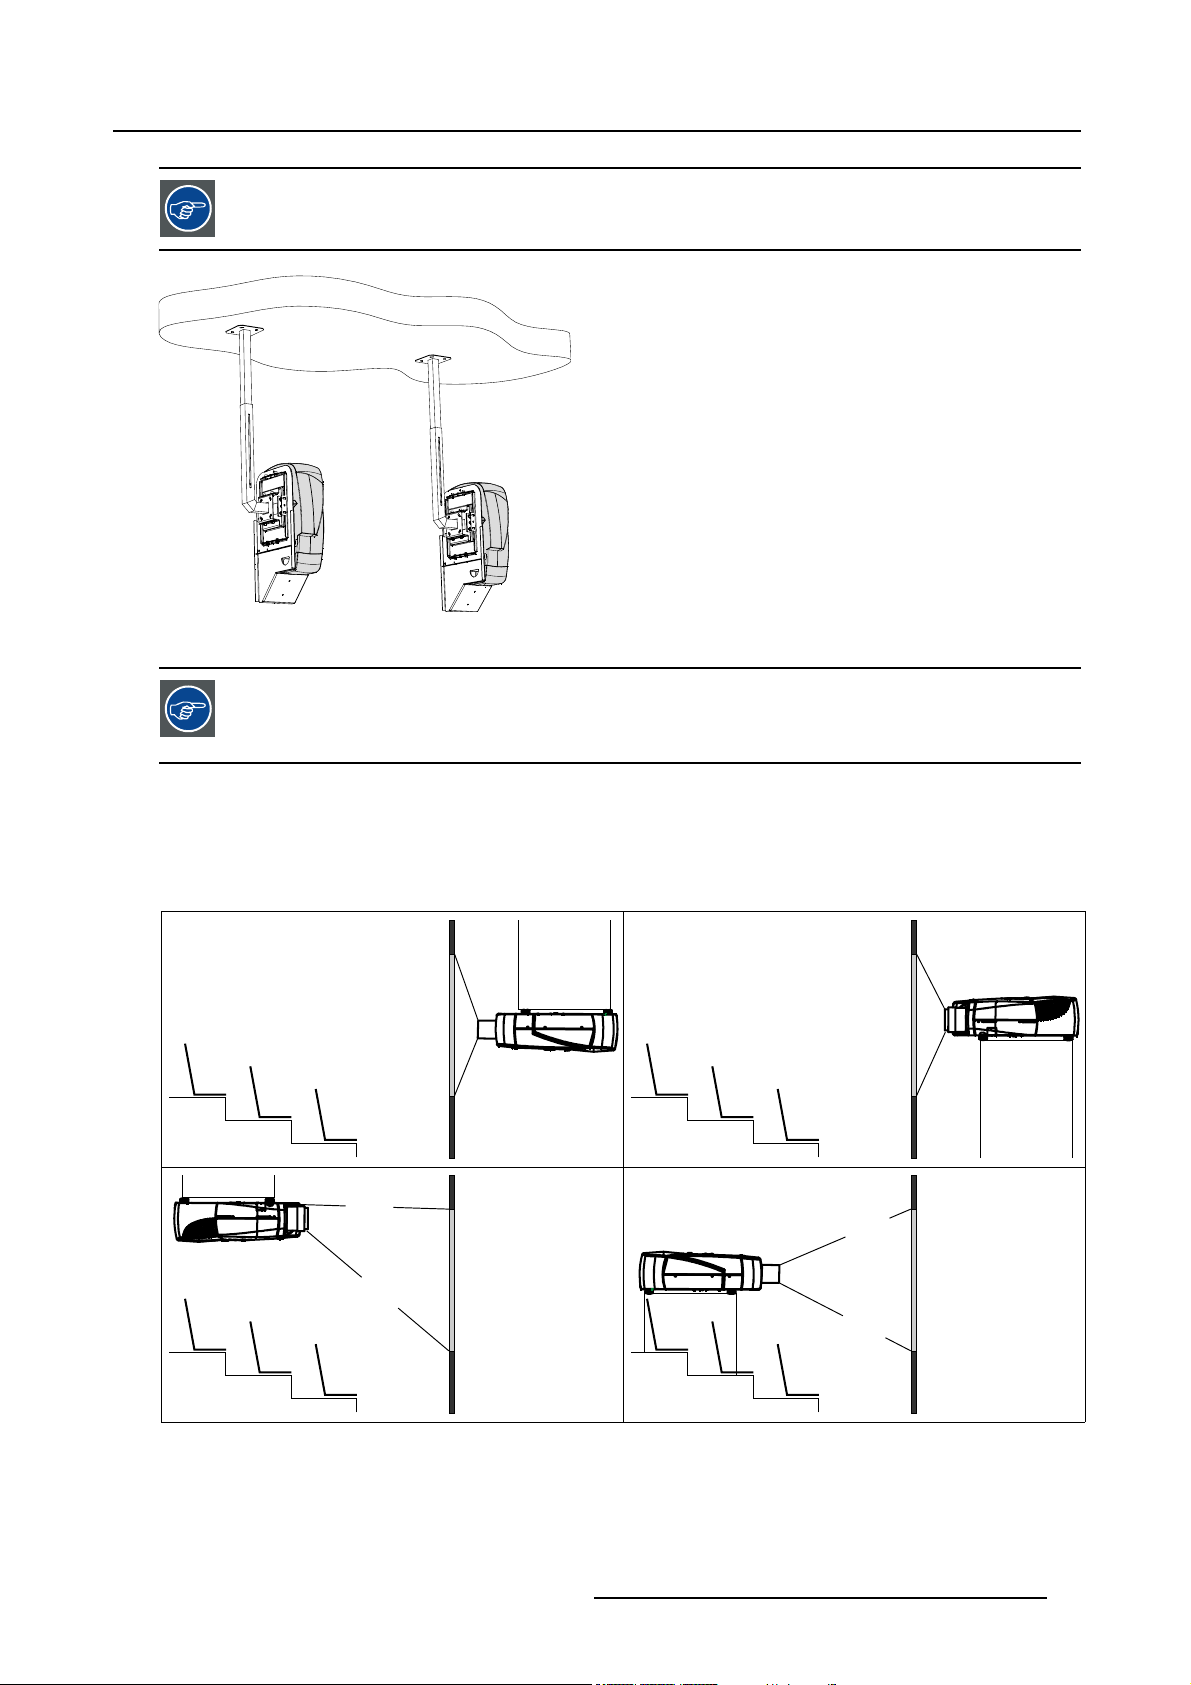
For the landscape viewing mode one can define the standard projector configurations:
1. Rear/Ceiling
2. Rear/Table
3. Front/Ceiling
4. Front/Table
1
3
2
4
ont projection: SVD (2.0 - 2.5)
Image 3-3
R5976741 MGP 15 MEDICAL GRADE PROJECTOR 28/04/2004 13
Page 18
3. Installation Guidelines
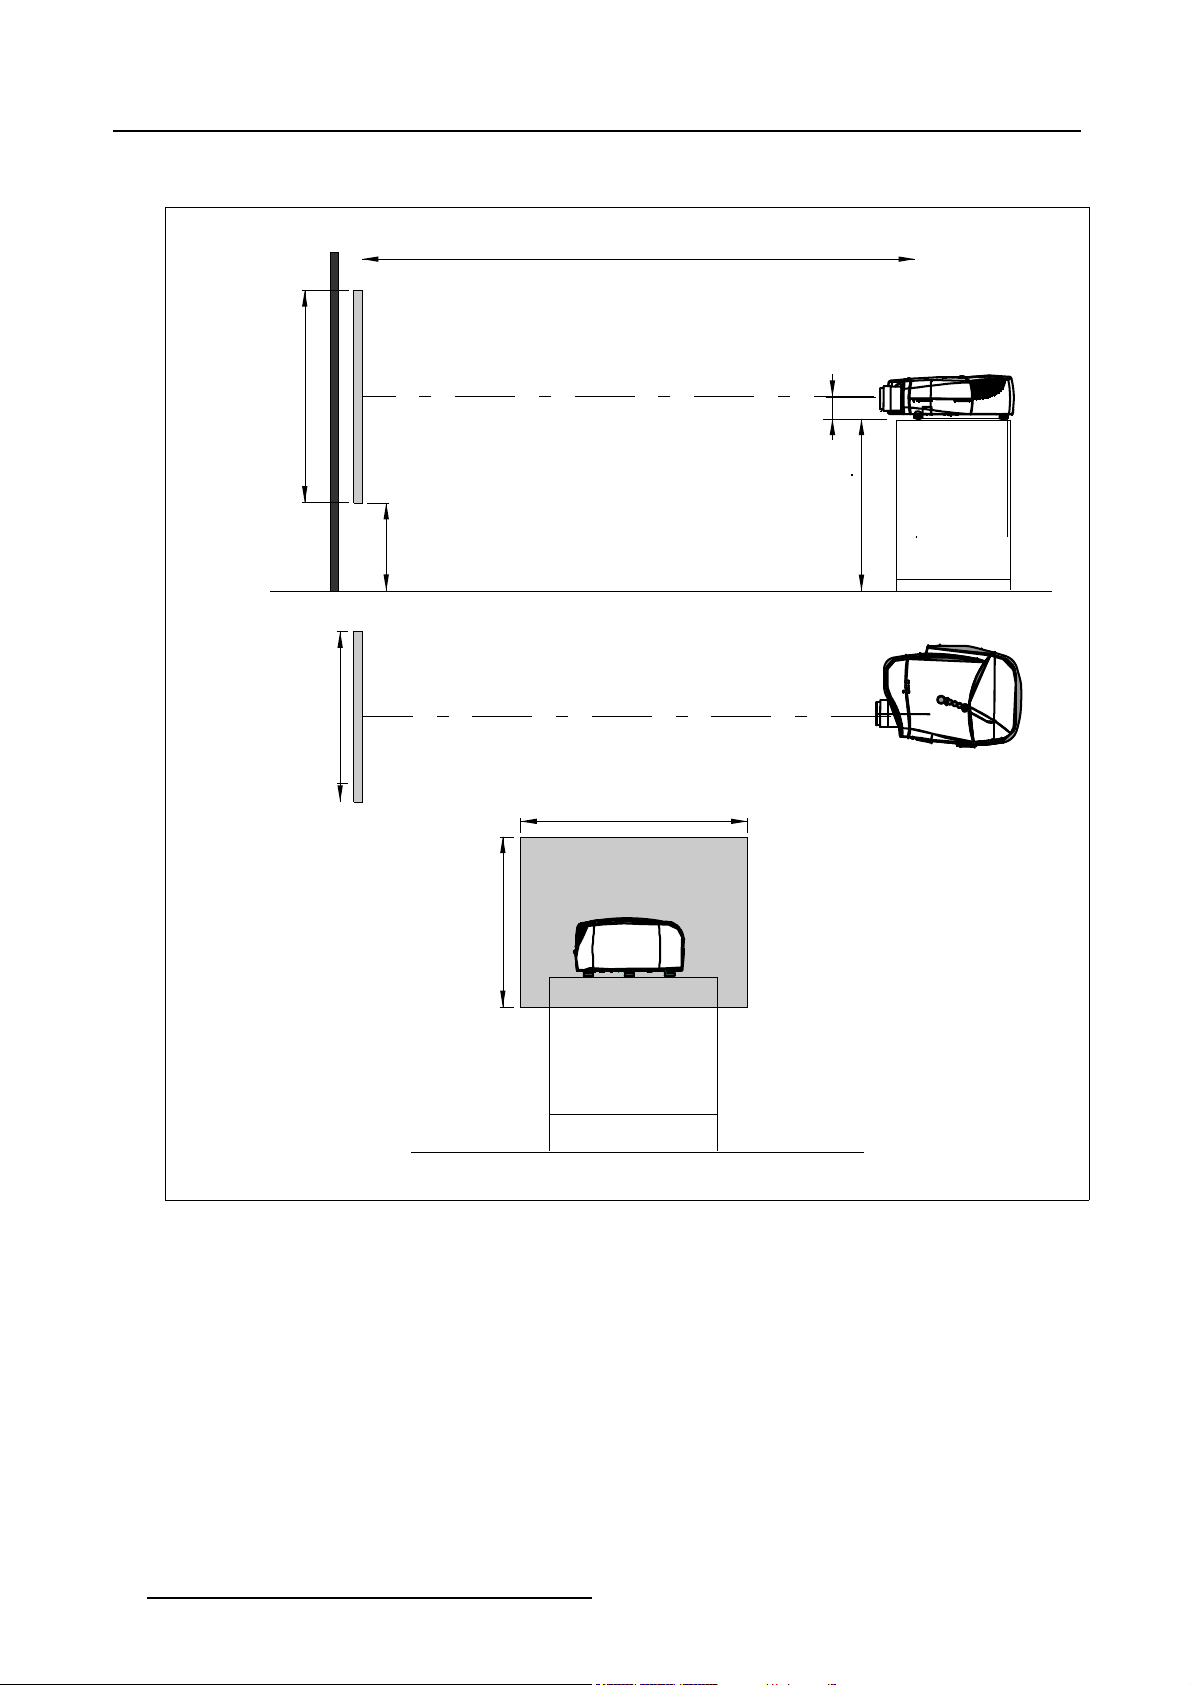
Positioning the projector
PD
P
a
b
c
SH
S
B
SW
S
SH
x
A
CD=SH/2+B-A
F
SW
Image 3-4
ON-Axis installation
a side view
b top view
c back view
x optical axis projection lens
pprojector
s screen
F floor
14
F
R5976741 MGP 15 MEDICAL GRADE PROJECTOR 28/04/2004
Page 19

3. Installation Guidelines
PD
x
a
SH
P
S
A
B
CD=B-A
F
b
c
Image 3-5
100% OFF Axis insta llation
a side view
b top view
c back view
x optical axis projec
pprojector
s screen
F floor
SW
S
SW
SH
F
tion lens
R5976741 MGP 15 MEDICAL GRADE PROJECTOR 28/04/2004
15
Page 20
3. Installation Guidelines
3.4 Lenses
Overview
• Lenses
• Lens formulas
• Lens installation
• Removing the lens
• Cleaning the lens
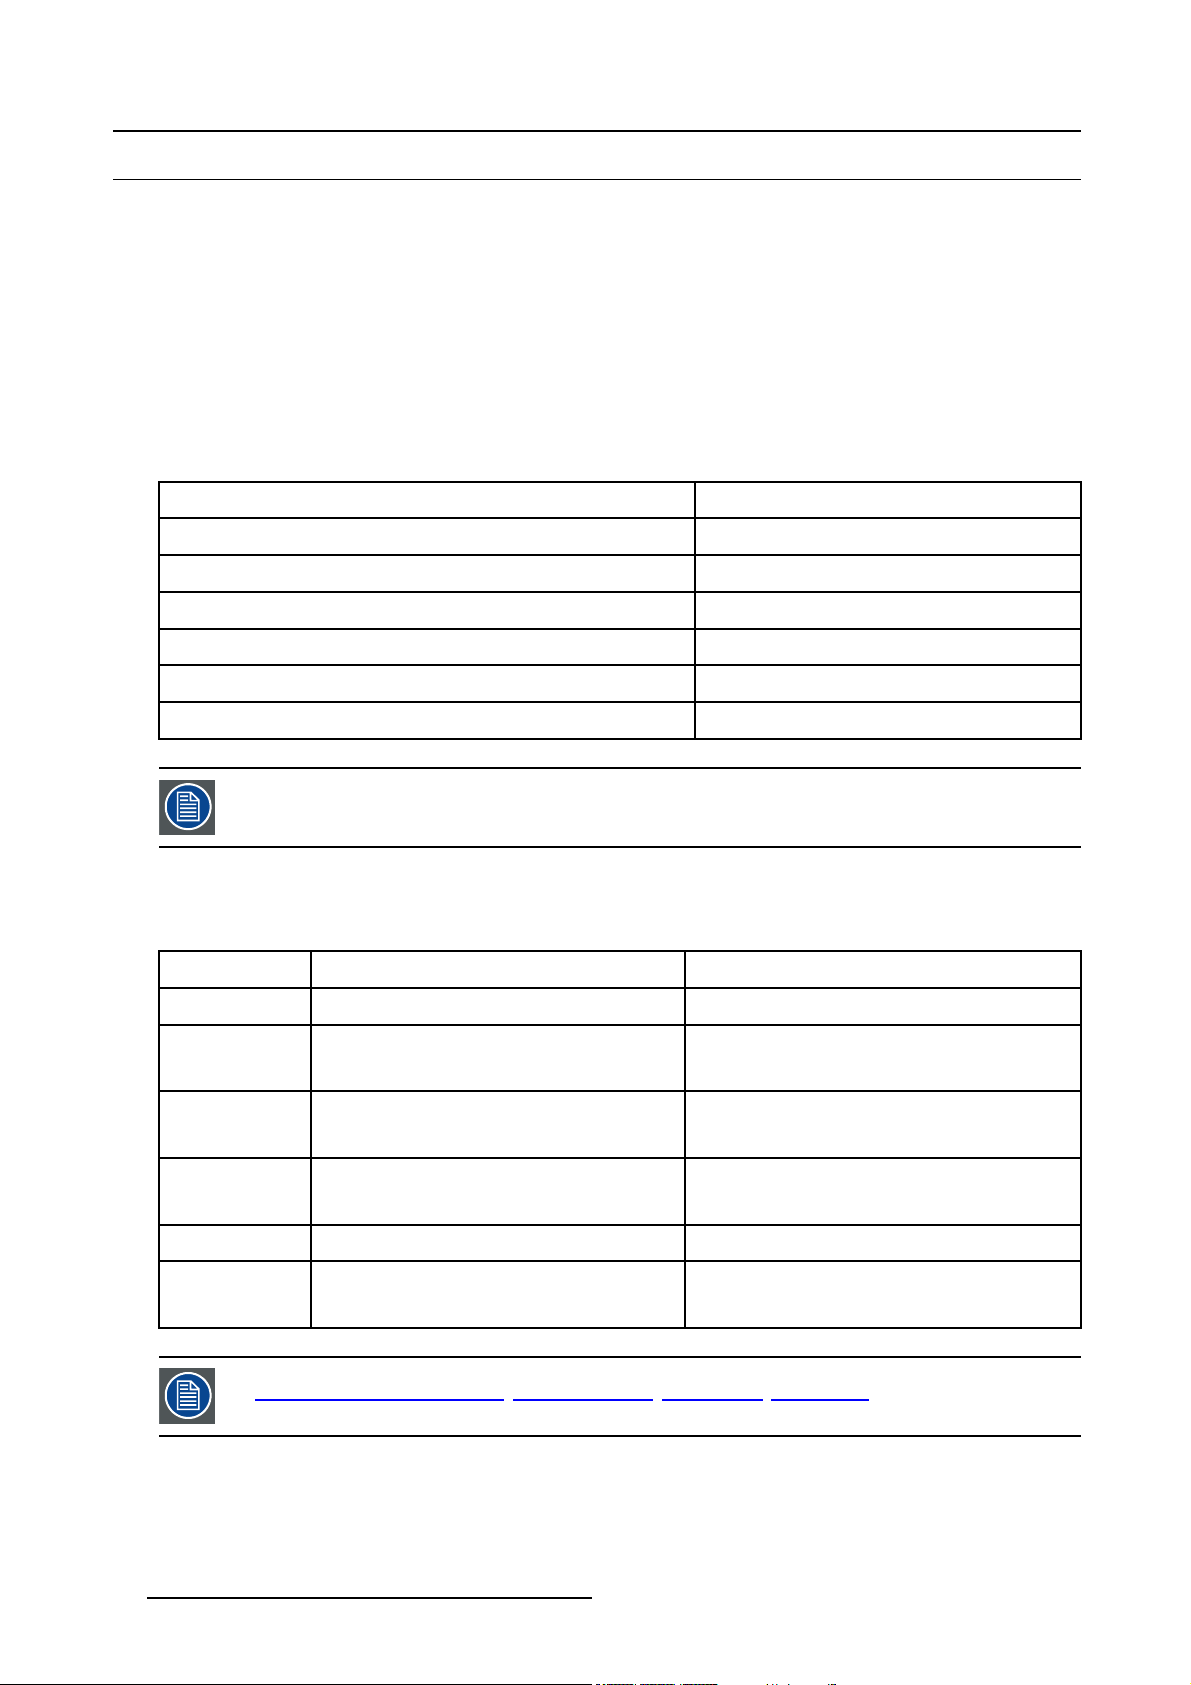
3.4.1 Lenses
Available lenses
The following lenses are available, or will become available (contact a BARCO service center) as an option :
Lenses
QVD(0.85:1)
QVD(1.3-1.8:1)
QVD(1.9-2.6:1)
QVD(3.0-6.0:1)
QVD(7:1)
SVD(2.0-2.5:1)
The QVD (0.85:1) is to be used in ON Axis configuration only.
Shifting the lens vertically will not guarantee optimal image quality.
Standard version
R9841220
R9840950
R9840960
R9840970
R9841230
R9841240
3.4.2 Lens formulas
Formulas
Metric Formulas (meter) Inch formulas (inch)
QVD(0.85:1) PD = -0.034 + 0.801 x SW + 0.0086 /SW PD = -1.34 + 0.801 x SW + 13.35 /SW
QVD(1.3-1.8:1) PDmin = 0.019 + 1.216xSW + 0.028/SW
PDmax = -0.001 + 1.584xSW + 0.074/SW
PDmin = 0.75 + 1.216xSW + 43.4/SW
PDmax = -0.04 + 1.584xSW + 115/SW
QVD(1.9-2.6:1) PDmin = 0.052 + 1.731xSW - 0.014/SW
PDmax = 0.11 + 2.33xSW - 0.059/SW
QVD(3.0-6.0:1) PDmin = 0.048 + 2.795xSW - 0.042/SW
PDmax = 0.06 + 5.6xSW - 0.041/SW
QVD(7:1) PD = 0.013 + 6.35xSW + 0.005/SW PD = 0.51 + 6.35xSW + 8.35/SW
SVD(2.0-2.5:1) PDmin = -0.139 + 1.733xSW + 0.1/SW
PDmax = 0.005 + 2.224xSW - 0.00862/SW
Lens program to calculate the projector distance is available on the BARCO web site :
ttp://www.barco.com/projection_systems/customer_services/lens_program.asp
h
16 R5976741 MGP 15 MEDICAL GRADE PROJECTOR 28/04/2004
PDmin = 2.05 + 1.731xSW - 21.7/SW
PDmax = 4.33 + 2.33xSW - 91.8/SW
PDmin = 1.89 + 2.795xSW - 65/SW
PDmax = 2.36 + 5.6xSW - 63.4/SW
PDmin = -5.47 + 1.733xSW + 153/SW
PDmax = 0.2 + 2.224xSW - 13.3/SW
Page 21

3.4.3 Lens installation
How to install ?
1. Take the lens out of its packing material
2. Slide the lensdoor to the left (image 3-6)
3. Fix the lens by placing it in the housing
Note: In case of a motorized lens the female jack must be in front of the male jack located in the upper-left part of the housing
in the projector (image 3-7)
4. Push carefully to lock the lens in the housing
5. Slide back the lensdoor to the right
3. Installation Guidelines
Image 3-6
Image 3-7
.4
3.4
How
1. Slide the lens door to the left.
2. Unlock the lens by pulling the handle located on the right side of the projector (image 3-8)
3. Remove the lens out of its housing
oving the lens
Rem
to remove the lens ?
Image 3-8
R5976741 MGP 15 MEDICAL GRADE PROJECTOR 28/04/2004 17
Page 22
3. Installation Guidelines
CAUTION: Never transport the projector with the lens mounted on it !
Always remove the lens before transporting the projector.
3.4.5 Cleaning the lens
To minimize the possibility of damaging the optical coating or scratching exposed lens surface, we have developed recommendations for cleaning the lens. FIRST, we recommend you try to remove any material from
the lens by blowing it off with clean, dry deionized air. DO NOT use any liquid to clean the lenses.
Necessary tools
To ra ys e eTMcloth (delivered together with the lens kit). Order number : R379058.
Howtocleanthelens?
Proceed as follow :
1. Always wipe lenses with a CLEAN Toraysee
2. Always wipe lenses in a single direction.
Warning: Do not wipe back and forwards across the lens surface as this tends to grind dirt into the coating.
3. Do not leave cleaning cloth in either an open room or lab coat pocket, as doing so can contaminate the cloth.
4. If smears occur when cleaning lenses, replace the cloth. Smears are the first indication of a dir
TM
cloth.
ty cloth.
WARNING: Do not use fabric softener when washing the cleaning cloth or softener sheets when dryi
cloth.
Do not use liquid cleaners on the cloth as doing so will contaminate the cloth.
CAUTION: Other lenses can also be cleaned safely with this Toraysee
TM
3.5 Batteries
Overview
• Battery installation
3.5.1 Battery installation
How to install the battery
Two batteries are packed together with the RCU. Before using your RCU, install first these batteries.
1. Remove the battery cover on the backside by pushing the handle a little towards the bottom of the RCU.
2. Lift up the top side of the cover at the same time.
3. Insert the batteries as indicated in the RCU.
4. Put the battery cover on its place.
ng the
cloth.
18
R5976741 MGP 15 MEDICAL GRADE PROJECTOR 28/04/2004
Page 23
4. CONNECTIONS
4.1 Power connection
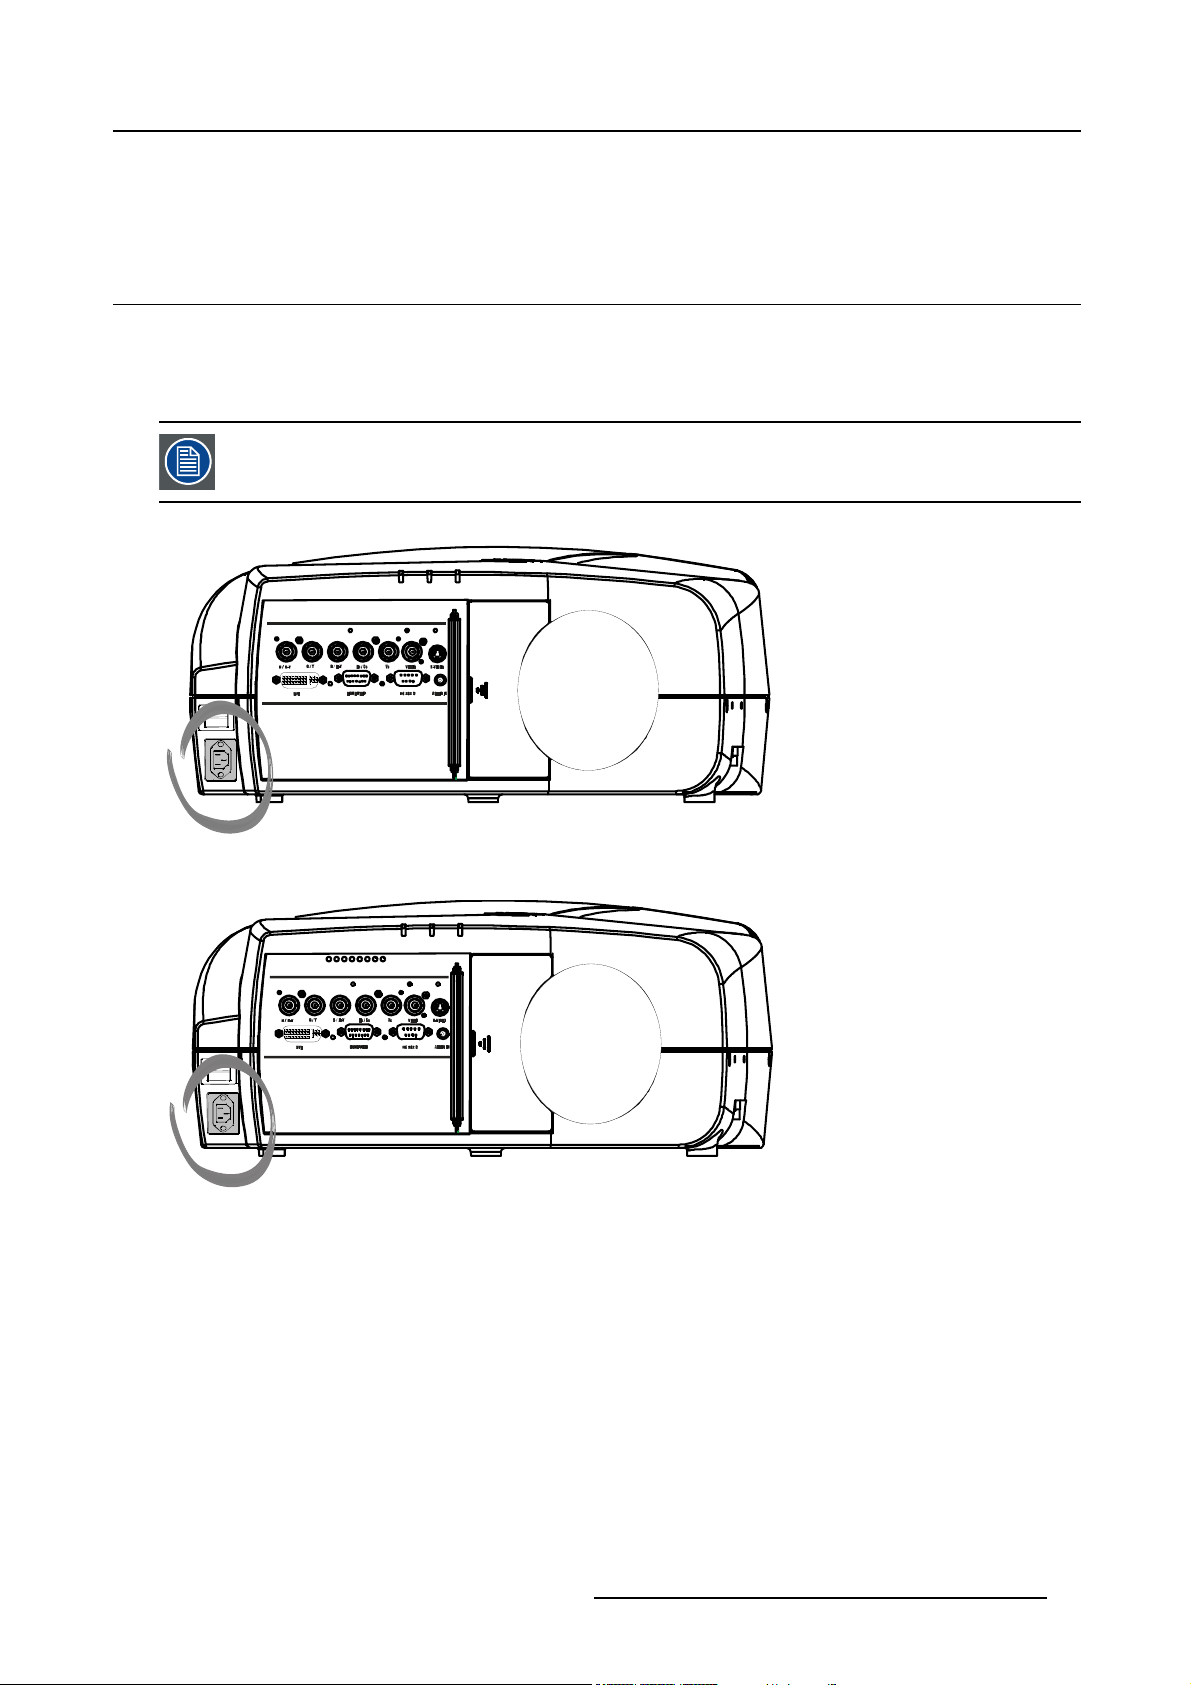
AC power (mains) cord connection
Use the supplied power cord to connect your projector to the wall outlet.
Plug the female power connector into the male connector at the front of the projector.
The power input is auto-ranging from 90 to 240 VAC.
4. Connections
I
0
Image 4-1
I
0
Image 4-2
Fuses
For continued protection against fire hazard :
• refer replacement to qualified service personnel
• ask to replace with the same type of fuse.
R5976741 MGP 15 MEDICAL GRADE PROJECTOR 28/04/2004
19
Page 24
4. Connections
4.2 Input Source connections
Overview
• Input section
• Input facilities
• 5-Cable input
• Composite Video Input
• S-Video input
• Digital Visual Interface (DVI) input
• Computer input
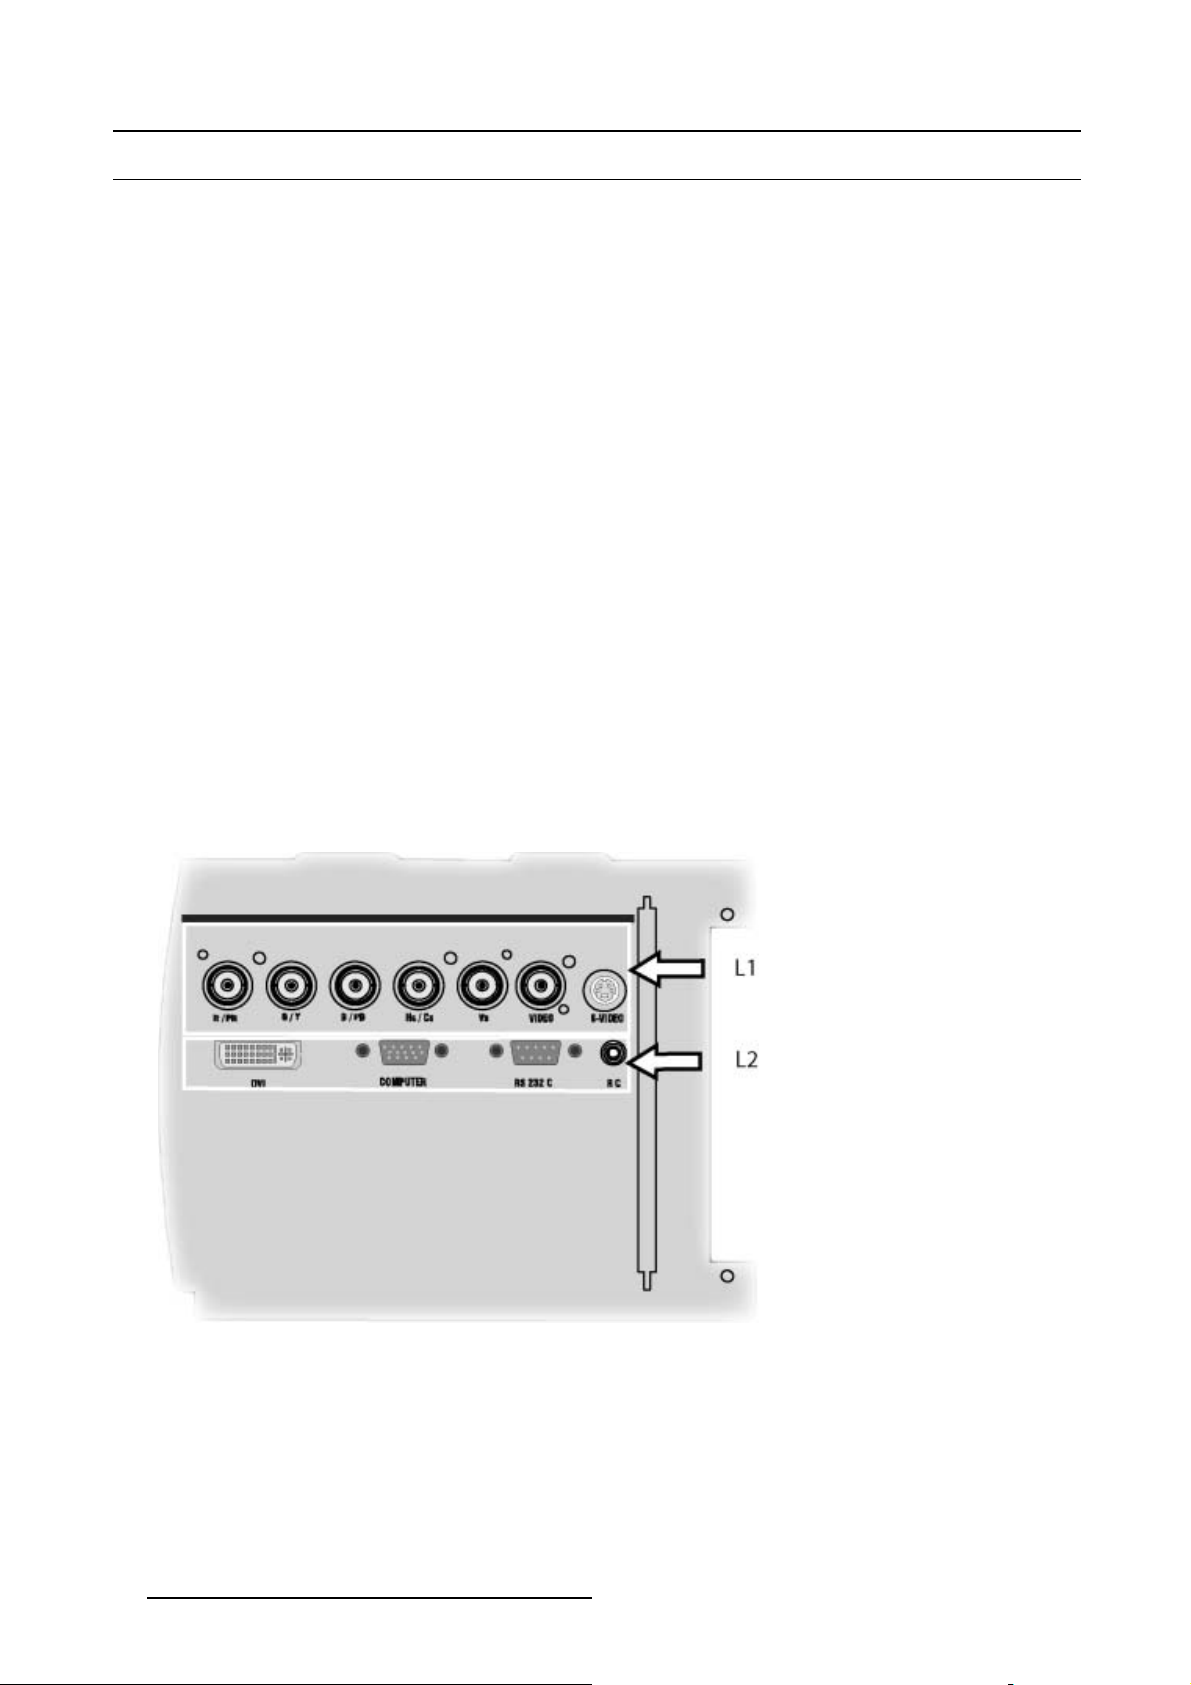
4.2.1 Input section
Input Layers
The input section is divided in layers, each of them regrouping several inputs, this architecture allows the input se
at any time with an optional analog or digital layer.
1. Layer 1: analog layer containing analog data and video inputs
2. Layer 2: a hybrid layer containing 2 digital and 1 analog input
4.2.2 Input facilities
overview
ctiontobeupgraded
• 5–cable input
• composite video
• component video (PR/Y/PB)
•S-Video
• Digital Visual Input (DVI)
• Computer
Image 4-3
4.2.3 5-Cable input
Input specifications
The 5-cable input section is made of 5 BNC input terminals.
0.7 Vpp ± 3dB
75 Ω terminated
20
R5976741 MGP 15 MEDICAL GRADE PROJECTOR 28/04/2004
Page 25
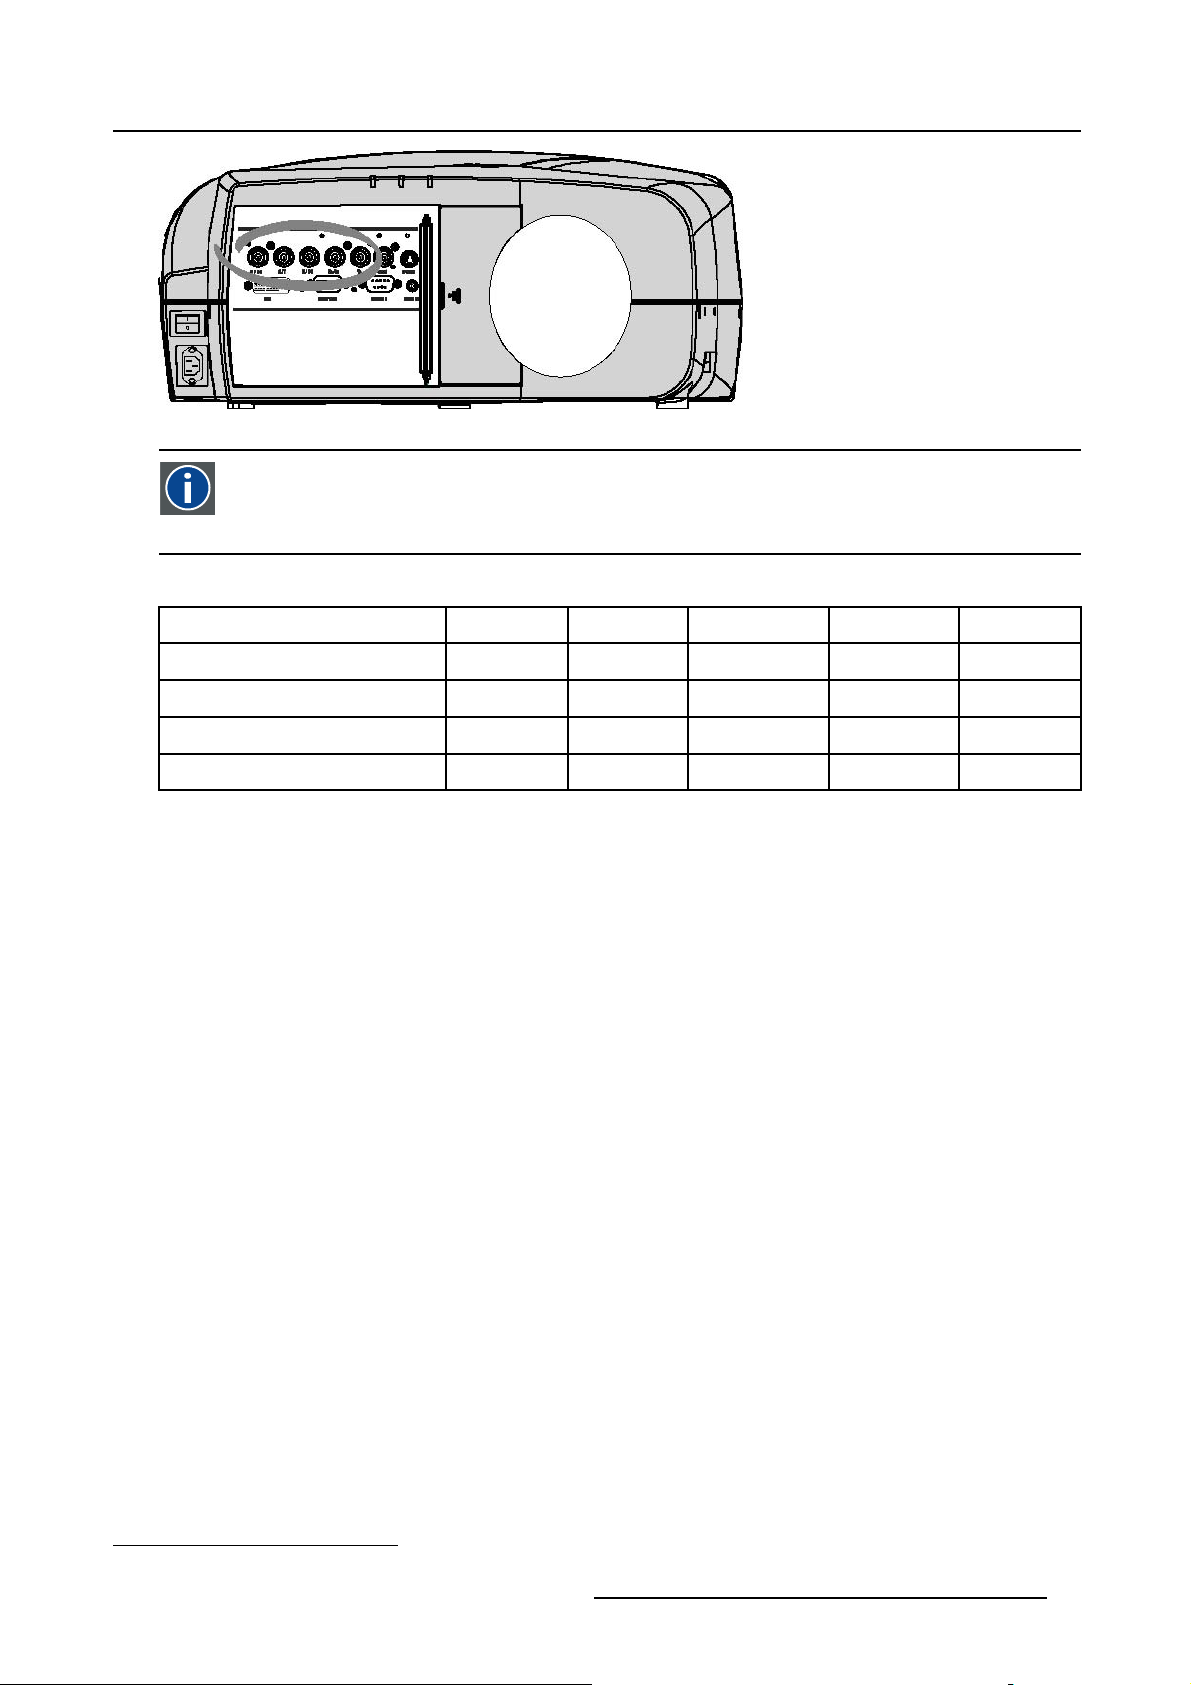
Image 4-4
Component Video
In Component Video the term component describes a number of elements that are needed to make up the video picture, these components are PR/Y/PB. A composite video signal on the other hand contains all the
for the color picture in a single channel of information
Which signals can be connected ?
4. Connections
information needed
Signals/Input BNC
RGBHV
1
RGsB
1
RGBS
Component
R
R
R
R
PR Y PB
How to select a source on the 5 cable input ?
1. Press 1 on the RCU
Note: Another way for selecting this input is via Source on the local keypad or via the Menu
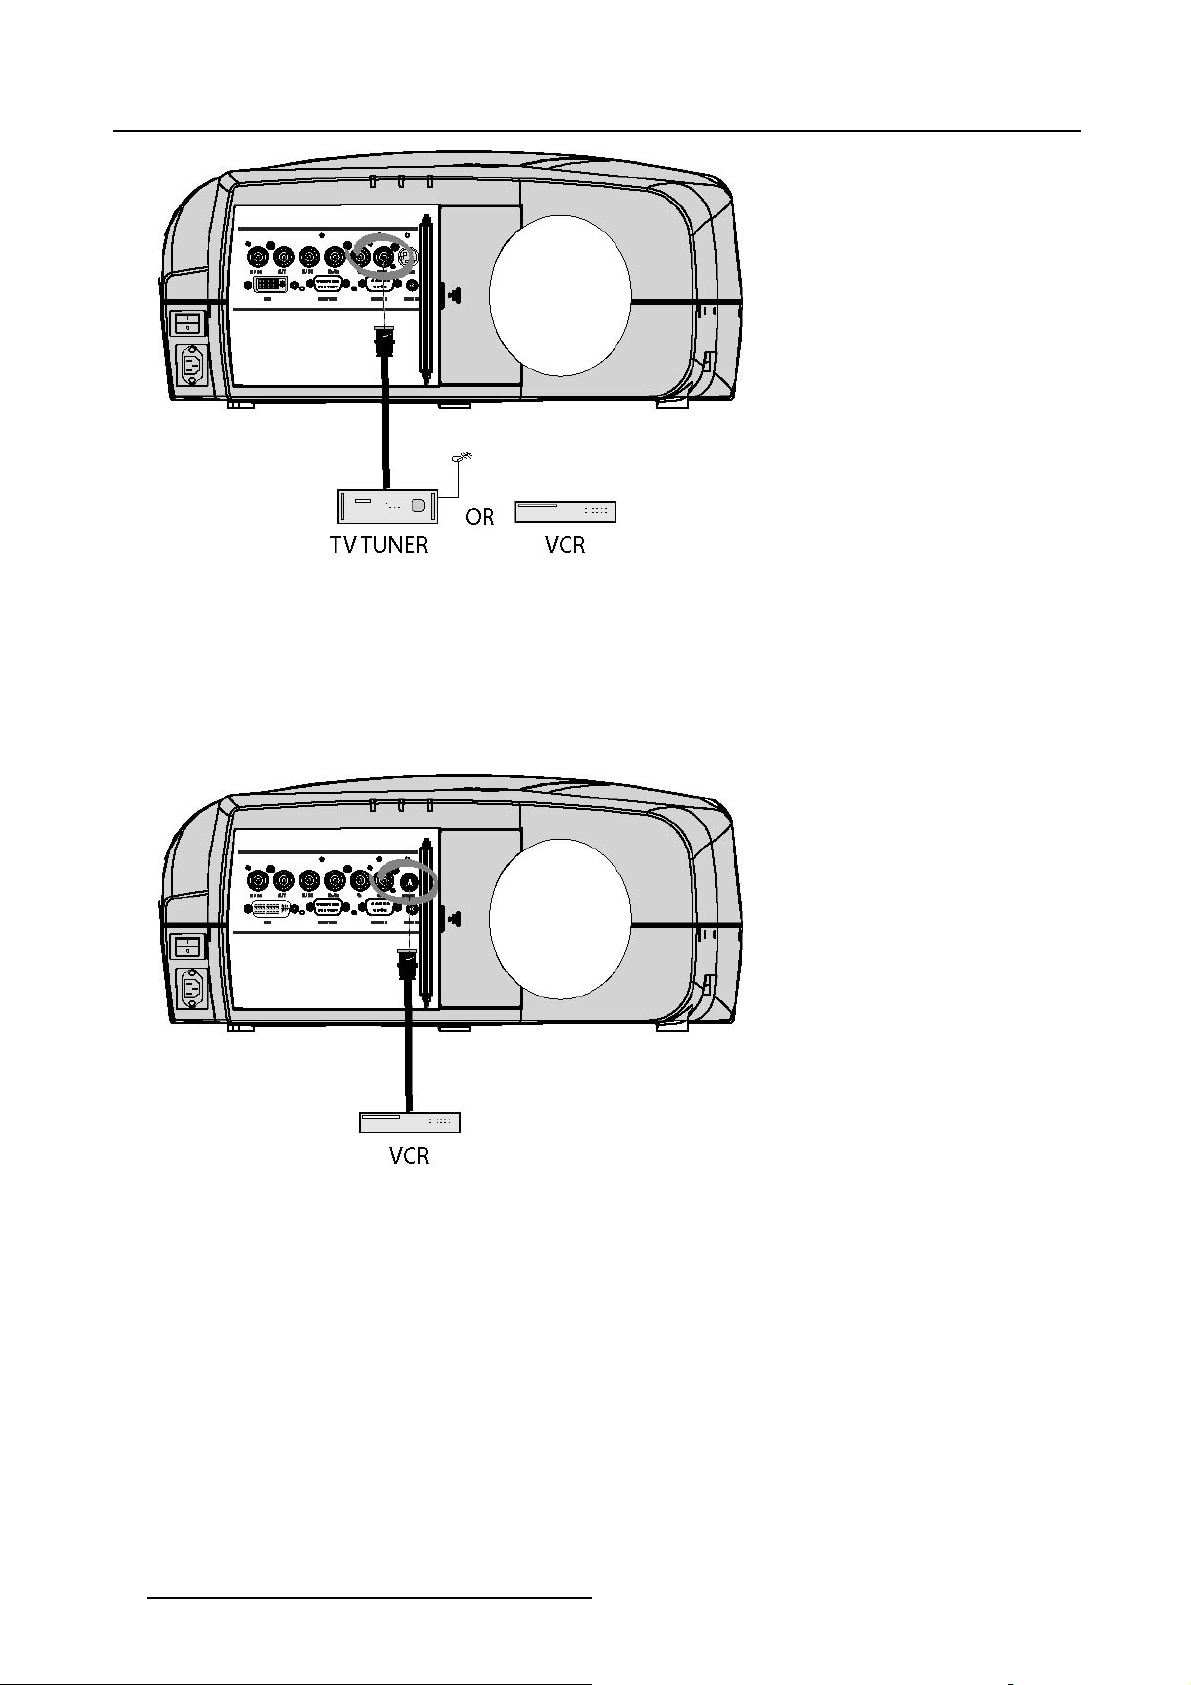
4.2.4 Composite Video Input
Input specification
The Composite video input section is made of 1BNC input terminal.
1.0 Vpp ± 3dB
75 Ω terminated
No loop through
s
G
G
G
s
G
B H V
B H V
B
B
- -
S
- -
-
1. data or video
R5976741 MGP 15 MEDICAL GRADE PROJECTOR 28/04/2004 21
Page 26
4. Connections
Image 4-5
How to select a Composite Video Input ?
1. Press 3 on the RCU
Note: Another way for selecting this input is via Source on the local keypad or via the Menu.
4.2.5 S-Video input
Input specification
Image 4-6
Which signal can be connected ?
Standard S-Video (S-VHS) with separate Y(luma) and C (chroma) signals.
How to select the S-Video input ?
1. Press 4 on the RCU
Note: Another way for selecting this input is via Source on the local keypad or via the Menu.
22
R5976741 MGP 15 MEDICAL GRADE PROJECTOR 28/04/2004
Page 27
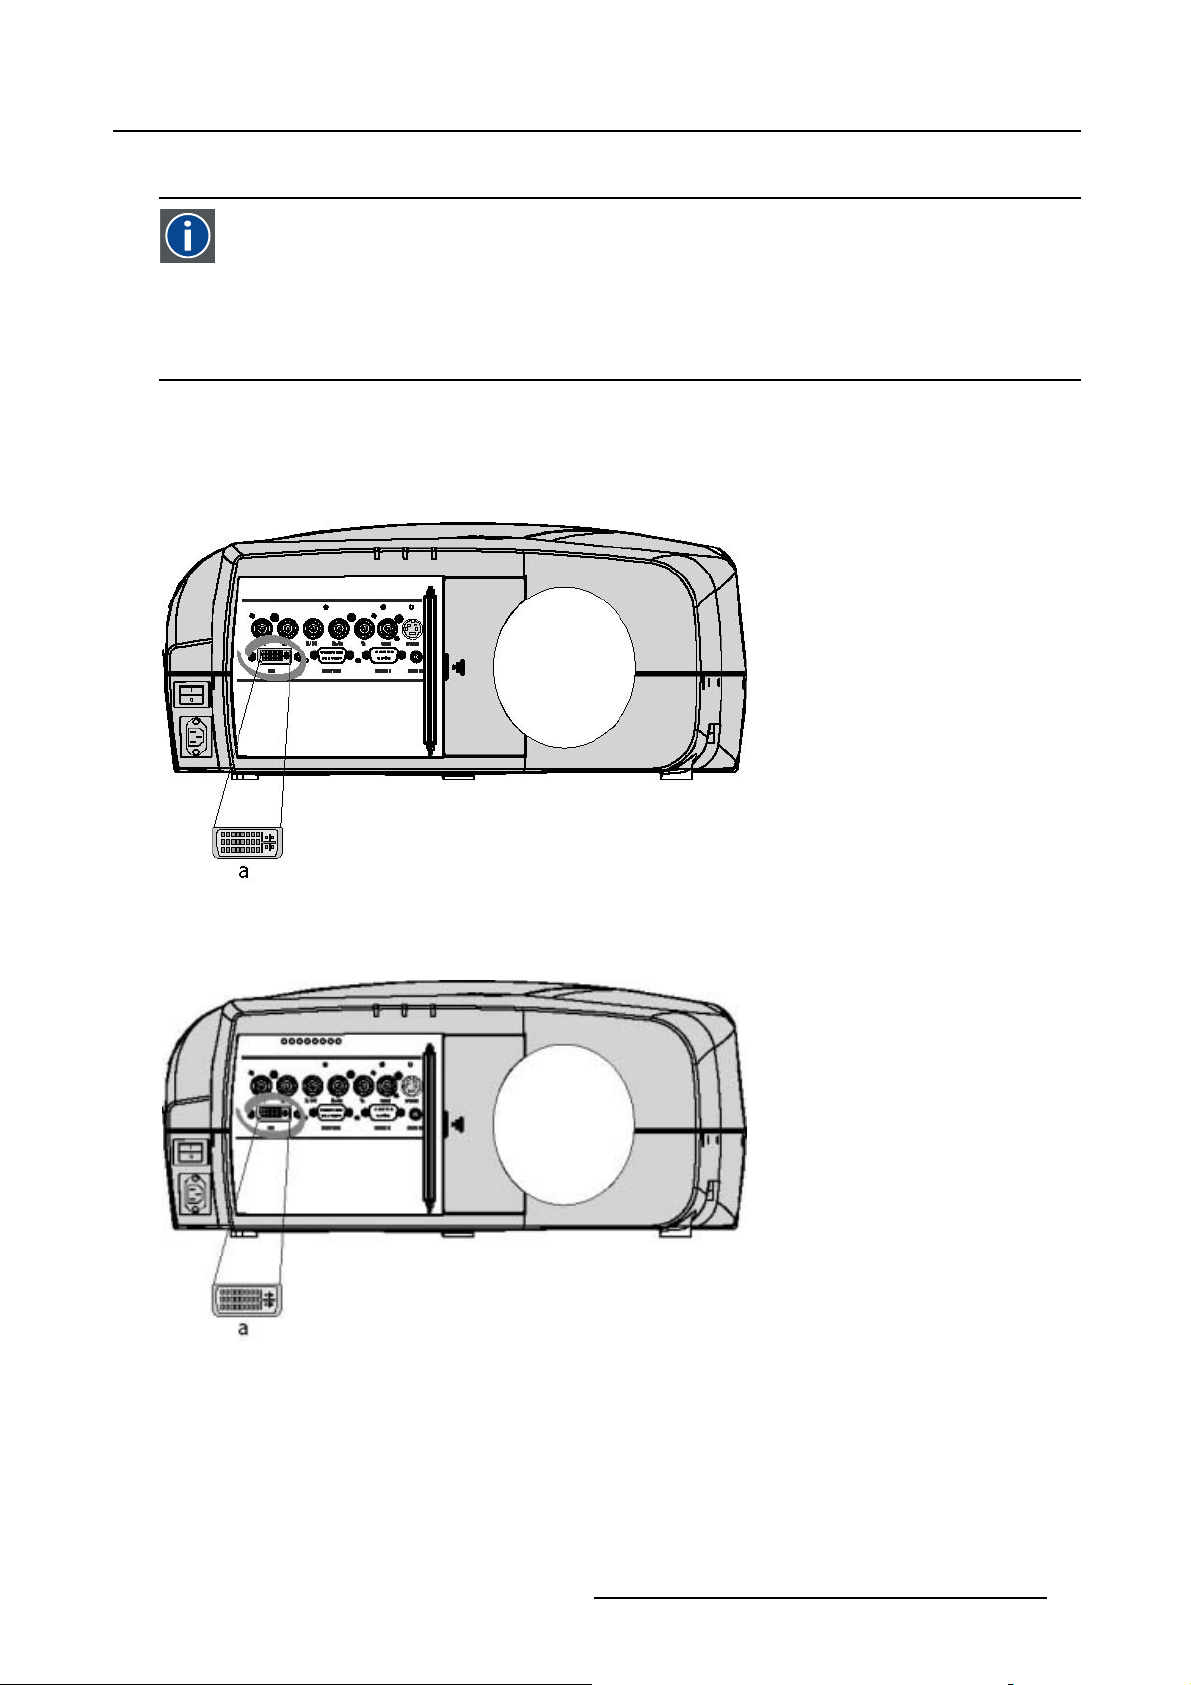
4.2.6 Digital Visual Interface (DVI) input
DVI
Digital Visual Interface is a display interface developed in response to the proliferation of digital flat panel displays.
The digital video connectivity standard that was developed by DDWG (Digital Display Work Group). This connection
standard offers two different connectors: one with 24 pins that handles digital video signals only, and one with 29 pins
that handles both digital and analog video. This standard uses TMDS (Transition Minimized Differential Signal) from
Silicon Image and DDC (Display Data Channel) from VESA (Video Electronics Standards Association).
DVI can be single or dual link.
Input specifications
Single link DVI
Differential input voltage: 200 mV - 800mV
4. Connections
Image 4-7
a DVI-I type connector analog link (4 pins at the right side of the connector) not sup-
ported
Image 4-8
How to select the DVI Input ?
1. Press 5 on the RCU
Note: Another way for selecting this input is via the Menu.
R5976741 MGP 15 MEDICAL GRADE PROJECTOR 28/04/2004
23
Page 28

4. Connections
4.2.7 Computer input
Input specification
TTL sync input : U
RGB input = 0.7 V
Image 4-9
min
pp
±3dB
=2.0V
Image 4-10
What can be connected ?
•RGBHV
•RG
B
S
CompositesynconlypossibleonGreen
How to select a computer input ?
1. Press 2 on the RCU
Note: Another way for selecting this input is via the Menu.
4.3 Communications Connections
Overview
• RS232 IN connection
4.3.1 RS232 IN connection
What can be connected to the RS232 IN connection ?
The RS 232 IN connections allows the projector to communicate with a Computer e.g. IBM PC or Apple Macintosh.
24
R5976741 MGP 15 MEDICAL GRADE PROJECTOR 28/04/2004
Page 29
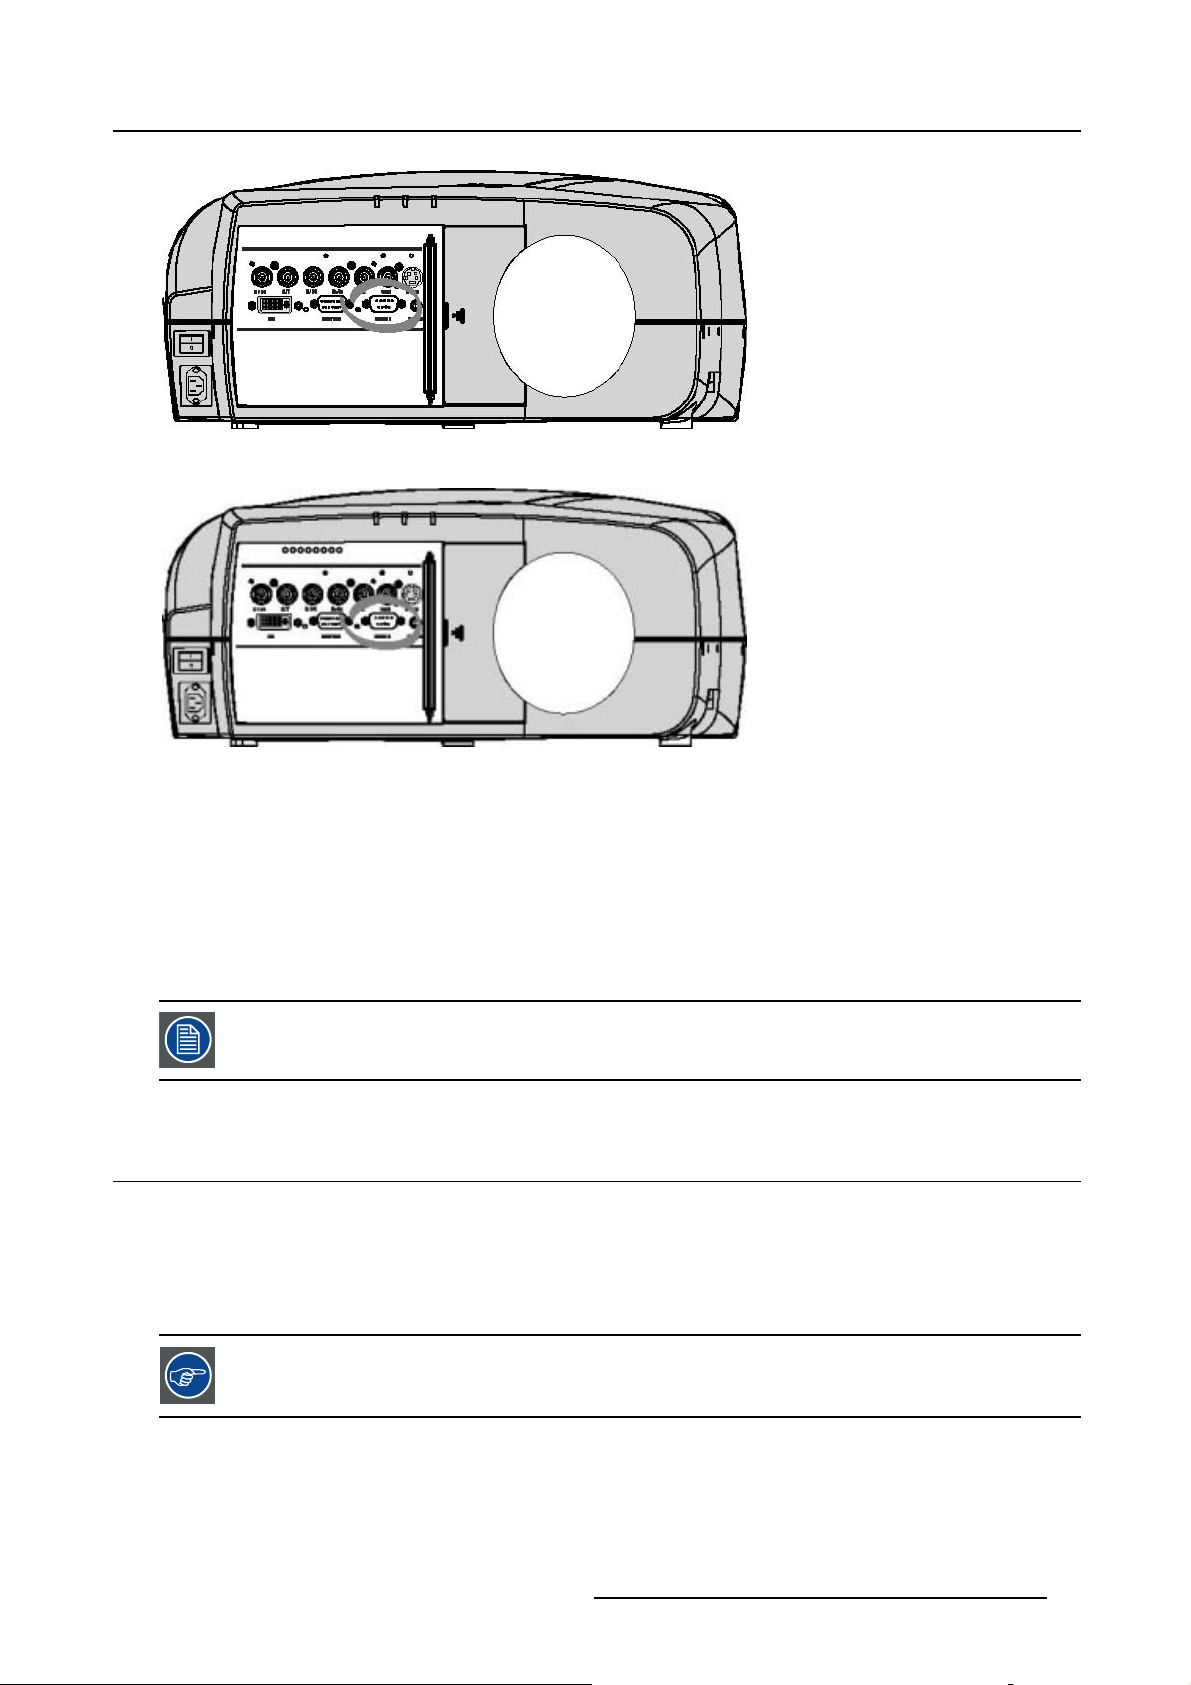
Image 4-11
4. Connections
Image 4-12
pplications of the RS232 connection
A
Remote control:
• easy adjustment of projector via IBM PC (or compatible) or MAC connection.
• address range from 1 to 255
• allow storage of multiple projector configurations and set ups.
• wide range of control possibilities
Data communication: sending data to the projector or copying the data from the projector to the computer
To set up the baudrate of the projector, see the Installation menu
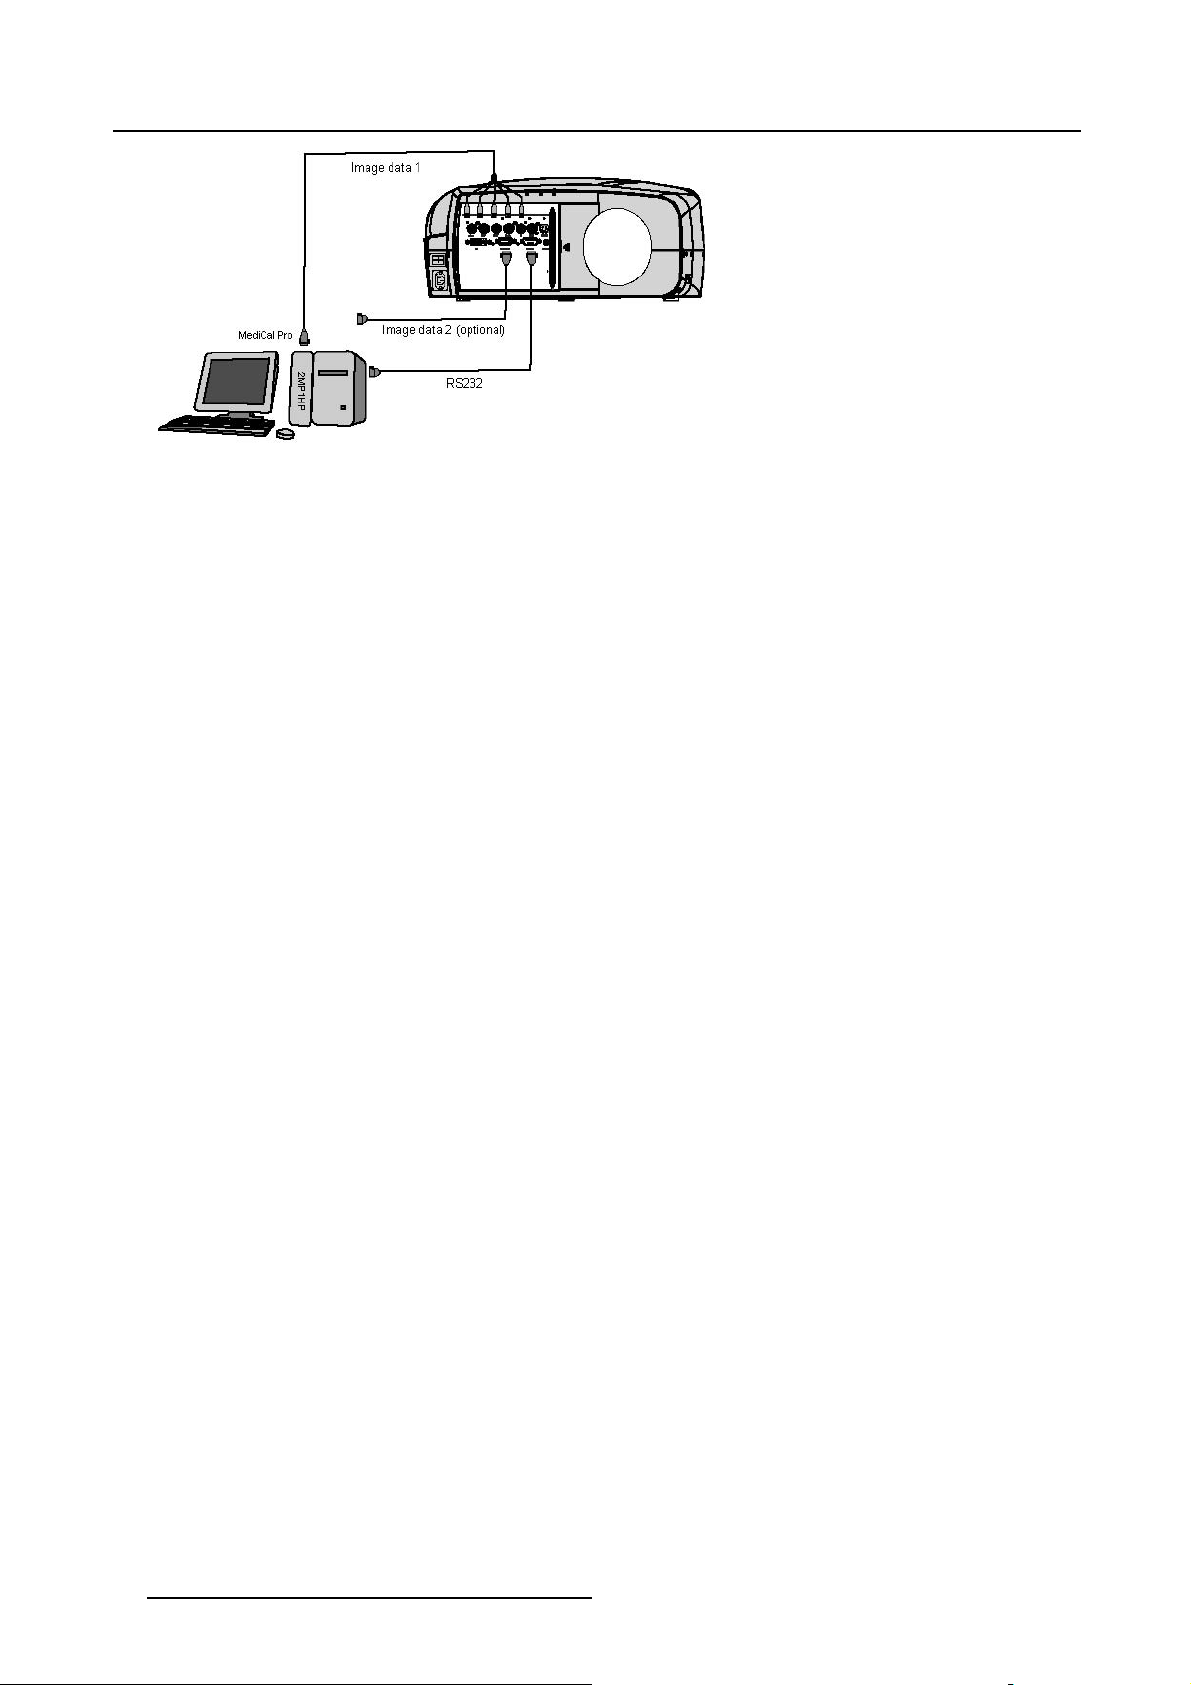
4.4 Connecting the MGP in Dicom Theatre
®
Which connections are made ?
The MGP is connected to the MediCal®Pro system through :
• serial communication via the RS232 IN port
gnal connection through the RGB data and/or D15 PC input
•si
nnecting to both RGB and D15 PC is possible and will allow simultaneous
Co
display in Picture in Picture mode, this can be useful for comparative purposes.
R5976741 MGP 15 MEDICAL GRADE PROJECTOR 28/04/2004 25
Page 30
4. Connections
Image 4-13
26 R5976741 MGP 15 MEDICAL GRADE PROJECTOR 28/04/2004
Page 31

5. GETTING STARTED
=
Overview
• Quick startup
• RCU & Local keypad
• Terminology overview
• Switching on
• Lamp runtime
• Quick set up adjustments
• Projector address
• Digital Zoom
• Menu structure
• Using the menu
• Using the Dialogboxes
5.1 Quick startup
The executive RCU
The executive RCU is used for quick acces and allows basic control over the projector.
5. Getting started
Dual head setup
In a dual head setup, the two projector are default programmed with respectively projector address 1 and 2.
In order to control the right projector , the executive RCU has to be programmed with the right address.
This done by pressing the numeric key 1 or 2 depending on the projector to be controlled.
PROJECTOR 1
PROJ ADDRESS = 1
1
2
ENTER
PROJECTOR 2
PROJ ADDRESS
BACK
SOURCE
Image 5-1
In case of a single projector setup the proj
AUTO
PIP
IMAGE
A
R
B
CO
M
G
P
ector should respond to address 1.
Otherwise, set the projector address to 1 in the Installation menu.
R5976741 MGP 15 MEDICAL GRADE PROJECTOR 28/04/2004 27
Page 32

5. Getting started
Select a projector
1. Push 1 or 2 to select projector 1 or 2 (image 5-2)
Image 5-2
1
SOURCE
ENTER
PIP
B
A
R
CO
MGP
2
BACK
AUTO
IMAGE
Turn the projector on
1. Push the standby button on the executive RCU (image 5-3)
It takes about a minute before the projector displays the identification screen (if enabled)
Image 5-3
1
SOURCE
ENTER
PIP
B
A
R
CO
MGP
2
BACK
AUTO
IMAGE
If the projector doesn’t go in operational mode verify that the main power switch is in the ON position (see
Connections)
Select a source
1. Push the source button (image 5-4)
Each key press moves to the n
A box is displayed in the lower part of the image indicating the selected source.
ext source.
28
R5976741 MGP 15 MEDICAL GRADE PROJECTOR 28/04/2004
Page 33

5. Getting started
Image 5-4
1
SOURCE
ENTER
PIP
B
A
R
CO
MGP
BACK
AUTO
IMAGE
2
The image is not stable or is disformed : AutoImage
1. Push the AutoImage button on the executive RCU (image 5-5)
The projector shows the evolution of the AutoSetup operation in a dialogbox.
Image 5-5
1
SOURCE
ENTER
PIP
B
A
R
CO
MGP
2
BACK
AUTO
IMAGE
DependingontheAutosetup setting in the menu, the operation may take a few seconds or minutes.
5.2 RCU & Local keypad
How controlling the projector ?
The projector can be controlled by the local keypad or by the remote control unit.
Location of the local keypad ?
The local keypad is located on the topside of the projector.
R5976741 MGP 15 MEDICAL GRADE PROJECTOR 28/04/2004
29
Page 34

5. Getting started
For key overview: "Terminology overview", page 31
Image 5-6
Local keypad layout
Remote control functions.
This remote control includes a battery powered infrared (IR) transmitter that allows the user to control the projector remotely. This
remote control is used for source selection, control, adaptation and set up. It includes automatic storing of picture controls (Brightness, Sharpness...) and setti
Other functions of the remote control are :
• switching between stand by and op
• switching to "pause" (blanked picture, full power for immediate restarting)
• direct access to all connected sources.
ngs.
erational mode.
Diagnose LED’s
Green
LED1
LED2
LED3 IR acknowledgement continue : standby
cool down sequence: flickers 60 seconds (120
seconds in case of 400 series) after switching to
standby
only for iQ Pro: shows when projector is in
standby and server is actif.
Red
rescue program (software error)
hardware error
flickers : Security = ON
30 R5976741 MGP 15 MEDICAL GRADE PROJECTOR 28/04/2004
Page 35

5.3 Terminology overview
Overview
The following table gives an overview of the different functionalities of the keys.
5. Getting started
Image 5-7
1 Function keys
2 MENU Menu key, to enter or exit the Toolbar menu.
3 Address key
4
LOGO key allows to recall the stored Logo (not in PiP mode)
5
PAU SE to stop projection for a short time, press ’PAUSE’. The image disappears but full power is
6
STBY standby button, to start projector when the power switch is switched on and to switch off the
7
MUTE
8
AUTOIMAGE Auto image, to center the image on the active LCD surface.
9 Digit buttons direct input selection.
9b
SOURCE button this button allows to switch through the active (scanned) inputs
R5976741 MGP 15 MEDICAL GRADE PROJECTOR 28/04/2004 31
user programmable keys with functions for direct access.
(recessed key), to enter the address of the projector (between 0 and 9). Press the recessed
address key with a pencil, followed by pressing one digit button between 0 and 9.
retained for immediate restarting.
projector without switching off the power switch.
Attention : Switching to Standby. When the projector is running and you want to
go to standby, press the standby
to interrupt the sound reproduction (audio = optional.
key for 2 seconds.
Page 36

5. Getting started
10 Lens control
11
VOL use this button to obtain the desired sound level (audio = optional)
12 Picture controls use these buttons to obtain the desired picture analog level.
13
DIGI ZOOM allows a digital Zoom of a part of the image
14 FREEZ
15 PIP
16 ENTER
17
Cursor keys Cursor Keys on RCU or on the local keypad : to make menu selections or to access the
18
BACK to leave the selected menu or item (go upwards to previous menu).
19
EFFECTS
20
PIP ADJUST allows to select a PiP window and change its configuration on screen
21
RC operating indication lights up when a button on the remote control is pressed. (This is a visual indicator to
22 IR receiver IR receiver
Table 5-2
use these buttons to obtain the desired ZOOM, SHIFT, FOCUS.
press to freeze the projected image.
allows to activate the PICTURE IN PICTURE mode
to confirm an adjustment or selection in the MENU.
On the local keypad the ENTER button additionally accesses the PIP window resize function
toolbar.
not yet implemented
check the operation of the remote control)
ordernumber RCU: R763794K
5.4 Switching on
How to switch on.
1. Press the power switch to switch on the projector.
- When ’0’ is pushed in, the projector is switched off.
- When ’1’ is pushed in, the projector is switched on
The projector starts in standby mode, LED3 is red.
Starting image projection.
1. Press Standby key once on the local keypad or on the remote control.
It may take about 60 seconds before image projection, i.e. no projection until the completion of several operations (software initialization,...).
If the Security mode is enabled,
Installation menu
a textbox will be displayed for PIN code entry, see Security settinginthe
5.5 Lamp runtime
Lamp runtime indication while running
Independently of the lamp m
message will be displayed.
32
ode, when the total runtime of an active lamp (lamp1 for example) is 1470 hours or more, a warning
R5976741 MGP 15 MEDICAL GRADE PROJECTOR 28/04/2004
Page 37

5. Getting started
Image 5-8
warning message in case of an MGP 10 projector
This warning message will be repeated at the next start up. Press BACK or MENU to remove the message.
The total lifetime of the lamp for a safe operation is 1500 hours max, do not use it longer. Always replace with a same type of lamp.
Call a BARCO authorized service technician for lamp replacement.
When the lamp runtime reaches 1500 hours the projector switches automatically to the other lamp, being lamp2.. following messages are displayed during and after switching.
Image 5-9
When lamp2 at its turn
Image 5-11
warning message in case of a MGP 10 projector
reaches 1470 hours, a warning message appears on the screen.
Image 5-10
At the end of the lifetime of lamp2 (1500 hours) the projector generates an alert message.
Image 5-12
A countdown time of 4 minutes is triggered before the projector is shut down (standby).
If the lamp runtime has not been reset, the alert message will reappear at the next start up (with again 4 minutes countdown time).
ert message can be escaped with MENU or BACK, but the countdown continues.
This al
Contact a qualified Barco technician for lamp replacement.
In Dual mode the lamp end of lifetimes are reached at the same time, however if in dual lamp mode one lamp
has been used more than the other (for example if the projector has been working temporarily in single mode),
one lamp will reach its end of lifetime sooner than the other lamp, which brings us to the Single mode operation.
5.6 Quick set up adjustments
Overview
• Quick lens Adjustment
•UsingtheRCU
R5976741 MGP 15 MEDICAL GRADE PROJECTOR 28/04/2004
33
Page 38

5. Getting started
5.6.1 Quick lens Adjustment
What can be done ?
For a quick lens set up and image shift, use the RCU dedicated keys or the lens button on the local keypad
Zoom/focus are only available for motorized lenses.
Quick zoom/focus adjustment
1. Press LENS ZOOM or
LENS FOCUS on the RCU
2. Use the arrow keys to adjust
Quick shift adjustment
1. Press LENS SHIFT
2. Use the arrow keys to adjust
5.6.2 Using the RCU
Pointing to a reflective screen
1. Point the front of the RCU to the reflective screen surface. (image 5-13)
Image 5-13
When using the remote control, make sure you are within the effective operating distance.
The operating distance may be up to 15 m (50ft).
The remote control unit will not function properly if strong light strikes the sensor window or if there are
obstacles between the remote control and the IR sensor.
How to connect ?
1. Plug one end of the remote cable in the connector on the bottom of the RCU.
2. Plug the other end in the connector in the front panel of the projector labelled RC. (image 5-14)
34
R5976741 MGP 15 MEDICAL GRADE PROJECTOR 28/04/2004
Page 39

Image 5-14
Specifications of the RC input
Uin=9V
=80mA
I
max
Internal IR receivers can be disabled:
• monojack: onpluginofthejack
• stereo jack : on plug in or using an external switch bringing the right channel (B) to ground level.
AB C
5. Getting started
D
Image 5-15
Stereo jack pin configuration
A tip: Left channel
B ring: right channel
C screen: common (GND)
D external switch
The Remote connection uses a standard two wire cable terminated on each end with a 3.5 mm male
(mono/stereo) phone jack.
This cable is not delivered but is available in most electronical or audio shops.
5.7 Projector address
Overview
• Address setting
• Displaying and Programming addresses into the RCU
5.7.1 Address setting
Projector address
Address installed in the projector to be individually controlled.
Common address
Default address. Projector will always execute the command coming from a RCU programmed with that common
address.
R5976741 MGP 15 MEDICAL GRADE PROJECTOR 28/04/2004 35
Page 40

5. Getting started
Why a projector address ?
As more than one projector can be installed in a room, the separate projector should be separately addressable with an RCU or
computer. Therefor each projector has its own address.
Set up an individual Projector Address.
The set up of a projector address can be done via the software.
Projector controlling.
Every projector requires an individual address between 0 and 255 which can be set in the Ins tallation menu.
Whentheaddressisset,theprojectorcanbecontrolledby:
• RCU for addresses between 0 and 9.
• computer, e.g. IBM PC (or compatible), Apple MAC, etc. for addresses between 0 and 255.
A projector will respond to a RCU set to the common address ’0’ regardless of what address is set in the projector itself (common
address of projector should also be “0” ).
The RCU is default programmed with address 0 , ’common address’.
If it is necessary to control a specific projector, then enter the projector address into the RCU (only when that
address is between 0 and 9). The projector with the corresponding address will listen to that specific RCU.
Some projectors may operate in domestic environments where other equipments may listen to the common
address “0” , therefore the common address can also be set to “1”.
5.7.2 Displaying and Programming addresses into the RCU
Displaying the Projector Address on the Screen.
1. Press the Address key (recessed key on the RCU) with a pencil.
The projector’s address will be displayed in a ’Text box’
To continue using the RCU with that specific address, it is necessary to enter the same address with the
digit buttons (address between 0 and 9) within 5 seconds after pushing the address key. For example : if the
Address key displays projector address 003, then press "3" digit button on the RCU to set the RCU’s address
to match the projector’s address. Do not press 0–0–3 . This will address the remote control to ’0’ and control
all projectors in the room. If the address is not entered within 5 seconds, the RCU returns to its default address
(zero address) and controls then all projectors in the room.
Address 0 (or 1) should always allow communication with the projector since it is a common address.
Displaying the Projector Address in Standby.
1. Press the Address key (recessed key on the RCU) with a pencil.
All the LED’s on the front of the projector go out.
Then LED1 starts blinking green the number of hundreds. Afte
blinking green the number of units. If this is done, the original status of the leds is restored.
r that LED2 starts blinking the number of tens. Finally LED3 starts
5.8 Digital Zoom
What can be done ?
The Digital Zoom key on the RCU allows to zoom (in or out) one particular part of the image
How to Zoom ?
1. Press ← or → on the Digital Zoom key on the remote to Zoom the center of the image
A wizardbox is displayed in the lower part of the screen, follow the instructions.
Use the BACK key to undo the Zoom function.
36
R5976741 MGP 15 MEDICAL GRADE PROJECTOR 28/04/2004
Page 41

5. Getting started
Digital Zoom can not be performed on a logo.
5.9 Menu structure
PC like menustructure
The projector has a build in "PC like" toolbar menu which allows easy access to different parameters for setting up the projector.
The menu is activated by pressing MENU, it contains 2 levels depending on the type of user:
• Level 1: standard user
• Level 2: advanced user, level 2 is password protected, the advanced parameters are only visible when the correct password
has been entered ( factory password = "0000")
Menu items which are not applicable are greyed out.
5.10 Using the menu
Menu Layout
A grey line gives the transition between standard and advanced parameters.
Theexistenceofasubmenuisindicatedbyawhitearrow,Aspect ratio is a submenu.
Contrast is an item of the Adjustment menu.
Three suspension points indicate that the menuitem hides a dialogbox or a te
Image 5-16
The menus inserted in this manual are of the adv
standard user on the screen will hence not correspond with the menus in the manual i.e. the advanced items
will not be visible, they will be replaced with "More..."
anced type: all the items are visible The menus seen by a
xtbox.
Greyed out menus or items are not available in this software version
How to pull down a menu ?
1. Use ↓ to pull down a menu
How to pull down a submenu ?
1. Use → to pull down a submenu
R5976741 MGP 15 MEDICAL GRADE PROJECTOR 28/04/2004
37
Page 42

5. Getting started
How to exit the submenu ?
1. Press BACK to exit a submenu
Press MENU to exit the menu
When the menu has been exited for more than 1 minute, the advanced user password has to be re-entered.
5.11 Using the Dialogboxes
How to use the dialogboxes ?
Some parameters are modified by means of a dialogbox, where selections can be made and/or values can be
can be entered in several ways:
Entering numeric values using the numeric keys on the remote control
1. Press ENTER to activate the input field (image 5-17)
2. Key in the desired value
entered, The values
Image 5-17
Entering numeric values using the arrow keys on the remote control
1. Press ENTER to activate the input field.
2. Press ←or → to select the digit to be changed (image 5-18)
3. Press ↓ or ↑ to increase or decrease the value
Image 5-18
Entering numeric values using the arrow keys on the local keypad
1. Press ENTER to activate the input field.
2. Press ←or → to select the digit to be changed
3. Press ↓ or ↑ to increase or decrease the value
To confirm the changes always press ENTER.
Use ↓ or ↑ to browse between the different fields.
38 R5976741 MGP 15 MEDICAL GRADE PROJECTOR 28/04/2004
Page 43

5. Getting started
In some cases an alphanumeric value (file name, ...) has to be entered. Use ↑ or ↓ to scroll through the character values once the input field is activated
Following characters can be browsed in this particular order:
Decimal scroll list: 0123456789
Signed decimal scroll list: 0123456789-
ASCII scrolllist:ABCDEFGHIJKLMNOPQRSTUVWXYZ0123456789+-*/&@#.;.abcdefghijklmnopqrstuvwxyz
R5976741 MGP 15 MEDICAL GRADE PROJECTOR 28/04/2004 39
Page 44

5. Getting started
40 R5976741 MGP 15 MEDICAL GRADE PROJECTOR 28/04/2004
Page 45

6. Introduction to Medical Visualization systems
6. INTRODUCTION TO MEDICAL VISUALIZATION
SYSTEMS
DICOM
Digital Imaging and Communications in Medicine
It is a standard developed by the American College of Radiology (ACR) and the National Electrical Manufacturers
Association (NEMA). The standard specifies how digital image data can be moved from system to system. In addition, Supplement 28 Part 14 specifies a function that relates pixel values to displayed Luminance levels and is called
Grayscale Display Function Standard.
Overview
• DICOM conformance
• Architecture of a typical medical visualization system
• Overview of Barco’s DICOM THEATRE
• Introduction to MGP configuration
6.1 DICOM conformance
®
Need for standardization
A digital signal from an image can be reproduced objectively and accurately. However, the visual interpretation of that signal is
dependent on the characteristics of the systems displaying that image i.e. images produced by the same signal may appear different
depending on the display device. In medical imaging, it is important that there be a visual consistency in how a given image appears,
whether viewed, for example, on the display monitor of a workstation, a projector or as a film on a light-box. In the absence of any
standard which regulates how these images are to be visually presented on any device, a digital image which has good diagnostic
value when viewed on one device could look very different and have greatly reduced diagnostic value when viewed on another
device.
Accordingly, PS 3.14 was developed to provide mapping of digital i
or relationship between digital values and display Luminance produces better visual consistency in how that image appears on
diverse display devices. The relationship that PS 3.14 defines between digital image values and displayed Luminance is based
upon measurements and models of human perception over a wide r
presentation device.
It is also not dependent upon user preferences but uses a DICOM Presentation Lookup Table.
A system is DICOM-compliant when it respects a predefined relationship (PS3.14) between digital input signal
values and display Luminance.
6.2 Architecture of a typical medical visualizat
LUT
Look Up Table. A table containing the displ
ays output values (Luminance) in function of the input signal (amplitude)
mage values into a given range of Luminance. The mapping
ange of Luminance and thus independently of the nature of the
ion system
System components
Basically a medical visualization system m
• Calibration/Control unit
• Feedback unit
• Display unit
ay contain:
System Principal
A closed loop system insures a stable control system by means of a feedback signal being the Luminance at display level, and gets
rid of possible drift (caused mainly by aging and external conditions) in the displayed Luminance value.
R5976741 MGP 15 MEDICAL GRADE PROJECTOR 28/04/2004
41
Page 46

6. Introduction to Medical Visualization systems
A control and calibration unit controls the display unit and insures the consistency of the displayed image according to a preset value
of the Display Function and Color temperature defined by the user.
Both parameters define a particular LUT.
Input signal
PRESET
( = display function + color temp)
Image 6-1
+
-
6.3 Overview of Barco’s DICOM THEATRE
LUT
(DISPLAY FONCTION
+ COLOR TEMP)
FEEDBACK
CONTROL &
CALIBRATION
®
DISPLAY
Architecture
A typical example of a medical visualization system is BARCO’s DICOM compliant DICOM THEATRE®.
This system provides consistent images for consulting, reviewing and training applications.
In this system the MGP projector is used as the large screen display device controlled and tuned by the MediCal
software providing optimal image quality and consistency at any time.
Analogy to the typical architecture
• Display function : the function can be chosen to be DICOM, DIN, standard or custom. This is done in the projector.
• Preset: is determined by the user on MediCal
• Control and calibration unit: Role played by MediCal
• Display units: one or more flat panel displays and one or more projectors
®
Pro and corresponds to a particular display function and color temperature.
®
Pro .
®
Pro management
6.4 Introduction to MGP configuration
Overview
• MGP main grayscale configuration tools
6.4.1 MGP main grayscale configuration tools
Available Presets
Basically the grayscale settings of the projector will depend on two factors
• Display function, page 69
• Color temperature, page 67
6 predetermined presets, containing each of them one particular display function and one particular color temperature, are stored
in the projector, they can however be overwritten at any time by MediCal
do not take account of any amount of ambient light, and could hence be referred to as DICOM compliant in dark room conditions at
time of manufacturing. It is advised to re-calibrate these presets to match them to the actual environment.
The factory settings can be restored via the projector’s menu.
Each time a preset is adapted, a calibration has to be done in order to verify conformance and consistency.
42
R5976741 MGP 15 MEDICAL GRADE PROJECTOR 28/04/2004
®
Pro. The presets have been pre-calibrated by Barco and
Page 47

6. Introduction to Medical Visualization systems
Preset
Preset 1
Preset 2
Preset 3
Preset 4 DIN
Preset 5 DIN Bluebase
Preset 6 DIN Full white
-
-
-
-
-
Display function Color temperature
DICOM Clearbase
DICOM
DICOM
DICOM Custom
DIN
Standard
Standard Video (6500K)
Standard Computer (9300K)
Bluebase
Full white
Clearbase
Custom
Full white
MGP10
Display function
Application
DICOM Theatre
Standard Projection
MediCalPro
Display function
®
DICOM
DIN
FACTORY RESET
Color temp
Full white
Clearbase
Bluebase
FACTORY RESET
PASSIVE MEMORY
DICOM
DIN
CUSTOM
Full white
Clearbase
Bluebase
ACTIVE MEMORY
COMMUNICATION
OVERWRITE
CALIBRATION
OVERWRITE
DICOM
DIN
Color temp
Full white
Clearbase
Bluebase
Image 6-2
It is recommended to use the DICOM presets since they give the best grayscale for medical applications.
R5976741 MGP 15 MEDICAL GRADE PROJECTOR 28/04/2004 43
Page 48

6. Introduction to Medical Visualization systems
44 R5976741 MGP 15 MEDICAL GRADE PROJECTOR 28/04/2004
Page 49

7. MAIN MENU
7.1 Autosetup
Introduction to Autosetup
Autosetup creates the best suited image file for the connected source.
Therefore Autosetup calculates/measures several parameters of the sources:
• Total pixels per line
• Start pixel
• Phase
• Contrast/Brightness levels
The measure of the total number of pixels per line can be done through 2 methods
• Limited scan: a windowing is used to allow fast tracking, takes about ...
• Full scan: tracking is done over the full range, takes about ...
How to setup the scan method ?
1. Press MENU to activate the Toolbar
2. Press → to select the Main item
3. Press ↓ to Pull down the Main menu
4. Use ↑ or ↓ to select Autosetup
5. Press → to pull down the menu (image 7-1)
6. Use ↓ or ↑ to select the desired method
7. Press ENTER
7. Main Menu
Image 7-1
R5976741 MGP 15 MEDICAL GRADE PROJECTOR 28/04/2004 45
Page 50

7. Main Menu
46 R5976741 MGP 15 MEDICAL GRADE PROJECTOR 28/04/2004
Page 51

8. ADJUSTMENTS
Overview
• Contrast
• Brightness
• Phase
• Gamma
• Custom color temperature adjustment
•Scaling
• Aspect ratio
• Positioning
• Image settings
• RGB Low Pass filter
• Standby Timer
•Blanking
• Autosetup parameters
8.1 Contrast
8. Adjustments
How to change the contrast ?
1. Press MENU to activate the Toolbar
2. Press → to select the Adjustments item
3. Press ↓ to Pull down the menu
4. Use ↑ or ↓ to select Contrast (image 8-1)
5. Press ENTER
A sliderbox is displayed
6. Use ←or →, the numeric keys on the remote, or the keypad to change the Contrast. (image 8-2)
Image 8-1
R5976741 MGP 15 MEDICAL GRADE PROJECTOR 28/04/2004 47
Page 52

8. Adjustments
Image 8-2
Contrast adjustment is only possible
In the other modes (DICOM, DIN, CUSTOM ) the contrast adjustment is disabled.
8.2 Brightness
How to change the brightness ?
1. Press MENU to activate the
2. Press → to select the Adjustments item
3. Press ↓ to Pull down the menu
4. Use ↑ or ↓ to select Brightness (image 8-3)
5. Press ENTER
A sliderbox is displayed
6. Use ←or →, the numeric keys o
if the Display function is Standard.
Toolbar
n the remote, or the keypad to change the Brightness.
mage 8-3
I
rightness adjustment is only possible if the Display function is Standard.
B
In the other modes (DICOM, DIN, CUSTOM ) the brightness adjustment is disabled.
48 R5976741 MGP 15 MEDICAL GRADE PROJECTOR 28/04/2004
Page 53

8. Adjustments
8.3 Phase
How to change the Phase ?
1. Press MENU to activate the Toolbar
2. Press → to select the Adjustments item
3. Press ↓ to Pull down the menu
4. Use ↑ or ↓ to select Phase
5. Press ENTER
A sliderbox is displayed
6. Use ←or →, the numeric keys on the remote, or the keypad to change the Phase.
8.4 Gamma
Gamma
Signal-Light transfer characteristic of a display.
Gamma adjustment
In the MGP10 the Gamma adjustment remains only adjustable in the StandardDisplay Function i.e. only if used for projection without
any constraint with with respect to consistency and conformance. The adjustment allows an adjustment in a range from 1.6 to 2.8.
A gamma of 2.2 is considered as the typical value for video signals.
When a Display Function is chosen to be DICOM,DINor Custom then the Gamma function or more generally the signal to luminance
characteristic is at the same time determined.
How to change the Gamma ?
1. Press MENU to activate the Toolbar
2. Press → to select the Adjustments item
3. Press ↓ to Pull down the menu
4. Use ↑ or ↓ to select Gamma
5. Press ENTER
A sliderbox is displayed.
6. Use ←or →, the numeric keys on the remote, or the keypad to change the Gamma.
Gamma adjustment is only possible if the Display function is Standard.
In the other modes (DICOM, DIN , Custom ) the Gamma adjustment is disabled since the signal-light function
is determined by the Display Function (DICOM, DIN, Custom )
8.5 Custom color temperature adjustment
How to edit the custom color temperature ?
1. Press MENU to activate the Toolbar
2. Press → to select the Adjustments item
3. Press ↓ to Pull down the menu
4. Use ↑ or ↓ to select Colo r t emperat ure
5. Press → to open the Color temperature item and select Edit RGB (image 8-4)
6. Press ENTER
A sliderbox for the Red custom setting is displayed as well as a wizard textbox in the lower part of the screen. (image 8-5,
image 8-6)
7. Use ←or →, the numeric keys on the remote, or the keypad to chan
8. Follow the instructions on the wizard textbox.
ge the Color temperature.
R5976741 MGP 15 MEDICAL GRADE PROJECTOR 28/04/2004
49
Page 54

8. Adjustments
Image 8-4
Image 8-5
Image 8-6
The custom color temperature can only be selected in the Standardprojection mode (Display function = standard).
8.6 Scaling
What are the different scaling methods ?
• Best Fit : forces to use the maximum resolution of the LCD panels by preserving the selected aspect ratio, "Aspect ratio", page
51
• None : uses the native resolution of the source, the aim being here to always show the resolution of the source, independently
of the resolution of the LCD panels.
The “show native resolution” function will handle the sources as shown in the table.
• Full screen:TheFull screen method forces to use the complete native resolution of the LCD panels independently of the native
resolution of the source.
50
R5976741 MGP 15 MEDICAL GRADE PROJECTOR 28/04/2004
Page 55

8. Adjustments
Source
Name Ratio Resolution Ratio Resolution Particularities
xga
sxga
sxga+
uxga
Table 8-1
Scaling method = None in case of a MGP10 projector
4:3 1024x768 4:3 1024x768 image centered +side blanked
5:4 1280x1024 5:4 1280x1024 image centered +side blanked
4:3 1400x1050 4:3 1400x1050
4:3 1600x1200 4:3 1600x1200
The None and the Full screen setting overrule the Aspect Ratio setting.
Projected image
Reality
part of the image not displayed
part of the image not displayed
How to set the scaling method ?
1. Press MENU to activate the Toolbar
2. Press → to select the Adjustments item
3. Press ↓ to Pull down the menu
4. Use ↑ or ↓ to select the Scaling (image 8-7)
5. Press → to pull down the menu
6. Use ↑ or ↓ to select the desired method
7. Press ENTER
Image 8-7
8.7 Aspect ratio
What can be done ?
The aspect ratio setting forces the projector to project an image using a defined aspect ratio.
R5976741 MGP 15 MEDICAL GRADE PROJECTOR 28/04/2004
51
Page 56

8. Adjustments
•4:3
• 16:9
•5:4
•Auto
The Auto function calculates an aspect ratio based on the information stored in the image files.
Selecting Auto in case of a Video source may shrink the image horizontally
How to change the Aspect ratio ?
1. Press MENU to activate the Toolbar
2. Press → to select Adjustment
3. Press ↓ to Pull down the menu (image 8-8)
4. Use ↑ or ↓ to select Aspect ratio
5. Press ENTER to confirm
Image 8-8
The Aspect ratio menu is greyed out in case of a None or Full screen scaling, see "Scaling", page 50
8.8 Positioning
What can be done ?
The pixel start and line start calculated by Autosetup (values can be read in the image file) can be adapted.
This adaptation can be seen as a horizontal (pixel start) and vertical image shift (line start).
How to reposition the image ?
1. Press MENU to activate the Toolbar
2. Press → to select the Adjustments item
3. Press ↓ to Pull down the menu
4. Use ↑ or ↓ to select Positioning
52
R5976741 MGP 15 MEDICAL GRADE PROJECTOR 28/04/2004
Page 57

5. Press → to pull down the menu
6. Use ↑ or ↓ to select Horizontal or Vertical (image 8-9)
7. Press ENTER
A sliderbox is displayed.
8. Use ←or →, the numeric keys on the remote, or the keypad to change the filter level.
8. Adjustments
Image 8-9
8.9 Image settings
How to adjust colour ?
1. Press MENU to activate the Toolbar
2. Press → to select the Adjustments item
3. Press ↓ to Pull down the menu
4. Use ↑ or ↓ to select Image
5. Press → to pull down the menu
6. Use ↑ or ↓ to select colour (image 8-10)
7. Press ENTER
A sliderbox is displayed
8. Use ←or →, the numeric keys on the remote, or the keypad to change the colour.
R5976741 MGP 15 MEDICAL GRADE PROJECTOR 28/04/2004
53
Page 58

8. Adjustments
Image 8-10
HowtoadjustTint?
1. Press MENU to activate the Toolbar
2. Press → to select the Adjustments item
3. Press ↓ to Pull down the menu
4. Use ↑ or ↓ to select Image
5. Press → to pull down the menu
6. Use ↑ or ↓ to select Tint (image 8-11)
7. Press ENTER
A sliderbox is displayed
8. Use ←or →, the numeric keys on the remote, or the keypad to change the Tint.
Image 8-11
54 R5976741 MGP 15 MEDICAL GRADE PROJECTOR 28/04/2004
Page 59

How to adjust Sharpness ?
1. Press MENU to activate the Toolbar
2. Press → to select the Adjustments item
3. Press ↓ to Pull down the menu
4. Use ↑ or ↓ to select Image
5. Press → to pull down the menu
6. Use ↑ or ↓ to select Sharpness (image 8-12)
7. Press ENTER
A sliderbox is displayed
8. Use ←or →, the numeric keys on the remote, or the keypad to change the Sharpness.
8. Adjustments
Image 8-12
How to adjust the Noise Reduction ?
1. Press MENU to activate the Toolbar
2. Press → to select the Adjustments item
3. Press ↓ to Pull down the menu
4. Use ↑ or ↓ to select Image
5. Press → to pull down the menu
6. Use ↑ or ↓ to select Noise Reduction (image 8-13)
7. Press ENTER
A sliderbox is displayed
8. Use ←or →, the numeric keys on the remote, or the keypad to change the Noise Reduction.
R5976741 MGP 15 MEDICAL GRADE PROJECTOR 28/04/2004
55
Page 60

8. Adjustments
Image 8-13
8.10 RGB Low Pass filter
Input filtering
The input section of the projector allows an additional filtering of the RGB signal by means of a 4 level (0–4) filter setup and can
result in a more stable and crisp image, especially with respect to phase stability.
works only on the RGB input
How to set the RGB Low pass filter ?
1. Press MENU to activate the Toolbar
2. Press → to select the Adjustments item
3. Press ↓ to Pull down the menu
4. Use ↑ or ↓ to select RGB Low pass filter (image 8-14)
5. Press ENTER
A sliderbox is displayed
6. Use ←or →, the numeric keys on the remote, or the keypad to change the filter level.
56
R5976741 MGP 15 MEDICAL GRADE PROJECTOR 28/04/2004
Page 61

Image 8-14
8. Adjustments
8.11 Standby Timer
Purpose of the Standby Timer
If there is no signal, and the standby timer is enabled, a dialogbox is displayed and the projector will shut down after a determined
time.
Image 8-15
The countdown time can be set in a dialog box in a range from 180 to 3600 seconds (default value = 300). The Timer can also be
disabled.
How to enable the timer ?
1. Press MENU to activate the Toolbar
2. Press → to select Adjustment
3. Press ↓ to Pull down the menu
4. Use ↑ or ↓ to select Standby Timer (image 8-16)
5. Press ENTER to activate the function
On the screen appears a dialogbox (image 8-17)
6. Use ↑ or ↓ to select Enabled, a box surrounds the selected item, press ENTER to activate
7. Use ↑ or ↓ to browse to the input field
8. Use ←or→ , the numeric keys on the remote o
9. Press MENU or BACK to exit or to go back to the previous menu
r the keypad to change the countdown setting
R5976741 MGP 15 MEDICAL GRADE PROJECTOR 28/04/2004
57
Page 62

8. Adjustments
Image 8-16
Standby timer
Enabled
Disabled
Countdown to
Image 8-17
sec
0
8.12 Blanking
What can be done ?
The image can be blanked in several ways :
• Top blanking
• Bottom blanking
• Left blanking
• Right blanking
58
R5976741 MGP 15 MEDICAL GRADE PROJECTOR 28/04/2004
Page 63

8. Adjustments
Image 8-18
How to blank the image ?
1. Press MENU to activate the Toolbar
2. Press → to select the Adjustments item
3. Press ↓ to Pull down the menu
4. Use ↑ or ↓ to select Blanking (image 8-19)
5. Press ENTER
A sliderbox is displayed (image 8-20)
6. Use ←or →, the numeric keys on the remote, or the keypad to change the blanking.
Image 8-19
R5976741 MGP 15 MEDICAL GRADE PROJECTOR 28/04/2004 59
Page 64

8. Adjustments
Blanking
Enabled
Top
Disabled
0
Bottom
Left
Right
RESET
Image 8-20
Use the checkboxes to enable/disable the blanking
Use the Reset key to reset the blanking values.
The logo is also a
ffected by the blanking
8.13 Autosetup parameters
What can be done ?
The autose
tup can be done by using automatic adjustments of following parameters:
0
0
0
• Frequency : adjust automatically the total number of pixels of the detected source
• Phase : adjusts automatically the phase of the detected source
• Geometry : adjusts automatically the total number of lines of the selected source
• Gain : adjusts automatically the contrast/brightness settings of the selected source
All these parameters can be chosen to be taken in account or not during the Autosetup process, enabling or disabling the options is
done by checking or unchecking the corresponding case.
How to setup ?
1. Press MENU to activate the Toolbar
2. Press → to se
3. Press ↓ to Pull down the menu
4. Use ↑ or ↓ to select Autosetup parameters (image 8-21)
5. Press ENTER to activate the function
On the screen appears a dialogbox (image 8-22)
6. Use ↑ or ↓ to select the desired parameter, a box surrounds the selected item, press ENTER to activate
7. Press MENU or B
lect Adjustment
ACK to exit or to go back to the previous menu
60
R5976741 MGP 15 MEDICAL GRADE PROJECTOR 28/04/2004
Page 65

Image 8-21
8. Adjustments
Autosetup parameters
Frequency
Phase
Geometry
Gain
Image 8-22
R5976741 MGP 15 MEDICAL GRADE PROJECTOR 28/04/2004 61
Page 66

8. Adjustments
62 R5976741 MGP 15 MEDICAL GRADE PROJECTOR 28/04/2004
Page 67

9. Input Selection
9. INPUT SELECTION
Overview
• Input selection
• Displaying the Logo
• Pause
• Freeze
9.1 Input selection
Selection method
The MGP10 offers a user-friendly way to select the desired input to be projected. 5 different selectable inputs are available in the
input selection menu, each of them is indicated with 2 icon :
• a slot number icon : icon representing the shortcut numeric key to be entered on the RCU to select the same input
• a Barco icon : indicates the presence of that particular source.
Another way of selecting an input is via the RCU using the numeric keys or via the local keypad.
BNC configuration
The advanced part of the source selection menu allows to configure the 5 BNC’s. In other words, one must specify which signal is
present on the 5 BNC’s in order to allow the appropriate processing.
• Data on BNC’s : must be selected when a data signal is present on the BNC’s.
An example is a RGBHV signal coming from a computer.
• Component video : must be selected when a signal of the type PR/Y/PB is connected to the BNC’s.
An example is a component signal coming from a professional DVD player
•RG
B Video : must be selected when an RGB video signal with Sync on Green or sync on H is presented on the BNC’s.
(s)
In case of an RG(s)B configuration of the BNC’s, the signal is routed to the video circuit and is projected in a
video window (see PiP).
How to select an input ?
1. Press MENU to activate the Toolbar
2. Press → to select the Input Selection item
3. Press ↓ to Pull down the menu
4. Use ↑ or ↓ to select the input (image 9-1)
5. Press ENTER
The selected input is displayed
R5976741 MGP 15 MEDICAL GRADE PROJECTOR 28/04/2004
63
Page 68

9. Input Selection
Image 9-1
How to configure the 5 BNC’s ?
1. Press MENU to activate the Toolbar
2. Press → to select the Input Selection item
3. Press ↓ to Pull down the menu
4. Use ↑ or ↓ to select BNC c onfiguration
5. Press → to open the menu
6. Use ↑ or ↓ to select the desired configuration (image 9-2)
7. Press ENTER
The selected configuration is indicated with a bullet
Image 9-2
9.2 Displaying the Logo
Logo
The projector is factory fitted with a standard Barco Logo (SXGA resolution), however it can be replaced by a new corporate logo
using the Take screenshot function.
Logo display is done automatically i
A standby timer can also be set to put t
absence.
64 R5976741 MGP 15 MEDICAL GRADE PROJECTOR 28/04/2004
n case of signal absence under the condition that Background is set to Logo
he projector in standby after a predetermined time in case of signal
Page 69

How to display the logo ?
1. Press MENU to activate the Toolbar
2. Press → to select the Input Selection item
3. Press ↓ to Pull down the menu
4. Use ↑ or ↓ to select Logo (image 9-3)
5. Press ENTER
The logo is displayed
9. Input Selection
Image 9-3
9.3 Pause
Interrupting the image projection
With the Pause function, the image projection can be stopped, the projector remains with full power for immediate restart. The
projection is interrupted by means of a mechanical shutter cutting the light beam.
How to interrupt the image projection ?
1. Press MENU to activate the Toolbar
2. Press → to select Input Selection
3. Press ↓ to Pull down the menu
4. Use ↑ or ↓ to select Pause (image 9-4)
5. Press ENTER to activate the Pause function
A brief sound indicates that the shutter has been activated.
Image 9-4
R5976741 MGP 15 MEDICAL GRADE PROJECTOR 28/04/2004 65
Page 70

9. Input Selection
The image projection can also be interrupted using the PAUSE key on the RCU.
To restart the image : press PAUSE, MENU, BACK or LOGO
9.4 Freeze
Freezing the image
With the Freeze function, the image can be frozen.To restart the image, reuse the Freeze function or press the FREEZE button on
the remote.
Howtofreezetheimage?
1. Press MENU to activate the Toolbar
2. Press → to select Input Selection
3. Press ↓ to Pull down the menu
4. Use ↑ or ↓ to select Freeze (image 9-5)
5. Press ENTER to activate the Freeze function
Image 9-5
TheimagecanalsobefrozenusingtheFREEZEkeyontheRCU
66 R5976741 MGP 15 MEDICAL GRADE PROJECTOR 28/04/2004
Page 71

10. SETTINGS
Overview
• Color temperature
• Display function
• Restoring the factory settings
• Black and white selection
• User Control
• Lamp mode selection
• Runtime warning
• Input Balance
• AGC on Video
• Manual Gain Control
• Lamps
10.1 Color temperature
10.1.1 Color temperatures in greyscale mode reproduction
10. Settings
Color temperatures in greyscale mode reproduction
Beside the standard projection color temperature Video (6500K), computer (9300K) and full white, 2
additional medical related color temperatures are added:
• Clearbase
CIE graph coordinates: x = 0.28 ; y = 0.304
• Bluebase
CIE graph coordinates: x = 0.25 ; y = 0.305
Since the projector is operating most of the time in greyscale mode meaning a B/W signal is to be reproduced, the color temperature
setting can be seen as an adjustment of the neutral greyscale color temperature.
These 2 predefined color temperatures (as well as Full White ) are used to form, in combination with a display function, a preset for
greyscale reproduction.
That way, 6 presets are defined and can be selected by the user through the projector menu or remotely by the MediCal
case of a Barco DICOM Theatre system)
10.1.2 Color temperature in a standalone projector setup
Color temperature setting
In a standalone or open loop system i.e. without any feedback from the screen, the color temperature is defined by the user via the
OSD of the projector. The selected color temperature is then the value as it was set in the factory.
Factory settings are “dark room” settings meaning they do not take account of environmental conditions (ambient light, glare,...).
®
Pro (in
How to define a color temperature via the projector menu (standa
1. Press MENU to activate the Toolbar
2. Press → to select the Settings item
3. Press ↓ to Pull down the Settings menu
4. Use ↑ or ↓ to select Colo r t emperat ure
5. Press → to pull down the menu
6. Use ↓ or ↑ to select the desired color temperature (image 10-1)
7. Press ENTER
The color temperature is adapted.
R5976741 MGP 15 MEDICAL GRADE PROJECTOR 28/04/2004
lone setup) ?
67
Page 72

10. Settings
Image 10-1
The custom color temperature allows the selection of a user defined color temperature set in the Adjustment
menu.
10.1.3 Color temperature in a closed loop medical visualization system
Color temperature in a closed loop medical visualization system
If, however the projector is part of a typical closed loop medical visualization system (Barco Dicom®Theatre ), color temperature
will be set by the control & calibration system (MediCal
The preset (formed by color temperature and display function
is within a tolerance with respect to consistency, in the case it isn’t, a calibration process will be launched.
How to select a color temperature ?
1. Refer to the system manual
OSD interaction
WhenapresetisselectedonMediCal®Pro , the selected color temperature (as well as the display function) will be marked on the
projector’s OSD menu.
®
Pro) along with a display function forming a pre-set value.
) values are checked on a regular basis to verify if the projected image
Full white
Clearbase
Bluebase
Video(6500K)
Computer(9300K)
Custom
Image 10-2
The completion of the calibration procedure will in the same way be signaled by a separate logo (as well as for the display function).
68
R5976741 MGP 15 MEDICAL GRADE PROJECTOR 28/04/2004
Page 73

Full white
Clearbase
Bluebase
Video(6500K)
Computer(9300K)
Custom
Image 10-3
10.2 Display function
Overview
• Display function in a standalone projector setup
• Display function in a closed loop medical visualization system
10. Settings
10.2.1 Display function in a standalone projector setup
Display function setting
In a standalone or open loop system i.e. without any feedback from the screen, the display function is defined by the user via the
OSD of the projector. The selected display function corresponds then to a Look Up Table (LUT) as it is was set in the factory.
Factory settings are “dark room” settings meaning they do not take account of environmental conditions (ambient light, glare,...).
How to define a display function via the projector menu (standalone setup) ?
1. Press MENU to activate the Toolbar
2. Press → to select the Settings item
3. Press ↓ to Pull down the Settings menu
4. Use ↑ or ↓ to select Display function
5. Press → to pull down the menu
6. Use ↓ or ↑ to select the desired display function (image 10-4)
7. Press ENTER
The display function is adapted and the corresponding LUT is loaded.
R5976741 MGP 15 MEDICAL GRADE PROJECTOR 28/04/2004
69
Page 74

10. Settings
Image 10-4
The custom display function allows the selection of a user defined display function set in Factory, which is a
linear function (Gamma = 1)
10.2.2 Display function in a closed loop medical visualization system
Display function in a closed loop medical visualization system
If, however the projector is part of a typical closed loop medical visualization system (Barco Dicom®Theatre ), the Display function
will be set by the control & calibration system (MediCal
How to select a Display function ?
1. Refer to the system manual
OSD interaction
When a preset is selected on MediCal®Pro , the selected Display function (as well as the color temperature ) will be marked on the
projector’s OSD menu.
®
Pro) along with a color temperature forming a pre-set value.
Standard
DICOM
DIN
Custom
Image 10-5
Display function : active selection
The completion of the calibration procedure will in the same way be signaled by a separate logo (as well as for the color temperature).
Standard
DICOM
DIN
Custom
Image 10-6
Display function: calibr
70 R5976741 MGP 15 MEDICAL GRADE PROJECTOR 28/04/2004
ated
Page 75

10.3 Restoring the factory settings
How to restore the factory settings for the display function and the color temperature ?
1. Press MENU to activate the Toolbar
2. Press → to select the Settings item
3. Press ↓ to Pull down the Settings menu
4. Use ↑ or ↓ to select Factory reset (image 10-7)
5. Press ENTER
The display function and color temperature are adapted and the corresponding LUT is loaded.
10. Settings
Image 10-7
Factory settings are “dark room” settings meaning they do not take a
bient light, glare,...).
ccount of environmental conditions (am-
10.4 Black and white selection
Build up of the Luminance signal Y
The color signals on the 5 BNC connectors can be chosen to b
to the luminance signal can be chosen to be done by one or more color components.
Additionally, switching color components may accentuate some details and that way emphasize a part of the projected image.
Selection
RGB to RGB
GtoY black & white Green is replaced by white (bright)
RGB to Y black & white
RtoY
BtoY
Projected image
color
black & white Red is replaced by white (bright)
black & white Blue is replaced by white (bright)
Comment
-
-
e converted to a luminance signal Y in several ways. The contribution
Image
image 10-8
image 10-11
image 10-9
image 10-10
image 10-12
RBG to Y black & white
GRB to Y black & white
GBR to Y black & white
BRG to Y black & white
BGR to Y black & white
R5976741 MGP 15 MEDICAL GRADE PROJECTOR 28/04/2004 71
bars are repositioned image 10-13
bars are repositioned
bars are repositioned
bars are repositioned
bars are repositioned
-
-
-
-
Page 76

10. Settings
Image 10-8
RGB to RGB
Image 10-10
RtoY
Image 10-9
RGB to Y
Image 10-11
GtoY
Image 10-12
BtoY
How to change the Black and White selection ?
1. Press MENU to activate the Toolbar
2. Press → to select the Settings item
3. Press ↓ to Pull down the menu
4. Use ↑ or ↓ to select Black and White Selection (image 10-14)
5. Press → to pull down the menu
6. Use ↑ or ↓ to select the desired selection
7. Press ENTER
72
Image 10-13
RBG to Y
R5976741 MGP 15 MEDICAL GRADE PROJECTOR 28/04/2004
Page 77

10. Settings
Image 10-14
10.5 User Control
What can be done ?
The User control parameter allows to lock the RCU, the commands coming from the RCU (or the executive RCU) are then ignored
in the projector.
This can be used to prevent unauthorized adjustment of projector parameters.
How to lock the RCU ?
1. Press MENU to activate the Toolbar
2. Press → to select the Settings item
3. Press ↓ to Pull down the menu
4. Use ↑ or ↓ to select U ser Control (image 10-15)
5. Press → to pull down the menu
6. Use ↑ or ↓ to select ON or OFF
7. Press ENTER
Image 10-15
How to unlock the RCU once locked ?
Following password has to be enter
1. Enter the “More...” password (password used to access advanced menu)
R5976741 MGP 15 MEDICAL GRADE PROJECTOR 28/04/2004
ed on the RCU or on the executive RCU:
73
Page 78

10. Settings
10.6 Lamp mode selection
What are the different lamp modes ?
Single mode
The projector will always switch to the lamp with the shortest runtime when the difference between the runtimes of lamp1 and lamp
2 reaches 100 hours, switching from one lamp to another happens only at switching on of the projector and not during operation.
When the lamp fails or reaches its maximum runtime the projector switches automatically to the other lamp without interrupting the
projection.The failure is logged and the lamp will never be initialized in the future.
Image 10-16
Single mode operation: switching principle
Dual mode
Both lamps are working.
When one lamp fails, the projector continues the projection using the remaining lamp.
How to select the lamp mode ?
1. Press MENU to activate the Toolbar
2. Press → to select the Settings item
3. Press ↓ to Pull down the menu
4. Use ↑ or ↓ to select Lamp
5. Press → to pull down the menu
6. Use ↑ or ↓ to select the mode (image 10-17)
7. Press ENTER
A bullet shows the active mode.
74
R5976741 MGP 15 MEDICAL GRADE PROJECTOR 28/04/2004
Page 79

10. Settings
Image 10-17
10.7 Runtime warning
What can be done ?
When the lamp has reached a certain predetermined runtime , a warning message will be displayed on the screen. The lamp runtime
warning can be set in a range from 30 to 200 hours. The runtime warning is displayed by default at 30 hours before end of lamp
lifetime.
How to set the lamp runtime warning?
1. Press MENU to activate the Toolbar
2. Press → to select the Settings item
3. Press ↓ to Pull down the menu
4. Use ↑ or ↓ to select Lamp
5. Press → to open the Lamp menu
6. Use ↑ or ↓ to select Runtime warning (image 10-18)
7. Press ENTER
A dialogbox is displayed (image 10-19)
8. Use ←or →, the numeric keys on the remote, or the keypad to change the runtime warning setting.
Image 10-18
R5976741 MGP 15 MEDICAL GRADE PROJECTOR 28/04/2004 75
Page 80

10. Settings
e
Image 10-19
WARNING: Lamp runtime reset as well as the lamp replacement can only be done by a Barco authorized
technician.
10.8 Input Balance
CAUTION: The input balance adjustmentis only for Barco authorized technicians !
Introduction: Unbalanc
When transporting signals, there is always a risk of deterioration of the information contained in the signals.
In case of information contained in the amplitude of the signals which is the case of data color signals (R, G, B),image 10-20 ,we
are quite sure that the amplitude of these color signals is subject to alterations.
An example of alteration may be a DC component added to the signal, in the form of a DC offset repositioning the black level, since
this black level (“brightness”) will become crucial later on ( clamping circuit) it will result in “black not being black”.
Another value that is subject to alteration is the amplitude of the signal, resulting in an altered “Gain” of the signal (“white level” or
contrast ).
The alterations of the three color signals will happen independently i.e. the colors will end to be unbalanced, image 10-21
ed color signals
B
0.7V
Image 10-20
R
Image 10-21
G
R
∆
∆
B
G
Black leve
∆Β
Black lev
Analog Digital Conversion
The analog color signals must pass through an Analog/Digital conversion circuit prior to any digital processing in the PMP.
A typical ADC transforms the analog value into an 8 bit coded digital signal.
The graphic shows that when converting a signal containing a DC offset component the range of the converter is not optimally used.
76
R5976741 MGP 15 MEDICAL GRADE PROJECTOR 28/04/2004
Page 81

ADC
10. Settings
R
∆
Image 10-22
One can conclude here that a good color tracking can only be met by using three previously (input) balanced
color signals
255
i2 : video information
0
i1 : superfleous information
Black level
The objective of input balancing
The objective in input balancing is to “set” the same black level and the same white level for the three colors of a particular input
source.
Black level setting : brightness
White level setting : contrast
The same absolute black and white level for the three colors allows the same r
picture !
These two references also set the range in which the ADC will work for that particular source ( this explains also why each input
balance setting is linked to a particular source and thus saved in the image file).
eference for Brightness and contrast control of the
How can it be done ?
To balance the three color signals of a particular source there a
the source i.e. :
1. the source in question must be able to generate a white signal, ideally a 100% white (background) full screen pattern
2. the source in question must be able to generate a black signa
A
Image 10-23
White balance : In the projector, we will set the contrast for each color until we get a 100% light output picture when projecting a
100% white image (image A)
Black balance : In the projector, we will set the brightness for each color until we get a 0% light output picture when projecting a
100% black image (image B).
The changeover (transition) from min t
noise”
B
re conditions; in fact we must know the black and the white level of
l, ideally a 100 % black (background) full screen pattern
o max is indicated by the apparition of bright spots also called “digital
R5976741 MGP 15 MEDICAL GRADE PROJECTOR 28/04/2004 77
Page 82

10. Settings
An alternative to a full screen White/black pattern is the standard gray scale pattern, the white bar will be used
for white balance and the black bar for black balance.
Image 10-24
Black balance
1. Press MENU to activate the Toolbar
2. Press → to select the Image item
3. Press ↓ to Pull down the Image menu
4. Use ↑ or ↓ to select Input balance
5. Press → to pull down the menu
6. Use ↓ or ↑ to select Black balance (image 10-25)
7. adjust the red black level on a minimal value (image 10-26, image 10-27)
8. adjust the blue black level on a minimal value
Note: this minimal value is not necessary , provided that the 2 other colors are not influencing too much the color to be adjusted,
in fact the aim is to minimize the effect of the two other colors since there is a risk of reaching too soon the transition due
to the contribution of these two other color signals.
9. Adjust the green black level until bright spots appear on the screen
10.adjust the blue black level on a minimal value
Note: this minimal value is not necessary , provided that the 2 other colors are not influencing too much the color to be adjusted,
in fact the aim is to minimize the effect of the two other colors since there is a risk of reaching too soon the transition due
to the contribution of these two other color signals.
11.Adjust the green black level until bright spots appear on the screen
12.Adjust the Blue black level until bright spots appear on the screen
13.Adjust the red black level until bright spots appear on the screen
The projected image should know be noisy full black
Image 10-25
78 R5976741 MGP 15 MEDICAL GRADE PROJECTOR 28/04/2004
Page 83

10. Settings
Image 10-26
Image 10-27
Performing White input balance
1. Connect the source you want to project
2. Select a white pattern (or gray scale as alternative)
3. Press MENU to activate the Toolbar
4. Press → to select the Image item
5. Press ↓ to Pull down the Image menu
6. Use ↑ or ↓ to select Input balance
7. Press → to pull down the menu
8. Use ↓ or ↑ to select White balance (image 10-28)
9. adjust the red white level (gain) on a minimal value (image 10-29)
10.adjust the blue white level (gain) on a minimal value
Note: this minimal value is not necessary , provided that the 2 other colors are not influencing too much the color to be adjusted,
in fact the aim is to minimize the effect of the two other colors since there is a risk of reaching too soon the transition
(bright spots) due to the contribution of these two other colors signals.
11.Adjust the Green white level (
12.Adjust the Blue white level (gain) until bright spots appear on the screen
13.Adjust the Red white level (gain) until bright spots appear on the screen
the projected image should know be noisy neutral grey.
gain) until bright spots appear on the screen
Image 10-28
0-29
Image 1
R5976741 MGP 15 MEDICAL GRADE PROJECTOR 28/04/2004 79
Page 84

10. Settings
if one uses a gray scale pattern, the bright spots should appear in the white bar.
10.9 AGC on Video
AGC
Automatic Gain Control: allows an automatic amplitude (gain) control of the incoming video signal
AGC is only for Video signals
Enabling/disabling the AGC
1. Press MENU to activate the Toolbar
2. Press → to select the Settings item
3. Press ↓ to Pull down the menu
4. Use ↑ or ↓ to select AGC on Video
5. Press → to pull down the menu
6. Use ↓ or ↑ to enable or disable the AGC
7. Press ENTER
A bullet shows the active setting (image 10-30)
Image 10-30
The AGC can be disturbing in case of Macrovision enc
at any time
oded signals, therefore the AGC can be disabled (OFF)
10.10Manual Gain Control
What can be done ?
Beside the AGC there is the possibility to manually set the gain of the incoming video signal. When the AGC is enabled (ON), the
manual setting does not affect the gain, AG
pattern with white areas (grey scale bar pattern)
80 R5976741 MGP 15 MEDICAL GRADE PROJECTOR 28/04/2004
C must therefore be disabled. The manual gain control must be done on an external
Page 85

10. Settings
How to set the Manual Gain Control ?
1. Press MENU to activate the Toolbar
2. Press → to select the Settings item
3. Press ↓ to Pull down the menu
4. Use ↑ or ↓ to select Manual Gain Con trol (image 10-31)
5. Press ENTER
A scrollbar is displayed (image 10-32)
6. Use ← or →, the numeric keys on the remote, or the keypad to change the gain so as to obtain homogene white parts in the
image.
Image 10-31
Image 10-32
10.11Lamps
Overview
• History
• Reset runtime
10.11.1 History
How to view the history ?
1. Press MENU to activate the Toolbar
2. Press → to select the Settings item
3. Press ↓ to Pull down the menu
4. Use ↑ or ↓ to select Lamps
5. Press →
6. Use ↑ or ↓ to select History
7. Press ENTER
A textbox is displayed (image 10-34)
to open the menu (image 10-33)
R5976741 MGP 15 MEDICAL GRADE PROJECTOR 28/04/2004
81
Page 86

10. Settings
Image 10-33
Image 10-34
10.11.2 Reset runtime
When to reset the lamp runtime ?
The lamp runtime should only be reset when placing a new lamp.
How to reset the lamp runtime ?
1. Press MENU to activate the Toolbar
2. Press → to select the Settings item
3. Press ↓ to Pull down the menu
4. Use ↑ or ↓ to select Lamps
5. Press → to pull down the menu
6. Use ↑ or ↓ to select Reset Runtime
7. Press → to open the menu
8. Use ↑ or ↓ to select the lamp to be reset (image 10-35)
9. Press ENTER
A dialogbox is displayed (image 10-36)
10.Use ←or →, the numeric keys on the remote, or the keypad to change the serial number of the lamp (serial number 0000000 will
not be accepted).
82
R5976741 MGP 15 MEDICAL GRADE PROJECTOR 28/04/2004
Page 87

Image 10-35
10. Settings
Image 10-36
WARNING: Lamp runtime reset as well as the lamp replacement can only be done by a Barco authorized
technician.
R5976741 MGP 15 MEDICAL GRADE PROJECTOR 28/04/2004 83
Page 88

10. Settings
84 R5976741 MGP 15 MEDICAL GRADE PROJECTOR 28/04/2004
Page 89

11. TOOLS
Overview
• Source switching mode
• Picture in Picture
• PiP select
• Add window
• Remove window
• PiP Lay-out
•PiPAdjust
• Background
• Logo
11.1 Source switching mode
Switching from one source to another
To minimize undesired effects when switching from one source to another, one can use the Seamless switching mode, beside Seamless switching there is a wide choice of several effects which render the source switching transitions more enjoyable.
11. Tools
How to select a switching mode ?
1. Press MENU to activate the Toolbar
2. Press → to select the Tools item
3. Press ↓ to Pull down the menu
4. Use ↑ or ↓ to select Source switching mode
5. Press → to open the Source switching mode menu (image 11-1)
6. Press ENTER
The logo is displayed
Image 11-1
The Random mode will select a new switching mode at each source switching i.e. there will never be 2 successive source switchings with the same effect.
The Seamless switching mode is not used in the Random mode.
Note on Fade in/out
In some cases, depending on the sources to be switched, the fade in/out effect is impossible or may not occur.
R5976741 MGP 15 MEDICAL GRADE PROJECTOR 28/04/2004 85
Page 90

11. Tools
Image 11-2
* Video may be Composite video/ S-Video / SDI
• dark arrow : fade in/out effect possible
• dotted arrow : undetermined case, fade in/out effect may take place or not
• striked out arrow : fade effect impossible
11.2 Picture in Picture
11.2.1 Introduction to PiP
PiP
PiP stands for "Picture in Pictu
windows may be of the video or data type.
What are the different possibilities within the PiP mode ?
The input section of the projector allows a multitude of combinations of different input signals which may be projected in the 4
windows of the PiP screen.
The PiP mode allows independent settings for each window:
• Image settings : contrast, brightness, tint, color,...
• Vertical and horizontal shift of each window all over the screen
• Resizing of the window
• Digital Zoom
re" and allows to display multiple windows containing each of them an image. The
86
R5976741 MGP 15 MEDICAL GRADE PROJECTOR 28/04/2004
Page 91

What are the different PiP configurations ?
• Full screen
The full screen is used to display one of the selected sources.
Browsing through the sources is possible with the PiP Adjust button on the remote.
2
11. Tools
• 2 Landscape:
2
2 sources are projected in landscape view mode.
The screen is divided into 2 subscreens containing 2 Data sources coming from the BNC and PC D15
input.
Image 11-3
•2Portrait:
2
2 source are projected side by side in portrait view mode .
The screen is divided into 2 subscreens containing 2 Data sources coming from the BNC and PC D15 input.
Image 11-4
• Personal layouts
Beside the 3 factory layouts one can set up to 7 additional (personal) layouts.
11.2.2 Preferences
Setting a prefered layout
There is a possibilty of memorising a particular layout.
The PiP key allows then the switching between Full screen and the memorised layout.
How to set a preffered layout ?
1. Press MENU to activate the Toolbar
2. Press → to select the Tools item
3. Press ↓ to Pull down the Tools menu
4. Use ↑ or ↓ to select Picture in Picture
5. Press → to pull down the menu
6. Use ↑ or ↓ to select the PiP Select
2. factory layout
R5976741 MGP 15 MEDICAL GRADE PROJECTOR 28/04/2004 87
Page 92

11. Tools
7. Press → to pull down the menu
8. Use ↑ or ↓ to select the desired configuration (image 11-5)
9. Press PiP on the RCU or on the executive RCU for at least 3 secondes (image 11-6)
The layout is memorized as the preferred layout.
A bullet shows the active layout.
Image 11-5
1
SOURCE
Image 11-6
ENTER
PIP
B
A
R
CO
MGP
BACK
AUTO
IMAGE
2
The PiP key allows now to switch between Full screen and the memorized layout.
11.3 PiP select
How to change the PiP configuration ?
1. Press MENU to activate the Toolbar
2. Press → to select the Tools item
3. Press ↓ to Pull down the Tools menu
4. Use ↑ or ↓ to select Picture in Picture
5. Press → to pull down the menu
6. Use ↑ or ↓ to select the PiP Select
7. Press → to pull down the menu
88
R5976741 MGP 15 MEDICAL GRADE PROJECTOR 28/04/2004
Page 93

8. Use ↑ or ↓ to select the desired configuration (image 11-7)
9. Press ENTER
A bullet shows the active layout
Image 11-7
11.4 Add window
What can be done ?
It is possible to add a window to the existing windows (maximum 4), therefore a source must be selected.
Sources which are already used are unselectable. If for instance the PiP layout contains a component video then component video
will be unselectable.
Once added, the window may be altered in several ways to meet particular needs:
11. Tools
• repositioning
• re-sizing
• changing the order
How to add a window ?
1. Press MENU to activate the Toolbar
2. Press → to select the Tools item
3. Press ↓ to Pull down the Tools menu
4. Use ↑ or ↓ to select Picture in Picture
5. Press → to pull down the menu
6. Use ↑ or ↓ to select PiP add window (image 11-8)
7. Press ENTER
The source selection menu is displayed (image 11-9)
In the lower part of the screen appears a wizard in 4 steps (image 11-10)
Image 11-8
R5976741 MGP 15 MEDICAL GRADE PROJECTOR 28/04/2004 89
Page 94

11. Tools
Image 11-9
11.5 Remove window
How to remove a window ?
1. Press MENU to activate the Toolbar
2. Press → to select the Tools item
3. Press ↓ to Pull down the Tools menu
4. Use ↑ or ↓ to select Pi
5. Press → to pull down the menu
6. Use ↑ or ↓ to select PiP remove window (image 11-11)
7. Press ENTER
The source selection menu is displayed (image 11-12)
In the lower part of the screen appears a wizard in 4 steps (image 11-13)
cture in Picture
Image 11-10
1
Image 11-1
Image 11-13
Image 11-12
90 R5976741 MGP 15 MEDICAL GRADE PROJECTOR 28/04/2004
Page 95

11.6 PiP Lay-out
Overview
•PiPSave
• PiP rename layout
• PiP delete layout
11.6.1 PiP Save
What can be done ?
The active layout can be saved or "saved as".
When a new layout is saved it is added to the PiP select menu.
A fixed layout can be edited (resizing, repositioning,...) but it can not be saved under its original name.
How to save a layout ?
1. Press MENU to activate the Toolbar
2. Press → to select the Tools item
3. Press ↓ to Pull down the Tools menu
4. Use ↑ or ↓ to select Picture in Picture
5. Press → to pull down the menu
6. Use ↑ or ↓ to select PiP layout
7. Press → to pull down the menu
8. Use ↑ or ↓ to select PiP save or save as (image 11-14)
9. Press ENTER
If save as has been selected, a dialogbox is displayed (image 11-15)
Use ← or →, the numeric keys on the remote, or the keypad to enter the name and exit with BACK or MENU.
If save as has been selected, a messagebox is displayed (image 11-16)
11. Tools
Image 11-14
Image 11-15 Image 11-16
R5976741 MGP 15 MEDICAL GRADE PROJECTOR 28/04/2004 91
Page 96

11. Tools
11.6.2 PiP rename layout
What can be done ?
The non fixed layouts (personal layouts) can be renamed .
The maximal length of the name is 12 characters.
A fixed layout can not be renamed
How to rename a layout ?
1. Press MENU to activate the Toolbar
2. Press → to select the Tools item
3. Press ↓ to Pull down the Tools menu
4. Use ↑ or ↓ to select Picture in Picture
5. Press → to pull down the menu
6. Use ↑ or ↓ to select PiP layout
7. Press → to pull down the menu
8. Use ↑ or ↓ to select Rename
9. Press ENTER
A dialogbox is displayed (image 11-17)
10.Use ↑ or ↓ to select the layout to be renamed
11. Pres s ENTER
A dialogbox is displayed (image 11-18)
Use ← or →, the numeric keys on the remote, or the keypad to enter the name and exit with BACK or MENU.
Image 11-17
11.6.3 PiP delete layout
What can be done ?
The non fixed layo
uts (factory and personal layouts) can be deleted.
The fixed layouts
How to delete a layout ?
1. Press MENU to activate the Toolbar
2. Press → to select the Tools item
3. Press ↓ to Pull down the Tools menu
Image 11-18
and the active layout can not be deleted.
92
R5976741 MGP 15 MEDICAL GRADE PROJECTOR 28/04/2004
Page 97

4. Use ↑ or ↓ to select Picture in Picture
5. Press → to pull down the menu
6. Use ↑ or ↓ to select PiP layout
7. Press → to pull down the menu
8. Use ↑ or ↓ to select Delete
9. Press ENTER
A dialogbox is displayed (image 11-19)
10.Use ↑ or ↓ to select the layout to be renamed
11. Pres s ENTER
The layout is deleted and disappears from the dialogbox.
11. Tools
Image 11-19
11.7 PiP Adjust
What can be done ?
PiP adjust allows to browse through the windows in the active layout, a white frame indicates the window which has the focus.
This way, independent settings (picture settings, ...) are possible for each window.
This can also be done by using the dedicated PiP Adjust key on the RCU
Image 11-20
PiP adjust in case a particular 4 window layout
A Data1 window has the focus, new settings will only affect Data1 window
B Video1 window has the focus, new settings will only affect Video1 window
R5976741 MGP 15 MEDICAL GRADE PROJECTOR 28/04/2004
93
Page 98

11. Tools
PiP adjust
1. Press MENU to activate the Toolbar
2. Press → to select the Tools item
3. Press ↓ to Pull down the Tools menu
4. Use ↑ or ↓ to select Picture in Picture
5. Press → to open the menu
6. Use ↑ or ↓ to select PiP Adjust (image 11-21)
7. Press ENTER
The menu dissapears and the source box is displayed
The focus moves to the next window when pressing ENTER (clockwise rotation)
If you press BACK or if you wait 5 seconds the menu is displayed.
Image 11-21
How to adjust a window in the layout ?
1. Use the PiP Adjust key or function in the menu to choose the window to be adjusted
2. Press ENTER
A wizard bar is displayed in the bottom of the screen
Follow the procedure.
11.8 Background
Purpose
If there is no signal connected to the projector, the background will be a logo, a black or a blue screen depending on the background
settings.
How to change the background ?
1. Press MENU to activate the Toolbar
2. Press → to select the Tools item
3. Press ↓ to Pull down the Tools menu
4. Use ↑ or ↓ to select Background
5. Press → to pull down the menu
6. Use ↑ or ↓ to select the desired background (image 11-22)
7. Press ENTER
Image 11-22
94 R5976741 MGP 15 MEDICAL GRADE PROJECTOR 28/04/2004
Page 99

The logo display is only possible in the full screen mode, a logo can thus not be displayed (rescaled) in a
window in the PiP mode.
When there is no signal connected, the projector will also start its standby timer countdown (if enabled) and
shuts down after the predetermined time.
11.9 Logo
What can be done ?
A screenshot can be taken from an active projected image. This screenshot is then saved and can be used as background.
Each new screenshot erases the previous logo, therefore a warning message is displayed asking the user to confirm.
How to take a screenshot ?
1. Press MENU to activate the Toolbar
2. Press → to select theTools item
3. Press ↓ to Pull down the menu
4. Use ↑ or ↓ to select Logo
5. Press → to open the menu
6. Use ↑ or ↓ to select Take screenshot (image 11-23)
7. Press ENTER
A dialogbox is displayed. Press yes to confirm. (image 11-24)
A textbox shows the evolution of the operation. (image 11-25, image 11-26)
11. Tools
Image 11-23
Image 11-24
Image 11-26
R5976741 MGP 15 MEDICAL GRADE PROJECTOR 28/04/2004 95
Image 11-25
Page 100

11. Tools
96 R5976741 MGP 15 MEDICAL GRADE PROJECTOR 28/04/2004
 Loading...